Godot Docs – 3.2 branch¶
Note
Godot’s documentation is available in various languages and versions. Expand the “Read the Docs” panel at the bottom of the sidebar to see the list.
Tip
This is the documentation for the stable 3.2 branch. Looking for the documentation of the current development branch? Have a look here. You can also browse the documentation for the previous stable 3.1 branch.
Welcome to the official documentation of Godot Engine, the free and open source community-driven 2D and 3D game engine! If you are new to this documentation, we recommend that you read the introduction page to get an overview of what this documentation has to offer.
The table of contents below and in the sidebar should let you easily access the documentation for your topic of interest. You can also use the search function in the top left corner.
Note
Godot Engine is an open source project developed by a community of volunteers. The documentation team can always use your feedback and help to improve the tutorials and class reference. If you don’t understand something, or cannot find what you are looking for in the docs, help us make the documentation better by letting us know!
Submit an issue or pull request on the GitHub repository,
help us translate the documentation into your
language, or talk to us on either the #documentation
channel on Discord, or the
#godotengine-doc channel on irc.freenode.net!

The main documentation for the site is organized into the following sections:
About¶
Introduction¶
func _ready():
$Label.text = "Hello world!"
Welcome to the official documentation of Godot Engine, the free and open source community-driven 2D and 3D game engine! Behind this mouthful, you will find a powerful yet user-friendly tool that you can use to develop any kind of game, for any platform and with no usage restriction whatsoever.
This page gives a broad presentation of the engine and of the contents of this documentation, so that you know where to start if you are a beginner or where to look if you need info on a specific feature.
Before you start¶
The Tutorials and resources page lists video tutorials contributed by the community. If you prefer video to text, those may be worth a look.
In case you have trouble with one of the tutorials or your project, you can find help on the various Community channels, especially the Godot Discord community, Q&A, and IRC.
About Godot Engine¶
A game engine is a complex tool, and it is therefore difficult to present Godot in a few words. Here’s a quick synopsis, which you are free to reuse if you need a quick writeup about Godot Engine.
Godot Engine is a feature-packed, cross-platform game engine to create 2D and 3D games from a unified interface. It provides a comprehensive set of common tools, so users can focus on making games without having to reinvent the wheel. Games can be exported in one click to a number of platforms, including the major desktop platforms (Linux, macOS, Windows) as well as mobile (Android, iOS) and web-based (HTML5) platforms.
Godot is completely free and open source under the permissive MIT license. No strings attached, no royalties, nothing. Users’ games are theirs, down to the last line of engine code. Godot’s development is fully independent and community-driven, empowering users to help shape their engine to match their expectations. It is supported by the Software Freedom Conservancy not-for-profit.
For a more in-depth view of the engine, you are encouraged to read this documentation further, especially the Step by step tutorial.
About the documentation¶
This documentation is continuously written, corrected, edited, and revamped by members of the Godot Engine community. It is edited via text files in the reStructuredText markup language and then compiled into a static website/offline document using the open source Sphinx and ReadTheDocs tools.
Note
You can contribute to Godot’s documentation by opening issue tickets or sending patches via pull requests on its GitHub source repository, or translating it into your language on Hosted Weblate.
All the contents are under the permissive Creative Commons Attribution 3.0 (CC-BY 3.0) license, with attribution to “Juan Linietsky, Ariel Manzur and the Godot Engine community”.
Organization of the documentation¶
This documentation is organised in five sections with an impressively unbalanced distribution of contents – but the way it is split up should be relatively intuitive:
- The General section contains this introduction as well as information about the engine, its history, its licensing, authors, etc. It also contains the Frequently asked questions.
- The Getting started section is the raison d’être of this documentation, as it contains all the necessary information on using the engine to make games. It starts with the Step by step tutorial which should be the entry point for all new users.
- The Tutorials section can be read as needed, in any order. It contains feature-specific tutorials and documentation.
- The Development section is intended for advanced users and contributors to the engine development, with information on compiling the engine, developing C++ modules or editor plugins.
- The Community section gives information related to contributing to engine development and the life of its community, e.g. how to report bugs, help with the documentation, etc. It also points to various community channels like IRC and Discord and contains a list of recommended third-party tutorials outside of this documentation.
- Finally, the Class reference is the documentation of the Godot API, which is also available directly within the engine’s script editor. It is generated automatically from a file in the main source repository, therefore the generated files of the documentation are not meant to be modified. See Contribute to the Class Reference for details.
In addition to this documentation you may also want to take a look at the various Godot demo projects.
Have fun reading and making games with Godot Engine!
Frequently asked questions¶
What can I do with Godot? How much does it cost? What are the license terms?¶
Godot is Free and Open-Source Software available under the OSI-approved MIT license. This means it is free as in “free speech” as well as in “free beer.”
In short:
- You are free to download and use Godot for any purpose, personal, non-profit, commercial, or otherwise.
- You are free to modify, distribute, redistribute, and remix Godot to your heart’s content, for any reason, both non-commercially and commercially.
All the contents of this accompanying documentation are published under the permissive Creative Commons Attribution 3.0 (CC-BY 3.0) license, with attribution to “Juan Linietsky, Ariel Manzur and the Godot Engine community.”
Logos and icons are generally under the same Creative Commons license. Note that some third-party libraries included with Godot’s source code may have different licenses.
For full details, look at the COPYRIGHT.txt as well as the LICENSE.txt and LOGO_LICENSE.txt files in the Godot repository.
Also, see the license page on the Godot website.
Which platforms are supported by Godot?¶
For the editor:
- Windows
- macOS
- X11 (Linux, *BSD)
For exporting your games:
- Windows (and UWP)
- macOS
- X11 (Linux, *BSD)
- Android
- iOS
- Web
Both 32- and 64-bit binaries are supported where it makes sense, with 64 being the default.
Some users also report building and using Godot successfully on ARM-based systems with Linux, like the Raspberry Pi.
Additionally, there is some unofficial third-party work being done on building for some consoles. However, none of this is included in the default build scripts or export templates at this time.
For more on this, see the sections on exporting and compiling Godot yourself.
Which programming languages are supported in Godot?¶
The officially supported languages for Godot are GDScript, Visual Scripting, C#, and C++. See the subcategories for each language in the scripting section.
If you are just starting out with either Godot or game development in general, GDScript is the recommended language to learn and use since it is native to Godot. While scripting languages tend to be less performant than lower-level languages in the long run, for prototyping, developing Minimum Viable Products (MVPs), and focusing on Time-To-Market (TTM), GDScript will provide a fast, friendly, and capable way of developing your games.
Note that C# support is still relatively new, and as such, you may encounter some issues along the way. Our friendly and hard-working development community is always ready to tackle new problems as they arise, but since this is an open-source project, we recommend that you first do some due diligence yourself. Searching through discussions on open issues is a great way to start your troubleshooting.
As for new languages, support is possible via third parties using the GDNative / NativeScript / PluginScript facilities. (See the question about plugins below.) Work is currently underway, for example, on unofficial bindings for Godot to Python and Nim.
What is GDScript and why should I use it?¶
GDScript is Godot’s integrated scripting language. It was built from the ground up to maximize Godot’s potential in the least amount of code, affording both novice and expert developers alike to capitalize on Godot’s strengths as fast as possible. If you’ve ever written anything in a language like Python before then you’ll feel right at home. For examples, history, and a complete overview of the power GDScript offers you, check out the GDScript scripting guide.
There are several reasons to use GDScript–especially when you are prototyping, in alpha/beta stages of your project, or are not creating the next AAA title–but the most salient reason is the overall reduction of complexity.
The original intent of creating a tightly integrated, custom scripting language for Godot was two-fold: first, it reduces the amount of time necessary to get up and running with Godot, giving developers a rapid way of exposing themselves to the engine with a focus on productivity; second, it reduces the overall burden of maintenance, attenuates the dimensionality of issues, and allows the developers of the engine to focus on squashing bugs and improving features related to the engine core–rather than spending a lot of time trying to get a small set of incremental features working across a large set of languages.
Since Godot is an open-source project, it was imperative from the start to prioritize a more integrated and seamless experience over attracting additional users by supporting more familiar programming languages–especially when supporting those more familiar languages would result in a worse experience. We understand if you would rather use another language in Godot (see the list of supported options above). That being said, if you haven’t given GDScript a try, try it for three days. Just like Godot, once you see how powerful it is and rapid your development becomes, we think GDScript will grow on you.
More information about getting comfortable with GDScript or dynamically typed languages can be found in the GDScript: An introduction to dynamic languages tutorial.
What were the motivations behind creating GDScript?¶
The main reasons for creating a custom scripting language for Godot were:
- Poor thread support in most script VMs, and Godot uses threads (Lua, Python, Squirrel, JS, AS, etc.).
- Poor class-extending support in most script VMs, and adapting to the way Godot works is highly inefficient (Lua, Python, JS).
- Many existing languages have horrible interfaces for binding to C++, resulting in large amount of code, bugs, bottlenecks, and general inefficiency (Lua, Python, Squirrel, JS, etc.) We wanted to focus on a great engine, not a great amount of integrations.
- No native vector types (vector3, matrix4, etc.), resulting in highly reduced performance when using custom types (Lua, Python, Squirrel, JS, AS, etc.).
- Garbage collector results in stalls or unnecessarily large memory usage (Lua, Python, JS, AS, etc.).
- Difficulty to integrate with the code editor for providing code completion, live editing, etc. (all of them). This is well supported by GDScript.
GDScript was designed to curtail the issues above and more.
What type of 3D model formats does Godot support?¶
Godot supports Collada via the OpenCollada exporter (Maya, 3DSMax). If you are using Blender, take a look at our own Better Collada Exporter.
As of Godot 3.0, glTF is supported.
FBX is supported via the Open Asset Import library. However, FBX is proprietary so we recommend using other formats listed above, if suitable for your workflow.
Will [insert closed SDK such as FMOD, GameWorks, etc.] be supported in Godot?¶
The aim of Godot is to create a free and open-source MIT-licensed engine that is modular and extendable. There are no plans for the core engine development community to support any third-party, closed-source/proprietary SDKs, as integrating with these would go against Godot’s ethos.
That said, because Godot is open-source and modular, nothing prevents you or anyone else interested in adding those libraries as a module and shipping your game with them–as either open- or closed-source.
To see how support for your SDK of choice could still be provided, look at the Plugins question below.
If you know of a third-party SDK that is not supported by Godot but that offers free and open-source integration, consider starting the integration work yourself. Godot is not owned by one person; it belongs to the community, and it grows along with ambitious community contributors like you.
How should assets be created to handle multiple resolutions and aspect ratios?¶
This question pops up often and it’s probably thanks to the misunderstanding created by Apple when they originally doubled the resolution of their devices. It made people think that having the same assets in different resolutions was a good idea, so many continued towards that path. That originally worked to a point and only for Apple devices, but then several Android and Apple devices with different resolutions and aspect ratios were created, with a very wide range of sizes and DPIs.
The most common and proper way to achieve this is to, instead, use a single base resolution for the game and only handle different screen aspect ratios. This is mostly needed for 2D, as in 3D it’s just a matter of Camera XFov or YFov.
- Choose a single base resolution for your game. Even if there are devices that go up to 2K and devices that go down to 400p, regular hardware scaling in your device will take care of this at little or no performance cost. Most common choices are either near 1080p (1920x1080) or 720p (1280x720). Keep in mind the higher the resolution, the larger your assets, the more memory they will take and the longer the time it will take for loading.
- Use the stretch options in Godot; 2D stretching while keeping aspect ratios works best. Check the Multiple resolutions tutorial on how to achieve this.
- Determine a minimum resolution and then decide if you want your game to stretch vertically or horizontally for different aspect ratios, or if there is one aspect ratio and you want black bars to appear instead. This is also explained in Multiple resolutions.
- For user interfaces, use the anchoring to determine where controls should stay and move. If UIs are more complex, consider learning about Containers.
And that’s it! Your game should work in multiple resolutions.
If there is a desire to make your game also work on ancient devices with tiny screens (fewer than 300 pixels in width), you can use the export option to shrink images, and set that build to be used for certain screen sizes in the App Store or Google Play.
How can I extend Godot?¶
For extending Godot, like creating Godot Editor plugins or adding support for additional languages, take a look at EditorPlugins and tool scripts.
Also, see the official blog posts on these topics:
You can also take a look at the GDScript implementation, the Godot modules, as well as the unofficial Python support for Godot. This would be a good starting point to see how another third-party library integrates with Godot.
I would like to contribute! How can I get started?¶
Awesome! As an open-source project, Godot thrives off of the innovation and ambition of developers like you.
The first place to get started is in the issues. Find an issue that resonates with you, then proceed to the How to Contribute guide to learn how to fork, modify, and submit a Pull Request (PR) with your changes.
Why does Godot not use STL (Standard Template Library)¶
Like many other libraries (Qt as an example), Godot does not make use of STL. We believe STL is a great general purpose library, but we had special requirements for Godot.
- STL templates create very large symbols, which results in huge debug binaries. We use few templates with very short names instead.
- Most of our containers cater to special needs, like Vector, which uses copy on write and we use to pass data around, or the RID system, which requires O(1) access time for performance. Likewise, our hash map implementations are designed to integrate seamlessly with internal engine types.
- Our containers have memory tracking built-in, which helps better track memory usage.
- For large arrays, we use pooled memory, which can be mapped to either a preallocated buffer or virtual memory.
- We use our custom String type, as the one provided by STL is too basic and lacks proper internationalization support.
Why does Godot not use exceptions?¶
We believe games should not crash, no matter what. If an unexpected situation happens, Godot will print an error (which can be traced even to script), but then it will try to recover as gracefully as possible and keep going.
Additionally, exceptions significantly increase binary size for the executable.
Why does Godot not enforce RTTI?¶
Godot provides its own type-casting system, which can optionally use RTTI internally. Disabling RTTI in Godot means considerably smaller binary sizes can be achieved, at a little performance cost.
Why does Godot not force users to implement DoD (Data oriented Design)?¶
While Godot internally for a lot of the heavy performance tasks attempts to use cache coherency as best as possible, we believe most users don’t really need to be forced to use DoD practices.
DoD is mostly a cache coherency optimization that can only gain you significant performance improvements when dealing with dozens of thousands of objects (which are processed every frame with little modification). As in, if you are moving a few hundred sprites or enemies per frame, DoD won’t help you, and you should consider a different approach to optimization.
The vast majority of games do not need this and Godot provides handy helpers to do the job for most cases when you do.
If a game that really needs to process such large amount of objects is needed, our recommendation is to use C++ and GDNative for the high performance parts and GDScript (or C#) for the rest of the game.
How can I support Godot development or contribute?¶
See Ways to contribute.
Who is working on Godot? How can I contact you?¶
See the corresponding page on the Godot website.
Documentation changelog¶
The documentation is continually being improved. The release of version 3.1 includes many new tutorials, many fixes and updates for old tutorials, and many updates to the class reference. Below is a list of new tutorials added since version 3.0.
Note
This document only contains new tutorials so not all changes are reflected, many tutorials have been substantially updated but are not reflected in this document.
New tutorials since version 3.1¶
Project workflow¶
Inputs¶
Internationalization¶
Shading¶
Your First Shader Series:
Multi-threading¶
Creating content¶
- Procedural geometry series:
Legal¶
Step by step¶
Introduction to Godot’s editor¶
This tutorial will run you through Godot’s interface. We’re going to look at the Project Manager, docks, workspaces and everything you need to know to get started with the engine.
Project manager¶
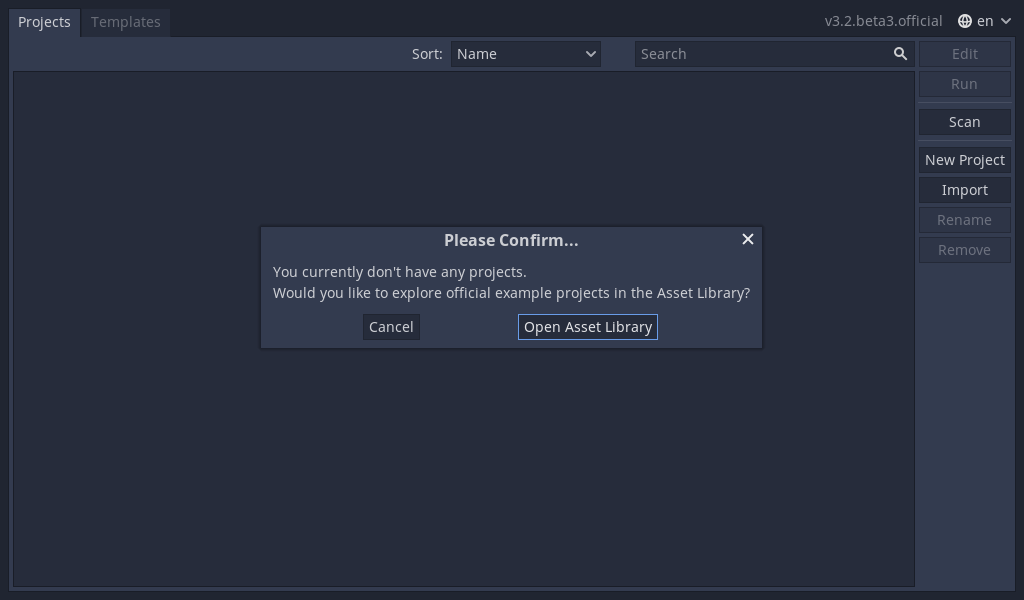
When you launch Godot, the first window you’ll see is the Project Manager. Since you have no projects there will be a popup asking if you want to open the asset library, just click cancel, we’ll look at it later.
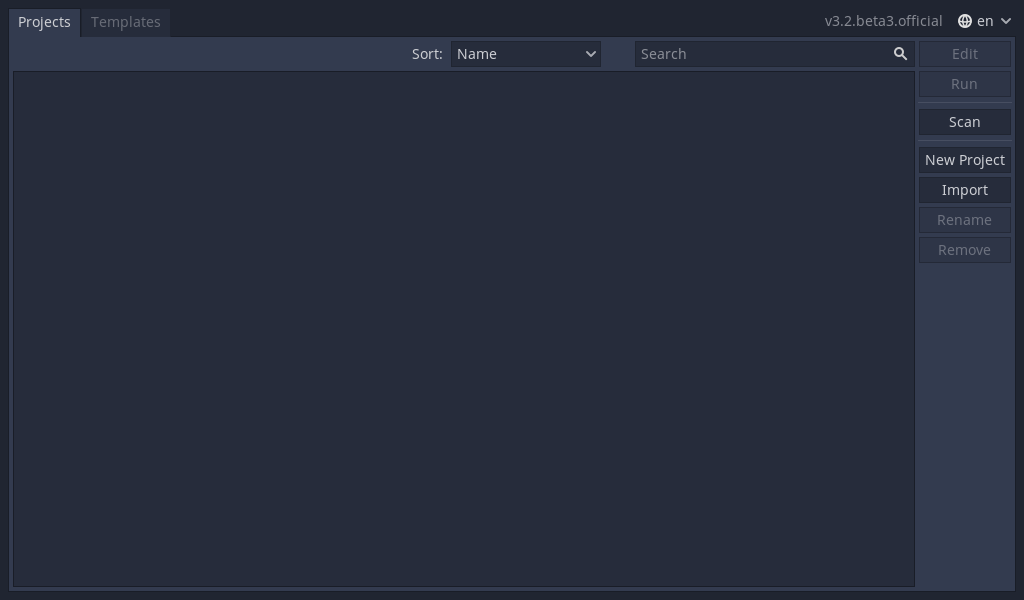
Now you should see the project manager. It lets you create, remove, import or play game projects.
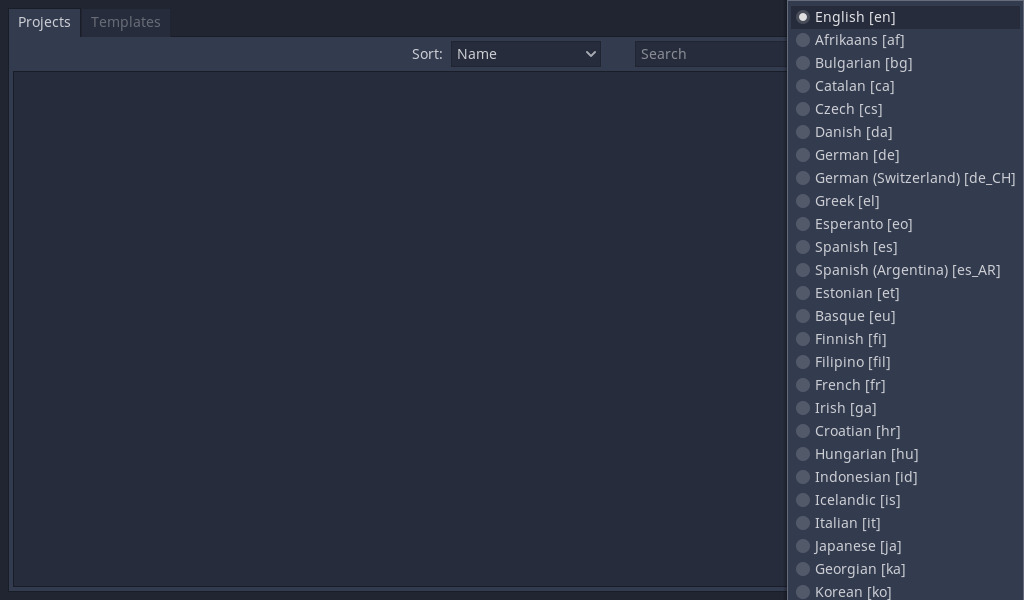
In the top-right corner you’ll find a drop-down menu to change the editor’s language.
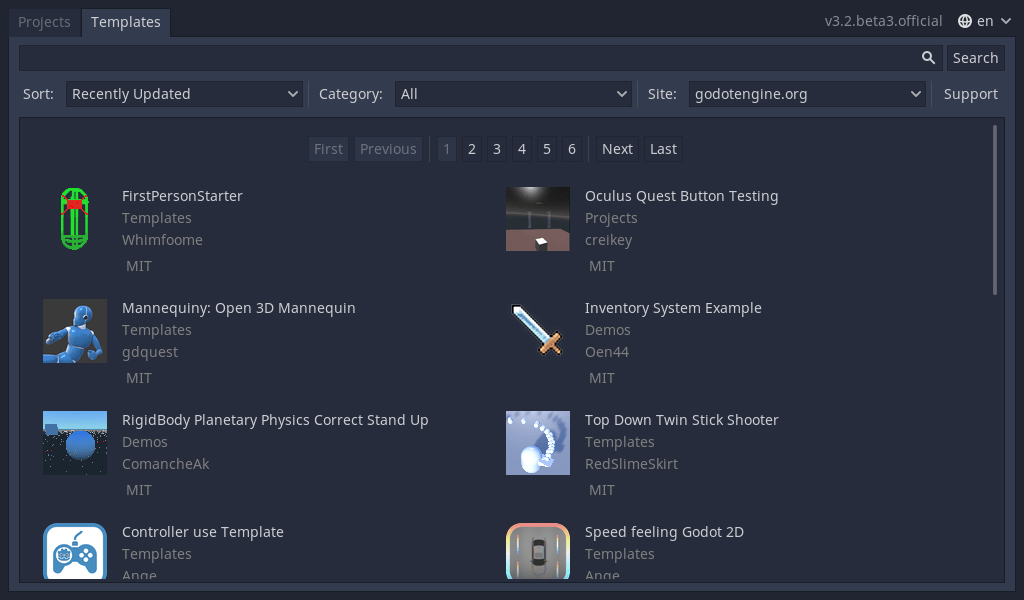
From the Templates tab you can download open source project templates and demos from the Asset Library to help you get started faster. Just select the template or demo you want, click download, once it’s finished downloading click install and choose where you want the project to go. You can learn more about it in About the Asset Library.
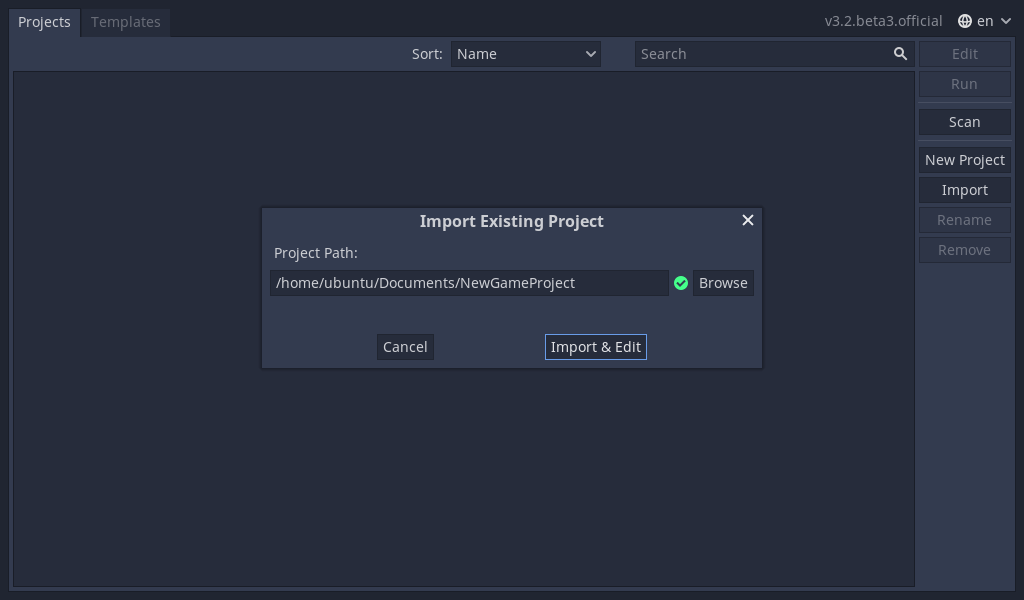
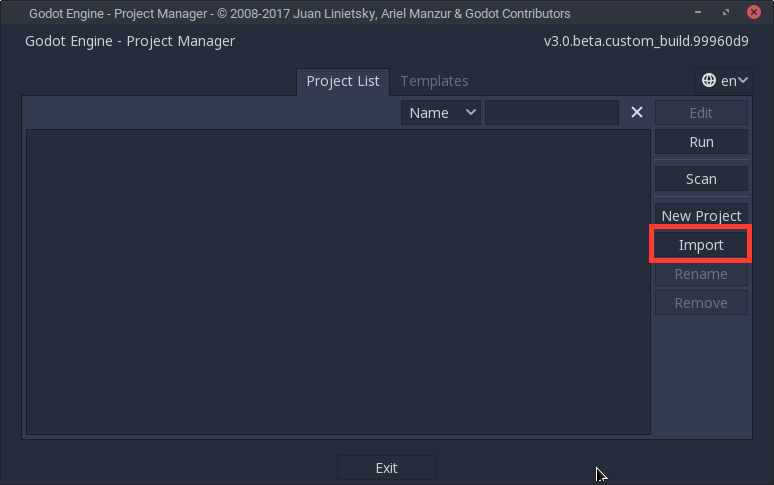
Create or import a project¶
To create a new project, click the New Project button on the right. Here
you give it a name, choose an empty folder on your computer to save it to,
and choose a renderer.
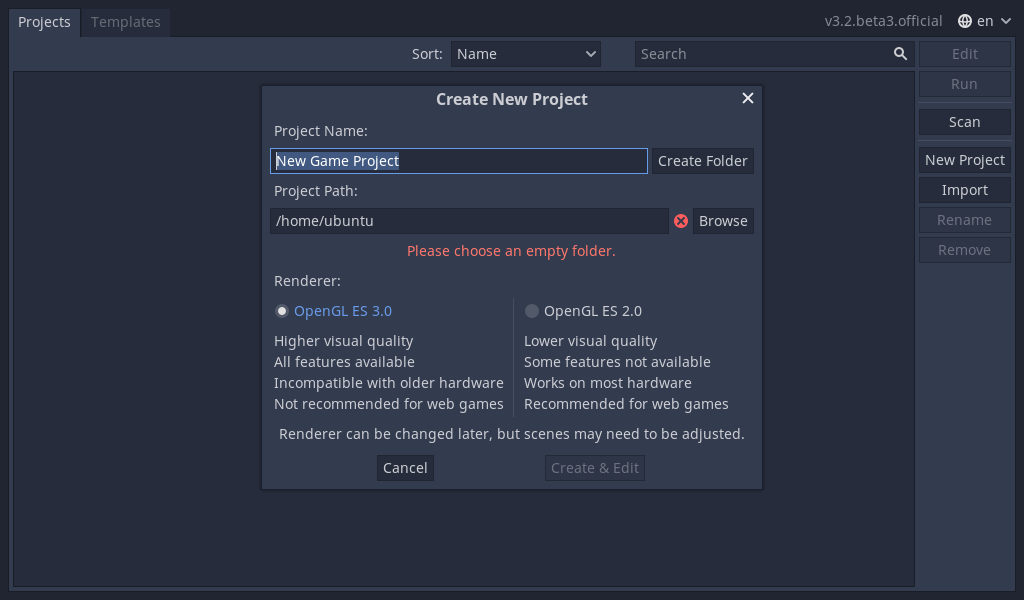
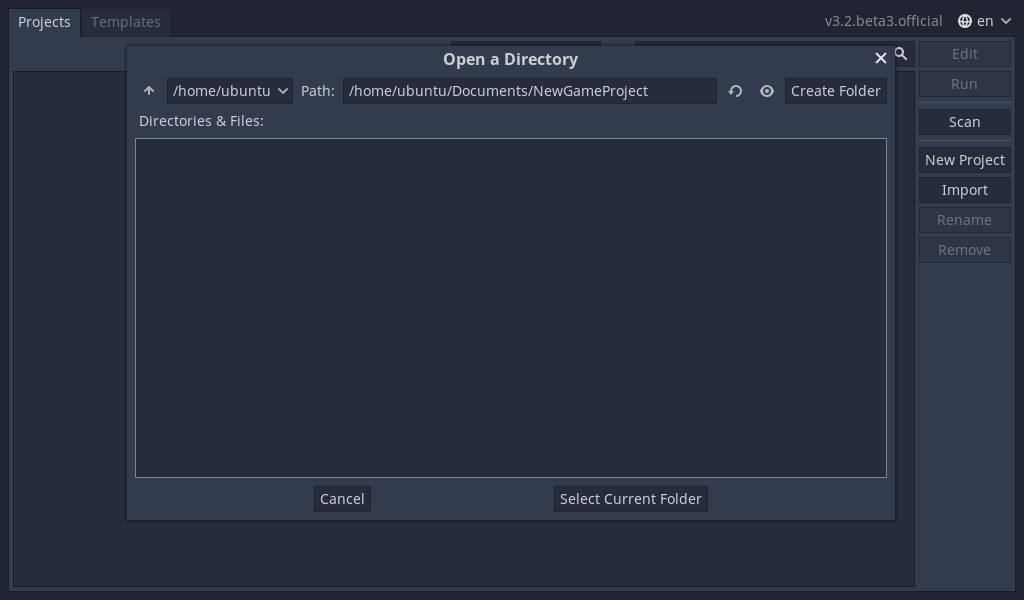
Click the Browse button to open Godot’s file browser and pick a location or type the folder’s path in the Project Path field.
When you see the green tick on the right, it means the engine detects an
empty folder. You can also click the Create Folder button next to your
project name and an empty folder will be created with that name for the project.
Finally, you need to choose which renderer to use (OpenGL ES 3.0 or OpenGL ES 2.0). The advantages and disadvantages of each are listed to help you choose, and you can refer to Differences between GLES2 and GLES3 for more details. Note that you can change the backend from the project settings if you change your mind later on. For this tutorial either backend is fine.
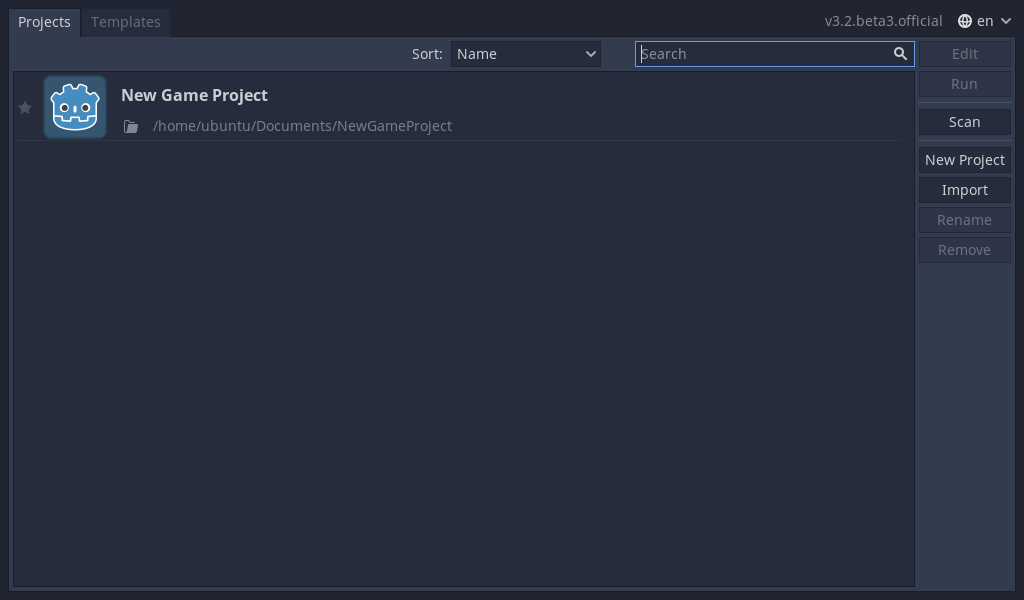
Once you are done click Create & Edit. Godot will create
the project for you and open it in the editor.
The next time you open the project manager, you’ll see your new project in the list. Double click on it to open it in the editor.
You can import existing projects in a similar way, using the Import
button. Locate the folder that contains the project or the
project.godot file to import and edit it.
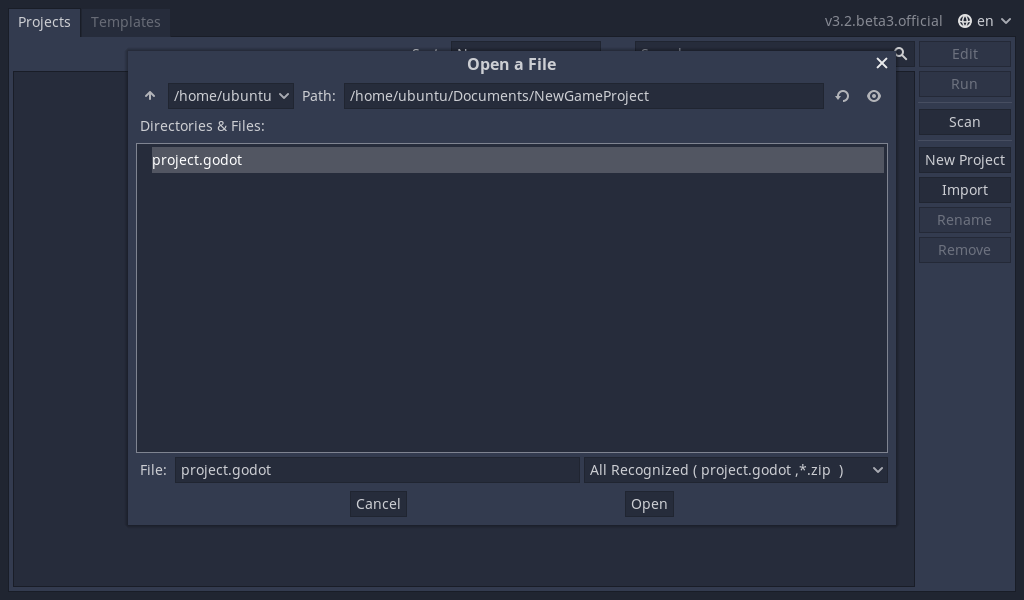
When the folder path is correct, you’ll see a green checkmark.
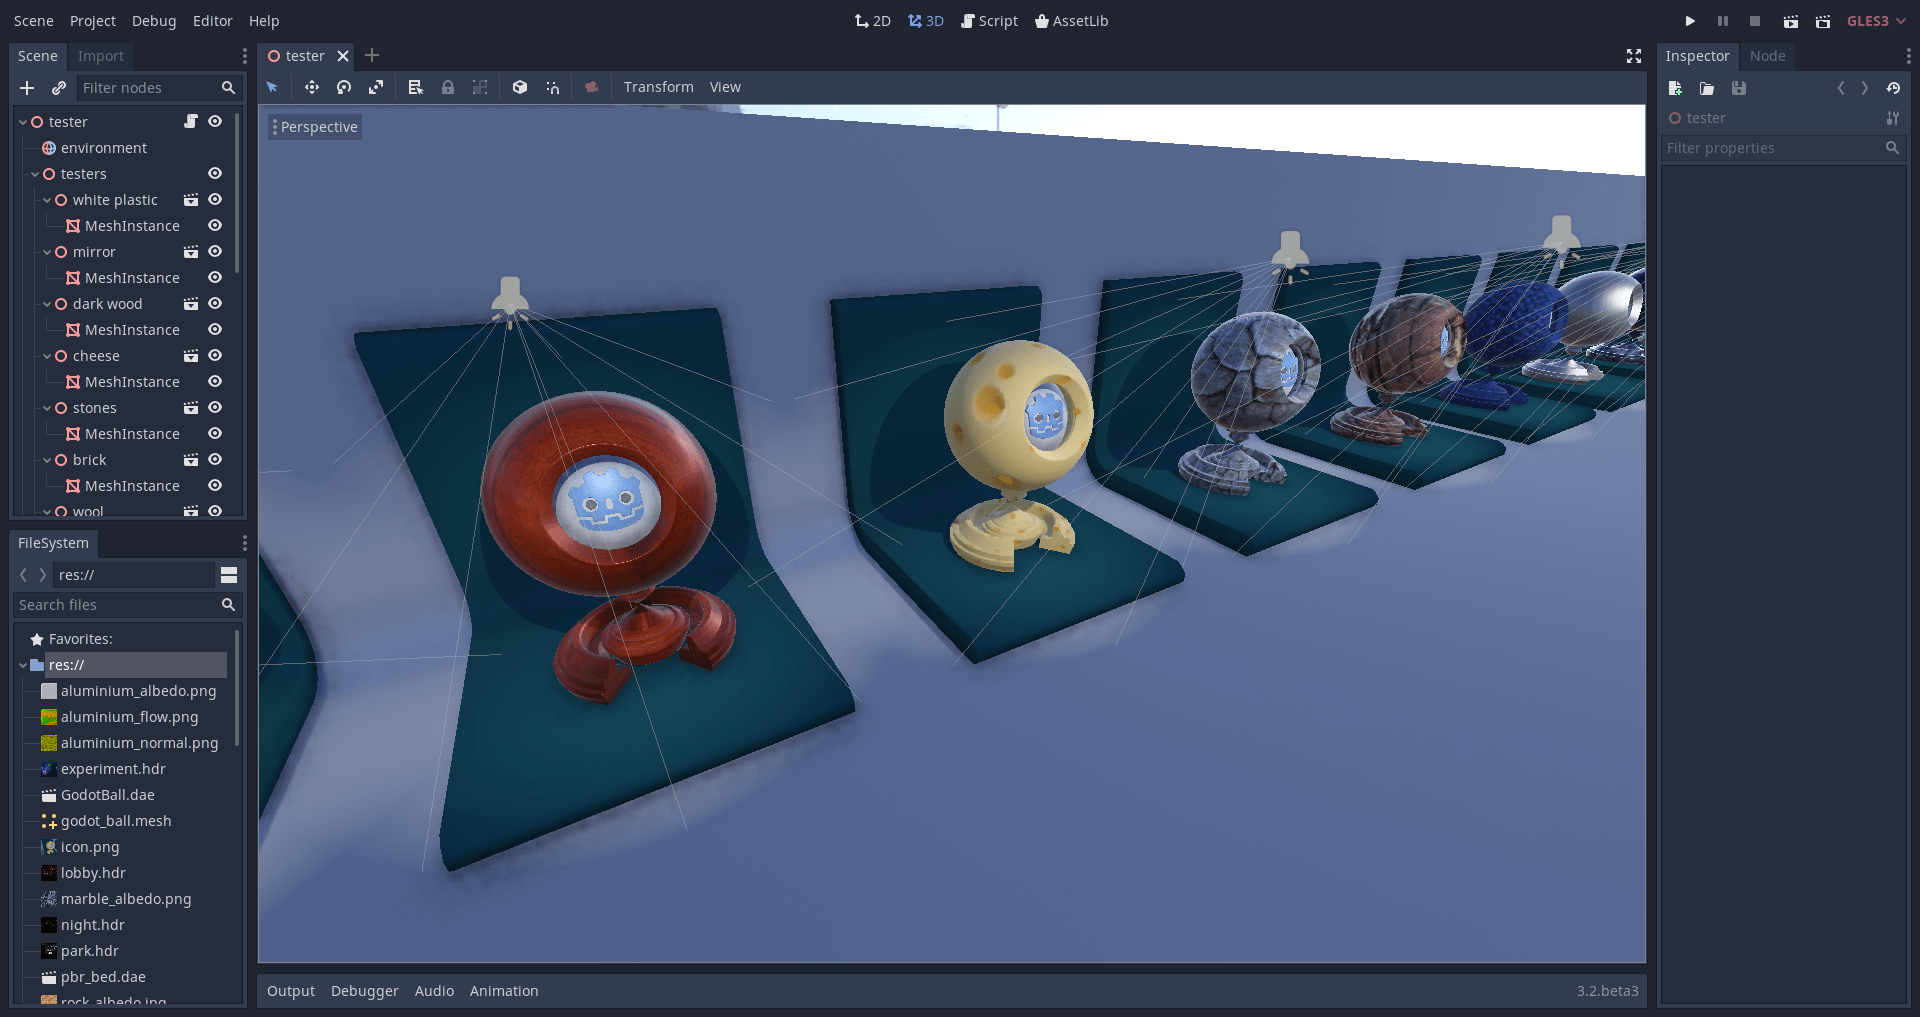
Your first look at Godot’s editor¶
Welcome to Godot! With your project open, you should see the editor’s interface with menus along the top of the interface and docks along the far extremes of the interface on either side of the viewport.
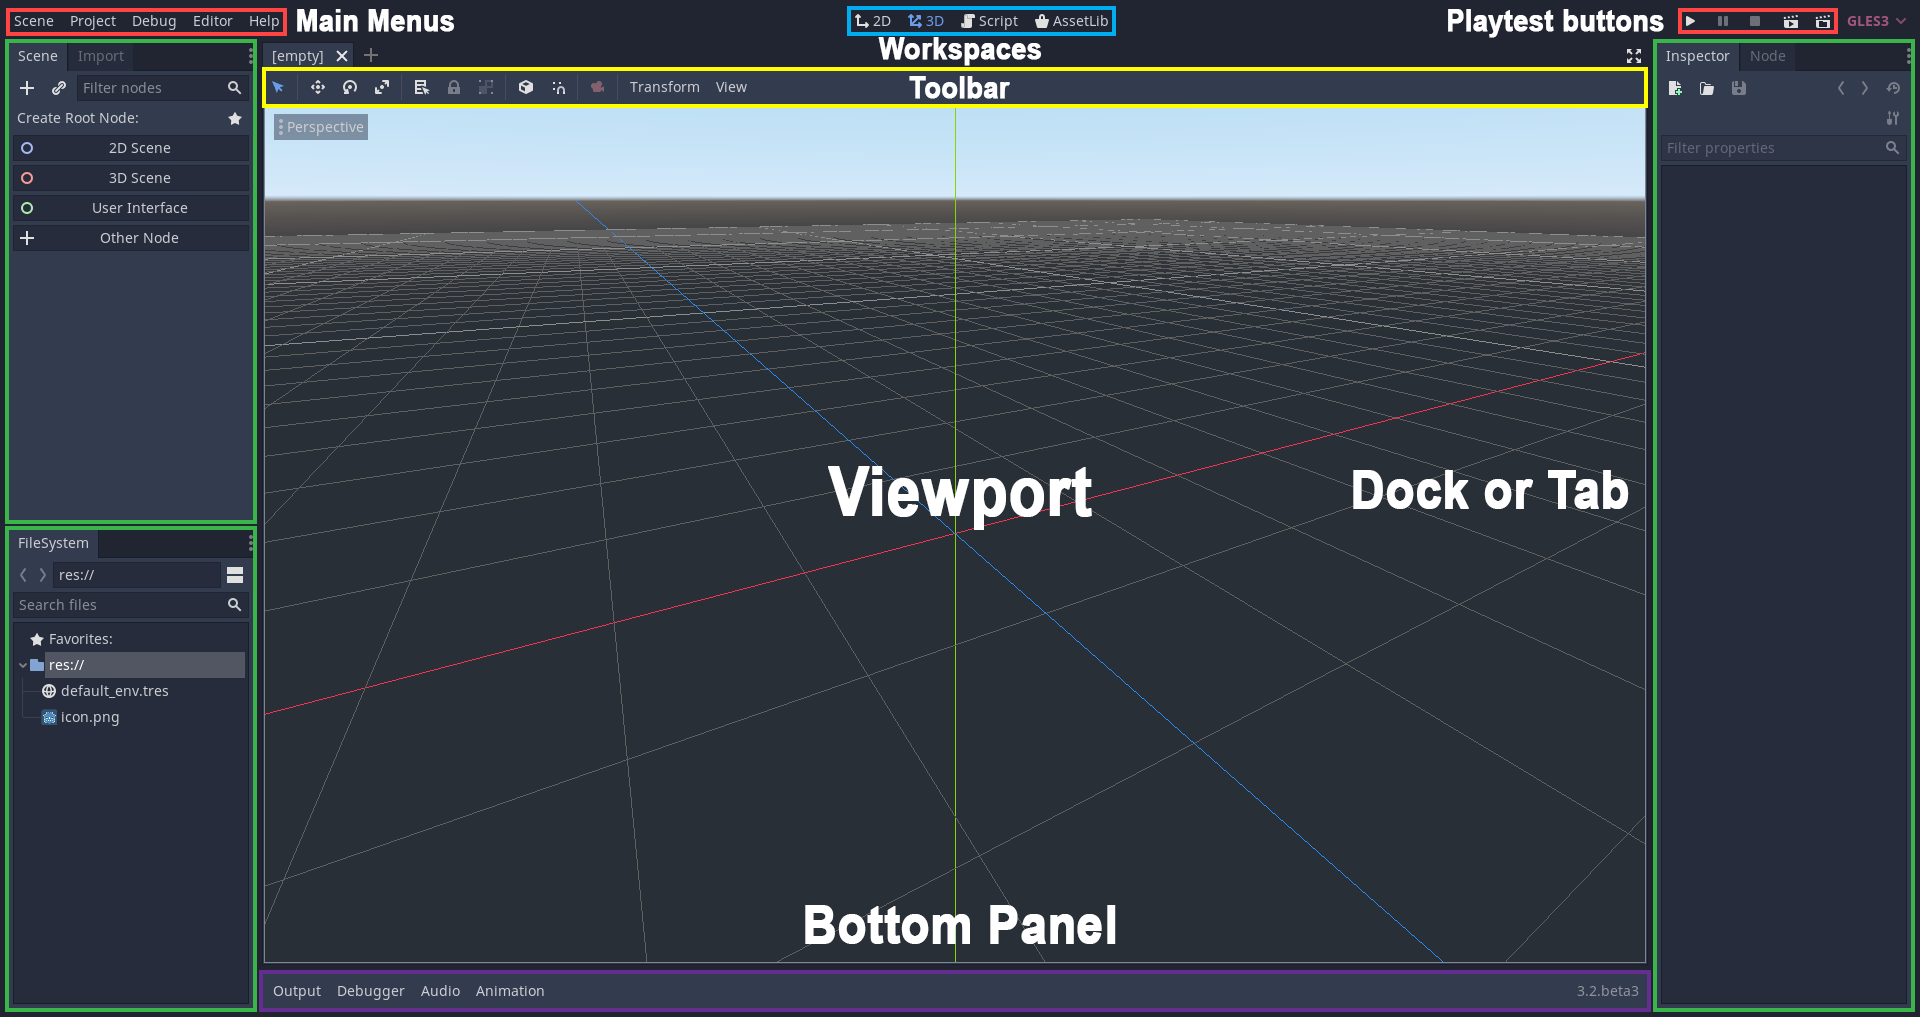
At the top, from left to right, you can see the main menus, the workspaces, and the playtest buttons.
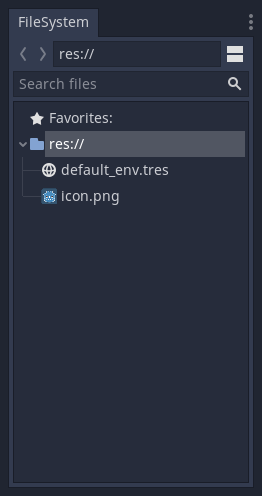
The FileSystem dock is where you’ll manage your project files and assets.
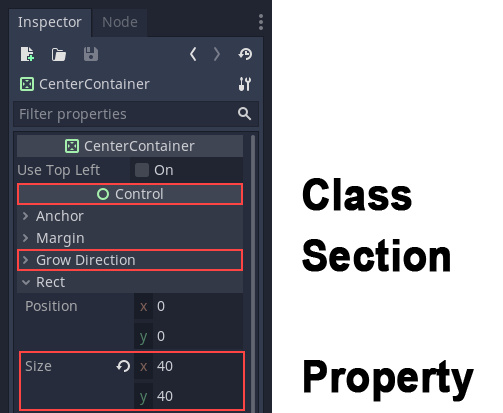
The Scene dock lists the active scene’s content and the Inspector allows for the management of the properties of a scene’s content.
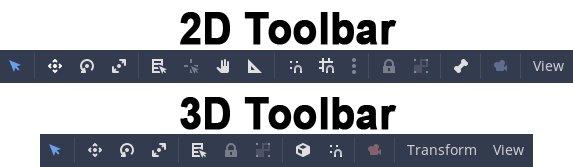
In the center, you have the Toolbar at the top, where you’ll find tools to move, scale or lock your scene’s objects. It changes as you jump to different workspaces.
The Bottom Panel is the host for the debug console, the animation editor, the audio mixer… They are wide and can take precious space. That’s why they’re folded by default.

The workspaces¶
You can see four workspace buttons at the top: 2D, 3D, Script and AssetLib.
You’ll use the 2D workspace for all types of games. In addition to 2D games, the 2D workspace is where you’ll build your interfaces. Press F1 (or Alt + 1 on macOS) to access it.

In the 3D workspace, you can work with meshes, lights, and design levels for 3D games. Press F2 (or Alt + 2 on macOS) to access it.
Notice the perspective button under the toolbar, it opens a list of options related to the 3D viewport.

Note
Read Introduction to 3D for more detail about 3D workspace.
The Script workspace is a complete code editor with a debugger, rich auto-completion, and built-in code reference. Press F3 (or Alt + 3 on macOS) to access it, and F4 to search the reference.
Finally the AssetLib is a library of Free add-ons, scripts and assets to use in your projects.
Modify the interface¶
Godot’s interface lives in a single window. You cannot split it across multiple screens although you can work with an external code editor like Atom or Visual Studio Code for instance.
Move and resize docks¶
Click and drag on the edge of any dock or panel to resize it horizontally or vertically.

Click the three-dotted icon at the top of any dock to change its location.
Go to the Editor menu and Editor Settings to fine-tune the look
and feel of the editor.
Scenes and nodes¶
Introduction¶

Imagine for a second that you are not a game developer anymore. Instead, you’re a chef! Change your hipster outfit for a toque and a double breasted jacket. Now, instead of making games, you create new and delicious recipes for your guests.
So, how does a chef create a recipe? Recipes are divided into two sections: the first is the ingredients and the second is the instructions to prepare it. This way, anyone can follow the recipe and savor your magnificent creation.
Making games in Godot feels pretty much the same way. Using the engine feels like being in a kitchen. In this kitchen, nodes are like a refrigerator full of fresh ingredients with which to cook.
There are many types of nodes. Some show images, others play sound, other nodes display 3D models, etc. There are dozens of them.
Nodes¶
But let’s start with the basics. Nodes are fundamental building blocks for creating a game. As mentioned above, a node can perform a variety of specialized functions. However, any given node always has the following attributes:
- It has a name.
- It has editable properties.
- It can receive a callback to process every frame.
- It can be extended (to have more functions).
- It can be added to another node as a child.
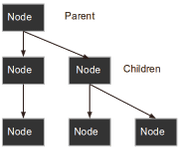
The last one is important. Nodes can have other nodes as children. When arranged in this way, the nodes become a tree.
In Godot, the ability to arrange nodes in this way creates a powerful tool for organizing projects. Since different nodes have different functions, combining them allows for the creation of more complex functions.
Don’t worry if this doesn’t click yet. We will continue to explore this over the next few sections. The most important fact to remember for now is that nodes exist and can be arranged this way.
Scenes¶
Now that the concept of nodes has been defined, the next logical step is to explain what a Scene is.
A scene is composed of a group of nodes organized hierarchically (in tree fashion). Furthermore, a scene:
- always has one root node.
- can be saved to disk and loaded back.
- can be instanced (more on that later).
Running a game means running a scene. A project can contain several scenes, but for the game to start, one of them must be selected as the main scene.
Basically, the Godot editor is a scene editor. It has plenty of tools for editing 2D and 3D scenes as well as user interfaces, but the editor is based on the concept of editing a scene and the nodes that compose it.
Editor¶
Open the project you made in Introduction to Godot’s editor, or create a new one. This will open the Godot editor:
As mentioned before, making games in Godot feels like being in a kitchen, so let’s open the refrigerator and add some fresh nodes to the project. We’ll begin with a “Hello World” message that we’ll put on the screen.
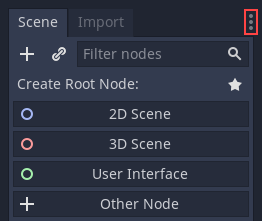
To do this we need to add a Label node. Press the “Add Child Node” button at the top left of the scene dock (the icon represents a plus symbol). This button is the main way to add new nodes to a scene, and will always add the chosen node as a child of the currently selected node (or, in an empty scene, as the “root” node).
Note
In an empty scene (without root node), the scene dock shows several options to quickly add a root node to the scene. “2D Scene” adds a Node2D node, “3D Scene” adds a Spatial node, “User Interface” adds a Control node, and “Custom Node” which lets you select any node (so it is equivalent to pressing the “Add Child Node” button). You can also press the star-shaped icon to toggle the display of your favorited nodes.
Note that these presets are here for convenience and are not mandatory for the different types of scenes. Not every 3D scene needs a Spatial node as its root node, likewise not every GUI or 2D scene needs a Control node or Node2D as their root node.
Now, to add a label node to this scene you can click on the Custom Node button or the Add Node button at the top. In scenes that aren’t empty you use the add node button to create every child node.

This will open the Create Node dialog, showing the long list of nodes that can be created:
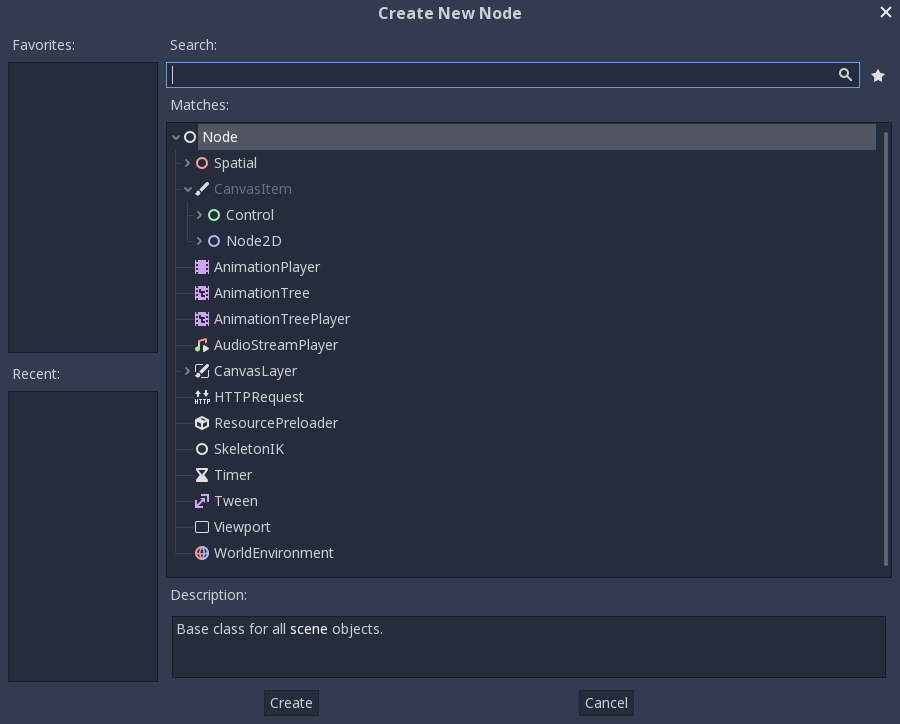
From there, select the “Label” node first. Searching for it is probably the fastest way:
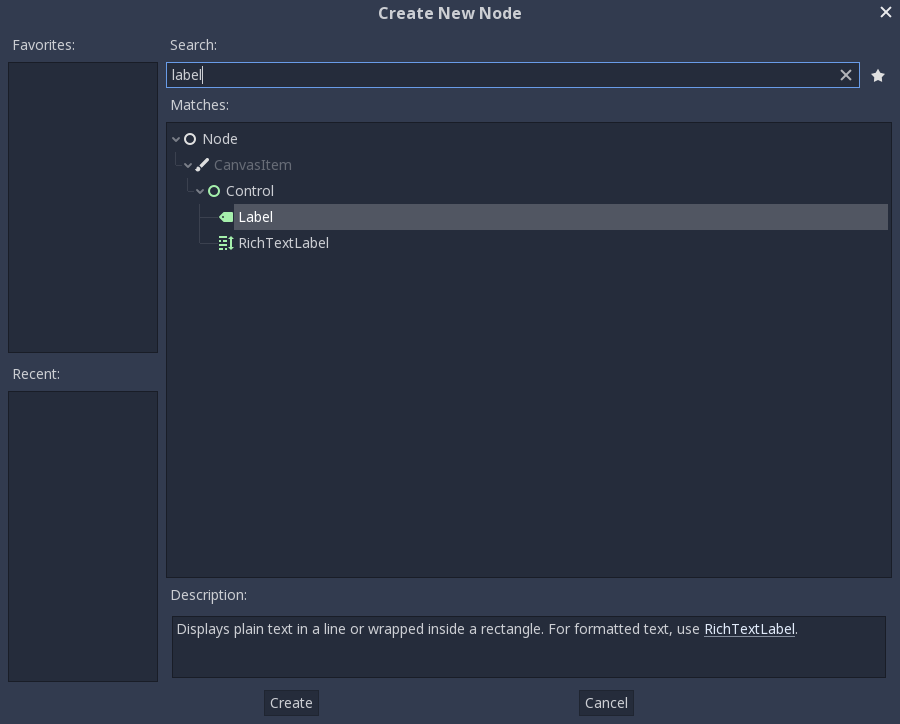
And finally, create the Label! A lot happens when Create is pressed:
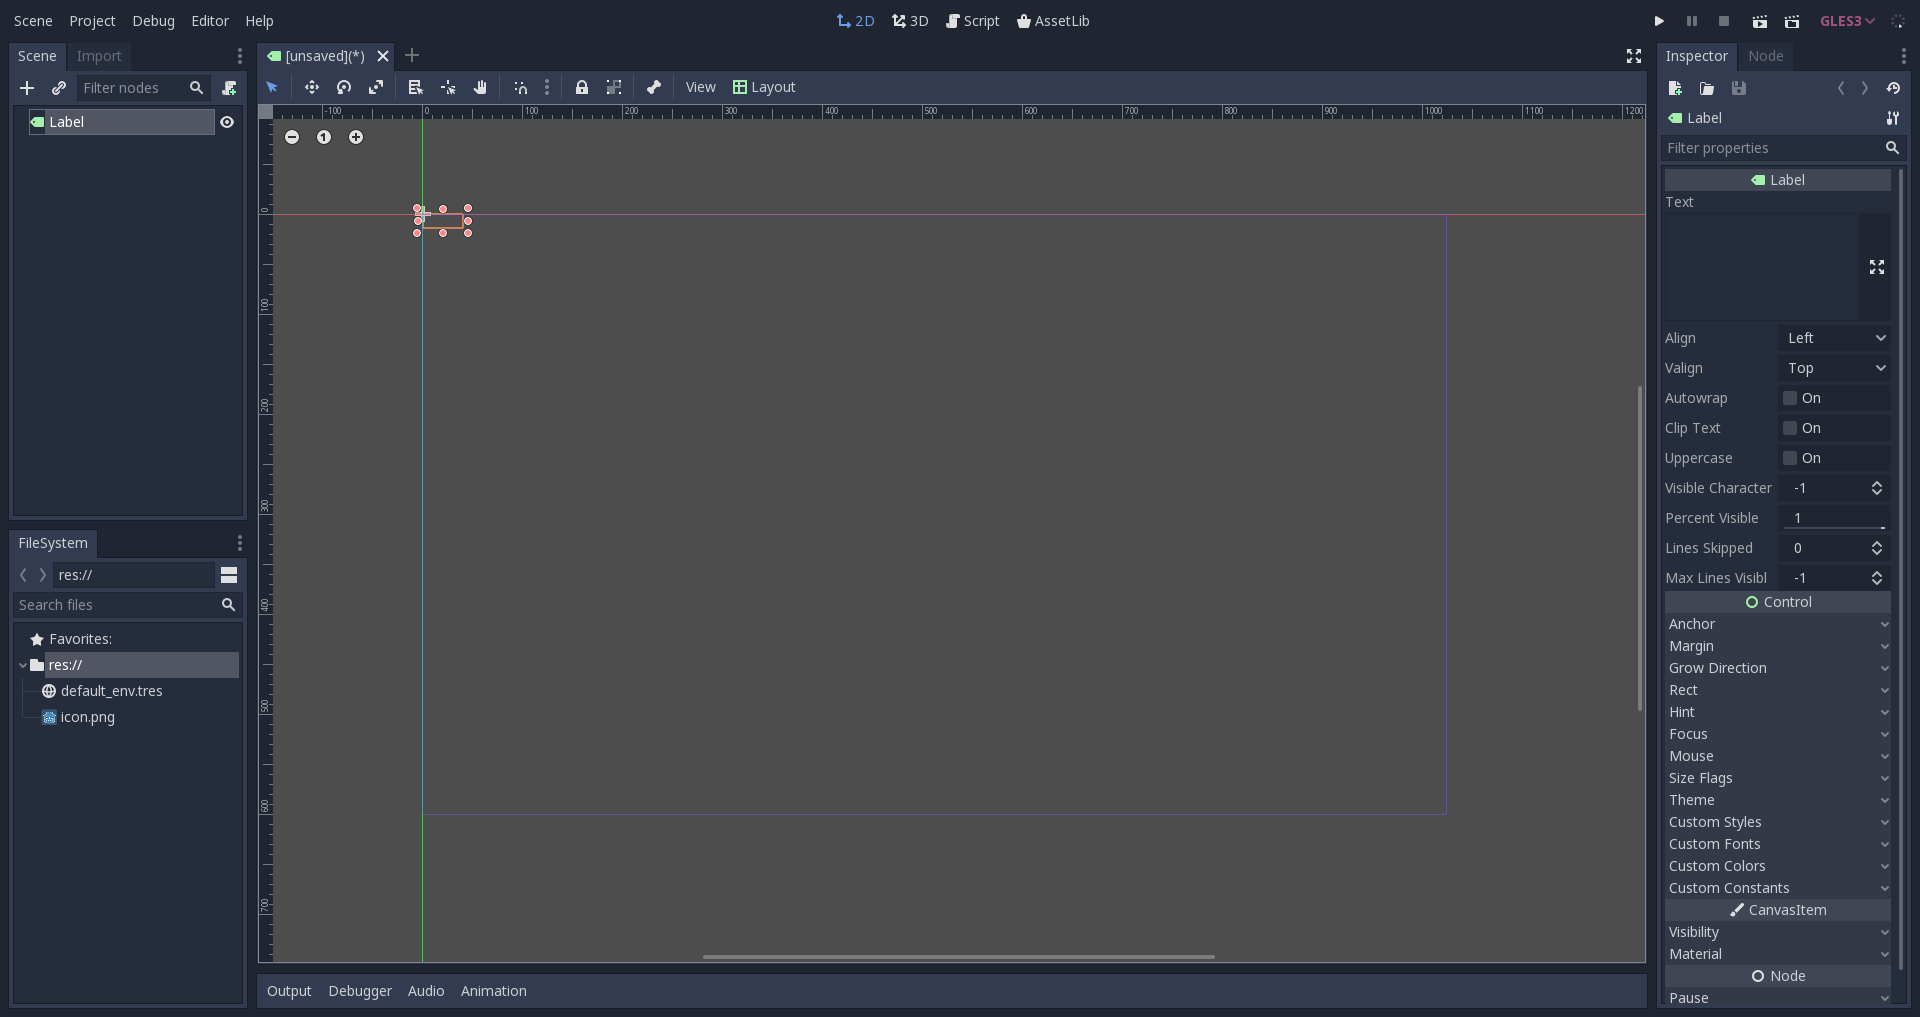
First of all, the scene changes to the 2D editor (because Label is a 2D Node type), and the Label appears, selected, at the top left corner of the viewport.
The node appears in the scene tree editor in the Scene dock, and the label properties appear in the Inspector dock.
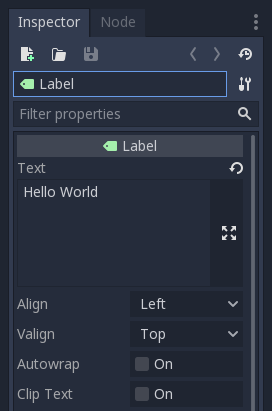
The next step will be to change the “Text” Property of the label. Let’s change it to “Hello World”:
Ok, everything’s ready to run the scene! Press the PLAY SCENE Button on the top bar (or hit F6):

Aaaand… Oops.
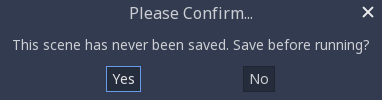
Scenes need to be saved to be run, so save the scene to something like Hello.tscn in Scene -> Save:
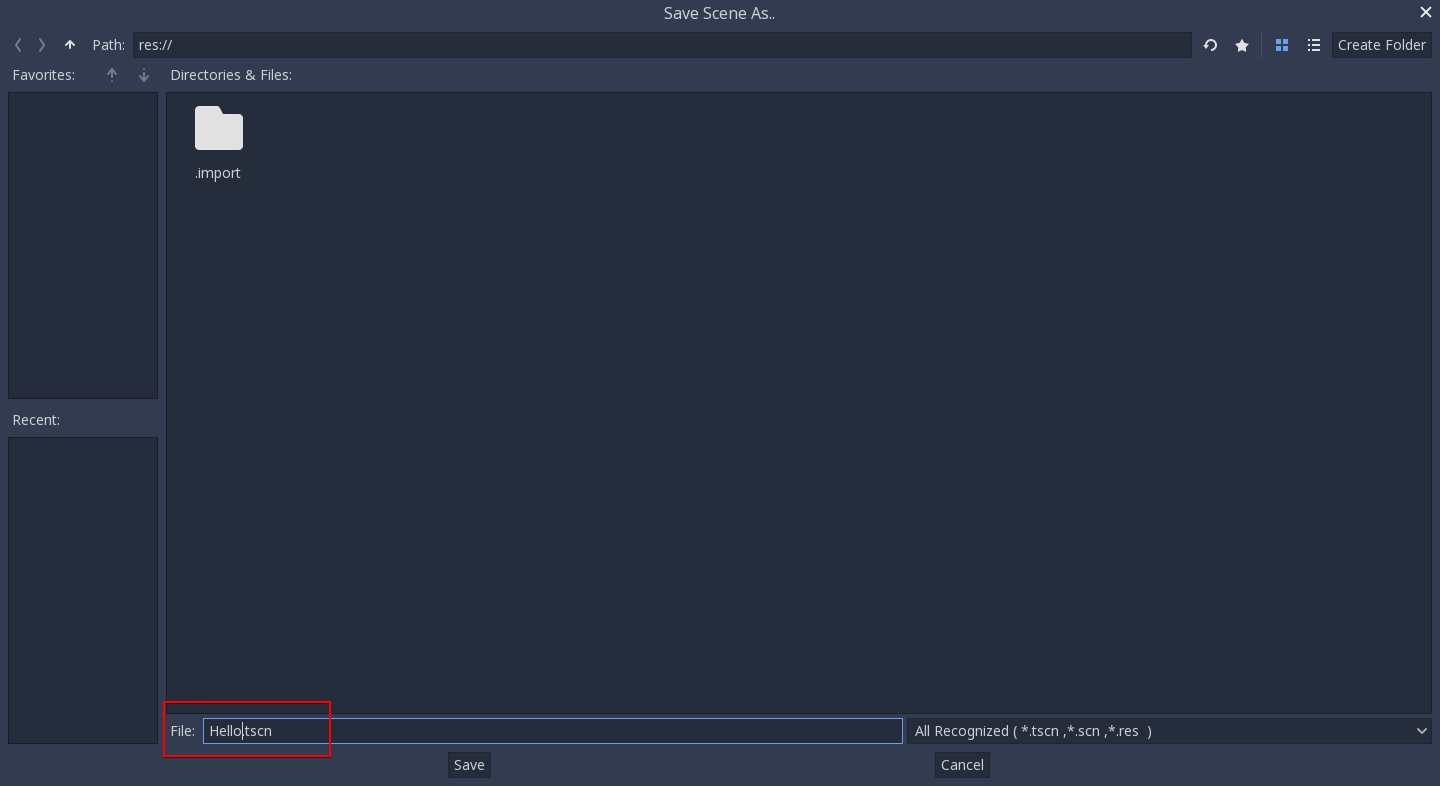
And here’s when something funny happens. The file dialog is a special
file dialog, and only allows you to save inside the project. The project
root is res:// which means “resource path”. This means that files can
only be saved inside the project. For the future, when doing file
operations in Godot, remember that res:// is the resource path, and no
matter the platform or install location, it is the way to locate where
resource files are from inside the game.
After saving the scene and pressing run scene again, the “Hello World” demo should finally execute:

Success!
Note
If this doesn’t immediately work and you have a hiDPI display on at least one of your monitors, go to Project → Project Settings → Display → Window then enable Allow Hidpi under Dpi.
Configuring the project¶
Ok, it’s time to configure the project. Right now, the only way to run something is to execute the current scene. Projects, however, may have several scenes, so one of them must be set as the main scene. This is the scene that will be loaded any time the project is run.
These settings are all stored in a project.godot file, which is a plaintext file in win.ini format (for easy editing). There are dozens of settings that you can change in this file to alter how a project executes. To simplify this process, Godot provides a project settings dialog, which acts as a sort of frontend to editing a project.godot file.
To access that dialog, select Project -> Project Settings. Try it now.
Once the window opens, let’s select a main scene. Locate the Application/Run/Main Scene property and click on it to select ‘Hello.tscn’.
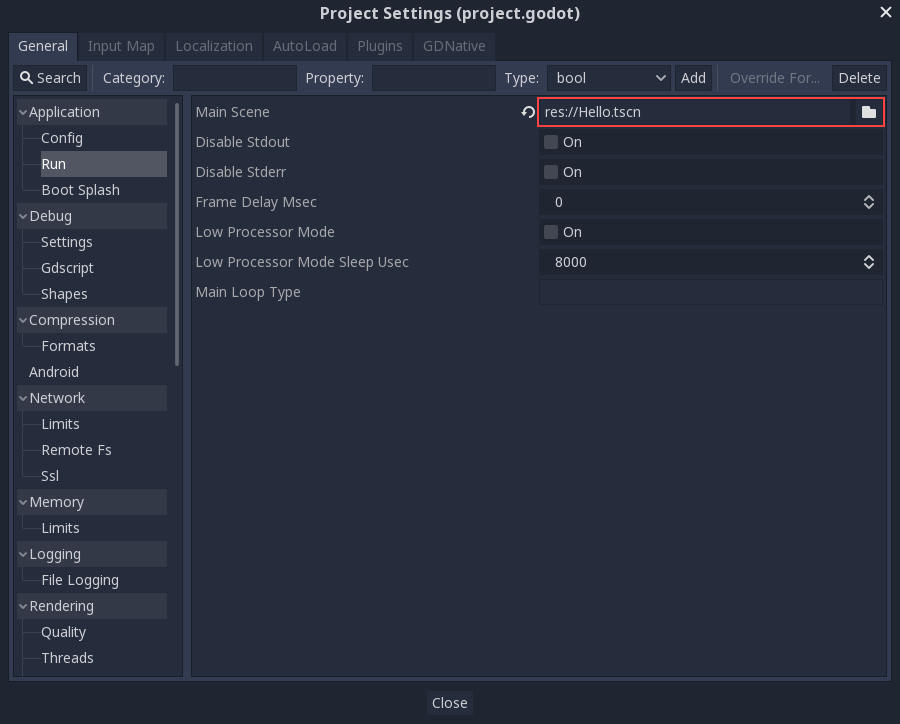
Now, with this change, when you press the regular Play button (or F5), this scene will run, no matter which scene is actively being edited.
The project settings dialog provides a lot of options that can be saved to a project.godot file and shows their default values. If you change a value, a tick is marked to the left of its name. This means that the property will be saved to the project.godot file and remembered.
As a side note, it is also possible to add custom configuration options and read them in at run-time using the ProjectSettings singleton.
To be continued…¶
This tutorial talked about “scenes and nodes”, but so far there has been only one scene and one node! Don’t worry, the next tutorial will expand on that…
Instancing¶
Introduction¶
Creating a single scene and adding nodes into it might work for small projects, but as a project grows in size and complexity, the number of nodes can quickly become unmanageable. To address this, Godot allows a project to be separated into any number of scenes. This provides you with a powerful tool that helps you organize the different components of your game.
In Scenes and nodes you learned that a scene is a collection of nodes organized in a tree structure, with a single node as the tree root.
You can create as many scenes as you like and save them to disk. Scenes
saved in this manner are called “Packed Scenes” and have a .tscn filename
extension.
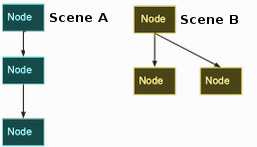
Once a scene has been saved, it can be instanced into another scene as if it were any other node.
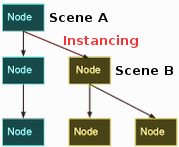
In the above picture, Scene B was added to Scene A as an instance.
Instancing by example¶
To learn how instancing works, let’s start by downloading a sample
project: instancing.zip.
Unzip this project anywhere you like. Then open Godot and add this project to the project manager using the ‘Import’ button:
Browse to the folder you extracted and open the “project.godot” file you can find inside it. After doing this, the new project will appear on the list of projects. Edit the project by pressing the ‘Edit’ button.
This project contains two scenes: “Ball.tscn” and “Main.tscn”. The ball scene uses a RigidBody2D to provide physics behavior while the main scene has a set of obstacles for the ball to collide with (using StaticBody2D).

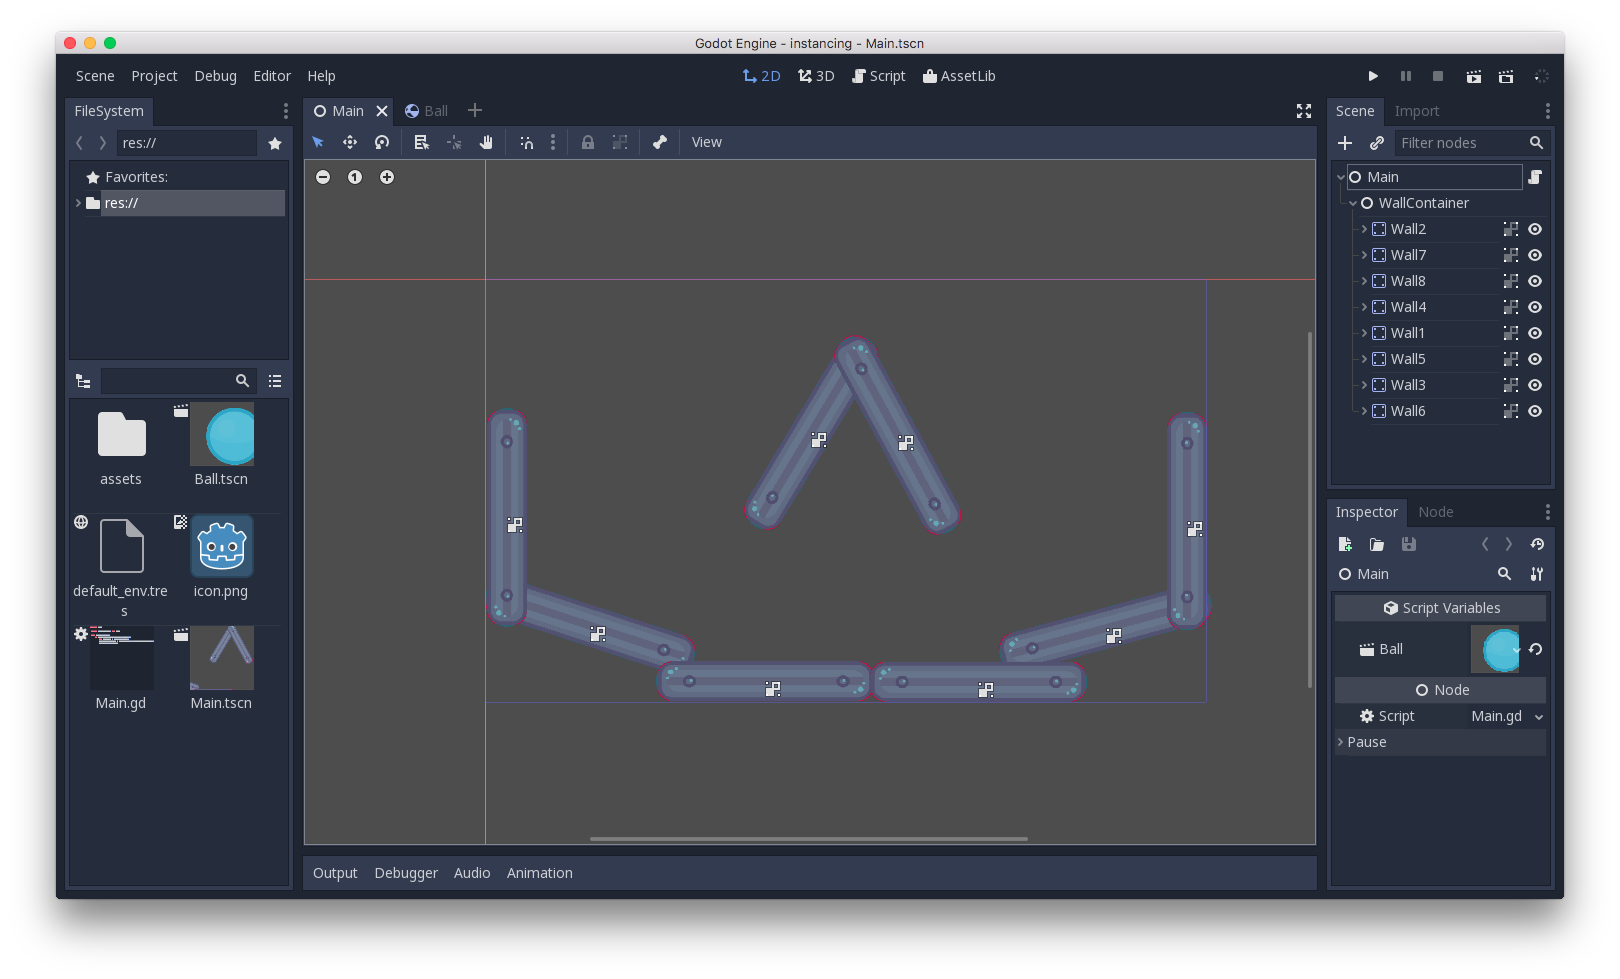
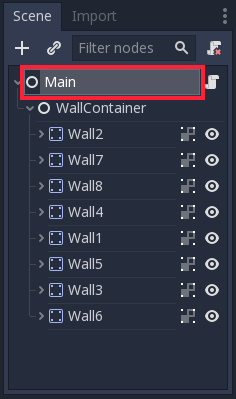
Open the Main scene, and then select the root node:
We want to add an instance of the Ball scene as a child of Main.
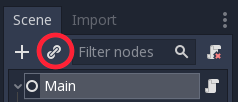
Click the “link”-shaped button (its hover-text says “Instance a scene file
as a Node.”) and select the Ball.tscn file.
The ball will be placed at the top-left corner of the screen area (this is
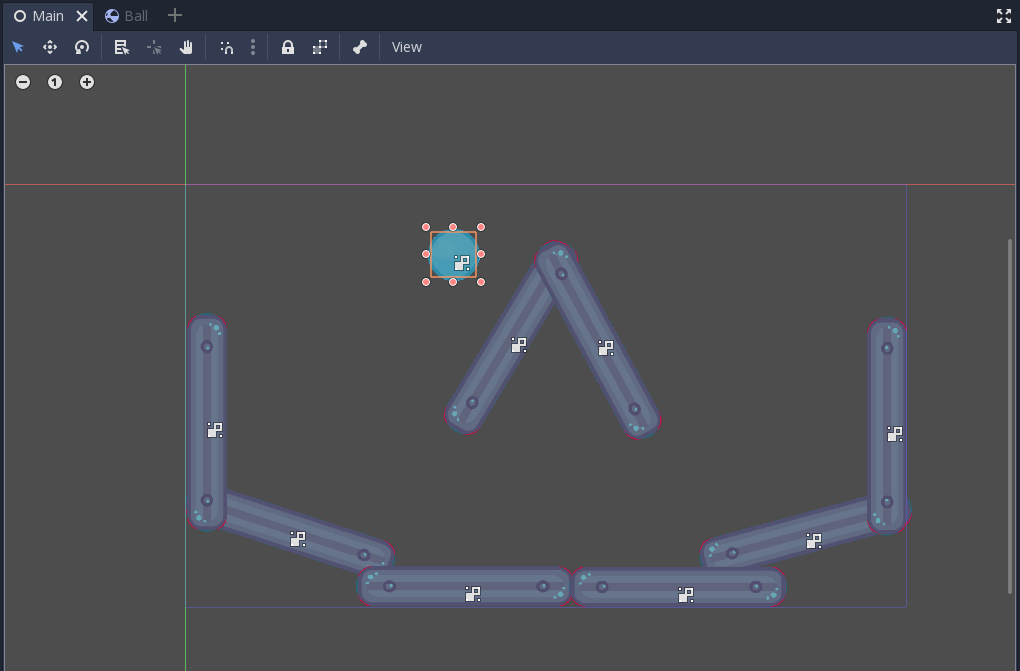
(0, 0) in screen coordinates). Click and drag the ball somewhere near
the top-center of the scene:
Press “Play” and watch the ball fall to the bottom of the screen:

Multiple instances¶
You can add as many instances as you like to a scene, either by using the “Instance” button again, or by clicking on the ball instance and pressing “Duplicate” (Ctrl + D):
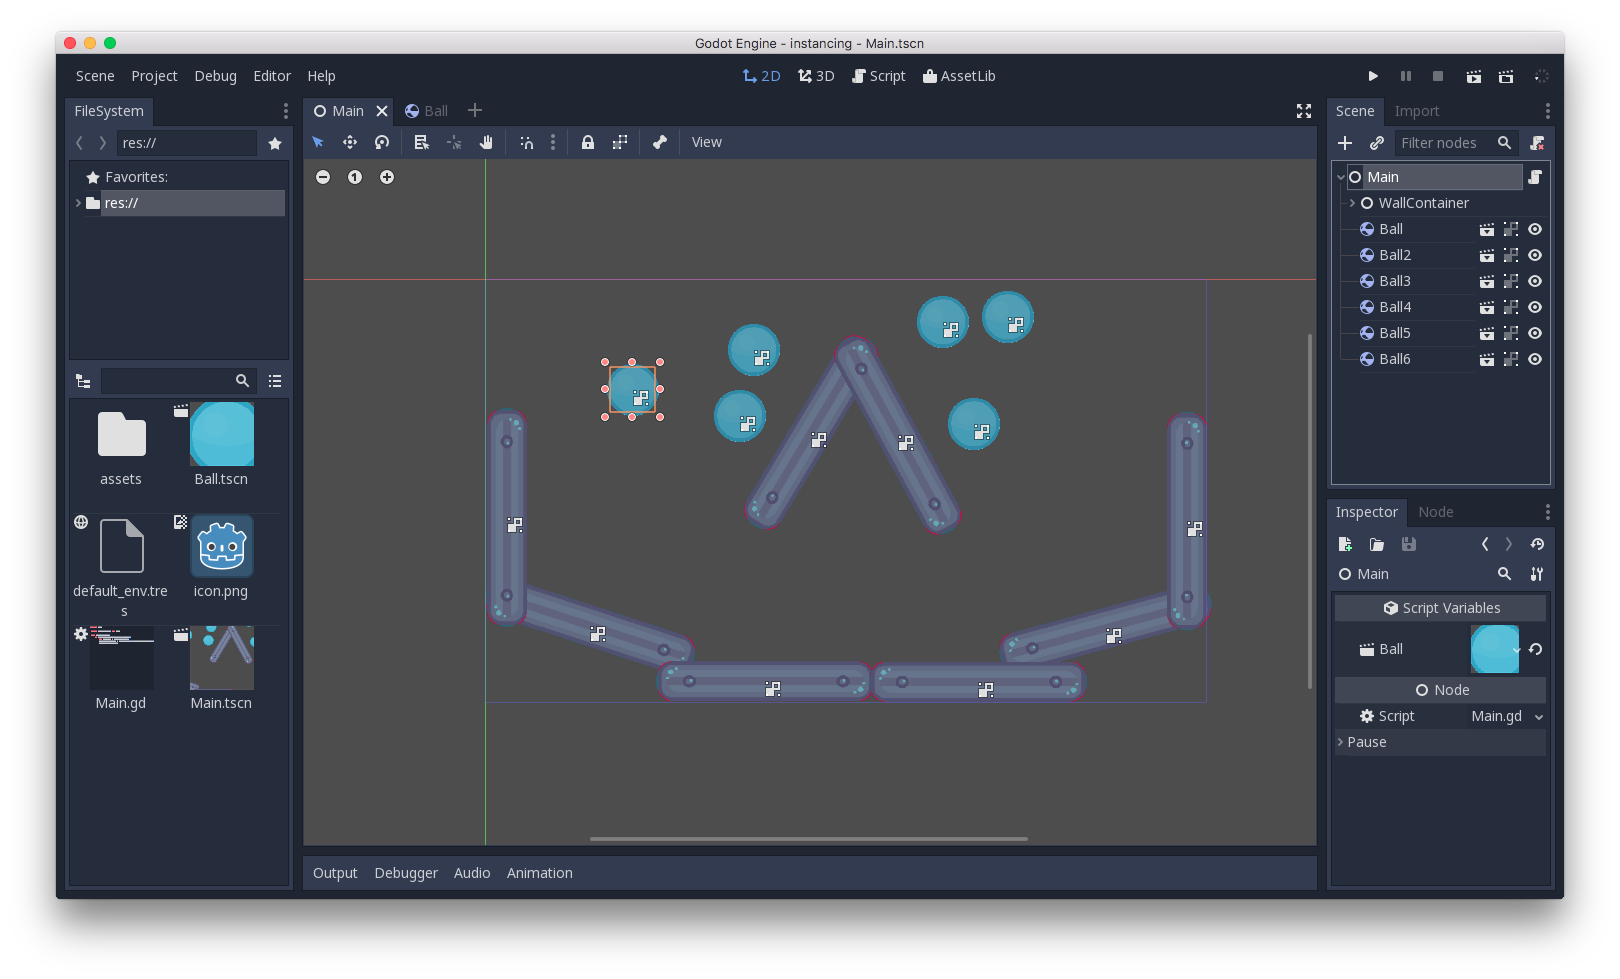
Run the scene again and all of the balls will fall.
Editing instances¶
Open the Ball scene and add a PhysicsMaterial by opening the “Physics
Material Override” dropdown in the Inspector dock and selecting “New
PhysicsMaterial”.
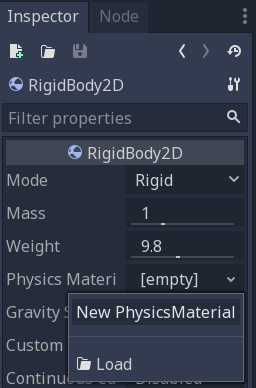
Then, expand the material by clicking on it, and set the Bounce property
to 1.
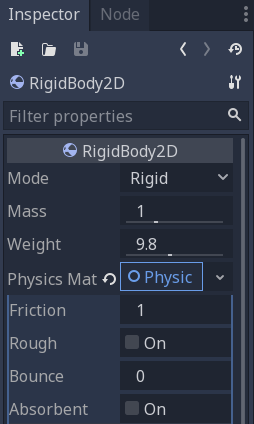
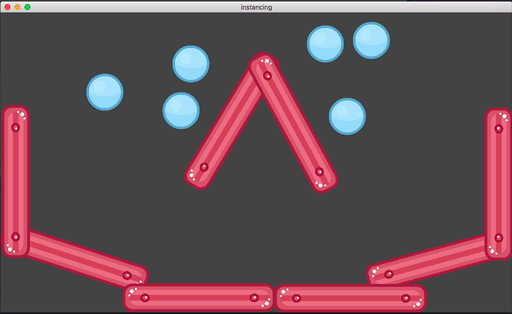
Press “Play” and notice that all of the instanced balls are now much more bouncy. Because the instanced balls are based on the saved scene, changes to that scene will affect all instances.
You can also adjust individual instances. Set the bounce value back to 0
and then in the Main scene, select one of the instanced balls. Resources
like PhysicsMaterial are shared between instances by default, so we need
to make it unique. Click on the down arrow and select “Make Unique”. Set its
Bounce to 1 and press “Play”.

Notice that a grey “revert” button appears next to the adjusted property. When this button is present, it means you modified a property in the instanced scene to override its value in the saved scene. Even if that property is modified in the original scene, the custom value will remain. Pressing the revert button will restore the property to the value in the saved scene.
Conclusion¶
Instancing can be useful when you want to create many copies of the same object. It is also possible to create instances in code by using GDScript, see Instancing (continued).
Instancing (continued)¶
Recap¶
Instancing has many handy uses. At a glance, with instancing you have:
- The ability to subdivide scenes and make them easier to manage.
- A tool to manage and edit multiple node instances at once.
- A way to organize and embed complex game flows or even UIs (in Godot, UI Elements are nodes, too).
Design language¶
But the greatest strength that comes with instancing scenes is that it works as an excellent design language. This distinguishes Godot from all the other engines out there. Godot was designed from the ground up around this concept.
When making games with Godot, the recommended approach is to dismiss most common design patterns, such as MVC or Entity-Relationship diagrams, and instead think about your scenes in a more natural way. Start by imagining the visible elements in your game, the ones that can be named not just by a programmer, but by anyone.
For example, here’s how a simple shooter game could be imagined:
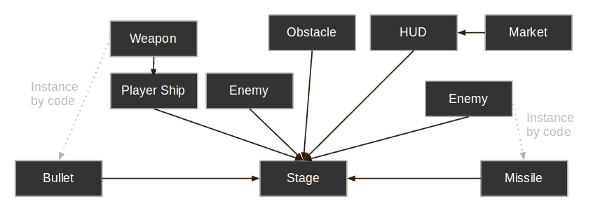
You can come up with a diagram like this for almost any kind of game. Write down the parts of the game that you can visualize, and then add arrows to represent ownership of one component by another.
Once you have a diagram like this, the recommended process for making a game is to create a scene for each element listed in the diagram. You’ll use instancing (either by code or directly in the editor) for the ownership relationships.
A lot of time spent in programming games (or software in general) is on designing an architecture and fitting game components to that architecture. Designing based on scenes replaces that approach and makes development much faster and more straightforward, allowing you to concentrate on the game logic itself. Because most game components map directly to a scene, using a design based on scene instantiation means little other architectural code is needed.
Let’s take a look at one more, somewhat more complex, example of an open-world type game with lots of assets and nested elements:
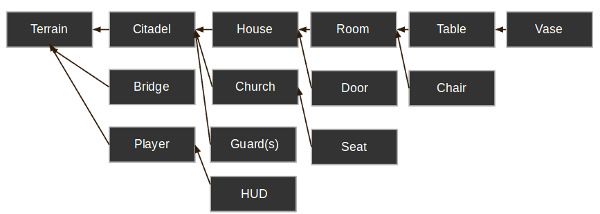
Take a look at the room element. Let’s say we started there. We could make a couple of different room scenes, with different arrangements of furniture (also scenes) in them. Later, we could make a house scene, connecting rooms to make up its interior.
Then, we could make a citadel scene, which is made out of many instanced houses. Then, we could start working on the world map terrain, adding the citadel onto it.
Later, we could create scenes that represent guards (and other NPCs) and add them to the citadel as well. As a result, they would be indirectly added to the overall game world.
With Godot, it’s easy to iterate on your game like this, as all you need to do is create and instance more scenes. Furthermore, the editor UI is designed to be user friendly for programmers and non-programmers alike. A typical team development process can involve 2D or 3D artists, level designers, game designers, and animators, all working with the editor interface.
Information overload!¶
This has been a lot of high level information dropped on you all at once. However, the important part of this tutorial was to create an awareness of how scenes and instancing are used in real projects.
Everything discussed here will become second nature to you once you start making games and putting these concepts into practice. For now, don’t worry about it too much, and go on to the next tutorial!
Scripting¶
Introduction¶
Before Godot 3.0, the only choice for scripting a game was to use GDScript. Nowadays, Godot has four (yes, four!) official languages and the ability to add extra scripting languages dynamically!
This is great, mostly due to the large amount of flexibility provided, but it also makes our work supporting languages more difficult.
The “main” languages in Godot, though, are GDScript and VisualScript. The main reason to choose them is their level of integration with Godot, as this makes the experience smoother; both have slick editor integration, while C# and C++ need to be edited in a separate IDE. If you are a big fan of statically typed languages, go with C# and C++ instead.
GDScript¶
GDScript is, as mentioned above, the main language used in Godot. Using it has some positive points compared to other languages due to its high integration with Godot:
- It’s simple, elegant, and designed to be familiar for users of other languages such as Lua, Python, Squirrel, etc.
- Loads and compiles blazingly fast.
- The editor integration is a pleasure to work with, with code completion for nodes, signals, and many other items pertaining to the scene being edited.
- Has vector types built-in (such as Vectors, transforms, etc.), making it efficient for heavy use of linear algebra.
- Supports multiple threads as efficiently as statically typed languages - one of the limitations that made us avoid VMs such as Lua, Squirrel, etc.
- Uses no garbage collector, so it trades a small bit of automation (most objects are reference counted anyway), by determinism.
- Its dynamic nature makes it easy to optimize sections of code in C++ (via GDNative) if more performance is required, all without recompiling the engine.
If you’re undecided and have experience with programming, especially dynamically typed languages, go for GDScript!
VisualScript¶
Beginning with 3.0, Godot offers Visual Scripting. This is a typical implementation of a “blocks and connections” language, but adapted to how Godot works.
Visual scripting is a great tool for non-programmers, or even for experienced developers who want to make parts of the code more accessible to others, like game designers or artists.
It can also be used by programmers to build state machines or custom visual node workflows - for example, a dialogue system.
.NET / C#¶
As Microsoft’s C# is a favorite amongst game developers, we have added official support for it. C# is a mature language with tons of code written for it, and support was added thanks to a generous donation from Microsoft.
It has an excellent tradeoff between performance and ease of use, although one must be aware of its garbage collector.
Since Godot uses the Mono .NET runtime, in theory any third-party .NET library or framework can be used for scripting in Godot, as well as any Common Language Infrastructure-compliant programming language, such as F#, Boo or ClojureCLR. In practice however, C# is the only officially supported .NET option.
GDNative / C++¶
Finally, one of our brightest additions for the 3.0 release: GDNative allows scripting in C++ without needing to recompile (or even restart) Godot.
Any C++ version can be used, and mixing compiler brands and versions for the generated shared libraries works perfectly, thanks to our use of an internal C API Bridge.
This language is the best choice for performance and does not need to be used throughout an entire game, as other parts can be written in GDScript or Visual Script. However the API is clear and easy to use as it resembles, mostly, Godot’s actual C++ API.
More languages can be made available through the GDNative interface, but keep in mind we don’t have official support for them.
Scripting a scene¶
For the rest of this tutorial we’ll set up a GUI scene consisting of a button and a label, where pressing the button will update the label. This will demonstrate:
- Writing a script and attaching it to a node.
- Hooking up UI elements via signals.
- Writing a script that can access other nodes in the scene.
Before continuing, please make sure to read the GDScript reference. It’s a language designed to be simple, and the reference is short, so it will not take more than a few minutes to get an overview of the concepts.
Scene setup¶
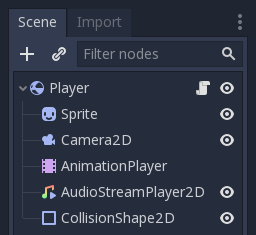
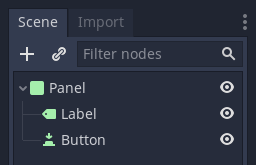
Use the “Add Child Node” dialogue accessed from the Scene tab (or by pressing Ctrl + A) to create a hierarchy with the following nodes:
- Panel
- Label
- Button
The scene tree should look like this:
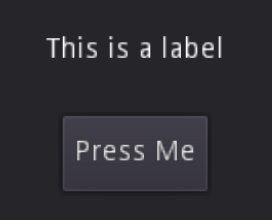
Use the 2D editor to position and resize the Button and Label so that they look like the image below. You can set the text from the Inspector tab.
Finally, save the scene with a name such as sayhello.tscn.
Adding a script¶
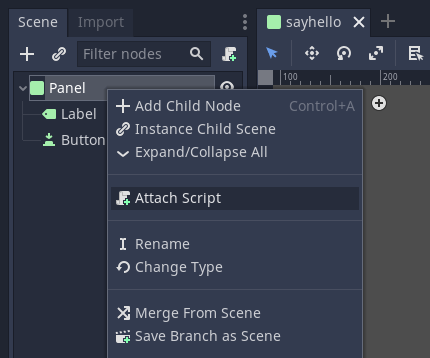
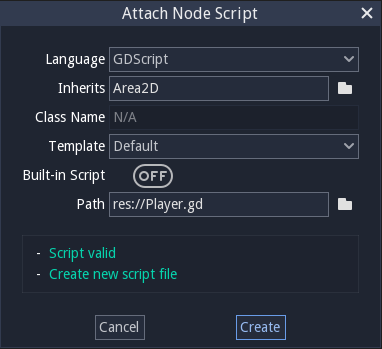
Right click on the Panel node, then select “Attach Script” from the context menu:
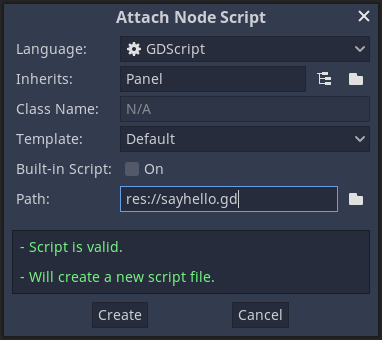
The script creation dialog will pop up. This dialog allows you to set the script’s language, class name, and other relevant options.
In GDScript, the file itself represents the class, so the class name field is not editable.
The node we’re attaching the script to is a panel, so the Inherits field will automatically be filled in with “Panel”. This is what we want, as the script’s goal is to extend the functionality of our panel node.
Finally, enter a path name for the script and select Create:
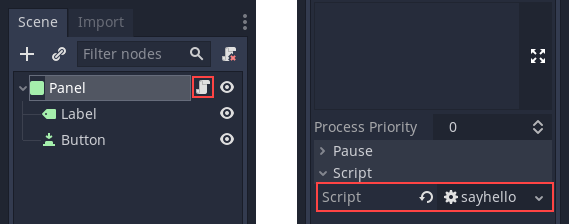
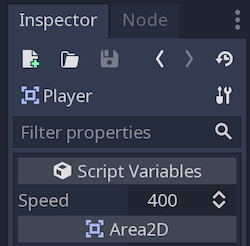
The script will then be created and added to the node. You can see this as an “Open script” icon next to the node in the Scene tab, as well as in the script property under Inspector:
To edit the script, select either of these buttons, both of which are highlighted in the above image. This will bring you to the script editor, where a default template will be included:
There’s not much there. The _ready() function is called when the
node, and all its children, enters the active scene. Note: _ready() is not
the constructor; the constructor is instead _init().
The role of the script¶
A script adds behavior to a node. It is used to control how the node functions as well as how it interacts with other nodes: children, parent, siblings, and so on. The local scope of the script is the node. In other words, the script inherits the functions provided by that node.
Handling a signal¶
Signals are “emitted” when some specific kind of action happens, and they can be connected to any function of any script instance. Signals are used mostly in GUI nodes, although other nodes have them too, and you can even define custom signals in your own scripts.
In this step, we’ll connect the “pressed” signal to a custom function. Forming connections is the first part and defining the custom function is the second part. For the first part, Godot provides two ways to create connections: through a visual interface the editor provides or through code.
While we will use the code method for the remainder of this tutorial series, let’s cover how the editor interface works for future reference.
Select the Button node in the scene tree and then select the “Node” tab. Next, make sure that you have “Signals” selected.
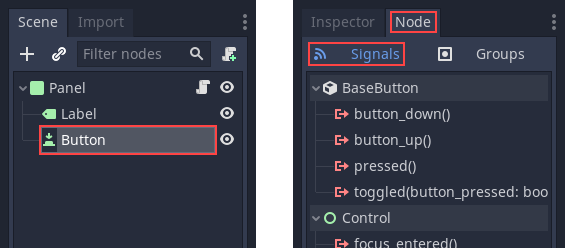
If you then select “pressed()” under “BaseButton” and click the “Connect…” button in the bottom right, you’ll open up the connection creation dialogue.
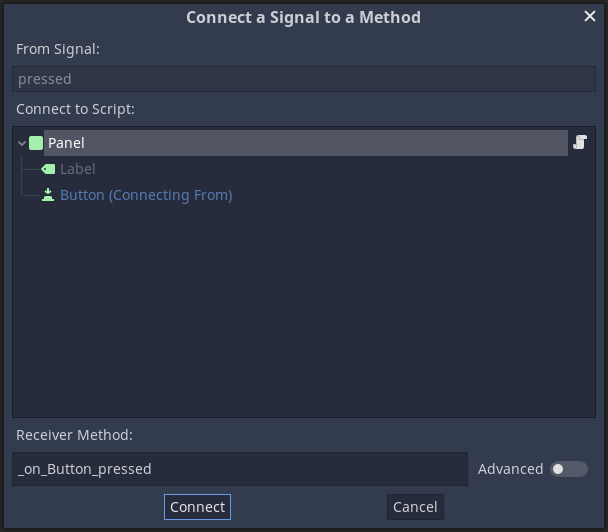
The top of the dialogue displays a list of your scene’s nodes with the emitting node’s name highlighted in blue. Select the “Panel” node here.
The bottom of the dialogue shows the name of the method that will be created.
By default, the method name will contain the emitting node’s name (“Button” in
this case), resulting in _on_[EmitterNode]_[signal_name].
And that concludes the guide on how to use the visual interface. However, this is a scripting tutorial, so for the sake of learning, let’s dive into the manual process!
To accomplish this, we will introduce a function that is probably the most used by Godot programmers: Node.get_node(). This function uses paths to fetch nodes anywhere in the scene, relative to the node that owns the script.
For the sake of convenience, delete everything underneath extends Panel.
You will fill out the rest of the script manually.
Because the Button and Label are siblings under the Panel
where the script is attached, you can fetch the Button by typing
the following underneath the _ready() function:
func _ready():
get_node("Button")
public override void _Ready()
{
GetNode("Button");
}
Next, write a function which will be called when the button is pressed:
func _on_Button_pressed():
get_node("Label").text = "HELLO!"
public void _OnButtonPressed()
{
GetNode<Label>("Label").Text = "HELLO!";
}
Finally, connect the button’s “pressed” signal to _on_Button_pressed() by
using Object.connect().
func _ready():
get_node("Button").connect("pressed", self, "_on_Button_pressed")
public override void _Ready()
{
GetNode("Button").Connect("pressed", this, nameof(_OnButtonPressed));
}
The final script should look like this:
extends Panel
func _ready():
get_node("Button").connect("pressed", self, "_on_Button_pressed")
func _on_Button_pressed():
get_node("Label").text = "HELLO!"
using Godot;
// IMPORTANT: the name of the class MUST match the filename exactly.
// this is case sensitive!
public class sayhello : Panel
{
public override void _Ready()
{
GetNode("Button").Connect("pressed", this, nameof(_OnButtonPressed));
}
public void _OnButtonPressed()
{
GetNode<Label>("Label").Text = "HELLO!";
}
}
Run the scene and press the button. You should get the following result:
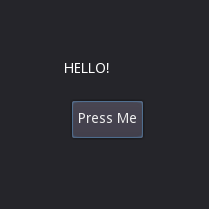
Why, hello there! Congratulations on scripting your first scene.
Note
A common misunderstanding regarding this tutorial is how get_node(path)
works. For a given node, get_node(path) searches its immediate children.
In the above code, this means that Button must be a child of Panel. If
Button were instead a child of Label, the code to obtain it would be:
# Not for this case,
# but just in case.
get_node("Label/Button")
// Not for this case,
// but just in case.
GetNode("Label/Button")
Also, remember that nodes are referenced by name, not by type.
Note
The right-hand panel of the connect dialogue is for binding specific values to the connected function’s parameters. You can add and remove values of different types.
The code approach also enables this with a 4th Array parameter that
is empty by default. Feel free to read up on the Object.connect
method for more information.
Scripting (continued)¶
Processing¶
Several actions in Godot are triggered by callbacks or virtual functions, so there is no need to write code that runs all the time.
However, it is still common to need a script to be processed on every frame. There are two types of processing: idle processing and physics processing.
Idle processing is activated when the method Node._process() is found in a script. It can be turned off and on with the Node.set_process() function.
This method will be called every time a frame is drawn:
func _process(delta):
# Do something...
pass
public override void _Process(float delta)
{
// Do something...
}
It’s important to bear in mind that the frequency with which _process()
will be called depends on how many frames per second (FPS) your application
is running at. This rate can vary over time and devices.
To help manage this variability the delta parameter contains the time
elapsed in seconds, as a floating point, since the previous call to _process().
This parameter can be used to make sure things always take the same amount of time, regardless of the game’s FPS.
For example, movement is often multiplied with a time delta to make movement speed both constant and independent from the frame rate.
Physics processing with _physics_process() is similar, but it should be used for processes that
must happen before each physics step, such as controlling a character.
It always runs before a physics step and it is called at fixed time intervals:
60 times per second by default. You can change the interval from the Project Settings, under
Physics -> Common -> Physics Fps.
The function _process(), however, is not synced with physics. Its frame rate is not constant and is dependent
on hardware and game optimization. Its execution is done after the physics step on single-threaded games.
A simple way to see the _process() function at work is to create a scene with a single Label node,
with the following script:
extends Label
var accum = 0
func _process(delta):
accum += delta
text = str(accum) # 'text' is a built-in label property.
public class CustomLabel : Label
{
private float _accum;
public override void _Process(float delta)
{
_accum += delta;
Text = _accum.ToString(); // 'Text' is a built-in label property.
}
}
Which will show a counter increasing each frame.
Groups¶
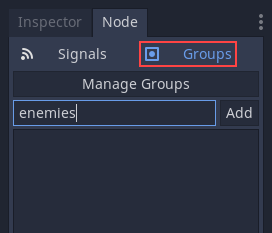
Groups in Godot work like tags you might have come across in other software. A node can be added to as many groups as desired. This is a useful feature for organizing large scenes. There are two ways to add nodes to groups. The first is from the UI, using the Groups button under the Node panel:
And the second way is from code. The following script would add the current
node to the enemies group as soon as it appeared in the scene tree.
func _ready():
add_to_group("enemies")
public override void _Ready()
{
base._Ready();
AddToGroup("enemies");
}
This way, if the player is discovered sneaking into a secret base, all enemies can be notified about its alarm sounding by using SceneTree.call_group():
func _on_discovered(): # This is a purely illustrative function.
get_tree().call_group("enemies", "player_was_discovered")
public void _OnDiscovered() // This is a purely illustrative function.
{
GetTree().CallGroup("enemies", "player_was_discovered");
}
The above code calls the function player_was_discovered on every
member of the group enemies.
It is also possible to get the full list of enemies nodes by
calling
SceneTree.get_nodes_in_group():
var enemies = get_tree().get_nodes_in_group("enemies")
var enemies = GetTree().GetNodesInGroup("enemies");
The SceneTree class provides many useful methods, like interacting with scenes, their node hierarchy and groups of nodes. It allows you to easily switch scenes or reload them, to quit the game or pause and unpause it. It even comes with interesting signals. So check it out if you have some time!
Notifications¶
Godot has a system of notifications. These are usually not needed for scripting, as it’s too low-level and virtual functions are provided for most of them. It’s just good to know they exist. For example, you may add an Object._notification() function in your script:
func _notification(what):
match what:
NOTIFICATION_READY:
print("This is the same as overriding _ready()...")
NOTIFICATION_PROCESS:
print("This is the same as overriding _process()...")
public override void _Notification(int what)
{
base._Notification(what);
switch (what)
{
case NotificationReady:
GD.Print("This is the same as overriding _Ready()...");
break;
case NotificationProcess:
var delta = GetProcessDeltaTime();
GD.Print("This is the same as overriding _Process()...");
break;
}
}
The documentation of each class in the Class Reference shows the notifications it can receive. However, in most cases GDScript provides simpler overridable functions.
Overridable functions¶
Such overridable functions, which are described as follows, can be applied to nodes:
func _enter_tree():
# When the node enters the Scene Tree, it becomes active
# and this function is called. Children nodes have not entered
# the active scene yet. In general, it's better to use _ready()
# for most cases.
pass
func _ready():
# This function is called after _enter_tree, but it ensures
# that all children nodes have also entered the Scene Tree,
# and became active.
pass
func _exit_tree():
# When the node exits the Scene Tree, this function is called.
# Children nodes have all exited the Scene Tree at this point
# and all became inactive.
pass
func _process(delta):
# This function is called every frame.
pass
func _physics_process(delta):
# This is called every physics frame.
pass
public override void _EnterTree()
{
// When the node enters the Scene Tree, it becomes active
// and this function is called. Children nodes have not entered
// the active scene yet. In general, it's better to use _ready()
// for most cases.
base._EnterTree();
}
public override void _Ready()
{
// This function is called after _enter_tree, but it ensures
// that all children nodes have also entered the Scene Tree,
// and became active.
base._Ready();
}
public override void _ExitTree()
{
// When the node exits the Scene Tree, this function is called.
// Children nodes have all exited the Scene Tree at this point
// and all became inactive.
base._ExitTree();
}
public override void _Process(float delta)
{
// This function is called every frame.
base._Process(delta);
}
public override void _PhysicsProcess(float delta)
{
// This is called every physics frame.
base._PhysicsProcess(delta);
}
As mentioned before, it’s better to use these functions instead of the notification system.
Creating nodes¶
To create a node from code, call the .new() method, like for any
other class-based datatype. For example:
var s
func _ready():
s = Sprite.new() # Create a new sprite!
add_child(s) # Add it as a child of this node.
private Sprite _sprite;
public override void _Ready()
{
base._Ready();
_sprite = new Sprite(); // Create a new sprite!
AddChild(_sprite); // Add it as a child of this node.
}
To delete a node, be it inside or outside the scene, free() must be
used:
func _someaction():
s.free() # Immediately removes the node from the scene and frees it.
public void _SomeAction()
{
_sprite.Free(); // Immediately removes the node from the scene and frees it.
}
When a node is freed, it also frees all its child nodes. Because of this, manually deleting nodes is much simpler than it appears. Free the base node and everything else in the subtree goes away with it.
A situation might occur where we want to delete a node that is currently “blocked”, because it is emitting a signal or calling a function. This will crash the game. Running Godot with the debugger will often catch this case and warn you about it.
The safest way to delete a node is by using Node.queue_free(). This erases the node safely during idle.
func _someaction():
s.queue_free() # Removes the node from the scene and frees it when it becomes safe to do so.
public void _SomeAction()
{
_sprite.QueueFree(); // Removes the node from the scene and frees it when it becomes safe to do so.
}
Instancing scenes¶
Instancing a scene from code is done in two steps. The first one is to load the scene from your hard drive:
var scene = load("res://myscene.tscn") # Will load when the script is instanced.
var scene = GD.Load<PackedScene>("res://myscene.tscn"); // Will load when the script is instanced.
Preloading it can be more convenient, as it happens at parse time (GDScript only):
var scene = preload("res://myscene.tscn") # Will load when parsing the script.
But scene is not yet a node. It’s packed in a
special resource called PackedScene.
To create the actual node, the function
PackedScene.instance()
must be called. This will return the tree of nodes that can be added to
the active scene:
var node = scene.instance()
add_child(node)
var node = scene.Instance();
AddChild(node);
The advantage of this two-step process is that a packed scene may be kept loaded and ready to use so that you can create as many instances as desired. This is especially useful to quickly instance several enemies, bullets, and other entities in the active scene.
Register scripts as classes¶
Godot has a “Script Class” feature to register individual scripts with the Editor. By default, you can only access unnamed scripts by loading the file directly.
You can name a script and register it as a type in the editor with the
class_name keyword followed by the class’s name. You may add a comma and an
optional path to an image to use as an icon. You will then find your new type in
the Node or Resource creation dialog.
extends Node
# Declare the class name here
class_name ScriptName, "res://path/to/optional/icon.svg"
func _ready():
var this = ScriptName # reference to the script
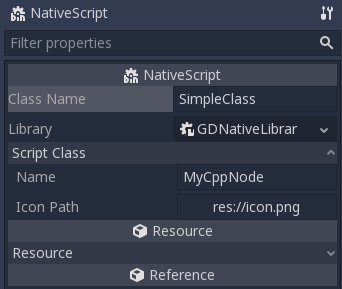
var cppNode = MyCppNode.new() # new instance of a class named MyCppNode
cppNode.queue_free()
Warning
In Godot 3.1:
- Only GDScript and NativeScript, i.e., C++ and other GDNative-powered languages, can register scripts.
- Only GDScript creates global variables for each named script.
Signals¶
Introduction¶
Signals are Godot’s version of the observer pattern. They allow a node to send out a message that other nodes can listen for and respond to. For example, rather than continuously checking a button to see if it’s being pressed, the button can emit a signal when it’s pressed.
Note
You can read more about the observer pattern here: http://gameprogrammingpatterns.com/observer.html
Signals are a way to decouple your game objects, which leads to better organized and more manageable code. Instead of forcing game objects to expect other objects to always be present, they can instead emit signals that all interested objects can subscribe to and respond to.
Below you can see some examples of how you can use signals in your own projects.
Timer example¶
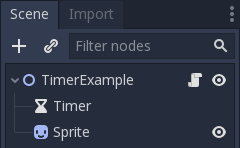
To see how signals work, let’s try using a Timer node. Create a new scene with a Node2D and two children: a Timer and a Sprite. In the Scene dock, rename Node2D to TimerExample.
For the Sprite’s texture, you can use the Godot icon, or any other image you
like. Do so by selecting Load in the Sprite’s Texture attribute drop-down menu.
Attach a script to the root node, but don’t add any code to it yet.
Your scene tree should look like this:
In the Timer node’s properties, check the “On” box next to Autostart. This will cause the timer to start automatically when you run the scene. You can leave the Wait Time at 1 second.
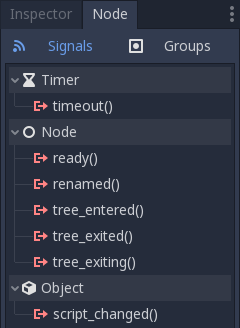
Next to the “Inspector” tab is a tab labeled “Node”. Click on this tab and you’ll
see all of the signals that the selected node can emit. In the case of the Timer
node, the one we’re concerned with is “timeout”. This signal is emitted whenever
the Timer reaches 0.
Click on the “timeout()” signal and click “Connect…” at the bottom of the signals panel. You’ll see the following window, where you can define how you want to connect the signal:
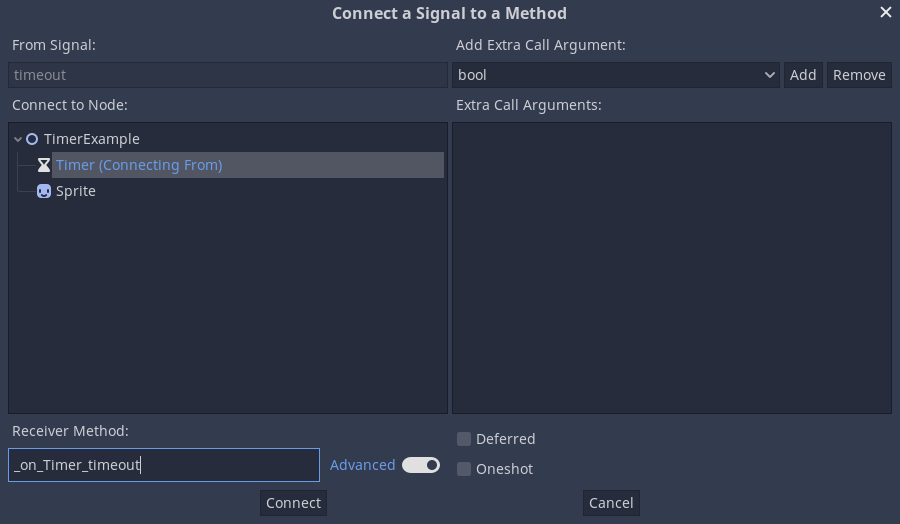
On the left side, you’ll see the nodes in your scene and can select the node that you want to “listen” for the signal. Note that the Timer node is blue, this is a visual indication that it’s the node that is emitting the signal. Select the root node.
Warning
The target node must have a script attached or you’ll receive an error message.
On the right side, you can bind an arbitrary number of arguments of (possibly) different types. This can be useful when you have more than one signal connected to the same method, as each signal propagation will result in different values for those extra call arguments.
On the bottom of the window is a field labeled “Receiver Method”. This is the name
of the function in the target node’s script that you want to use. By default,
Godot will create this function using the naming convention _on_<node_name>_<signal_name>
but you can change it if you wish.
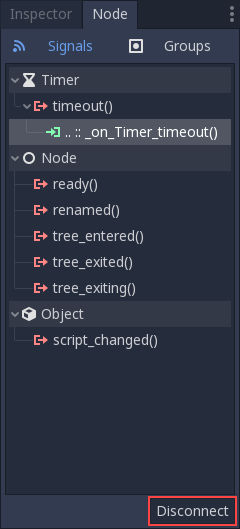
Click “Connect” and you’ll see that the function has been created in the script:
extends Node2D
func _on_Timer_timeout():
pass # replace with function body
public class TimerExample : Node2D
{
public void _on_Timer_timeout()
{
// Replace with function body.
}
}
Now we can replace the placeholder code with whatever code we want to run when the signal is received. Let’s make the Sprite blink:
extends Node2D
func _on_Timer_timeout():
# Note: the `$` operator is a shorthand for `get_node()`,
# so `$Sprite` is equivalent to `get_node("Sprite")`.
$Sprite.visible = !$Sprite.visible
public class TimerExample : Node2D
{
public void _on_Timer_timeout()
{
var sprite = GetNode<Sprite>("Sprite");
sprite.Visible = !sprite.Visible;
}
}
Run the scene and you’ll see the Sprite blinking on and off every second. You can change the Timer’s Wait Time property to alter this.
Connecting signals in code¶
You can also make the signal connection in code rather than with the editor. This is usually necessary when you’re instancing nodes via code and so you can’t use the editor to make the connection.
First, disconnect the signal by selecting the connection in the Timer’s “Node” tab and clicking disconnect.
To make the connection in code, we can use the connect function. We’ll put it
in _ready() so that the connection will be made on run. The syntax of the
function is <source_node>.connect(<signal_name>, <target_node>, <target_function_name>).
Here is the code for our Timer connection:
extends Node2D
func _ready():
$Timer.connect("timeout", self, "_on_Timer_timeout")
func _on_Timer_timeout():
$Sprite.visible = !$Sprite.visible
public class TimerExample : Node2D
{
public override void _Ready()
{
GetNode("Timer").Connect("timeout", this, nameof(_on_Timer_timeout));
}
public void _on_Timer_timeout()
{
var sprite = GetNode<Sprite>("Sprite");
sprite.Visible = !sprite.Visible;
}
}
Custom signals¶
You can also declare your own custom signals in Godot:
extends Node2D
signal my_signal
public class Main : Node2D
{
[Signal]
public delegate void MySignal();
}
Once declared, your custom signals will appear in the Inspector and can be connected in the same way as a node’s built-in signals.
To emit a signal via code, use the emit_signal function:
extends Node2D
signal my_signal
func _ready():
emit_signal("my_signal")
public class Main : Node2D
{
[Signal]
public delegate void MySignal();
public override void _Ready()
{
EmitSignal(nameof(MySignal));
}
}
A signal can also optionally declare one or more arguments. Specify the argument names between parentheses:
extends Node
signal my_signal(value, other_value)
public class Main : Node
{
[Signal]
public delegate void MySignal();
}
Note
The signal arguments show up in the editor’s node dock, and Godot can use them to generate callback functions for you. However, you can still emit any number of arguments when you emit signals. So it’s up to you to emit the correct values.
To pass values, add them as the second argument to the emit_signal function:
extends Node
signal my_signal(value, other_value)
func _ready():
emit_signal("my_signal", true, 42)
public class Main : Node
{
[Signal]
public delegate void MySignal();
public override void _Ready()
{
EmitSignal(nameof(MySignal), true, 42);
}
}
Conclusion¶
Many of Godot’s built-in node types provide signals you can use to detect
events. For example, an Area2D representing a coin emits
a body_entered signal whenever the player’s physics body enters its collision
shape, allowing you to know when the player collected it.
In the next section, Your first game, you’ll build a complete game including several uses of signals to connect different game components.
Your first game¶
Overview¶
This tutorial will guide you through making your first Godot project. You will learn how the Godot editor works, how to structure a project, and how to build a 2D game.
Note
This project is an introduction to the Godot engine. It assumes that you have some programming experience already. If you’re new to programming entirely, you should start here: Scripting.
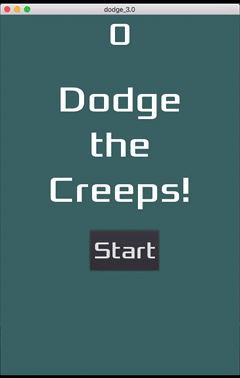
The game is called “Dodge the Creeps!”. Your character must move and avoid the enemies for as long as possible. Here is a preview of the final result:
Why 2D? 3D games are much more complex than 2D ones. You should stick to 2D until you have a good understanding of the game development process.
Project setup¶
Launch Godot and create a new project. Then, download
dodge_assets.zip - the images and sounds you’ll be
using to make the game. Unzip these files to your project folder.
Note
For this tutorial, we will assume you are familiar with the editor. If you haven’t read Scenes and nodes, do so now for an explanation of setting up a project and using the editor.
This game will use portrait mode, so we need to adjust the size of the
game window. Click on Project -> Project Settings -> Display -> Window and
set “Width” to 480 and “Height” to 720.
Organizing the project¶
In this project, we will make 3 independent scenes: Player,
Mob, and HUD, which we will combine into the game’s Main
scene. In a larger project, it might be useful to make folders to hold
the various scenes and their scripts, but for this relatively small
game, you can save your scenes and scripts in the project’s root folder,
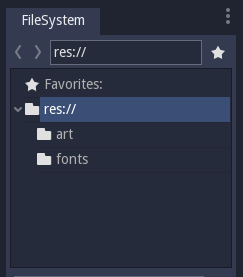
referred to as res://. You can see your project folders in the FileSystem
Dock in the lower left corner:
Player scene¶
The first scene we will make defines the Player object. One of the benefits
of creating a separate Player scene is that we can test it separately, even
before we’ve created other parts of the game.
Node structure¶
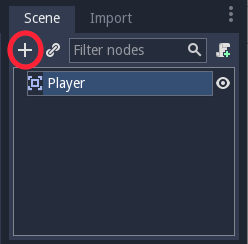
To begin, click the “Add/Create a New Node” button and add an Area2D node to the scene.
Godot will display a warning icon next to the node in the scene tree. You can ignore it for now. We will address it later.
With Area2D we can detect objects that overlap or run into the player.
Change its name to Player by clicking on the node’s name.
This is the scene’s root node. We can add additional nodes to the player to add
functionality.
Before we add any children to the Player node, we want to make sure we don’t
accidentally move or resize them by clicking on them. Select the node and
click the icon to the right of the lock; its tooltip says “Makes sure the object’s children
are not selectable.”

Save the scene. Click Scene -> Save, or press Ctrl + S on Windows/Linux or Cmd + S on macOS.
Note
For this project, we will be following the Godot naming conventions.
- GDScript: Classes (nodes) use PascalCase, variables and functions use snake_case, and constants use ALL_CAPS (See GDScript style guide).
- C#: Classes, export variables and methods use PascalCase, private fields use _camelCase, local variables and parameters use camelCase (See C# style guide). Be careful to type the method names precisely when connecting signals.
Sprite animation¶
Click on the Player node and add an AnimatedSprite node as a
child. The AnimatedSprite will handle the appearance and animations
for our player. Notice that there is a warning symbol next to the node.
An AnimatedSprite requires a SpriteFrames resource, which is a
list of the animations it can display. To create one, find the
Frames property in the Inspector and click “[empty]” ->
“New SpriteFrames”. This should automatically open the SpriteFrames panel.
On the left is a list of animations. Click the “default” one and rename
it to “right”. Then click the “Add” button to create a second animation
named “up”. Drag the two images for each animation, named playerGrey_up[1/2] and playerGrey_walk[1/2],
into the “Animation Frames” side of the panel:
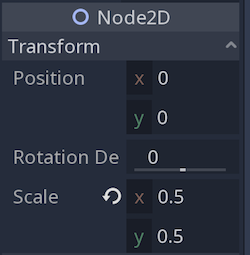
The player images are a bit too large for the game window, so we need to
scale them down. Click on the AnimatedSprite node and set the Scale
property to (0.5, 0.5). You can find it in the Inspector under the
Node2D heading.
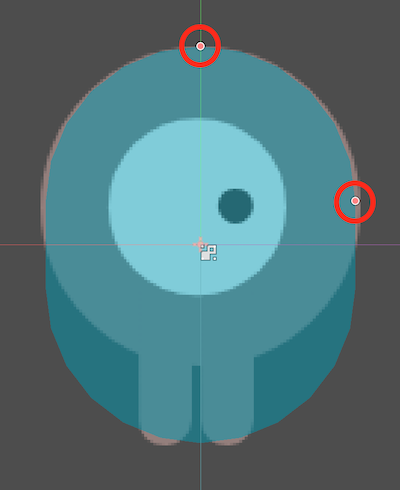
Finally, add a CollisionShape2D as a child
of Player. This will determine the player’s “hitbox”, or the
bounds of its collision area. For this character, a CapsuleShape2D
node gives the best fit, so next to “Shape” in the Inspector, click
“[empty]”” -> “New CapsuleShape2D”. Using the two size handles, resize the
shape to cover the sprite:
When you’re finished, your Player scene should look like this:

Moving the player¶
Now we need to add some functionality that we can’t get from a built-in
node, so we’ll add a script. Click the Player node and click the
“Add Script” button:

In the script settings window, you can leave the default settings alone. Just click “Create”:
Note
If you’re creating a C# script or other languages, select the language from the language drop down menu before hitting create.
Note
If this is your first time encountering GDScript, please read Scripting before continuing.
Start by declaring the member variables this object will need:
extends Area2D
export var speed = 400 # How fast the player will move (pixels/sec).
var screen_size # Size of the game window.
public class Player : Area2D
{
[Export]
public int Speed = 400; // How fast the player will move (pixels/sec).
private Vector2 _screenSize; // Size of the game window.
}
Using the export keyword on the first variable speed allows us to
set its value in the Inspector. This can be handy for values that you
want to be able to adjust just like a node’s built-in properties. Click on
the Player node and you’ll see the property now appears in the “Script
Variables” section of the Inspector. Remember, if you change the value here, it
will override the value written in the script.
Warning
If you’re using C#, you need to (re)build the project assemblies whenever you want to see new export variables or signals. This build can be manually triggered by clicking the word “Mono” at the bottom of the editor window to reveal the Mono Panel, then clicking the “Build Project” button.
The _ready() function is called when a node enters the scene tree,
which is a good time to find the size of the game window:
func _ready():
screen_size = get_viewport_rect().size
public override void _Ready()
{
_screenSize = GetViewport().Size;
}
Now we can use the _process() function to define what the player will do.
_process() is called every frame, so we’ll use it to update
elements of our game, which we expect will change often. For the player, we
need to do the following:
- Check for input.
- Move in the given direction.
- Play the appropriate animation.
First, we need to check for input - is the player pressing a key? For this game, we have 4 direction inputs to check. Input actions are defined in the Project Settings under “Input Map”. Here, you can define custom events and assign different keys, mouse events, or other inputs to them. For this demo, we will use the default events that are assigned to the arrow keys on the keyboard.
You can detect whether a key is pressed using
Input.is_action_pressed(), which returns true if it is pressed
or false if it isn’t.
func _process(delta):
var velocity = Vector2() # The player's movement vector.
if Input.is_action_pressed("ui_right"):
velocity.x += 1
if Input.is_action_pressed("ui_left"):
velocity.x -= 1
if Input.is_action_pressed("ui_down"):
velocity.y += 1
if Input.is_action_pressed("ui_up"):
velocity.y -= 1
if velocity.length() > 0:
velocity = velocity.normalized() * speed
$AnimatedSprite.play()
else:
$AnimatedSprite.stop()
public override void _Process(float delta)
{
var velocity = new Vector2(); // The player's movement vector.
if (Input.IsActionPressed("ui_right"))
{
velocity.x += 1;
}
if (Input.IsActionPressed("ui_left"))
{
velocity.x -= 1;
}
if (Input.IsActionPressed("ui_down"))
{
velocity.y += 1;
}
if (Input.IsActionPressed("ui_up"))
{
velocity.y -= 1;
}
var animatedSprite = GetNode<AnimatedSprite>("AnimatedSprite");
if (velocity.Length() > 0)
{
velocity = velocity.Normalized() * Speed;
animatedSprite.Play();
}
else
{
animatedSprite.Stop();
}
}
We start by setting the velocity to (0, 0) - by default the player
should not be moving. Then we check each input and add/subtract from the
velocity to obtain a total direction. For example, if you hold right
and down at the same time, the resulting velocity vector will be
(1, 1). In this case, since we’re adding a horizontal and a vertical
movement, the player would move faster than if it just moved horizontally.
We can prevent that if we normalize the velocity, which means we set
its length to 1, and multiply by the desired speed. This means no
more fast diagonal movement.
Tip
If you’ve never used vector math before, or need a refresher, you can see an explanation of vector usage in Godot at Vector math. It’s good to know but won’t be necessary for the rest of this tutorial.
We also check whether the player is moving so we can start or stop the AnimatedSprite animation.
Tip
In GDScript, $ returns the node at the relative path from the current node, or returns null if the node is not found.
Since AnimatedSprite is a child of the current node, we can use $AnimatedSprite.
$ is shorthand for get_node().
So in the code above, $AnimatedSprite.play() is the same as get_node("AnimatedSprite").play().
Now that we have a movement direction, we can update the player’s position. We
can also use clamp() to prevent it from leaving the screen. Clamping a value
means restricting it to a given range. Add the following to the bottom of
the _process function:
position += velocity * delta
position.x = clamp(position.x, 0, screen_size.x)
position.y = clamp(position.y, 0, screen_size.y)
Position += velocity * delta;
Position = new Vector2(
x: Mathf.Clamp(Position.x, 0, _screenSize.x),
y: Mathf.Clamp(Position.y, 0, _screenSize.y)
);
Tip
The delta parameter in the _process() function refers to the frame length - the amount of time that the previous frame took to complete. Using this value ensures that your movement will remain consistent even if the frame rate changes.
Click “Play Scene” (F6) and confirm you can move the player
around the screen in all directions. The console output that opens upon playing
the scene can be closed by clicking Output (which should be highlighted in
blue) in the lower left of the Bottom Panel.
Warning
If you get an error in the “Debugger” panel that refers to a “null instance”,
this likely means you spelled the node name wrong. Node names are case-sensitive
and $NodeName or get_node("NodeName") must match the name you see in the scene tree.
Choosing animations¶
Now that the player can move, we need to change which animation the
AnimatedSprite is playing based on direction. We have a “right”
animation, which should be flipped horizontally using the flip_h
property for left movement, and an “up” animation, which should be
flipped vertically with flip_v for downward movement.
Let’s place this code at the end of our _process() function:
if velocity.x != 0:
$AnimatedSprite.animation = "right"
$AnimatedSprite.flip_v = false
# See the note below about boolean assignment
$AnimatedSprite.flip_h = velocity.x < 0
elif velocity.y != 0:
$AnimatedSprite.animation = "up"
$AnimatedSprite.flip_v = velocity.y > 0
if (velocity.x != 0)
{
animatedSprite.Animation = "right";
animatedSprite.FlipV = false;
// See the note below about boolean assignment
animatedSprite.FlipH = velocity.x < 0;
}
else if(velocity.y != 0)
{
animatedSprite.Animation = "up";
animatedSprite.FlipV = velocity.y > 0;
}
Note
The boolean assignments in the code above are a common shorthand for programmers. Consider this code versus the shortened boolean assignment above:
if velocity.x < 0:
$AnimatedSprite.flip_h = true
else:
$AnimatedSprite.flip_h = false
if velocity.x < 0:
animatedSprite.FlipH = true
else:
animatedSprite.FlipH = false
Play the scene again and check that the animations are correct in each
of the directions. When you’re sure the movement is working correctly,
add this line to _ready(), so the player will be hidden when the game
starts:
hide()
Hide();
Preparing for collisions¶
We want Player to detect when it’s hit by an enemy, but we haven’t
made any enemies yet! That’s OK, because we’re going to use Godot’s
signal functionality to make it work.
Add the following at the top of the script, after extends Area2d:
signal hit
// Don't forget to rebuild the project so the editor knows about the new signal.
[Signal]
public delegate void Hit();
This defines a custom signal called “hit” that we will have our player
emit (send out) when it collides with an enemy. We will use Area2D to
detect the collision. Select the Player node and click the “Node” tab
next to the Inspector tab to see the list of signals the player can emit:
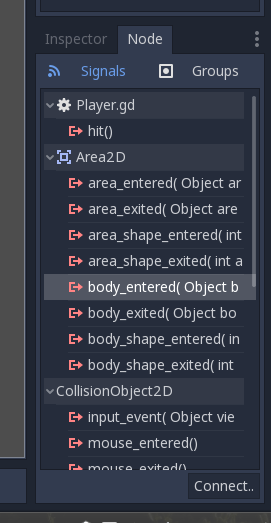
Notice our custom “hit” signal is there as well! Since our enemies are
going to be RigidBody2D nodes, we want the
body_entered( Object body ) signal; this will be emitted when a
body contacts the player. Click “Connect..” and then “Connect” again on
the “Connecting Signal” window. We don’t need to change any of these
settings - Godot will automatically create a function in your player’s script.
This function will be called whenever the signal is emitted - it handles the
signal.
Tip
When connecting a signal, instead of having Godot create a function for you, you can also give the name of an existing function that you want to link the signal to.
Add this code to the function:
func _on_Player_body_entered(body):
hide() # Player disappears after being hit.
emit_signal("hit")
$CollisionShape2D.set_deferred("disabled", true)
public void OnPlayerBodyEntered(PhysicsBody2D body)
{
Hide(); // Player disappears after being hit.
EmitSignal("Hit");
GetNode<CollisionShape2D>("CollisionShape2D").SetDeferred("disabled", true);
}
Each time an enemy hits the player, the signal is going to be emitted. We need
to disable the player’s collision so that we don’t trigger the hit signal
more than once.
Note
Disabling the area’s collision shape can cause an error if it happens
in the middle of the engine’s collision processing. Using set_deferred()
allows us to have Godot wait to disable the shape until it’s safe to
do so.
The last piece for our player is to add a function we can call to reset the player when starting a new game.
func start(pos):
position = pos
show()
$CollisionShape2D.disabled = false
public void Start(Vector2 pos)
{
Position = pos;
Show();
GetNode<CollisionShape2D>("CollisionShape2D").Disabled = false;
}
Enemy scene¶
Now it’s time to make the enemies our player will have to dodge. Their behavior will not be very complex: mobs will spawn randomly at the edges of the screen and move in a random direction in a straight line, then despawn when they go offscreen.
We will build this into a Mob scene, which we can then instance to
create any number of independent mobs in the game.
Node setup¶
Click Scene -> New Scene and we’ll create the Mob.
The Mob scene will use the following nodes:
- RigidBody2D (named
Mob)- AnimatedSprite
- CollisionShape2D
- VisibilityNotifier2D (named
Visibility)
Don’t forget to set the children so they can’t be selected, like you did with the Player scene.
In the RigidBody2D properties, set Gravity Scale to 0, so
the mob will not fall downward. In addition, under the
PhysicsBody2D section, click the Mask property and
uncheck the first box. This will ensure the mobs do not collide with each other.
Set up the AnimatedSprite like you did for the player.
This time, we have 3 animations: fly, swim, and walk. Set the Playing
property in the Inspector to “On” and adjust the “Speed (FPS)” setting as shown below.
We’ll select one of these animations randomly so that the mobs will have some variety.
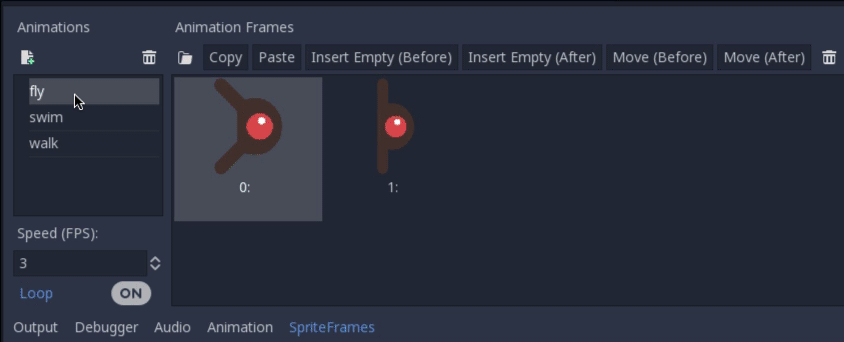
fly should be set to 3 FPS, with swim and walk set to 4 FPS.
Like the player images, these mob images need to be scaled down. Set the
AnimatedSprite’s Scale property to (0.75, 0.75).
As in the Player scene, add a CapsuleShape2D for the
collision. To align the shape with the image, you’ll need to set the
Rotation Degrees property to 90 under Node2D.
Enemy script¶
Add a script to the Mob and add the following member variables:
extends RigidBody2D
export var min_speed = 150 # Minimum speed range.
export var max_speed = 250 # Maximum speed range.
var mob_types = ["walk", "swim", "fly"]
public class Mob : RigidBody2D
{
// Don't forget to rebuild the project so the editor knows about the new export variables.
[Export]
public int MinSpeed = 150; // Minimum speed range.
[Export]
public int MaxSpeed = 250; // Maximum speed range.
private String[] _mobTypes = {"walk", "swim", "fly"};
}
When we spawn a mob, we’ll pick a random value between min_speed and
max_speed for how fast each mob will move (it would be boring if they
were all moving at the same speed). We also have an array containing the names
of the three animations, which we’ll use to select a random one. Make sure
you’ve spelled these the same in the script and in the SpriteFrames resource.
Now let’s look at the rest of the script. In _ready() we randomly
choose one of the three animation types:
func _ready():
$AnimatedSprite.animation = mob_types[randi() % mob_types.size()]
// C# doesn't implement GDScript's random methods, so we use 'System.Random' as an alternative.
static private Random _random = new Random();
public override void _Ready()
{
GetNode<AnimatedSprite>("AnimatedSprite").Animation = _mobTypes[_random.Next(0, _mobTypes.Length)];
}
Note
You must use randomize() if you want
your sequence of “random” numbers to be different every time you run
the scene. We’re going to use randomize() in our Main scene,
so we won’t need it here. randi() % n is the standard way to get
a random integer between 0 and n-1.
The last piece is to make the mobs delete themselves when they leave the
screen. Connect the screen_exited() signal of the Visibility
node and add this code:
func _on_Visibility_screen_exited():
queue_free()
public void OnVisibilityScreenExited()
{
QueueFree();
}
This completes the Mob scene.
Main scene¶
Now it’s time to bring it all together. Create a new scene and add a
Node named Main. Click the “Instance” button and select your
saved Player.tscn.
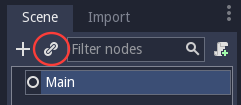
Note
See Instancing to learn more about instancing.
Now, add the following nodes as children of Main, and name them as
shown (values are in seconds):
- Timer (named
MobTimer) - to control how often mobs spawn - Timer (named
ScoreTimer) - to increment the score every second - Timer (named
StartTimer) - to give a delay before starting - Position2D (named
StartPosition) - to indicate the player’s start position
Set the Wait Time property of each of the Timer nodes as
follows:
MobTimer:0.5ScoreTimer:1StartTimer:2
In addition, set the One Shot property of StartTimer to “On” and
set Position of the StartPosition node to (240, 450).
Spawning mobs¶
The Main node will be spawning new mobs, and we want them to appear at a
random location on the edge of the screen. Add a Path2D node named
MobPath as a child of Main. When you select Path2D,
you will see some new buttons at the top of the editor:

Select the middle one (“Add Point”) and draw the path by clicking to add the points at the corners shown. To have the points snap to the grid, make sure “Use Grid Snap” is selected. This option can be found to the left of the “Lock” button, appearing as a magnet next to some intersecting lines.
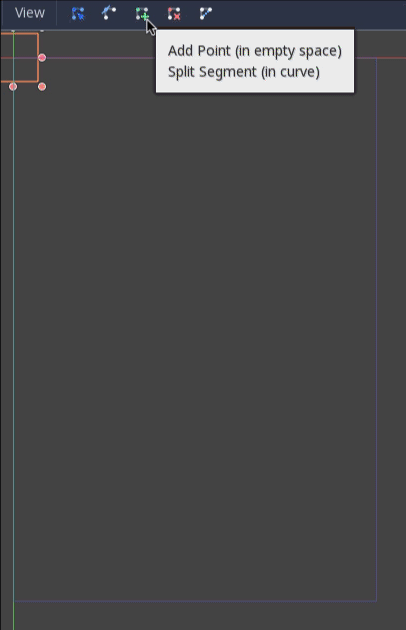
Important
Draw the path in clockwise order, or your mobs will spawn pointing outwards instead of inwards!
After placing point 4 in the image, click the “Close Curve” button and
your curve will be complete.
Now that the path is defined, add a PathFollow2D
node as a child of MobPath and name it MobSpawnLocation. This node will
automatically rotate and follow the path as it moves, so we can use it
to select a random position and direction along the path.
Main script¶
Add a script to Main. At the top of the script, we use
export (PackedScene) to allow us to choose the Mob scene we want to
instance.
extends Node
export (PackedScene) var Mob
var score
func _ready():
randomize()
public class Main : Node
{
// Don't forget to rebuild the project so the editor knows about the new export variable.
[Export]
public PackedScene Mob;
private int _score;
// We use 'System.Random' as an alternative to GDScript's random methods.
private Random _random = new Random();
public override void _Ready()
{
}
// We'll use this later because C# doesn't support GDScript's randi().
private float RandRange(float min, float max)
{
return (float)_random.NextDouble() * (max - min) + min;
}
}
Drag Mob.tscn from the “FileSystem” panel and drop it in the
Mob property under the Script Variables of the Main node.
Next, click on the Player and connect the hit signal. We want to make a
new function named game_over, which will handle what needs to happen when a
game ends. Type “game_over” in the “Receiver Method” box at the bottom of the
“Connecting Signal” window. Add the following code, as well as a new_game
function to set everything up for a new game:
func game_over():
$ScoreTimer.stop()
$MobTimer.stop()
func new_game():
score = 0
$Player.start($StartPosition.position)
$StartTimer.start()
public void GameOver()
{
GetNode<Timer>("MobTimer").Stop();
GetNode<Timer>("ScoreTimer").Stop();
}
public void NewGame()
{
_score = 0;
var player = GetNode<Player>("Player");
var startPosition = GetNode<Position2D>("StartPosition");
player.Start(startPosition.Position);
GetNode<Timer>("StartTimer").Start();
}
Now connect the timeout() signal of each of the Timer nodes (StartTimer,
ScoreTimer ,and MobTimer) to the main script. StartTimer will start
the other two timers. ScoreTimer will increment the score by 1.
func _on_StartTimer_timeout():
$MobTimer.start()
$ScoreTimer.start()
func _on_ScoreTimer_timeout():
score += 1
public void OnStartTimerTimeout()
{
GetNode<Timer>("MobTimer").Start();
GetNode<Timer>("ScoreTimer").Start();
}
public void OnScoreTimerTimeout()
{
_score++;
}
In _on_MobTimer_timeout(), we will create a mob instance, pick a
random starting location along the Path2D, and set the mob in
motion. The PathFollow2D node will automatically rotate as it
follows the path, so we will use that to select the mob’s direction as
well as its position.
Note that a new instance must be added to the scene using
add_child().
func _on_MobTimer_timeout():
# Choose a random location on Path2D.
$MobPath/MobSpawnLocation.offset = randi()
# Create a Mob instance and add it to the scene.
var mob = Mob.instance()
add_child(mob)
# Set the mob's direction perpendicular to the path direction.
var direction = $MobPath/MobSpawnLocation.rotation + PI / 2
# Set the mob's position to a random location.
mob.position = $MobPath/MobSpawnLocation.position
# Add some randomness to the direction.
direction += rand_range(-PI / 4, PI / 4)
mob.rotation = direction
# Set the velocity (speed & direction).
mob.linear_velocity = Vector2(rand_range(mob.min_speed, mob.max_speed), 0)
mob.linear_velocity = mob.linear_velocity.rotated(direction)
public void OnMobTimerTimeout()
{
// Choose a random location on Path2D.
var mobSpawnLocation = GetNode<PathFollow2D>("MobPath/MobSpawnLocation");
mobSpawnLocation.SetOffset(_random.Next());
// Create a Mob instance and add it to the scene.
var mobInstance = (RigidBody2D)Mob.Instance();
AddChild(mobInstance);
// Set the mob's direction perpendicular to the path direction.
float direction = mobSpawnLocation.Rotation + Mathf.Pi / 2;
// Set the mob's position to a random location.
mobInstance.Position = mobSpawnLocation.Position;
// Add some randomness to the direction.
direction += RandRange(-Mathf.Pi / 4, Mathf.Pi / 4);
mobInstance.Rotation = direction;
// Choose the velocity.
mobInstance.SetLinearVelocity(new Vector2(RandRange(150f, 250f), 0).Rotated(direction));
}
Important
In functions requiring angles, GDScript uses radians,
not degrees. If you’re more comfortable working with
degrees, you’ll need to use the deg2rad() and
rad2deg() functions to convert between the two.
HUD¶
The final piece our game needs is a UI: an interface to display things
like score, a “game over” message, and a restart button. Create a new
scene, and add a CanvasLayer node named HUD. “HUD” stands for
“heads-up display”, an informational display that appears as an
overlay on top of the game view.
The CanvasLayer node lets us draw our UI elements on a layer above the rest of the game, so that the information it displays isn’t covered up by any game elements like the player or mobs.
The HUD displays the following information:
- Score, changed by
ScoreTimer. - A message, such as “Game Over” or “Get Ready!”
- A “Start” button to begin the game.
The basic node for UI elements is Control. To create our UI, we’ll use two types of Control nodes: Label and Button.
Create the following as children of the HUD node:
- Label named
ScoreLabel. - Label named
MessageLabel. - Button named
StartButton. - Timer named
MessageTimer.
Click on the ScoreLabel and type a number into the Text field in the
Inspector. The default font for Control nodes is small and doesn’t scale
well. There is a font file included in the game assets called
“Xolonium-Regular.ttf”. To use this font, do the following for each of
the three Control nodes:
- Under “Custom Fonts”, choose “New DynamicFont”
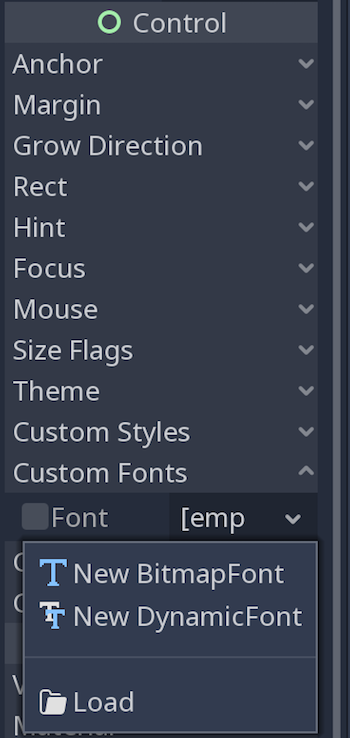
- Click on the “DynamicFont” you added, and under “Font/Font Data”,
choose “Load” and select the “Xolonium-Regular.ttf” file. You must
also set the font’s
Size. A setting of64works well.
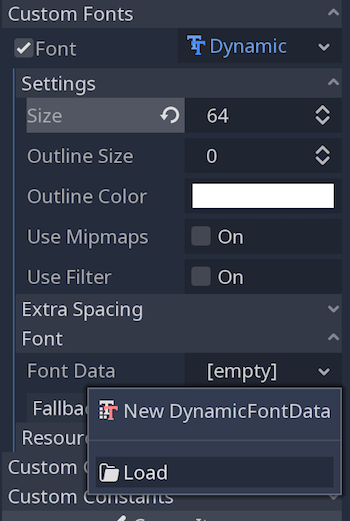
Note
Anchors and Margins: Control nodes have a position and size,
but they also have anchors and margins. Anchors define the
origin - the reference point for the edges of the node. Margins
update automatically when you move or resize a control node. They
represent the distance from the control node’s edges to its anchor.
See Design interfaces with the Control nodes for more details.
Arrange the nodes as shown below. Click the “Layout” button to set a Control node’s layout:
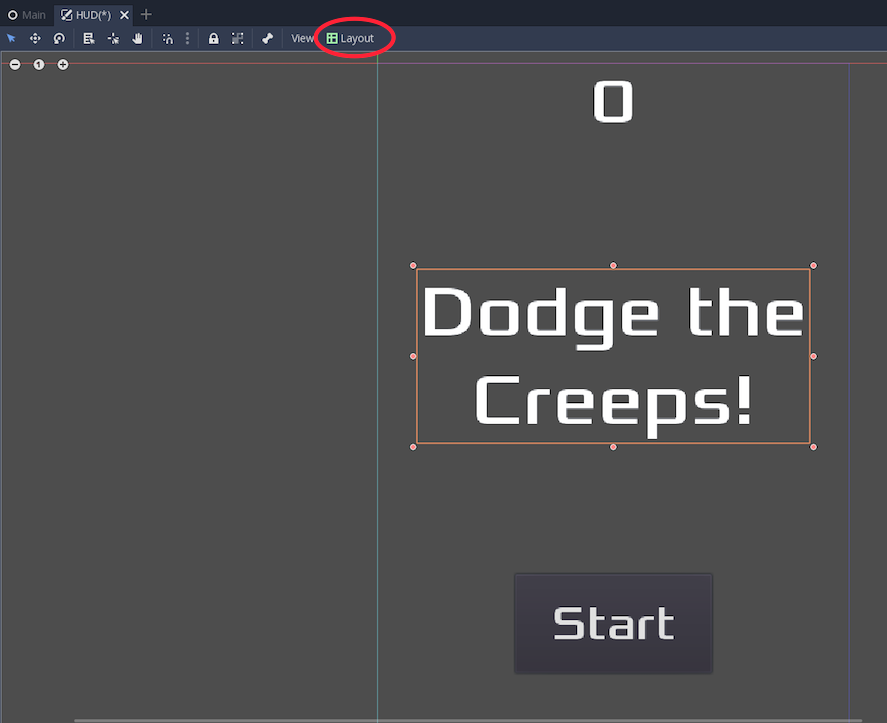
You can drag the nodes to place them manually, or for more precise placement, use the following settings:
ScoreLabel¶
- Text :
0 - Layout : “Top Wide”
- Align : “Center”
MessageLabel¶
- Text :
Dodge the Creeps! - Layout : “HCenter Wide”
- Align : “Center”
- Autowrap : “On”
StartButton¶
- Text :
Start - Layout : “Center Bottom”
- Margin :
- Top:
-200 - Bottom:
-100
- Top:
Now add this script to HUD:
extends CanvasLayer
signal start_game
public class HUD : CanvasLayer
{
// Don't forget to rebuild the project so the editor knows about the new signal.
[Signal]
public delegate void StartGame();
}
The start_game signal tells the Main node that the button
has been pressed.
func show_message(text):
$MessageLabel.text = text
$MessageLabel.show()
$MessageTimer.start()
public void ShowMessage(string text)
{
var messageLabel = GetNode<Label>("MessageLabel");
messageLabel.Text = text;
messageLabel.Show();
GetNode<Timer>("MessageTimer").Start();
}
This function is called when we want to display a message
temporarily, such as “Get Ready”. On the MessageTimer, set the
Wait Time to 2 and set the One Shot property to “On”.
func show_game_over():
show_message("Game Over")
yield($MessageTimer, "timeout")
$MessageLabel.text = "Dodge the\nCreeps!"
$MessageLabel.show()
yield(get_tree().create_timer(1), "timeout")
$StartButton.show()
async public void ShowGameOver()
{
ShowMessage("Game Over");
var messageTimer = GetNode<Timer>("MessageTimer");
await ToSignal(messageTimer, "timeout");
var messageLabel = GetNode<Label>("MessageLabel");
messageLabel.Text = "Dodge the\nCreeps!";
messageLabel.Show();
GetNode<Button>("StartButton").Show();
}
This function is called when the player loses. It will show “Game Over” for 2 seconds, then return to the title screen and, after a brief pause, show the “Start” button.
Note
When you need to pause for a brief time, an alternative to using a
Timer node is to use the SceneTree’s create_timer() function. This
can be very useful to delay, such as in the above code, where we want
to wait a little bit of time before showing the “Start” button.
func update_score(score):
$ScoreLabel.text = str(score)
public void UpdateScore(int score)
{
GetNode<Label>("ScoreLabel").Text = score.ToString();
}
This function is called by Main whenever the score changes.
Connect the timeout() signal of MessageTimer and the
pressed() signal of StartButton.
func _on_StartButton_pressed():
$StartButton.hide()
emit_signal("start_game")
func _on_MessageTimer_timeout():
$MessageLabel.hide()
public void OnStartButtonPressed()
{
GetNode<Button>("StartButton").Hide();
EmitSignal("StartGame");
}
public void OnMessageTimerTimeout()
{
GetNode<Label>("MessageLabel").Hide();
}
Connecting HUD to Main¶
Now that we’re done creating the HUD scene, save it and go back to Main.
Instance the HUD scene in Main like you did the Player scene, and
place it at the bottom of the tree. The full tree should look like this,
so make sure you didn’t miss anything:
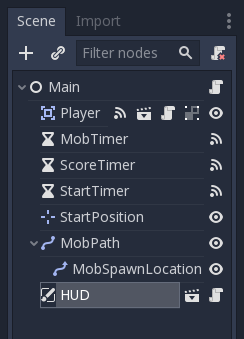
Now we need to connect the HUD functionality to our Main script.
This requires a few additions to the Main scene:
In the Node tab, connect the HUD’s start_game signal to the
new_game() function of the Main node.
In new_game(), update the score display and show the “Get Ready”
message:
$HUD.update_score(score)
$HUD.show_message("Get Ready")
var hud = GetNode<HUD>("HUD");
hud.UpdateScore(_score);
hud.ShowMessage("Get Ready!");
In game_over() we need to call the corresponding HUD function:
$HUD.show_game_over()
GetNode<HUD>("HUD").ShowGameOver();
Finally, add this to _on_ScoreTimer_timeout() to keep the display in
sync with the changing score:
$HUD.update_score(score)
GetNode<HUD>("HUD").UpdateScore(_score);
Now you’re ready to play! Click the “Play the Project” button. You will
be asked to select a main scene, so choose Main.tscn.
Removing old creeps¶
If you play until “Game Over” and then start a new game the creeps from the previous game are still on screen. It would be better if they all disappeared at the start of a new game.
We’ll use the start_game signal that’s already being emitted by the HUD
node to remove the remaining creeps. We can’t use the editor to connect the
signal to the mobs in the way we need because there are no Mob nodes in the
Main scene tree until we run the game. Instead we’ll use code.
Start by adding a new function to Mob.gd. queue_free() will delete the
current node at the end of the current frame.
func _on_start_game():
queue_free()
public void OnStartGame()
{
QueueFree();
}
Then in Main.gd add a new line inside the _on_MobTimer_timeout() function,
at the end.
$HUD.connect("start_game", mob, "_on_start_game")
GetNode("HUD").Connect("StartGame", mobInstance, "OnStartGame");
This line tells the new Mob node (referenced by the mob variable) to respond
to any start_game signal emitted by the HUD node by running its
_on_start_game() function.
Finishing up¶
We have now completed all the functionality for our game. Below are some remaining steps to add a bit more “juice” to improve the game experience. Feel free to expand the gameplay with your own ideas.
Background¶
The default gray background is not very appealing, so let’s change its
color. One way to do this is to use a ColorRect node.
Make it the first node under Main so that it will be drawn behind the other
nodes. ColorRect only has one property: Color. Choose a color
you like and drag the size of the ColorRect so that it covers the
screen.
You could also add a background image, if you have one, by using a
Sprite node.
Sound effects¶
Sound and music can be the single most effective way to add appeal to the game experience. In your game assets folder, you have two sound files: “House In a Forest Loop.ogg” for background music, and “gameover.wav” for when the player loses.
Add two AudioStreamPlayer nodes as children of Main. Name one of
them Music and the other DeathSound. On each one, click on the
Stream property, select “Load”, and choose the corresponding audio
file.
To play the music, add $Music.play() in the new_game() function
and $Music.stop() in the game_over() function.
Finally, add $DeathSound.play() in the game_over() function.
Keyboard Shortcut¶
Since the game is played with keyboard controls, it would be convenient if we
could also start the game by pressing a key on the keyboard. One way to do this
is using the “Shortcut” property of the Button node.
In the HUD scene, select the StartButton and find its Shortcut property
in the Inspector. Select “New Shortcut” and click on the “Shortcut” item. A
second Shortcut property will appear. Select “New InputEventAction” and click
the new “InputEvent”. Finally, in the Action property, type the name ui_select.
This is the default input event associated with the spacebar.
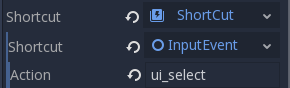
Now when the start button appears, you can either click it or press Space to start the game.
Project files¶
- You can find a completed version of this project at these locations:
Exporting¶
Overview¶
Now that you have a working game, you probably want to share your success with others. However, it’s not practical to ask your friends to download Godot just so they can open your project. Instead, you can export your project, converting it into a “package” that can be run by anyone.
The way you export your game depends on what platform you are targeting. In this tutorial, you’ll learn how to export the “Dodge the Creeps” game for a variety of platforms. First, however, we need to make some changes to the way the game works.
Note
If you haven’t made “Dodge the Creeps” yourself yet, please read Your first game before continuing with this tutorial.
Preparing the project¶
In “Dodge the Creeps” we used keyboard controls to move the player’s character. This is fine if your game is being played on a PC platform, but on a phone or tablet, you need to support touchscreen input. Because a click event can be treated the same as a touch event, we’ll convert the game to a click-and-move input style.
By default Godot emulates mouse input from touch input. That means if anything is coded to happen on a mouse event, touch will trigger it as well. Godot can also emulate touch input from mouse clicks, which we will need to be able to keep playing our game on our computer after we switch to touch input. In the “Project Settings” under Input Devices and Pointing, set Emulate Touch From Mouse to “On”.

We also want to ensure that the game scales consistently on different-sized screens, so in the project settings go to Display, then click on Window. In the Stretch options, set Mode to “2d” and Aspect to “keep”.
Since we are already in the Window settings, we should also set under Handheld the Orientation to “portrait”.
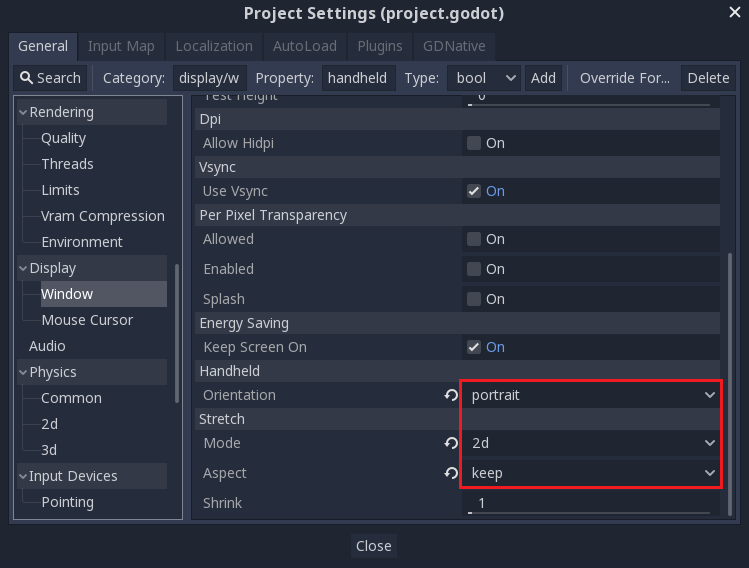
Next, we need to modify the Player.gd script to change the input method.
We’ll remove the key inputs and make the player move towards a “target” that’s
set by the touch (or click) event.
Here is the full script for the player, with comments noting what we’ve changed:
extends Area2D
signal hit
export var speed = 400
var screen_size
# Add this variable to hold the clicked position.
var target = Vector2()
func _ready():
hide()
screen_size = get_viewport_rect().size
func start(pos):
position = pos
# Initial target is the start position.
target = pos
show()
$CollisionShape2D.disabled = false
# Change the target whenever a touch event happens.
func _input(event):
if event is InputEventScreenTouch and event.pressed:
target = event.position
func _process(delta):
var velocity = Vector2()
# Move towards the target and stop when close.
if position.distance_to(target) > 10:
velocity = (target - position).normalized() * speed
else:
velocity = Vector2()
# Remove keyboard controls.
# if Input.is_action_pressed("ui_right"):
# velocity.x += 1
# if Input.is_action_pressed("ui_left"):
# velocity.x -= 1
# if Input.is_action_pressed("ui_down"):
# velocity.y += 1
# if Input.is_action_pressed("ui_up"):
# velocity.y -= 1
if velocity.length() > 0:
velocity = velocity.normalized() * speed
$AnimatedSprite.play()
else:
$AnimatedSprite.stop()
position += velocity * delta
# We still need to clamp the player's position here because on devices that don't
# match your game's aspect ratio, Godot will try to maintain it as much as possible
# by creating black borders, if necessary.
# Without clamp(), the player would be able to move under those borders.
position.x = clamp(position.x, 0, screen_size.x)
position.y = clamp(position.y, 0, screen_size.y)
if velocity.x != 0:
$AnimatedSprite.animation = "right"
$AnimatedSprite.flip_v = false
$AnimatedSprite.flip_h = velocity.x < 0
elif velocity.y != 0:
$AnimatedSprite.animation = "up"
$AnimatedSprite.flip_v = velocity.y > 0
func _on_Player_body_entered( body ):
hide()
emit_signal("hit")
$CollisionShape2D.set_deferred("disabled", true)
using Godot;
using System;
public class Player : Area2D
{
[Signal]
public delegate void Hit();
[Export]
public int Speed = 400;
private Vector2 _screenSize;
// Add this variable to hold the clicked position.
private Vector2 _target;
public override void _Ready()
{
Hide();
_screenSize = GetViewport().Size;
}
public void Start(Vector2 pos)
{
Position = pos;
// Initial target us the start position.
_target = pos;
Show();
GetNode<CollisionShape2D>("CollisionShape2D").Disabled = false;
}
// Change the target whenever a touch event happens.
public override void _Input(InputEvent @event)
{
if (@event is InputEventScreenTouch eventMouseButton && eventMouseButton.Pressed)
{
_target = (@event as InputEventScreenTouch).Position;
}
}
public override void _Process(float delta)
{
var velocity = new Vector2();
// Move towards the target and stop when close.
if (Position.DistanceTo(_target) > 10)
{
velocity = (_target - Position).Normalized() * Speed;
}
else
{
velocity = new Vector2();
}
// Remove keyboard controls.
//if (Input.IsActionPressed("ui_right"))
//{
// velocity.x += 1;
//}
//if (Input.IsActionPressed("ui_left"))
//{
// velocity.x -= 1;
//}
//if (Input.IsActionPressed("ui_down"))
//{
// velocity.y += 1;
//}
//if (Input.IsActionPressed("ui_up"))
//{
// velocity.y -= 1;
//}
var animatedSprite = GetNode<AnimatedSprite>("AnimatedSprite");
if (velocity.Length() > 0)
{
velocity = velocity.Normalized() * Speed;
animatedSprite.Play();
}
else
{
animatedSprite.Stop();
}
Position += velocity * delta;
// We still need to clamp the player's position here because on devices that don't
// match your game's aspect ratio, Godot will try to maintain it as much as possible
// by creating black borders, if necessary.
// Without clamp(), the player would be able to move under those borders.
Position = new Vector2(
x: Mathf.Clamp(Position.x, 0, _screenSize.x),
y: Mathf.Clamp(Position.y, 0, _screenSize.y)
);
if (velocity.x != 0)
{
animatedSprite.Animation = "right";
animatedSprite.FlipV = false;
animatedSprite.FlipH = velocity.x < 0;
}
else if(velocity.y != 0)
{
animatedSprite.Animation = "up";
animatedSprite.FlipV = velocity.y > 0;
}
}
public void OnPlayerBodyEntered(PhysicsBody2D body)
{
Hide(); // Player disappears after being hit.
EmitSignal("Hit");
GetNode<CollisionShape2D>("CollisionShape2D").SetDeferred("disabled", true);
}
}
Setting a main scene¶
The main scene is the one that your game will start in. In Project -> Project Settings -> Application -> Run, set Main Scene to “Main.tscn” by clicking the folder icon and selecting it.
Export templates¶
In order to export, you need to download the export templates from the http://godotengine.org/download. These templates are optimized versions of the engine without the editor pre-compiled for each platform . You can also download them in Godot by clicking on Editor -> Manage Export Templates:
In the window that appears, you can click “Download” to get the template version that matches your version of Godot.
Note
If you upgrade Godot, you must download templates that match the new version or your exported projects may not work correctly.
Export presets¶
Next, you can configure the export settings by clicking on Project -> Export.
Create a new export preset by clicking “Add…” and selecting a platform. You can make as many presets as you like with different settings.
At the bottom of the window are two buttons. “Export PCK/ZIP” only creates a packed version of your project’s data. This doesn’t include an executable so the project can’t be run on its own.
The second button, “Export Project”, creates a complete executable version of your game, such as an .apk for Android or an .exe for Windows.
In the “Resources” and “Features” tabs, you can customize how the game is exported for each platform. We can leave those settings alone for now.
Exporting by platform¶
In this section, we’ll walk through the process for each platform, including any additional software or requirements you’ll need.
PC (Linux/macOS/Windows)¶
Exporting PC platforms works the same across the three supported operating systems. Open the export window and click “Add..” to create the preset(s) you want to make. Then click “Export Project” and choose a name and destination folder. Choose a location outside of your project folder.
Click “Save” and the engine will build the export files.
Note
When exporting for macOS, if you export on a macOS computer, you’ll end up with a .dmg file, while using Linux or Windows produces a .zip. In either case, the compressed file contains a macOS .app that you can double-click and run.
Note
On Windows, if you want your exported executable to have a different icon than the default one, you need to change it manually. See: Changing application icon for Windows.
Android¶
Tip
Mobile devices come with a wide variety of capabilities. In most cases, Godot’s default settings will work, but mobile development is sometimes more art than science, and you may need to do some experimenting and searching for help in order to get everything working.
Before you can export your project for Android, you must download the following software:
- Android SDK: https://developer.android.com/studio/
- Java JDK: http://www.oracle.com/technetwork/java/javase/downloads/index.html
When you run Android Studio for the first time, click on Configure -> SDK Manager and install “Android SDK Platform Tools”. This installs the adb command-line tool that Godot uses to communicate with your device.
Next, create a debug keystore by running the following command on your system’s command line:
keytool -keyalg RSA -genkeypair -alias androiddebugkey -keypass android -keystore debug.keystore -storepass android -dname "CN=Android Debug,O=Android,C=US" -validity 9999
Click on Editor -> Editor Settings in Godot and select the Export/Android section. Here, you need to set the paths to the Android SDK applications on your system and the location of the keystore you just created.
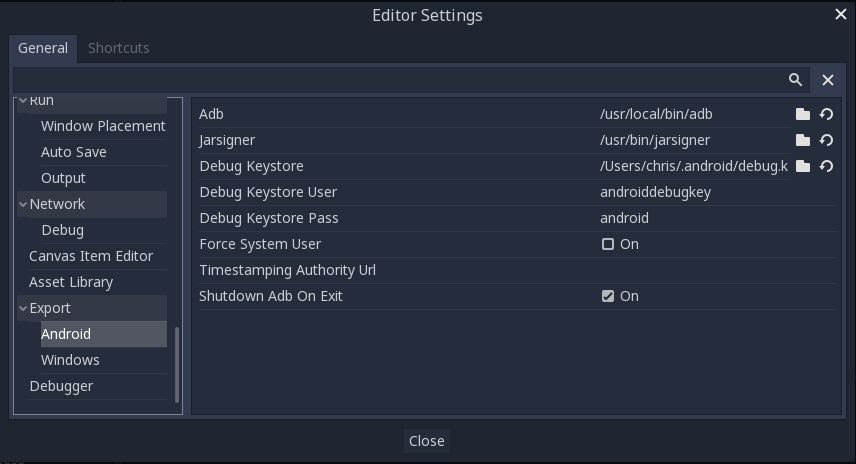
Now you’re ready to export. Click on Project -> Export and add a preset for Android (see above). Select the Android Presets and under Options go to Screen and set Orientation to “Portrait”.
Click the “Export Project” button and Godot will build an APK you can download on your device. To do this on the command line, use the following:
adb install dodge.apk
Note
Your device may need to be in developer mode. Consult your device’s documentation for details.
If your system supports it, connecting a compatible Android device will cause a “One-click Deploy” button to appear in Godot’s playtest button area:

Clicking this button builds the APK and copies it onto your device in one step.
iOS¶
Note
In order to build your game for iOS, you must have a computer running macOS with Xcode installed.
Before exporting, there are some settings that you must complete for the project to export successfully. First, the “App Store Team Id”, which you can find by logging in to your Apple developer account and looking in the “Membership” section.
You must also provide icons and splash screen images as shown below:
Click “Export Project” and select a destination folder.
Once you have successfully exported the project, you’ll find the following folders and files have been created in your selected location:
You can now open the project in Xcode and build the project for iOS. Xcode build procedure is beyond the scope of this tutorial. See https://help.apple.com/xcode/mac/current/#/devc8c2a6be1 for more information.
HTML5 (web)¶
Click “Export Project” on the HTML5 preset. We don’t need to change any of the default settings.
When the export is complete, you’ll have a folder containing the following files:
Viewing the .html file in your browser lets you play the game. However, you can’t open the file directly, it needs to be served by a web server. If you don’t have one set up on your computer, you can search online to find suggestions for your specific OS.
Point your browser at the URL where you’ve placed the html file. You may have to wait a few moments while the game loads before you see the start screen.

The console window beneath the game tells you if anything goes wrong. You can disable it by setting “Export With Debug” off when you export the project.
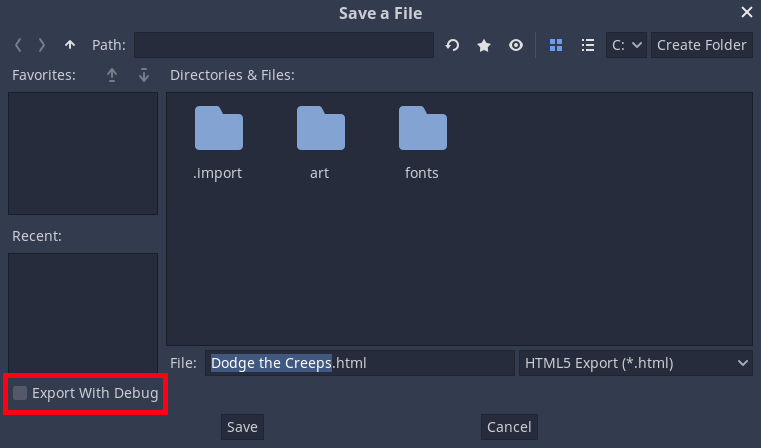
Note
While WASM is supported in all major browsers, it is still an emerging technology and you may find some things that don’t work. Make sure you have updated your browser to the most recent version, and report any bugs you find at the Godot Github repository.
Godot’s design philosophy¶
Now that you’ve gotten your hands wet, let’s talk about Godot’s design.
Every game engine is different and fits different needs. Not only do they offer a range of features, but the design of each engine is unique. This leads to different workflows and different ways to form your games’ structures. This all stems from their respective design philosophies.
This page is here to help you understand how Godot works, starting with some of its core pillars. It is not a list of available features, nor is it an engine comparison. To know if any engine can be a good fit for your project, you need to try it out for yourself and understand its design and limitations.
Please watch Discover Godot 3, the Free game engine if you’re looking for an overview of the engine’s features.
Object-oriented design and composition¶
Godot embraces object-oriented design at its core with its flexible scene system and Node hierarchy. It tries to stay away from strict programming patterns to offer an intuitive way to structure your game.
For one, Godot lets you compose or aggregate scenes. It’s like nested prefabs: you can create a BlinkingLight scene and a BrokenLantern scene that uses the BlinkingLight. Then, create a city filled with BrokenLanterns. Change the BlinkingLight’s color, save, and all the BrokenLanterns in the city will update instantly.
On top of that, you can inherit from any scene.
A Godot scene could be a Weapon, a Character, an Item, a Door, a Level, part of a level… anything you’d like. It works like a class in pure code, except you’re free to design it by using the editor, using only the code, or mixing and matching the two.
It’s different from prefabs you find in several 3D engines, as you can then inherit from and extend those scenes. You may create a Magician that extends your Character. Modify the Character in the editor and the Magician will update as well. It helps you build your projects so that their structure matches the game’s design.
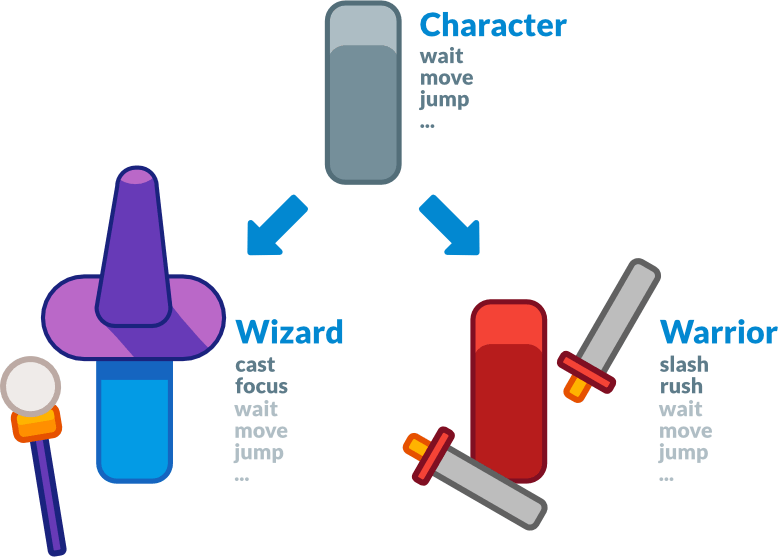
Also note that Godot offers many different types of objects called nodes, each with a specific purpose. Nodes are part of a tree and always inherit from their parents up to the Node class. Although the engine does feature components like collision shapes, they’re the exception, not the norm.
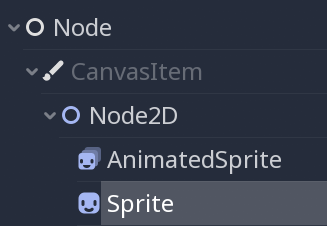
Sprite is a Node2D, a CanvasItem and a Node. It has all the properties and features of its three parent classes, like transforms or the ability to draw custom shapes and render with a custom shader.
All-inclusive package¶
Godot tries to provide its own tools to answer most common needs. It has a dedicated scripting workspace, an animation editor, a tilemap editor, a shader editor, a debugger, a profiler, the ability to hot-reload locally and on remote devices, etc.
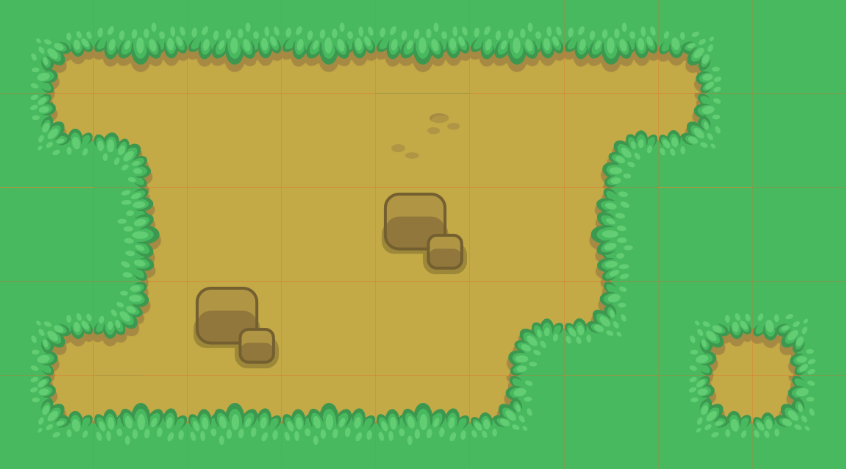
The goal is to offer a full package to create games and a continuous user experience. You can still work with external programs as long as there is an import plugin for it. Or you can create one, like the Tiled Map Importer.
That is also partly why Godot offers its own programming languages GDscript and VisualScript, along with C#. They’re designed for the needs of game developers and game designers, and they’re tightly integrated in the engine and the editor.
GDscript lets you write simple code using Python-like syntax, yet it detects types and offers a static language’s quality of auto-completion. It is also optimized for gameplay code with built-in types like Vectors and Colors.
Note that with GDNative, you can write high-performance code using compiled languages like C, C++, Rust, or Python (using the Cython compiler) without recompiling the engine.
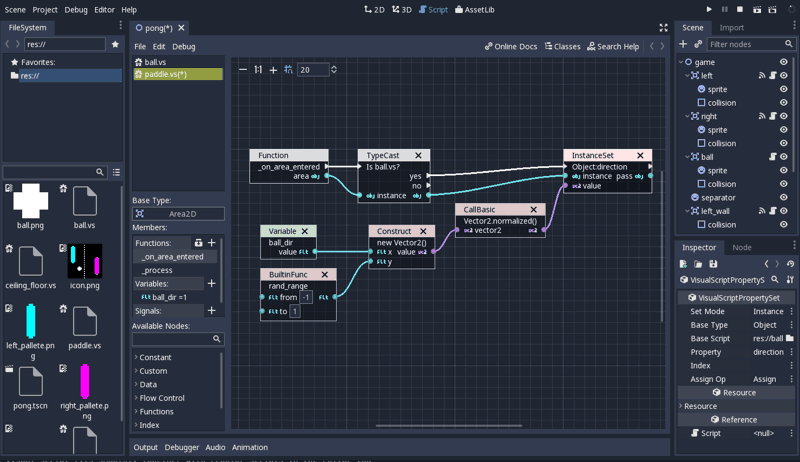
VisualScript is a node-based programming language that integrates well in the editor. You can drag and drop nodes or resources into the graph to create new code blocks.
Note that the 3D workspace doesn’t feature as many tools as the 2D workspace. You’ll need external programs or add-ons to edit terrains, animate complex characters, and so on. Godot provides a complete API to extend the editor’s functionality using game code. See The Godot editor is a Godot game below.
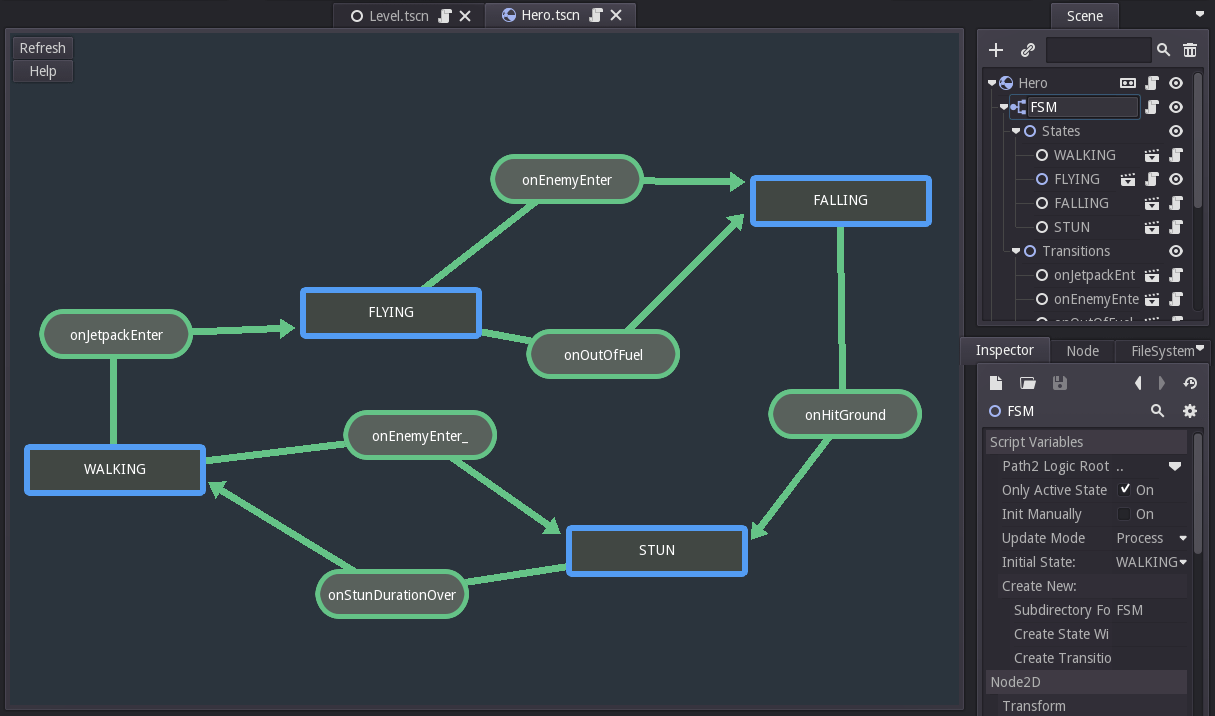
A State Machine editor plugin in Godot 2 by kubecz3k. It lets you manage states and transitions visually.
Open source¶
Godot offers a fully open source codebase under the MIT license. This means all the technologies that ship with it have to be Free (as in freedom) as well. For the most part, they’re developed from the ground up by contributors.
Anyone can plug in proprietary tools for the needs of their projects — they just won’t ship with the engine. This may include Google AdMob, or FMOD. Any of these can come as third-party plugins instead.
On the other hand, an open codebase means you can learn from and extend the engine to your heart’s content. You can also debug games easily, as Godot will print errors with a stack trace, even if they come from the engine itself.
Note
This does not affect the work you do with Godot in any way: there’s no strings attached to the engine or anything you make with it.
Community-driven¶
Godot is made by its community, for the community, and for all game creators out there. It’s the needs of the users and open discussions that drive the core updates. New features from the core developers often focus on what will benefit the most users first.
That said, although a handful of core developers work on it full-time, the project has over 600 contributors at the time of writing. Benevolent programmers work on features they may need themselves, so you’ll see improvements in all corners of the engine at the same time in every major release.
The Godot editor is a Godot game¶
The Godot editor runs on the game engine. It uses the engine’s own UI system, it can hot-reload code and scenes when you test your projects, or run game code in the editor. This means you can use the same code and scenes for your games, or build plugins and extend the editor.
This leads to a reliable and flexible UI system, as it powers the editor
itself. With the tool keyword, you can run any game code in the editor.
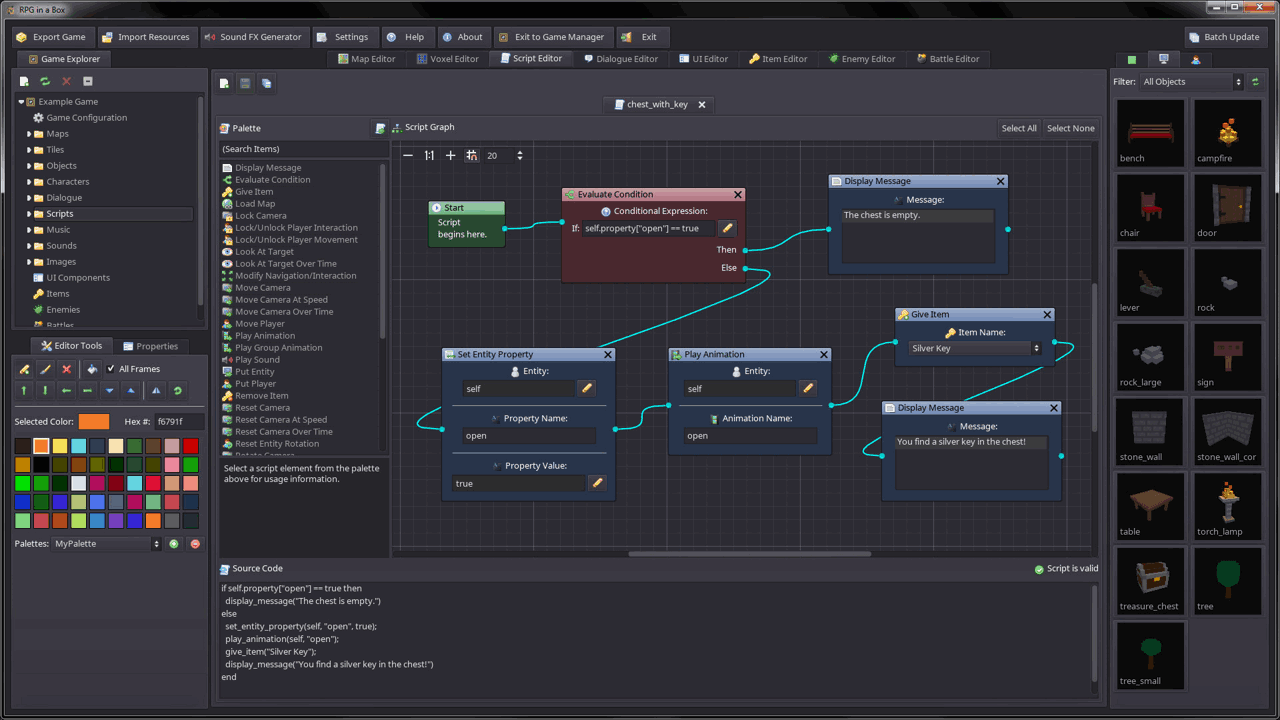
RPG in a Box is a voxel RPG editor made with Godot 2. It uses Godot’s UI tools for its node-based programming system and for the rest of the interface.
Put the tool keyword at the top of any GDScript file and it will run
in the editor. This lets you import and export plugins, create plugins
like custom level editors, or create scripts with the same nodes and API
you use in your projects.
Separate 2D and 3D engines¶
Godot offers dedicated 2D and 3D rendering engines. As a result, the base unit for 2D scenes is pixels. Even though the engines are separate, you can render 2D in 3D, 3D in 2D, and overlay 2D sprites and interfaces over your 3D world.
Design interfaces with the Control nodes¶
Computer displays, mobile phones, and TV screens come in all shapes and sizes. To ship a game, you’ll need to support different screen ratios and resolutions. It can be hard to build responsive interfaces that adapt to all platforms. Thankfully, Godot comes with robust tools to design and manage a responsive User Interface.
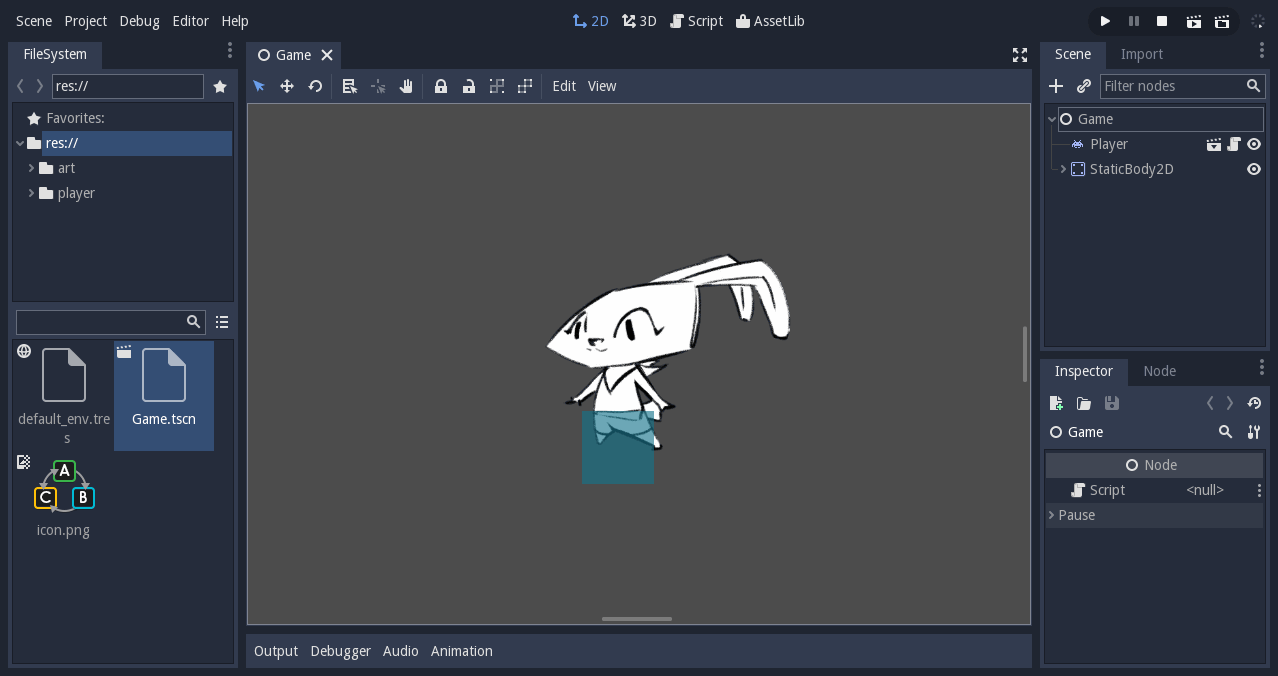
Godot’s editor is made with the engine’s UI framework
This guide will get you started with UI design. You will learn:
- The five most useful control nodes to build your games’ interface
- How to work with the anchor of UI elements
- How to efficiently place and arrange your user interface using containers
- The five most common containers (you can learn more about containers in the GUI Containers documentation page).
To learn how to control the interface and connect it to other scripts, read Build your first game UI in Godot.
To design your UI, you’ll use the Control nodes. These are the nodes with green icons in the editor. There are dozens of them, for creating anything from life bars to complex applications. Godot’s editor itself is built using Control nodes.
Control nodes have unique properties that allow them to work well with one another. Other visual nodes, like Node2D and Sprite don’t have these capabilities. So to make your life easier use Control nodes wherever possible when building your UIs.
All control nodes share the same main properties:
- Anchor
- Bounding rectangle
- Focus and focus neighbor
- Size flags
- Margin
- The optional UI theme
Once you understand the basics of the Control node, it will take you less time to learn all the nodes that derive from it.
The 5 most common UI elements¶
Godot ships with dozens of Control nodes. A lot of them are here to help you build editor plugins and applications.
For most games, you’ll only need five types of UI elements, and a few Containers. These five Control nodes are:
- Label: for displaying text
- TextureRect: used mostly for backgrounds, or everything that should be a static image
- TextureProgress: for lifebars, loading bars, horizontal, vertical or radial
- NinePatchRect: for scalable panels
- TextureButton: to create buttons
The 5 most common Control nodes for UI design
TextureRect¶
TextureRect displays a texture or image inside a UI. It seems similar to the Sprite node, but it offers multiple scaling modes. Set the Stretch Mode property to change its behavior:
Scale On Expand (compat)scales the texture to fit the node’s bounding rectangle, only ifexpandproperty istrue; otherwise, it behaves likeKeepmode. Default mode for backwards compatibility.Scalescales the texture to fit the node’s bounding rectangle.Tilemakes the texture repeat, but it won’t scale.KeepandKeep Centeredforce the texture to remain at its original size, in the top left corner or the center of the frame respectively.Keep AspectandKeep Aspect Centeredscales the texture but force it to remain its original aspect ratio, in the top left corner or the center of the frame respectively.Keep Aspect Coveredworks just likeKeep Aspect Centeredbut the shorter side fits the bounding rectangle and the other one clips to the node’s limits.
As with Sprite nodes, you can modulate the TextureRect’s color. Click
the Modulate property and use the color picker.
TextureRect modulated with a red color
TextureButton¶
TextureButton is like TextureRect, except it has 5 texture slots: one for each of the button’s states. Most of the time, you’ll use the Normal, Pressed, and Hover textures. Focused is useful if your interface listens to the keyboard’s input. The sixth image slot, the Click Mask, lets you define the clickable area using a 1-bit, pure black and white image.
In the Base Button section, you’ll find a few checkboxes that change how
the button behaves. When Toggle Mode is on, the button will toggle
between active and normal states when you press it. Disabled makes it
disabled by default, in which case it will use the Disabled texture.
TextureButton shares a few properties with the texture frame: it has a
modulate property, to change its color, and Resize and Stretch modes to
change its scale behavior.
TextureButton and its 5 texture slots
TextureProgress¶
TextureProgress layers up to 3 sprites to create a progress bar. The Under and Over textures sandwich the Progress one, which displays the bar’s value.
The Mode property controls the direction in which the bar grows:
horizontally, vertically, or radially. If you set it to radial, the
Initial Angle and Fill Degrees properties let you limit the range of the
gauge.
To animate the bar, you’ll want to look at the Range section. Set the
Min and Max properties to define the range of the gauge. For instance,
to represent a character’s life, you’ll want to set Min to 0, and Max to
the character’s maximum life. Change the Value property to update the
bar. If you leave the Min and Max values to the default of 0 and 100,
and set the Value property to 40, 40% of the Progress texture will show
up, and 60% of it will stay hidden.
TextureProgress bar, two thirds filled
Label¶
Label prints text to the screen. You’ll find all its properties in
the Label section, in the Inspector. Write the text in the Text
property, and check Autowrap if you want it to respect the textbox’s
size. If Autowrap is off, you won’t be able to scale the node. You can
align the text horizontally and vertically with Align and Valign,
respectively.
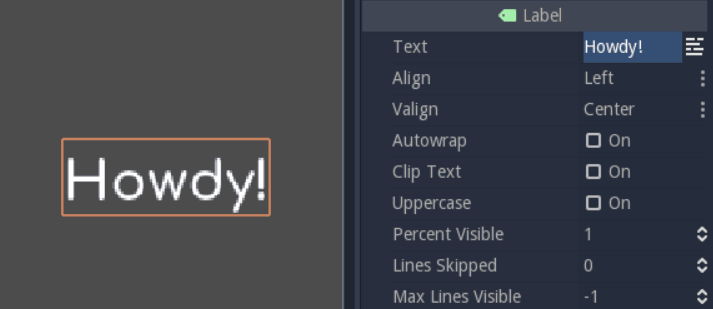
Picture of a Label
NinePatchRect¶
NinePatchRect takes a texture split in 3 rows and 3 columns. The center and the sides tile when you scale the texture, but it never scales the corners. It is useful to build panels, dialog boxes and scalable backgrounds for your UI.
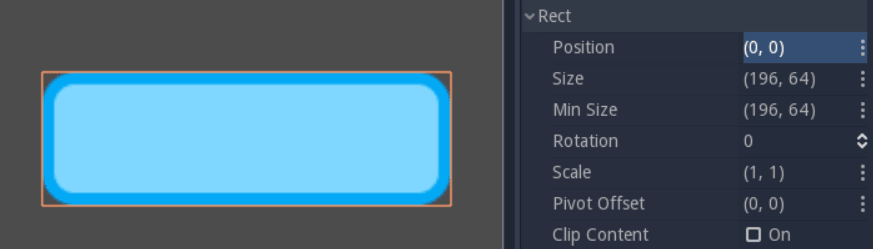
NinePatchRect scaled with the min_size property
There are two workflows to build responsive UIs¶
There are two workflows to build scalable and flexible interfaces in Godot:
- You have many container nodes at your disposal that scale and place UI elements for you. They take control over their children.
- On the other side, you have the layout menu. It helps you to anchor, place and resize a UI element within its parent.
The two approaches are not always compatible. Because a container controls its children, you cannot use the layout menu on them. Each container has a specific effect, so you may need to nest several of them to get a working interface. With the layout approach you work from the bottom up, on the children. As you don’t insert extra containers in the scene it can make for cleaner hierarchies, but it’s harder to arrange items in a row, column, grid, etc.
As you create UIs for your games and tools, you’ll develop a sense for what fits best in each situation.
Place UI elements precisely with anchors¶
Control nodes have a position and size, but they also have anchors and margins. Anchors define the origin, or the reference point, for the Left, Top, Right and Bottom edges of the node. Change any of the 4 anchors to change the reference point of the margins.
The anchor property
How to change the anchor¶
Like any properties, you can edit the 4 anchor points in the Inspector, but this is not the most convenient way. When you select a control node, the layout menu appears above the viewport, in the toolbar. It gives you a list of icons to set all 4 anchors with a single click, instead of using the inspector’s 4 properties. The layout menu will only show up when you select a control node.
The layout menu in the viewport
Anchors are relative to the parent container¶
Each anchor is a value between 0 and 1. For the left and top anchors, a value of 0 means that without any margin, the node’s edges will align with the left and top edges of its parent. For the right and bottom edges, a value of 1 means they’ll align with the parent container’s right and bottom edges. On the other hand, margins represent a distance to the anchor position in pixels, while anchors are relative to the parent container’s size.
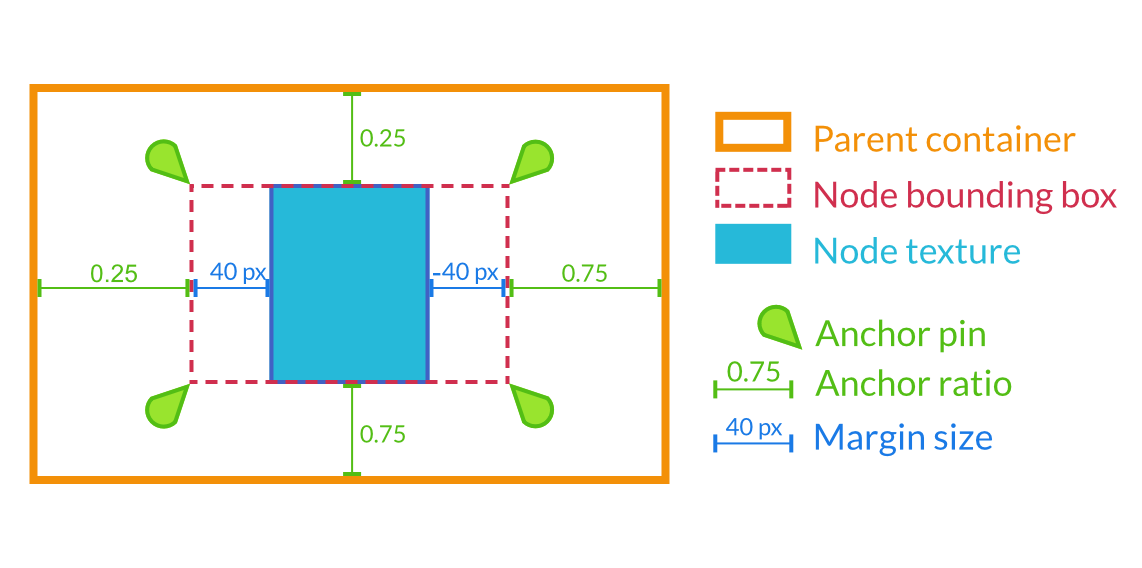
Margins are relative to the anchor position, which is relative to the anchors. In practice, you’ll often let the container update margins for you
Margins change with the anchor¶
Margins update automatically when you move or resize a control node. They represent the distance from the control node’s edges to its anchor, which is relative to the parent control node or container. That’s why your control nodes should always be inside a container, as we’ll see in a moment. If there’s no parent, the margins will be relative to the node’s own bounding Rectangle, set in the Rect section, in the inspector.
Margins on a CenterContainer set to the “Full Rect” anchor
Try to change the anchors or nest your Control nodes inside Containers: the margins will update. You’ll rarely need to edit the margins manually. Always try to find a container to help you first; Godot comes with nodes to solve all the common cases for you. Need to add space between a lifebar and the border of the screen? Use the MarginContainer. Want to build a vertical menu? Use the VBoxContainer. More on these below.
Use size tags to change how UI elements fill the available space¶
Every control node has Size Flags. They tell containers how the UI elements should scale. If you add the “Fill” flag to the Horizontal or Vertical property, the node’s bounding box will take all the space it can, but it’ll respect its siblings and retain its size. If there are 3 TextureRect nodes in an HBoxContainer, with the “Fill” flags on both axes, they’ll each take up to a third of the available space, but no more. The container will take over the node and resize it automatically.
3 UI elements in an HBoxContainer, they align horizontally
The “Expand” flag lets the UI element take all the space it can, and push against its siblings. Its bounding rectangle will grow against the edges of its parent, or until it’s blocked by another UI node.
The same example as above, but the center node has the “Expand” size flag
You’ll need some practice to understand the size tags, as their effect can change quite a bit depending on how you set up your interface.
Arrange control nodes automatically with containers¶
Containers automatically arrange all children Control nodes including other containers in rows, columns, and more. Use them to add padding around your interface or center nodes in their bounding rectangles. All built-in containers update in the editor, so you can see the effect instantly.
Containers have a few special properties to control how they arrange UI elements. To change them, navigate down to the Custom Constants section in the Inspector.
The 5 most useful containers¶
If you build tools, you might need all of the containers. But for most games, a handful will be enough:
- MarginContainer, to add margins around part of the UI
- CenterContainer, to center its children in its bounding box
- VboxContainer and HboxContainer, to arrange UI elements in rows or columns
- GridContainer, to arrange Controls nodes in a grid-like pattern
CenterContainer centers all its children inside of its bounding rectangle. It’s one you typically use for title screens, if you want the options to stay in the center of the viewport. As it centers everything, you’ll often want a single container nested inside it. If you use textures and buttons instead, they’ll stack up.
CenterContainer in action. The life bar centers inside its parent container.
The MarginContainer adds a margin on any side of the child nodes. Add a MarginContainer that encompasses the entire viewport to add a separation between the edge of the window and the UI. You can set a margin on the top, left, right, or bottom side of the container. No need to tick the checkbox: click the corresponding value box and type any number. It will activate automatically.

The MarginContainer adds a 40px margin around the Game User Interface
There are two BoxContainers: VBoxContainer and HBoxContainer. You cannot add the BoxContainer node itself, as it is a helper class, but you can use vertical and horizontal box containers. They arrange nodes either in rows or columns. Use them to line up items in a shop, or to build complex grids with rows and columns of different sizes, as you can nest them to your heart’s content.

The HBoxContainer horizontally aligns UI elements
VBoxContainer automatically arranges its children into a column. It puts
them one after the other. If you use the separation parameter, it will
leave a gap between its children. HBoxContainer arranges UI elements in
a row. It’s similar to the VBoxContainer, with an extra add_spacer
method to add a spacer control node before its first child or after its
last child, from a script.
The GridContainer lets you arrange UI elements in a grid-like pattern. You can only control the number of columns it has, and it will set the number of rows by itself, based on its children’s count. If you have nine children and three columns, you will have 9÷3 = 3 rows. Add three more children and you’ll have four rows. In other words, it will create new rows as you add more textures and buttons. Like the box containers, it has two properties to set the vertical and horizontal separation between the rows and columns respectively.
A GridContainer with 2 columns. It sizes each column automatically.
Godot’s UI system is complex, and has a lot more to offer. To learn how to design more advanced interfaces, head to the GUI section of the docs.
Design a title screen¶
In the next two tutorials, you will build two responsive UI (user interface) scenes step-by-step using the engine’s UI system:
- A main menu.
- A game UI with a health bar, energy bar, bomb and money counters.
You will learn how to design game UIs efficiently, and how to use Godot’s Control nodes. This page focuses on the visual part: everything you do from the editor. To learn how to code a life bar, read Control the game’s UI with code.
The GUI you’re going to create.
Download the project files: ui_main_menu_design.zip and extract the archive. Import the start/
project in Godot to follow this tutorial. The end/ folder contains the
final result. You’ll find all the sprites in the start/assets/main_menu
folder.
Note
Read the Design interfaces with the Control nodes first to learn how Godot’s UI system works.
How to design your game UI¶
To design a good UI, you want to come up with a rough mockup first: a plain drawing version that focuses on the placement of your UI components, their size, and user interaction. Pen and paper is all you need. You shouldn’t use fancy and final graphics at this stage. Then, you only need simple placeholder sprites and you’re good to jump into Godot. You want to make sure the players can find their way around the interface using those placeholders.
The UI’s rough plan or mockup
Placeholder doesn’t have to mean ugly, but you should keep the graphics simple and clean. Avoid special effects, animation, and detailed illustration before you have players playtest your UI. Otherwise:
- The graphics might skew the players’ perception of the experience and you’ll miss out on valuable feedback.
- If the User Experience doesn’t work, you’ll have to redo some sprites.
Tip
Always try to make the interface work with simple text and boxes first. It’s easy to replace the textures later. Professional UX designers often work with plain outlines and boxes in greyscale. When you take colors and fancy visuals away, it’s a lot easier to size and place UI elements properly. It helps you refine the design foundation you’ll build upon.
There are two ways to design your UI in Godot. You can:
- Build it all in a single scene, and eventually save some branches as reusable scenes.
- Build template scenes for reusable components and create specific components that inherit from your base scenes.
We will use the first approach, because the first version of your UI may not work as well as you’d like. You’re likely to throw parts away and redesign components as you go. When you’re sure everything works, it’s easy to make some parts reusable, as you’ll see below.
The files you’ll find in Godot. The graphics look cleaner than on the rough design, but they’re still placeholders.
Design the main menu¶
Before we jump into the editor, we want to plan how we’ll nest containers based on our mockup image.
Break down the UI mockup¶
Here are my three rules of thumb to find the right containers:
- Break down the UI into nested boxes, from the largest that contains everything, to the smallest ones, that encompass one widget, like a bar with its label, a panel or a button.
- If there’s some padding around an area, use a
MarginContainer. - If the elements are arranged in rows or columns, use an
HBoxContainerorVBoxContainer.
These rules are enough to get us started, and work well for simple interfaces.
For the main menu, the largest box is the entire game window. There’s
padding between the edges of the window and the first components: this
should be a MarginContainer. Then, the screen is split into two
columns, so we’ll use an HBoxContainer. In the left column, we’ll
manage the rows with a VBoxContainer. And in the right column, we’ll
center the illustration with a CenterContainer.
Interface building blocks, broken down using the three rules of thumb.
Tip
Containers adapt to the window’s resolution and width-to-height ratio. Although we could place UI elements by hand, containers are faster, more precise, and responsive.
Add the UI sprites¶
Select the MarginContainer, and create the UI elements as
TextureRect nodes. We need:
- the title or logo,
- the three text options as individual nodes,
- the version note,
- and the main menu’s illustration.
Click the Add Node button or press Meta + A on your keyboard.
Start to type TextureRect to find the corresponding node and press
enter. With the new node selected, press Meta + D five times to
create five extra TextureRect instances.
Click each of the nodes to select it. In the inspector, find the Texture property and click [empty] > Load. A file browser opens and lets you pick a sprite to load into the texture slot.
The file browser lets you find and load textures.
Repeat the operation for all TextureRect nodes. You should have the
logo, the illustration, the three menu options and the version note,
each as a separate node. Then, double click on each of the nodes in the
Scene tab to rename them. Nothing has been placed in containers yet so this
should look messy.
The six nodes with textures loaded.
Note
If you want to support localization in your game, use
Labels for menu options instead of TextureRect.
Add containers to place UI elements automatically¶
Our main menu has some margin around the edges of the screen. It is
split in two parts: on the left, you have the logo and the menu options.
On the right, you have the characters. We can use one of two containers
to achieve this: HSplitContainer or HBoxContainer. Split
containers split the area into two: a left and a right side or a top and
a bottom side. They also allow the user to resize the left and right
areas using an interactive bar. On the other hand, HBoxContainer
just splits itself into as many columns as it has children. Although you
can deactivate the split container’s resize behaviour, I recommend to
favour box containers.
Select the MarginContainer and add an HBoxContainer. Then, we
need two containers as children of our HBoxContainer: a
VBoxContainer for the menu options on the left, and a
CenterContainer for the illustration on the right.
You should have four nested containers and the TextureRect nodes sitting aside from it.
In the node tree, select all the TextureRect nodes that should go on the
left side: the logo, the menu options (Continue, NewGame, Options), and the
version note. Drag and drop them into the VBoxContainer. The nodes should
position automatically.
Containers automatically place and resize textures
We’re left with two problems to solve:
- The characters on the right aren’t centered.
- There’s no space between the logo and the other UI elements.
To center the characters on the right, first select the CenterContainer.
Then in the Inspector, scroll down to the Size Flags category and click
on the field to the right of the Vertical property, and check Expand
in addition to Fill. Do the same for the Horizontal property. This
makes the CenterContainer expand into all available space while
respecting its neighbour VBoxContainer. Finally, drag and drop the
Characters node into the CenterContainer. The Characters element will center
automatically.
The character node centers inside the right half of the screen as soon as you place it inside the CenterContainer.
To space out the menu options and the logo on the left, we’ll use one
final container and its size flags. Select the VBoxContainer and
press Meta + A to add a new node inside it. Add a second
VBoxContainer and name it MenuOptions. Select all three menu
options, Continue, NewGame and Options, and drag and drop
them inside the new VBoxContainer. The UI’s layout should barely
change, if at all.
Place the new container between the other two nodes to retain the UI’s layout.
Now we grouped the menu options together, we can tell their container to
expand to take as much vertical space as possible. Select the
MenuOptions node. In the Inspector, scroll down to the
Size Flags category. Click on the field to the right of the
Vertical property, and check Expand in addition to Fill.
The container expands to take all the available vertical space
while respecting its neighbors, the Logo and Version elements.
To center the nodes in the VBoxContainer, scroll to the top of the
Inspector and change the Alignment property to Center.
The menu options should center vertically in the UI’s left column.
To wrap things up, let’s add some separation between the menu options. Expand the Custom Constants category below Size Flags, and click the field next to the Separation parameter. Set it to 30. Once you press enter, the Separation property becomes active and Godot adds 30 pixels between menu options.
The final interface.
Without a single line of code, we have a precise and responsive main menu.
Congratulations for getting there! You can download the final
menu ui_main_menu_design.zip
to compare with your own. In the next tutorial, you’ll
create a Game User Interface with bars and item counters.
Break down the UI mockup¶
A responsive User Interface is all about making sure our UIs scale well on all screen types. TV screens and computer displays have different sizes and ratios. In Godot, we use containers to control the position and the size of UI elements.
The order in which you nest matters. To see if your UI adapts nicely to different screen ratios, select the root node, press Q to activate the Select Mode, select the container and click and drag on one of the container’s corners to resize it. The UI components should flow inside of it.
You’ll notice that although containers move sprites around, they don’t scale them. This is normal. We want the UI system to handle different screen ratios, but we also need the entire game to adapt to different screen resolutions. To do this, Godot scales the entire window up and down.
You can change the scale mode in the project settings: click Project > Project Settings in the top menu. In the window’s left column, look for the Display category. Click on the Window sub-category. On the right side of the window, you’ll find a Stretch section. The three settings, Mode, Aspect, and Shrink, control the screen size. For more information, see Multiple resolutions.
Design the GUI¶
Now that you’ve nailed the basics, we’re going to see how to build a game Graphical User Interface (GUI) with reusable UI components: a life bar, an energy bar, and bomb and emerald counters. By the end of this tutorial, you’ll have a game GUI, ready to control with GDscript or VisualScript:

The final result
You’ll also learn to:
- Create flexible UI components
- Use scene inheritance
- Build a complex UI
Download the project files: ui_gui_design.zip and extract the archive. Import the start/ project in Godot to follow this tutorial. The end/ folder contains the final result.
Note
You can watch this tutorial as a video on Youtube.
Breaking down the UI¶
Let’s break down the final UI and plan the containers we’ll use. As in
the Design a title screen, it starts with a MarginContainer.
Then, we can see up to three columns:
- The life and energy counters on the left
- The life and energy bars
- The bomb and emerald counters on the right
But the bar’s label and the gauge are two parts of the same UI element. If we think of them this way, we’re left with two columns:
- The life and energy bars on the left
- The bomb and emerald counters on the right
This makes it easier to nest containers: we have some margins around the
border of the screen using a MarginContainer, followed by an
HBoxContainer to manage our two columns. The two bars stack on top
of one another inside a VBoxContainer. And we’ll need a last
HBoxContainer in the right column to place the bomb and emerald
counters side-by-side.

We get a clean UI layout with only 4 containers
We will need extra containers inside the individual UI components, but this gives us the main GUI scene’s structure. With this plan in place, we can jump into Godot and create our GUI.
Create the base GUI¶
There are two possible approaches to the GUI: we can design elements in separate scenes and put them together, or prototype everything in a single scene and break it down later. I recommend working with a single scene as you can play with your UI’s placement and proportions faster this way. Once it looks good, you can save entire sections of the node tree as reusable sub-scenes. We’ll do that in a moment.
For now, let’s start with a few containers.
Create a new scene and add a MarginContainer. Select the node and name it
GUI.
We want our interface to anchor to the top of the screen. Select the GUI
node and click the Layout button at the top of the viewport. Select the Top
Wide option. The GUI node will anchor to the top edge of its parent, the
viewport by default. It will resize automatically on the vertical axis to make
space for its child UI components.
Save the scene as GUI.tscn. We will put the entire GUI in it.
With the MarginContainer selected, head to the inspector and scroll
down to the custom constants section. Unfold it and click the field next
to each of the Margin properties. Set them all to 20 pixels.
Next, add an HBoxContainer node. This one will contain our two bars
on the left and separate them from the two counters on the right.
We want to stack the bars vertically inside the HBoxContainer.
Add a VBoxContainer as a child of HBoxContainer and name it Bars. Select the parent
HBoxContainer again and this time, add another HBoxContainer as a child of it.
Call it Counters. With these four containers, we have the base for our GUI scene.
You should have 4 containers that look like this
Note
We can work this way because we first broke down our UI design and took a few moments to think about the containers we’d use. When you follow a tutorial like this, it may seem weird. But once you’re working on real games, you’ll see it’s an efficient workflow.
Create the bars’ base¶
Each bar is split into two sub-elements that align horizontally: the
label with the health count on the left, and the gauge on the right.
Once again, the HBoxContainer is the perfect tool for the job.
Select the Bars node and add a new HBoxContainer inside of it.
Name it Bar.
The label itself requires at least three nodes: a NinePatchRect
for the background, on top of which we’ll add a texture on the left,
either HP or EP, and a Label on the right for the value. We
can nest Control nodes however we want. We could use the
NinePatchRect as a parent for the two other elements, as it
encompasses them. In general, you want to use containers instead, as
their role is to help organize UI components. We’ll need a
MarginContainer later anyway to add some space between the life
count and the gauge. Select the Bar and add a MarginContainer.
Name it Count. Inside of it, add three nodes:
- A
NinePatchRectnamedBackground - A
TextureRectnamedTitle - And a
LabelnamedNumber
To add the nodes as siblings, always select the Count node first.
Your scene tree should look like this. We’re ready to throw in some textures
Our scene is still empty. It’s time to throw in some textures. To load the textures, head to the FileSystem dock to the left of the viewport. Browse down to the res://assets/GUI folder.
You should see a list of textures that we’ll use to skin our interface.
Select the Background in the Scene dock. In the Inspector, you
should see a Texture property. In the FileSystem tab, click and drag
label_HP_bg.png onto the Texture slot. It stays squashed. The
parent MarginContainer will force its size down to 0 until we force
elements inside the container to have a minimum size. Select the
Background node. In the Inspector, scroll down to the Rect section.
Set Min Size to (100, 40). You should see the Background resize
along with its parent containers.
Next, select the Title and drag and drop label_HP.png into its
Texture slot. Select the Number node, click the field next to
the Text property and type 10. This way, we can see both nodes
in the viewport. They should stack up in the top-left corner of their
parent MarginContainer.
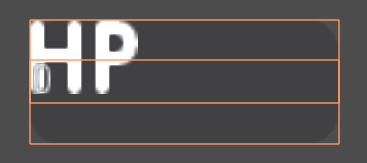
If you select both nodes, you should see something like this
As they have a container as their direct parent, we cannot move them
freely: the Count node will always reset their anchors, their size
and position. Try to move and resize the nodes in the viewport. Then,
select any of the three textures and press Ctrl + Up or Ctrl + Down to
reorder them in the Scene dock. They’ll snap back to their previous size
and position.
Parent containers control the size, the scale, the margins, and the
anchors of their direct children. To modify the nodes, you must nest
them inside a regular Control or another UI element. We’ll use the
Background as a parent for the Title and Number. Select both
the Title and Number, and drag and drop them onto
Background.
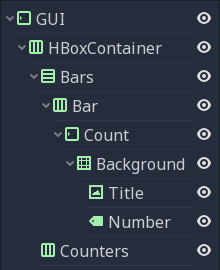
By using the Background node as the two textures’ parent, we take control away from the Count MarginContainer
Select the Title and in the Inspector, change its Stretch Mode property
to Keep Centered. Next find the Rect category in the Inspector and
change the Size property to (50, 40) so it only takes the left half of
the background. Next, select the Number node. In the viewport, click the
Layout menu and click Full Rect. The node will resize to fit
the Background. Head to the Inspector and change its Align
property to Right, and the Valign property to Center. The
text should snap to the center of the Background’s right edge.
Resize the node horizontally, so it takes the right half of the
Background and there’s a bit of padding with the right edge.
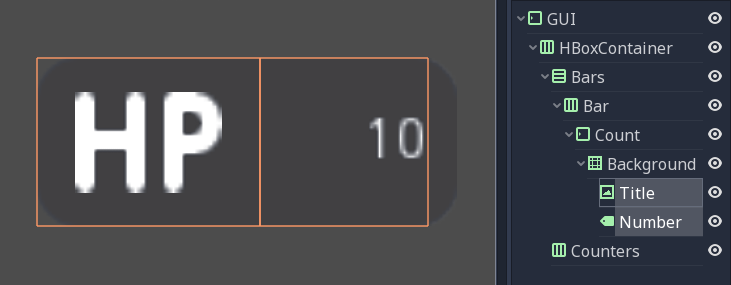
Here’s how the nodes’ bounding boxes should look in the viewport. Keep it rough, you don’t need to place them too precisely for now.
Replace the Label’s font¶
The label’s font is too small. We need to replace it. Select the
Number node and in the Inspector, scroll down to the Control
class, and find the Custom Font category. Click the field next to
the Font property and click on New Dynamic Font. Click on the
field again and select Edit.
You will enter the Dynamic Font resource. Unfold the Font
category and click the field next to Font Data. Click the Load
button. In the file browser, navigate down to the assets/font folder and
double click Comfortaa-Bold.ttf to open it. You should see the font
update in the viewport. Unfold the settings category to change the font
size. Set the Size property to a higher value, like 24 or
28.
We now need the text’s baseline, the number’s lower edge, to align with
the HP texture on the left. To do so, still in the DynamicFont
resource, you can tweak the Bottom property under the
Extra Spacing category. It adds some bottom padding to the text.
Click the Number node in the Scene tab to go back to the node’s
properties and change the Valign to Bottom. To adjust the text’s
baseline, click on the font field under the Custom Font category
again and tweak the Bottom property until the text aligns with the
Title node. I used a value of 2 pixels.
With a Bottom value of 2 pixels, the Number aligns with the Title
With this, we finished the hardest part of the GUI. Congratulations! Let’s move on to the simpler nodes.
Add the progress bar¶
We need one last element to complete our life bar: the gauge itself.
Godot ships with a TextureProgress node that has everything we need.
Select the Bar node and add a TextureProgress inside of it. Name it
Gauge. In the inspector unfold the Textures section. Head to the
FileSystem dock and drag and drop the lifebar_bg.png texture onto
the Under slot. Do the same with the lifebar_fill.png image and
drop it onto the Progress slot. Under the Range class in the
inspector, change the Value property to 50 to see the gauge fill
up.
With only five Control nodes, our first bar is ready to use.

That’s it, our life bar is ready. This last part was quick, wasn’t it? That’s thanks to our robust container setup.
Design the bomb and emerald counters¶
The bomb and emerald counters are like the bar’s Count node. So we’ll
duplicate it and use it as a template.
Under the Bar node, select Count and press Ctrl + D to duplicate
it. Drag and drop the new node under the Counters HBoxContainer
at the bottom of the scene tree. You should see it resize automatically.
Don’t worry about this for now, we’ll fix the size soon.
Rename the Count2 node to Counter. Unlike the bars, we want the
number to be on the left, and an icon to sit on the right. The setup is
the same: we need a background (a NinePatchRect), the title, and the
number nodes. The Title node is a TextureRect, so it’s what we
need to display the icon. In the scene tree, select the Title node,
and rename it to Icon.
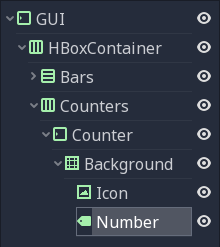
Here’s how your node tree should look so far
With the Icon node selected, in the inspector, scroll to the top to
see the Texture slot. Head to the FileSystem dock on the left and
select the bombs_icon.png. Drag and drop it onto the Texture
slot. In the Scene Tab select both the Icon and the Number
nodes. Click the Layout menu in the toolbar at the top of the viewport
and select Full Rect. Both nodes will update to fit
the size of the Background.
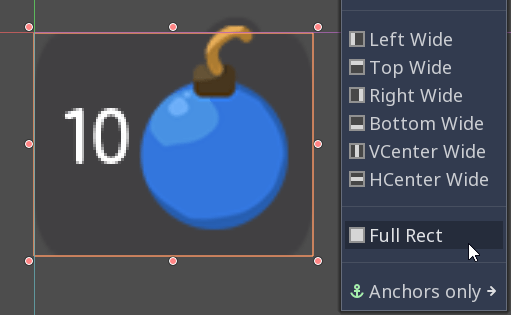
The nodes anchor to the entire Background, but their position is off
Let’s change the Number’s align properties to move it to the left
and center of the Background. Select the Number node, change its
Align property to left and the Valign property to centre. Then
resize its left edge a little bit to add some padding between the left
edge of the Background and the text.
The Number node aligned to the left and centre
To overlap the Icon and the background, we need a few tweaks. First, our background is a bit too tall. It’s because it’s inside a margin container that is controlled by the top-most GUI node. Select the GUI node at the top of the scene tree and downsize it vertically so that it’s as thin as possible. You’ll see the gauge prevents you from making it too small. A container cannot be smaller than the minimal size of its children. The container’s margins also weigh in.
Select the Icon, click the Layout menu, and select
Full Rect to re-center it. We need it to anchor to
the Background’s right edge. Open the Layout menu again and select
Center Right. Move the icon up so it is centered vertically with the
Background.
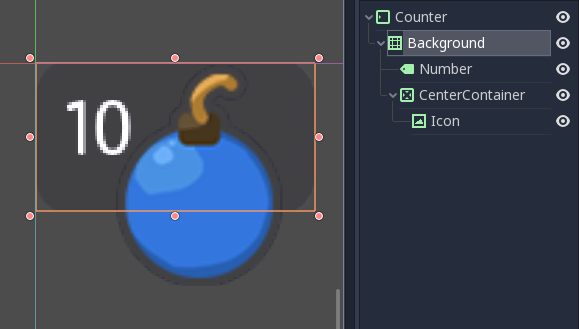
The bomb icon anchors to the Background’s right edge. Resize the Counter container to see the Icon node stick to its right side
Because we duplicated the Counter from the bar’s Count, the
Number node’s font is off. Select the Number node again, head to
the Font property, and click it to access the DynamicFont
resource. In the Extra Spacing section, change the Bottom value
to 0 to reset the font’s baseline. Our counter now works as
expected.
Let’s make the Counters anchor to the right edge of the viewport. To do so,
we need to set the Bars container take all the available horizontal space it
can. Select the Bars node and scroll down to the Size Flags category. In
the Horizontal category, check the Expand value. The Bars node
should resize and push the counter to the right side of the screen.

An expanding container eats all the space it can from its parent, pushing everything else along the way
Turn the bar and counter into reusable UI components¶
We have one bar and one counter widget. But we need two of each. We may need to change the bars’ design or their functionality later on. It’d be great if we could have a single scene to store a UI element’s template, and child scenes to work on variations. Godot lets us do this with Inherited Scenes.
Let’s save both the Counter and the Bar branches as separate
scenes that we’ll reduce to create the LifeBar, the EnergyBar,
the BombCounter, and the EmeraldCounter. Select the Bar
HBoxContainer. Right click on it and click on Save Branch as Scene.
Save the scene as Bar.tscn. You should see the node branch turn it
to a single Bar node.
Tip
A scene is a tree of nodes. The topmost node is the tree’s
root, and the children at the bottom of the hierarchy are
leaves. Any node other than the root along with one or more children is
a branch. We can encapsulate node branches into separate scenes, or
load and merge them from other scenes into the active one. Right click
on any node in the Scene dock and select Save Branch as Scene or
Merge from Scene.
Then, select the Counter node and do the same. Right click,
Save Branch as Scene, and save it as Counter.tscn. A new edit
scene icon appears to the right of the nodes in the scene tree. Click on
the one next to Bar to open the corresponding scene. Resize the
Bar node so that its bounding box fits its content. The way we named
and placed the Control nodes, we’re ready to inherit this template and
create the life bar. It’s the same for the Counter.

With no extra changes, our Bar is ready to use
Use scene inheritance to create the remaining elements¶
We need two bars that work the same way: they should feature a label on the left, with some value, and a horizontal gauge on the right. The only difference is that one has the HP label and is green, while the other is called EP and is yellow. Godot gives us a powerful tool to create a common base to reuse for all bars in the game: inherited scenes.
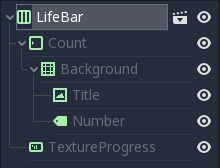
Inherited scenes help us keep the GUI scene clean. In the end, we will only have containers and one node for each UI component.
On an inherited scene, you can change any property of every node in the inspector, aside from its name. If you modify and save the parent scene, all the inherited scenes update to reflect the changes. If you change a value in the inherited scene, it will always override the parent’s property. It’s useful for UIs, as they often require variations of the same elements. In general, in UI design, buttons, panels etc. share a common base style and interactions. We don’t want to copy it over to all variations manually.
A reload icon will appear next to the properties you override. Click it to reset the value to the parent scene’s default.
Note
Think of scene inheritance like the node tree, or the
extends keyword in GDScript. An inherited scene does everything like
its parent, but you can override properties, resources and add extra
nodes and scripts to extend its functionality.
Inherit the Bar Scene to build the LifeBar¶
Go to Scene -> New Inherited Scene to create a new type of Bar.
Select the Bar scene and open it. You should see a new [unsaved] tab,
that’s like your Bar, but with all nodes except the root in grey.
Press Meta + S to save the new inherited scene and name it
LifeBar.

You can’t rename grey nodes. This tells you they have a parent scene
First, rename the root or top level node to LifeBar. We always want
the root to describe exactly what this UI component is. The name
differentiates this bar from the EnergyBar we’ll create next. The
other nodes inside the scene should describe the component’s structure
with broad terms, so it works with all inherited scenes. Like our
TextureProgress and Number nodes.
Note
If you’ve ever done web design, it’s the same spirit as working with CSS: you create a base class, and add variations with modifier classes. From a base button class, you’ll have button-green and button-red variations for the user to accept and refuse prompts. The new class contains the name of the parent element and an extra keyword to explain how it modifies it. When we create an inherited scene and change the name of the top level node, we’re doing the same thing.
Design the EnergyBar¶
We already setup the LifeBar’s design with the main Bar scene.
Now we need the EnergyBar.
Let’s create a new inherited scene, and once again select the
Bar.tscn scene and open it. Double-click on the Bar root node and rename it
to EnergyBar. Save the new scene as EnergyBar.tscn.
We need to replace the HP texture with EP one, and to
change the textures on the gauge.
Head to the FileSystem dock on the left, select the Title node in
the Scene tree and drag and drop the label_EP.png file onto the
texture slot. Select the Number node and change the Text
property to a different value like 14.
You’ll notice the EP texture is smaller than the HP one. We should
update the Number’s font size to better fit it. A font is a
resource. All the nodes in the entire project that use this resource
will be affected by any property we change. You can try to change the
size to a huge value like 40 and switch back to the LifeBar or
the Bar scenes. You will see the text increased in size.

If we change the font resource, all the nodes that use it are affected
To change the font size on this node only, we must create a copy of the
font resource. Select the Number node again and click on the wrench
and screwdriver icon on the top right of the inspector. In the drop-down
menu, select the Make Sub-Resources Unique option. Godot will find
all the resources this node uses and create unique copies for us.
Use this option to create unique copies of the resources for one node
Tip
When you duplicate a node from the Scene tree, with
Meta + D, it shares its resources with the original node. You
need to use Make Sub-Resources Unique before you can tweak the
resources without affecting the source node.
Scroll down to the Custom Font section and open Font. Lower the
Size to a smaller value like 20 or 22. You may also need to
adjust the Bottom spacing value to align the text’s baseline with
the EP label on the left.

The EP Count widget, with a smaller font than its HP counterpart
Now, select the TextureProgress node. Drag the energy_bar_bg.png
file onto the Under slot and do the same for energy_bar_fill.png
and drop it onto the Progress texture slot.
You can resize the node vertically so that its bounding rectangle fits
the gauge. Do the same with the Count node until its size aligns
with that of the bar. Because the minimal size of TextureProgress is
set based on its textures, you won’t be able to downsize the Count
node below that. That is also the size the Bar container will have.
You may downscale this one as well.
Last but not least, the Background container has a minimum size that
makes it a bit large. Select it and in the Rect section, change the
Min Size property down to 80 pixels. It should resize
automatically and the Title and Number nodes should reposition
as well.

The Count looks better now it’s a bit smaller
Tip
The Count node’s size affects the position of the TextureProgress. As we’ll align our bars vertically in a moment, we’re better off using the Counter’s left margin to resize our EP label. This way both the EnergyBar’s Count and the LifeBar’s Count nodes are one hundred pixels wide, so both gauges will align perfectly.
Prepare the bomb and emerald counters¶
Let us now take care of the counters. Go to
Scene -> New Inherited Scene and select the Counter.tscn as a
base. Rename the root node as BombCounter too.
Save the new scene as BombCounter.tscn. That’s all for this scene.
The bomb counter is the same as the original Counter scene
Go to Scene -> New Inherited Scene again and select Counter.tscn
once more. Rename the root node EmeraldCounter and save the scene as EmeraldCounter.tscn.
For this one, we mainly need to replace the bomb icon
with the emerald icon. In the FileSystem tab, drag the emeralds_icon.png
onto the Icon node’s Texture slot. Icon already anchors to
the right edge of the Background node so we can change its position
and it will scale and reposition with the EmeraldCounter container.
Shift the emerald icon a little bit to the right and down. Use the Arrow
Keys on the keyboard to nudge its position. Save, and we’re done with
all the UI elements.
The emerald counter should look something like this
Add the UI components to the final GUI¶
Time to add all the UI elements to the main GUI scene. Open the
GUI.tscn scene again, and delete the Bar and Counter nodes.
In the FileSystem dock, find the LifeBar.tscn and drag and drop it
onto the Bars container in the scene tree. Do the same for the
EnergyBar. You should see them align vertically.
The LifeBar and the EnergyBar align automatically
Now, drag and drop the BombCounter.tscn and EmeraldCounter.tscn scenes onto the
Counters node. They’ll resize automatically.
The nodes resize to take all the available vertical space
To let the EmeraldCounter and BombCounter use the size we defined
in Counter.tscn, we need to change the Size Flags on the
Counters container. Select the Counters node and unfold the
Size Flags section in the Inspector. Uncheck the Fill tag for
the Vertical property, and check Shrink Center so the container
centers inside the HBoxContainer.
Now both counters have a decent size
Tip
Change the Min Size property of the Counters container
to control the height of the counters’ background.
We have one small issue left with the EP label on the EnergyBar: the 2
bars should align vertically. Click the icon next to the EnergyBar
node to open its scene. Select the Count node and scroll down to the
Custom Constants section. Add a Margin Left of 20. In
the Rect section set the node’s Min Size back to 100, the same
value as on the LifeBar. The Count should now have some margin on
the left. If you save and go back to the GUI scene, it will be aligned
vertically with the LifeBar.
The 2 bars align perfectly
Note
We could have set up the EnergyBar this way a few moments
ago. But this shows you that you can go back to any scene anytime, tweak
it, and see the changes propagate through the project!
Place the GUI onto the game’s mockup¶
To wrap up the tutorial we’re going to insert the GUI onto the game’s mockup scene.
Head to the FileSystem dock and open LevelMockup.tscn.
Drag-and-drop the GUI.tscn scene right below the bg node and
above the Characters. The GUI will scale to fit the entire viewport.
Head to the Layout menu and select the Center Top option so it anchors
to the top edge of the game window. Then resize the GUI to make it as
small as possible vertically. Now you can see how the interface looks in
the context of the game.
Congratulations for getting to the end of this long tutorial. You can
find the final project here: ui_gui_design.zip.
The final result
Note
A final note about Responsive Design. If you resize the GUI, you’ll see the nodes move, but the textures and text won’t scale. The GUI also has a minimum size, based on the textures inside of it. In games, we don’t need the interface to be as flexible as that of a website. You almost never want to support both landscape and portrait screen orientations. It’s one or the other. In landscape orientation, the most common ratios range from 4:3 to 16:9. They are close to one another. That’s why it’s enough for the GUI elements to only move horizontally when we change the window size.
Control the game’s UI with code¶
Intro¶
In this tutorial, you will connect a character to a life bar and animate the health loss.
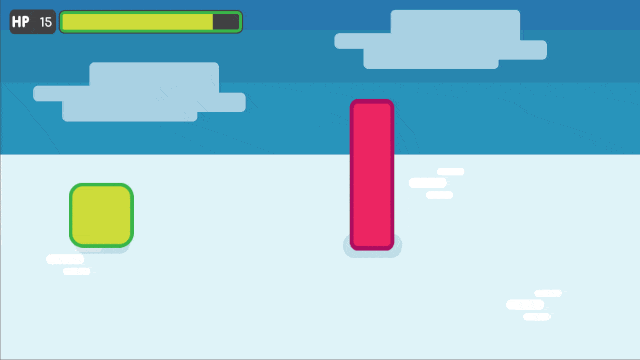
Here’s what you’ll create: the bar and the counter animate when the character takes a hit. They fade when it dies.
You will learn:
- How to connect a character to a GUI with signals
- How to control a GUI with GDscript
- How to animate a life bar with the Tween node
If you want to learn how to set up the interface instead, check out the step-by-step UI tutorials:
- Create a main menu screen
- Create a game user interface
When you code a game, you want to build the core gameplay first: the main mechanics, player input, win and loss conditions. The UI comes a bit later. You want to keep all the elements that make up your project separate if possible. Each character should be in its own scene, with its own scripts, and so should the UI elements. This prevents bugs, keeps your project manageable, and allows different team members to work on different parts of the game.
Once the core gameplay and the UI are ready, you’ll need to connect them somehow. In our example, we have the Enemy who attacks the Player at constant time intervals. We want the life bar to update when the Player takes damage.
To do this, we will use signals.
Note
Signals are Godot’s version of the Observer pattern. They allow us to send out some message. Other nodes can connect to the object that emits the signal and receive the information. It’s a powerful tool we use a lot for User Interface and achievement systems. You don’t want to use them everywhere, though. Connecting two nodes adds some coupling between them. When there’s a lot of connections, they become hard to manage. For more information, check out the signals video tutorial on GDquest.
Download and explore the start project¶
Download the Godot project: ui_code_life_bar.zip. It contains all the assets and scripts you
need to get started. Extract the .zip archive to get two folders: start and end.
Load the start project in Godot. In the FileSystem dock,
double click on LevelMockup.tscn to open it. It’s an RPG game’s mockup
where 2 characters face each other. The pink enemy attacks and damages
the green square at regular time intervals, until its death. Feel free
to try out the game: the basic combat mechanics already work. But as the
character isn’t connected to the life bar, the GUI doesn’t do
anything.
Note
This is typical of how you’d code a game: you implement the core gameplay first, handle the player’s death, and only then you’ll add the interface. That’s because the UI listens to what’s happening in the game. So it can’t work if other systems aren’t in place yet. If you design the UI before you prototype and test the gameplay, chances are it won’t work well and you’ll have to re-create it from scratch.
The scene contains a background sprite, a GUI, and two characters.
The scene tree, with the GUI scene set to display its children
The GUI scene encapsulates all of the game’s Graphical User Interface. It comes with a barebones script where we get the path to nodes that exist inside the scene:
onready var number_label = $Bars/LifeBar/Count/Background/Number
onready var bar = $Bars/LifeBar/TextureProgress
onready var tween = $Tween
public class Gui : MarginContainer
{
private Tween _tween;
private Label _numberLabel;
private TextureProgress _bar;
public override void _Ready()
{
// C# doesn't have an onready feature, this works just the same.
_bar = (TextureProgress) GetNode("Bars/LifeBar/TextureProgress");
_tween = (Tween) GetNode("Tween");
_numberLabel = (Label) GetNode("Bars/LifeBar/Count/Background/Number");
}
}
number_labeldisplays a life count as a number. It’s aLabelnodebaris the life bar itself. It’s aTextureProgressnodetweenis a component-style node that can animate and control any value or method from any other node
Note
The project uses a simple organisation that works for game jams and tiny games.
At the root of the project, in the res:// folder, you will find the LevelMockup. That’s the main game scene and the one we will work with. All the components that make up the game are in the scenes/ folder. The assets/ folder contains the game sprites and the font for the HP counter. In the scripts/ folder you will find the enemy, the player, and the GUI controller scripts.
Click the edit scene icon to the right of the node in the scene tree to open the scene in the editor. You’ll see the LifeBar and EnergyBar are sub-scenes themselves.
The scene tree, with the Player scene set to display its children
Set up the Lifebar with the Player’s max_health¶
We have to tell the GUI somehow what the player’s current health is, to
update the lifebar’s texture, and to display the remaining health in the
HP counter in the top left corner of the screen. To do this we send the
player’s health to the GUI every time they take damage. The GUI will then
update the Lifebar and Number nodes with this value.
We could stop here to display the number, but we need to initialize the
bar’s max_value for it to update in the right proportions. The first
step is thus to tell the GUI what the green character’s
max_health is.
Tip
The bar, a TextureProgress, has a max_value of 100 by default. If you don’t need to display the character’s health with a number, you don’t need to change its max_value property. You send a percentage from the Player to the GUI instead: health / max_health * 100.
Click the script icon to the right of the GUI in the Scene dock to
open its script. In the _ready function, we’re going to store the
Player’s max_health in a new variable and use it to set the
bar’s max_value:
func _ready():
var player_max_health = $"../Characters/Player".max_health
bar.max_value = player_max_health
public override void _Ready()
{
// Add this below _bar, _tween, and _numberLabel.
var player = (Player) GetNode("../Characters/Player");
_bar.MaxValue = player.MaxHealth;
}
Let’s break it down. $"../Characters/Player" is a shorthand that
goes one node up in the scene tree, and retrieves the
Characters/Player node from there. It gives us access to the node.
The second part of the statement, .max_health, accesses the
max_health on the Player node.
The second line assigns this value to bar.max_value. You could
combine the two lines into one, but we’ll need to use
player_max_health again later in the tutorial.
Player.gd sets the health to max_health at the start of the
game, so we could work with this. Why do we still use max_health?
There are two reasons:
We don’t have the guarantee that health will always equal
max_health: a future version of the game may load a level where
the player already lost some health.
Note
When you open a scene in the game, Godot creates nodes one by one, following the order in your Scene dock, from top to bottom. GUI and Player are not part of the same node branch. To make sure they both exist when we access each other, we have to use the _ready function. Godot calls _ready right after it loaded all nodes, before the game starts. It’s the perfect function to set everything up and prepare the game session. Learn more about _ready: Scripting (continued)
Update health with a signal when the player takes a hit¶
Our GUI is ready to receive the health value updates from the
Player. To achieve this we’re going to use signals.
Note
There are many useful built-in signals like enter_tree and exit_tree, that all nodes emit when they are respectively created and destroyed. You can also create your own using the signal keyword. On the Player node, you’ll find two signals we created for you: died and health_changed.
Why don’t we directly get the Player node in the _process
function and look at the health value? Accessing nodes this way creates
tight coupling between them. If you did it sparingly it may work. As
your game grows bigger, you may have many more connections. If you get
nodes this way it gets complex quickly. Not only that: you
need to listen to the state change constantly in the _process
function. This check happens 60 times a second and you’ll likely break
the game because of the order in which the code runs.
On a given frame you may look at another node’s property before it was updated: you get a value from the last frame. This leads to obscure bugs that are hard to fix. On the other hand, a signal is emitted right after a change happened. It guarantees you’re getting a fresh piece of information. And you will update the state of your connected node right after the change happened.
Note
The Observer pattern, that signals derive from, still adds a bit of coupling between node branches. But it’s generally lighter and more secure than accessing nodes directly to communicate between two separate classes. It can be okay for a parent node to get values from its children. But you’ll want to favor signals if you’re working with two separate branches. Read Game Programming Patterns for more information on the Observer pattern. The full book is available online for free.
With this in mind, let’s connect the GUI to the Player. Click on
the Player node in the scene dock to select it. Head down to the
Inspector and click on the Node tab. This is the place to connect nodes
to listen to the one you selected.
The first section lists custom signals defined in Player.gd:
diedis emitted when the character died. We will use it in a moment to hide the UI.health_changedis emitted when the character got hit.
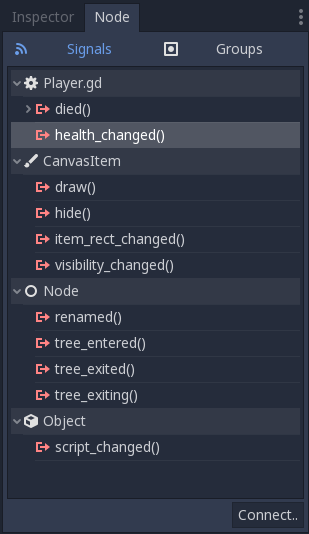
We’re connecting to the health_changed signal
Select health_changed and click on the Connect button in the bottom
right corner to open the Connect Signal window. On the left side you can
pick the node that will listen to this signal. Select the GUI node.
The right side of the screen lets you pack optional values with the
signal. We already took care of it in Player.gd. In general I
recommend not to add too many arguments using this window as they’re
less convenient than doing it from the code.
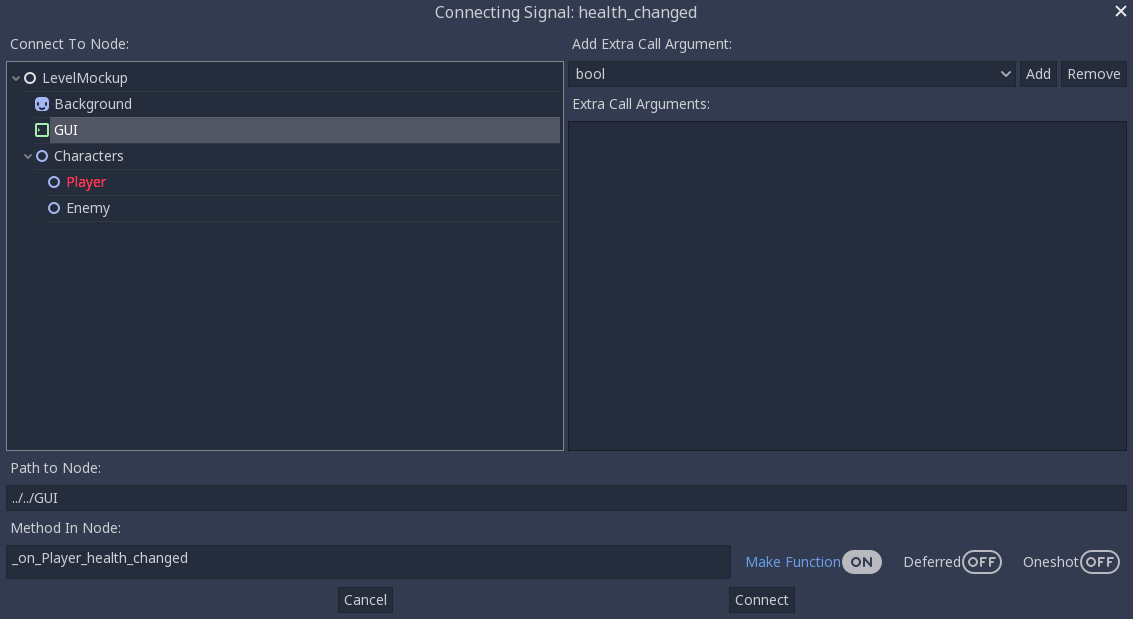
The Connect Signal window with the GUI node selected
Tip
You can optionally connect nodes from the code. However doing it from the editor has two advantages:
- Godot can write new callback functions for you in the connected script
- An emitter icon appears next to the node that emits the signal in the Scene dock
At the bottom of the window you will find the path to the node you
selected. We’re interested in the second row called “Method in Node”.
This is the method on the GUI node that gets called when the signal
is emitted. This method receives the values sent with the signal and
lets you process them. If you look to the right, there is a “Make
Function” radio button that is on by default. Click the connect button
at the bottom of the window. Godot creates the method inside the GUI
node. The script editor opens with the cursor inside a new
_on_Player_health_changed function.
Note
When you connect nodes from the editor, Godot generates a
method name with the following pattern: _on_EmitterName_signal_name.
If you wrote the method already, the “Make Function” option will keep
it. You may replace the name with anything you’d like.

Godot writes the callback method for you and takes you to it
Inside the parentheses after the function name, add a player_health
argument. When the player emits the health_changed signal, it will send
its current health alongside it. Your code should look like:
func _on_Player_health_changed(player_health):
pass
public void OnPlayerHealthChanged(int playerHealth)
{
}
Note
The engine does not convert PascalCase to snake_case, for C# examples we’ll be using PascalCase for method names & camelCase for method parameters, which follows the official C# naming conventions.

In Player.gd, when the Player emits the health_changed signal, it also sends its health value
Inside _on_Player_health_changed, let’s call a second function called
update_health and pass it the player_health variable.
Note
We could directly update the health value on LifeBar and Number. There are two reasons to use this method instead:
- The name makes it clear for our future selves and teammates that when the player took damage, we update the health count on the GUI
- We will reuse this method a bit later
Create a new update_health method below _on_Player_health_changed.
It takes a new_value as its only argument:
func update_health(new_value):
pass
public void UpdateHealth(int health)
{
}
This method needs to:
- set the
Numbernode’stexttonew_valueconverted to a string - set the
TextureProgress’svaluetonew_value
func update_health(new_value):
number_label.text = str(new_value)
bar.value = new_value
public void UpdateHealth(int health)
{
_numberLabel.Text = health.ToString();
_bar.Value = health;
}
Tip
str is a built-in function that converts about any value to
text. Number’s text property requires a string, so we can’t
assign it to new_value directly
Also call update_health at the end of the _ready function to
initialize the Number node’s text with the right value at the
start of the game. Press F5 to test the game: the life bar updates with
every attack!
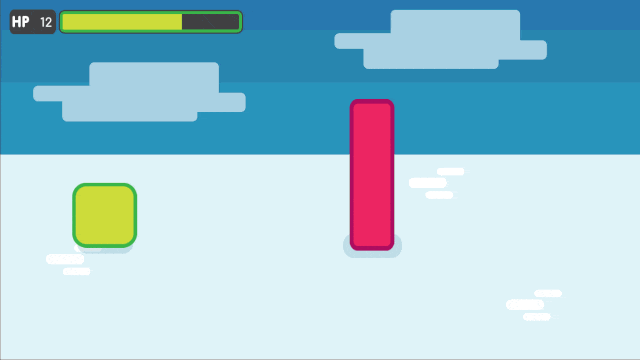
Both the Number node and the TextureProgress update when the Player takes a hit
Animate the loss of life with the Tween node¶
Our interface is functional, but it could use some animation. That’s a
good opportunity to introduce the Tween node, an essential tool to
animate properties. Tween animates anything you’d like from a start
to an end state over a certain duration. For example, it can animate the
health on the TextureProgress from its current level to the
Player’s new health when the character takes damage.
The GUI scene already contains a Tween child node stored in the
tween variable. Let’s now use it. We have to make some changes to
update_health.
We will use the Tween node’s interpolate_property method. It
takes seven arguments:
- A reference to the node who owns the property to animate
- The property’s identifier as a string
- The starting value
- The end value
- The animation’s duration in seconds
- The type of the transition
- The easing to use in combination with the equation.
The last two arguments combined correspond to an easing equation. This controls how the value evolves from the start to the end point.
Click the script icon next to the GUI node to open it again. The
Number node needs text to update itself, and the Bar needs a
float or an integer. We can use interpolate_property to animate a
number, but not to animate text directly. We’re going to use it to
animate a new GUI variable named animated_health.
At the top of the script, define a new variable, name it
animated_health, and set its value to 0. Navigate back to the update_health method and
clear its content. Let’s animate the animated_health value. Call the
Tween node’s interpolate_property method:
func update_health(new_value):
tween.interpolate_property(self, "animated_health", animated_health, new_value, 0.6, Tween.TRANS_LINEAR, Tween.EASE_IN)
// Add this to the top of your class.
private float _animatedHealth = 0;
public void UpdateHealth(int health)
{
_tween.InterpolateProperty(this, "_animatedHealth", _animatedHealth, health, 0.6f, Tween.TransitionType.Linear,
Tween.EaseType.In);
}
Let’s break down the call:
tween.interpolate_property(self, "animated_health", ...
We target animated_health on self, that is to say the GUI
node. Tween’s interpolate_property takes the property’s name as a
string. That’s why we write it as "animated_health".
... _health", animated_health, new_value, 0.6 ...
The starting point is the current value the bar’s at. We still have to
code this part, but it’s going to be animated_health. The end point
of the animation is the Player’s health after the
health_changed: that’s new_value. And 0.6 is the animation’s
duration in seconds.
... 0.6, Tween.TRANS_LINEAR, Tween.EASE_IN)
The last two arguments are constants from the Tween class.
TRANS_LINEAR means the animation should be linear. EASE_IN
doesn’t do anything with a linear transition, but we must provide this
last argument or we’ll get an error.
The animation will not play until we activated the Tween node with
tween.start(). We only have to do this once if the node is not
active. Add this code after the last line:
if not tween.is_active():
tween.start()
if (!_tween.IsActive())
{
_tween.Start();
}
Note
Although we could animate the health property on the Player, we shouldn’t. Characters should lose life instantly when they get hit. It makes it a lot easier to manage their state, like to know when one died. You always want to store animations in a separate data container or node. The tween node is perfect for code-controlled animations. For hand-made animations, check out AnimationPlayer.
Assign the animated_health to the LifeBar¶
Now the animated_health variable animates but we don’t update the
actual Bar and Number nodes anymore. Let’s fix this.
So far, the update_health method looks like this:
func update_health(new_value):
tween.interpolate_property(self, "animated_health", animated_health, new_value, 0.6, Tween.TRANS_LINEAR, Tween.EASE_IN)
if not tween.is_active():
tween.start()
public void UpdateHealth(int health)
{
_tween.InterpolateProperty(this, "_animatedHealth", _animatedHealth, health, 0.6f, Tween.TransitionType.Linear,
Tween.EaseType.In);
if(!_tween.IsActive())
{
_tween.Start();
}
}
In this specific case, because number_label takes text, we need to
use the _process method to animate it. Let’s now update the
Number and TextureProgress nodes like before, inside of
_process:
func _process(delta):
number_label.text = str(animated_health)
bar.value = animated_health
public override void _Process(float delta)
{
_numberLabel.Text = _animatedHealth.ToString();
_bar.Value = _animatedHealth;
}
Note
number_label and bar are variables that store references to the Number and TextureProgress nodes.
Play the game to see the bar animate smoothly. But the text displays decimal number and looks like a mess. And considering the style of the game, it’d be nice for the life bar to animate in a choppier fashion.

The animation is smooth, but the number is broken
We can fix both problems by rounding out animated_health. Use a
local variable named round_value to store the rounded
animated_health. Then assign it to number_label.text and
bar.value:
func _process(delta):
var round_value = round(animated_health)
number_label.text = str(round_value)
bar.value = round_value
public override void _Process(float delta)
{
var roundValue = Mathf.Round(_animatedHealth);
_numberLabel.Text = roundValue.ToString();
_bar.Value = roundValue;
}
Try the game again to see a nice blocky animation.
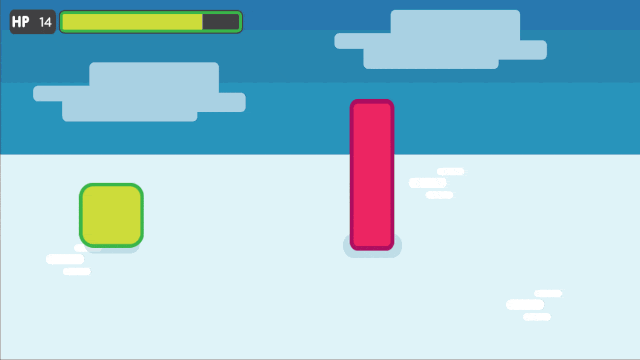
By rounding out animated_health, we kill two birds with one stone
Tip
Every time the player takes a hit, the GUI calls
_on_Player_health_changed, which in turn calls update_health. This
updates the animation and the number_label and bar follow in
_process. The animated life bar that shows the health going down gradually
is a trick. It makes the GUI feel alive. If the Player takes 3 damage,
it happens in an instant.
Fade the bar when the Player dies¶
When the green character dies, it plays a death animation and fades out.
At this point, we shouldn’t show the interface anymore. Let’s fade the
bar as well when the character died. We will reuse the same Tween
node as it manages multiple animations in parallel for us.
First, the GUI needs to connect to the Player’s died signal
to know when it died. Press F1 to jump back to the 2D
Workspace. Select the Player node in the Scene dock and click on the
Node tab next to the Inspector.
Find the died signal, select it, and click the Connect button.
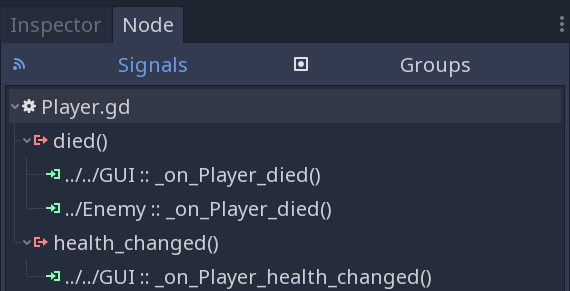
The signal should already have the Enemy connected to it
In the Connecting Signal window, connect to the GUI node again. The
Path to Node should be ../../GUI and the Method in Node should show
_on_Player_died. Leave the Make Function option on and click Connect
at the bottom of the window. This will take you to the GUI.gd file
in the Script Workspace.

You should get these values in the Connecting Signal window
Note
You should see a pattern by now: every time the GUI needs a new piece of information, we emit a new signal. Use them wisely: the more connections you add, the harder they are to track.
To animate a fade on a UI element, we have to use its modulate
property. modulate is a Color that multiplies the colors of our
textures.
Note
modulate comes from the CanvasItem class, All 2D and UI nodes inherit from it. It lets you toggle the visibility of the node, assign a shader to it, and modify it using a color with modulate.
modulate takes a Color value with 4 channels: red, green, blue
and alpha. If we darken any of the first three channels it darkens the
interface. If we lower the alpha channel, our interface fades out.
We’re going to tween between two color values: from a white with an
alpha of 1, that is to say at full opacity, to a pure white with an
alpha value of 0, completely transparent. Let’s add two variables at
the top of the _on_Player_died method and name them start_color
and end_color. Use the Color() constructor to build two
Color values.
func _on_Player_died():
var start_color = Color(1.0, 1.0, 1.0, 1.0)
var end_color = Color(1.0, 1.0, 1.0, 0.0)
public void OnPlayerDied()
{
var startColor = new Color(1.0f, 1.0f, 1.0f);
var endColor = new Color(1.0f, 1.0f, 1.0f, 0.0f);
}
Color(1.0, 1.0, 1.0) corresponds to white. The fourth argument,
respectively 1.0 and 0.0 in start_color and end_color,
is the alpha channel.
We then have to call the interpolate_property method of the
Tween node again:
tween.interpolate_property(self, "modulate", start_color, end_color, 1.0, Tween.TRANS_LINEAR, Tween.EASE_IN)
_tween.InterpolateProperty(this, "modulate", startColor, endColor, 1.0f, Tween.TransitionType.Linear,
Tween.EaseType.In);
This time, we change the modulate property and have it animate from
start_color to the end_color. The duration is of one second,
with a linear transition. Here again, because the transition is linear,
the easing does not matter. Here’s the complete _on_Player_died
method:
func _on_Player_died():
var start_color = Color(1.0, 1.0, 1.0, 1.0)
var end_color = Color(1.0, 1.0, 1.0, 0.0)
tween.interpolate_property(self, "modulate", start_color, end_color, 1.0, Tween.TRANS_LINEAR, Tween.EASE_IN)
public void OnPlayerDied()
{
var startColor = new Color(1.0f, 1.0f, 1.0f);
var endColor = new Color(1.0f, 1.0f, 1.0f, 0.0f);
_tween.InterpolateProperty(this, "modulate", startColor, endColor, 1.0f, Tween.TransitionType.Linear,
Tween.EaseType.In);
}
And that is it. You may now play the game to see the final result!
The final result. Congratulations for getting there!
Note
Using the exact same techniques, you can change the color of the bar when the Player gets poisoned, turn the bar red when its health drops low, shake the UI when they take a critical hit… the principle is the same: emit a signal to forward the information from the Player to the GUI and let the GUI process it.
Splash screen¶
Tutorial¶
This is a simple tutorial to establish the basic idea of how the GUI subsystem works. The goal is to create a simple, static splash screen.
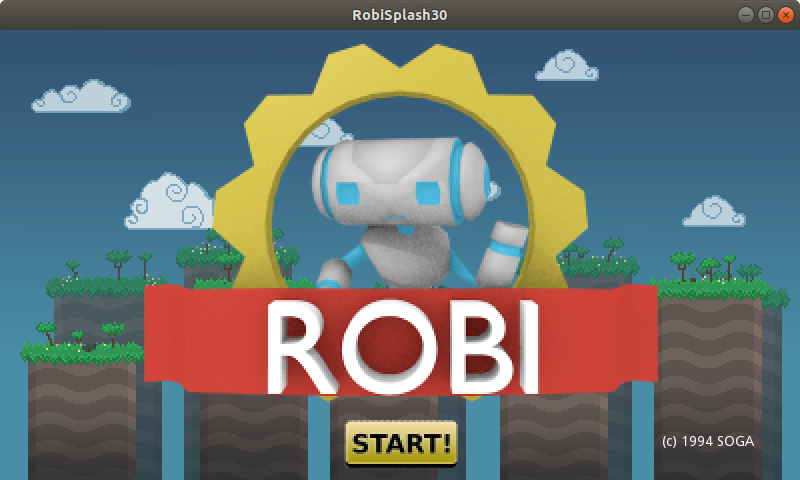
Following is a file with the assets that will be used. The extracted files can be placed directly in your project folder and Godot will import them automatically.
Setting up¶
Set the display resolution to 800x450 in Project Settings, and set up a new scene like this:
The nodes “background” and “logo” are of TextureRect type. To display an image, drag the corresponding asset to the texture property.
The node “start” is a TextureButton. It takes several images for different states, but only the normal and pressed will be supplied in this example:
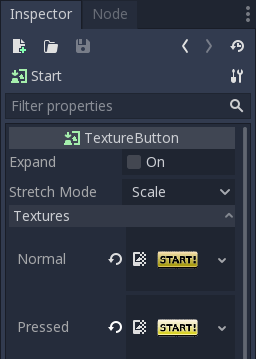
Finally, the node “copyright” is a Label.
Your final scene should look something like this.
Go ahead and run the project. If you’re satisfied with the results, continue to the next tutorial.
Animations¶
Introduction¶
Godot’s animation system is extremely powerful and flexible.
To begin, let’s use the scene from the previous tutorial (Splash screen).
The goal is to add a “fade-in” animation to the splash image. Here’s a copy
just in case: robisplash.zip.
Add an animation player¶
First of all, add an AnimationPlayer node to the scene as a child of “background” (the root node):

When a node of this type is selected, the animation editor panel will appear:

The animation editor panel stays visible until manually hidden.
Creating the animation¶
It’s time to create a new animation! Press the Animation button then select new from the menu. Name the animation “intro” when the dialog appears.

Now that we have an animation, the property editor enters “animation editing” mode. In this mode, a key icon appears next to every property of the property editor. In Godot, any property of an object can be animated:

Editing the animation¶
The logo will appear from the top of the screen.
With the animation editor panel open, select the “logo” node and set the
“Rect / Position” property to (118, -400) and press the key button next
to the property to add a keyframe:
When the dialog appears, confirm that you are creating a new track.
The keyframe will be added in the animation player editor:
Move the editor cursor forward in time by clicking here:
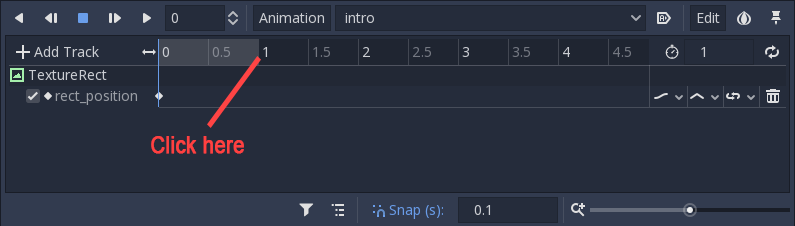
Change the logo position to (118, 0) and add a keyframe again. With two
keyframes with different values, the animation happens.
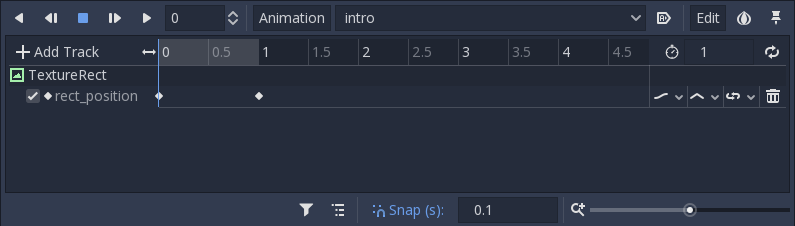
Pressing “Play selected animation from start” button on the animation panel (or Shift + D on keyboard) will make the logo descend.
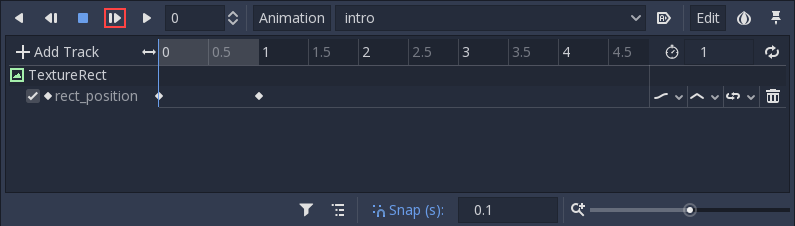
Click the “Autoplay on Load” button to set the animation to start automatically when the scene starts.
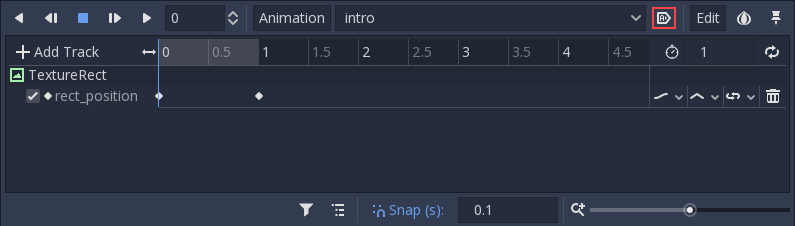
And finally, when running the scene, the animation should look like this:

Resources¶
Nodes and resources¶
Up to this tutorial, we focused on the Node class in Godot as that’s the one you use to code behavior and most of the engine’s features rely on it. There is another datatype that is just as important: Resource.
Nodes give you functionality: they draw sprites, 3D models, simulate physics, arrange user interfaces, etc. Resources are data containers. They don’t do anything on their own: instead, nodes use the data contained in resources.
Anything Godot saves or loads from disk is a resource. Be it a scene (a .tscn
or an .scn file), an image, a script… Here are some Resource examples:
Texture, Script, Mesh, Animation, AudioStream, Font, Translation.
When the engine loads a resource from disk, it only loads it once. If a copy of that resource is already in memory, trying to load the resource again will return the same copy every time. As resources only contain data, there is no need to duplicate them.
Every object, be it a Node or a Resource, can export properties. There are many types of Properties, like String, integer, Vector2, etc., and any of these types can become a resource. This means that both nodes and resources can contain resources as properties:
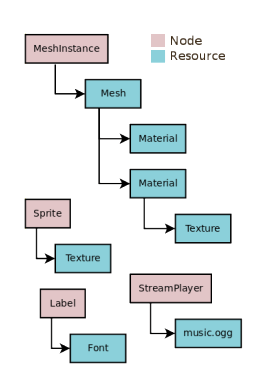
External vs built-in¶
There are two ways to save resources. They can be:
- External to a scene, saved on the disk as individual files.
- Built-in, saved inside the
.tscnor the.scnfile they’re attached to.
To be more specific, here’s a Texture in a Sprite node:
Clicking the resource preview allows us to view and edit the resource’s properties.
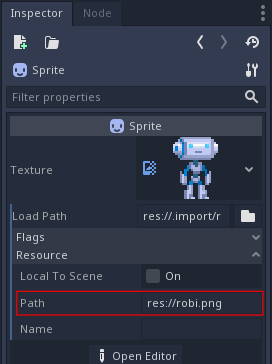
The path property tells us where the resource comes from. In this case, it comes
from a PNG image called robi.png. When the resource comes from a file like
this, it is an external resource. If you erase the path or this path is empty,
it becomes a built-in resource.
The switch between built-in and external resources happens when you save the
scene. In the example above, if you erase the path "res://robi.png" and
save, Godot will save the image inside the .tscn scene file.
Note
Even if you save a built-in resource, when you instance a scene multiple times, the engine will only load one copy of it.
Loading resources from code¶
There are two ways to load resources from code. First, you can use the load() function anytime:
func _ready():
var res = load("res://robi.png") # Godot loads the Resource when it reads the line.
get_node("sprite").texture = res
public override void _Ready()
{
var texture = (Texture)GD.Load("res://robi.png"); // Godot loads the Resource when it reads the line.
var sprite = (Sprite)GetNode("sprite");
sprite.Texture = texture;
}
You can also preload resources. Unlike load, this function will read the
file from disk and load it at compile-time. As a result, you cannot call preload
with a variable path: you need to use a constant string.
func _ready():
var res = preload("res://robi.png") # Godot loads the resource at compile-time
get_node("sprite").texture = res
// 'preload()' is unavailable in C Sharp.
Loading scenes¶
Scenes are also resources, but there is a catch. Scenes saved to disk are resources of type PackedScene. The scene is packed inside a resource.
To get an instance of the scene, you have to use the PackedScene.instance() method.
func _on_shoot():
var bullet = preload("res://bullet.tscn").instance()
add_child(bullet)
private PackedScene _bulletScene = (PackedScene)GD.Load("res://bullet.tscn");
public void OnShoot()
{
Node bullet = _bulletScene.Instance();
AddChild(bullet);
}
This method creates the nodes in the scene’s hierarchy, configures them, and returns the root node of the scene. You can then add it as a child of any other node.
The approach has several advantages. As the PackedScene.instance() function is fast, you can create new enemies, bullets, effects, etc. without having to load them again from disk each time. Remember that, as always, images, meshes, etc. are all shared between the scene instances.
Freeing resources¶
When a Resource is no longer in use, it will automatically free itself.
Since, in most cases, Resources are contained in Nodes, when you free a node,
the engine frees all the resources it owns as well if no other node uses them.
Creating your own resources¶
Like any Object in Godot, users can also script Resources. Resource scripts inherit the ability to freely translate between object properties and serialized text or binary data (/.tres, /.res). They also inherit the reference-counting memory management from the Reference type.
This comes with many distinct advantages over alternative data structures, such as JSON, CSV, or custom TXT files. Users can only import these assets as a Dictionary (JSON) or as a File to parse. What sets Resources apart is their inheritance of Object, Reference, and Resource features:
- They can define constants, so constants from other data fields or objects are not needed.
- They can define methods, including setter/getter methods for properties. This allows for abstraction and encapsulation of the underlying data. If the Resource script’s structure needs to change, the game using the Resource need not also change.
- They can define signals, so Resources can trigger responses to changes in the data they manage.
- They have defined properties, so users know 100% that their data will exist.
- Resource auto-serialization and deserialization is a built-in Godot Engine feature. Users do not need to implement custom logic to import/export a resource file’s data.
- Resources can even serialize sub-Resources recursively, meaning users can design even more sophisticated data structures.
- Users can save Resources as version-control-friendly text files (*.tres). Upon exporting a game, Godot serializes resource files as binary files (*.res) for increased speed and compression.
- Godot Engine’s Inspector renders and edits Resource files out-of-the-box. As such, users often do not need to implement custom logic to visualize or edit their data. To do so, double-click the resource file in the FileSystem dock or click the folder icon in the Inspector and open the file in the dialog.
- They can extend other resource types besides just the base Resource.
Warning
Resources and Dictionaries are both passed by reference, but only Resources are reference-counted. This means that if a Dictionary is passed between objects and the first object is deleted, all other objects’ references to the Dictionary will be invalidated. Conversely, Resources will not be freed from memory until all the objects are deleted.
extends Node
class MyObject:
extends Object
var dict = {}
func _ready():
var obj1 = MyObject.new()
var obj2 = MyObject.new()
obj1.dict.greeting = "hello"
obj2.dict = obj1.dict # 'obj2.dict' now references 'obj1's Dictionary.
obj1.free() # 'obj1' is freed and the Dictionary too!
print(obj2.dict.greeting) # Error! 'greeting' index accessed on null instance!
# To avoid this, we must manually duplicate the Dictionary.
obj1 = MyObject.new()
obj1.dict.greeting = "hello"
obj2.dict = obj1.dict.duplicate() # Now we are passing a copy, not a reference.
obj1.free() # obj2's Dictionary still exists.
print(obj2.dict.greeting) # Prints 'hello'.
Godot makes it easy to create custom Resources in the Inspector.
- Create a plain Resource object in the Inspector. This can even be a type that derives Resource, so long as your script is extending that type.
- Set the
scriptproperty in the Inspector to be your script.
The Inspector will now display your Resource script’s custom properties. If one edits those values and saves the resource, the Inspector serializes the custom properties too! To save a resource from the Inspector, click the Inspector’s tools menu (top right), and select “Save” or “Save As…”.
If the script’s language supports script classes, then it streamlines the process. Defining a name for your script alone will add it to the Inspector’s creation dialog. This will auto-add your script to the Resource object you create.
Let’s see some examples.
# bot_stats.gd
extends Resource
export(int) var health
export(Resource) var sub_resource
export(Array, String) var strings
func _init(p_health = 0, p_sub_resource = null, p_strings = []):
health = p_health
sub_resource = p_sub_resource
strings = p_strings
# bot.gd
extends KinematicBody
export(Resource) var stats
func _ready():
# Uses an implicit, duck-typed interface for any 'health'-compatible resources.
if stats:
print(stats.health) # Prints '10'.
// BotStats.cs
using System;
using Godot;
namespace ExampleProject {
public class BotStats : Resource
{
[Export]
public int Health { get; set; }
[Export]
public Resource SubResource { get; set; }
[Export]
public String[] Strings { get; set; }
public BotStats(int health = 0, Resource subResource = null, String[] strings = null)
{
Health = health;
SubResource = subResource;
Strings = strings ?? new String[0];
}
}
}
// Bot.cs
using System;
using Godot;
namespace ExampleProject {
public class Bot : KinematicBody
{
[Export]
public Resource Stats;
public override void _Ready()
{
if (Stats != null && Stats is BotStats botStats) {
GD.Print(botStats.Health); // Prints '10'.
}
}
}
}
Note
Resource scripts are similar to Unity’s ScriptableObjects. The Inspector provides built-in support for custom resources. If desired though, users can even design their own Control-based tool scripts and combine them with an EditorPlugin to create custom visualizations and editors for their data.
Unreal Engine 4’s DataTables and CurveTables are also easy to recreate with Resource scripts. DataTables are a String mapped to a custom struct, similar to a Dictionary mapping a String to a secondary custom Resource script.
# bot_stats_table.gd
extends Resource
const BotStats = preload("bot_stats.gd")
var data = {
"GodotBot": BotStats.new(10), # Creates instance with 10 health.
"DifferentBot": BotStats.new(20) # A different one with 20 health.
}
func _init():
print(data)
using System;
using Godot;
public class BotStatsTable : Resource
{
private Godot.Dictionary<String, BotStats> _stats = new Godot.Dictionary<String, BotStats>();
public BotStatsTable()
{
_stats["GodotBot"] = new BotStats(10); // Creates instance with 10 health.
_stats["DifferentBot"] = new BotStats(20); // A different one with 20 health.
GD.Print(_stats);
}
}
Instead of just inlining the Dictionary values, one could also, alternatively…
- Import a table of values from a spreadsheet and generate these key-value pairs, or…
- Design a visualization within the editor and create a simple plugin that adds it to the Inspector when you open these types of Resources.
CurveTables are the same thing, except mapped to an Array of float values or a Curve/Curve2D resource object.
Warning
Beware that resource files (*.tres/*.res) will store the path of the script
they use in the file. When loaded, they will fetch and load this script as an
extension of their type. This means that trying to assign a subclass, i.e. an
inner class of a script (such as using the class keyword in GDScript) won’t
work. Godot will not serialize the custom properties on the script subclass properly.
In the example below, Godot would load the Node script, see that it doesn’t
extend Resource, and then determine that the script failed to load for the
Resource object since the types are incompatible.
extends Node
class MyResource:
extends Resource
export var value = 5
func _ready():
var my_res = MyResource.new()
# This will NOT serialize the 'value' property.
ResourceSaver.save("res://my_res.tres", my_res)
using Godot;
public class MyNode : Node
{
public class MyResource : Resource
{
[Export]
public int Value { get; set; } = 5;
}
public override void _Ready()
{
var res = new MyResource();
// This will NOT serialize the 'Value' property.
ResourceSaver.Save("res://MyRes.tres", res);
}
}
File system¶
Introduction¶
A file system manages how assets are stored and how they are accessed. A well-designed file system also allows multiple developers to edit the same source files and assets while collaborating. Godot stores all assets as files in its file system.
Implementation¶
The file system stores resources on disk. Anything, from a script, to a scene or a PNG image is a resource to the engine. If a resource contains properties that reference other resources on disk, the paths to those resources are also included. If a resource has sub-resources that are built-in, the resource is saved in a single file together with all the bundled sub-resources. For example, a font resource is often bundled together with the font textures.
The Godot file system avoids using metadata files. Existing asset managers and VCSs are better than anything we can implement, so Godot tries its best to play along with SVN, Git, Mercurial, Perforce, etc.
Example of file system contents:
/project.godot
/enemy/enemy.tscn
/enemy/enemy.gd
/enemy/enemysprite.png
/player/player.gd
project.godot¶
The project.godot file is the project description file, and it is always found at the root of the project. In fact, its location defines where the root is. This is the first file that Godot looks for when opening a project.
This file contains the project configuration in plain text, using the win.ini format. Even an empty project.godot can function as a basic definition of a blank project.
Path delimiter¶
Godot only supports / as a path delimiter. This is done for
portability reasons. All operating systems support this, even Windows,
so a path such as c:\project\project.godot needs to be typed as
c:/project/project.godot.
Resource path¶
When accessing resources, using the host OS file system layout can be
cumbersome and non-portable. To solve this problem, the special path
res:// was created.
The path res:// will always point at the project root (where
project.godot is located, so res://project.godot is always
valid).
This file system is read-write only when running the project locally from the editor. When exported or when running on different devices (such as phones or consoles, or running from DVD), the file system will become read-only and writing will no longer be permitted.
User path¶
Writing to disk is still needed for tasks such as saving game
state or downloading content packs. To this end, the engine ensures that there is a
special path user:// that is always writable.
Host file system¶
Alternatively host file system paths can also be used, but this is not recommended for a released product as these paths are not guaranteed to work on all platforms. However, using host file system paths can be useful when writing development tools in Godot.
Drawbacks¶
There are some drawbacks to this simple file system design. The first issue is that moving assets around (renaming them or moving them from one path to another inside the project) will break existing references to these assets. These references will have to be re-defined to point at the new asset location.
To avoid this, do all your move, delete and rename operations from within Godot, on the FileSystem dock. Never move assets from outside Godot, or dependencies will have to be fixed manually (Godot detects this and helps you fix them anyway, but why go the hard route?).
The second is that, under Windows and macOS, file and path names are case insensitive. If a developer working in a case insensitive host file system saves an asset as “myfile.PNG”, but then references it as “myfile.png”, it will work fine on their platform, but not on other platforms, such as Linux, Android, etc. This may also apply to exported binaries, which use a compressed package to store all files.
It is recommended that your team clearly define a naming convention for files when working with Godot. One simple fool-proof convention is to only allow lowercase file and path names.
SceneTree¶
Introduction¶
In previous tutorials, everything revolved around the concept of nodes. Scenes are collections of nodes. They become active once they enter the scene tree.
MainLoop¶
The way Godot works internally is as follows. There is the OS class, which is the only instance that runs at the beginning. Afterwards, all drivers, servers, scripting languages, scene system, etc are loaded.
When initialization is complete, OS needs to be supplied a MainLoop to run. Up to this point, all this is internals working (you can check main/main.cpp file in the source code if you are ever interested to see how this works internally).
The user program, or game, starts in the MainLoop. This class has a few methods, for initialization, idle (frame-synchronized callback), fixed (physics-synchronized callback), and input. Again, this is low level and when making games in Godot, writing your own MainLoop seldom makes sense.
SceneTree¶
One of the ways to explain how Godot works is that it’s a high level game engine over a low level middleware.
The scene system is the game engine, while the OS and servers are the low level API.
The scene system provides its own main loop to OS, SceneTree. This is automatically instanced and set when running a scene, no need to do any extra work.
It’s important to know that this class exists because it has a few important uses:
- It contains the root Viewport, to which a scene is added as a child when it’s first opened to become part of the Scene Tree (more on that next).
- It contains information about the groups and has the means to call all nodes in a group or get a list of them.
- It contains some global state functionality, such as setting pause mode or quitting the process.
When a node is part of the Scene Tree, the SceneTree singleton can be obtained by calling Node.get_tree().
Root viewport¶
The root Viewport is always at the top of the scene. From a node, it can be obtained in two different ways:
get_tree().get_root() # Access via scene main loop.
get_node("/root") # Access via absolute path.
GetTree().GetRoot(); // Access via scene main loop.
GetNode("/root"); // Access via absolute path.
This node contains the main viewport. Anything that is a child of a Viewport is drawn inside of it by default, so it makes sense that the top of all nodes is always a node of this type otherwise nothing would be seen.
While other viewports can be created in the scene (for split-screen effects and such), this one is the only one that is never created by the user. It’s created automatically inside SceneTree.
Scene tree¶
When a node is connected, directly or indirectly, to the root viewport, it becomes part of the scene tree.
This means that as explained in previous tutorials, it will get the _enter_tree() and _ready() callbacks (as well as _exit_tree()).
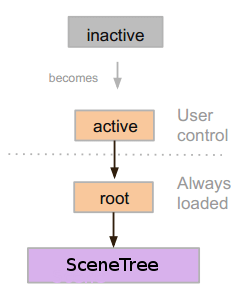
When nodes enter the Scene Tree, they become active. They get access to everything they need to process, get input, display 2D and 3D visuals, receive and send notifications, play sounds, etc. When they are removed from the scene tree, they lose these abilities.
Tree order¶
Most node operations in Godot, such as drawing 2D, processing, or getting notifications are done in tree order. This means that parents and siblings with a lower rank in the tree order will get notified before the current node.
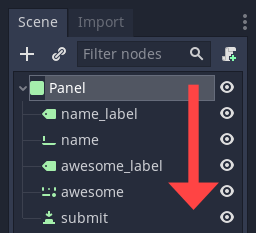
“Becoming active” by entering the Scene Tree¶
- A scene is loaded from disk or created by scripting.
- The root node of that scene (only one root, remember?) is added as either a child of the “root” Viewport (from SceneTree), or to any child or grandchild of it.
- Every node of the newly added scene, will receive the “enter_tree” notification ( _enter_tree() callback in GDScript) in top-to-bottom order.
- An extra notification, “ready” ( _ready() callback in GDScript) is provided for convenience, when a node and all its children are inside the active scene.
- When a scene (or part of it) is removed, they receive the “exit scene” notification ( _exit_tree() callback in GDScript) in bottom-to-top order
Changing current scene¶
After a scene is loaded, it is often desired to change this scene for another one. The simple way to do this is to use the SceneTree.change_scene() function:
func _my_level_was_completed():
get_tree().change_scene("res://levels/level2.tscn")
public void _MyLevelWasCompleted()
{
GetTree().ChangeScene("res://levels/level2.tscn");
}
Rather than using file paths, one can also use ready-made PackedScene resources using the equivalent function SceneTree.change_scene_to(PackedScene scene):
var next_scene = preload("res://levels/level2.tscn")
func _my_level_was_completed():
get_tree().change_scene_to(next_scene)
public void _MyLevelWasCompleted()
{
var nextScene = (PackedScene)ResourceLoader.Load("res://levels/level2.tscn");
GetTree().ChangeSceneTo(nextScene);
}
These are quick and useful ways to switch scenes but have the drawback that the game will stall until the new scene is loaded and running. At some point in the development of your game, it may be preferable to create proper loading screens with progress bar, animated indicators or thread (background) loading. This must be done manually using autoloads (see next chapter) and Background loading.
Singletons (AutoLoad)¶
Introduction¶
Godot’s scene system, while powerful and flexible, has a drawback: there is no method for storing information (e.g. a player’s score or inventory) that is needed by more than one scene.
It’s possible to address this with some workarounds, but they come with their own limitations:
- You can use a “master” scene that loads and unloads other scenes as its children. However, this means you can no longer run those scenes individually and expect them to work correctly.
- Information can be stored to disk in
user://and then loaded by scenes that require it, but frequently saving and loading data is cumbersome and may be slow.
The Singleton Pattern is a useful tool for solving the common use case where you need to store persistent information between scenes. In our case it is possible re-use the same scene or class for multiple singletons, so long as they have different names.
Using this concept, you can create objects that:
- Are always loaded, no matter which scene is currently running
- Can store global variables, such as player information
- Can handle switching scenes and between-scene transitions
- Act like a singleton, since GDScript does not support global variables by design
Autoloading nodes and scripts can give us these characteristics.
AutoLoad¶
You can use AutoLoad to load a scene or a script that inherits from Node. Note: when autoloading a script, a Node will be created and the script will be attached to it. This node will be added to the root viewport before any other scenes are loaded.
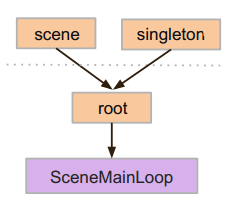
To autoload a scene or script, select Project -> Project Settings from the
menu and switch to the “AutoLoad” tab.
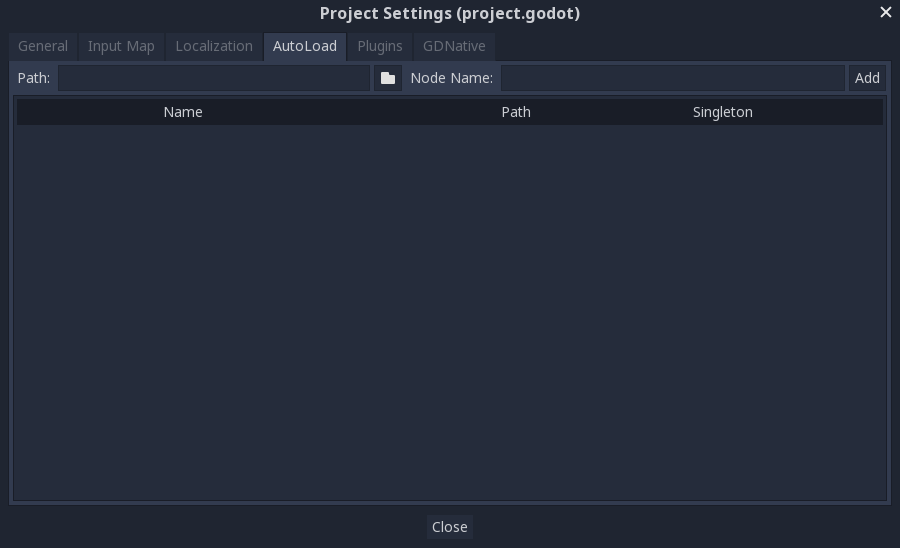
Here you can add any number of scenes or scripts. Each entry in the list
requires a name, which is assigned as the node’s name property. The order of
the entries as they are added to the global scene tree can be manipulated using
the up/down arrow keys.

This means that any node can access a singleton named “PlayerVariables” with:
var player_vars = get_node("/root/PlayerVariables")
player_vars.health -= 10
var playerVariables = (PlayerVariables)GetNode("/root/PlayerVariables");
playerVariables.Health -= 10; // Instance field.
If the “Enable” column is checked (default true) then the singleton can simply
be accessed directly:
PlayerVariables.health -= 10
// Static members can be accessed by using the class name.
PlayerVariables.Health -= 10;
Note that autoload objects (scripts and/or scenes) are accessed just like any other node in the scene tree. In fact, if you look at the running scene tree, you’ll see the autoloaded nodes appear:
Custom scene switcher¶
This tutorial will demonstrate building a scene switcher using autoload. For basic scene switching, you can use the SceneTree.change_scene() method (see SceneTree for details). However, if you need more complex behavior when changing scenes, this method provides more functionality.
To begin, download the template from here:
autoload.zip and open it in Godot.
The project contains two scenes: Scene1.tscn and Scene2.tscn. Each
scene contains a label displaying the scene name and a button with its
pressed() signal connected. When you run the project, it starts in
Scene1.tscn. However, pressing the button does nothing.
Global.gd¶
Switch to the “Script” tab and create a new script called Global.gd. Make sure
it inherits from Node:
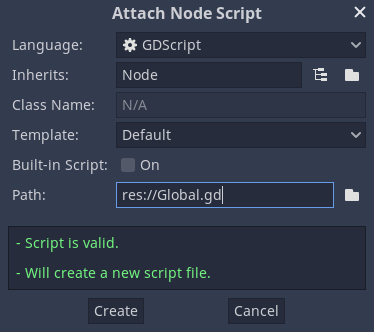
The next step is to add this script to the autoLoad list. Open
Project > Project Settings from the menu, switch to the “AutoLoad” tab and
select the script by clicking the browse button or typing its path:
res://Global.gd. Press “Add” to add it to the autoload list:
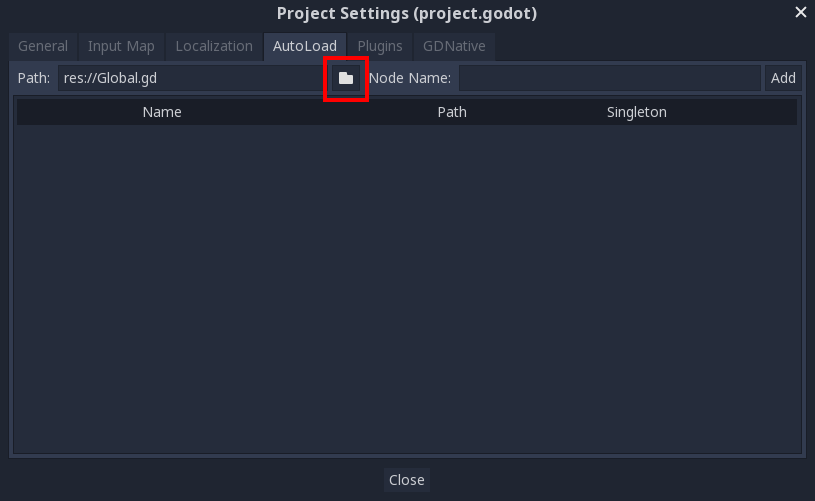
Now whenever we run any scene in the project, this script will always be loaded.
Returning to the script, it needs to fetch the current scene in the
_ready() function. Both the current scene (the one with the button) and
global.gd are children of root, but autoloaded nodes are always first. This
means that the last child of root is always the loaded scene.
extends Node
var current_scene = null
func _ready():
var root = get_tree().get_root()
current_scene = root.get_child(root.get_child_count() - 1)
using Godot;
using System;
public class Global : Godot.Node
{
public Node CurrentScene { get; set; }
public override void _Ready()
{
Viewport root = GetTree().GetRoot();
CurrentScene = root.GetChild(root.GetChildCount() - 1);
}
}
Now we need a function for changing the scene. This function needs to free the current scene and replace it with the requested one.
func goto_scene(path):
# This function will usually be called from a signal callback,
# or some other function in the current scene.
# Deleting the current scene at this point is
# a bad idea, because it may still be executing code.
# This will result in a crash or unexpected behavior.
# The solution is to defer the load to a later time, when
# we can be sure that no code from the current scene is running:
call_deferred("_deferred_goto_scene", path)
func _deferred_goto_scene(path):
# It is now safe to remove the current scene
current_scene.free()
# Load the new scene.
var s = ResourceLoader.load(path)
# Instance the new scene.
current_scene = s.instance()
# Add it to the active scene, as child of root.
get_tree().get_root().add_child(current_scene)
# Optionally, to make it compatible with the SceneTree.change_scene() API.
get_tree().set_current_scene(current_scene)
public void GotoScene(string path)
{
// This function will usually be called from a signal callback,
// or some other function from the current scene.
// Deleting the current scene at this point is
// a bad idea, because it may still be executing code.
// This will result in a crash or unexpected behavior.
// The solution is to defer the load to a later time, when
// we can be sure that no code from the current scene is running:
CallDeferred(nameof(DeferredGotoScene), path);
}
public void DeferredGotoScene(string path)
{
// It is now safe to remove the current scene
CurrentScene.Free();
// Load a new scene.
var nextScene = (PackedScene)GD.Load(path);
// Instance the new scene.
CurrentScene = nextScene.Instance();
// Add it to the active scene, as child of root.
GetTree().GetRoot().AddChild(CurrentScene);
// Optionally, to make it compatible with the SceneTree.change_scene() API.
GetTree().SetCurrentScene(CurrentScene);
}
Using Object.call_deferred(), the second function will only run once all code from the current scene has completed. Thus, the current scene will not be removed while it is still being used (i.e. its code is still running).
Finally, we need to fill the empty callback functions in the two scenes:
# Add to 'Scene1.gd'.
func _on_Button_pressed():
Global.goto_scene("res://Scene2.tscn")
// Add to 'Scene1.cs'.
public void OnButtonPressed()
{
var global = (Global)GetNode("/root/Global");
global.GotoScene("res://Scene2.tscn");
}
and
# Add to 'Scene2.gd'.
func _on_Button_pressed():
Global.goto_scene("res://Scene1.tscn")
// Add to 'Scene2.cs'.
public void OnButtonPressed()
{
var global = (Global)GetNode("/root/Global");
global.GotoScene("res://Scene1.tscn");
}
Run the project and test that you can switch between scenes by pressing the button.
Note: When scenes are small, the transition is instantaneous. However, if your scenes are more complex, they may take a noticeable amount of time to appear. To learn how to handle this, see the next tutorial: Background loading
Editor manual¶
From Unity to Godot Engine¶
This guide provides an overview of Godot Engine from the viewpoint of a Unity user, and aims to help you migrate your existing Unity experience into the world of Godot.
Note
This article talks about older versions of Unity. Nestable prefabs (‘Nested prefabs’) were added to Unity 2018.3. Nestable prefabs are analogous to Godot’s scenes, and allow a more Godot-like approach to scene organisation.
Differences¶
| Unity | Godot | |
|---|---|---|
| License | Proprietary, closed, free license with revenue caps and usage restrictions | MIT license, free and fully open source without any restriction |
| OS (editor) | Windows, macOS, Linux | Windows, macOS, X11 (Linux, *BSD) |
| OS (export) |
|
|
| Scene system |
|
Scene tree and nodes, allowing scenes to be nested and/or inherit other scenes |
| Third-party tools | Visual Studio or VS Code | |
| Notable advantages |
|
|
The editor¶
Godot Engine provides a rich-featured editor that allows you to build your games. The pictures below display the default layouts of both editors with colored blocks to indicate common functionalities.
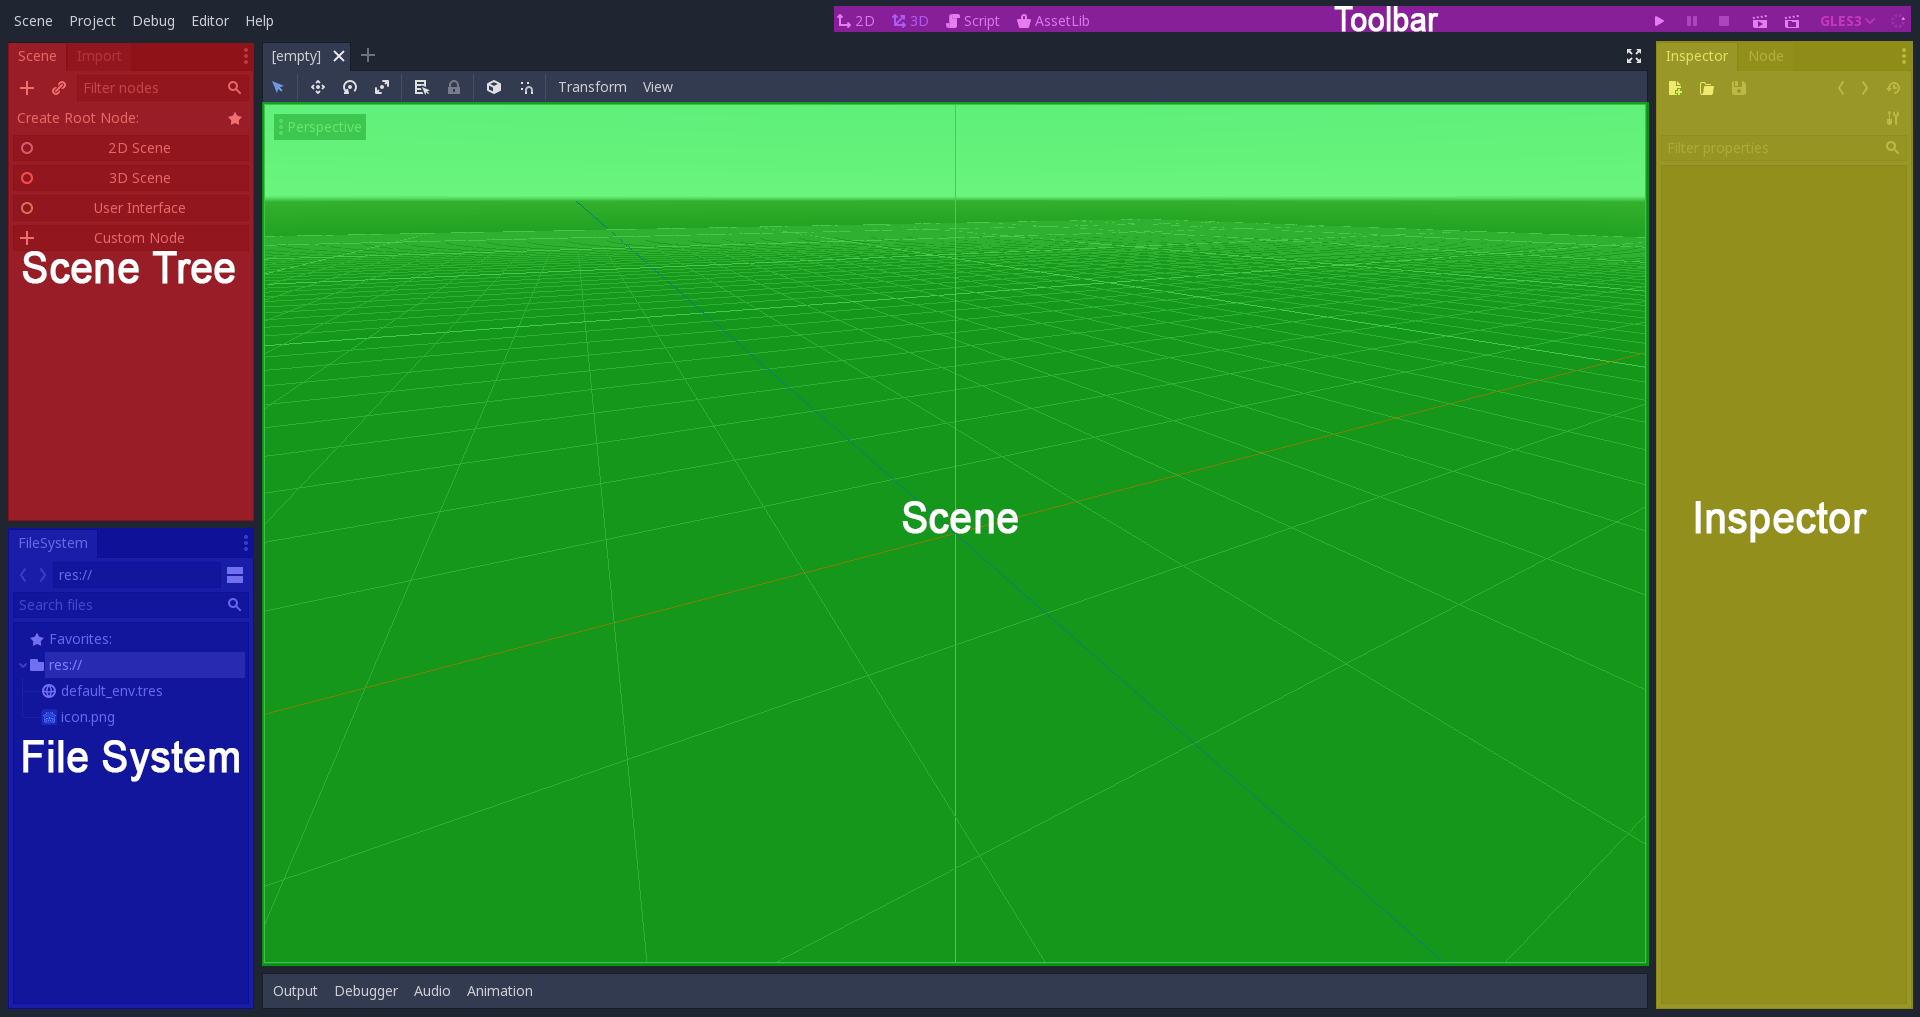
While both editors may seem similar, there are many differences below the surface. Both let you organize the project using the filesystem, but Godot’s approach is simpler with a single configuration file, minimalist text format, and no metadata. This makes Godot more friendly to VCS systems, such as Git, Subversion, or Mercurial.
Godot’s Scene panel is similar to Unity’s Hierarchy panel but, as each node has a specific function, the approach used by Godot is more visually descriptive. It’s easier to understand what a scene does at a glance.
The Inspector in Godot is more minimal, it shows only properties. Thanks to this, objects can expose more useful parameters to the user without having to hide functionality in language APIs. As a plus, Godot allows animating any of those properties visually. Changing colors, textures, enumerations, or even links to resources in real-time is possible without needing to write code.
The Toolbar at the top of the screen is similar in both editors, offering control over project playback. Projects in Godot run in a separate window, rather than inside the editor (but the tree and objects can still be explored in the debugger window).
This approach has the disadvantage that in Godot the running game can’t be explored from different angles (though this may be supported in the future and displaying collision gizmos in the running game is already possible), but in exchange has several advantages:
- Running the project and closing it is fast (Unity has to save, run the project, close the project, and then reload the previous state).
- Live editing is a lot more useful because changes done to the editor take effect immediately in the game and are not lost (nor have to be synced) when the game is closed. This allows fantastic workflows, like creating levels while you play them.
- The editor is more stable because the game runs in a separate process.
Finally, Godot’s top toolbar includes a menu for remote debugging. These options allow deployment to a device (connected phone, tablet, or browser via HTML5), and debugging/live editing on it after the game is exported.
The scene system¶
This is the most important difference between Unity and Godot and the favourite feature of most Godot users.
Working on a ‘level’ in Unity usually means embedding all the required assets in a scene and linking them together with components and scripts.
Godot’s scene system is superficially similar to Unity. A ‘level’ consists of a collection of nodes, each with its own purpose: Sprite, Mesh, Light, etc. However, in Godot the nodes are arranged in a tree. Each node can have multiple children, which makes each a subscene of the main scene. This means you can compose a whole scene with different scenes stored in different files.
For example, think of a platformer level. You would compose it with multiple elements:
- Bricks
- Coins
- The player
- The enemies
In Unity, you would put all the GameObjects in the scene: the player, multiple instances of enemies, bricks everywhere to form the ground of the level and then multiple instances of coins all over the level. You would then add various components to each element to link them and add logic in the level: For example, you’d add a BoxCollider2D to all the elements of the scene so that they can collide. This principle is different in Godot.
In Godot, you would split your whole scene into three separate, smaller scenes, and instance them in the main scene.
- A scene for the Player alone.
Consider the player as an element we’d like to use in different parent scenes (for instance ‘level’ scenes). In our case, the player element needs at least an AnimatedSprite node. This node contains the sprite textures necessary for various animations (for example, a walking animation).
- A scene for the Enemy.
An enemy is also an element we’d like to use in several scenes. It’s almost the same as the Player node. The only differences are the script (it needs ‘AI’ routines to generate the enemy’s behaviour) and the sprite textures used by the AnimatedSprite node.
- A Level scene.
A Level scene is composed of Bricks (for platforms), Coins (for the player to collect) and a number of instances of the Enemy scene. Each instance is a node in the Level scene tree. These instances are separate enemies, which initially have shared behaviour and appearance as defined in the Enemy scene. You can set different properties for each Enemy node (to change its color, for example).
4. A Main scene. The Main scene would be composed of one root node with 2 children: a Player instance node, and a Level instance node. The root node can be anything, generally a “root” type such as “Node” which is the most global type, or “Node2D” (root type of all 2D-related nodes), “Spatial” (root type of all 3D-related nodes) or “Control” (root type of all GUI-related nodes).
As you can see, every scene is organized as a tree. The same goes for nodes’ properties: you don’t add a collision component to a node to make it collidable like Unity does. Instead, you make this node a child of a new specific node that has collision properties. Godot features various collision types nodes, depending on the usage (see the Physics introduction).
What are the advantages of this system? Wouldn’t this system potentially increase the depth of the scene tree? And doesn’t Unity already allow you to organize GameObjects by putting them inside empty GameObjects?
- Godot’s system is closer to the well-known object-oriented paradigm: Godot provides a number of nodes which are not clearly “Game Objects”, but they provide their children with their own capabilities: this is inheritance.
- Godot allows the extraction of a subtree of a scene to make it a scene of its own. So if a scene tree gets too deep, it can be split into smaller subtrees. This is better for reusability, as you can include any subtree as a child of any node. Putting multiple GameObjects in an empty GameObject in Unity does not provide the same functionality.
Project organization¶
There is no perfect project architecture. Any architecture can be made to work in either Unity and Godot.
However, a common architecture for Unity projects is to have one Assets folder in the root directory that contains various folders, one per type of asset: Audio, Graphics, Models, Materials, Scripts, Scenes, and so on.
Since Godot allows splitting scenes into smaller scenes, each scene and subscene existing as a file in the project, we recommend organizing your project a bit differently. This wiki provides a page for this: Project organization.
Where are my prefabs?¶
A prefab as provided by Unity is a ‘template’ element of the scene. It is reusable, and each instance of the prefab that exists in the scene has an existence of its own, but all of them have the same properties as defined by the prefab.
Godot does not provide prefabs as such, but the same functionality is provided by its scene system: The scene system is organized as a tree. Godot allows you to save any subtree of a scene as a scene file. This new scene can then be instanced as many times as you want, as a child of any node. Any change you make to this new, separate scene will be applied to its instances. However, any change you make to the instance will not have any impact on the ‘template’ scene.
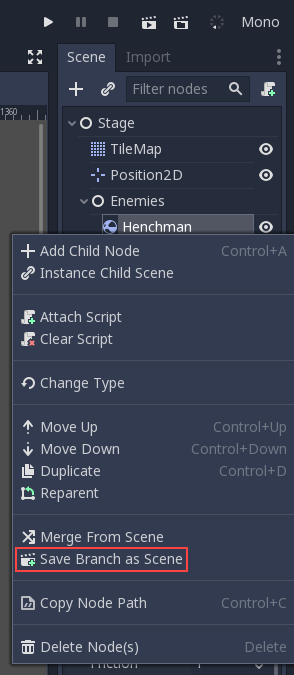
To be precise, you can modify the parameters of an instance in the Inspector panel. The nodes that compose this instance are initially locked. You can unlock them if you need to by right-clicking the instance in the Scene tree and selecting “Editable children” in the menu. You don’t need to do this to add new child nodes to this node. Remember that any new children will belong to the instance, not to the ‘template’ scene on disk. If you want to add new children to every instance of your ‘template’ scene, then you should add them in the ‘template’ scene.
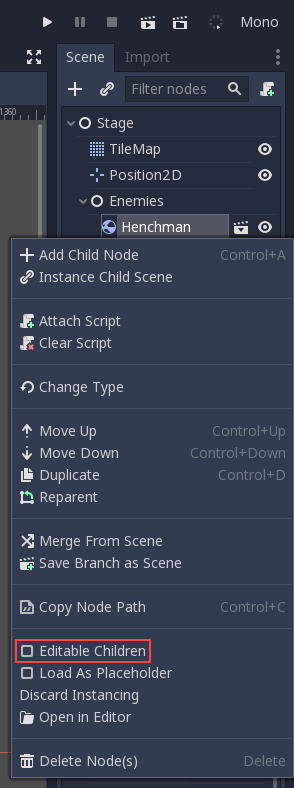
Glossary correspondence¶
- GameObject -> Node
- Add a component -> Inheriting
- Prefab -> Reusable Scene file
Scripting: GDScript, C# and Visual Script¶
Design¶
Unity supports C#. C# benefits from its integration with Visual Studio and has desirable features such as static typing.
Godot provides its own scripting language, GDScript as well as support for Visual Script and C#. GDScript borrows its syntax from Python, but is not related to it. If you wonder about the reasoning for a custom scripting language, please read the GDScript basics and Frequently asked questions pages. GDScript is strongly attached to the Godot API and doesn’t take long to learn: Between one evening for an experienced programmer and a week for a complete beginner.
Unity allows you to attach as many scripts as you want to a GameObject. Each script adds a behaviour to the GameObject: For example, you can attach a script so that it reacts to the player’s controls, and another that controls its specific game logic.
In Godot, you can only attach one script per node. You can use either an external GDScript file or include the script directly in the node. If you need to attach more scripts to one node, then you may consider two solutions, depending on your scene and on what you want to achieve:
- either add a new node between your target node and its current parent, then add a script to this new node.
- or, you can split your target node into multiple children and attach one script to each of them.
As you can see, it can be easy to turn a scene tree to a mess. Consider splitting any complicated scene into multiple, smaller branches.
Connections: groups and signals¶
You can control nodes by accessing them via script and calling built-in or user-defined functions on them. You can also place nodes in a group and call functions on all nodes in this group. See more in the scripting documentation.
Nodes can send a signal when a specified action occurs. A signal can be set to call any function. You can define custom signals and specify when they are triggered. See more in the signals documentation.
Script serialization¶
Unity can handle script serialization in two ways:
- Implicit: All public fields in a class are automatically serialized if the type is a serializable type (
Dictionaryis not serializable). - Explicit: Non-public fields can be serialized using the
[SerializeField]attribute.
Godot also has a built-in script serialization system, but it works only explicitly.
You can serialize any serializable type (built-in and various engine types,
including Array and Dictionary) using the export keyword.
See the exports documentation for details.
Unity also has a data type called ScriptableObject used to serialize custom asset objects.
Its equivalent in Godot is the base class for all resources: Resource.
Creating a script that inherits Resource will allow you to create custom serializable objects. More information about resources can be found here.
Using Godot in C++¶
Godot allows you to develop your project directly in C++ by using its API, which is not possible with Unity at the moment. As an example, you can consider Godot Engine’s editor as a “game” written in C++ using the Godot API.
If you are interested in using Godot in C++, you may want to start reading the Developing in C++ page.
Command line tutorial¶
Some developers like using the command line extensively. Godot is designed to be friendly to them, so here are the steps for working entirely from the command line. Given the engine relies on almost no external libraries, initialization times are pretty fast, making it suitable for this workflow.
Command line reference¶
General options
| Command | Description |
-h, --help, /? |
Display the list of command line options. |
--version |
Display the version string. |
-v, --verbose |
Use verbose stdout mode. |
--quiet |
Quiet mode, silences stdout messages. Errors are still displayed. |
Run options
| Command | Description |
-e, --editor |
Start the editor instead of running the scene (tools must be enabled). |
-p, --project-manager |
Start the project manager, even if a project is auto-detected (tools must be enabled). |
-q, --quit |
Quit after the first iteration. |
-l <locale>, --language <locale> |
Use a specific locale (<locale> being a two-letter code). See Locales for more details. |
--path <directory> |
Path to a project (<directory> must contain a ‘project.godot’ file). |
-u, --upwards |
Scan folders upwards for ‘project.godot’ file. |
--main-pack <file> |
Path to a pack (.pck) file to load. |
--render-thread <mode> |
Render thread mode (‘unsafe’, ‘safe’, ‘separate’). See Thread Model for more details. |
--remote-fs <address> |
Remote filesystem (<host/IP>[:<port>] address). |
--audio-driver <driver> |
Audio driver. Use --help first to display the list of available drivers. |
--video-driver <driver> |
Video driver. Use --help first to display the list of available drivers. |
Display options
| Command | Description |
-f, --fullscreen |
Request fullscreen mode. |
-m, --maximized |
Request a maximized window. |
-w, --windowed |
Request windowed mode. |
-t, --always-on-top |
Request an always-on-top window. |
--resolution <W>x<H> |
Request window resolution. |
--position <X>,<Y> |
Request window position. |
--low-dpi |
Force low-DPI mode (macOS and Windows only). |
--no-window |
Disable window creation (Windows only). Useful together with --script. |
Debug options
Note
Debug options are only available in the editor and debug export templates
(they require debug or release_debug build targets, see
Target for more details).
| Command | Description |
-d, --debug |
Debug (local stdout debugger). |
-b, --breakpoints |
Breakpoint list as source::line comma-separated pairs, no spaces (use %%20 instead). |
--profiling |
Enable profiling in the script debugger. |
--remote-debug <address> |
Remote debug (<host/IP>:<port> address). |
--debug-collisions |
Show collision shapes when running the scene. |
--debug-navigation |
Show navigation polygons when running the scene. |
--frame-delay <ms> |
Simulate high CPU load (delay each frame by <ms> milliseconds). |
--time-scale <scale> |
Force time scale (higher values are faster, 1.0 is normal speed). |
--disable-render-loop |
Disable render loop so rendering only occurs when called explicitly from script. |
--disable-crash-handler |
Disable crash handler when supported by the platform code. |
--fixed-fps <fps> |
Force a fixed number of frames per second. This setting disables real-time synchronization. |
--print-fps |
Print the frames per second to the stdout. |
Standalone tools
| Command | Description |
-s <script>, --script <script> |
Run a script. |
--check-only |
Only parse for errors and quit (use with --script). |
--export <target> |
Export the project using the given export target. Export only main pack if path ends with .pck or .zip (tools must be enabled). |
--export-debug <target> |
Like --export, but use debug template (tools must be enabled). |
--doctool <path> |
Dump the engine API reference to the given <path> in XML format, merging if existing files are found (tools must be enabled). |
--no-docbase |
Disallow dumping the base types (used with --doctool, tools must be enabled). |
--build-solutions |
Build the scripting solutions (e.g. for C# projects, tools must be enabled). |
--gdnative-generate-json-api |
Generate JSON dump of the Godot API for GDNative bindings (tools must be enabled). |
--test <test> |
Run a unit test. Use --help first to display the list of tests. (tools must be enabled). |
Path¶
It is recommended that your Godot binary be in your PATH environment
variable, so it can be executed easily from any place by typing
godot. You can do so on Linux by placing the Godot binary in
/usr/local/bin and making sure it is called godot.
Setting the project path¶
Depending on where your Godot binary is located and what your current working directory is, you may need to set the path to your project for any of the following commands to work correctly.
This can be done by giving the path to the project.godot file
of your project as either the first argument, like this:
user@host:~$ godot path_to_your_project/project.godot [other] [commands] [and] [args]
Or by using the --path argument:
user@host:~$ godot --path path_to_your_project [other] [commands] [and] [args]
For example, the full command for exporting your game (as explained below) might look like this:
user@host:~$ godot --path path_to_your_project --export my_export_preset_name game.exe
Creating a project¶
Creating a project from the command line can be done by navigating the shell to the desired place and making a project.godot file.
user@host:~$ mkdir newgame
user@host:~$ cd newgame
user@host:~/newgame$ touch project.godot
The project can now be opened with Godot.
Running the editor¶
Running the editor is done by executing Godot with the -e flag. This
must be done from within the project directory or a subdirectory,
otherwise the command is ignored and the project manager appears.
user@host:~/newgame$ godot -e
If a scene has been created and saved, it can be edited later by running the same code with that scene as argument.
user@host:~/newgame$ godot -e scene.tscn
Erasing a scene¶
Godot is friends with your filesystem and will not create extra
metadata files. Use rm to erase a scene file. Make sure nothing
references that scene or else an error will be thrown upon opening.
user@host:~/newgame$ rm scene.tscn
Running the game¶
To run the game, simply execute Godot within the project directory or subdirectory.
user@host:~/newgame$ godot
When a specific scene needs to be tested, pass that scene to the command line.
user@host:~/newgame$ godot scene.tscn
Debugging¶
Catching errors in the command line can be a difficult task because they
just fly by. For this, a command line debugger is provided by adding
-d. It works for running either the game or a simple scene.
user@host:~/newgame$ godot -d
user@host:~/newgame$ godot -d scene.tscn
Exporting¶
Exporting the project from the command line is also supported. This is especially useful for continuous integration setups. The version of Godot that is headless (server build, no video) is ideal for this.
user@host:~/newgame$ godot --export "Linux/X11" /var/builds/project
user@host:~/newgame$ godot --export Android /var/builds/project.apk
The platform names recognized by the --export switch are the same as
displayed in the export wizard of the editor. To get a list of supported
platforms from the command line, try exporting to a non-recognized
platform and the full listing of platforms your configuration supports
will be shown.
To export a debug version of the game, use the --export-debug switch
instead of --export. Their parameters and usage are the same.
Running a script¶
It is possible to run a simple .gd script from the command line. This feature is especially useful in large projects, for batch conversion of assets or custom import/export.
The script must inherit from SceneTree or MainLoop.
Here is a simple example of how it works:
#sayhello.gd
extends SceneTree
func _init():
print("Hello!")
quit()
And how to run it:
user@host:~/newgame$ godot -s sayhello.gd
Hello!
If no project.godot exists at the path, current path is assumed to be the
current working directory (unless -path is specified).
Using an external text editor¶
Godot can be used with an external text editor, such as Sublime Text or Visual Studio Code.
To enable an external text editor, browse to the relevant editor settings via:
Editor -> Editor Settings -> Text Editor -> External
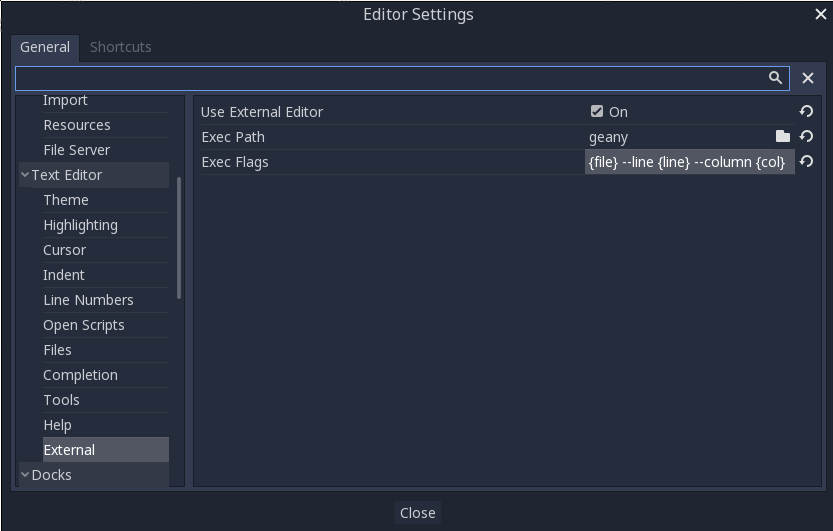
There are two fields: the executable path and command line flags. The flags allow you to integrate the editor with Godot, passing it the file path to open and other relevant arguments. Godot will replace the following placeholders in the flags string:
| Field in Exec Flags | Is replaced with |
|---|---|
{project} |
The absolute path to the project directory |
{file} |
The absolute path to the file |
{col} |
The column number of the error |
{line} |
The line number of the error |
Some example Exec Flags for various editors include:
| Editor | Exec Flags |
|---|---|
| Geany/Kate | {file} --line {line} --column {col} |
| Atom/Sublime Text | {file}:{line} |
| JetBrains Rider | --line {line} {file} |
| Visual Studio Code | {project} --goto {file}:{line}:{col} |
| Vim (gVim) | "+call cursor({line}, {col})" {file} |
Note
For Visual Studio Code you will have to point to the code.cmd file.
Scripting¶
GDScript¶
GDScript basics¶
Introduction¶
GDScript is a high-level, dynamically typed programming language used to create content. It uses a syntax similar to Python (blocks are indent-based and many keywords are similar). Its goal is to be optimized for and tightly integrated with Godot Engine, allowing great flexibility for content creation and integration.
History¶
In the early days, the engine used the Lua scripting language. Lua is fast, but creating bindings to an object oriented system (by using fallbacks) was complex and slow and took an enormous amount of code. After some experiments with Python, it also proved difficult to embed.
The last third party scripting language that was used for shipped games was Squirrel, but it was dropped as well. At that point, it became evident that a custom scripting language could more optimally make use of Godot’s particular architecture:
- Godot embeds scripts in nodes. Most languages are not designed with this in mind.
- Godot uses several built-in data types for 2D and 3D math. Script languages do not provide this, and binding them is inefficient.
- Godot uses threads heavily for lifting and initializing data from the net or disk. Script interpreters for common languages are not friendly to this.
- Godot already has a memory management model for resources, most script languages provide their own, which results in duplicate effort and bugs.
- Binding code is always messy and results in several failure points, unexpected bugs and generally low maintainability.
The result of these considerations is GDScript. The language and interpreter for GDScript ended up being smaller than the binding code itself for Lua and Squirrel, while having equal functionality. With time, having a built-in language has proven to be a huge advantage.
Example of GDScript¶
Some people can learn better by taking a look at the syntax, so here’s a simple example of how GDScript looks.
# A file is a class!
# Inheritance
extends BaseClass
# (optional) class definition with a custom icon
class_name MyClass, "res://path/to/optional/icon.svg"
# Member variables
var a = 5
var s = "Hello"
var arr = [1, 2, 3]
var dict = {"key": "value", 2: 3}
var typed_var: int
var inferred_type := "String"
# Constants
const ANSWER = 42
const THE_NAME = "Charly"
# Enums
enum {UNIT_NEUTRAL, UNIT_ENEMY, UNIT_ALLY}
enum Named {THING_1, THING_2, ANOTHER_THING = -1}
# Built-in vector types
var v2 = Vector2(1, 2)
var v3 = Vector3(1, 2, 3)
# Function
func some_function(param1, param2):
var local_var = 5
if param1 < local_var:
print(param1)
elif param2 > 5:
print(param2)
else:
print("Fail!")
for i in range(20):
print(i)
while param2 != 0:
param2 -= 1
var local_var2 = param1 + 3
return local_var2
# Functions override functions with the same name on the base/parent class.
# If you still want to call them, use '.' (like 'super' in other languages).
func something(p1, p2):
.something(p1, p2)
# Inner class
class Something:
var a = 10
# Constructor
func _init():
print("Constructed!")
var lv = Something.new()
print(lv.a)
If you have previous experience with statically typed languages such as C, C++, or C# but never used a dynamically typed one before, it is advised you read this tutorial: GDScript: An introduction to dynamic languages.
Language¶
In the following, an overview is given to GDScript. Details, such as which methods are available to arrays or other objects, should be looked up in the linked class descriptions.
Identifiers¶
Any string that restricts itself to alphabetic characters (a to
z and A to Z), digits (0 to 9) and _ qualifies
as an identifier. Additionally, identifiers must not begin with a digit.
Identifiers are case-sensitive (foo is different from FOO).
Keywords¶
The following is the list of keywords supported by the language. Since
keywords are reserved words (tokens), they can’t be used as identifiers.
Operators (like in, not, and or or) and names of built-in types
as listed in the following sections are also reserved.
Keywords are defined in the GDScript tokenizer in case you want to take a look under the hood.
| Keyword | Description |
|---|---|
| if | See if/else/elif. |
| elif | See if/else/elif. |
| else | See if/else/elif. |
| for | See for. |
| while | See while. |
| match | See match. |
| break | Exits the execution of the current for or while loop. |
| continue | Immediately skips to the next iteration of the for or while loop. |
| pass | Used where a statement is required syntactically but execution of code is undesired, e.g. in empty functions. |
| return | Returns a value from a function. |
| class | Defines a class. |
| extends | Defines what class to extend with the current class. |
| is | Tests whether a variable extends a given class, or is of a given built-in type. |
| as | Cast the value to a given type if possible. |
| self | Refers to current class instance. |
| tool | Executes the script in the editor. |
| signal | Defines a signal. |
| func | Defines a function. |
| static | Defines a static function. Static member variables are not allowed. |
| const | Defines a constant. |
| enum | Defines an enum. |
| var | Defines a variable. |
| onready | Initializes a variable once the Node the script is attached to and its children are part of the scene tree. |
| export | Saves a variable along with the resource it’s attached to and makes it visible and modifiable in the editor. |
| setget | Defines setter and getter functions for a variable. |
| breakpoint | Editor helper for debugger breakpoints. |
| preload | Preloads a class or variable. See Classes as resources. |
| yield | Coroutine support. See Coroutines with yield. |
| assert | Asserts a condition, logs error on failure. Ignored in non-debug builds. See Assert keyword. |
| remote | Networking RPC annotation. See high-level multiplayer docs. |
| master | Networking RPC annotation. See high-level multiplayer docs. |
| puppet | Networking RPC annotation. See high-level multiplayer docs. |
| remotesync | Networking RPC annotation. See high-level multiplayer docs. |
| mastersync | Networking RPC annotation. See high-level multiplayer docs. |
| puppetsync | Networking RPC annotation. See high-level multiplayer docs. |
| PI | PI constant. |
| TAU | TAU constant. |
| INF | Infinity constant. Used for comparisons. |
| NAN | NAN (not a number) constant. Used for comparisons. |
Operators¶
The following is the list of supported operators and their precedence.
| Operator | Description |
x[index] |
Subscription (highest priority) |
x.attribute |
Attribute reference |
foo() |
Function call |
is |
Instance type checker |
~ |
Bitwise NOT |
-x |
Negative / Unary negation |
* / % |
Multiplication / Division / Remainder These operators have the same behavior as C++. Integer division is truncated rather than returning a fractional number, and the % operator is only available for ints (“fmod” for floats) |
+ |
Addition / Concatenation of arrays |
- |
Subtraction |
<< >> |
Bit shifting |
& |
Bitwise AND |
^ |
Bitwise XOR |
| |
Bitwise OR |
< > == != >= <= |
Comparisons |
in |
Content test |
! not |
Boolean NOT |
and && |
Boolean AND |
or || |
Boolean OR |
if x else |
Ternary if/else |
= += -= *= /= %= &= |= |
Assignment (lowest priority) |
Literals¶
| Literal | Type |
45 |
Base 10 integer |
0x8F51 |
Base 16 (hexadecimal) integer |
0b101010 |
Base 2 (binary) integer |
3.14, 58.1e-10 |
Floating-point number (real) |
"Hello", "Hi" |
Strings |
"""Hello""" |
Multiline string |
@"Node/Label" |
NodePath or StringName |
$NodePath |
Shorthand for get_node("NodePath") |
Comments¶
Anything from a # to the end of the line is ignored and is
considered a comment.
# This is a comment.
Built-in types¶
Built-in types are stack-allocated. They are passed as values. This means a copy
is created on each assignment or when passing them as arguments to functions.
The only exceptions are Arrays and Dictionaries, which are passed by
reference so they are shared. (Pooled arrays such as PoolByteArray are still
passed as values.)
Basic built-in types¶
A variable in GDScript can be assigned to several built-in types.
null is an empty data type that contains no information and can not
be assigned any other value.
Short for “integer”, it stores whole numbers (positive and negative). It is stored as a 64-bit value, equivalent to “int64_t” in C++.
Stores real numbers, including decimals, using floating-point values. It is stored as a 64-bit value, equivalent to “double” in C++. Note: Currently, data structures such as Vector2, Vector3, and PoolRealArray store 32-bit single-precision “float” values.
A sequence of characters in Unicode format. Strings can contain standard C escape sequences. GDScript also supports GDScript format strings.
Vector built-in types¶
2D Rectangle type containing two vectors fields: position and size.
Also contains an end field which is position + size.
3×2 matrix used for 2D transforms.
3D Plane type in normalized form that contains a normal vector field
and a d scalar distance.
Quaternion is a datatype used for representing a 3D rotation. It’s useful for interpolating rotations.
Axis-aligned bounding box (or 3D box) contains 2 vectors fields: position
and size. Also contains an end field which is
position + size.
Engine built-in types¶
Color data type contains r, g, b, and a fields. It can
also be accessed as h, s, and v for hue/saturation/value.
Container built-in types¶
Generic sequence of arbitrary object types, including other arrays or dictionaries (see below).
The array can resize dynamically. Arrays are indexed starting from index 0.
Negative indices count from the end.
var arr = []
arr = [1, 2, 3]
var b = arr[1] # This is 2.
var c = arr[arr.size() - 1] # This is 3.
var d = arr[-1] # Same as the previous line, but shorter.
arr[0] = "Hi!" # Replacing value 1 with "Hi!".
arr.append(4) # Array is now ["Hi!", 2, 3, 4].
GDScript arrays are allocated linearly in memory for speed. Large arrays (more than tens of thousands of elements) may however cause memory fragmentation. If this is a concern, special types of arrays are available. These only accept a single data type. They avoid memory fragmentation and use less memory, but are atomic and tend to run slower than generic arrays. They are therefore only recommended to use for large data sets:
- PoolByteArray: An array of bytes (integers from 0 to 255).
- PoolIntArray: An array of integers.
- PoolRealArray: An array of floats.
- PoolStringArray: An array of strings.
- PoolVector2Array: An array of Vector2 objects.
- PoolVector3Array: An array of Vector3 objects.
- PoolColorArray: An array of Color objects.
Associative container which contains values referenced by unique keys.
var d = {4: 5, "A key": "A value", 28: [1, 2, 3]}
d["Hi!"] = 0
d = {
22: "value",
"some_key": 2,
"other_key": [2, 3, 4],
"more_key": "Hello"
}
Lua-style table syntax is also supported. Lua-style uses = instead of :
and doesn’t use quotes to mark string keys (making for slightly less to write).
Note however that like any GDScript identifier, keys written in this form cannot
start with a digit.
var d = {
test22 = "value",
some_key = 2,
other_key = [2, 3, 4],
more_key = "Hello"
}
To add a key to an existing dictionary, access it like an existing key and assign to it:
var d = {} # Create an empty Dictionary.
d.waiting = 14 # Add String "waiting" as a key and assign the value 14 to it.
d[4] = "hello" # Add integer 4 as a key and assign the String "hello" as its value.
d["Godot"] = 3.01 # Add String "Godot" as a key and assign the value 3.01 to it.
Data¶
Variables¶
Variables can exist as class members or local to functions. They are
created with the var keyword and may, optionally, be assigned a
value upon initialization.
var a # Data type is 'null' by default.
var b = 5
var c = 3.8
var d = b + c # Variables are always initialized in order.
Variables can optionally have a type specification. When a type is specified, the variable will be forced to have always that same type, and trying to assign an incompatible value will raise an error.
Types are specified in the variable declaration using a : (colon) symbol
after the variable name, followed by the type.
var my_vector2: Vector2
var my_node: Node = Sprite.new()
If the variable is initialized within the declaration, the type can be inferred, so it’s possible to omit the type name:
var my_vector2 := Vector2() # 'my_vector2' is of type 'Vector2'.
var my_node := Sprite.new() # 'my_node' is of type 'Sprite'.
Type inference is only possible if the assigned value has a defined type, otherwise it will raise an error.
Valid types are:
- Built-in types (Array, Vector2, int, String, etc.).
- Engine classes (Node, Resource, Reference, etc.).
- Constant names if they contain a script resource (
MyScriptif you declaredconst MyScript = preload("res://my_script.gd")). - Other classes in the same script, respecting scope (
InnerClass.NestedClassif you declaredclass NestedClassinside theclass InnerClassin the same scope). - Script classes declared with the
class_namekeyword.
Values assigned to typed variables must have a compatible type. If it’s needed to
coerce a value to be of a certain type, in particular for object types, you can
use the casting operator as.
Casting between object types results in the same object if the value is of the same type or a subtype of the cast type.
var my_node2D: Node2D
my_node2D = $Sprite as Node2D # Works since Sprite is a subtype of Node2D.
If the value is not a subtype, the casting operation will result in a null value.
var my_node2D: Node2D
my_node2D = $Button as Node2D # Results in 'null' since a Button is not a subtype of Node2D.
For built-in types, they will be forcibly converted if possible, otherwise the engine will raise an error.
var my_int: int
my_int = "123" as int # The string can be converted to int.
my_int = Vector2() as int # A Vector2 can't be converted to int, this will cause an error.
Casting is also useful to have better type-safe variables when interacting with the scene tree:
# Will infer the variable to be of type Sprite.
var my_sprite := $Character as Sprite
# Will fail if $AnimPlayer is not an AnimationPlayer, even if it has the method 'play()'.
($AnimPlayer as AnimationPlayer).play("walk")
Constants¶
Constants are similar to variables, but must be constants or constant expressions and must be assigned on initialization.
const A = 5
const B = Vector2(20, 20)
const C = 10 + 20 # Constant expression.
const D = Vector2(20, 30).x # Constant expression: 20.
const E = [1, 2, 3, 4][0] # Constant expression: 1.
const F = sin(20) # 'sin()' can be used in constant expressions.
const G = x + 20 # Invalid; this is not a constant expression!
const H = A + 20 # Constant expression: 25.
Although the type of constants is inferred from the assigned value, it’s also possible to add explicit type specification:
const A: int = 5
const B: Vector2 = Vector2()
Assigning a value of an incompatible type will raise an error.
Enums are basically a shorthand for constants, and are pretty useful if you want to assign consecutive integers to some constant.
If you pass a name to the enum, it will put all the keys inside a constant dictionary of that name.
Important
In Godot 3.1 and later, keys in a named enum are not registered
as global constants. They should be accessed prefixed by the
enum’s name (Name.KEY); see an example below.
enum {TILE_BRICK, TILE_FLOOR, TILE_SPIKE, TILE_TELEPORT}
# Is the same as:
const TILE_BRICK = 0
const TILE_FLOOR = 1
const TILE_SPIKE = 2
const TILE_TELEPORT = 3
enum State {STATE_IDLE, STATE_JUMP = 5, STATE_SHOOT}
# Is the same as:
const State = {STATE_IDLE = 0, STATE_JUMP = 5, STATE_SHOOT = 6}
# Access values with State.STATE_IDLE, etc.
Functions¶
Functions always belong to a class. The scope priority for
variable look-up is: local → class member → global. The self variable is
always available and is provided as an option for accessing class members, but
is not always required (and should not be sent as the function’s first
argument, unlike Python).
func my_function(a, b):
print(a)
print(b)
return a + b # Return is optional; without it 'null' is returned.
A function can return at any point. The default return value is null.
Functions can also have type specification for the arguments and for the return value. Types for arguments can be added in a similar way to variables:
func my_function(a: int, b: String):
pass
If a function argument has a default value, it’s possible to infer the type:
func my_function(int_arg := 42, String_arg := "string"):
pass
The return type of the function can be specified after the arguments list using
the arrow token (->):
func my_int_function() -> int:
return 0
Functions that have a return type must return a proper value. Setting the
type as void means the function doesn’t return anything. Void functions can
return early with the return keyword, but they can’t return any value.
void_function() -> void:
return # Can't return a value
Note
Non-void functions must always return a value, so if your code has
branching statements (such as an if/else construct), all the
possible paths must have a return. E.g., if you have a return
inside an if block but not after it, the editor will raise an
error because if the block is not executed, the function won’t have a
valid value to return.
Contrary to Python, functions are not first-class objects in GDScript. This means they cannot be stored in variables, passed as an argument to another function or be returned from other functions. This is for performance reasons.
To reference a function by name at run-time, (e.g. to store it in a variable, or
pass it to another function as an argument) one must use the call or
funcref helpers:
# Call a function by name in one step.
my_node.call("my_function", args)
# Store a function reference.
var my_func = funcref(my_node, "my_function")
# Call stored function reference.
my_func.call_func(args)
A function can be declared static. When a function is static, it has no
access to the instance member variables or self. This is mainly
useful to make libraries of helper functions:
static func sum2(a, b):
return a + b
Statements and control flow¶
Statements are standard and can be assignments, function calls, control
flow structures, etc (see below). ; as a statement separator is
entirely optional.
Simple conditions are created by using the if/else/elif syntax.
Parenthesis around conditions are allowed, but not required. Given the
nature of the tab-based indentation, elif can be used instead of
else/if to maintain a level of indentation.
if [expression]:
statement(s)
elif [expression]:
statement(s)
else:
statement(s)
Short statements can be written on the same line as the condition:
if 1 + 1 == 2: return 2 + 2
else:
var x = 3 + 3
return x
Sometimes, you might want to assign a different initial value based on a boolean expression. In this case, ternary-if expressions come in handy:
var x = [value] if [expression] else [value]
y += 3 if y < 10 else -1
Simple loops are created by using while syntax. Loops can be broken
using break or continued using continue:
while [expression]:
statement(s)
To iterate through a range, such as an array or table, a for loop is used. When iterating over an array, the current array element is stored in the loop variable. When iterating over a dictionary, the index is stored in the loop variable.
for x in [5, 7, 11]:
statement # Loop iterates 3 times with 'x' as 5, then 7 and finally 11.
var dict = {"a": 0, "b": 1, "c": 2}
for i in dict:
print(dict[i]) # Prints 0, then 1, then 2.
for i in range(3):
statement # Similar to [0, 1, 2] but does not allocate an array.
for i in range(1, 3):
statement # Similar to [1, 2] but does not allocate an array.
for i in range(2, 8, 2):
statement # Similar to [2, 4, 6] but does not allocate an array.
for c in "Hello":
print(c) # Iterate through all characters in a String, print every letter on new line.
for i in 3:
statement # Similar to range(3)
for i in 2.2:
statement # Similar to range(ceil(2.2))
A match statement is used to branch execution of a program.
It’s the equivalent of the switch statement found in many other languages, but offers some additional features.
Basic syntax:
match [expression]:
[pattern](s):
[block]
[pattern](s):
[block]
[pattern](s):
[block]
Crash-course for people who are familiar with switch statements:
- Replace
switchwithmatch. - Remove
case. - Remove any
breaks. If you don’t want tobreakby default, you can usecontinuefor a fallthrough. - Change
defaultto a single underscore.
Control flow:
The patterns are matched from top to bottom.
If a pattern matches, the corresponding block will be executed. After that, the execution continues below the match statement.
If you want to have a fallthrough, you can use continue to stop execution in the current block and check the ones below it.
There are 6 pattern types:
- Constant pattern
Constant primitives, like numbers and strings:
match x: 1: print("We are number one!") 2: print("Two are better than one!") "test": print("Oh snap! It's a string!")
- Variable pattern
Matches the contents of a variable/enum:
match typeof(x): TYPE_REAL: print("float") TYPE_STRING: print("text") TYPE_ARRAY: print("array")
- Wildcard pattern
This pattern matches everything. It’s written as a single underscore.
It can be used as the equivalent of the
defaultin aswitchstatement in other languages:match x: 1: print("It's one!") 2: print("It's one times two!") _: print("It's not 1 or 2. I don't care to be honest.")
- Binding pattern
A binding pattern introduces a new variable. Like the wildcard pattern, it matches everything - and also gives that value a name. It’s especially useful in array and dictionary patterns:
match x: 1: print("It's one!") 2: print("It's one times two!") var new_var: print("It's not 1 or 2, it's ", new_var)
- Array pattern
Matches an array. Every single element of the array pattern is a pattern itself, so you can nest them.
The length of the array is tested first, it has to be the same size as the pattern, otherwise the pattern doesn’t match.
Open-ended array: An array can be bigger than the pattern by making the last subpattern
...Every subpattern has to be comma-separated.
match x: []: print("Empty array") [1, 3, "test", null]: print("Very specific array") [var start, _, "test"]: print("First element is ", start, ", and the last is \"test\"") [42, ..]: print("Open ended array")
- Dictionary pattern
Works in the same way as the array pattern. Every key has to be a constant pattern.
The size of the dictionary is tested first, it has to be the same size as the pattern, otherwise the pattern doesn’t match.
Open-ended dictionary: A dictionary can be bigger than the pattern by making the last subpattern
...Every subpattern has to be comma separated.
If you don’t specify a value, then only the existence of the key is checked.
A value pattern is separated from the key pattern with a
:.match x: {}: print("Empty dict") {"name": "Dennis"}: print("The name is Dennis") {"name": "Dennis", "age": var age}: print("Dennis is ", age, " years old.") {"name", "age"}: print("Has a name and an age, but it's not Dennis :(") {"key": "godotisawesome", ..}: print("I only checked for one entry and ignored the rest")
- Multiple patterns
You can also specify multiple patterns separated by a comma. These patterns aren’t allowed to have any bindings in them.
match x: 1, 2, 3: print("It's 1 - 3") "Sword", "Splash potion", "Fist": print("Yep, you've taken damage")
Classes¶
By default, all script files are unnamed classes. In this case, you can only
reference them using the file’s path, using either a relative or an absolute
path. For example, if you name a script file character.gd:
# Inherit from 'Character.gd'.
extends "res://path/to/character.gd"
# Load character.gd and create a new node instance from it.
var Character = load("res://path/to/character.gd")
var character_node = Character.new()
Instead, you can give your class a name to register it as a new type in Godot’s
editor. For that, you use the class_name keyword. You can add an
optional comma followed by a path to an image, to use it as an icon. Your class
will then appear with its new icon in the editor:
# Item.gd
extends Node
class_name Item, "res://interface/icons/item.png"
Here’s a class file example:
# Saved as a file named 'character.gd'.
class_name Character
var health = 5
func print_health():
print(health)
func print_this_script_three_times():
print(get_script())
print(ResourceLoader.load("res://character.gd"))
print(Character)
Note
Godot’s class syntax is compact: it can only contain member variables or functions. You can use static functions, but not static member variables. In the same way, the engine initializes variables every time you create an instance, and this includes arrays and dictionaries. This is in the spirit of thread safety, since scripts can be initialized in separate threads without the user knowing.
A class (stored as a file) can inherit from:
- A global class.
- Another class file.
- An inner class inside another class file.
Multiple inheritance is not allowed.
Inheritance uses the extends keyword:
# Inherit/extend a globally available class.
extends SomeClass
# Inherit/extend a named class file.
extends "somefile.gd"
# Inherit/extend an inner class in another file.
extends "somefile.gd".SomeInnerClass
To check if a given instance inherits from a given class,
the is keyword can be used:
# Cache the enemy class.
const Enemy = preload("enemy.gd")
# [...]
# Use 'is' to check inheritance.
if entity is Enemy:
entity.apply_damage()
To call a function in a parent class (i.e. one extend-ed in your current
class), prepend . to the function name:
.base_func(args)
This is especially useful because functions in extending classes replace
functions with the same name in their parent classes. If you still want to
call them, you can prefix them with . (like the super keyword
in other languages):
func some_func(x):
.some_func(x) # Calls the same function on the parent class.
Note
Default functions like _init, and most notifications such as
_enter_tree, _exit_tree, _process, _physics_process,
etc. are called in all parent classes automatically.
There is no need to call them explicitly when overloading them.
The class constructor, called on class instantiation, is named _init. As
mentioned earlier, the constructors of parent classes are called automatically
when inheriting a class. So, there is usually no need to call ._init()
explicitly.
Unlike the call of a regular function, like in the above example with
.some_func, if the constructor from the inherited class takes arguments,
they are passed like this:
func _init(args).(parent_args):
pass
This is better explained through examples. Consider this scenario:
# State.gd (inherited class)
var entity = null
var message = null
func _init(e=null):
entity = e
func enter(m):
message = m
# Idle.gd (inheriting class)
extends "State.gd"
func _init(e=null, m=null).(e):
# Do something with 'e'.
message = m
There are a few things to keep in mind here:
If the inherited class (
State.gd) defines a_initconstructor that takes arguments (ein this case), then the inheriting class (Idle.gd) must define_initas well and pass appropriate parameters to_initfromState.gd.Idle.gdcan have a different number of arguments than the parent classState.gd.In the example above,
epassed to theState.gdconstructor is the sameepassed in toIdle.gd.If
Idle.gd’s_initconstructor takes 0 arguments, it still needs to pass some value to theState.gdparent class, even if it does nothing. This brings us to the fact that you can pass literals in the base constructor as well, not just variables. eg.:# Idle.gd func _init().(5): pass
A class file can contain inner classes. Inner classes are defined using the
class keyword. They are instanced using the ClassName.new()
function.
# Inside a class file.
# An inner class in this class file.
class SomeInnerClass:
var a = 5
func print_value_of_a():
print(a)
# This is the constructor of the class file's main class.
func _init():
var c = SomeInnerClass.new()
c.print_value_of_a()
Classes stored as files are treated as resources. They
must be loaded from disk to access them in other classes. This is done using
either the load or preload functions (see below). Instancing of a loaded
class resource is done by calling the new function on the class object:
# Load the class resource when calling load().
var my_class = load("myclass.gd")
# Preload the class only once at compile time.
const MyClass = preload("myclass.gd")
func _init():
var a = MyClass.new()
a.some_function()
Exports¶
Note
Documentation about exports has been moved to GDScript exports.
Setters/getters¶
It is often useful to know when a class’ member variable changes for whatever reason. It may also be desired to encapsulate its access in some way.
For this, GDScript provides a setter/getter syntax using the setget keyword.
It is used directly after a variable definition:
var variable = value setget setterfunc, getterfunc
Whenever the value of variable is modified by an external source
(i.e. not from local usage in the class), the setter function (setterfunc above)
will be called. This happens before the value is changed. The setter must decide what to do
with the new value. Vice versa, when variable is accessed, the getter function
(getterfunc above) must return the desired value. Below is an example:
var my_var setget my_var_set, my_var_get
func my_var_set(new_value):
my_var = new_value
func my_var_get():
return my_var # Getter must return a value.
Either of the setter or getter functions can be omitted:
# Only a setter.
var my_var = 5 setget my_var_set
# Only a getter (note the comma).
var my_var = 5 setget ,my_var_get
Setters and getters are useful when exporting variables to the editor in tool scripts or plugins, for validating input.
As said, local access will not trigger the setter and getter. Here is an illustration of this:
func _init():
# Does not trigger setter/getter.
my_integer = 5
print(my_integer)
# Does trigger setter/getter.
self.my_integer = 5
print(self.my_integer)
Tool mode¶
By default, scripts don’t run inside the editor and only the exported
properties can be changed. In some cases, it is desired that they do run
inside the editor (as long as they don’t execute game code or manually
avoid doing so). For this, the tool keyword exists and must be
placed at the top of the file:
tool
extends Button
func _ready():
print("Hello")
See Running code in the editor for more information.
Warning
Be cautious when freeing nodes with queue_free() or free()
in a tool script (especially the script’s owner itself). As tool
scripts run their code in the editor, misusing them may lead to
crashing the editor.
Memory management¶
If a class inherits from Reference, then instances will be
freed when no longer in use. No garbage collector exists, just
reference counting. By default, all classes that don’t define
inheritance extend Reference. If this is not desired, then a class
must inherit Object manually and must call instance.free(). To
avoid reference cycles that can’t be freed, a weakref function is
provided for creating weak references.
Alternatively, when not using references, the
is_instance_valid(instance) can be used to check if an object has been
freed.
Signals¶
Signals are a tool to emit messages from an object that other objects can react
to. To create custom signals for a class, use the signal keyword.
extends Node
# A signal named health_depleted.
signal health_depleted
Note
Signals are a Callback mechanism. They also fill the role of Observers, a common programming pattern. For more information, read the Observer tutorial in the Game Programming Patterns ebook.
You can connect these signals to methods the same way you connect built-in signals of nodes like Button or RigidBody.
In the example below, we connect the health_depleted signal from a
Character node to a Game node. When the Character node emits the
signal, the game node’s _on_Character_health_depleted is called:
# Game.gd
func _ready():
var character_node = get_node('Character')
character_node.connect("health_depleted", self, "_on_Character_health_depleted")
func _on_Character_health_depleted():
get_tree().reload_current_scene()
You can emit as many arguments as you want along with a signal.
Here is an example where this is useful. Let’s say we want a life bar on screen to react to health changes with an animation, but we want to keep the user interface separate from the player in our scene tree.
In our Character.gd script, we define a health_changed signal and emit
it with Object.emit_signal(), and from
a Game node higher up our scene tree, we connect it to the Lifebar using
the Object.connect() method:
# Character.gd
...
signal health_changed
func take_damage(amount):
var old_health = health
health -= amount
# We emit the health_changed signal every time the
# character takes damage.
emit_signal("health_changed", old_health, health)
...
# Lifebar.gd
# Here, we define a function to use as a callback when the
# character's health_changed signal is emitted.
...
func _on_Character_health_changed(old_value, new_value):
if old_value > new_value:
progress_bar.modulate = Color.red
else:
progress_bar.modulate = Color.green
# Imagine that `animate` is a user-defined function that animates the
# bar filling up or emptying itself.
progress_bar.animate(old_value, new_value)
...
Note
To use signals, your class has to extend the Object class or any
type extending it like Node, KinematicBody, Control…
In the Game node, we get both the Character and Lifebar nodes, then
connect the character, that emits the signal, to the receiver, the Lifebar
node in this case.
# Game.gd
func _ready():
var character_node = get_node('Character')
var lifebar_node = get_node('UserInterface/Lifebar')
character_node.connect("health_changed", lifebar_node, "_on_Character_health_changed")
This allows the Lifebar to react to health changes without coupling it to
the Character node.
You can write optional argument names in parentheses after the signal’s definition:
# Defining a signal that forwards two arguments.
signal health_changed(old_value, new_value)
These arguments show up in the editor’s node dock, and Godot can use them to generate callback functions for you. However, you can still emit any number of arguments when you emit signals; it’s up to you to emit the correct values.
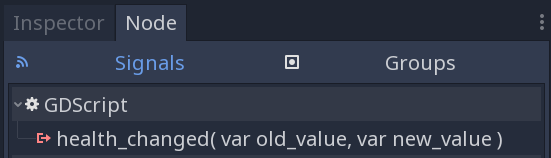
GDScript can bind an array of values to connections between a signal and a method. When the signal is emitted, the callback method receives the bound values. These bound arguments are unique to each connection, and the values will stay the same.
You can use this array of values to add extra constant information to the connection if the emitted signal itself doesn’t give you access to all the data that you need.
Building on the example above, let’s say we want to display a log of the damage
taken by each character on the screen, like Player1 took 22 damage.. The
health_changed signal doesn’t give us the name of the character that took
damage. So when we connect the signal to the in-game console, we can add the
character’s name in the binds array argument:
# Game.gd
func _ready():
var character_node = get_node('Character')
var battle_log_node = get_node('UserInterface/BattleLog')
character_node.connect("health_changed", battle_log_node, "_on_Character_health_changed", [character_node.name])
Our BattleLog node receives each element in the binds array as an extra argument:
# BattleLog.gd
func _on_Character_health_changed(old_value, new_value, character_name):
if not new_value <= old_value:
return
var damage = old_value - new_value
label.text += character_name + " took " + str(damage) + " damage."
Coroutines with yield¶
GDScript offers support for coroutines
via the yield built-in function. Calling yield() will
immediately return from the current function, with the current frozen
state of the same function as the return value. Calling resume() on
this resulting object will continue execution and return whatever the
function returns. Once resumed, the state object becomes invalid. Here is
an example:
func my_func():
print("Hello")
yield()
print("world")
func _ready():
var y = my_func()
# Function state saved in 'y'.
print("my dear")
y.resume()
# 'y' resumed and is now an invalid state.
Will print:
Hello
my dear
world
It is also possible to pass values between yield() and resume(),
for example:
func my_func():
print("Hello")
print(yield())
return "cheers!"
func _ready():
var y = my_func()
# Function state saved in 'y'.
print(y.resume("world"))
# 'y' resumed and is now an invalid state.
Will print:
Hello
world
cheers!
Remember to save the new function state, when using multiple yields:
func co_func():
for i in range(1, 5):
print("Turn %d" % i)
yield();
func _ready():
var co = co_func();
while co is GDScriptFunction && co.is_valid():
co = co.resume();
The real strength of using yield is when combined with signals.
yield can accept two arguments, an object and a signal. When the
signal is received, execution will recommence. Here are some examples:
# Resume execution the next frame.
yield(get_tree(), "idle_frame")
# Resume execution when animation is done playing.
yield(get_node("AnimationPlayer"), "animation_finished")
# Wait 5 seconds, then resume execution.
yield(get_tree().create_timer(5.0), "timeout")
Coroutines themselves use the completed signal when they transition
into an invalid state, for example:
func my_func():
yield(button_func(), "completed")
print("All buttons were pressed, hurray!")
func button_func():
yield($Button0, "pressed")
yield($Button1, "pressed")
my_func will only continue execution once both buttons have been pressed.
Onready keyword¶
When using nodes, it’s common to desire to keep references to parts
of the scene in a variable. As scenes are only warranted to be
configured when entering the active scene tree, the sub-nodes can only
be obtained when a call to Node._ready() is made.
var my_label
func _ready():
my_label = get_node("MyLabel")
This can get a little cumbersome, especially when nodes and external
references pile up. For this, GDScript has the onready keyword, that
defers initialization of a member variable until _ready() is called. It
can replace the above code with a single line:
onready var my_label = get_node("MyLabel")
Assert keyword¶
The assert keyword can be used to check conditions in debug builds. These
assertions are ignored in non-debug builds. This means that the expression
passed as argument won’t be evaluated in a project exported in release mode.
Due to this, assertions must not contain expressions that have
side effects. Otherwise, the behavior of the script would vary
depending on whether the project is run in a debug build.
# Check that 'i' is 0. If 'i' is not 0, an assertion error will occur.
assert(i == 0)
When running a project from the editor, the project will be paused if an assertion error occurs.
GDScript: An introduction to dynamic languages¶
About¶
This tutorial aims to be a quick reference for how to use GDScript more efficiently. It focuses on common cases specific to the language, but also covers a lot of information on dynamically typed languages.
It’s meant to be especially useful for programmers with little or no previous experience with dynamically typed languages.
Dynamic nature¶
Pros & cons of dynamic typing¶
GDScript is a Dynamically Typed language. As such, its main advantages are that:
- The language is simple and easy to learn.
- Most code can be written and changed quickly and without hassle.
- Less code written means less errors & mistakes to fix.
- Easier to read the code (less clutter).
- No compilation is required to test.
- Runtime is tiny.
- Duck-typing and polymorphism by nature.
While the main disadvantages are:
- Less performance than statically typed languages.
- More difficult to refactor (symbols can’t be traced)
- Some errors that would typically be detected at compile time in statically typed languages only appear while running the code (because expression parsing is more strict).
- Less flexibility for code-completion (some variable types are only known at run-time).
This, translated to reality, means that Godot+GDScript are a combination designed to create games quickly and efficiently. For games that are very computationally intensive and can’t benefit from the engine built-in tools (such as the Vector types, Physics Engine, Math library, etc), the possibility of using C++ is present too. This allows you to still create most of the game in GDScript and add small bits of C++ in the areas that need a performance boost.
Variables & assignment¶
All variables in a dynamically typed language are “variant”-like. This means that their type is not fixed, and is only modified through assignment. Example:
Static:
int a; // Value uninitialized.
a = 5; // This is valid.
a = "Hi!"; // This is invalid.
Dynamic:
var a # 'null' by default.
a = 5 # Valid, 'a' becomes an integer.
a = "Hi!" # Valid, 'a' changed to a string.
As function arguments:¶
Functions are of dynamic nature too, which means they can be called with different arguments, for example:
Static:
void print_value(int value) {
printf("value is %i\n", value);
}
[..]
print_value(55); // Valid.
print_value("Hello"); // Invalid.
Dynamic:
func print_value(value):
print(value)
[..]
print_value(55) # Valid.
print_value("Hello") # Valid.
Pointers & referencing:¶
In static languages, such as C or C++ (and to some extent Java and C#), there is a distinction between a variable and a pointer/reference to a variable. The latter allows the object to be modified by other functions by passing a reference to the original one.
In C# or Java, everything not a built-in type (int, float, sometimes String) is always a pointer or a reference. References are also garbage-collected automatically, which means they are erased when no longer used. Dynamically typed languages tend to use this memory model, too. Some Examples:
- C++:
void use_class(SomeClass *instance) {
instance->use();
}
void do_something() {
SomeClass *instance = new SomeClass; // Created as pointer.
use_class(instance); // Passed as pointer.
delete instance; // Otherwise it will leak memory.
}
- Java:
@Override
public final void use_class(SomeClass instance) {
instance.use();
}
public final void do_something() {
SomeClass instance = new SomeClass(); // Created as reference.
use_class(instance); // Passed as reference.
// Garbage collector will get rid of it when not in
// use and freeze your game randomly for a second.
}
- GDScript:
func use_class(instance): # Does not care about class type
instance.use() # Will work with any class that has a ".use()" method.
func do_something():
var instance = SomeClass.new() # Created as reference.
use_class(instance) # Passed as reference.
# Will be unreferenced and deleted.
In GDScript, only base types (int, float, string and the vector types) are passed by value to functions (value is copied). Everything else (instances, arrays, dictionaries, etc) is passed as reference. Classes that inherit Reference (the default if nothing is specified) will be freed when not used, but manual memory management is allowed too if inheriting manually from Object.
Arrays¶
Arrays in dynamically typed languages can contain many different mixed datatypes inside and are always dynamic (can be resized at any time). Compare for example arrays in statically typed languages:
int *array = new int[4]; // Create array.
array[0] = 10; // Initialize manually.
array[1] = 20; // Can't mix types.
array[2] = 40;
array[3] = 60;
// Can't resize.
use_array(array); // Passed as pointer.
delete[] array; // Must be freed.
// or
std::vector<int> array;
array.resize(4);
array[0] = 10; // Initialize manually.
array[1] = 20; // Can't mix types.
array[2] = 40;
array[3] = 60;
array.resize(3); // Can be resized.
use_array(array); // Passed reference or value.
// Freed when stack ends.
And in GDScript:
var array = [10, "hello", 40, 60] # Simple, and can mix types.
array.resize(3) # Can be resized.
use_array(array) # Passed as reference.
# Freed when no longer in use.
In dynamically typed languages, arrays can also double as other datatypes, such as lists:
var array = []
array.append(4)
array.append(5)
array.pop_front()
Or unordered sets:
var a = 20
if a in [10, 20, 30]:
print("We have a winner!")
Dictionaries¶
Dictionaries are a powerful tool in dynamically typed languages. Most programmers that come from statically typed languages (such as C++ or C#) ignore their existence and make their life unnecessarily more difficult. This datatype is generally not present in such languages (or only in limited form).
Dictionaries can map any value to any other value with complete disregard for the datatype used as either key or value. Contrary to popular belief, they are efficient because they can be implemented with hash tables. They are, in fact, so efficient that some languages will go as far as implementing arrays as dictionaries.
Example of Dictionary:
var d = {"name": "John", "age": 22} # Simple syntax.
print("Name: ", d["name"], " Age: ", d["age"])
Dictionaries are also dynamic, keys can be added or removed at any point at little cost:
d["mother"] = "Rebecca" # Addition.
d["age"] = 11 # Modification.
d.erase("name") # Removal.
In most cases, two-dimensional arrays can often be implemented more easily with dictionaries. Here’s a simple battleship game example:
# Battleship Game
const SHIP = 0
const SHIP_HIT = 1
const WATER_HIT = 2
var board = {}
func initialize():
board[Vector2(1, 1)] = SHIP
board[Vector2(1, 2)] = SHIP
board[Vector2(1, 3)] = SHIP
func missile(pos):
if pos in board: # Something at that position.
if board[pos] == SHIP: # There was a ship! hit it.
board[pos] = SHIP_HIT
else:
print("Already hit here!") # Hey dude you already hit here.
else: # Nothing, mark as water.
board[pos] = WATER_HIT
func game():
initialize()
missile(Vector2(1, 1))
missile(Vector2(5, 8))
missile(Vector2(2, 3))
Dictionaries can also be used as data markup or quick structures. While GDScript’s dictionaries resemble python dictionaries, it also supports Lua style syntax and indexing, which makes it useful for writing initial states and quick structs:
# Same example, lua-style support.
# This syntax is a lot more readable and usable.
# Like any GDScript identifier, keys written in this form cannot start
# with a digit.
var d = {
name = "John",
age = 22
}
print("Name: ", d.name, " Age: ", d.age) # Used "." based indexing.
# Indexing
d["mother"] = "Rebecca"
d.mother = "Caroline" # This would work too to create a new key.
For & while¶
Iterating in some statically typed languages can be quite complex:
const char* strings = new const char*[50];
[..]
for (int i = 0; i < 50; i++) {
printf("Value: %s\n", i, strings[i]);
}
// Even in STL:
for (std::list<std::string>::const_iterator it = strings.begin(); it != strings.end(); it++) {
std::cout << *it << std::endl;
}
This is usually greatly simplified in dynamically typed languages:
for s in strings:
print(s)
Container datatypes (arrays and dictionaries) are iterable. Dictionaries allow iterating the keys:
for key in dict:
print(key, " -> ", dict[key])
Iterating with indices is also possible:
for i in range(strings.size()):
print(strings[i])
The range() function can take 3 arguments:
range(n) # Will go from 0 to n-1.
range(b, n) # Will go from b to n-1.
range(b, n, s) # Will go from b to n-1, in steps of s.
Some statically typed programming language examples:
for (int i = 0; i < 10; i++) {}
for (int i = 5; i < 10; i++) {}
for (int i = 5; i < 10; i += 2) {}
Translate to:
for i in range(10):
pass
for i in range(5, 10):
pass
for i in range(5, 10, 2):
pass
And backwards looping is done through a negative counter:
for (int i = 10; i > 0; i--) {}
Becomes:
for i in range(10, 0, -1):
pass
While¶
while() loops are the same everywhere:
var i = 0
while i < strings.size():
print(strings[i])
i += 1
Custom iterators¶
You can create custom iterators in case the default ones don’t quite meet your
needs by overriding the Variant class’s _iter_init, _iter_next, and _iter_get
functions in your script. An example implementation of a forward iterator follows:
class ForwardIterator:
var start
var current
var end
var increment
func _init(start, stop, increment):
self.start = start
self.current = start
self.end = stop
self.increment = increment
func should_continue():
return (current < end)
func _iter_init(arg):
current = start
return should_continue()
func _iter_next(arg):
current += increment
return should_continue()
func _iter_get(arg):
return current
And it can be used like any other iterator:
var itr = ForwardIterator.new(0, 6, 2)
for i in itr:
print(i) # Will print 0, 2, and 4.
Make sure to reset the state of the iterator in _iter_init, otherwise nested
for-loops that use custom iterators will not work as expected.
Duck typing¶
One of the most difficult concepts to grasp when moving from a statically typed language to a dynamic one is duck typing. Duck typing makes overall code design much simpler and straightforward to write, but it’s not obvious how it works.
As an example, imagine a situation where a big rock is falling down a tunnel, smashing everything on its way. The code for the rock, in a statically typed language would be something like:
void BigRollingRock::on_object_hit(Smashable *entity) {
entity->smash();
}
This way, everything that can be smashed by a rock would have to
inherit Smashable. If a character, enemy, piece of furniture, small rock
were all smashable, they would need to inherit from the class Smashable,
possibly requiring multiple inheritance. If multiple inheritance was
undesired, then they would have to inherit a common class like Entity.
Yet, it would not be very elegant to add a virtual method smash() to
Entity only if a few of them can be smashed.
With dynamically typed languages, this is not a problem. Duck typing
makes sure you only have to define a smash() function where required
and that’s it. No need to consider inheritance, base classes, etc.
func _on_object_hit(object):
object.smash()
And that’s it. If the object that hit the big rock has a smash() method, it will be called. No need for inheritance or polymorphism. Dynamically typed languages only care about the instance having the desired method or member, not what it inherits or the class type. The definition of Duck Typing should make this clearer:
“When I see a bird that walks like a duck and swims like a duck and quacks like a duck, I call that bird a duck”
In this case, it translates to:
“If the object can be smashed, don’t care what it is, just smash it.”
Yes, we should call it Hulk typing instead.
It’s possible that the object being hit doesn’t have a smash() function. Some dynamically typed languages simply ignore a method call when it doesn’t exist (like Objective C), but GDScript is stricter, so checking if the function exists is desirable:
func _on_object_hit(object):
if object.has_method("smash"):
object.smash()
Then, simply define that method and anything the rock touches can be smashed.
GDScript exports¶
Introduction to exports¶
In Godot, class members can be exported. This means their value gets saved along
with the resource (such as the scene) they’re
attached to. They will also be available for editing in the property editor.
Exporting is done by using the export keyword:
extends Button
export var number = 5 # Value will be saved and visible in the property editor.
An exported variable must be initialized to a constant expression or have an
export hint in the form of an argument to the export keyword (see the
Examples section below).
One of the fundamental benefits of exporting member variables is to have them visible and editable in the editor. This way, artists and game designers can modify values that later influence how the program runs. For this, a special export syntax is provided.
Note
Exporting properties can also be done in other languages such as C#. The syntax varies depending on the language.
Examples¶
# If the exported value assigns a constant or constant expression,
# the type will be inferred and used in the editor.
export var number = 5
# Export can take a basic data type as an argument, which will be
# used in the editor.
export(int) var number
# Export can also take a resource type to use as a hint.
export(Texture) var character_face
export(PackedScene) var scene_file
# There are many resource types that can be used this way, try e.g.
# the following to list them:
export(Resource) var resource
# Integers and strings hint enumerated values.
# Editor will enumerate as 0, 1 and 2.
export(int, "Warrior", "Magician", "Thief") var character_class
# Editor will enumerate with string names.
export(String, "Rebecca", "Mary", "Leah") var character_name
# Named enum values
# Editor will enumerate as THING_1, THING_2, ANOTHER_THING.
enum NamedEnum {THING_1, THING_2, ANOTHER_THING = -1}
export(NamedEnum) var x
# Strings as paths
# String is a path to a file.
export(String, FILE) var f
# String is a path to a directory.
export(String, DIR) var f
# String is a path to a file, custom filter provided as hint.
export(String, FILE, "*.txt") var f
# Using paths in the global filesystem is also possible,
# but only in scripts in "tool" mode.
# String is a path to a PNG file in the global filesystem.
export(String, FILE, GLOBAL, "*.png") var tool_image
# String is a path to a directory in the global filesystem.
export(String, DIR, GLOBAL) var tool_dir
# The MULTILINE setting tells the editor to show a large input
# field for editing over multiple lines.
export(String, MULTILINE) var text
# Limiting editor input ranges
# Allow integer values from 0 to 20.
export(int, 20) var i
# Allow integer values from -10 to 20.
export(int, -10, 20) var j
# Allow floats from -10 to 20 and snap the value to multiples of 0.2.
export(float, -10, 20, 0.2) var k
# Allow values 'y = exp(x)' where 'y' varies between 100 and 1000
# while snapping to steps of 20. The editor will present a
# slider for easily editing the value.
export(float, EXP, 100, 1000, 20) var l
# Floats with easing hint
# Display a visual representation of the 'ease()' function
# when editing.
export(float, EASE) var transition_speed
# Colors
# Color given as red-green-blue value (alpha will always be 1).
export(Color, RGB) var col
# Color given as red-green-blue-alpha value.
export(Color, RGBA) var col
# Another node in the scene can be exported, too.
export(NodePath) var node
It must be noted that even if the script is not being run while in the editor, the exported properties are still editable. This can be used in conjunction with a script in “tool” mode.
Exporting bit flags¶
Integers used as bit flags can store multiple true/false (boolean)
values in one property. By using the export hint int, FLAGS, they
can be set from the editor:
# Individually edit the bits of an integer.
export(int, FLAGS) var spell_elements = ELEMENT_WIND | ELEMENT_WATER
Restricting the flags to a certain number of named flags is also possible. The syntax is similar to the enumeration syntax:
# Set any of the given flags from the editor.
export(int, FLAGS, "Fire", "Water", "Earth", "Wind") var spell_elements = 0
In this example, Fire has value 1, Water has value 2, Earth
has value 4 and Wind corresponds to value 8. Usually, constants
should be defined accordingly (e.g. const ELEMENT_WIND = 8 and so
on).
Using bit flags requires some understanding of bitwise operations. If in doubt, boolean variables should be exported instead.
Exporting arrays¶
Exporting arrays works, but with an important caveat: while regular arrays are created local to every class instance, exported arrays are shared between all instances. This means that editing them in one instance will cause them to change in all other instances. Exported arrays can have initializers, but they must be constant expressions.
# Exported array, shared between all instances.
# Default value must be a constant expression.
export var a = [1, 2, 3]
# Exported arrays can specify type (using the same hints as before).
export(Array, int) var ints = [1,2,3]
export(Array, int, "Red", "Green", "Blue") var enums = [2, 1, 0]
export(Array, Array, float) var two_dimensional = [[1.0, 2.0], [3.0, 4.0]]
# You can omit the default value, but then it would be null if not assigned.
export(Array) var b
export(Array, PackedScene) var scenes
# Typed arrays also work, only initialized empty:
export var vector3s = PoolVector3Array()
export var strings = PoolStringArray()
# Regular array, created local for every instance.
# Default value can include run-time values, but can't
# be exported.
var c = [a, 2, 3]
GDScript style guide¶
This style guide lists conventions to write elegant GDScript. The goal is to encourage writing clean, readable code and promote consistency across projects, discussions, and tutorials. Hopefully, this will also support the development of auto-formatting tools.
Since GDScript is close to Python, this guide is inspired by Python’s PEP 8 programming style guide.
Style guides aren’t meant as hard rulebooks. At times, you may not be able to apply some of the guidelines below. When that happens, use your best judgment, and ask fellow developers for insights.
In general, keeping your code consistent in your projects and within your team is more important than following this guide to a tee.
Note
Godot’s built-in script editor uses a lot of these conventions by default. Let it help you.
Here is a complete class example based on these guidelines:
class_name StateMachine
extends Node
# Hierarchical State machine for the player.
# Initializes states and delegates engine callbacks
# (_physics_process, _unhandled_input) to the state.
signal state_changed(previous, new)
export var initial_state = NodePath()
var is_active = true setget set_is_active
onready var _state = get_node(initial_state) setget set_state
onready var _state_name = _state.name
func _init():
add_to_group("state_machine")
func _ready():
connect("state_changed", self, "_on_state_changed")
_state.enter()
func _unhandled_input(event):
_state.unhandled_input(event)
func _physics_process(delta):
_state.physics_process(delta)
func transition_to(target_state_path, msg={}):
if not has_node(target_state_path):
return
var target_state = get_node(target_state_path)
assert target_state.is_composite == false
_state.exit()
self._state = target_state
_state.enter(msg)
Events.emit_signal("player_state_changed", _state.name)
func set_is_active(value):
is_active = value
set_physics_process(value)
set_process_unhandled_input(value)
set_block_signals(not value)
func set_state(value):
_state = value
_state_name = _state.name
func _on_state_changed(previous, new):
print("state changed")
emit_signal("state_changed")
Formatting¶
Encoding and special characters¶
- Use line feed (LF) characters to break lines, not CRLF or CR. (editor default)
- Use one line feed character at the end of each file. (editor default)
- Use UTF-8 encoding without a byte order mark. (editor default)
- Use Tabs instead of spaces for indentation. (editor default)
Indentation¶
Each indent level should be one greater than the block containing it.
Good:
for i in range(10):
print("hello")
Bad:
for i in range(10):
print("hello")
for i in range(10):
print("hello")
Use 2 indent levels to distinguish continuation lines from regular code blocks.
Good:
effect.interpolate_property(sprite, "transform/scale",
sprite.get_scale(), Vector2(2.0, 2.0), 0.3,
Tween.TRANS_QUAD, Tween.EASE_OUT)
Bad:
effect.interpolate_property(sprite, "transform/scale",
sprite.get_scale(), Vector2(2.0, 2.0), 0.3,
Tween.TRANS_QUAD, Tween.EASE_OUT)
Exceptions to this rule are arrays, dictionaries, and enums. Use a single indentation level to distinguish continuation lines:
Good:
var party = [
"Godot",
"Godette",
"Steve",
]
var character_dir = {
"Name": "Bob",
"Age": 27,
"Job": "Mechanic",
}
enum Tiles {
TILE_BRICK,
TILE_FLOOR,
TILE_SPIKE,
TILE_TELEPORT,
}
Bad:
var party = [
"Godot",
"Godette",
"Steve",
]
var character_dir = {
"Name": "Bob",
"Age": 27,
"Job": "Mechanic",
}
enum Tiles {
TILE_BRICK,
TILE_FLOOR,
TILE_SPIKE,
TILE_TELEPORT,
}
Trailing comma¶
Use a trailing comma on the last line in arrays, dictionaries, and enums. This results in easier refactoring and better diffs in version control as the last line doesn’t need to be modified when adding new elements.
Good:
enum Tiles {
TILE_BRICK,
TILE_FLOOR,
TILE_SPIKE,
TILE_TELEPORT,
}
Bad:
enum Tiles {
TILE_BRICK,
TILE_FLOOR,
TILE_SPIKE,
TILE_TELEPORT
}
Trailing commas are unnecessary in single-line lists, so don’t add them in this case.
Good:
enum Tiles {TILE_BRICK, TILE_FLOOR, TILE_SPIKE, TILE_TELEPORT}
Bad:
enum Tiles {TILE_BRICK, TILE_FLOOR, TILE_SPIKE, TILE_TELEPORT,}
Blank lines¶
Surround functions and class definitions with two blank lines:
func heal(amount):
health += amount
health = min(health, max_health)
emit_signal("health_changed", health)
func take_damage(amount, effect=null):
health -= amount
health = max(0, health)
emit_signal("health_changed", health)
Use one blank line inside functions to separate logical sections.
Line length¶
Keep individual lines of code under 100 characters.
If you can, try to keep lines under 80 characters. This helps to read the code on small displays and with two scripts opened side-by-side in an external text editor. For example, when looking at a differential revision.
One statement per line¶
Never combine multiple statements on a single line. No, C programmers, not even with a single line conditional statement.
Good:
if position.x > width:
position.x = 0
if flag:
print("flagged")
Bad:
if position.x > width: position.x = 0
if flag: print("flagged")
The only exception to that rule is the ternary operator:
next_state = "fall" if not is_on_floor() else "idle"
Avoid unnecessary parentheses¶
Avoid parentheses in expressions and conditional statements. Unless necessary for order of operations, they only reduce readability.
Good:
if is_colliding():
queue_free()
Bad:
if (is_colliding()):
queue_free()
Boolean operators¶
Prefer the plain English versions of boolean operators, as they are the most accessible:
- Use
andinstead of&&. - Use
orinstead of||.
You may also use parentheses around boolean operators to clear any ambiguity. This can make long expressions easier to read.
Good:
if (foo and bar) or baz:
print("condition is true")
Bad:
if foo && bar || baz:
print("condition is true")
Comment spacing¶
Regular comments should start with a space, but not code that you comment out. This helps differentiate text comments from disabled code.
Good:
# This is a comment.
#print("This is disabled code")
Bad:
#This is a comment.
# print("This is disabled code")
Note
In the script editor, to toggle the selected code commented, press Ctrl + K. This feature adds a single # sign at the start of the selected lines.
Whitespace¶
Always use one space around operators and after commas. Also, avoid extra spaces in dictionary references and function calls.
Good:
position.x = 5
position.y = target_position.y + 10
dict["key"] = 5
my_array = [4, 5, 6]
print("foo")
Bad:
position.x=5
position.y = mpos.y+10
dict ["key"] = 5
myarray = [4,5,6]
print ("foo")
Don’t use spaces to align expressions vertically:
x = 100
y = 100
velocity = 500
Quotes¶
Use double quotes unless single quotes make it possible to escape fewer characters in a given string. See the examples below:
# Normal string.
print("hello world")
# Use double quotes as usual to avoid escapes.
print("hello 'world'")
# Use single quotes as an exception to the rule to avoid escapes.
print('hello "world"')
# Both quote styles would require 2 escapes; prefer double quotes if it's a tie.
print("'hello' \"world\"")
Naming conventions¶
These naming conventions follow the Godot Engine style. Breaking these will make your code clash with the built-in naming conventions, leading to inconsistent code.
Classes and nodes¶
Use PascalCase for class and node names:
extends KinematicBody
Also use PascalCase when loading a class into a constant or a variable:
const Weapon = preload("res://weapon.gd")
Functions and variables¶
Use snake_case to name functions and variables:
var particle_effect
func load_level():
Prepend a single underscore (_) to virtual methods functions the user must override, private functions, and private variables:
var _counter = 0
func _recalculate_path():
Constants and enums¶
Write constants with CONSTANT_CASE, that is to say in all caps with an underscore (_) to separate words:
const MAX_SPEED = 200
Use PascalCase for enum names and CONSTANT_CASE for their members, as they are constants:
enum Element {
EARTH,
WATER,
AIR,
FIRE,
}
Code order¶
This first section focuses on code order. For formatting, see Formatting. For naming conventions, see Naming conventions.
We suggest to organize GDScript code this way:
01. tool
02. class_name
03. extends
04. # docstring
05. signals
06. enums
07. constants
08. exported variables
09. public variables
10. private variables
11. onready variables
12. optional built-in virtual _init method
13. built-in virtual _ready method
14. remaining built-in virtual methods
15. public methods
16. private methods
We optimized the order to make it easy to read the code from top to bottom, to help developers reading the code for the first time understand how it works, and to avoid errors linked to the order of variable declarations.
This code order follows four rules of thumb:
- Properties and signals come first, followed by methods.
- Public comes before private.
- Virtual callbacks come before the class’s interface.
- The object’s construction and initialization functions,
_initand_ready, come before functions that modify the object at runtime.
Class declaration¶
If the code is meant to run in the editor, place the tool keyword on the
first line of the script.
Follow with the class_name if necessary. You can turn a GDScript file into a global type in your project using this feature. For more information, see GDScript basics.
Then, add the extends keyword if the class extends a built-in type.
Following that, you should have the class’s optional docstring as comments. You can use that to explain the role of your class to your teammates, how it works, and how other developers should use it, for example.
class_name MyNode
extends Node
# A brief description of the class's role and functionality.
# Longer description.
Signals and properties¶
Write signal declarations, followed by properties, that is to say, member variables, after the docstring.
Enums should come after signals, as you can use them as export hints for other properties.
Then, write constants, exported variables, public, private, and onready variables, in that order.
enum Jobs {KNIGHT, WIZARD, ROGUE, HEALER, SHAMAN}
const MAX_LIVES = 3
export(Jobs) var job = Jobs.KNIGHT
export var max_health = 50
export var attack = 5
var health = max_health setget set_health
var _speed = 300.0
onready var sword = get_node("Sword")
onready var gun = get_node("Gun")
Note
The GDScript compiler evaluates onready variables right before the _ready
callback. You can use that to cache node dependencies, that is to say, to get
child nodes in the scene that your class relies on. This is what the example
above shows.
Methods and static functions¶
After the class’s properties come the methods.
Start with the _init() callback method, that the engine will call upon
creating the object in memory. Follow with the _ready() callback, that Godot
calls when it adds a node to the scene tree.
These function should come first because they show how the object is initialized.
Other built-in virtual callbacks, like _unhandled_input() and
_physics_process, should come next. These control the object’s main loop and
interactions with the game engine.
The rest of the class’s interface, public and private methods, come after that, in that order.
func _init():
add_to_group("state_machine")
func _ready():
connect("state_changed", self, "_on_state_changed")
_state.enter()
func _unhandled_input(event):
_state.unhandled_input(event)
func transition_to(target_state_path, msg={}):
if not has_node(target_state_path):
return
var target_state = get_node(target_state_path)
assert target_state.is_composite == false
_state.exit()
self._state = target_state
_state.enter(msg)
Events.emit_signal("player_state_changed", _state.name)
func _on_state_changed(previous, new):
print("state changed")
emit_signal("state_changed")
Static typing¶
Since Godot 3.1, GDScript supports optional static typing.
Type hints¶
Place the colon right after the variable’s name, without a space, and let the GDScript compiler infer the variable’s type when possible.
Good:
onready var health_bar: ProgressBar = get_node("UI/LifeBar")
var health := 0 # The compiler will use the int type.
Bad:
# The compiler can't infer the exact type and will use Node
# instead of ProgressBar.
onready var health_bar := get_node("UI/LifeBar")
When you let the compiler infer the type hint, write the colon and equal signs together: :=.
var health := 0 # The compiler will use the int type.
Add a space on either sides of the return type arrow when defining functions.
func heal(amount: int) -> void:
Static typing in GDScript¶
In this guide, you will learn:
- How to use types in GDScript
- That static types can help you avoid bugs
Where and how you use this new language feature is entirely up to you: you can use it only in some sensitive GDScript files, use it everywhere, or write code like you always did!
Static types can be used on variables, constants, functions, parameters, and return types.
Note
Typed GDScript is available since Godot 3.1.
A brief look at static typing¶
With typed GDScript, Godot can detect even more errors as you write code! It gives you and your teammates more information as you’re working, as the arguments’ types show up when you call a method.
Imagine you’re programming an inventory system. You code an Item
node, then an Inventory. To add items to the inventory, the people
who work with your code should always pass an Item to the
Inventory.add method. With types, you can enforce this:
# In 'Item.gd'.
class_name Item
# In 'Inventory.gd'.
class_name Inventory
func add(reference: Item, amount: int = 1):
var item = find_item(reference)
if not item:
item = _instance_item_from_db(reference)
item.amount += amount
Another significant advantage of typed GDScript is the new warning system. From version 3.1, Godot gives you warnings about your code as you write it: the engine identifies sections of your code that may lead to issues at runtime, but lets you decide whether or not you want to leave the code as it is. More on that in a moment.
Static types also give you better code completion options. Below, you
can see the difference between a dynamic and a static typed completion
options for a class called PlayerController.
You’ve probably stored a node in a variable before, and typed a dot to be left with no autocomplete suggestions:

This is due to dynamic code. Godot cannot know what node or value type you’re passing to the function. If you write the type explicitly however, you will get all public methods and variables from the node:
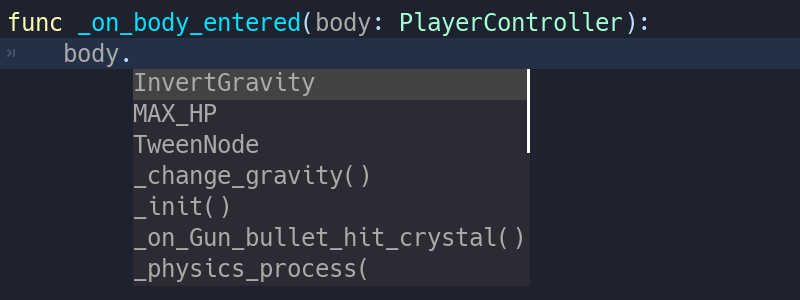
In the future, typed GDScript will also increase code performance: Just-In-Time compilation and other compiler improvements are already on the roadmap!
Overall, typed programming gives you a more structured experience. It helps prevent errors and improves the self-documenting aspect of your scripts. This is especially helpful when you’re working in a team or on a long-term project: studies have shown that developers spend most of their time reading other people’s code, or scripts they wrote in the past and forgot about. The clearer and the more structured the code, the faster it is to understand, the faster you can move forward.
How to use static typing¶
To define the type of a variable or a constant, write a colon after the
variable’s name, followed by its type. E.g. var health: int. This
forces the variable’s type to always stay the same:
var damage: float = 10.5
const MOVE_SPEED: float = 50.0
Godot will try to infer types if you write a colon, but you omit the type:
var life_points := 4
var damage := 10.5
var motion := Vector2()
Currently you can use three types of… types:
- Built-in
- Core classes and nodes (
Object,Node,Area2D,Camera2D, etc.) - Your own, custom classes. Look at the new class_name feature to register types in the editor.
Note
You don’t need to write type hints for constants, as Godot sets it automatically from the assigned value. But you can still do so to make the intent of your code clearer.
Custom variable types¶
You can use any class, including your custom classes, as types. There are two ways to use them in scripts. The first method is to preload the script you want to use as a type in a constant:
const Rifle = preload("res://player/weapons/Rifle.gd")
var my_rifle: Rifle
The second method is to use the class_name keyword when you create.
For the example above, your Rifle.gd would look like this:
extends Node2D
class_name Rifle
If you use class_name, Godot registers the Rifle type globally in
the editor, and you can use it anywhere, without having to preload it
into a constant:
var my_rifle: Rifle
Variable casting¶
Type casting is a key concept in typed languages. Casting is the conversion of a value from one type to another.
Imagine an Enemy in your game, that extends Area2D. You want it to
collide with the Player, a KinematicBody2D with a script called
PlayerController attached to it. You use the on_body_entered
signal to detect the collision. With typed code, the body you detect is
going to be a generic PhysicsBody2D, and not your
PlayerController on the _on_body_entered callback.
You can check if this PhysicsBody2D is your Player with the as
casting keyword, and using the colon : again to force the variable
to use this type. This forces the variable to stick to the
PlayerController type:
func _on_body_entered(body: PhysicsBody2D) -> void:
var player := body as PlayerController
if not player:
return
player.damage()
As we’re dealing with a custom type, if the body doesn’t extend
PlayerController, the playervariable will be set to null.
We can use this to check if the body is the player or not. We will also
get full autocompletion on the player variable thanks to that cast.
Note
If you try to cast with a built-in type and it fails, Godot will throw an error.
You can also use casting to ensure safe lines. Safe lines are a new tool in Godot 3.1 to tell you when ambiguous lines of code are type-safe. As you can mix and match typed and dynamic code, at times, Godot doesn’t have enough information to know if an instruction will trigger an error or not at runtime.
This happens when you get a child node. Let’s take a timer for example:
with dynamic code, you can get the node with $Timer. GDScript
supports duck-typing,
so even if your timer is of type Timer, it is also a Node and an
Object, two classes it extends. With dynamic GDScript, you also
don’t care about the node’s type as long as it has the methods you need
to call.
You can use casting to tell Godot the type you expect when you get a
node: ($Timer as Timer), ($Player as KinematicBody2D), etc.
Godot will ensure the type works and if so, the line number will turn
green at the left of the script editor.

Safe vs Unsafe Line
Note
You can turn off safe lines or change their color in the editor settings.
Define the return type of a function with the arrow ->¶
To define the return type of a function, write a dash and a right angle
bracket -> after its declaration, followed by the return type:
func _process(delta: float) -> void:
pass
The type void means the function does not return anything. You can
use any type, as with variables:
func hit(damage: float) -> bool:
health_points -= damage
return health_points <= 0
You can also use your own nodes as return types:
# Inventory.gd
# Adds an item to the inventory and returns it.
func add(reference: Item, amount: int) -> Item:
var item: Item = find_item(reference)
if not item:
item = ItemDatabase.get_instance(reference)
item.amount += amount
return item
Typed or dynamic: stick to one style¶
Typed GDScript and dynamic GDScript can coexist in the same project. But I recommended to stick to either style for consistency in your codebase, and for your peers. It’s easier for everyone to work together if you follow the same guidelines, and faster to read and understand other people’s code.
Typed code takes a little more writing, but you get the benefits we discussed above. Here’s an example of the same, empty script, in a dynamic style:
extends Node
func _ready():
pass
func _process(delta):
pass
And with static typing:
extends Node
func _ready() -> void:
pass
func _process(delta: float) -> void:
pass
As you can see, you can also use types with the engine’s virtual
methods. Signal callbacks, like any methods, can also use types. Here’s
a body_entered signal in a dynamic style:
func _on_Area2D_body_entered(body):
pass
And the same callback, with type hints:
func _on_area_entered(area: CollisionObject2D) -> void:
pass
You’re free to replace, e.g. the CollisionObject2D, with your own type,
to cast parameters automatically:
func _on_area_entered(bullet: Bullet) -> void:
if not bullet:
return
take_damage(bullet.damage)
The bullet variable could hold any CollisionObject2D here, but
we make sure it is our Bullet, a node we created for our project. If
it’s anything else, like an Area2D, or any node that doesn’t extend
Bullet, the bullet variable will be null.
Warning system¶
The warning system complements typed GDScript. It’s here to help you avoid mistakes that are hard to spot during development, and that may lead to runtime errors.
You can configure warnings in the Project Settings under a new section
called GDScript:
warning system project settings
You can find a list of warnings for the active GDScript file in the script editor’s status bar. The example below has 3 warnings:
warning system example
To ignore specific warnings in one file, insert a special comment of the
form # warning-ignore:warning-id, or click on the ignore link to the
right of the warning’s description. Godot will add a comment above the
corresponding line and the code won’t trigger the corresponding warning
anymore:
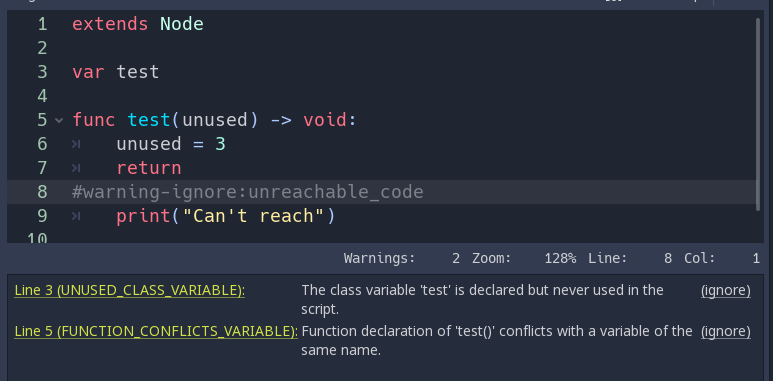
warning system ignore example
You can also choose to ignore not just one but all warnings of a certain
type in this file with # warning-ignore-all:warning-id. To ignore all
warnings of all types in a file add the comment # warnings-disable to it.
Warnings won’t prevent the game from running, but you can turn them into
errors if you’d like. This way your game won’t compile unless you fix
all warnings. Head to the GDScript section of the Project Settings to
turn on this option. Here’s the same file as the previous example with
warnings as errors turned on:
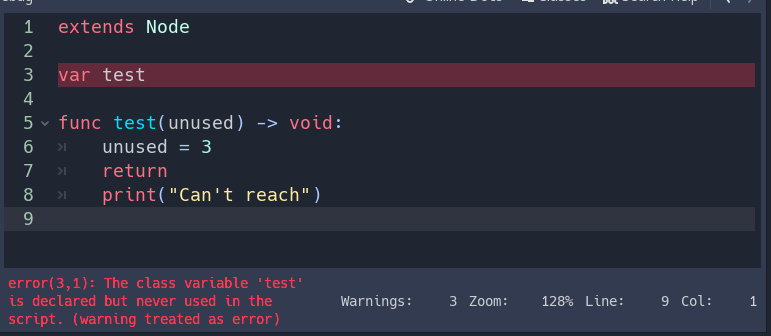
warnings as errors
Cases where you can’t specify types¶
To wrap up this introduction, let’s cover a few cases where you can’t use type hints. All the examples below will trigger errors.
You can’t use Enums as types:
enum MoveDirection {UP, DOWN, LEFT, RIGHT}
var current_direction: MoveDirection
You can’t specify the type of individual members in an array. This will give you an error:
var enemies: Array = [$Goblin: Enemy, $Zombie: Enemy]
You can’t force the assignment of types in a for loop, as each
element the for keyword loops over already has a different type. So you
cannot write:
var names = ["John", "Marta", "Samantha", "Jimmy"]
for name: String in names:
pass
Two scripts can’t depend on each other in a cyclic fashion:
# Player.gd
extends Area2D
class_name Player
var rifle: Rifle
# Rifle.gd
extends Area2D
class_name Rifle
var player: Player
Summary¶
Typed GDScript is a powerful tool. Available as of version 3.1 of Godot, it helps you write more structured code, avoid common errors, and create scalable systems. In the future, static types will also bring you a nice performance boost thanks to upcoming compiler optimizations.
GDScript format strings¶
GDScript offers a feature called format strings, which allows reusing text templates to succinctly create different but similar strings.
Format strings are just like normal strings, except they contain certain placeholder character-sequences. These placeholders can then easily be replaced by parameters handed to the format string.
As an example, with %s as a placeholder, the format string "Hello %s, how
are you? can easily be changed to "Hello World, how are you?". Notice
the placeholder is in the middle of the string; modifying it without format
strings could be cumbersome.
Usage in GDScript¶
Examine this concrete GDScript example:
# Define a format string with placeholder '%s'
var format_string = "We're waiting for %s."
# Using the '%' operator, the placeholder is replaced with the desired value
var actual_string = format_string % "Godot"
print(actual_string)
# Output: "We're waiting for Godot."
Placeholders always start with a %, but the next character or characters,
the format specifier, determines how the given value is converted to a
string.
The %s seen in the example above is the simplest placeholder and works for
most use cases: it converts the value by the same method by which an implicit
String conversion or str() would convert it. Strings remain unchanged,
Booleans turn into either "True" or "False", an integral or real number
becomes a decimal, other types usually return their data in a human-readable
string.
There is also another way to format text in GDScript, namely the String.format()
method. It replaces all occurrences of a key in the string with the corresponding
value. The method can handle arrays or dictionaries for the key/value pairs.
Arrays can be used as key, index, or mixed style (see below examples). Order only matters when the index or mixed style of Array is used.
A quick example in GDScript:
# Define a format string
var format_string = "We're waiting for {str}"
# Using the 'format' method, replace the 'str' placeholder
var actual_string = format_string.format({"str": "Godot"})
print(actual_string)
# Output: "We're waiting for Godot"
There are other format specifiers, but they are only applicable when using
the % operator.
Multiple placeholders¶
Format strings may contain multiple placeholders. In such a case, the values
are handed in the form of an array, one value per placeholder (unless using a
format specifier with *, see dynamic padding):
var format_string = "%s was reluctant to learn %s, but now he enjoys it."
var actual_string = format_string % ["Estragon", "GDScript"]
print(actual_string)
# Output: "Estragon was reluctant to learn GDScript, but now he enjoys it."
Note the values are inserted in order. Remember all placeholders must be replaced at once, so there must be an appropriate number of values.
Format specifiers¶
There are format specifiers other than s that can be used in placeholders.
They consist of one or more characters. Some of them work by themselves like
s, some appear before other characters, some only work with certain
values or characters.
Placeholder types¶
One and only one of these must always appear as the last character in a format
specifier. Apart from s, these require certain types of parameters.
s |
Simple conversion to String by the same method as implicit String conversion. |
c |
A single Unicode character. Expects an unsigned 8-bit integer (0-255) for a code point or a single-character string. |
d |
A decimal integral number. Expects an integral or real number (will be floored). |
o |
An octal integral number. Expects an integral or real number (will be floored). |
x |
A hexadecimal integral number with lower-case letters. Expects an integral or real number (will be floored). |
X |
A hexadecimal integral number with upper-case letters. Expects an integral or real number (will be floored). |
f |
A decimal real number. Expects an integral or real number. |
Placeholder modifiers¶
These characters appear before the above. Some of them work only under certain conditions.
+ |
In number specifiers, show + sign if positive. |
| Integer | Set padding. Padded with spaces or with zeroes if integer
starts with 0 in an integer placeholder. When used after
., see .. |
. |
Before f, set precision to 0 decimal places. Can be
followed up with numbers to change. Padded with zeroes. |
- |
Pad to the right rather than the left. |
* |
Dynamic padding, expect additional integral parameter to set
padding or precision after ., see dynamic padding. |
Padding¶
The . (dot), * (asterisk), - (minus sign) and digit
(0-9) characters are used for padding. This allows printing several
values aligned vertically as if in a column, provided a fixed-width font is
used.
To pad a string to a minimum length, add an integer to the specifier:
print("%10d" % 12345)
# output: " 12345"
# 5 leading spaces for a total length of 10
If the integer starts with 0, integral values are padded with zeroes
instead of white space:
print("%010d" % 12345)
# output: "0000012345"
Precision can be specified for real numbers by adding a . (dot) with an
integer following it. With no integer after ., a precision of 0 is used,
rounding to integral value. The integer to use for padding must appear before
the dot.
# Pad to minimum length of 10, round to 3 decimal places
print("%10.3f" % 10000.5555)
# Output: " 10000.556"
# 1 leading space
The - character will cause padding to the right rather than the left,
useful for right text alignment:
print("%-10d" % 12345678)
# Output: "12345678 "
# 2 trailing spaces
Dynamic padding¶
By using the * (asterisk) character, the padding or precision can be set
without modifying the format string. It is used in place of an integer in the
format specifier. The values for padding and precision are then passed when
formatting:
var format_string = "%*.*f"
# Pad to length of 7, round to 3 decimal places:
print(format_string % [7, 3, 8.8888])
# Output: " 8.889"
# 2 leading spaces
It is still possible to pad with zeroes in integer placeholders by adding 0
before *:
print("%0*d" % [2, 3])
#output: "03"
Escape sequence¶
To insert a literal % character into a format string, it must be escaped to
avoid reading it as a placeholder. This is done by doubling the character:
var health = 56
print("Remaining health: %d%%" % health)
# Output: "Remaining health: 56%"
Format method examples¶
The following are some examples of how to use the various invocations of the
String.format method.
| Type | Style | Example | Result |
| Dictionary | key | "Hi, {name} v{version}!".format({"name":"Godette", "version":"3.0"}) |
Hi, Godette v3.0! |
| Dictionary | index | "Hi, {0} v{1}!".format({"0":"Godette", "1":"3.0"}) |
Hi, Godette v3.0! |
| Dictionary | mix | "Hi, {0} v{version}!".format({"0":"Godette", "version":"3.0"}) |
Hi, Godette v3.0! |
| Array | key | "Hi, {name} v{version}!".format([["version","3.0"], ["name","Godette"]]) |
Hi, Godette v3.0! |
| Array | index | "Hi, {0} v{1}!".format(["Godette","3.0"]) |
Hi, Godette v3.0! |
| Array | mix | "Hi, {name} v{0}!".format([3.0, ["name","Godette"]]) |
Hi, Godette v3.0! |
| Array | no index | "Hi, {} v{}!".format(["Godette", 3.0], "{}") |
Hi, Godette v3.0! |
Placeholders can also be customized when using String.format, here’s some
examples of that functionality.
| Type | Example | Result |
| Infix (default) | "Hi, {0} v{1}".format(["Godette", "3.0"], "{_}") |
Hi, Godette v3.0 |
| Postfix | "Hi, 0% v1%".format(["Godette", "3.0"], "_%") |
Hi, Godette v3.0 |
| Prefix | "Hi, %0 v%1".format(["Godette", "3.0"], "%_") |
Hi, Godette v3.0 |
Combining both the String.format method and the % operator could be useful, as
String.format does not have a way to manipulate the representation of numbers.
| Example | Result |
"Hi, {0} v{version}".format({0:"Godette", "version":"%0.2f" % 3.114}) |
Hi, Godette v3.11 |
VisualScript¶
What is Visual Scripting¶
Visual Scripting is a tool designed to make the entry barrier to programming much lower. As code is more visual, it needs less abstract thinking to be understood. Any artist, animator, game designer, etc. can look at it and quickly grasp the flow of logic.
The reason it does not make existing programming obsolete is, simply, that it does not scale as well. It takes considerably more time to create code with it, and it’s often more difficult to modify than just writing a few characters.
With the misunderstanding cleared up, the question that remains is what are the practical uses for Visual Scripting.
The most common use cases are as follows:
- Game development beginners who want to learn an engine but have no programming experience yet.
- Artists and Game Designers who have no experience in programming and want to create quick prototypes or simple games.
- Programmers working in a team that want to make part of the game logic available to Artists or Game Designers in order to offload some of their work.
These scenarios are far more common than one might think, so this is why Godot has added this feature.
Getting started with Visual Scripting¶
As with everything in Godot, we prioritize a good experience over copying or integrating third party solutions which might not fit nicely in the current workflow. This led us to write our own version of how we believe this feature would work best with the engine.
In Godot, a Visual Script fits smoothly together with regular scripts in the Editor tab
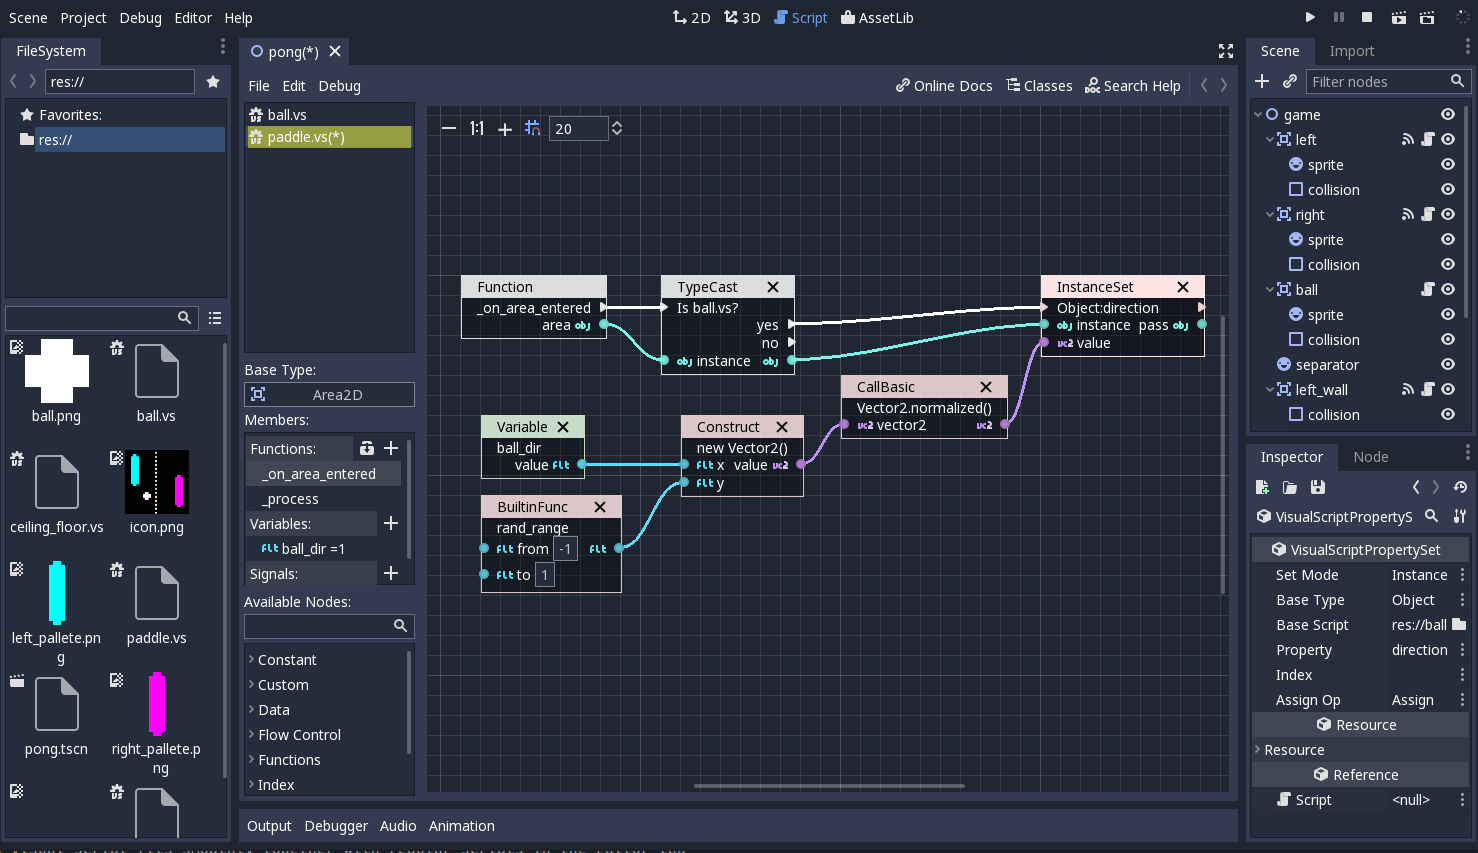
In fact, Visual Scripting integrates so well to Godot that it’s hard to believe it was added only in version 3.0. This is because, when editing, the rest of Godot panels and docks act like a palette from where you can drag and drop all sorts of information to the script canvas:
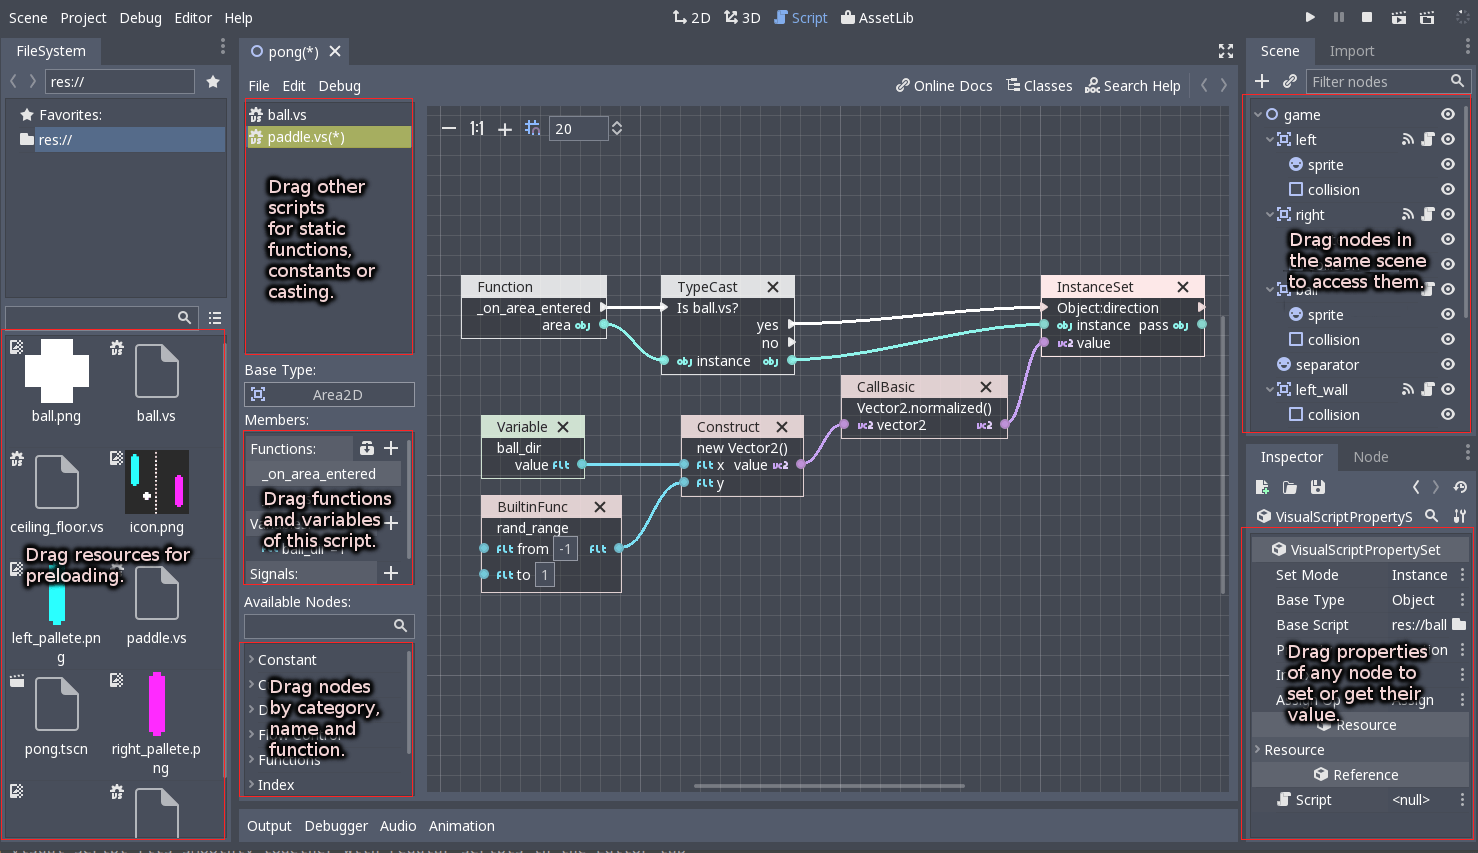
Creating a script¶
Creating scripts works the same as with other scripting languages: Select any node in the scene and push the “New Script” button at the top right corner of the Scene Tree dock:
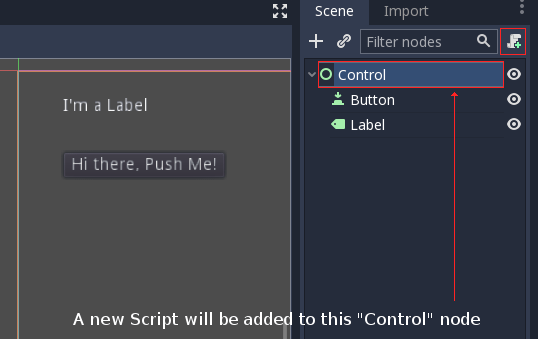
Once it opens, the script type “Visual Script” must be selected from the drop down list. The script extension must be “.vs” (for Visual Script!).
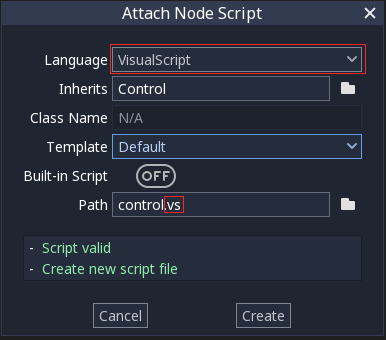
Finally, the Script Editor will open, allowing you to start editing the visual script:
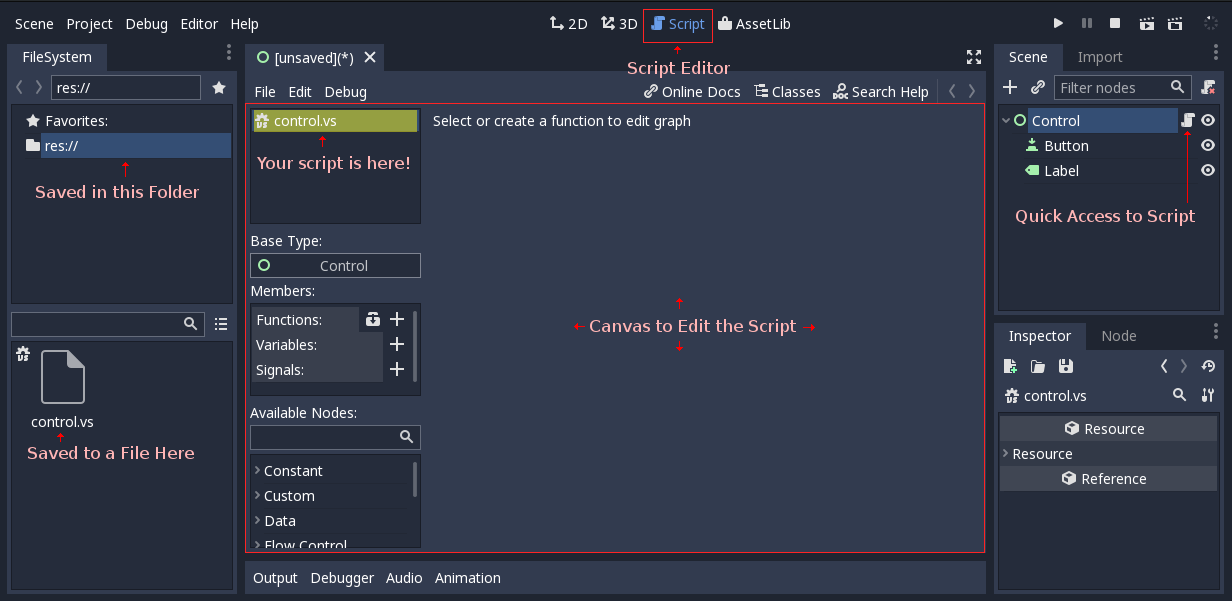
Adding a function¶
Unlike other visual scripting implementations, Visual Scripting in Godot is heavily based on functions. This happens because it uses the same interface to communicate with the engine as other scripting engines. In Godot, the scripting interface is universal and all implementations conform to it.
A function is an individual canvas with nodes connected.
A single script can contain many functions, each of which will have a canvas of its own, allowing for more organization.
There are three main ways to add functions in a script:
Overriding a virtual function¶
Most types of nodes and other types of objects in Godot contain virtual functions. These are functions that will be called (run your code) when something happens and can be looked up in the reference. Virtual functions are listed when pressing the “Override” icon in the member panel:
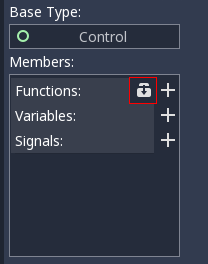
In the following example, a function will be executed when the node is loaded and added to the running scene. For this, the _ready() virtual method will be overridden:
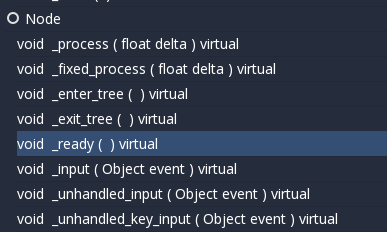
Finally, a canvas appears for this function, showing the override:
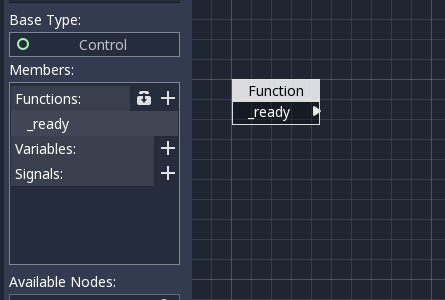
As some functions expect you to return a value, they will also add a return node where such value is supposed to be provided:
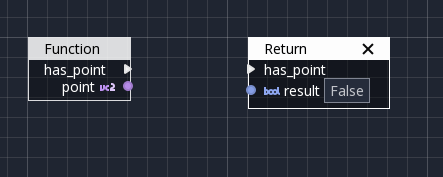
Connecting a signal to a function¶
Nodes in a tree emit signals when something happens. Godot uses signals for all sorts of things. A typical example would be a button that emits a “pressed” signal when actually pressed.
For this, a node must be selected and the Node tab opened. This will allow inspecting the signals. Once they are displayed, connect the “pressed” signal:
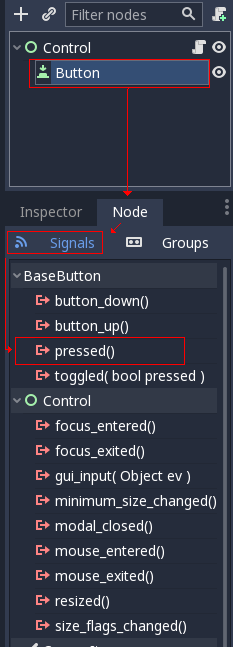
This will open the connection dialog. In this dialog, you must select the node where the signal will be connected to, and the function that will receive the signal:

If this is done right, a new function will be created in our script and a signal will automatically be connected to it:
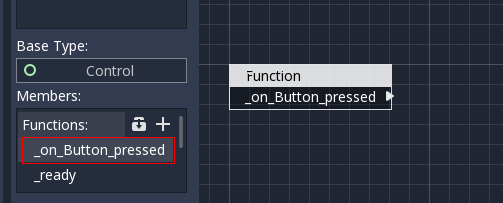
Creating a function manually¶
The last way to create functions is to do it manually. In general, this is not as common unless you really need it. Custom functions work when another (or the same) script calls them manually. The main use cases for this are breaking a larger function up into several manageable chunks and reusing your visual code.
To create a function manually, push the big “Plus” button, and a new function will be added with a default name:
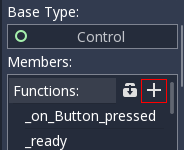
This will add a new function, which can be renamed by simply double clicking its name:
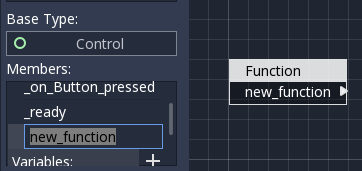
To edit the “arguments” this function can get (the values you pass to it when you call this function), simply click the Function node and check the inspector:
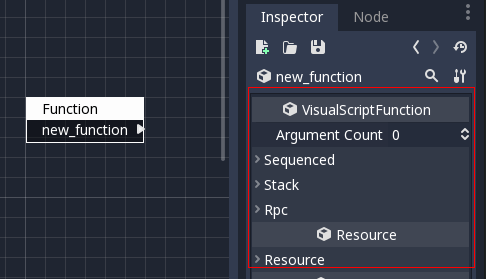
More on that will be explained later in this document.
Nodes and terminology¶
Before continuing, it must be noted that the Node terminology needs to be used with care. When referring to Visual Script Nodes (or generally Nodes) this text will refer to the little boxes you connect with lines, which are part of a graph. When referring to Scene Nodes, it is implied that the elements that make up a Scene are being referred, which are part of a tree. Their naming is similar but their function is different. When referring to Node here, it will be implied that a Visual Script Node is referred to unless indicated otherwise.
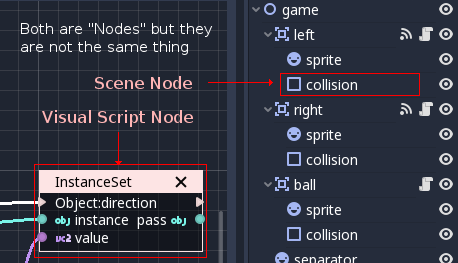
Node properties¶
Like in most visual scripting implementations, each node has editable properties. In Godot, though, we try to avoid bloating the nodes with editable controls for the sake of readability.
Nodes still display the required information as text, but editing is done via the Inspector. To edit them, select any node and edit its properties in the Inspector.
Ports and connections¶
Programming in Godot Visual Scripting is done via Nodes and Port Connections inside each function.
Ports¶
Nodes in Godot Visual Scripting have Ports. These are endpoints that appear to the left and right of nodes and which can be used to make Connections: There are two types of Ports: Sequence and Data.
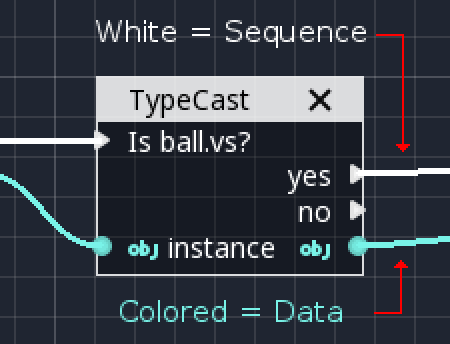
Sequence Ports indicate the order in which operations are executed. Typically when a Node is done processing, it will go to the next node from one of the ports at the right. If nothing is connected, the function may end, or another output Sequence Port might be tried (this depends on the node). Thanks to this, you can follow the logic flow within a function by following the white lines. Not every Node has Sequence Ports. In fact, most do not.
Data Ports ports contain typed values. Types can be any regular Godot types, such as a boolean, an integer, a string, a Vector3, an array, any Object or Scene Node, etc. A Data Port on the right side of a node is considered an output, while, a port on the left side is an input. Connecting them allows information to flow to the next node.
Not all Data Port types are compatible and will allow connections, though. Pay special attention to colors and icons, as each type has a different representation:
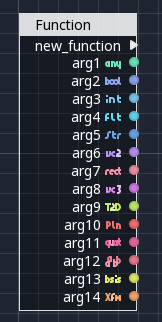
Connections¶
Connecting is a relatively simple process. Drag an Output Port towards an Input Port.
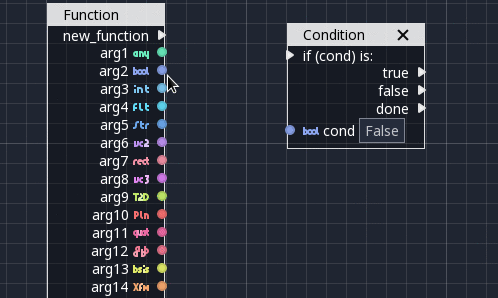
Disconnecting takes a bit more practice. Disconnecting in Data Ports happens by dragging the Input away, while for Sequence Ports, this happens by dragging the Output away.
This may seem strange at first, but it happens because Data Ports are 1:N (A single output port can connect to many inputs), while Sequence Ports are N:1 (Many sequence outputs can be connected to a single input).
Connecting to empty space (drag to connect but unpress over empty space) is also context sensitive, it will supply a list of most common operations. For sequences, it will be conditional nodes:
While, for data, a contextual set/get/call menu will open:
Adding nodes¶
Finally! We got to the fun part! But, before explaining in more detail what each type of node does, let’s take a short look at how nodes are most commonly added and dealt with.
Accessing scene nodes¶
One of the most common tasks is accessing Scene Tree Nodes (again, not to mistake with Visual Script Nodes). Dragging from the Scene Tree and dropping into the canvas will ask you to call a method (sometimes referred to as member function) on this node.

While accessing properties is desired in most cases (more on that below), sometimes calling methods can be useful too. Methods execute specific actions on objects. In the above case, the mouse pointer can be warped to a position in local coordinates to the control. Another common use case is queueing a node for deletion, which is done with the queue_free method.
Care must be taken that this only works if the scene being edited contains your Visual Script in one of the nodes! Otherwise, a warning will be shown.
Accessing scene node properties¶
This is the most common way to edit Scene Nodes in Visual Scripting. Select a Scene Node from the Scene Tree, go to the Inspector, find the Name of the property you want to edit (hint, not the value!) and drag it to the canvas:
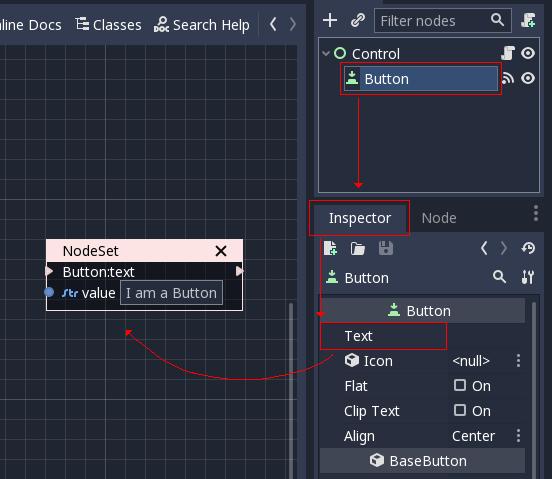
The result is that this value can be changed from your script by writing to a Data Port.
If instead reading this value is desired, drag the node again but hold Ctrl (or Cmd on macOS). This will create a getter:
In this case, the value can be read from a Data Port.
Variables¶
Variables are memory containers local to the script which can hold a value. This value can be read from any of the functions of the script or from other scripts via the method described in the previous step.
To add a Variable, push the “+” button on the Variables section of the Members panel. Double-click the new variable to rename it:
Right-clicking the variable allows you to configure its properties:
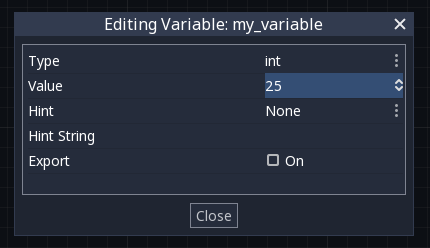
As it can be seen above, the type and initial value of the variable can be changed, as well as some property hints. Ticking the “Export” option makes the variable visible in the Inspector when selecting the node. This also makes it available to other scripts via the method described in the previous step.
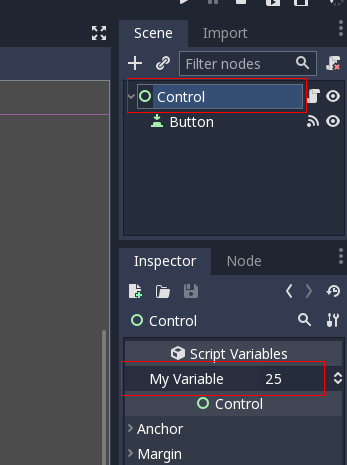
To use the variable in the script, simply drag it to the canvas to create a getter:
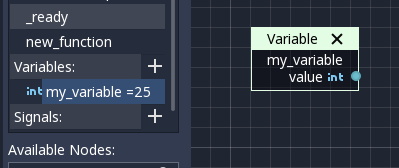
Likewise, hold Ctrl (or Cmd on macOS) to drop a setter:
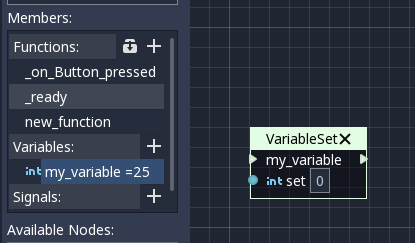
Signals¶
It is also possible to create your own signals in a script and use them. For this, do the same steps you did for variables in the previous step, except for Signals:
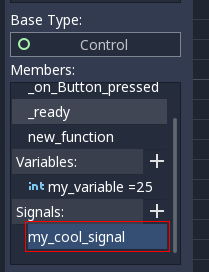
A signal can also be edited via the right-click menu to customize its arguments:
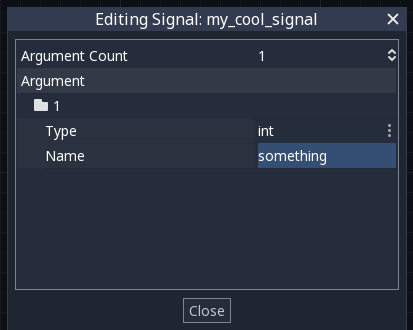
The signal you have created will appear in the Inspector, along with the built-in node signals. This allows you to connect it from another script from another Scene Node:
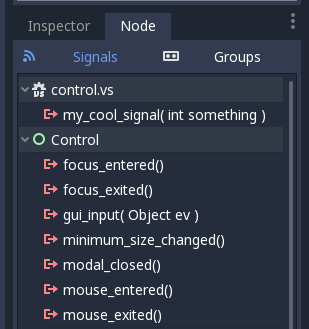
Finally, to emit the signal, simply drag it to the canvas:
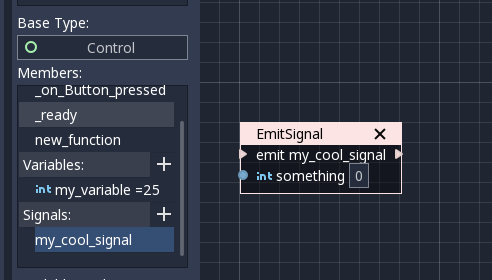
Remember that emitting a signal is a sequenced operation, so it must come from a Sequence port.
Adding more nodes¶
Now that the basics are covered, let’s discuss the large amount of utility nodes available for your canvas! Below the member panel, exists the list of all available node types:
Pressing Ctrl + F (or Cmd + F on macOS) allows you to search the list.
Any of them can be dragged to the scene. Unlike nodes (e.g. dragging a property from the Inspector sets the context to the node being edited automatically), these are added without any “contextual” information, so this has to be done manually.
Remember that you can check the class reference for what each node does, as they are documented there. That mentioned, a brief overview of node types follows:
Constants¶
Constant nodes are nodes that provide values that, while not changing over time, can be useful as reference values. Most of the time they are integer or float.
The first one is “Constant”, which allows you to select any value of any type as constant, from an integer (42) to a String (“Hello!”). In general, this node is not used that often because of default input values in Data Ports, but it’s good to know it exists.
The second is the GlobalConstant node, which contains a long list of constants for global types in Godot. In there you can find some useful constants to refer to key names, joystick or mouse buttons, etc.
The third one is MathConstant, which provides typical mathematical constants, such as PI, E, etc.
Data¶
Data nodes deal with all sorts of access to information. Any information in Godot is accessed via these nodes, so they are some of the most important ones to use and pretty diverse.
There are many types of nodes of interest here, so a short attempt to describe them will follow:
Action nodes are vital when dealing with input from a device. You can read more about actions in the (@TODO ACTION TUTE LINK). In the following example below, the control is moved to the right when the “move_right” action is pressed.
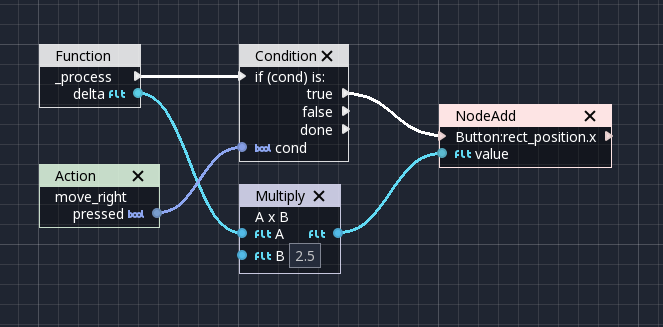
Engine singletons are global interfaces (meaning they can be accessed without a reference; unlike Scene Nodes, they are always available). They have several purposes, but in general, they are useful for low-level access or OS-related access.
Remember that dragging a connection to empty space will help you call functions or set/get properties on these:

These are nodes you can use as temporary storage for your graphs. Make sure they all have the same name and type when using them and they will reference the same piece of memory.
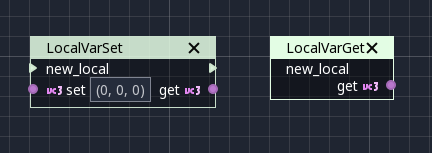
As it can be seen above, there are two nodes available: A simple getter, and a sequenced getter (setting requires a sequence port).
This is just a reference to a node in the tree, but it’s easier to use this node by dragging the actual node from the scene tree to the canvas (this will create it and configure it).
In some rare occasions, it may be desired to pass this Scene Node as argument. It can be used to call functions and set/get properties, or drag nodes (or event the node itself that has the script) from the Scene Tree to the canvas for this.
This node is similar to the Singleton node because it references the SceneTree, which contains the active scene. SceneTree, however, only works when the node is sitting in the scene and active, otherwise accessing it will return an error.
SceneTree allows for many low-level things, like setting stretch options, calling groups, make timers, or even load another scene. It’s a good class to get familiar with.
This does the same function as preload() in GDScript. It maintains this resource loaded and ready to use. Rather than instancing the node, it’s simpler to drag the desired resource from the filesystem dock to the canvas.
This node is a simple helper to get a string with a path to a resource you can pick. It’s useful in functions that load things from disk.
A Comment node works as a node you can resize to put around other nodes. It will not try to get focus or be brought to top when selecting it. It can also be used to write text on it.
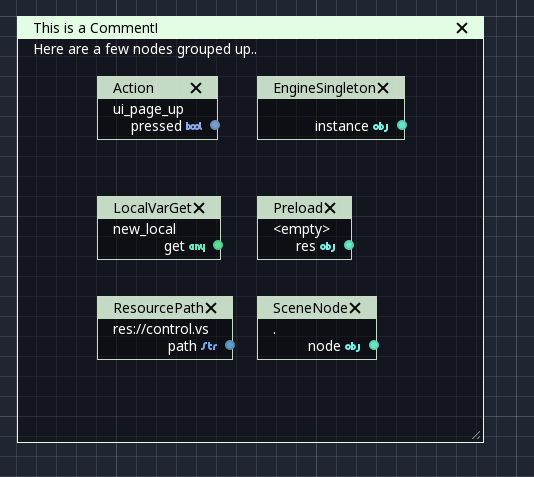
Flow Control¶
Flow control nodes allow the execution to take different branches, usually depending on a given condition.
This is a simple node that checks a bool port. If true, it will go via the “true” sequence port. If false,
the second. After going for either of them, it goes via the “done” port. Leaving sequence
ports disconnected is fine if not all of them are used.
Some data types in Godot (ie, arrays, dictionaries) are iterable. This means that a bit of code can run for each element that it has.
The Iterator node goes through all elements and, for each of them, it goes via the “each” sequence port, making the element available in the “elem” data port.
When done, it goes via the “exit” sequence port.
Some functions can return values. In general for virtual ones, Godot will add the Return node for you. A return node forces the function to end.
This node is useful mostly for organizing your graph. It calls its sequence ports in order.
This is a useful and commonly used node. You can use it to cast arguments or other objects to the type you desire. Afterwards, you can even drag the object output to get full completion.
It is also possible to cast to a script, which will allow complete script properties and functions:
The Switch node is similar to the Condition node, but it matches many values at the same time.
This is a more primitive form of iteration. “repeat” sequence output will be called as long as the condition in the “cond” data port is met.
Functions¶
Functions are simple helpers, most of the time deterministic. They take some arguments as input and return an output. They are almost never sequenced.
There is a list of built-in helpers. The list is almost identical to the one from GDScript. Most of them are mathematical functions, but others can be useful helpers. Make sure to take a look at the list at some point.
Those are the methods available to basic types. For example, if you want a dot-product, you can search for “dot” instead of the Vector3 category. In most cases just search the list of nodes, it should be faster.
This is the generic calling node. It is rarely used directly but by dragging to empty space on an already configured node.
These are all the functions needed to create Godot basic datatypes. For example, If you need to create a Vector3 out of 3 floats, a constructor must be used.
This is the opposite to Constructor, it allows to separate any basic type (ie, Vector3) into its sub-elements.
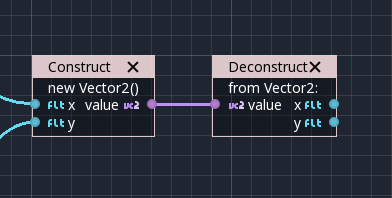
Emits signals from any object. In general it’s not that useful, as dragging a signal to the canvas works better.
Generic Getter/Setter node. Dragging properties from the Inspector works better, as they appear properly configured on drop.
The Wait nodes will suspend execution of the function until something happens (many frames can pass until resuming, in fact). Default nodes allow you to wait for a frame to pass, a fixed frame or a given amount of time until execution is resumed.
This node completely suspends the execution of the script, and it will make the function return a value that can be used to resume execution.
Same as Yield, but will wait until a given signal is emitted.
Index¶
Generic indexing operator, not often used but it’s good that it exists just in case.
Operators¶
These are mostly generic operators, such as addition, multiplication, comparison, etc. By default, these mostly accept any datatype (and will throw an error at run-time if the types fed do not match those expected by the operator). It is always recommended to set the right type for operators to catch errors faster and make the graph easier to read.
Among the operators, the Expression node is the most powerful. If well used, it allows you to enormously simplify visual scripts that are math or logic heavy. Type any expression on it and it will be executed in real-time.
Expression nodes can:
- Perform math and logic expressions based on custom inputs (eg: “a*5+b”, where a and b are custom inputs):
- Access local variables or properties:
- Use most of the existing built-in functions that are available to GDScript, such as sin(),cos(),print(), as well as constructors, such as Vector3(x,y,z),Rect2(..), etc.:

- Call API functions:

- Use sequenced mode, which makes more sense in case of respecting the processing order:
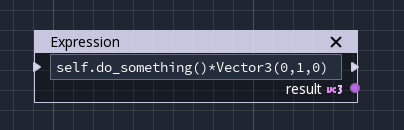
C#¶
Introduction¶
Warning
C# support is a new feature available since Godot 3.0. As such, you may still run into some issues, or find spots where the documentation could be improved. Please report issues with C# in Godot on the engine GitHub page, and any documentation issues on the documentation GitHub page.
This page provides a brief introduction to C#, both what it is and how to use it in Godot. Afterwards, you may want to look at how to use specific features, read about the differences between the C# and the GDScript API and (re)visit the Scripting section of the step-by-step tutorial.
C# is a high-level programming language developed by Microsoft. In Godot, it is implemented with the Mono 6.x .NET framework, including full support for C# 8.0. Mono is an open source implementation of Microsoft’s .NET Framework based on the ECMA standards for C# and the Common Language Runtime. A good starting point for checking its capabilities is the Compatibility page in the Mono documentation.
Note
This is not a full-scale tutorial on the C# language as a whole. If you aren’t already familiar with its syntax or features, see the Microsoft C# guide or look for a suitable introduction elsewhere.
Setting up C# for Godot¶
Windows¶
Download and install the latest version of Visual Studio (not Visual Studio Code), which contains utilities required to use C# in Godot. If you don’t plan on using the Visual Studio IDE, you can download just the Visual Studio Build Tools instead. Make sure you at least have the .NET Framework 4.5 targeting pack installed, you can get it using any of the installers mentioned above inside the “Individual components” tab.
macOS and Linux¶
Download and install the latest version of the Mono SDK. As of Godot 3.1 beta 3, the version number doesn’t matter since Godot bundles its own Mono 5.18 installation. We only need the Mono installation for NuGet and MSBuild which are required to use C# in Godot.
Note
To download Mono on macOS, use the “Stable Channel” link from the Mono Downloads Page. The Visual Studio channel is an earlier version of Mono and will not work.
Additional notes¶
Your Godot version must have Mono support enabled, so make sure to download the Mono version of Godot. If you are building Godot from source, make sure to follow the steps to enable Mono support in your build as outlined in the Compiling with Mono page.
In summary, you must have installed Visual Studio or Mono (depending on your operating system) and the Mono-enabled version of Godot.
Configuring an external editor¶
C# support in Godot’s script editor is minimal. Consider using an external IDE or editor, such as Visual Studio Code or MonoDevelop. These provide autocompletion, debugging, and other useful features for C#. To select an external editor in Godot, click on Editor → Editor Settings and scroll down to Mono. Under Mono, click on Editor, and select your external editor of choice. Godot currently supports the following external editors:
- Visual Studio 2019
- Visual Studio Code
- MonoDevelop
- Visual Studio for Mac
- JetBrains Rider
Note
If you are using Visual Studio Code, ensure you download and install the C# extension to enable features like syntax highlighting and IntelliSense.
Note
If you are using Visual Studio 2019, you must follow the instructions found in the “Configure VS2019 for Debugging” section below.
Creating a C# script¶
After you successfully set up C# for Godot, you should see the following option
when selecting Attach script in the context menu of a node in your scene:
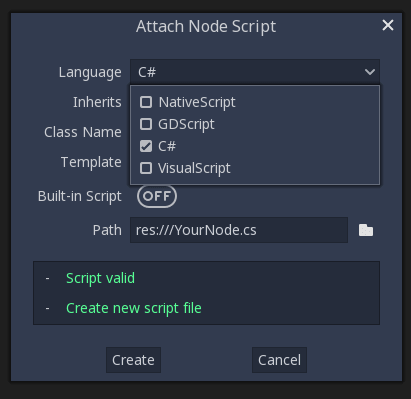
Note that while some specifics change, most concepts work the same when using C# for scripting. If you’re new to Godot, you may want to follow the tutorials on Scripting at this point. While some places in the documentation still lack C# examples, most concepts can be transferred easily from GDScript.
Project setup and workflow¶
When you create the first C# script, Godot initializes the C# project files
for your Godot project. This includes generating a C# solution (.sln)
and a project file (.csproj), as well as some utility files and folders
(.mono and Properties/AssemblyInfo.cs).
All of these but .mono are important and should be committed to your
version control system. .mono can be safely added to the ignore list of your VCS.
When troubleshooting, it can sometimes help to delete the .mono folder
and let it regenerate.
Note that currently, there are some issues where Godot and the C# project don’t stay in sync; if you delete, rename or move a C# script, the change may not be reflected in the C# project file. In cases like this, you will have to edit the C# project file manually.
For example, if you created a script (e.g. Test.cs) and delete it in Godot,
compilation will fail because the missing file is still expected to be there
by the C# project file. For now, you can simply open up the .csproj file
and look for the ItemGroup, there should be a line included
like the following:
<ItemGroup>
<Compile Include="Test.cs" />
<Compile Include="AnotherTest.cs" />
</ItemGroup>
Simply remove that line and your project should build correctly again. Same for renaming and moving things, simply rename and move them in the project file if needed.
Example¶
Here’s a blank C# script with some comments to demonstrate how it works.
using Godot;
using System;
public class YourCustomClass : Node
{
// Member variables here, example:
private int a = 2;
private string b = "textvar";
public override void _Ready()
{
// Called every time the node is added to the scene.
// Initialization here.
GD.Print("Hello from C# to Godot :)");
}
public override void _Process(float delta)
{
// Called every frame. Delta is time since the last frame.
// Update game logic here.
}
}
As you can see, functions normally in global scope in GDScript like Godot’s
print function are available in the GD class which is part of
the Godot namespace. For a list of methods in the GD class, see the
class reference pages for
@GDScript and @GlobalScope.
Note
Keep in mind that the class you wish to attach to your node should have the same
name as the .cs file. Otherwise, you will get the following error
and won’t be able to run the scene:
“Cannot find class XXX for script res://XXX.cs”
General differences between C# and GDScript¶
The C# API uses PascalCase instead of snake_case in GDScript/C++.
Where possible, fields and getters/setters have been converted to properties.
In general, the C# Godot API strives to be as idiomatic as is reasonably possible.
For more information, see the API differences to GDScript page.
Current gotchas and known issues¶
As C# support is quite new in Godot, there are some growing pains and things that need to be ironed out. Below is a list of the most important issues you should be aware of when diving into C# in Godot, but if in doubt, also take a look over the official issue tracker for Mono issues.
- As explained above, the C# project isn’t always kept in sync automatically when things are deleted, renamed or moved in Godot (#12917).
- Writing editor plugins is possible, but it is currently quite convoluted.
- State is currently not saved and restored when hot-reloading, with the exception of exported variables.
- Exporting Mono projects is only supported for desktop platforms (Linux, Windows and macOS). Android, iOS, HTML5 and UWP are not currently supported (#20267, #20268 #20270 #20271).
- Attached C# scripts should refer to a class that has a class name that matches the file name.
- There are some methods such as
Get()/Set(),Call()/CallDeferred()and signal connection methodConnect()that rely on Godot’ssnake_caseAPI naming conventions. So when using e.g.CallDeferred("AddChild"),AddChildwill not work because the API is expecting the originalsnake_caseversionadd_child. However, you can use any custom properties or methods without this limitation.
Performance of C# in Godot¶
According to some preliminary benchmarks, the performance of C# in Godot — while generally in the same order of magnitude — is roughly ~4× that of GDScript in some naive cases. C++ is still a little faster; the specifics are going to vary according to your use case. GDScript is likely fast enough for most general scripting workloads. C# is faster, but requires some expensive marshalling when talking to Godot.
Using NuGet packages in Godot¶
NuGet packages can be installed and used with Godot,
as with any C# project. Many IDEs are able to add packages directly.
They can also be added manually by adding the package reference in
the .csproj file located in the project root:
<ItemGroup>
<PackageReference Include="Newtonsoft.Json">
<Version>11.0.2</Version>
</PackageReference>
</ItemGroup>
...
</Project>
Note
By default, tools like NuGet put Version as an attribute of the `PackageReference` Node. You must manually create a Version node as shown above. This is because the version of MSBuild used requires this. (This will be fixed in Godot 4.0.)
Whenever packages are added or modified, run nuget restore (not dotnet restore) in the root of the
project directory. To ensure that NuGet packages will be available for
msbuild to use, run:
msbuild /t:restore
Profiling your C# code¶
- Mono log profiler is available for Linux and macOS. Due to a Mono change, it does not work on Windows currently.
- External Mono profiler like JetBrains dotTrace can be used as described here.
Configuring VS 2019 for debugging¶
Note
Godot has built-in support for workflows involving several popular C# IDEs. Built-in support for Visual Studio will be including in future versions, but in the meantime, the steps below can let you configure VS 2019 for use with Godot C# projects.
- Install VS 2019 with
.NET desktop developmentandDesktop development with C++workloads selected. - Ensure that you do not have Xamarin installed. Do not choose the
Mobile development with .NETworkload. Xamarin changes the DLLs used by MonoDebugger, which breaks debugging. - Install the VSMonoDebugger extension.
- In VS 2019 –> Extensions –> Mono –> Settings:
- Select
Debug/Deploy to local Windows. - Leave
Local Deploy Pathblank. - Set the
Mono Debug Portto the port in Godot –> Project –> Project Settings –> Mono –> Debugger Agent. - Also select
Wait for Debuggerin the Godot Mono options. This Godot Addon may be helpful.
- Select
- Run the game in Godot. It should hang at the Godot splash screen while it waits for your debugger to attach.
- In VS 2019, open your project and choose Extensions –> Mono –> Attach to Mono Debugger.
Features¶
This page provides an overview of the commonly used features of both C# and Godot and how they are used together.
Type conversion and casting¶
C# is a statically typed language. Therefore, you can’t do the following:
var mySprite = GetNode("MySprite");
mySprite.SetFrame(0);
The method GetNode() returns a Node instance.
You must explicitly convert it to the desired derived type, Sprite in this case.
For this, you have various options in C#.
Casting and Type Checking
Throws InvalidCastException if the returned node cannot be cast to Sprite.
You would use it instead of the as operator if you are pretty sure it won’t fail.
Sprite mySprite = (Sprite)GetNode("MySprite");
mySprite.SetFrame(0);
Using the AS operator
The as operator returns null if the node cannot be cast to Sprite,
and for that reason, it cannot be used with value types.
Sprite mySprite = GetNode("MySprite") as Sprite;
// Only call SetFrame() if mySprite is not null
mySprite?.SetFrame(0);
Using the generic methods
Generic methods are also provided to make this type conversion transparent.
GetNode<T>() casts the node before returning it. It will throw an InvalidCastException if the node cannot be cast to the desired type.
Sprite mySprite = GetNode<Sprite>("MySprite");
mySprite.SetFrame(0);
GetNodeOrNull<T>() uses the as operator and will return null if the node cannot be cast to the desired type.
Sprite mySprite = GetNodeOrNull<Sprite>("MySprite");
// Only call SetFrame() if mySprite is not null
mySprite?.SetFrame(0);
Type checking using the IS operator
To check if the node can be cast to Sprite, you can use the is operator.
The is operator returns false if the node cannot be cast to Sprite,
otherwise it returns true.
if (GetNode("MySprite") is Sprite)
{
// Yup, it's a sprite!
}
For more advanced type checking, you can look into Pattern Matching.
C# signals¶
For a complete C# example, see the Handling a signal section in the step by step Scripting tutorial.
Declaring a signal in C# is done with the [Signal] attribute on a delegate.
[Signal]
delegate void MySignal();
[Signal]
delegate void MySignalWithArguments(string foo, int bar);
These signals can then be connected either in the editor or from code with Connect.
If you want to connect a signal in the editor, you need to (re)build the project assemblies to see the new signal. This build can be manually triggered by clicking the “Build” button at the top right corner of the editor window.
public void MyCallback()
{
GD.Print("My callback!");
}
public void MyCallbackWithArguments(string foo, int bar)
{
GD.Print("My callback with: ", foo, " and ", bar, "!");
}
public void SomeFunction()
{
instance.Connect("MySignal", this, "MyCallback");
instance.Connect(nameof(MySignalWithArguments), this, "MyCallbackWithArguments");
}
Emitting signals is done with the EmitSignal method.
public void SomeFunction()
{
EmitSignal(nameof(MySignal));
EmitSignal("MySignalWithArguments", "hello there", 28);
}
Notice that you can always reference a signal name with the nameof keyword (applied on the delegate itself).
It is possible to bind values when establishing a connection by passing an object array.
public int Value { get; private set; } = 0;
private void ModifyValue(int modifier)
{
Value += modifier;
}
public void SomeFunction()
{
var plusButton = (Button)GetNode("PlusButton");
var minusButton = (Button)GetNode("MinusButton");
plusButton.Connect("pressed", this, "ModifyValue", new object[] { 1 });
minusButton.Connect("pressed", this, "ModifyValue", new object[] { -1 });
}
Signals support parameters and bound values of all the built-in types and Classes derived from Godot.Object.
Consequently, any Node or Reference will be compatible automatically, but custom data objects will need to extend from Godot.Object or one of its subclasses.
public class DataObject : Godot.Object
{
public string Field1 { get; set; }
public string Field2 { get; set; }
}
Finally, signals can be created by calling AddUserSignal, but be aware that it should be executed before any use of said signals (with Connect or EmitSignal).
public void SomeFunction()
{
AddUserSignal("MyOtherSignal");
EmitSignal("MyOtherSignal");
}
Preprocessor defines¶
Godot has a set of defines that allow you to change your C# code depending on the environment you are compiling to.
Note
If you created your project before Godot 3.2, you have to modify
or regenerate your csproj file to use this feature
(compare <DefineConstants> with a new 3.2+ project).
Examples¶
For example, you can change code based on the platform:
public override void _Ready()
{
#if GODOT_SERVER
// Don't try to load meshes or anything, this is a server!
LaunchServer();
#elif GODOT_32 || GODOT_MOBILE || GODOT_WEB
// Use simple objects when running on less powerful systems.
SpawnSimpleObjects();
#else
SpawnComplexObjects();
#endif
}
Or you can detect which engine your code is in, useful for making cross-engine libraries:
public void MyPlatformPrinter()
{
#if GODOT
GD.Print("This is Godot.");
#elif UNITY_5_3_OR_NEWER
print("This is Unity.");
#else
throw new InvalidWorkflowException("Only Godot and Unity are supported.");
#endif
}
Full list of defines¶
GODOTis always defined for Godot projects.- One of
GODOT_64orGODOT_32is defined depending on if the architecture is 64-bit or 32-bit. - One of
GODOT_X11,GODOT_WINDOWS,GODOT_OSX,GODOT_ANDROID,GODOT_HTML5, orGODOT_SERVERdepending on the OS. These names may change in the future. These are created from theget_name()method of the :ref:OS <class_OS>singleton, but not every possible OS the method returns is an OS that Godot with Mono runs on.
When exporting, the following may also be defined depending on the export features:
- One of
GODOT_PC,GODOT_MOBILE, orGODOT_WEBdepending on the platform type. - One of
GODOT_ARM64_V8AorGODOT_ARMEABI_V7Aon Android only depending on the architecture. - One of
GODOT_S3TC,GODOT_ETC, orGODOT_ETC2depending on the texture compression type. - Any custom features added in the export menu will be capitalized and prefixed:
foo->GODOT_FOO.
API differences to GDScript¶
This is a (incomplete) list of API differences between C# and GDScript.
General differences¶
As explained in the Introduction, C# generally uses PascalCase instead
of the snake_case used in GDScript and C++.
Global scope¶
Global functions and some constants had to be moved to classes, since C# does not allow declaring them in namespaces. Most global constants were moved to their own enums.
Constants¶
Global constants were moved to their own enums.
For example, ERR_* constants were moved to the Error enum.
Special cases:
| GDScript | C# |
|---|---|
SPKEY |
GD.SpKey |
TYPE_* |
Variant.Type enum |
OP_* |
Variant.Operator enum |
Math functions¶
Math global functions, like abs, acos, asin, atan and atan2, are
located under Mathf as Abs, Acos, Asin, Atan and Atan2.
The PI constant can be found as Mathf.Pi.
Random functions¶
Random global functions, like rand_range and rand_seed, are located under GD.
Example: GD.RandRange and GD.RandSeed.
Other functions¶
Many other global functions like print and var2str are located under GD.
Example: GD.Print and GD.Var2Str.
Exceptions:
| GDScript | C# |
|---|---|
weakref(obj) |
Object.WeakRef(obj) |
is_instance_valid(obj) |
Object.IsInstanceValid(obj) |
Tips¶
Sometimes it can be useful to use the using static directive. This directive allows
to access the members and nested types of a class without specifying the class name.
Example:
using static Godot.GD;
public class Test
{
static Test()
{
Print("Hello"); // Instead of GD.Print("Hello");
}
}
Export keyword¶
Use the [Export] attribute instead of the GDScript export keyword.
This attribute can also be provided with optional PropertyHint and hintString parameters.
Default values can be set by assigning a value.
Example:
using Godot;
public class MyNode : Node
{
[Export]
private NodePath _nodePath;
[Export]
private string _name = "default";
[Export(PropertyHint.Range, "0,100000,1000,or_greater")]
private int _income;
[Export(PropertyHint.File, "*.png,*.jpg")]
private string _icon;
}
Signal keyword¶
Use the [Signal] attribute to declare a signal instead of the GDScript signal keyword.
This attribute should be used on a delegate, whose name signature will be used to define the signal.
[Signal]
delegate void MySignal(string willSendsAString);
See also: C# signals
Singletons¶
Singletons are available as static classes rather than using the singleton pattern.
This is to make code less verbose than it would be with an Instance property.
Example:
Input.IsActionPressed("ui_down")
However, in some very rare cases this is not enough. For example, you may want
to access a member from the base class Godot.Object, like Connect.
For such use cases we provide a static property named Singleton that returns
the singleton instance. The type of this instance is Godot.Object.
Example:
Input.Singleton.Connect("joy_connection_changed", this, nameof(Input_JoyConnectionChanged));
String¶
Use System.String (string). Most of Godot’s String methods are
provided by the StringExtensions class as extension methods.
Example:
string upper = "I LIKE SALAD FORKS";
string lower = upper.ToLower();
There are a few differences, though:
erase: Strings are immutable in C#, so we cannot modify the string passed to the extension method. For this reason,Erasewas added as an extension method ofStringBuilderinstead of string. Alternatively, you can usestring.Remove.IsSubsequenceOf/IsSubsequenceOfi: An additional method is provided, which is an overload ofIsSubsequenceOf, allowing you to explicitly specify case sensitivity:
str.IsSubsequenceOf("ok"); // Case sensitive
str.IsSubsequenceOf("ok", true); // Case sensitive
str.IsSubsequenceOfi("ok"); // Case insensitive
str.IsSubsequenceOf("ok", false); // Case insensitive
Match/Matchn/ExprMatch: An additional method is provided besidesMatchandMatchn, which allows you to explicitly specify case sensitivity:
str.Match("*.txt"); // Case sensitive
str.ExprMatch("*.txt", true); // Case sensitive
str.Matchn("*.txt"); // Case insensitive
str.ExprMatch("*.txt", false); // Case insensitive
Basis¶
Structs cannot have parameterless constructors in C#. Therefore, new Basis()
initializes all primitive members to their default value. Use Basis.Identity
for the equivalent of Basis() in GDScript and C++.
The following method was converted to a property with a different name:
| GDScript | C# |
|---|---|
get_scale() |
Scale |
Transform2D¶
Structs cannot have parameterless constructors in C#. Therefore, new Transform2D()
initializes all primitive members to their default value.
Please use Transform2D.Identity for the equivalent of Transform2D() in GDScript and C++.
The following methods were converted to properties with their respective names changed:
| GDScript | C# |
|---|---|
get_rotation() |
Rotation |
get_scale() |
Scale |
Plane¶
The following method was converted to a property with a slightly different name:
| GDScript | C# |
|---|---|
center() |
Center |
Rect2¶
The following field was converted to a property with a slightly different name:
| GDScript | C# |
|---|---|
end |
End |
The following method was converted to a property with a different name:
| GDScript | C# |
|---|---|
get_area() |
Area |
Quat¶
Structs cannot have parameterless constructors in C#. Therefore, new Quat()
initializes all primitive members to their default value.
Please use Quat.Identity for the equivalent of Quat() in GDScript and C++.
The following methods were converted to a property with a different name:
| GDScript | C# |
|---|---|
length() |
Length |
length_squared() |
LengthSquared |
Array¶
This is temporary. PoolArrays will need their own types to be used the way they are meant to.
| GDScript | C# |
|---|---|
Array |
Godot.Collections.Array |
PoolIntArray |
int[] |
PoolByteArray |
byte[] |
PoolFloatArray |
float[] |
PoolStringArray |
String[] |
PoolColorArray |
Color[] |
PoolVector2Array |
Vector2[] |
PoolVector3Array |
Vector3[] |
Godot.Collections.Array<T> is a type-safe wrapper around Godot.Collections.Array.
Use the Godot.Collections.Array<T>(Godot.Collections.Array) constructor to create one.
Dictionary¶
Use Godot.Collections.Dictionary.
Godot.Collections.Dictionary<T> is a type-safe wrapper around Godot.Collections.Dictionary.
Use the Godot.Collections.Dictionary<T>(Godot.Collections.Dictionary) constructor to create one.
Variant¶
System.Object (object) is used instead of Variant.
Communicating with other scripting languages¶
This is explained extensively in Cross-language scripting.
Yield¶
Something similar to GDScript’s yield with a single parameter can be achieved with
C#’s yield keyword.
The equivalent of yield on signal can be achieved with async/await and Godot.Object.ToSignal.
Example:
await ToSignal(timer, "timeout");
GD.Print("After timeout");
Other differences¶
preload, as it works in GDScript, is not available in C#.
Use GD.Load or ResourceLoader.Load instead.
Other differences:
| GDScript | C# |
|---|---|
Color8 |
Color.Color8 |
is_inf |
float.IsInfinity |
is_nan |
float.IsNaN |
dict2inst |
TODO |
inst2dict |
TODO |
C# style guide¶
Having well-defined and consistent coding conventions is important for every project, and Godot is no exception to this rule.
This page contains a coding style guide, which is followed by developers of and contributors to Godot itself. As such, it is mainly intended for those who want to contribute to the project, but since the conventions and guidelines mentioned in this article are those most widely adopted by the users of the language, we encourage you to do the same, especially if you do not have such a guide yet.
Note
This article is by no means an exhaustive guide on how to follow the standard coding conventions or best practices. If you feel unsure of an aspect which is not covered here, please refer to more comprehensive documentation, such as C# Coding Conventions or Framework Design Guidelines.
Language specification¶
Godot currently uses C# version 7.0 in its engine and example source code. So, before we move to a newer version, care must be taken to avoid mixing language features only available in C# 7.1 or later.
For detailed information on C# features in different versions, please see What’s New in C#.
Formatting¶
General guidelines¶
- Use line feed (LF) characters to break lines, not CRLF or CR.
- Use one line feed character at the end of each file, except for csproj files.
- Use UTF-8 encoding without a byte order mark.
- Use 4 spaces instead of tabs for indentation (which is referred to as “soft tabs”).
- Consider breaking a line into several if it’s longer than 100 characters.
Line breaks and blank lines¶
For a general indentation rule, follow the “Allman Style” which recommends placing the brace associated with a control statement on the next line, indented to the same level:
// Use this style:
if (x > 0)
{
DoSomething();
}
// NOT this:
if (x > 0) {
DoSomething();
}
However, you may choose to omit line breaks inside brackets:
- For simple property accessors.
- For simple object, array, or collection initializers.
- For abstract auto property, indexer, or event declarations.
// You may put the brackets in a single line in following cases:
public interface MyInterface
{
int MyProperty { get; set; }
}
public class MyClass : ParentClass
{
public int Value
{
get { return 0; }
set
{
ArrayValue = new [] {value};
}
}
}
Insert a blank line:
- After a list of
usingstatements. - Between method, properties, and inner type declarations.
- At the end of each file.
Field and constant declarations can be grouped together according to relevance. In that case, consider inserting a blank line between the groups for easier reading.
Avoid inserting a blank line:
- After
{, the opening brace. - Before
}, the closing brace. - After a comment block or a single-line comment.
- Adjacent to another blank line.
using System;
using Godot;
// Blank line after `using` list.
public class MyClass
{ // No blank line after `{`.
public enum MyEnum
{
Value,
AnotherValue // No blank line before `}`.
}
// Blank line around inner types.
public const int SomeConstant = 1;
public const int AnotherConstant = 2;
private Vector3 _x; // Related constants or fields can be
private Vector3 _y; // grouped together.
private float _width;
private float _height;
public int MyProperty { get; set; }
// Blank line around properties.
public void MyMethod()
{
// Some comment.
AnotherMethod(); // No blank line after a comment.
}
// Blank line around methods.
public void AnotherMethod()
{
}
}
Using spaces¶
Insert a space:
- Around a binary and tertiary operator.
- Between an opening parenthesis and
if,for,foreach,catch,while,lockorusingkeywords. - Before and within a single line accessor block.
- Between accessors in a single line accessor block.
- After a comma which is not at the end of a line.
- After a semicolon in a
forstatement. - After a colon in a single line
casestatement. - Around a colon in a type declaration.
- Around a lambda arrow.
- After a single-line comment symbol (
//), and before it if used at the end of a line.
Do not use a space:
- After type cast parentheses.
- Within single line initializer braces.
The following example shows a proper use of spaces, according to some of the above mentioned conventions:
public class MyClass<A, B> : Parent<A, B>
{
public float MyProperty { get; set; }
public float AnotherProperty
{
get { return MyProperty; }
}
public void MyMethod()
{
int[] values = {1, 2, 3, 4}; // No space within initializer brackets.
int sum = 0;
// Single line comment.
for (int i = 0; i < values.Length; i++)
{
switch (i)
{
case 3: return;
default:
sum += i > 2 ? 0 : 1;
break;
}
}
i += (int)MyProperty; // No space after a type cast.
}
}
Naming conventions¶
Use PascalCase for all namespaces, type names and member level identifiers (i.e. methods, properties, constants, events), except for private fields:
namespace ExampleProject
{
public class PlayerCharacter
{
public const float DefaultSpeed = 10f;
public float CurrentSpeed { get; set; }
protected int HitPoints;
private void CalculateWeaponDamage()
{
}
}
}
Use camelCase for all other identifiers (i.e. local variables, method arguments), and use
an underscore (_) as a prefix for private fields (but not for methods or properties, as explained above):
private Vector3 _aimingAt; // Use a `_` prefix for private fields.
private void Attack(float attackStrength)
{
Enemy targetFound = FindTarget(_aimingAt);
targetFound?.Hit(attackStrength);
}
There’s an exception with acronyms which consist of two letters, like UI, which should be written in
uppercase letters where PascalCase would be expected, and in lowercase letters otherwise.
Note that id is not an acronym, so it should be treated as a normal identifier:
public string Id { get; }
public UIManager UI
{
get { return uiManager; }
}
It is generally discouraged to use a type name as a prefix of an identifier, like string strText
or float fPower, for example. An exception is made, however, for interfaces, which
should, in fact, have an uppercase letter I prefixed to their names, like IInventoryHolder or IDamageable.
Lastly, consider choosing descriptive names and do not try to shorten them too much if it affects readability.
For instance, if you want to write code to find a nearby enemy and hit it with a weapon, prefer:
FindNearbyEnemy()?.Damage(weaponDamage);
Rather than:
FindNode()?.Change(wpnDmg);
Implicitly typed local variables¶
Consider using implicitly typing (var) for declaration of a local variable, but do so
only when the type is evident from the right side of the assignment:
// You can use `var` for these cases:
var direction = new Vector2(1, 0);
var value = (int)speed;
var text = "Some value";
for (var i = 0; i < 10; i++)
{
}
// But not for these:
var value = GetValue();
var velocity = direction * 1.5;
// It's generally a better idea to use explicit typing for numeric values, especially with
// the existence of the `real_t` alias in Godot, which can either be double or float
// depending on the build configuration.
var value = 1.5;
Other considerations¶
- Use explicit access modifiers.
- Use properties instead of non-private fields.
- Use modifiers in this order:
public/protected/private/internal/virtual/override/abstract/new/static/readonly.- Avoid using fully-qualified names or
this.prefix for members when it’s not necessary.- Remove unused
usingstatements and unnecessary parentheses.- Consider omitting the default initial value for a type.
- Consider using null-conditional operators or type initializers to make the code more compact.
- Use safe cast when there is a possibility of the value being a different type, and use direct cast otherwise.
Cross-language scripting¶
Godot allows you to mix and match scripting languages to suit your needs. This means a single project can define nodes in both C# and GDScript. This page will go through the possible interactions between two nodes writen in different languages.
The following two scripts will be used as references throughout this page.
extends Node
var str1 : String = "foo"
var str2 : String setget ,get_str2
func get_str2() -> String:
return "foofoo"
func print_node_name(node : Node) -> void:
print(node.get_name())
func print_array(arr : Array) -> void:
for element in arr:
print(element)
func print_x_times(msg : String, n : int) -> void:
for i in range(n):
print(msg)
public class MyCSharpNode : Node
{
public String str1 = "bar";
public String str2 { get { return "barbar"; } }
public void PrintNodeName(Node node)
{
GD.Print(node.GetName());
}
public void PrintArray(String[] arr)
{
foreach (String element in arr)
{
GD.Print(element);
}
}
public void PrintNTimes(String msg, int n)
{
for (int i = 0; i < n; ++i)
{
GD.Print(msg);
}
}
}
Instantiating nodes¶
If you’re not using nodes from the scene tree, you’ll probably want to instantiate nodes directly from the code.
Instantiating C# nodes from GDScript¶
Using C# from GDScript doesn’t need much work. Once loaded (see Classes as resources) the script can be instantiated with new().
var my_csharp_script = load("res://path_to_cs_file.cs")
var my_csharp_node = my_csharp_script.new()
print(my_csharp_node.str2) # barbar
Warning
When creating .cs scripts you should always keep in mind that the class
Godot will use is the one named like the .cs file itself. If that class
does not exist in the file, you’ll see the following error:
Invalid call. Nonexistent function `new` in base.
For example, MyCoolNode.cs should contain a class named MyCoolNode.
You also need to check your .cs file is referenced in the project’s .csproj file. Otherwise, the same error will occur.
Instantiating GDScript nodes from C#¶
From the C# side, everything work the same way. Once loaded, the GDScript can be instantiated with GDScript.New().
GDScript MyGDScript = (GDScript) GD.Load("res://path_to_gd_file.gd");
Object myGDScriptNode = (Godot.Object) MyGDScript.New(); // This is a Godot.Object
Here we are using an Object but you can use type convertion like explained in Type conversion and casting.
Accessing fields¶
Accessing C# fields from GDScript¶
Accessing C# fields from GDScript is straightforward, you shouldn’t have anything to worry about.
print(my_csharp_node.str1) # bar
my_csharp_node.str1 = "BAR"
print(my_csharp_node.str1) # BAR
print(my_csharp_node.str2) # barbar
# my_csharp_node.str2 = "BARBAR" # This line will hang and crash
Note that it doesn’t matter if the field is defined as a property or an attribute, but trying to set a value on a property that does not define a setter will result in a crash.
Accessing GDScript fields from C#¶
As C# is statically typed, accessing GDScript from C# is a bit more convoluted, you will have to use Object.Get() and Object.Set(). The first argument is the name of the field you want to access.
GD.Print(myGDScriptNode.Get("str1")); // foo
myGDScriptNode.Set("str1", "FOO");
GD.Print(myGDScriptNode.Get("str1")); // FOO
GD.Print(myGDScriptNode.Get("str2")); // foofoo
// myGDScriptNode.Set("str2", "FOOFOO"); // This line won't do anything
Keep in mind that when setting a field value you should only use types the GDScript side knows about. Essentially, you want to work with built-in types as described in GDScript basics or classes extending Object.
Calling methods¶
Calling C# methods from GDScript¶
Again, calling C# methods from GDScript should be straightforward. The
marshalling process will do its best to cast your the arguments to match
function signatures.
If that’s impossible you’ll see the following error: Invalid call. Nonexistent function `FunctionName`.
my_csharp_node.PrintNodeName(self) # myGDScriptNode
# my_csharp_node.PrintNodeName() # This line will fail.
my_csharp_node.PrintNTimes("Hello there!", 2) # Hello there! Hello there!
my_csharp_node.PrintArray(["a", "b", "c"]) # a, b, c
my_csharp_node.PrintArray([1, 2, 3]) # 1, 2, 3
Calling GDScript methods from C#¶
To call GDScript methods from C# you’ll need to use Object.Call(). The first arguments is the name of the method you want to call. The following arguments will be passed to said method.
myGDScriptNode.Call("print_node_name", this); // my_csharp_node
// myGDScriptNode.Call("print_node_name"); // This line will fail silently and won't error out.
myGDScriptNode.Call("print_n_times", "Hello there!", 2); // Hello there! Hello there!
// When dealing with functions taking a single array as arguments, we need to be careful.
// If we don't cast it into an object, the engine will treat each element of the array as a separate argument and the call will fail.
String[] arr = new String[] { "a", "b", "c" };
// myGDScriptNode.Call("print_array", arr); // This line will fail silently and won't error out.
myGDScriptNode.Call("print_array", (object)arr); // a, b, c
myGDScriptNode.Call("print_array", (object)new int[] { 1, 2, 3 }); // 1, 2, 3
// Note how the type of each array entry does not matter as long as it can be handled by the marshaller
Warning
As you can see, if the first argument of the called method is an array,
you’ll need to cast it as object.
Otherwise each element of your array will be treated as a single argument
and the function signature won’t match.
Project workflow¶
Project setup¶
Project organization¶
Introduction¶
Since Godot has no restrictions on project structure or filesystem usage, organizing files when learning the engine can seem challenging. This tutorial suggests a workflow which should be a good starting point. We will also cover using version control with Godot.
Organization¶
Godot is scene-based in nature, and uses the filesystem as-is, without metadata or an asset database.
Unlike other engines, many resources are contained within the scene itself, so the amount of files in the filesystem is considerably lower.
Considering that, the most common approach is to group assets as close to scenes as possible; when a project grows, it makes it more maintainable.
As an example, one can usually place into a single folder their basic assets, such as sprite images, 3D model meshes, materials, and music, etc. They can then use a separate folder to store built levels that use them.
/project.godot
/docs/.gdignore # See "Ignoring specific folders" below
/docs/learning.html
/models/town/house/house.dae
/models/town/house/window.png
/models/town/house/door.png
/characters/player/cubio.dae
/characters/player/cubio.png
/characters/enemies/goblin/goblin.dae
/characters/enemies/goblin/goblin.png
/characters/npcs/suzanne/suzanne.dae
/characters/npcs/suzanne/suzanne.png
/levels/riverdale/riverdale.scn
Importing¶
Godot versions prior to 3.0 did the import process from files outside the project. While this can be useful in large projects, it resulted in an organization hassle for most developers.
Because of this, assets are now transparently imported from within the project folder.
Ignoring specific folders¶
To prevent Godot from importing files contained in a specific folder, create
an empty file called .gdignore in the folder (the leading . is required).
This can be useful to speed up the initial project importing.
Note
To create a file whose name starts with a dot on Windows, you can use a
text editor such as Notepad++ or use the following command in a
command prompt: type nul > .gdignore
Once the folder is ignored, resources in that folder can’t be loaded anymore
using the load() and preload() methods.
Ignoring a folder will also automatically hide it from the FileSystem dock, which can be useful to reduce clutter.
Assets workflow¶
Import process¶
Importing assets in Godot 3.0+¶
Previously, importing assets in Godot 2.x required manual maintenance of a separate directory with source assets. Without doing this, it was impossible to specify how to convert and change import flags for textures, audio files, scenes, etc.
In Godot 3.0, we use a more modern approach to importing: Simply drop your assets (image files, scenes, audio files, fonts, etc) directly in the project folder (copy them manually with your OS file explorer). Godot will automatically import these files internally and keep the imported resources hidden in a res://.import folder.
This allows changing all the import parameters transparently.
Changing import parameters¶
Changing the import parameters of an asset in Godot (again, keep in mind import parameters are only present in non-native Godot resource types) is easy. Select the relevant resource in the filesystem dock:
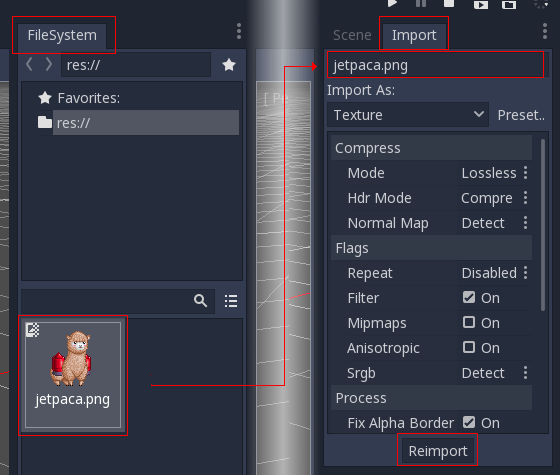
Then, after adjusting the parameters, press “Reimport”. These parameters will only be used for this asset and on future reimports.
Changing the import parameters of several assets at the same time is also possible. Simply select all of them together in the resources dock and the exposed parameters will apply to all of them when reimporting.
Automatic reimport¶
When the MD5 checksum of the source asset changes, Godot will perform an automatic reimport of it, applying the preset configured for that specific asset.
Files generated¶
Importing will add an extra <asset>.import file, containing the import configuration. Make sure to commit these to your version control system!
Additionally, extra assets will be preset in the hidden res://.import folder:

If any of the files present in this folder is erased (or the whole folder), the asset or assets will be reimported automatically. As such, committing this folder to the version control system is optional. It can shorten reimporting time when checking out on another computer, but it takes considerably more space and transfer time. Pick your poison!
Changing import resource type¶
Some source assets can be imported as different types of resources. For this, select the relevant type of resource desired and press “Reimport”:
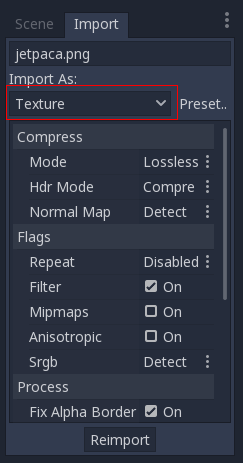
Changing default import parameters¶
Different types of games might require different defaults. Changing the defaults per project can be achieved by using the “Preset..” Menu. Besides some resource types offering presets, the default setting can be saved and cleared too:
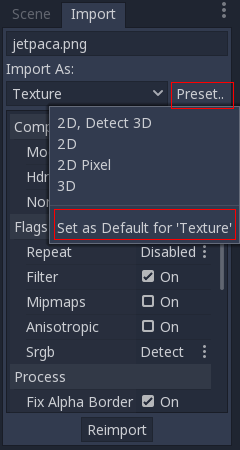
Simplicity is key!¶
This is a very simple workflow which should take very little time to get used to. It also enforces a more correct way to deal with resources.
There are many types of assets available for import, so please continue reading to understand how to work with all of them!
Importing images¶
Why import them?¶
In Godot 3+, image files are no longer native resources and they must be imported. The reason behind this is the large amount of configuration parameters that image files can be imported with.
This small tutorial will explain what these parameters are and how to best make use of them.
Importing textures¶
The default action in Godot is to import images as textures. Textures are stored in video memory and can’t be accessed directly. This is what makes drawing them efficient.
Import options are vast:
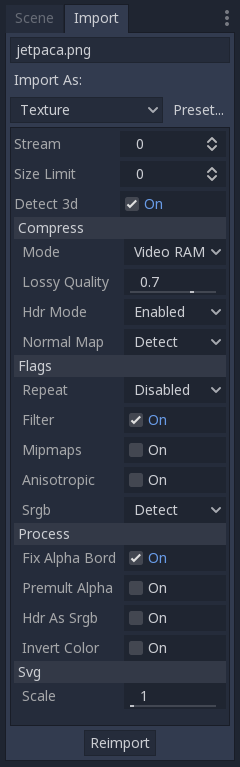
Detect 3D¶
This option makes Godot be aware of when a texture (which is imported for 2D as default) is used in 3D. If this happens, setting are changed so the texture flags are friendlier to 3D (mipmaps, filter and repeat become enabled and compression is changed to VRAM). Texture is also reimported automatically.
Supported image formats¶
Godot can import the following image formats:
- BMP (
.bmp) - DirectDraw Surface (
.dds) - If mipmaps are present in the texture, they will be loaded directly. This can be used to achieve effects using custom mipmaps. - OpenEXR (
.exr) - Supports HDR (highly recommended for panorama skies). - Radiance HDR (
.hdr) - Supports HDR (highly recommended for panorama skies). - JPEG (
.jpg,.jpeg) - Doesn’t support transparency per the format’s limitations. - PNG (
.png) - Precision is limited to 8 bits per channel upon importing (no HDR images). - Truevision Targa (
.tga) - SVG (
.svg,.svgz) - SVGs are rasterized using NanoSVG when importing them. Support is limited; complex vectors may not render correctly. For complex vectors, rendering them to PNGs using Inkscape is often a better solution. This can be automated thanks to its command-line interface. - WebP (
.webp)
Note
If you’ve compiled the Godot editor from source with specific modules disabled, some formats may not be available.
Compression¶
Images are one of the largest assets in a game. To handle them efficiently, they need to be compressed. Godot offers several compression methods, depending on the use case.
Compress Mode¶
- VRAM Compression: This is the most common compression mode for 3D assets. Size on disk is reduced and video memory usage is also decreased considerably (usually by a factor between 4 and 6). This mode should be avoided for 2D as it exhibits noticeable artifacts.
- Lossless Compression: This is the most common compression mode for 2D assets. It shows assets without any kind of artifacting, and disk compression is decent. It will use considerably more amount of video memory than VRAM Compression, though. This is also the recommended setting for pixel art.
- Lossy Compression: This is a good choice for large 2D assets. It has some artifacts, but less than VRAM and the file size is several times lower compared to Lossless or Uncompressed. Video memory usage isn’t decreased by this mode; it’s the same as with Lossless Compression or Uncompressed.
- Uncompressed: Only useful for formats that can’t be compressed (such as raw float images).
In this table, each of the four options are described together with their
advantages and disadvantages ( = best,
  = worst):
| Uncompressed | Compress Lossless (PNG) | Compress Lossy (WebP) | Compress VRAM | |
|---|---|---|---|---|
| Description | Stored as raw pixels | Stored as PNG | Stored as WebP | Stored as S3TC/BC or PVRTC/ETC depending on platform |
| Size on Disk | Large |
 Small Small |
Very Small |
Small |
| Memory Usage | Large |
Large |
Large |
Small |
| Performance | Normal |
Normal |
Normal |
Fast |
| Quality Loss | None |
None |
Slight |
Moderate |
| Load Time | Normal |
Slow |
Slow |
Fast |
HDR Mode¶
Godot supports high dynamic range textures (as .HDR or .EXR). These are mostly useful as high dynamic range equirectangular panorama skies (the internet has plenty if you search for them), which replace Cubemaps in Godot 2.x. Modern PCs support the BC6H VRAM format, but there are still plenty that do not.
If you want Godot to ensure full compatibility in terms of the kind of textures, enable the “Force RGBE” option.
Normal Map¶
When using a texture as normal map, only the red and green channels are required. Given regular texture compression algorithms produce artifacts that don’t look that nice in normal maps, the RGTC compression format is the best fit for this data. Forcing this option to “Enabled” will make Godot import the image as RGTC compressed. By default, it’s set to “Detect”, which means that if the texture is ever used as a normal map, it will be changed to “Enabled” and reimported automatically.
Note that RGTC compression affects the resulting normal map image. You will have to adjust custom shaders that use the normal map to take this into account.
Flags¶
There are plenty of settings that can be toggled when importing an image as a texture, depending on the use case.
Repeat¶
This setting is most commonly used in 3D, and is therefore generally disabled in 2D. It sets UV coordinates going beyond the 0,0 - 1,1 range to “loop”.
Repeating can optionally be set to mirrored mode.
Filter¶
When pixels become larger than the screen pixels, this option enables linear interpolation for them. The result is a smoother (less blocky) texture. This setting can be commonly used in 2D and 3D, but it’s usually disabled when making pixel perfect games.
Mipmaps¶
When pixels become smaller than the screen, mipmaps kick in. This helps reduce the grainy effect when shrinking the textures. Keep in mind that, in older hardware (GLES2, mainly mobile), there are some requirements to use mipmaps:
- Texture width and height must be powers of 2
- Repeat must be enabled
Keep in mind the above when making phone games and applications, want to aim for full compatibility, and need mipmaps.
When doing 3D, mipmap should be turned on, as this also improves performance (smaller versions of the texture are used for objects further away).
Anisotropic¶
When textures are near parallel to the view (like floors), this option makes them have more detail by reducing blurriness.
SRGB¶
Godot uses Linear colorspace when rendering 3D. Textures mapped to albedo or detail channels need to have this option turned on in order for colors to look correct. When set to “Detect” mode, the texture will be marked as SRGB when used in albedo channels.
Process¶
Some special processes can be applied to images when imported as textures.
Fix Alpha Border¶
This puts pixels of the same surrounding color in transition from transparency to non transparency. It helps mitigate the outline effect when exporting images from Photoshop and the like.
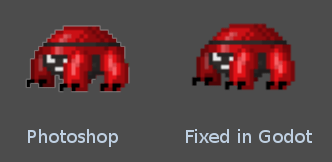
It’s a good idea to leave it on by default, unless specific values are needed.
Premultiplied Alpha¶
An alternative to fix darkened borders is to use premultiplied alpha. By enabling this option, the texture will be converted to this format. Keep in mind that a material will need to be created that uses the PREMULT ALPHA blend mode on canvas items that need it.
HDR as sRGB¶
A few HDR files are broken and contain sRGB color data. It is advised not to use them, but, in the worst-case scenario, toggling this option on will make them look right.
Invert Color¶
Reverses the image’s color. This is useful, for example, to convert a height map generated by external programs to depth map to use with Spatial Material.
Importing audio samples¶
Why import?¶
Raw audio data in general is large and undesired. Godot provides two main options to import your audio data: WAV and Ogg Vorbis.
Each has different advantages.
- WAV files use raw data or light compression, make few demands on the CPU to play back (hundreds of simultaneous voices in this format are fine), but take up significant space.
- Ogg Vorbis files use a stronger compression that results in much smaller file size, but require significantly more processing power to play back.
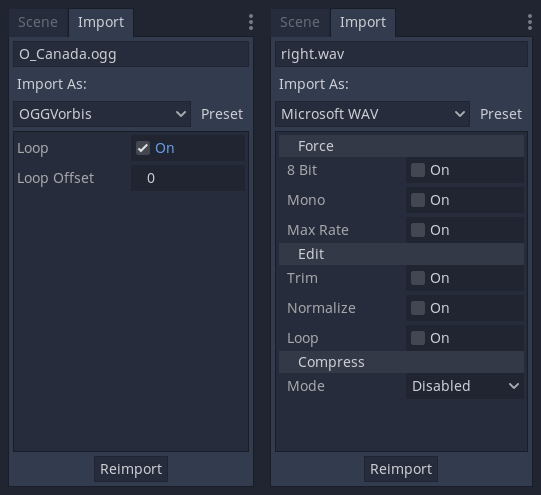
Here is a comparative chart.
| Format | 1 second of audio |
|---|---|
| WAV 24-bit, 96 kHz, stereo | 576 KB |
| WAV 16-bit, 44 kHz, mono | 88 KB |
| WAV 16-bit, IMA-ADPCM, mono | 22 KB |
| Ogg Vorbis 128 Kb/s, stereo | 16 KB |
| Ogg Vorbis 96 Kb/s, stereo | 12 KB |
Consider using WAV for short and repetitive sound effects, and Ogg Vorbis for music, speech, and long sound effects.
Best practices¶
Godot has an extensive bus system with built-in effects. This saves SFX artists the need to add reverb to the sound effects, reducing their size greatly and ensuring correct trimming. Say no to SFX with baked reverb!
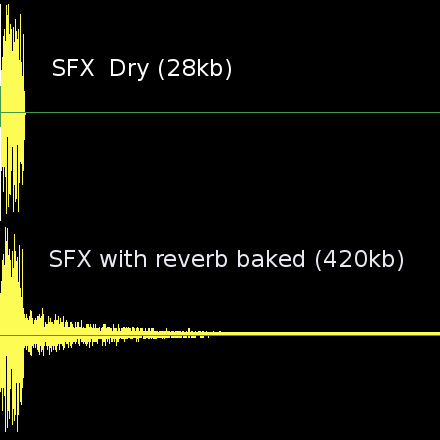
As you can see above, sound effects become huge with reverb added.
Trimming¶
One issue that happens often is that the waveform is exported with long silences at the beginning and at the end. These are inserted by DAWs when saving to a waveform, increase their size unnecessarily and add latency to the moment they are played back.
Importing as WAV with the Trimming option enabled solves this.
Looping¶
Godot supports looping in the samples (tools such as Sound Forge or Audition can add loop points to WAV files). This is useful for sound effects, such as engines, machine guns etc. Ping-pong looping is also supported.
As an alternative, the Import dock has a Loop option that enables looping for the entire sample when importing.
Importing translations¶
Games and internationalization¶
The world is full of different markets and cultures and, to maximize profits™, nowadays games are released in several languages. To solve this, internationalized text must be supported in any modern game engine.
In regular desktop or mobile applications, internationalized text is usually located in resource files (or .po files for GNU stuff). Games, however, can use several orders of magnitude more text than applications, so they must support efficient methods for dealing with loads of multilingual text.
There are two approaches to generate multilingual language games and applications. Both are based on a key:value system. The first is to use one of the languages as the key (usually English), the second is to use a specific identifier. The first approach is probably easier for development if a game is released first in English, later in other languages, but a complete nightmare if working with many languages at the same time.
In general, games use the second approach and a unique ID is used for each string. This allows you to revise the text while it is being translated to other languages. The unique ID can be a number, a string, or a string with a number (it’s just a unique string anyway).
Note
If you need a more powerful file format, Godot also supports
loading translations written in the gettext .po format. See
Localization using gettext for details.
Translation format¶
To complete the picture and allow efficient support for translations, Godot has a special importer that can read CSV files. Most spreadsheet editors can export to this format, so the only requirement is that the files have a special arrangement. The CSV files must be saved with UTF-8 encoding without a byte order mark.
Warning
By default, Microsoft Excel will always save CSV files with ANSI encoding rather than UTF-8. There is no built-in way to do this, but there are workarounds as described here.
We recommend using LibreOffice or Google Sheets instead.
CSV files must be formatted as follows:
| keys | <lang1> | <lang2> | <langN> |
|---|---|---|---|
| KEY1 | string | string | string |
| KEY2 | string | string | string |
| KEYN | string | string | string |
The “lang” tags must represent a language, which must be one of the valid locales supported by the engine. The “KEY” tags must be unique and represent a string universally (they are usually in uppercase, to differentiate from other strings). These keys will be replaced at runtime by the matching translated string. Note that the case is important, “KEY1” and “Key1” will be different keys. The top-left cell is ignored and can be left empty or having any content. Here’s an example:
| keys | en | es | ja |
|---|---|---|---|
| GREET | Hello, friend! | Hola, amigo! | こんにちは |
| ASK | How are you? | Cómo está? | 元気ですか |
| BYE | Goodbye | Adiós | さようなら |
| QUOTE | “Hello” said the man. | “Hola” dijo el hombre. | 「こんにちは」男は言いました |
The same example is shown below as a comma-separated plain text file, which should be the result of editing the above in a spreadsheet. When editing the plain text version, be sure to enclose with double quotes any message that contains commas, line breaks or double quotes, so that commas are not parsed as delimiters, line breaks don’t create new entries and double quotes are not parsed as enclosing characters. Be sure to escape any double quotes a message may contain by preceding them with another double quote. Alternatively, you can select another delimiter than comma in the import options.
keys,en,es,ja
GREET,"Hello, friend!","Hola, amigo!",こんにちは
ASK,How are you?,Cómo está?,元気ですか
BYE,Goodbye,Adiós,さようなら
QUOTE,"""Hello"" said the man.","""Hola"" dijo el hombre.",「こんにちは」男は言いました
CSV importer¶
Godot will treat CSV files as translations by default. It will import them and generate one or more compressed translation resource files next to it.
Importing will also add the translation to the list of translations to load when the game runs, specified in project.godot (or the project settings). Godot allows loading and removing translations at runtime as well.
Select the .csv file and access the Import dock to define import
options. You can toggle the compression of the imported translations, and
select the delimiter to use when parsing the CSV file.
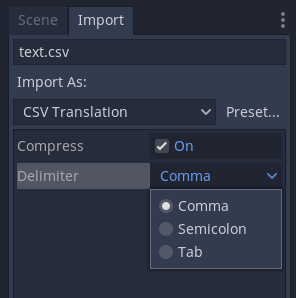
Be sure to click Reimport after any change to these options.
Importing 3D scenes¶
Godot scene importer¶
When dealing with 3D assets, Godot has a flexible and configurable importer.
Godot works with scenes. This means that the entire scene being worked on in your favorite 3D DCC will be transferred as close as possible.
Godot supports the following 3D scene file formats:
- glTF 2.0. Godot has full support for text and binary formats.
- DAE (COLLADA), an older format that is fully supported.
- OBJ (Wavefront) formats. It is also fully supported, but pretty limited (no support for pivots, skeletons, etc).
- ESCN, a Godot specific format that Blender can export with a plugin.
- FBX, supported via the Open Asset Import library. However, FBX is proprietary so we recommend using other formats listed above, if suitable for your workflow.
Just copy the scene file together with the texture to the project repository, and Godot will do a full import.
It is important that the mesh is not deformed by bones when exporting. Make sure that the skeleton is reset to its T-pose or default rest pose before exporting with your favorite 3D editor.
Exporting DAE files from Maya and 3DS Max¶
Autodesk added built-in COLLADA support to Maya and 3DS Max, but it’s broken by default and should not be used. The best way to export this format is by using the OpenCollada plugins. They work well, although they are not always up-to date with the latest version of the software.
Exporting glTF 2.0 files from Blender¶
There are three ways to export glTF files from Blender. As a glTF binary (.glb file), glTF embedded (.gltf file),
and with textures (gltf + .bin + textures).
glTF binary files are the smallest of the three options. They include the mesh and textures set up in Blender. When brought into Godot the textures are part of the object’s material file.
glTF embedded files function the same way as binary files. They don’t provide extra functionality in Godot, and shouldn’t be used since they have a larger file size.
There are two reasons to use glTF with the textures separate. One is to have the scene description in a text based format and the binary data in a separate binary file. This can be useful for version control if you want to review changes in a text based format. The second is you need the texture files separate from the material file. If you don’t need either of those glTF binary files are fine.
Note
Blender does not export emissive textures with the glTF file. If your model uses one it must be brought in separately.
Exporting DAE files from Blender¶
Blender has built-in COLLADA support, but it does not work properly for the needs of game engines and should not be used as is.
Godot provides a Blender plugin that will correctly export COLLADA scenes for use in Godot.
Exporting ESCN files from Blender¶
The most powerful one, called godot-blender-exporter. It uses a .escn file, which is kind of another name for a .tscn file (Godot scene file); it keeps as much information as possible from a Blender scene.
The ESCN exporter has a detailed document describing its functionality and usage.
Import workflows¶
Godot scene importer allows different workflows regarding how data is imported. Depending on many options, it is possible to import a scene with:
- External materials (default): Where each material is saved to a file resource. Modifications to them are kept.
- External meshes: Where each mesh is saved to a different file. Many users prefer to deal with meshes directly.
- External animations: Allowing saved animations to be modified and merged when sources change.
- External scenes: Save each of the root nodes of the imported scenes as a separate scene.
- Single scene: A single scene file with everything built in.
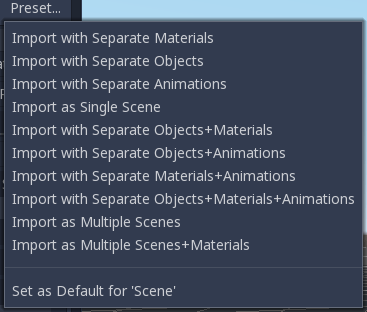
As different developers have different needs, this import process is highly customizable.
Import options¶
The importer has several options, which will be discussed below:
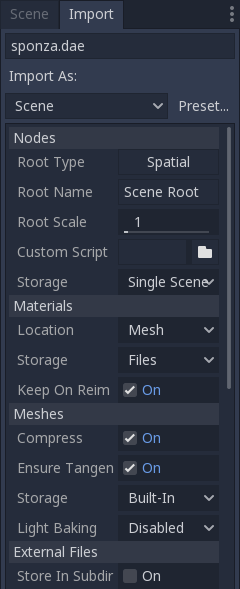
Nodes¶
By default, the type of the root node in imported scenes is “Spatial”, but this can be modified.
Allows setting a specific name to the generated root node.
The scale of the root node.
A special script to process the whole scene after import can be provided. This is great for post processing, changing materials, doing funny stuff with the geometry etc.
Create a script like this:
tool # needed so it runs in the editor
extends EditorScenePostImport
func post_import(scene):
# do your stuff here
return scene # remember to return the imported scene
The post_import function takes the imported scene as argument (the
parameter is actually the root node of the scene). The scene that
will finally be used must be returned. It can be a different one.
By default, Godot imports a single scene. This option allows specifying that nodes below the root will each be a separate scene and instanced into the imported one.
Of course, instancing such imported scenes in other places manually works, too.
Materials¶
Godot supports materials in meshes or nodes. By default, materials will be put on each node.
Materials can be stored within the scene or in external files. By default, they are stored in external files so editing them is possible. This is because most 3D DCCs don’t have the same material options as those present in Godot.
When materials are built-in, they will be lost each time the source scene is modified and re-imported.
Once materials are edited to use Godot features, the importer will keep the edited ones and ignore the ones coming from the source scene. This option is only present if materials are saved as files.
Meshes¶
Makes meshes use less precise numbers for multiple aspects of the mesh in order to save space.
- These are:
- Transform Matrix (Location, rotation, and scale) : 32-bit float to 16-bit signed integer.
- Vertices : 32-bit float to 16-bit signed integer.
- Normals : 32-bit float to 32-bit unsigned integer.
- Tangents : 32-bit float to 32-bit unsigned integer.
- Vertex Colors : 32-bit float to 32-bit unsigned integer.
- UV : 32-bit float to 32-bit unsigned integer.
- UV2 : 32-bit float to 32-bit unsigned integer.
- Vertex weights : 32-bit float to 16-bit unsigned integer.
- Armature bones : 32-bit float to 16-bit unsigned integer.
- Array index : 32-bit or 16-bit unsigned integer based on how many elements there are.
- Additional info:
- UV2 = The second UV channel for detail textures and baked lightmap textures.
- Array index = An array of numbers that number each element of the arrays above; i.e. they number the vertices and normals.
In some cases, this might lead to loss of precision, so disabling this option may be needed. For instance, if a mesh is very big or there are multiple meshes being imported that cover a large area, compressing the import of this mesh(es) may lead to gaps in geometry or vertices not being exactly where they should be.
If textures with normal mapping are to be used, meshes need to have tangent arrays. This option ensures that these are generated if not present in the source scene. Godot uses Mikktspace for this, but it’s always better to have them generated in the exporter.
Meshes can be stored in separate files (resources) instead of built-in. This does not have much practical use unless one wants to build objects with them directly.
This option is provided to help those who prefer working directly with meshes instead of scenes.
Whether or not the mesh is used in baked lightmaps.
- Disabled: The mesh is not used in baked lightmaps.
- Enable: The mesh is used in baked lightmaps.
- Gen Lightmaps: The mesh is used in baked lightmaps, and unwraps a second UV layer for lightmaps.
Note
For more information on light baking see Baked lightmaps.
External Files¶
Generated meshes and materials can be optionally stored in a subdirectory with the name of the scene.
Animation options¶
Godot provides many options regarding how animation data is dealt with. Some exporters (such as Blender) can generate many animations in a single file. Others, such as 3DS Max or Maya, need many animations put into the same timeline or, at worst, put each animation in a separate file.
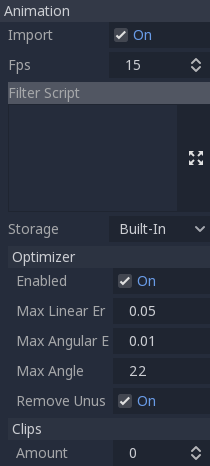
Import of animations is enabled by default.
FPS¶
Most 3D export formats store animation timeline in seconds instead of frames. To ensure animations are imported as faithfully as possible, please specify the frames per second used to edit them. Failing to do this may result in shaky animations.
Filter Script¶
It is possible to specify a filter script in a special syntax to decide which tracks from which animations should be kept.
The filter script is executed against each imported animation. The syntax consists of two types of
statements, the first for choosing which animations to filter, and the second for filtering
individual tracks within the matched animation. All name patterns are performed using a case
insensitive expression match, using ? and * wildcards (using String.matchn() under the
hood).
The script must start with an animation filter statement (as denoted by the line beginning with an
@). For example, if we would like to apply filters to all imported animations which have a name
ending in "_Loop":
@+*_Loop
Similarly, additional patterns can be added to the same line, separated by commas. Here is a
modified example to additionally include all animations with names that begin with "Arm_Left",
but also exclude all animations which have names ending in "Attack":
@+*_Loop, +Arm_Left*, -*Attack
Following the animation selection filter statement, we add track filtering patterns to indicate which animation tracks should be kept or discarded. If no track filter patterns are specified, then all tracks within the matched animations will be discarded!
It’s important to note that track filter statements are applied in order for each track within the animation, this means that one line may include a track, a later rule can still discard it. Similarly, a track excluded by an early rule may then be re-included once again by a filter rule further down in the filter script.
For example: include all tracks in animations with names ending in "_Loop", but discard any
tracks affecting a "Skeleton" which end in "Control", unless they have "Arm" in their
name:
@+*_Loop
+*
-Skeleton:*Control
+*Arm*
In the above example, tracks like "Skeleton:Leg_Control" would be discarded, while tracks such
as "Skeleton:Head" or "Skeleton:Arm_Left_Control" would be retained.
Any track filter lines that do not begin with a + or - are ignored.
Storage¶
By default, animations are saved as built-in. It is possible to save them to a file instead. This allows adding custom tracks to the animations and keeping them after a reimport.
Optimizer¶
When animations are imported, an optimizer is run, which reduces the size of the animation considerably. In general, this should always be turned on unless you suspect that an animation might be broken due to it being enabled.
Clips¶
It is possible to specify multiple animations from a single timeline as clips. Specify from which frame to which frame each clip must be taken (and, of course, don’t forget to specify the FPS option above).
Scene inheritance¶
In many cases, it may be desired to make modifications to the imported scene. By default, this is not possible because
if the source asset changes (source .dae, .gltf, .obj file re-exported from 3D modelling app), Godot will re-import the whole scene.
It is possible, however, to make local modifications by using Scene Inheritance. Try to open the imported scene and the following dialog will appear:
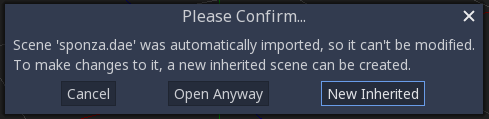
In inherited scenes, the only limitations for modifications are:
- Nodes can’t be removed (but can be added anywhere).
- Sub-Resources can’t be edited (save them externally as described above for this)
Other than that, everything is allowed!
Import hints¶
Many times, when editing a scene, there are common tasks that need to be done after exporting:
- Adding collision detection to objects
- Setting objects as navigation meshes
- Deleting nodes that are not used in the game engine (like specific lights used for modelling)
To simplify this workflow, Godot offers a few suffixes that can be added to the names of the objects in your 3D modelling software. When imported, Godot will detect them and perform actions automatically:
Remove nodes (-noimp)¶
Node names that have this suffix will be removed at import time, no matter what their type is. They will not appear in the imported scene.
Create collisions (-col, -colonly, -convcolonly)¶
Option “-col” will work only for Mesh nodes. If it is detected, a child static collision node will be added, using the same geometry as the mesh.
However, it is often the case that the visual geometry is too complex or too un-smooth for collisions, which ends up not working well.
To solve this, the “-colonly” modifier exists, which will remove the mesh upon import and create a StaticBody collision instead. This helps the visual mesh and actual collision to be separated.
Option “-convcolonly” will create a ConvexPolygonShape instead of a ConcavePolygonShape.
Option “-colonly” can also be used with Blender’s empty objects. On import, it will create a StaticBody with a collision node as a child. The collision node will have one of a number of predefined shapes, depending on Blender’s empty draw type:
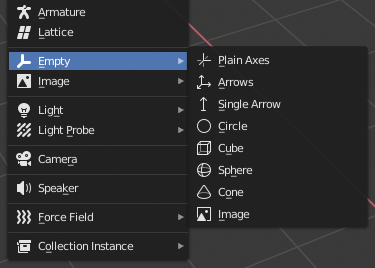
- Single arrow will create a RayShape
- Cube will create a BoxShape
- Image will create a PlaneShape
- Sphere (and the others not listed) will create a SphereShape
For better visibility in Blender’s editor, the user can set “X-Ray” option on collision empties and set some distinct color for them in User Preferences / Themes / 3D View / Empty.
Create a VehicleBody (-vehicle)¶
A mesh node with this suffix will be imported as a child to a VehicleBody node.
Create a VehicleWheel (-wheel)¶
A mesh node with this suffix will be imported as a child to a VehicleWheel node.
Rigid Body (-rigid)¶
Creates a rigid body from this mesh.
Animation loop (-loop, -cycle)¶
Animation clips in the COLLADA document that start or end with the token “loop” or “cycle” will be imported as a Godot Animation with the loop flag set. This is case-sensitive and does not require a hyphen.
In Blender, this requires using the NLA Editor and naming the Action with the “loop” or “cycle” prefix or suffix.
Blender ESCN exporter¶
Note
This chapter relates to the Blender plugin called “Godot Blender Exporter”, which can be downloaded here: https://github.com/godotengine/godot-blender-exporter
This plugin can be used to export Blender scenes in a Godot-specific scene format called ESCN, which is similar to TSCN (text format) but will be imported as binary SCN for performance.
Details on exporting¶
Materials¶
One way in which the exporter can handle materials is to attempt to match the Blender material with an existing Godot material. This has the advantage of being able to use all of the features of Godot’s material system, but it means that you cannot see your model with the material applied inside Blender.
To do this, the exporter attempts to find Godot materials with names that match
those of the material name in Blender. So if you export an object in Blender
with the material name PurpleDots then the exporter will search for the
file PurpleDots.tres and assign it to the object. If this file is not a
SpatialMaterial or ShaderMaterial or if it cannot be found, then the
exporter will fall back to exporting the material from Blender.
Where the exporter searches for the .tres file is determined by the “Material
Search Paths” option:
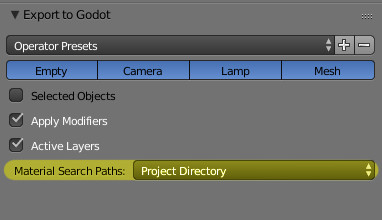
- This can take the value of:
- Project Directory - Attempts to find the
project.Godotand recursively searches through subdirectories. Ifproject.Godotcannot be found it will throw an error. This is useful for most projects where naming conflicts are unlikely. - Export Directory - Look for materials in subdirectories of the export location. This is useful for projects where you may have duplicate material names and need more control over what material gets assigned.
- None - Do not search for materials. Export them from the Blender file.
- Project Directory - Attempts to find the
The exporter has a primitive support for converting Cycles/EEVEE material node tree to Godot Shader Material. Note that some of the Shader Node are not supported yet due to difficulties in implementation, which are:
- all the
noisy textures generated texture coordinatesgroup node- shader nodes except
PrincipledBSDF,Diffuse,Glossy,Glass,add shaderandmix shader
Warning
If possible, try to use PrincipledBSDF node with GGX distribution as the output shader node, it is the only one guaranteed to be exactly correct. Others are just based on approximation.
Sometimes materials may not be valid for exporting (e.g. has some unsupported node) or it is using Blender Internal Engine, only the diffuse color and a few flags (e.g. unshaded) are exported and form a Spatial Material.
The default configuration of material exporting would keep all the materials internal to
the escn file. There is an option which could enable generating external .material
file when the escn file opens in Godot.
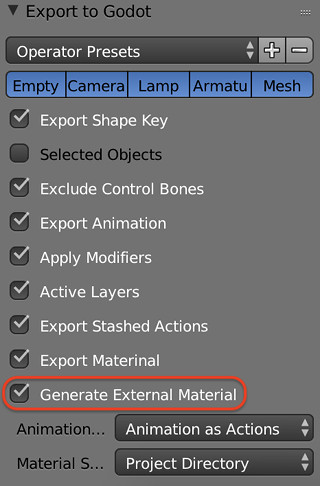
.material file can be assigned to any material slot to be a external resource.
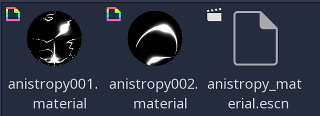
Physics properties¶
Exporting physics properties is done by enabling “Rigid Body” in Blender’s physics tab:
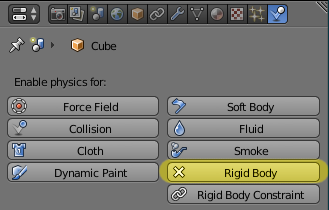
Important
By default, a single Blender object with rigid body enabled will export as three nodes: a PhysicsBody, a CollisionShape, and a MeshInstance.
Blender only has the concept of “Active” and “Passive” rigid bodies. These turn into Static and RigidBody nodes. To create a kinematic body, enable the “animated” checkbox on an “Active” body:

Many of the parameters for collision shapes are missing from Blender, and many of the collision shapes are also not present. However, almost all of the options in Blender’s rigid body collision and rigid body dynamics interfaces are supported:

- There are the following caveats:
- Not all of the collision shapes are supported. Only
Mesh,Convex Hull,Capsule,SphereandBoxare supported in both Blender and Godot - In Godot, you can have different collision groups and collision masks. In Blender you only have collision groups. As a result, the exported object’s collision mask is equal to its collision group. Most of the time, this is what you want.
- Not all of the collision shapes are supported. Only
Important
To build compound physics shapes, parent together multiple objects with rigid body enabled. The physics properties are taken from the parent-most rigid body, and the rest are used as collision shapes.
Frequently you want different geometry for your collision meshes and your graphical meshes, but by default the exporter will export a mesh along with the collision shape. To only export the collision shape, set the object’s maximum draw type to Wire:
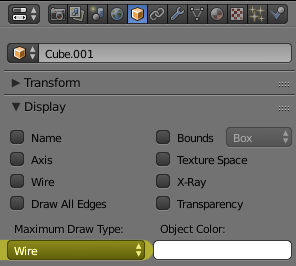
This will also influence how the object is shown in Blender’s viewport. Most of the time, you want your collision geometry to be shown see-through when working on the models, so this works out fairly nicely.
Lights¶
Warning
By default, lamps in Blender have shadows enabled. This can cause performance issues in Godot.
Warning
Lamps are exported using their “Blender Render” settings. When Blender 2.8 is released, this will be removed and this part of the exporter will change.
Sun, point and spot lamps are all exported from Blender along with many of their properties:
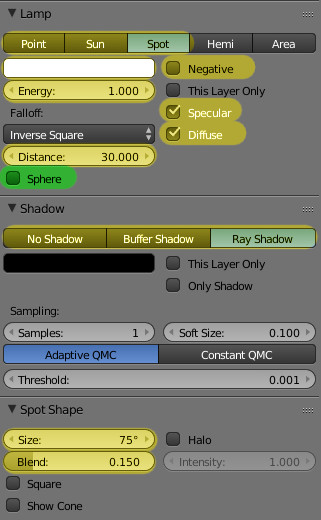
There are some things to note:
- In Blender, a light casts light all the way to infinity. In Godot, it is clamped by the attenuation distance. To most closely match between the viewport and Godot, enable the “Sphere” checkbox. (Highlighted green)
- Light attenuation models differ between Godot and Blender. The exporter attempts to make them match, but it isn’t always very good.
- Spotlight angular attenuation models also differ between Godot and Blender. The exporter attempts to make them similar, but it doesn’t always look the same.
- There is no difference between buffer shadow and ray shadow in the export.
Mesh¶
There is an exporting option Apply Modifiers to
control whether mesh modifiers are applied to the exported mesh.
Exporting mesh shape key is supported, however exporting each shape key is almost like exporting the mesh again, so don’t be surprised it takes a relatively long time.
Warning
A lot of modifiers are not compatible with shape keys
(e.g. subsurface modifier), so if you found you have
incorrect shape keys exported, try to disable Apply Modifiers
and do the exporting again. Besides, it is worthwhile to report the
incompatible modifier to the issue list,
which helps to develop the exporter to have a more precise check of modifiers.
Skeleton¶

Armature object in Blender is exported as a Skeleton node along with rest position (transform in Godot) of bones.
Warning
The three check boxes Inherit Rotation, Inherit Scale,
Local Location (colored in red) must be ticked when building
armature in Blender, so that the exported bone transform be
consistent between Blender and Godot
It is important that the mesh is not deformed by bones when exporting in Blender. Make sure that the skeleton is reset to its T-pose or default rest pose.
Blender put rigged mesh vertices which has no bone weights at its original position, but these vertices would be placed at (0, 0, 0) in Godot, making the mesh deformed. Therefore, the exporter would raise an error for any vertex with no bone weights detected in a rigged mesh.
Note that the non-deform bone can be configured as not exported
by enabling the Exclude Control Bones; the deform bone
checkbox is shown in the picture.
A bone can be the parent of an object in Blender; this relation is exported as a BoneAttachment node in the Godot scene.
Animation¶
- Animation supported:
- transform animation of all types of objects
- transform animation of pose bones
- shape key animation
- light animation
- camera animation
In most games, one object would have several animations to switch between. This add-on has support for exporting multiple actions all at once into a single AnimationPlayer and makes it easy to switch actions.
This workflow makes use of blender nla_tracks. Here is a brief guide on how to use this feature:
1. Stash active action
New created action is always an active action bound to object. There are
several ways to place an active action into NLA track,
one is of course doing it in NLA Editor

Or it can be done stashing the action in Dope Sheet
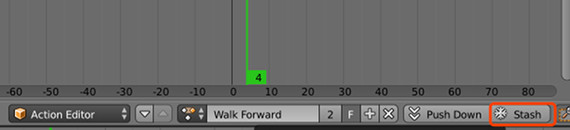
2. Check mute status of NLA tracks
An NLA track can be mute or unmute, the exporter will export all
the mute NLA track as a separate action, while blends all the unmute
NLA tracks into every action (including the action action) being exported.

3. Export the scene
Make sure the Export Stashed Actions option has been turned on.
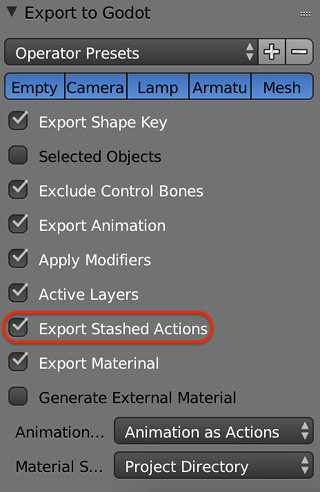
Then all the stashed actions, as well as the active action, are exported to an AnimationPlayer.

Sometimes complicated animation is built with object constraint; a usual example is inverse kinematics. The add-on would automatically check if an object has some constraint; if it does, all the constraints are baked into actions and then exported along with the object.
Godot and Blender have different structure to store animation data. In Godot animation data is stored in an AnimationPlayer node, instead of in each animated node. In order to fix this inconsistence and still make the animation play versatile, this add-on has three animation exporting modes.
Mode ‘Animation as Actions’
Treat all the animations as object actions, so in the exported scene, every object would have its own AnimationPlayer and hold its actions.
Mode ‘Scene Animation’
If you want your animation to generate the same result as playing at Blender’s timeline, this is what you want. In this mode, all the animations in the scene are placed in just one AnimationPlayer in the scene root.
Mode ‘Animation as Action with Squash’
This mode has very similar behaviour of mode ‘Animation as Action’, but it can generate fewer AnimationPlayers; objects in parent-children relationship would share their AnimationPlayer. It is useful when you have several rigs, and each Skeleton and Mesh has actions; then one rig would have just one AnimationPlayer.
Disabling specific objects¶
Sometimes you don’t want some objects exported (e.g. high-res models used for baking). An object will not be exported if it is not rendered in the scene. This can be set in the outliner:
Objects hidden in the viewport will be exported, but will be hidden in the Godot scene.
Build pipeline integration¶
If you have hundreds of model files, you don’t want your artists to waste time
manually exporting their blend files. To combat this, the exporter provides a
python function io_scene_godot.export(out_file_path) that can be called to
export a file. This allows easy integration with other build systems. An
example Makefile and python script that exports all the blends in a directory
are present in the Godot-Blender-exporter repository.
Export¶
Exporting projects¶
Why export?¶
Originally, Godot did not have any means to export projects. The developers would compile the proper binaries and build the packages for each platform manually.
When more developers (and even non-programmers) started using it, and when our company started taking more projects at the same time, it became evident that this was a bottleneck.
On PC¶
Distributing a game project on PC with Godot is rather easy. Drop
the Godot binary in the same directory as the project.godot file,
then compress the project directory and you are done.
It sounds simple, but there are probably a few reasons why the developer may not want to do this. The first one is that it may not be desirable to distribute loads of files. Some developers may not like curious users peeking at how the game was made, others may find it inelegant, and so on. Another reason is that the developer might prefer a specially-compiled binary, which is smaller in size, more optimized and does not include tools like the editor and debugger.
Finally, Godot has a simple but efficient system for creating DLCs as extra package files.
On mobile¶
The same scenario on mobile platforms is a little worse. To distribute a project on those devices, a binary for each of those platforms is built, then added to a native project together with the game data.
This can be troublesome because it means that the developer must be familiarized with the SDK of each platform before even being able to export. While learning each SDK is always encouraged, it can be frustrating to be forced to do it at an undesired time.
There is also another problem with this approach: different devices prefer some data in different formats to run. The main example of this is texture compression. All PC hardware uses S3TC (BC) compression and that has been standardized for more than a decade, but mobile devices use different formats for texture compression, such as PVRTC (iOS) or ETC (Android).
Export menu¶
After many attempts at different export workflows, the current one has proven to work the best. At the time of this writing, not all platforms are supported yet, but the supported platforms continue to grow.
To open the export menu, click the Export button:
The export menu will open. However, it will be completely empty. This is because we need to add an export preset.
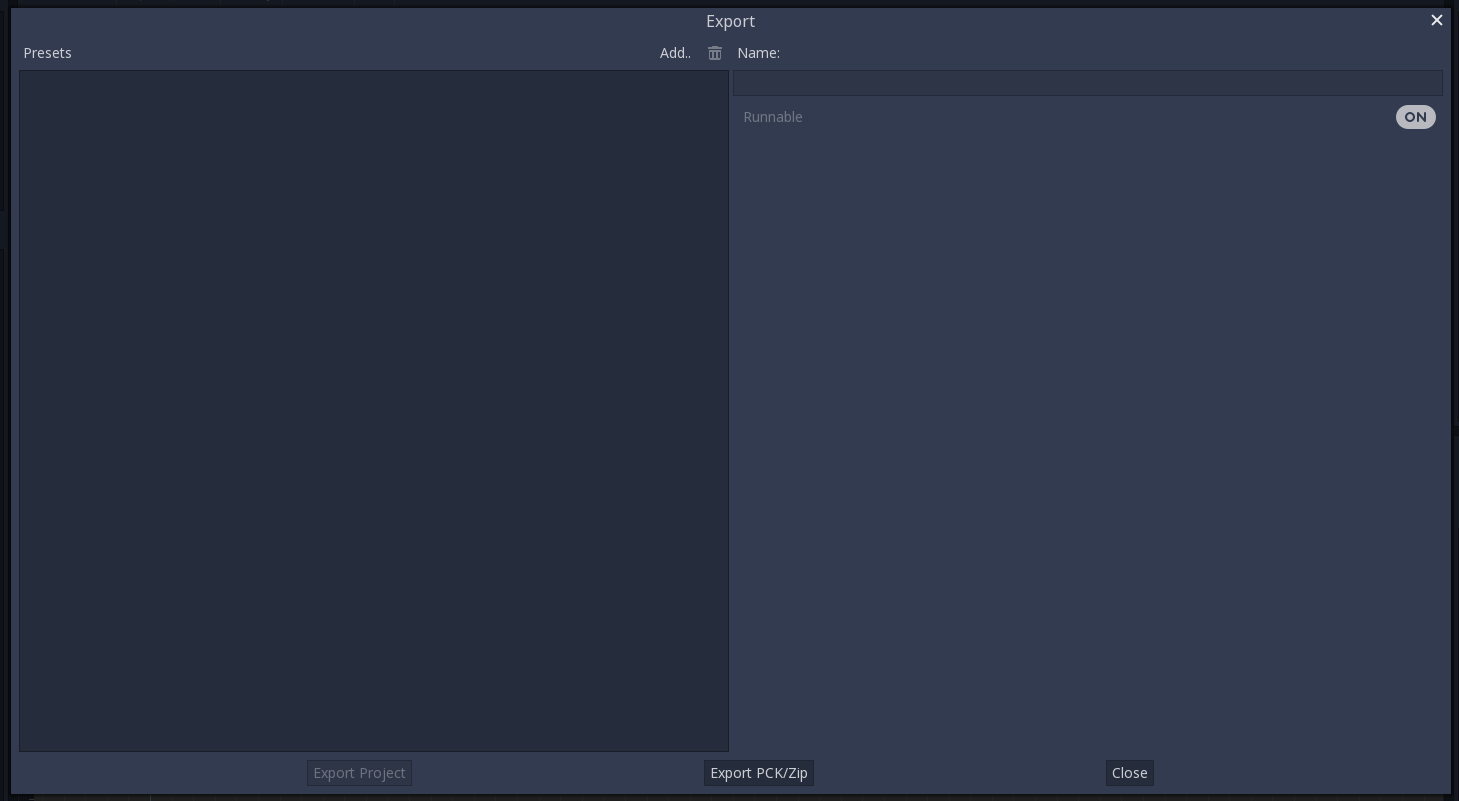
To create an export preset, click the Add… button at the top of the export menu. This will open a drop-down list of platforms to choose from for an export preset.
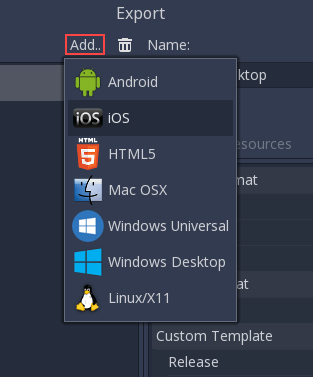
The default options are often enough to export, so tweaking them is usually not necessary. However, many platforms require additional tools (SDKs) to be installed to be able to export. Additionally, Godot needs export templates installed to create packages. The export menu will complain when something is missing and will not allow the user to export for that platform until they resolve it:

At that time, the user is expected to come back to the documentation and follow instructions on how to properly set up that platform.
Export templates¶
Apart from setting up the platform, the export templates must be installed to be able to export projects. They can be obtained as a TPZ file (which is a renamed ZIP archive) from the download page of the website.
Once downloaded, they can be installed using the Install Export Templates option in the editor:
Export mode¶
When exporting, Godot makes a list of all the files to export and then creates the package. There are 3 different modes for exporting:
- Export every single file in the project
- Export only resources (+ custom filter), this is the default.
- Export only selected resources (+ custom filter)
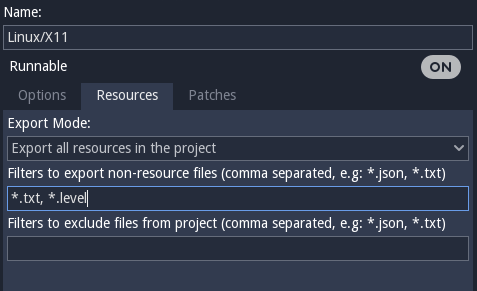
- Export every single file - This mode exports every single file in the project. This is good to test if something is being forgotten, but developers often have a lot of unrelated stuff around in the project directory, which makes it a bad idea.
- Export only resources - Only resources are exported. For most
projects, this is enough. However many developers like to use custom
datafiles in their games. To compensate for this, filters can be
added for extra extensions (for instance,
*.txt,*.csv). - Export only selected resources - Only select resources from a list are exported. This is probably overkill for most projects, but in some cases it is justified (usually huge projects). This mode offers total control of what is exported. Individual resources can be selected and dependency detection is performed to ensure that everything needed is added.
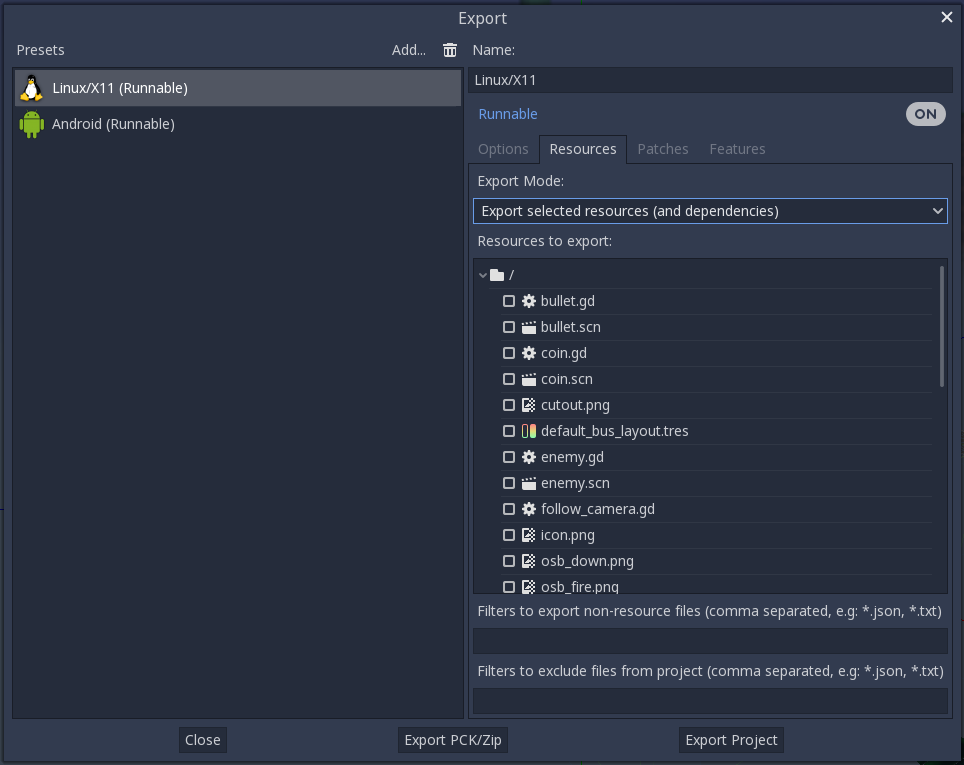
Exporting from the command line¶
In production, it is useful to automate builds, and Godot supports this
with the --export and --export-debug command line parameters.
Exporting from the command line still requires an export preset to define
the export parameters. A basic invocation of the command would be:
godot --export "Windows Desktop" some_name
This will export to some_name.exe, assuming there is a preset
called “Windows Desktop” and the template can be found.
The output path is relative to the project path or absolute;
it does not respect the directory the command was invoked from.
You can also configure it to export only the PCK or ZIP file, allowing
a single export to be used with multiple Godot executables.
This takes place if the target name ends with .pck or .zip.
It is often useful to combine the --export flag with the --path
flag, and to create a dedicated export preset for automated export:
godot --path path/to/project --export "pck" game_name.pck
Exporting packs, patches, and mods¶
Use cases¶
Oftentimes one would like to add functionality to one’s game after it has been deployed.
Examples of this include…
- Downloadable Content: the ability to add features and content to one’s game.
- Patches: the ability to fix a bug that is present in a shipped product.
- Mods: grant other people the ability to create content for one’s game.
These tools help developers to extend their development beyond the initial release.
Overview of PCK files¶
Godot enables this via a feature called resource packs (PCK files,
with extension .pck).
Advantages:
- incremental updates/patches
- offer DLCs
- offer mod support
- no source code disclosure needed for mods
- more modular project structure
- users don’t have to replace the entire game
The first part of using them involves exporting and delivering the project to players. Then, when one wants to add functionality or content later on, they just deliver the updates via PCK files to the users.
PCK files usually contain, but are not limited to:
- scripts
- scenes
- shaders
- models
- textures
- sound effects
- music
- any other asset suitable for import into the game
The PCK files can even be an entirely different Godot project, which the original game loads in at runtime.
Generating PCK files¶
In order to pack all resources of a project into a PCK file open the project and go to Project/Export and click on “Export PCK/Zip”. Also make sure to have an export template selected while doing so.
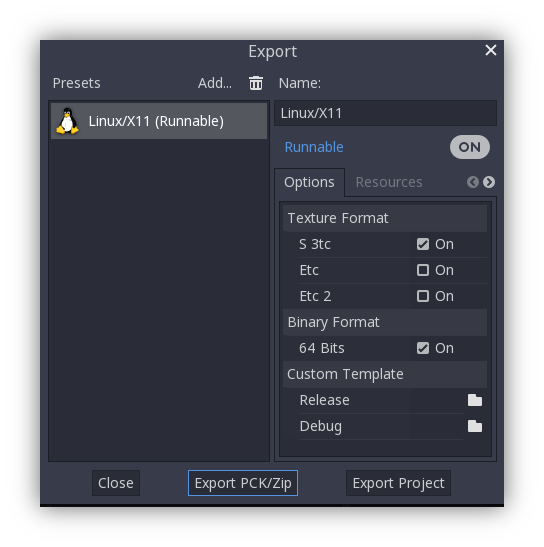
Another method would be to export from the command line. If the output file ends with a PCK or ZIP file extension, then the export process will build that type of file for the chosen platform.
Note
If one wishes to support mods for their game, they will need their users to create similarly exported files. Assuming the original game expects a certain structure for the PCK’s resources and/or a certain interface for its scripts, then either…
- The developer must publicize documentation of these expected structures/ interfaces, expect modders to install Godot Engine, and then also expect those modders to conform to the documentation’s defined API when building mod content for the game (so that it will work). Users would then use Godot’s built in exporting tools to create a PCK file, as detailed above.
- The developer uses Godot to build a GUI tool for adding their exact API content to a project. This Godot tool must either run on a tools-enabled build of the engine or have access to one (distributed alongside or perhaps in the original game’s files). The tool can then use the Godot executable to export a PCK file from the command line with OS.execute(). It makes the most sense for the game to not use a tool-build though (for security) and for the modding tools to do use a tool-enabled engine build.
Opening PCK files at runtime¶
To import a PCK file, one uses a one-liner. Keep in mind, there is no error or exception if the import fails. Instead, one might have to create some validation code as a layer on top. The following example expects a “mod.pck” file in the directory of the games executable. The PCK file contains a “mod_scene.tscn” test scene in its root.
func _your_function():
ProjectSettings.load_resource_pack("res://mod.pck")
# Now one can use the assets as if they had them in the project from the start
var imported_scene = load("res://mod_scene.tscn")
private void YourFunction()
{
ProjectSettings.LoadResourcePack("res://mod.pck");
// Now one can use the assets as if they had them in the project from the start
var importedScene = (PackedScene)ResourceLoader.Load("res://mod_scene.tscn");
}
Warning
If you import a file with the same file path/name as one you already have in your project, the imported one will replace it. This is something to watch out for when creating DLC or mods (solved easily with a tool isolating mods to a specific mods subfolder). However, it is also a way of creating patches for one’s own game. A PCK file of this kind can fix the content of a previously loaded PCK.
Note
For a C# project, you need to build the DLL and place it in the project directory first.
Then, before loading the resource pack, you need to load its DLL as follows:
Assembly.LoadFile("mod.dll")
Summary¶
This tutorial should illustrate how easy adding mods, patches or DLC to a game is. The most important thing is to identify how one plans to distribute future content for their game and develop a workflow that is customized for that purpose. Godot should make that process smooth regardless of which route a developer pursues.
Feature tags¶
Introduction¶
Godot has a special system to tag availability of features. Each feature is represented as a string, which can refer to many of the following:
- Platform name.
- Platform architecture (64-bit or 32-bit, x86 or ARM).
- Platform type (desktop, mobile, Web).
- Supported texture compression algorithms on the platform.
- Whether a build is
debugorrelease(debugincludes the editor). - Whether the project is running from the editor or a “standalone” binary.
- Many more things.
Features can be queried at run-time from the singleton API by calling:
OS.has_feature(name)
Default features¶
Here is a list of most feature tags in Godot. Keep in mind they are case-sensitive:
| Feature tag | Description |
|---|---|
| Android | Running on Android |
| HTML5 | Running on HTML5 |
| JavaScript | JavaScript singleton is available |
| OSX | Running on macOS |
| iOS | Running on iOS |
| UWP | Running on UWP |
| Windows | Running on Windows |
| X11 | Running on X11 (Linux/BSD desktop) |
| Server | Running on the headless server platform |
| debug | Running on a debug build (including the editor) |
| release | Running on a release build |
| editor | Running on an editor build |
| standalone | Running on a non-editor build |
| 64 | Running on a 64-bit build (any architecture) |
| 32 | Running on a 32-bit build (any architecture) |
| x86_64 | Running on a 64-bit x86 build |
| x86 | Running on a 32-bit x86 build |
| arm64 | Running on a 64-bit ARM build |
| arm | Running on a 32-bit ARM build |
| mobile | Host OS is a mobile platform |
| pc | Host OS is a PC platform (desktop/laptop) |
| web | Host OS is a Web browser |
| etc | Textures using ETC1 compression are supported |
| etc2 | Textures using ETC2 compression are supported |
| s3tc | Textures using S3TC (DXT/BC) compression are supported |
| pvrtc | Textures using PVRTC compression are supported |
Custom features¶
It is possible to add custom features to a build; use the relevant field in the export preset used to generate it:
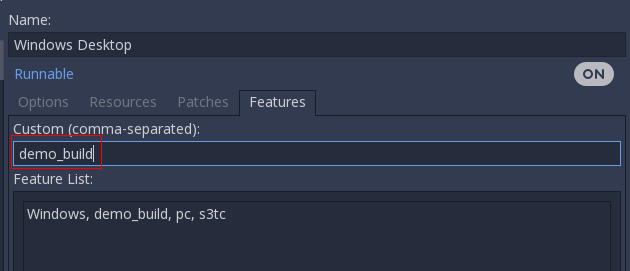
Overriding project settings¶
Features can be used to override specific configuration values in the Project Settings. This allows you to better customize any configuration when doing a build.
In the following example, a different icon is added for the demo build of the game (which was customized in a special export preset, which, in turn, includes only demo levels).
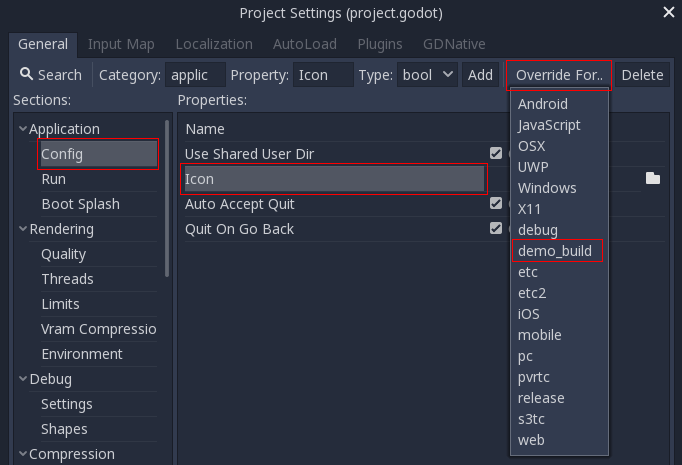
After overriding, a new field is added for this specific configuration:
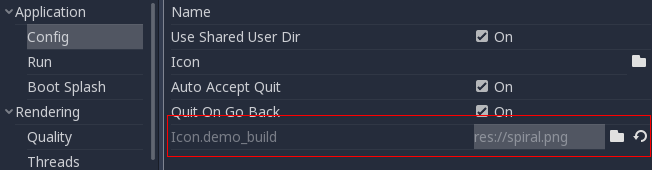
Default overrides¶
There are already a lot of settings that come with overrides by default; they can be found in many sections of the project settings.
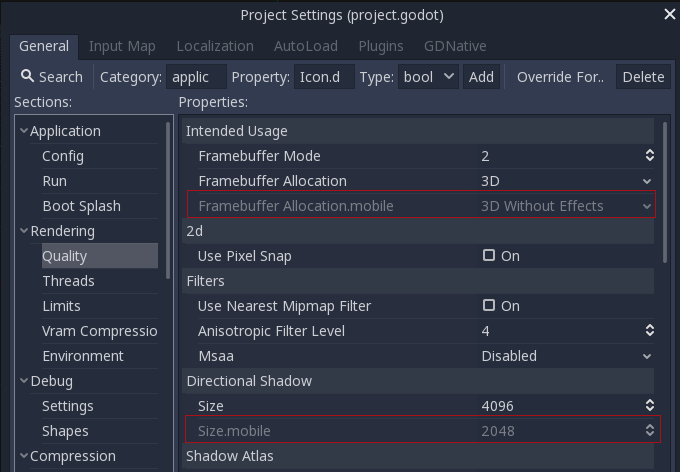
Customizing the build¶
Feature tags can be used to customize a build process too, by writing a custom ExportPlugin. They are also used to specify which shared library is loaded and exported in GDNative.
Exporting for PC¶
The simplest way to distribute a game for PC is to copy the executables
(godot.exe on Windows, godot on the rest), compress the folder
and send it to someone else. However, this is often not desired.
Godot offers a more elegant approach for PC distribution when using the
export system. When exporting for PC (Linux, Windows, macOS), the exporter
takes all the project files and creates a data.pck file. This file is
bundled with a specially optimized binary that is smaller, faster and
does not contain the editor and debugger.
Exporting for iOS¶
These are the steps to load a Godot project in Xcode. This allows you to build and deploy to an iOS device, build a release for the App Store, and do everything else you can normally do with Xcode.
Requirements¶
- You must export for iOS from a computer running macOS with Xcode installed.
- Download the Godot export templates. Use the Godot menu: Editor > Manage Export Templates
Export a Godot project to Xcode¶
In the Godot editor, open the Export window from the Project menu. When the Export window opens, click Add.. and select iOS.
The following export options are required. Leaving any blank will cause the exporter to throw an error:
- In the Application category * App Store Team ID
- Everything in the Required Icons category
- Everything in the Landscape Launch Screens category
- Everything in the Portrait Launch Screens category
After you click Export Project, there are still two important options left:
- Path is an empty folder that will contain the exported Xcode project files.
- File will be the name of the Xcode project and several project specific files and directories.
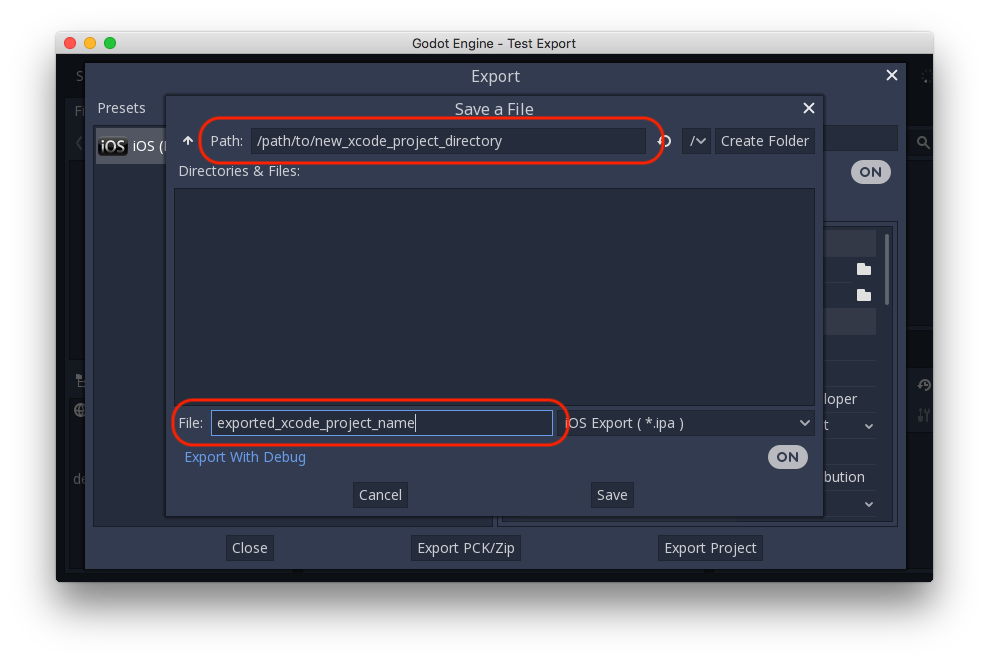
Note
This tutorial uses exported_xcode_project_name, but you will use your project’s name. When you see exported_xcode_project_name in the following steps, replace it with the name you used instead.
Note
Avoid using spaces when you choose your exported_xcode_project_name as this can lead to corruption in your XCode project file.
When the export completes, the output folder should look like this:
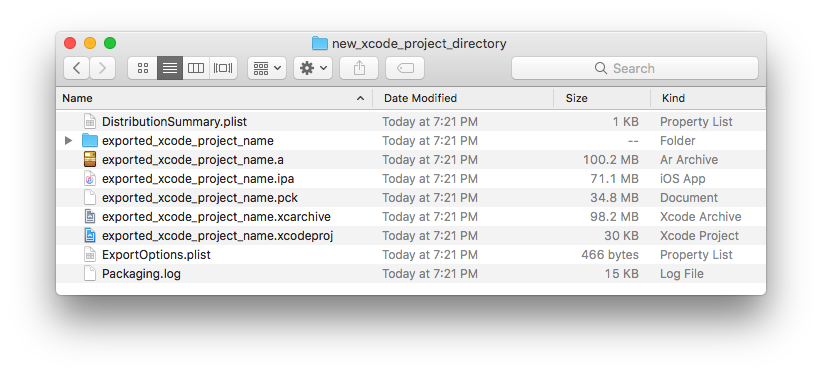
Opening exported_xcode_project_name.xcodeproj lets you build and deploy like any other iOS app.
Active development considerations¶
The above method creates an exported project that you can build for release, but you have to re-export every time you make a change in Godot.
While developing, you can speed this process up by linking your Godot project files directly into your app.
In the following example:
- exported_xcode_project_name is the name of the exported iOS application (as above).
- godot_project_to_export is the name of the Godot project.
Steps to link a Godot project folder to Xcode¶
- Start from an exported iOS project (follow the steps above).
- In Finder, drag the Godot project folder into the Xcode file browser.
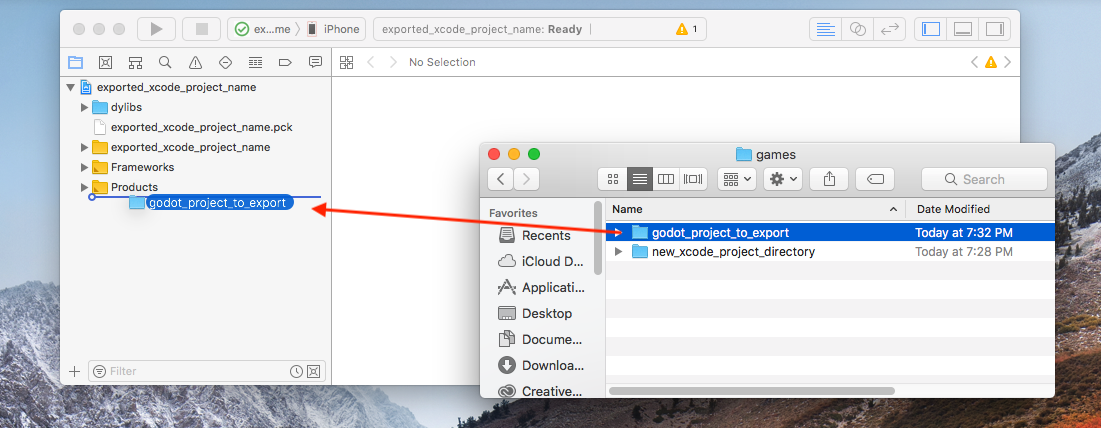
3. In the dialog, make sure Create folder references is selected. This means you will be able to continue to edit your Godot project in its current location.
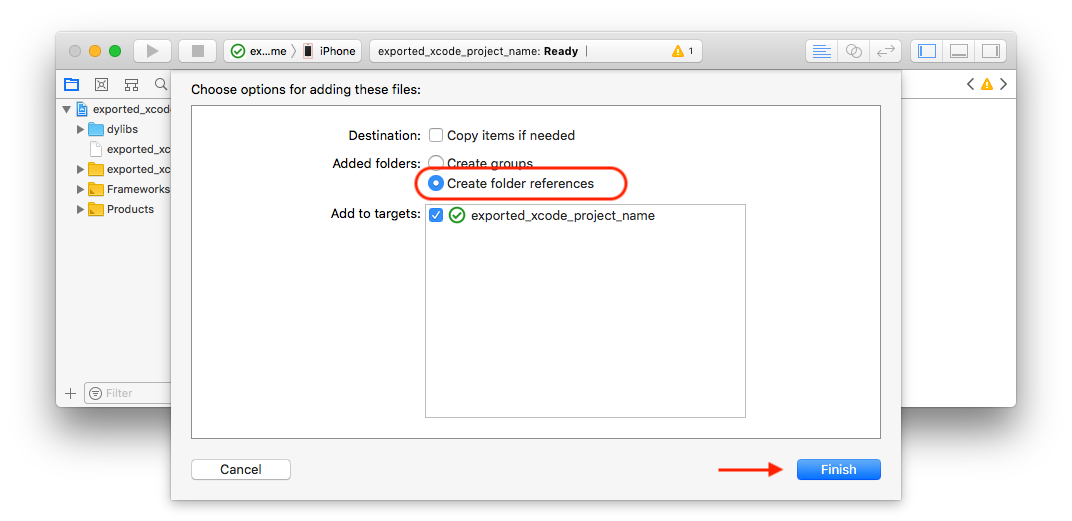
- See the godot_project_to_export folder in the Xcode file browser.
- Delete exported_xcode_project_name.pck from the Xcode project.
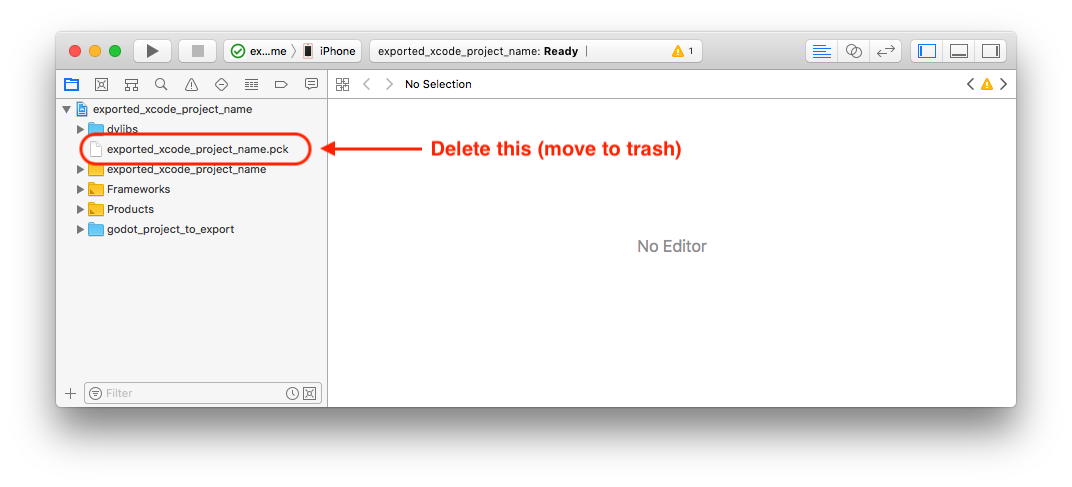
6. Open exported_xcode_project_name-Info.plist and add a string property named godot_path (this is the real key name) with a value godot_project_to_export (this is the name of your project)
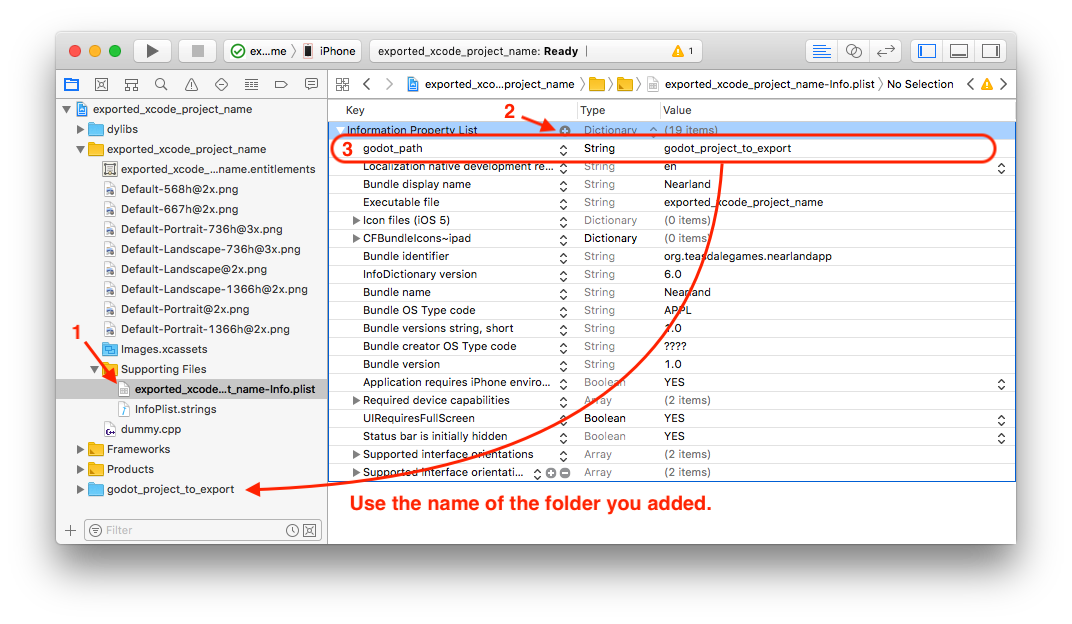
That’s it! You can now edit your project in the Godot editor and build it in Xcode when you want to run it on a device.
Services for iOS¶
Special iOS services can be used in Godot. Check out the Services for iOS page.
Exporting for Universal Windows Platform¶
There’s no extra requirement to export an .appx package that can be
installed as a Windows App or submitted to the Windows Store. Exporting UWP
packages also works from any platform, not only from Windows.
However, if you want to install and run the app, you need to sign it with a trusted signature. Currently, Godot does not support signing of packages, so you need to use external tools to do so.
Also, make sure the Publisher Name you set when exporting the package matches the name used on the certificate.
Limitations on Xbox One¶
As described in the UWP documentation:
- Submitted as an “App”
- available memory is 1GB
- share of 2-4 CPU cores
- shared access of GPU power (45%)
- Submitted as a “Game” (through Xbox Live Creators Program)
- available memory is 5GB
- 4 exclusive CPU cores and 2 shared CPU cores
- exclusive access to GPU power (100%)
- Exceeding these memory limitations will cause allocation failures and the application will crash.
Creating a signing certificate¶
This requires the MakeCert.exe and Pvk2Pfx.exe tools, which come with
the Windows SDK. If you use Visual Studio, you can open one of its Developer
Prompts, since it comes with these tools and they can be located in the path.
You can get more detailed instructions from Microsoft’s documentation.
First, run MakeCert to create a private key:
MakeCert /n publisherName /r /h 0 /eku "1.3.6.1.5.5.7.3.3,1.3.6.1.4.1.311.10.3.13" /e expirationDate /sv MyKey.pvk MyKey.cer
Where publisherName matches the Publisher Name of your package and
expirationDate is in the mm/dd/yyyy format.
Next, create a Personal Information Exchange (.pfx) file using Pvk2Pfx.exe:
Pvk2Pfx /pvk MyKey.pvk /pi pvkPassword /spc MyKey.cer /pfx MyKey.pfx [/po pfxPassword]
If you don’t specify a password with /po argument, the PFX will have the
same password as the private key.
You will also need to trust this certificate in order to be able to install your app. Open the Command Prompt as Administrator and run the following command:
Certutil -addStore TrustedPeople MyKey.cer
Signing the package¶
Finally, use SignTool.exe from the Windows SDK or Visual Studio:
SignTool sign /fd SHA256 /a /f MyKey.pfx /p pfxPassword package.appx
Installing the package¶
As of the Windows 10 Anniversary Update, you are able to install packages simply by
double clicking the .appx file from Windows Explorer.
It’s also possible to install by using the Add-AppxPackage PowerShell cmdlet.
Note
If you want to update your already installed app, you must update the version number on the new package or first uninstall the previous package.
Exporting for Android¶
Exporting for Android has fewer requirements than compiling Godot for it. The following steps detail what is needed to setup the SDK and the engine.
Download the Android SDK¶
Download and install the Android SDK from developer.android.com.
If you install Android Studio, you need to run it once to complete the SDK setup.
Install OpenJDK or Oracle JDK¶
Download and install OpenJDK or Oracle JDK. Versions below JDK 8 may not work; some users have reported issues with the jarsigner (used to sign the APKs) in JDK 7.
If you install OpenJDK, choose 1.8. Don’t choose the openjdk-jre files as that only contains the JRE, not the JDK which is required here.
Create a debug.keystore¶
Android needs a debug keystore file to install to devices and distribute
non-release APKs. If you have used the SDK before and have built
projects, ant or eclipse probably generated one for you (on Linux and
macOS, you can find it in the ~/.android directory).
If you can’t find it or need to generate one, the keytool command from the JDK can be used for this purpose:
keytool -keyalg RSA -genkeypair -alias androiddebugkey -keypass android -keystore debug.keystore -storepass android -dname "CN=Android Debug,O=Android,C=US" -validity 9999
This will create a debug.keystore file in your current directory. You should move it to a memorable location such as %USERPROFILE%\.android\, because you will need its location in a later step. For more information on keytool usage, see this Q&A article.
Make sure you have adb¶
Android Debug Bridge (adb) is the command line tool used to communicate with
Android devices. It’s installed with the SDK, but you may need to install one
(any) of the Android API levels for it to be installed in the SDK directory.
Setting it up in Godot¶
Enter the Editor Settings screen. This screen contains the editor settings for the user account in the computer (it’s independent from the project).
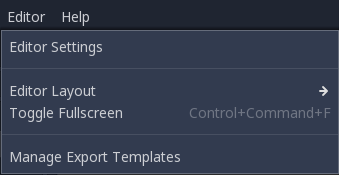
Scroll down to the section where the Android settings are located:
In that screen, the path to 3 files needs to be set:
- The
adbexecutable (adb.exeon Windows) - It can usually be found at%LOCALAPPDATA%\Android\Sdk\platform-tools\adb.exe. - The
jarsignerexecutable (from JDK 6 or 8) - On Windows, OpenJDK installs to a dir like%PROGRAMFILES%\ojdkbuild\java-1.8.0-openjdk-1.8.0.232-2\bin. On Linux, it typically installs to a dir like/usr/bin/jarsigner. The exact path may vary depending on the OpenJDK update you’ve installed and your machine’s operating system. - The debug
.keystorefile - It can be found in the folder where you put thedebug.keystorefile you created above.
Once that is configured, everything is ready to export to Android!
Providing launcher icons¶
Launcher icons are used by Android launcher apps to represent your application to users. Godot only requires high-resolution icons (for xxxhdpi density screens) and will automatically generate lower-resolution variants.
There are two types of icons required by Godot:
- Main Icon:: The “classic” icon. This will be used on all Android versions up to Android 8 (Oreo), exclusive. Must be at least 192×192 px.
- Adaptive Icons: Starting from Android 8 (inclusive), Adaptive Icons were introduced. Applications will need to include separate background and foreground icons to have a native look. The user’s launcher application will control the icon’s animation and masking. Must be at least 432×432 px.
See also
It’s important to adhere to some rules when designing adaptive icons. Google Design has provided a nice article that helps to understand those rules and some of the capabilities of adaptive icons.
Caution
The most important adaptive icon design rule is to have your icon critical elements inside the safe zone: a centered circle with a radius of 66dp (264 pixels on xxxhdpi) to avoid being clipped by the launcher.
If you don’t provide some of the requested icons, Godot will replace them using a fallback chain, trying the next in line when the current one fails:
- Main Icon: Provided main icon -> Project icon -> Default Godot main icon.
- Adaptive Icon Foreground: Provided foreground icon -> Provided main icon -> Project icon -> Default Godot foreground icon.
- Adaptive Icon Background: Provided background icon -> Default Godot background icon.
It’s highly recommended to provide all of the requested icons, and at least with the specified resolutions. Only this way your application will look great on all the Android devices and versions.
Exporting for Google Play Store¶
Uploading an APK to Google’s Play Store requires you to sign using a non-debug keystore file; such file can be generated like this:
keytool -v -genkey -v -keystore mygame.keystore -alias mygame -keyalg RSA -validity 10000
This keystore and key are used to verify your developer identity, remember the password and keep it in a safe place! Use Google’s Android Developer guides to learn more about APK signing.
Now fill in the following forms in your Android Export Presets:
- Release: Enter the path to the keystore file you just generated.
- Release User: Replace with the key alias.
- Release Password: Key password. Note that the keystore password and the key password currently have to be the same.
Your export_presets.cfg file now contains sensitive information. If you use
a version control system, you should remove it from public repositories and add
it to your .gitignore file or equivalent.
Don’t forget to uncheck the Export With Debug checkbox while choosing the APK’s name.

Optimizing the APK size¶
By default, the APK will contain native libraries for both ARMv7 and ARMv8 architectures. This increases its size significantly. To create a smaller APK, uncheck either Armeabi-v 7a or Arm 64 -v 8a in your project’s Android export preset. This will create an APK that only contains a library for a single architecture. Note that applications targeting ARMv7 can also run on ARMv8 devices, but the opposite is not true.
Since August 2019, Google Play requires all applications to be available in 64-bit form. This means you cannot upload an APK that contains just an ARMv7 library. To solve this, you can upload several APKs to Google Play using its Multiple APK support. Each APK should target a single architecture; creating an APK for ARMv7 and ARMv8 is usually sufficient to cover most devices in use today.
You can optimize the size further by compiling an Android export template with only the features you need. See Optimizing a build for size for more information.
Exporting for the Web¶
HTML5 export allows publishing games made in Godot Engine to the browser. This requires support for WebAssembly and WebGL in the user’s browser.
Important
Use the browser-integrated developer console, usually opened with F12, to view debug information like JavaScript, engine, and WebGL errors.
Attention
Many browsers, including Firefox and Chromium-based browsers,
will not load exported projects when opened locally per
file:// protocol. To get around this, use a local server.
Tip
Python offers an easy method to start a local server.
Use python -m SimpleHTTPServer with Python 2 or
python -m http.server with Python 3 to serve the
current working directory at http://localhost:8000.
WebGL 2¶
Until the OpenGL ES 3 renderer is removed from Godot in favor of Vulkan, HTML5 export uses WebGL 2 when the GLES3 option is selected.
Warning
Usage of WebGL 2 is not recommended due to its expected removal from Godot without replacement.
WebGL 2 is not supported in all browsers. Firefox and Chromium (Chrome, Opera) are the most popular supported browsers, Safari and Edge do not work. On iOS, all browsers are based on WebKit (i.e. Safari), so they will also not work.
Godot’s WebGL 2 renderer has issues with 3D and is no longer maintained.
Limitations¶
For security and privacy reasons, many features that work effortlessly on native platforms are more complicated on the web platform. Following is a list of limitations you should be aware of when porting a Godot game to the web.
Using cookies for data persistence¶
Users must allow cookies (specifically IndexedDB) if persistence of the
user:// file system is desired. When playing a game presented in an
iframe, third-party cookies must also be enabled. Incognito/private
browsing mode also prevents persistence.
The method OS.is_userfs_persistent() can be used to check if the
user:// file system is persistent, but can give false positives in some
cases.
Full screen and mouse capture¶
Browsers do not allow arbitrarily entering full screen. The same goes for
capturing the cursor. Instead, these actions have to occur as a response to
a JavaScript input event. In Godot, this means entering full screen from within
a pressed input event callback such as _input or _unhandled_input.
Querying the Input singleton is not sufficient, the relevant
input event must currently be active.
For the same reason, the full screen project setting doesn’t work unless the engine is started from within a valid input event handler. This requires customization of the HTML page.
Audio autoplay¶
Chrome restricts how websites may play audio. It may be necessary for the player to click or tap or press a key to enable audio.
See also
Google offers additional information about their Web Audio autoplay policies.
HTTPClient and HTTPRequest¶
The HTTP classes have several restrictions on the HTML5 platform:
- Accessing or changing the
StreamPeeris not possible- Threaded/Blocking mode is not available
- Cannot progress more than once per frame, so polling in a loop will freeze
- No chunked responses
- Host verification cannot be disabled
- Subject to same-origin policy
Exported .html file must not be reused¶
Each project must generate their own HTML file. On export, several text placeholders are replaced in the generated HTML file specifically for the given export options. Any direct modifications to the generated HTML file will be lost in future exports. To customize the generated file, see Customizing the Web export HTML page.
Boot splash is not displayed¶
The default HTML page does not display the boot splash while loading. However, the image is exported as a PNG file, so custom HTML pages can display it.
Unimplemented functionality¶
The following functionality is currently unavailable on the HTML5 platform:
- Threads
- GDNative
- C#
- Clipboard synchronisation between engine and operating system
- Networking other than HTTPClient and WebSocketClient
Tip
Check the list of open HTML5 issues on Github to see if the functionality you’re interested in has an issue yet. If not, open one to communicate your interest.
Serving the files¶
Exporting for the web generates several files to be served from a web server, including a default HTML page for presentation. A custom HTML file can be used, see Customizing the Web export HTML page.
The generated .html file can be used as DirectoryIndex in Apache
servers and can be renamed to e.g. index.html at any time, its name is
never depended on by default.
The HTML page draws the game at maximum size within the browser window.
This way it can be inserted into an <iframe> with the game’s size, as is
common on most web game hosting sites.
The other exported files are served as they are, next to the .html file,
names unchanged. The .wasm file is a binary WebAssembly module implementing
the engine. The .pck file is the Godot main pack containing your game. The
.js file contains start-up code and is used by the .html file to access
the engine. The .png file contains the boot splash image. It is not used in
the default HTML page, but is included for
custom HTML pages.
The .pck file is binary, usually delivered with the MIME-type
application/octet-stream. The .wasm file is delivered as
application/wasm.
Caution
Delivering the WebAssembly module (.wasm) with a MIME-type
other than application/wasm can prevent some start-up
optimizations.
Delivering the files with server-side compression is recommended especially for
the .pck and .wasm files, which are usually large in size.
The WebAssembly module compresses particularly well, down to around a quarter
of its original size with gzip compression.
Export options¶
If a runnable web export template is available, a button appears between the Stop scene and Play edited Scene buttons in the editor to quickly open the game in the default browser for testing.
If a path to a Custom HTML shell file is given, it will be used instead of the default HTML page. See Customizing the Web export HTML page.
Head Include is appended into the <head> element of the generated
HTML page. This allows to, for example, load webfonts and third-party
JavaScript APIs, include CSS, or run JavaScript code.
Calling JavaScript from script¶
In web builds, the JavaScript singleton is implemented. It offers a single
method called eval that works similarly to the JavaScript function of the
same name. It takes a string as an argument and executes it as JavaScript code.
This allows interacting with the browser in ways not possible with script
languages integrated into Godot.
func my_func():
JavaScript.eval("alert('Calling JavaScript per GDScript!');")
The value of the last JavaScript statement is converted to a GDScript value and
returned by eval() under certain circumstances:
- JavaScript
numberis returned as GDScript float- JavaScript
booleanis returned as GDScript bool- JavaScript
stringis returned as GDScript String- JavaScript
ArrayBuffer,TypedArrayandDataVieware returned as GDScript PoolByteArray
func my_func2():
var js_return = JavaScript.eval("var myNumber = 1; myNumber + 2;")
print(js_return) # prints '3.0'
Any other JavaScript value is returned as null.
HTML5 export templates may be built without support for the singleton. With such
templates, and on platforms other than HTML5, calling JavaScript.eval will
also return null. The availability of the singleton can be checked with the
JavaScript feature tag:
func my_func3():
if OS.has_feature('JavaScript'):
JavaScript.eval("""
console.log('The JavaScript singleton is available')
""")
else:
print("The JavaScript singleton is NOT available")
Tip
GDScript’s multi-line strings, surrounded by 3 quotes """ as in
my_func3() above, are useful to keep JavaScript code readable.
The eval method also accepts a second, optional Boolean argument, which
specifies whether to execute the code in the global execution context,
defaulting to false to prevent polluting the global namespace:
func my_func4():
# execute in global execution context,
# thus adding a new JavaScript global variable `SomeGlobal`
JavaScript.eval("var SomeGlobal = {};", true)
One-click deploy¶
Sounds good, what is it?¶
This feature will pop up automatically once a platform is properly configured and a supported device is connected to the computer. Since things can go wrong at many levels (platform may not be configured correctly, SDK may be incorrectly installed, device may be improperly configured, etc.), it’s good to let the user know that it exists.
Some platforms (at the time of this writing, only Android) can detect when a USB device is connected to the computer, and offer the user to automatically export, install and run the project (in debug mode) on the device. This feature is called, in industry buzzwords, “One-Click Deploy”.
Steps for one-click deploy¶
- Configure target platform.
- Configure device (make sure it’s in developer mode, likes the computer, USB cable is plugged, USB is recognized, etc.).
- Connect the device…
- And voilà!

Click once… and deploy!
Custom builds for Android¶
Godot provides the option to use custom build Android templates. Instead of using the already pre-built template that ships with Godot, an actual Android Java project gets installed into your project folder. Godot will then build it and use it as an export template every time you export the project.
There are some reasons why you may want to do this:
- Modify the project before it’s built.
- Add external SDKs that build with your project.
Configuring the custom build is a more or less straightforward process, but it may take a while to get used to how the Android SDK works.
Instructions will be provided as detailed as possible to do this process.
Set up the custom build environment¶
Go to the Project menu, and install the Custom Build template:
Make sure export templates are downloaded. If not, this menu will help you download them.
This will create an Gradle-based Android project in res://android/build and
place a .gdignore file in res://android so the Godot filesystem ignores
this folder. Editing these files is not needed unless you want to create
your own add-ons, or you really need to modify the project.
Install the Android SDK (command-line version)¶
These are the steps for installing the Android SDK using command line. The advantage of this approach is the simplicity and small download/install size. It can be more challenging though. The Android Studio approach is easier, but it requires downloading and installing Android Studio (which may require more than 1 GB of storage).
Install a JDK¶
The Android SDK doesn’t come with Java, so it needs to be installed manually. You need to install a Java SDK (not just the runtime or JRE). OpenJDK 8 is recommended. Oracle JDK 8 should also work. Later versions may not work for Android development.
Download the command-line tools¶
Go to the Android Studio download page. To save disk space, you don’t want the full IDE, so don’t download it.
Note
If you do want Android Studio, read further down for instructions for doing the same using Android Studio.
Look on that page for the Command line tools only section. Currently, they are listed under Download Options. Scroll down a bit until you see them.

Download the ZIP file for your platform, there will be a single tools
folder inside:
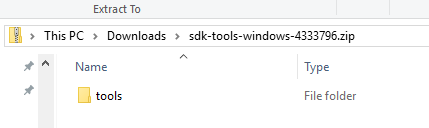
This may appear a little confusing, but be sure to follow these instructions carefully:
Create a new folder anywhere you want named android-sdk (it must be
an empty directory). On Windows, the following path is usually good enough:
C:\users\<yourusername>\Documents\android-sdk
Unzip the Android SDK ZIP file you just downloaded there. The only thing in the
directory you created in the previous step should be the tools folder with
its contents inside, like this:
android-sdk/
android-sdk/tools/
android-sdk/tools/allthefiles
Accepting the licenses¶
To be able to use the Android SDK tools, Google requires you to accept its licenses.
To do this, the sdkmanager must be executed from the command line with a
special argument. Navigate to the tools/bin directory inside the SDK folder
(instructions provided for Windows users, as Linux and macOS users are expected
to understand how command line navigation works):
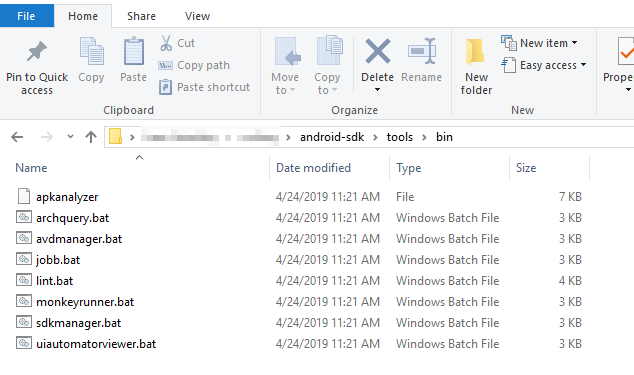
Then open a command line window:
In there, run sdkmanager --licenses:

This will ask you to accept several licenses, just write y and press Enter
on every of them until it’s done.
Afterwards, install the platform tools (this is required to install adb):

Generating the keystore¶
Once the platform tools are installed, the last step is to generate a debug keystore (this is needed to build). Go up two folders by writing:
cd ..\..
(or open a new shell in the android-sdk folder).
And you need to input the following line (on Linux and macOS, this should work out of the box, for Windows there are further instructions below):
keytool -keyalg RSA -genkeypair -alias androiddebugkey -keypass android -keystore debug.keystore -storepass android -dname "CN=Android Debug,O=Android,C=US" -validity 9999
On Windows, the full path to Java should be provided. You need to add & at
the beginning of the line if you use PowerShell; it’s not needed for the regular
cmd.exe console.
To make it clearer, here is an capture of a line that works on PowerShell (by
adding & and the full Java path before keytool.exe). Again, keep in mind that you
need Java installed:
(right-click and open the image in a new tab if this appears too small)
Setting up Godot¶
Go to the Editor Settings and set up a few fields in Export > Android. Make sure they look like the following:
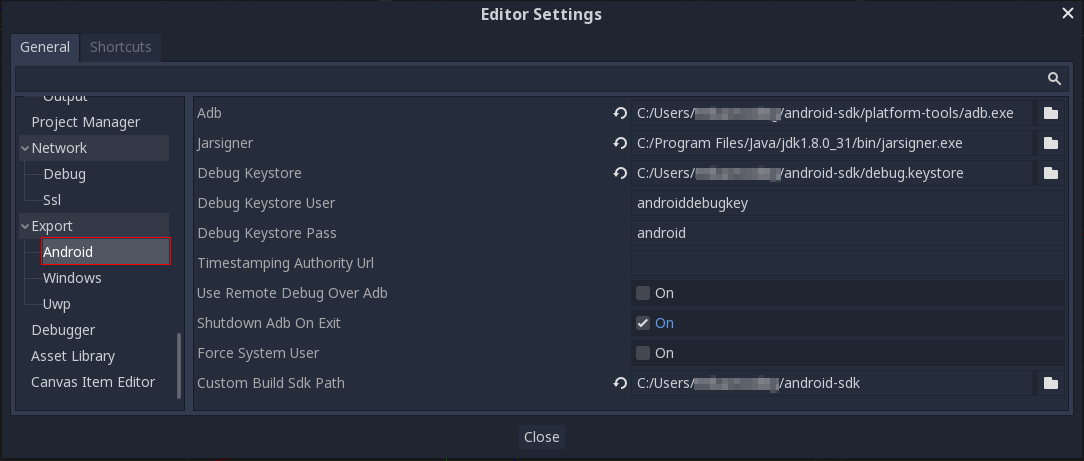
(right-click and open the image in a new tab if this appears too small)
As it can be seen, most paths are inside either the android-sdk folder you
originally created, or inside the Java install. For Linux and macOS users,
jarsigner is often located in /usr/bin.
With this, you should be all set.
Install the Android SDK (Android Studio)¶
If you just finished installing the SDK via the command-line tools, feel free to skip this section entirely. The Android Studio path is easier, but it takes up more disk space. It’s also useful if you plan to develop Godot for Android (modify the Java source code) or if you plan to develop add-ons.
Download and install Android Studio¶
Download the latest version of Android Studio. When installing, pay attention to where the android-sdk directory is created.
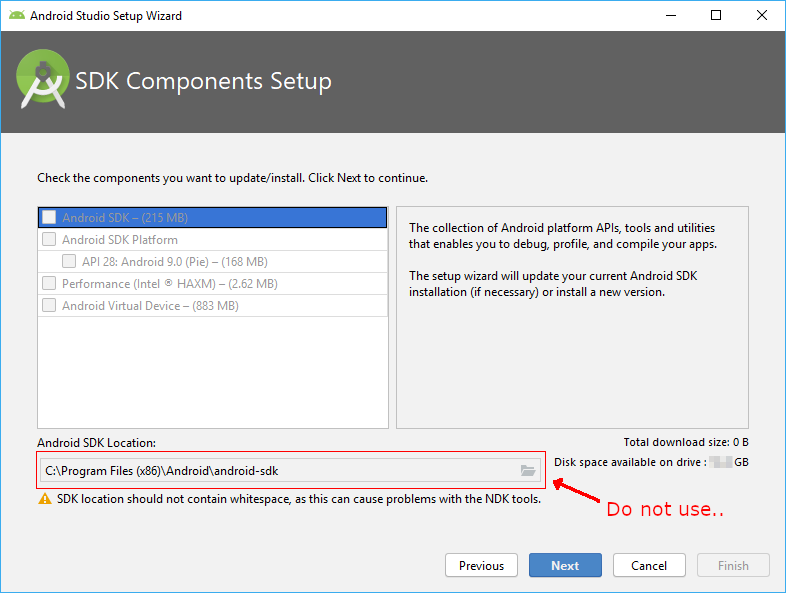
Note
This is funny, the path it proposes by default contains whitespace (and complains about it). It must be changed.
In any case, it’s better to select a different path inside your user folders. The recommended one is usually:
C:\Users\<yourusername>\Documents\android-sdk
Replace yourusername by your actual user name. Once it’s correct, select from the list above in the same screen:
- Android SDK
- Android SDK Platform
The rest are not needed, because the build system will fetch them itself. After selecting them, go on with the installation.
Generating the keystore¶
Go to the folder where you installed android-sdk in the previous step, use File
Explorer and open a command line tool there:
The actual command line to type is the following. On Linux and macOS, it should work out of the box, but on Windows, it needs additional details (keep reading afterwards).
keytool -keyalg RSA -genkeypair -alias androiddebugkey -keypass android -keystore debug.keystore -storepass android -dname "CN=Android Debug,O=Android,C=US" -validity 9999
On Windows, the full path to Java should be provided (and & needs to be
added at the beginning on the line if you use PowerShell, it’s not needed for
the regular cmd.exe console). Don’t worry, at least by using Android Studio
on Windows, Java comes bundled with it.
To make it clearer, here is a screen capture of a line that works on PowerShell
(by adding & and the full Java Path to keytool.exe; remove & if you
use cmd.exe). It uses a path to the Java version that comes with Android
Studio:

(right-click and open the image in a new tab if this appears too small)
Setting up Godot¶
Go to the Editor Settings and set up a few fields in Export > Android. Make sure they look like the following:
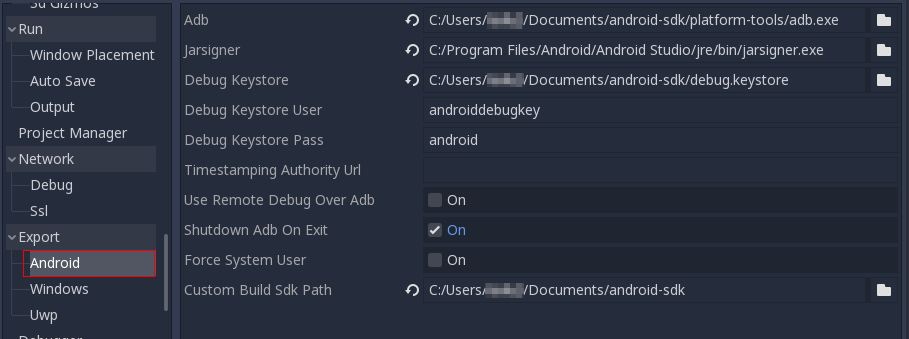
(right-click and open the image in a new tab if this appears too small)
As it can be seen, most paths are inside either the android-sdk folder you
originally created, or inside the Java install. For Linux and macOS users,
jarsigner is often located in /usr/bin.
With this, you should be all set.
Enabling the custom build and exporting¶
When setting up the Android project in the Project > Export dialog, Custom Build needs to be enabled:
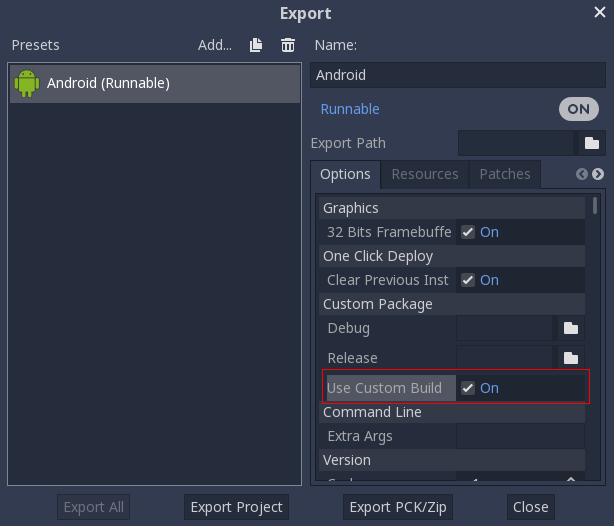
From now on, attempting to export the project or one-click deploy will call the Gradle build system to generate fresh templates (this window will appear every time):
The templates built will be used automatically afterwards, so no further configuration is needed.
Changing application icon for Windows¶
By default, the exported project’s icon will be the Godot icon. You will most likely want to change that for your project. There are two types of icons that can be changed on Windows: the file icon and the taskbar icon.
Changing the taskbar icon¶
The taskbar icon is the icon that shows up on the taskbar when your project is running.
To change the taskbar icon, go to Project → Project Settings → Application → Config → Icon. Click on the folder icon and select your desired icon.
Note
This is also the icon that gets displayed in the Godot project list.
Changing the file icon¶
The file icon is the icon of the executable that you click on to start the project.
Before selecting it in the export options, you will need to install an extra tool called rcedit. You can download it here.
After downloading, you need to tell Godot the path to the rcedit executable on your computer. Go to Editor → Editor Settings → Export → Windows. Click on the folder icon for the rcedit entry. Navigate to and select the rcedit executable.
Note
Linux and macOS users will also need to install WINE to use rcedit.
You should now have everything in place to change the file icon. To do that, you will need to specify the icon when exporting. Go to Project → Export. Assuming you have already created a Windows Desktop preset, select your icon in ICO format in the Application → Icon field.
Note
You can use software such as GIMP to export an ICO image. For more information, please refer to this tutorial.
ICO file requirements¶
Regardless of which program you use to create your ICO file, there are some requirements to ensure the icon (and your executable) works on Windows.
This is a bit tricky, as can be seen in the following Stack Overflow threads: one, two.
Your ICO file should at least contain icons in the following resolutions: 16×16, 48×48 and 256×256.
If you want to fully support high-DPI screens, this is the full list of supported icon sizes on Windows 10: 16, 20, 24, 28, 30, 31, 32, 40, 42, 47, 48, 56, 60, 63, 84 and one larger than 255 pixels (such as 256, 512 or 1024).
It is also possible to convert a PNG image to an hiDPI-friendly ICO file using this ImageMagick command:
magick convert icon.png -define icon:auto-resize=256,128,64,48,32,16 icon.ico
Best practices¶
Introduction¶
This series is a collection of best practices to help you work efficiently with Godot.
Godot allows for a great amount of flexibility in how you structure a project’s codebase and break it down into scenes. Each approach has its own pros and cons, and they can be hard to weigh until you’ve worked with the engine for long enough.
There are always many ways to structure your code and solve specific programming problems. It would be impossible to cover them all here.
That is why each article starts from a real-world problem. We will break down each problem in fundamental questions, suggest solutions, analyze the pros and cons of each option, and highlight the best course of action for the problem at hand.
You should start by reading Godot scenes and scripts are classes. It explains how Godot’s nodes and scenes relate to classes and objects in another Object-Oriented programming language. It will help you make sense of the rest of the series.
Note
The best practices in Godot rely on Object-Oriented design principles. We use tools like the single responsibility principle and encapsulation.
Godot scenes and scripts are classes¶
In Godot, scripts and scenes can both be the equivalent of classes in an Object-Oriented programming language. The main difference is that scenes are declarative code, while scripts can contain imperative code.
As a result, many best practices in Godot boil down to applying Object-Oriented design principles to the scenes, nodes, or script that make up your game.
This guide explains how scripts and scenes work in the engine’s core, to help you get a sense of how Godot works under the hood, and to help you better understand where some of this series’ best practices come from.
Making sense of classes in Godot¶
Godot Engine provides built-in classes like Node. User-created types are not technically classes. Instead, they are resources that tell the engine a sequence of initializations to perform on one of the engine’s built-in classes.
Godot’s internal classes have methods that register a class’s data with a
ClassDB. This database provides runtime access to class
information. ClassDB contains information about classes like:
- properties
- methods
- constants
- signals
This ClassDB is what Objects check against when performing an operation like
accessing a property or calling a method. ClassDB checks the database’s
records and the records of the Object’s base types to see if the Object supports
the operation.
On the engine’s side, every class defines a static _bind_methods() function
that describes what C++ content it registers to the database and how. When you
use the engine, you can extend the methods, properties, and signals available from
the ClassDB by attaching a Script to your node.
Objects check their attached script before the database. This is why scripts can
override built-in methods. If a script defines a _get_property_list() method,
Godot appends that data to the list of properties the Object fetches from the
ClassDB. The same is true for other declarative code.
Even scripts that don’t inherit from a built-in type, i.e. scripts that don’t
start with the extends keyword, implicitly inherit from the engine’s base
Reference class. This allows the Object to defer
to the script’s content where the engine logic deems appropriate.
Note
As a result, you can instance scripts without the extends keyword
from code, but you cannot attach them to a Node
Scripting performances and PackedScene¶
As the size of Objects increases, the scripts’ necessary size to create them grows much, much larger. Creating node hierarchies demonstrates this. Each individual Node’s logic could be several hundred lines of code in length.
Let’s see a simple example of creating a single Node as a child. The code
below creates a new Node, changes its name, assigns a script to it, sets its
future parent as its owner so it gets saved to disk along with it, and finally
adds it as a child of the Main node:
# Main.gd
extends Node
func _init():
var child = Node.new()
child.name = "Child"
child.script = preload("Child.gd")
child.owner = self
add_child(child)
using System;
using Godot;
namespace ExampleProject
{
public class Main : Resource
{
public Node Child { get; set; }
public Main()
{
Child = new Node();
Child.Name = "Child";
Child.Script = (Script)ResourceLoader.Load("child.gd");
Child.Owner = this;
AddChild(Child);
}
}
}
Script code like this is much slower than engine-side C++ code. Each change makes a separate call to the scripting API which leads to many “look-ups” on the back-end to find the logic to execute.
Scenes help to avoid this performance issue. PackedScene, the base type that scenes inherit from, are resources that use serialized data to create objects. The engine can process scenes in batches on the back-end and provide much better performance than scripts.
Scenes and scripts are objects¶
Why is any of this important to scene organization? Because scenes are objects. One often pairs a scene with a scripted root node that makes use of the sub-nodes. This means that the scene is often an extension of the script’s declarative code.
The content of a scene helps to define:
- What nodes are available to the script
- How they are organized
- How are they initialized
- What signal connections they have with each other
Many Object-Oriented principles which apply to written code also apply to scenes.
The scene is always an extension of the script attached to its root node. You can see all the nodes it contains as part of a single class.
Most of the tips and techniques explained in this series will build on this.
Scene organization¶
This article covers topics related to the effective organization of scene content. Which nodes should one use? Where should one place them? How should they interact?
How to build relationships effectively¶
When Godot users begin crafting their own scenes, they often run into the following problem:
They create their first scene and fill it with content before the creeping sense that they need to split it up into re-usable pieces haunts them. They save branches of their scene into their own scene. However, they then notice that the hard references they were able to rely on before are no longer possible. Re-using the scene in multiple places creates issues because the node paths do not find their targets. Signal connections established in the editor break.
To fix these problems, one must instantiate the sub-scenes without them requiring details about their environment. One needs to be able to trust that the sub-scene will create itself without being picky about how one uses it.
One of the biggest things to consider in OOP is maintaining focused, singular-purpose classes with loose coupling to other parts of the codebase. This keeps the size of objects small (for maintainability) and improves their reusability so that re-writing completed logic is unnecessary.
These OOP best practices have several ramifications for the best practices in scene structure and script usage.
If at all possible, one should design scenes to have no dependencies. That is, one should create scenes that keep everything they need within themselves.
If a scene must interact with an external context, experienced developers recommend the use of Dependency Injection. This technique involves having a high-level API provide the dependencies of the low-level API. Why do this? Because classes which rely on their external environment can inadvertently trigger bugs and unexpected behavior.
To do this, one must expose data and then rely on a parent context to initialize it:
Connect to a signal. Extremely safe, but should use only to “respond” to behavior, not start it. Note that signal names are usually past-tense verbs like “entered”, “skill_activated”, or “item_collected”.
# Parent $Child.connect("signal_name", object_with_method, "method_on_the_object") # Child emit_signal("signal_name") # Triggers parent-defined behavior.
// Parent GetNode("Child").Connect("SignalName", ObjectWithMethod, "MethodOnTheObject"); // Child EmitSignal("SignalName"); // Triggers parent-defined behavior.
Call a method. Used to start behavior.
# Parent $Child.method_name = "do" # Child, assuming it has String property 'method_name' and method 'do'. call(method_name) # Call parent-defined method (which child must own).
// Parent GetNode("Child").Set("MethodName", "Do"); // Child Call(MethodName); // Call parent-defined method (which child must own).
Initialize a FuncRef property. Safer than a method as ownership of the method is unnecessary. Used to start behavior.
# Parent $Child.func_property = funcref(object_with_method, "method_on_the_object") # Child func_property.call_func() # Call parent-defined method (can come from anywhere).
// Parent GetNode("Child").Set("FuncProperty", GD.FuncRef(ObjectWithMethod, "MethodOnTheObject")); // Child FuncProperty.CallFunc(); // Call parent-defined method (can come from anywhere).
Initialize a Node or other Object reference.
# Parent $Child.target = self # Child print(target) # Use parent-defined node.
// Parent GetNode("Child").Set("Target", this); // Child GD.Print(Target); // Use parent-defined node.
Initialize a NodePath.
# Parent $Child.target_path = ".." # Child get_node(target_path) # Use parent-defined NodePath.
// Parent GetNode("Child").Set("TargetPath", NodePath("..")); // Child GetNode(TargetPath); // Use parent-defined NodePath.
These options hide the source of accesses from the child node. This in turn keeps the child loosely coupled to its environment. One can re-use it in another context without any extra changes to its API.
Note
Although the examples above illustrate parent-child relationships, the same principles apply towards all object relations. Nodes which are siblings should only be aware of their hierarchies while an ancestor mediates their communications and references.
# Parent
$Left.target = $Right.get_node("Receiver")
# Left
var target: Node
func execute():
# Do something with 'target'.
# Right
func _init():
var receiver = Receiver.new()
add_child(receiver)
// Parent
GetNode<Left>("Left").Target = GetNode("Right/Receiver");
public class Left : Node
{
public Node Target = null;
public void Execute()
{
// Do something with 'Target'.
}
}
public class Right : Node
{
public Node Receiver = null;
public Right()
{
Receiver = ResourceLoader.Load<Script>("Receiver.cs").New();
AddChild(Receiver);
}
}
The same principles also apply to non-Node objects that maintain dependencies on other objects. Whichever object actually owns the objects should manage the relationships between them.
Warning
One should favor keeping data in-house (internal to a scene) though as placing a dependency on an external context, even a loosely coupled one, still means that the node will expect something in its environment to be true. The project’s design philosophies should prevent this from happening. If not, the code’s inherent liabilities will force developers to use documentation to keep track of object relations on a microscopic scale; this is otherwise known as development hell. Writing code that relies on external documentation for one to use it safely is error-prone by default.
To avoid creating and maintaining such documentation, one converts the dependent node (“child” above) into a tool script that implements _get_configuration_warning(). Returning a non-empty string from it will make the Scene dock generate a warning icon with the string as a tooltip by the node. This is the same icon that appears for nodes such as the Area2D node when it has no child CollisionShape2D nodes defined. The editor then self-documents the scene through the script code. No content duplication via documentation is necessary.
A GUI like this can better inform project users of critical information about a Node. Does it have external dependencies? Have those dependencies been satisfied? Other programmers, and especially designers and writers, will need clear instructions in the messages telling them what to do to configure it.
So, why do all this complex switcharoo work? Well, because scenes operate best when they operate alone. If unable to work alone, then working with others anonymously (with minimal hard dependencies, i.e. loose coupling). If the inevitable changes made to a class cause it to interact with other scenes in unforeseen ways, then things break down. A change to one class could result in damaging effects to other classes.
Scripts and scenes, as extensions of engine classes should abide by all OOP principles. Examples include…
Choosing a node tree structure¶
So, a developer starts work on a game only to stop at the vast possibilities before them. They might know what they want to do, what systems they want to have, but where to put them all? Well, how one goes about making their game is always up to them. One can construct node trees in a myriad of ways. But, for those who are unsure, this helpful guide can give them a sample of a decent structure to start with.
A game should always have a sort of “entry point”; somewhere the developer can definitively track where things begin so that they can follow the logic as it continues elsewhere. This place also serves as a bird’s eye view to all of the other data and logic in the program. For traditional applications, this would be the “main” function. In this case, it would be a Main node.
- Node “Main” (main.gd)
The main.gd script would then serve as the primary controller of one’s
game.
Then one has their actual in-game “World” (a 2D or 3D one). This can be a child of Main. In addition, one will need a primary GUI for their game that manages the various menus and widgets the project needs.
- Node “Main” (main.gd)
- Node2D/Spatial “World” (game_world.gd)
- Control “GUI” (gui.gd)
When changing levels, one can then swap out the children of the “World” node. Changing scenes manually gives users full control over how their game world transitions.
The next step is to consider what gameplay systems one’s project requires. If one has a system that…
- tracks all of its data internally
- should be globally accessible
- should exist in isolation
… then one should create an autoload ‘singleton’ node.
Note
For smaller games, a simpler alternative with less control would be to have a “Game” singleton that simply calls the SceneTree.change_scene() method to swap out the main scene’s content. This structure more or less keeps the “World” as the main game node.
Any GUI would need to also be a singleton, be transitory parts of the “World”, or be manually added as a direct child of the root. Otherwise, the GUI nodes would also delete themselves during scene transitions.
If one has systems that modify other systems’ data, one should define those as their own scripts or scenes rather than autoloads. For more information on the reasons, please see the ‘Autoloads vs. Internal Nodes’ documentation.
Each subsystem within one’s game should have its own section within the SceneTree. One should use parent-child relationships only in cases where nodes are effectively elements of their parents. Does removing the parent reasonably mean that one should also remove the children? If not, then it should have its own place in the hierarchy as a sibling or some other relation.
Note
In some cases, one needs these separated nodes to also position themselves
relative to each other. One can use the
RemoteTransform /
RemoteTransform2D nodes for this purpose.
They will allow a target node to conditionally inherit selected transform
elements from the Remote* node. To assign the target
NodePath, use one of the following:
- A reliable third party, likely a parent node, to mediate the assignment.
- A group, to easily pull a reference to the desired node (assuming there will only ever be one of the targets).
When should one do this? Well, it’s up to them to decide. The dilemma arises when one must micro-manage when a node must move around the SceneTree to preserve itself. For example…
Add a “player” node to a “room”.
Need to change rooms, so one must delete the current room.
Before the room can be deleted, one must preserve and/or move the player.
Is memory a concern?
- If not, one can just create the two rooms, move the player and delete the old one. No problem.
If so, one will need to…
- Move the player somewhere else in the tree.
- Delete the room.
- Instantiate and add the new room.
- Re-add the player.
The issue is that the player here is a “special case”, one where the developers must know that they need to handle the player this way for the project. As such, the only way to reliably share this information as a team is to document it. Keeping implementation details in documentation however is dangerous. It’s a maintenance burden, strains code readability, and bloats the intellectual content of a project unnecessarily.
In a more complex game with larger assets, it can be a better idea to simply keep the player somewhere else in the SceneTree entirely. This involves…
- More consistency.
- No “special cases” that must be documented and maintained somewhere.
- No opportunity for errors to occur because these details are not accounted for.
In contrast, if one ever needs to have a child node that does not inherit the transform of their parent, one has the following options:
- The declarative solution: place a Node in between them. As nodes with no transform, Nodes will not pass along such information to their children.
- The imperative solution: Use the
set_as_toplevelsetter for the CanvasItem or Spatial node. This will make the node ignore its inherited transform.
Note
If building a networked game, keep in mind which nodes and gameplay systems are relevant to all players versus those just pertinent to the authoritative server. For example, users do not all need to have a copy of every players’ “PlayerController” logic. Instead, they need only their own. As such, keeping these in a separate branch from the “world” can help simplify the management of game connections and the like.
The key to scene organization is to consider the SceneTree in relational terms rather than spatial terms. Do the nodes need to be dependent on their parent’s existence? If not, then they can thrive all by themselves somewhere else. If so, then it stands to reason they should be children of that parent (and likely part of that parent’s scene if they aren’t already).
Does this mean nodes themselves are components? Not at all. Godot’s node trees form an aggregation relationship, not one of composition. But while one still has the flexibility to move nodes around, it is still best when such moves are unnecessary by default.
When to use scenes versus scripts¶
We’ve already covered how scenes and scripts are different. Scripts define an engine class extension with imperative code, scenes with declarative code.
Each system’s capabilities are different as a result. Scenes can define how an extended class initializes, but not what its behavior actually is. Scenes are often used in conjunction with a script so that the scene acts as an extension of the scripts declarative code.
Anonymous types¶
It is possible to completely define a scenes’ contents using a script alone. This is, in essence, what the Godot Editor does, only in the C++ constructor of its objects.
But, choosing which one to use can be a dilemma. Creating script instances is identical to creating in-engine classes whereas handling scenes requires a change in API:
const MyNode = preload("my_node.gd") const MyScene = preload("my_scene.tscn") var node = Node.new() var my_node = MyNode.new() # Same method call var my_scene = MyScene.instance() # Different method call var my_inherited_scene = MyScene.instance(PackedScene.GEN_EDIT_STATE_MAIN) # Create scene inheriting from MySceneusing System; using Godot; public class Game : Node { public readonly Script MyNodeScr = (Script)ResourceLoader.Load("MyNode.cs"); public readonly PackedScene MySceneScn = (PackedScene)ResourceLoader.load("MyScene.tscn"); public Node ANode; public Node MyNode; public Node MyScene; public Node MyInheritedScene; public Game() { ANode = new Node(); MyNode = new MyNode(); // Same syntax MyScene = MySceneScn.Instance(); // Different. Instantiated from a PackedScene MyInheritedScene = MySceneScn.Instance(PackedScene.GenEditState.Main); // Create scene inheriting from MyScene } }
Also, scripts will operate a little slower than scenes due to the speed differences between engine and script code. The larger and more complex the node, the more reason there is to build it as a scene.
Named types¶
In some cases, a user can register a script as a new type within the editor itself. This displays it as a new type in the node or resource creation dialog with an optional icon. In these cases, the user’s ability to use the script is much more streamlined. Rather than having to…
- Know the base type of the script they would like to use.
- Create an instance of that base type.
- Add the script to the node.
- (Drag-n-drop method)
- Find the script in the FileSystem dock.
- Drag and drop the script onto the node in the Scene dock.
- (Property method)
- Scroll down to the bottom of the Inspector to find the
scriptproperty and select it. - Select “Load” from the dropdown.
- Select the script from the file dialog.
- Scroll down to the bottom of the Inspector to find the
- (Drag-n-drop method)
With a registered script, the scripted type instead becomes a creation option like the other nodes and resources in the system. One need not do any of the above work. The creation dialog even has a search bar to look up the type by name.
There are two systems for registering types…
-
- Editor-only. Typenames are not accessible at runtime.
- Does not support inherited custom types.
- An initializer tool. Creates the node with the script. Nothing more.
- Editor has no type-awareness of the script or its relationship to other engine types or scripts.
- Allows users to define an icon.
- Works for all scripting languages because it deals with Script resources in abstract.
- Set up using EditorPlugin.add_custom_type.
-
- Editor and runtime accessible.
- Displays inheritance relationships in full.
- Creates the node with the script, but can also change types or extend the type from the editor.
- Editor is aware of inheritance relationships between scripts, script classes, and engine C++ classes.
- Allows users to define an icon.
- Engine developers must add support for languages manually (both name exposure and runtime accessibility).
- Godot 3.1+ only.
- The Editor scans project folders and registers any exposed names for all scripting languages. Each scripting language must implement its own support for exposing this information.
Both methodologies add names to the creation dialog, but script classes, in particular, also allow for users to access the typename without loading the script resource. Creating instances and accessing constants or static methods is viable from anywhere.
With features like these, one may wish their type to be a script without a scene due to the ease of use it grants users. Those developing plugins or creating in-house tools for designers to use will find an easier time of things this way.
On the downside, it also means having to use largely imperative programming.
Conclusion¶
In the end, the best approach is to consider the following:
If one wishes to create a basic tool that is going to be re-used in several different projects and which people of all skill levels will likely use (including those who don’t label themselves as “programmers”), then chances are that it should probably be a script, likely one with a custom name/icon.
If one wishes to create a concept that is particular to their game, then it should always be a scene. Scenes are easier to track/edit and provide more security than scripts.
If one would like to give a name to a scene, then they can still sort of do this in 3.1 by declaring a script class and giving it a scene as a constant. The script becomes, in effect, a namespace:
# game.gd extends Reference class_name Game # extends Reference, so it won't show up in the node creation dialog const MyScene = preload("my_scene.tscn") # main.gd extends Node func _ready(): add_child(Game.MyScene.instance())
Autoloads versus regular nodes¶
Godot offers a feature to automatically load nodes at the root of your project, allowing you to access them globally, that can fulfill the role of a Singleton: Singletons (AutoLoad). These auto-loaded nodes are not freed when you change the scene from code with SceneTree.change_scene.
In this guide, you will learn when to use the Autoload feature, and techniques you can use to avoid it.
The cutting audio issue¶
Other engines can encourage the use of creating manager classes, singletons that organize a lot of functionality into a globally accessible object. Godot offers many ways to avoid global state thanks to the node tree and signals.
For example, let’s say we are building a platformer and want to collect coins
that play a sound effect. There’s a node for that: the AudioStreamPlayer. But if we call the AudioStreamPlayer while it is
already playing a sound, the new sound interrupts the first.
A solution is to code a global, auto-loaded sound manager class. It generates a
pool of AudioStreamPlayer nodes that cycle through as each new request for
sound effects comes in. Say we call that class Sound, you can use it from
anywhere in your project by calling Sound.play("coin_pickup.ogg"). This
solves the problem in the short term but causes more problems:
- Global state: one object is now responsible for all objects’ data. If the
Soundclass has errors or doesn’t have an AudioStreamPlayer available, all the nodes calling it can break. - Global access: now that any object can call
Sound.play(sound_path)from anywhere, there’s no longer an easy way to find the source of a bug. - Global resource allocation: with a pool of
AudioStreamPlayernodes stored from the start, you can either have too few and face bugs, or too many and use more memory than you need.
Note
About global access, the problem is that Any code anywhere could pass wrong
data to the Sound autoload in our example. As a result, the domain to
explore to fix the bug spans the entire project.
When you keep code inside a scene, only one or two scripts may be involved in audio.
Contrast this with each scene keeping as many AudioStreamPlayer nodes as it
needs within itself and all these problems go away:
- Each scene manages its own state information. If there is a problem with the data, it will only cause issues in that one scene.
- Each scene accesses only its own nodes. Now, if there is a bug, it’s easy to find which node is at fault.
- Each scene allocates exactly the amount of resources it needs.
When you should use an Autoload¶
Auto-loaded nodes can simplify your code in some cases:
- Static Data: if you need data that is exclusive to one class, like a database, then an autoload can be a good tool. There is no scripting API in Godot to create and manage static data otherwise.
- Static functions: creating a library of functions that only return values.
- Systems with a wide scope: If the singleton is managing its own information and not invading the data of other objects, then it’s a great way to create systems that handle broad-scoped tasks. For example, a quest or a dialogue system.
Until Godot 3.1, another use was just for convenience: autoloads have a global
variable for their name generated in GDScript, allowing you to call them from
any script file in your project. But now, you can use the class_name keyword
instead to get auto-completion for a type in your entire project.
Note
Autoload is not exactly a Singleton. Nothing prevents you from instantiating copies of an auto-loaded node. It is only a tool that makes a node load automatically as a child of the root of your scene tree, regardless of your game’s node structure or which scene you run, e.g. by pressing F6 key.
As a result, you can get the auto-loaded node, for example an autoload called
Sound, by calling get_node("/root/Sound").
When and how to avoid using nodes for everything¶
Nodes are cheap to produce, but even they have their limits. A project may have tens of thousands of nodes all doing things. The more complex their behavior though, the larger the strain each one adds to a project’s performance.
Godot provides more lightweight objects for creating APIs which nodes use. Be sure to keep these in mind as options when designing how you wish to build your project’s features.
Object: The ultimate lightweight object, the original Object must use manual memory management. With that said, it isn’t too difficult to create one’s own custom data structures, even node structures, that are also lighter than the Node class.
- Example: See the Tree node. It supports a high level of customization for a table of content with an arbitrary number of rows and columns. The data that it uses to generate its visualization though is actually a tree of TreeItem Objects.
- Advantages: Simplifying one’s API to smaller scoped objects helps improve its accessibility improve iteration time. Rather than working with the entire Node library, one creates an abbreviated set of Objects from which a node can generate and manage the appropriate sub-nodes.
Note
One should be careful when handling them. One can store an Object into a variable, but these references can become invalid without warning. For example, if the object’s creator decides to delete it out of nowhere, this would trigger an error state when one next accesses it.
Reference: Only a little more complex than Object. They track references to themselves, only deleting loaded memory when no further references to themselves exist. These are useful in the majority of cases where one needs data in a custom class.
- Example: See the File object. It functions just like a regular Object except that one need not delete it themselves.
- Advantages: same as the Object.
Resource: Only slightly more complex than Reference. They have the innate ability to serialize/deserialize (i.e. save and load) their object properties to/from Godot resource files.
- Example: Scripts, PackedScene (for scene files), and other types like each of the AudioEffect classes. Each of these can be save and loaded, therefore they extend from Resource.
- Advantages: Much has already been said on Resource’s advantages over traditional data storage methods. In the context of using Resources over Nodes though, their main advantage is in Inspector-compatibility. While nearly as lightweight as Object/Reference, they can still display and export properties in the Inspector. This allows them to fulfill a purpose much like sub-Nodes on the usability front, but also improve performance if one plans to have many such Resources/Nodes in their scenes.
Godot interfaces¶
Often one needs scripts that rely on other objects for features. There are 2 parts to this process:
- Acquiring a reference to the object that presumably has the features.
- Accessing the data or logic from the object.
The rest of this tutorial outlines the various ways of doing all this.
Acquiring object references¶
For all Objects, the most basic way of referencing them is to get a reference to an existing object from another acquired instance.
var obj = node.object # Property access.
var obj = node.get_object() # Method access.
Object obj = node.Object; // Property access.
Object obj = node.GetObject(); // Method access.
The same principle applies for Reference objects. While users often access Node and Resource this way, alternative measures are available.
Instead of property or method access, one can get Resources by load access.
var preres = preload(path) # Load resource during scene load
var res = load(path) # Load resource when program reaches statement
# Note that users load scenes and scripts, by convention, with PascalCase
# names (like typenames), often into constants.
const MyScene : = preload("my_scene.tscn") as PackedScene # Static load
const MyScript : = preload("my_script.gd") as Script
# This type's value varies, i.e. it is a variable, so it uses snake_case.
export(Script) var script_type: Script
# If need an "export const var" (which doesn't exist), use a conditional
# setter for a tool script that checks if it's executing in the editor.
tool # Must place at top of file.
# Must configure from the editor, defaults to null.
export(Script) var const_script setget set_const_script
func set_const_script(value):
if Engine.is_editor_hint():
const_script = value
# Warn users if the value hasn't been set.
func _get_configuration_warning():
if not const_script:
return "Must initialize property 'const_script'."
return ""
// Tool script added for the sake of the "const [Export]" example.
[Tool]
public MyType : extends Object
{
// Property initializations load during Script instancing, i.e. .new().
// No "preload" loads during scene load exists in C#.
// Initialize with a value. Editable at runtime.
public Script MyScript = GD.Load<Script>("MyScript.cs");
// Initialize with same value. Value cannot be changed.
public readonly Script MyConstScript = GD.Load<Script>("MyScript.cs");
// Like 'readonly' due to inaccessible setter.
// But, value can be set during constructor, i.e. MyType().
public Script Library { get; } = GD.Load<Script>("res://addons/plugin/library.gd");
// If need a "const [Export]" (which doesn't exist), use a
// conditional setter for a tool script that checks if it's executing
// in the editor.
private PackedScene _enemyScn;
[Export]
public PackedScene EnemyScn
{
get { return _enemyScn; }
set
{
if (Engine.IsEditorHint())
{
_enemyScn = value;
}
}
};
// Warn users if the value hasn't been set.
public String _GetConfigurationWarning()
{
if (EnemyScn == null)
return "Must initialize property 'EnemyScn'.";
return "";
}
}
Note the following:
- There are many ways in which a language can load such resources.
- When designing how objects will access data, don’t forget that one can pass resources around as references as well.
- Keep in mind that loading a resource fetches the cached resource
instance maintained by the engine. To get a new object, one must
duplicate an existing reference or
instantiate one from scratch with
new().
Nodes likewise have an alternative access point: the SceneTree.
extends Node
# Slow.
func dynamic_lookup_with_dynamic_nodepath():
print(get_node("Child"))
# Faster. GDScript only.
func dynamic_lookup_with_cached_nodepath():
print($Child)
# Fastest. Doesn't break if node moves later.
# Note that `onready` keyword is GDScript only.
# Other languages must do...
# var child
# func _ready():
# child = get_node("Child")
onready var child = $Child
func lookup_and_cache_for_future_access():
print(child)
# Delegate reference assignment to an external source
# Con: need to perform a validation check
# Pro: node makes no requirements of its external structure.
# 'prop' can come from anywhere.
var prop
func call_me_after_prop_is_initialized_by_parent():
# Validate prop in one of three ways.
# Fail with no notification.
if not prop:
return
# Fail with an error message.
if not prop:
printerr("'prop' wasn't initialized")
return
# Fail and terminate.
# Compiled scripts in final binary do not include assert statements
assert prop.
# Use an autoload.
# Dangerous for typical nodes, but useful for true singleton nodes
# that manage their own data and don't interfere with other objects.
func reference_a_global_autoloaded_variable():
print(globals)
print(globals.prop)
print(globals.my_getter())
public class MyNode
{
// Slow, dynamic lookup with dynamic NodePath.
public void Method1()
{
GD.Print(GetNode(NodePath("Child")));
}
// Fastest. Lookup node and cache for future access.
// Doesn't break if node moves later.
public Node Child;
public void _Ready()
{
Child = GetNode(NodePath("Child"));
}
public void Method2()
{
GD.Print(Child);
}
// Delegate reference assignment to an external source
// Con: need to perform a validation check
// Pro: node makes no requirements of its external structure.
// 'prop' can come from anywhere.
public object Prop;
public void CallMeAfterPropIsInitializedByParent()
{
// Validate prop in one of three ways.
// Fail with no notification.
if (prop == null)
{
return;
}
// Fail with an error message.
if (prop == null)
{
GD.PrintErr("'Prop' wasn't initialized");
return;
}
// Fail and terminate.
Debug.Assert(Prop, "'Prop' wasn't initialized");
}
// Use an autoload.
// Dangerous for typical nodes, but useful for true singleton nodes
// that manage their own data and don't interfere with other objects.
public void ReferenceAGlobalAutoloadedVariable()
{
Node globals = GetNode(NodePath("/root/Globals"));
GD.Print(globals);
GD.Print(globals.prop);
GD.Print(globals.my_getter());
}
};
Accessing data or logic from an object¶
Godot’s scripting API is duck-typed. This means that if a script executes an operation, Godot doesn’t validate that it supports the operation by type. It instead checks that the object implements the individual method.
For example, the CanvasItem class has a visible
property. All properties exposed to the scripting API are in fact a setter and
getter pair bound to a name. If one tried to access
CanvasItem.visible, then Godot would do the
following checks, in order:
- If the object has a script attached, it will attempt to set the property through the script. This leaves open the opportunity for scripts to override a property defined on a base object by overriding the setter method for the property.
- If the script does not have the property, it performs a HashMap lookup in the ClassDB for the “visible” property against the CanvasItem class and all of its inherited types. If found, it will call the bound setter or getter. For more information about HashMaps, see the data preferences docs.
- If not found, it does an explicit check to see if the user wants to access the “script” or “meta” properties.
- If not, it checks for a
_set/_getimplementation (depending on type of access) in the CanvasItem and its inherited types. These methods can execute logic that gives the impression that the Object has a property. This is also the case with the_get_property_listmethod.- Note that this happens even for non-legal symbol names such as in the case of TileSet’s “1/tile_name” property. This refers to the name of the tile with ID 1, i.e. TileSet.tile_get_name(1).
As a result, this duck-typed system can locate a property either in the script, the object’s class, or any class that object inherits, but only for things which extend Object.
Godot provides a variety of options for performing runtime checks on these accesses:
A duck-typed property access. These will property check (as described above). If the operation isn’t supported by the object, execution will halt.
# All Objects have duck-typed get, set, and call wrapper methods. get_parent().set("visible", false) # Using a symbol accessor, rather than a string in the method call, # will implicitly call the `set` method which, in turn, calls the # setter method bound to the property through the property lookup # sequence. get_parent().visible = false # Note that if one defines a _set and _get that describe a property's # existence, but the property isn't recognized in any _get_property_list # method, then the set() and get() methods will work, but the symbol # access will claim it can't find the property.
// All Objects have duck-typed Get, Set, and Call wrapper methods. GetParent().Set("visible", false); // C# is a static language, so it has no dynamic symbol access, e.g. // `GetParent().Visible = false` won't work.
A method check. In the case of CanvasItem.visible, one can access the methods,
set_visibleandis_visiblelike any other method.var child = get_child(0) # Dynamic lookup. child.call("set_visible", false) # Symbol-based dynamic lookup. # GDScript aliases this into a 'call' method behind the scenes. child.set_visible(false) # Dynamic lookup, checks for method existence first. if child.has("set_visible"): child.set_visible(false) # Cast check, followed by dynamic lookup # Useful when you make multiple "safe" calls knowing that the class # implements them all. No need for repeated checks. # Tricky if one executes a cast check for a user-defined type as it # forces more dependencies. if child is CanvasItem: child.set_visible(false) child.show_on_top = true # If one does not wish to fail these checks without notifying users, one # can use an assert instead. These will trigger runtime errors # immediately if not true. assert child.has("set_visible") assert child.is_in_group("offer") assert child is CanvasItem # Can also use object labels to imply an interface, i.e. assume it implements certain methods. # There are two types, both of which only exist for Nodes: Names and Groups # Assuming... # A "Quest" object exists and 1) that it can "complete" or "fail" and # that it will have text available before and after each state... # 1. Use a name. var quest = $Quest print(quest.text) quest.complete() # or quest.fail() print(quest.text) # implied new text content # 2. Use a group. for a_child in get_children(): if a_child.is_in_group("quest"): print(quest.text) quest.complete() # or quest.fail() print(quest.text) # implied new text content # Note that these interfaces are project-specific conventions the team # defines (which means documentation! But maybe worth it?). # Any script that conforms to the documented "interface" of the name/group can fill in for it.
Node child = GetChild(0); // Dynamic lookup. child.Call("SetVisible", false); // Dynamic lookup, checks for method existence first. if (child.HasMethod("SetVisible")) { child.Call("SetVisible", false); } // Use a group as if it were an "interface", i.e. assume it implements certain methods // requires good documentation for the project to keep it reliable (unless you make // editor tools to enforce it at editor time. // Note, this is generally not as good as using an actual interface in C#, // but you can't set C# interfaces from the editor since they are // language-level features. if (child.IsInGroup("Offer")) { child.Call("Accept"); child.Call("Reject"); } // Cast check, followed by static lookup. CanvasItem ci = GetParent() as CanvasItem; if (ci != null) { ci.SetVisible(false); // useful when you need to make multiple safe calls to the class ci.ShowOnTop = true; } // If one does not wish to fail these checks without notifying users, one // can use an assert instead. These will trigger runtime errors // immediately if not true. Debug.Assert(child.HasMethod("set_visible")); Debug.Assert(child.IsInGroup("offer")); Debug.Assert(CanvasItem.InstanceHas(child)); // Can also use object labels to imply an interface, i.e. assume it implements certain methods. // There are two types, both of which only exist for Nodes: Names and Groups // Assuming... // A "Quest" object exists and 1) that it can "Complete" or "Fail" and // that it will have Text available before and after each state... // 1. Use a name. Node quest = GetNode("Quest"); GD.Print(quest.Get("Text")); quest.Call("Complete"); // or "Fail". GD.Print(quest.Get("Text")); // Implied new text content. // 2. Use a group. foreach (Node AChild in GetChildren()) { if (AChild.IsInGroup("quest")) { GD.Print(quest.Get("Text")); quest.Call("Complete"); // or "Fail". GD.Print(quest.Get("Text")); // Implied new text content. } } // Note that these interfaces are project-specific conventions the team // defines (which means documentation! But maybe worth it?).. // Any script that conforms to the documented "interface" of the // name/group can fill in for it. Also note that in C#, these methods // will be slower than static accesses with traditional interfaces.
Outsource the access to a FuncRef. These may be useful in cases where one needs the max level of freedom from dependencies. In this case, one relies on an external context to setup the method.
# child.gd
extends Node
var fn = null
func my_method():
if fn:
fn.call_func()
# parent.gd
extends Node
onready var child = $Child
func _ready():
child.fn = funcref(self, "print_me")
child.my_method()
func print_me():
print(name)
// Child.cs
public class Child extends Node
{
public FuncRef FN = null;
public void MyMethod()
{
Debug.Assert(FN != null);
FN.CallFunc();
}
}
// Parent.cs
public class Parent extends Node
{
public Node Child;
public void _Ready()
{
Child = GetNode("Child");
Child.Set("FN", GD.FuncRef(this, "PrintMe"));
Child.MyMethod();
}
public void PrintMe() {
{
GD.Print(GetClass());
}
}
These strategies contribute to Godot’s flexible design. Between them, users have a breadth of tools to meet their specific needs.
Godot notifications¶
Every Object in Godot implements a
_notification method. Its purpose is to
allow the Object to respond to a variety of engine-level callbacks that may
relate to it. For example, if the engine tells a
CanvasItem to “draw”, it will call
_notification(NOTIFICATION_DRAW).
Some of these notifications, like draw, are useful to override in scripts. So much so that Godot exposes many of them with dedicated functions:
_ready(): NOTIFICATION_READY_enter_tree(): NOTIFICATION_ENTER_TREE_exit_tree(): NOTIFICATION_EXIT_TREE_process(delta): NOTIFICATION_PROCESS_physics_process(delta): NOTIFICATION_PHYSICS_PROCESS_input(): NOTIFICATION_INPUT_unhandled_input(): NOTIFICATION_UNHANDLED_INPUT_draw(): NOTIFICATION_DRAW
What users might not realize is that notifications exist for types other than Node alone:
- Object::NOTIFICATION_POSTINITIALIZE: a callback that triggers during object initialization. Not accessible to scripts.
- Object::NOTIFICATION_PREDELETE: a callback that triggers before the engine deletes an Object, i.e. a ‘destructor’.
- MainLoop::NOTIFICATION_WM_MOUSE_ENTER: a callback that triggers when the mouse enters the window in the operating system that displays the game content.
And many of the callbacks that do exist in Nodes don’t have any dedicated methods, but are still quite useful.
- Node::NOTIFICATION_PARENTED: a callback that triggers anytime one adds a child node to another node.
- Node::NOTIFICATION_UNPARENTED: a callback that triggers anytime one removes a child node from another node.
- Popup::NOTIFICATION_POST_POPUP:
a callback that triggers after a Popup node completes any
popup*method. Note the difference from itsabout_to_showsignal which triggers before its appearance.
One can access all these custom notifications from the universal
_notification method.
Note
Methods in the documentation labeled as “virtual” are also intended to be overridden by scripts.
A classic example is the
_init method in Object. While it has no
NOTIFICATION_* equivalent, the engine still calls the method. Most languages
(except C#) rely on it as a constructor.
So, in which situation should one use each of these notifications or virtual functions?
_process vs. _physics_process vs. *_input¶
Use _process when one needs a framerate-dependent deltatime between
frames. If code that updates object data needs to update as often as
possible, this is the right place. Recurring logic checks and data caching
often execute here, but it comes down to the frequency at which one needs
the evaluations to update. If they don’t need to execute every frame, then
implementing a Timer-yield-timeout loop is another option.
# Infinitely loop, but only execute whenever the Timer fires.
# Allows for recurring operations that don't trigger script logic
# every frame (or even every fixed frame).
while true:
my_method()
$Timer.start()
yield($Timer, "timeout")
Use _physics_process when one needs a framerate-independent deltatime
between frames. If code needs consistent updates over time, regardless
of how fast or slow time advances, this is the right place.
Recurring kinematic and object transform operations should execute here.
While it is possible, to achieve the best performance, one should avoid
making input checks during these callbacks. _process and
_physics_process will trigger at every opportunity (they do not “rest” by
default). In contrast, *_input callbacks will trigger only on frames in
which the engine has actually detected the input.
One can check for input actions within the input callbacks just the same. If one wants to use delta time, one can fetch it from the related deltatime methods as needed.
# Called every frame, even when the engine detects no input.
func _process(delta):
if Input.is_action_just_pressed("ui_select"):
print(delta)
# Called during every input event.
func _unhandled_input(event):
match event.get_class():
"InputEventKey":
if Input.is_action_just_pressed("ui_accept"):
print(get_process_delta_time())
public class MyNode : Node
{
// Called every frame, even when the engine detects no input.
public void _Process(float delta)
{
if (Input.IsActionJustPressed("ui_select"))
GD.Print(delta);
}
// Called during every input event. Equally true for _input().
public void _UnhandledInput(InputEvent event)
{
switch (event)
{
case InputEventKey keyEvent:
if (Input.IsActionJustPressed("ui_accept"))
GD.Print(GetProcessDeltaTime());
break;
default:
break;
}
}
}
_init vs. initialization vs. export¶
If the script initializes its own node subtree, without a scene,
that code should execute here. Other property or SceneTree-independent
initializations should also run here. This triggers before _ready or
_enter_tree, but after a script creates and initializes its properties.
Scripts have three types of property assignments that can occur during instantiation:
# "one" is an "initialized value". These DO NOT trigger the setter.
# If someone set the value as "two" from the Inspector, this would be an
# "exported value". These DO trigger the setter.
export(String) var test = "one" setget set_test
func _init():
# "three" is an "init assignment value".
# These DO NOT trigger the setter, but...
test = "three"
# These DO trigger the setter. Note the `self` prefix.
self.test = "three"
func set_test(value):
test = value
print("Setting: ", test)
public class MyNode : Node
{
private string _test = "one";
// Changing the value from the inspector does trigger the setter in C#.
[Export]
public string Test
{
get { return _test; }
set
{
_test = value;
GD.Print("Setting: " + _test);
}
}
public MyNode()
{
// Triggers the setter as well
Test = "three";
}
}
When instantiating a scene, property values will set up according to the following sequence:
- Initial value assignment: instantiation will assign either the initialization value or the init assignment value. Init assignments take priority over initialization values.
- Exported value assignment: If instancing from a scene rather than a script, Godot will assign the exported value to replace the initial value defined in the script.
As a result, instantiating a script versus a scene will affect both the initialization and the number of times the engine calls the setter.
_ready vs. _enter_tree vs. NOTIFICATION_PARENTED¶
When instantiating a scene connected to the first executed scene, Godot will
instantiate nodes down the tree (making _init calls) and build the tree
going downwards from the root. This causes _enter_tree calls to cascade
down the tree. Once the tree is complete, leaf nodes call _ready. A node
will call this method once all child nodes have finished calling theirs. This
then causes a reverse cascade going up back to the tree’s root.
When instantiating a script or a standalone scene, nodes are not
added to the SceneTree upon creation, so no _enter_tree callbacks
trigger. Instead, only the _init and later _ready calls occur.
If one needs to trigger behavior that occurs as nodes parent to another, regardless of whether it occurs as part of the main/active scene or not, one can use the PARENTED notification. For example, here is a snippet that connects a node’s method to a custom signal on the parent node without failing. Useful on data-centric nodes that one might create at runtime.
extends Node
var parent_cache
func connection_check():
return parent.has_user_signal("interacted_with")
func _notification(what):
match what:
NOTIFICATION_PARENTED:
parent_cache = get_parent()
if connection_check():
parent_cache.connect("interacted_with", self, "_on_parent_interacted_with")
NOTIFICATION_UNPARENTED:
if connection_check():
parent_cache.disconnect("interacted_with", self, "_on_parent_interacted_with")
func _on_parent_interacted_with():
print("I'm reacting to my parent's interaction!")
public class MyNode : Node
{
public Node ParentCache = null;
public void ConnectionCheck()
{
return ParentCache.HasUserSignal("InteractedWith");
}
public void _Notification(int what)
{
switch (what)
{
case NOTIFICATION_PARENTED:
ParentCache = GetParent();
if (ConnectionCheck())
ParentCache.Connect("InteractedWith", this, "OnParentInteractedWith");
break;
case NOTIFICATION_UNPARENTED:
if (ConnectionCheck())
ParentCache.Disconnect("InteractedWith", this, "OnParentInteractedWith");
break;
}
}
public void OnParentInteractedWith()
{
GD.Print("I'm reacting to my parent's interaction!");
}
}
Data preferences¶
Ever wondered whether one should approach problem X with data structure Y or Z? This article covers a variety of topics related to these dilemmas.
Note
This article makes references to “[something]-time” operations. This terminology comes from algorithm analysis’ Big O Notation.
Long-story short, it describes the worst-case scenario of runtime length. In laymen’s terms:
“As the size of a problem domain increases, the runtime length of the algorithm…”
- Constant-time,
O(1): “…does not increase.” - Logarithmic-time,
O(log n): “…increases at a slow rate.” - Linear-time,
O(n): “…increases at the same rate.” - Etc.
Imagine if one had to process 3 million data points within a single frame. It would be impossible to craft the feature with a linear-time algorithm since the sheer size of the data would increase the runtime far beyond the time allotted. In comparison, using a constant-time algorithm could handle the operation without issue.
By and large, developers want to avoid engaging in linear-time operations as much as possible. But, if one keeps the scale of a linear-time operation small, and if one does not need to perform the operation often, then it may be acceptable. Balancing these requirements and choosing the right algorithm / data structure for the job is part of what makes programmers’ skills valuable.
Array vs. Dictionary vs. Object¶
Godot stores all variables in the scripting API in the Variant class. Variants can store Variant-compatible data structures such as Array and Dictionary as well as Object s.
Godot implements Array as a Vector<Variant>. The engine stores the Array
contents in a contiguous section of memory, i.e. they are in a row adjacent
to each other.
Note
For those unfamiliar with C++, a Vector is the name of the
array object in traditional C++ libraries. It is a “templated”
type, meaning that its records can only contain a particular type (denoted
by angled brackets). So, for example, a
PoolStringArray would be something like
a Vector<String>.
Contiguous memory stores imply the following operation performance:
Iterate: Fastest. Great for loops.
- Op: All it does is increment a counter to get to the next record.
Insert, Erase, Move: Position-dependent. Generally slow.
Op: Adding/removing/moving content involves moving the adjacent records over (to make room / fill space).
Fast add/remove from the end.
Slow add/remove from an arbitrary position.
Slowest add/remove from the front.
If doing many inserts/removals from the front, then…
- invert the array.
- do a loop which executes the Array changes at the end.
- re-invert the array.
This makes only 2 copies of the array (still constant time, but slow) versus copying roughly 1/2 of the array, on average, N times (linear time).
Get, Set: Fastest by position. Ex. can request 0th, 2nd, 10th record, etc. but cannot specify which record you want.
- Op: 1 addition operation from array start position up to desired index.
Find: Slowest. Identifies the index/position of a value.
Op: Must iterate through array and compare values until one finds a match.
- Performance is also dependent on whether one needs an exhaustive search.
If kept ordered, custom search operations can bring it to logarithmic time (relatively fast). Laymen users won’t be comfortable with this though. Done by re-sorting the Array after every edit and writing an ordered-aware search algorithm.
Godot implements Dictionary as an OrderedHashMap<Variant, Variant>. The engine
stores a giant array (initialized to 1000 records) of key-value pairs. When
one attempts to access a value, they provide it a key. It then hashes the
key, i.e. converts it into a number. The “hash” becomes the index into the
array, giving the OHM a quick lookup for the value within the conceptual
“table” of keys mapped to values.
Hashes are to reduce the chance of a key collision. If one occurs, the table must recalculate another index for the value that takes the previous position into account. In all, this results in constant-time access to all records at the expense of memory and some minor operational efficiency.
Hashing every key an arbitrary number of times.
- Hash operations are constant-time, so even if an algorithm must do more than one, as long as the number of hash calculations doesn’t become too dependent on the density of the table, things will stay fast. Which leads to…
Maintaining a huge size for the table.
- The reason it starts with 1000 records, and the reason it forces large gaps of unused memory interspersed in the table is to minimize hash collisions and maintain the speed of the accesses.
As one might be able to tell, Dictionaries specialize in tasks that Arrays aren’t. An overview of their operational details is as follows:
Iterate: Fast.
- Op: Iterate over the map’s internal vector of hashes. Return each key. Afterwards, users then use the key to jump to and return the desired value.
Insert, Erase, Move: Fastest.
Op: Hash the given key. Do 1 addition operation to look up the appropriate value (array start + offset). Move is two of these (one insert, one erase). The map must do some maintenance to preserve its capabilities:
- update ordered List of records.
- determine if table density mandates a need to expand table capacity.
The Dictionary remembers in what order users inserted its keys. This enables it to execute reliable iterations.
Get, Set: Fastest. Same as a lookup by key.
- Op: Same as insert/erase/move.
Find: Slowest. Identifies the key of a value.
- Op: Must iterate through records and compare the value until a match is found.
- Note that Godot does not provide this feature out-of-the-box (because they aren’t meant for this task).
Godot implements Objects as stupid, but dynamic containers of data content. Objects query data sources when posed questions. For example, to answer the question, “do you have a property called, ‘position’?”, it might ask its script or the ClassDB. One can find more information about what objects are and how they work in the Godot scenes and scripts are classes article.
The important detail here is the complexity of the Object’s task. Every time it performs one of these multi-source queries, it runs through several iteration loops and HashMap lookups. What’s more, the queries are linear-time operations dependent on the Object’s inheritance hierarchy size. If the class the Object queries (its current class) doesn’t find anything, the request defers to the next base class, all the way up until the original Object class. While these are each fast operations in isolation, the fact that it must make so many checks is what makes them slower than both of the alternatives for looking up data.
Note
When developers mention how slow the scripting API is, it is this chain of queries they refer to. Compared to compiled C++ code where the application knows exactly where to go to find anything, it is inevitable that scripting API operations will take much longer. They must locate the source of any relevant data before they can attempt to access it.
The reason GDScript is slow is because every operation it performs passes through this system.
C# can process some content at higher speeds via more optimized bytecode. But, if the C# script calls into an engine class’ content or if the script tries to access something external to it, it will go through this pipeline.
NativeScript C++ goes even further and keeps everything internal by default. Calls into external structures will go through the scripting API. In NativeScript C++, registering methods to expose them to the scripting API is a manual task. It is at this point that external, non-C++ classes will use the API to locate them.
So, assuming one extends from Reference to create a data structure, like an Array or Dictionary, why choose an Object over the other two options?
- Control: With objects comes the ability to create more sophisticated structures. One can layer abstractions over the data to ensure the external API doesn’t change in response to internal data structure changes. What’s more, Objects can have signals, allowing for reactive behavior.
- Clarity: Objects are a reliable data source when it comes to the data that scripts and engine classes define for them. Properties may not hold the values one expects, but one doesn’t need to worry about whether the property exists in the first place.
- Convenience: If one already has a similar data structure in mind, then extending from an existing class makes the task of building the data structure much easier. In comparison, Arrays and Dictionaries don’t fulfill all use cases one might have.
Objects also give users the opportunity to create even more specialized data structures. With it, one can design their own List, Binary Search Tree, Heap, Splay Tree, Graph, Disjoint Set, and any host of other options.
“Why not use Node for tree structures?” one might ask. Well, the Node class contains things that won’t be relevant to one’s custom data structure. As such, it can be helpful to construct one’s own node type when building tree structures.
extends Object
class_name TreeNode
var _parent : TreeNode = null
var _children : = [] setget
func _notification(p_what):
match p_what:
NOTIFICATION_PREDELETE:
# Destructor.
for a_child in _children:
a_child.free()
// Can decide whether to expose getters/setters for properties later
public class TreeNode : Object
{
private TreeNode _parent = null;
private object[] _children = new object[0];
public override void Notification(int what)
{
if (what == NotificationPredelete)
{
foreach (object child in _children)
{
TreeNode node = child as TreeNode;
if (node != null)
node.Free();
}
}
}
}
From here, one can then create their own structures with specific features, limited only by their imagination.
Enumerations: int vs. string¶
Most languages offer an enumeration type option. GDScript is no different, but unlike most other languages, it allows one to use either integers or strings for the enum values. The question then arises, “which should one use?”
The short answer is, “whichever you are more comfortable with.” This is a feature specific to GDScript and not Godot scripting in general; The languages prioritizes usability over performance.
On a technical level, integer comparisons (constant-time) will happen faster than string comparisons (linear-time). If one wants to keep up other languages’ conventions though, then one should use integers.
The primary issue with using integers comes up when one wants to print
an enum value. As integers, attempting to print MY_ENUM will print
5 or what-have-you, rather than something like "MyEnum". To
print an integer enum, one would have to write a Dictionary that maps the
corresponding string value for each enum.
If the primary purpose of using an enum is for printing values and one wishes to group them together as related concepts, then it makes sense to use them as strings. That way, a separate data structure to execute on the printing is unnecessary.
AnimatedTexture vs. AnimatedSprite vs. AnimationPlayer vs. AnimationTree¶
Under what circumstances should one use each of Godot’s animation classes? The answer may not be immediately clear to new Godot users.
AnimatedTexture is a texture that the engine draws as an animated loop rather than a static image. Users can manipulate…
- the rate at which it moves across each section of the texture (fps).
- the number of regions contained within the texture (frames).
Godot’s VisualServer then draws the regions in sequence at the prescribed rate. The good news is that this involves no extra logic on the part of the engine. The bad news is that users have very little control.
Also note that AnimatedTexture is a Resource unlike the other Node objects discussed here. One might create a Sprite node that uses AnimatedTexture as its texture. Or (something the others can’t do) one could add AnimatedTextures as tiles in a TileSet and integrate it with a TileMap for many auto-animating backgrounds that all render in a single batched draw call.
The AnimatedSprite node, in combination with the SpriteFrames resource, allows one to create a variety of animation sequences through spritesheets, flip between animations, and control their speed, regional offset, and orientation. This makes them well-suited to controlling 2D frame-based animations.
If one needs trigger other effects in relation to animation changes (for example, create particle effects, call functions, or manipulate other peripheral elements besides the frame-based animation), then will need to use an AnimationPlayer node in conjunction with the AnimatedSprite.
AnimationPlayers are also the tool one will need to use if they wish to design more complex 2D animation systems, such as…
- Cut-Out animations: editing sprites’ transforms at runtime.
- 2D Mesh animations: defining a region for the sprite’s texture and rigging a skeleton to it. Then one animates the bones which stretch and bend the texture in proportion to the bones’ relationships to each other.
- A mix of the above.
While one needs an AnimationPlayer to design each of the individual animation sequences for a game, it can also be useful to combine animations for blending, i.e. enabling smooth transitions between these animations. There may also be a hierarchical structure between animations that one plans out for their object. These are the cases where the AnimationTree shines. One can find an in-depth guide on using the AnimationTree here.
Logic preferences¶
Ever wondered whether one should approach problem X with strategy Y or Z? This article covers a variety of topics related to these dilemmas.
Loading vs. preloading¶
In GDScript, there exists the global preload method. It loads resources as early as possible to front-load the “loading” operations and avoid loading resources while in the middle of performance-sensitive code.
Its counterpart, the load method, loads a
resource only when it reaches the load statement. That is, it will load a
resource in-place which can cause slowdowns then it occurs in the middle of
sensitive processes. The load function is also an alias for
ResourceLoader.load(path) which is
accessible to all scripting languages.
So, when exactly does preloading occur versus loading, and when should one use either? Let’s see an example:
# my_buildings.gd
extends Node
# Note how constant scripts/scenes have a different naming scheme than
# their property variants.
# This value is a constant, so it spawns when the Script object loads.
# The script is preloading the value. The advantage here is that the editor
# can offer autocompletion since it must be a static path.
const BuildingScn = preload("res://building.tscn")
# 1. The script preloads the value, so it will load as a dependency
# of the 'my_buildings.gd' script file. But, because this is a
# property rather than a constant, the object won't copy the preloaded
# PackedScene resource into the property until the script instantiates
# with .new().
#
# 2. The preloaded value is inaccessible from the Script object alone. As
# such, preloading the value here actually does not benefit anyone.
#
# 3. Because the user exports the value, if this script stored on
# a node in a scene file, the scene instantiation code will overwrite the
# preloaded initial value anyway (wasting it). It's usually better to
# provide null, empty, or otherwise invalid default values for exports.
#
# 4. It is when one instantiates this script on its own with .new() that
# one will load "office.tscn" rather than the exported value.
export(PackedScene) var a_building = preload("office.tscn")
# Uh oh! This results in an error!
# One must assign constant values to constants. Because `load` performs a
# runtime lookup by its very nature, one cannot use it to initialize a
# constant.
const OfficeScn = load("res://office.tscn")
# Successfully loads and only when one instantiates the script! Yay!
var office_scn = load("res://office.tscn")
using System;
using Godot;
// C# and other languages have no concept of "preloading".
public class MyBuildings : Node
{
//This is a read-only field, it can only be assigned when it's declared or during a constructor.
public readonly PackedScene Building = ResourceLoader.Load<PackedScene>("res://building.tscn");
public PackedScene ABuilding;
public override void _Ready()
{
// Can assign the value during initialization.
ABuilding = GD.Load<PackedScene>("res://office.tscn");
}
}
Preloading allows the script to handle all the loading the moment one loads the script. Preloading is useful, but there are also times when one doesn’t wish for it. To distinguish these situations, there are a few things one can consider:
- If one cannot determine when the script might load, then preloading a resource, especially a scene or script, could result in further loads one does not expect. This could lead to unintentional, variable-length load times on top of the original script’s load operations.
- If something else could replace the value (like a scene’s exported initialization), then preloading the value has no meaning. This point isn’t a significant factor if one intends to always create the script on its own.
- If one wishes only to ‘import’ another class resource (script or scene),
then using a preloaded constant is often the best course of action. However,
in exceptional cases, one my wish not to do this:
- If the ‘imported’ class is liable to change, then it should be a property
instead, initialized either using an
exportor aload(and perhaps not even initialized until later). - If the script requires a great many dependencies, and one does not wish
to consume so much memory, then one may wish to, load and unload various
dependencies at runtime as circumstances change. If one preloads
resources into constants, then the only way to unload these resources
would be to unload the entire script. If they are instead loaded
properties, then one can set them to
nulland remove all references to the resource entirely (which, as a Reference-extending type, will cause the resources to delete themselves from memory).
- If the ‘imported’ class is liable to change, then it should be a property
instead, initialized either using an
Large levels: static vs. dynamic¶
If one is creating a large level, which circumstances are most appropriate? Should they create the level as one static space? Or should they load the level in pieces and shift the world’s content as needed?
Well, the simple answer is , “when the performance requires it.” The dilemma associated with the two options is one of the age-old programming choices: does one optimize memory over speed, or vice versa?
The naive answer is to use a static level that loads everything at once. But, depending on the project, this could consume a large amount of memory. Wasting users’ RAM leads to programs running slow or outright crashing from everything else the computer tries to do at the same time.
No matter what, one should break larger scenes into smaller ones (to aid in reusability of assets). Developers can then design a node that manages the creation/loading and deletion/unloading of resources and nodes in real-time. Games with large and varied environments or procedurally generated elements often implement these strategies to avoid wasting memory.
On the flip side, coding a dynamic system is more complex, i.e. uses more programmed logic, which results in opportunities for errors and bugs. If one isn’t careful, they can develop a system that bloats the technical debt of the application.
As such, the best options would be…
- To use a static level for smaller games.
- If one has the time/resources on a medium/large game, create a library or plugin that can code the management of nodes and resources. If refined over time, so as to improve usability and stability, then it could evolve into a reliable tool across projects.
- Code the dynamic logic for a medium/large game because one has the coding skills, but not the time or resources to refine the code (game’s gotta get done). Could potentially refactor later to outsource the code into a plugin.
For an example of the various ways one can swap scenes around at runtime, please see the “Change scenes manually” documentation.
2D¶
Canvas layers¶
Viewport and Canvas items¶
Regular 2D nodes, such as Node2D or Control both inherit from CanvasItem, which is the base for all 2D nodes. CanvasItems can be arranged in trees. Each item will inherit its parent’s transform. This means that when the parent is moved, the children will move too.
CanvasItem nodes, and nodes inheriting from them, are direct or indirect children of a Viewport, and will be displayed through it.
A Viewport has the property Viewport.canvas_transform, which allows applying a custom Transform2D transform to the CanvasItem hierarchy it contains. Nodes such as Camera2D work by changing that transform.
Effects like scrolling are best achieved by manipulating the canvas transform property. This approach is more efficient than moving the root canvas item (and hence the whole scene).
Usually though, we don’t want everything in the game or app to be subject to the canvas transform. Examples of this are:
- Parallax Backgrounds: Backgrounds that move slower than the rest of the stage.
- UI: Think of a user interface (UI) or Heads-up display (HUD) superimposed on our view of the game world. We want a life counter, score display and other elements to retain their screen positions even when our view of the game world is changing.
- Transitions: We may want visual effects used for transitions (fades, blends) to remain at a fixed screen location.
How can these problems be solved in a single scene tree?
CanvasLayers¶
The answer is CanvasLayer, which is a node that adds a separate 2D rendering layer for all its children and grand-children. Viewport children will draw by default at layer “0”, while a CanvasLayer will draw at any numeric layer. Layers with a greater number will be drawn above those with a smaller number. CanvasLayers also have their own transform and do not depend on the transform of other layers. This allows the UI to be fixed in screen-space while our view on the game world changes.
An example of this is creating a parallax background. This can be done with a CanvasLayer at layer “-1”. The screen with the points, life counter and pause button can also be created at layer “1”.
Here’s a diagram of how it looks:
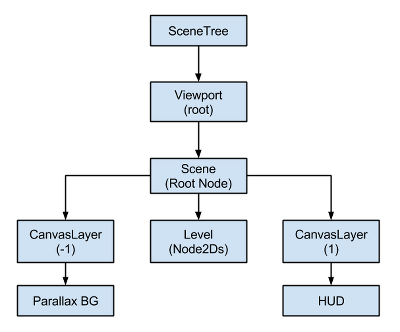
CanvasLayers are independent of tree order, and they only depend on their layer number, so they can be instantiated when needed.
Note
CanvasLayers aren’t necessary to control the drawing order of nodes. The standard way to ensuring that a node is correctly drawn ‘in front’ or ‘behind’ others is to manipulate the order of the nodes in the scene panel. Perhaps counterintuitively, the topmost nodes in the scene panel are drawn on behind lower ones in the viewport. 2d nodes also have a property for controlling their drawing order (see Node2D.z_index).
Viewport and canvas transforms¶
Introduction¶
This is an overview of the 2D transforms going on for nodes from the moment they draw their content locally to the time they are drawn onto the screen. This overview discusses very low level details of the engine.
Canvas transform¶
As mentioned in the previous tutorial, Canvas layers, every CanvasItem node (remember that Node2D and Control based nodes use CanvasItem as their common root) will reside in a Canvas Layer. Every canvas layer has a transform (translation, rotation, scale, etc.) that can be accessed as a Transform2D.
Also covered in the previous tutorial, nodes are drawn by default in Layer 0, in the built-in canvas. To put nodes in a different layer, a CanvasLayer node can be used.
Global canvas transform¶
Viewports also have a Global Canvas transform (also a Transform2D). This is the master transform and affects all individual Canvas Layer transforms. Generally, this transform is not of much use, but is used in the CanvasItem Editor in Godot’s editor.
Stretch transform¶
Finally, viewports have a Stretch Transform, which is used when resizing or stretching the screen. This transform is used internally (as described in Multiple resolutions), but can also be manually set on each viewport.
Input events received in the MainLoop._input_event() callback are multiplied by this transform but lack the ones above. To convert InputEvent coordinates to local CanvasItem coordinates, the CanvasItem.make_input_local() function was added for convenience.
Transform order¶
For a coordinate in CanvasItem local properties to become an actual screen coordinate, the following chain of transforms must be applied:
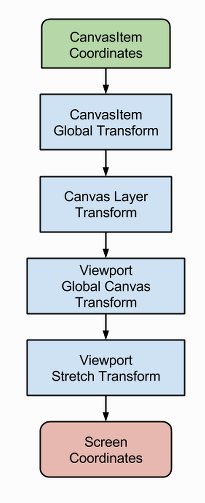
Transform functions¶
Obtaining each transform can be achieved with the following functions:
| Type | Transform |
|---|---|
| CanvasItem | CanvasItem.get_global_transform() |
| CanvasLayer | CanvasItem.get_canvas_transform() |
| CanvasLayer+GlobalCanvas+Stretch | CanvasItem.get_viewport_transform() |
Finally, then, to convert a CanvasItem local coordinates to screen coordinates, just multiply in the following order:
var screen_coord = get_viewport_transform() * (get_global_transform() * local_pos)
var screenCord = (GetViewportTransform() * GetGlobalTransform()).Xform(localPos);
Keep in mind, however, that it is generally not desired to work with
screen coordinates. The recommended approach is to simply work in Canvas
coordinates (CanvasItem.get_global_transform()), to allow automatic
screen resolution resizing to work properly.
Feeding custom input events¶
It is often desired to feed custom input events to the scene tree. With the above knowledge, to correctly do this, it must be done the following way:
var local_pos = Vector2(10, 20) # local to Control/Node2D
var ie = InputEventMouseButton.new()
ie.button_index = BUTTON_LEFT
ie.position = get_viewport_transform() * (get_global_transform() * local_pos)
get_tree().input_event(ie)
var localPos = new Vector2(10,20); // local to Control/Node2D
var ie = new InputEventMouseButton();
ie.ButtonIndex = (int)ButtonList.Left;
ie.Position = (GetViewportTransform() * GetGlobalTransform()).Xform(localPos);
GetTree().InputEvent(ie);
Using tilemaps¶
Introduction¶
A tilemap is a grid of tiles used to create a game’s layout. There are several benefits to using TileMap nodes to design your levels. First, they make it possible to draw the layout by “painting’ the tiles onto a grid, which is much faster than placing individual Sprite nodes one by one. Second, they allow for much larger levels because they are optimized for drawing large numbers of tiles. Finally, you can add collision, occlusion, and navigation shapes to tiles, adding additional functionality to the TileMap.
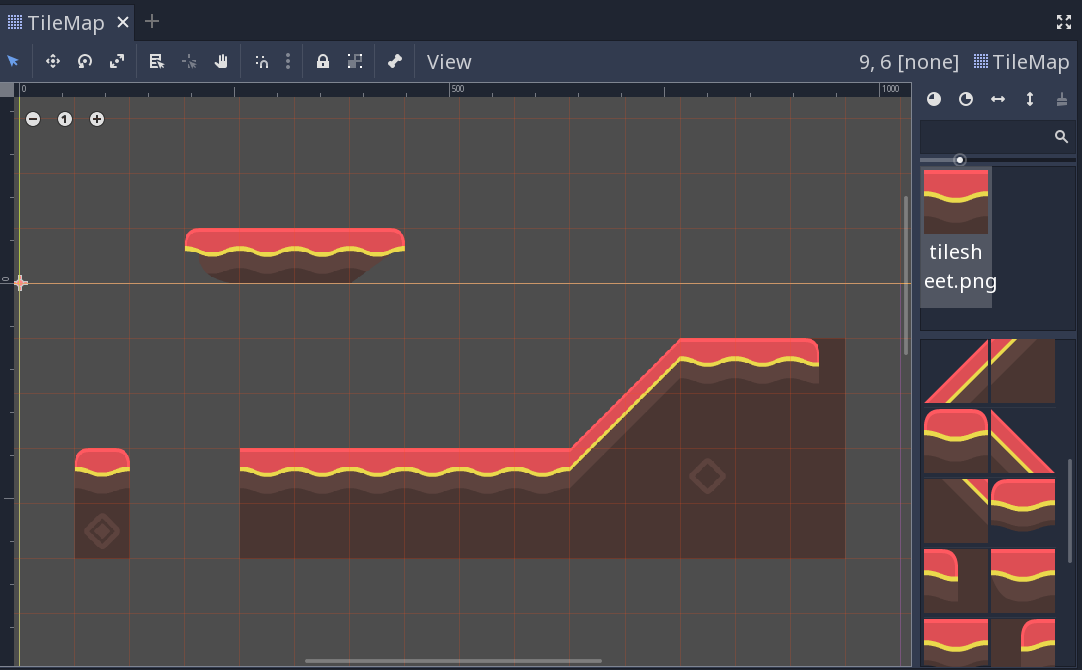
Project setup¶
This demo we’ll use the following tiles taken from Kenney’s “Abstract Platformer” art pack. You can find the complete set here but for this demo we’ll stick to this small set.

Create a new project and place the above image in the project folder.
When using a tileset, it’s important that adjacent tiles match up. Godot’s default
is to import 2D images using an interpolated “filter” mode, which will result in
ugly borders between the tiles. Select the image and click the Import tab. Turn
off Filter and click “Reimport”. See Importing images for details.
TileMap node¶
Add a new TileMap node to the scene. By default, a TileMap uses a square grid of tiles. You can also use a perspective-based “Isometric” mode or define your own custom tile shape.
Under the “Cell” section in the Inspector are many properties you can adjust to customize your tilemap’s behavior:
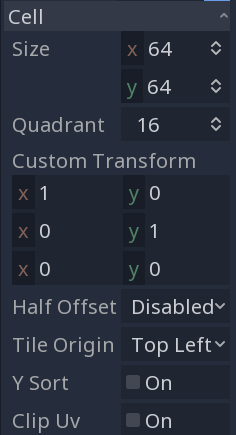
Cell Size- This defines the size of the grid. This should match the pixel size
of your tiles. The default value is
(64, 64).
YSort- This causes tiles to be drawn in order of their
Yposition, so that “lower” tiles are drawn on top of “higher” ones.
Half OffsetandTile Origin- These properties affect the position of the tile relative to the grid position.
Quadrant- Defines the chunk size used for batched drawing. This can negatively affect performance. Don’t change it unless you know what you’re doing.
Custom Transform- Used to alter the tile’s shape. Use this if you have non-square tiles.
All of these options can be left at their defaults for this demo.
Creating a TileSet¶
Once you’ve configured your tilemap, it’s time to add a TileSet. A TileSet is a Resource that contains the data about your tiles - their textures, collision shapes, and other properties. When the game runs, the TileMap combines the individual tiles into a single object.
To add a new TileSet, click on the “Tile Set” property and select “New TileSet”.
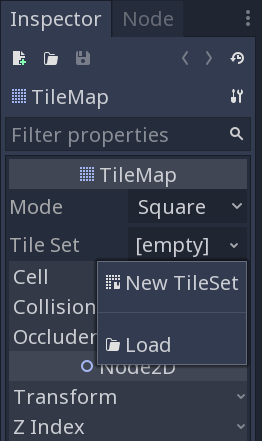
When you do this, the “TileSet” panel will open at the bottom of the editor window:
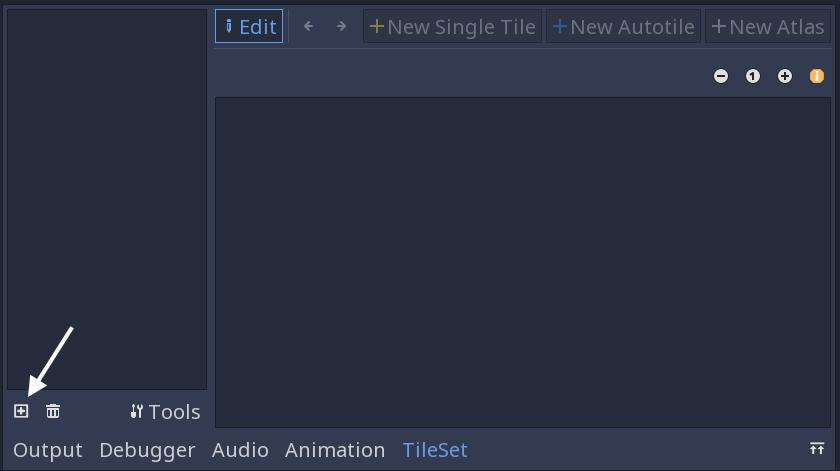
First, you need to add the texture(s) that you’ll use for the tiles. Click the
“Add Texture(s) to TileSet” button and select the tilesheet.png image.
Next, click “New Single Tile” and drag in the image to select the tile you want. Click the “Enable Snap” button to make it easier to select the entire tile. A yellow rectangle appears around the selected tile.

Click on the TileMap in the scene tree, and you’ll see that the newly created tile now appears on the right side. Click in the viewport and you can place tiles. Right-click to remove them.
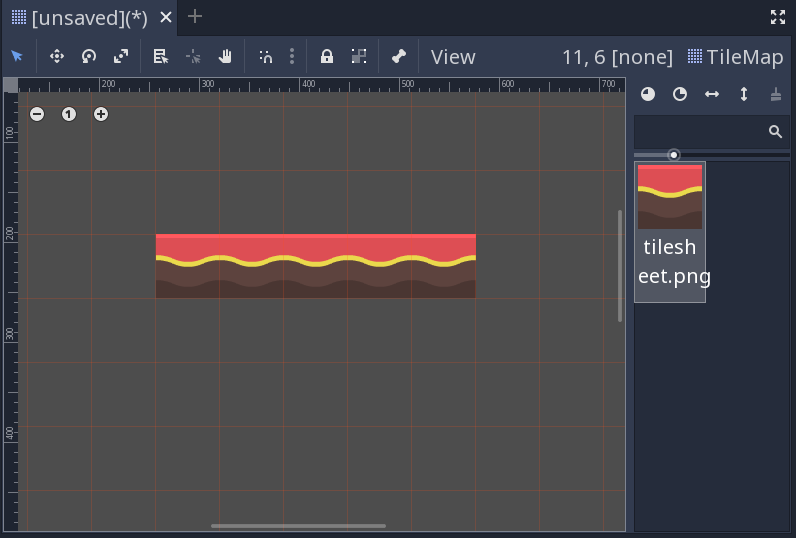
It’s easy to accidentally select and move the tilemap node. To avoid this, use the node’s lock button:

Collision Shapes¶
If you’re making a map that needs collisions - walls, floor, or other obstacles, for example - then you’ll need to add collision shapes to any tiles that you want to be considered “solid”.
Click “TileSet” at the bottom of the editor window to return to the tileset tool. Click the tile you previously defined (outlined in yellow). Select the “Collision” tab and click the “Create a new rectangle” button. Make sure you still have grid snap enabled, then click and drag in the tile. A square collision shape appears in light blue:
You can add occlusion and navigation shapes to the tile in the same way.
Atlas tiles¶
Rather than adding individual tiles one at a time, you can define a group of tiles all at once using an atlas. Click “New Atlas” and drag to select the entire tile sheet.
If you haven’t already, make sure to change the “Step” in the snap settings to (64, 64), or your tiles may be chopped into smaller pieces. You can find this in the Inspector:
Once you’ve defined the atlas you can add collision shapes to the individual tiles as before. You can also click “Icon” to select one of the tiles to represent the atlas.
Back in the TileMap, you can select the atlas tile and you’ll see all of the tiles it contains:
In addition to saving time when defining the tiles, this can help by grouping similar tiles together when you’re working with a large number of tiles.
Tips and tricks¶
- If you’re using a Camera2D to scroll your level, you may notice lines appearing between your tiles. To fix this, open Project Settings and enable “Use Pixel Snap” in the “Rendering/Quality” section.
- You can flip and rotate tiles using the icons at the top right of the editor.
- To draw straight lines, hold Shift while clicking and dragging a tile.
- Tools such as copy, paste, and bucket fill, can be found in the “TileMap” menu in the upper-right.
Particle systems (2D)¶
Intro¶
A simple (but flexible enough for most uses) particle system is provided. Particle systems are used to simulate complex physical effects, such as sparks, fire, magic particles, smoke, mist, etc.
The idea is that a “particle” is emitted at a fixed interval and with a fixed lifetime. During its lifetime, every particle will have the same base behavior. What makes each particle different from the rest and provides a more organic look is the “randomness” associated with each parameter. In essence, creating a particle system means setting base physics parameters and then adding randomness to them.
Particle nodes¶
Godot provides two different nodes for 2D particles, Particles2D and CPUParticles2D. Particles2D is more advanced and uses the GPU to process particle effects, but that limits it to higher end graphics API, and in our case to the GLES3 renderer. For projects using the GLES2 backend, CPUParticles2D is a CPU-driven option with near feature parity with Particles2D, but lesser performance. While Particles2D is configured via a ParticlesMaterial (and optionally with a custom shader), the matching options are provided via node properties in CPUParticles2D (with the exception of the trail settings). You can convert a Particles2D node into a CPUParticles2D node by clicking on the node in the inspector, and selecting “Convert to CPUParticles2D” in the “Particles” menu of the toolbar.
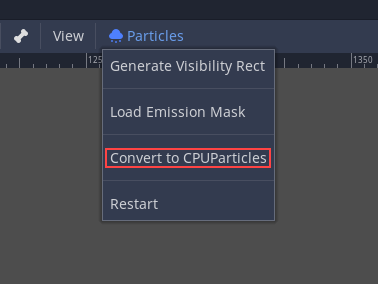
The rest of this tutorial is going to use the Particles2D node. First, add a Particles2D node to your scene. After creating that node you will notice that only a white dot was created, and that there is a warning icon next to your Particles2D node in the inspector. This is because the node needs a ParticlesMaterial to function.
ParticlesMaterial¶
To add a process material to your particles node, go to Process Material in
your inspector panel. Click on the box next to Material, and from the dropdown
menu select New ParticlesMaterial.
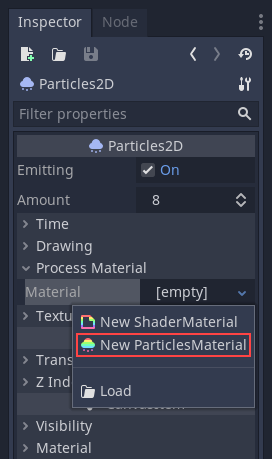
Your Particles2D node should now be emitting white points downward.
Texture¶
A particle system uses a single texture (in the future this might be extended to animated textures via spritesheet). The texture is set via the relevant texture property:
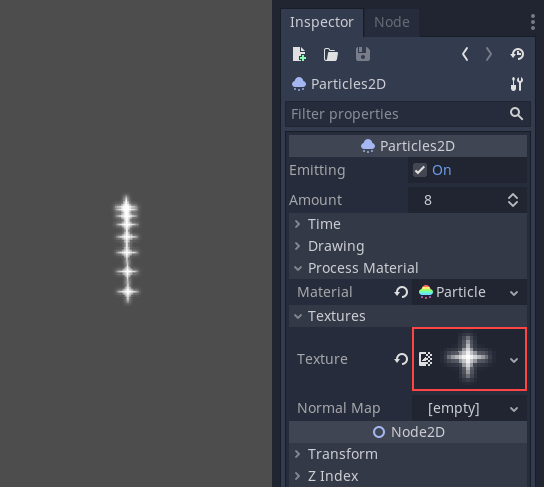
Time parameters¶
Lifetime¶
The time in seconds that every particle will stay alive. When lifetime ends, a new particle is created to replace it.
Lifetime: 0.5
Lifetime: 4.0
One Shot¶
When enabled, a Particles2D node will emit all of its particles once and then never again.
Preprocess¶
Particle systems begin with zero particles emitted, then start emitting. This can be an inconvenience when loading a scene and systems like a torch, mist, etc. begin emitting the moment you enter. Preprocess is used to let the system process a given number of seconds before it is actually drawn the first time.
Speed Scale¶
The speed scale has a default value of 1 and is used to adjust the
speed of a particle system. Lowering the value will make the particles
slower while increasing the value will make the particles much faster.
Explosiveness¶
If lifetime is 1 and there are 10 particles, it means a particle
will be emitted every 0.1 seconds. The explosiveness parameter changes
this, and forces particles to be emitted all together. Ranges are:
- 0: Emit particles at regular intervals (default value).
- 1: Emit all particles simultaneously.
Values in the middle are also allowed. This feature is useful for creating explosions or sudden bursts of particles:
Randomness¶
All physics parameters can be randomized. Random values range from 0 to
1. The formula to randomize a parameter is:
initial_value = param_value + param_value * randomness
Fixed FPS¶
This setting can be used to set the particle system to render at a fixed
FPS. For instance, changing the value to 2 will make the particles render
at 2 frames per second. Note this does not slow down the particle system itself.
Fract Delta¶
This can be used to turn Fract Delta on or off.
Drawing parameters¶
Visibility Rect¶
The visibility rectangle controls the visibility of the particles on screen. If this rectangle is outside of the viewport, the engine will not render the particles on screen.
The rectangle’s W and H properties respectively control its Width and its Height.
The X and Y properties control the position of the upper-left
corner of the rectangle, relative to the particle emitter.
You can have Godot generate a Visibility Rect automatically using the toolbar above the 2d view. To do so, select the Particles2D node and Click Particles > Generate Visibility Rect. Godot will simulate the Particles2D node emitting particles for a few seconds and set the rectangle to fit the surface the particles take.
You can control the emit duration with the Generation Time (sec) option. The maximum value is 25 seconds. If you need more time for your particles to move around, you can temporarily change the preprocess duration on the Particles2D node.
Local Coords¶
By default this option is on, and it means that the space that particles are emitted to is relative to the node. If the node is moved, all particles are moved with it:
If disabled, particles will emit to global space, meaning that if the node is moved, already emitted particles are not affected:
Draw Order¶
This controls the order in which individual particles are drawn. Index
means particles are drawn according to their emission order (default).
Lifetime means they are drawn in order of remaining lifetime.
ParticlesMaterial settings¶
Spread¶
This parameter is the angle in degrees which will be randomly added in
either direction to the base Direction. A spread of 180 will emit
in all directions (+/- 180). For spread to do anything the “Initial Velocity”
parameter must be greater than 0.
Initial Velocity¶
Initial velocity is the speed at which particles will be emitted (in pixels/sec). Speed might later be modified by gravity or other accelerations (as described further below).
Angular Velocity¶
Angular velocity is the initial angular velocity applied to particles.
Spin Velocity¶
Spin velocity is the speed at which particles turn around their center (in degrees/sec).
Linear Acceleration¶
The linear acceleration applied to each particle.
Radial Acceleration¶
If this acceleration is positive, particles are accelerated away from the center. If negative, they are absorbed towards it.
Tangential Acceleration¶
This acceleration will use the tangent vector to the center. Combining with radial acceleration can do nice effects.

Damping¶
Damping applies friction to the particles, forcing them to stop. It is especially useful for sparks or explosions, which usually begin with a high linear velocity and then stop as they fade.
Angle¶
Determines the initial angle of the particle (in degrees). This parameter is mostly useful randomized.
Color¶
Used to change the color of the particles being emitted.
Hue variation¶
The Variation value sets the initial hue variation applied to each
particle. The Variation Random value controls the hue variation
randomness ratio.
Emission Shapes¶
ParticlesMaterials allow you to set an Emission Mask, which dictates the area and direction in which particles are emitted. These can be generated from textures in your project.
Ensure that a ParticlesMaterial is set, and the Particles2D node is selected. A “Particles” menu should appear in the Toolbar:

Open it and select “Load Emission Mask”:
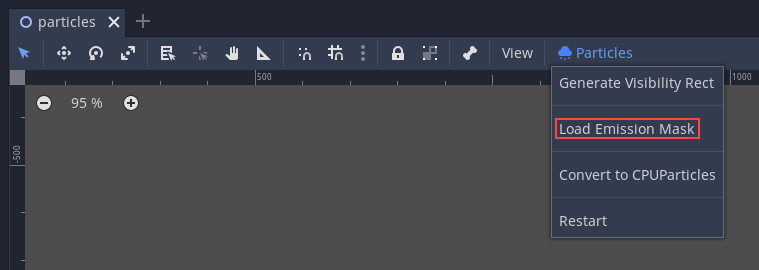
Then select which texture you want to use as your mask:
A dialog box with several settings will appear.
Emission Mask¶
Three types of emission masks can be generated from a texture:
- Solid Pixels: Particles will spawn from any area of the texture, excluding transparent areas.
- Border Pixels: Particles will spawn from the outer edges of the texture.

- Directed Border Pixels: Similar to Border Pixels, but adds extra
information to the mask to give particles the ability to emit away
from the borders. Note that an
Initial Velocitywill need to be set in order to utilize this.
Emission Colors¶
Capture from Pixel will cause the particles to inherit the color of the mask at their spawn points.
Once you click “OK”, the mask will be generated and set to the ParticlesMaterial, under the Emission Shape section:
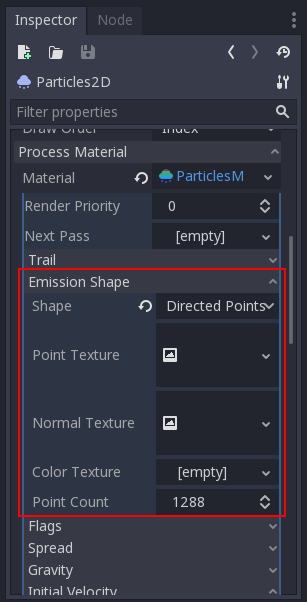
All of the values within this section have been automatically generated by the “Load Emission Mask” menu, so they should generally be left alone.
Note
An image should not be added to Point Texture or Color Texture directly.
The “Load Emission Mask” menu should always be used instead.
2D movement overview¶
Introduction¶
Every beginner has been there: “How do I move my character?” Depending on the style of game you’re making, you may have special requirements, but in general the movement in most 2D games is based on a small number of designs.
We’ll use KinematicBody2D for these examples, but the principles will apply to other node types (Area2D, RigidBody2D) as well.
Setup¶
Each example below uses the same scene setup. Start with a KinematicBody2D with two
children: Sprite and CollisionShape2D. You can use the Godot icon (“icon.png”)
for the Sprite’s texture or use any other 2D image you have.
Open Project -> Project Settings and select the “Input Map” tab. Add the following
input actions (see InputEvent for details):
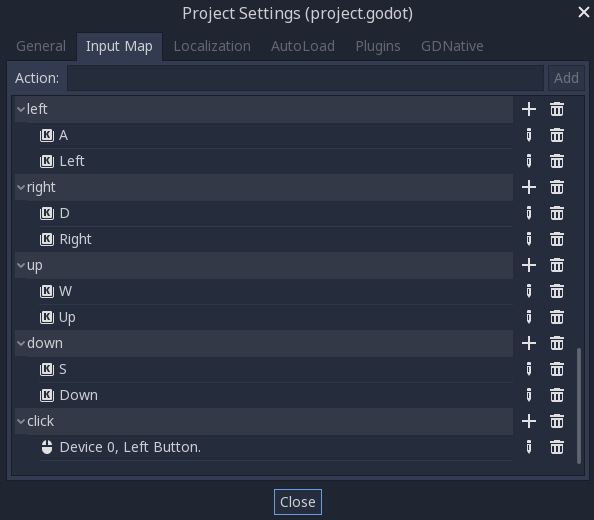
8-way movement¶
In this scenario, you want the user to press the four directional keys (up/left/down/right or W/A/S/D) and move in the selected direction. The name “8-way movement” comes from the fact that the player can move diagonally by pressing two keys at the same time.
Add a script to the kinematic body and add the following code:
extends KinematicBody2D
export (int) var speed = 200
var velocity = Vector2()
func get_input():
velocity = Vector2()
if Input.is_action_pressed('right'):
velocity.x += 1
if Input.is_action_pressed('left'):
velocity.x -= 1
if Input.is_action_pressed('down'):
velocity.y += 1
if Input.is_action_pressed('up'):
velocity.y -= 1
velocity = velocity.normalized() * speed
func _physics_process(delta):
get_input()
velocity = move_and_slide(velocity)
using Godot;
using System;
public class Movement : KinematicBody2D
{
[Export] public int speed = 200;
public Vector2 velocity = new Vector2();
public void GetInput()
{
velocity = new Vector2();
if (Input.IsActionPressed("right"))
velocity.x += 1;
if (Input.IsActionPressed("left"))
velocity.x -= 1;
if (Input.IsActionPressed("down"))
velocity.y += 1;
if (Input.IsActionPressed("up"))
velocity.y -= 1;
velocity = velocity.Normalized() * speed;
}
public override void _PhysicsProcess(float delta)
{
GetInput();
velocity = MoveAndSlide(velocity);
}
}
In the get_input() function we check for the four key events and sum them
up to get the velocity vector. This has the benefit of making two opposite keys
cancel each other out, but will also result in diagonal movement being faster
due to the two directions being added together.
We can prevent that if we normalize the velocity, which means we set
its length to 1, and multiply by the desired speed.
Tip
If you’ve never used vector math before, or need a refresher, you can see an explanation of vector usage in Godot at Vector math.
Rotation + movement¶
This type of movement is sometimes called “Asteroids-style” because it resembles how that classic arcade game worked. Pressing left/right rotates the character, while up/down moves it forward or backward in whatever direction it’s facing.

extends KinematicBody2D
export (int) var speed = 200
export (float) var rotation_speed = 1.5
var velocity = Vector2()
var rotation_dir = 0
func get_input():
rotation_dir = 0
velocity = Vector2()
if Input.is_action_pressed('right'):
rotation_dir += 1
if Input.is_action_pressed('left'):
rotation_dir -= 1
if Input.is_action_pressed('down'):
velocity = Vector2(-speed, 0).rotated(rotation)
if Input.is_action_pressed('up'):
velocity = Vector2(speed, 0).rotated(rotation)
func _physics_process(delta):
get_input()
rotation += rotation_dir * rotation_speed * delta
velocity = move_and_slide(velocity)
using Godot;
using System;
public class Movement : KinematicBody2D
{
[Export] public int speed = 200;
[Export] public float rotationSpeed = 1.5f;
public Vector2 velocity = new Vector2();
public int rotationDir = 0;
public void GetInput()
{
rotationDir = 0;
velocity = new Vector2();
if (Input.IsActionPressed("right"))
rotationDir += 1;
if (Input.IsActionPressed("left"))
rotationDir -= 1;
if (Input.IsActionPressed("down"))
velocity = new Vector2(-speed, 0).Rotated(Rotation);
if (Input.IsActionPressed("up"))
velocity = new Vector2(speed, 0).Rotated(Rotation);
velocity = velocity.Normalized() * speed;
}
public override void _PhysicsProcess(float delta)
{
GetInput();
Rotation += rotationDir * rotationSpeed * delta;
velocity = MoveAndSlide(velocity);
}
}
Here we’ve added two new variables to track our rotation direction and speed.
Again, pressing both keys at once will cancel out and result in no rotation.
The rotation is applied directly to the body’s rotation property.
To set the velocity, we use the Vector2.rotated() method, so that it points
in the same direction as the body. rotated() is a useful vector function
that you can use in many circumstances where you would otherwise need to apply
trigonometric functions.
Rotation + movement (mouse)¶
This style of movement is a variation of the previous one. This time, the direction is set by the mouse position instead of the keyboard. The character will always “look at” the mouse pointer. The forward/back inputs remain the same, however.
extends KinematicBody2D
export (int) var speed = 200
var velocity = Vector2()
func get_input():
look_at(get_global_mouse_position())
velocity = Vector2()
if Input.is_action_pressed('down'):
velocity = Vector2(-speed, 0).rotated(rotation)
if Input.is_action_pressed('up'):
velocity = Vector2(speed, 0).rotated(rotation)
func _physics_process(delta):
get_input()
velocity = move_and_slide(velocity)
using Godot;
using System;
public class Movement : KinematicBody2D
{
[Export] public int speed = 200;
public Vector2 velocity = new Vector2();
public void GetInput()
{
LookAt(GetGlobalMousePosition());
velocity = new Vector2();
if (Input.IsActionPressed("down"))
velocity = new Vector2(-speed, 0).Rotated(Rotation);
if (Input.IsActionPressed("up"))
velocity = new Vector2(speed, 0).Rotated(Rotation);
velocity = velocity.Normalized() * speed;
}
public override void _PhysicsProcess(float delta)
{
GetInput();
velocity = MoveAndSlide(velocity);
}
}
Here we’re using the Node2D look_at() method to
point the player towards a given position. Without this function, you
could get the same effect by setting the angle like this:
rotation = get_global_mouse_position().angle_to_point(position)
var rotation = GetGlobalMousePosition().AngleToPoint(Position);
Click-and-move¶
This last example uses only the mouse to control the character. Clicking on the screen will cause the player to move to the target location.

extends KinematicBody2D
export (int) var speed = 200
var target = Vector2()
var velocity = Vector2()
func _input(event):
if event.is_action_pressed('click'):
target = get_global_mouse_position()
func _physics_process(delta):
velocity = position.direction_to(target) * speed
# look_at(target)
if position.distance_to(target) > 5:
velocity = move_and_slide(velocity)
using Godot;
using System;
public class Movement : KinematicBody2D
{
[Export] public int speed = 200;
public Vector2 target = new Vector2();
public Vector2 velocity = new Vector2();
public override void _Input(InputEvent @event)
{
if (@event.IsActionPressed("click"))
{
target = GetGlobalMousePosition();
}
}
public override void _PhysicsProcess(float delta)
{
velocity = Position.DirectionTo(target) * speed;
// LookAt(target);
if (Position.DistanceTo(target) > 5)
{
velocity = MoveAndSlide(velocity);
}
}
}
Note the distance_to() check we make prior to movement. Without this test,
the body would “jitter” upon reaching the target position, as it moves
slightly past the position and tries to move back, only to move too far and
repeat.
Uncommenting the look_at() line will also turn the body to point in its
direction of motion if you prefer.
Tip
This technique can also be used as the basis of a “following” character.
The target position can be that of any object you want to move to.
Summary¶
You may find these code samples useful as starting points for your own projects. Feel free to use them and experiment with them to see what you can make.
You can download this sample project here:
2D_movement_demo.zip
2D lights and shadows¶
Introduction¶
This tutorial explains how the 2D lighting works in the lights and shadows demo project. It begins with a brief description of the resources used in the final demo and then describes how to make a scene like the demo step by step.
All the resources for this tutorial can be found in the official demo repository on github. I suggest you download it before starting. Alternatively, it can be downloaded from the Project Manager. Launch Godot and in the top bar select “Templates” and search for “2D Lights and Shadows Demo”.
Setup¶
For this demo we use four textures: two for the lights, one for the shadow casters, and one for the background. I’ve included links to them all here if you want to download them separately from the demo.
The first is the background image (background.png) used in the demo. You do not necessarily need a background, but we use one for the demo.
The second is a plain black image (caster.png) to use as our shadow caster object. For a top down game this could be a wall or any other object that casts a shadow.
Next is the light itself (light.png). If you click the link you will notice how large it is. The image you use for a light should cover the area you want your light to cover. This image is 1024x1024 pixels, so you should use it to cover 1024x1024 pixels in your game.
Lastly, we have the spotlight image (spot.png). The demo uses a blob to show where the light is and the larger light image to show the effect of the light upon the rest of the scene.
Nodes¶
- The demo uses four different nodes:
CanvasModulate is used to darken the scene.
Sprites are used to display the textures for the light blobs, the background, and for the shadow casters.
Light2Ds are used to light the scene. The way a light typically works is by adding a selected texture over the rest of the scene to simulate lighting. But it can be used in other ways, for example masking out parts of the scene.
LightOccluder2Ds are used to tell the shader which parts of the scene cast shadows. The shadows appear only on areas covered by the Light2D and their direction is based on the center of the Light.
Lights¶
Lights cover the entire extent of their respective Texture. They use additive blending to add the color of their texture to the scene.

Lights have four Modes: Add, Sub, Mix, and Mask.
Add adds the color of the light texture to the scene. It brightens the area under the light.
Sub subtracts the color of the light from the scene. It darkens the area under the light.
Mix mixes the color of the light with the underlying scene. The resulting brightness is
halfway between the color of the light and the color underneath.
Mask is used to mask out areas that are covered by the light. Masked out areas are hidden or revealed based on
the color of the light.
For the demo the lights have two components, the Light itself (which is the effect of the light), and a Sprite blob which is an image showing the location of the light source. A child Sprite is not necessary to make a Light work.

Shadows¶
Shadows are made by intersecting a Light with a LightOccluder2D.
By default shadows are turned off. To turn them on click on the Light
and under the Shadows section check Enabled.
In the demo we are using a Sprite with a Texture on it to make the “Shadow Casters”, but in reality all you need is a couple of LightOccluder2Ds. By itself the LightOccluder2D looks like a dark spot and in this demo the Sprite is just a black square.
Step by step¶
Now that we have covered the basics of the nodes being used, we can now walk step by step through the process of making a scene like the one found in the demo.
First add a Sprite and set its texture to the background image. For your game this can be any background you choose. For this style of shadow it is most likely to be a floor texture.

Next create three Light2D’s and set their textures to the light image. You can alter their
color in the top section. By default shadows are turned off and the mode is set to add. This
means that each light adds its own color to whatever is underneath.

Next add a child Sprite to each of the Light nodes, and set the Sprite’s texture to the blob image. Each of these should stay centered on the Light node. The blob is the image of the light itself while the Light shows the effect that the light has on the scene. The LightOccluder2D’s will treat the position of the light as the center of the Light node, which is why we want the blob to be centered on its parent Light.

Note
At the time of writing, 3.0 is the stable release version. The 3.1 development branch contains many changes to the animation system, so the animations in the demo will not be covered here. See Introduction to the 2D animation features for more information.
Right now the scene should look too bright. This is because all three lights are adding color to the scene. This is why the demo uses a CanvasModulate in the scene. The CanvasModulate multiples the entire viewport by a specific color.
Add a CanvasModulate to the scene and set its color to rgb(70, 70, 70).
This will make the scene sufficiently dark to see the effects of the lights distinctly.

Now we add the shadow casters.
The demo uses a Node named “casters” to organize the shadow casters. Add a Node2D to the scene. It will be used to group all the shadow casters together. This way we can show and hide them all at the same time.
Each shadow caster is made of a Sprite, with a LightOccluder2D child. For the demo the Sprite has a texture set to the caster image and nothing else. The child LightOccluder2D is where all the magic happens. In a game the Sprite could be more than a black box; it could be an image of whatever object is casting the shadow: a wall, a magical chest, or anything else.
LightOccluder2Ds tell the game what shape the occluder has. They hold
an OccluderPolygon2D, which is a container
for a polygon and some other information. For this demo, since our wall is a square, we
set Polygon to a square. The other default settings are fine.
The first setting, Closed can be either on or off. A closed polygon occludes light
coming from all directions. An open polygon only occludes light from one direction
Cull Mode lets you select which direction gets culled. The default is Disabled, meaning the occluder
will cast a shadow no matter which side the light is on. The other two settings Clockwise and
Counter-Clockwise refer to the winding order of the vertices of the polygon. The winding order
is used to determine which side of the line is inside the polygon. Only outward facing lines cast shadows.
To illustrate the difference, here is an image of a LightOccluder2D with Closed
set to off in the corresponding OccluderPolygon2D, so that the
lines of the polygon can be seen:
Note
Cull Mode is set to Disabled. All three lines cast shadows.
Note
Cull Mode is set to Clockwise. Only the top and right lines cast shadows.

Note
Cull Mode is set to Counter-Clockwise. Only the bottom line casts a shadow.
If Closed was set to on there would be an additional vertical line on the
left which would cast a shadow as well.
When you have added the LightOccluder2Ds the shadows still won’t
appear. You need to go back into the Light2Ds and under the Shadow
section set Enable to on. This turns on shadows with hard edges like in the image below.

To give the shadows that nice, soft edge look we set the variables filter, filter smooth, and
gradient length. Godot supports Percentage Closer Filtering
(PCF), which takes multiple samples of the shadow map around a pixel and blurs them to create
a smooth shadow effect. The higher the number of samples the smoother the shadow will
look, but the slower it will run. That is why Godot provides 3-13 samples by default and allows you to choose.
The demo uses PCF7.
Note
This is a shadow rendered with the demo’s settings. gradient length is set
to 1.3, filter smooth is set to 11.1, and filter is set to PCF7.
Note
filter is set to PCF13. Notice how the shadow becomes wider, this is because the
distance between samples is based on the variable filter smooth.
In order to make use of filtering you need to set the filter smooth variable.
This dictates how far apart the samples are. If you want the soft area to extend quite far, you can increase
the size of filter smooth. However, with few samples and a large filter smooth, you can see lines
forming between the samples.
Note
filter smooth is set to 30.
The different Light nodes in the demo use different values for filter smooth. Play around with it and see what you like.

Note
filter smooth is set to 0.
Lastly, there is the variable gradient length. For some smooth shadows it is preferable not to have the
shadow start immediately on the object, as this produces a hard edge. The gradient length variable creates
a smooth gradient to begin the shadow to reduce the effect of the hard edge.

Note
gradient length is set to 0.
Note
gradient length is set to 10.
You will need to play around with the options a bit to find settings that suit your project. There is no right solution
for everyone, which is why Godot provides so much flexibility. Just keep in mind that the higher filter
set the more expensive the shadows will be.
2D meshes¶
Introduction¶
In 3D, meshes are used to display the world. In 2D, they are rare as images are used more often.
Godot’s 2D engine is a pure two dimensional engine, so it can’t really display 3D meshes directly (although it can be done
via Viewport and ViewportTexture).
See also
If you are interested in displaying 3D meshes on a 2D viewport, see the Using a Viewport as a texture tutorial.
2D meshes are meshes that contain two dimensional geometry (Z can be omitted or ignored) instead of 3D.
You can experiment creating them yourself using SurfaceTool from code and displaying them in a MeshInstance2D node.
Currently, the only way to generate a 2D mesh within the editor is by either importing an OBJ file as a mesh, or converting it from a Sprite.
Optimizing pixels drawn¶
This workflow is useful for optimizing 2D drawing in some situations. When drawing large images with transparency, Godot will draw the whole quad to the screen. The large transparent areas will still be drawn.
This can affect performance, especially on mobile devices, when drawing very large images (generally screen sized),
or layering multiple images on top of each other with large transparent areas (for example, when using ParallaxBackground).
Converting to a mesh will ensure that only the opaque parts will be drawn and the rest will be ignored.
Converting Sprites to 2D meshes¶
You can take advantage of this optimization by converting a Sprite to a MeshInstance2D.
Start with an image that contains large amounts of transparency on the edges, like this tree:
Put it in a Sprite and select “Convert to 2D Mesh” from the menu:
A dialog will appear, showing a preview of how the 2D mesh will be created:
The default values are good enough for many cases, but you can change growth and simplification according to your needs:
Finally, push the Convert 2D Mesh button and your Sprite will be replaced:

Custom drawing in 2D¶
Why?¶
Godot has nodes to draw sprites, polygons, particles, and all sorts of stuff. For most cases, this is enough; but not always. Before crying in fear, angst, and rage because a node to draw that specific something does not exist… it would be good to know that it is possible to easily make any 2D node (be it Control or Node2D based) draw custom commands. It is really easy to do it, too.
But…¶
Custom drawing manually in a node is really useful. Here are some examples why:
- Drawing shapes or logic that is not handled by nodes (example: making a node that draws a circle, an image with trails, a special kind of animated polygon, etc).
- Visualizations that are not that compatible with nodes: (example: a tetris board). The tetris example uses a custom draw function to draw the blocks.
- Drawing a large number of simple objects. Custom drawing avoids the overhead of using nodes which makes it less memory intensive and potentially faster.
- Making a custom UI control. There are plenty of controls available, but it’s easy to run into the need to make a new, custom one.
OK, how?¶
Add a script to any CanvasItem
derived node, like Control or
Node2D. Then override the _draw() function.
extends Node2D
func _draw():
# Your draw commands here
pass
public override void _Draw()
{
// Your draw commands here
}
Draw commands are described in the CanvasItem class reference. There are plenty of them.
Updating¶
The _draw() function is only called once, and then the draw commands
are cached and remembered, so further calls are unnecessary.
If re-drawing is required because a state or something else changed,
simply call CanvasItem.update()
in that same node and a new _draw() call will happen.
Here is a little more complex example, a texture variable that will be redrawn if modified:
extends Node2D
export (Texture) var texture setget _set_texture
func _set_texture(value):
# If the texture variable is modified externally,
# this callback is called.
texture = value #texture was changed
update() # update the node
func _draw():
draw_texture(texture, Vector2())
public class CustomNode2D : Node2D
{
private Texture _texture;
public Texture Texture
{
get
{
return _texture;
}
set
{
_texture = value;
Update();
}
}
public override void _Draw()
{
DrawTexture(_texture, new Vector2());
}
}
In some cases, it may be desired to draw every frame. For this, just
call update() from the _process() callback, like this:
extends Node2D
func _draw():
# Your draw commands here
pass
func _process(delta):
update()
public class CustomNode2D : Node2D
{
public override void _Draw()
{
// Your draw commands here
}
public override void _Process(float delta)
{
Update();
}
}
An example: drawing circular arcs¶
We will now use the custom drawing functionality of the Godot Engine to draw
something that Godot doesn’t provide functions for. As an example, Godot provides
a draw_circle() function that draws a whole circle. However, what about drawing a
portion of a circle? You will have to code a function to perform this and draw it yourself.
Arc function¶
An arc is defined by its support circle parameters, that is, the center position and the radius. The arc itself is then defined by the angle it starts from and the angle at which it stops. These are the 4 arguments that we have to provide to our drawing function. We’ll also provide the color value, so we can draw the arc in different colors if we wish.
Basically, drawing a shape on the screen requires it to be decomposed into a certain number of points linked from one to the next. As you can imagine, the more points your shape is made of, the smoother it will appear, but the heavier it will also be in terms of processing cost. In general, if your shape is huge (or in 3D, close to the camera), it will require more points to be drawn without it being angular-looking. On the contrary, if your shape is small (or in 3D, far from the camera), you may decrease its number of points to save processing costs; this is known as Level of Detail (LoD). In our example, we will simply use a fixed number of points, no matter the radius.
func draw_circle_arc(center, radius, angle_from, angle_to, color):
var nb_points = 32
var points_arc = PoolVector2Array()
for i in range(nb_points + 1):
var angle_point = deg2rad(angle_from + i * (angle_to-angle_from) / nb_points - 90)
points_arc.push_back(center + Vector2(cos(angle_point), sin(angle_point)) * radius)
for index_point in range(nb_points):
draw_line(points_arc[index_point], points_arc[index_point + 1], color)
public void DrawCircleArc(Vector2 center, float radius, float angleFrom, float angleTo, Color color)
{
int nbPoints = 32;
var pointsArc = new Vector2[nbPoints];
for (int i = 0; i < nbPoints; ++i)
{
float anglePoint = Mathf.Deg2Rad(angleFrom + i * (angleTo - angleFrom) / nbPoints - 90f);
pointsArc[i] = center + new Vector2(Mathf.Cos(anglePoint), Mathf.Sin(anglePoint)) * radius;
}
for (int i = 0; i < nbPoints - 1; ++i)
DrawLine(pointsArc[i], pointsArc[i + 1], color);
}
Remember the number of points our shape has to be decomposed into? We fixed this
number in the nb_points variable to a value of 32. Then, we initialize an empty
PoolVector2Array, which is simply an array of Vector2s.
The next step consists of computing the actual positions of these 32 points that compose an arc. This is done in the first for-loop: we iterate over the number of points for which we want to compute the positions, plus one to include the last point. We first determine the angle of each point, between the starting and ending angles.
The reason why each angle is decreased by 90° is that we will compute 2D positions
out of each angle using trigonometry (you know, cosine and sine stuff…). However,
to be simple, cos() and sin() use radians, not degrees. The angle of 0° (0 radian)
starts at 3 o’clock, although we want to start counting at 12 o’clock. So we decrease
each angle by 90° in order to start counting from 12 o’clock.
The actual position of a point located on a circle at angle angle (in radians)
is given by Vector2(cos(angle), sin(angle)). Since cos() and sin() return values
between -1 and 1, the position is located on a circle of radius 1. To have this
position on our support circle, which has a radius of radius, we simply need to
multiply the position by radius. Finally, we need to position our support circle
at the center position, which is performed by adding it to our Vector2 value.
Finally, we insert the point in the PoolVector2Array which was previously defined.
Now, we need to actually draw our points. As you can imagine, we will not simply draw our 32 points: we need to draw everything that is between each of them. We could have computed every point ourselves using the previous method, and drew it one by one. But this is too complicated and inefficient (except if explicitly needed), so we simply draw lines between each pair of points. Unless the radius of our support circle is big, the length of each line between a pair of points will never be long enough to see them. If that were to happen, we would simply need to increase the number of points.
Draw the arc on the screen¶
We now have a function that draws stuff on the screen;
it is time to call it inside the _draw() function:
func _draw():
var center = Vector2(200, 200)
var radius = 80
var angle_from = 75
var angle_to = 195
var color = Color(1.0, 0.0, 0.0)
draw_circle_arc(center, radius, angle_from, angle_to, color)
public override void _Draw()
{
var center = new Vector2(200, 200);
float radius = 80;
float angleFrom = 75;
float angleTo = 195;
var color = new Color(1, 0, 0);
DrawCircleArc(center, radius, angleFrom, angleTo, color);
}
Result:
Arc polygon function¶
We can take this a step further and not only write a function that draws the plain portion of the disc defined by the arc, but also its shape. The method is exactly the same as before, except that we draw a polygon instead of lines:
func draw_circle_arc_poly(center, radius, angle_from, angle_to, color):
var nb_points = 32
var points_arc = PoolVector2Array()
points_arc.push_back(center)
var colors = PoolColorArray([color])
for i in range(nb_points + 1):
var angle_point = deg2rad(angle_from + i * (angle_to - angle_from) / nb_points - 90)
points_arc.push_back(center + Vector2(cos(angle_point), sin(angle_point)) * radius)
draw_polygon(points_arc, colors)
public void DrawCircleArcPoly(Vector2 center, float radius, float angleFrom, float angleTo, Color color)
{
int nbPoints = 32;
var pointsArc = new Vector2[nbPoints + 1];
pointsArc[0] = center;
var colors = new Color[] { color };
for (int i = 0; i < nbPoints; ++i)
{
float anglePoint = Mathf.Deg2Rad(angleFrom + i * (angleTo - angleFrom) / nbPoints - 90);
pointsArc[i + 1] = center + new Vector2(Mathf.Cos(anglePoint), Mathf.Sin(anglePoint)) * radius;
}
DrawPolygon(pointsArc, colors);
}
Dynamic custom drawing¶
All right, we are now able to draw custom stuff on the screen. However, it is static; let’s make this shape turn around the center. The solution to do this is simply to change the angle_from and angle_to values over time. For our example, we will simply increment them by 50. This increment value has to remain constant or else the rotation speed will change accordingly.
First, we have to make both angle_from and angle_to variables global at the top
of our script. Also note that you can store them in other nodes and access them
using get_node().
extends Node2D
var rotation_angle = 50
var angle_from = 75
var angle_to = 195
public class CustomNode2D : Node2D
{
private float _rotationAngle = 50;
private float _angleFrom = 75;
private float _angleTo = 195;
}
We make these values change in the _process(delta) function.
We also increment our angle_from and angle_to values here. However, we must not
forget to wrap() the resulting values between 0 and 360°! That is, if the angle
is 361°, then it is actually 1°. If you don’t wrap these values, the script will
work correctly, but the angle values will grow bigger and bigger over time until
they reach the maximum integer value Godot can manage (2^31 - 1).
When this happens, Godot may crash or produce unexpected behavior.
Finally, we must not forget to call the update() function, which automatically
calls _draw(). This way, you can control when you want to refresh the frame.
func _process(delta):
angle_from += rotation_angle
angle_to += rotation_angle
# We only wrap angles when both of them are bigger than 360.
if angle_from > 360 and angle_to > 360:
angle_from = wrapf(angle_from, 0, 360)
angle_to = wrapf(angle_to, 0, 360)
update()
private float Wrap(float value, float minVal, float maxVal)
{
float f1 = value - minVal;
float f2 = maxVal - minVal;
return (f1 % f2) + minVal;
}
public override void _Process(float delta)
{
_angleFrom += _rotationAngle;
_angleTo += _rotationAngle;
// We only wrap angles when both of them are bigger than 360.
if (_angleFrom > 360 && _angleTo > 360)
{
_angleFrom = Wrap(_angleFrom, 0, 360);
_angleTo = Wrap(_angleTo, 0, 360);
}
Update();
}
Also, don’t forget to modify the _draw() function to make use of these variables:
func _draw():
var center = Vector2(200, 200)
var radius = 80
var color = Color(1.0, 0.0, 0.0)
draw_circle_arc( center, radius, angle_from, angle_to, color )
public override void _Draw()
{
var center = new Vector2(200, 200);
float radius = 80;
var color = new Color(1, 0, 0);
DrawCircleArc(center, radius, _angleFrom, _angleTo, color);
}
Let’s run! It works, but the arc is rotating insanely fast! What’s wrong?
The reason is that your GPU is actually displaying the frames as fast as it can.
We need to “normalize” the drawing by this speed; to achieve that, we have to make
use of the delta parameter of the _process() function. delta contains the
time elapsed between the two last rendered frames. It is generally small
(about 0.0003 seconds, but this depends on your hardware), so using delta to
control your drawing ensures that your program runs at the same speed on
everybody’s hardware.
In our case, we simply need to multiply our rotation_angle variable by delta
in the _process() function. This way, our 2 angles will be increased by a much
smaller value, which directly depends on the rendering speed.
func _process(delta):
angle_from += rotation_angle * delta
angle_to += rotation_angle * delta
# We only wrap angles when both of them are bigger than 360.
if angle_from > 360 and angle_to > 360:
angle_from = wrapf(angle_from, 0, 360)
angle_to = wrapf(angle_to, 0, 360)
update()
public override void _Process(float delta)
{
_angleFrom += _rotationAngle * delta;
_angleTo += _rotationAngle * delta;
// We only wrap angles when both of them are bigger than 360.
if (_angleFrom > 360 && _angleTo > 360)
{
_angleFrom = Wrap(_angleFrom, 0, 360);
_angleTo = Wrap(_angleTo, 0, 360);
}
Update();
}
Let’s run again! This time, the rotation displays fine!
Tools¶
Drawing your own nodes might also be desired while running them in the editor to use as a preview or visualization of some feature or behavior.
Remember to use the “tool” keyword at the top of the script (check the GDScript basics reference if you forgot what this does).
2D Sprite animation¶
Introduction¶
In this tutorial, you’ll learn how to create 2D animated characters with the AnimatedSprite class and the AnimationPlayer. Typically, when you create or download an animated character, it will come in one of two ways: as individual images or as a single sprite sheet containing all the animation’s frames. Both can be animated in Godot with the AnimatedSprite class.
First, we’ll use AnimatedSprite to animate a collection of individual images. Then we will animate a sprite sheet using this class. Finally, we will learn another way to animate a sprite sheet with AnimationPlayer and the Animation property of Sprite.
Note
Art for the following examples by https://opengameart.org/users/ansimuz and by https://opengameart.org/users/tgfcoder
Individual images with AnimatedSprite¶
In this scenario, you have a collection of images, each containing one of your character’s animation frames. For this example, we’ll use the following animation:

You can download the images here:
run_animation.zip
Unzip the images and place them in your project folder. Set up your scene tree with the following nodes:
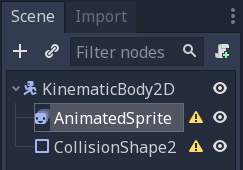
Note
The root node could also be Area2D or RigidBody2D. The animation will still be made in the same way. Once the animation is completed, you can assign a shape to the CollisionShape2D. See Physics Introduction for more information.
Now select the AnimatedSprite and in its SpriteFrames property, select
“New SpriteFrames”.
Click on the new SpriteFrames resource and you’ll see a new panel appear at the bottom of the editor window:
From the FileSystem dock on the left side, drag the 8 individual images into the center part of the SpriteFrames panel. On the left side, change the name of the animation from “default” to “run”.
Back in the Inspector, check the box for the Playing property. You should now see the animation playing in the viewport. However, it is a bit slow. To fix this, change the Speed (FPS) setting in the SpriteFrames panel to 10.
You can add additional animations by clicking the “New Animation” button and adding additional images.
Controlling the animation¶
Once the animation is complete, you can control the animation via code using
the play() and stop() methods. Here is a brief example to play the
animation while the right arrow key is held, and stop it when the key is
released.
extends KinematicBody2D
func _process(delta):
if Input.is_action_pressed("ui_right"):
$AnimatedSprite.play("run")
else:
$AnimatedSprite.stop()
Sprite sheet with AnimatedSprite¶
You can also easily animate from a sprite sheet with the class AnimatedSprite. We will use this public domain sprite sheet:
Right-click the image and choose “Save Image As” to download it, and then copy the image into your project folder.
Set up your scene tree the same way you did previously when using individual images. Select the AnimatedSprite and in its SpriteFrames property, select
“New SpriteFrames”.
Click on the new SpriteFrames resource. This time, when the bottom panel appears, select “Add frames from a Sprite Sheet”.
You will be prompted to open a file. Select your sprite sheet.
A new window will open, showing your sprite sheet. The first thing you will need to do is to change the number of vertical and horizontal images in your sprite sheet. In this sprite sheet, we have four images horizontally and two images vertically.
Next, select the frames from the sprite sheet that you want to include in your animation. We will select the top four, then click “Add 4 frames” to create the animation.
You will now see your animation under the list of animations in the bottom panel. Double click on default to change the name of the animation to jump.
Finally, check Playing on the AnimatedSprite in the inspector to see your frog jump!
Sprite sheet with AnimationPlayer¶
Another way that you can animate when using a sprite sheet is to use a standard Sprite node to display the texture, and then animating the change from texture to texture with AnimationPlayer.
Consider this sprite sheet, which contains 6 frames of animation:

Right-click the image and choose “Save Image As” to download, then copy the image into your project folder.
Our goal is to display these images one after another in a loop. Start by setting up your scene tree:
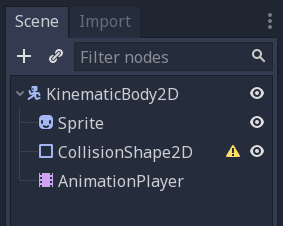
Note
The root node could also be Area2D or RigidBody2D. The animation will still be made in the same way. Once the animation is completed, you can assign a shape to the CollisionShape2D. See Physics Introduction for more information.
Drag the spritesheet into the Sprite’s Texture property, and you’ll see the
whole sheet displayed on the screen. To slice it up into individual frames,
expand the Animation section in the Inspector and set the Hframes to 6.
Hframes and Vframes are the number of horizontal and vertical frames in
your sprite sheet.
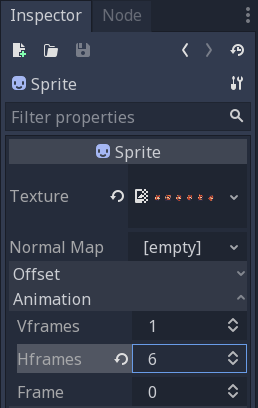
Now try changing the value of the Frame property. You’ll see that it ranges
from 0 to 5 and the image displayed by the Sprite changes accordingly.
This is the property we’ll be animating.
Select the AnimationPlayer and click the “Animation” button followed by
“New”. Name the new animation “walk”. Set the animation length to 0.6 and
click the “Loop” button so that our animation will repeat.

Now select the Sprite node and click the key icon to add a new track.

Continue adding frames at each point in the timeline (0.1 seconds by
default), until you have all the frames from 0 to 5. You’ll see the frames
actually appearing in the animation track:
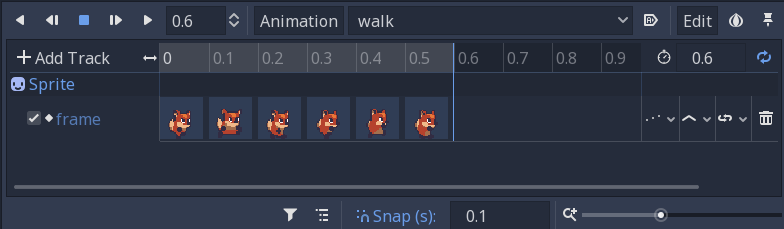
Press “Play” on the animation to see how it looks.
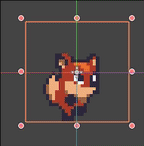
Controlling an AnimationPlayer animation¶
Like with AnimatedSprite, you can control the animation via code using
the play() and stop() methods. Again, here is an example to play the
animation while the right arrow key is held, and stop it when the key is
released.
extends KinematicBody2D
func _process(delta):
if Input.is_action_pressed("ui_right"):
$AnimationPlayer.play("walk")
else:
$AnimationPlayer.stop()
Note
If updating both an animation and a separate property at once
(for example, a platformer may update the sprite’s h_flip/v_flip
properties when a character turns while starting a ‘turning’ animation),
it’s important to keep in mind that play() isn’t applied instantly.
Instead, it’s applied the next time the AnimationPlayer is processed.
This may end up being on the next frame, causing a ‘glitch’ frame,
where the property change was applied but the animation was not.
If this turns out to be a problem, after calling play(), you can call advance(0)
to update the animation immediately.
Summary¶
These examples illustrate the two classes you can use in Godot for
2D animation. AnimationPlayer is
a bit more complex than AnimatedSprite, but it provides additional functionality, since you can also
animate other properties like position or scale. The class AnimationPlayer can also be used with an AnimatedSprite. Experiment to see what works best for your needs.
3D¶
Introduction to 3D¶
Creating a 3D game can be challenging. That extra Z coordinate makes many of the common techniques that helped to make 2D games simple no longer work. To aid in this transition, it is worth mentioning that Godot uses similar APIs for 2D and 3D. Most nodes are the same and are present in both 2D and 3D versions. In fact, it is worth checking the 3D platformer tutorial, or the 3D kinematic character tutorials, which are almost identical to their 2D counterparts.
In 3D, math is a little more complex than in 2D, so also checking the Vector math entry in the wiki (which was especially created for game developers, not mathematicians or engineers) will help pave the way for you to develop 3D games efficiently.
Spatial node¶
Node2D is the base node for 2D. Control is the base node for everything GUI. Following this reasoning, the 3D engine uses the Spatial node for everything 3D.
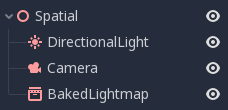
Spatial nodes have a local transform, which is relative to the parent node (as long as the parent node is also of or inherits from the type Spatial). This transform can be accessed as a 4x3 Transform, or as 3 Vector3 members representing location, Euler rotation (x,y and z angles) and scale.
3D content¶
Unlike 2D, where loading image content and drawing is straightforward, 3D is a little more difficult. The content needs to be created with special 3D tools (usually referred to as DCCs) and exported to an exchange file format in order to be imported in Godot (3D formats are not as standardized as images).
DCC-created models¶
There are two pipelines to import 3D models in Godot. The first and most common one is by Importing 3D scenes, which allows you to import entire scenes (just as they look in the DCC), including animation, skeletal rigs, blend shapes, etc.
The second pipeline is by importing simple .OBJ files as mesh resources, which can be then put inside a MeshInstance node for display.
Generated geometry¶
It is possible to create custom geometry by using the ArrayMesh resource directly. Simply create your arrays and use the ArrayMesh.add_surface_from_arrays() function. A helper class is also available, SurfaceTool, which provides a more straightforward API and helpers for indexing, generating normals, tangents, etc.
In any case, this method is meant for generating static geometry (models that will not be updated often), as creating vertex arrays and submitting them to the 3D API has a significant performance cost.
Immediate geometry¶
If, instead, there is a requirement to generate simple geometry that will be updated often, Godot provides a special node, ImmediateGeometry, which provides an OpenGL 1.x style immediate-mode API to create points, lines, triangles, etc.
2D in 3D¶
While Godot packs a powerful 2D engine, many types of games use 2D in a 3D environment. By using a fixed camera (either orthogonal or perspective) that does not rotate, nodes such as Sprite3D and AnimatedSprite3D can be used to create 2D games that take advantage of mixing with 3D backgrounds, more realistic parallax, lighting/shadow effects, etc.
The disadvantage is, of course, that added complexity and reduced performance in comparison to plain 2D, as well as the lack of reference of working in pixels.
Environment¶
Besides editing a scene, it is often common to edit the environment. Godot provides a WorldEnvironment node that allows changing the background color, mode (as in, put a skybox), and applying several types of built-in post-processing effects. Environments can also be overridden in the Camera.
3D viewport¶
Editing 3D scenes is done in the 3D tab. This tab can be selected manually, but it will be automatically enabled when a Spatial node is selected.
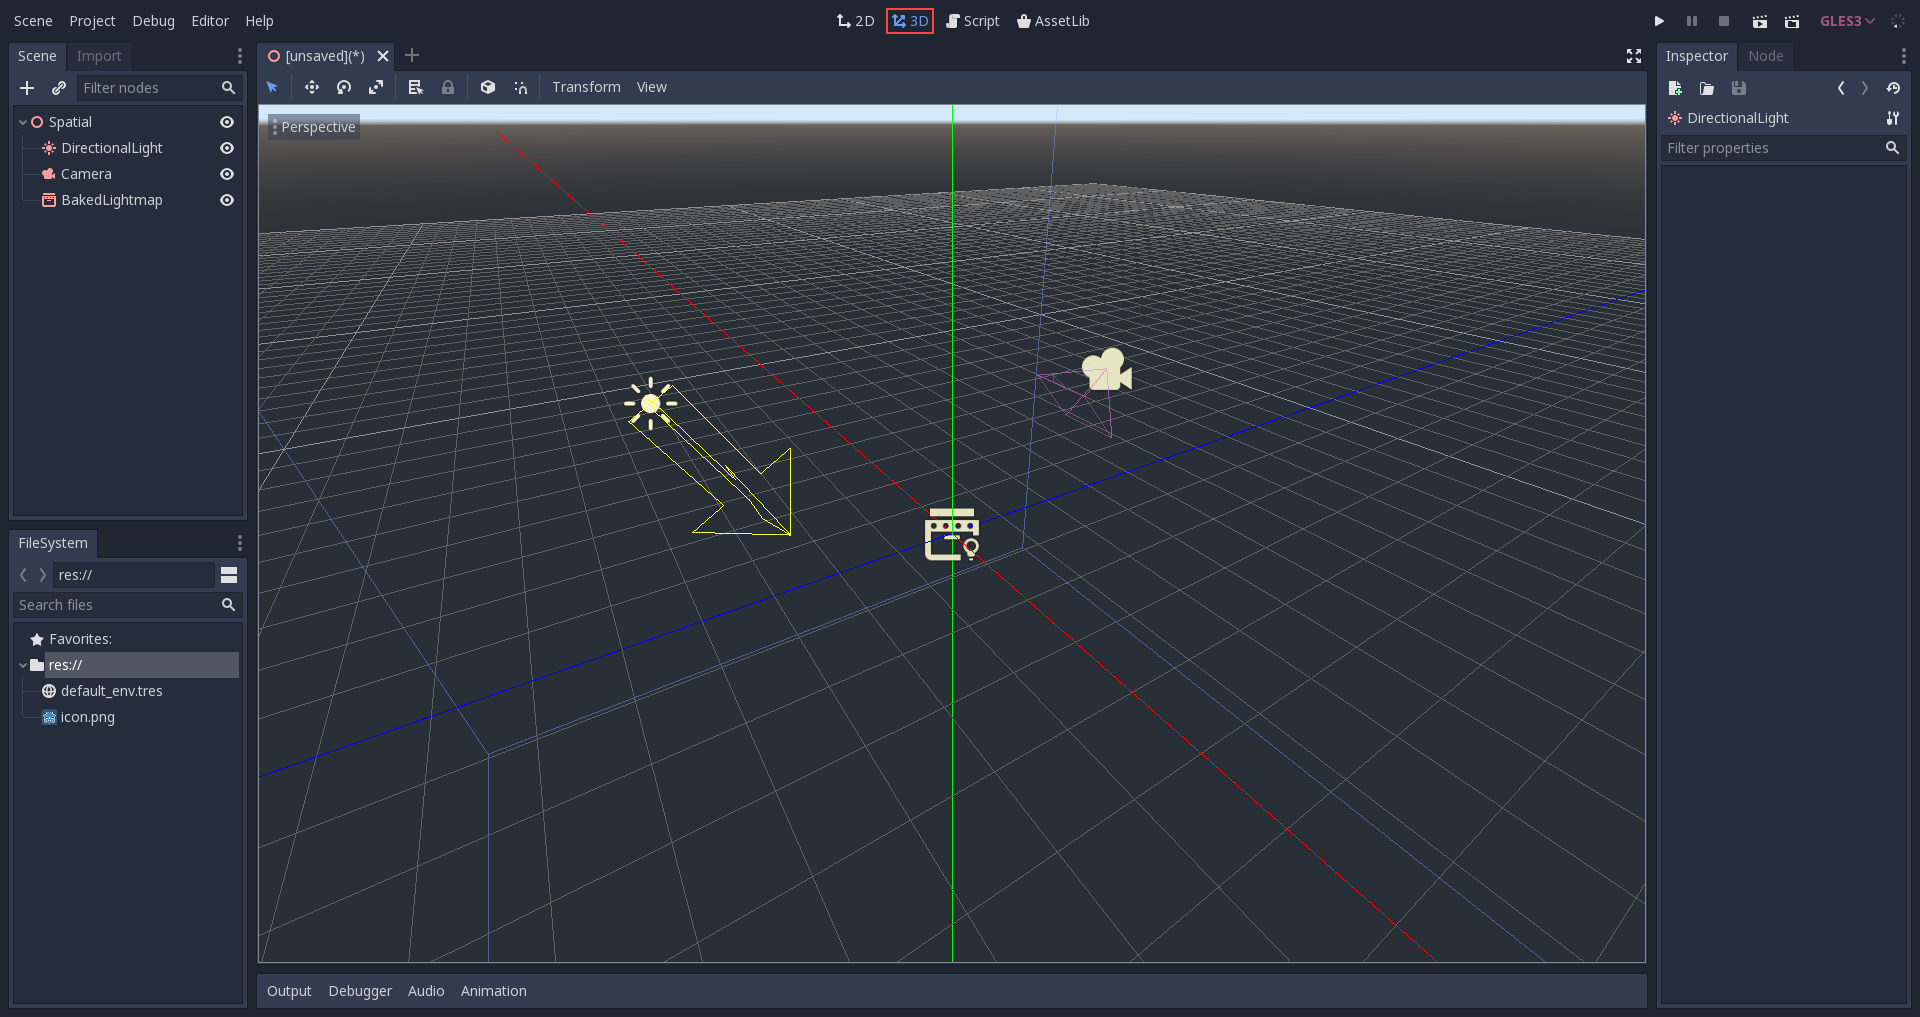
Default 3D scene navigation controls are similar to Blender (aiming to have some sort of consistency in the free software pipeline..), but options are included to customize mouse buttons and behavior to be similar to other tools in the Editor Settings:
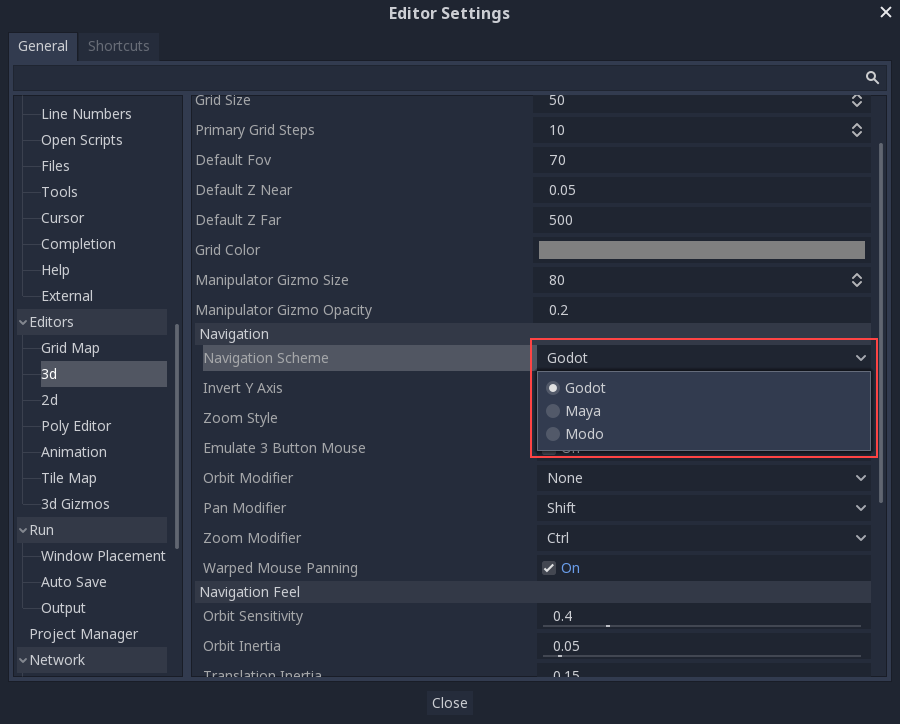
Coordinate system¶
Godot uses the metric system for everything. 3D Physics and other areas are tuned for this, so attempting to use a different scale is usually a bad idea (unless you know what you are doing).
When working with 3D assets, it’s always best to work in the correct scale (set your DCC to metric). Godot allows scaling post-import and, while this works in most cases, in rare situations it may introduce floating point precision issues (and thus, glitches or artifacts) in delicate areas, such as rendering or physics, so make sure your artists always work in the right scale!
The Y coordinate is used for “up”, though for most objects that need alignment (like lights, cameras, capsule collider, vehicle, etc.), the Z axis is used as a “pointing towards” direction. This convention roughly means that:
- X is sides
- Y is up/down
- Z is front/back
Space and manipulation gizmos¶
Moving objects in the 3D view is done through the manipulator gizmos. Each axis is represented by a color: Red, Green, Blue represent X,Y,Z respectively. This convention applies to the grid and other gizmos too (and also to the shader language, ordering of components for Vector3,Color,etc.).
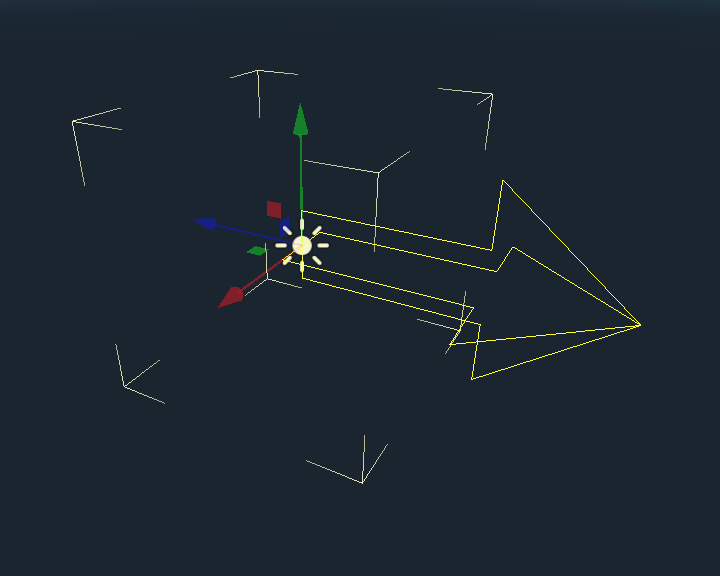
Some useful keybindings:
- To snap placement or rotation, press Ctrl while moving, scaling or rotating.
- To center the view on the selected object, press F.
View menu¶
The view options are controlled by the “View” menu in the viewport’s toolbar.
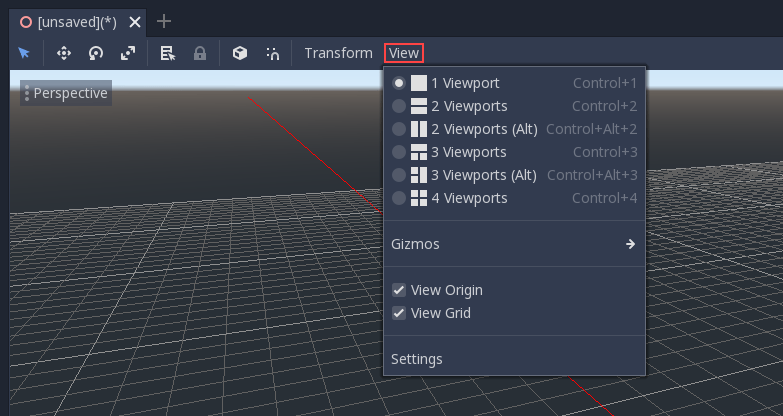
You can hide the gizmos in the 3D view of the editor through this menu:
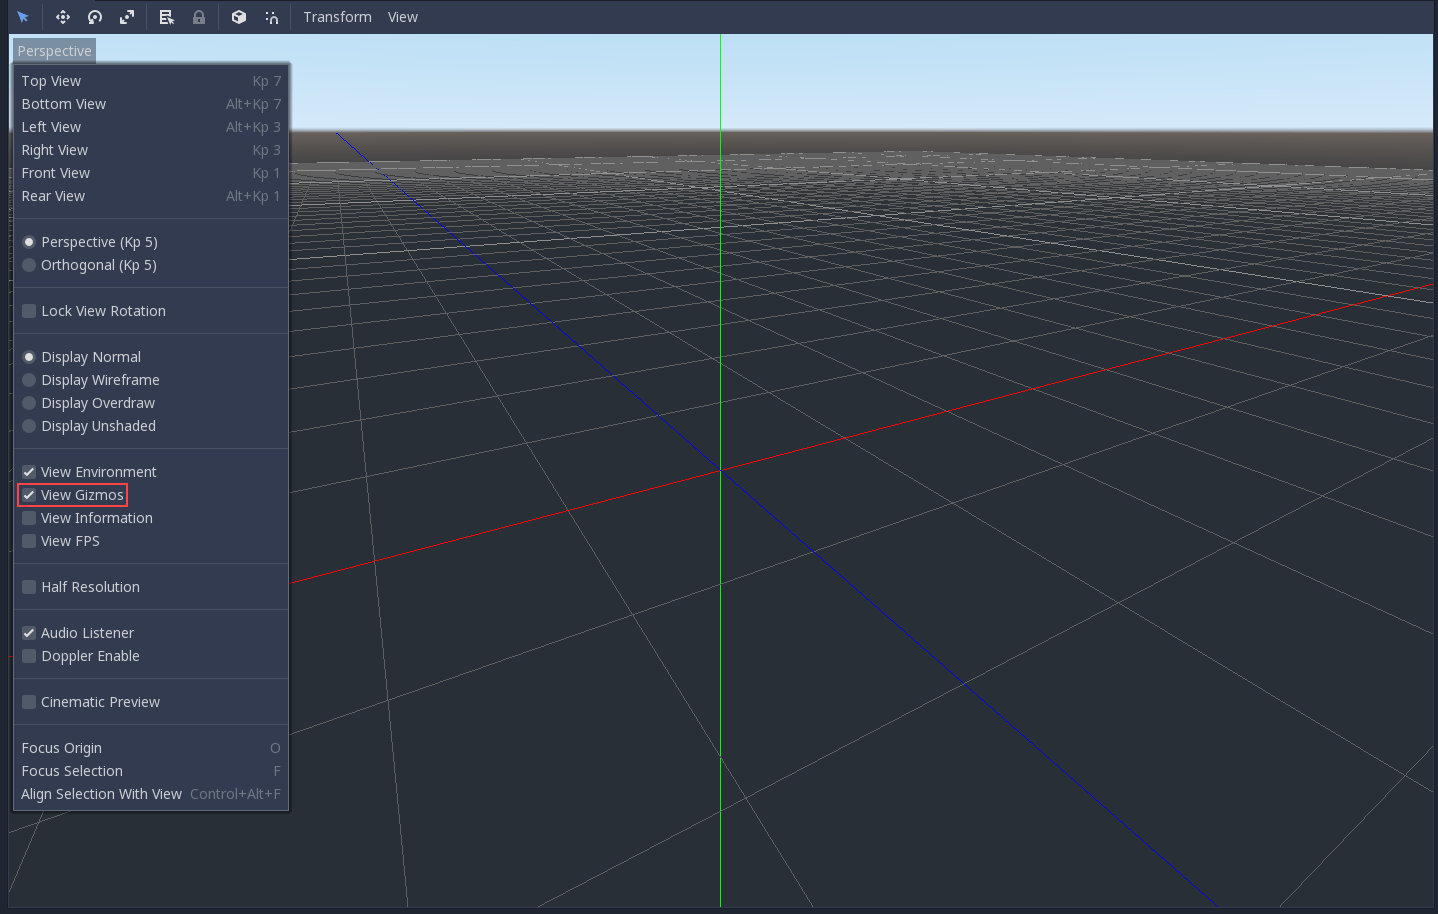
To hide a specific type of gizmos, you can toggle them off in the “View” menu.
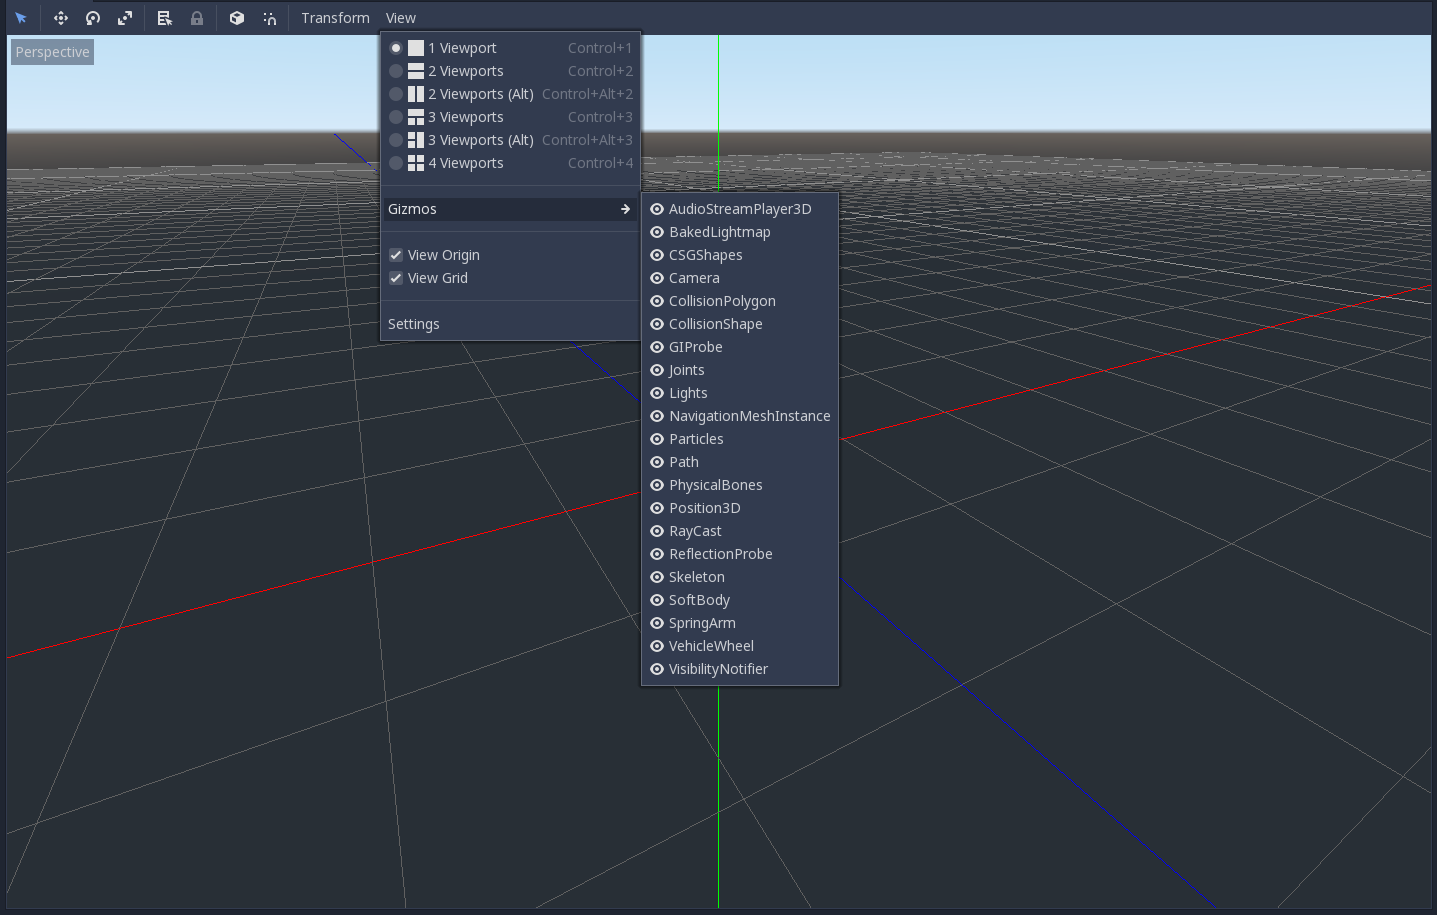
Default environment¶
When created from the Project Manager, the 3D environment has a default sky.
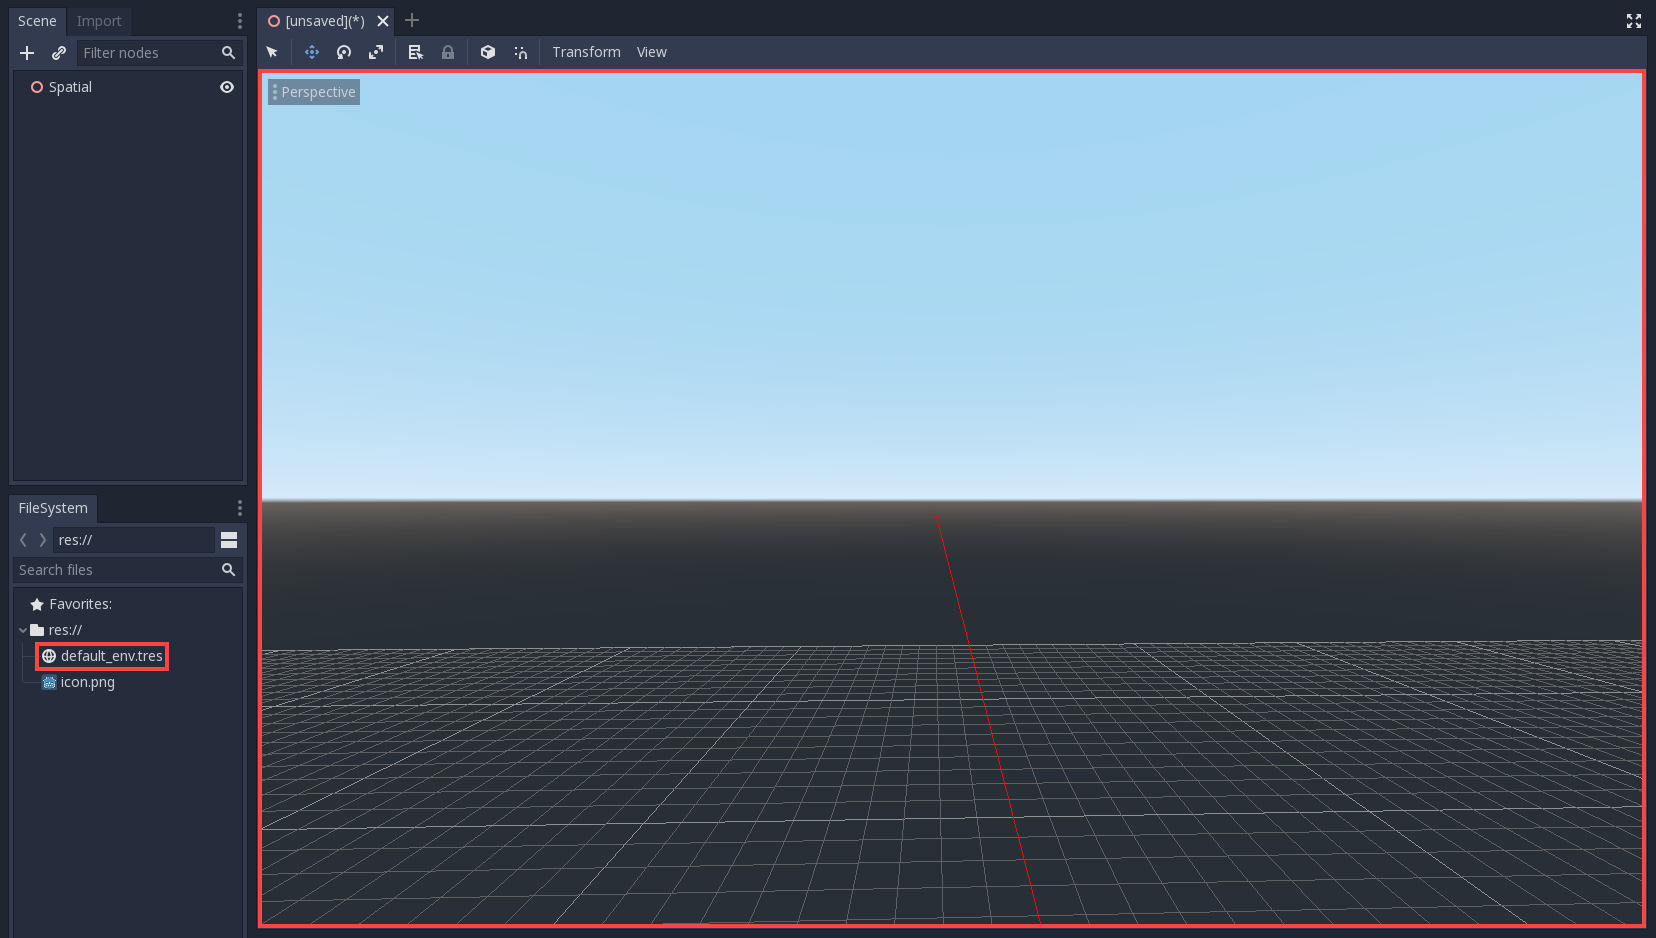
Given how physically based rendering works, it is advised to always try to work with a default environment in order to provide indirect and reflected light to your objects.
Cameras¶
No matter how many objects are placed in the 3D space, nothing will be displayed unless a Camera is also added to the scene. Cameras can work in either orthogonal or perspective projections:
Cameras are associated with (and only display to) a parent or grandparent viewport. Since the root of the scene tree is a viewport, cameras will display on it by default, but if sub-viewports (either as render target or picture-in-picture) are desired, they need their own children cameras to display.
When dealing with multiple cameras, the following rules are enforced for each viewport:
- If no cameras are present in the scene tree, the first one that enters it will become the active camera. Further cameras entering the scene will be ignored (unless they are set as current).
- If a camera has the “current” property set, it will be used regardless of any other camera in the scene. If the property is set, it will become active, replacing the previous camera.
- If an active camera leaves the scene tree, the first camera in tree-order will take its place.
Lights¶
There is no limitation on the number of lights, nor of types of lights, in Godot. As many as desired can be added (as long as performance allows).
Using 3D transforms¶
Introduction¶
If you have never made 3D games before, working with rotations in three dimensions can be confusing at first. Coming from 2D, the natural way of thinking is along the lines of “Oh, it’s just like rotating in 2D, except now rotations happen in X, Y and Z”.
At first this seems easy and for simple games, this way of thinking may even be enough. Unfortunately, it’s often incorrect.
Angles in three dimensions are most commonly referred to as “Euler Angles”.
Euler angles were introduced by mathematician Leonhard Euler in the early 1700s.
This way of representing 3D rotations was groundbreaking at the time, but it has several shortcomings when used in game development (which is to be expected from a guy with a funny hat). The idea of this document is to explain why, as well as outlining best practices for dealing with transforms when programming 3D games.
Problems of Euler angles¶
While it may seem intuitive that each axis has a rotation, the truth is that it’s just not practical.
Axis order¶
The main reason for this is that there isn’t a unique way to construct an orientation from the angles. There isn’t a standard mathematical function that takes all the angles together and produces an actual 3D rotation. The only way an orientation can be produced from angles is to rotate the object angle by angle, in an arbitrary order.
This could be done by first rotating in X, then Y and then in Z. Alternatively, you could first rotate in Y, then in Z and finally in X. Anything works, but depending on the order, the final orientation of the object will not necessarily be the same. Indeed, this means that there are several ways to construct an orientation from 3 different angles, depending on the order of the rotations.
Following is a visualization of rotation axes (in X,Y,Z order) in a gimbal (from Wikipedia). As you can see, the orientation of each axis depends on the rotation of the previous one:
You may be wondering how this affects you. Let’s look at a practical example:
Imagine you are working on a first-person controller (e.g. an FPS game). Moving the mouse left and right controls your view angle parallel to the ground, while moving it up and down moves the player’s view up and down.
In this case to achieve the desired effect, rotation must be applied first in the Y axis (“up” in this case, since Godot uses a “Y-Up” orientation), followed by rotation in the X axis.
If we were to apply rotation in the X axis first, and then in Y, the effect would be undesired:
Depending on the type of game or effect desired, the order in which you want axis rotations to be applied may differ. Therefore, applying rotations in X, Y, and Z is not enough: you also need a rotation order.
Interpolation¶
Another problem with using Euler angles is interpolation. Imagine you want to transition between two different camera or enemy positions (including rotations). One logical way to approach this is to interpolate the angles from one position to the next. One would expect it to look like this:
But this does not always have the expected effect when using angles:
The camera actually rotated the opposite direction!
There are a few reasons this may happen:
- Rotations don’t map linearly to orientation, so interpolating them does not always result in the shortest path (i.e., to go from
270to0degrees is not the same as going from270to360, even though the angles are equivalent). - Gimbal lock is at play (first and last rotated axis align, so a degree of freedom is lost). See Wikipedia’s page on Gimbal Lock for a detailed explanation of this problem.
Say no to Euler angles¶
The result of all this is that you should not use the rotation property of Spatial nodes in Godot for games. It’s there to be used mainly in the editor, for coherence with the 2D engine, and for simple rotations (generally just one axis, or even two in limited cases). As much as you may be tempted, don’t use it.
Instead, there is a better way to solve your rotation problems.
Introducing transforms¶
Godot uses the Transform datatype for orientations. Each Spatial node contains a transform property which is relative to the parent’s transform, if the parent is a Spatial-derived type.
It is also possible to access the world coordinate transform via the global_transform property.
A transform has a Basis (transform.basis sub-property), which consists of three Vector3 vectors. These are accessed via the transform.basis property and can be accessed directly by transform.basis.x, transform.basis.y, and transform.basis.z. Each vector points in the direction its axis has been rotated, so they effectively describe the node’s total rotation. The scale (as long as it’s uniform) can also be inferred from the length of the axes. A basis can also be interpreted as a 3x3 matrix and used as transform.basis[x][y].
A default basis (unmodified) is akin to:
var basis = Basis()
# Contains the following default values:
basis.x = Vector3(1, 0, 0) # Vector pointing along the X axis
basis.y = Vector3(0, 1, 0) # Vector pointing along the Y axis
basis.z = Vector3(0, 0, 1) # Vector pointing along the Z axis
// Due to technical limitations on structs in C# the default
// constructor will contain zero values for all fields.
var defaultBasis = new Basis();
GD.Print(defaultBasis); // prints: ((0, 0, 0), (0, 0, 0), (0, 0, 0))
// Instead we can use the Identity property.
var identityBasis = Basis.Identity;
GD.Print(identityBasis.x); // prints: (1, 0, 0)
GD.Print(identityBasis.y); // prints: (0, 1, 0)
GD.Print(identityBasis.z); // prints: (0, 0, 1)
// The Identity basis is equivalent to:
var basis = new Basis(Vector3.Right, Vector3.Up, Vector3.Back);
GD.Print(basis); // prints: ((1, 0, 0), (0, 1, 0), (0, 0, 1))
This is also an analog of a 3x3 identity matrix.
Following the OpenGL convention, X is the Right axis, Y is the Up axis and Z is the Forward axis.
Together with the basis, a transform also has an origin. This is a Vector3 specifying how far away from the actual origin (0, 0, 0) this transform is. Combining the basis with the origin, a transform efficiently represents a unique translation, rotation, and scale in space.
One way to visualize a transform is to look at an object’s 3D gizmo while in “local space” mode.

The gizmo’s arrows show the X, Y, and Z axes (in red, green, and blue respectively) of the basis, while the gizmo’s center is at the object’s origin.
For more information on the mathematics of vectors and transforms, please read the Vector math tutorials.
Manipulating transforms¶
Of course, transforms are not as straightforward to manipulate as angles and have problems of their own.
It is possible to rotate a transform, either by multiplying its basis by another (this is called accumulation), or by using the rotation methods.
# Rotate the transform about the X axis
transform.basis = Basis(Vector3(1, 0, 0), PI) * transform.basis
# shortened
transform.basis = transform.basis.rotated(Vector3(1, 0, 0), PI)
// rotate the transform about the X axis
transform.basis = new Basis(Vector3.Right, Mathf.Pi) * transform.basis;
// shortened
transform.basis = transform.basis.Rotated(Vector3.Right, Mathf.Pi);
A method in Spatial simplifies this:
# Rotate the transform in X axis
rotate(Vector3(1, 0, 0), PI)
# shortened
rotate_x(PI)
// Rotate the transform about the X axis
Rotate(Vector3.Right, Mathf.Pi);
// shortened
RotateX(Mathf.Pi);
This rotates the node relative to the parent node.
To rotate relative to object space (the node’s own transform), use the following:
# Rotate locally
rotate_object_local(Vector3(1, 0, 0), PI)
// Rotate locally
RotateObjectLocal(Vector3.Right, Mathf.Pi);
Precision errors¶
Doing successive operations on transforms will result in a loss of precision due to floating-point error. This means the scale of each axis may no longer be exactly 1.0, and they may not be exactly 90 degrees from each other.
If a transform is rotated every frame, it will eventually start deforming over time. This is unavoidable.
There are two different ways to handle this. The first is to orthonormalize the transform after some time (maybe once per frame if you modify it every frame):
transform = transform.orthonormalized()
transform = transform.Orthonormalized();
This will make all axes have 1.0 length again and be 90 degrees from each other. However, any scale applied to the transform will be lost.
It is recommended you not scale nodes that are going to be manipulated; scale their children nodes instead (such as MeshInstance). If you absolutely must scale the node, then re-apply it at the end:
transform = transform.orthonormalized()
transform = transform.scaled(scale)
transform = transform.Orthonormalized();
transform = transform.Scaled(scale);
Obtaining information¶
You might be thinking at this point: “Ok, but how do I get angles from a transform?”. The answer again is: you don’t. You must do your best to stop thinking in angles.
Imagine you need to shoot a bullet in the direction your player is facing. Just use the forward axis (commonly Z or -Z).
bullet.transform = transform
bullet.speed = transform.basis.z * BULLET_SPEED
bullet.Transform = transform;
bullet.LinearVelocity = transform.basis.z * BulletSpeed;
Is the enemy looking at the player? Use the dot product for this (see the Vector math tutorial for an explanation of the dot product):
# Get the direction vector from player to enemy
var direction = enemy.transform.origin - player.transform.origin
if direction.dot(enemy.transform.basis.z) > 0:
enemy.im_watching_you(player)
// Get the direction vector from player to enemy
Vector3 direction = enemy.Transform.origin - player.Transform.origin;
if (direction.Dot(enemy.Transform.basis.z) > 0)
{
enemy.ImWatchingYou(player);
}
Strafe left:
# Remember that +X is right
if Input.is_action_pressed("strafe_left"):
translate_object_local(-transform.basis.x)
// Remember that +X is right
if (Input.IsActionPressed("strafe_left"))
{
TranslateObjectLocal(-Transform.basis.x);
}
Jump:
# Keep in mind Y is up-axis
if Input.is_action_just_pressed("jump"):
velocity.y = JUMP_SPEED
velocity = move_and_slide(velocity)
// Keep in mind Y is up-axis
if (Input.IsActionJustPressed("jump"))
velocity.y = JumpSpeed;
velocity = MoveAndSlide(velocity);
All common behaviors and logic can be done with just vectors.
Setting information¶
There are, of course, cases where you want to set information to a transform. Imagine a first person controller or orbiting camera. Those are definitely done using angles, because you do want the transforms to happen in a specific order.
For such cases, keep the angles and rotations outside the transform and set them every frame. Don’t try to retrieve and re-use them because the transform is not meant to be used this way.
Example of looking around, FPS style:
# accumulators
var rot_x = 0
var rot_y = 0
func _input(event):
if event is InputEventMouseMotion and event.button_mask & 1:
# modify accumulated mouse rotation
rot_x += event.relative.x * LOOKAROUND_SPEED
rot_y += event.relative.y * LOOKAROUND_SPEED
transform.basis = Basis() # reset rotation
rotate_object_local(Vector3(0, 1, 0), rot_x) # first rotate in Y
rotate_object_local(Vector3(1, 0, 0), rot_y) # then rotate in X
// accumulators
private float _rotationX = 0f;
private float _rotationY = 0f;
public override void _Input(InputEvent @event)
{
if (@event is InputEventMouseMotion mouseMotion)
{
// modify accumulated mouse rotation
_rotationX += mouseMotion.Relative.x * LookAroundSpeed;
_rotationY += mouseMotion.Relative.y * LookAroundSpeed;
// reset rotation
Transform transform = Transform;
transform.basis = Basis.Identity;
Transform = transform;
RotateObjectLocal(Vector3.Up, _rotationX); // first rotate about Y
RotateObjectLocal(Vector3.Right, _rotationY); // then rotate about X
}
}
As you can see, in such cases it’s even simpler to keep the rotation outside, then use the transform as the final orientation.
Interpolating with quaternions¶
Interpolating between two transforms can efficiently be done with quaternions. More information about how quaternions work can be found in other places around the Internet. For practical use, it’s enough to understand that pretty much their main use is doing a closest path interpolation. As in, if you have two rotations, a quaternion will smoothly allow interpolation between them using the closest axis.
Converting a rotation to quaternion is straightforward.
# Convert basis to quaternion, keep in mind scale is lost
var a = Quat(transform.basis)
var b = Quat(transform2.basis)
# Interpolate using spherical-linear interpolation (SLERP).
var c = a.slerp(b,0.5) # find halfway point between a and b
# Apply back
transform.basis = Basis(c)
// Convert basis to quaternion, keep in mind scale is lost
var a = transform.basis.Quat();
var b = transform2.basis.Quat();
// Interpolate using spherical-linear interpolation (SLERP).
var c = a.Slerp(b, 0.5f); // find halfway point between a and b
// Apply back
transform.basis = new Basis(c);
The Quat type reference has more information on the datatype (it can also do transform accumulation, transform points, etc., though this is used less often). If you interpolate or apply operations to quaternions many times, keep in mind they need to be eventually normalized or they also may suffer from numerical precision errors.
Quaternions are useful when doing camera/path/etc. interpolations, as the result will always be correct and smooth.
Transforms are your friend¶
For most beginners, getting used to working with transforms can take some time. However, once you get used to them, you will appreciate their simplicity and power.
Don’t hesitate to ask for help on this topic in any of Godot’s online communities and, once you become confident enough, please help others!
3D performance and limitations¶
Introduction¶
Godot follows a balanced performance philosophy. In the performance world, there are always trade-offs, which consist of trading speed for usability and flexibility. Some practical examples of this are:
- Rendering objects efficiently in high amounts is easy, but when a large scene must be rendered, it can become inefficient. To solve this, visibility computation must be added to the rendering, which makes rendering less efficient, but, at the same time, fewer objects are rendered, so efficiency overall improves.
- Configuring the properties of every material for every object that needs to be rendered is also slow. To solve this, objects are sorted by material to reduce the costs, but at the same time sorting has a cost.
- In 3D physics a similar situation happens. The best algorithms to handle large amounts of physics objects (such as SAP) are slow at insertion/removal of objects and ray-casting. Algorithms that allow faster insertion and removal, as well as ray-casting, will not be able to handle as many active objects.
And there are many more examples of this! Game engines strive to be general purpose in nature, so balanced algorithms are always favored over algorithms that might be fast in some situations and slow in others.. or algorithms that are fast but make usability more difficult.
Godot is not an exception and, while it is designed to have backends swappable for different algorithms, the default ones (or more like, the only ones that are there for now) prioritize balance and flexibility over performance.
With this clear, the aim of this tutorial is to explain how to get the maximum performance out of Godot.
Rendering¶
3D rendering is one of the most difficult areas to get performance from, so this section will have a list of tips.
Reuse shaders and materials¶
The Godot renderer is a little different to what is out there. It’s designed to minimize GPU state changes as much as possible. SpatialMaterial does a good job at reusing materials that need similar shaders but, if custom shaders are used, make sure to reuse them as much as possible. Godot’s priorities will be like this:
- Reusing Materials: The fewer different materials in the scene, the faster the rendering will be. If a scene has a huge amount of objects (in the hundreds or thousands) try reusing the materials or in the worst case use atlases.
- Reusing Shaders: If materials can’t be reused, at least try to re-use shaders (or SpatialMaterials with different parameters but the same configuration).
If a scene has, for example, 20.000 objects with 20.000 different materials each, rendering will be slow. If the same scene has 20.000 objects, but only uses 100 materials, rendering will be blazingly fast.
Pixel cost vs vertex cost¶
It is a common thought that the lower the number of polygons in a model, the faster it will be rendered. This is really relative and depends on many factors.
On a modern PC and console, vertex cost is low. GPUs originally only rendered triangles, so all the vertices:
- Had to be transformed by the CPU (including clipping).
- Had to be sent to the GPU memory from the main RAM.
Nowadays, all this is handled inside the GPU, so the performance is extremely high. 3D artists usually have the wrong feeling about polycount performance because 3D DCCs (such as Blender, Max, etc.) need to keep geometry in CPU memory in order for it to be edited, reducing actual performance. Truth is, a model rendered by a 3D engine is much more optimal than how 3D DCCs display them.
On mobile devices, the story is different. PC and Console GPUs are brute-force monsters that can pull as much electricity as they need from the power grid. Mobile GPUs are limited to a tiny battery, so they need to be a lot more power efficient.
To be more efficient, mobile GPUs attempt to avoid overdraw. This means, the same pixel on the screen being rendered (as in, with lighting calculation, etc.) more than once. Imagine a town with several buildings, GPUs don’t know what is visible and what is hidden until they draw it. A house might be drawn and then another house in front of it (rendering happened twice for the same pixel!). PC GPUs normally don’t care much about this and just throw more pixel processors to the hardware to increase performance (but this also increases power consumption).
On mobile, pulling more power is not an option, so a technique called “Tile Based Rendering” is used (almost every mobile hardware uses a variant of it), which divides the screen into a grid. Each cell keeps the list of triangles drawn to it and sorts them by depth to minimize overdraw. This technique improves performance and reduces power consumption, but takes a toll on vertex performance. As a result, fewer vertices and triangles can be processed for drawing.
Generally, this is not so bad, but there is a corner case on mobile that must be avoided, which is to have small objects with a lot of geometry within a small portion of the screen. This forces mobile GPUs to put a lot of strain on a single screen cell, considerably decreasing performance (as all the other cells must wait for it to complete in order to display the frame).
To make it short, do not worry about vertex count so much on mobile, but avoid concentration of vertices in small parts of the screen. If, for example, a character, NPC, vehicle, etc. is far away (so it looks tiny), use a smaller level of detail (LOD) model instead.
An extra situation where vertex cost must be considered is objects that have extra processing per vertex, such as:
- Skinning (skeletal animation)
- Morphs (shape keys)
- Vertex Lit Objects (common on mobile)
Texture compression¶
Godot offers to compress textures of 3D models when imported (VRAM compression). Video RAM compression is not as efficient in size as PNG or JPG when stored, but increases performance enormously when drawing.
This is because the main goal of texture compression is bandwidth reduction between memory and the GPU.
In 3D, the shapes of objects depend more on the geometry than the texture, so compression is generally not noticeable. In 2D, compression depends more on shapes inside the textures, so the artifacts resulting from 2D compression are more noticeable.
As a warning, most Android devices do not support texture compression of textures with transparency (only opaque), so keep this in mind.
Transparent objects¶
As mentioned before, Godot sorts objects by material and shader to improve performance. This, however, can not be done on transparent objects. Transparent objects are rendered from back to front to make blending with what is behind work. As a result, please try to keep transparent objects to a minimum! If an object has a small section with transparency, try to make that section a separate material.
Level of detail (LOD)¶
As also mentioned before, using objects with fewer vertices can improve performance in some cases. Godot has a simple system to change level of detail, GeometryInstance based objects have a visibility range that can be defined. Having several GeometryInstance objects in different ranges works as LOD.
Use instancing (MultiMesh)¶
If several identical objects have to be drawn in the same place or nearby, try using MultiMesh instead. MultiMesh allows the drawing of dozens of thousands of objects at very little performance cost, making it ideal for flocks, grass, particles, etc.
Bake lighting¶
Small lights are usually not a performance issue. Shadows a little more. In general, if several lights need to affect a scene, it’s ideal to bake it (Baked lightmaps). Baking can also improve the scene quality by adding indirect light bounces.
If working on mobile, baking to texture is recommended, since this method is even faster.
Spatial Material¶
Introduction¶
SpatialMaterial is a default 3D material that aims to provide most of the features
artists look for in a material, without the need for writing shader code. However,
it can be converted to shader code if additional functionality is needed.
This tutorial explains most parameters present in SpatialMaterial.
There are three ways to add a SpatialMaterial to an object. It can be added in
the Material property of the mesh. It can be added in the Material property of
the node using the mesh (such as a MeshInstance node), or in the Material Override
property of the node using the mesh.
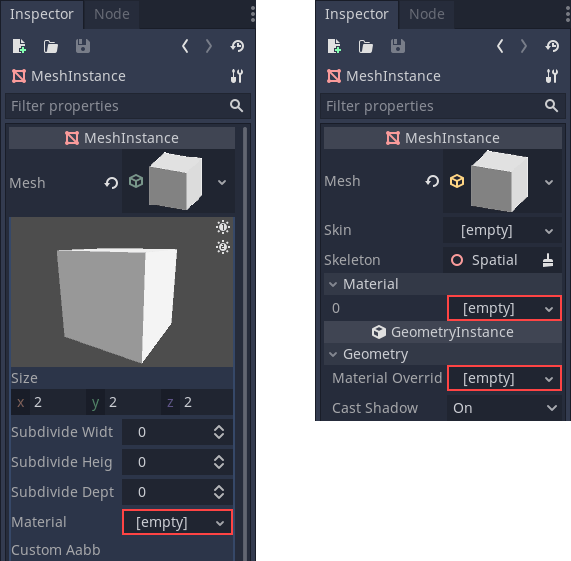
If you add a material to the mesh itself, every time that mesh is used it will have that material. If you add a material to the node using the mesh, the material will only be used by that node, it will also override the material property of the mesh. If a material is added in the Material Override property of the node, it will only be used by that node. It will also override the regular material property of the node and the material property of the mesh.
Flags¶
Spatial materials have many flags determining the general usage of a material.
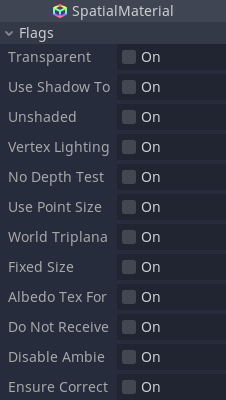
Transparent¶
In Godot, materials are not transparent unless specifically configured to be. The main reason behind this is that transparent materials are rendered using a different technique (sorted from back to front and rendered in order).
This technique is less efficient (many state changes happen) and makes the materials unusable with many mid- and post-processing effects (such as SSAO, SSR, etc.) that require perfectly opaque geometry.
For this reason, materials in Godot are assumed opaque unless specified otherwise. The main settings that enable transparency are:
- Transparent flag (this one)
- Blend mode set to other than “Mix”
- Enabling distance or proximity fade
Use Shadow to Opacity¶
Lighting modifies the alpha so shadowed areas are opaque and non-shadowed areas are transparent. Useful for overlaying shadows onto a camera feed in AR.
Unshaded¶
In most cases it is common for materials to be affected by lighting (shaded).
However, in some cases you might want to show just the albedo (color) and ignore the rest. Toggling this flag on will remove all shading and display pure, unlit color.
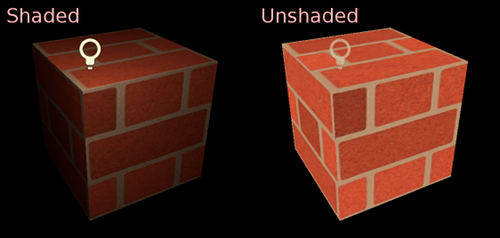
Vertex Lighting¶
Godot has a more or less uniform cost per pixel thanks to depth pre-pass. All lighting calculations are made by running the lighting shader on every pixel.
As these calculations are costly, performance can be brought down considerably in some corner cases such as drawing several layers of transparency (which is common in particle systems). Switching to per-vertex lighting may help in these cases.
Additionally, on low-end or mobile devices, switching to vertex lighting can considerably increase rendering performance.
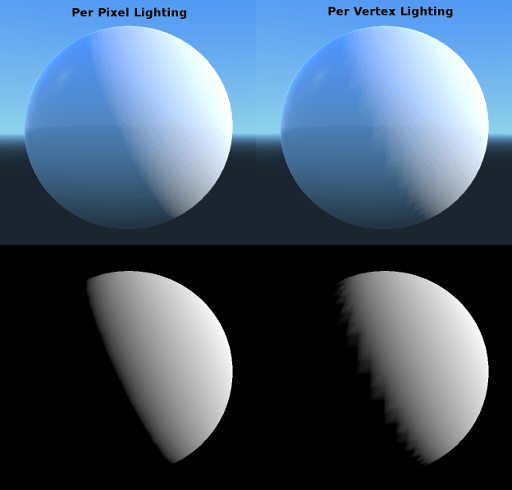
Keep in mind that when vertex lighting is enabled, only directional lighting can produce shadows (for performance reasons).
No Depth Test¶
In order for close objects to appear over far away objects, depth testing is performed. Disabling it has the result of objects appearing over (or under) everything else.
Disabling this makes the most sense for drawing indicators in world space, and works very well with the Render Priority property of Material (see the bottom of this page).
Use Point Size¶
This option is only effective when the geometry rendered is made of points (generally it’s made of triangles when imported from 3D DCCs). If so, then those points can be resized (see below).
World Triplanar¶
When using triplanar mapping (see below, in the UV1 and UV2 settings), triplanar is computed in object local space. This option makes triplanar work in world space.
Fixed Size¶
This causes the object to be rendered at the same size no matter the distance. This is useful mostly for indicators (no depth test and high render priority) and some types of billboards.
Do Not Receive Shadows¶
Makes the object not receive any kind of shadow that would otherwise be cast onto it.
Disable Ambient Light¶
Makes the object not receive any kind of ambient lighting that would otherwise light it.
Ensure Correct Normals¶
Fixes normals when non-uniform scaling is used.
Vertex Color¶
This setting allows choosing what is done by default to vertex colors that come from your 3D modelling application. By default they are ignored.
Use as Albedo¶
Choosing this option means vertex color is used as albedo color.
Is sRGB¶
Most 3D DCCs will likely export vertex colors as sRGB, so toggling this option on will help them look correct.
Parameters¶
SpatialMaterial also has several configurable parameters to tweak
many aspects of the rendering:

Diffuse Mode¶
Specifies the algorithm used by diffuse scattering of light when hitting the object. The default is Burley. Other modes are also available:
- Burley: Default mode, the original Disney Principled PBS diffuse algorithm.
- Lambert: Is not affected by roughness.
- Lambert Wrap: Extends Lambert to cover more than 90 degrees when roughness increases. Works great for hair and simulating cheap subsurface scattering. This implementation is energy conserving.
- Oren Nayar: This implementation aims to take microsurfacing into account (via roughness). Works well for clay-like materials and some types of cloth.
- Toon: Provides a hard cut for lighting, with smoothing affected by roughness. It is recommended you disable sky contribution from your environment’s ambient light settings or disable ambient light in the spatial material to achieve a better effect.
Specular Mode¶
Specifies how the specular blob will be rendered. The specular blob represents the shape of a light source reflected in the object.
- ShlickGGX: The most common blob used by PBR 3D engines nowadays.
- Blinn: Common in previous-generation engines. Not worth using nowadays, but left here for the sake of compatibility.
- Phong: Same as above.
- Toon: Creates a toon blob, which changes size depending on roughness.
- Disabled: Sometimes the blob gets in the way. Begone!
Blend Mode¶
Controls the blend mode for the material. Keep in mind that any mode other than Mix forces the object to go through the transparent pipeline.
- Mix: Default blend mode, alpha controls how much the object is visible.
- Add: Object is blended additively, nice for flares or some fire-like effects.
- Sub: Object is subtracted.
- Mul: Object is multiplied.
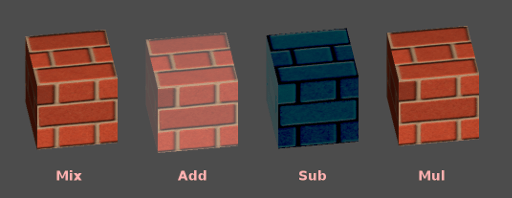
Cull Mode¶
Determines which side of the object is not drawn when backfaces are rendered:
- Back: The back of the object is culled when not visible (default).
- Front: The front of the object is culled when not visible.
- Disabled: Used for objects that are double-sided (no culling is performed).
Depth Draw Mode¶
Specifies when depth rendering must take place.
- Opaque Only (default): Depth is only drawn for opaque objects.
- Always: Depth draw is drawn for both opaque and transparent objects.
- Never: No depth draw takes place (do not confuse this with the No Depth Test option above).
- Depth Pre-Pass: For transparent objects, an opaque pass is made first with the opaque parts, then transparency is drawn above. Use this option with transparent grass or tree foliage.
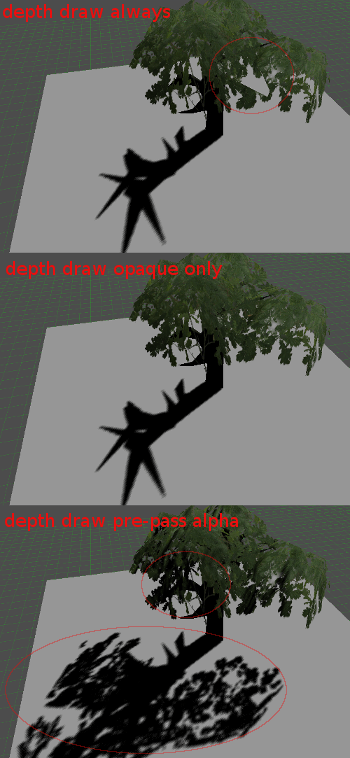
Line Width¶
When drawing lines, specify the width of the lines being drawn. This option is not available on most modern hardware.
Point Size¶
When drawing points, specify the point size in pixels.
Billboard Mode¶
Enables billboard mode for drawing materials. This controls how the object faces the camera:
- Disabled: Billboard mode is disabled.
- Enabled: Billboard mode is enabled, the object’s -Z axis will always face the camera.
- Y-Billboard: The object’s X axis will always be aligned with the camera.
- Particles: Most suited for particle systems, because it allows specifying animation options.
The above options are only enabled for Particle Billboard.
Billboard Keep Scale¶
Enables scaling a mesh in billboard mode.
Grow¶
Grows the object vertices in the direction pointed by their normals:
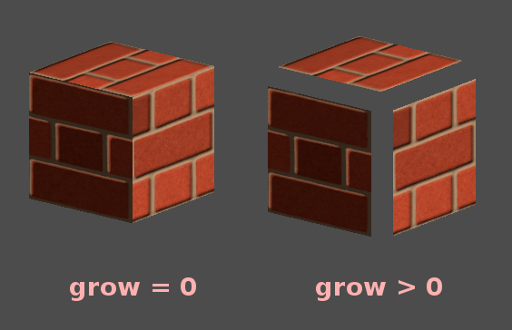
This is commonly used to create cheap outlines. Add a second material pass, make it black and unshaded, reverse culling (Cull Front), and add some grow:
Use Alpha Scissor¶
When transparency other than 0 or 1 is not needed, it’s possible to
set a threshold to prevent the object from rendering semi-transparent pixels.
This renders the object via the opaque pipeline, which is faster and allows it to use mid- and post-process effects such as SSAO, SSR, etc.
Material colors, maps and channels¶
Besides the parameters, what defines materials themselves are the colors, textures, and channels. Godot supports an extensive list of them. They are described in detail below:
Albedo¶
Albedo is the base color for the material, on which all the other settings operate. When set to Unshaded, this is the only color that is visible. In previous versions of Godot, this channel was named Diffuse. The change of name mainly happened because, in PBR (Physically Based Rendering), this color affects many more calculations than just the diffuse lighting path.
Albedo color and texture can be used together as they are multiplied.
Alpha channel in albedo color and texture is also used for the object transparency. If you use a color or texture with alpha channel, make sure to either enable transparency or alpha scissoring for it to work.
Metallic¶
Godot uses a metallic model over competing models due to its simplicity. This parameter defines how reflective the material is. The more reflective, the less diffuse/ambient light affects the material and the more light is reflected. This model is called “energy-conserving”.
The Specular parameter is a general amount for the reflectivity (unlike
Metallic, this is not energy-conserving, so leave it at 0.5 and don’t touch
it unless you need to).
The minimum internal reflectivity is 0.04, so it’s impossible to make a
material completely unreflective, just like in real life.
Roughness¶
Roughness affects the way reflection happens. A value of 0 makes it a
perfect mirror while a value of 1 completely blurs the reflection (simulating
natural microsurfacing). Most common types of materials can be achieved with
the right combination of Metallic and Roughness.
Emission¶
Emission specifies how much light is emitted by the material (keep in mind this does not include light surrounding geometry unless GI Probes are used). This value is added to the resulting final image and is not affected by other lighting in the scene.
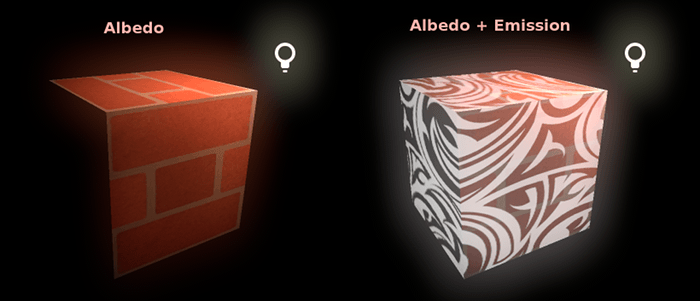
Normalmap¶
Normal mapping allows you to set a texture that represents finer shape detail. This does not modify geometry, only the incident angle for light. In Godot, only the red and green channels of normal maps are used for wider compatibility.
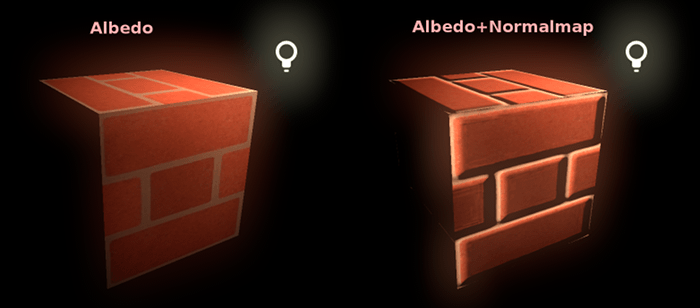
Rim¶
Some fabrics have small micro-fur that causes light to scatter around it. Godot emulates this with the Rim parameter. Unlike other rim lighting implementations, which just use the emission channel, this one actually takes light into account (no light means no rim). This makes the effect considerably more believable.
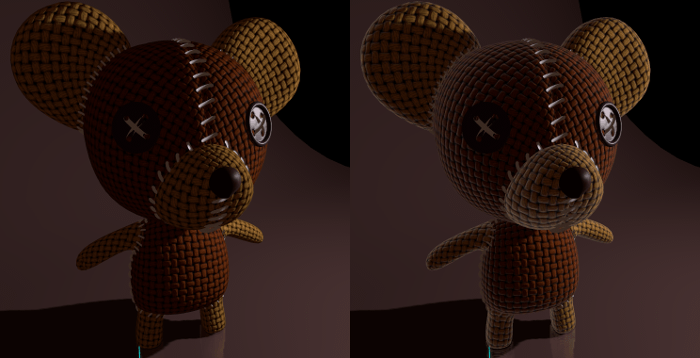
Rim size depends on roughness, and there is a special parameter to specify how
it must be colored. If Tint is 0, the color of the light is used for the
rim. If Tint is 1, then the albedo of the material is used. Using
intermediate values generally works best.
Clearcoat¶
This feature is only available when using the GLES3 backend.
The Clearcoat parameter is used to add a secondary pass of transparent coat to the material. This is common in car paint and toys. In practice, it’s a smaller specular blob added on top of the existing material.
Anisotropy¶
This feature is only available when using the GLES3 backend.
This changes the shape of the specular blob and aligns it to tangent space. Anisotropy is commonly used with hair, or to make materials such as brushed aluminum more realistic. It works especially well when combined with flowmaps.
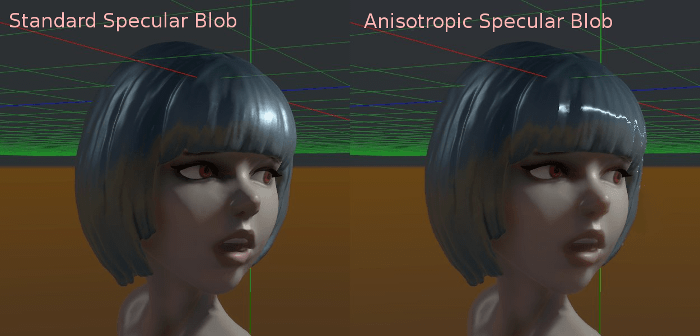
Ambient Occlusion¶
It is possible to specify a baked ambient occlusion map. This map affects how much ambient light reaches each surface of the object (it does not affect direct light by default). While it is possible to use Screen-Space Ambient Occlusion (SSAO) to generate ambient occlusion, nothing beats the quality of a well-baked AO map. It is recommended to bake ambient occlusion whenever possible.
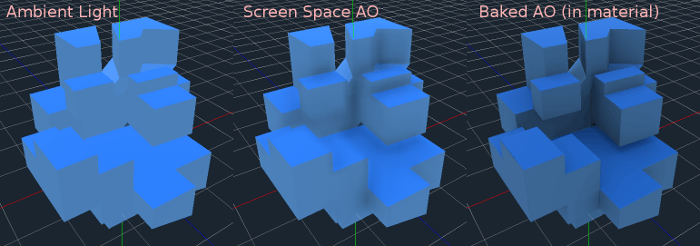
Depth¶
This feature is only available when using the GLES3 backend.
Setting a depth map on a material produces a ray-marched search to emulate the proper displacement of cavities along the view direction. This is not real added geometry, but an illusion of depth. It may not work for complex objects, but it produces a realistic depth effect for textures. For best results, Depth should be used together with normal mapping.
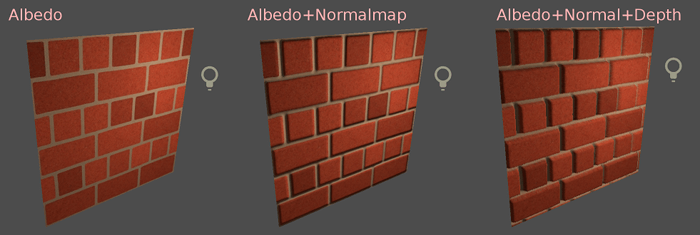
Subsurface Scattering¶
This feature is only available when using the GLES3 backend.
This effect emulates light that penetrates an object’s surface, is scattered, and then comes out. It is useful to create realistic skin, marble, colored liquids, etc.
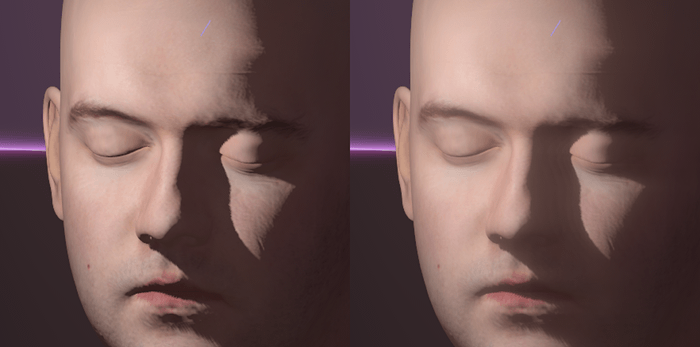
Transmission¶
This controls how much light from the lit side (visible to light) is transferred to the dark side (opposite from the light). This works well for thin objects such as plant leaves, grass, human ears, etc.
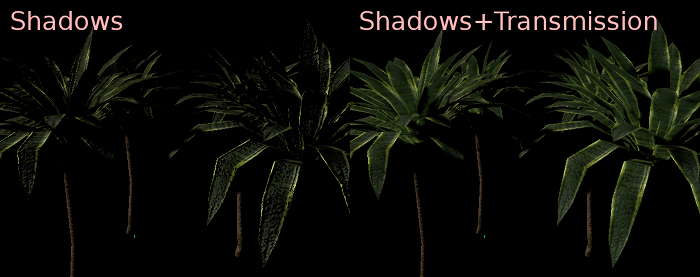
Refraction¶
This feature is only available when using the GLES3 backend.
When refraction is enabled, it supersedes alpha blending, and Godot attempts to fetch information from behind the object being rendered instead. This allows distorting the transparency in a way similar to refraction in real life.
Detail¶
Godot allows using secondary albedo and normal maps to generate a detail texture, which can be blended in many ways. By combining this with secondary UV or triplanar modes, many interesting textures can be achieved.
UV1 and UV2¶
Godot supports two UV channels per material. Secondary UV is often useful for ambient occlusion or emission (baked light). UVs can be scaled and offset, which is useful when using repeating textures.
Triplanar Mapping¶
Triplanar mapping is supported for both UV1 and UV2. This is an alternative way to obtain texture coordinates, sometimes called “Autotexture”. Textures are sampled in X, Y and Z and blended by the normal. Triplanar mapping can be performed in either world space or object space.
In the image below, you can see how all primitives share the same material with world triplanar, so the brick texture continues smoothly between them.
Proximity and distance fade¶
Godot allows materials to fade by proximity to each other as well as depending on the distance from the viewer. Proximity fade is useful for effects such as soft particles or a mass of water with a smooth blending to the shores. Distance fade is useful for light shafts or indicators that are only present after a given distance.
Keep in mind enabling these enables alpha blending, so abusing them for an entire scene is usually not a good idea.
Render priority¶
The rendering order of objects can be changed, although this is mostly useful for transparent objects (or opaque objects that perform depth draw but no color draw, such as cracks on the floor).
Lights and shadows¶
Introduction¶
Light sources emit light that mixes with the materials and produces a visible result. Light can come from several types of sources in a scene:
- From the Material itself in the form of the emission color (though it does not affect nearby objects unless baked).
- Light Nodes: Directional, Omni and Spot.
- Ambient Light in the Environment.
- Baked Light (read Baked lightmaps).
The emission color is a material property. You can read more about it in the Spatial Material tutorial.
Light nodes¶
There are three types of light nodes: Directional light, Omni light and Spot light. Let’s take a look at the common parameters for lights:
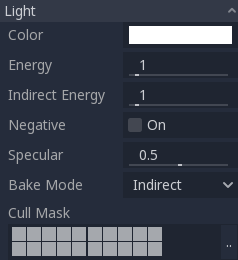
Each one has a specific function:
- Color: Base color for emitted light.
- Energy: Energy multiplier. This is useful for saturating lights or working with Light transport in game engines.
- Indirect Energy: Secondary multiplier used with indirect light (light bounces). This works in baked light or GIProbe.
- Negative: Light becomes subtractive instead of additive. It’s sometimes useful to manually compensate some dark corners.
- Specular: Affects the intensity of the specular blob in objects affected by this light. At zero, this light becomes a pure diffuse light.
- Bake Mode: Sets the bake mode for the light. For more information see Baked lightmaps
- Cull Mask: Objects that are in the selected layers below will be affected by this light.
Shadow mapping¶
Lights can optionally cast shadows. This gives them greater realism (light does not reach occluded areas), but it can incur a bigger performance cost. There is a list of generic shadow parameters, each also has a specific function:
- Enabled: Check to enable shadow mapping in this light.
- Color: Areas occluded are multiplied by this color. It is black by default, but it can be changed to tint shadows.
- Bias: When this parameter is too small, self shadowing occurs. When too large, shadows separate from the casters. Tweak to what works best for you.
- Contact: Performs a short screen-space raycast to reduce the gap generated by the bias. Contact shadows are only available when using the GLES3 backend.
- Reverse Cull Faces: Some scenes work better when shadow mapping is rendered with face-culling inverted.
Below is an image of what tweaking bias looks like. Default values work for most cases, but in general it depends on the size and complexity of geometry.
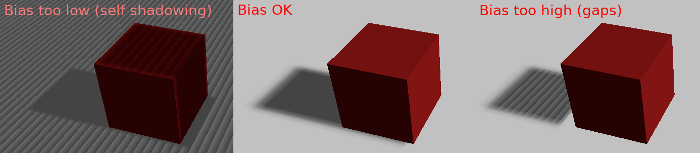
Finally, if gaps can’t be solved, the Contact option can help:
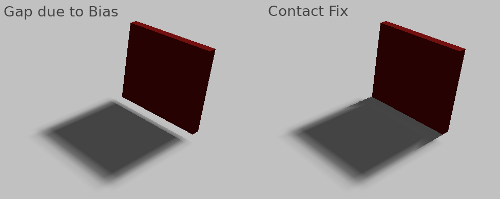
Any sort of bias issues can always be fixed by increasing the shadow map resolution, although that may lead to decreased performance on low-end hardware.
Directional light¶
This is the most common type of light and represents a light source very far away (such as the sun). It is also the cheapest light to compute and should be used whenever possible (although it’s not the cheapest shadow-map to compute, but more on that later).
Directional light models an infinite number of parallel light rays covering the whole scene. The directional light node is represented by a big arrow which indicates the direction of the light rays. However, the position of the node does not affect the lighting at all and can be anywhere.
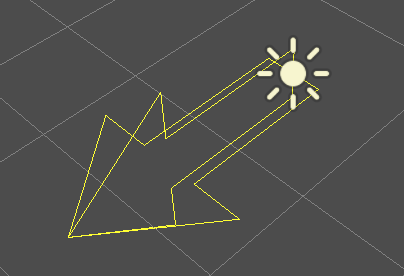
Every face whose front-side is hit by the light rays is lit, while the others stay dark. Most light types have specific parameters, but directional lights are pretty simple in nature, so they don’t.
Directional shadow mapping¶
To compute shadow maps, the scene is rendered (only depth) from an orthogonal point of view that covers the whole scene (or up to the max distance). There is, however, a problem with this approach because objects closer to the camera receive blocky shadows.
To fix this, a technique named “Parallel Split Shadow Maps” (or PSSM) is used. This splits the view frustum in 2 or 4 areas. Each area gets its own shadow map. This allows small areas close to the viewer to have the same shadow resolution as a huge, far-away area.
With this, shadows become more detailed:
To control PSSM, a number of parameters are exposed:
Each split distance is controlled relative to the camera far (or shadow Max Distance if greater than zero), so 0.0 is the eye position and 1.0 is where the shadow ends at a distance. Splits are in-between. Default values generally work well, but tweaking the first split a bit is common to give more detail to close objects (like a character in a third person game).
Always make sure to set a shadow Max Distance according to what the scene needs. A lower maximum distance will result in better-looking shadows.
Sometimes, the transition between a split and the next can look bad. To fix this, the “Blend Splits” option can be turned on, which sacrifices detail in exchange for smoother transitions:
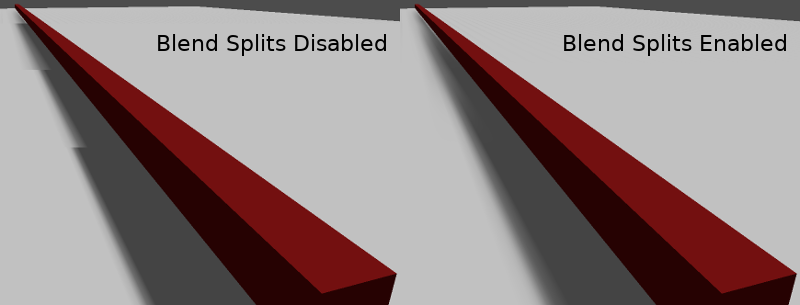
The “Normal Bias” parameter can be used to fix special cases of self shadowing when objects are perpendicular to the light. The only downside is that it makes the shadow a bit thinner.
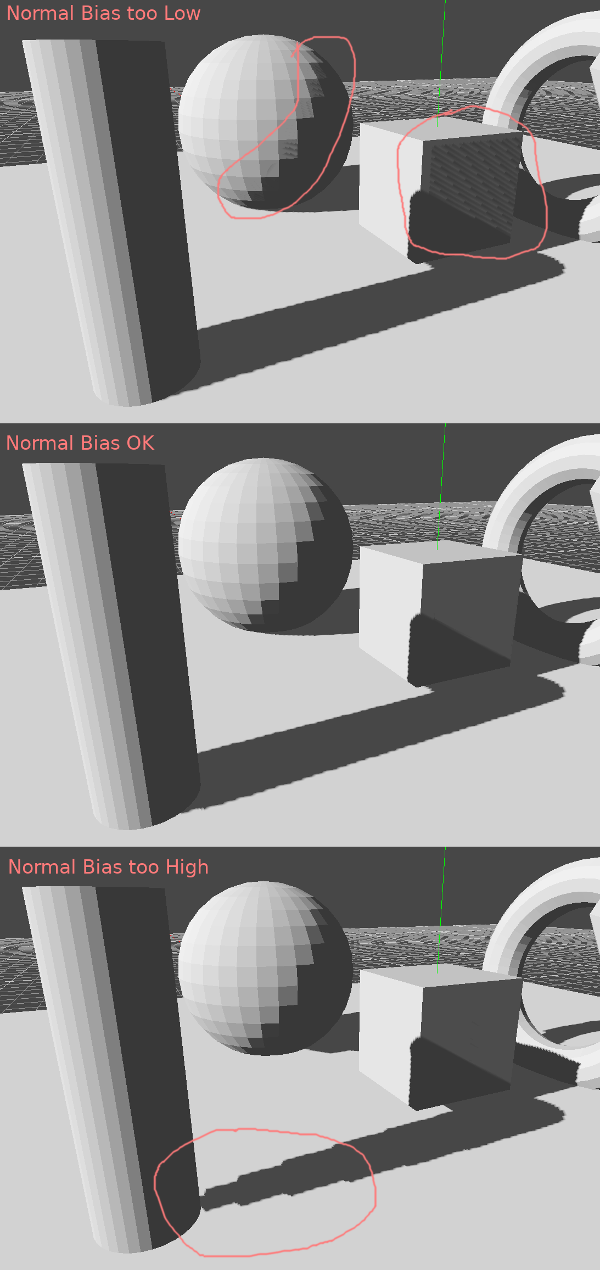
The “Bias Split Scale” parameter can control extra bias for the splits that are far away. If self shadowing occurs only on the splits far away, this value can fix them.
Finally, the “Depth Range” has two settings:
- Stable: Keeps the shadow stable while the camera moves, and the blocks that appear in the outline when close to the shadow edges remain in-place. This is the default and generally desired, but it reduces the effective shadow resolution.
- Optimized: Tries to achieve the maximum resolution available at any given time. This may result in a “moving saw” effect on shadow edges, but at the same time the shadow looks more detailed (so this effect may be subtle enough to be forgiven).
Just experiment which setting works better for your scene.
Shadowmap size for directional lights can be changed in Project Settings -> Rendering -> Quality:

Increasing it can solve bias problems, but decrease performance. Shadow mapping is an art of tweaking.
Omni light¶
Omni light is a point source that emits light spherically in all directions up to a given radius.
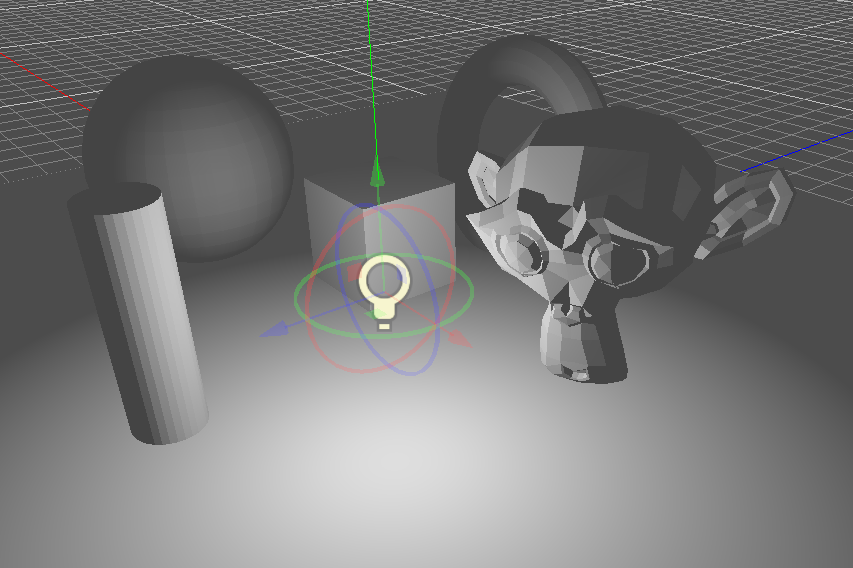
In real life, light attenuation is an inverse function, which means omni lights don’t have a radius. This is a problem because it means computing several omni lights would become demanding.
To solve this, a Range is introduced together with an attenuation function.
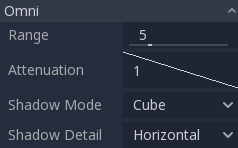
These two parameters allow tweaking how this works visually in order to find aesthetically pleasing results.
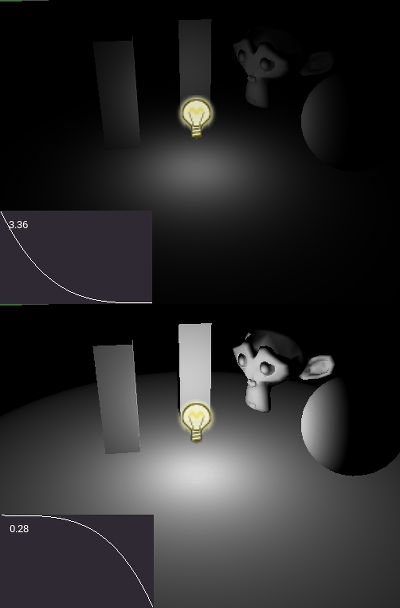
Omni shadow mapping¶
Omni light shadow mapping is relatively straightforward. The main issue that needs to be considered is the algorithm used to render it.
Omni Shadows can be rendered as either “Dual Paraboloid” or “Cube Mapped”. The former renders quickly, but can cause deformations, while the later is more correct, but costlier.
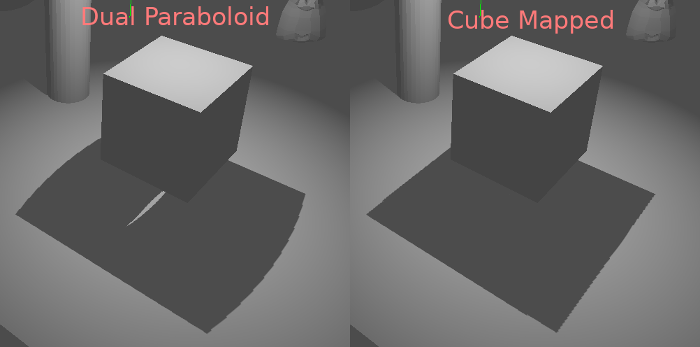
If the objects being rendered are mostly irregular, Dual Paraboloid is usually enough. In any case, as these shadows are cached in a shadow atlas (more on that at the end), it may not make a difference in performance for most scenes.
Spot light¶
Spot lights are similar to omni lights, except they emit light only into a cone (or “cutoff”). They are useful to simulate flashlights, car lights, reflectors, spots, etc. This type of light is also attenuated towards the opposite direction it points to.
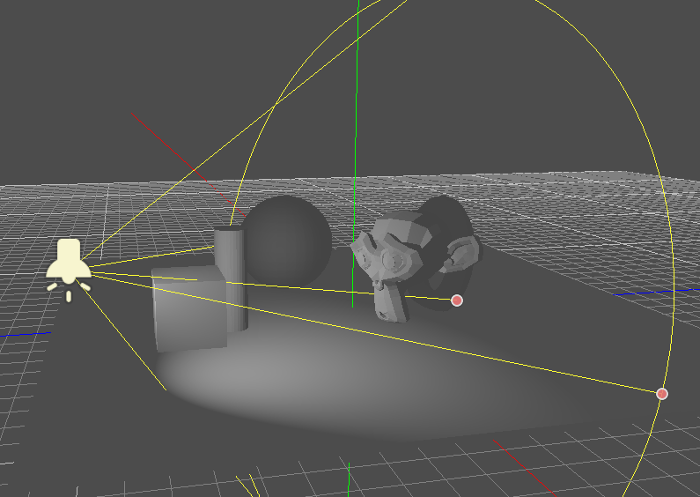
Spot lights share the same Range and Attenuation as OmniLight, and add two extra parameters:
- Angle: The aperture angle of the light
- Angle Attenuation: The cone attenuation, which helps soften the cone borders.
Spot shadow mapping¶
Spots don’t need any parameters for shadow mapping. Keep in mind that, at more than 89 degrees of aperture, shadows stop functioning for spots, and you should consider using an Omni light instead.
Shadow atlas¶
Unlike Directional lights, which have their own shadow texture, Omni and Spot lights are assigned to slots of a shadow atlas. This atlas can be configured in Project Settings -> Rendering -> Quality -> Shadow Atlas.
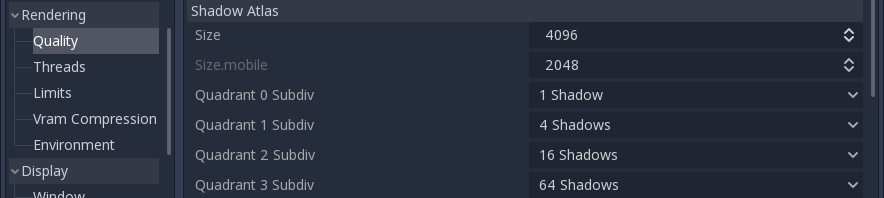
The resolution applies to the whole Shadow Atlas. This atlas is divided into four quadrants:
Each quadrant can be subdivided to allocate any number of shadow maps; the following is the default subdivision:
The allocation logic is simple. The biggest shadow map size (when no subdivision is used) represents a light the size of the screen (or bigger). Subdivisions (smaller maps) represent shadows for lights that are further away from view and proportionally smaller.
Every frame, the following procedure is performed for all lights:
- Check if the light is on a slot of the right size. If not, re-render it and move it to a larger/smaller slot.
- Check if any object affecting the shadow map has changed. If it did, re-render the light.
- If neither of the above has happened, nothing is done, and the shadow is left untouched.
If the slots in a quadrant are full, lights are pushed back to smaller slots, depending on size and distance.
This allocation strategy works for most games, but you may want to use a separate one in some cases (for example, a top-down game where all lights are around the same size and quadrants may all have the same subdivision).
Shadow filter quality¶
The filter quality of shadows can be tweaked. This can be found in Project Settings -> Rendering -> Quality -> Shadows. Godot supports no filter, PCF5 and PCF13.

It affects the blockyness of the shadow outline:
Reflection probes¶
Introduction¶
As stated in the Spatial Material, objects can show reflected or diffuse light. Reflection probes are used as a source of reflected and ambient light for objects inside their area of influence.
A probe of this type captures the surroundings (as a sort of 360 degrees image), and stores versions of it with increasing levels of blur. This is used to simulate roughness in materials, as well as ambient lighting.
While these probes are an efficient way of storing reflections, they have a few shortcomings:
- They are efficient to render, but expensive to compute. This leads to a default behavior where they only capture on scene load.
- They work best for rectangular shaped rooms or places, otherwise the reflections shown are not as faithful (especially when roughness is 0).
Setting up¶
Create a ReflectionProbe node and wrap it around the area where you want to have reflections:
This should result in immediate local reflections. If you are using a Sky texture, reflections are by default blended with it.
By default, on interiors, reflections may appear not to have much consistence. In this scenario, make sure to tick the “Box Correct” property.

This setting changes the reflection from an infinite skybox to reflecting a box the size of the probe:
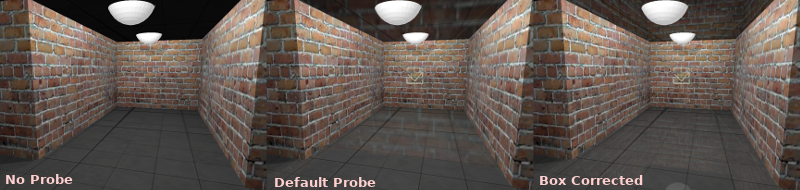
Adjusting the box walls may help improve the reflection a bit, but it will always look best in box shaped rooms.
The probe captures the surrounding from the center of the gizmo. If, for some reason, the room shape or contents occlude the center, it can be displaced to an empty place by moving the handles in the center:
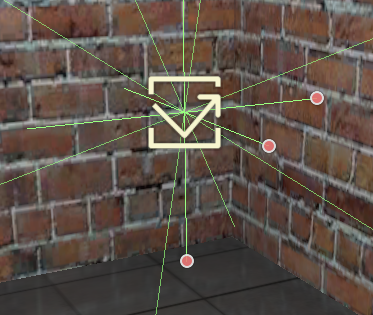
By default, shadow mapping is disabled when rendering probes (only in the rendered image inside the probe, not the actual scene). This is a simple way to save on performance and memory. If you want shadows in the probe, they can be toggled on/off with the Enable Shadow setting:

Finally, keep in mind that you may not want the Reflection Probe to render some objects. A typical scenario is an enemy inside the room which will move around. To keep objects from being rendered in the reflections, use the Cull Mask setting:
Interior vs exterior¶
If you are using reflection probes in an interior setting, it is recommended that the Interior property be enabled. This stops the probe from rendering the sky and also allows custom ambient lighting settings.
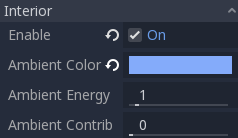
When probes are set to Interior, custom constant ambient lighting can be specified per probe. Just choose a color and an energy.
Optionally, you can blend this ambient light with the probe diffuse capture by tweaking the Ambient Contribution property (0.0 means pure ambient color, while 1.0 means pure diffuse capture).
Blending¶
Multiple reflection probes can be used, and Godot will blend them where they overlap using a smart algorithm:
As you can see, this blending is never perfect (after all, these are box reflections, not real reflections), but these artifacts are only visible when using perfectly mirrored reflections. Normally, scenes have normal mapping and varying levels of roughness, which can hide this.
Alternatively, Reflection Probes work well blended together with Screen Space Reflections to solve these problems. Combining them makes local reflections appear more faithful, while probes are only used as a fallback when no screen-space information is found:
Finally, blending interior and exterior probes is the recommended approach when making levels that combine both interiors and exteriors. Near the door, a probe can be marked as exterior (so it will get sky reflections) while on the inside, it can be interior.
Reflection atlas¶
In the current renderer implementation, all probes are the same size and are fit into a Reflection Atlas. The size and amount of probes can be customized in Project Settings -> Quality -> Reflections
GI Probes¶
Introduction¶
Note
This feature is only available when using the GLES3 backend. Baked lightmaps can be used as an alternative when using the GLES2 renderer.
Just like with Reflection probes, and as stated in the Spatial Material, objects can show reflected or diffuse light. GI Probes are similar to Reflection Probes, but they use a different and more complex technique to produce indirect light and reflections.
The strength of GI Probes is real-time, high quality, indirect light. While the scene needs a quick pre-bake for the static objects that will be used, lights can be added, changed or removed, and this will be updated in real-time. Dynamic objects that move within one of these probes will also receive indirect lighting from the scene automatically.
Just like with ReflectionProbe, GIProbe can be blended (in a bit more limited
way), so it is possible to provide full real-time lighting
for a stage without having to resort to lightmaps.
The main downsides of GIProbe are:
- A small amount of light leaking can occur if the level is not carefully designed. This must be artist-tweaked.
- Performance requirements are higher than for lightmaps, so it may not run properly in low-end integrated GPUs (may need to reduce resolution).
- Reflections are voxelized, so they don’t look as sharp as with
ReflectionProbe. However, in exchange they are volumetric, so any room size or shape works for them. Mixing them with Screen Space Reflection also works well. - They consume considerably more video memory than Reflection Probes, so they must be used with care in the right subdivision sizes.
Setting up¶
Just like a ReflectionProbe, simply set up the GIProbe by wrapping it around
the geometry that will be affected.
Afterwards, make sure to enable the geometry will be baked. This is important in
order for GIProbe to recognize objects, otherwise they will be ignored:
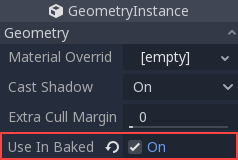
Once the geometry is set up, push the Bake button that appears on the 3D editor toolbar to begin the pre-baking process:

Adding lights¶
Unless there are materials with emission, GIProbe does nothing by default.
Lights need to be added to the scene to have an effect.
The effect of indirect light can be viewed quickly (it is recommended you turn off all ambient/sky lighting to tweak this, though, as shown below):
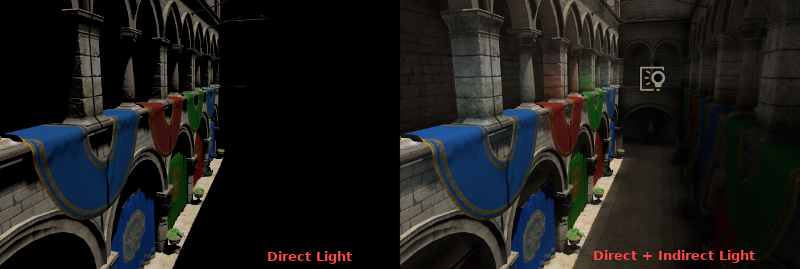
In some situations, though, indirect light may be too weak. Lights have an indirect multiplier to tweak this:
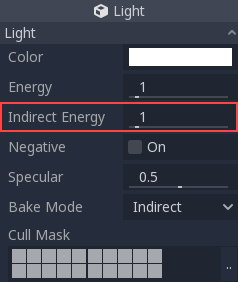
And, as GIProbe lighting updates in real-time, this effect is immediate:
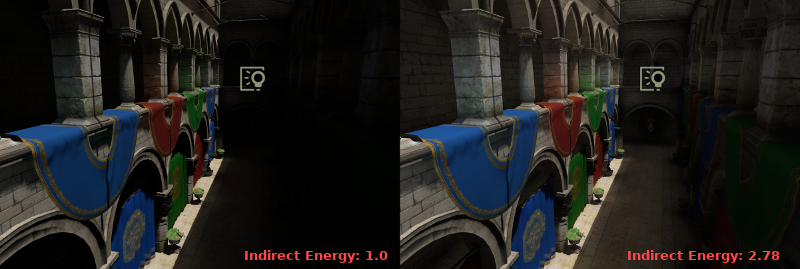
Reflections¶
For very metallic materials with low roughness, it’s possible to appreciate voxel reflections. Keep in mind that these have far less detail than Reflection Probes or Screen Space Reflections, but fully reflect volumetrically.
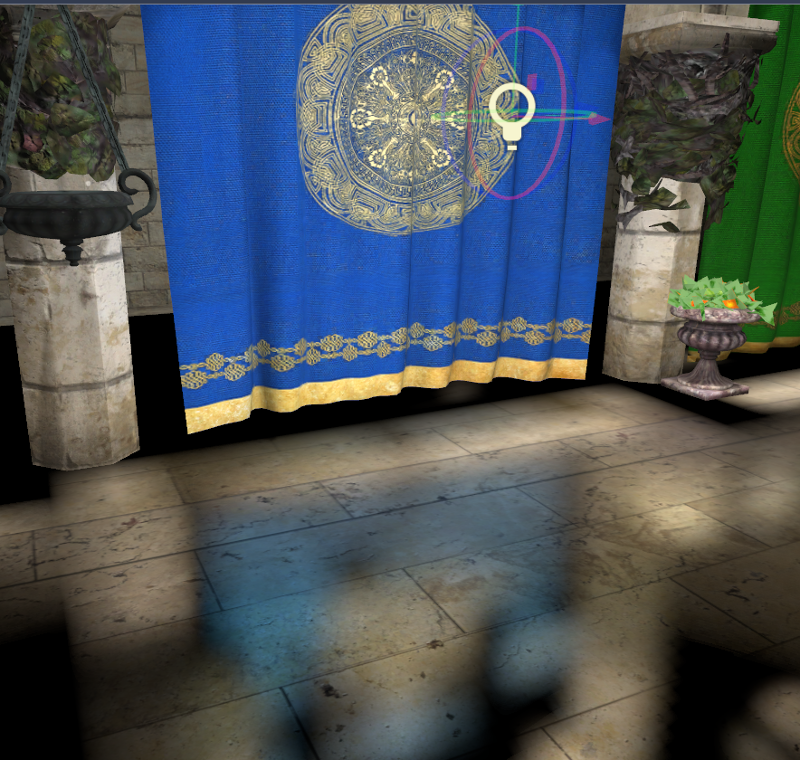
GIProbes can be easily mixed with Reflection Probes and Screen Space Reflections,
as a full 3-stage fallback-chain. This allows to have precise reflections where needed:

Interior vs exterior¶
GI Probes normally allow mixing with lighting from the sky. This can be disabled when turning on the Interior setting.

The difference becomes clear in the image below, where light from the sky goes from spreading inside to being ignored.
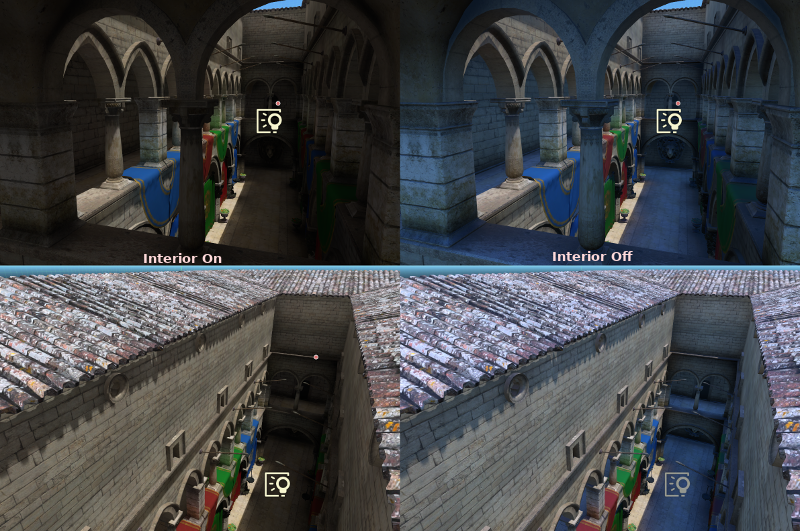
As complex buildings may mix interiors with exteriors, combining GIProbes for both parts works well.
Tweaking¶
GI Probes support a few parameters for tweaking:
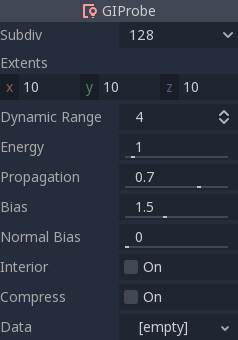
- Subdiv Subdivision used for the probe. The default (128) is generally good for small- to medium-sized areas. Bigger subdivisions use more memory.
- Extents Size of the probe. Can be tweaked from the gizmo.
- Dynamic Range Maximum light energy the probe can absorb. Higher values allow brighter light, but with less color detail.
- Energy Multiplier for all the probe. Can be used to make the indirect light brighter (although it’s better to tweak this from the light itself).
- Propagation How much light propagates through the probe internally.
- Bias Value used to avoid self-occlusion when doing voxel cone tracing, should generally be above 1.0 (1==voxel size).
- Normal Bias Alternative type of bias useful for some scenes. Experiment with this one if regular bias does not work.
- Interior Allows mixing with lighting from the sky.
- Compress Currently broken. Do not use.
- Data Contains the light baked data after baking. If you are saving the data it should be saved as a .res file.
Quality¶
GIProbes are quite demanding. It is possible to use lower quality voxel cone
tracing in exchange for more performance.
Baked lightmaps¶
Introduction¶
Baked lightmaps are an alternative workflow for adding indirect (or baked) lighting to a scene. Unlike the GI Probes approach, baked lightmaps work fine on low-end PCs and mobile devices, as they consume almost no resources at run-time.
Unlike GIProbes, Baked Lightmaps are completely static. Once baked, they can’t be
modified at all. They also don’t provide the scene with
reflections, so using Reflection probes together with it on interiors
(or using a Sky on exteriors) is a requirement to get good quality.
As they are baked, they have fewer problems than GIProbe regarding light bleeding,
and indirect light can look better if using Raytrace
mode on high quality setting (but baking can take a while).
In the end, deciding which indirect lighting approach is better depends on your use case. In general, GIProbe looks better and is much easier to set up. For mobile or low-end compatibility, though, Baked Lightmaps are your only choice.
Visual comparison¶
Here are some comparisons of how Baked Lightmaps vs. GIProbe look. Notice that lightmaps are more accurate, but also suffer from the fact that lighting is on an unwrapped texture, so transitions and resolution may not be that good. GIProbe looks less accurate (as it’s an approximation), but smoother overall.
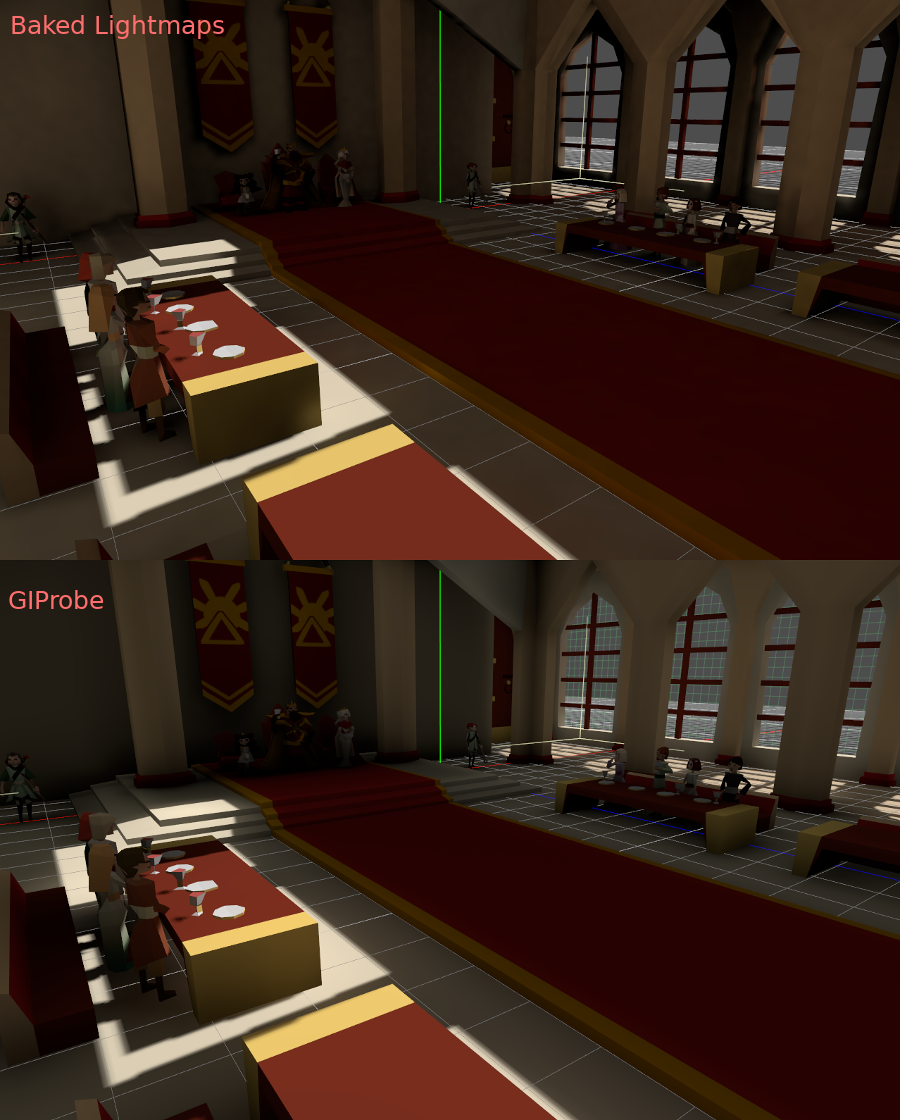
Setting up¶
First of all, before the lightmapper can do anything, the objects to be baked need an UV2 layer and a texture size. An UV2 layer is a set of secondary texture coordinates that ensures any face in the object has its own place in the UV map. Faces must not share pixels in the texture.
There are a few ways to ensure your object has a unique UV2 layer and texture size:
Unwrap from your 3D DCC¶
One option is to do it from your favorite 3D app. This approach is generally not recommended, but it’s explained first so that you know it exists. The main advantage is that, on complex objects that you may want to re-import a lot, the texture generation process can be quite costly within Godot, so having it unwrapped before import can be faster.
Simply do an unwrap on the second UV2 layer.
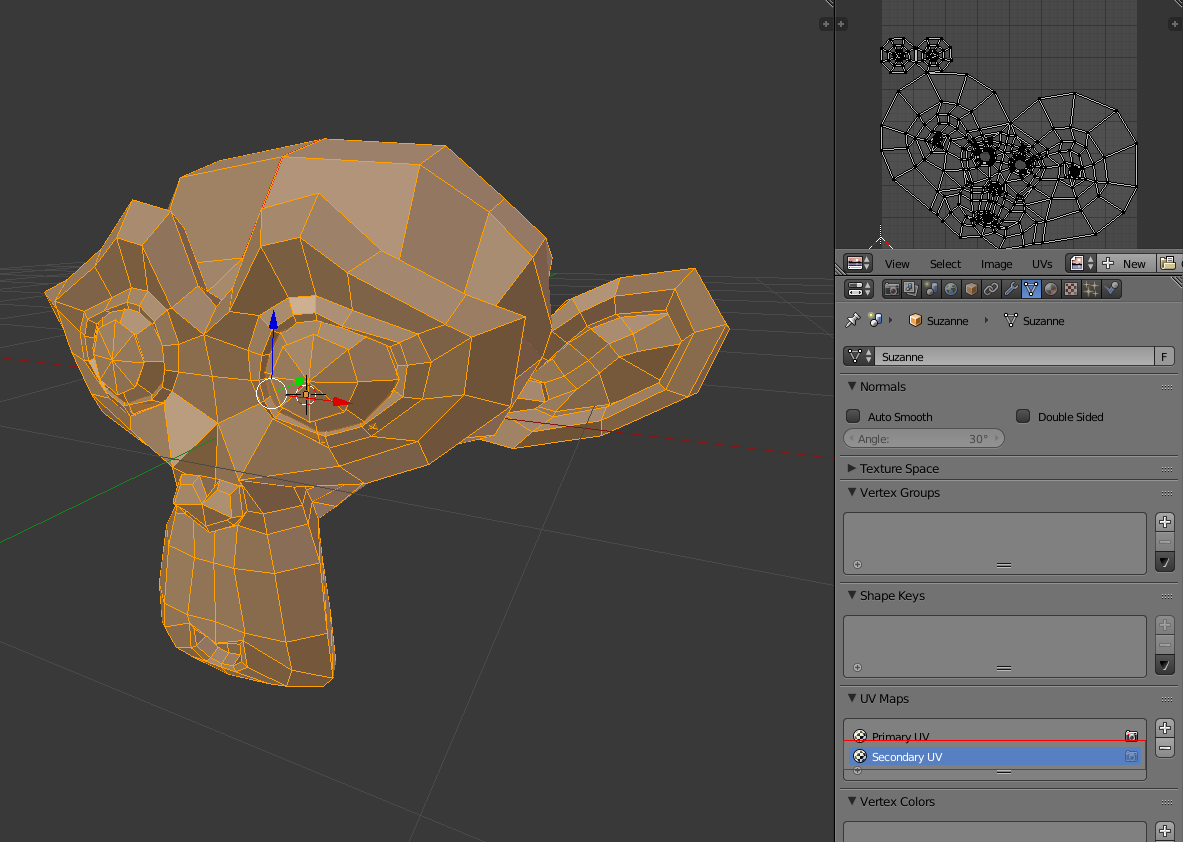
And import normally. Remember you will need to set the texture size on the mesh after import.

If you use external meshes on import, the size will be kept. Be wary that most unwrappers in 3D DCCs are not quality oriented, as they are meant to work quickly. You will mostly need to use seams or other techniques to create better unwrapping.
Unwrap from within Godot¶
Godot has an option to unwrap meshes and visualize the UV channels. It can be found in the Mesh menu:
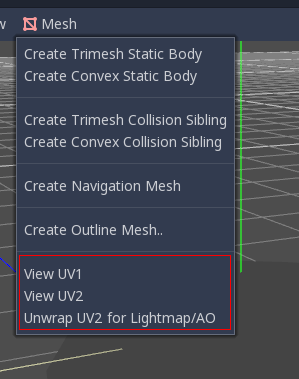
This will generate a second set of UV2 coordinates which can be used for baking, and it will also set the texture size automatically.
Unwrap on scene import¶
This is probably the best approach overall. The only downside is that, on large models, unwrapping can take a while on import. Just select the imported scene in the filesystem dock, then go to the Import tab. There, the following option can be modified:
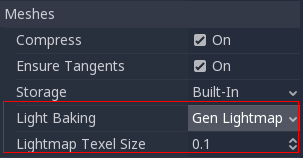
The Light Baking mode needs to be set to “Gen Lightmaps”. A texel size in world units must also be provided, as this will determine the final size of the lightmap texture (and, in consequence, the UV padding in the map).
The effect of setting this option is that all meshes within the scene will have their UV2 maps properly generated.
As a word of warning: When reusing a mesh within a scene, keep in mind that UVs will be generated for the first instance found. If the mesh is re-used with different scales (and the scales are wildly different, more than half or twice), this will result in inefficient lightmaps. Just don’t reuse a source mesh at different scales if you are planning to use lightmapping.
Checking UV2¶
In the mesh menu mentioned before, the UV2 texture coordinates can be visualized. Make sure, if something is failing, to check that the meshes have these UV2 coordinates:
Setting up the scene¶
Before anything is done, a BakedLightmap Node needs to be added to a scene. This will enable light baking on all nodes (and sub-nodes) in that scene, even on instanced scenes.
A sub-scene can be instanced several times, as this is supported by the baker, and each will be assigned a lightmap of its own (just make sure to respect the rule about scaling mentioned before):
Configure bounds¶
Lightmap needs an approximate volume of the area affected because it uses it to
transfer light to dynamic objects inside it (more on that later). Just
cover the scene with the volume as you do with GIProbe:
Setting up meshes¶
For a MeshInstance node to take part in the baking process, it needs to have the “Use in Baked Light” property enabled.
When auto-generating lightmaps on scene import, this is enabled automatically.
Setting up lights¶
Lights are baked with indirect light by default. This means that shadowmapping and lighting are still dynamic and affect moving objects, but light bounces from that light will be baked.
Lights can be disabled (no bake) or be fully baked (direct and indirect). This can be controlled from the Bake Mode menu in lights:
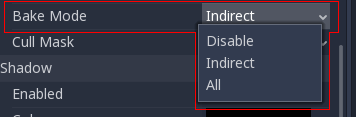
The modes are:
- Disabled: Light is ignored in baking. Keep in mind hiding a light will have no effect for baking, so this must be used instead.
- Indirect: This is the default mode. Only indirect lighting will be baked.
- All: Both indirect and direct lighting will be baked. If you don’t want the light to appear twice (dynamically and statically), simply hide it.
Baking quality¶
BakedLightmap uses, for simplicity, a voxelized version of the scene to compute
lighting. Voxel size can be adjusted with the Bake Subdiv parameter.
More subdivision results in more detail, but also takes more time to bake.
In general, the defaults are good enough. There is also a Capture Subdivision (that must always be equal to or less than the main subdivision), which is used for capturing light in dynamic objects (more on that later). Its default value is also good enough for most cases.

Besides the capture size, quality can be modified by setting the Bake Mode. Two modes of capturing indirect are provided:
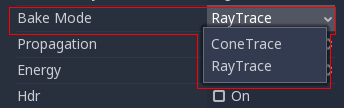
- Voxel Cone: Trace: Is the default one; it’s less precise, but faster. Looks similar to (but slightly better than)
GIProbe. - Ray Tracing: This method is more precise, but can take considerably longer to bake. If used in low or medium quality, some scenes may produce grain.
Baking¶
To begin the bake process, just push the big Bake Lightmaps button on top
when selecting the BakedLightmap node:

This can take from seconds to minutes (or hours) depending on scene size, bake method and quality selected.
Configuring bake¶
Several more options are present for baking:
- Bake Subdiv: The Godot lightmapper uses a grid to transfer light information around; the default value is fine and should work for most cases. Increase it in case you want better lighting on small details or your scene is large.
- Capture Subdiv: This is the grid used for real-time capture information (lighting dynamic objects). Default value is generally OK, it’s usually smaller than Bake Subdiv and can’t be larger than it.
- Bake Quality: Three bake quality modes are provided, Low, Medium and High. Higher quality takes more time.
- Bake Mode: The baker can use two different techniques: Voxel Cone Tracing (fast, but approximate), or RayTracing (slow, but accurate).
- Propagation: Used for the Voxel Cone Trace mode. Works just like in
GIProbe. - HDR: If disabled, lightmaps are smaller, but can’t capture any light over white (1.0).
- Image Path: Where lightmaps will be saved. By default, on the same directory as the scene (“.”), but can be tweaked.
- Extents: Size of the area affected (can be edited visually)
- Light Data: Contains the light baked data after baking. Textures are saved to disk, but this also contains the capture data for dynamic objects, which can be a bit heavy. If you are using .tscn formats (instead of .scn), you can save it to disk.
Dynamic objects¶
In other engines or lightmapper implementations, you are required to manually place small objects called “lightprobes” all around the level to generate capture data. This is used to, then, transfer the light to dynamic objects that move around the scene.
However, this implementation of lightmapping uses a different method. The process is automatic, so you don’t have to do anything. Just move your objects around, and they will be lit accordingly. Of course, you have to make sure you set up your scene bounds accordingly or it won’t work.
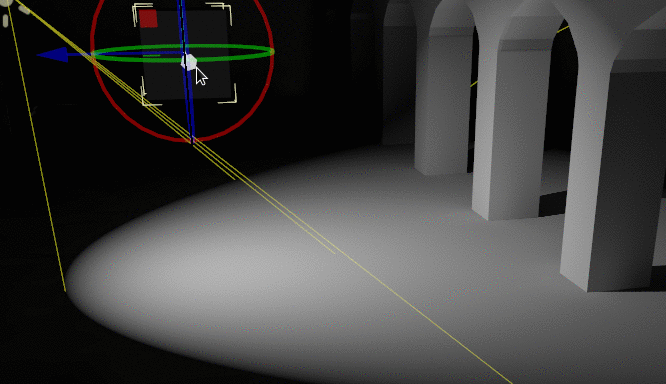
Environment and post-processing¶
Godot 3 provides a redesigned Environment resource, as well as a brand new post-processing system with many available effects right out of the box.
Environment¶
The Environment resource stores all the information required for controlling rendering environment. This includes sky, ambient lighting, tone mapping, effects, and adjustments. By itself it does nothing, but it becomes enabled once used in one of the following locations in order of priority:
Camera node¶
An Environment can be set to a camera. It will have priority over any other setting.
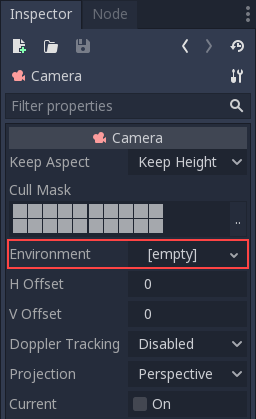
This is mostly useful when wanting to override an existing environment, but in general it’s a better idea to use the option below.
WorldEnvironment node¶
The WorldEnvironment node can be added to any scene, but only one can exist per active scene tree. Adding more than one will result in a warning.
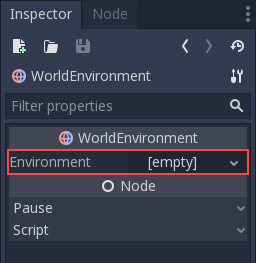
Any Environment added has higher priority than the default Environment (explained below). This means it can be overridden on a per-scene basis, which makes it quite useful.
Default environment¶
A default environment can be set, which acts as a fallback when no Environment was set to a Camera or WorldEnvironment. Just head to Project Settings -> Rendering -> Environment:
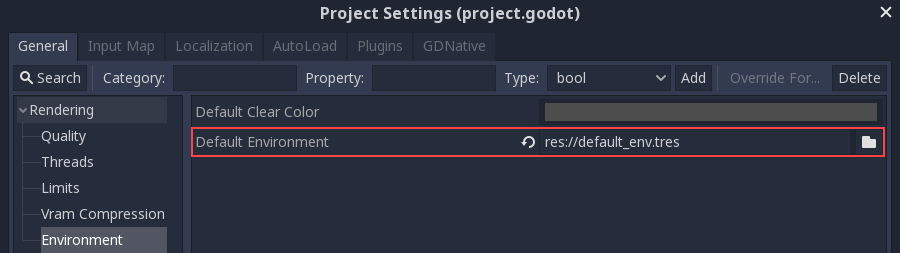
New projects created from the Project Manager come with a default environment
(default_env.tres). If one needs to be created, save it to disk before
referencing it here.
Environment options¶
Following is a detailed description of all environment options and how they are intended to be used.
Background¶
The Background section contains settings on how to fill the background (parts of the screen where objects were not drawn). In Godot 3.0, the background not only serves the purpose of displaying an image or color, it can also change how objects are affected by ambient and reflected light.
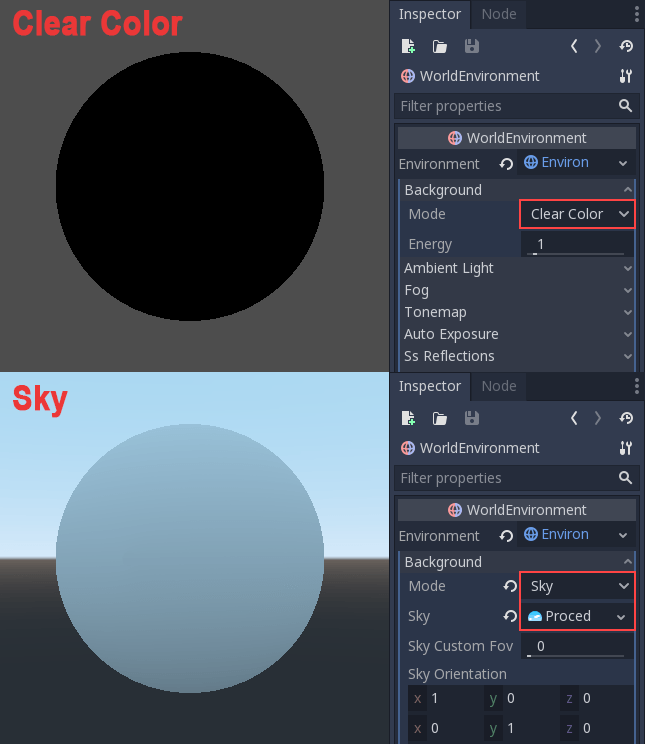
There are many ways to set the background:
- Clear Color uses the default clear color defined by the project. The background will be a constant color.
- Custom Color is like Clear Color, but with a custom color value.
- Sky lets you define a panorama sky (a 360 degree sphere texture) or a procedural sky (a simple sky featuring a gradient and an optional sun). Objects will reflect it and absorb ambient light from it.
- Color+Sky lets you define a sky (as above), but uses a constant color value for drawing the background. The sky will only be used for reflection and ambient light.
Ambient Light¶
Ambient (as defined here) is a type of light that affects every piece of geometry with the same intensity. It is global and independent of lights that might be added to the scene.
There are two types of ambient light: the Ambient Color (which is a constant color multiplied by the material albedo) and then one obtained from the Sky (as described before, but a sky needs to be set as background for this to be enabled).

When a Sky is set as background, it’s possible to blend between ambient color and sky using the Sky Contribution setting (this value is 1.0 by default for convenience, so only the sky affects objects).
Here is a comparison of how different ambient light affects a scene:
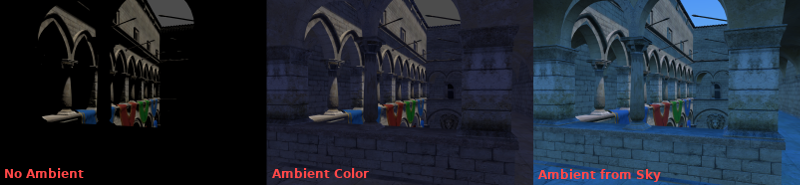
Finally there is an Energy setting, which is a multiplier, useful when working with HDR.
In general, ambient light should only be used for simple scenes, large exteriors, or for performance reasons (ambient light is cheap), as it does not provide the best lighting quality. It’s better to generate ambient light from ReflectionProbe or GIProbe, which will more faithfully simulate how indirect light propagates. Below is a comparison, in terms of quality, between using a flat ambient color and a GIProbe:
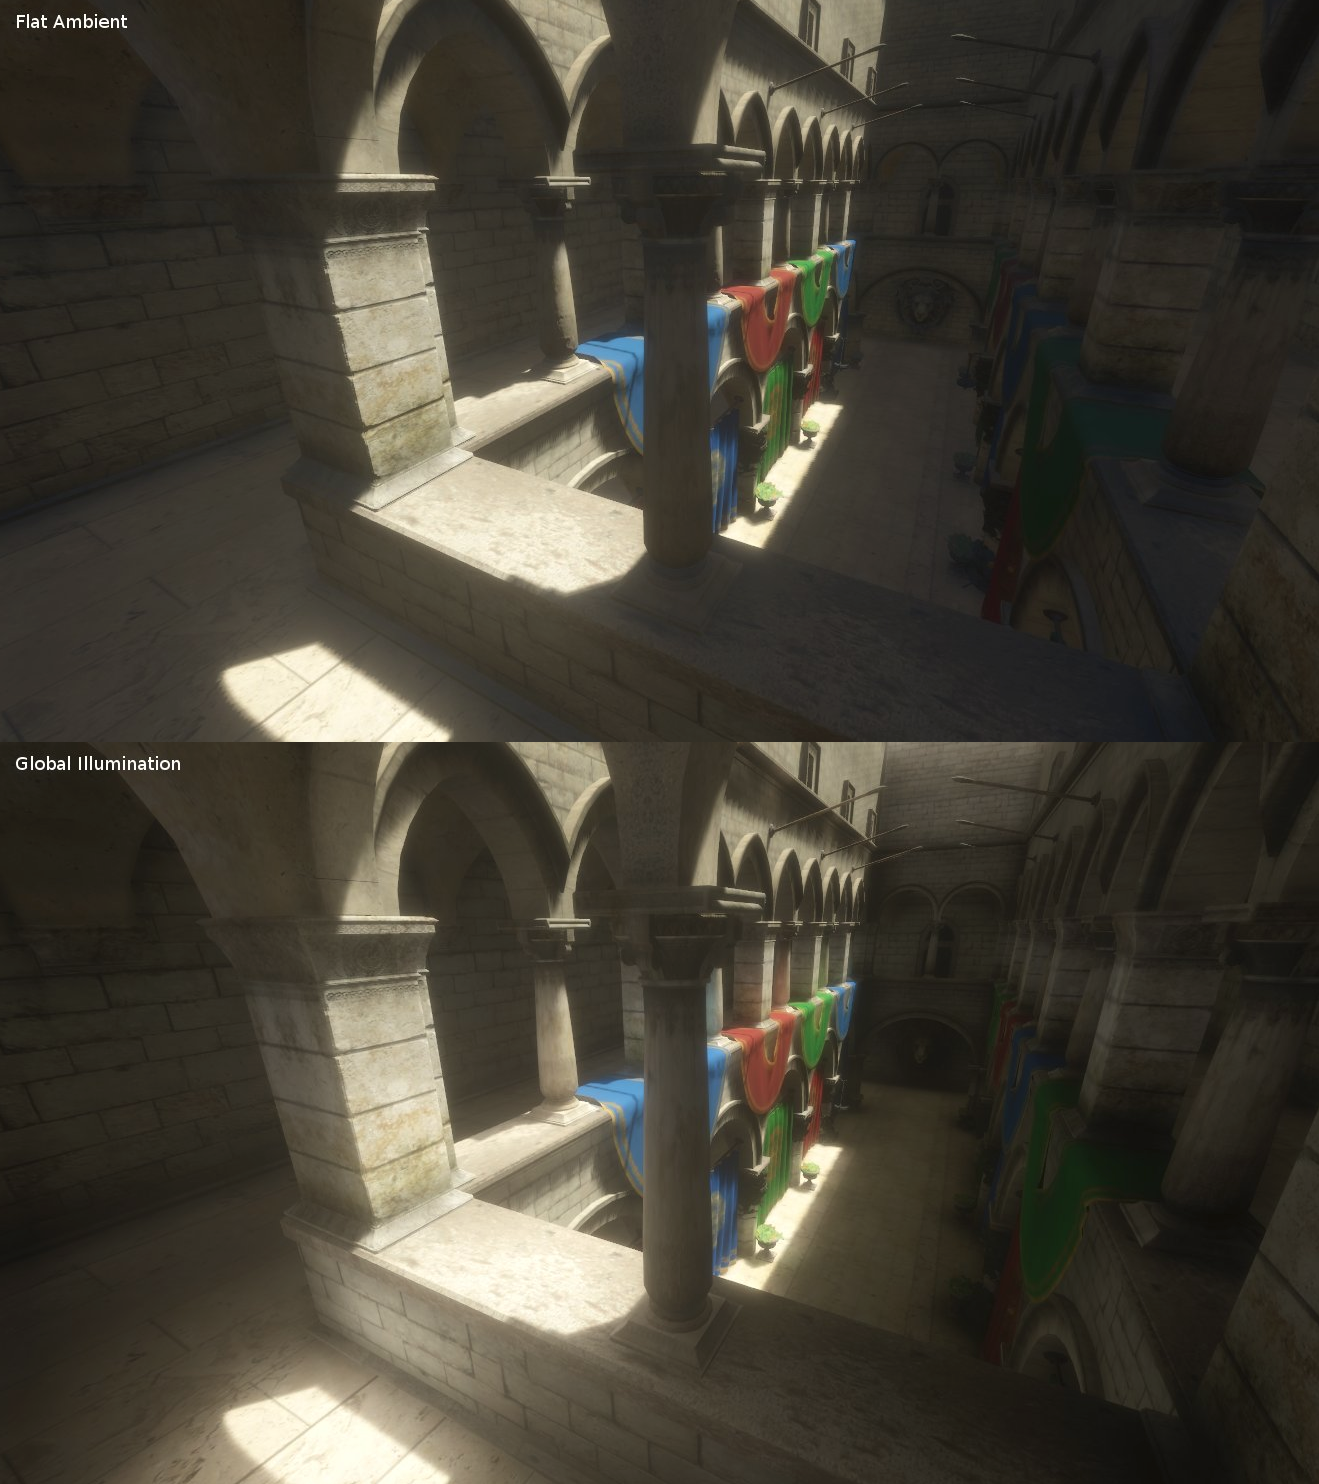
Using one of the methods described above, objects get constant ambient lighting replaced by ambient light from the probes.
Fog¶
Fog, as in real life, makes distant objects fade away into an uniform color. The physical effect is actually pretty complex, but Godot provides a good approximation. There are two kinds of fog in Godot:
- Depth Fog: This one is applied based on the distance from the camera.
- Height Fog: This one is applied to any objects below (or above) a certain height, regardless of the distance from the camera.
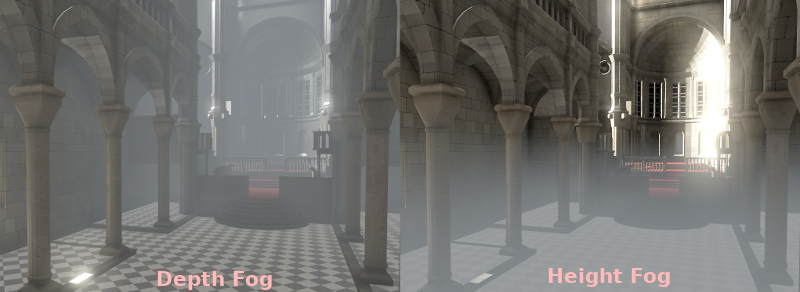
Both of these fog types can have their curve tweaked, making their transition more or less sharp.
Two properties can be tweaked to make the fog effect more interesting:
The first is Sun Amount, which makes use of the Sun Color property of the fog. When looking towards a directional light (usually a sun), the color of the fog will be changed, simulating the sunlight passing through the fog.
The second is Transmit Enabled which simulates more realistic light transmittance. In practice, it makes light stand out more across the fog.
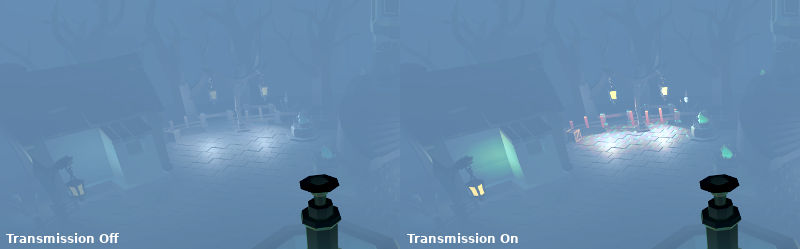
Tonemap¶
This feature is only available when using the GLES3 backend.
Selects the tone-mapping curve that will be applied to the scene, from a short list of standard curves used in the film and game industry. Tone mapping can make light and dark areas more homogeneous, even though the result is not that strong. Tone mapping options are:
- Mode: Tone mapping mode, which can be Linear, Reindhart, Filmic, or Aces.
- Exposure: Tone mapping exposure which simulates amount of light received over time.
- White: Tone mapping white, which simulates where in the scale white is located (by default 1.0).
Auto Exposure (HDR)¶
This feature is only available when using the GLES3 backend.
Even though, in most cases, lighting and texturing are heavily artist controlled, Godot supports a simple high dynamic range implementation with the auto exposure mechanism. This is generally used for the sake of realism when combining interior areas with low light and outdoors. Auto exposure simulates the camera (or eye) in an effort to adapt between light and dark locations and their different amounts of light.
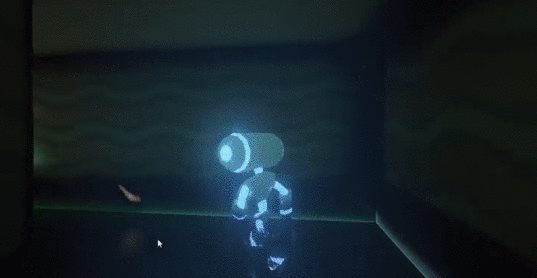
The simplest way to use auto exposure is to make sure outdoor lights (or other strong lights) have energy beyond 1.0. This is done by tweaking their Energy multiplier (on the Light itself). To make it consistent, the Sky usually needs to use the energy multiplier too, to match with the directional light. Normally, values between 3.0 and 6.0 are enough to simulate indoor-outdoor conditions.
By combining Auto Exposure with Glow post processing (more on that below), pixels that go over the tonemap White will bleed to the glow buffer, creating the typical bloom effect in photography.
The user-controllable values in the Auto Exposure section come with sensible defaults, but you can still tweak them:
- Scale: Value to scale the lighting. Brighter values produce brighter images, smaller ones produce darker ones.
- Min Luma: Minimum luminance that auto exposure will aim to adjust for. Luminance is the average of the light in all the pixels of the screen.
- Max Luma: Maximum luminance that auto exposure will aim to adjust for.
- Speed: Speed at which luminance corrects itself. The higher the value, the faster correction happens.
Mid- and post-processing effects¶
A large amount of widely-used mid- and post-processing effects are supported in the Environment.
Screen-Space Reflections (SSR)¶
This feature is only available when using the GLES3 backend.
While Godot supports three sources of reflection data (Sky, ReflectionProbe, and GIProbe), they may not provide enough detail for all situations. Scenarios where Screen Space Reflections make the most sense are when objects are in contact with each other (object over floor, over a table, floating on water, etc).
The other advantage (even if only enabled to a minimum), is that it works in real-time (while the other types of reflections are pre-computed). This can be used to make characters, cars, etc. reflect on surrounding surfaces when moving around.
A few user-controlled parameters are available to better tweak the technique:
- Max Steps determines the length of the reflection. The bigger this number, the more costly it is to compute.
- Fade In allows adjusting the fade-in curve, which is useful to make the contact area softer.
- Fade Out allows adjusting the fade-out curve, so the step limit fades out softly.
- Depth Tolerance can be used for screen-space-ray hit tolerance to gaps. The bigger the value, the more gaps will be ignored.
- Roughness will apply a screen-space blur to approximate roughness in objects with this material characteristic.
Keep in mind that screen-space-reflections only work for reflecting opaque geometry. Transparent objects can’t be reflected.
Screen-Space Ambient Occlusion (SSAO)¶
This feature is only available when using the GLES3 backend.
As mentioned in the Ambient section, areas where light from light nodes does not reach (either because it’s outside the radius or shadowed) are lit with ambient light. Godot can simulate this using GIProbe, ReflectionProbe, the Sky, or a constant ambient color. The problem, however, is that all the methods proposed previously act more on a larger scale (large regions) than at the smaller geometry level.
Constant ambient color and Sky are the same everywhere, while GI and Reflection probes have more local detail, but not enough to simulate situations where light is not able to fill inside hollow or concave features.
This can be simulated with Screen Space Ambient Occlusion. As you can see in the image below, its purpose is to make sure concave areas are darker, simulating a narrower path for the light to enter:

It is a common mistake to enable this effect, turn on a light, and not be able to appreciate it. This is because SSAO only acts on ambient light, not direct light.
This is why, in the image above, the effect is less noticeable under the direct light (on the left). If you want to force SSAO to work with direct light too, use the Light Affect parameter (even though this is not correct, some artists like how it looks).
SSAO looks best when combined with a real source of indirect light, like GIProbe:
Tweaking SSAO is possible with several parameters:
- Radius/Intensity: To control the radius or intensity of the occlusion, these two parameters are available. Radius is in world (Metric) units.
- Radius2/Intensity2: A Secondary radius/intensity can be used. Combining a large and a small radius AO generally works well.
- Bias: This can be tweaked to solve self occlusion, though the default generally works well enough.
- Light Affect: SSAO only affects ambient light, but increasing this slider can make it also affect direct light. Some artists prefer this effect.
- Ao Channel Affect: If a value of zero is used, only the material’s AO texture will be used for ambient occlusion; SSAO will not be applied. Values greater than 0 multiply the AO texture by the SSAO effect to varying degrees. This does not affect materials without an AO texture.
- Quality: Depending on quality, SSAO will take more samples over a sphere for every pixel. High quality only works well on modern GPUs.
- Blur: Type of blur kernel used. The 1x1 kernel is a simple blur that preserves local detail better, but is not as efficient (generally works better with the high quality setting above), while 3x3 will soften the image better (with a bit of dithering-like effect), but does not preserve local detail as well.
- Edge Sharpness: This can be used to preserve the sharpness of edges (avoids areas without AO on creases).
Depth of Field / Far Blur¶
This feature is only available when using the GLES3 backend.
This effect simulates focal distance on high end cameras. It blurs objects behind a given range. It has an initial Distance with a Transition region (in world units):
The Amount parameter controls the amount of blur. For larger blurs, tweaking the Quality may be needed in order to avoid artifacts.
Depth of Field / Near Blur¶
This feature is only available when using the GLES3 backend.
This effect simulates focal distance on high end cameras. It blurs objects close to the camera (acts in the opposite direction as far blur). It has an initial Distance with a Transition region (in world units):
The Amount parameter controls the amount of blur. For larger blurs, tweaking the Quality may be needed in order to avoid artifacts.
It is common to use both blurs together to focus the viewer’s attention on a given object:

Glow¶
This feature is only available when using the GLES3 backend.
In photography and film, when light amount exceeds the maximum supported by the media (be it analog or digital), it generally bleeds outwards to darker regions of the image. This is simulated in Godot with the Glow effect.
By default, even if the effect is enabled, it will be weak or invisible. One of two conditions need to happen for it to actually show:
- The light in a pixel surpasses the HDR Threshold (where 0 is all light surpasses it, and 1.0 is light over the tonemapper White value). Normally, this value is expected to be at 1.0, but it can be lowered to allow more light to bleed. There is also an extra parameter, HDR Scale, that allows scaling (making brighter or darker) the light surpassing the threshold.
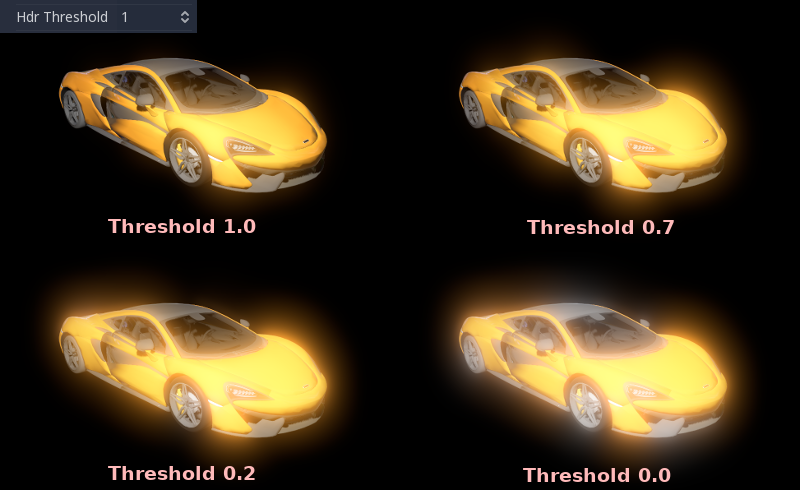
- The Bloom effect has a value set greater than 0. As it increases, it sends the whole screen to the glow processor at higher amounts.
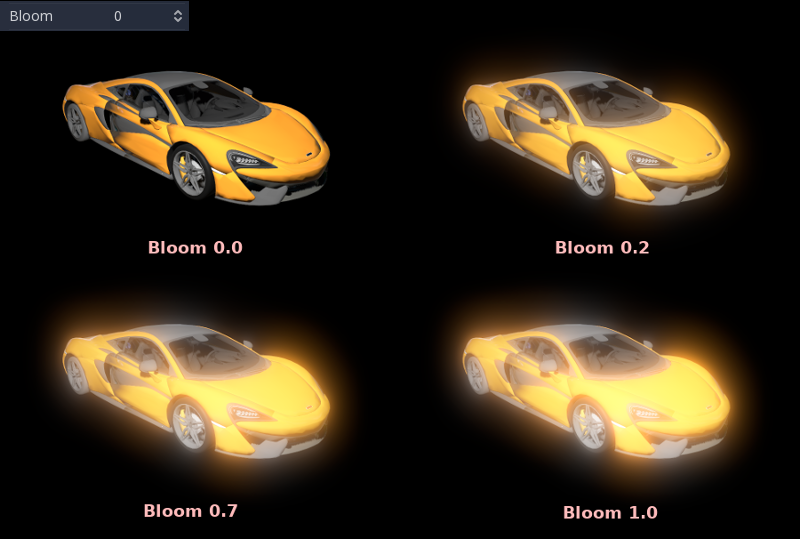
Both will cause the light to start bleeding out of the brighter areas.
Once glow is visible, it can be controlled with a few extra parameters:
- Intensity is an overall scale for the effect, it can be made stronger or weaker (0.0 removes it).
- Strength is how strong the gaussian filter kernel is processed. Greater values make the filter saturate and expand outwards. In general, changing this is not needed, as the size can be more efficiently adjusted with the Levels.
The Blend Mode of the effect can also be changed:
- Additive is the strongest one, as it just adds the glow effect over the image with no blending involved. In general, it’s too strong to be used, but can look good with low intensity Bloom (produces a dream-like effect).
- Screen is the default one. It ensures glow never brights more than itself and works great as an all around.
- Softlight is the weakest one, producing only a subtle color disturbance around the objects. This mode works best on dark scenes.
- Replace can be used to blur the whole screen or debug the effect. It just shows the glow effect without the image below.
To change the glow effect size and shape, Godot provides Levels. Smaller levels are strong glows that appear around objects, while large levels are hazy glows covering the whole screen:

The real strength of this system, though, is to combine levels to create more interesting glow patterns:
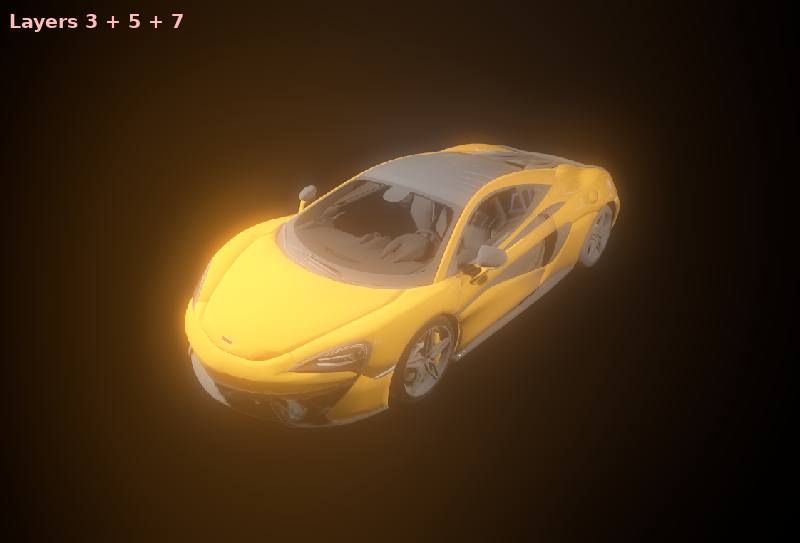
Finally, as the highest layers are created by stretching small blurred images, it is possible that some blockiness may be visible. Enabling Bicubic Upscaling gets rids of it, at a minimal performance cost.
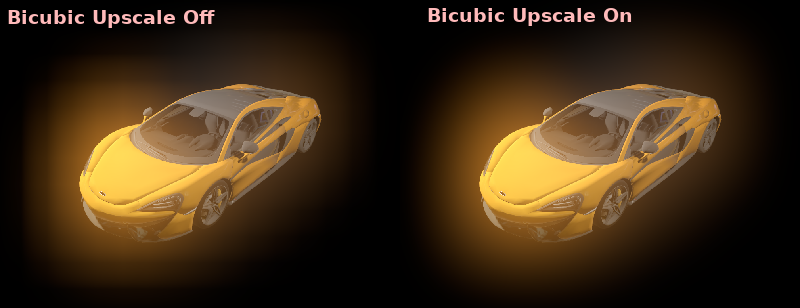
Adjustments¶
This feature is only available when using the GLES3 backend.
At the end of processing, Godot offers the possibility to do some standard image adjustments.
The first one is being able to change the typical Brightness, Contrast, and Saturation:
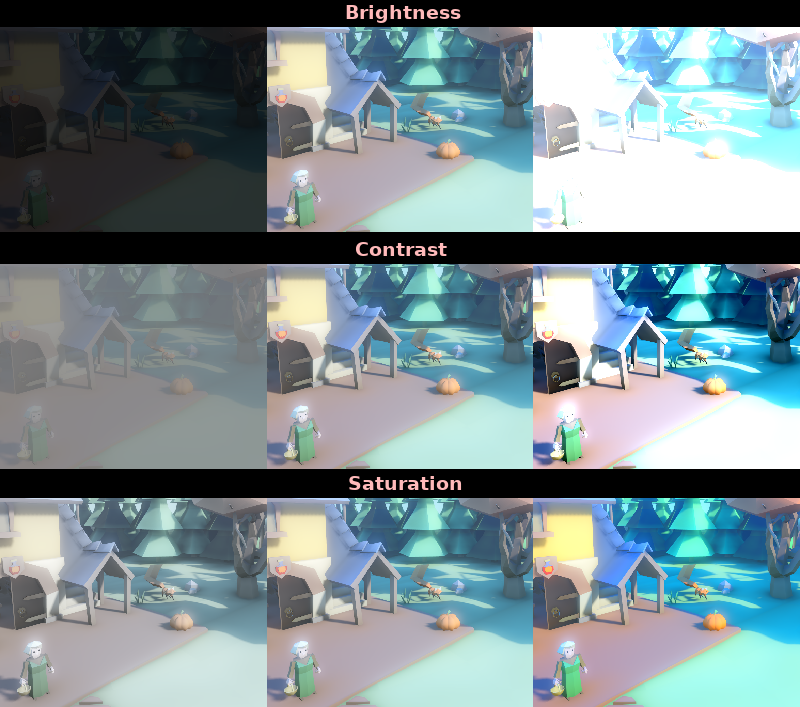
The second is by supplying a color correction gradient. A regular black to white gradient like the following one will produce no effect:

But creating custom ones will allow to map each channel to a different color:
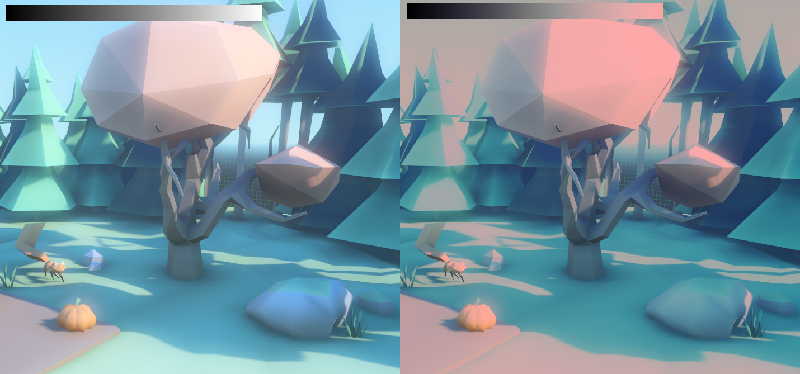
Light transport in game engines¶
Introduction¶
Normally, an artist does all the 3D modelling, then all the texturing, looks at their awesome looking model in the 3D DCC and says “looks fantastic, ready for integration!” then goes into the game, lighting is setup and the game runs.
So at what point does all this “HDR” business come into play? To understand the answer, we need to look at how displays behave.
Your display outputs linear light ratios from some maximum to some minimum intensity. Modern game engines perform complex math on linear light values in their respective scenes. So what’s the problem?
The display has a limited range of intensity, depending on the display type. The game engine renders to an unlimited range of intensity values, however. While “maximum intensity” means something to an sRGB display, it has no bearing in the game engine; there is only a potentially infinitely wide range of intensity values generated per frame of rendering.
This means that some transformation of the scene light intensity, also known as scene-referred light ratios, need to be transformed and mapped to fit within the particular output range of the chosen display. This can be most easily understood if we consider virtually photographing our game engine scene through a virtual camera. Here, our virtual camera would apply a particular camera rendering transform to the scene data, and the output would be ready for display on a particular display type.
Computer displays¶
Almost all displays require a nonlinear encoding for the code values sent to them. The display in turn, using its unique transfer characteristic, “decodes” the code value into linear light ratios of output, and projects the ratios out of the uniquely colored lights at each reddish, greenish, and blueish emission site.
For a majority of computer displays, the specifications of the display are outlined in accordance with IEC 61966-2-1, also known as the 1996 sRGB specification. This specification outlines how an sRGB display is to behave, including the color of the lights in the LED pixels as well as the transfer characteristics of the input (OETF) and output (EOTF).
Not all displays use the same OETF and EOTF as a computer display. For example, television broadcast displays use the BT.1886 EOTF. However, Godot currently only supports sRGB displays.
The sRGB standard is based around the nonlinear relationship between the current to light output of common desktop computing CRT displays.
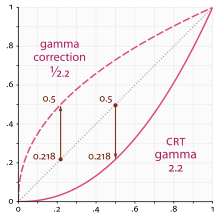
The mathematics of a scene-referred model require that we multiply the scene by different values to adjust the intensities and exposure to different light ranges. The transfer function of the display can’t appropriately render the wider dynamic range of the game engine’s scene output using the simple transfer function of the display. A more complex approach to encoding is required.
Scene linear & asset pipelines¶
Working in scene-linear sRGB is not as simple as just pressing a switch. First, imported image assets must be converted to linear light ratios on import. Even when linearized, those assets may not be perfectly well suited for use as textures, depending on how they were generated.
There are two ways to do this:
sRGB transfer function to display linear ratios on image import¶
This is the easiest method of using sRGB assets, but it’s not the most ideal. One issue with this is loss of quality. Using 8 bits per channel to represent linear light ratios is not sufficient to quantize the values correctly. These textures may also be compressed later, which can exacerbate the problem.
Hardware sRGB transfer function to display linear conversion¶
The GPU will do the conversion after reading the texel using floating point. This works fine on PC and consoles, but most mobile devices don’t support it, or they don’t support it on compressed texture formats (iOS for example).
Scene linear to display referred nonlinear¶
After all the rendering is done, the scene linear render requires transforming to a suitable output such as an sRGB display. To do this, enable sRGB conversion in the current Environment (more on that below).
Keep in mind that the sRGB -> Display Linear and Display Linear -> sRGB conversions must always be both enabled. Failing to enable one of them will result in horrible visuals suitable only for avant-garde experimental indie games.
Parameters of HDR¶
HDR settings can be found in the Environment resource. Most of the time, these are found inside a WorldEnvironment node or set in a Camera node. For more information, see Environment and post-processing.
Using gridmaps¶
Introduction¶
Gridmaps are a tool for creating 3D game levels, similar to the way TileMap works in 2D. You start with a predefined collection of 3D meshes (a MeshLibrary) that can be placed on a grid, as if you were building a level with an unlimited amount of Lego blocks.
Collisions and navigation can also be added to the meshes, just like you would do with the tiles of a tilemap.
Example project¶
To learn how GridMaps work, start by downloading the sample project:
gridmap_demo.zip.
Unzip this project and add it to the Project Manager using the “Import” button.
Creating a MeshLibrary¶
To begin, you need a MeshLibrary, which is a collection of individual meshes that can be used in the gridmap. Open the “MeshLibrary_Source.tscn” scene to see an example of how to set up the mesh library.
As you can see, this scene has a Spatial node as its root, and a number of MeshInstance node children.
If you don’t need any physics in your scene, then you’re done. However, in most cases you’ll want to assign collision bodies to the meshes.
Collisions¶
You can manually assign a StaticBody and CollisionShape to each mesh. Alternatively, you can use the “Mesh” menu to automatically create the collision body based on the mesh data.
Note that a “Convex” collision body will work better for simple meshes. For more complex shapes, select “Create Trimesh Static Body”. Once each mesh has a physics body and collision shape assigned, your mesh library is ready to be used.
Materials¶
Only the materials from within the meshes are used when generating the mesh library. Materials set on the node will be ignored.
Exporting the MeshLibrary¶
To export the library, click on Scene -> Convert To.. -> MeshLibrary.., and save it as a resource.
You can find an already exported MeshLibrary in the project named “MeshLibrary.tres”.
Using GridMap¶
Create a new scene and add a GridMap node. Add the mesh library by dragging the resource file from the FileSystem dock and dropping it in the “Theme” property in the Inspector.
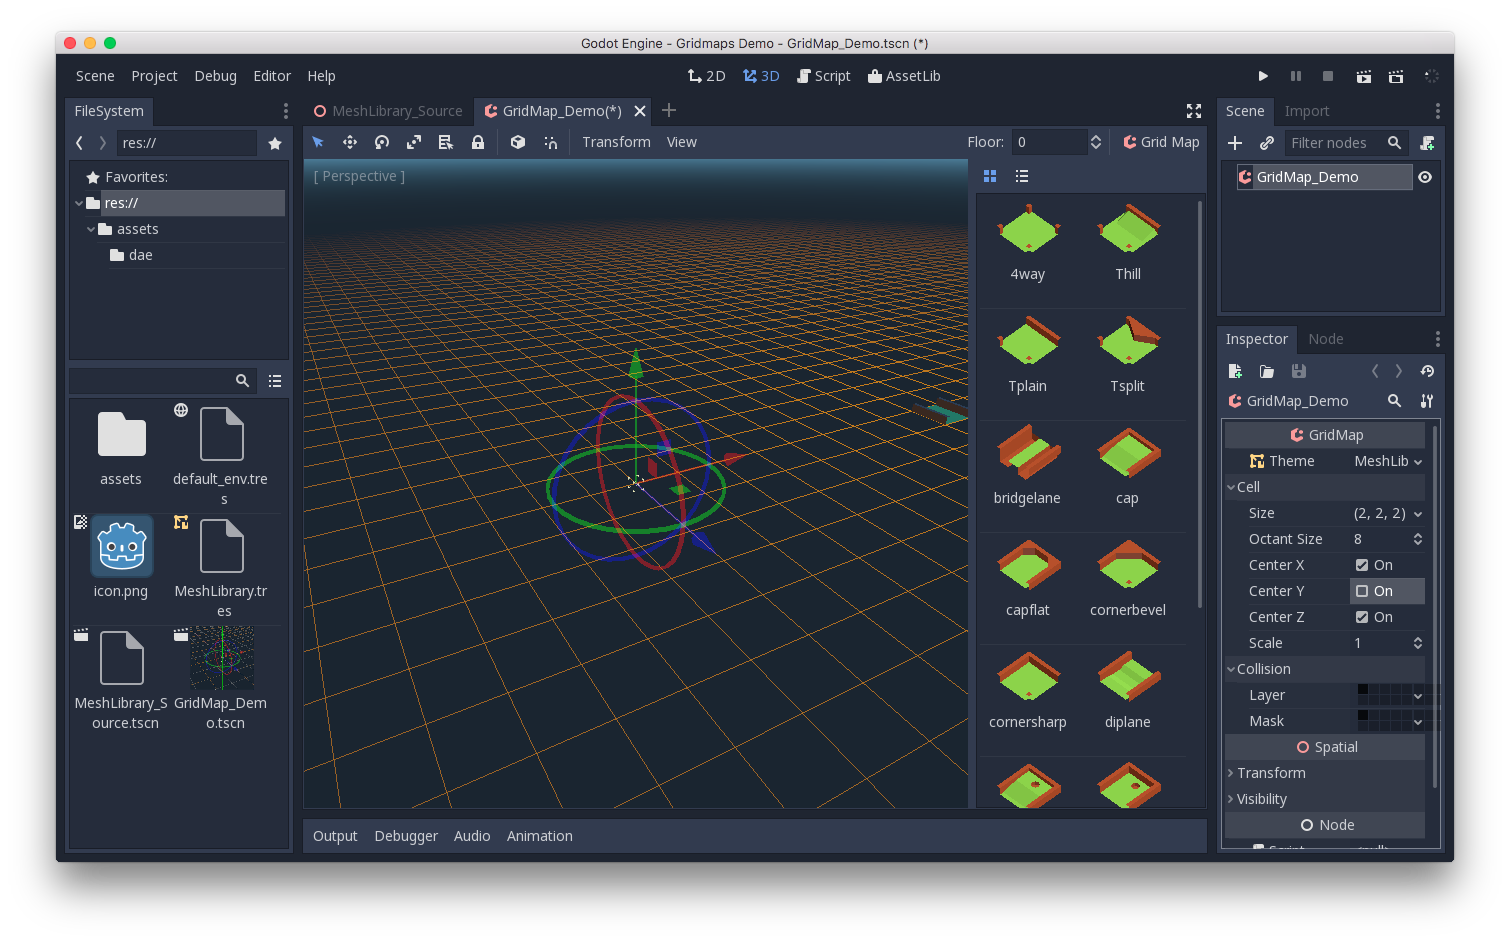
The “Cell/Size” property should be set to the size of your meshes. You can leave it at the default value for the demo. Set the “Center Y” property to “Off”.
Now you can start designing the level by choosing a tile from the palette and placing it with Left-Click in the editor window. To remove a tile, hold Shift and use Right-click.
Click on the “GridMap” menu to see options and shortcuts. For example, pressing S rotates a tile around the y-axis.
Holding Shift and dragging with the left mouse button will draw a selection box. You can duplicate or clear the selected area using the respective menu options.

In the menu, you can also change the axis you’re drawing on, as well as shift the drawing plane higher or lower on its axis.
Using MultiMeshInstance¶
Introduction¶
In a normal scenario, you would use a MeshInstance node to display a 3D mesh like a human model for the main character, but in some cases, you would like to create multiple instances of the same mesh in a scene. You could duplicate the same node multiple times and adjust the transforms manually. This may be a tedious process and the result may look mechanical. Also, this method is not conducive to rapid iterations. MultiMeshInstance is one of the possible solutions to this problem.
MultiMeshInstance, as the name suggests, creates multiple copies of a MeshInstance over a surface of a specific mesh. An example would be having a tree mesh populate a landscape mesh with trees of random scales and orientations.
Setting up the nodes¶
The basic setup requires three nodes: the MultiMeshInstance node and two MeshInstance nodes.
One node is used as the target, the mesh that you want to place multiple meshes on. In the tree example, this would be the landscape.
The other node is used as the source, the mesh that you want to have duplicated. In the tree case, this would be the tree itself.
In our example, we would use a Spatial node as the root node of the scene. Your scene tree would look like this:
Note
For simplicity’s sake, this tutorial uses built-in primitives.
Now you have everything ready. Select the MultiMeshInstance node and look at the
toolbar, you should see an extra button called MultiMesh next to View.
Click it and select Populate surface in the dropdown menu. A new window titled
Populate MultiMesh will pop up.

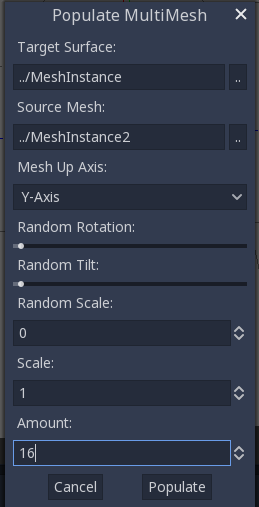
MultiMesh settings¶
Below are descriptions of the options.
Target Surface¶
The mesh used as the target surface on which to place copies of your source mesh.
Source Mesh¶
The mesh you want duplicated on the target surface.
Mesh Up Axis¶
The axis used as the up axis of the source mesh.
Random Rotation¶
Randomizing the rotation around the up axis of the source mesh.
Random Tilt¶
Randomizing the overall rotation of the source mesh.
Random Scale¶
Randomizing the scale of the source mesh.
Scale¶
The scale of the source mesh that will be placed over the target surface.
Amount¶
The amount of mesh instances placed over the target surface.
Select the target surface. In the tree case, this should be the landscape node.
The source mesh should be the tree node. Adjust the other parameters
according to your preference. Press Populate and multiple copies of the
source mesh will be placed over the target mesh. If you are satisfied with the
result, you can delete the mesh instance used as the source mesh.
The end result should look like this:
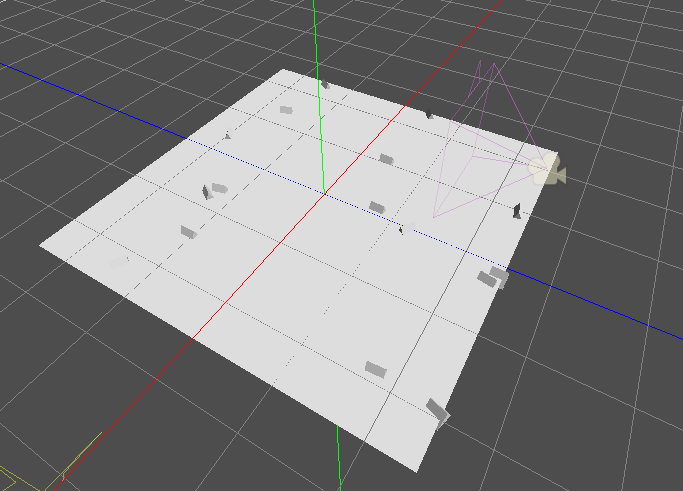
To change the result, repeat the previous steps with different parameters.
CSG¶
CSG stands for Constructive Solid Geometry, and is a tool to combine basic shapes or custom meshes to create more complex shapes. In 3D modelling software, CSG is mostly known as “Boolean Operators”.
Level prototyping is one of the main uses of CSG in Godot. This technique allows users to create simple versions of most common shapes by combining primitives. Interior environments can be created by using inverted primitives.
Introduction to CSG nodes¶
Like other features of Godot, CSG is supported in the form of nodes. These are the CSG nodes:
- CSGBox
- CSGCylinder (also supports cone)
- CSGSphere
- CSGTorus
- CSGPolygon
- CSGMesh
- CSGCombiner
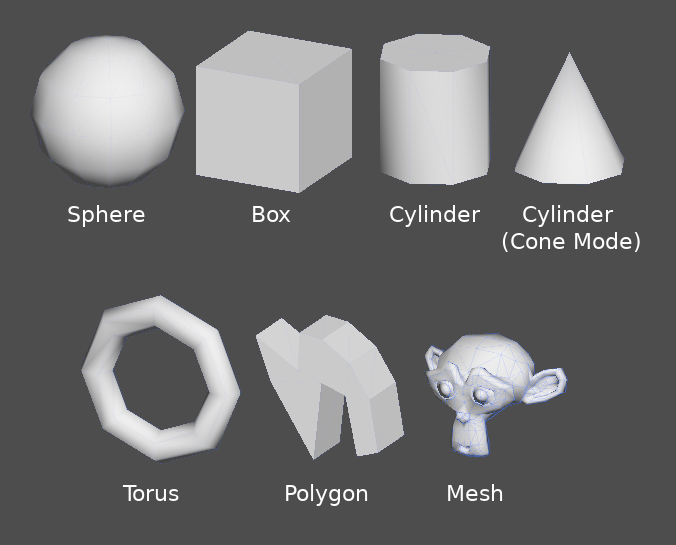
CSG tools features¶
Every CSG node supports 3 kinds of boolean operations:
- Union: Geometry of both primitives is merged, intersecting geometry is removed.
- Intersection: Only intersecting geometry remains, the rest is removed.
- Subtraction: The second shape is subtracted from the first, leaving a dent with its shape.
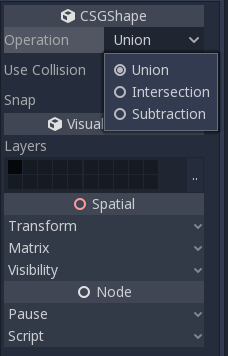
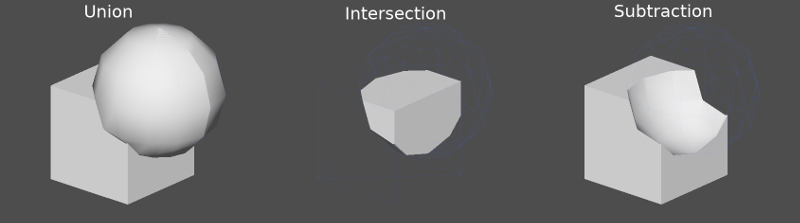
CSGPolygon¶
The CSGPolygon node extrude along a Polygon drawn in 2D (in X,Y coordinates) in the following ways:
- Depth: Extruded back a given amount.
- Spin: Extruded while spinning around its origin.
- Path: Extruded along a Path node. This operation is commonly called lofting.
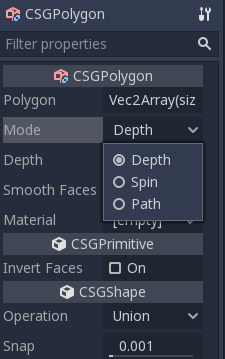
Note
The Path mode must be provided with a Path node to work. In the Path node, draw the path and the polygon in CSGPolygon will extrude along the given path.
Custom meshes¶
Any mesh can be used for CSGMesh; the mesh can be modelled in other software and imported into Godot. Multiple materials are supported. There are some restrictions for geometry:
- it must be closed,
- it must not self-intersect,
- it must not contain internal faces,
- every edge must connect to only two other faces.
CSGCombiner¶
The CSGCombiner node is an empty shape used for organization. It will only combine children nodes.
Processing order¶
Every CSG node will first process its children nodes and their operations: union, intersection or subtraction, in tree order, and apply them to itself one after the other.
Note
In the interest of performance, make sure CSG geometry remains relatively simple, as complex meshes can take a while to process. If adding objects together (such as table and room objects), create them as separate CSG trees. Forcing too many objects in a single tree will eventually start affecting performance. Only use binary operations where you actually need them.
Prototyping a level¶
We will prototype a room to practice the use of CSG tools.
Tip
Working in Orthogonal projection gives a better view when combining the CSG shapes.
Our level will contain these objects:
- a room,
- a bed,
- a lamp,
- a desk,
- a bookshelf.
Create a scene with a Spatial node as root node.
Tip
The default lighting of the environment doesn’t provide clear shading at some angles. Change the display mode using Display Overdraw in the 3D viewport menu, or add a DirectionalLight node to help you see clearly.
Create a CSGBox and name it room, enable Invert Faces and change the
dimensions of your room.
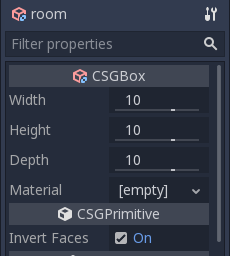
Next, create a CSGCombiner and name it desk.
A desk has one surface and 4 legs:
- Create 1 CSGBox children node in Union mode for the surface and adjust the dimensions.
- Create 4 CSGBox children nodes in Union mode for the legs and adjust the dimensions.
Adjust their placement to resemble a desk.
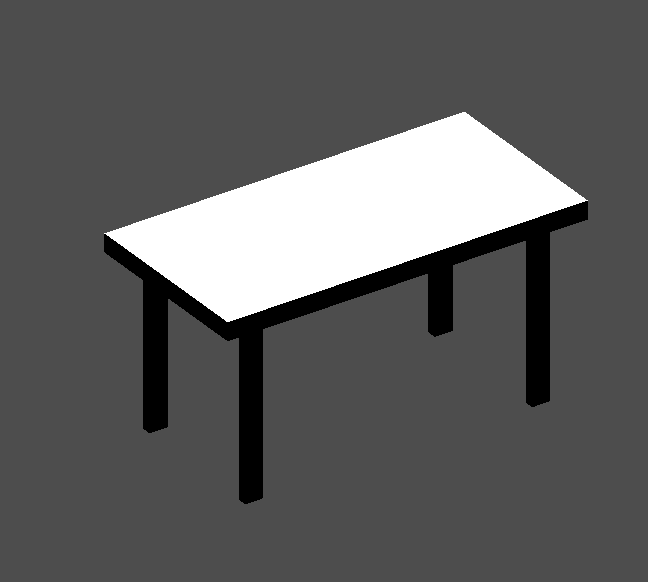
Note
CSG nodes inside a CSGCombiner will only process their operation within the combiner. Therefore, CSGCombiners are used to organize CSG nodes.
Create a CSGCombiner and name it bed.
Our bed consists of 3 parts: the bed, the mattress and a pillow. Create a CSGBox and adjust its dimension for the bed. Create another CSGBox and adjust its dimension for the mattress.
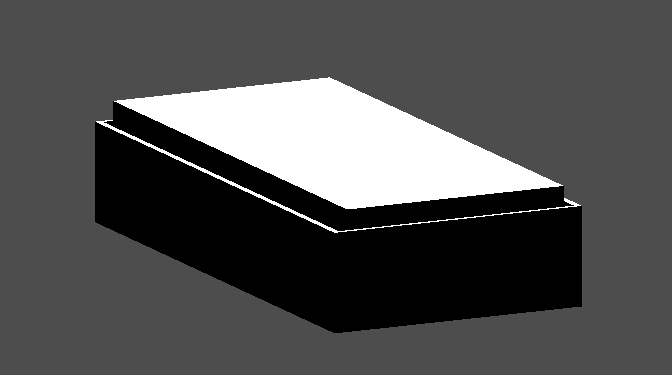
We will create another CSGCombiner named pillow as the child of bed.
The scene tree should look like this:
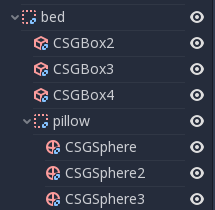
We will combine 3 CSGSphere nodes in Union mode to form a pillow. Scale the Y axis of the spheres and enable Smooth Faces.
Select the pillow node and switch the mode to Subtraction; the combined
spheres will cut a hole into the mattress.
Try to re-parent the pillow node to the root Spatial node; the hole will
disappear.
Note
This is to illustrate the effect of CSG processing order. Since the root node is not a CSG node, the CSGCombiner nodes are the end of the operations; this shows the use of CSGCombiner to organize the CSG scene.
Undo the re-parent after observing the effect. The bed you’ve built should look like this:
Create a CSGCombiner and name it lamp.
A lamp consists of 3 parts: the stand, the pole and the lampshade. Create a CSGCylinder, enable the Cone option and make it the stand. Create another CSGCylinder and adjust the dimensions to use it as a pole.
We will use a CSGPolygon for the lampshade. Use the Spin mode for the CSGPolygon and draw a trapezoid while in Front View (numeric keypad 1); this shape will extrude around the origin and form the lampshade.
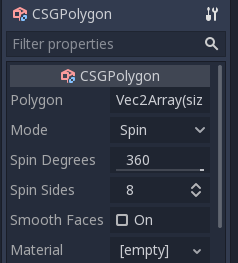
Adjust the placement of the 3 parts to make it look like a lamp.
Create a CSGCombiner and name it bookshelf.
We will use 3 CSGBox nodes for the bookshelf. Create a CSGBox and adjust its dimensions; this will be the size of the bookshelf.
Duplicate the CSGBox and shorten the dimensions of each axis and change the mode to Subtraction.

You’ve almost built a shelf. Create one more CSGBox for dividing the shelf into two levels.

Position your furniture in your room as you like and your scene should look this:
You’ve successfully prototyped a room level with the CSG tools in Godot. CSG tools can be used for designing all kinds of levels, such as a maze or a city; explore its limitations when designing your game.
FPS tutorial¶
Part 1¶
Tutorial introduction¶
This tutorial series will show you how to make a single player FPS game.
Throughout the course of this tutorial series, we will cover how:
- To make a first person character that can move, sprint, and jump.
- To make a simple animation state machine for handling animation transitions.
- To add three weapons to the first person character, each using a different way to handle bullet collisions:
- A knife (using an Area)
- A pistol (Bullet scenes)
- A rifle (using a Raycast)
- To add two different types of grenades to the first person character:
- A normal grenade
- A sticky grenade
- To add the ability to grab and throw RigidBody nodes
- To add joypad input for the player
- To add ammo and reloading for all weapons that consume ammo.
- To add ammo and health pick ups
- In two sizes: big and small
- To add an automatic turret
- That can fire using bullet objects or a Raycast
- To add targets that break when they’ve taken enough damage
- To add sounds that play when the guns fire.
- To add a simple main menu:
- With an options menu for changing how the game runs
- With a level select screen
- To add a universal pause menu we can access anywhere
Note
While this tutorial can be completed by beginners, it is highly advised to complete Your first game, if you are new to Godot and/or game development before going through this tutorial series.
Remember: Making 3D games is much harder than making 2D games. If you do not know how to make 2D games, you will likely struggle making 3D games.
This tutorial assumes you have experience working with the Godot editor, basic programming experience in GDScript, and basic experience in game development.
You can find the start assets for this tutorial here: Godot_FPS_Starter.zip
The provided starter assets contain an animated 3D model, a bunch of 3D models for making levels, and a few scenes already configured for this tutorial.
All assets provided (unless otherwise noted) were originally created by TwistedTwigleg, with changes/additions by the Godot community.
All original assets provided for this tutorial are released under the MIT license.
Feel free to use these assets however you want! All original assets belong to the Godot community, with the other assets belonging to those listed below:
Note
The skybox is created by StumpyStrust on OpenGameArt. The skybox used is
licensed under CC0.
The font used is Titillium-Regular, and is licensed under the SIL Open Font License, Version 1.1.
Tip
You can find the finished project for each part at the bottom of each part’s page
Part overview¶
In this part we will be making a first person player that can move around the environment.
By the end of this part, you will have a working first-person character who can move around the game environment, sprint, look around with a mouse based first person camera, jump into the air, and turn a flash light on and off.
Getting everything ready¶
Launch Godot and open up the project included in the starter assets.
Note
While these assets are not necessarily required to use the scripts provided in this tutorial, they will make the tutorial much easier to follow, as there are several pre-setup scenes we will be using throughout the tutorial series.
First, open the project settings and go to the “Input Map” tab. You’ll find several actions have already been defined. We will be using these actions for our player. Feel free to change the keys bound to these actions if you want.
Let’s take a second to see what we have in the starter assets.
Included in the starter assets are several scenes. For example, in res:// we have 14 scenes, most of which we will be visiting as
we go through this tutorial series.
For now let’s open up Player.tscn.
Note
There are a bunch of scenes and a few textures in the Assets folder. You can look at these if you want,
but we will not be exploring through Assets in this tutorial series. Assets contains all the models used
for each of the levels, as well as some textures and materials.
Making the FPS movement logic¶
Once you have Player.tscn open, let’s take a quick look at how it is set up
First, notice how the player’s collision shapes are set up. Using a vertical pointing capsule as the collision shape for the player is fairly common in most first person games.
We are adding a small square to the ‘feet’ of the player so the player does not feel like they are balancing on a single point.
We do want the ‘feet’ slightly higher than the bottom of the capsule so we can roll over slight edges. Where to place the ‘feet’ is dependent on your levels and how you want your player to feel.
Note
Many times the player will notice the collision shape being circular when they walk to an edge and slide off. We are adding the small square at the bottom of the capsule to reduce sliding on, and around, edges.
Another thing to notice is how many nodes are children of Rotation_Helper. This is because
Rotation_Helper contains all the nodes we want to rotate on the X axis (up and down).
The reason behind this is so we can rotate Player on the Y axis, and Rotation_helper on
the X axis.
Note
Had we not used Rotation_helper, we would’ve likely had cases of rotating on
both the X and Y axes simultaneously, potentially further degenerating into a state of
rotation on all three axes in some cases.
See using transforms for more information
Attach a new script to the Player node and call it Player.gd.
Let’s program our player by adding the ability to move around, look around with the mouse, and jump.
Add the following code to Player.gd:
extends KinematicBody
const GRAVITY = -24.8
var vel = Vector3()
const MAX_SPEED = 20
const JUMP_SPEED = 18
const ACCEL = 4.5
var dir = Vector3()
const DEACCEL= 16
const MAX_SLOPE_ANGLE = 40
var camera
var rotation_helper
var MOUSE_SENSITIVITY = 0.05
func _ready():
camera = $Rotation_Helper/Camera
rotation_helper = $Rotation_Helper
Input.set_mouse_mode(Input.MOUSE_MODE_CAPTURED)
func _physics_process(delta):
process_input(delta)
process_movement(delta)
func process_input(delta):
# ----------------------------------
# Walking
dir = Vector3()
var cam_xform = camera.get_global_transform()
var input_movement_vector = Vector2()
if Input.is_action_pressed("movement_forward"):
input_movement_vector.y += 1
if Input.is_action_pressed("movement_backward"):
input_movement_vector.y -= 1
if Input.is_action_pressed("movement_left"):
input_movement_vector.x -= 1
if Input.is_action_pressed("movement_right"):
input_movement_vector.x += 1
input_movement_vector = input_movement_vector.normalized()
# Basis vectors are already normalized.
dir += -cam_xform.basis.z * input_movement_vector.y
dir += cam_xform.basis.x * input_movement_vector.x
# ----------------------------------
# ----------------------------------
# Jumping
if is_on_floor():
if Input.is_action_just_pressed("movement_jump"):
vel.y = JUMP_SPEED
# ----------------------------------
# ----------------------------------
# Capturing/Freeing the cursor
if Input.is_action_just_pressed("ui_cancel"):
if Input.get_mouse_mode() == Input.MOUSE_MODE_VISIBLE:
Input.set_mouse_mode(Input.MOUSE_MODE_CAPTURED)
else:
Input.set_mouse_mode(Input.MOUSE_MODE_VISIBLE)
# ----------------------------------
func process_movement(delta):
dir.y = 0
dir = dir.normalized()
vel.y += delta * GRAVITY
var hvel = vel
hvel.y = 0
var target = dir
target *= MAX_SPEED
var accel
if dir.dot(hvel) > 0:
accel = ACCEL
else:
accel = DEACCEL
hvel = hvel.linear_interpolate(target, accel * delta)
vel.x = hvel.x
vel.z = hvel.z
vel = move_and_slide(vel, Vector3(0, 1, 0), 0.05, 4, deg2rad(MAX_SLOPE_ANGLE))
func _input(event):
if event is InputEventMouseMotion and Input.get_mouse_mode() == Input.MOUSE_MODE_CAPTURED:
rotation_helper.rotate_x(deg2rad(event.relative.y * MOUSE_SENSITIVITY))
self.rotate_y(deg2rad(event.relative.x * MOUSE_SENSITIVITY * -1))
var camera_rot = rotation_helper.rotation_degrees
camera_rot.x = clamp(camera_rot.x, -70, 70)
rotation_helper.rotation_degrees = camera_rot
using Godot;
using System;
public class Player : KinematicBody
{
[Export]
public float Gravity = -24.8f;
[Export]
public float MaxSpeed = 20.0f;
[Export]
public float JumpSpeed = 18.0f;
[Export]
public float Accel = 4.5f;
[Export]
public float Deaccel = 16.0f;
[Export]
public float MaxSlopeAngle = 40.0f;
[Export]
public float MouseSensitivity = 0.05f;
private Vector3 _vel = new Vector3();
private Vector3 _dir = new Vector3();
private Camera _camera;
private Spatial _rotationHelper;
// Called when the node enters the scene tree for the first time.
public override void _Ready()
{
_camera = GetNode<Camera>("Rotation_Helper/Camera");
_rotationHelper = GetNode<Spatial>("Rotation_Helper");
Input.SetMouseMode(Input.MouseMode.Captured);
}
public override void _PhysicsProcess(float delta)
{
ProcessInput(delta);
ProcessMovement(delta);
}
private void ProcessInput(float delta)
{
// -------------------------------------------------------------------
// Walking
_dir = new Vector3();
Transform camXform = _camera.GetGlobalTransform();
Vector2 inputMovementVector = new Vector2();
if (Input.IsActionPressed("movement_forward"))
inputMovementVector.y += 1;
if (Input.IsActionPressed("movement_backward"))
inputMovementVector.y -= 1;
if (Input.IsActionPressed("movement_left"))
inputMovementVector.x -= 1;
if (Input.IsActionPressed("movement_right"))
inputMovementVector.x += 1;
inputMovementVector = inputMovementVector.Normalized();
// Basis vectors are already normalized.
_dir += -camXform.basis.z * inputMovementVector.y;
_dir += camXform.basis.x * inputMovementVector.x;
// -------------------------------------------------------------------
// -------------------------------------------------------------------
// Jumping
if (IsOnFloor())
{
if (Input.IsActionJustPressed("movement_jump"))
_vel.y = JumpSpeed;
}
// -------------------------------------------------------------------
// -------------------------------------------------------------------
// Capturing/Freeing the cursor
if (Input.IsActionJustPressed("ui_cancel"))
{
if (Input.GetMouseMode() == Input.MouseMode.Visible)
Input.SetMouseMode(Input.MouseMode.Captured);
else
Input.SetMouseMode(Input.MouseMode.Visible);
}
// -------------------------------------------------------------------
}
private void ProcessMovement(float delta)
{
_dir.y = 0;
_dir = _dir.Normalized();
_vel.y += delta * Gravity;
Vector3 hvel = _vel;
hvel.y = 0;
Vector3 target = _dir;
target *= MaxSpeed;
float accel;
if (_dir.Dot(hvel) > 0)
accel = Accel;
else
accel = Deaccel;
hvel = hvel.LinearInterpolate(target, accel * delta);
_vel.x = hvel.x;
_vel.z = hvel.z;
_vel = MoveAndSlide(_vel, new Vector3(0, 1, 0), false, 4, Mathf.Deg2Rad(MaxSlopeAngle));
}
public override void _Input(InputEvent @event)
{
if (@event is InputEventMouseMotion && Input.GetMouseMode() == Input.MouseMode.Captured)
{
InputEventMouseMotion mouseEvent = @event as InputEventMouseMotion;
_rotationHelper.RotateX(Mathf.Deg2Rad(mouseEvent.Relative.y * MouseSensitivity));
RotateY(Mathf.Deg2Rad(-mouseEvent.Relative.x * MouseSensitivity));
Vector3 cameraRot = _rotationHelper.RotationDegrees;
cameraRot.x = Mathf.Clamp(cameraRot.x, -70, 70);
_rotationHelper.RotationDegrees = cameraRot;
}
}
}
This is a lot of code, so let’s break it down function by function:
Tip
While copy and pasting code is ill advised, as you can learn a lot from manually typing the code in, you can copy and paste the code from this page directly into the script editor.
If you do this, all of the code copied will be using spaces instead of tabs.
To convert the spaces to tabs in the script editor, click the “edit” menu and select “Convert Indent To Tabs”. This will convert all the spaces into tabs. You can select “Convert Indent To Spaces” to convert tabs back into spaces.
First, we define some class variables to dictate how our player will move about the world.
Note
Throughout this tutorial, variables defined outside functions will be referred to as “class variables”. This is because we can access any of these variables from any place in the script.
Let’s go through each of the class variables:
GRAVITY: How strong gravity pulls us down.vel: Our KinematicBody’s velocity.MAX_SPEED: The fastest speed we can reach. Once we hit this speed, we will not go any faster.JUMP_SPEED: How high we can jump.ACCEL: How quickly we accelerate. The higher the value, the sooner we get to max speed.DEACCEL: How quickly we are going to decelerate. The higher the value, the sooner we will come to a complete stop.MAX_SLOPE_ANGLE: The steepest angle our KinematicBody will consider as a ‘floor’.camera: The Camera node.rotation_helper: A Spatial node holding everything we want to rotate on the X axis (up and down).MOUSE_SENSITIVITY: How sensitive the mouse is. I find a value of0.05works well for my mouse, but you may need to change it based on how sensitive your mouse is.
You can tweak many of these variables to get different results. For example, by lowering GRAVITY and/or
increasing JUMP_SPEED you can get a more ‘floaty’ feeling character.
Feel free to experiment!
Note
You may have noticed that MOUSE_SENSITIVITY is written in all caps like the other constants, but MOUSE_SENSITIVITY is not a constant.
The reason behind this is we want to treat it like a constant variable (a variable that cannot change) throughout our script, but we want to be able to change the value later when we add customizable settings. So, in an effort to remind ourselves to treat it like a constant, it’s named in all caps.
Now let’s look at the _ready function:
First we get the camera and rotation_helper nodes and store them into their variables.
Then we need to set the mouse mode to captured, so the mouse cannot leave the game window.
This will hide the mouse and keep it at the center of the screen. We do this for two reasons: The first reason being we do not want the player to see their mouse cursor as they play.
The second reason is because we do not want the cursor to leave the game window. If the cursor leaves the game window there could be instances where the player clicks outside the window, and then the game would lose focus. To assure neither of these issues happens, we capture the mouse cursor.
Note
See Input documentation for the various mouse modes. We will only be using
MOUSE_MODE_CAPTURED and MOUSE_MODE_VISIBLE in this tutorial series.
Next let’s take a look at _physics_process:
All we’re doing in _physics_process is calling two functions: process_input and process_movement.
process_input will be where we store all the code relating to player input. We want to call it first, before
anything else, so we have fresh player input to work with.
process_movement is where we’ll send all the data necessary to the KinematicBody
so it can move through the game world.
Let’s look at process_input next:
First we set dir to an empty Vector3.
dir will be used for storing the direction the player intends to move towards. Because we do not
want the player’s previous input to effect the player beyond a single process_movement call, we reset dir.
Next we get the camera’s global transform and store it as well, into the cam_xform variable.
The reason we need the camera’s global transform is so we can use its directional vectors. Many have found directional vectors confusing, so let’s take a second to explain how they work:
World space can be defined as: The space in which all objects are placed in, relative to a constant origin point. Every object, no matter if it is 2D or 3D, has a position in world space.
To put it another way: world space is the space in a universe where every object’s position, rotation, and scale can be measured by a single, known, fixed point called the origin.
In Godot, the origin is at position (0, 0, 0) with a rotation of (0, 0, 0) and a scale of (1, 1, 1).
Note
When you open up the Godot editor and select a Spatial based node, a gizmo pops up. Each of the arrows points using world space directions by default.
If you want to move using the world space directional vectors, you’d do something like this:
if Input.is_action_pressed("movement_forward"):
node.translate(Vector3(0, 0, 1))
if Input.is_action_pressed("movement_backward"):
node.translate(Vector3(0, 0, -1))
if Input.is_action_pressed("movement_left"):
node.translate(Vector3(1, 0, 0))
if Input.is_action_pressed("movement_right"):
node.translate(Vector3(-1, 0, 0))
if (Input.IsActionPressed("movement_forward"))
node.Translate(new Vector3(0, 0, 1));
if (Input.IsActionPressed("movement_backward"))
node.Translate(new Vector3(0, 0, -1));
if (Input.IsActionPressed("movement_left"))
node.Translate(new Vector3(1, 0, 0));
if (Input.IsActionPressed("movement_right"))
node.Translate(new Vector3(-1, 0, 0));
Note
Notice how we do not need to do any calculations to get world space directional vectors. We can define a few Vector3 variables and input the values pointing in each direction.
Here is what world space looks like in 2D:
Note
The following images are just examples. Each arrow/rectangle represents a directional vector
And here is what it looks like for 3D:
Notice how in both examples, the rotation of the node does not change the directional arrows. This is because world space is a constant. No matter how you translate, rotate, or scale an object, world space will always point in the same direction.
Local space is different, because it takes the rotation of the object into account.
Local space can be defined as follows:
The space in which an object’s position is the origin of the universe. Because the position
of the origin can be at N many locations, the values derived from local space change
with the position of the origin.
Note
This stack overflow question has a much better explanation of world space and local space.
https://gamedev.stackexchange.com/questions/65783/what-are-world-space-and-eye-space-in-game-development (Local space and eye space are essentially the same thing in this context)
To get a Spatial node’s local space, we need to get its Transform, so then we can get the Basis from the Transform.
Each Basis has three vectors: X, Y, and Z.
Each of those vectors point towards each of the local space vectors coming from that object.
To use the Spatial node’s local directional vectors, we use this code:
if Input.is_action_pressed("movement_forward"):
node.translate(node.global_transform.basis.z.normalized())
if Input.is_action_pressed("movement_backward"):
node.translate(-node.global_transform.basis.z.normalized())
if Input.is_action_pressed("movement_left"):
node.translate(node.global_transform.basis.x.normalized())
if Input.is_action_pressed("movement_right"):
node.translate(-node.global_transform.basis.x.normalized())
if (Input.IsActionPressed("movement_forward"))
node.Translate(node.GlobalTransform.basis.z.Normalized());
if (Input.IsActionPressed("movement_backward"))
node.Translate(-node.GlobalTransform.basis.z.Normalized());
if (Input.IsActionPressed("movement_left"))
node.Translate(node.GlobalTransform.basis.x.Normalized());
if (Input.IsActionPressed("movement_right"))
node.Translate(-node.GlobalTransform.basis.x.Normalized());
Here is what local space looks like in 2D:
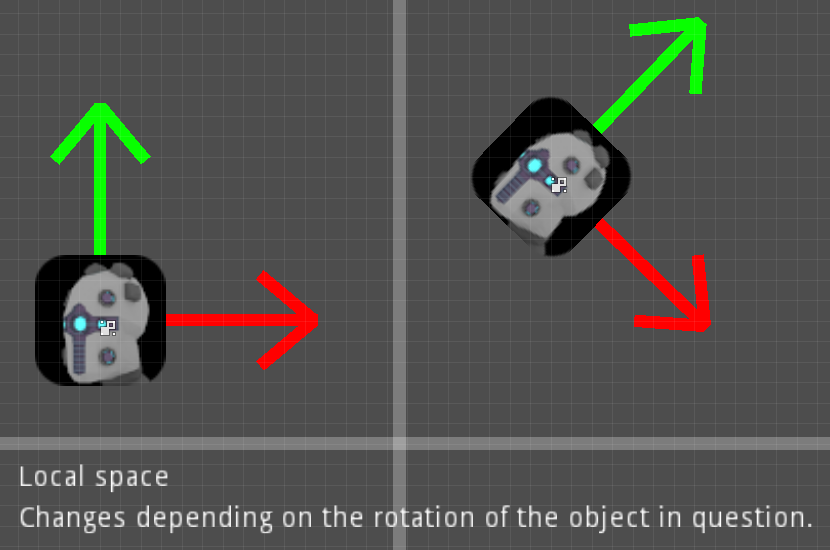
And here is what it looks like for 3D:
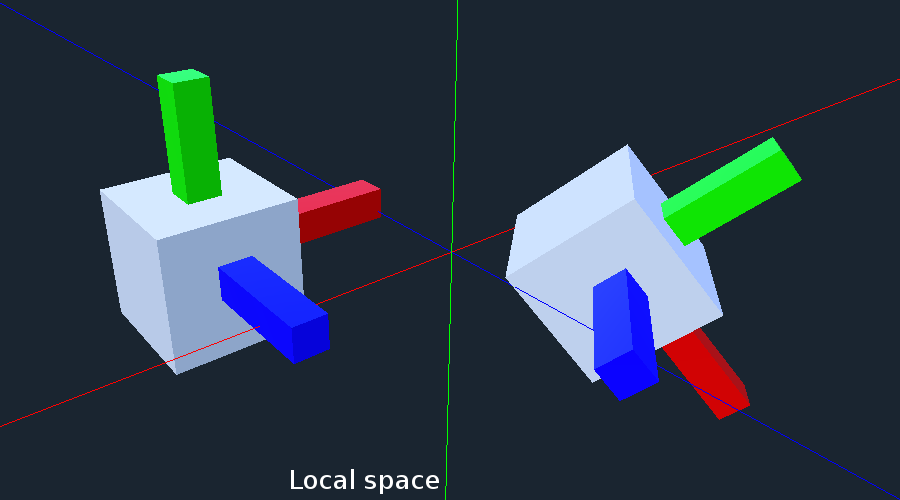
Here is what the Spatial gizmo shows when you are using local space mode. Notice how the arrows follow the rotation of the object on the left, which looks exactly the same as the 3D example for local space.
Note
You can change between local and world space modes by pressing T or the little cube button when you have a Spatial based node selected.
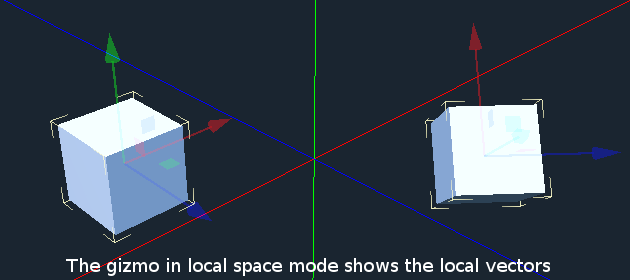
Local vectors are confusing even for more experienced game developers, so do not worry if this all doesn’t make a lot of sense. The key thing to remember about local vectors is that we are using local coordinates to get direction from the object’s point of view, as opposed to using world vectors, which give direction from the world’s point of view.
Okay, back to process_input:
Next we make a new variable called input_movement_vector and assign it to an empty Vector2.
We will use this to make a virtual axis of sorts, to map the player’s input to movement.
Note
This may seem overkill for just the keyboard, but this will make sense later when we add joypad input.
Based on which directional movement action is pressed, we add to or subtract from input_movement_vector.
After we’ve checked each of the directional movement actions, we normalize input_movement_vector. This makes it where input_movement_vector’s values
are within a 1 radius unit circle.
Next we add the camera’s local Z vector times input_movement_vector.y to dir. This is so when the player presses forward or backwards, we add the camera’s
local Z axis so the player moves forward or backwards in relation to the camera.
Note
Because the camera is rotated by -180 degrees, we have to flip the Z directional vector.
Normally forward would be the positive Z axis, so using basis.z.normalized() would work,
but we are using -basis.z.normalized() because our camera’s Z axis faces backwards in relation
to the rest of the player.
We do the same thing for the camera’s local X vector, and instead of using input_movement_vector.y we instead use input_movement_vector.x.
This makes it where the player moves left/right in relation to the camera when the player presses left/right.
Next we check if the player is on the floor using KinematicBody’s is_on_floor function. If it is, then we
check to see if the “movement_jump” action has just been pressed. If it has, then we set the player’s Y velocity to
JUMP_SPEED.
Because we’re setting the Y velocity, the player will jump into the air.
Then we check for the ui_cancel action. This is so we can free/capture the mouse cursor when the escape button
is pressed. We do this because otherwise we’d have no way to free the cursor, meaning it would be stuck until you terminate the
runtime.
To free/capture the cursor, we check to see if the mouse is visible (freed) or not. If it is, we capture it, and if it’s not, we make it visible (free it).
That’s all we’re doing right now for process_input. We’ll come back several times to this function as we add more complexities to our player.
Now let’s look at process_movement:
First we ensure that dir does not have any movement on the Y axis by setting its Y value to zero.
Next we normalize dir to ensure we’re within a 1 radius unit circle. This makes it where we’re moving at a constant speed regardless
of whether the player is moving straight or diagonally. If we did not normalize, the player would move faster on the diagonal than when going straight.
Next we add gravity to the player by adding GRAVITY * delta to the player’s Y velocity.
After that we assign the player’s velocity to a new variable (called hvel) and remove any movement on the Y axis.
Next we set a new variable (target) to the player’s direction vector.
Then we multiply that by the player’s max speed so we know how far the player will move in the direction provided by dir.
After that we make a new variable for acceleration, named accel.
We then take the dot product of hvel to see if the player is moving according to hvel. Remember, hvel does not have any
Y velocity, meaning we are only checking if the player is moving forwards, backwards, left, or right.
If the player is moving according to hvel, then we set accel to the ACCEL constant so the player will accelerate, otherwise we set accel to
our DEACCEL constant so the player will decelerate.
Then we interpolate the horizontal velocity, set the player’s X and Z velocity to the interpolated horizontal velocity,
and call move_and_slide to let the KinematicBody handle moving the player through the physics world.
Tip
All of the code in process_movement is exactly the same as the movement code from the Kinematic Character demo!
The final function we have is the _input function, and thankfully it’s fairly short:
First we make sure that the event we are dealing with is an InputEventMouseMotion event. We also want to check if the cursor is captured, as we do not want to rotate if it is not.
Note
See Mouse and input coordinates for a list of possible input events.
If the event is indeed a mouse motion event and the cursor is captured, we rotate based on the relative mouse motion provided by InputEventMouseMotion.
First we rotate the rotation_helper node on the X axis, using the relative mouse motion’s
Y value, provided by InputEventMouseMotion.
Then we rotate the entire KinematicBody on the Y axis by the relative mouse motion’s X value.
Tip
Godot converts relative mouse motion into a Vector2 where mouse movement going
up and down is 1 and -1 respectively. Right and Left movement is
1 and -1 respectively.
Because of how we are rotating the player, we multiply the relative mouse motion’s
X value by -1 so mouse motion going left and right rotates the player left and right
in the same direction.
Finally, we clamp the rotation_helper’s X rotation to be between -70 and 70
degrees so the player cannot rotate themselves upside down.
Tip
See using transforms for more information on rotating transforms.
To test the code, open up the scene named Testing_Area.tscn, if it’s not already opened up. We will be using
this scene as we go through the next few tutorial parts, so be sure to keep it open in one of your scene tabs.
Go ahead and test your code either by pressing F6 with Testing_Area.tscn as the open tab, by pressing the
play button in the top right corner, or by pressing F5.
You should now be able to walk around, jump in the air, and look around using the mouse.
Giving the player a flash light and the option to sprint¶
Before we get to making the weapons work, there are a couple more things we should add.
Many FPS games have an option to sprint and a flashlight. We can easily add these to our player, so let’s do that!
First we need a few more class variables in our player script:
const MAX_SPRINT_SPEED = 30
const SPRINT_ACCEL = 18
var is_sprinting = false
var flashlight
[Export]
public float MaxSprintSpeed = 30.0f;
[Export]
public float SprintAccel = 18.0f;
private bool _isSprinting = false;
private SpotLight _flashlight;
All the sprinting variables work exactly the same as the non sprinting variables with similar names.
is_sprinting is a boolean to track whether the player is currently sprinting, and flashlight is a variable
we will be using to hold the player’s flash light node.
Now we need to add a few lines of code, starting in _ready. Add the following to _ready:
flashlight = $Rotation_Helper/Flashlight
_flashlight = GetNode<SpotLight>("Rotation_Helper/Flashlight");
This gets the Flashlight node and assigns it to the flashlight variable.
Now we need to change some of the code in process_input. Add the following somewhere in process_input:
# ----------------------------------
# Sprinting
if Input.is_action_pressed("movement_sprint"):
is_sprinting = true
else:
is_sprinting = false
# ----------------------------------
# ----------------------------------
# Turning the flashlight on/off
if Input.is_action_just_pressed("flashlight"):
if flashlight.is_visible_in_tree():
flashlight.hide()
else:
flashlight.show()
# ----------------------------------
// -------------------------------------------------------------------
// Sprinting
if (Input.IsActionPressed("movement_sprint"))
_isSprinting = true;
else
_isSprinting = false;
// -------------------------------------------------------------------
// -------------------------------------------------------------------
// Turning the flashlight on/off
if (Input.IsActionJustPressed("flashlight"))
{
if (_flashlight.IsVisibleInTree())
_flashlight.Hide();
else
_flashlight.Show();
}
Let’s go over the additions:
We set is_sprinting to true when the player is holding down the movement_sprint action, and false
when the movement_sprint action is released. In process_movement we’ll add the code that makes the player faster when
they sprint. Here in process_input we are just going to change the is_sprinting variable.
We do something similar to freeing/capturing the cursor for handling the flashlight. We first check to see if the flashlight action
was just pressed. If it was, we then check to see if flashlight is visible in the scene tree. If it is, then we hide it, and if it’s not, we show it.
Now we need to change a couple things in process_movement. First, replace target *= MAX_SPEED with the following:
if is_sprinting:
target *= MAX_SPRINT_SPEED
else:
target *= MAX_SPEED
if (_isSprinting)
target *= MaxSprintSpeed;
else
target *= MaxSpeed;
Now instead of always multiplying target by MAX_SPEED, we first check to see if the player is sprinting or not.
If the player is sprinting, we instead multiply target by MAX_SPRINT_SPEED.
Now all that’s left is to change the acceleration when sprinting. Change accel = ACCEL to the following:
if is_sprinting:
accel = SPRINT_ACCEL
else:
accel = ACCEL
if (_isSprinting)
accel = SprintAccel;
else
accel = Accel;
Now, when the player is sprinting, we’ll use SPRINT_ACCEL instead of ACCEL, which will accelerate the player faster.
You should now be able to sprint if you press Shift, and can toggle the flash light on and off by pressing F!
Go try it out! You can change the sprint-related class variables to make the player faster or slower when sprinting!
Final notes¶
Whew! That was a lot of work. Now you have a fully working first person character!
In Part 2 we will add some guns to our player character.
Note
At this point we’ve recreated the Kinematic character demo from first person perspective with sprinting and a flash light!
Tip
Currently the player script would be at an ideal state for making all sorts of first person games. For example: Horror games, platformer games, adventure games, and more!
Warning
If you ever get lost, be sure to read over the code again!
You can download the finished project for this part here: Godot_FPS_Part_1.zip
Part 2¶
Part overview¶
In this part we will be giving our player weapons to play with.
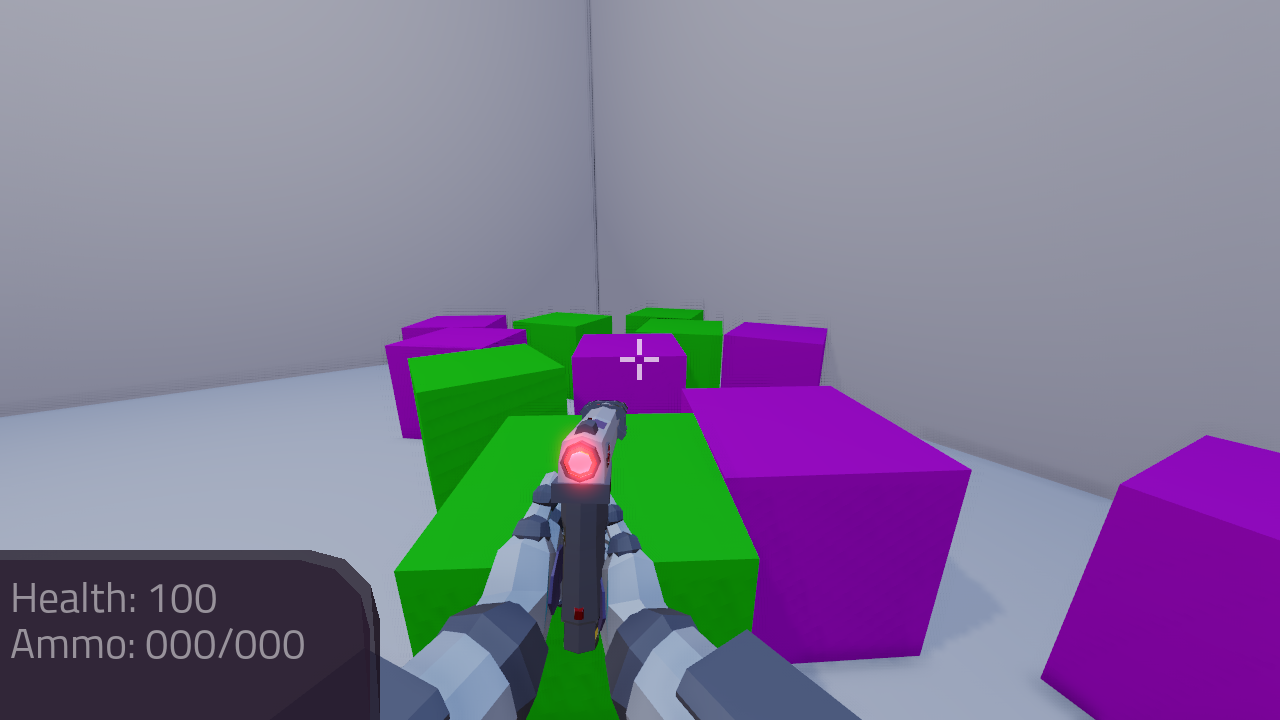
By the end of this part, you will have a player that can fire a pistol, rifle, and attack using a knife. The player will also now have animations with transitions, and the weapons will interact with objects in the environment.
Note
You are assumed to have finished Part 1 before moving on to this part of the tutorial. The finished project from Part 1 will be the starting project for part 2
Let’s get started!
Making a system to handle animations¶
First we need a way to handle changing animations. Open up Player.tscn and select the AnimationPlayer
Node (Player -> Rotation_Helper -> Model -> Animation_Player).
Create a new script called AnimationPlayer_Manager.gd and attach that to the AnimationPlayer.
Add the following code to AnimationPlayer_Manager.gd:
extends AnimationPlayer
# Structure -> Animation name :[Connecting Animation states]
var states = {
"Idle_unarmed":["Knife_equip", "Pistol_equip", "Rifle_equip", "Idle_unarmed"],
"Pistol_equip":["Pistol_idle"],
"Pistol_fire":["Pistol_idle"],
"Pistol_idle":["Pistol_fire", "Pistol_reload", "Pistol_unequip", "Pistol_idle"],
"Pistol_reload":["Pistol_idle"],
"Pistol_unequip":["Idle_unarmed"],
"Rifle_equip":["Rifle_idle"],
"Rifle_fire":["Rifle_idle"],
"Rifle_idle":["Rifle_fire", "Rifle_reload", "Rifle_unequip", "Rifle_idle"],
"Rifle_reload":["Rifle_idle"],
"Rifle_unequip":["Idle_unarmed"],
"Knife_equip":["Knife_idle"],
"Knife_fire":["Knife_idle"],
"Knife_idle":["Knife_fire", "Knife_unequip", "Knife_idle"],
"Knife_unequip":["Idle_unarmed"],
}
var animation_speeds = {
"Idle_unarmed":1,
"Pistol_equip":1.4,
"Pistol_fire":1.8,
"Pistol_idle":1,
"Pistol_reload":1,
"Pistol_unequip":1.4,
"Rifle_equip":2,
"Rifle_fire":6,
"Rifle_idle":1,
"Rifle_reload":1.45,
"Rifle_unequip":2,
"Knife_equip":1,
"Knife_fire":1.35,
"Knife_idle":1,
"Knife_unequip":1,
}
var current_state = null
var callback_function = null
func _ready():
set_animation("Idle_unarmed")
connect("animation_finished", self, "animation_ended")
func set_animation(animation_name):
if animation_name == current_state:
print ("AnimationPlayer_Manager.gd -- WARNING: animation is already ", animation_name)
return true
if has_animation(animation_name):
if current_state != null:
var possible_animations = states[current_state]
if animation_name in possible_animations:
current_state = animation_name
play(animation_name, -1, animation_speeds[animation_name])
return true
else:
print ("AnimationPlayer_Manager.gd -- WARNING: Cannot change to ", animation_name, " from ", current_state)
return false
else:
current_state = animation_name
play(animation_name, -1, animation_speeds[animation_name])
return true
return false
func animation_ended(anim_name):
# UNARMED transitions
if current_state == "Idle_unarmed":
pass
# KNIFE transitions
elif current_state == "Knife_equip":
set_animation("Knife_idle")
elif current_state == "Knife_idle":
pass
elif current_state == "Knife_fire":
set_animation("Knife_idle")
elif current_state == "Knife_unequip":
set_animation("Idle_unarmed")
# PISTOL transitions
elif current_state == "Pistol_equip":
set_animation("Pistol_idle")
elif current_state == "Pistol_idle":
pass
elif current_state == "Pistol_fire":
set_animation("Pistol_idle")
elif current_state == "Pistol_unequip":
set_animation("Idle_unarmed")
elif current_state == "Pistol_reload":
set_animation("Pistol_idle")
# RIFLE transitions
elif current_state == "Rifle_equip":
set_animation("Rifle_idle")
elif current_state == "Rifle_idle":
pass;
elif current_state == "Rifle_fire":
set_animation("Rifle_idle")
elif current_state == "Rifle_unequip":
set_animation("Idle_unarmed")
elif current_state == "Rifle_reload":
set_animation("Rifle_idle")
func animation_callback():
if callback_function == null:
print ("AnimationPlayer_Manager.gd -- WARNING: No callback function for the animation to call!")
else:
callback_function.call_func()
Lets go over what this script is doing:
Lets start with this script’s class variables:
states: A dictionary for holding our animation states. (Further explanation below)animation_speeds: A dictionary for holding all the speeds at which we want to play our animations.current_state: A variable for holding the name of the animation state we are currently in.callback_function: A variable for holding the callback function. (Further explanation below)
If you are familiar with state machines, then you may have noticed that states is structured
like a basic state machine. Here is roughly how states is set up:
states is a dictionary with the key being the name of the current state, and the value being
an array holding all the animations (states) we can transition to. For example, if we are currently in the
Idle_unarmed state, we can only transition to Knife_equip, Pistol_equip, Rifle_equip, and
Idle_unarmed.
If we try to transition to a state that is not included in the possible transitions states for the state we are in,
then we get a warning message and the animation does not change. We can also automatically
transition from some states into others, as will be explained further below in animation_ended
Note
For the sake of keeping this tutorial simple, we are not using a ‘proper’ state machine. If you are interested to know more about state machines, see the following articles:
animation_speeds is how fast each animation will play. Some of the animations are a little slow
and in an effort to make everything look smooth, we need to play them at faster speeds.
Tip
Notice that all of the firing animations are faster than their normal speed. Remember this for later!
current_state will hold the name of the animation state we are currently in.
Finally, callback_function will be a FuncRef passed in by the player for spawning bullets
at the proper frame of animation. A FuncRef allows us to pass in a function as an argument,
effectively allowing us to call a function from another script, which is how we will use it later.
Now let’s look at _ready.
First we are setting our animation to Idle_unarmed using the set_animation function,
so we for sure start in that animation.
Next we connect the animation_finished signal to this script and assign it to call animation_ended.
This means whenever an animation is finished, animation_ended will be called.
Lets look at set_animation next.
set_animation changes the animation to the animation named animation_name
if we can transition to it. In other words, if the animation state we are currently in
has the passed in animation state name in states, then we will change to that animation.
Firstly, we check if the passed in animation name is the same name as the animation currently playing.
If they are the same, then we write a warning to the console and return true.
Secondly, we see if AnimationPlayer has the animation with the name animation_name using has_animation.
If it does not, we return false.
Thirdly, we check whether current_state is set. If current_state is not currently set, then we
set current_state to the passed in animation name and tell AnimationPlayer to start playing the animation with
a blend time of -1 at the speed set in animation_speeds and then we return true.
Note
Blend time is how long to blend/mix the two animations together.
By putting in a value of -1, the new animation instantly plays, overriding whatever animation is already playing.
If you put in a value of 1, for one second the new animation will play with increasing strength, blending the two animations together for one second
before playing only the new animation. This leads to a smooth transition between animations, which looks great when you are changing from
a walking animation to a running animation.
We set the blend time to -1 because we want to instantly change animations.
If we have a state in current_state, then we get all the possible states we can transition to.
If the animation name is in the list of possible transitions, we set current_state to the passed
in animation (animation_name), tell AnimationPlayer to play the animation with a blend time of -1 at the speed set in
animation_speeds and return true.
Now lets look at animation_ended.
animation_ended is the function that will be called by AnimationPlayer when it’s done playing an animation.
For certain animation states, we may need to transition into another state when it’s finished. To handle this, we check for every possible animation state. If we need to, we will transition into another state.
Warning
If you are using your own animated models, make sure that none of the animations are set
to loop. Looping animations do not send the animation_finished signal when they reach
the end of the animation and are about to loop again.
Note
The transitions in animation_ended would ideally be part of the data in states, but in
an effort to make the tutorial easier to understand, we’ll hard code each state transition
in animation_ended.
Finally, there is animation_callback. This function will be called by a call method track in our animations.
If we have a FuncRef assigned to callback_function, then we call that passed in function. If we do not
have a FuncRef assigned to callback_function, we print out a warning to the console.
Tip
Try running Testing_Area.tscn to make sure there are no runtime issues. If the game runs but nothing
seems to have changed, then everything is working correctly.
Getting the animations ready¶
Now that we have a working animation manager, we need to call it from our player script. Before that, though, we need to set some animation callback tracks in our firing animations.
Open up Player.tscn if you don’t have it open and navigate to the AnimationPlayer node
(Player -> Rotation_Helper -> Model -> Animation_Player).
We need to attach a call method track to three of our animations: The firing animation for the pistol, rifle, and knife. Let’s start with the pistol. Click the animation drop down list and select “Pistol_fire”.
Now scroll down to the bottom of the list of animation tracks. The final item in the list should read
Armature/Skeleton:Left_UpperPointer. Now above the list, click the “Add track” button, to the left of the time line
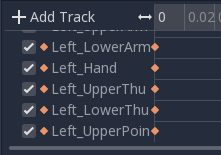
This will bring up a window with a few choices. We want to add a call method track, so click the option that reads “Call Method Track”. This will open a window showing the entire node tree. Navigate to the AnimationPlayer node, select it, and press OK.
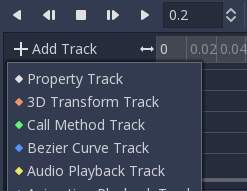
Now at the bottom of list of animation tracks you will have a green track that reads “AnimationPlayer”. Now we need to add the point where we want to call our callback function. Scrub the timeline until you reach the point where the muzzle starts to flash.
Note
The timeline is the window where all the points in our animation are stored. Each of the little points represents a point of animation data.
Scrubbing the timeline means moving ourselves through the animation. So when we say “scrub the timeline until you reach a point”, what we mean is move through the animation window until you reach the point on the timeline.
Also, the muzzle of a gun is the end point where the bullet comes out. The muzzle flash is the flash of light that escapes the muzzle when a bullet is fired. The muzzle is also sometimes referred to as the barrel of the gun.
Tip
For finer control when scrubbing the timeline, press Ctrl and scroll forward with the mouse wheel to zoom in. Scrolling backwards will zoom out.
You can also change how the timeline scrubbing snaps by changing the value in Step (s) to a lower/higher value.
Once you get to a point you like, right click on the row for “Animation Player” and press Insert Key.
In the empty name field, enter animation_callback and press Enter.
Now when we are playing this animation the call method track will be triggered at that specific point of the animation.
Let’s repeat the process for the rifle and knife firing animations!
Note
Because the process is exactly the same as the pistol, the process is going to explained in a little less depth. Follow the steps from above if you get lost! It is exactly the same, just on a different animation.
Go to the “Rifle_fire” animation from the animation drop down. Add the call method track once you reach the bottom of the
animation track list by clicking the “Add Track” button above the list. Find the point where the muzzle starts
to flash and right click and press Insert Key to add a call method track point at that position on the track.
Type “animation_callback” into the name field of the pop up which opened and press Enter.
Now we need to apply the callback method track to the knife animation. Select the “Knife_fire” animation and scroll to the bottom of the animation tracks. Click the “Add Track” button above the list and add a method track. Next find a point around the first third of the animation to place the animation callback method point at.
Note
We will not actually be firing the knife, and the animation is a stabbing animation rather than a firing one. For this tutorial we are reusing the gun firing logic for our knife, so the animation has been named in a style that is consistent with the other animations.
From there right click on the timeline and click “Insert Key”. Put “animation_callback” into the name field and press Enter.
Tip
Be sure to save your work!
With that done, we are almost ready to start adding the ability to fire to our player script! We need to set up one last scene: The scene for our bullet object.
Creating the bullet scene¶
There are several ways to handle a gun’s bullets in video games. In this tutorial series, we will be exploring two of the more common ways: Objects, and raycasts.
One of the two ways is using a bullet object. This will be an object that travels through the world and handles its own collision code. In this method we create/spawn a bullet object in the direction our gun is facing, and then it travels forward.
There are several advantages to this method. The first being we do not have to store the bullets in our player. We can simply create the bullet and then move on, and the bullet itself will handle checking for collisions, sending the proper signal(s) to the object it collides with, and destroying itself.
Another advantage is we can have more complex bullet movement. If we want to make the bullet fall ever so slightly as time goes on, we can make the bullet controlling script slowly push the bullet towards the ground. Using an object also makes the bullet take time to reach its target, it doesn’t instantly hit whatever it’s pointed at. This feels more realistic because nothing in real life moves instantly from one point to another.
One of the huge disadvantages is performance. While having each bullet calculate their own paths and handle their own collision allows for a lot of flexibility, it comes at the cost of performance. With this method we are calculating every bullet’s movement every step, and while this may not be a problem for a few dozen bullets, it can become a huge problem when you potentially have several hundred bullets.
Despite the performance hit, many first person shooters include some form of object bullets. Rocket launchers are a prime example because in many first person shooters, rockets do not just instantly explode at their target position. You can also find bullets as objects many times with grenades because they generally bounce around the world before exploding.
Note
While I cannot say for sure this is the case, these games probably use bullet objects in some form or another: (These are entirely from my observations. They may be entirely wrong. I have never worked on any of the following games)
- Halo (Rocket launchers, fragmentation grenades, sniper rifles, brute shot, and more)
- Destiny (Rocket launchers, grenades, fusion rifles, sniper rifles, super moves, and more)
- Call of Duty (Rocket launchers, grenades, ballistic knives, crossbows, and more)
- Battlefield (Rocket launchers, grenades, claymores, mortars, and more)
Another disadvantage with bullet objects is networking. Bullet objects have to sync the positions (at least) with all the clients that are connected to the server.
While we are not implementing any form of networking (as that would be in its own entire tutorial series), it is a consideration to keep in mind when creating your first person shooter, especially if you plan on adding some form of networking in the future.
The other way of handling bullet collisions we will be looking at is raycasting.
This method is extremely common in guns that have fast moving bullets that rarely change trajectory over time.
Instead of creating a bullet object and sending it through space, we instead send a ray starting from the barrel/muzzle of the gun forwards. We set the raycast’s origin to the starting position of the bullet, and based on the length we can adjust how far the bullet ‘travels’ through space.
Note
While I cannot say for sure this is the case, these games probably use raycasts in some form or another: (These are entirely from my observations. They may be entirely wrong. I have never worked on any of the following games)
- Halo (Assault rifles, DMRs, battle rifles, covenant carbine, spartan laser, and more)
- Destiny (Auto rifles, pulse rifles, scout rifles, hand cannons, machine guns, and more)
- Call of Duty (Assault rifles, light machine guns, sub machine guns, pistols, and more)
- Battlefield (Assault rifles, SMGs, carbines, pistols, and more)
One huge advantage of this method is that it’s light on performance. Sending a couple hundred rays through space is much easier for the computer to calculate than sending a couple hundred bullet objects.
Another advantage is we can instantly know if we’ve hit something or not exactly when we call for it. For networking this is important because we do not need to sync the bullet movements over the Internet, we only need to send whether or not the raycast hit.
Raycasting does have some disadvantages, though. One major disadvantage is we cannot easily cast a ray in anything but a linear line. This means we can only fire in a straight line for however long our ray length is. You can create the illusion of bullet movement by casting multiple rays at different positions, but not only is this hard to implement in code, it is also heavier on performance.
Another disadvantage is we cannot see the bullet. With bullet objects we can actually see the bullet travel through space if we attach a mesh to it, but because raycasts happen instantly, we do not have a decent way of showing the bullets. You could draw a line from the origin of the raycast to the point where the raycast collided, and that is one popular way of showing raycasts. Another way is simply not drawing the raycast at all, because theoretically the bullets move so fast our eyes could not see it anyway.
Let’s get the bullet object set up. This is what our pistol will create when the “Pistol_fire” animation callback function is called.
Open up Bullet_Scene.tscn. The scene contains Spatial node called bullet, with a MeshInstance
and an Area with a CollisionShape children to it.
Create a new script called Bullet_script.gd and attach it to the Bullet Spatial.
We are going to move the entire bullet object at the root (Bullet). We will be using the Area to check whether or not we’ve collided with something
Note
Why are we using an Area and not a RigidBody? The main reason we’re not using a RigidBody is because we do not want the bullet to interact with other RigidBody nodes. By using an Area we are ensuring that none of the other RigidBody nodes, including other bullets, will be effected.
Another reason is simply because it is easier to detect collisions with an Area!
Here’s the script that will control our bullet:
extends Spatial
var BULLET_SPEED = 70
var BULLET_DAMAGE = 15
const KILL_TIMER = 4
var timer = 0
var hit_something = false
func _ready():
$Area.connect("body_entered", self, "collided")
func _physics_process(delta):
var forward_dir = global_transform.basis.z.normalized()
global_translate(forward_dir * BULLET_SPEED * delta)
timer += delta
if timer >= KILL_TIMER:
queue_free()
func collided(body):
if hit_something == false:
if body.has_method("bullet_hit"):
body.bullet_hit(BULLET_DAMAGE, global_transform)
hit_something = true
queue_free()
Let’s go through the script:
First we define a few class variables:
BULLET_SPEED: The speed at which the bullet travels.BULLET_DAMAGE: The damage the bullet will cause to anything with which it collides.KILL_TIMER: How long the bullet can last without hitting anything.timer: A float for tracking how long the bullet has been alive.hit_something: A boolean for tracking whether or not we’ve hit something.
With the exception of timer and hit_something, all of these variables
change how the bullet interacts with the world.
Note
The reason we are using a kill timer is so we do not have a case where we get a bullet travelling forever. By using a kill timer, we can ensure that no bullets will travel forever and consume resources.
Tip
As in Part 1, we have a couple all uppercase class variables. The reason behind this is the same as the reason given in Part 1: We want to treat these variables like constants, but we want to be able to change them. In this case we will later need to change the damage and speed of these bullets, so we need them to be variables and not constants.
In _ready we set the area’s body_entered signal to ourself so that it calls
the collided function when a body enters the area.
_physics_process gets the bullet’s local Z axis. If you look at the scene
in local mode, you will find that the bullet faces the positive local Z axis.
Next we translate the entire bullet by that forward direction, multiplying in our speed and delta time.
After that we add delta time to our timer and check whether the timer has reached a value as big or greater
than our KILL_TIME constant. If it has, we use queue_free to free the bullet.
In collided we check whether we’ve hit something yet.
Remember that collided is only called when a body has entered the Area node.
If the bullet has not already collided with something, we then proceed to check if the body the bullet has collided
with has a function/method called bullet_hit. If it does, we call it and pass in the bullet’s damage and the bullet’s global transform
so we can get the bullet’s rotation and position.
Note
in collided, the passed in body can be a StaticBody,
RigidBody, or KinematicBody
We set the Bullet’s hit_something variable to true because regardless of whether or not the body that
the bullet collided with has the bullet_hit function/method, it has hit something and so we need to make sure the bullet does not hit anything else.
Then we free the bullet using queue_free.
Tip
You may be wondering why we even have a hit_something variable if we
free the bullet using queue_free as soon as it hits something.
The reason we need to track whether we’ve hit something or not is because queue_free
does not immediately free the node, so the bullet could collide with another body
before Godot has a chance to free it. By tracking whether the bullet has hit something,
we can make sure that the bullet will only hit one object.
Before we start programming the player again, let’s take a quick look at Player.tscn.
Open up Player.tscn again.
Expand Rotation_Helper and notice how it has two nodes: Gun_Fire_Points and
Gun_Aim_Point.
Gun_aim_point is the point that the bullets will be aiming at. Notice how it
is lined up with the center of the screen and pulled a distance forward on the Z
axis. Gun_aim_point will serve as the point where the bullets will for sure collide
with as it goes along.
Note
There is a invisible mesh instance for debugging purposes. The mesh is a small sphere that visually shows at which target the bullets will be aiming.
Open up Gun_Fire_Points and you’ll find three more Spatial nodes, one for each
weapon.
Open up Rifle_Point and you’ll find a Raycast node. This is where
we will be sending the raycasts for our rifle’s bullets.
The length of the raycast will dictate how far our bullets will travel.
We are using a Raycast node to handle the rifle’s bullet because we want to fire lots of bullets quickly. If we use bullet objects, it is quite possible we could run into performance issues on older machines.
Note
If you are wondering from where the positions of the points came, they
are the rough positions of the ends of each weapon. You can see this by
going to AnimationPlayer, selecting one of the firing animations
and scrubbing through the timeline. The point for each weapon should mostly line
up with the end of each weapon.
Open up Knife_Point and you’ll find an Area node. We are using an Area for the knife
because we only care for all the bodies close to us, and because our knife does
not fire into space. If we were making a throwing knife, we would likely spawn a bullet
object that looks like a knife.
Finally, we have Pistol_Point. This is the point where we will be creating/instancing
our bullet objects. We do not need any additional nodes here, as the bullet handles all
of its own collision detection.
Now that we’ve seen how we will handle our other weapons, and where we will spawn the bullets, let’s start working on making them work.
Note
You can also look at the HUD nodes if you want. There is nothing fancy there and other than using a single Label, we will not be touching any of those nodes. Check Design interfaces with the Control nodes for a tutorial on using GUI nodes.
Creating the first weapon¶
Lets write the code for each of our weapons, starting with the pistol.
Select Pistol_Point (Player -> Rotation_Helper -> Gun_Fire_Points -> Pistol_Point) and create a new script called Weapon_Pistol.gd.
Add the following code to Weapon_Pistol.gd:
extends Spatial
const DAMAGE = 15
const IDLE_ANIM_NAME = "Pistol_idle"
const FIRE_ANIM_NAME = "Pistol_fire"
var is_weapon_enabled = false
var bullet_scene = preload("Bullet_Scene.tscn")
var player_node = null
func _ready():
pass
func fire_weapon():
var clone = bullet_scene.instance()
var scene_root = get_tree().root.get_children()[0]
scene_root.add_child(clone)
clone.global_transform = self.global_transform
clone.scale = Vector3(4, 4, 4)
clone.BULLET_DAMAGE = DAMAGE
func equip_weapon():
if player_node.animation_manager.current_state == IDLE_ANIM_NAME:
is_weapon_enabled = true
return true
if player_node.animation_manager.current_state == "Idle_unarmed":
player_node.animation_manager.set_animation("Pistol_equip")
return false
func unequip_weapon():
if player_node.animation_manager.current_state == IDLE_ANIM_NAME:
if player_node.animation_manager.current_state != "Pistol_unequip":
player_node.animation_manager.set_animation("Pistol_unequip")
if player_node.animation_manager.current_state == "Idle_unarmed":
is_weapon_enabled = false
return true
else:
return false
Let’s go over how the script works.
First we define some class variables we’ll need in the script:
DAMAGE: The amount of damage a single bullet does.IDLE_ANIM_NAME: The name of the pistol’s idle animation.FIRE_ANIM_NAME: The name of the pistol’s fire animation.is_weapon_enabled: A variable for checking whether this weapon is in use/enabled.bullet_scene: The bullet scene we worked on earlier.player_node: A variable to holdPlayer.gd.
The reason we define most of these variables is so we can use them in Player.gd.
Each of the weapons we’ll make will have all these variables (minus bullet_scene) so we have
a consistent interface to interact with in Player.gd. By using the same variables/functions in each
weapon, we can interact with them without having to know which weapon we are using, which makes our code
much more modular because we can add weapons without having to change much of the code in Player.gd and it will just work.
We could write all the code in Player.gd, but then Player.gd will get increasingly harder to manage as we add weapons.
By using a modular design with a consistent interface, we can keep Player.gd nice and neat, while also making it easier to add/remove/modify weapons.
In _ready we simply pass over it.
There is one thing of note though, an assumption that we’ll fill in Player.gd at some point.
We are going to assume that Player.gd will pass themselves in before calling any of the functions in Weapon_Pistol.gd.
While this can lead to situations where the player does not pass themselves in (because we forget), we would have to have a long string
of get_parent calls to traverse up the scene tree to retrieve the player. This does not look pretty (get_parent().get_parent().get_parent() and so on)
and it is relatively safe to assume we will remember to pass ourselves to each weapon in Player.gd.
Next let’s look at fire_weapon:
The first thing we do is instance the bullet scene we made earlier.
Tip
By instancing the scene, we are creating a new node holding all the node(s) in the scene we instanced, effectively cloning that scene.
Then we add a clone to the first child node of the root of the scene we are currently in. By doing this, we’re making it a child of the root node of the currently loaded scene.
In other words, we are adding a clone as a child of the first node (whatever is at the top of the scene tree) in the currently loaded/opened scene.
If the currently loaded/open scene is Testing_Area.tscn, we’d be adding our clone as a child of Testing_Area, the root node in that scene.
Warning
As mentioned later below in the section on adding sounds, this method makes an assumption. This will be explained later in the section on adding sounds in Part 3
Next we set the global transform of the clone to the Pistol_Aim_Point’s global transform. The reason we do this is so the bullet is spawned at the end of the pistol.
You can see that Pistol_Aim_Point is positioned right at the end of the pistol by clicking the AnimationPlayer and
scrolling through Pistol_fire. You’ll find the position is more or less at the end of the pistol when it fires.
Next we scale it up by a factor of 4 because the bullet scene is a little too small by default.
Then we set the bullet’s damage (BULLET_DAMAGE) to the amount of damage a single pistol bullet does (DAMAGE).
Now let’s look at equip_weapon:
The first thing we do is check to see whether the animation manager is in the pistol’s idle animation.
If we are in the pistol’s idle animation, we set is_weapon_enabled to true and return true because the pistol has successfully
been equipped.
Because we know our pistol’s equip animation automatically transitions to the pistol’s idle animation, if we are in the pistol’s
idle animation the pistol must have finished playing the equip animation.
Note
We know these animations will transition because we wrote the code to make them transition in Animation_Manager.gd
Next we check to see if the player is in the Idle_unarmed animation state. Because all unequipping animations go to this state, and because any
weapon can be equipped from this state, we change animations to Pistol_equip if the player is in the Idle_unarmed state.
Since we know Pistol_equip will transition to Pistol_idle, we do not need to do any more additional processing for equipping weapons,
but since we were not able to equip the pistol yet, we return false.
Finally, let’s look at unequip_weapon:
unequip_weapon is similar to equip_weapon, but instead we’re checking things in reverse.
First we check to see whether the player is in the idle animation state. Then we check to make sure the player is not in the Pistol_unequip animation.
If the player is not in the Pistol_unequip animation, we want to play the pistol_unequip animation.
Note
You may be wondering why we are checking to see whether the player is in the pistol’s idle animation, and then making sure the player is not unequipping right after.
The reason behind the additional check is because we could (in rare cases) call unequip_weapon twice before we’ve had a chance to process set_animation,
so we add this additional check to make sure the unequip animation plays.
Next we check to see whether the player is in Idle_unarmed, which is the animation state we will transition into from Pistol_unequip. If the player is in Idle_unarmed, then we set
is_weapon_enabled to false since we are no longer using this weapon, and return true because we have successfully unequipped the pistol.
If the player is not in Idle_unarmed, we return false because we have not yet successfully unequipped the pistol.
Creating the other two weapons¶
Now that we have all the code we’ll need for the pistol, let’s add the code for the rifle and knife next.
Select Rifle_Point (Player -> Rotation_Helper -> Gun_Fire_Points -> Rifle_Point) and create a new script called Weapon_Rifle.gd,
then add the following:
extends Spatial
const DAMAGE = 4
const IDLE_ANIM_NAME = "Rifle_idle"
const FIRE_ANIM_NAME = "Rifle_fire"
var is_weapon_enabled = false
var player_node = null
func _ready():
pass
func fire_weapon():
var ray = $Ray_Cast
ray.force_raycast_update()
if ray.is_colliding():
var body = ray.get_collider()
if body == player_node:
pass
elif body.has_method("bullet_hit"):
body.bullet_hit(DAMAGE, ray.global_transform)
func equip_weapon():
if player_node.animation_manager.current_state == IDLE_ANIM_NAME:
is_weapon_enabled = true
return true
if player_node.animation_manager.current_state == "Idle_unarmed":
player_node.animation_manager.set_animation("Rifle_equip")
return false
func unequip_weapon():
if player_node.animation_manager.current_state == IDLE_ANIM_NAME:
if player_node.animation_manager.current_state != "Rifle_unequip":
player_node.animation_manager.set_animation("Rifle_unequip")
if player_node.animation_manager.current_state == "Idle_unarmed":
is_weapon_enabled = false
return true
return false
Most of this is exactly the same as Weapon_Pistol.gd, so we’re only going to look at what’s changed: fire_weapon.
The first thing we do is get the Raycast node, which is a child of Rifle_Point.
Next we force the Raycast to update using force_raycast_update. This will force the Raycast to detect collisions when we call it, meaning
we get a frame perfect collision check with the 3D physics world.
Then we check to see if the Raycast collided with something.
If the Raycast has collided with something, we first get the collision body it collided with. This can be a StaticBody, RigidBody, or a KinematicBody.
Next we want to make sure the body we’ve collided with is not the player, since we (probably) do not want to give the player the ability to shoot themselves in the foot.
If the body is not the player, we then check to see if it has a function/method called bullet_hit. If it does, we call it and pass in the amount of
damage this bullet does (DAMAGE), and the global transform of the Raycast so we can tell from which direction the bullet came.
Now all we need to do is write the code for the knife.
Select Knife_Point (Player -> Rotation_Helper -> Gun_Fire_Points -> Knife_Point) and create a new script called Weapon_Knife.gd,
then add the following:
extends Spatial
const DAMAGE = 40
const IDLE_ANIM_NAME = "Knife_idle"
const FIRE_ANIM_NAME = "Knife_fire"
var is_weapon_enabled = false
var player_node = null
func _ready():
pass
func fire_weapon():
var area = $Area
var bodies = area.get_overlapping_bodies()
for body in bodies:
if body == player_node:
continue
if body.has_method("bullet_hit"):
body.bullet_hit(DAMAGE, area.global_transform)
func equip_weapon():
if player_node.animation_manager.current_state == IDLE_ANIM_NAME:
is_weapon_enabled = true
return true
if player_node.animation_manager.current_state == "Idle_unarmed":
player_node.animation_manager.set_animation("Knife_equip")
return false
func unequip_weapon():
if player_node.animation_manager.current_state == IDLE_ANIM_NAME:
player_node.animation_manager.set_animation("Knife_unequip")
if player_node.animation_manager.current_state == "Idle_unarmed":
is_weapon_enabled = false
return true
return false
As with Weapon_Rifle.gd, the only differences are in fire_weapon, so let’s look at that:
The first thing we do is get the Area child node of Knife_Point.
Next we want to get all the collision bodies inside the Area using get_overlapping_bodies. This will return a
list of every body that touches the Area.
We next want to go through each of those bodies.
First we check to make sure the body is not the player, because we do not want to let the player be able to stab themselves. If the body is the player,
we use continue so we jump and look at the next body in bodies.
If we have not jumped to the next body, we then check to see if the body has the bullet_hit function/method. If it does,
we call it, passing in the amount of damage a single knife swipe does (DAMAGE) and the global transform of the Area.
Note
While we could attempt to calculate a rough location for where the knife hit exactly, we are not going to because using the Area’s position works well enough and the extra time needed to calculate a rough position for each body is not worth the effort.
Making the weapons work¶
Let’s start making the weapons work in Player.gd.
First let’s start by adding some class variables we’ll need for the weapons:
# Place before _ready
var animation_manager
var current_weapon_name = "UNARMED"
var weapons = {"UNARMED":null, "KNIFE":null, "PISTOL":null, "RIFLE":null}
const WEAPON_NUMBER_TO_NAME = {0:"UNARMED", 1:"KNIFE", 2:"PISTOL", 3:"RIFLE"}
const WEAPON_NAME_TO_NUMBER = {"UNARMED":0, "KNIFE":1, "PISTOL":2, "RIFLE":3}
var changing_weapon = false
var changing_weapon_name = "UNARMED"
var health = 100
var UI_status_label
Let’s go over what these new variables will do:
animation_manager: This will hold the AnimationPlayer node and its script, which we wrote previously.current_weapon_name: The name of the weapon we are currently using. It has four possible values:UNARMED,KNIFE,PISTOL, andRIFLE.weapons: A dictionary that will hold all the weapon nodes.WEAPON_NUMBER_TO_NAME: A dictionary allowing us to convert from a weapon’s number to its name. We’ll use this for changing weapons.WEAPON_NAME_TO_NUMBER: A dictionary allowing us to convert from a weapon’s name to its number. We’ll use this for changing weapons.changing_weapon: A boolean to track whether or not we are changing guns/weapons.changing_weapon_name: The name of the weapon we want to change to.health: How much health our player has. In this part of the tutorial we will not be using it.UI_status_label: A label to show how much health we have, and how much ammo we have both in our gun and in reserve.
Next we need to add a few things in _ready. Here’s the new _ready function:
func _ready():
camera = $Rotation_Helper/Camera
rotation_helper = $Rotation_Helper
animation_manager = $Rotation_Helper/Model/Animation_Player
animation_manager.callback_function = funcref(self, "fire_bullet")
Input.set_mouse_mode(Input.MOUSE_MODE_CAPTURED)
weapons["KNIFE"] = $Rotation_Helper/Gun_Fire_Points/Knife_Point
weapons["PISTOL"] = $Rotation_Helper/Gun_Fire_Points/Pistol_Point
weapons["RIFLE"] = $Rotation_Helper/Gun_Fire_Points/Rifle_Point
var gun_aim_point_pos = $Rotation_Helper/Gun_Aim_Point.global_transform.origin
for weapon in weapons:
var weapon_node = weapons[weapon]
if weapon_node != null:
weapon_node.player_node = self
weapon_node.look_at(gun_aim_point_pos, Vector3(0, 1, 0))
weapon_node.rotate_object_local(Vector3(0, 1, 0), deg2rad(180))
current_weapon_name = "UNARMED"
changing_weapon_name = "UNARMED"
UI_status_label = $HUD/Panel/Gun_label
flashlight = $Rotation_Helper/Flashlight
Let’s go over what’s changed.
First we get the AnimationPlayer node and assign it to the animation_manager variable. Then we set the callback function
to a FuncRef that will call the player’s fire_bullet function. Right now we haven’t written the fire_bullet function,
but we’ll get there soon.
Next we get all the weapon nodes and assign them to weapons. This will allow us to access the weapon nodes only with their name
(KNIFE, PISTOL, or RIFLE).
We then get Gun_Aim_Point’s global position so we can rotate the player’s weapons to aim at it.
Then we go through each weapon in weapons.
We first get the weapon node. If the weapon node is not null, we then set its player_node variable to this script (Player.gd).
Then we have it look at gun_aim_point_pos using the look_at function, and then rotate it by 180 degrees on the Y axis.
Note
We rotate all of those weapon points by 180 degrees on their Y axis because our camera is pointing backwards.
If we did not rotate all of these weapon points by 180 degrees, all of the weapons would fire backwards.
Then we set current_weapon_name and changing_weapon_name to UNARMED.
Finally, we get the UI Label from our HUD.
Let’s add a new function call to _physics_process so we can change weapons. Here’s the new code:
func _physics_process(delta):
process_input(delta)
process_movement(delta)
process_changing_weapons(delta)
Now we will call process_changing_weapons.
Now let’s add all the player input code for the weapons in process_input. Add the following code:
# ----------------------------------
# Changing weapons.
var weapon_change_number = WEAPON_NAME_TO_NUMBER[current_weapon_name]
if Input.is_key_pressed(KEY_1):
weapon_change_number = 0
if Input.is_key_pressed(KEY_2):
weapon_change_number = 1
if Input.is_key_pressed(KEY_3):
weapon_change_number = 2
if Input.is_key_pressed(KEY_4):
weapon_change_number = 3
if Input.is_action_just_pressed("shift_weapon_positive"):
weapon_change_number += 1
if Input.is_action_just_pressed("shift_weapon_negative"):
weapon_change_number -= 1
weapon_change_number = clamp(weapon_change_number, 0, WEAPON_NUMBER_TO_NAME.size() - 1)
if changing_weapon == false:
if WEAPON_NUMBER_TO_NAME[weapon_change_number] != current_weapon_name:
changing_weapon_name = WEAPON_NUMBER_TO_NAME[weapon_change_number]
changing_weapon = true
# ----------------------------------
# ----------------------------------
# Firing the weapons
if Input.is_action_pressed("fire"):
if changing_weapon == false:
var current_weapon = weapons[current_weapon_name]
if current_weapon != null:
if animation_manager.current_state == current_weapon.IDLE_ANIM_NAME:
animation_manager.set_animation(current_weapon.FIRE_ANIM_NAME)
# ----------------------------------
Let’s go over the additions, starting with how we’re changing weapons.
First we get the current weapon’s number and assign it to weapon_change_number.
Then we check to see if any of the number keys (keys 1-4) are pressed. If they are, we set
weapon_change_number to the value mapped at that key.
Note
The reason key 1 is mapped to 0 is because the first element in a list is mapped to zero, not one. Most list/array accessors
in most programming languages start at 0 instead of 1. See https://en.wikipedia.org/wiki/Zero-based_numbering for more information.
Next we check to see if shift_weapon_positive or shift_weapon_negative is pressed. If one of them is, we add/subtract 1 from
weapon_change_number.
Because the player may have shifted weapon_change_number outside of the number of weapons the player has, we clamp it so it cannot exceed the maximum number of weapons
the player has and it ensures weapon_change_number is 0 or more.
Then we check to make sure the player is not already changing weapons. If the player is not, we then check to see if the weapon the player wants to change to
is a new weapon and not the weapon the player is currently using. If the weapon the player is wanting to change to is a new weapon, we then set changing_weapon_name to
the weapon at weapon_change_number and set changing_weapon to true.
For firing the weapon we first check to see if the fire action is pressed.
Then we check to make sure the player is not changing weapons.
Next we get the weapon node for the current weapon.
If the current weapon node does not equal null, and the player is in its IDLE_ANIM_NAME state, we set the player’s animation
to the current weapon’s FIRE_ANIM_NAME.
Let’s add process_changing_weapons next.
Add the following code:
func process_changing_weapons(delta):
if changing_weapon == true:
var weapon_unequipped = false
var current_weapon = weapons[current_weapon_name]
if current_weapon == null:
weapon_unequipped = true
else:
if current_weapon.is_weapon_enabled == true:
weapon_unequipped = current_weapon.unequip_weapon()
else:
weapon_unequipped = true
if weapon_unequipped == true:
var weapon_equipped = false
var weapon_to_equip = weapons[changing_weapon_name]
if weapon_to_equip == null:
weapon_equipped = true
else:
if weapon_to_equip.is_weapon_enabled == false:
weapon_equipped = weapon_to_equip.equip_weapon()
else:
weapon_equipped = true
if weapon_equipped == true:
changing_weapon = false
current_weapon_name = changing_weapon_name
changing_weapon_name = ""
Let’s go over what’s happening here:
The first thing we do is make sure we’ve received input to change weapons. We do this by making sure changing_weapons is true.
Next we define a variable (weapon_unequipped) so we can check whether the current weapon has been successfully unequipped or not.
Then we get the current weapon from weapons.
If the current weapon is not null, then we need to check whether the weapon is enabled. If the weapon is enabled, we call its unequip_weapon function
so it will start the unequip animation. If the weapon is not enabled, we set weapon_unequipped to true because the weapon has successfully been unequipped.
If the current weapon is null, then we can simply set weapon_unequipped to true. The reason we do this check is because there is no weapon script/node for
UNARMED, but there is also no animations for UNARMED, so we can just start equipping the weapon the player wants to change to.
If the player has successfully unequipped the current weapon (weapon_unequipped == true), we need to equip the new weapon.
First we define a new variable (weapon_equipped) for tracking whether the player has successfully equipped the new weapon or not.
Then we get the weapon the player wants to change to. If the weapon the player wants to change to is not null, we then check to see whether it’s enabled or not.
If it is not enabled, we call its equip_weapon function so it starts to equip the weapon. If the weapon is enabled, we set weapon_equipped to true.
If the weapon the player wants to change to is null, we simply set weapon_equipped to true because we do not have any node/script for UNARMED,
nor do we have any animations.
Finally, we check to see whether the player has successfully equipped the new weapon. If (s)he has done so, we set changing_weapon to false because the player is no
longer changing weapons.
We also set current_weapon_name to changing_weapon_name since the current weapon has changed, and then we set changing_weapon_name to an empty string.
Now, we need to add one more function to the player, and then the player is ready to start firing the weapons!
We need to add fire_bullet, which will be called by the AnimationPlayer at those
points we set earlier in the AnimationPlayer function track:
func fire_bullet():
if changing_weapon == true:
return
weapons[current_weapon_name].fire_weapon()
Let’s go over what this function does:
First we check to see whether the player is changing weapons. If the player is changing weapons, we do not want shoot, so we return.
Tip
Calling return stops the rest of the function from being called. In this case, we are not returning a variable
because we are only interested in not running the rest of the code, and because we are not looking for a returned
variable either when we call this function.
Then we tell the current weapon the player is using to fire by calling its fire_weapon function.
Tip
Remember how we mentioned the speed of the animations for firing was faster than the other animations? By changing the firing animation speeds, you can change how fast the weapon fires bullets!
Before we are ready to test our new weapons, we still have a little bit of work to do.
Creating some test subjects¶
Create a new script by going to the scripting window, clicking “file”, and selecting new.
Name this script RigidBody_hit_test and make sure it extends RigidBody.
Now we need to add this code:
extends RigidBody
const BASE_BULLET_BOOST = 9;
func _ready():
pass
func bullet_hit(damage, bullet_global_trans):
var direction_vect = bullet_global_trans.basis.z.normalized() * BASE_BULLET_BOOST;
apply_impulse((bullet_global_trans.origin - global_transform.origin).normalized(), direction_vect * damage)
Let’s go over how bullet_hit works:
First we get the bullet’s forward directional vector. This is so we can tell from which direction the bullet will hit the RigidBody. We will use this to push the RigidBody in the same direction as the bullet.
Note
We need to boost the directional vector by BASE_BULLET_BOOST so the bullets pack a bit more of a punch
and move the RigidBody nodes in a visible way. You can just set BASE_BULLET_BOOST to lower or higher values if you want
less or more of a reaction when the bullets collide with the RigidBody.
Then we apply an impulse using apply_impulse.
First, we need to calculate the position for the impulse.
Because apply_impulse takes a vector relative to the RigidBody, we need to calculate the distance from
the RigidBody to the bullet. We do this by subtracting the RigidBody’s global origin/position from the bullet’s global origin/position.
This gets us the distance from the RigidBody to the bullet. We normalize this vector so the size of the collider does not effect how much
the bullets move the RigidBody.
Finally, we need to calculate the force for the impulse. For this, we use the direction the bullet is facing and multiply it by the bullet’s damage. This gives a nice result and for stronger bullets, we get a stronger result.
Now we need to attach this script to all of the RigidBody nodes we want to affect.
Open up Testing_Area.tscn and select all the cubes parented to the Cubes node.
Tip
If you select the top cube, and then hold down Shift and select the last cube, Godot will select all the cubes in-between!
Once you have all the cubes selected, scroll down in the inspector until you get to
the “scripts” section. Click the drop down and select “Load”. Open your newly created RigidBody_hit_test.gd script.
Final notes¶
That was a lot of code! But now, with all that done, you can go and give your weapons a test!
You should now be able to fire as many bullets as you want at the cubes and they will move in response to the bullets colliding with them.
In Part 3, we will add ammo to the weapons, as well as some sounds!
Warning
If you ever get lost, be sure to read over the code again!
You can download the finished project for this part here: Godot_FPS_Part_2.zip
Part 3¶
Part overview¶
In this part, we will be limiting the player’s weapons by giving them ammo. We will also be giving the player the ability to reload, and we will be adding sounds when the weapons fire.
Note
You are assumed to have finished Part 2 before moving on to this part of the tutorial. The finished project from Part 2 will be the starting project for part 3
Let’s get started!
Changing levels¶
Now that we have a fully working FPS, let’s move to a more FPS-like level.
Open up Space_Level.tscn (assets/Space_Level_Objects/Space_Level.tscn)
and/or Ruins_Level.tscn (assets/Ruin_Level_Objects/Ruins_Level.tscn).
Space_Level.tscn and Ruins_Level.tscn are complete custom FPS levels
created for the purpose of this tutorial. Press Play Current Scene button,
or F6 on keyboard, and give each a try.
Warning
Space_Level.tscn is more graphically demanding of the GPU than Ruins_Level.tscn. If your computer is struggling to render
Space_Level.tscn, try using Ruins_Level.tscn instead.
You might have noticed there are several RigidBody nodes placed throughout the level.
We can place RigidBody_hit_test.gd on them and then they will react to being hit with bullets, so let’s do that!
Follow the instructions below for either (or both) of the scenes you want to use
Expand "Other_Objects" and then expand "Physics_Objects".
Expand one of the "Barrel_Group" nodes and then select "Barrel_Rigid_Body" and open it using
the "Open in Editor" button.
This will bring you to the "Barrel_Rigid_Body" scene. From there, select the root node and
scroll the inspector down to the bottom.
Select the drop down arrow under the "Node" tab, and then select "Load". Navigate to
"RigidBody_hit_test.gd" and select "Open".
Return back to "Space_Level.tscn".
Expand one of the "Box_Group" nodes and then select "Crate_Rigid_Body" and open it using the
"Open in Editor" button.
This will bring you to the "Crate_Rigid_Body" scene. From there, select the root node and
scroll the inspector down to the bottom.
Select the drop down arrow under the "Node" tab, and then select "Load". Navigate to
"RigidBody_hit_test.gd" and select "Open".
Return to "Space_Level.tscn".
Expand "Misc_Objects" and then expand "Physics_Objects".
Select all the "Stone_Cube" RigidBodies and then in the inspector scroll down to the bottom.
Select the drop down arrow under the "Node" tab, and then select "Load". Navigate to
"RigidBody_hit_test.gd" and select "Open".
Return to "Ruins_Level.tscn".
Now you can fire at all the rigid bodies in either level and they will react to bullets hitting them!
Adding ammo¶
Now that the player has working guns, let’s give them a limited amount of ammo.
Firstly, we need to define a few variables in each of our weapon scripts.
Open up Weapon_Pistol.gd and add the following class variables:
var ammo_in_weapon = 10
var spare_ammo = 20
const AMMO_IN_MAG = 10
ammo_in_weapon: The amount of ammo currently in the pistolspare_ammo: The amount of ammo we have left in reserve for the pistolAMMO_IN_MAG: The amount of ammo in a fully reloaded weapon/magazine
Now all we need to do is add a single line of code to fire_weapon.
Add the following right under Clone.BULLET_DAMAGE = DAMAGE: ammo_in_weapon -= 1
This will remove one from ammo_in_weapon every time the player fires. Notice we’re not checking to see
if the player has enough ammo or not in fire_weapon. Instead, we’re going to check to see if the player has enough ammo in Player.gd.
Now we need to add ammo for both the rifle and the knife.
Note
You may be wondering why we are adding ammo for the knife given it does not consume any ammunition. The reason we want to add ammo to the knife is so we have a consistent interface for all our weapons.
If we did not add ammo variables for the knife, we would have to add checks for the knife. By adding the ammo variables to the knife, we don’t need to worry about whether or not all our weapons have the same variables.
Add the following class variables to Weapon_Rifle.gd:
var ammo_in_weapon = 50
var spare_ammo = 100
const AMMO_IN_MAG = 50
And then add the following to fire_weapon: ammo_in_weapon -= 1. Make sure that ammo_in_weapon -= 1 is outside of the if ray.is_colliding() check so
the player loses ammo regardless of whether the player hit something or not.
Now all that’s left is the knife. Add the following to Weapon_Knife.gd:
var ammo_in_weapon = 1
var spare_ammo = 1
const AMMO_IN_MAG = 1
Because the knife does not consume ammo, that is all we need to add.
Now we need to change one thing in Player.gd, that is to say,
how we’re firing the weapons in process_input. Change the code for firing weapons to the following:
# ----------------------------------
# Firing the weapons
if Input.is_action_pressed("fire"):
if changing_weapon == false:
var current_weapon = weapons[current_weapon_name]
if current_weapon != null:
if current_weapon.ammo_in_weapon > 0:
if animation_manager.current_state == current_weapon.IDLE_ANIM_NAME:
animation_manager.set_animation(current_weapon.FIRE_ANIM_NAME)
# ----------------------------------
Now the weapons have a limited amount of ammo, and will stop firing when the player runs out.
Ideally, we’d like to let the player be able to see how much ammo is left. Let’s make a new function called process_UI.
First, add process_UI(delta) to _physics_process.
Now add the following to Player.gd:
func process_UI(delta):
if current_weapon_name == "UNARMED" or current_weapon_name == "KNIFE":
UI_status_label.text = "HEALTH: " + str(health)
else:
var current_weapon = weapons[current_weapon_name]
UI_status_label.text = "HEALTH: " + str(health) + \
"\nAMMO: " + str(current_weapon.ammo_in_weapon) + "/" + str(current_weapon.spare_ammo)
Let’s go over what’s happening:
Firstly, we check to see if the current weapon is either UNARMED or KNIFE. If it is, we
change the UI_status_label’s text to only show the player’s health since UNARMED and KNIFE do not consume ammo.
If the player is using a weapon that consumes ammo, we first get the weapon node.
Then we change UI_status_label’s text to show the player’s health, along with how much ammo the player has in the weapon
and how much spare ammo the player has for that weapon.
Now we can see how much ammo the player has through the HUD.
Adding reloading to the weapons¶
Now that the player can run out of ammo, we need a way to let the player fill them back up. Let’s add reloading next!
For reloading, we need to add a few more variables and a function to every weapon.
Open up Weapon_Pistol.gd and add the following class variables:
const CAN_RELOAD = true
const CAN_REFILL = true
const RELOADING_ANIM_NAME = "Pistol_reload"
CAN_RELOAD: A boolean to track whether this weapon has the ability to reloadCAN_REFILL: A boolean to track whether we can refill this weapon’s spare ammo. We will not be usingCAN_REFILLin this part, but we will in the next part!RELOADING_ANIM_NAME: The name of the reloading animation for this weapon.
Now we need to add a function for handling reloading. Add the following function to Weapon_Pistol.gd:
func reload_weapon():
var can_reload = false
if player_node.animation_manager.current_state == IDLE_ANIM_NAME:
can_reload = true
if spare_ammo <= 0 or ammo_in_weapon == AMMO_IN_MAG:
can_reload = false
if can_reload == true:
var ammo_needed = AMMO_IN_MAG - ammo_in_weapon
if spare_ammo >= ammo_needed:
spare_ammo -= ammo_needed
ammo_in_weapon = AMMO_IN_MAG
else:
ammo_in_weapon += spare_ammo
spare_ammo = 0
player_node.animation_manager.set_animation(RELOADING_ANIM_NAME)
return true
return false
Let’s go over what’s happening:
First we define a variable to see whether or not this weapon can reload.
Then we check to see if the player is in this weapon’s idle animation state because we only want to be able to reload when the player is not firing, equipping, or unequipping.
Next we check to see if the player has spare ammo, and if the ammo already in the weapon is equal to a fully reloaded weapon. This way we can ensure the player cannot reload when the player has no ammo or when the weapon is already full of ammo.
If we can still reload, then we calculate the amount of ammo needed to reload the weapon.
If the player has enough ammo to fill the weapon, we remove the ammo needed from spare_ammo and then set ammo_in_weapon to a full weapon/magazine.
If the player does not have enough ammo, we add all the ammo left in spare_ammo, and then set spare_ammo to 0.
Next we play the reloading animation for this weapon, and then return true.
If the player could not reload, we return false.
Now we need to add reloading to the rifle. Open up Weapon_Rifle.gd and add the following class variables:
const CAN_RELOAD = true
const CAN_REFILL = true
const RELOADING_ANIM_NAME = "Rifle_reload"
These variables are exactly the same as the pistol, just with RELOADING_ANIM_NAME changed to the rifle’s reloading animation.
Now we need to add reload_weapon to Weapon_Rifle.gd:
func reload_weapon():
var can_reload = false
if player_node.animation_manager.current_state == IDLE_ANIM_NAME:
can_reload = true
if spare_ammo <= 0 or ammo_in_weapon == AMMO_IN_MAG:
can_reload = false
if can_reload == true:
var ammo_needed = AMMO_IN_MAG - ammo_in_weapon
if spare_ammo >= ammo_needed:
spare_ammo -= ammo_needed
ammo_in_weapon = AMMO_IN_MAG
else:
ammo_in_weapon += spare_ammo
spare_ammo = 0
player_node.animation_manager.set_animation(RELOADING_ANIM_NAME)
return true
return false
This code is exactly the same as the one for the pistol.
The last bit we need to do for the weapons is add ‘reloading’ to the knife. Add the following class variables to Weapon_Knife.gd:
const CAN_RELOAD = false
const CAN_REFILL = false
const RELOADING_ANIM_NAME = ""
Since we both cannot reload or refill a knife, we set both constants to false. We also define RELOADING_ANIM_NAME as an empty string, since the knife
has no reloading animation.
Now we need to add reloading_weapon:
func reload_weapon():
return false
Since we cannot reload a knife, we always return false.
Adding reloading to the player¶
Now we need to add a few things to Player.gd. First we need to define a new class variable:
var reloading_weapon = false
reloading_weapon: A variable to track whether or not the player is currently trying to reload.
Next we need to add another function call to _physics_process.
Add process_reloading(delta) to _physics_process. Now _physics_process should look something like this:
func _physics_process(delta):
process_input(delta)
process_movement(delta)
process_changing_weapons(delta)
process_reloading(delta)
process_UI(delta)
Now we need to add process_reloading. Add the following function to Player.gd:
func process_reloading(delta):
if reloading_weapon == true:
var current_weapon = weapons[current_weapon_name]
if current_weapon != null:
current_weapon.reload_weapon()
reloading_weapon = false
Let’s go over what’s happening here.
Firstly, we check to make sure the player is trying to reload.
If the player is trying to reload, we then get the current weapon. If the current weapon does not equal null, we call its reload_weapon function.
Note
If the current weapon is equal to null, then the current weapon is UNARMED.
Finally, we set reloading_weapon to false because, regardless of whether the player successfully reloaded, we’ve tried reloading
and no longer need to keep trying.
Before we can let the player reload, we need to change a few things in process_input.
The first thing we need to change is in the code for changing weapons. We need to add an additional check (if reloading_weapon == false:) to see if the player is reloading:
if changing_weapon == false:
# New line of code here!
if reloading_weapon == false:
if WEAPON_NUMBER_TO_NAME[weapon_change_number] != current_weapon_name:
changing_weapon_name = WEAPON_NUMBER_TO_NAME[weapon_change_number]
changing_weapon = true
This makes it so the player cannot change weapons if the player is reloading.
Now we need to add the code to trigger a reload when the player pushes the reload action. Add the following code to process_input:
# ----------------------------------
# Reloading
if reloading_weapon == false:
if changing_weapon == false:
if Input.is_action_just_pressed("reload"):
var current_weapon = weapons[current_weapon_name]
if current_weapon != null:
if current_weapon.CAN_RELOAD == true:
var current_anim_state = animation_manager.current_state
var is_reloading = false
for weapon in weapons:
var weapon_node = weapons[weapon]
if weapon_node != null:
if current_anim_state == weapon_node.RELOADING_ANIM_NAME:
is_reloading = true
if is_reloading == false:
reloading_weapon = true
# ----------------------------------
Let’s go over what’s happening here.
First we make sure the player is not reloading already, nor is the player trying to change weapons.
Then we check to see if the reload action has been pressed.
If the player has pressed reload, we then get the current weapon and check to make sure it is not null. Then we check to see whether the
weapon can reload or not using its CAN_RELOAD constant.
If the weapon can reload, we then get the current animation state, and make a variable for tracking whether the player is already reloading or not.
We then go through every weapon to make sure the player is not already playing that weapon’s reloading animation.
If the player is not reloading any weapon, we set reloading_weapon to true.
One thing I like to add is where the weapon will reload itself if you try to fire it and it’s out of ammo.
We also need to add an additional if check (is_reloading_weapon == false:) so the player cannot fire the current weapon while
reloading.
Let’s change our firing code in process_input so it reloads when trying to fire an empty weapon:
# ----------------------------------
# Firing the weapons
if Input.is_action_pressed("fire"):
if reloading_weapon == false:
if changing_weapon == false:
var current_weapon = weapons[current_weapon_name]
if current_weapon != null:
if current_weapon.ammo_in_weapon > 0:
if animation_manager.current_state == current_weapon.IDLE_ANIM_NAME:
animation_manager.set_animation(current_weapon.FIRE_ANIM_NAME)
else:
reloading_weapon = true
# ----------------------------------
Now we check to make sure the player is not reloading before we fire the weapon, and when we have 0 or less ammo in the current weapon,
we set reloading_weapon to true if the player tries to fire.
This will make it so the player will try to reload when attempting to fire an empty weapon.
With that done, the player can now reload! Give it a try! Now you can fire all the spare ammo for each weapon.
Adding sounds¶
Finally, let’s add some sounds that accompany the player firing, reloading and changing weapons.
Tip
There are no game sounds provided in this tutorial (for legal reasons). https://gamesounds.xyz/ is a collection of “royalty free or public domain music and sounds suitable for games”. I used Gamemaster’s Gun Sound Pack, which can be found in the Sonniss.com GDC 2017 Game Audio Bundle.
Open up Simple_Audio_Player.tscn. It is simply a Spatial with an AudioStreamPlayer as its child.
Note
The reason this is called a ‘simple’ audio player is because we are not taking performance into account and because the code is designed to provide sound in the simplest way possible.
If you want to use 3D audio, so it sounds like it’s coming from a location in 3D space, right click the AudioStreamPlayer and select “Change type”.
This will open the node browser. Navigate to AudioStreamPlayer3D and select “change”. In the source for this tutorial, we will be using AudioStreamPlayer, but you can optionally use AudioStreamPlayer3D if you desire, and the code provided below will work regardless of which one you chose.
Create a new script and call it Simple_Audio_Player.gd. Attach it to the Spatial in Simple_Audio_Player.tscn
and insert the following code:
extends Spatial
# All of the audio files.
# You will need to provide your own sound files.
var audio_pistol_shot = preload("res://path_to_your_audio_here")
var audio_gun_cock = preload("res://path_to_your_audio_here")
var audio_rifle_shot = preload("res://path_to_your_audio_here")
var audio_node = null
func _ready():
audio_node = $Audio_Stream_Player
audio_node.connect("finished", self, "destroy_self")
audio_node.stop()
func play_sound(sound_name, position=null):
if audio_pistol_shot == null or audio_rifle_shot == null or audio_gun_cock == null:
print ("Audio not set!")
queue_free()
return
if sound_name == "Pistol_shot":
audio_node.stream = audio_pistol_shot
elif sound_name == "Rifle_shot":
audio_node.stream = audio_rifle_shot
elif sound_name == "Gun_cock":
audio_node.stream = audio_gun_cock
else:
print ("UNKNOWN STREAM")
queue_free()
return
# If you are using an AudioStreamPlayer3D, then uncomment these lines to set the position.
#if audio_node is AudioStreamPlayer3D:
# if position != null:
# audio_node.global_transform.origin = position
audio_node.play()
func destroy_self():
audio_node.stop()
queue_free()
Tip
By setting position to null by default in play_sound, we are making it an optional argument,
meaning position doesn’t necessarily have to be passed in to call play_sound.
Let’s go over what’s happening here:
In _ready, we get the AudioStreamPlayer and connect its finished signal to the destroy_self function.
It doesn’t matter if it’s an AudioStreamPlayer or AudioStreamPlayer3D node,
as they both have the finished signal. To make sure it is not playing any sounds, we call stop on the AudioStreamPlayer.
Warning
Make sure your sound files are not set to loop! If it is set to loop, the sounds will continue to play infinitely and the script will not work!
The play_sound function is what we will be calling from Player.gd. We check if the sound
is one of the three possible sounds, and if it is one of the three sounds we set the audio stream in AudioStreamPlayer
to the correct sound.
If it is an unknown sound, we print an error message to the console and free the audio player.
If you are using an AudioStreamPlayer3D, remove the # to set the position of
the audio player node so it plays at the correct position.
Finally, we tell the AudioStreamPlayer to play.
When the AudioStreamPlayer is finished playing the sound, it will call destroy_self because
we connected the finished signal in _ready. We stop the AudioStreamPlayer and free the audio player
to save on resources.
Note
This system is extremely simple and has some major flaws:
One flaw is we have to pass in a string value to play a sound. While it is relatively simple to remember the names of the three sounds, it can be increasingly complex when you have more sounds. Ideally, we’d place these sounds in some sort of container with exposed variables so we do not have to remember the name(s) of each sound effect we want to play.
Another flaw is we cannot play looping sounds effects, nor background music, easily with this system. Because we cannot play looping sounds, certain effects, like footstep sounds, are harder to accomplish because we then have to keep track of whether or not there is a sound effect and whether or not we need to continue playing it.
One of the biggest flaws with this system is we can only play sounds from Player.gd.
Ideally we’d like to be able to play sounds from any script at any time.
With that done, let’s open up Player.gd again.
First we need to load the Simple_Audio_Player.tscn. Place the following code in the class variables section of the script:
var simple_audio_player = preload("res://Simple_Audio_Player.tscn")
Now we need to instance the simple audio player when we need it, and then call its
play_sound function and pass the name of the sound we want to play. To make the process simpler,
let’s create a create_sound function in Player.gd:
func create_sound(sound_name, position=null):
var audio_clone = simple_audio_player.instance()
var scene_root = get_tree().root.get_children()[0]
scene_root.add_child(audio_clone)
audio_clone.play_sound(sound_name, position)
Let’s walk through what this function does:
The first line instances the Simple_Audio_Player.tscn scene and assigns it to a variable
named audio_clone.
The second line gets the scene root, and this has a large (though safe) assumption.
We first get this node’s SceneTree,
and then access the root node, which in this case is the Viewport this entire game is running under.
Then we get the first child of the Viewport, which in our case happens to be the root node in
Test_Area.tscn or any of the other provided levels. We are making a huge assumption that the first child of the root node
is the root scene that the player is under, which may not always be the case.
If this doesn’t make sense to you, don’t worry too much about it. The second line of code only does not work reliably if you have multiple scenes loaded as children of the root node at a time, which will rarely happen for most projects and will not be happening in this tutorial series. This is only potentially a issue depending on how you handle scene loading.
The third line adds our newly created Simple_Audio_Player scene to be a child of the scene root. This
works exactly the same as when we are spawning bullets.
Finally, we call the play_sound function and pass in the arguments passed in to create_sound. This will call
Simple_Audio_Player.gd’s play_sound function with the passed in arguments.
Now all that is left is playing the sounds when we want to. Let’s add sound to the pistol first!
Open up Weapon_Pistol.gd.
Now, we want to make a noise when the player fires the pistol, so add the following to the end of the fire_weapon function:
player_node.create_sound("Pistol_shot", self.global_transform.origin)
Now when the player fires the pistol, we’ll play the Pistol_shot sound.
To make a sound when the player reloads, we need to add the following right under player_node.animation_manager.set_animation(RELOADING_ANIM_NAME) in the
reload_weapon function:
player_node.create_sound("Gun_cock", player_node.camera.global_transform.origin)
Now when the player reloads, we’ll play the Gun_cock sound.
Now let’s add sounds to the rifle.
Open up Weapon_Rifle.gd.
To play sounds when the rifle is fired, add the following to the end of the fire_weapon function:
player_node.create_sound("Rifle_shot", ray.global_transform.origin)
Now when the player fires the rifle, we’ll play the Rifle_shot sound.
To make a sound when the player reloads, we need to add the following right under player_node.animation_manager.set_animation(RELOADING_ANIM_NAME) in the
reload_weapon function:
player_node.create_sound("Gun_cock", player_node.camera.global_transform.origin)
Now when the player reloads, we’ll play the Gun_cock sound.
Final notes¶
Now you have weapons with limited ammo that play sounds when you fire them!
At this point, we have all the basics of an FPS game working. There are still a few things that would be nice to add, and we’re going to add them in the next three parts!
For example, right now we have no way to add ammo to our spares, so we’ll eventually run out. Also, we don’t have anything to shoot at outside of the RigidBody nodes.
In Part 4 we’ll add some targets to shoot at, along with some health and ammo pick ups! We’re also going to add joypad support, so we can play with wired Xbox 360 controllers!
Warning
If you ever get lost, be sure to read over the code again!
You can download the finished project for this part here: Godot_FPS_Part_3.zip
Part 4¶
Part overview¶
In this part, we will be adding health pickups, ammo pickups, targets the player can destroy, support for joypads, and add the ability to change weapons with the scroll wheel.

Note
You are assumed to have finished Part 3 before moving on to this part of the tutorial. The finished project from Part 3 will be the starting project for part 4
Let’s get started!
Adding joypad input¶
Note
In Godot, any game controller is referred to as a joypad. This includes: Console controllers, Joysticks (like for flight simulators), Wheels (like for driving simulators), VR Controllers, and more!
Firstly, we need to change a few things in our project’s input map. Open up the project settings and select the Input Map tab.
Now we need to add some joypad buttons to our various actions. Click the plus icon and select Joy Button.

Feel free to use whatever button layout you want. Make sure that the device selected is set to 0. In the finished project, we will be using the following:
- movement_sprint:
Device 0, Button 4 (L, L1) - fire:
Device 0, Button 0 (PS Cross, XBox A, Nintendo B) - reload:
Device 0, Button 0 (PS Square, XBox X, Nintendo Y) - flashlight:
Device 0, Button 12 (D-Pad Up) - shift_weapon_positive:
Device 0, Button 15 (D-Pad Right) - shift_weapon_negative:
Device 0, Button 14 (D-Pad Left) - fire_grenade:
Device 0, Button 1 (PS Circle, XBox B, Nintendo A).
Note
These are already set up for you if you downloaded the starter assets
Once you are happy with the input, close the project settings and save.
Now let’s open up Player.gd and add joypad input.
First, we need to define a few new class variables. Add the following class variables to Player.gd:
# You may need to adjust depending on the sensitivity of your joypad
var JOYPAD_SENSITIVITY = 2
const JOYPAD_DEADZONE = 0.15
Let’s go over what each of these does:
JOYPAD_SENSITIVITY: This is how fast the joypad’s joysticks will move the camera.JOYPAD_DEADZONE: The dead zone for the joypad. You may need to adjust depending on your joypad.
Note
Many joypads jitter around a certain point. To counter this, we ignore any movement within a radius of JOYPAD_DEADZONE. If we did not ignore said movement, the camera would jitter.
Also, we are defining JOYPAD_SENSITIVITY as a variable instead of a constant because we’ll later be changing it.
Now we are ready to start handling joypad input!
In process_input, add the following code just before input_movement_vector = input_movement_vector.normalized():
# Add joypad input if one is present
if Input.get_connected_joypads().size() > 0:
var joypad_vec = Vector2(0, 0)
if OS.get_name() == "Windows":
joypad_vec = Vector2(Input.get_joy_axis(0, 0), -Input.get_joy_axis(0, 1))
elif OS.get_name() == "X11":
joypad_vec = Vector2(Input.get_joy_axis(0, 1), Input.get_joy_axis(0, 2))
elif OS.get_name() == "OSX":
joypad_vec = Vector2(Input.get_joy_axis(0, 1), Input.get_joy_axis(0, 2))
if joypad_vec.length() < JOYPAD_DEADZONE:
joypad_vec = Vector2(0, 0)
else:
joypad_vec = joypad_vec.normalized() * ((joypad_vec.length() - JOYPAD_DEADZONE) / (1 - JOYPAD_DEADZONE))
input_movement_vector += joypad_vec
# Add joypad input if one is present
if Input.get_connected_joypads().size() > 0:
var joypad_vec = Vector2(0, 0)
if OS.get_name() == "Windows" or OS.get_name() == "X11":
joypad_vec = Vector2(Input.get_joy_axis(0, 0), -Input.get_joy_axis(0, 1))
elif OS.get_name() == "OSX":
joypad_vec = Vector2(Input.get_joy_axis(0, 1), Input.get_joy_axis(0, 2))
if joypad_vec.length() < JOYPAD_DEADZONE:
joypad_vec = Vector2(0, 0)
else:
joypad_vec = joypad_vec.normalized() * ((joypad_vec.length() - JOYPAD_DEADZONE) / (1 - JOYPAD_DEADZONE))
input_movement_vector += joypad_vec
Let’s go over what we’re doing.
Firstly, we check to see if there is a connected joypad.
If there is a joypad connected, we then get its left stick axes for right/left and up/down. Because a wired Xbox 360 controller has different joystick axis mapping based on OS, we will use different axes based on the OS.
Warning
This tutorial assumes you are using a XBox 360 or a Playstation wired controller. Also, I do not (currently) have access to a Mac computer, so the joystick axes may need changing. If they do, please open a GitHub issue on the Godot documentation repository! Thanks!
Next, we check to see if the joypad vector length is within the JOYPAD_DEADZONE radius.
If it is, we set joypad_vec to an empty Vector2. If it is not, we use a scaled Radial Dead zone for precise dead zone calculation.
Note
You can find a great article explaining all about how to handle joypad/controller dead zones here: http://www.third-helix.com/2013/04/12/doing-thumbstick-dead-zones-right.html
We’re using a translated version of the scaled radial dead zone code provided in that article. The article is a great read, and I highly suggest giving it a look!
Finally, we add joypad_vec to input_movement_vector.
Tip
Remember how we normalize input_movement_vector? This is why! If we did not normalize input_movement_vector, the player could
move faster if they pushed in the same direction with both the keyboard and the joypad!
Make a new function called process_view_input and add the following:
func process_view_input(delta):
if Input.get_mouse_mode() != Input.MOUSE_MODE_CAPTURED:
return
# NOTE: Until some bugs relating to captured mice are fixed, we cannot put the mouse view
# rotation code here. Once the bug(s) are fixed, code for mouse view rotation code will go here!
# ----------------------------------
# Joypad rotation
var joypad_vec = Vector2()
if Input.get_connected_joypads().size() > 0:
if OS.get_name() == "Windows":
joypad_vec = Vector2(Input.get_joy_axis(0, 2), Input.get_joy_axis(0, 3))
elif OS.get_name() == "X11":
joypad_vec = Vector2(Input.get_joy_axis(0, 3), Input.get_joy_axis(0, 4))
elif OS.get_name() == "OSX":
joypad_vec = Vector2(Input.get_joy_axis(0, 3), Input.get_joy_axis(0, 4))
if joypad_vec.length() < JOYPAD_DEADZONE:
joypad_vec = Vector2(0, 0)
else:
joypad_vec = joypad_vec.normalized() * ((joypad_vec.length() - JOYPAD_DEADZONE) / (1 - JOYPAD_DEADZONE))
rotation_helper.rotate_x(deg2rad(joypad_vec.y * JOYPAD_SENSITIVITY))
rotate_y(deg2rad(joypad_vec.x * JOYPAD_SENSITIVITY * -1))
var camera_rot = rotation_helper.rotation_degrees
camera_rot.x = clamp(camera_rot.x, -70, 70)
rotation_helper.rotation_degrees = camera_rot
# ----------------------------------
func process_view_input(delta):
if Input.get_mouse_mode() != Input.MOUSE_MODE_CAPTURED:
return
# NOTE: Until some bugs relating to captured mice are fixed, we cannot put the mouse view
# rotation code here. Once the bug(s) are fixed, code for mouse view rotation code will go here!
# ----------------------------------
# Joypad rotation
var joypad_vec = Vector2()
if Input.get_connected_joypads().size() > 0:
if OS.get_name() == "Windows" or OS.get_name() == "X11":
joypad_vec = Vector2(Input.get_joy_axis(0, 2), Input.get_joy_axis(0, 3))
elif OS.get_name() == "OSX":
joypad_vec = Vector2(Input.get_joy_axis(0, 3), Input.get_joy_axis(0, 4))
if joypad_vec.length() < JOYPAD_DEADZONE:
joypad_vec = Vector2(0, 0)
else:
joypad_vec = joypad_vec.normalized() * ((joypad_vec.length() - JOYPAD_DEADZONE) / (1 - JOYPAD_DEADZONE))
rotation_helper.rotate_x(deg2rad(joypad_vec.y * JOYPAD_SENSITIVITY))
rotate_y(deg2rad(joypad_vec.x * JOYPAD_SENSITIVITY * -1))
var camera_rot = rotation_helper.rotation_degrees
camera_rot.x = clamp(camera_rot.x, -70, 70)
rotation_helper.rotation_degrees = camera_rot
# ----------------------------------
Let’s go over what’s happening:
Firstly, we check the mouse mode. If the mouse mode is not MOUSE_MODE_CAPTURED, we want to return, which will skip the code below.
Next, we define a new Vector2 called joypad_vec. This will hold the right joystick position. Based on the OS, we set its values so
it is mapped to the proper axes for the right joystick.
Warning
As stated above, I do not (currently) have access to a Mac computer, so the joystick axes may need changing. If they do, please open a GitHub issue on the Godot documentation repository! Thanks!
We then account for the joypad’s dead zone, exactly like in process_input.
Then, we rotate rotation_helper and the player’s KinematicBody using joypad_vec.
Notice how the code that handles rotating the player and rotation_helper is exactly the same as the
code in _input. All we’ve done is change the values to use joypad_vec and JOYPAD_SENSITIVITY.
Note
Due to a few mouse-related bugs on Windows, we cannot put mouse rotation in process_view as well.
Once these bugs are fixed, this will likely be updated to place the mouse rotation here in process_view_input as well.
Finally, we clamp the camera’s rotation so the player cannot look upside down.
The last thing we need to do is add process_view_input to _physics_process.
Once process_view_input is added to _physics_process, you should be able to play using a joypad!
Note
I decided not to use the joypad triggers for firing because we’d then have to do some more axis managing, and because I prefer to use a shoulder buttons to fire.
If you want to use the triggers for firing, you will need to change how firing works in process_input. You need to get the axis values for the triggers,
and check if it’s over a certain value, say 0.8 for example. If it is, you add the same code as when the fire action was pressed.
Adding mouse scroll wheel input¶
Let’s add one more input related feature before we start working on the pickups and the target. Let’s add the ability to change weapons using the scroll wheel on the mouse.
Open up Player.gd and add the following class variables:
var mouse_scroll_value = 0
const MOUSE_SENSITIVITY_SCROLL_WHEEL = 0.08
Let’s go over what each of these new variables will be doing:
mouse_scroll_value: The value of the mouse scroll wheel.MOUSE_SENSITIVITY_SCROLL_WHEEL: How much a single scroll action increases mouse_scroll_value
Now let’s add the following to _input:
if event is InputEventMouseButton and Input.get_mouse_mode() == Input.MOUSE_MODE_CAPTURED:
if event.button_index == BUTTON_WHEEL_UP or event.button_index == BUTTON_WHEEL_DOWN:
if event.button_index == BUTTON_WHEEL_UP:
mouse_scroll_value += MOUSE_SENSITIVITY_SCROLL_WHEEL
elif event.button_index == BUTTON_WHEEL_DOWN:
mouse_scroll_value -= MOUSE_SENSITIVITY_SCROLL_WHEEL
mouse_scroll_value = clamp(mouse_scroll_value, 0, WEAPON_NUMBER_TO_NAME.size() - 1)
if changing_weapon == false:
if reloading_weapon == false:
var round_mouse_scroll_value = int(round(mouse_scroll_value))
if WEAPON_NUMBER_TO_NAME[round_mouse_scroll_value] != current_weapon_name:
changing_weapon_name = WEAPON_NUMBER_TO_NAME[round_mouse_scroll_value]
changing_weapon = true
mouse_scroll_value = round_mouse_scroll_value
Let’s go over what’s happening here:
Firstly, we check if the event is an InputEventMouseButton event and that the mouse mode is MOUSE_MODE_CAPTURED.
Then, we check to see if the button index is either a BUTTON_WHEEL_UP or BUTTON_WHEEL_DOWN index.
If the event’s index is indeed a button wheel index, we then check to see if it is a BUTTON_WHEEL_UP or BUTTON_WHEEL_DOWN index.
Based on whether it is up or down, we add or subtract MOUSE_SENSITIVITY_SCROLL_WHEEL to/from mouse_scroll_value.
Next, we clamp mouse scroll value to ensure it is inside the range of selectable weapons.
We then check to see if the player is changing weapons or reloading. If the player is doing neither, we round mouse_scroll_value and cast it to an int.
Note
We are casting mouse_scroll_value to an int so we can use it as a key in our dictionary. If we left it as a float,
we would get an error when we tried to run the project.
Next, we check to see if the weapon name at round_mouse_scroll_value is not equal to the current weapon name using WEAPON_NUMBER_TO_NAME.
If the weapon is different than the player’s current weapon, we assign changing_weapon_name, set changing_weapon to true so the player will change weapons in
process_changing_weapon, and set mouse_scroll_value to round_mouse_scroll_value.
Tip
The reason we are setting mouse_scroll_value to the rounded scroll value is because we do not want the player to keep their
mouse scroll wheel just in between values, giving them the ability to switch almost extremely fast. By assigning mouse_scroll_value
to round_mouse_scroll_value, we ensure that each weapon takes exactly the same amount of scrolling to change.
One more thing we need to change is in process_input. In the code for changing weapons, add the following right after the line changing_weapon = true:
mouse_scroll_value = weapon_change_number
Now the scroll value will be changed with the keyboard input. If we did not change this, the scroll value would be out of sync. If the scroll wheel were out of sync, scrolling forwards or backwards would not transition to the next/last weapon, but rather the next/last weapon the scroll wheel changed to.
Now you can change weapons using the scroll wheel! Go give it a whirl!
Adding the health pickups¶
Now that the player has health and ammo, we ideally need a way to replenish those resources.
Open up Health_Pickup.tscn.
Expand Holder if it’s not already expanded. Notice how we have two Spatial nodes, one called Health_Kit and another called Health_Kit_Small.
This is because we’re actually going to be making two sizes of health pickups, one small and one large/normal. Health_Kit and Health_Kit_Small only
have a single MeshInstance as their children.
Next expand Health_Pickup_Trigger. This is an Area node we’re going to use to check if the player has walked close enough to pick up
the health kit. If you expand it, you’ll find two collision shapes, one for each size. We will be using a different collision shape size based on the size of the
health pickup, so the smaller health pickup has a trigger collision shape closer to its size.
The last thing to note is how we have an AnimationPlayer node so the health kit bobs and spins around slowly.
Select Health_Pickup and add a new script called Health_Pickup.gd. Add the following:
extends Spatial
export (int, "full size", "small") var kit_size = 0 setget kit_size_change
# 0 = full size pickup, 1 = small pickup
const HEALTH_AMOUNTS = [70, 30]
const RESPAWN_TIME = 20
var respawn_timer = 0
var is_ready = false
func _ready():
$Holder/Health_Pickup_Trigger.connect("body_entered", self, "trigger_body_entered")
is_ready = true
kit_size_change_values(0, false)
kit_size_change_values(1, false)
kit_size_change_values(kit_size, true)
func _physics_process(delta):
if respawn_timer > 0:
respawn_timer -= delta
if respawn_timer <= 0:
kit_size_change_values(kit_size, true)
func kit_size_change(value):
if is_ready:
kit_size_change_values(kit_size, false)
kit_size = value
kit_size_change_values(kit_size, true)
else:
kit_size = value
func kit_size_change_values(size, enable):
if size == 0:
$Holder/Health_Pickup_Trigger/Shape_Kit.disabled = !enable
$Holder/Health_Kit.visible = enable
elif size == 1:
$Holder/Health_Pickup_Trigger/Shape_Kit_Small.disabled = !enable
$Holder/Health_Kit_Small.visible = enable
func trigger_body_entered(body):
if body.has_method("add_health"):
body.add_health(HEALTH_AMOUNTS[kit_size])
respawn_timer = RESPAWN_TIME
kit_size_change_values(kit_size, false)
Let’s go over what this script is doing, starting with its class variables:
kit_size: The size of the health pickup. Notice how we’re using asetgetfunction to tell if it’s changed.HEALTH_AMMOUNTS: The amount of health each pickup in each size contains.RESPAWN_TIME: The amount of time, in seconds, it takes for the health pickup to respawnrespawn_timer: A variable used to track how long the health pickup has been waiting to respawn.is_ready: A variable to track whether the_readyfunction has been called or not.
We’re using is_ready because setget functions are called before _ready; we need to ignore the
first kit_size_change call, because we cannot access child nodes until _ready is called. If we did not ignore the
first setget call, we would get several errors in the debugger.
Also, notice how we are using an exported variable. This is so we can change the size of the health pickups in the editor. This makes it so we do not have to make two scenes for the two sizes, since we can easily change sizes in the editor using the exported variable.
Tip
See GDScript basics and scroll down to the Exports section for a list of export hints you can use.
Let’s look at _ready:
Firstly, we connect the body_entered signal from the Health_Pickup_Trigger to the trigger_body_entered function. This makes it so any
body that enters the Area triggers the trigger_body_entered function.
Next, we set is_ready to true so we can use the setget function.
Then we hide all the possible kits and their collision shapes using kit_size_change_values. The first argument is the size of the kit, while the second argument
is whether to enable or disable the collision shape and mesh at that size.
Then we make only the kit size we selected visible, calling kit_size_change_values and passing in kit_size and true, so the size at kit_size is enabled.
Next let’s look at kit_size_change.
The first thing we do is check to see if is_ready is true.
If is_ready is true, we then make whatever kit already assigned to kit_size disabled using kit_size_change_values, passing in kit_size and false.
Then we assign kit_size to the new value passed in, value. Then we call kit_size_change_values passing in kit_size again, but this time
with the second argument as true so we enable it. Because we changed kit_size to the passed in value, this will make whatever kit size was passed in visible.
If is_ready is not true, we simply assign kit_size to the passed in value.
Now let’s look at kit_size_change_values.
The first thing we do is check to see which size was passed in. Based on which size we want to enable/disable, we want to get different nodes.
We get the collision shape for the node corresponding to size and disable it based on the enabled passed in argument/variable.
Note
Why are we using !enable instead of enable? This is so when we say we want to enable the node, we can pass in true, but since
CollisionShape uses disabled instead of enabled, we need to flip it. By flipping it, we can enable the collision shape
and make the mesh visible when true is passed in.
We then get the correct Spatial node holding the mesh and set its visibility to enable.
This function may be a little confusing; try to think of it like this: We’re enabling/disabling the proper nodes for size using enabled. This is so we cannot pick up
health for a size that is not visible, and so only the mesh for the proper size will be visible.
Finally, let’s look at trigger_body_entered.
The first thing we do is check whether or not the body that has just entered has a method/function called add_health. If it does, we then
call add_health and pass in the health provided by the current kit size.
Then we set respawn_timer to RESPAWN_TIME so the player has to wait before the player can get health again. Finally, call kit_size_change_values,
passing in kit_size and false so the kit at kit_size is invisible until it has waited long enough to respawn.
The last thing we need to do before the player can use this health pickup is add a few things to Player.gd.
Open up Player.gd and add the following class variable:
const MAX_HEALTH = 150
MAX_HEALTH: The maximum amount of health a player can have.
Now we need to add the add_health function to the player. Add the following to Player.gd:
func add_health(additional_health):
health += additional_health
health = clamp(health, 0, MAX_HEALTH)
Let’s quickly go over what this does.
We first add additional_health to the player’s current health. We then clamp the health so that it cannot take on a value higher than MAX_HEALTH, nor a value lower
than 0.
With that done, the player can now collect health! Go place a few Health_Pickup scenes around and give it a try. You can change the size of the health pickup in the editor
when a Health_Pickup instanced scene is selected, from a convenient drop down.
Adding the ammo pickups¶
While adding health is good and all, we can’t reap the rewards from adding it since nothing can (currently) damage us. Let’s add some ammo pickups next!
Open up Ammo_Pickup.tscn. Notice how it’s structured exactly the same as Health_Pickup.tscn, but with the meshes and trigger collision shapes changed slightly to account
for the difference in mesh sizes.
Select Ammo_Pickup and add a new script called Ammo_Pickup.gd. Add the following:
extends Spatial
export (int, "full size", "small") var kit_size = 0 setget kit_size_change
# 0 = full size pickup, 1 = small pickup
const AMMO_AMOUNTS = [4, 1]
const RESPAWN_TIME = 20
var respawn_timer = 0
var is_ready = false
func _ready():
$Holder/Ammo_Pickup_Trigger.connect("body_entered", self, "trigger_body_entered")
is_ready = true
kit_size_change_values(0, false)
kit_size_change_values(1, false)
kit_size_change_values(kit_size, true)
func _physics_process(delta):
if respawn_timer > 0:
respawn_timer -= delta
if respawn_timer <= 0:
kit_size_change_values(kit_size, true)
func kit_size_change(value):
if is_ready:
kit_size_change_values(kit_size, false)
kit_size = value
kit_size_change_values(kit_size, true)
else:
kit_size = value
func kit_size_change_values(size, enable):
if size == 0:
$Holder/Ammo_Pickup_Trigger/Shape_Kit.disabled = !enable
$Holder/Ammo_Kit.visible = enable
elif size == 1:
$Holder/Ammo_Pickup_Trigger/Shape_Kit_Small.disabled = !enable
$Holder/Ammo_Kit_Small.visible = enable
func trigger_body_entered(body):
if body.has_method("add_ammo"):
body.add_ammo(AMMO_AMOUNTS[kit_size])
respawn_timer = RESPAWN_TIME
kit_size_change_values(kit_size, false)
You may have noticed this code looks almost exactly the same as the health pickup. That’s because it largely is the same! Only a few things have been changed, and that’s what we’re going to go over.
Firstly, notice the change to AMMO_AMOUNTS from HEALTH_AMMOUNTS. AMMO_AMOUNTS will be how many ammo clips/magazines the pickup adds to the current weapon.
(Unlike in the case of HEALTH_AMMOUNTS, which has stood for how many health points would be awarded, we add an entire clip to the current weapon instead of the raw ammo amount)
The only other thing to notice is in trigger_body_entered. We’re checking for the existence of and calling a function called add_ammo instead of add_health.
Other than those two small changes, everything else is the same as the health pickup!
All we need to do to make the ammo pickups work is add a new function to the player. Open Player.gd and add the following function:
func add_ammo(additional_ammo):
if (current_weapon_name != "UNARMED"):
if (weapons[current_weapon_name].CAN_REFILL == true):
weapons[current_weapon_name].spare_ammo += weapons[current_weapon_name].AMMO_IN_MAG * additional_ammo
Let’s go over what this function does.
The first thing we check is whether the player is UNARMED. Because UNARMED does not have a node/script, we want to make sure the player is not
UNARMED before trying to get the node/script attached to current_weapon_name.
Next, we check to see if the current weapon can be refilled. If the current weapon can, we add a full clip/magazine worth of ammo to the weapon by
multiplying the current weapon’s AMMO_IN_MAG value by however many ammo clips we’re adding (additional_ammo).
With that done, you should now be able to get additional ammo! Go place some ammo pickups in one/both/all of the scenes and give it a try!
Note
Notice how we’re not limiting the amount of ammo you can carry. To limit the amount of ammo each weapon can carry, you need to add an additional variable to
each weapon’s script, and then clamp the weapon’s spare_ammo variable after adding ammo in add_ammo.
Adding breakable targets¶
Before we end this part, let’s add some targets.
Open up Target.tscn and take a look at the scenes in the scene tree.
Firstly, notice how we’re not using a RigidBody node, but a StaticBody one. The reason behind this is our non-broken targets will not be moving anywhere; using a RigidBody would be more hassle than it’s worth since all it has to do is stay still.
Tip
We also save a tiny bit of performance using a StaticBody over a RigidBody.
The other thing to note is we have a node called Broken_Target_Holder. This node is going to hold a spawned/instanced scene called
Broken_Target.tscn. Open up Broken_Target.tscn.
Notice how the target is broken up into five pieces, each a RigidBody node. We’re going to spawn/instance this scene when the target takes too much damage and needs to be destroyed. Then, we’re going to hide the non-broken target, so it looks like the target shattered rather than a shattered target was spawned/instanced.
While you still have Broken_Target.tscn open, attach RigidBody_hit_test.gd to all of the RigidBody nodes. This will make
it so the player can shoot at the broken pieces and they will react to the bullets.
Alright, now switch back to Target.tscn, select the Target StaticBody node and create a new script called Target.gd.
Add the following code to Target.gd:
extends StaticBody
const TARGET_HEALTH = 40
var current_health = 40
var broken_target_holder
# The collision shape for the target.
# NOTE: this is for the whole target, not the pieces of the target.
var target_collision_shape
const TARGET_RESPAWN_TIME = 14
var target_respawn_timer = 0
export (PackedScene) var destroyed_target
func _ready():
broken_target_holder = get_parent().get_node("Broken_Target_Holder")
target_collision_shape = $Collision_Shape
func _physics_process(delta):
if target_respawn_timer > 0:
target_respawn_timer -= delta
if target_respawn_timer <= 0:
for child in broken_target_holder.get_children():
child.queue_free()
target_collision_shape.disabled = false
visible = true
current_health = TARGET_HEALTH
func bullet_hit(damage, bullet_transform):
current_health -= damage
if current_health <= 0:
var clone = destroyed_target.instance()
broken_target_holder.add_child(clone)
for rigid in clone.get_children():
if rigid is RigidBody:
var center_in_rigid_space = broken_target_holder.global_transform.origin - rigid.global_transform.origin
var direction = (rigid.transform.origin - center_in_rigid_space).normalized()
# Apply the impulse with some additional force (I find 12 works nicely).
rigid.apply_impulse(center_in_rigid_space, direction * 12 * damage)
target_respawn_timer = TARGET_RESPAWN_TIME
target_collision_shape.disabled = true
visible = false
Let’s go over what this script does, starting with the class variables:
TARGET_HEALTH: The amount of damage needed to break a fully healed target.current_health: The amount of health this target currently has.broken_target_holder: A variable to hold theBroken_Target_Holdernode so we can use it easily.target_collision_shape: A variable to hold the CollisionShape for the non-broken target.TARGET_RESPAWN_TIME: The length of time, in seconds, it takes for a target to respawn.target_respawn_timer: A variable to track how long a target has been broken.destroyed_target: A PackedScene to hold the broken target scene.
Notice how we’re using an exported variable (a PackedScene) to get the broken target scene instead of
using preload. By using an exported variable, we can choose the scene from the editor, and if we need to use a different scene,
it’s as easy as selecting a different scene in the editor; we don’t need to go to the code to change the scene we’re using.
Let’s look at _ready.
The first thing we do is get the broken target holder and assign it to broken_target_holder. Notice how we’re using get_parent().get_node() here, instead
of $. If you wanted to use $, then you’d need to change get_parent().get_node() to $"../Broken_Target_Holder".
Note
At the time of when this was written, I did not realize you can use $"../NodeName" to get the parent nodes using $, which is why get_parent().get_node()
is used instead.
Next, we get the collision shape and assign it to target_collision_shape. The reason we need the collision shape is because even when the mesh is invisible, the
collision shape will still exist in the physics world. This makes it so the player could interact with a non-broken target even though it’s invisible, which is
not what we want. To get around this, we will disable/enable the collision shape as we make the mesh visible/invisible.
Next let’s look at _physics_process.
We’re only going to be using _physics_process for respawning, and so the first thing we do is check to see if target_respawn_timer is greater than 0.
If it is, we then subtract delta from it.
Then we check to see if target_respawn_timer is 0 or less. The reason behind this is since we just removed delta from target_respawn_timer, if it’s
0 or less, then the target just got here, effectively allowing us to do whatever we need to do when the timer is finished.
In this case, we want to respawn the target.
The first thing we do is remove all children in the broken target holder. We do this by iterating over all of the children in broken_target_holder and free them using queue_free.
Next, we enable the collision shape by setting its disabled boolean to false.
Then we make the target, and all of its children nodes, visible again.
Finally, we reset the target’s health (current_health) to TARGET_HEALTH.
Finally, let’s look at bullet_hit.
The first thing we do is subtract however much damage the bullet does from the target’s health.
Next we check to see if the target is at 0 health or lower. If it is, the target has just died and we need to spawn a broken target.
We first instance a new destroyed target scene, and assign it to a new variable, a clone.
Next we add the clone as a child of the broken target holder.
For bonus effect, we want to make all the target pieces explode outwards. To do this, we iterate over all the children in clone.
For each child, we first check to see if it’s a RigidBody node. If it is, we then calculate the center position of the target relative to the child node. Then we figure out which direction the child node is relative to the center. Using those calculated variables, we push the child from the calculated center, in the direction away from the center, using the damage of the bullet as the force.
Note
We multiply the damage by 12 so it has a more dramatic effect. You can change this to a higher or lower value depending on how explosively you want
your targets to shatter.
Next, we set the target’s respawn timer. We set the timer to TARGET_RESPAWN_TIME, so it takes TARGET_RESPAWN_TIME in seconds until it is respawned.
Then we disable the non-broken target’s collision shape, and set the target’s visibility to false.
Warning
Make sure to set the exported destroyed_target value for Target.tscn in the editor! Otherwise the targets will not be destroyed
and you will get an error!
With that done, go place some Target.tscn instances around in one/both/all of the levels. You should find they explode into five pieces after they’ve taken enough
damage. After a little while, they’ll respawn into a whole target again.
Final notes¶
Now you can use a joypad, change weapons with the mouse’s scroll wheel, replenish your health and ammo, and break targets with your weapons.
In the next part, Part 5, we’re going to add grenades to our player, give our player the ability to grab and throw objects, and add turrets!
Warning
If you ever get lost, be sure to read over the code again!
You can download the finished project for this part here: Godot_FPS_Part_4.zip
Part 5¶
Part overview¶
In this part, we’re going to add grenades to the player, give the player the ability to grab and throw objects, and add turrets!

Note
You are assumed to have finished Part 4 before moving on to this part of the tutorial. The finished project from Part 4 will be the starting project for part 5
Let’s get started!
Adding grenades¶
Firstly, let’s give the player some grenades to play with. Open up Grenade.tscn.
There are a few things to note here, the first and foremost being that the grenades are going to use RigidBody nodes. We’re going to use RigidBody nodes for our grenades so they bounce around the world in a (somewhat) realistic manner.
The second thing to note is Blast_Area. This is an Area node that will represent the blast radius of the grenade.
Finally, the last thing to note is Explosion. This is the Particles node that will emit an explosion effect when
the grenade explodes. One thing to note here is that we have One shot enabled. This is so we emit all the particles at once. The particles are also emitted using world
coordinates instead of local coordinates, so we have Local Coords unchecked as well.
Note
If you want, you can see how the particles are set up by looking through the particle’s Process Material and Draw Passes.
Let’s write the code needed for the grenade. Select Grenade and make a new script called Grenade.gd. Add the following:
extends RigidBody
const GRENADE_DAMAGE = 60
const GRENADE_TIME = 2
var grenade_timer = 0
const EXPLOSION_WAIT_TIME = 0.48
var explosion_wait_timer = 0
var rigid_shape
var grenade_mesh
var blast_area
var explosion_particles
func _ready():
rigid_shape = $Collision_Shape
grenade_mesh = $Grenade
blast_area = $Blast_Area
explosion_particles = $Explosion
explosion_particles.emitting = false
explosion_particles.one_shot = true
func _process(delta):
if grenade_timer < GRENADE_TIME:
grenade_timer += delta
return
else:
if explosion_wait_timer <= 0:
explosion_particles.emitting = true
grenade_mesh.visible = false
rigid_shape.disabled = true
mode = RigidBody.MODE_STATIC
var bodies = blast_area.get_overlapping_bodies()
for body in bodies:
if body.has_method("bullet_hit"):
body.bullet_hit(GRENADE_DAMAGE, body.global_transform.looking_at(global_transform.origin, Vector3(0, 1, 0)))
# This would be the perfect place to play a sound!
if explosion_wait_timer < EXPLOSION_WAIT_TIME:
explosion_wait_timer += delta
if explosion_wait_timer >= EXPLOSION_WAIT_TIME:
queue_free()
Let’s go over what’s happening, starting with the class variables:
GRENADE_DAMAGE: The amount of damage the grenade causes when it explodes.GRENADE_TIME: The amount of time the grenade takes (in seconds) to explode once it’s created/thrown.grenade_timer: A variable for tracking how long the grenade has been created/thrown.EXPLOSION_WAIT_TIME: The amount of time needed (in seconds) to wait before we destroy the grenade scene after the explosionexplosion_wait_timer: A variable for tracking how much time has passed since the grenade exploded.rigid_shape: The CollisionShape for the grenade’s RigidBody.grenade_mesh: The MeshInstance for the grenade.blast_area: The blast Area used to damage things when the grenade explodes.explosion_particles: The Particles that come out when the grenade explodes.
Notice how EXPLOSION_WAIT_TIME is a rather strange number (0.48). This is because we want EXPLOSION_WAIT_TIME to be equal to the length of time
the explosion particles are emitting, so when the particles are done we destroy/free the grenade. We calculate EXPLOSION_WAIT_TIME by taking the particle’s life time
and dividing it by the particle’s speed scale. This gets us the exact time the explosion particles will last.
Now let’s turn our attention to _ready.
First we get all the nodes we’ll need and assign them to the proper class variables.
We need to get the CollisionShape and MeshInstance because similarly to the target in Part 4, we will be hiding the grenade’s mesh and disabling the collision shape when the grenade explodes.
The reason we need to get the blast Area is so we can damage everything inside it when the grenade explodes. We’ll be using code similar to the knife code in the player. We need the Particles so we can emit particles when the grenade explodes.
After we get all the nodes and assign them to their class variables, we then make sure the explosion particles are not emitting, and that they are set to emit in one shot. This is to be extra sure the particles will behave the way we expect them to.
Now let’s look at _process.
Firstly, we check to see if the grenade_timer is less than GRENADE_TIME. If it is, we add delta and return. This is so the grenade has to wait GRENADE_TIME seconds
before exploding, allowing the RigidBody to move around.
If grenade_timer is at GRENADE_TIMER or higher, we then need to check if the grenade has waited long enough and needs to explode. We do this by checking to see
if explosion_wait_timer is equal to 0 or less. Since we will be adding delta to explosion_wait_timer right after, whatever code under the check
will only be called once, right when the grenade has waited long enough and needs to explode.
If the grenade has waited long enough to explode, we first tell the explosion_particles to emit. Then we make grenade_mesh invisible, and disable rigid_shape, effectively
hiding the grenade.
We then set the RigidBody’s mode to MODE_STATIC so the grenade does not move.
Then we get all the bodies in blast_area, check to see if they have the bullet_hit method/function, and if they do, we call it and pass in GRENADE_DAMAGE and
the transform from the body looking at the grenade. This makes it where the bodies exploded by the grenade will explode outwards from the grenade’s position.
We then check to see if explosion_wait_timer is less than EXPLOSION_WAIT_TIME. If it is, we add delta to explosion_wait_timer.
Next, we check to see if explosion_wait_timer is greater than or equal to EXPLOSION_WAIT_TIME. Because we added delta, this will only be called once.
If explosion_wait_timer is greater or equal to EXPLOSION_WAIT_TIME, the grenade has waited long enough to let the Particles play
and we can free/destroy the grenade, as we no longer need it.
Let’s quickly get the sticky grenade set up too. Open up Sticky_Grenade.tscn.
Sticky_Grenade.tscn is almost identical to Grenade.tscn, with one small addition. We now have a second
Area, called Sticky_Area. We will be using Stick_Area to detect when the sticky grenade has collided with
the environment and needs to stick to something.
Select Sticky_Grenade and make a new script called Sticky_Grenade.gd. Add the following:
extends RigidBody
const GRENADE_DAMAGE = 40
const GRENADE_TIME = 3
var grenade_timer = 0
const EXPLOSION_WAIT_TIME = 0.48
var explosion_wait_timer = 0
var attached = false
var attach_point = null
var rigid_shape
var grenade_mesh
var blast_area
var explosion_particles
var player_body
func _ready():
rigid_shape = $Collision_Shape
grenade_mesh = $Sticky_Grenade
blast_area = $Blast_Area
explosion_particles = $Explosion
explosion_particles.emitting = false
explosion_particles.one_shot = true
$Sticky_Area.connect("body_entered", self, "collided_with_body")
func collided_with_body(body):
if body == self:
return
if player_body != null:
if body == player_body:
return
if attached == false:
attached = true
attach_point = Spatial.new()
body.add_child(attach_point)
attach_point.global_transform.origin = global_transform.origin
rigid_shape.disabled = true
mode = RigidBody.MODE_STATIC
func _process(delta):
if attached == true:
if attach_point != null:
global_transform.origin = attach_point.global_transform.origin
if grenade_timer < GRENADE_TIME:
grenade_timer += delta
return
else:
if explosion_wait_timer <= 0:
explosion_particles.emitting = true
grenade_mesh.visible = false
rigid_shape.disabled = true
mode = RigidBody.MODE_STATIC
var bodies = blast_area.get_overlapping_bodies()
for body in bodies:
if body.has_method("bullet_hit"):
body.bullet_hit(GRENADE_DAMAGE, body.global_transform.looking_at(global_transform.origin, Vector3(0, 1, 0)))
# This would be the perfect place to play a sound!
if explosion_wait_timer < EXPLOSION_WAIT_TIME:
explosion_wait_timer += delta
if explosion_wait_timer >= EXPLOSION_WAIT_TIME:
if attach_point != null:
attach_point.queue_free()
queue_free()
The code above is almost identical to the code for Grenade.gd, so let’s just go over what’s changed.
Firstly, we have a few more class variables:
attached: A variable for tracking whether or not the sticky grenade has attached to a PhysicsBody.attach_point: A variable to hold a Spatial that will be at the position where the sticky grenade collided.player_body: The player’s KinematicBody.
They have been added to enable the sticky grenade to stick to any PhysicsBody it might hit. We also now need the player’s KinematicBody so the sticky grenade does not stick to the player when the player throws it.
Now let’s look at the small change in _ready. In _ready we’ve added a line of code so when any body enters Stick_Area,
the collided_with_body function is called.
Next let’s take a look at collided_with_body.
Firstly, we make sure the sticky grenade is not colliding with itself. Because the sticky Area does not know it’s attached to the grenade’s RigidBody, we need to make sure it’s not going to stick to itself by checking to make sure the body it has collided with is not itself. If we have collided with ourself, we ignore it by returning.
We then check to see if we have something assigned to player_body, and if the body the sticky grenade has collided with is the player that threw it.
If the body the sticky grenade has collided with is indeed player_body, we ignore it by returning.
Next, we check if the sticky grenade has attached to something already or not.
If the sticky grenade is not attached, we then set attached to true so we know the sticky grenade has attached to something.
We then make a new Spatial node, and make it a child of the body the sticky grenade collided with. We then set the Spatial’s position to the sticky grenade’s current global position.
Note
Because we’ve added the Spatial as a child of the body the sticky grenade has collided with, it will follow along with said body. We can then use this Spatial to set the sticky grenade’s position, so it is always at the same position relative to the body it collided with.
We then disable rigid_shape so the sticky grenade is not constantly moving whatever body it has collided with.
Finally, we set our mode to MODE_STATIC so the grenade does not move.
Finally, lets go over the few changes in _process.
Now we’re checking to see if the sticky grenade is attached right at the top of _process.
If the sticky grenade is attached, we then make sure the attached point is not equal to null.
If the attached point is not equal to null, we set the sticky grenade’s global position (using its global Transform’s origin) to the global position of
the Spatial assigned to attach_point (using its global Transform’s origin).
The only other change is now before we free/destroy the sticky grenade is to check to see if the sticky grenade has an attached point.
If it does, we also call queue_free on the attach point, so it’s also freed/destroyed.
Adding grenades to the player¶
Now we need to add some code to Player.gd so we can use the grenades.
Firstly, open up Player.tscn and expand the node tree until you get to Rotation_Helper. Notice how in
Rotation_Helper we have a node called Grenade_Toss_Pos. This is where we will be spawning the grenades.
Also notice how it’s slightly rotated on the X axis, so it’s not pointing straight, but rather slightly up. By changing
the rotation of Grenade_Toss_Pos, you can change the angle at which the grenades are tossed.
Okay, now let’s start making the grenades work with the player. Add the following class variables to Player.gd:
var grenade_amounts = {"Grenade":2, "Sticky Grenade":2}
var current_grenade = "Grenade"
var grenade_scene = preload("res://Grenade.tscn")
var sticky_grenade_scene = preload("res://Sticky_Grenade.tscn")
const GRENADE_THROW_FORCE = 50
grenade_amounts: The amount of grenades the player is currently carrying (for each type of grenade).current_grenade: The name of the grenade the player is currently using.grenade_scene: The grenade scene we worked on earlier.sticky_grenade_scene: The sticky grenade scene we worked on earlier.GRENADE_THROW_FORCE: The force at which the player will throw the grenades.
Most of these variables are similar to how we have our weapons set up.
Tip
While it’s possible to make a more modular grenade system, I found it was not worth the additional complexity for just two grenades. If you were going to make a more complex FPS with more grenades, you’d likely want to make a system for grenades similar to how we have the weapons set up.
Now we need to add some code in _process_input Add the following to _process_input:
# ----------------------------------
# Changing and throwing grenades
if Input.is_action_just_pressed("change_grenade"):
if current_grenade == "Grenade":
current_grenade = "Sticky Grenade"
elif current_grenade == "Sticky Grenade":
current_grenade = "Grenade"
if Input.is_action_just_pressed("fire_grenade"):
if grenade_amounts[current_grenade] > 0:
grenade_amounts[current_grenade] -= 1
var grenade_clone
if current_grenade == "Grenade":
grenade_clone = grenade_scene.instance()
elif current_grenade == "Sticky Grenade":
grenade_clone = sticky_grenade_scene.instance()
# Sticky grenades will stick to the player if we do not pass ourselves
grenade_clone.player_body = self
get_tree().root.add_child(grenade_clone)
grenade_clone.global_transform = $Rotation_Helper/Grenade_Toss_Pos.global_transform
grenade_clone.apply_impulse(Vector3(0, 0, 0), grenade_clone.global_transform.basis.z * GRENADE_THROW_FORCE)
# ----------------------------------
Let’s go over what’s happening here.
Firstly, we check to see if the change_grenade action has just been pressed. If it has, we then check to see which grenade the player is
currently using. Based on the name of the grenade the player is currently using, we change current_grenade to the opposite grenade name.
Next we check to see if the fire_grenade action has just been pressed. If it has, we then check to see if the player has more than 0 grenades for the
current grenade type selected.
If the player has more than 0 grenades, we then remove one from the grenade amounts for the current grenade.
Then, based on the grenade the player is currently using, we instance the proper grenade scene and assign it to grenade_clone.
Next we add grenade_clone as a child of the node at the root and set its global Transform to
Grenade_Toss_Pos’s global Transform. Finally, we apply an impulse to the grenade so that it is launched forward, relative
to the Z directional vector of grenade_clone’s.
Now the player can use both types of grenades, but there are still a few things we should probably add before we move on to adding the other things.
We still need a way to show the player how many grenades are left, and we should probably add a way to get more grenades when the player picks up ammo.
Firstly, let’s change some of the code in Player.gd to show how many grenades are left. Change process_UI to the following:
func process_UI(delta):
if current_weapon_name == "UNARMED" or current_weapon_name == "KNIFE":
# First line: Health, second line: Grenades
UI_status_label.text = "HEALTH: " + str(health) + \
"\n" + current_grenade + ": " + str(grenade_amounts[current_grenade])
else:
var current_weapon = weapons[current_weapon_name]
# First line: Health, second line: weapon and ammo, third line: grenades
UI_status_label.text = "HEALTH: " + str(health) + \
"\nAMMO: " + str(current_weapon.ammo_in_weapon) + "/" + str(current_weapon.spare_ammo) + \
"\n" + current_grenade + ": " + str(grenade_amounts[current_grenade])
Now we’ll show how many grenades the player has left in the UI.
While we’re still in Player.gd, let’s add a function to add grenades to the player. Add the following function to Player.gd:
func add_grenade(additional_grenade):
grenade_amounts[current_grenade] += additional_grenade
grenade_amounts[current_grenade] = clamp(grenade_amounts[current_grenade], 0, 4)
Now we can add a grenade using add_grenade, and it will automatically be clamped to a maximum of 4 grenades.
Tip
You can change the 4 to a constant if you want. You’d need to make a new global constant, something like MAX_GRENADES, and
then change the clamp from clamp(grenade_amounts[current_grenade], 0, 4) to clamp(grenade_amounts[current_grenade], 0, MAX_GRENADES)
If you do not want to limit how many grenades the player can carry, remove the line that clamps the grenades altogether!
Now we have a function to add grenades, let’s open up AmmoPickup.gd and use it!
Open up AmmoPickup.gd and go to the trigger_body_entered function. Change it to the following:
func trigger_body_entered(body):
if body.has_method("add_ammo"):
body.add_ammo(AMMO_AMOUNTS[kit_size])
respawn_timer = RESPAWN_TIME
kit_size_change_values(kit_size, false)
if body.has_method("add_grenade"):
body.add_grenade(GRENADE_AMOUNTS[kit_size])
respawn_timer = RESPAWN_TIME
kit_size_change_values(kit_size, false)
Now we are also checking to see if the body has the add_grenade function. If it does, we call it like we call add_ammo.
You may have noticed we are using a new constant we have not defined yet, GRENADE_AMOUNTS. Let’s add it! Add the following class variable
to AmmoPickup.gd with the other class variables:
const GRENADE_AMOUNTS = [2, 0]
GRENADE_AMOUNTS: The amount of grenades each pickup contains.
Notice how the second element in GRENADE_AMOUNTS is 0. This is so the small ammo pickup does not give the player
any additional grenades.
Now you should be able to throw grenades! Go give it a try!
Adding the ability to grab and throw RigidBody nodes to the player¶
Next, let’s give the player the ability to pick up and throw RigidBody nodes.
Open up Player.gd and add the following class variables:
var grabbed_object = null
const OBJECT_THROW_FORCE = 120
const OBJECT_GRAB_DISTANCE = 7
const OBJECT_GRAB_RAY_DISTANCE = 10
grabbed_object: A variable to hold the grabbed RigidBody node.OBJECT_THROW_FORCE: The force with which the player throws the grabbed object.OBJECT_GRAB_DISTANCE: The distance away from the camera at which the player holds the grabbed object.OBJECT_GRAB_RAY_DISTANCE: The distance the Raycast goes. This is the player’s grab distance.
With that done, all we need to do is add some code to process_input:
# ----------------------------------
# Grabbing and throwing objects
if Input.is_action_just_pressed("fire") and current_weapon_name == "UNARMED":
if grabbed_object == null:
var state = get_world().direct_space_state
var center_position = get_viewport().size / 2
var ray_from = camera.project_ray_origin(center_position)
var ray_to = ray_from + camera.project_ray_normal(center_position) * OBJECT_GRAB_RAY_DISTANCE
var ray_result = state.intersect_ray(ray_from, ray_to, [self, $Rotation_Helper/Gun_Fire_Points/Knife_Point/Area])
if !ray_result.empty():
if ray_result["collider"] is RigidBody:
grabbed_object = ray_result["collider"]
grabbed_object.mode = RigidBody.MODE_STATIC
grabbed_object.collision_layer = 0
grabbed_object.collision_mask = 0
else:
grabbed_object.mode = RigidBody.MODE_RIGID
grabbed_object.apply_impulse(Vector3(0, 0, 0), -camera.global_transform.basis.z.normalized() * OBJECT_THROW_FORCE)
grabbed_object.collision_layer = 1
grabbed_object.collision_mask = 1
grabbed_object = null
if grabbed_object != null:
grabbed_object.global_transform.origin = camera.global_transform.origin + (-camera.global_transform.basis.z.normalized() * OBJECT_GRAB_DISTANCE)
# ----------------------------------
Let’s go over what’s happening.
Firstly, we check to see if the action pressed is the fire action, and that the player is using the UNARMED ‘weapon’.
This is because we only want the player to be able to pick up and throw objects when the player is not using any weapons. This is a design choice,
but I feel it gives UNARMED a use.
Next we check to see whether or not grabbed_object is null.
If grabbed_object is null, we want to see if we can pick up a RigidBody.
We first get the direct space state from the current World. This is so we can cast a ray entirely from code, instead of having to use a Raycast node.
Note
see Ray-casting for more information on raycasting in Godot.
Then we get the center of the screen by dividing the current Viewport size in half. We then get the ray’s origin point and end point using
project_ray_origin and project_ray_normal from the camera. If you want to know more about how these functions work, see Ray-casting.
Next we send the ray into the space state and see if it gets a result. We add the player and the knife’s Area as two exceptions so the player cannot carry themselves or the knife’s collision Area.
Then we check to see if we got a result back from the ray. If no object has collided with the ray, an empty Dictionary will be returned. If the Dictionary is not empty (i.e. at least one object has collided), we then see if the collider the ray collided with is a RigidBody.
If the ray collided with a RigidBody, we set grabbed_object to the collider the ray collided with. We then set the mode on
the RigidBody we collided with to MODE_STATIC so it doesn’t move in our hands.
Finally, we set the grabbed RigidBody’s collision layer and collision mask to 0.
This will make the grabbed RigidBody have no collision layer or mask, which means it will not be able to collide with anything as long as we are holding it.
If grabbed_object is not null, then we need to throw the RigidBody the player is holding.
We first set the mode of the RigidBody we are holding to MODE_RIGID.
Note
This is making a rather large assumption that all the rigid bodies will be using MODE_RIGID. While that is the case for this tutorial series,
that may not be the case in other projects.
If you have rigid bodies with different modes, you may need to store the mode of the RigidBody you have picked up into a class variable so you can change it back to the mode it was in before you picked it up.
Then we apply an impulse to send it flying forward. We send it flying in the direction the camera is facing, using the force we set in the OBJECT_THROW_FORCE variable.
We then set the grabbed RigidBody’s collision layer and mask to 1, so it can collide with anything on layer 1 again.
Note
This is, once again, making a rather large assumption that all the rigid bodies will be only on collision layer 1, and all collision masks will be on layer 1.
If you are using this script in other projects, you may need to store the collision layer/mask of the RigidBody in a variable before you change them to 0, so you would have the original collision layer/mask to set for them when you are reversing the process.
Finally, we set grabbed_object to null since the player has successfully thrown the held object.
The last thing we do is check to see whether or not grabbed_object is equal to null, outside all of the grabbing/throwing related code.
Note
While technically not input related, it’s easy enough to place the code moving the grabbed object here because it’s only two lines, and then all of the grabbing/throwing code is in one place
If the player is holding an object, we set its global position to the camera’s position plus OBJECT_GRAB_DISTANCE in the direction the camera is facing.
Before we test this, we need to change something in _physics_process. While the player is holding an object, we do not
want the player to be able to change weapons or reload, so change _physics_process to the following:
func _physics_process(delta):
process_input(delta)
process_view_input(delta)
process_movement(delta)
if grabbed_object == null:
process_changing_weapons(delta)
process_reloading(delta)
# Process the UI
process_UI(delta)
Now the player cannot change weapons or reload while holding an object.
Now you can grab and throw RigidBody nodes while you’re in the UNARMED state! Go give it a try!
Adding a turret¶
Next, let’s make a turret to shoot the player!
Open up Turret.tscn. Expand Turret if it’s not already expanded.
Notice how the turret is broken up into several parts: Base, Head, Vision_Area, and a Smoke Particles node.
Open up Base and you’ll find it’s a StaticBody and a mesh. Open up Head and you’ll find there are several meshes,
a StaticBody and a Raycast node.
One thing to note with the Head is that the raycast will be where the turret’s bullets will fire from if we are using raycasting. We also have two meshes called
Flash and Flash_2. These will be the muzzle flash that briefly shows when the turret fires.
Vision_Area is an Area we’ll use as the turret’s ability to see. When something enters Vision_Area, we’ll assume the turret can see it.
Smoke is a Particles node that will play when the turret is destroyed and repairing.
Now that we’ve looked at how the scene is set up, lets start writing the code for the turret. Select Turret and create a new script called Turret.gd.
Add the following to Turret.gd:
extends Spatial
export (bool) var use_raycast = false
const TURRET_DAMAGE_BULLET = 20
const TURRET_DAMAGE_RAYCAST = 5
const FLASH_TIME = 0.1
var flash_timer = 0
const FIRE_TIME = 0.8
var fire_timer = 0
var node_turret_head = null
var node_raycast = null
var node_flash_one = null
var node_flash_two = null
var ammo_in_turret = 20
const AMMO_IN_FULL_TURRET = 20
const AMMO_RELOAD_TIME = 4
var ammo_reload_timer = 0
var current_target = null
var is_active = false
const PLAYER_HEIGHT = 3
var smoke_particles
var turret_health = 60
const MAX_TURRET_HEALTH = 60
const DESTROYED_TIME = 20
var destroyed_timer = 0
var bullet_scene = preload("Bullet_Scene.tscn")
func _ready():
$Vision_Area.connect("body_entered", self, "body_entered_vision")
$Vision_Area.connect("body_exited", self, "body_exited_vision")
node_turret_head = $Head
node_raycast = $Head/Ray_Cast
node_flash_one = $Head/Flash
node_flash_two = $Head/Flash_2
node_raycast.add_exception(self)
node_raycast.add_exception($Base/Static_Body)
node_raycast.add_exception($Head/Static_Body)
node_raycast.add_exception($Vision_Area)
node_flash_one.visible = false
node_flash_two.visible = false
smoke_particles = $Smoke
smoke_particles.emitting = false
turret_health = MAX_TURRET_HEALTH
func _physics_process(delta):
if is_active == true:
if flash_timer > 0:
flash_timer -= delta
if flash_timer <= 0:
node_flash_one.visible = false
node_flash_two.visible = false
if current_target != null:
node_turret_head.look_at(current_target.global_transform.origin + Vector3(0, PLAYER_HEIGHT, 0), Vector3(0, 1, 0))
if turret_health > 0:
if ammo_in_turret > 0:
if fire_timer > 0:
fire_timer -= delta
else:
fire_bullet()
else:
if ammo_reload_timer > 0:
ammo_reload_timer -= delta
else:
ammo_in_turret = AMMO_IN_FULL_TURRET
if turret_health <= 0:
if destroyed_timer > 0:
destroyed_timer -= delta
else:
turret_health = MAX_TURRET_HEALTH
smoke_particles.emitting = false
func fire_bullet():
if use_raycast == true:
node_raycast.look_at(current_target.global_transform.origin + Vector3(0, PLAYER_HEIGHT, 0), Vector3(0, 1, 0))
node_raycast.force_raycast_update()
if node_raycast.is_colliding():
var body = node_raycast.get_collider()
if body.has_method("bullet_hit"):
body.bullet_hit(TURRET_DAMAGE_RAYCAST, node_raycast.get_collision_point())
ammo_in_turret -= 1
else:
var clone = bullet_scene.instance()
var scene_root = get_tree().root.get_children()[0]
scene_root.add_child(clone)
clone.global_transform = $Head/Barrel_End.global_transform
clone.scale = Vector3(8, 8, 8)
clone.BULLET_DAMAGE = TURRET_DAMAGE_BULLET
clone.BULLET_SPEED = 60
ammo_in_turret -= 1
node_flash_one.visible = true
node_flash_two.visible = true
flash_timer = FLASH_TIME
fire_timer = FIRE_TIME
if ammo_in_turret <= 0:
ammo_reload_timer = AMMO_RELOAD_TIME
func body_entered_vision(body):
if current_target == null:
if body is KinematicBody:
current_target = body
is_active = true
func body_exited_vision(body):
if current_target != null:
if body == current_target:
current_target = null
is_active = false
flash_timer = 0
fire_timer = 0
node_flash_one.visible = false
node_flash_two.visible = false
func bullet_hit(damage, bullet_hit_pos):
turret_health -= damage
if turret_health <= 0:
smoke_particles.emitting = true
destroyed_timer = DESTROYED_TIME
This is quite a bit of code, so let’s break it down function by function. Let’s first look at the class variables:
use_raycast: An exported boolean so we can change whether the turret uses objects or raycasting for bullets.TURRET_DAMAGE_BULLET: The amount of damage a single bullet scene does.TURRET_DAMAGE_RAYCAST: The amount of damage a single Raycast bullet does.FLASH_TIME: The amount of time (in seconds) the muzzle flash meshes are visible.flash_timer: A variable for tracking how long the muzzle flash meshes have been visible.FIRE_TIME: The amount of time (in seconds) needed to fire a bullet.fire_timer: A variable for tracking how much time has passed since the turret last fired.node_turret_head: A variable to hold theHeadnode.node_raycast: A variable to hold the Raycast node attached to the turret’s head.node_flash_one: A variable to hold the first muzzle flash MeshInstance.node_flash_two: A variable to hold the second muzzle flash MeshInstance.ammo_in_turret: The amount of ammo currently in the turret.AMMO_IN_FULL_TURRET: The amount of ammo in a full turret.AMMO_RELOAD_TIME: The amount of time it takes the turret to reload.ammo_reload_timer: A variable for tracking how long the turret has been reloading.current_target: The turret’s current target.is_active: A variable for tracking whether the turret is able to fire at the target.PLAYER_HEIGHT: The amount of height we’re adding to the target so we’re not shooting at its feet.smoke_particles: A variable to hold the smoke particles node.turret_health: The amount of health the turret currently has.MAX_TURRET_HEALTH: The amount of health a fully healed turret has.DESTROYED_TIME: The amount of time (in seconds) it takes for a destroyed turret to repair itself.destroyed_timer: A variable for tracking the amount of time a turret has been destroyed.bullet_scene: The bullet scene the turret fires (same scene as the player’s pistol)
Whew, that’s quite a few class variables!
Let’s go through _ready next.
Firstly, we get the vision area and connect the body_entered and body_exited signals to body_entered_vision and body_exited_vision, respectively.
We then get all the nodes and assign them to their respective variables.
Next, we add some exceptions to the Raycast so the turret cannot hurt itself.
Then we make both flash meshes invisible at start, since we are not going to be firing during _ready.
We then get the smoke particles node and assign it to the smoke_particles variable. We also set emitting to false to ensure the particles are
not emitting until the turret is broken.
Finally, we set the turret’s health to MAX_TURRET_HEALTH so it starts at full health.
Now let’s go through _physics_process.
Firstly, we check whether the turret is active. If the turret is active, we want to process the firing code.
Next, if flash_timer is greater than zero, meaning the flash meshes are visible, we want to remove
delta from flash_timer. If flash_timer gets to zero or less after we’ve subtracted delta, we want to hide
both of the flash meshes.
Next, we check whether the turret has a target. If the turret has a target, we make the turret head look at it, adding PLAYER_HEIGHT so it is not
aiming at the player’s feet.
We then check whether the turret’s health is greater than zero. If it is, we then check whether there is ammo in the turret.
If there is, we then check whether fire_timer is greater than zero. If it is, the turret cannot fire and we need to
remove delta from fire_timer. If fire_timer is less than or equal to zero, the turret can fire a bullet, so we call the fire_bullet function.
If there isn’t any ammo in the turret, we check whether ammo_reload_timer is greater than zero. If it is,
we subtract delta from ammo_reload_timer. If ammo_reload_timer is less than or equal to zero, we set ammo_in_turret to AMMO_IN_FULL_TURRET because
the turret has waited long enough to refill its ammo.
Next, we check whether the turret’s health is less than or equal to 0 outside of whether it is active or not. If the turret’s health is zero or less, we then
check whether destroyed_timer is greater than zero. If it is, we subtract delta from destroyed_timer.
If destroyed_timer is less than or equal to zero, we set turret_health to MAX_TURRET_HEALTH and stop emitting smoke particles by setting smoke_particles.emitting to
false.
Next let’s go through fire_bullet.
Firstly, we check whether the turret is using a raycast.
The code for using a raycast is almost entirely the same as the code in the rifle from Part 2, so I’m only going to go over it briefly.
We first make the raycast look at the target, ensuring the raycast will hit the target if nothing is in the way. We then force the raycast to update so we get a frame
perfect collision check. We then check whether the raycast has collided with anything. If it has, we then check
whether the collided body has the bullet_hit method. If it does, we call it and pass in the damage a single raycast bullet does along with the raycast’s transform.
We then subtract 1 from ammo_in_turret.
If the turret is not using a raycast, we spawn a bullet object instead. This code is almost entirely the same as the code in the pistol from Part 2, so like with the raycast code, I’m only going to go over it briefly.
We first make a bullet clone and assign it to clone. We then add that as a child of the root node. We set the bullet’s global transform to
the barrel end, scale it up since it’s too small, and set its damage and speed using the turret’s constant class variables. We then subtract 1 from
ammo_in_turret.
Then, regardless of which bullet method we used, we make both of the muzzle flash meshes visible. We set flash_timer and fire_timer
to FLASH_TIME and FIRE_TIME, respectively. We then check whether the turret has used the last bullet in its ammo. If it has,
we set ammo_reload_timer to AMMO_RELOAD_TIME so the turret reloads.
Let’s look at body_entered_vision next, and thankfully it is rather short.
We first check whether the turret currently has a target by checking if current_target is equal to null.
If the turret does not have a target, we then check whether the body that has just entered the vision Area is a KinematicBody.
Note
We’re assuming the turret should only fire at KinematicBody nodes since that is what the player is using.
If the body that just entered the vision Area is a KinematicBody, we set current_target to the body, and set is_active to
true.
Now let’s look at body_exited_vision.
Firstly, we check whether the turret has a target. If it does, we then check whether the body that has just left the turret’s vision Area is the turret’s target.
If the body that has just left the vision Area is the turret’s current target, we set current_target to null, set is_active to false, and reset
all the variables related to firing the turret since the turret no longer has a target to fire at.
Finally, let’s look at bullet_hit.
We first subtract however much damage the bullet causes from the turret’s health.
Then, we check whether the turret has been destroyed (health being zero or less).
If the turret is destroyed, we start emitting the smoke particles and set destroyed_timer to DESTROYED_TIME so the turret has to wait before being repaired.
Whew, with all of that done and coded, we only have one last thing to do before the turret is ready for use. Open up Turret.tscn if it’s not already open and
select one of the StaticBody nodes from either Base or Head. Create a new script called TurretBodies.gd and attach it to whichever
StaticBody you have selected.
Add the following code to TurretBodies.gd:
extends StaticBody
export (NodePath) var path_to_turret_root
func _ready():
pass
func bullet_hit(damage, bullet_hit_pos):
if path_to_turret_root != null:
get_node(path_to_turret_root).bullet_hit(damage, bullet_hit_pos)
All this code does is call bullet_hit on whatever node to which path_to_turret_root leads. Go back to the editor and assign the NodePath
to the Turret node.
Now select the other StaticBody node (either in Body or Head) and assign TurretBodies.gd script to it. Once the script is
attached, assign again the NodePath to the Turret node.
The last thing we need to do is add a way for the player to be hurt. Since all the bullets use the bullet_hit function, we need to add that function to the player.
Open Player.gd and add the following:
func bullet_hit(damage, bullet_hit_pos):
health -= damage
With all that done, you should have fully operational turrets! Go place a few in one/both/all of the scenes and give them a try!
Final notes¶
Now you can pick up RigidBody nodes and throw grenades. We now also have turrets to fire at the player.
In Part 6, we’re going to add a main menu and a pause menu, add a respawn system for the player, and change/move the sound system so we can use it from any script.
Warning
If you ever get lost, be sure to read over the code again!
You can download the finished project for this part here: Godot_FPS_Part_5.zip
Part 6¶
Part overview¶
In this part, we’re going to add a main menu and pause menu, add a respawn system for the player, and change/move the sound system so we can use it from any script.
This is the last part of the FPS tutorial; by the end of this, you will have a solid base to build amazing FPS games with Godot!
Note
You are assumed to have finished Part 5 before moving on to this part of the tutorial. The finished project from Part 5 will be the starting project for part 6
Let’s get started!
Making the Globals singleton¶
Now, for all this to work, we need to create the Globals singleton. Make a new script in the Script tab and call it Globals.gd.
Note
To make the Globals singleton, go to the Script tab in the editor, then click New and a Create Script box will appear, leave everything unchanged except for the Path where you need to insert the script’s name Globals.gd.
Add the following to Globals.gd.
extends Node
var mouse_sensitivity = 0.08
var joypad_sensitivity = 2
func _ready():
pass
func load_new_scene(new_scene_path):
get_tree().change_scene(new_scene_path)
As you can see, it’s quite small and simple. As this part progresses, we will
keep adding more complex logic to Globals.gd, but for now, all it is doing is holding two class variables, and abstract defining how we change scenes.
mouse_sensitivity: The current sensitivity for our mouse, so we can load it inPlayer.gd.joypad_sensitivity: The current sensitivity for our joypad, so we can load it inPlayer.gd.
Right now, all we will be using Globals.gd for is a way to carry variables across scenes. Because the sensitivities of our mouse and joypad are
stored in Globals.gd, any changes we make in one scene (like in Options_Menu) will affect the sensitivity for the player.
All we’re doing in load_new_scene is calling SceneTree’s change_scene function, passing in the scene path given in load_new_scene.
That’s all the code needed for Globals.gd right now! Before we can test the main menu, we first need to set Globals.gd as an autoload script.
Open up the Project Settings and click the AutoLoad tab.

Then select the path to Globals.gd in the Path field by clicking the button (..) beside it. Make sure the name in the Node Name field is Globals. If you
have everything like in the picture above, then press Add!
This will make Globals.gd a singleton/autoload script, which will allow us to access it from any script, in any scene.
Tip
For more information on singleton/autoload scripts, see Singletons (AutoLoad).
Now that Globals.gd is a singleton/autoload script, you can test the main menu!
You may want to change the main scene from Testing_Area.tscn to Main_Menu.tscn so when we export the game the player will start at the main menu. You can do this
through the Project Settings, under the General tab. Then in the Application category, click the Run subcategory and you can change the main scene by changing
the value in Main Scene.
Warning
You’ll have to set the paths to the correct files in Main_Menu in the editor before testing the main menu!
Otherwise you will not be able to change scenes from the level select menu/screen.
Starting the respawn system¶
Since the player can lose all their health, it would be ideal if the player died and respawned too, so let’s add that next!
Firstly, open up Player.tscn and expand HUD. Notice how there is a ColorRect called Death_Screen.
When the player dies, we’re going to make Death_Screen visible, and show them how long they have to wait before the player is able to respawn.
Open up Player.gd and add the following class variables:
const RESPAWN_TIME = 4
var dead_time = 0
var is_dead = false
var globals
RESPAWN_TIME: The amount of time (in seconds) it takes to respawn.dead_time: A variable to track how long the player has been dead.is_dead: A variable to track whether or not the player is currently dead.globals: A variable to hold theGlobals.gdsingleton.
We now need to add a couple lines to _ready, so we can use Globals.gd in Player.gd. Add the following to _ready:
globals = get_node("/root/Globals")
global_transform.origin = globals.get_respawn_position()
Now we’re getting the Globals.gd singleton and assigning it to globals. We also set the player’s global position
by setting the origin in the player’s global Transform to the position returned by globals.get_respawn_position.
Note
Don’t worry, we will be adding get_respawn_position further below!
Next, we need to make a few changes to _physics_process. Change _physics_process to the following:
func _physics_process(delta):
if !is_dead:
process_input(delta)
process_view_input(delta)
process_movement(delta)
if (grabbed_object == null):
process_changing_weapons(delta)
process_reloading(delta)
process_UI(delta)
process_respawn(delta)
Now the player will not be processing input or movement input when the player is dead. We are also now calling process_respawn.
Note
The if !is_dead: expression is equivalent and works in the same way as the expression if is_dead == false:. And by removing the ! sign from the expression we obtain the opposite expression if is_dead == true:. It is just a shorter way of writing the same code functionality.
We have not made process_respawn yet, so let’s change that.
Let’s add process_respawn. Add the following to Player.gd:
func process_respawn(delta):
# If we've just died
if health <= 0 and !is_dead:
$Body_CollisionShape.disabled = true
$Feet_CollisionShape.disabled = true
changing_weapon = true
changing_weapon_name = "UNARMED"
$HUD/Death_Screen.visible = true
$HUD/Panel.visible = false
$HUD/Crosshair.visible = false
dead_time = RESPAWN_TIME
is_dead = true
if grabbed_object != null:
grabbed_object.mode = RigidBody.MODE_RIGID
grabbed_object.apply_impulse(Vector3(0, 0, 0), -camera.global_transform.basis.z.normalized() * OBJECT_THROW_FORCE / 2)
grabbed_object.collision_layer = 1
grabbed_object.collision_mask = 1
grabbed_object = null
if is_dead:
dead_time -= delta
var dead_time_pretty = str(dead_time).left(3)
$HUD/Death_Screen/Label.text = "You died\n" + dead_time_pretty + " seconds till respawn"
if dead_time <= 0:
global_transform.origin = globals.get_respawn_position()
$Body_CollisionShape.disabled = false
$Feet_CollisionShape.disabled = false
$HUD/Death_Screen.visible = false
$HUD/Panel.visible = true
$HUD/Crosshair.visible = true
for weapon in weapons:
var weapon_node = weapons[weapon]
if weapon_node != null:
weapon_node.reset_weapon()
health = 100
grenade_amounts = {"Grenade":2, "Sticky Grenade":2}
current_grenade = "Grenade"
is_dead = false
Let’s go through what this function is doing.
Firstly, we check whether the player has just died by checking if health is less than or equal to 0 and is_dead is false.
If the player has just died, we disable the collision shapes for the player. We do this to make sure the player is not blocking anything with their dead body.
Next, we set changing_weapon to true and set changing_weapon_name to UNARMED. This is so, if the player is using a weapon, it is put away
when they dies.
We then make the Death_Screen ColorRect visible so the player gets a nice grey overlay over everything when they have died.
We then make the rest of the UI, the Panel and Crosshair nodes, invisible.
Next, we set dead_time to RESPAWN_TIME so we can start counting down how long the player has been dead. We also set is_dead to true so we know the player has died.
If the player is holding an object when they died, we need to throw it. We first check whether the player is holding an object or not. If the player is holding a object, we throw it using the same code as the throwing code we added in Part 5.
Note
The \n combination from the expression You have died\n is a command used to display the text following after it on a new line below. This is always useful when you want to nicely group displayed text in multiple lines so it looks better and is more readable by the players of your games.
Then we check whether the player is dead. If so, we then remove delta from dead_time.
We then make a new variable called dead_time_pretty, where we convert dead_time to a string, using only the first three characters starting from the left. This gives
the player a nice looking string showing how much time the player has left to wait before the player can respawn.
We then change the Label in Death_Screen to show how much time the player has left.
Next we check to see if the player has waited long enough and can respawn. We do this by checking to see if dead_time is 0 or less.
If the player has waited long enough to respawn, we set the player’s position to a new respawn position provided by get_respawn_position.
We then enable both of the player’s collision shapes so the player can collide again with the environment.
Next, we make the Death_Screen invisible and make the rest of the UI, the Panel and Crosshair nodes, visible again.
We then go through each weapon and call its reset_weapon function, which we will add soon.
Then, we reset health to 100, grenade_amounts to its default values, and change current_grenade to Grenade.
This effectively resets these variables to their default values.
Finally, we set is_dead to false.
Before we leave Player.gd, we need to add one quick thing to _input. Add the following at the beginning of _input:
if is_dead:
return
Now, when the player is dead, they cannot look around with the mouse.
Finishing the respawn system¶
Firstly, let’s open Weapon_Pistol.gd and add the reset_weapon function. Add the following:
func reset_weapon():
ammo_in_weapon = 10
spare_ammo = 20
Now, when we call reset_weapon, the ammo in the pistol and the ammo in the spares will be reset to their default values.
Now let’s add reset_weapon in Weapon_Rifle.gd:
func reset_weapon():
ammo_in_weapon = 50
spare_ammo = 100
And add the following to Weapon_Knife.gd:
func reset_weapon():
ammo_in_weapon = 1
spare_ammo = 1
Now all the weapons will reset when the player dies.
Now we need to add a few things to Globals.gd. Firstly, add the following class variable:
var respawn_points = null
respawn_points: A variable to hold all the respawn points in a level
Because we’re getting a random spawn point each time, we need to randomize the number generator. Add the following to _ready:
randomize()
randomize will get us a new random seed so we get a (relatively) random string of numbers when we use any of the random functions.
Now let’s add get_respawn_position to Globals.gd:
func get_respawn_position():
if respawn_points == null:
return Vector3(0, 0, 0)
else:
var respawn_point = rand_range(0, respawn_points.size() - 1)
return respawn_points[respawn_point].global_transform.origin
Let’s go over what this function does.
Firstly, we check if Globals.gd has any respawn_points by checking whether respawn_points is null or not.
If respawn_points is null, we return a position of empty Vector 3 with the position (0, 0, 0).
If respawn_points is not null, we then get a random number between 0 and the number of elements we have in respawn_points, minus 1 since
most programming languages, including GDScript, start counting from 0 when you are accessing elements in a list.
We then return the position of the Spatial node at respawn_point position in respawn_points.
Before we are done with Globals.gd, we need to add the following to load_new_scene:
respawn_points = null
We set respawn_points to null so when/if the player gets to a level with no respawn points, we do not respawn the player
at the respawn points that were in the level prior.
Now all we need is a way to set the respawn points. Open up Ruins_Level.tscn and select Spawn_Points. Add a new script called
Respawn_Point_Setter.gd and attach it to Spawn_Points. Add the following to Respawn_Point_Setter.gd:
extends Spatial
func _ready():
var globals = get_node("/root/Globals")
globals.respawn_points = get_children()
Now, when a node with Respawn_Point_Setter.gd has its _ready function called, all the children
nodes of the node with Respawn_Point_Setter.gd, Spawn_Points in the case of Ruins_Level.tscn, will be added
to respawn_points in Globals.gd.
Warning
Any node with Respawn_Point_Setter.gd has to be above the player in the SceneTree so the respawn points are set
before the player needs them in the player’s _ready function.
Now, when the player dies, they will respawn after waiting 4 seconds!
Note
No spawn points are already set up for any of the levels besides Ruins_Level.tscn!
Adding spawn points to Space_Level.tscn is left as an exercise for the reader.
Writing a sound system we can use anywhere¶
Finally, let’s make a sound system so we can play sounds from anywhere, without having to use the player.
Firstly, open up SimpleAudioPlayer.gd and change it to the following:
extends Spatial
var audio_node = null
var should_loop = false
var globals = null
func _ready():
audio_node = $Audio_Stream_Player
audio_node.connect("finished", self, "sound_finished")
audio_node.stop()
globals = get_node("/root/Globals")
func play_sound(audio_stream, position=null):
if audio_stream == null:
print ("No audio stream passed; cannot play sound")
globals.created_audio.remove(globals.created_audio.find(self))
queue_free()
return
audio_node.stream = audio_stream
# If you are using an AudioStreamPlayer3D, then uncomment these lines to set the position.
#if audio_node is AudioStreamPlayer3D:
# if position != null:
# audio_node.global_transform.origin = position
audio_node.play(0.0)
func sound_finished():
if should_loop:
audio_node.play(0.0)
else:
globals.created_audio.remove(globals.created_audio.find(self))
audio_node.stop()
queue_free()
There are several changes from the old version, first and foremost being we are no longer storing the sound files in SimpleAudioPlayer.gd anymore.
This is much better for performance since we’re no longer loading each audio clip when we create a sound, but instead we are forcing an audio stream to be passed
in to play_sound.
Another change is we have a new class variable called should_loop. Instead of just destroying the audio player every time it’s finished, we instead want to check and see if the audio player is set to loop or not. This allows us to have audio like looping background music without having to spawn a new audio player with the music when the old one is finished.
Finally, instead of being instanced/spawned in Player.gd, the audio player is instead going to be spawned in Globals.gd so we can create sounds from any scene.
Now the audio player stores Globals.gd singleton so when the audio player is destroyed, we can also remove it from a list in Globals.gd.
Let’s go over the changes.
For the class variables, we removed all the audio_[insert name here] variables since we will instead have these passed in from Globals.gd.
We also added two new class variables, should_loop and globals. We’ll use should_loop to tell whether the audio player should loop when the sound has
finished, and globals will hold the Globals.gd singleton.
The only change in _ready is now audio player is getting the Globals.gd singleton and assigning it to globals.
play_sound now expects an audio stream, named audio_stream, to be passed in, instead of sound_name. Instead of checking the
sound name and setting the stream for the audio player, we instead check to make sure an audio stream was passed in. If an audio stream was not passed
in, we print an error message, remove the audio player from a list in the Globals.gd singleton called created_audio, and then free the audio player.
Finally, in sound_finished we first check to see if the audio player is supposed to loop or not using should_loop. If the audio player is supposed to loop,
we play the sound again from the start, at position 0.0. If the audio player is not supposed to loop, we remove the audio player from a list in the Globals.gd singleton
called created_audio, and then free the audio player.
Now that we’ve finished our changes to SimpleAudioPlayer.gd, we now need to turn our attention to Globals.gd. First, add the following class variables:
# All the audio files.
# You will need to provide your own sound files.
var audio_clips = {
"Pistol_shot":null, #preload("res://path_to_your_audio_here!")
"Rifle_shot":null, #preload("res://path_to_your_audio_here!")
"Gun_cock":null, #preload("res://path_to_your_audio_here!")
}
const SIMPLE_AUDIO_PLAYER_SCENE = preload("res://Simple_Audio_Player.tscn")
var created_audio = []
Let’s go over these global variables.
audio_clips: A dictionary holding all the audio clipsGlobals.gdcan play.SIMPLE_AUDIO_PLAYER_SCENE: The simple audio player scene.created_audio: A list to hold all the simple audio playersGlobals.gdhas created.
Note
If you want to add additional audio, you need to add it to audio_clips. No audio files are provided in this tutorial,
so you will have to provide your own.
One site I’d recommend is GameSounds.xyz. I’m using the Gamemaster audio gun sound pack included in the Sonniss’ GDC Game Audio bundle for 2017. The tracks I’ve used (with some minor editing) are as follows:
- gun_revolver_pistol_shot_04,
- gun_semi_auto_rifle_cock_02,
- gun_submachine_auto_shot_00_automatic_preview_01
Now we need to add a new function called play_sound to Globals.gd:
func play_sound(sound_name, loop_sound=false, sound_position=null):
if audio_clips.has(sound_name):
var new_audio = SIMPLE_AUDIO_PLAYER_SCENE.instance()
new_audio.should_loop = loop_sound
add_child(new_audio)
created_audio.append(new_audio)
new_audio.play_sound(audio_clips[sound_name], sound_position)
else:
print ("ERROR: cannot play sound that does not exist in audio_clips!")
Let’s go over what this function does.
Firstly, we check whether Globals.gd has an audio clip with the name sound_name in audio_clips. If it does not, we print an error message.
If Globals.gd has an audio clip with the name sound_name, we then instance/spawn a new SIMPLE_AUDIO_PLAYER_SCENE and assign it to new_audio.
We then set should_loop, and add new_audio as a child of Globals.gd.
Note
Remember, we have to be careful adding nodes to a singleton, since these nodes will not be destroyed when changing scenes.
We add the new_audio into the created_audio list to hold all created audios.
We then call play_sound, passing in the audio clip associated with sound_name and the sound position.
Before we leave Globals.gd, we need to add a few lines of code to load_new_scene so when the player changes scenes, all the audio is destroyed.
Add the following to load_new_scene:
for sound in created_audio:
if (sound != null):
sound.queue_free()
created_audio.clear()
Now, before Globals.gd changes scenes, it goes through each simple audio player in created_sounds and frees/destroys them. Once Globals.gd has gone through
all the sounds in created_audio, we clear created_audio so it no longer holds any references to any (now freed/destroyed) simple audio players.
Let’s change create_sound in Player.gd to use this new system. First, remove simple_audio_player from Player.gd’s class variables since we will
no longer be directly instancing/spawning sounds in Player.gd.
Now, change create_sound to the following:
func create_sound(sound_name, position=null):
globals.play_sound(sound_name, false, position)
Now, whenever create_sound is called, we simply call play_sound in Globals.gd, passing in all the arguments received.
Now all the sounds in our FPS can be played from anywhere. All we have to do is get the Globals.gd singleton, and call play_sound, pass in the name of the sound
we want to play, whether we want it to loop or not, and the position from which to play the sound.
For example, if you want to play an explosion sound when the grenade explodes you’d need to add a new sound to audio_clips in Globals.gd,
get the Globals.gd singleton, and then you just need to add something like
globals.play_sound("explosion", false, global_transform.origin) in the grenades
_process function, right after the grenade damages all the bodies within its blast radius.
Final notes¶
Now you have a fully working single player FPS!
At this point, you have a good base to build more complicated FPS games.
Warning
If you ever get lost, be sure to read over the code again!
You can download the finished project for the entire tutorial here: Godot_FPS_Part_6.zip
Note
The finished project source files contain the same code, just written in a different order. This is because the finished project source files are what the tutorial is based on.
The finished project code was written in the order that features were created, not necessarily in a order that is ideal for learning.
Other than that, the source is exactly the same, just with helpful comments explaining what each part does.
Tip
The finished project source is hosted on Github as well: https://github.com/TwistedTwigleg/Godot_FPS_Tutorial
Please note that the code in Github may or may not be in sync with the tutorial in the documentation.
The code in the documentation is likely better managed and/or more up to date. If you are unsure of which to use, use the project(s) provided in the documentation, as they are maintained by the Godot community.
You can download all the .blend files used in this tutorial here: Godot_FPS_BlenderFiles.zip
All assets provided in the started assets (unless otherwise noted) were originally created by TwistedTwigleg, with changes/additions by the Godot community.
All original assets provided for this tutorial are released under the MIT license.
Feel free to use these assets however you want! All original assets belong to the Godot community, with the other assets belonging to those listed below:
The skybox is created by StumpyStrust and can be found at OpenGameArt.org. https://opengameart.org/content/space-skyboxes-0
. The skybox is licensed under the CC0 license.
The font used is Titillium-Regular, and is licensed under the SIL Open Font License, Version 1.1.
The skybox was converted to a 360 equirectangular image using this tool: https://www.360toolkit.co/convert-cubemap-to-spherical-equirectangular.html
While no sounds are provided, you can find many game ready sounds at https://gamesounds.xyz/
Warning
OpenGameArt.org, 360toolkit.co, the creator(s) of Titillium-Regular, StumpyStrust, and GameSounds.xyz are in no way involved in this tutorial.
Animating thousands of objects¶
Animating thousands of fish with MultiMeshInstance¶
This tutorial explores a technique used in the game ABZU for rendering and animating thousands of fish using vertex animation and static mesh instancing.
In Godot, this can be accomplished with a custom Shader and a MultiMeshInstance. Using the following technique you can render thousands of animated objects, even on low end hardware.
We will start by animating one fish. Then, we will see how to extend that animation to thousands of fish.
Animating one Fish¶
We will start with a single fish. Load your fish model into a MeshInstance and add a new ShaderMaterial.
Here is the fish we will be using for the example images, you can use any fish model you like.

Note
The fish model in this tutorial is made by QuaterniusDev and is shared with a creative commons license. CC0 1.0 Universal (CC0 1.0) Public Domain Dedication https://creativecommons.org/publicdomain/zero/1.0/
Typically, you would use bones and a Skeleton to animate objects. However, bones are animated on the CPU and so you end having to calculate thousands of operations every frame and it becomes impossible to have thousands of objects. Using vertex animation in a vertex shader, you avoid using bones and can instead calculate the full animation in a few lines of code and completely on the GPU.
The animation will be made of four key motions:
- A side to side motion
- A pivot motion around the center of the fish
- A panning wave motion
- A panning twist motion
All the code for the animation will be in the vertex shader with uniforms controlling the amount of motion. We use uniforms to control the strength of the motion so that you can tweak the animation in editor and see the results in real time, without the shader having to recompile.
All the motions will be made using cosine waves applied to VERTEX in model space. We want the vertices to
be in model space so that the motion is always relative to the orientation of the fish. For example, side-to-side
will always be move the fish back and forth in its left to right direction, instead of on the x axis in the
world orientation.
In order to control the speed of the animation, we will start by defining our own time variable using TIME.
//time_scale is a uniform float
float time = TIME * time_scale;
The first motion we will implement is the side to side motion. It can be made by offsetting VERTEX.x by
cos of TIME. Each time the mesh is rendered, all the vertices will move to the side by the amount
of cos(time).
//side_to_side is a uniform float
VERTEX.x += cos(time) * side_to_side;
The resulting animation should look something like this:

Next, we add the pivot. Because the fish is centered at (0, 0), all we have to do is multiply VERTEX by a
rotation matrix for it to rotate around the center of the fish.
We construct a rotation matrix like so:
//angle is scaled by 0.1 so that the fish only pivots and doesn't rotate all the way around
//pivot is a uniform float
float pivot_angle = cos(time) * 0.1 * pivot;
mat2 rotation_matrix = mat2(vec2(cos(pivot_angle), -sin(pivot_angle)), vec2(sin(pivot_angle), cos(pivot_angle)));
And then we apply it in the x and z axes by multiplying it by VERTEX.xz.
VERTEX.xz = rotation_matrix * VERTEX.xz;
With only the pivot applied you should see something like this:

The next two motions need to pan down the spine of the fish. For that, we need a new variable, body.
body is a float that is 0 at the tail of the fish and 1 at its head.
float body = (VERTEX.z + 1.0) / 2.0; //for a fish centered at (0, 0) with a length of 2
The next motion is a cosine wave that moves down the length of the fish. To make
it move along the spine of the fish, we offset the input to cos by the position
along the spine, which is the variable we defined above, body.
//wave is a uniform float
VERTEX.x += cos(time + body) * wave;
This looks very similar to the side to side motion we defined above, but in this one, by
using body to offset cos each vertex along the spine has a different position in
the wave making it look like a wave is moving along the fish.

The last motion is the twist, which is a panning roll along the spine. Similarly to the pivot, we first construct a rotation matrix.
//twist is a uniform float
float twist_angle = cos(time + body) * 0.3 * twist;
mat2 twist_matrix = mat2(vec2(cos(twist_angle), -sin(twist_angle)), vec2(sin(twist_angle), cos(twist_angle)));
We apply the rotation in the xy axes so that the fish appears to roll around its spine. For
this to work, the fishes spine needs to be centered on the z axis.
VERTEX.xy = twist_matrix * VERTEX.xy;
Here is the fish with twist applied:

If we apply all these motions one after another, we get a fluid jelly-like motion.
Normal fish swim mostly with the back half of their body. Accordingly, we need to limit the
panning motions to the back half of the fish. To do this, we create a new variable, mask.
mask is a float that goes from 0 at the front of the fish to 1 at the end using
smoothstep to control the point at which the transition from 0 to 1 happens.
//mask_black and mask_white are uniforms
float mask = smoothstep(mask_black, mask_white, 1.0 - body);
Below is an image of the fish with mask used as COLOR:

For the wave, we multiply the motion by mask which will limit it to the back half.
//wave motion with mask
VERTEX.x += cos(time + body) * mask * wave;
In order to apply the mask to the twist, we use mix. mix allows us to mix the
vertex position between a fully rotated vertex and one that is not rotated. We need to
use mix instead of multiplying mask by the rotated VERTEX because we are not
adding the motion to the VERTEX we are replacing the VERTEX with the rotated
version. If we multiplied that by mask we would shrink the fish.
//twist motion with mask
VERTEX.xy = mix(VERTEX.xy, twist_matrix * VERTEX.xy, mask);
Putting the four motions together gives us the final animation.

Go ahead and play with the uniforms in order to alter the swim cycle of the fish. You will find that you can create a wide variety of swim styles using these four motions.
Making a school of fish¶
Godot makes it easy to render thousands of the same object using a MultiMeshInstance node.
A MultiMeshInstance node is created and used the same way you would make a MeshInstance node.
For this tutorial, we will name the MultiMeshInstance node School, because it will contain
a school of fish.
Once you have a MultiMeshInstance add a MultiMesh, and to that MultiMesh add your Mesh with the shader from above.
MultiMeshes draw your Mesh with three additional per-instance properties: Transform (rotation, translation, scale), Color, and Custom. Custom is used to pass in 4 multi-use variables using a Color.
instance_count specifies how many instances of the mesh you want to draw. For now, leave
instance_count at 0 because you cannot change any of the other parameters while
instance_count is larger than 0. We will set instance count in GDScript later.
transform_format specifies whether the transforms used are 3D or 2D. For this tutorial, select 3D.
For both color_format and custom_data_format you can choose between None, Byte, and
Float. None means you won’t be passing in that data (either a per-instance COLOR variable,
or INSTANCE_CUSTOM) to the shader. Byte means each number making up the color you pass in will
be stored with 8 bits while Float means each number will be stored in a floating point number
(32 bits). Float is slower but more precise, Byte will take less memory and be faster, but you
may see some visual artifacts.
Now, set instance_count to the number of fish you want to have.
Next we need to set the per-instance transforms.
There are two ways to set per-instance transforms for MultiMeshes. The first is entirely in editor and is described in the MultiMeshInstance tutorial.
The second is to loop over all the instances and set their transforms in code. Below, we use GDScript to loop over all the instances and set their transform to a random position.
for i in range($School.multimesh.instance_count):
var position = Transform()
position = position.translated(Vector3(randf() * 100 - 50, randf() * 50 - 25, randf() * 50 - 25))
$School.multimesh.set_instance_transform(i, position)
Running this script will place the fish in random positions in a box around the position of the MultiMeshInstance.
Note
If performance is an issue for you, try running the scene with GLES2 or with fewer fish.
Notice how all the fish are all in the same position in their swim cycle? It makes them look very robotic. The next step is to give each fish a different position in the swim cycle so the entire school looks more organic.
Animating a school of fish¶
One of the benefits of animating the fish using cos functions is that they are animated with
one parameter, time. In order to give each fish a unique position in the
swim cycle, we only need to offset time.
We do that by adding the per-instance custom value INSTANCE_CUSTOM to time.
float time = (TIME * time_scale) + (6.28318 * INSTANCE_CUSTOM.x);
Next, we need to pass a value into INSTANCE_CUSTOM. We do that by adding one line into
the for loop from above. In the for loop we assign each instance a set of four
random floats to use.
$School.multimesh.set_instance_custom_data(i, Color(randf(), randf(), randf(), randf()))
Now the fish all have unique positions in the swim cycle. You can give them a little more
individuality by using INSTANCE_CUSTOM to make them swim faster or slower by multiplying
by TIME.
//set speed from 50% - 150% of regular speed
float time = (TIME * (0.5 + INSTANCE_CUSTOM.y) * time_scale) + (6.28318 * INSTANCE_CUSTOM.x);
You can even experiment with changing the per-instance color the same way you changed the per-instance custom value.
One problem that you will run into at this point is that the fish are animated, but they are not moving. You can move them by updating the per-instance transform for each fish every frame. Although doing so will be faster then moving thousands of MeshInstances per frame, it is still likely to be slow.
In the next tutorial we will cover how to use Particles to take advantage of the GPU and move each fish around individually while still receiving the benefits of instancing.
Controlling thousands of fish with Particles¶
The problem with MeshInstances is that it is expensive to update their transform array. It is great for placing many static objects around the scene. But it is still difficult to move the objects around the scene.
To make each instance move in an interesting way we will use a Particles node. Particles take advantage of GPU acceleration by computing and setting the per-instance information in a Shader.
Note
Particles are not available in GLES2, instead use CPUParticles, which do the same thing as Particles, but do not benefit from GPU acceleration.
First create a Particles node. Then, under “Draw Passes” set the Particle’s “Draw Pass 1” to your Mesh. Then under “Process Material” create a new ShaderMaterial.
Set the shader_type to particles.
shader_type particles
Then add the following two functions:
float rand_from_seed(in uint seed) {
int k;
int s = int(seed);
if (s == 0)
s = 305420679;
k = s / 127773;
s = 16807 * (s - k * 127773) - 2836 * k;
if (s < 0)
s += 2147483647;
seed = uint(s);
return float(seed % uint(65536)) / 65535.0;
}
uint hash(uint x) {
x = ((x >> uint(16)) ^ x) * uint(73244475);
x = ((x >> uint(16)) ^ x) * uint(73244475);
x = (x >> uint(16)) ^ x;
return x;
}
These functions come from the default ParticlesMaterial.
They are used to generate a random number from each particle’s RANDOM_SEED.
A unique thing about particle shaders is that some of the built-in variables are saved across frames.
TRANSFORM, COLOR, and CUSTOM can all be accessed in the Spatial shader of the mesh, and
also in the particle shader the next time it is run.
Next, setup your vertex function. Particles shaders only contain a vertex function
and no others.
First we will distinguish between code that needs to be run only when the particle system starts
and code that should always run. We want to give each fish a random position and a random animation
offset when the system is first run so we wrap that code in an if statement that checks the
built-in variable RESTART which becomes true for one frame when the particle system is restarted.
From a high level, this looks like:
void vertex() {
if (RESTART) {
//Initialization code goes here
} else {
//per-frame code goes here
}
}
Next, we need to generate 4 random numbers: 3 to create a random position and one for the random offset of the swim cycle.
First, generate 4 seeds inside the RESTART block using the hash function provided above:
uint alt_seed1 = hash(NUMBER + uint(1) + RANDOM_SEED);
uint alt_seed2 = hash(NUMBER + uint(27) + RANDOM_SEED);
uint alt_seed3 = hash(NUMBER + uint(43) + RANDOM_SEED);
uint alt_seed4 = hash(NUMBER + uint(111) + RANDOM_SEED);
Then, use those seeds to generate random numbers using rand_from_seed:
CUSTOM.x = rand_from_seed(alt_seed1);
vec3 position = vec3(rand_from_seed(alt_seed2) * 2.0 - 1.0,
rand_from_seed(alt_seed3) * 2.0 - 1.0,
rand_from_seed(alt_seed4) * 2.0 - 1.0);
Finally, assign position to TRANSFORM[3].xyz, which is the part of the transform that holds
the position information.
TRANSFORM[3].xyz = position * 20.0;
Remember, all this code so far goes inside the RESTART block.
The vertex shader for your mesh can stay the exact same as it was in the previous tutorial.
Now you can move each fish individually each frame, either by adding to the TRANSFORM directly
or by writing to VELOCITY.
Let’s transform the fish by setting their VELOCITY.
VELOCITY.z = 10.0;
This is the most basic way to set VELOCITY every particle (or fish) will have the same velocity.
Just by setting VELOCITY you can make the fish swim however you want. For example, try the code
below.
VELOCITY.z = cos(TIME + CUSTOM.x * 6.28) * 4.0 + 6.0;
This will give each fish a unique speed between 2 and 10.
If you used CUSTOM.y in the last tutorial, you can also set the speed of the swim animation based
on the VELOCITY. Just use CUSTOM.y.
CUSTOM.y = VELOCITY.z * 0.1;
This code gives you the following behavior:
Using a ParticlesMaterial you can make the fish behavior as simple or complex as you like. In this
tutorial we only set Velocity, but in your own Shaders you can also set COLOR, rotation, scale
(through TRANSFORM). Please refer to the Particles Shader Reference
for more information on particle shaders.
Audio¶
Audio buses¶
Introduction¶
Godot’s audio processing code has been written with games in mind, with the aim of achieving an optimal balance between performance and sound quality.
Godot’s audio engine allows any number of audio buses to be created and any number of effect processors can be added to each bus. Only the hardware of the device running your game will limit the number of buses and effects that can be used before performance starts to suffer.
Decibel scale¶
Godot’s sound interface is designed to meet the expectations of sound design professionals. To this end, it primarily uses the decibel scale.
For those unfamiliar with it, it can be explained with a few facts:
- The decibel (dB) scale is a relative scale. It represents the ratio of sound power by using 20 times the base 10 logarithm of the ratio (20 × log10(P/P0)).
- For every 6 dB, sound amplitude doubles or halves. 12 dB represents a factor of 4, 18 dB a factor of 8, 20 dB a factor of 10, 40 dB a factor of 100, etc.
- Since the scale is logarithmic, true zero (no audio) can’t be represented.
- 0 dB is the maximum amplitude possible in a digital audio system. This limit is not the human limit, but a limit from the sound hardware. Audio with amplitudes that are too high to be represented properly below 0 dB create a kind of distortion called clipping.
- To avoid clipping, your sound mix be arranged so that the output of the master bus (more on that later) never exceeds 0 dB.
- Every 6 dB below the 0 dB limit, sound energy is halved. It means the sound volume at -6 dB is half as loud as 0dB. -12 dB is half as loud as -6 dB and so on.
- When working with decibels, sound is considered no longer audible between -60 dB and -80 dB. This makes your working range generally between -60 dB and 0 dB.
This can take a bit getting used to, but it’s friendlier in the end and will allow you to communicate better with audio professionals.
Audio buses¶
Audio buses can be found in the bottom panel of the Godot editor:
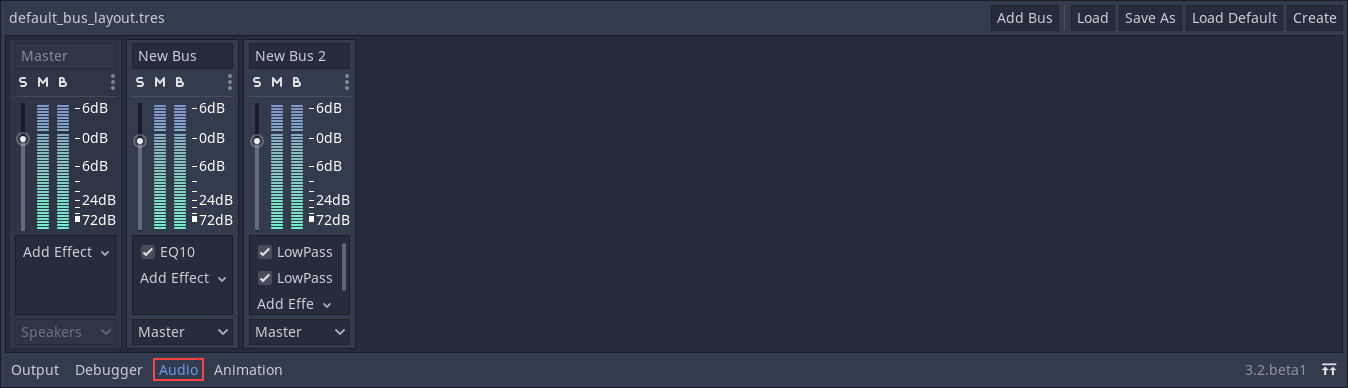
An audio bus (also called an audio channel) can be considered a place that audio is channeled through on the way to playback through a device’s speakers. Audio data can be modified and re-routed by an audio bus. An audio bus has a VU meter (the bars that light up when sound is played) which indicates the amplitude of the signal passing through.
The leftmost bus is the master bus. This bus outputs the mix to your speakers so, as mentioned in the Decibel scale section above, make sure that your mix level doesn’t reach 0 dB in this bus. The rest of the audio buses can be flexibly routed. After modifying the sound, they send it to another bus to the left. The destination bus can be specified for each of the non-master audio buses. Routing always passes audio from buses on the right to buses further to the left. This avoids infinite routing loops.
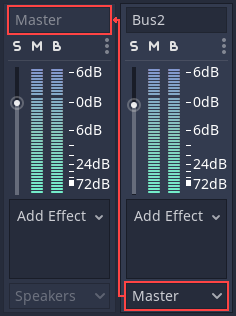
In the above image, the output of Bus 2 has been routed to the Master bus.
Playback of audio through a bus¶
To test passing audio to a bus, create an AudioStreamPlayer node, load an AudioStream and select a target bus for playback:
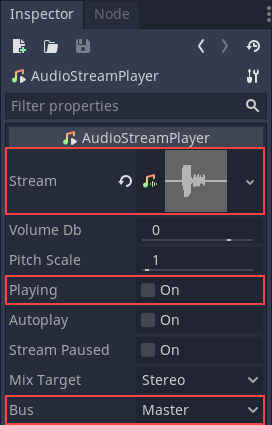
Finally, toggle the Playing property to On and sound will flow.
See also
You may also be interested in reading about Audio streams now.
Adding effects¶
Audio buses can contain all sorts of effects. These effects modify the sound in one way or another and are applied in order.
Try them all out to get a sense of how they alter sound. Here follows a short description of the available effects:
Amplify¶
Amplify changes the amplitude of the signal. Some care needs to be taken. Setting the level too high can make the sound clip, which is usually undesirable.
BandLimit and BandPass¶
These are resonant filters which block frequencies around the Cutoff point. BandPass can be used to simulate sound passing through an old telephone line or megaphone. Modulating the BandPass frequency can simulate the sound of a wah-wah guitar pedal, think of the guitar in Jimi Hendrix’s Voodoo Child (Slight Return).
Chorus¶
The Chorus effect duplicates the incoming audio, delays the duplicate slightly and uses an LFO to continuously modulate the pitch of the duplicated signal before mixing the duplicated signal(s) and the original together again. This creates a shimmering effect and adds stereo width to the sound.
Compressor¶
A dynamic range compressor automatically attenuates the level of the incoming signal when its amplitude exceeds a certain threshold. The level of attenuation applied is proportional to how far the incoming audio exceeds the threshold. The compressor’s Ratio parameter controls the degree of attenuation. One of the main uses of a compressor is to reduce the dynamic range of signals with very loud and quiet parts. Reducing the dynamic range of a signal can make it easier to mix.
The compressor has many uses. For example:
- It can be used in the Master bus to compress the whole output.
- It can be used in voice channels to ensure they sound as even as possible.
- It can be sidechained. This means it can reduce the sound level of one signal using the level of another audio bus for threshold detection. This technique is very common in video game mixing to “duck” the level of music or sound effects when voices need to be heard.
- It can accentuate transients by using a slower attack. This can make sound effects more punchy.
Note
If your goal is to prevent a signal from exceeding a given amplitude altogether, rather than to reduce the dynamic range of the signal, a limiter is likely a better choice than a compressor.
Delay¶
Adds an “echo” effect with a feedback loop. It can be used together with Reverb to simulate wide rooms, canyons, etc. where sound bounces are far apart.
Distortion¶
Distortion effects make the sound “dirty”. Godot offers several types of distortion: overdrive, tan and bit crushing. Distortion can be used to simulate sound coming through a low-quality speaker or device.
EQ¶
EQ is what all other equalizers inherit from. It can be extended with with Custom scripts to create an equalizer with a custom number of bands.
EQ6, EQ10, EQ21¶
Godot provides three equalizers with different numbers of bands. An equalizer on the Master bus can be useful to cut frequencies that the device’s speakers can’t reproduce well (e.g. a mobile phone’s speakers won’t reproduce bass content well). The equalizer effect can be disabled when headphones are plugged in.
Filter¶
Filter is what all other filters inherit from and should not be used directly.
HighPassFilter, HighShelfFilter¶
These are filters that cut frequencies below a specific Cutoff frequency. HighPassFilter and HighShelfFilter are used to reduce the bass content of a signal.
Limiter¶
A limiter is similar to a compressor, but it’s less flexible and designed to prevent a signal’s amplitude exceeding a given dB threshold. Adding a limiter to the Master bus is a safeguard against clipping.
LowPassFilter, LowShelfFilter¶
These are the most common filters, they cut frequencies above a specific Cutoff frequency and can also resonate (boost frequencies close to the Cutoff frequency). Low pass filters can be used to simulate “muffled” sound. For instance, underwater sounds, sounds blocked by walls, or distant sounds.
NotchFilter¶
The opposite of the BandPassFilter, it removes a band of sound from the frequency spectrum at a given Cutoff frequency.
Panner¶
The Panner allows the stereo balance of a signal to be adjusted between the left and right channels (wear headphones to audition this effect).
Phaser¶
It probably does not make much sense to explain that this effect is formed by two signals being dephased and cancelling each other out. You can make a Darth Vader voice with it, or jet-like sounds.
PitchShift¶
This effect allows the adjustment of the signal’s pitch independently of its speed. All frequencies can be increased/decreased with minimal effect on transients. PitchShift can be useful to create unusually high or deep voices.
Record¶
The Record effect allows audio passing through the bus to be written to a file.
Reverb¶
Reverb simulates rooms of different sizes. It has adjustable parameters that can be tweaked to obtain the sound of a specific room. Reverb is commonly outputted from Areas (see Reverb buses), or to apply a “chamber” feel to all sounds.
SpectrumAnalyzer¶
This effect doesn’t alter audio, instead, you add this effect to buses you want a spectrum analysis of. This would typically be used for audio visualization. A demo project using this can be found here.
StereoEnhance¶
This effect uses a few algorithms to enhance a signal’s stereo spectrum.
Automatic bus disabling¶
There is no need to disable buses manually when not in use. Godot detects that the bus has been silent for a few seconds and disables it (including all effects).
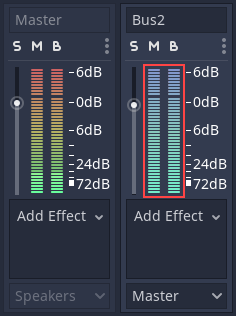
Disabled buses have a blue VU meter instead of a red-green one.
Bus rearrangement¶
Stream Players use bus names to identify a bus, which allows adding, removing and moving buses around while the reference to them is kept. However, if a bus is renamed, the reference will be lost and the Stream Player will output to Master. This system was chosen because rearranging buses is a more common process than renaming them.
Default bus layout¶
The default bus layout is automatically saved to the
res://default_bus_layout.tres file. Custom bus arrangements can be saved
and loaded from disk.
Audio streams¶
Introduction¶
As you might have already read in Audio buses, sound is sent to each bus via an AudioStreamPlayer node. There are different kinds of AudioStreamPlayers. Each one loads an AudioStream and plays it back.
AudioStream¶
An audio stream is an abstract object that emits sound. The sound can come from
many places, but is most commonly loaded from the filesystem. Audio files such
as WAV (.wav) or Ogg Vorbis (.ogg) can be loaded as AudioStreams and
placed inside an AudioStreamPlayer.
Here is a comparison of the two file types to help you choose the one that fits your use case best:
- WAV files are quite large, but use little CPU power to play back. Hundreds of them can be played simultaneously with little impact on performance. This format is usually best for short sound effects.
- Ogg Vorbis files are much smaller, but use considerably more CPU power to play back, so only a few can be played back at once (especially on mobile). This format works well for music, long sound effect sequences, and voice at relatively low bitrates.
Keep in mind Ogg Vorbis files don’t contain looping information. If looping an Ogg Vorbis file is desired, it must be set up using the import options:
There are other types of AudioStreamPlayer, such as AudioStreamRandomPitch. This one makes a random adjustment to the sound’s pitch every time it’s played back. This can be helpful for adding variation to sounds that are played back often.
AudioStreamPlayer¶
This is the standard, non-positional stream player. It can play to any bus. In 5.1 sound setups, it can send audio to stereo mix or front speakers.
AudioStreamPlayer2D¶
This is a variant of AudioStreamPlayer, but emits sound in a 2D positional environment. When close to the left of the screen, the panning will go left. When close to the right side, it will go right.
Note
Area2Ds can be used to divert sound from any AudioStreamPlayer2Ds they contain to specific buses. This makes it possible to create buses with different reverb or sound qualities to handle action happening in a particular parts of your game world.
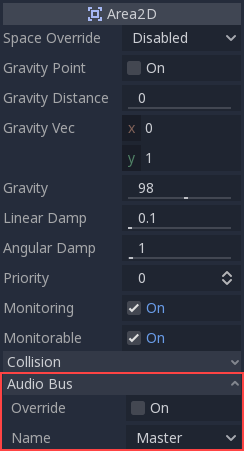
AudioStreamPlayer3D¶
This is a variant of AudioStreamPlayer, but emits sound in a 3D positional environment. Depending on the location of the player relative to the screen, it can position sound in stereo, 5.1 or 7.1 depending on the chosen audio setup.
Similar to AudioStreamPlayer2D, an Area can divert the sound to an audio bus.
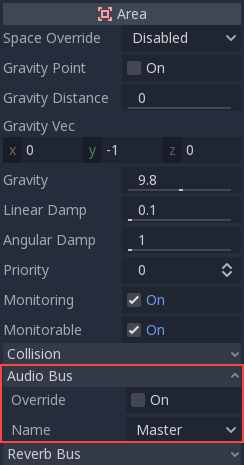
Unlike for 2D, the 3D version of AudioStreamPlayer has a few more advanced options:
Reverb buses¶
Godot allows for 3D audio streams that enter a specific Area node to send dry and wet audio to separate buses. This is useful when you have several reverb configurations for different types of rooms. This is done by enabling this type of reverb in the Reverb Bus section of the Area’s properties:
At the same time, a special bus layout is created where each area receives the reverb info from each area. A Reverb effect needs to be created and configured in each reverb bus to complete the setup for the desired effect:
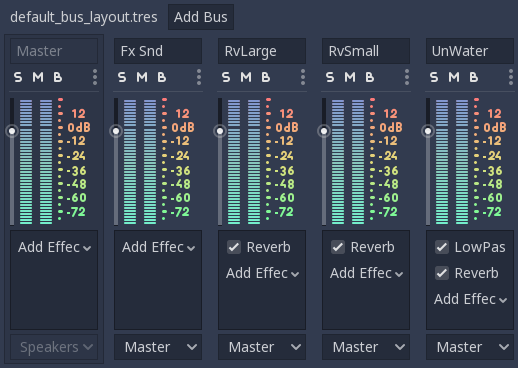
The Area’s Reverb Bus section also has a parameter named Uniformity. Some types of rooms bounce sounds more than others (like a warehouse), so reverberation can be heard almost uniformly across the room even though the source may be far away. Playing around with this parameter can simulate that effect.
Doppler¶
When the relative velocity between an emitter and listener changes, this is perceived as an increase or decrease in the pitch of the emitted sound. Godot can track velocity changes in the AudioStreamPlayer3D and Camera nodes. Both nodes have this property, which must be enabled manually:
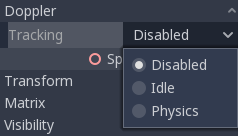
Enable it by setting it depending on how objects will be moved:
use Idle for objects moved using _process, or Physics
for objects moved using _physics_process. The tracking will
happen automatically.
Sync the gameplay with audio and music¶
Introduction¶
In any application or game, sound and music playback will have a slight delay. For games, this delay is often so small that it is negligible. Sound effects will come out a few milliseconds after any play() function is called. For music this does not matter as in most games it does not interact with the gameplay.
Still, for some games (mainly, rhythm games), it may be required to synchronize player actions with something happening in a song (usually in sync with the BPM). For this, having more precise timing information for an exact playback position is useful.
Achieving very low playback timing precision is difficult. This is because many factors are at play during audio playback:
- Audio is mixed in chunks (not continuously), depending on the size of audio buffers used (check latency in project settings).
- Mixed chunks of audio are not played immediately.
- Graphics APIs display two or three frames late.
- When playing on TVs, some delay may be added due to image processing.
The most common way to reduce latency is to shrink the audio buffers (again, by editing the latency setting in the project settings). The problem is that when latency is too small, sound mixing will require considerably more CPU. This increases the risk of skipping (a crack in sound because a mix callback was lost).
This is a common tradeoff, so Godot ships with sensible defaults that should not need to be altered.
The problem, in the end, is not this slight delay but synchronizing graphics and audio for games that require it. Beginning with Godot 3.2, some helpers were added to obtain more precise playback timing.
Using the system clock to sync¶
As mentioned before, If you call AudioStreamPlayer.play(), sound will not begin immediately, but when the audio thread processes the next chunk.
This delay can’t be avoided but it can be estimated by calling AudioServer.get_time_to_next_mix().
The output latency (what happens after the mix) can also be estimated by calling AudioServer.get_output_latency().
Add these two and it’s possible to guess almost exactly when sound or music will begin playing in the speakers during _process():
var time_begin
var time_delay
func _ready()
time_begin = OS.get_ticks_usec()
time_delay = AudioServer.get_time_to_next_mix() + AudioServer.get_output_latency()
$Player.play()
func _process(delta):
# Obtain from ticks.
var time = (OS.get_ticks_usec() - time_begin) / 1000000.0
# Compensate for latency.
time -= time_delay
# May be below 0 (did not being yet).
time = max(0, time)
print("Time is: ", time)
In the long run, though, as the sound hardware clock is never exactly in sync with the system clock, the timing information will slowly drift away.
For a rhythm game where a song begins and ends after a few minutes, this approach is fine (and it’s the recommended approach). For a game where playback can last a much longer time, the game will eventually go out of sync and a different approach is needed.
Using the sound hardware clock to sync¶
Using AudioStreamPlayer.get_playback_position() to obtain the current position for the song sounds ideal, but it’s not that useful as-is. This value will increment in chunks (every time the audio callback mixed a block of sound), so many calls can return the same value. Added to this, the value will be out of sync with the speakers too because of the previously mentioned reasons.
To compensate for the “chunked” output, there is a function that can help: AudioServer.get_time_since_last_mix().
Adding the return value from this function to get_playback_position() increases precision:
var time = $Player.get_playback_position() + AudioServer.get_time_since_last_mix()
To increase precision, subtract the latency information (how much it takes for the audio to be heard after it was mixed):
var time = $Player.get_playback_position() + AudioServer.get_time_since_last_mix() - AudioServer.get_output_latency()
The result may be a bit jittery due how multiple threads work. Just check that the value is not less than in the previous frame (discard it if so). This is also a less precise approach than the one before, but it will work for songs of any length, or synchronizing anything (sound effects, as an example) to music.
Here is the same code as before using this approach:
func _ready()
$Player.play()
func _process(delta):
var time = $Player.get_playback_position() + AudioServer.get_time_since_last_mix()
# Compensate for output latency.
time -= AudioServer.get_output_latency()
print("Time is: ", time)
Recording with microphone¶
Godot supports in-game audio recording for Windows, macOS, Linux, Android and iOS.
A simple demo is included in the official demo projects and will be used as support for this tutorial: https://github.com/godotengine/godot-demo-projects/tree/master/audio/mic_record.
The structure of the demo¶
The demo consists of a single scene. This scene includes two major parts: the GUI and the audio.
We will focus on the audio part. In this demo, a bus named Record with the
effect Record is created to handle the audio recording.
An AudioStreamPlayer named AudioStreamRecord is used for recording.
var effect
var recording
func _ready():
# We get the index of the "Record" bus.
var idx = AudioServer.get_bus_index("Record")
# And use it to retrieve its first effect, which has been defined
# as an "AudioEffectRecord" resource.
effect = AudioServer.get_bus_effect(idx, 0)
The audio recording is handled by the AudioEffectRecord resource which has three methods: get_recording(), is_recording_active(), and set_recording_active().
func _on_RecordButton_pressed():
if effect.is_recording_active():
recording = effect.get_recording()
$PlayButton.disabled = false
$SaveButton.disabled = false
effect.set_recording_active(false)
$RecordButton.text = "Record"
$Status.text = ""
else:
$PlayButton.disabled = true
$SaveButton.disabled = true
effect.set_recording_active(true)
$RecordButton.text = "Stop"
$Status.text = "Recording..."
At the start of the demo, the recording effect is not active. When the user
presses the RecordButton, the effect is enabled with
set_recording_active(true).
On the next button press, as effect.is_recording_active() is true,
the recorded stream can be stored into the recording variable by calling
effect.get_recording().
func _on_PlayButton_pressed():
print(recording)
print(recording.format)
print(recording.mix_rate)
print(recording.stereo)
var data = recording.get_data()
print(data)
print(data.size())
$AudioStreamPlayer.stream = recording
$AudioStreamPlayer.play()
To playback the recording, you assign the recording as the stream of the
AudioStreamPlayer and call play().
func _on_SaveButton_pressed():
var save_path = $SaveButton/Filename.text
recording.save_to_wav(save_path)
$Status.text = "Saved WAV file to: %s\n(%s)" % [save_path, ProjectSettings.globalize_path(save_path)]
To save the recording, you call save_to_wav() with the path to a file.
In this demo, the path is defined by the user via a LineEdit input box.
Physics¶
Physics introduction¶
In game development, you often need to know when two objects in the game intersect or come into contact. This is known as collision detection. When a collision is detected, you typically want something to happen. This is known as collision response.
Godot offers a number of collision objects in 2D and 3D to provide both collision detection and response. Trying to decide which one to use for your project can be confusing. You can avoid problems and simplify development if you understand how each works and what their pros and cons are.
In this guide, you will learn:
- Godot’s four collision object types
- How each collision object works
- When and why to choose one type over another
Note
This document’s examples will use 2D objects. Every 2D physics object and collision shape has a direct equivalent in 3D and in most cases they work in much the same way.
Collision objects¶
Godot offers four kinds of physics bodies, extending CollisionObject2D:
- Area2D
Area2Dnodes provide detection and influence. They can detect when objects overlap and can emit signals when bodies enter or exit. AnArea2Dcan also be used to override physics properties, such as gravity or damping, in a defined area.
The other three bodies extend PhysicsBody2D:
- StaticBody2D
- A static body is one that is not moved by the physics engine. It participates in collision detection, but does not move in response to the collision. They are most often used for objects that are part of the environment or that do not need to have any dynamic behavior.
- RigidBody2D
- This is the node that implements simulated 2D physics. You do not control a
RigidBody2Ddirectly, but instead you apply forces to it (gravity, impulses, etc.) and the physics engine calculates the resulting movement. Read more about using rigid bodies.
- KinematicBody2D
- A body that provides collision detection, but no physics. All movement and collision response must be implemented in code.
Collision shapes¶
A physics body can hold any number of Shape2D objects as children. These shapes are used to define the object’s collision bounds and to detect contact with other objects.
Note
In order to detect collisions, at least one Shape2D must be
assigned to the object.
The most common way to assign a shape is by adding a CollisionShape2D or CollisionPolygon2D as a child of the object. These nodes allow you to draw the shape directly in the editor workspace.
Important
Be careful to never scale your collision shapes in the editor.
The “Scale” property in the Inspector should remain (1, 1). When changing
the size of the collision shape, you should always use the size handles, not
the Node2D scale handles. Scaling a shape can result in unexpected
collision behavior.
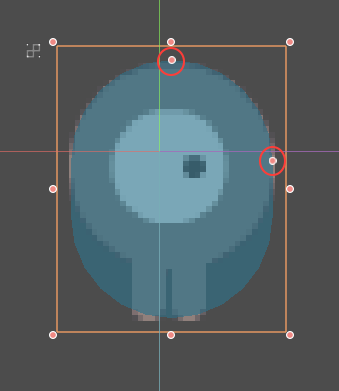
Physics process callback¶
The physics engine may spawn multiple threads to improve performance, so
it can use up to a full frame to process physics. Because of this, the value
of a body’s state variables such as position or linear velocity
may not be accurate for the current frame.
In order to avoid this inaccuracy, any code that needs to access a body’s properties should be run in the Node._physics_process() callback, which is called before each physics step at a constant frame rate (60 times per second by default).
Collision layers and masks¶
One of the most powerful, but frequently misunderstood, collision features
is the collision layer system. This system allows you to build up complex
interactions between a variety of objects. The key concepts are layers
and masks. Each CollisionObject2D has 20 different physics layers
it can interact with.
Let’s look at each of the properties in turn:
- collision_layer
- This describes the layers that the object appears in. By default, all
bodies are on layer
1.
- collision_mask
- This describes what layers the body will scan for collisions. If an
object isn’t in one of the mask layers, the body will ignore it. By default,
all bodies scan layer
1.
These properties can be configured via code, or by editing them in the Inspector.
Keeping track of what you’re using each layer for can be difficult, so you may find it useful to assign names to the layers you’re using. Names can be assigned in Project Settings -> Layer Names.
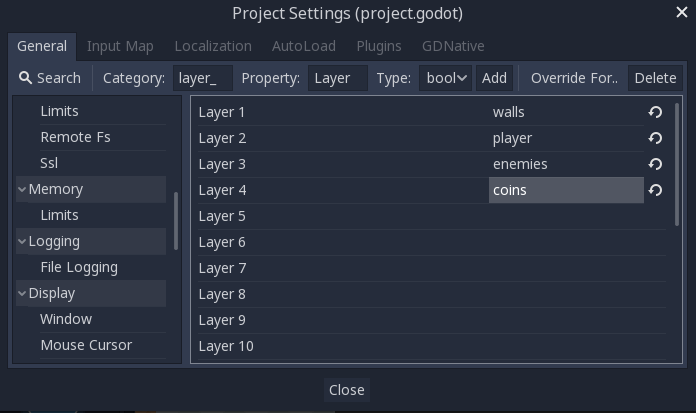
Example:
You have four node types in your game: Walls, Player, Enemy, and Coin. Both Player and Enemy should collide with Walls. The Player node should detect collisions with both Enemy and Coin, but Enemy and Coin should ignore each other.
Start by naming layers 1-4 “walls”, “player”, “enemies”, and “coins” and place each node type in its respective layer using the “Layer” property. Then set each node’s “Mask” property by selecting the layers it should interact with. For example, the Player’s settings would look like this:


Area2D¶
Area nodes provide detection and influence. They can detect when objects overlap and emit signals when bodies enter or exit. Areas can also be used to override physics properties, such as gravity or damping, in a defined area.
There are three main uses for Area2D:
- Overriding physics parameters (such as gravity) in a given region.
- Detecting when other bodies enter or exit a region or what bodies are currently in a region.
- Checking other areas for overlap.
By default, areas also receive mouse and touchscreen input.
StaticBody2D¶
A static body is one that is not moved by the physics engine. It participates
in collision detection, but does not move in response to the collision. However,
it can impart motion or rotation to a colliding body as if it were moving,
using its constant_linear_velocity and constant_angular_velocity properties.
StaticBody2D nodes are most often used for objects that are part of the environment
or that do not need to have any dynamic behavior.
Example uses for StaticBody2D:
- Platforms (including moving platforms)
- Conveyor belts
- Walls and other obstacles
RigidBody2D¶
This is the node that implements simulated 2D physics. You do not control a RigidBody2D directly. Instead, you apply forces to it and the physics engine calculates the resulting movement, including collisions with other bodies, and collision responses, such as bouncing, rotating, etc.
You can modify a rigid body’s behavior via properties such as “Mass”, “Friction”, or “Bounce”, which can be set in the Inspector.
The body’s behavior is also affected by the world’s properties, as set in Project Settings -> Physics, or by entering an Area2D that is overriding the global physics properties.
When a rigid body is at rest and hasn’t moved for a while, it goes to sleep. A sleeping body acts like a static body, and its forces are not calculated by the physics engine. The body will wake up when forces are applied, either by a collision or via code.
Rigid body modes¶
A rigid body can be set to one of four modes:
- Rigid - The body behaves as a physical object. It collides with other bodies and responds to forces applied to it. This is the default mode.
- Static - The body behaves like a StaticBody2D and does not move.
- Character - Similar to “Rigid” mode, but the body cannot rotate.
- Kinematic - The body behaves like a KinematicBody2D and must be moved by code.
Using RigidBody2D¶
One of the benefits of using a rigid body is that a lot of behavior can be had “for free” without writing any code. For example, if you were making an “Angry Birds”-style game with falling blocks, you would only need to create RigidBody2Ds and adjust their properties. Stacking, falling, and bouncing would automatically be calculated by the physics engine.
However, if you do wish to have some control over the body, you should take
care - altering the position, linear_velocity, or other physics properties
of a rigid body can result in unexpected behavior. If you need to alter any
of the physics-related properties, you should use the _integrate_forces()
callback instead of _physics_process(). In this callback, you have access
to the body’s Physics2DDirectBodyState,
which allows for safely changing properties and synchronizing them with
the physics engine.
For example, here is the code for an “Asteroids” style spaceship:
extends RigidBody2D
var thrust = Vector2(0, 250)
var torque = 20000
func _integrate_forces(state):
if Input.is_action_pressed("ui_up"):
applied_force = thrust.rotated(rotation)
else:
applied_force = Vector2()
var rotation_dir = 0
if Input.is_action_pressed("ui_right"):
rotation_dir += 1
if Input.is_action_pressed("ui_left"):
rotation_dir -= 1
applied_torque = rotation_dir * torque
class Spaceship : RigidBody2D
{
private Vector2 thrust = new Vector2(0, 250);
private float torque = 20000;
public override void _IntegrateForces(Physics2DDirectBodyState state)
{
if (Input.IsActionPressed("ui_up"))
SetAppliedForce(thrust.Rotated(Rotation));
else
SetAppliedForce(new Vector2());
var rotationDir = 0;
if (Input.IsActionPressed("ui_right"))
rotationDir += 1;
if (Input.IsActionPressed("ui_left"))
rotationDir -= 1;
SetAppliedTorque(rotationDir * torque);
}
}
Note that we are not setting the linear_velocity or angular_velocity
properties directly, but rather applying forces (thrust and torque) to
the body and letting the physics engine calculate the resulting movement.
Note
When a rigid body goes to sleep, the _integrate_forces()
function will not be called. To override this behavior, you will
need to keep the body awake by creating a collision, applying a
force to it, or by disabling the can_sleep
property. Be aware that this can have a negative effect on performance.
Contact reporting¶
By default, rigid bodies do not keep track of contacts, because this can require a huge amount of memory if many bodies are in the scene. To enable contact reporting, set the contacts_reported property to a non-zero value. The contacts can then be obtained via Physics2DDirectBodyState.get_contact_count() and related functions.
Contact monitoring via signals can be enabled via the contact_monitor property. See RigidBody2D for the list of available signals.
KinematicBody2D¶
KinematicBody2D bodies detect collisions with other bodies, but are not affected by physics properties like gravity or friction. Instead, they must be controlled by the user via code. The physics engine will not move a kinematic body.
When moving a kinematic body, you should not set its position directly.
Instead, you use the move_and_collide() or move_and_slide() methods.
These methods move the body along a given vector, and it will instantly stop
if a collision is detected with another body. After the body has collided,
any collision response must be coded manually.
Kinematic collision response¶
After a collision, you may want the body to bounce, to slide along a wall, or to alter the properties of the object it hit. The way you handle collision response depends on which method you used to move the KinematicBody2D.
move_and_collide¶
When using move_and_collide(), the function returns a
KinematicCollision2D object, which contains
information about the collision and the colliding body. You can use this
information to determine the response.
For example, if you want to find the point in space where the collision occurred:
extends KinematicBody2D
var velocity = Vector2(250, 250)
func _physics_process(delta):
var collision_info = move_and_collide(velocity * delta)
if collision_info:
var collision_point = collision_info.position
class Body : KinematicBody2D
{
private Vector2 velocity = new Vector2(250, 250);
public override void _PhysicsProcess(float delta)
{
var collisionInfo = MoveAndCollide(velocity * delta);
if (collisionInfo != null)
{
var collisionPoint = collisionInfo.GetPosition();
}
}
}
Or to bounce off of the colliding object:
extends KinematicBody2D
var velocity = Vector2(250, 250)
func _physics_process(delta):
var collision_info = move_and_collide(velocity * delta)
if collision_info:
velocity = velocity.bounce(collision_info.normal)
class Body : KinematicBody2D
{
private Vector2 velocity = new Vector2(250, 250);
public override void _PhysicsProcess(float delta)
{
var collisionInfo = MoveAndCollide(velocity * delta);
if (collisionInfo != null)
velocity = velocity.Bounce(collisionInfo.Normal);
}
}
move_and_slide¶
Sliding is a common collision response; imagine a player moving along walls
in a top-down game or running up and down slopes in a platformer. While it’s
possible to code this response yourself after using move_and_collide(),
move_and_slide() provides a convenient way to implement sliding movement
without writing much code.
Warning
move_and_slide() automatically includes the timestep in its
calculation, so you should not multiply the velocity vector
by delta.
For example, use the following code to make a character that can walk along the ground (including slopes) and jump when standing on the ground:
extends KinematicBody2D
var run_speed = 350
var jump_speed = -1000
var gravity = 2500
var velocity = Vector2()
func get_input():
velocity.x = 0
var right = Input.is_action_pressed('ui_right')
var left = Input.is_action_pressed('ui_left')
var jump = Input.is_action_just_pressed('ui_select')
if is_on_floor() and jump:
velocity.y = jump_speed
if right:
velocity.x += run_speed
if left:
velocity.x -= run_speed
func _physics_process(delta):
velocity.y += gravity * delta
get_input()
velocity = move_and_slide(velocity, Vector2(0, -1))
class Body : KinematicBody2D
{
private float runSpeed = 350;
private float jumpSpeed = -1000;
private float gravity = 2500;
private Vector2 velocity = new Vector2();
private void getInput()
{
velocity.x = 0;
var right = Input.IsActionPressed("ui_right");
var left = Input.IsActionPressed("ui_left");
var jump = Input.IsActionPressed("ui_select");
if (IsOnFloor() && jump)
velocity.y = jumpSpeed;
if (right)
velocity.x += runSpeed;
if (left)
velocity.x -= runSpeed;
}
public override void _PhysicsProcess(float delta)
{
velocity.y += gravity * delta;
}
}
See Kinematic character (2D) for more details on using move_and_slide(),
including a demo project with detailed code.
RigidBody¶
What is a rigid body?¶
A rigid body is one that is directly controlled by the physics engine in order to simulate the behavior of physical objects. In order to define the shape of the body, it must have one or more Shape objects assigned. Note that setting the position of these shapes will affect the body’s center of mass.
How to control a rigid body¶
A rigid body’s behavior can be altered by setting its properties, such as friction, mass, bounce, etc. These properties can be set in the Inspector or via code. See RigidBody for the full list of properties and their effects.
There are several ways to control a rigid body’s movement, depending on your desired application.
If you only need to place a rigid body once, for example to set its initial location, you can use the methods provided by the Spatial node, such as set_global_transform() or look_at(). However, these methods cannot be called every frame or the physics engine will not be able to correctly simulate the body’s state.
As an example, consider a rigid body that you want to rotate so that it points towards another object. A common mistake when implementing this kind of behavior is to use look_at() every frame, which breaks the physics simulation. Below, we’ll demonstrate how to implement this correctly.
The fact that you can’t use set_global_transform() or look_at() methods doesn’t mean that you can’t have full control of a rigid body. Instead, you can control it by using the _integrate_forces() callback. In this method, you can add forces, apply impulses, or set the velocity in order to achieve any movement you desire.
The “look at” method¶
As described above, using the Spatial node’s look_at() method can’t be used each frame to follow a target.
Here is a custom look_at() method that will work reliably with rigid bodies:
extends RigidBody
func look_follow(state, current_transform, target_position):
var up_dir = Vector3(0, 1, 0)
var cur_dir = current_transform.basis.xform(Vector3(0, 0, 1))
var target_dir = (target_position - current_transform.origin).normalized()
var rotation_angle = acos(cur_dir.x) - acos(target_dir.x)
state.set_angular_velocity(up_dir * (rotation_angle / state.get_step()))
func _integrate_forces(state):
var target_position = $my_target_spatial_node.get_global_transform().origin
look_follow(state, get_global_transform(), target_position)
class Body : RigidBody
{
private void LookFollow(PhysicsDirectBodyState state, Transform currentTransform, Vector3 targetPosition)
{
var upDir = new Vector3(0, 1, 0);
var curDir = currentTransform.basis.Xform(new Vector3(0, 0, 1));
var targetDir = (targetPosition - currentTransform.origin).Normalized();
var rotationAngle = Mathf.Acos(curDir.x) - Mathf.Acos(targetDir.x);
state.SetAngularVelocity(upDir * (rotationAngle / state.GetStep()));
}
public override void _IntegrateForces(PhysicsDirectBodyState state)
{
var targetPosition = GetNode<Spatial>("my_target_spatial_node").GetGlobalTransform().origin;
LookFollow(state, GetGlobalTransform(), targetPosition);
}
}
This method uses the rigid body’s set_angular_velocity() method to rotate the body. It first calculates the difference between the current and desired angle and then adds the velocity needed to rotate by that amount in one frame’s time.
Note
This script will not work with rigid bodies in character mode because then, the body’s rotation is locked. In that case, you would have to rotate the attached mesh node instead using the standard Spatial methods.
Using Area2D¶
Introduction¶
Godot offers a number of collision objects to provide both collision detection and response. Trying to decide which one to use for your project can be confusing. You can avoid problems and simplify development if you understand how each of them works and what their pros and cons are. In this tutorial, we’ll look at the Area2D node and show some examples of how it can be used.
Note
This document assumes you’re familiar with Godot’s various physics bodies. Please read Physics introduction first.
What is an area?¶
An Area2D defines a region of 2D space. In this space you can detect other CollisionObject2D nodes overlapping, entering, and exiting. Areas also allow for overriding local physics properties. We’ll explore each of these functions below.
Area properties¶
Areas have many properties you can use to customize their behavior.
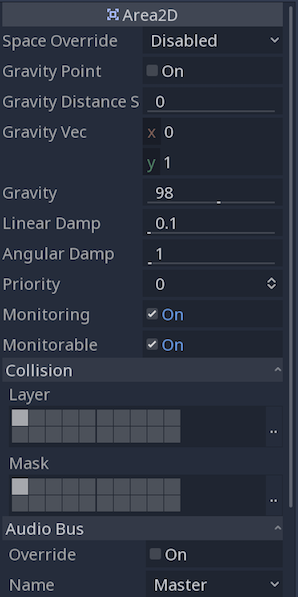
The first eight properties are used to configure the area’s physics override behavior. We’ll look at how to use those in the section below.
Monitoring and Monitorable are used to enable and disable the area.
The “Collision” section is where you configure the area’s collision layer(s) and mask(s).
The “Audio Bus” section allows you to override audio in the area, for example to apply an audio effect when the player moves through.
Note that Area2D extends CollisionObject2D, so it
also provides properties inherited from that class, such as input_pickable.
Overlap detection¶
Perhaps the most common use of Area2D nodes is for contact and overlap detection. When you need to know that two objects have touched, but don’t need physical collision, you can use an area to notify you of the contact.
For example, let’s say we’re making a coin for the player to pick up. The coin is not a solid object - the player can’t stand on it or push it - we just want it to disappear when the player touches it.
Here’s the node setup for the coin:
To detect the overlap, we’ll connect the appropriate signal on the Area2d. Which
signal to use depends on the player’s node type. If the player is another area,
use area_entered. However, let’s assume our player is a KinematicBody2D
(and therefore a CollisionObject2D type), so we’ll connect the
body_entered signal.
Note
If you’re not familiar with using signals, see Signals for an introduction.
extends Area2D
func _on_Coin_body_entered(body):
queue_free()
public class Coin : Area2D
{
public void OnCoinBodyEntered(PhysicsBody2D body)
{
QueueFree();
}
}
Now our player can collect the coins!
Some other usage examples:
- Areas are great for bullets and other projectiles that hit and deal damage, but don’t need any other physics such as bouncing.
- Use a large circular area around an enemy to define its “detect” radius. When the player is outside the area, the enemy can’t “see” it.
- “Security cameras” - In a large level with multiple cameras, attach areas to each camera and activate them when the player enters.
See the Your first game for an example of using Area2D in a game.
Area influence¶
The second major use for area nodes is to alter physics. By default, the area won’t do this, but you can enable this with the Space Override property. When areas overlap, they are processed in Priority order (higher priority areas are processed first). There are four options for override:
- Combine - The area adds its values to what has been calculated so far.
- Replace - The area replaces physics properties, and lower priority areas are ignored.
- Combine-Replace - The area adds its gravity/damping values to whatever has been calculated so far (in priority order), ignoring any lower priority areas.
- Replace-Combine - The area replaces any gravity/damping calculated so far, but keeps calculating the rest of the areas.
Using these properties, you can create very complex behavior with multiple overlapping areas.
The physics properties that can be overridden are:
- Gravity - Gravity’s strength inside the area.
- Gravity Vec - Gravity’s direction. This vector does not need to be normalized.
- Linear Damp - How quickly objects stop moving - linear velocity lost per second.
- Angular Damp - How quickly objects stop spinning - angular velocity lost per second.
Point gravity¶
The Gravity Point property allows you to create an “attractor”. Gravity in the
area will be calculated towards a point, given by the Gravity Vec property.
Values are relative to the Area2D, so for example using (0, 0) will attract
objects to the center of the area.
Examples¶
The example project attached below has three areas demonstrating physics override.
You can download this project here:
using_area_2d.zip
Using KinematicBody2D¶
Introduction¶
Godot offers several collision objects to provide both collision detection and response. Trying to decide which one to use for your project can be confusing. You can avoid problems and simplify development if you understand how each of them works and what their pros and cons are. In this tutorial, we’ll look at the KinematicBody2D node and show some examples of how to use it.
Note
This document assumes you’re familiar with Godot’s various physics bodies. Please read Physics introduction first.
What is a kinematic body?¶
KinematicBody2D is for implementing bodies that are controlled via code.
Kinematic bodies detect collisions with other bodies when moving, but are not affected by
engine physics properties, like gravity or friction. While this means that you
have to write some code to create their behavior, it also means you have more
precise control over how they move and react.
Tip
A KinematicBody2D can be affected by gravity and other forces, but you must calculate the movement in code. The physics engine will not move a KinematicBody2D.
Movement and collision¶
When moving a KinematicBody2D, you should not set its position property
directly. Instead, you use the move_and_collide() or move_and_slide() methods.
These methods move the body along a given vector and instantly stop if
a collision is detected with another body. After a KinematicBody2D has collided,
any collision response must be coded manually.
Warning
You should only do Kinematic body movement in the _physics_process() callback.
The two movement methods serve different purposes, and later in this tutorial, you’ll see examples of how they work.
move_and_collide¶
This method takes one parameter: a Vector2 indicating the body’s
relative movement. Typically, this is your velocity vector multiplied by the
frame timestep (delta). If the engine detects a collision anywhere along
this vector, the body will immediately stop moving. If this happens, the
method will return a KinematicCollision2D object.
KinematicCollision2D is an object containing data about the collision
and the colliding object. Using this data, you can calculate your collision
response.
move_and_slide¶
The move_and_slide() method is intended to simplify the collision
response in the common case where you want one body to slide along the other.
It is especially useful in platformers or top-down games, for example.
Tip
move_and_slide() automatically calculates frame-based movement
using delta. Do not multiply your velocity vector by delta
before passing it to move_and_slide().
In addition to the velocity vector, move_and_slide() takes a number of
other parameters allowing you to customize the slide behavior:
floor_normal- default value:Vector2( 0, 0 )This parameter allows you to define what surfaces the engine should consider being the floor. Setting this lets you use the
is_on_floor(),is_on_wall(), andis_on_ceiling()methods to detect what type of surface the body is in contact with. The default value means that all surfaces are considered walls.slope_stop_min_velocity- default value:5This parameter is the minimum velocity required to move when standing on a slope. It prevents a body from sliding down when standing still.
max_bounces- default value:4This parameter is the maximum number of collisions before the body stops moving. Setting it too low may prevent movement entirely.
floor_max_angle- default value:0.785398(in radians, equivalent to45degrees)This parameter is the maximum angle before a surface is no longer considered a “floor.”
move_and_slide_with_snap¶
This method adds some additional functionality to move_and_slide() by adding
the snap parameter. As long as this vector is in contact with the ground, the
body will remain attached to the surface. Note that this means you must disable
snapping when jumping, for example. You can do this either by setting snap
to Vector2(0, 0) or by using move_and_slide() instead.
Which movement method to use?¶
A common question from new Godot users is: “How do you decide which movement
function to use?” Often, the response is to use move_and_slide() because
it’s “simpler,” but this is not necessarily the case. One way to think of it
is that move_and_slide() is a special case, and move_and_collide()
is more general. For example, the following two code snippets result in
the same collision response:
# using move_and_collide
var collision = move_and_collide(velocity * delta)
if collision:
velocity = velocity.slide(collision.normal)
# using move_and_slide
velocity = move_and_slide(velocity)
// using MoveAndCollide
var collision = MoveAndCollide(velocity * delta);
if (collision != null)
{
velocity = velocity.Slide(collision.Normal);
}
// using MoveAndSlide
velocity = MoveAndSlide(velocity);
Anything you do with move_and_slide() can also be done with move_and_collide(),
but it might take a little more code. However, as we’ll see in the examples below,
there are cases where move_and_slide() doesn’t provide the response you want.
In the example above, we assign the velocity that move_and_slide() returns
back into the velocity variable. This is because when the character collides
with the environment, the function recalculates the speed internally to reflect
the slowdown.
For example, if your character fell on the floor, you don’t want it to accumulate vertical speed due to the effect of gravity. Instead, you want its vertical speed to reset to zero.
move_and_slide() may also recalculate the kinematic body’s velocity several
times in a loop as, to produce a smooth motion, it moves the character and
collides up to five times by default. At the end of the process, the function
returns the character’s new velocity that we can store in our velocity
variable, and use on the next frame.
Examples¶
To see these examples in action, download the sample project:
using_kinematic2d.zip.
Movement and walls¶
If you’ve downloaded the sample project, this example is in “BasicMovement.tscn”.
For this example, add a KinematicBody2D with two children: a Sprite and a
CollisionShape2D. Use the Godot “icon.png” as the Sprite’s texture (drag it
from the Filesystem dock to the Texture property of the Sprite). In the
CollisionShape2D’s Shape property, select “New RectangleShape2D” and
size the rectangle to fit over the sprite image.
Note
See 2D movement overview for examples of implementing 2D movement schemes.
Attach a script to the KinematicBody2D and add the following code:
extends KinematicBody2D
var speed = 250
var velocity = Vector2()
func get_input():
# Detect up/down/left/right keystate and only move when pressed.
velocity = Vector2()
if Input.is_action_pressed('ui_right'):
velocity.x += 1
if Input.is_action_pressed('ui_left'):
velocity.x -= 1
if Input.is_action_pressed('ui_down'):
velocity.y += 1
if Input.is_action_pressed('ui_up'):
velocity.y -= 1
velocity = velocity.normalized() * speed
func _physics_process(delta):
get_input()
move_and_collide(velocity * delta)
using Godot;
using System;
public class KBExample : KinematicBody2D
{
public int Speed = 250;
private Vector2 _velocity = new Vector2();
public void GetInput()
{
// Detect up/down/left/right keystate and only move when pressed
_velocity = new Vector2();
if (Input.IsActionPressed("ui_right"))
_velocity.x += 1;
if (Input.IsActionPressed("ui_left"))
_velocity.x -= 1;
if (Input.IsActionPressed("ui_down"))
_velocity.y += 1;
if (Input.IsActionPressed("ui_up"))
_velocity.y -= 1;
}
public override void _PhysicsProcess(float delta)
{
GetInput();
MoveAndCollide(velocity * delta);
}
}
Run this scene and you’ll see that move_and_collide() works as expected, moving
the body along the velocity vector. Now let’s see what happens when you add
some obstacles. Add a StaticBody2D with a
rectangular collision shape. For visibility, you can use a sprite, a
Polygon2D, or turn on “Visible Collision Shapes” from the “Debug” menu.
Run the scene again and try moving into the obstacle. You’ll see that the KinematicBody2D
can’t penetrate the obstacle. However, try moving into the obstacle at an angle and
you’ll find that the obstacle acts like glue - it feels like the body gets stuck.
This happens because there is no collision response. move_and_collide() stops
the body’s movement when a collision occurs. We need to code whatever response we
want from the collision.
Try changing the function to move_and_slide(velocity) and running again.
Note that we removed delta from the velocity calculation.
move_and_slide() provides a default collision response of sliding the body along the
collision object. This is useful for a great many game types, and may be all you need
to get the behavior you want.
Bouncing/reflecting¶
What if you don’t want a sliding collision response? For this example (“BounceandCollide.tscn” in the sample project), we have a character shooting bullets and we want the bullets to bounce off the walls.
This example uses three scenes. The main scene contains the Player and Walls. The Bullet and Wall are separate scenes so that they can be instanced.
The Player is controlled by the w and s keys for forward and back. Aiming
uses the mouse pointer. Here is the code for the Player, using move_and_slide():
extends KinematicBody2D
var Bullet = preload("res://Bullet.tscn")
var speed = 200
var velocity = Vector2()
func get_input():
# Add these actions in Project Settings -> Input Map.
velocity = Vector2()
if Input.is_action_pressed('backward'):
velocity = Vector2(-speed/3, 0).rotated(rotation)
if Input.is_action_pressed('forward'):
velocity = Vector2(speed, 0).rotated(rotation)
if Input.is_action_just_pressed('mouse_click'):
shoot()
func shoot():
# "Muzzle" is a Position2D placed at the barrel of the gun.
var b = Bullet.instance()
b.start($Muzzle.global_position, rotation)
get_parent().add_child(b)
func _physics_process(delta):
get_input()
var dir = get_global_mouse_position() - global_position
# Don't move if too close to the mouse pointer.
if dir.length() > 5:
rotation = dir.angle()
velocity = move_and_slide(velocity)
using Godot;
using System;
public class KBExample : KinematicBody2D
{
private PackedScene _bullet = (PackedScene)GD.Load("res://Bullet.tscn");
public int Speed = 200;
private Vector2 _velocity = new Vector2();
public void GetInput()
{
// add these actions in Project Settings -> Input Map
_velocity = new Vector2();
if (Input.IsActionPressed("backward"))
{
_velocity = new Vector2(-speed/3, 0).Rotated(Rotation);
}
if (Input.IsActionPressed("forward"))
{
_velocity = new Vector2(speed, 0).Rotated(Rotation);
}
if (Input.IsActionPressed("mouse_click"))
{
Shoot();
}
}
public void Shoot()
{
// "Muzzle" is a Position2D placed at the barrel of the gun
var b = (Bullet)_bullet.Instance();
b.Start(GetNode<Node2D>("Muzzle").GlobalPosition, Rotation);
GetParent().AddChild(b);
}
public override void _PhysicsProcess(float delta)
{
GetInput();
var dir = GetGlobalMousePosition() - GlobalPosition;
// Don't move if too close to the mouse pointer
if (dir.Length() > 5)
{
Rotation = dir.Angle();
_velocity = MoveAndSlide(_velocity);
}
}
}
And the code for the Bullet:
extends KinematicBody2D
var speed = 750
var velocity = Vector2()
func start(pos, dir):
rotation = dir
position = pos
velocity = Vector2(speed, 0).rotated(rotation)
func _physics_process(delta):
var collision = move_and_collide(velocity * delta)
if collision:
velocity = velocity.bounce(collision.normal)
if collision.collider.has_method("hit"):
collision.collider.hit()
func _on_VisibilityNotifier2D_screen_exited():
queue_free()
using Godot;
using System;
public class Bullet : KinematicBody2D
{
public int Speed = 750;
private Vector2 _velocity = new Vector2();
public void Start(Vector2 pos, float dir)
{
Rotation = dir;
Position = pos;
_velocity = new Vector2(speed, 0).Rotated(Rotation);
}
public override void _PhysicsProcess(float delta)
{
var collision = MoveAndCollide(_velocity * delta);
if (collision != null)
{
_velocity = _velocity.Bounce(collision.Normal);
if (collision.Collider.HasMethod("Hit"))
{
collision.Collider.Call("Hit");
}
}
}
public void OnVisibilityNotifier2DScreenExited()
{
QueueFree();
}
}
The action happens in _physics_process(). After using move_and_collide(), if a
collision occurs, a KinematicCollision2D object is returned (otherwise, the return
is Nil).
If there is a returned collision, we use the normal of the collision to reflect
the bullet’s velocity with the Vector2.bounce() method.
If the colliding object (collider) has a hit method,
we also call it. In the example project, we’ve added a flashing color effect to
the Wall to demonstrate this.
Platformer movement¶
Let’s try one more popular example: the 2D platformer. move_and_slide()
is ideal for quickly getting a functional character controller up and running.
If you’ve downloaded the sample project, you can find this in “Platformer.tscn”.
For this example, we’ll assume you have a level made of StaticBody2D objects.
They can be any shape and size. In the sample project, we’re using
Polygon2D to create the platform shapes.
Here’s the code for the player body:
extends KinematicBody2D
export (int) var run_speed = 100
export (int) var jump_speed = -400
export (int) var gravity = 1200
var velocity = Vector2()
var jumping = false
func get_input():
velocity.x = 0
var right = Input.is_action_pressed('ui_right')
var left = Input.is_action_pressed('ui_left')
var jump = Input.is_action_just_pressed('ui_select')
if jump and is_on_floor():
jumping = true
velocity.y = jump_speed
if right:
velocity.x += run_speed
if left:
velocity.x -= run_speed
func _physics_process(delta):
get_input()
velocity.y += gravity * delta
if jumping and is_on_floor():
jumping = false
velocity = move_and_slide(velocity, Vector2(0, -1))
using Godot;
using System;
public class KBExample : KinematicBody2D
{
[Export] public int RunSpeed = 100;
[Export] public int JumpSpeed = -400;
[Export] public int Gravity = 1200;
Vector2 velocity = new Vector2();
bool jumping = false;
public void GetInput()
{
velocity.x = 0;
bool right = Input.IsActionPressed("ui_right");
bool left = Input.IsActionPressed("ui_left");
bool jump = Input.IsActionPressed("ui_select");
if (jump && IsOnFloor())
{
jumping = true;
velocity.y = JumpSpeed;
}
if (right)
velocity.x += RunSpeed;
if (left)
velocity.x -= RunSpeed;
}
public override void _PhysicsProcess(float delta)
{
GetInput();
velocity.y += Gravity * delta;
if (jumping && IsOnFloor())
jumping = false;
velocity = MoveAndSlide(velocity, new Vector2(0, -1));
}
}
When using move_and_slide(), the function returns a vector representing the
movement that remained after the slide collision occurred. Setting that value back
to the character’s velocity allows us to move up and down slopes smoothly. Try
removing velocity = and see what happens if you don’t do this.
Also note that we’ve added Vector2(0, -1) as the floor normal. This vector points
straight upward. As a result, if the character collides with an object
that has this normal, it will be considered a floor.
Using the floor normal allows us to make jumping work, using is_on_floor().
This function will only return true after a move_and_slide() collision
where the colliding body’s normal is within 45 degrees of the given floor
vector. You can control the maximum angle by setting floor_max_angle.
This angle also allows you to implement other features like wall jumps using
is_on_wall(), for example.
Ray-casting¶
Introduction¶
One of the most common tasks in game development is casting a ray (or custom shaped object) and checking what it hits. This enables complex behaviors, AI, etc. to take place. This tutorial will explain how to do this in 2D and 3D.
Godot stores all the low level game information in servers, while the scene is just a frontend. As such, ray casting is generally a lower-level task. For simple raycasts, node such as RayCast and RayCast2D will work, as they will return every frame what the result of a raycast is.
Many times, though, ray-casting needs to be a more interactive process so a way to do this by code must exist.
Space¶
In the physics world, Godot stores all the low level collision and physics information in a space. The current 2d space (for 2D Physics) can be obtained by accessing CanvasItem.get_world_2d().space. For 3D, it’s Spatial.get_world().space.
The resulting space RID can be used in PhysicsServer and Physics2DServer respectively for 3D and 2D.
Accessing space¶
Godot physics runs by default in the same thread as game logic, but may be set to run on a separate thread to work more efficiently. Due to this, the only time accessing space is safe is during the Node._physics_process() callback. Accessing it from outside this function may result in an error due to space being locked.
To perform queries into physics space, the Physics2DDirectSpaceState and PhysicsDirectSpaceState must be used.
Use the following code in 2D:
func _physics_process(delta):
var space_rid = get_world_2d().space
var space_state = Physics2DServer.space_get_direct_state(space_rid)
public override void _PhysicsProcess(float delta)
{
var spaceRid = GetWorld2d().Space;
var spaceState = Physics2DServer.SpaceGetDirectState(spaceRid);
}
Or more directly:
func _physics_process(delta):
var space_state = get_world_2d().direct_space_state
public override void _PhysicsProcess(float delta)
{
var spaceState = GetWorld2d().DirectSpaceState;
}
And in 3D:
func _physics_process(delta):
var space_state = get_world().direct_space_state
public override void _PhysicsProcess(float delta)
{
var spaceState = GetWorld().DirectSpaceState;
}
Raycast query¶
For performing a 2D raycast query, the method Physics2DDirectSpaceState.intersect_ray() may be used. For example:
func _physics_process(delta):
var space_state = get_world_2d().direct_space_state
# use global coordinates, not local to node
var result = space_state.intersect_ray(Vector2(0, 0), Vector2(50, 100))
public override void _PhysicsProcess(float delta)
{
var spaceState = GetWorld2d().DirectSpaceState;
// use global coordinates, not local to node
var result = spaceState.IntersectRay(new Vector2(), new Vector2(50, 100));
}
The result is a dictionary. If the ray didn’t hit anything, the dictionary will be empty. If it did hit something, it will contain collision information:
if result:
print("Hit at point: ", result.position)
if (result.Count > 0)
GD.Print("Hit at point: ", result["position"]);
The result dictionary when a collision occurs contains the following
data:
{
position: Vector2 # point in world space for collision
normal: Vector2 # normal in world space for collision
collider: Object # Object collided or null (if unassociated)
collider_id: ObjectID # Object it collided against
rid: RID # RID it collided against
shape: int # shape index of collider
metadata: Variant() # metadata of collider
}
The data is similar in 3D space, using Vector3 coordinates.
Collision exceptions¶
A common use case for ray casting is to enable a character to gather data about the world around it. One problem with this is that the same character has a collider, so the ray will only detect its parent’s collider, as shown in the following image:
To avoid self-intersection, the intersect_ray() function can take an
optional third parameter which is an array of exceptions. This is an
example of how to use it from a KinematicBody2D or any other
collision object node:
extends KinematicBody2D
func _physics_process(delta):
var space_state = get_world_2d().direct_space_state
var result = space_state.intersect_ray(global_position, enemy_position, [self])
class Body : KinematicBody2D
{
public override void _PhysicsProcess(float delta)
{
var spaceState = GetWorld2d().DirectSpaceState;
var result = spaceState.IntersectRay(globalPosition, enemyPosition, new object[] { this });
}
}
The exceptions array can contain objects or RIDs.
Collision Mask¶
While the exceptions method works fine for excluding the parent body, it becomes very inconvenient if you need a large and/or dynamic list of exceptions. In this case, it is much more efficient to use the collision layer/mask system.
The optional fourth argument for intersect_ray() is a collision mask. For
example, to use the same mask as the parent body, use the collision_mask
member variable:
extends KinematicBody2D
func _physics_process(delta):
var space_state = get_world().direct_space_state
var result = space_state.intersect_ray(global_position, enemy_position,
[self], collision_mask)
class Body : KinematicBody2D
{
public override void _PhysicsProcess(float delta)
{
var spaceState = GetWorld2d().DirectSpaceState;
var result = spaceState.IntersectRay(globalPosition, enemyPosition,
new object[] { this }, CollisionMask);
}
}
3D ray casting from screen¶
Casting a ray from screen to 3D physics space is useful for object picking. There is not much need to do this because CollisionObject has an “input_event” signal that will let you know when it was clicked, but in case there is any desire to do it manually, here’s how.
To cast a ray from the screen, you need a Camera
node. A Camera can be in two projection modes: perspective and
orthogonal. Because of this, both the ray origin and direction must be
obtained. This is because origin changes in orthogonal mode, while
normal changes in perspective mode:
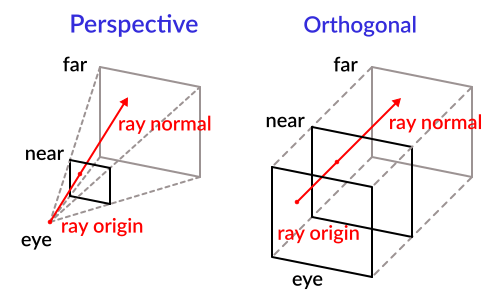
To obtain it using a camera, the following code can be used:
const ray_length = 1000
func _input(event):
if event is InputEventMouseButton and event.pressed and event.button_index == 1:
var camera = $Camera
var from = camera.project_ray_origin(event.position)
var to = from + camera.project_ray_normal(event.position) * ray_length
private const float rayLength = 1000;
public override void _Input(InputEvent @event)
{
if (@event is InputEventMouseButton eventMouseButton && eventMouseButton.Pressed && eventMouseButton.ButtonIndex == 1)
{
var camera = (Camera)GetNode("Camera");
var from = camera.ProjectRayOrigin(eventMouseButton.Position);
var to = from + camera.ProjectRayNormal(eventMouseButton.Position) * rayLength;
}
}
Remember that during _input(), the space may be locked, so in practice
this query should be run in _physics_process().
Ragdoll system¶
Introduction¶
Since version 3.1, Godot supports ragdoll physics. Ragdolls rely on physics simulation to create realistic procedural animation. They are used for death animations in many games.
In this tutorial, we will be using the Platformer3D demo to set up a ragdoll.
Note
You can download the Platformer3D demo on GitHub or using the Asset Library.
Setting up the ragdoll¶
Creating physical bones¶
Like many other features in the engine, there is a node to set up a ragdoll: the PhysicalBone node. To simplify the setup, you can generate PhysicalBone nodes with the “Create physical skeleton” feature in the skeleton node.
Open the platformer demo in Godot, and then the Robi scene. Select the Skeleton node. A skeleton button appears on the top bar menu:
Click it and select the Create physical skeleton option. Godot will generate PhysicalBone nodes and collision shapes for each bone in the skeleton and pin joints to connect them together:
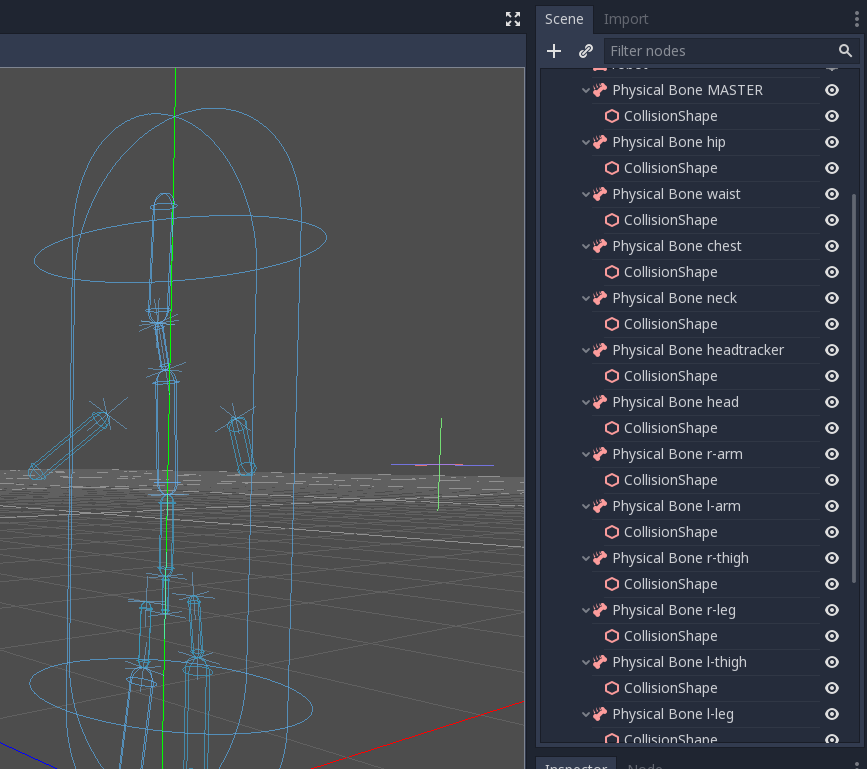
Some of the generated bones aren’t necessary: the MASTER bone for example. So we’re going to clean up the skeleton by removing them.
Cleaning up the skeleton¶
Each PhysicalBone the engine needs to simulate has a performance cost, so you want to remove every bone that is too small to make a difference in the simulation, as well as all utility bones.
For example, if we take a humanoid, you do not want to have physical bones for each finger. You can use a single bone for the entire hand instead, or one for the palm, one for the thumb, and a last one for the other four fingers.
Remove these physical bones: MASTER, waist, neck, headtracker. This gives us an optimized skeleton and makes it easier to control the ragdoll.
Collision shape adjustment¶
The next task is adjusting the collision shape and the size of physical bones to match the part of the body that each bone should simulate.
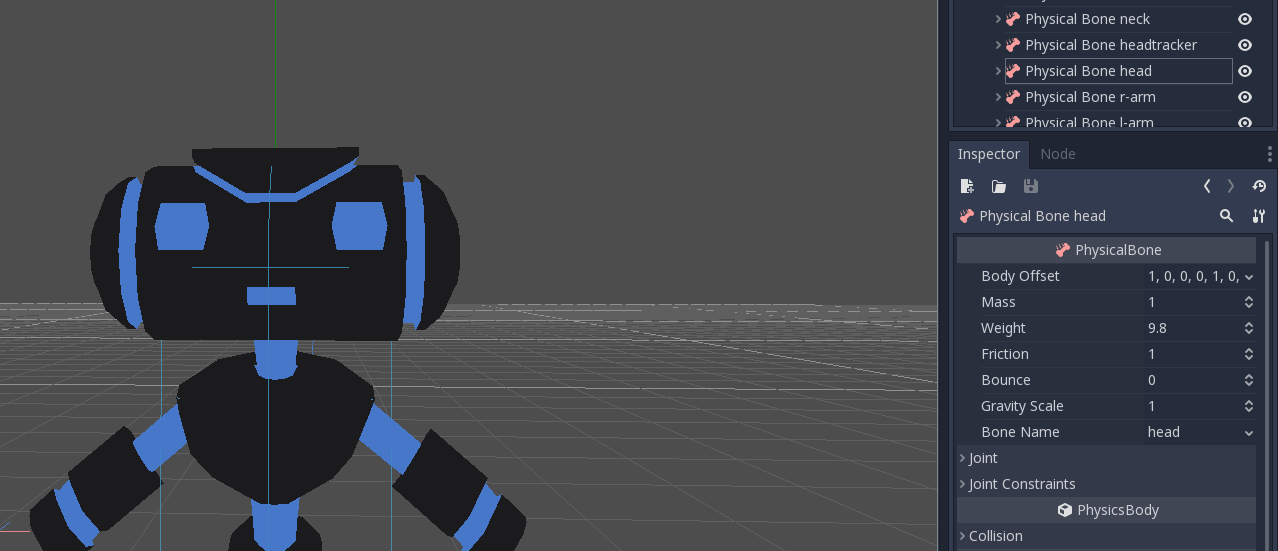
Joints adjustment¶
Once you adjusted the collision shapes, your ragdoll is almost ready. You just want to adjust the pin joints to get a better simulation. PhysicalBone nodes have an unconstrained pin joint assigned to them by default. To change the pin joint, select the PhysicalBone and change the constraint type in the Joint section. There, you can change the constraint’s orientation and its limits.
This is the final result:
Simulating the ragdoll¶
The ragdoll is now ready to use. To start the simulation and play the ragdoll animation, you need to call the physical_bones_start_simulation method. Attach a script to the skeleton node and call the method in the _ready method:
func _ready():
physical_bones_start_simulation()
To stop the simulation, call the physical_bones_stop_simulation() method.
You can also limit the simulation to only a few bones. To do so, pass the bone names as a parameter. Here’s an example of partial ragdoll simulation:
Collision layer and mask¶
Make sure to set up your collision layers and masks properly so the KinematicBody’s capsule doesn’t get in the way of the physics simulation:
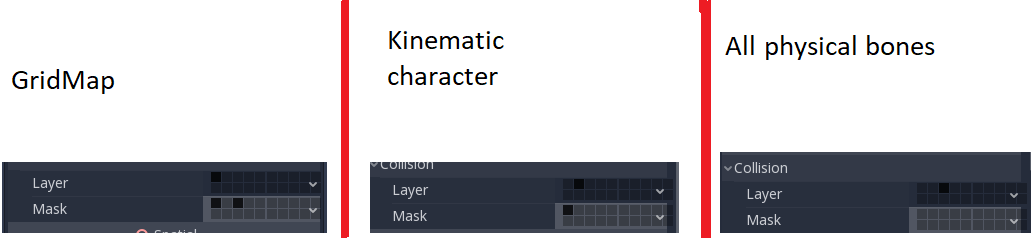
For more information, read Physics introduction
Kinematic character (2D)¶
Introduction¶
Yes, the name sounds strange. “Kinematic Character”. What is that? The reason for the name is that, when physics engines came out, they were called “Dynamics” engines (because they dealt mainly with collision responses). Many attempts were made to create a character controller using the dynamics engines, but it wasn’t as easy as it seemed. Godot has one of the best implementations of dynamic character controller you can find (as it can be seen in the 2d/platformer demo), but using it requires a considerable level of skill and understanding of physics engines (or a lot of patience with trial and error).
Some physics engines, such as Havok seem to swear by dynamic character controllers as the best option, while others (PhysX) would rather promote the kinematic one.
So, what is the difference?:
- A dynamic character controller uses a rigid body with an infinite inertia tensor. It’s a rigid body that can’t rotate. Physics engines always let objects move and collide, then solve their collisions all together. This makes dynamic character controllers able to interact with other physics objects seamlessly, as seen in the platformer demo. However, these interactions are not always predictable. Collisions can take more than one frame to be solved, so a few collisions may seem to displace a tiny bit. Those problems can be fixed, but require a certain amount of skill.
- A kinematic character controller is assumed to always begin in a non-colliding state, and will always move to a non-colliding state. If it starts in a colliding state, it will try to free itself like rigid bodies do, but this is the exception, not the rule. This makes their control and motion a lot more predictable and easier to program. However, as a downside, they can’t directly interact with other physics objects, unless done by hand in code.
This short tutorial will focus on the kinematic character controller. Basically, the old-school way of handling collisions (which is not necessarily simpler under the hood, but well hidden and presented as a nice and simple API).
Physics process¶
To manage the logic of a kinematic body or character, it is always advised to use physics process, because it’s called before physics step and its execution is in sync with physics server, also it is called the same amount of times per second, always. This makes physics and motion calculation work in a more predictable way than using regular process, which might have spikes or lose precision if the frame rate is too high or too low.
extends KinematicBody2D
func _physics_process(delta):
pass
using Godot;
using System;
public class PhysicsScript : KinematicBody2D
{
public override void _PhysicsProcess(float delta)
{
}
}
Scene setup¶
To have something to test, here’s the scene (from the tilemap tutorial):
kbscene.zip. We’ll be creating a new scene
for the character. Use the robot sprite and create a scene like this:

You’ll notice that there’s a warning icon next to our CollisionShape2D node; that’s because we haven’t defined a shape for it. Create a new CircleShape2D in the shape property of CollisionShape2D. Click on <CircleShape2D> to go to the options for it, and set the radius to 30:
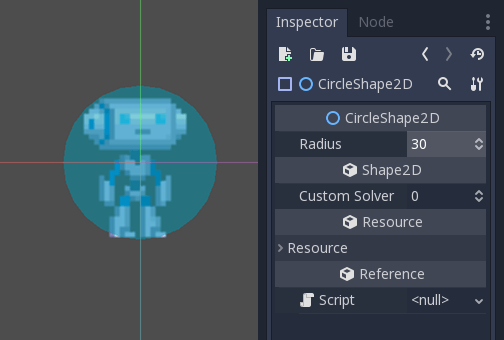
Note: As mentioned before in the physics tutorial, the physics engine can’t handle scale on most types of shapes (only collision polygons, planes and segments work), so always change the parameters (such as radius) of the shape instead of scaling it. The same is also true for the kinematic/rigid/static bodies themselves, as their scale affects the shape scale.
Now, create a script for the character, the one used as an example above should work as a base.
Finally, instance that character scene in the tilemap, and make the map scene the main one, so it runs when pressing play.
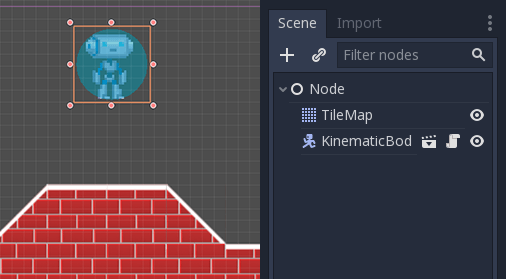
Moving the kinematic character¶
Go back to the character scene, and open the script, the magic begins now! Kinematic body will do nothing by default, but it has a useful function called KinematicBody2D.move_and_collide(). This function takes a Vector2 as an argument, and tries to apply that motion to the kinematic body. If a collision happens, it stops right at the moment of the collision.
So, let’s move our sprite downwards until it hits the floor:
extends KinematicBody2D
func _physics_process(delta):
move_and_collide(Vector2(0, 1)) # Move down 1 pixel per physics frame
using Godot;
using System;
public class PhysicsScript : KinematicBody2D
{
public override void _PhysicsProcess(float delta)
{
// Move down 1 pixel per physics frame
MoveAndCollide(new Vector2(0, 1));
}
}
The result is that the character will move, but stop right when hitting the floor. Pretty cool, huh?
The next step will be adding gravity to the mix, this way it behaves a little more like a regular game character:
extends KinematicBody2D
const GRAVITY = 200.0
var velocity = Vector2()
func _physics_process(delta):
velocity.y += delta * GRAVITY
var motion = velocity * delta
move_and_collide(motion)
using Godot;
using System;
public class PhysicsScript : KinematicBody2D
{
const float gravity = 200.0f;
Vector2 velocity;
public override void _PhysicsProcess(float delta)
{
velocity.y += delta * gravity;
var motion = velocity * delta;
MoveAndCollide(motion);
}
}
Now the character falls smoothly. Let’s make it walk to the sides, left and right when touching the directional keys. Remember that the values being used (for speed at least) are pixels/second.
This adds simple walking support by pressing left and right:
extends KinematicBody2D
const GRAVITY = 200.0
const WALK_SPEED = 200
var velocity = Vector2()
func _physics_process(delta):
velocity.y += delta * GRAVITY
if Input.is_action_pressed("ui_left"):
velocity.x = -WALK_SPEED
elif Input.is_action_pressed("ui_right"):
velocity.x = WALK_SPEED
else:
velocity.x = 0
# We don't need to multiply velocity by delta because "move_and_slide" already takes delta time into account.
# The second parameter of "move_and_slide" is the normal pointing up.
# In the case of a 2D platformer, in Godot, upward is negative y, which translates to -1 as a normal.
move_and_slide(velocity, Vector2(0, -1))
using Godot;
using System;
public class PhysicsScript : KinematicBody2D
{
const float gravity = 200.0f;
const int walkSpeed = 200;
Vector2 velocity;
public override void _PhysicsProcess(float delta)
{
velocity.y += delta * gravity;
if (Input.IsActionPressed("ui_left"))
{
velocity.x = -walkSpeed;
}
else if (Input.IsActionPressed("ui_right"))
{
velocity.x = walkSpeed;
}
else
{
velocity.x = 0;
}
// We don't need to multiply velocity by delta because "MoveAndSlide" already takes delta time into account.
// The second parameter of "MoveAndSlide" is the normal pointing up.
// In the case of a 2D platformer, in Godot, upward is negative y, which translates to -1 as a normal.
MoveAndSlide(velocity, new Vector2(0, -1));
}
}
And give it a try.
This is a good starting point for a platformer. A more complete demo can be found in the demo zip distributed with the engine, or in the https://github.com/godotengine/godot-demo-projects/tree/master/2d/kinematic_character.
SoftBody¶
Soft bodies (or soft-body dynamics) simulate movement, changing shape and other physical properties of deformable objects. This can for example be used to simulate cloth or to create more realistic characters.
Basic set-up¶
A SoftBody node is used for soft body simulations.
We will create a bouncy cube to demonstrate the setup of a soft body.
Create a new scene with a Spatial node as root. Then, create a Softbody node. Add a CubeMesh in the mesh property of the node in the inspector and increase the subdivision of the mesh for simulation.
Set the parameters to obtain the type of soft body you aim for. Try to keep the Simulation Precision above 5, otherwise, the soft body may collapse.
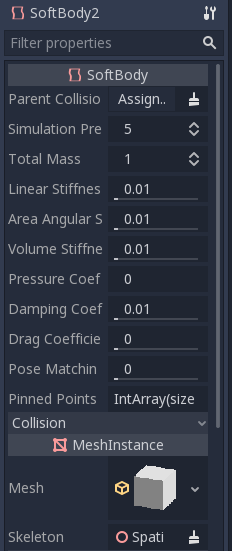
Note
Handle some parameters with care, as some value can lead to strange results. For example, if the shape is not completely closed and you set pressure to more than 0, the softbody will fly around like a plastic bag under strong wind.
Play the scene to view the simulation.
Tip
To improve the simulation’s result, increase the Simulation Precision, this will give significant improvement at the cost of performance.
Cloak simulation¶
Let’s make a cloak in the Platformer3D demo.
Note
You can download the Platformer3D demo on GitHub <https://github.com/godotengine/godot-demo-projects/tree/master/3d/platformer> or the Asset Library.
Open the Player scene, add a SoftBody node and assign a PlaneMesh to it.
Open the PlaneMesh properties and set the size(x: 0.5 y: 1) then set Subdivide Width and Subdivide Depth to 5. Adjust the SoftBody’s position. You should end up with something like this:
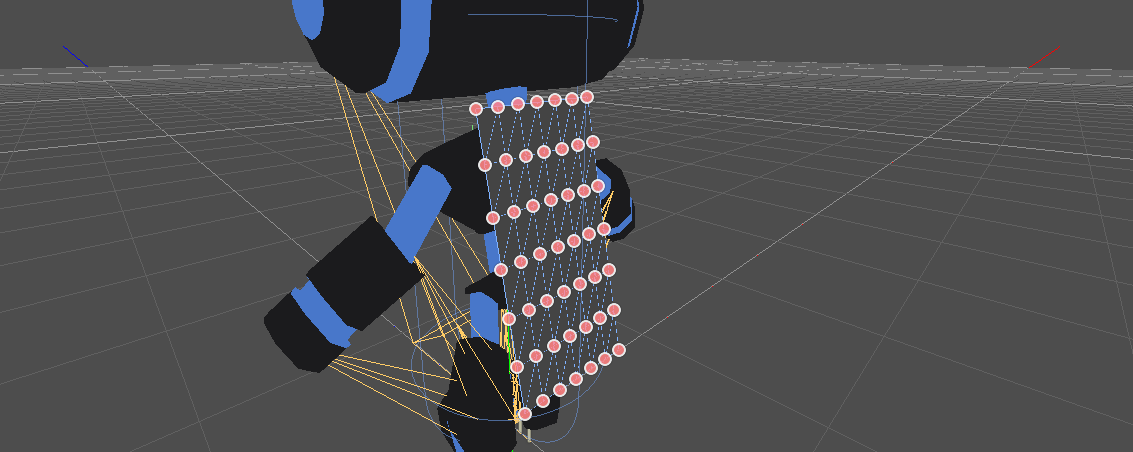
Tip
Subdivision generates a more tessellated mesh for better simulations.
Add a BoneAttachment node under the skeleton node and select the Neck bone to attach the cloak to the character skeleton.
Note
BoneAttachment node is to attach objects to a bone of a armature. The attached object will follow the bone’s movement, weapon of a character can be attached this way.
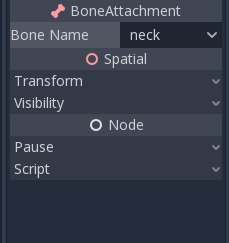
To create pinned joints, select the upper vertices in the SoftBody node:
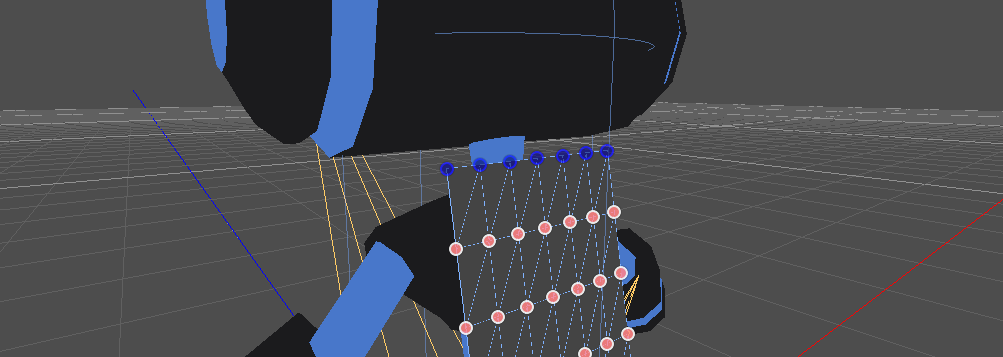
The pinned joints can be find in SoftBody’s Attachments property, choose the BoneAttachment as the SpatialAttachment for each pinned joints, the pinned joints are now attached to the neck.
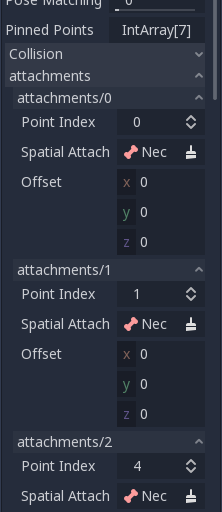
Last step is to avoid clipping by adding the Kinematic Body Player to Parent Collision Ignore of the SoftBody.
Play the scene and the cloak should simulate correctly.
This covers the basic settings of softbody, experiment with the parameters to achieve the effect you are aiming for when making your game.
Math¶
Vector math¶
Introduction¶
This tutorial is a short and practical introduction to linear algebra as it applies to game development. Linear algebra is the study of vectors and their uses. Vectors have many applications in both 2D and 3D development and Godot uses them extensively. Developing a good understanding of vector math is essential to becoming a strong game developer.
Note
This tutorial is not a formal textbook on linear algebra. We will only be looking at how it is applied to game development. For a broader look at the mathematics, see https://www.khanacademy.org/math/linear-algebra
Coordinate systems (2D)¶
In 2D space, coordinates are defined using a horizontal axis (x) and
a vertical axis (y). A particular position in 2D space is written
as a pair of values such as (4, 3).
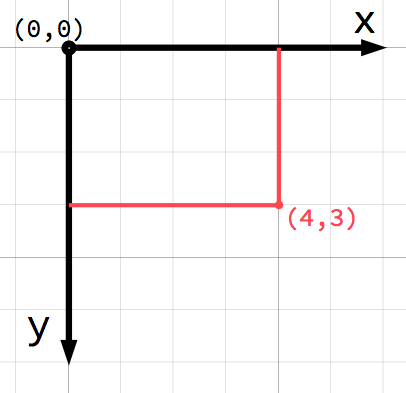
Note
If you’re new to computer graphics, it might seem odd that the
positive y axis points downwards instead of upwards,
as you probably learned in math class. However, this is common
in most computer graphics applications.
Any position in the 2D plane can be identified by a pair of numbers in this
way. However, we can also think of the position (4, 3) as an offset
from the (0, 0) point, or origin. Draw an arrow pointing from
the origin to the point:
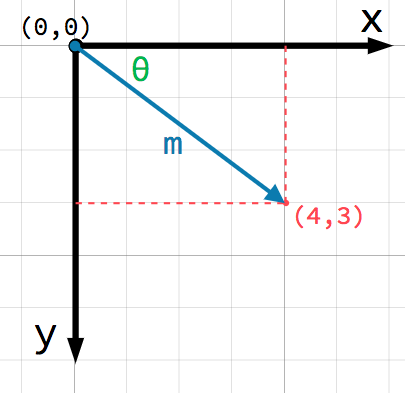
This is a vector. A vector represents a lot of useful information. As
well as telling us that the point is at (4, 3), we can also think of
it as an angle θ and a length (or magnitude) m. In this case, the
arrow is a position vector - it denotes a position in space, relative
to the origin.
A very important point to consider about vectors is that they only represent relative direction and magnitude. There is no concept of a vector’s position. The following two vectors are identical:
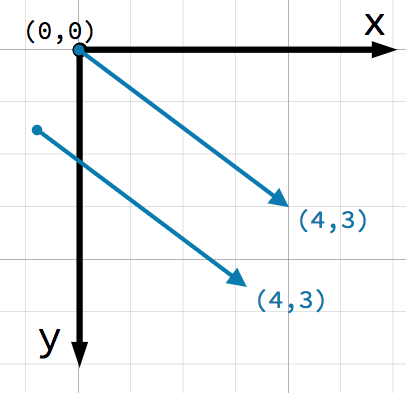
Both vectors represent a point 4 units to the right and 3 units below some starting point. It does not matter where on the plane you draw the vector, it always represents a relative direction and magnitude.
Vector operations¶
You can use either method (x and y coordinates or angle and magnitude) to
refer to a vector, but for convenience, programmers typically use the
coordinate notation. For example, in Godot, the origin is the top-left
corner of the screen, so to place a 2D node named Node2D 400 pixels to the right and
300 pixels down, use the following code:
$Node2D.position = Vector2(400, 300)
var node2D = (Node2D) GetNode("Node2D");
node2D.Position = new Vector2(400, 300);
Godot supports both Vector2 and Vector3 for 2D and 3D usage, respectively. The same mathematical rules discussed in this article apply to both types.
Member access¶
The individual components of the vector can be accessed directly by name.
# create a vector with coordinates (2, 5)
var a = Vector2(2, 5)
# create a vector and assign x and y manually
var b = Vector2()
b.x = 3
b.y = 1
// create a vector with coordinates (2, 5)
var a = new Vector2(2, 5);
// create a vector and assign x and y manually
var b = new Vector2();
b.x = 3;
b.y = 1;
Adding vectors¶
When adding or subtracting two vectors, the corresponding components are added:
var c = a + b # (2, 5) + (3, 1) = (5, 6)
var c = a + b; // (2, 5) + (3, 1) = (5, 6)
We can also see this visually by adding the second vector at the end of the first:
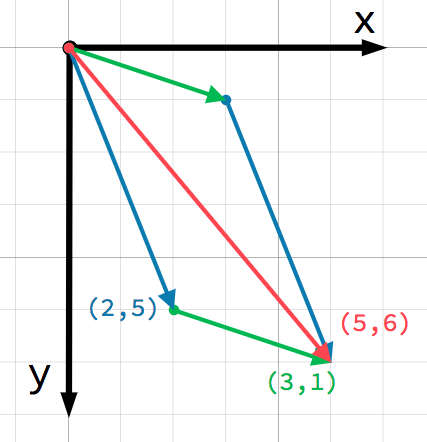
Note that adding a + b gives the same result as b + a.
Scalar multiplication¶
Note
Vectors represent both direction and magnitude. A value representing only magnitude is called a scalar.
A vector can be multiplied by a scalar:
var c = a * 2 # (2, 5) * 2 = (4, 10)
var d = b / 3 # (3, 6) / 3 = (1, 2)
var c = a * 2; // (2, 5) * 2 = (4, 10)
var d = b / 3; // (3, 6) / 3 = (1, 2)
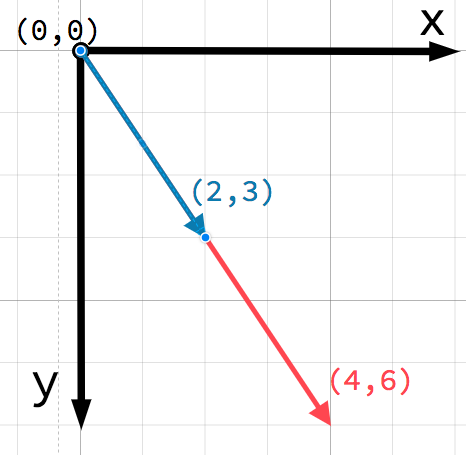
Note
Multiplying a vector by a scalar does not change its direction, only its magnitude. This is how you scale a vector.
Practical applications¶
Let’s look at two common uses for vector addition and subtraction.
Movement¶
A vector can represent any quantity with a magnitude and direction. Typical examples are: position, velocity, acceleration, and force. In
this image, the spaceship at step 1 has a position vector of (1,3) and
a velocity vector of (2,1). The velocity vector represents how far the
ship moves each step. We can find the position for step 2 by adding
the velocity to the current position.
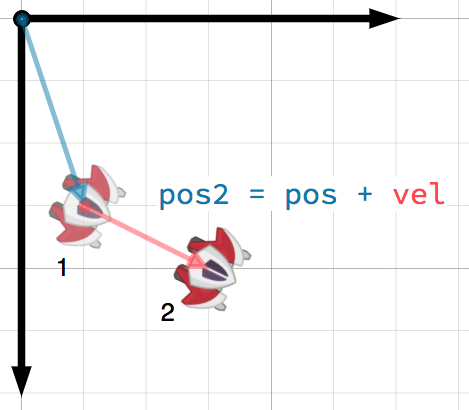
Tip
Velocity measures the change in position per unit of time. The new position is found by adding velocity to the previous position.
Pointing toward a target¶
In this scenario, you have a tank that wishes to point its turret at a robot. Subtracting the tank’s position from the robot’s position gives the vector pointing from the tank to the robot.
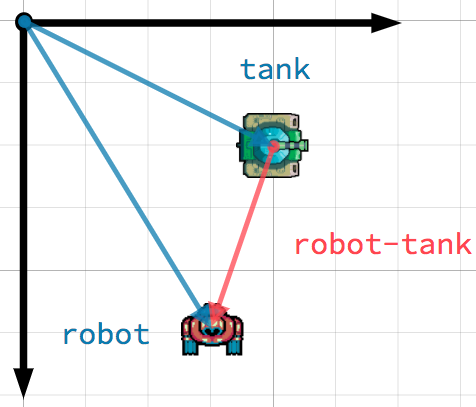
Tip
To find a vector pointing from A to B use B - A.
Unit vectors¶
A vector with magnitude of 1 is called a unit vector. They are
also sometimes referred to as direction vectors or normals. Unit
vectors are helpful when you need to keep track of a direction.
Normalization¶
Normalizing a vector means reducing its length to 1 while
preserving its direction. This is done by dividing each of its components
by its magnitude:
var a = Vector2(2, 4)
var m = sqrt(a.x*a.x + a.y*a.y) # get magnitude "m" using the Pythagorean theorem
a.x /= m
a.y /= m
var a = new Vector2(2, 4);
var m = Mathf.Sqrt(a.x*a.x + a.y*a.y); // get magnitude "m" using the Pythagorean theorem
a.x /= m;
a.y /= m;
Because this is such a common operation, Vector2 and Vector3 provide
a method for normalizing:
a = a.normalized()
a = a.Normalized();
Warning
Because normalization involves dividing by the vector’s length,
you cannot normalize a vector of length 0. Attempting to
do so will result in an error.
Reflection¶
A common use of unit vectors is to indicate normals. Normal vectors are unit vectors aligned perpendicularly to a surface, defining its direction. They are commonly used for lighting, collisions, and other operations involving surfaces.
For example, imagine we have a moving ball that we want to bounce off a wall or other object:
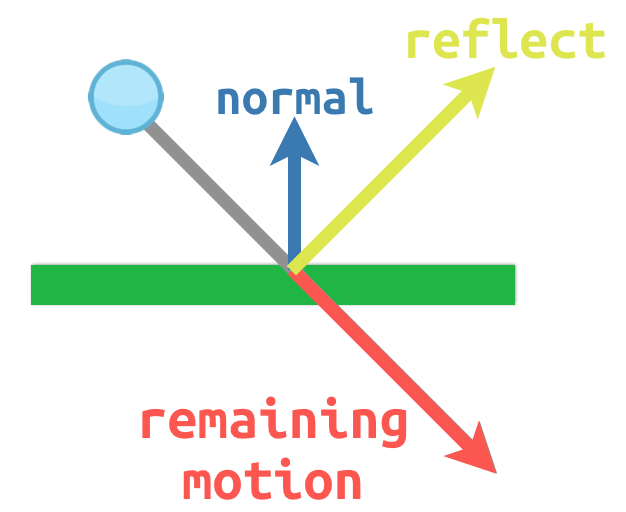
The surface normal has a value of (0, -1) because this is a horizontal
surface. When the ball collides, we take its remaining motion (the amount
left over when it hits the surface) and reflect it using the normal. In
Godot, the Vector2 class has a bounce() method
to handle this. Here is a GDScript example of the diagram above using a
KinematicBody2D:
# object "collision" contains information about the collision
var collision = move_and_collide(velocity * delta)
if collision:
var reflect = collision.remainder.bounce(collision.normal)
velocity = velocity.bounce(collision.normal)
move_and_collide(reflect)
// KinematicCollision2D contains information about the collision
KinematicCollision2D collision = MoveAndCollide(_velocity * delta);
if (collision != null)
{
var reflect = collision.Remainder.Bounce(collision.Normal);
_velocity = _velocity.Bounce(collision.Normal);
MoveAndCollide(reflect);
}
Dot product¶
The dot product is one of the most important concepts in vector math, but is often misunderstood. Dot product is an operation on two vectors that returns a scalar. Unlike a vector, which contains both magnitude and direction, a scalar value has only magnitude.
The formula for dot product takes two common forms:

and

However, in most cases it is easiest to use the built-in method. Note that the order of the two vectors does not matter:
var c = a.dot(b)
var d = b.dot(a) # these are equivalent
float c = a.Dot(b);
float d = b.Dot(a); // these are equivalent
The dot product is most useful when used with unit vectors, making the
first formula reduce to just cosθ. This means we can use the dot
product to tell us something about the angle between two vectors:
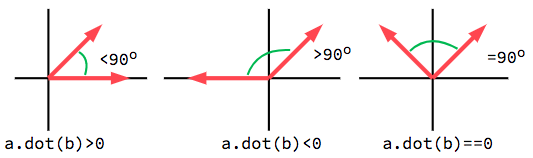
When using unit vectors, the result will always be between -1 (180°)
and 1 (0°).
Facing¶
We can use this fact to detect whether an object is facing toward another
object. In the diagram below, the player P is trying to avoid the
zombies A and B. Assuming a zombie’s field of view is 180°, can they see the player?
The green arrows fA and fB are unit vectors representing the
zombies’ facing directions and the blue semicircle represents its field of
view. For zombie A, we find the direction vector AP pointing to
the player using P - A and normalize it. If the angle between this
vector and the facing vector is less than 90°, then the zombie can see
the player.
In code it would look like this:
var AP = (P - A).normalized()
if AP.dot(fA) > 0:
print("A sees P!")
var AP = (P - A).Normalized();
if (AP.Dot(fA) > 0)
{
GD.Print("A sees P!");
}
Cross product¶
Like the dot product, the cross product is an operation on two vectors. However, the result of the cross product is a vector with a direction that is perpendicular to both. Its magnitude depends on their relative angle. If two vectors are parallel, the result of their cross product will be a null vector.


The cross product is calculated like this:
var c = Vector3()
c.x = (a.y * b.z) - (a.z * b.y)
c.y = (a.z * b.x) - (a.x * b.z)
c.z = (a.x * b.y) - (a.y * b.x)
var c = new Vector3();
c.x = (a.y * b.z) - (a.z * b.y);
c.y = (a.z * b.x) - (a.x * b.z);
c.z = (a.x * b.y) - (a.y * b.x);
With Godot, you can use the built-in method:
var c = a.cross(b)
var c = a.Cross(b);
Note
In the cross product, order matters. a.cross(b) does not
give the same result as b.cross(a). The resulting vectors
point in opposite directions.
Calculating normals¶
One common use of cross products is to find the surface normal of a plane
or surface in 3D space. If we have the triangle ABC we can use vector
subtraction to find two edges AB and AC. Using the cross product,
AB x AC produces a vector perpendicular to both: the surface normal.
Here is a function to calculate a triangle’s normal:
func get_triangle_normal(a, b, c):
# find the surface normal given 3 vertices
var side1 = b - a
var side2 = c - a
var normal = side1.cross(side2)
return normal
Vector3 GetTriangleNormal(Vector3 a, Vector3 b, Vector3 c)
{
// find the surface normal given 3 vertices
var side1 = b - a;
var side2 = c - a;
var normal = side1.Cross(side2);
return normal;
}
Pointing to a target¶
In the dot product section above, we saw how it could be used to find the angle between two vectors. However, in 3D, this is not enough information. We also need to know what axis to rotate around. We can find that by calculating the cross product of the current facing direction and the target direction. The resulting perpendicular vector is the axis of rotation.
More information¶
For more information on using vector math in Godot, see the following articles:
Advanced vector math¶
Planes¶
The dot product has another interesting property with unit vectors. Imagine that perpendicular to that vector (and through the origin) passes a plane. Planes divide the entire space into positive (over the plane) and negative (under the plane), and (contrary to popular belief) you can also use their math in 2D:
Unit vectors that are perpendicular to a surface (so, they describe the orientation of the surface) are called unit normal vectors. Though, usually they are just abbreviated as normals. Normals appear in planes, 3D geometry (to determine where each face or vertex is siding), etc. A normal is a unit vector, but it’s called normal because of its usage. (Just like we call (0,0) the Origin!).
It’s as simple as it looks. The plane passes by the origin and the surface of it is perpendicular to the unit vector (or normal). The side towards the vector points to is the positive half-space, while the other side is the negative half-space. In 3D this is exactly the same, except that the plane is an infinite surface (imagine an infinite, flat sheet of paper that you can orient and is pinned to the origin) instead of a line.
Distance to plane¶
Now that it’s clear what a plane is, let’s go back to the dot product. The dot product between a unit vector and any point in space (yes, this time we do dot product between vector and position), returns the distance from the point to the plane:
var distance = normal.dot(point)
var distance = normal.Dot(point);
But not just the absolute distance, if the point is in the negative half space the distance will be negative, too:
This allows us to tell which side of the plane a point is.
Away from the origin¶
I know what you are thinking! So far this is nice, but real planes are everywhere in space, not only passing through the origin. You want real plane action and you want it now.
Remember that planes not only split space in two, but they also have polarity. This means that it is possible to have perfectly overlapping planes, but their negative and positive half-spaces are swapped.
With this in mind, let’s describe a full plane as a normal N and a distance from the origin scalar D. Thus, our plane is represented by N and D. For example:
For 3D math, Godot provides a Plane built-in type that handles this.
Basically, N and D can represent any plane in space, be it for 2D or 3D (depending on the amount of dimensions of N) and the math is the same for both. It’s the same as before, but D is the distance from the origin to the plane, travelling in N direction. As an example, imagine you want to reach a point in the plane, you will just do:
var point_in_plane = N*D
var pointInPlane = N * D;
This will stretch (resize) the normal vector and make it touch the plane. This math might seem confusing, but it’s actually much simpler than it seems. If we want to tell, again, the distance from the point to the plane, we do the same but adjusting for distance:
var distance = N.dot(point) - D
var distance = N.Dot(point) - D;
The same thing, using a built-in function:
var distance = plane.distance_to(point)
var distance = plane.DistanceTo(point);
This will, again, return either a positive or negative distance.
Flipping the polarity of the plane can be done by negating both N and D. This will result in a plane in the same position, but with inverted negative and positive half spaces:
N = -N
D = -D
N = -N;
D = -D;
Of course, Godot also implements this operator in Plane, so doing:
var inverted_plane = -plane
var invertedPlane = -plane;
Will work as expected.
So, remember, a plane is just that and its main practical use is calculating the distance to it. So, why is it useful to calculate the distance from a point to a plane? It’s extremely useful! Let’s see some simple examples..
Constructing a plane in 2D¶
Planes clearly don’t come out of nowhere, so they must be built. Constructing them in 2D is easy, this can be done from either a normal (unit vector) and a point, or from two points in space.
In the case of a normal and a point, most of the work is done, as the normal is already computed, so just calculate D from the dot product of the normal and the point.
var N = normal
var D = normal.dot(point)
var N = normal;
var D = normal.Dot(point);
For two points in space, there are actually two planes that pass through them, sharing the same space but with normal pointing to the opposite directions. To compute the normal from the two points, the direction vector must be obtained first, and then it needs to be rotated 90° degrees to either side:
# calculate vector from a to b
var dvec = (point_b - point_a).normalized()
# rotate 90 degrees
var normal = Vector2(dvec.y, -dvec.x)
# or alternatively
# var normal = Vector2(-dvec.y, dvec.x)
# depending the desired side of the normal
// calculate vector from a to b
var dvec = (pointB - pointA).Normalized();
// rotate 90 degrees
var normal = new Vector2(dvec.y, -dvec.x);
// or alternatively
// var normal = new Vector2(-dvec.y, dvec.x);
// depending the desired side of the normal
The rest is the same as the previous example, either point_a or point_b will work since they are in the same plane:
var N = normal
var D = normal.dot(point_a)
# this works the same
# var D = normal.dot(point_b)
var N = normal;
var D = normal.Dot(pointA);
// this works the same
// var D = normal.Dot(pointB);
Doing the same in 3D is a little more complex and will be explained further down.
Some examples of planes¶
Here is a simple example of what planes are useful for. Imagine you have a convex polygon. For example, a rectangle, a trapezoid, a triangle, or just any polygon where no faces bend inwards.
For every segment of the polygon, we compute the plane that passes by that segment. Once we have the list of planes, we can do neat things, for example checking if a point is inside the polygon.
We go through all planes, if we can find a plane where the distance to the point is positive, then the point is outside the polygon. If we can’t, then the point is inside.
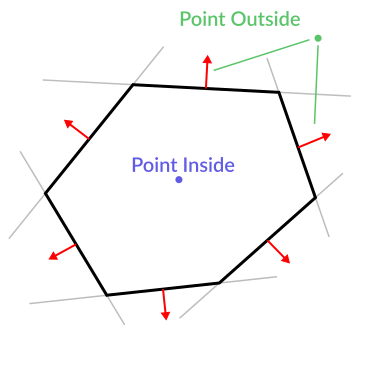
Code should be something like this:
var inside = true
for p in planes:
# check if distance to plane is positive
if (p.distance_to(point) > 0):
inside = false
break # with one that fails, it's enough
var inside = true;
foreach (var p in planes)
{
// check if distance to plane is positive
if (p.DistanceTo(point) > 0)
{
inside = false;
break; // with one that fails, it's enough
}
}
Pretty cool, huh? But this gets much better! With a little more effort, similar logic will let us know when two convex polygons are overlapping too. This is called the Separating Axis Theorem (or SAT) and most physics engines use this to detect collision.
With a point, just checking if a plane returns a positive distance is enough to tell if the point is outside. With another polygon, we must find a plane where all the other polygon points return a positive distance to it. This check is performed with the planes of A against the points of B, and then with the planes of B against the points of A:
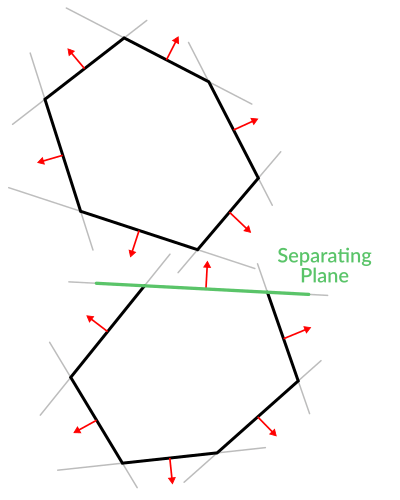
Code should be something like this:
var overlapping = true
for p in planes_of_A:
var all_out = true
for v in points_of_B:
if (p.distance_to(v) < 0):
all_out = false
break
if (all_out):
# a separating plane was found
# do not continue testing
overlapping = false
break
if (overlapping):
# only do this check if no separating plane
# was found in planes of A
for p in planes_of_B:
var all_out = true
for v in points_of_A:
if (p.distance_to(v) < 0):
all_out = false
break
if (all_out):
overlapping = false
break
if (overlapping):
print("Polygons Collided!")
var overlapping = true;
foreach (Plane plane in planesOfA)
{
var allOut = true;
foreach (Vector3 point in pointsOfB)
{
if (plane.DistanceTo(point) < 0)
{
allOut = false;
break;
}
}
if (allOut)
{
// a separating plane was found
// do not continue testing
overlapping = false;
break;
}
}
if (overlapping)
{
// only do this check if no separating plane
// was found in planes of A
foreach (Plane plane in planesOfB)
{
var allOut = true;
foreach (Vector3 point in pointsOfA)
{
if (plane.DistanceTo(point) < 0)
{
allOut = false;
break;
}
}
if (allOut)
{
overlapping = false;
break;
}
}
}
if (overlapping)
{
GD.Print("Polygons Collided!");
}
As you can see, planes are quite useful, and this is the tip of the iceberg. You might be wondering what happens with non convex polygons. This is usually just handled by splitting the concave polygon into smaller convex polygons, or using a technique such as BSP (which is not used much nowadays).
Collision detection in 3D¶
This is another bonus bit, a reward for being patient and keeping up with this long tutorial. Here is another piece of wisdom. This might not be something with a direct use case (Godot already does collision detection pretty well) but it’s used by almost all physics engines and collision detection libraries :)
Remember that converting a convex shape in 2D to an array of 2D planes was useful for collision detection? You could detect if a point was inside any convex shape, or if two 2D convex shapes were overlapping.
Well, this works in 3D too, if two 3D polyhedral shapes are colliding, you won’t be able to find a separating plane. If a separating plane is found, then the shapes are definitely not colliding.
To refresh a bit a separating plane means that all vertices of polygon A are in one side of the plane, and all vertices of polygon B are in the other side. This plane is always one of the face-planes of either polygon A or polygon B.
In 3D though, there is a problem to this approach, because it is possible that, in some cases a separating plane can’t be found. This is an example of such situation:

To avoid it, some extra planes need to be tested as separators, these planes are the cross product between the edges of polygon A and the edges of polygon B
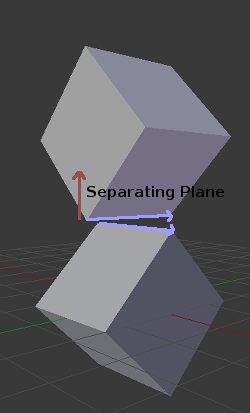
So the final algorithm is something like:
var overlapping = true
for p in planes_of_A:
var all_out = true
for v in points_of_B:
if (p.distance_to(v) < 0):
all_out = false
break
if (all_out):
# a separating plane was found
# do not continue testing
overlapping = false
break
if (overlapping):
# only do this check if no separating plane
# was found in planes of A
for p in planes_of_B:
var all_out = true
for v in points_of_A:
if (p.distance_to(v) < 0):
all_out = false
break
if (all_out):
overlapping = false
break
if (overlapping):
for ea in edges_of_A:
for eb in edges_of_B:
var n = ea.cross(eb)
if (n.length() == 0):
continue
var max_A = -1e20 # tiny number
var min_A = 1e20 # huge number
# we are using the dot product directly
# so we can map a maximum and minimum range
# for each polygon, then check if they
# overlap.
for v in points_of_A:
var d = n.dot(v)
max_A = max(max_A, d)
min_A = min(min_A, d)
var max_B = -1e20 # tiny number
var min_B = 1e20 # huge number
for v in points_of_B:
var d = n.dot(v)
max_B = max(max_B, d)
min_B = min(min_B, d)
if (min_A > max_B or min_B > max_A):
# not overlapping!
overlapping = false
break
if (not overlapping):
break
if (overlapping):
print("Polygons collided!")
var overlapping = true;
foreach (Plane plane in planesOfA)
{
var allOut = true;
foreach (Vector3 point in pointsOfB)
{
if (plane.DistanceTo(point) < 0)
{
allOut = false;
break;
}
}
if (allOut)
{
// a separating plane was found
// do not continue testing
overlapping = false;
break;
}
}
if (overlapping)
{
// only do this check if no separating plane
// was found in planes of A
foreach (Plane plane in planesOfB)
{
var allOut = true;
foreach (Vector3 point in pointsOfA)
{
if (plane.DistanceTo(point) < 0)
{
allOut = false;
break;
}
}
if (allOut)
{
overlapping = false;
break;
}
}
}
if (overlapping)
{
foreach (Vector3 edgeA in edgesOfA)
{
foreach (Vector3 edgeB in edgesOfB)
{
var normal = edgeA.Cross(edgeB);
if (normal.Length() == 0)
{
continue;
}
var maxA = float.MinValue; // tiny number
var minA = float.MaxValue; // huge number
// we are using the dot product directly
// so we can map a maximum and minimum range
// for each polygon, then check if they
// overlap.
foreach (Vector3 point in pointsOfA)
{
var distance = normal.Dot(point);
maxA = Mathf.Max(maxA, distance);
minA = Mathf.Min(minA, distance);
}
var maxB = float.MinValue; // tiny number
var minB = float.MaxValue; // huge number
foreach (Vector3 point in pointsOfB)
{
var distance = normal.Dot(point);
maxB = Mathf.Max(maxB, distance);
minB = Mathf.Min(minB, distance);
}
if (minA > maxB || minB > maxA)
{
// not overlapping!
overlapping = false;
break;
}
}
if (!overlapping)
{
break;
}
}
}
if (overlapping)
{
GD.Print("Polygons Collided!");
}
Matrices and transforms¶
Introduction¶
Before reading this tutorial, we recommend that you thoroughly read and understand the Vector math tutorial, as this tutorial requires a knowledge of vectors.
This tutorial is about transformations and how we represent them in Godot using matrices. It is not a full in-depth guide to matrices. Transformations are most of the time applied as translation, rotation, and scale, so we will focus on how to represent those with matrices.
Most of this guide focuses on 2D, using Transform2D and Vector2, but the way things work in 3D is very similar.
Note
As mentioned in the previous tutorial, it is important to remember that in Godot, the Y axis points down in 2D. This is the opposite of how most schools teach linear algebra, with the Y axis pointing up.
Note
The convention is that the X axis is red, the Y axis is green, and the Z axis is blue. This tutorial is color-coded to match these conventions, but we will also represent the origin vector with a blue color.
Matrix components and the Identity matrix¶
The identity matrix represents a transform with no translation, no rotation, and no scale. Let’s start by looking at the identity matrix and how its components relate to how it visually appears.
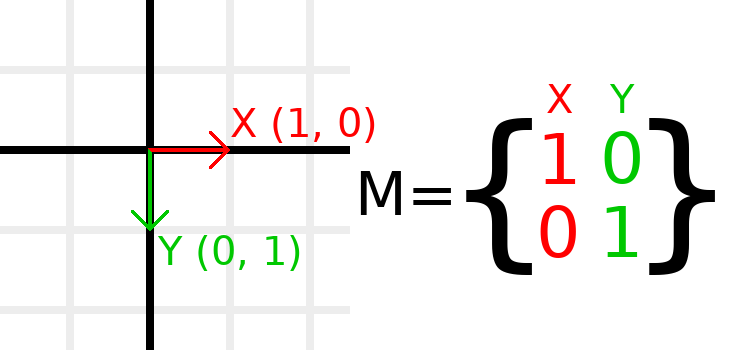
Matrices have rows and columns, and a transformation matrix has specific conventions on what each does.
In the image above, we can see that the red X vector is represented by the first column of the matrix, and the green Y vector is likewise represented by the second column. A change to the columns will change these vectors. We will see how they can be manipulated in the next few examples.
You should not worry about manipulating rows directly, as we usually work with columns. However, you can think of the rows of the matrix as showing which vectors contribute to moving in a given direction.
When we refer to a value such as t.x.y, that’s the Y component of the X column vector. In other words, the bottom-left of the matrix. Similarly, t.x.x is top-left, t.y.x is top-right,and t.y.y is bottom-right, where t is the Transform2D.
Scaling the transformation matrix¶
Applying a scale is one of the easiest operations to understand. Let’s start by placing the Godot logo underneath our vectors so that we can visually see the effects on an object:
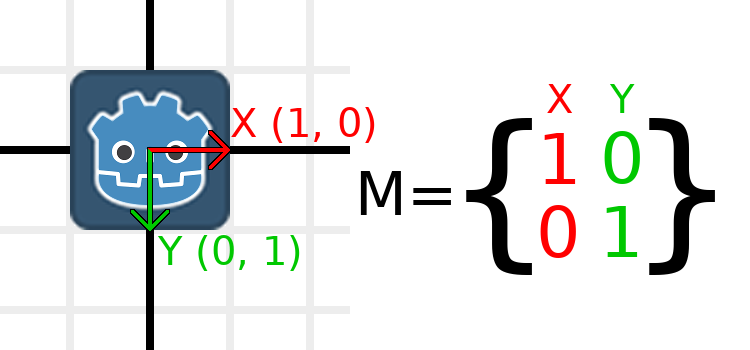
Now, to scale the matrix, all we need to do is multiply each component by the scale we want. Let’s scale it up by 2. 1 times 2 becomes 2, and 0 times 2 becomes 0, so we end up with this:
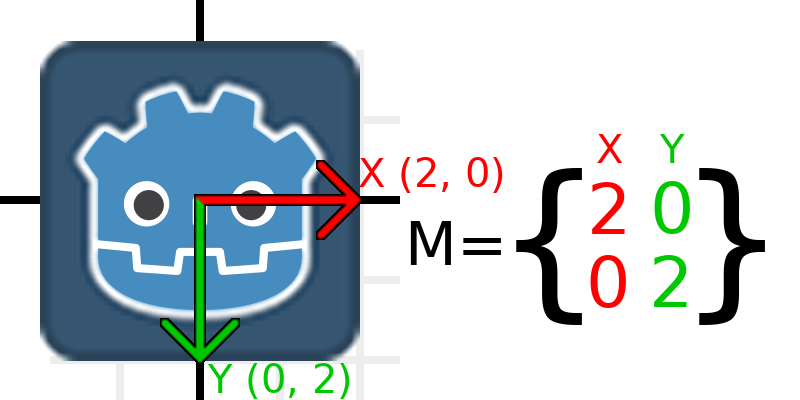
To do this in code, we can simply multiply each of the vectors:
var t = Transform2D()
# Scale
t.x *= 2
t.y *= 2
transform = t # Change the node's transform to what we just calculated.
Transform2D t = Transform2D.Identity;
// Scale
t.x *= 2;
t.y *= 2;
Transform = t; // Change the node's transform to what we just calculated.
If we wanted to return it to its original scale, we can multiply each component by 0.5. That’s pretty much all there is to scaling a transformation matrix.
To calculate the object’s scale from an existing transformation matrix, you can use length() on each of the column vectors.
Note
In actual projects, you can use the scaled() method to perform scaling.
Rotating the transformation matrix¶
We’ll start the same way as earlier, with the Godot logo underneath the identity matrix:
As an example, let’s say we want to rotate our Godot logo clockwise by 90 degrees. Right now the X axis points right and the Y axis points down. If we rotate these in our head, we would logically see that the new X axis should point down and the new Y axis should point left.
You can imagine that you grab both the Godot logo and its vectors, and then spin it around the center. Wherever you finish spinning, the orientation of the vectors determines what the matrix is.
We need to represent “down” and “left” in normal coordinates, so means we’ll set X to (0, 1) and Y to (-1, 0). These are also the values of Vector2.DOWN and Vector2.LEFT. When we do this, we get the desired result of rotating the object:
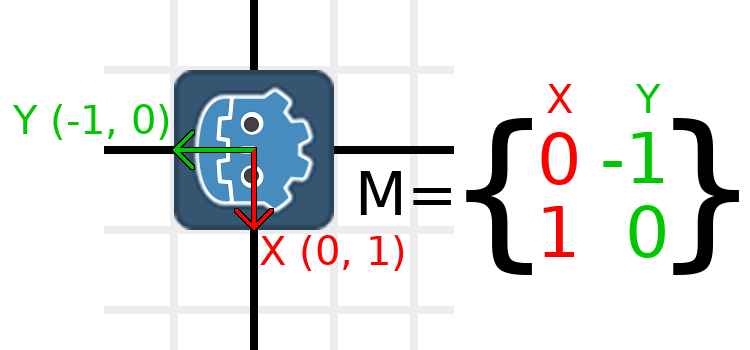
If you have trouble understanding the above, try this excercise: Cut a square of paper, draw X and Y vectors on top of it, place it on graph paper, then rotate it and note the endpoints.
To perform rotation in code, we need to be able to calculate the values programatically. This image shows the formulas needed to calculate the transformation matrix from a rotation angle. Don’t worry if this part seems complicated, I promise it’s the hardest thing you need to know.
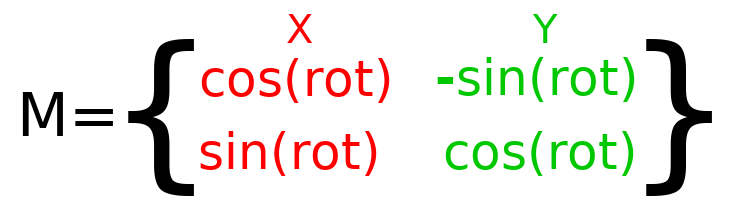
Note
Godot represents all rotations with radians, not degrees. A full turn is TAU or PI*2 radians, and a quarter turn of 90 degrees is TAU/4 or PI/2 radians. Working with TAU usually results in more readable code.
Note
Fun fact: In addition to Y being down in Godot, rotation is represented clockwise. This means that all the math and trig functions behave the same as a Y-is-up CCW system, since these differences “cancel out”. You can think of rotations in both systems being “from X to Y”.
In order to perform a rotation of 0.5 radians (about 28.65 degrees), we simply plug in a value of 0.5 to the formula above and evaluate to find what the actual values should be:
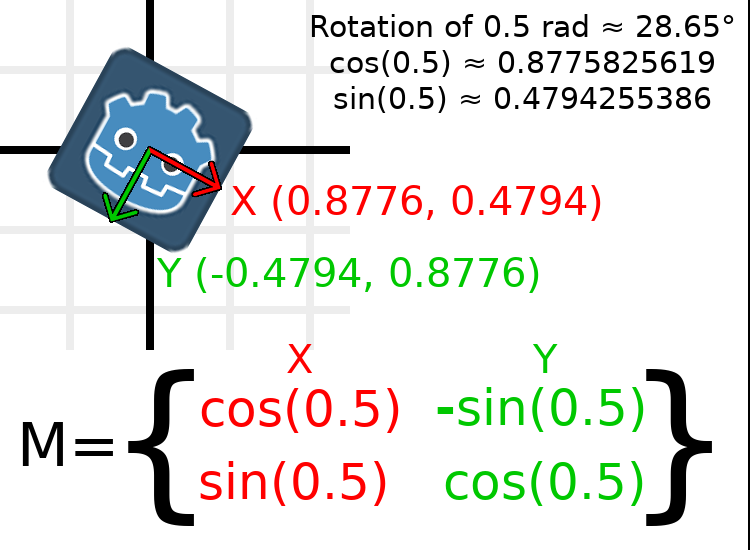
Here’s how that would be done in code (place the script on a Node2D):
var rot = 0.5 # The rotation to apply.
var t = Transform2D()
t.x.x = cos(rot)
t.y.y = cos(rot)
t.x.y = sin(rot)
t.y.x = -sin(rot)
transform = t # Change the node's transform to what we just calculated.
float rot = 0.5f; // The rotation to apply.
Transform2D t = Transform2D.Identity;
t.x.x = t.y.y = Mathf.Cos(rot);
t.x.y = t.y.x = Mathf.Sin(rot);
t.y.x *= -1;
Transform = t; // Change the node's transform to what we just calculated.
To calculate the object’s rotation from an existing transformation matrix, you can use atan2(t.x.y, t.x.x), where t is the Transform2D.
Note
In actual projects, you can use the rotated() method to perform rotations.
Basis of the transformation matrix¶
So far we have only been working with the x and y, vectors, which are in charge of representing rotation, scale, and/or shearing (advanced, covered at the end). The X and Y vectors are together called the basis of the transformation matrix. The terms “basis” and “basis vectors” are important to know.
You might have noticed that Transform2D actually has three Vector2 values: x, y, and origin. The origin value is not part of the basis, but it is part of the transform, and we need it to represent position. From now on we’ll keep track of the origin vector in all examples. You can think of origin as another column, but it’s often better to think of it as completely separate.
Note that in 3D, Godot has a separate Basis structure for holding the three Vector3 values of the basis, since the code can get complex and it makes sense to separate it from Transform (which is composed of one Basis and one extra Vector3 for the origin).
Translating the transformation matrix¶
Changing the origin vector is called a translating the transformation matrix. Translating is basically a technical term for “moving” the object, but it explicitly does not involve any rotation.
This should be fairly common sense, assuming that you read and understood the vector tutorial, but let’s work through an example. Again, we’ll start with the identity transform, but this time we’ll also keep track of the origin vector:
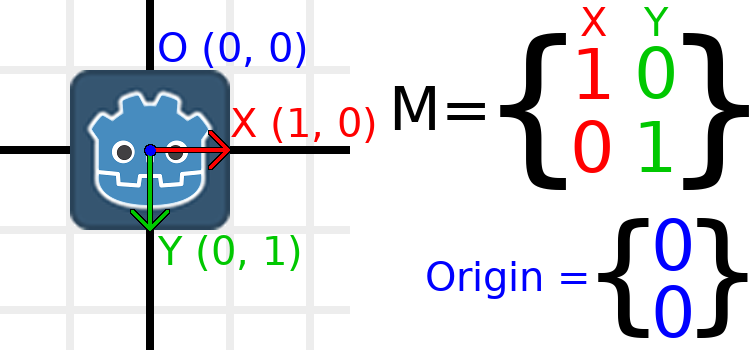
If we want the object to move to a position of (1, 2), we simply need to set its origin vector to (1, 2):

There is also a translated() method, which performs a different operation to adding or changing origin directly. The translated() method will translate the object relative to its own rotation. For example, an object rotated 90 degrees clockwise will move to the right when translated() with Vector2.UP.
Note
Godot’s 2D uses coordinates based on pixels, so in actual projects you will want to translate by hundreds of units.
Putting it all together¶
We’re going to apply everything we mentioned so far onto one transform. To follow along, get a simple project with a Sprite set to the Godot logo.
Let’s set the translation to (350, 150), rotate by -0.5 rad, and scale by 3. I’ve posted a screenshot, and the code to reproduce it, but I encourage you to try and reproduce the screenshot without looking at the code!
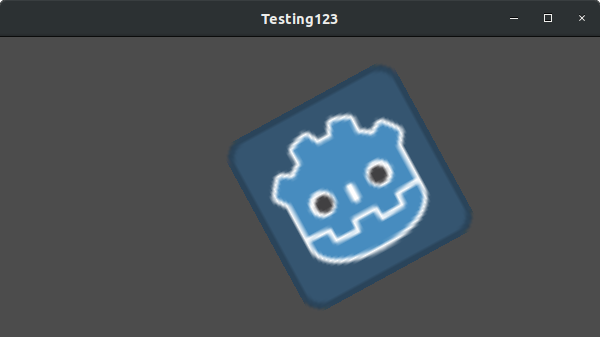
var t = Transform2D()
# Translation
t.origin = Vector2(350, 150)
# Rotation
var rot = -0.5 # The rotation to apply.
t.x.x = cos(rot)
t.y.y = cos(rot)
t.x.y = sin(rot)
t.y.x = -sin(rot)
# Scale
t.x *= 3
t.y *= 3
transform = t # Change the node's transform to what we just calculated.
Transform2D t = Transform2D.Identity;
// Translation
t.origin = new Vector2(350, 150);
// Rotation
float rot = -0.5f; // The rotation to apply.
t.x.x = t.y.y = Mathf.Cos(rot);
t.x.y = t.y.x = Mathf.Sin(rot);
t.y.x *= -1;
// Scale
t.x *= 3;
t.y *= 3;
Transform = t; // Change the node's transform to what we just calculated.
Shearing the transformation matrix (advanced)¶
Note
If you are only looking for how to use transformation matrices, feel free to skip this section of the tutorial. This section explores an uncommonly used aspect of transformation matrices for the purpose of building an understanding of them.
You may have noticed that a transform has more degrees of freedom than the combination of the above actions. The basis of a 2D transformation matrix has four total numbers in two Vector2 values, while a rotation value and a Vector2 for scale only has 3 numbers. The high-level concept for the missing degree of freedom is called shearing.
Normally you will always have the basis vectors perpendicular to each other. However, shearing can be useful in some situations, and understanding shearing helps you understand how transforms work.
To show you visually how it will look, let’s overlay a grid onto the Godot logo:
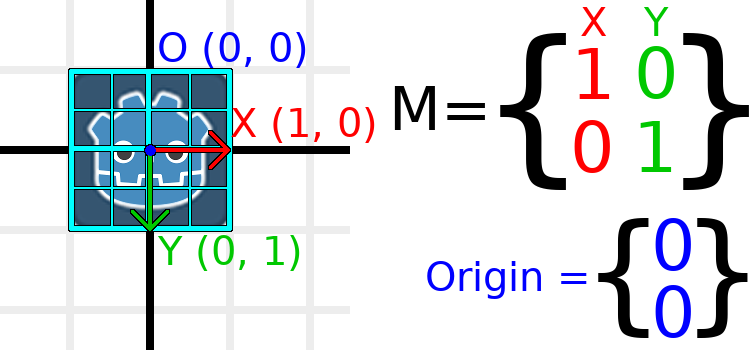
Each point on this grid is obtained by adding the basis vectors together. The bottom-right corner is X + Y, while the top-right corner is X - Y. If we change the basis vectors, the entire grid moves with it, as the grid is composed of the basis vectors. All lines on the grid that are currently parallel will remain parallel no matter what changes we make to the basis vectors.
As an example, let’s set Y to (1, 1):
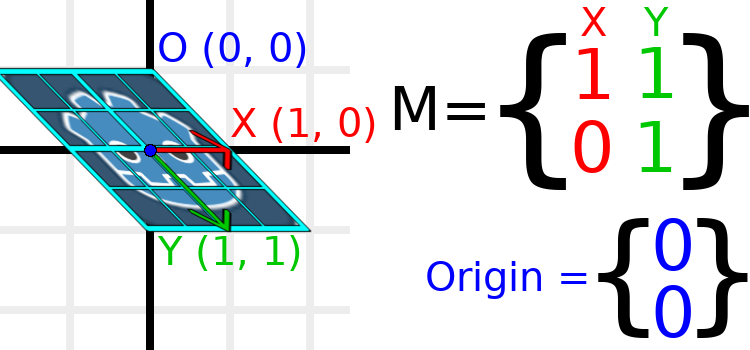
var t = Transform2D()
# Shear by setting Y to (1, 1)
t.y = Vector2.ONE
transform = t # Change the node's transform to what we just calculated.
Transform2D t = Transform2D.Identity;
// Shear by setting Y to (1, 1)
t.y = Vector2.One;
Transform = t; // Change the node's transform to what we just calculated.
Note
You can’t set the raw values of a Transform2D in the editor, so you must use code if you want to shear the object.
Due to the vectors no longer being perpendicular, the object has been sheared. The bottom-center of the grid, which is (0, 1) relative to itself, is now located at a world position of (1, 1).
The intra-object coordinates are called UV coordinates in textures, so let’s borrow that terminology for here. To find the world position from a relative position, the formula is U * X + V * Y, where U and V are numbers and X and Y are the basis vectors.
The bottom-right corner of the grid, which is always at the UV position of (1, 1), is at the world position of (2, 1), which is calculated from X*1 + Y*1, which is (1, 0) + (1, 1), or (1 + 1, 0 + 1), or (2, 1). This matches up with our observation of where the bottom-right corner of the image is.
Similarly, the top-right corner of the grid, which is always at the UV position of (1, -1), is at the world position of (0, -1), which is calculated from X*1 + Y*-1, which is (1, 0) - (1, 1), or (1 - 1, 0 - 1), or (0, -1). This matches up with our observation of where the top-right corner of the image is.
Hopefully you now fully understand the how a transformation matrix affects the object, and the relationship between the basis vectors and how the object’s “UV” or “intra-coordinates” have their world position changed.
Note
In Godot, all transform math is done relative to the parent node. When we refer to “world position”, that would be relative to the node’s parent instead, if the node had a parent.
If you would like additional explanation, you should check out 3Blue1Brown’s excellent video about linear transformations: https://www.youtube.com/watch?v=kYB8IZa5AuE
Practical applications of transforms¶
In actual projects, you will usually be working with transforms inside transforms by having multiple Node2D or Spatial nodes parented to each other.
However, sometimes it’s very useful to manually calculate the values we need. We will go over how you could use Transform2D or Transform to manually calculate transforms of nodes.
Converting positions between transforms¶
There are many cases where you’d want to convert a position in and out of a transform. For example, if you have a position relative to the player and would like to find the world (parent-relative) position, or if you have a world position and want to know where it is relative to the player.
We can find what a vector relative to the player would be defined in world space as using the “xform” method:
# World space vector 100 units below the player.
print(transform.xform(Vector2(0, 100)))
// World space vector 100 units below the player.
GD.Print(Transform.Xform(new Vector2(0, 100)));
And we can use the “xform_inv” method to find a what world space position would be if it was instead defined relative to the player:
# Where is (0, 100) relative to the player?
print(transform.xform_inv(Vector2(0, 100)))
// Where is (0, 100) relative to the player?
GD.Print(Transform.XformInv(new Vector2(0, 100)));
Note
If you know in advance that the transform is positioned at (0, 0), you can use the “basis_xform” or “basis_xform_inv” methods instead, which skip dealing with translation.
Moving an object relative to itself¶
A common operation, especially in 3D games, is to move an object relative to itself. For example, in first-person shooter games, you would want the character to move forward (-Z axis) when you press W.
Since the basis vectors are the orientation relative to the parent, and the origin vector is the position relative to the parent, we can simply add multiples of the basis vectors to move an object relative to itself.
This code moves an object 100 units to its own right:
transform.origin += transform.x * 100
Transform2D t = Transform;
t.origin += t.x * 100;
Transform = t;
For moving in 3D, you would need to replace “x” with “basis.x”.
Note
In actual projects, you can use translate_object_local in 3D or move_local_x and move_local_y in 2D to do this.
Applying transforms onto transforms¶
One of the most important things to know about transforms is how you can use several of them together. A parent node’s transform affects all of its children. Let’s dissect an example.
In this image, the child node has a “2” after the component names to distinguish them from the parent node. It might look a bit overwhelming with so many numbers, but remember that each number is displayed twice (next to the arrows and also in the matrices), and that almost half of the numbers are zero.
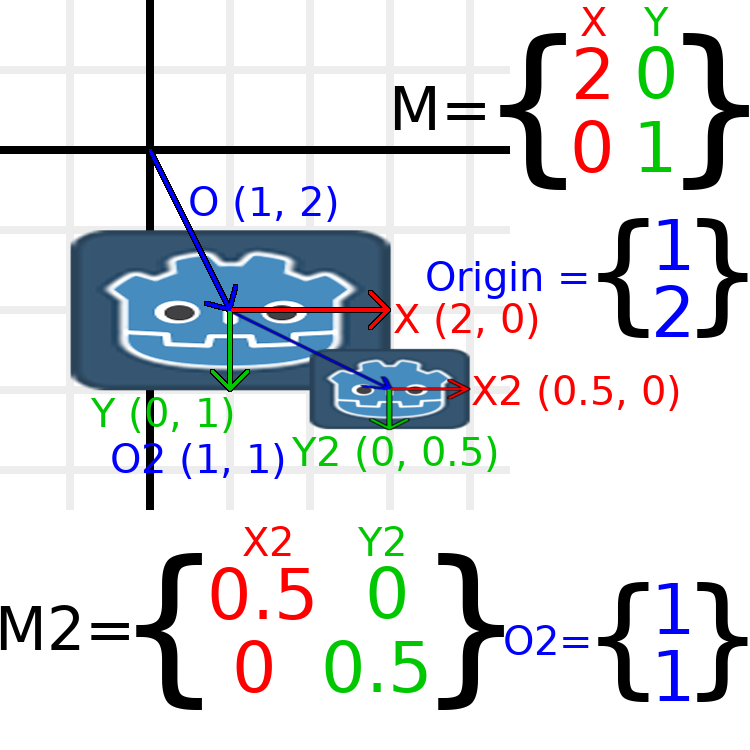
The only transformations going on here are that the parent node has been given a scale of (2, 1), the child has been given a scale of (0.5, 0.5), and both nodes have been given positions.
All child transformations are affected by the parent transformations. The child has a scale of (0.5, 0.5), so you would expect it to be a 1:1 ratio square, and it is, but only relative to the parent. The child’s X vector ends up being (1, 0) in world space, because it is scaled by the parent’s basis vectors. Similarly, the child node’s origin vector is set to (1, 1), but this actually moves it (2, 1) in world space, due to the parent node’s basis vectors.
To calculate a child transform’s world space transform manually, this is the code we would use:
# Set up transforms just like in the image, except make positions be 100 times bigger.
var parent = Transform2D(2, 0, 0, 1, 100, 200)
var child = Transform2D(0.5, 0, 0, 0.5, 100, 100)
# Calculate the child's world space transform
# origin = (2, 0) * 100 + (0, 1) * 100 + (100, 200)
var origin = parent.x * child.origin.x + parent.y * child.origin.y + parent.origin
# basis_x = (2, 0) * 0.5 + (0, 1) * 0
var basis_x = parent.x * child.x.x + parent.y * child.x.y
# basis_y = (2, 0) * 0 + (0, 1) * 0.5
var basis_y = parent.x * child.y.x + parent.y * child.y.y
# Change the node's transform to what we just calculated.
transform = Transform2D(basis_x, basis_y, origin)
// Set up transforms just like in the image, except make positions be 100 times bigger.
Transform2D parent = new Transform2D(2, 0, 0, 1, 100, 200);
Transform2D child = new Transform2D(0.5f, 0, 0, 0.5f, 100, 100);
// Calculate the child's world space transform
// origin = (2, 0) * 100 + (0, 1) * 100 + (100, 200)
Vector2 origin = parent.x * child.origin.x + parent.y * child.origin.y + parent.origin;
// basisX = (2, 0) * 0.5 + (0, 1) * 0 = (0.5, 0)
Vector2 basisX = parent.x * child.x.x + parent.y * child.x.y;
// basisY = (2, 0) * 0 + (0, 1) * 0.5 = (0.5, 0)
Vector2 basisY = parent.x * child.y.x + parent.y * child.y.y;
// Change the node's transform to what we just calculated.
Transform = new Transform2D(basisX, basisY, origin);
In actual projects, we can find the world transform of the child by applying one transform onto another using the * operator:
# Set up transforms just like in the image, except make positions be 100 times bigger.
var parent = Transform2D(Vector2(2, 0), Vector2(0, 1), Vector2(100, 200))
var child = Transform2D(Vector2(0.5, 0), Vector2(0, 0.5), Vector2(100, 100))
# Change the node's transform to what would be the child's world transform.
transform = parent * child
// Set up transforms just like in the image, except make positions be 100 times bigger.
Transform2D parent = new Transform2D(2, 0, 0, 1, 100, 200);
Transform2D child = new Transform2D(0.5f, 0, 0, 0.5f, 100, 100);
// Change the node's transform to what would be the child's world transform.
Transform = parent * child;
Note
When multiplying matrices, order matters! Don’t mix them up.
Lastly, applying the identity transform will always do nothing.
If you would like additional explanation, you should check out 3Blue1Brown’s excellent video about matrix composition: https://www.youtube.com/watch?v=XkY2DOUCWMU
Inverting a transformation matrix¶
The “affine_inverse” function returns a transform that “undoes” the previous transform. This can be useful in some situations, but it’s easier to just provide a few examples.
Multiplying an inverse transform by the normal transform undoes all transformations:
var ti = transform.affine_inverse()
var t = ti * transform
# The transform is the identity transform.
Transform2D ti = Transform.AffineInverse();
Transform2D t = ti * Transform;
// The transform is the identity transform.
Transforming a position by a transform and its inverse results in the same position (same for “xform_inv”):
var ti = transform.affine_inverse()
position = transform.xform(position)
position = ti.xform(position)
# The position is the same as before.
Transform2D ti = Transform.AffineInverse();
Position = Transform.Xform(Position);
Position = ti.Xform(Position);
// The position is the same as before.
How does it all work in 3D?¶
One of the great things about transformation matrices is that they work very similarly between 2D and 3D transformations. All of the code and formulas used above for 2D work the same in 3D, with 3 exceptions: the addition of a third axis, that each axis is of type Vector3, and also that Godot stores the Basis separately from the Transform, since the math can get complex and it makes sense to separate it.
All of the concepts for how translation, rotation, scale, and shearing work in 3D are all the same compared to 2D. To scale, we take each component and multiply it; to rotate, we change where each basis vector is pointing; to translate, we manipulate the origin; and to shear, we change the basis vectors to be non-perpendicular.
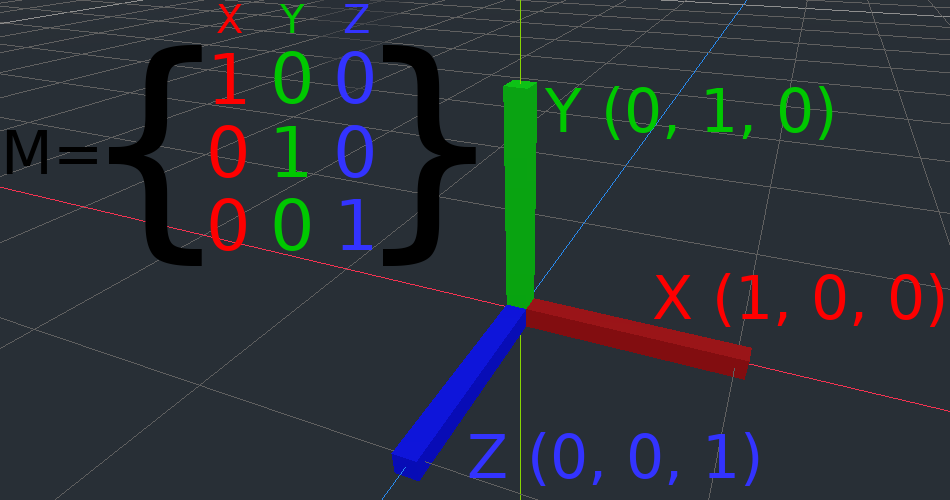
If you would like, it’s a good idea to play around with transforms to get an understanding of how they work. Godot allows you to edit 3D transform matrices directly from the inspector. You can download this project which has colored lines and cubes to help visualize the Basis vectors and the origin in both 2D and 3D: https://github.com/godotengine/godot-demo-projects/tree/master/misc/matrix_transform
Note
Spatial’s “Matrix” section in Godot 3.2’s inspector displays the matrix as transposed, with the columns horizontal and the rows vertical. This may be changed to be less confusing in a future release of Godot.
Note
You cannot edit Node2D’s transform matrix directly in Godot 3.2’s inspector. This may be changed in a future release of Godot.
If you would like additional explanation, you should check out 3Blue1Brown’s excellent video about 3D linear transformations: https://www.youtube.com/watch?v=rHLEWRxRGiM
Representing rotation in 3D (advanced)¶
The biggest difference between 2D and 3D transformation matrices is how you represent rotation by itself without the basis vectors.
With 2D, we have an easy way (atan2) to switch between a transformation matrix and an angle. In 3D, we can’t simply represent rotation as one number. There is something called Euler angles, which can represent rotations as a set of 3 numbers, however they are limited and not very useful, except for trivial cases.
In 3D we do not typically use angles, we either use a transformation basis (used pretty much everywhere in Godot), or we use quaternions. Godot can represent quaternions using the Quat struct. My suggestion to you is to completely ignore how they work under-the-hood, because they are very complicated and unintuitive.
However, if you really must know how it works, here are some great resources, which you can follow in order:
https://www.youtube.com/watch?v=mvmuCPvRoWQ
Interpolation¶
Interpolation is a very basic operation in graphics programming. It’s good to become familiar with it in order to expand your horizons as a graphics developer.
The basic idea is that you want to transition from A to B. A value t, represents the states in-between.
As an example if t is 0, then the state is A. If t is 1, then the state is B. Anything in-between is an interpolation.
Between two real (floating point) numbers, a simple interpolation is usually described as:
interpolation = A * (1 - t) + B * t
And often simplified to:
interpolation = A + (B - A) * t
The name of this type of interpolation, which transforms a value into another at constant speed is “linear”. So, when you hear about Linear Interpolation, you know they are referring to this simple formula.
There are other types of interpolations, which will not be covered here. A recommended read afterwards is the Bezier page.
Vector interpolation¶
Vector types (Vector2 and Vector3) can also be interpolated, they come with handy functions to do it Vector2.linear_interpolate() and Vector3.linear_interpolate().
For cubic interpolation, there are also Vector2.cubic_interpolate() and Vector3.cubic_interpolate(), which do a Bezier style interpolation.
Here is simple pseudo-code for going from point A to B using interpolation:
func _physics_process(delta):
t += delta * 0.4
$Sprite.position = $A.position.linear_interpolate($B.position, t)
It will produce the following motion:
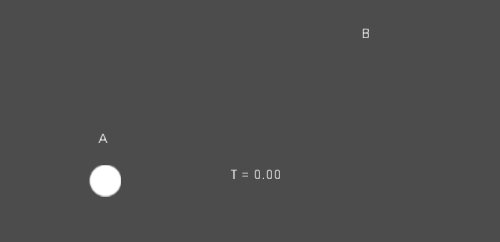
Transform interpolation¶
It is also possible to interpolate whole transforms (make sure they have either uniform scale or, at least, the same non-uniform scale). For this, the function Transform.interpolate_with() can be used.
Here is an example of transforming a monkey from Position1 to Position2:
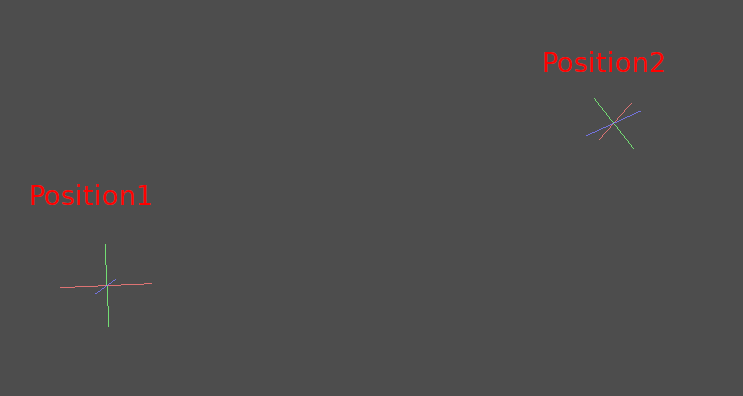
Using the following pseudocode:
var t = 0.0
func _physics_process(delta):
t += delta
$Monkey.transform = $Position1.transform.interpolate_with($Position2.transform, t)
And again, it will produce the following motion:
Smoothing motion¶
Interpolation can be used to smooth movement, rotation, etc. Here is an example of a circle following the mouse using smoothed motion:
const FOLLOW_SPEED = 4.0
func _physics_process(delta):
var mouse_pos = get_local_mouse_position()
$Sprite.position = $Sprite.position.linear_interpolate(mouse_pos, delta * FOLLOW_SPEED)
Here is how it looks:

This useful for smoothing camera movement, allies following you (ensuring they stay within a certain range), and many other common game patterns.
Beziers, curves and paths¶
Bezier curves are a mathematical approximation of natural geometric shapes. We use them to represent a curve with as little information as possible and with a high level of flexibility.
Unlike more abstract mathematical concepts, Bezier curves were created for industrial design. They are a popular tool in the graphics software industry.
They rely on interpolation, which we saw in the previous article, combining multiple steps to create smooth curves. To better understand how Bezier curves work, let’s start from its simplest form: Quadratic Bezier.
Quadratic Bezier¶
Take three points, the minimum required for Quadratic Bezier to work:
To draw a curve between them, we first interpolate gradually over the two
vertices of each of the two segments formed by the three points, using values
ranging from 0 to 1. This gives us two points that move along the segments as we
change the value of t from 0 to 1.
func _quadratic_bezier(p0: Vector2, p1: Vector2, p2: Vector2, t: float):
var q0 = p0.linear_interpolate(p1, t)
var q1 = p1.linear_interpolate(p2, t)
We then interpolate q0 and q1 to obtain a single point r that moves
along a curve.
var r = q0.linear_interpolate(q1, t)
return r
This type of is called a Quadratic Bezier curve.
(Image credit: Wikipedia)
Cubic Bezier¶
Building upon the previous example, we can get more control by interpolating between four points.
We first use a function with four parameters to take four points as an input,
p0, p1, p2 and p3:
func _cubic_bezier(p0: Vector2, p1: Vector2, p2: Vector2, p3: Vector2, t: float):
We apply a linear interpolation to each couple of points to reduce them to three:
var q0 = p0.linear_interpolate(p1, t)
var q1 = p1.linear_interpolate(p2, t)
var q2 = p2.linear_interpolate(p3, t)
We then take our three points and reduce them to two:
var r0 = q0.linear_interpolate(q1, t)
var r1 = q1.linear_interpolate(q2, t)
And to one:
var s = r0.linear_interpolate(r1, t)
return s
Here is the full function:
func _cubic_bezier(p0: Vector2, p1: Vector2, p2: Vector2, p3: Vector2, t: float):
var q0 = p0.linear_interpolate(p1, t)
var q1 = p1.linear_interpolate(p2, t)
var q2 = p2.linear_interpolate(p3, t)
var r0 = q0.linear_interpolate(q1, t)
var r1 = q1.linear_interpolate(q2, t)
var s = r0.linear_interpolate(r1, t)
return s
The result will be a smooth curve interpolating between all four points:
(Image credit: Wikipedia)
Note
Cubic Bezier interpolation works the same in 3D, just use Vector3
instead of Vector2.
Adding control points¶
Building upon Cubic Bezier, we can change the way two of the points work to
control the shape of our curve freely. Instead of having p0, p1, p2
and p3, we will store them as:
point0 = p0: Is the first point, the sourcecontrol0 = p1 - p0: Is a vector relative to the first control pointcontrol1 = p3 - p2: Is a vector relative to the second control pointpoint1 = p3: Is the second point, the destination
This way, we have two points and two control points which are relative vectors to the respective points. If you’ve used graphics or animation software before, this might look familiar:
This is how graphics software presents Bezier curves to the users, and how they work and look in Godot.
Curve2D, Curve3D, Path and Path2D¶
There are two objects that contain curves: Curve3D and Curve2D (for 3D and 2D respectively).
They can contain several points, allowing for longer paths. It is also possible to set them to nodes: Path and Path2D (also for 3D and 2D respectively):
Using them, however, may not be completely obvious, so following is a description of the most common use cases for Bezier curves.
Evaluating¶
Just evaluating them may be an option, but in most cases it’s not very useful. The big drawback with Bezier curves is that if you traverse them at constant speed, from t = 0 to t = 1, the actual interpolation will not move at constant speed. The speed is also an interpolation between the distances between points p0, p1, p2 and p3 and there is not a mathematically simple way to traverse the curve at constant speed.
Let’s do a simple example with the following pseudocode:
var t = 0.0
func _process(delta):
t += delta
position = _cubic_bezier(p0, p1, p2, p3, t)
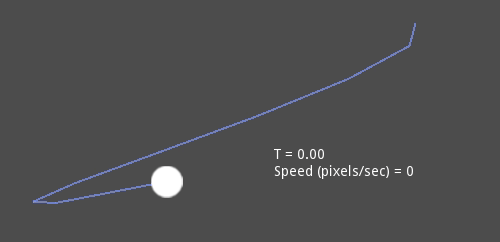
As you can see, the speed (in pixels per second) of the circle varies, even though t is increased at constant speed. This makes beziers difficult to use for anything practical out of the box.
Drawing¶
Drawing beziers (or objects based on the curve) is a very common use case, but it’s also not easy. For pretty much any case, Bezier curves need to be converted to some sort of segments. This is normally difficult, however, without creating a very high amount of them.
The reason is that some sections of a curve (specifically, corners) may require considerable amounts of points, while other sections may not:
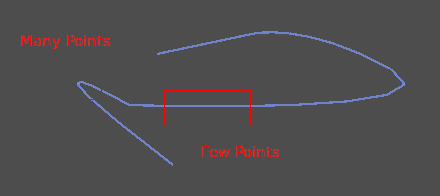
Additionally, if both control points were 0, 0 (remember they are relative vectors), the Bezier curve would just be a straight line (so drawing a high amount of points would be wasteful).
Before drawing Bezier curves, tessellation is required. This is often done with a recursive or divide and conquer function that splits the curve until the curvature amount becomes less than a certain threshold.
The Curve classes provide this via the
Curve2D.tessellate() function (which receives optional stages of recursion and angle tolerance arguments). This way, drawing something based on a curve is easier.
Traversal¶
The last common use case for the curves is to traverse them. Because of what was mentioned before regarding constant speed, this is also difficult.
To make this easier, the curves need to be baked into equidistant points. This way, they can be approximated with regular interpolation (which can be improved further with a cubic option). To do this, just use the Curve.interpolate_baked() method together with Curve2D.get_baked_length(). The first call to either of them will bake the curve internally.
Traversal at constant speed, then, can be done with the following pseudo-code:
var t = 0.0
func _process(delta):
t += delta
position = curve.interpolate_baked(t * curve.get_baked_length(), true)
And the output will, then, move at constant speed:

Animation¶
Introduction to the 2D animation features¶
Overview¶
The AnimationPlayer node allows you to create anything from simple to complex animations.
In this guide you learn to:
- Work with the Animation Panel
- Animate any property of any node
- Create a simple animation
- Call functions with the powerful Call Function Tracks
In Godot, you can animate anything available in the Inspector, such as Node transforms, sprites, UI elements, particles, visibility and color of materials, and so on. You can also modify values of script variables and call any function.
Create an AnimationPlayer node¶
To use the animation tools we first have to create an AnimationPlayer node.
The AnimationPlayer node type is the data container for your animations. One AnimationPlayer node can hold multiple animations, that can automatically transition to one another.
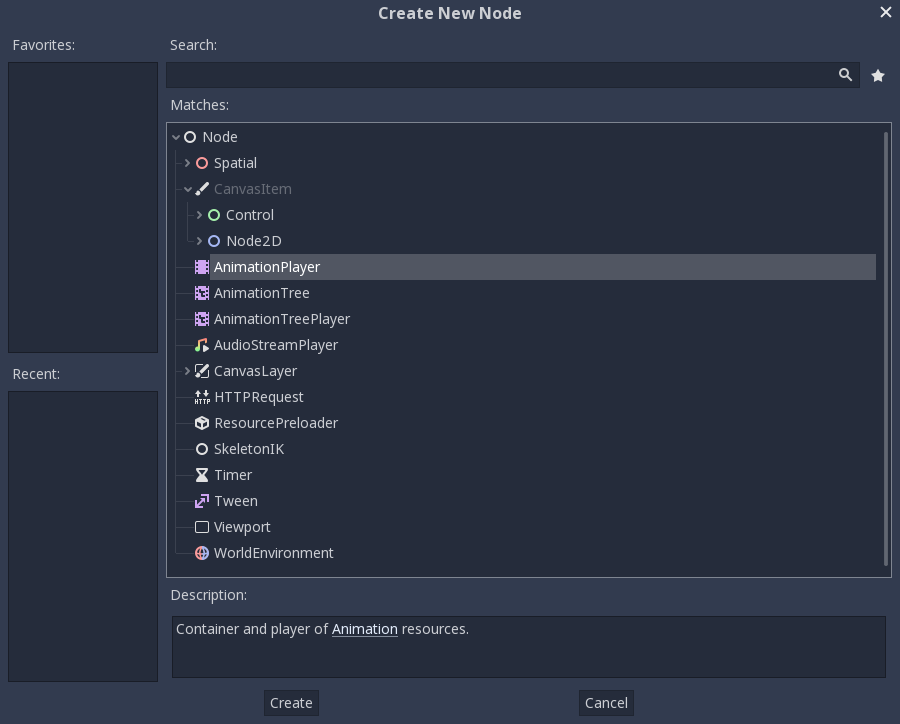
The AnimationPlayer node
After creating one click on the AnimationPlayer node in the Node tab to open the Animation Panel at the bottom of the viewport.

The animation panel position
It consists of four parts:

The animation panel
- Animation controls (i.e. add, load, save, and delete animations)
- The tracks listing
- The timeline with keyframes
- The timeline and track controls, where you can zoom the timeline and edit tracks for example.
Computer animation relies on keyframes¶
A keyframe defines the value of a property at a certain point in time.
Diamond shapes represent keyframes in the timeline. A line between two keyframes indicates that the value hasn’t changed.
Keyframes in Godot
The engine interpolates values between keyframes, resulting in a gradual change in values over time.
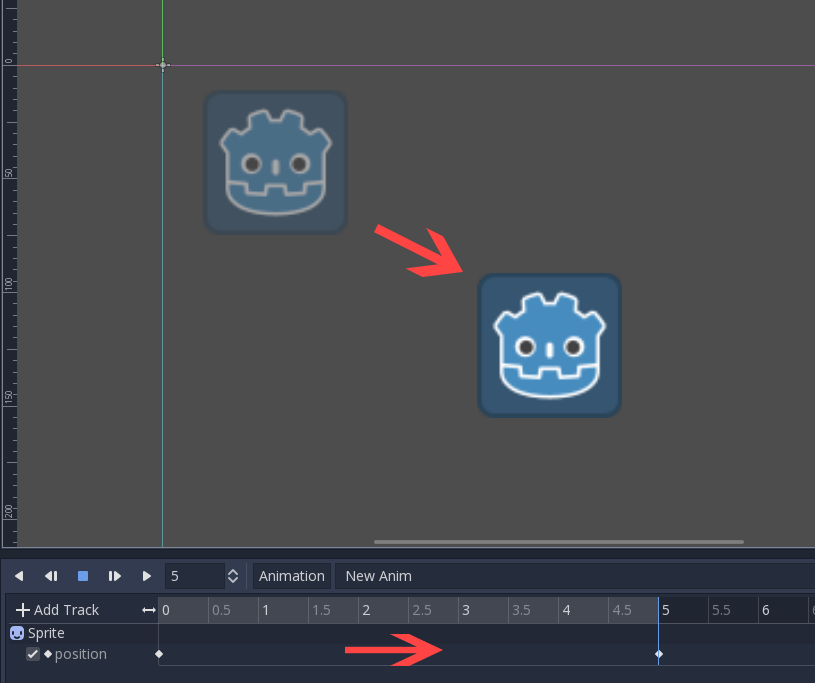
Two keyframes are all it takes to obtain a smooth motion
The timeline lets you insert keyframes and change their timing. It also defines how long the animation is.

The timeline in the animation panel
Each line of the Animation Panel is an animation track. Normal and Transform tracks reference node properties. Their name or id is a path to the node and the affected property.

Example of Normal animation tracks
Tip
If you animate the wrong property, you can edit a track’s path anytime.
Double click on it and type the new path. Play the animation using the
“Play from beginning” button  (or pressing
Shift + D on keyboard) to see the changes instantly.
(or pressing
Shift + D on keyboard) to see the changes instantly.
Tutorial: Creating a simple animation¶
Scene setup¶
For this tutorial, we’ll going to create an AnimationPlayer node and a sprite node as its child.
Our scene setup
The sprite holds an image texture and we animate that sprite to move between two points on the screen. For this tutorial use the default Godot Icon as the sprites’ texture. As a starting point, move the sprite to a left position on the screen.
Tip
Adding animated nodes as children to the AnimationPlayer node is not required, but it is a nice way of distinguishing animated nodes from non-animated nodes in the Scene Tree.
Select the AnimationPlayer node, then click the “Animation” button in the
animation editor. From the list select “New” ( ) to add a new animation. And Enter a name for the animation in the
dialog box.
) to add a new animation. And Enter a name for the animation in the
dialog box.
Add a new animation
Adding a track¶
To add a new track for our sprite, select it and take a look in the toolbar:

Convenience buttons
These switches and buttons allow you to add keyframes for the selected node’s location, rotation, and scale respectively.
Deselect rotation, because we are only interested in the location of our sprite for this tutorial and click on the key button.
As we don’t have a track already set up for the transform/location property, Godot asks, whether it should set it up for us. Click on “Create”.
This creates a new track and our first keyframe at the beginning of the timeline:

The sprite track
The second keyframe¶
Now we need to set the destination where our sprite should be headed and how much time it takes to get there.
Let’s say, we want it to take 2 seconds to go to the other point. By default the animation is set to last only 1 second, so change this in the timeline controls in animation panel’s lower panel to 2.

Animation length
Click on the timeline header near the 2 second mark and move the sprite to the target destination on the right side.
Again, click the key button in the toolbar. This creates our second keyframe.
Run the animation¶
Click on the “Play from beginning” () button.
Yay! Our animation runs:
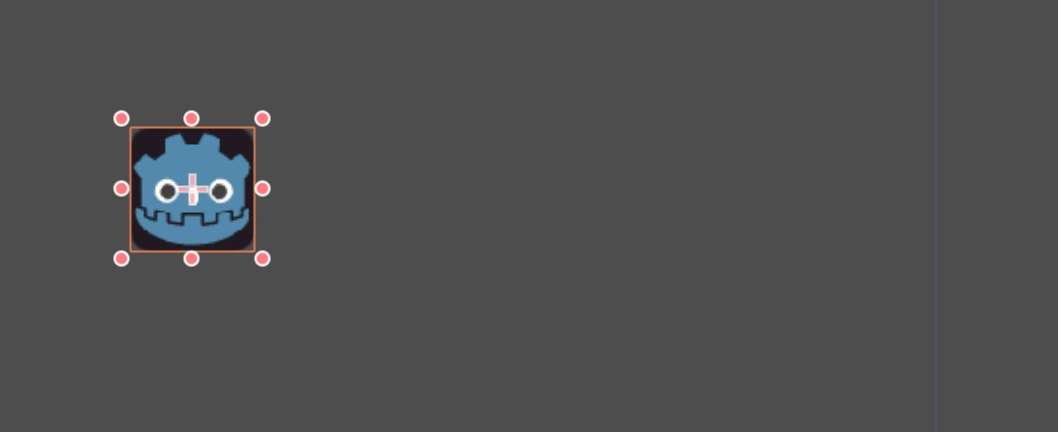
The animation
Back and forth¶
Godot has an additional feature here. Like said before, Godot always calculates the frames between two keyframes. In a loop, the first keyframe is also the last keyframe, if no keyframe is specified at the end.

Animation loop
If you set the animation length to 4 seconds now, the animation moves back and forth. You can change this behaviour if you change the track’s loop mode. This is covered in the next chapter.
Track settings¶
Each track has a settings panel at the end, where you can set the update mode, the track interpolation, and the loop mode.

Track settings
The update mode of a track tells Godot when to update the property values. This can be:
- Continuous: Update the property on each frame
- Discrete: Only update the property on keyframes
- Trigger: Only update the property on keyframes or triggers
- Capture: The current value of a property is remembered, and it will blend with the first animation key found
Track mode
In normal animations, you usually use “Continuous”. The other types are used to script complex animations.
The interpolation tells Godot how to calculate the frame values between the keyframes. These interpolation modes are supported:
- Nearest: Set the nearest keyframe value
- Linear: Set the value based on a linear function calculation between the two keyframes
- Cubic: Set the value based on a cubic function calculation between the two keyframes

Track interpolation
Cubic interpolation leads to a more natural movement, where the animation is slower at a keyframe and faster between keyframes. This is usually used for character animation. Linear interpolation creates more of a robotic movement.
Godot supports two loop modes, which affect the animation if it’s set to loop:
Loop modes
- Clamp loop interpolation: When this is selected, the animation stops after the last keyframe for this track. When the first keyframe is reached again, the animation will reset to its values.
- Wrap loop interpolation: When this is selected, Godot calculates the animation after the last keyframe to reach the values of the first keyframe again.
Keyframes for other properties¶
Godot doesn’t restrict you to only edit transform properties. Every property can be used as a track where you can set keyframes.
If you select your sprite while the animation panel is visible, you get a small keyframe button for all of the sprite’s properties. Click on this button and Godot automatically adds a track and keyframe to the current animation.
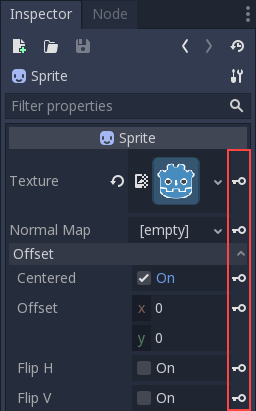
Keyframes for other properties
Edit keyframes¶
For advanced use and to edit keyframes in detail, You can click on them to bring up the keyframe editor in the inspector. You can use this to directly edit its values.
Keyframe editor editing a key
Additionally, you can also edit the easing value for this keyframe by clicking and dragging the easing setting. This tells Godot, how to change the property values when it reaches this keyframe.
You usually tweak your animations this way, when the movement doesn’t “look right”.
Advanced: Call Method tracks¶
Godot’s animation engine doesn’t stop here. If you’re already comfortable with Godot’s scripting language GDScript basics and Godot API you know that each node type is a class and has a bunch of callable methods.
For example, the AudioStreamPlayer node type has a method to play an audio stream.
Wouldn’t it be great to use a method at a specific keyframe in an animation? This is where “Call Method Tracks” come in handy. These tracks reference a node again, this time without a reference to a property. Instead, a keyframe holds the name and arguments of a method, that Godot should call when it reaches this keyframe.
To demonstrate, we’re going to use a call method track to play audio at a specific keyframe. Normally to play audio you should use an audio track, but for the sake of demonstrating methods we’re going to do it this way.
Add a AudioStreamPlayer to the Scene Tree and setup a stream using an audio file you put in your project.
Click on “Add track” ( ) on the animation panel’s track
controls.
) on the animation panel’s track
controls.
Select “Add Call Method Track” from the list of possible track types.
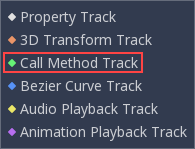
Add Call Method Track
Select the AudioStreamPlayer node in the selection window. Godot adds the track with the reference to the node.
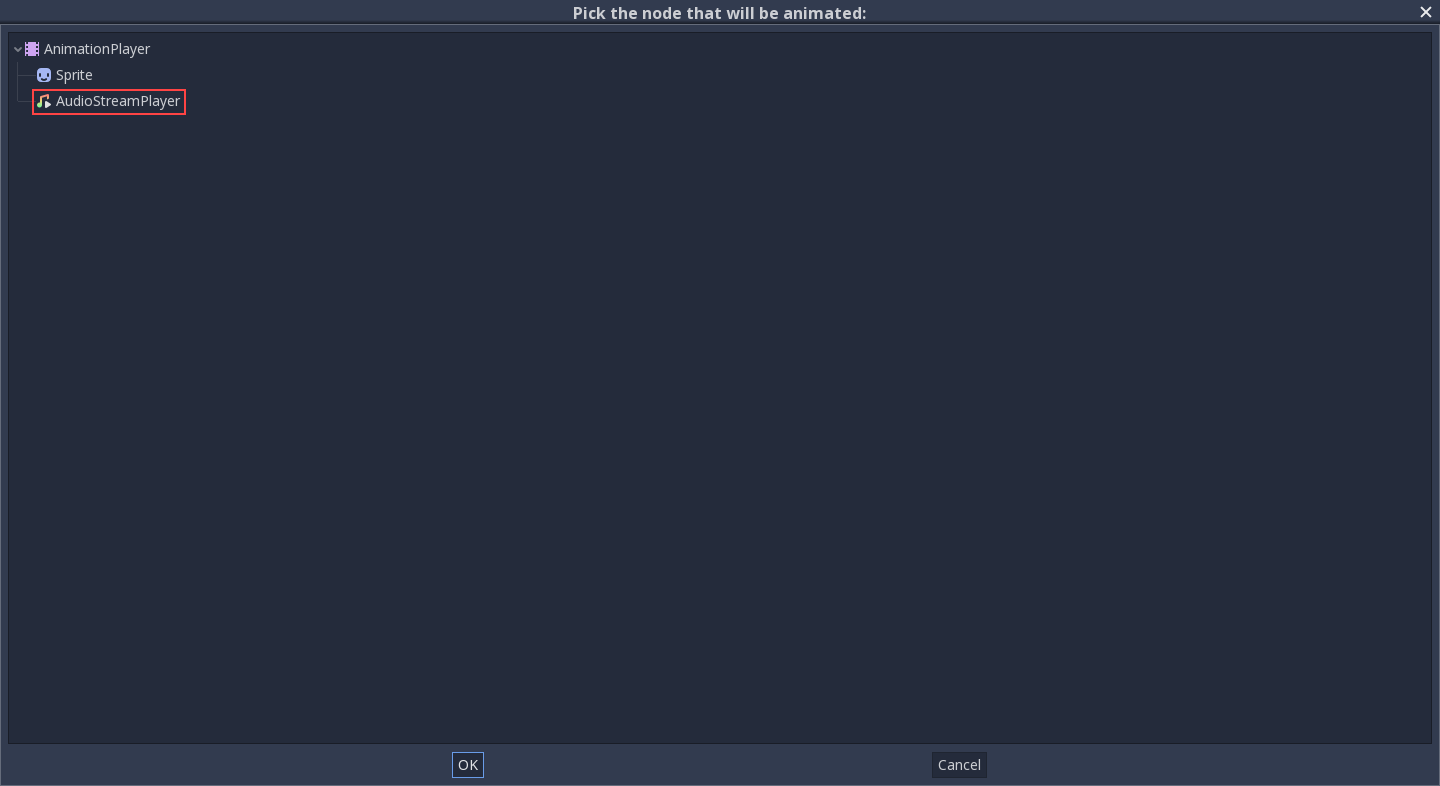
Select AudioStreamPlayer
Right click the timeline where Godot should play the sample and click the “Insert Key” option. This will bring up a list of methods that can be called for the AudioStreamPlayer node. Select the first one.
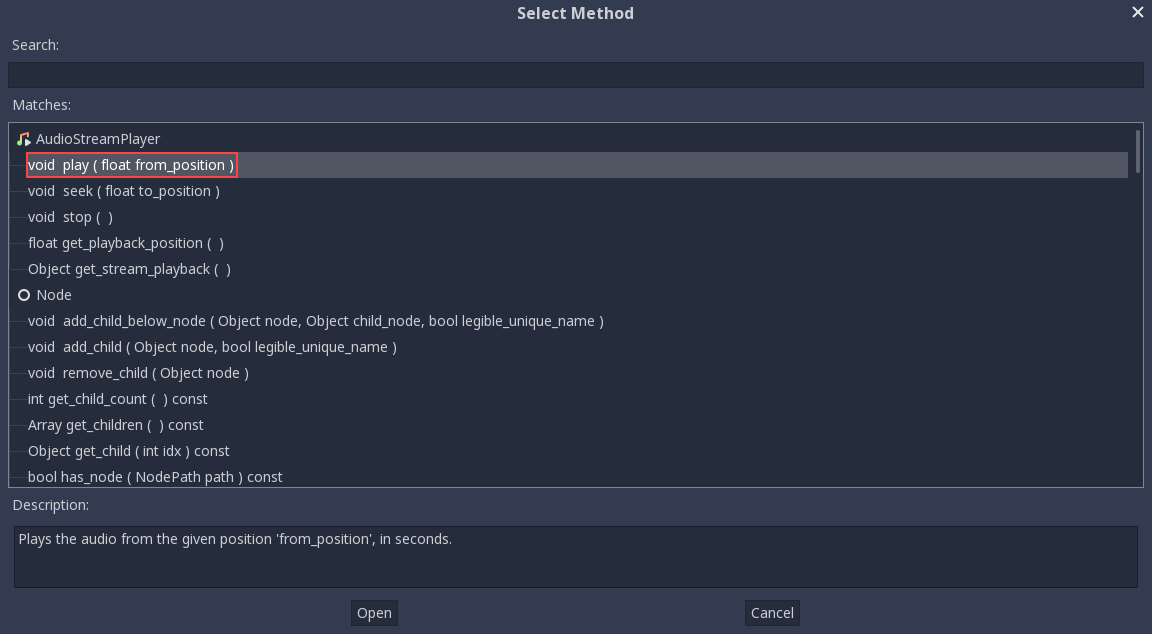
When Godot reaches the keyframe, Godot calls the AudioStreamPlayer node’s “play” function and the stream plays.
You can change its position by dragging it on the timeline, you can also click on the keyframe and use the keyframe settings in the inspector.
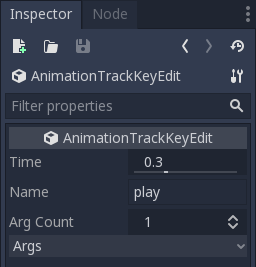
Cutout animation¶
What is it?¶
Traditionally, cutout animation is a type of stop motion animation in which pieces of paper (or other thin material) are cut into special shapes and arranged in two-dimensional representations of characters and objects. Characters’ bodies are usually made out of several pieces. The pieces are arranged and photographed once for each frame of the film. The animator moves and rotates the parts in small increments between each shot to create the illusion of movement when the images are played back quickly in sequence.
Simulations of cutout animation can now be created using software as seen in South Park and Jake and the Never Land Pirates.
In video games, this technique has also become popular. Examples of this are Paper Mario or Rayman Origins .
Cutout animation in Godot¶
Godot provides tools for working with cutout rigs, and is ideal for the workflow:
- The animation system is fully integrated with the engine: This means animations can control much more than just motion of objects. Textures, sprite sizes, pivots, opacity, color modulation, and more, can all be animated and blended.
- Combine animation styles: AnimatedSprite allows traditional cel animation to be used alongside cutout animation. In cel animation different animation frames use entirely different drawings rather than the same pieces positioned differently. In an otherwise cutout-based animation, cel animation can be used selectively for complex parts such as hands, feet, changing facial expressions, etc.
- Custom Shaped Elements: Custom shapes can be created with Polygon2D allowing UV animation, deformations, etc.
- Particle Systems: A cutout animation rig can be combined with particle systems. This can useful for magic effects, jetpacks, etc.
- Custom Colliders: Set colliders and influence areas in different parts of the skeletons, great for bosses and fighting games.
- Animation Tree: Allows complex combinations and blending between several animations, the same way it works in 3D.
And much more!
Making of GBot¶
For this tutorial, we will use as demo content the pieces of the GBot character, created by Andreas Esau.
Get your assets: gbot_resources.zip.
Setting up the rig¶
Create an empty Node2D as root of the scene, we will work under it:
The first node of the model is the hip. Generally, both in 2D and 3D, the hip is the root of the skeleton. This makes it easier to animate:
Next will be the torso. The torso needs to be a child of the hip, so create a child sprite and load the torso texture, later accommodate it properly:

This looks good. Let’s see if our hierarchy works as a skeleton by rotating the torso. We can do this be pressing E to enter rotate mode, and dragging with the left mouse button. To exit rotate mode hit ESC.
The rotation pivot is wrong and needs to be adjusted.
This small cross in the middle of the Sprite is the rotation pivot:
Adjusting the pivot¶
The pivot can be adjusted by changing the offset property in the Sprite:
The pivot can also be adjusted visually. While hovering over the desired pivot point, press V to move the pivot there for the selected Sprite. There is also a tool in the tool bar that has a similar function.

Continue adding body pieces, starting with the right arm. Make sure to put each sprite in its correct place in the hierarchy, so its rotations and translations are relative to its parent:
With the left arm there’s a problem. In 2D, child nodes appear in front of their parents:
We want the left arm to appear behind
the hip and the torso. We could move the left arm nodes behind the hip (above
the hip node in the scene hierarchy), but then the left arm is no longer in its
proper place in the hierarchy. This means it wouldn’t be affected the movement
of the torso. We’ll fix this problem with RemoteTransform2D nodes.
Note
You can also fix depth ordering problems by adjusting the Z property of any node inheriting from Node2D.
RemoteTransform2D node¶
The RemoteTransform2D node transforms nodes somewhere else in the hierarchy. This node applies its own transform (including any transformation it inherits from its parents) to the remote node it targets.
This allows us to correct the visibility order of our elements independent from the locations of those parts in the cutout hierarchy.
Create a RemoteTransform2D node as a child of the torso. Call it remote_arm_l.
Create another RemoteTransform2D node inside the first and call it remote_hand_l.
Use the Remote Path property of the two new nodes to target the arm_l and
hand_l sprites respectively:
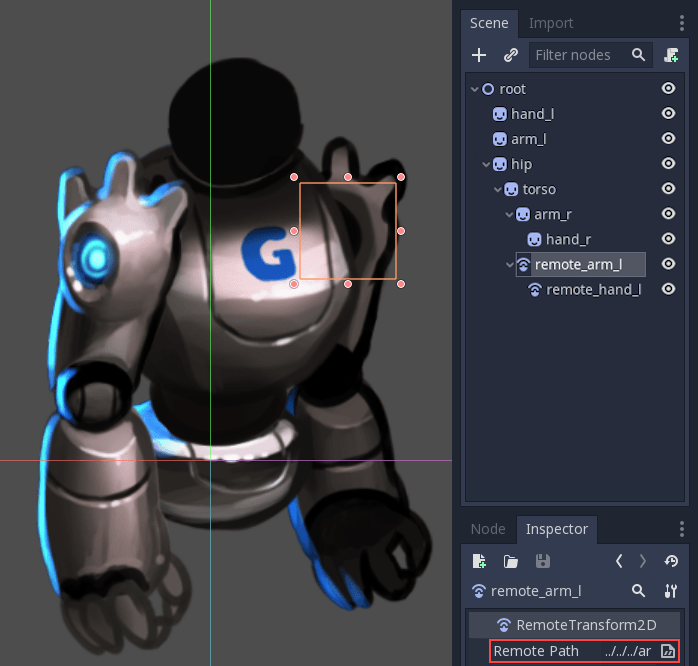
Moving the RemoteTransform2D nodes now moves the sprites. So we can create
animations by adjusting the RemoteTransform2D transforms:
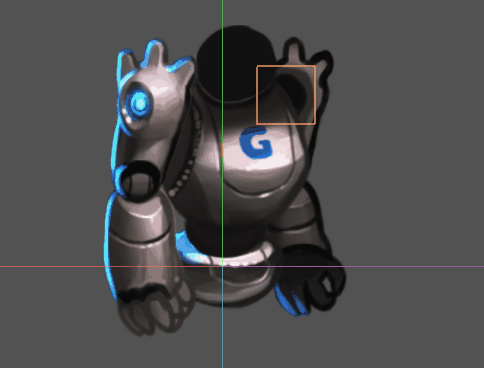
Completing the skeleton¶
Complete the skeleton by following the same steps for the rest of the parts. The resulting scene should look similar to this:

The resulting rig will be easy to animate. By selecting the nodes and rotating them you can animate forward kinematics (FK) efficiently.
For simple objects and rigs this is fine, but there are limitations:
- Selecting sprites in the main viewport can become difficult in complex rigs. The scene tree ends up being used to select parts instead, which can be slower.
- Inverse Kinematics (IK) is useful for animating extremities like hands and feet, and can’t be used with our rig in its current state.
To solve these problems we’ll use Godot’s skeletons.
Skeletons¶
In Godot there is a helper to create “bones” between nodes. The bone-linked nodes are called skeletons.
As an example, let’s turn the right arm into a skeleton. To create a skeleton, a chain of nodes must be selected from top to bottom:
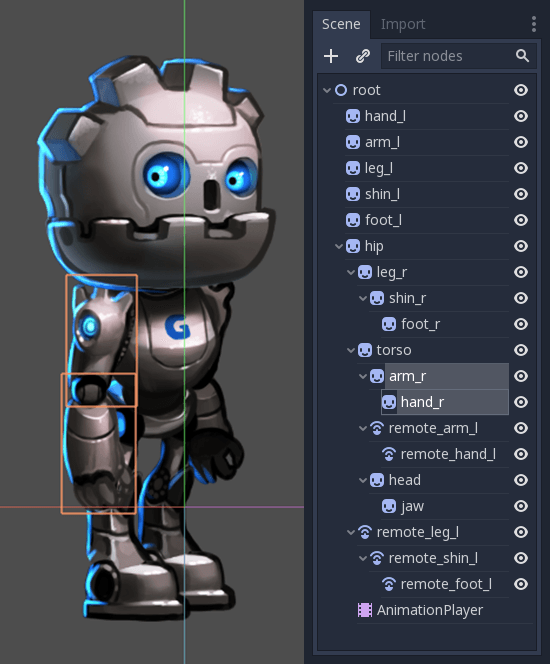
Then, click on the Skeleton menu and select Make Bones.
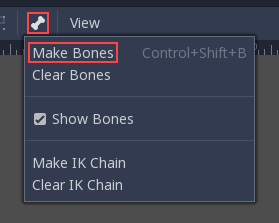
This will add bones covering the arm, but the result may be surprising.
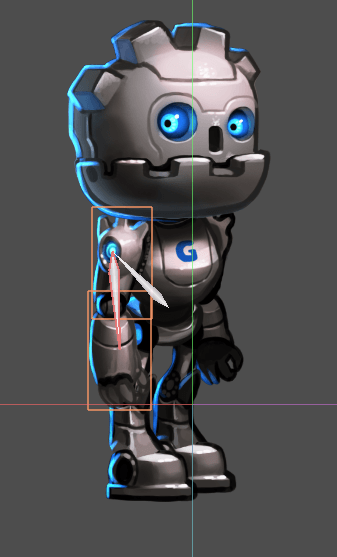
Why does the hand lack a bone? In Godot, a bone connects a node with its parent. And there’s currently no child of the hand node. With this knowledge let’s try again.
The first step is creating an endpoint node. Any kind of node will do, but Position2D is preferred because it’s visible in the editor. The endpoint node will ensure that the last bone has orientation.
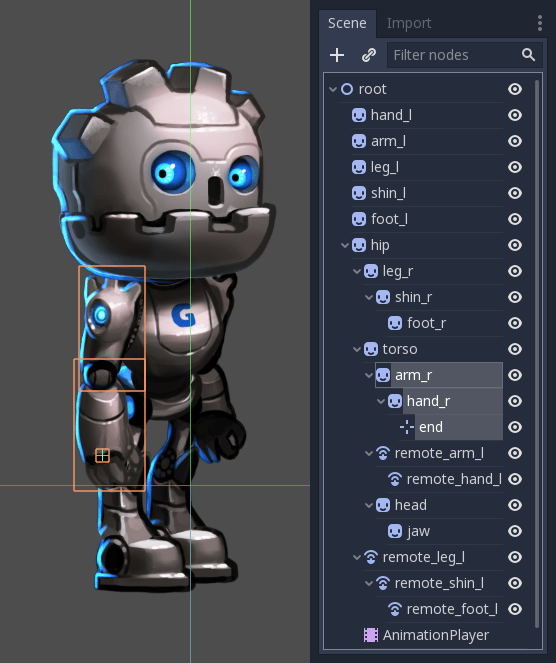
Now select the whole chain, from the endpoint to the arm and create bones:
The result resembles a skeleton a lot more, and now the arm and forearm can be selected and animated.
Create endpoints for all important extremities. Generate bones for all articulable parts of the cutout, with the hip as the ultimate connection between all of them.
You may notice that an extra bone is created when connecting the hip and torso.
Godot has connected the hip node to the scene root with a bone, and we don’t
want that. To fix this, select the root and hip node, open the Skeleton menu,
click clear bones.
Your final skeleton should look something like this:
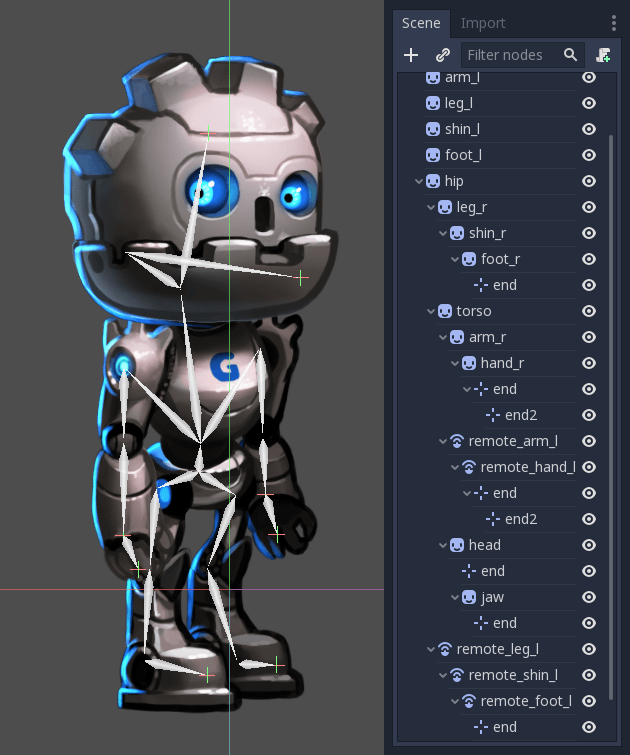
You might have noticed a second set of endpoints in the hands. This will make sense soon.
Now that the whole figure is rigged, the next step is setting up the IK chains. IK chains allow for more natural control of extremities.
IK chains¶
IK stands for inverse kinematics. It’s a convenient technique for animating the position of hands, feet and other extremities of rigs like the one we’ve made. Imagine you want to pose a character’s foot in a specific position on the ground. Without IK chains, each motion of the foot would require rotating and positioning several other bones (the shin and the thigh at least). This would be quite complex and lead to imprecise results.
IK allows us to move directly the foot while the shin and thigh self-adjust.
To create an IK chain, select a chain of bones from endpoint to the base for the chain. For example, to create an IK chain for the right leg, select the following:
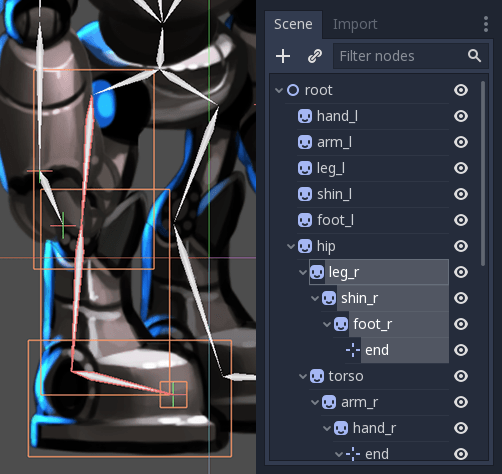
Then enable this chain for IK. Go to Edit > Make IK Chain.
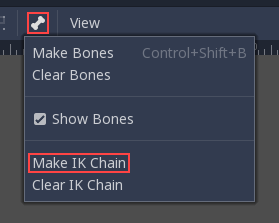
As a result, the base of the chain will turn Yellow.
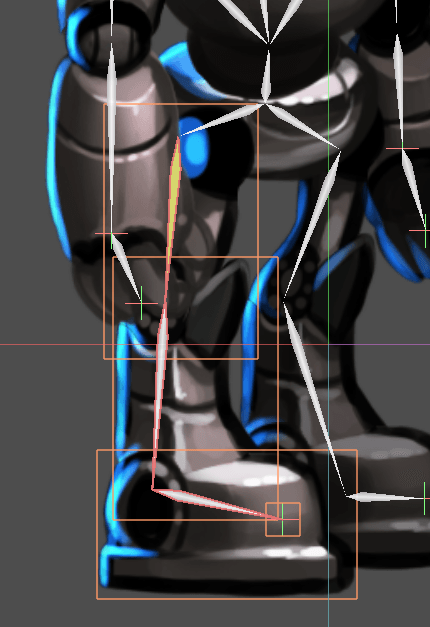
Once the IK chain is set-up grab any child or grand-child of the base of the chain (e.g. a foot) and move it. You’ll see the rest of the chain adjust as you adjust its position.
Animation tips¶
The following section will be a collection of tips for creating animation for your cutout rigs. For more information on how the animation system in Godot works, see Animations.
Setting keyframes and excluding properties¶
Special contextual elements appear in the top toolbar when the animation editor window is open:
The key button inserts location, rotation, and scale keyframes for the selected objects or bones at the current playhead position.
The “loc”, “rot”, and “scl” toggle buttons to the left of the key button modify its function, allowing you to specify which of the three properties keyframes will be created for.
Here’s an illustration of how this can be useful: Imagine you have a node which already has two keyframes animating its scale only. You want to add an overlapping rotation movement to the same node. The rotation movement should begin and end at different times from the scale change that’s already set up. You can use the toggle buttons to have only rotation information added when you add a new keyframe. This way, you can avoid adding unwanted scale keyframes which would disrupt the existing scale animation.
Creating a rest pose¶
Think of a rest pose as a default pose that your cutout rig should be set to when no other pose is active in your game. Create a rest pose as follows:
1. Make sure the rig parts are positioned in what looks like a “resting” arrangement.
- Create a new animation, rename it “rest”.
- Select all nodes in your rig (box selection should work fine).
4. Make sure the “loc”, “rot”, and “scl” toggle buttons are all active in the toolbar.
5. Press the key button. Keys will be inserted for all selected parts storing their current arrangement. This pose can now be recalled when necessary in your game by playing the “rest” animation you’ve created.
Modifying rotation only¶
When animating a cutout rig, often it’s only the rotation of the nodes that needs to change. Location and scale are rarely used.
So when inserting keys, you might find it convenient to have only the “rot” toggle active most of the time:

This will avoid the creation of unwanted animation tracks for position and scale.
Keyframing IK chains¶
When editing IK chains, it’s not necessary to select the whole chain to add keyframes. Selecting the endpoint of the chain and inserting a keyframe will automatically insert keyframes for all other parts of the chain too.
Visually move a sprite behind its parent¶
Sometimes it is necessary to have a node change its visual depth relative to its parent node during an animation. Think of a character facing the camera, who pulls something out from behind his back and holds it out in front of him. During this animation the whole arm and the object in his hand would need to change their visual depth relative to the body of the character.
To help with this there’s a keyframable “Behind Parent” property on all Node2D-inheriting nodes. When planning your rig, think about the movements it will need to perform and give some thought to how you’ll use “Behind Parent” and/or RemoteTransform2D nodes. They provide overlapping functionality.
Setting easing curves for multiple keys¶
To apply the same the easing curve to multiple keyframes at once:
- Select the relevant keys.
- Click on the pencil icon in the bottom right of the animation panel, this will open the transition editor.
- In the transition editor click on the desired curve to apply it.

2D Skeletal deform¶
Skeletal deform can be used to augment a cutout rig, allowing single pieces to deform organically (e.g. antennae that wobble as an insect character walks).
This process is described in a separate tutorial.
2D skeletons¶
Introduction¶
When working with 3D, skeletal deforms are common for characters and creatures and most 3D modelling applications support it. For 2D, as this function is not used as often, it’s difficult to find mainstream software aimed for this.
One option is to create animations in third-party software such as Spine or Dragonbones. From Godot 3.1 onwards, though, this functionality is supported built-in.
Why would you want to do skeletal animations directly in Godot? The answer is that there are many advantages to it:
- Better integration with the engine, so less hassle importing and editing from an external tool.
- Ability to control particle systems, shaders, sounds, call scripts, colors, transparency, etc. in animations.
- The built-in skeletal system in Godot is very efficient and designed for performance.
The following tutorial will, then, explain 2D skeletal deformations.
Setup¶
See also
Before starting, we recommend you to go through the Cutout animation tutorial to gain a general understanding of animating within Godot.
For this tutorial, we will be using a single image to construct our character.
Download it from gBot_pieces.png or save the
image below.
It is also advised to download the final character image
gBot_complete.png to have a good reference
for putting the different pieces together.

Creating the polygons¶
Create a new scene for your model (if it’s going to be an animated character,
you may want to use a KinematicBody2D). For ease of use, an empty 2D node is
created as a root for the polygons.
Begin with a Polygon2D node. There is no need to place it anywhere in the
scene for now, so simply create it like this:
Select it and assign the texture with the character pieces you have downloaded before:
Drawing a polygon directly is not advised. Instead, open the “UV” dialog for the polygon:
Head over to the Points mode, select the pencil and draw a polygon around the desired piece:
Duplicate the polygon node and give it a proper name. Then, enter the “UV” dialog again and replace the old polygon with another one in the new desired piece.
When you duplicate nodes and the next piece has a similar shape, you can edit the previous polygon instead of drawing a new one.
After moving the polygon, remember to update the UV by selecting Edit -> “Polygon -> UV” in the Polygon 2D UV Editor.

Keep doing this until you mapped all pieces.
You will notice that pieces for nodes appear in the same layout as they do in the original texture. This is because by default, when you draw a polygon, the UV and points are the same.
Rearrange the pieces and build the character. This should be pretty quick. There is no need to change pivots, so don’t bother making sure rotation pivots for each piece are right; you can leave them be for now.
Ah, the visual order of the pieces is not correct yet, as some are covering wrong pieces. Rearrange the order of the nodes to fix this:
And there you go! It was definitely much easier than in the cutout tutorial.
Creating the skeleton¶
Create a Skeleton2D node as a child of the root node. This will be the base
of our skeleton:
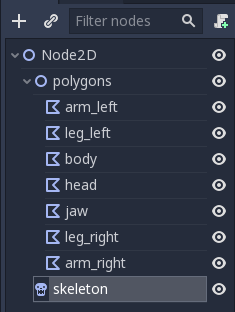
Create a Bone2D node as a child of the skeleton. Put it on the hip (usually
skeletons start here). The bone will be pointing to the right, but you can
ignore this for now.
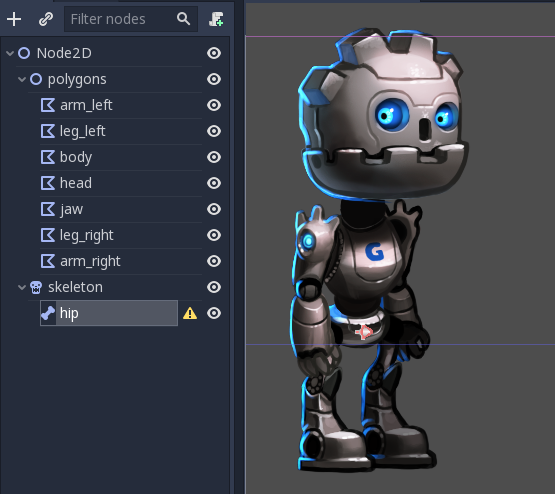
Keep creating bones in hierarchy and naming them accordingly.
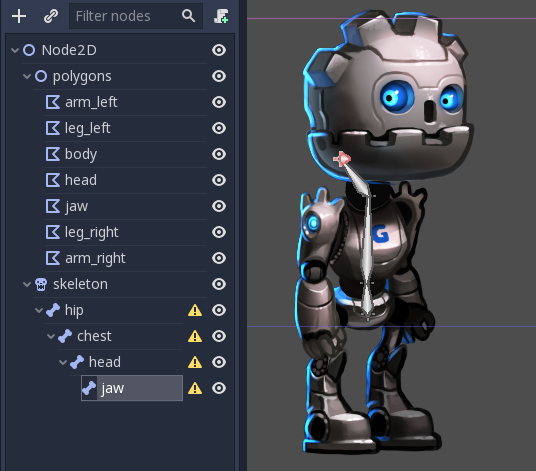
At the end of this chain, there will be a jaw node. It is, again, very short and pointing to the right. This is normal for bones without children. The length of tip bones can be changed with a property in the inspector:
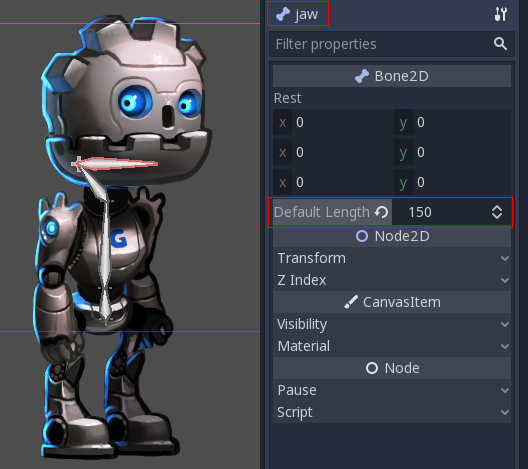
In this case, we don’t need to rotate the bone (coincidentally the jaw points right in the sprite), but in case you need to, feel free to do it. Again, this is only really needed for tip bones as nodes with children don’t usually need a length or a specific rotation.
Keep going and build the whole skeleton:
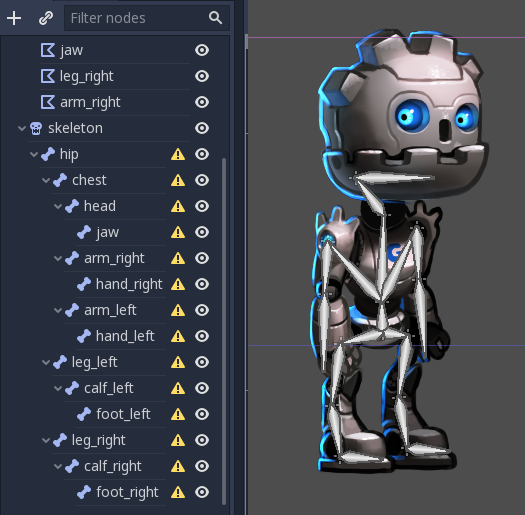
You will notice that all bones raise an annoying warning about a missing rest pose. This means that it’s time to set one. Go to the skeleton node and create a rest pose. This pose is the default one, you can come back to it anytime you want (which is very handy for animating):
The warnings will go away. If you modify the skeleton (add/remove bones) you will need to set the rest pose again.
Deforming the polygons¶
Select the previously created polygons and assign the skeleton node to their
Skeleton property. This will ensure that they can eventually be deformed by
it.
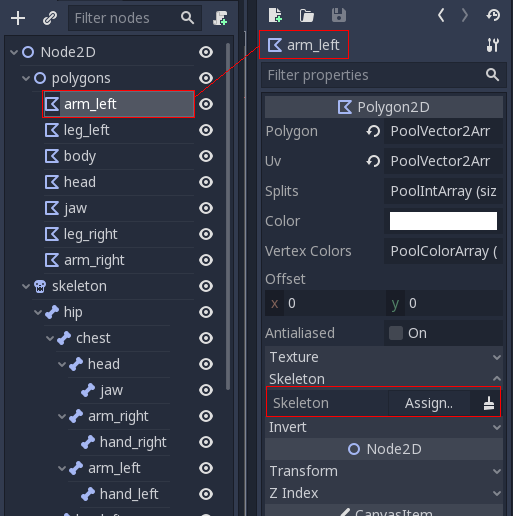
Click the property highlighted above and select the skeleton node:
Again, open the UV editor for the polygon and go to the Bones section.
You will not be able to paint weights yet. For this you need to synchronize the list of bones from the skeleton with the polygon. This step is done only once and manually (unless you modify the skeleton by adding/removing/renaming bones). It ensures that your rigging information is kept in the polygon, even if a skeleton node is accidentally lost or the skeleton modified. Push the “Sync Bones to Polygon” button to sync the list.
The list of bones will automatically appear. By default, your polygon has no weight assigned to any of them. Select the bones you want to assign weight to and paint them:
Points in white have a full weight assigned, while points in black are not influenced by the bone. If the same point is painted white for multiple bones, the influence will be distributed amongst them (so usually there is not that much need to use shades in-between unless you want to polish the bending effect).
After painting the weights, animating the bones (NOT the polygons!) will have the desired effect of modifying and bending the polygons accordingly. As you only need to animate bones in this approach, work becomes much easier!
But it’s not all roses. Trying to animate bones that bend the polygon will often yield unexpected results:
This happens because Godot generates internal triangles that connect the points when drawing the polygon. They don’t always bend the way you would expect. To solve this, you need to set hints in the geometry to clarify how you expect it to deform.
Internal vertices¶
Open the UV menu for each bone again and go to the Points section. Add some internal vertices in the regions where you expect the geometry to bend:
Now, go to the Polygon section and redraw your own polygons with more detail. Imagine that, as your polygons bend, you need to make sure they deform the least possible, so experiment a bit to find the right setup.

Once you start drawing, the original polygon will disappear and you will be free to create your own:
This amount of detail is usually fine, though you may want to have more fine-grained control over where triangles go. Experiment by yourself until you get the results you like.
Note: Don’t forget that your newly added internal vertices also need weight painting! Go to the Bones section again to assign them to the right bones.
Once you are all set, you will get much better results:
AnimationTree¶
Introduction¶
With AnimationPlayer, Godot has one of the most flexible animation systems that you can find in any game engine. The ability to animate pretty much any property in any node or resource, as well as having dedicated transform, bezier, function calling, audio and sub-animation tracks, is pretty much unique.
However, the support for blending those animations via AnimationPlayer is relatively limited, as only a fixed cross-fade transition time can be set.
AnimationTree is a new node introduced in Godot 3.1 to deal with advanced transitions.
It supersedes the ancient AnimationTreePlayer, while adding a huge amount of features and flexibility.
Creating an AnimationTree¶
Before starting, it must be made clear that an AnimationTree node does not contain its own animations.
Instead, it uses animations contained in an AnimationPlayer node. This way, you can edit your animations (or import them from a 3D scene)
as usual and then use this extra node to control the playback.
The most common way to use AnimationTree is in a 3D scene. When importing your scenes from a 3D exchange format, they will usually come
with animations built-in (either multiple ones or split from a large one on import).
At the end, the imported Godot scene will contain the animations in a AnimationPlayer node.
As you rarely use imported scenes directly in Godot (they are either instantiated or inherited from), you can place the AnimationTree node in your
new scene which contains the imported one. Afterwards, point the AnimationTree node to the AnimationPlayer that was created in the imported scene.
This is how it’s done in the Third Person Shooter demo, for reference:
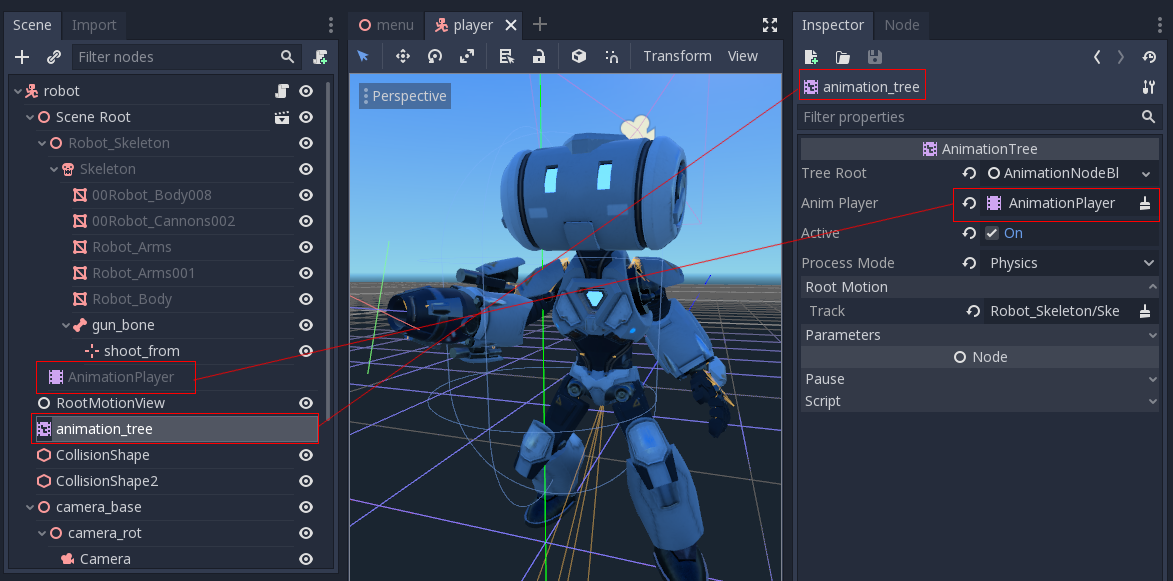
A new scene was created for the player with a KinematicBody as root. Inside this scene, the original .dae (Collada) file was instantiated
and an AnimationTree node was created.
Creating a tree¶
There are three main types of nodes that can be used in AnimationTree:
- Animation nodes, which reference an animation from the linked
AnimationTree. - Animation Root nodes, which are used to blend sub-nodes.
- Animation Blend nodes, which are used within
AnimationNodeBlendTreeas single-graph blending via multiple input ports.
To set a root node in AnimationTree, a few types are available:
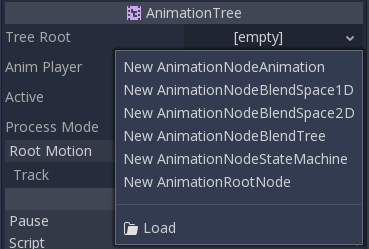
AnimationNodeAnimation: Selects an animation from the list and plays it. This is the simplest root node, and generally not used directly as root.AnimationNodeBlendTree: Contains many blend type nodes, such as mix, blend2, blend3, one shot, etc. This is one of the most commonly used roots.AnimationNodeStateMachine: Contains multiple root nodes as children in a graph. Each node is used as a state, and provides multiple functions to alternate between states.AnimationNodeBlendSpace2D: Allows placing root nodes in a 2D blend space. Control the blend position in 2D to mix between multiple animations.AnimationNodeBlendSpace1D: Simplified version of the above (1D).
Blend tree¶
An AnimationNodeBlendTree can contain both root and regular nodes used for blending. Nodes are added to the graph from a menu:
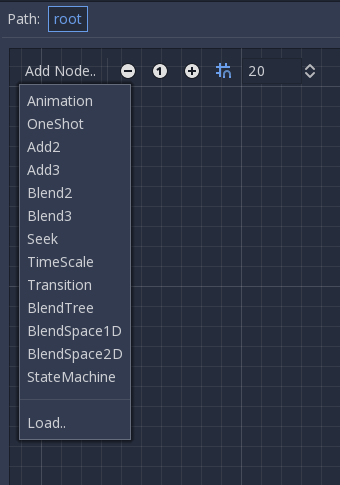
All blend trees contain an Output node by default, and something has to be connected to it in order for animations to play.
The easiest way to test this functionality is to connect an Animation node to it directly:
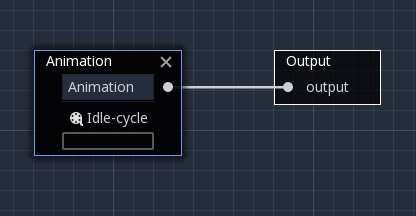
This will simply play back the animation. Make sure that the AnimationTree is active for something to actually happen.
Following is a short description of available nodes:
Blend2 / Blend3¶
These nodes will blend between two or three inputs by a user-specified blend value:
For more complex blending, it is advised to use blend spaces instead.
Blending can also use filters, i.e. you can control individually which tracks go through the blend function. This is very useful for layering animations on top of each other.
OneShot¶
This node will execute a sub-animation and return once it finishes. Blend times for fading in and out can be customized, as well as filters.
Seek¶
This node can be used to cause a seek command to happen to any sub-children of the graph. After setting the time, this value returns to -1.
TimeScale¶
Allows scaling the speed of the animation (or reverse it) in any children nodes. Setting it to 0 will pause the animation.
Transition¶
Very simple state machine (when you don’t want to cope with a StateMachine node). Animations can be connected to the outputs and transition times can be specified.
BlendSpace2D¶
BlendSpace2D is a node to do advanced blending in two dimensions. Points are added to a two dimensional space and then a position
can be controlled to determine blending:
The ranges in X and Y can be controlled (and labeled for convenience). By default, points can be placed anywhere (just right-click on the coordinate system or use the add point button) and triangles will be generated automatically using Delaunay.
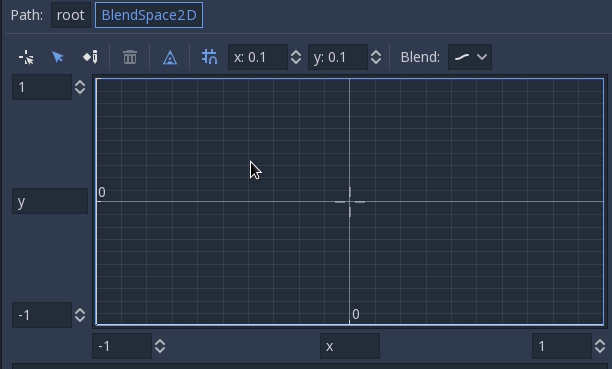
It is also possible to draw the triangles manually by disabling the auto triangle option, though this is rarely necessary:

Finally, it is possible to change the blend mode. By default, blending happens by interpolating points inside the closest triangle. When dealing with 2D animations (frame by frame), you may want to switch to Discrete mode. Alternatively, if you want to keep the current play position when switching between discrete animations, there is a Carry mode. This mode can be changed in the Blend menu:
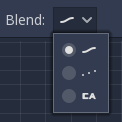
BlendSpace1D¶
This is similar to 2D blend spaces, but in one dimension (so triangles are not needed).
StateMachine¶
This node is a relatively simple state machine. Root nodes can be created and connected via lines. States are connected via Transitions, which are connections with special properties. Transitions are uni-directional, but two can be used to connect in both ways.
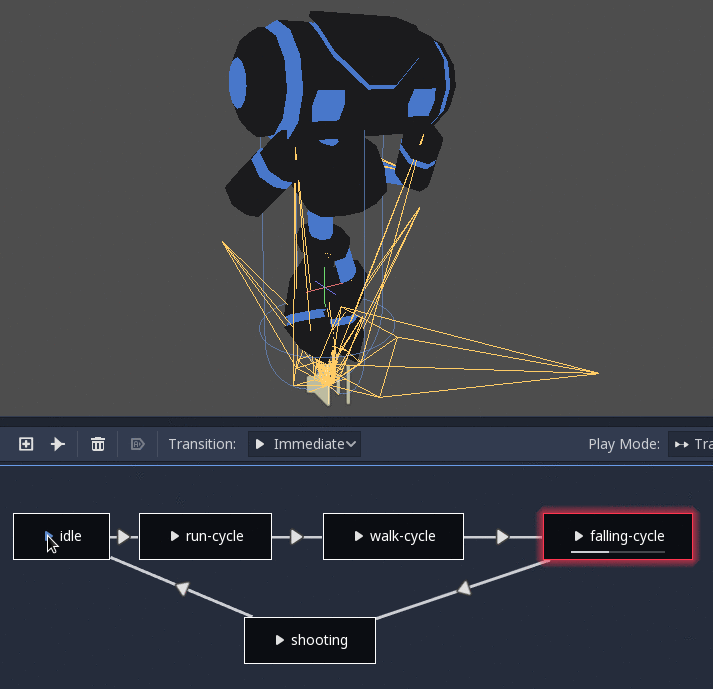
There are many types of transitions:
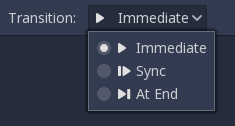
- Immediate: Will switch to the next state immediately. The current state will end and blend into the beginning of the new one.
- Sync: Will switch to the next state immediately, but will seek the new state to the playback position of the old state.
- At End: Will wait for the current state playback to end, then switch to the beginning of the next state animation.
Transitions also have a few properties. Click any transition and it will be displayed in the inspector dock:
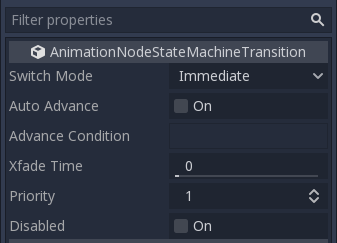
- Switch Mode is the transition type (see above), it can be modified after creation here.
- Auto Advance will turn on the transition automatically when this state is reached. This works best with the At End switch mode.
- Advance Condition will turn on auto advance when this condition is set. This is a custom text field that can be filled with a variable name. The variable can be modified from code (more on this later).
- Xfade Time is the time to cross-fade between this state and the next.
- Priority is used together with the
travel()function from code (more on this later). When travelling from a state to another, give more priority to this node. - Disabled allows to disable this transition (it will not be used during travel or auto advance).
Root motion¶
When working with 3D animations, a popular technique is for animators to use the root skeleton bone to give motion to the rest of the skeleton. This allows animating characters in a way where steps actually match the floor below. It also allows precise interaction with objects during cinematics.
When playing back the animation in Godot, it is possible to select this bone as the root motion track. Doing so will cancel the bone transformation visually (the animation will stay in place).
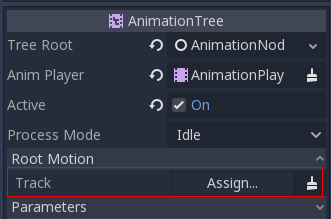
Afterwards, the actual motion can be retrieved via the AnimationTree API as a transform:
anim_tree.get_root_motion_transform()
animTree.GetRootMotionTransform();
This can be fed to functions such as KinematicBody.move_and_slide to control the character movement.
There is also a tool node, RootMotionView, that can be placed in a scene and will act as a custom floor for your
character and animations (this node is normally disabled during the game).
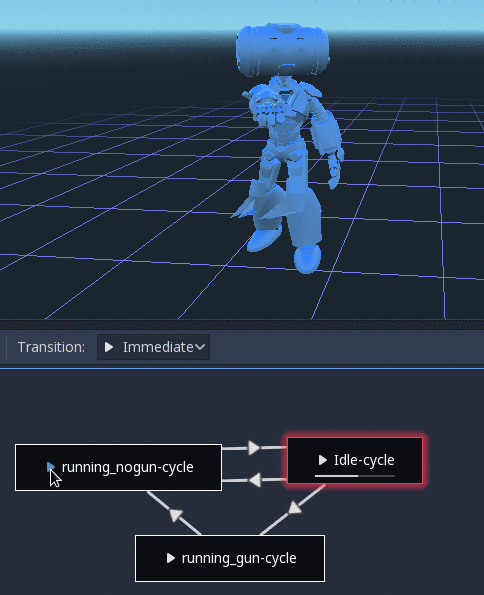
Controlling from code¶
After building the tree and previewing it, the only question remaining is “How is all this controlled from code?”.
Keep in mind that the animation nodes are just resources and, as such, they are shared between all the instances.
Setting values in the nodes directly will affect all instances of the scene that uses this AnimationTree.
This has some cool use cases, though, e.g. you can copy and paste parts of your animation tree, or reuse nodes with a complex layout
(such as a state machine or blend space) in different animation trees.
The actual animation data is contained in the AnimationTree node and is accessed via properties.
Check the “Parameters” section of the AnimationTree node to see all the parameters that can be modified in real-time:
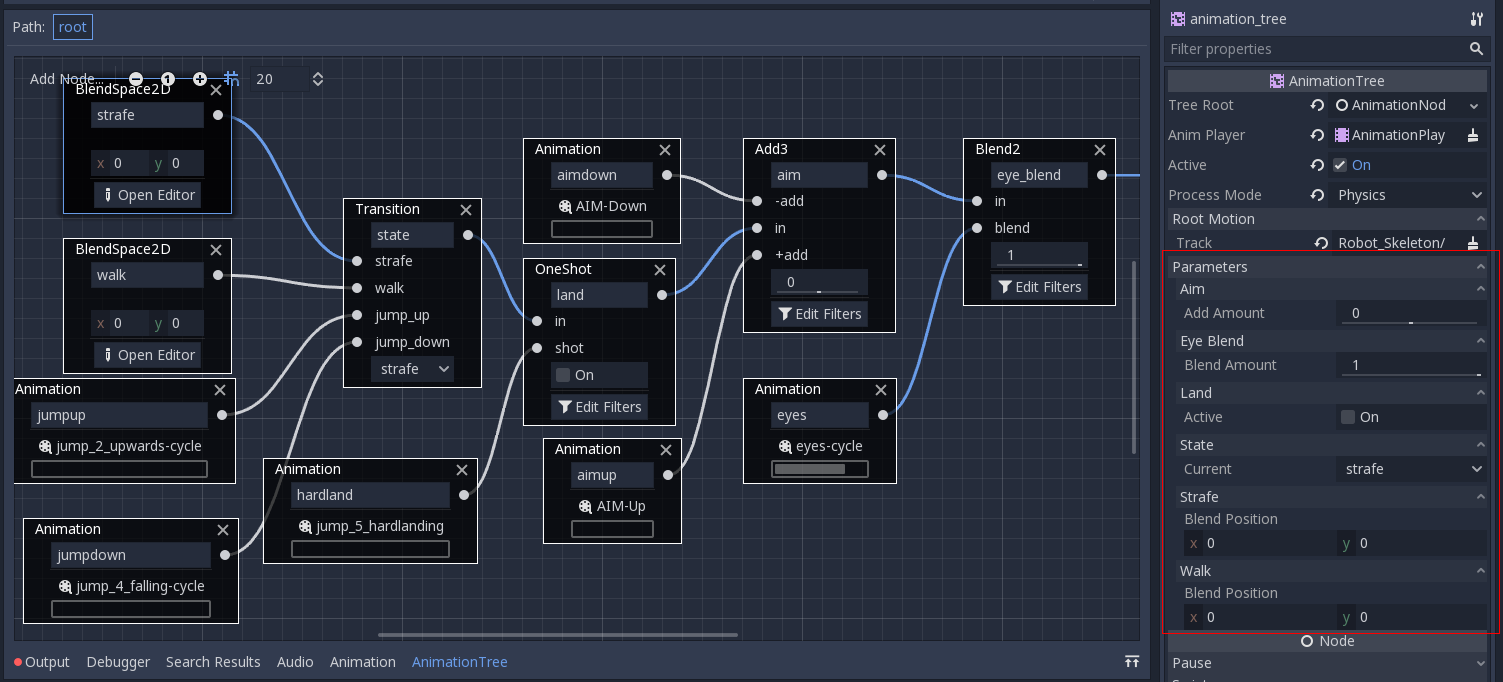
This is handy because it makes it possible to animate them from an AnimationPlayer, or even the AnimationTree itself,
allowing the realisation of very complex animation logic.
To modify these values from code, the property path must be obtained. This is done easily by hovering the mouse over any of the parameters:
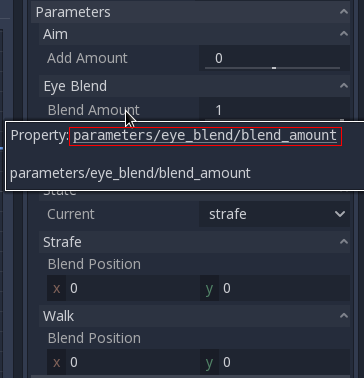
Which allows setting them or reading them:
anim_tree.set("parameters/eye_blend/blend_amount", 1.0)
# Simpler alternative form:
anim_tree["parameters/eye_blend/blend_amount"] = 1.0
animTree.Set("parameters/eye_blend/blend_amount", 1.0);
State machine travel¶
One of the nice features in Godot’s StateMachine implementation is the ability to travel. The graph can be instructed to go from the
current state to another one, while visiting all the intermediate ones. This is done via the A* algorithm.
To use the travel ability, you should first retrieve the AnimationNodeStateMachinePlayback
object from the AnimationTree node (it is exported as a property).
var state_machine = anim_tree["parameters/StateMachine/playback"]
AnimationNodeStateMachinePlayback stateMachine = (AnimationNodeStateMachinePlayback)animTree.Get("parameters/StateMachine/playback");
Once retrieved, it can be used by calling one of the many functions it offers:
state_machine.travel("SomeState")
stateMachine.Travel("SomeState")
Inputs¶
InputEvent¶
What is it?¶
Managing input is usually complex, no matter the OS or platform. To ease this a little, a special built-in type is provided, InputEvent. This datatype can be configured to contain several types of input events. Input events travel through the engine and can be received in multiple locations, depending on the purpose.
Here is a quick example, closing your game if the escape key is hit:
func _unhandled_input(event):
if event is InputEventKey:
if event.pressed and event.scancode == KEY_ESCAPE:
get_tree().quit()
public override void _UnhandledInput(InputEvent @event)
{
if (@event is InputEventKey eventKey)
if (eventKey.Pressed && eventKey.Scancode == (int)KeyList.Escape)
GetTree().Quit();
}
However, it is cleaner and more flexible to use the provided InputMap feature, which allows you to define input actions and assign them different keys. This way, you can define multiple keys for the same action (e.g. they keyboard escape key and the start button on a gamepad). You can then more easily change this mapping in the project settings without updating your code, and even build a key mapping feature on top of it to allow your game to change the key mapping at runtime!
You can setup your InputMap under Project > Project Settings > Input Map and then use those actions like this:
func _process(delta):
if Input.is_action_pressed("ui_right"):
# Move right
public override void _Process(float delta)
{
if (Input.IsActionPressed("ui_right"))
{
// Move right
}
}
How does it work?¶
Every input event is originated from the user/player (though it’s possible to generate an InputEvent and feed them back to the engine, which is useful for gestures). The OS object for each platform will read events from the device, then feed them to MainLoop. As SceneTree is the default MainLoop implementation, events are fed to it. Godot provides a function to get the current SceneTree object : get_tree().
But SceneTree does not know what to do with the event, so it will give it to the viewports, starting by the “root” Viewport (the first node of the scene tree). Viewport does quite a lot of stuff with the received input, in order:
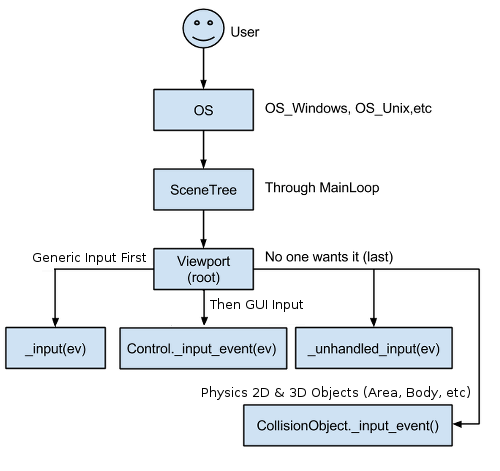
- First of all, the standard Node._input() function will be called in any node that overrides it (and hasn’t disabled input processing with Node.set_process_input()). If any function consumes the event, it can call SceneTree.set_input_as_handled(), and the event will not spread any more. This ensures that you can filter all events of interest, even before the GUI. For gameplay input, Node._unhandled_input() is generally a better fit, because it allows the GUI to intercept the events.
- Second, it will try to feed the input to the GUI, and see if any control can receive it. If so, the Control will be called via the virtual function Control._gui_input() and the signal “input_event” will be emitted (this function is re-implementable by script by inheriting from it). If the control wants to “consume” the event, it will call Control.accept_event() and the event will not spread any more. Use the Control.mouse_filter property to control whether a Control is notified of mouse events via Control._gui_input() callback, and whether these events are propagated further.
- If so far no one consumed the event, the unhandled input callback will be called if overridden (and not disabled with Node.set_process_unhandled_input()). If any function consumes the event, it can call SceneTree.set_input_as_handled(), and the event will not spread any more. The unhandled input callback is ideal for full-screen gameplay events, so they are not received when a GUI is active.
- If no one wanted the event so far, and a Camera is assigned to the Viewport, a ray to the physics world (in the ray direction from the click) will be cast. If this ray hits an object, it will call the CollisionObject._input_event() function in the relevant physics object (bodies receive this callback by default, but areas do not. This can be configured through Area properties).
- Finally, if the event was unhandled, it will be passed to the next Viewport in the tree, otherwise it will be ignored.
When sending events to all listening nodes within a scene, the viewport will do so in a reverse depth-first order: Starting with the node at the bottom of the scene tree, and ending at the root node:
GUI events also travel up the scene tree but, since these events target specific Controls, only direct ancestors of the targeted Control node receive the event.
In accordance with Godot’s node-based design, this enables specialized child nodes to handle and consume particular events, while their ancestors, and ultimately the scene root, can provide more generalized behaviour if needed.
Anatomy of an InputEvent¶
InputEvent is just a base built-in type, it does not represent anything and only contains some basic information, such as event ID (which is increased for each event), device index, etc.
There are several specialised types of InputEvent, described in the table below:
| Event | Type Index | Description |
| InputEvent | NONE | Empty Input Event. |
| InputEventKey | KEY | Contains a scancode and unicode value, as well as modifiers. |
| InputEventMouseButton | MOUSE_BUTTON | Contains click information, such as button, modifiers, etc. |
| InputEventMouseMotion | MOUSE_MOTION | Contains motion information, such as relative, absolute positions and speed. |
| InputEventJoypadMotion | JOYSTICK_MOTION | Contains Joystick/Joypad analog axis information. |
| InputEventJoypadButton | JOYSTICK_BUTTON | Contains Joystick/Joypad button information. |
| InputEventScreenTouch | SCREEN_TOUCH | Contains multi-touch press/release information. (only available on mobile devices) |
| InputEventScreenDrag | SCREEN_DRAG | Contains multi-touch drag information. (only available on mobile devices) |
| InputEventAction | SCREEN_ACTION | Contains a generic action. These events are often generated by the programmer as feedback. (more on this below) |
Actions¶
An InputEvent may or may not represent a pre-defined action. Actions are useful because they abstract the input device when programming the game logic. This allows for:
- The same code to work on different devices with different inputs (e.g., keyboard on PC, Joypad on console).
- Input to be reconfigured at run-time.
Actions can be created from the Project Settings menu in the Actions tab.
Any event has the methods InputEvent.is_action(), InputEvent.is_pressed() and InputEvent.
Alternatively, it may be desired to supply the game back with an action from the game code (a good example of this is detecting gestures). The Input singleton has a method for this: Input.parse_input_event(). You would normally use it like this:
var ev = InputEventAction.new()
# set as move_left, pressed
ev.action = "move_left"
ev.pressed = true
# feedback
Input.parse_input_event(ev)
var ev = new InputEventAction();
// set as move_left, pressed
ev.SetAction("move_left");
ev.SetPressed(true);
// feedback
Input.ParseInputEvent(ev);
InputMap¶
Customizing and re-mapping input from code is often desired. If your whole workflow depends on actions, the InputMap singleton is ideal for reassigning or creating different actions at run-time. This singleton is not saved (must be modified manually) and its state is run from the project settings (project.godot). So any dynamic system of this type needs to store settings in the way the programmer best sees fit.
Input examples¶
Introduction¶
In this tutorial, you’ll learn how to use Godot’s InputEvent system to capture player input. There are many different types of input your game may use - keyboard, gamepad, mouse, etc. - and many different ways to turn those inputs into actions in your game. This document will show you some of the most common scenarios, which you can use as starting points for your own projects.
Note
For a detailed overview of how Godot’s input event system works, see InputEvent.
Events versus polling¶
Sometimes you want your game to respond to a certain input event - pressing
the “jump” button, for example. For other situations, you might want something
to happen as long as a key is pressed, such as movement. In the first case,
you can use the _input() function, which will be called whenever an input
event occurs. In the second case, Godot provides the Input
singleton, which you can use to query the state of an input.
Examples:
func _input(event):
if event.is_action_pressed("jump"):
jump()
func _physics_process(delta):
if Input.is_action_pressed("move_right"):
# Move as long as the key/button is pressed.
position.x += speed * delta
public override void _Input(InputEvent inputEvent)
{
if (inputEvent.IsActionPressed("jump"))
{
Jump();
}
}
public override void _PhysicsProcess(float delta)
{
if (Input.IsActionPressed("move_right"))
{
// Move as long as the key/button is pressed.
position.x += speed * delta;
}
}
This gives you the flexibility to mix-and-match the type of input processing you do.
For the remainder of this tutorial, we’ll focus on capturing individual
events in _input().
Input events¶
Input events are objects that inherit from InputEvent. Depending on the event type, the object will contain specific properties related to that event. To see what events actually look like, add a Node and attach the following script:
extends Node
func _input(event):
print(event.as_text())
public override void _Input(InputEvent inputEvent)
{
GD.Print(inputEvent.AsText());
}
As you press keys, move the mouse, and perform other inputs, you’ll see each event scroll by in the output window. Here’s an example of the output:
A
InputEventMouseMotion : button_mask=0, position=(551, 338), relative=(-85, 47), speed=(0, 0)
InputEventMouseButton : button_index=BUTTON_LEFT, pressed=true, position=(551, 338), button_mask=1, doubleclick=false
InputEventMouseButton : button_index=BUTTON_LEFT, pressed=false, position=(551, 338), button_mask=0, doubleclick=false
S
F
InputEventMouseMotion : button_mask=0, position=(547, 338), relative=(-1, 0), speed=(0, 0)
InputEventMouseMotion : button_mask=0, position=(542, 338), relative=(-4, 0), speed=(0, 0)
As you can see, the results are very different for the different types of input. Key events are even printed as their key symbols. For example, let’s consider InputEventMouseButton. It inherits from the following classes:
- InputEvent - the base class for all input events
- InputEventWithModifiers - adds the ability to check if modifiers are pressed, such as Shift or Alt.
- InputEventMouse - adds mouse event properties, such as
position - InputEventMouseButton - contains the index of the button that was pressed, whether it was a double-click, etc.
Tip
It’s a good idea to keep the class reference open while you’re working with events so you can check the event type’s available properties and methods.
You can encounter errors if you try to access a property on an input type that
doesn’t contain it - calling position on InputEventKey for example. To
avoid this, make sure to test the event type first:
func _input(event):
if event is InputEventMouseButton:
print("mouse button event at ", event.position)
public override void _Input(InputEvent inputEvent)
{
if (inputEvent is InputEventMouseButton mouseEvent)
{
GD.Print($"mouse button event at {mouseEvent.Position}");
}
}
InputMap¶
The InputMap is the most flexible way to handle a variety of inputs. You use this by creating named input actions, to which you can assign any number of input events, such as keypresses or mouse clicks. A new Godot project includes a number of default actions already defined. To see them, and to add your own, open Project -> Project Settings and select the InputMap tab:

Capturing actions¶
Once you’ve defined your actions, you can process them in your scripts using
is_action_pressed() and is_action_released() by passing the name of
the action you’re looking for:
func _input(event):
if event.is_action_pressed("my_action"):
print("my_action occurred!")
public override void _Input(InputEvent inputEvent)
{
if (inputEvent.IsActionPressed("my_action"))
{
GD.Print("my_action occurred!");
}
}
Keyboard events¶
Keyboard events are captured in InputEventKey. While it’s recommended to use input actions instead, there may be cases where you want to specifically look at key events. For this example, let’s check for the T:
func _input(event):
if event is InputEventKey and event.pressed:
if event.scancode == KEY_T:
print("T was pressed")
public override void _Input(InputEvent inputEvent)
{
if (inputEvent is InputEventKey keyEvent && keyEvent.Pressed)
{
if ((Keylist)keyEvent.Scancode == KeyList.T)
{
GD.Print("T was pressed");
}
}
}
Tip
See @GlobalScope_KeyList for a list of scancode constants.
Keyboard modifiers¶
Modifier properties are inherited from InputEventWithModifiers. This allows you to check for modifier combinations using boolean properties. Let’s imagine you want one thing to happen when the T is pressed, but something different when it’s Shift + T:
func _input(event):
if event is InputEventKey and event.pressed:
if event.scancode == KEY_T:
if event.shift:
print("Shift+T was pressed")
else:
print("T was pressed")
public override void _Input(InputEvent inputEvent)
{
if (inputEvent is InputEventKey keyEvent && keyEvent.Pressed)
{
switch ((KeyList)keyEvent.Scancode)
{
case KeyList.T:
GD.Print(keyEvent.Shift ? "Shift+T was pressed" : "T was pressed");
break;
}
}
}
Tip
See @GlobalScope_KeyList for a list of scancode constants.
Mouse events¶
Mouse events stem from the InputEventMouse class, and
are separated into two types: InputEventMouseButton
and InputEventMouseMotion. Note that this
means that all mouse events will contain a position property.
Mouse buttons¶
Capturing mouse buttons is very similar to handling key events. @GlobalScope_ButtonList
contains a list of BUTTON_* constants for each possible button, which will
be reported in the event’s button_index property. Note that the scrollwheel
also counts as a button - two buttons, to be precise, with both
BUTTON_WHEEL_UP and BUTTON_WHEEL_DOWN being separate events.
func _input(event):
if event is InputEventMouseButton:
if event.button_index == BUTTON_LEFT and event.pressed:
print("Left button was clicked at ", event.position)
if event.button_index == BUTTON_WHEEL_UP and event.pressed:
print("Wheel up")
public override void _Input(InputEvent inputEvent)
{
if (inputEvent as InputEventMouseButton mouseEvent && mouseEvent.Pressed)
{
switch ((ButtonList)mouseEvent.ButtonIndex)
{
case ButtonList.Left:
GD.Print($"Left button was clicked at {mouseEvent.Position}");
break;
case ButtonList.WheelUp:
GD.Print("Wheel up");
break;
}
}
}
Mouse motion¶
InputEventMouseMotion events occur whenever
the mouse moves. You can find the move’s distance with the relative
property.
Here’s an example using mouse events to drag-and-drop a Sprite node:
extends Node
var dragging = false
var click_radius = 32 # Size of the sprite
func _input(event):
if event is InputEventMouseButton and event.button_index == BUTTON_LEFT:
if (event.position - $Sprite.position).length() < click_radius:
# Start dragging if the click is on the sprite.
if !dragging and event.pressed:
dragging = true
# Stop dragging if the button is released.
if dragging and !event.pressed:
dragging = false
if event is InputEventMouseMotion and dragging:
# While dragging, move the sprite with the mouse.
$Sprite.position = event.position
public override void _Input(InputEvent inputEvent)
{
var sprite = GetNodeOrNull<Sprite>("Sprite");
if (sprite == null)
return;// No suitable node was found.
if (inputEvent is InputEventMouseButton mouseEvent && (ButtonList)mouseEvent.ButtonIndex == ButtonList.Left)
{
if ((mouseEvent.Position - sprite.Position).Length() < clickRadius)
{
// Start dragging if the click is on the sprite.
if (!dragging && mouseEvent.Pressed)
dragging = !dragging;
}
// Stop dragging if the button is released.
if (dragging && !mouseEvent.Pressed)
{
dragging = false;
}
}
else
{
if (inputEvent is InputEventMouseMotion motionEvent)
{
// While dragging, move the sprite with the mouse.
sprite.Position = motionEvent.Position;
}
}
}
Touch events¶
If you are using a touchscreen device, you can generate touch events. InputEventScreenTouch is equivalent to a mouse click event, and InputEventScreenDrag works much the same as mouse motion.
Tip
To test your touch events on a non-touchscreen device, open Project Settings and go to the “Input Devices/Pointing” section. Enable “Emulate Touch From Mouse” and your project will interpret mouse clicks and motion as touch events.
Mouse and input coordinates¶
About¶
The reason for this small tutorial is to clear up many common mistakes about input coordinates, obtaining mouse position and screen resolution, etc.
Hardware display coordinates¶
Using hardware coordinates makes sense in the case of writing complex UIs meant to run on PC, such as editors, MMOs, tools, etc. However, it does not make as much sense outside of that scope.
Viewport display coordinates¶
Godot uses viewports to display content, and viewports can be scaled by several options (see Multiple resolutions tutorial). Use, then, the functions in nodes to obtain the mouse coordinates and viewport size, for example:
func _input(event):
# Mouse in viewport coordinates
if event is InputEventMouseButton:
print("Mouse Click/Unclick at: ", event.position)
elif event is InputEventMouseMotion:
print("Mouse Motion at: ", event.position)
# Print the size of the viewport
print("Viewport Resolution is: ", get_viewport_rect().size)
public override void _Input(InputEvent @event)
{
// Mouse in viewport coordinates
if (@event is InputEventMouseButton eventMouseButton)
GD.Print("Mouse Click/Unclick at: ", eventMouseButton.Position);
else if (@event is InputEventMouseMotion eventMouseMotion)
GD.Print("Mouse Motion at: ", eventMouseMotion.Position);
// Print the size of the viewport
GD.Print("Viewport Resolution is: ", GetViewportRect().Size);
}
Alternatively, it’s possible to ask the viewport for the mouse position:
get_viewport().get_mouse_position()
GetViewport().GetMousePosition();
Note
When the mouse mode is set to Input.MOUSE_MODE_CAPTURED, the event.position value from InputEventMouseMotion is the center of the screen. Use event.relative instead of event.position and event.speed to process mouse movement and position changes.
Customizing mouse cursor¶
You might want to change the appearance of the mouse cursor in your game in order to suit the overall design. There are two ways to customize the mouse cursor:
- Using project settings
- Using a script
Using project settings is a simpler (but more limited) way to customize the mouse cursor. The second way is more customizable, but involves scripting.
Using project settings¶
Open project settings, go to Display>Mouse Cursor. You will see Custom Image and Custom Image Hotspot.
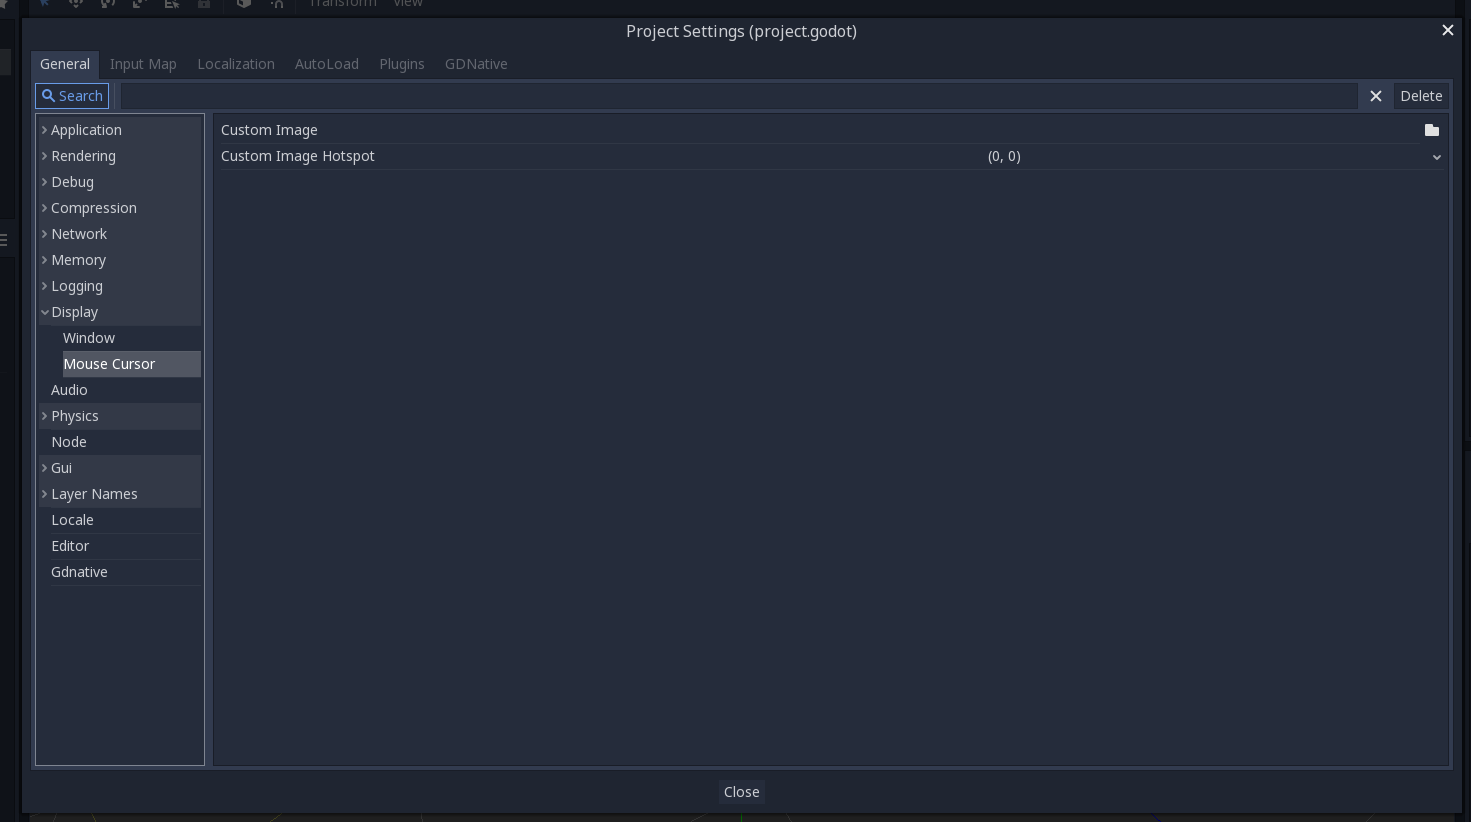
Custom Image is the desired image that you would like to set as the mouse cursor. Custom Hotspot is the point in the image that you would like to use as the cursor’s detection point.
Note
The custom image must be less than 256x256.
Using a script¶
Create a Node and attach the following script.
extends Node
# Load the custom images for the mouse cursor.
var arrow = load("res://arrow.png")
var beam = load("res://beam.png")
func _ready():
# Changes only the arrow shape of the cursor.
# This is similar to changing it in the project settings.
Input.set_custom_mouse_cursor(arrow)
# Changes a specific shape of the cursor (here, the I-beam shape).
Input.set_custom_mouse_cursor(beam, Input.CURSOR_IBEAM)
public override void _Ready()
{
// Load the custom images for the mouse cursor.
var arrow = ResourceLoader.Load("res://arrow.png");
var beam = ResourceLoader.Load("res://beam.png");
// Changes only the arrow shape of the cursor.
// This is similar to changing it in the project settings.
Input.SetCustomMouseCursor(arrow);
// Changes a specific shape of the cursor (here, the I-beam shape).
Input.SetCustomMouseCursor(beam, Input.CursorShape.Ibeam);
}
Note
Demo project¶
Find out more by studying this demo project: https://github.com/guilhermefelipecgs/custom_hardware_cursor
I/O¶
Background loading¶
When switching the main scene of your game (e.g. going to a new
level), you might want to show a loading screen with some indication
that progress is being made. The main load method
(ResourceLoader::load or just load from GDScript) blocks your
thread, making your game appear frozen and unresponsive while the resource is being loaded. This
document discusses the alternative of using the ResourceInteractiveLoader class for smoother
load screens.
ResourceInteractiveLoader¶
The ResourceInteractiveLoader class allows you to load a resource in
stages. Every time the method poll is called, a new stage is loaded,
and control is returned to the caller. Each stage is generally a
sub-resource that is loaded by the main resource. For example, if you’re
loading a scene that loads 10 images, each image will be one stage.
Usage¶
Usage is generally as follows
Obtaining a ResourceInteractiveLoader¶
Ref<ResourceInteractiveLoader> ResourceLoader::load_interactive(String p_path);
This method will give you a ResourceInteractiveLoader that you will use to manage the load operation.
Polling¶
Error ResourceInteractiveLoader::poll();
Use this method to advance the progress of the load. Each call to
poll will load the next stage of your resource. Keep in mind that
each stage is one entire “atomic” resource, such as an image, or a mesh,
so it will take several frames to load.
Returns OK on no errors, ERR_FILE_EOF when loading is finished.
Any other return value means there was an error and loading has stopped.
Load progress (optional)¶
To query the progress of the load, use the following methods:
int ResourceInteractiveLoader::get_stage_count() const;
int ResourceInteractiveLoader::get_stage() const;
get_stage_count returns the total number of stages to load.
get_stage returns the current stage being loaded.
Forcing completion (optional)¶
Error ResourceInteractiveLoader::wait();
Use this method if you need to load the entire resource in the current frame, without any more steps.
Obtaining the resource¶
Ref<Resource> ResourceInteractiveLoader::get_resource();
If everything goes well, use this method to retrieve your loaded resource.
Example¶
This example demonstrates how to load a new scene. Consider it in the context of the Singletons (AutoLoad) example.
First, we set up some variables and initialize the current_scene
with the main scene of the game:
var loader
var wait_frames
var time_max = 100 # msec
var current_scene
func _ready():
var root = get_tree().get_root()
current_scene = root.get_child(root.get_child_count() -1)
The function goto_scene is called from the game when the scene
needs to be switched. It requests an interactive loader, and calls
set_process(true) to start polling the loader in the _process
callback. It also starts a “loading” animation, which could show a
progress bar or loading screen.
func goto_scene(path): # game requests to switch to this scene
loader = ResourceLoader.load_interactive(path)
if loader == null: # check for errors
show_error()
return
set_process(true)
current_scene.queue_free() # get rid of the old scene
# start your "loading..." animation
get_node("animation").play("loading")
wait_frames = 1
_process is where the loader is polled. poll is called, and then
we deal with the return value from that call. OK means keep polling,
ERR_FILE_EOF means loading is done, anything else means there was an
error. Also note we skip one frame (via wait_frames, set on the
goto_scene function) to allow the loading screen to show up.
Note how we use OS.get_ticks_msec to control how long we block the
thread. Some stages might load fast, which means we might be able
to cram more than one call to poll in one frame; some might take way
more than your value for time_max, so keep in mind we won’t have
precise control over the timings.
func _process(time):
if loader == null:
# no need to process anymore
set_process(false)
return
if wait_frames > 0: # wait for frames to let the "loading" animation show up
wait_frames -= 1
return
var t = OS.get_ticks_msec()
while OS.get_ticks_msec() < t + time_max: # use "time_max" to control for how long we block this thread
# poll your loader
var err = loader.poll()
if err == ERR_FILE_EOF: # Finished loading.
var resource = loader.get_resource()
loader = null
set_new_scene(resource)
break
elif err == OK:
update_progress()
else: # error during loading
show_error()
loader = null
break
Some extra helper functions. update_progress updates a progress bar,
or can also update a paused animation (the animation represents the
entire load process from beginning to end). set_new_scene puts the
newly loaded scene on the tree. Because it’s a scene being loaded,
instance() needs to be called on the resource obtained from the
loader.
func update_progress():
var progress = float(loader.get_stage()) / loader.get_stage_count()
# Update your progress bar?
get_node("progress").set_progress(progress)
# ... or update a progress animation?
var length = get_node("animation").get_current_animation_length()
# Call this on a paused animation. Use "true" as the second argument to force the animation to update.
get_node("animation").seek(progress * length, true)
func set_new_scene(scene_resource):
current_scene = scene_resource.instance()
get_node("/root").add_child(current_scene)
Using multiple threads¶
ResourceInteractiveLoader can be used from multiple threads. A couple of things to keep in mind if you attempt it:
Use a semaphore¶
While your thread waits for the main thread to request a new resource,
use a Semaphore to sleep (instead of a busy loop or anything similar).
Not blocking main thread during the polling¶
If you have a mutex to allow calls from the main thread to your loader
class, don’t lock the main thread while you call poll on your loader class. When a
resource is done loading, it might require some resources from the
low-level APIs (VisualServer, etc), which might need to lock the main
thread to acquire them. This might cause a deadlock if the main thread
is waiting for your mutex while your thread is waiting to load a
resource.
Example class¶
You can find an example class for loading resources in threads here:
resource_queue.gd. Usage is as follows:
func start()
Call after you instance the class to start the thread.
func queue_resource(path, p_in_front = false)
Queue a resource. Use optional argument “p_in_front” to put it in front of the queue.
func cancel_resource(path)
Remove a resource from the queue, discarding any loading done.
func is_ready(path)
Returns true if a resource is fully loaded and ready to be retrieved.
func get_progress(path)
Get the progress of a resource. Returns -1 if there was an error (for example if the
resource is not in the queue), or a number between 0.0 and 1.0 with the
progress of the load. Use mostly for cosmetic purposes (updating
progress bars, etc), use is_ready to find out if a resource is
actually ready.
func get_resource(path)
Returns the fully loaded resource, or null on error. If the resource is
not fully loaded (is_ready returns false), it will block your thread
and finish the load. If the resource is not on the queue, it will call
ResourceLoader::load to load it normally and return it.
Example:¶
# Initialize.
queue = preload("res://resource_queue.gd").new()
queue.start()
# Suppose your game starts with a 10 second cutscene, during which the user can't interact with the game.
# For that time, we know they won't use the pause menu, so we can queue it to load during the cutscene:
queue.queue_resource("res://pause_menu.tres")
start_cutscene()
# Later, when the user presses the pause button for the first time:
pause_menu = queue.get_resource("res://pause_menu.tres").instance()
pause_menu.show()
# when you need a new scene:
queue.queue_resource("res://level_1.tscn", true) # Use "true" as the second argument to put it at the front
# of the queue, pausing the load of any other resource.
# to check progress
if queue.is_ready("res://level_1.tscn"):
show_new_level(queue.get_resource("res://level_1.tscn"))
else:
update_progress(queue.get_progress("res://level_1.tscn"))
# when the user walks away from the trigger zone in your Metroidvania game:
queue.cancel_resource("res://zone_2.tscn")
Note: this code, in its current form, is not tested in real world scenarios. Ask punto on IRC (#godotengine on irc.freenode.net) for help.
Data paths¶
Path separators¶
For the sake of supporting as many platforms as possible, Godot only
accepts UNIX-style path separators (/). These work on all
platforms, including Windows.
A path like C:\Projects will become C:/Projects.
Resource path¶
As mentioned in the Command line tutorial, Godot considers that
a project exists in any given folder that contains a project.godot
text file, even if such file is empty.
Accessing project files can be done by opening any path with res://
as a base. For example, a texture located in the root of the project
folder may be opened from the following path: res://some_texture.png.
User path (persistent data)¶
While the project is running, it is a common scenario that the resource path will be read-only, due to it being inside a package, self-contained executable, or system-wide install location.
Storing persistent files in such scenarios should be done by using the
user:// prefix, for example: user://game_save.txt.
On some devices (for example, mobile and consoles), this path is unique
to the project. On desktop operating systems, the engine uses the
typical ~/.local/share/godot/app_userdata/Name on macOS and Linux,
and %APPDATA%/Name on Windows. Name is taken from the
application name defined in the Project Settings, but it can be
overridden on a per-platform basis using
feature tags.
Editor data paths¶
The editor uses different paths for user data, user settings and cache depending on the platform. By default, these paths are:
| Type | Location |
|---|---|
| User data |
|
| User settings |
|
| Cache |
|
- User data contains export templates and project-specific data.
- User settings contains editor settings, text editor themes, script templates, etc.
- Cache contains temporary data. It can safely be removed when Godot is closed.
Godot complies with the XDG Base Directory Specification on all platforms. Environment variables can be overridden as per the specification to change the editor (and project) data paths.
Note
If you use
Godot packaged as a Flatpak,
the editor data paths will be located in subfolders in
~/.var/app/org.godotengine.Godot/.
Self-contained mode¶
If you create a file called ._sc_ or _sc_ in the same directory as the
editor binary, Godot will enable self-contained mode. This will make Godot
write all user data to a directory named editor_data/ in the same directory
as the editor binary. This is useful to create a “portable” installation,
which can then be placed on an USB drive.
The Steam release of Godot uses self-contained mode by default.
Saving games¶
Introduction¶
Save games can be complicated. For example, it may be desirable to store information from multiple objects across multiple levels. Advanced save game systems should allow for additional information about an arbitrary number of objects. This will allow the save function to scale as the game grows more complex.
Note
If you’re looking to save user configuration, you can use the ConfigFile class for this purpose.
Identify persistent objects¶
Firstly, we should identify what objects we want to keep between game sessions and what information we want to keep from those objects. For this tutorial, we will use groups to mark and handle objects to be saved, but other methods are certainly possible.
We will start by adding objects we wish to save to the “Persist” group. As in the Scripting (continued) tutorial, we can do this through either the GUI or script. Let’s add the relevant nodes using the GUI:

Once this is done, when we need to save the game, we can get all objects to save them and then tell them all to save with this script:
var save_nodes = get_tree().get_nodes_in_group("Persist")
for i in save_nodes:
# Now, we can call our save function on each node.
var saveNodes = GetTree().GetNodesInGroup("Persist");
foreach (Node saveNode in saveNodes)
{
// Now, we can call our save function on each node.
}
Serializing¶
The next step is to serialize the data. This makes it much easier to read from and store to disk. In this case, we’re assuming each member of group Persist is an instanced node and thus has a path. GDScript has helper functions for this, such as to_json() and parse_json(), so we will use a dictionary. Our node needs to contain a save function that returns this data. The save function will look like this:
func save():
var save_dict = {
"filename" : get_filename(),
"parent" : get_parent().get_path(),
"pos_x" : position.x, # Vector2 is not supported by JSON
"pos_y" : position.y,
"attack" : attack,
"defense" : defense,
"current_health" : current_health,
"max_health" : max_health,
"damage" : damage,
"regen" : regen,
"experience" : experience,
"tnl" : tnl,
"level" : level,
"attack_growth" : attack_growth,
"defense_growth" : defense_growth,
"health_growth" : health_growth,
"is_alive" : is_alive,
"last_attack" : last_attack
}
return save_dict
public Godot.Collections.Dictionary<string, object> Save()
{
return new Godot.Collections.Dictionary<string, object>()
{
{ "Filename", GetFilename() },
{ "Parent", GetParent().GetPath() },
{ "PosX", Position.x }, // Vector2 is not supported by JSON
{ "PosY", Position.y },
{ "Attack", Attack },
{ "Defense", Defense },
{ "CurrentHealth", CurrentHealth },
{ "MaxHealth", MaxHealth },
{ "Damage", Damage },
{ "Regen", Regen },
{ "Experience", Experience },
{ "Tnl", Tnl },
{ "Level", Level },
{ "AttackGrowth", AttackGrowth },
{ "DefenseGrowth", DefenseGrowth },
{ "HealthGrowth", HealthGrowth },
{ "IsAlive", IsAlive },
{ "LastAttack", LastAttack }
};
}
This gives us a dictionary with the style
{ "variable_name":value_of_variable }, which will be useful when
loading.
Saving and reading data¶
As covered in the File system tutorial, we’ll need to open a file so we can write to it or read from it. Now that we have a way to call our groups and get their relevant data, let’s use to_json() to convert it into an easily stored string and store them in a file. Doing it this way ensures that each line is its own object, so we have an easy way to pull the data out of the file as well.
# Note: This can be called from anywhere inside the tree. This function is
# path independent.
# Go through everything in the persist category and ask them to return a
# dict of relevant variables
func save_game():
var save_game = File.new()
save_game.open("user://savegame.save", File.WRITE)
var save_nodes = get_tree().get_nodes_in_group("Persist")
for node in save_nodes:
# Check the node is an instanced scene so it can be instanced again during load
if node.filename.empty():
print("persistent node '%s' is not an instanced scene, skipped" % node.name)
continue
# Check the node has a save function
if !node.has_method("save"):
print("persistent node '%s' is missing a save() function, skipped" % node.name)
continue
# Call the node's save function
var node_data = node.call("save")
# Store the save dictionary as a new line in the save file
save_game.store_line(to_json(node_data))
save_game.close()
// Note: This can be called from anywhere inside the tree. This function is
// path independent.
// Go through everything in the persist category and ask them to return a
// dict of relevant variables
public void SaveGame()
{
var saveGame = new File();
saveGame.Open("user://savegame.save", (int)File.ModeFlags.Write);
var saveNodes = GetTree().GetNodesInGroup("Persist");
foreach (Node saveNode in saveNodes)
{
// Check the node is an instanced scene so it can be instanced again during load
if (saveNode.Filename.Empty())
{
GD.Print(String.Format("persistent node '{0}' is not an instanced scene, skipped", saveNode.Name));
continue;
}
// Check the node has a save function
if (!saveNode.HasMethod("Save"))
{
GD.Print(String.Format("persistent node '{0}' is missing a Save() function, skipped", saveNode.Name));
continue;
}
// Call the node's save function
var nodeData = saveNode.Call("Save");
// Store the save dictionary as a new line in the save file
saveGame.StoreLine(JSON.Print(nodeData));
}
saveGame.Close();
}
Game saved! Loading is fairly simple as well. For that, we’ll read each line, use parse_json() to read it back to a dict, and then iterate over the dict to read our values. But we’ll need to first create the object and we can use the filename and parent values to achieve that. Here is our load function:
# Note: This can be called from anywhere inside the tree. This function
# is path independent.
func load_game():
var save_game = File.new()
if not save_game.file_exists("user://savegame.save"):
return # Error! We don't have a save to load.
# We need to revert the game state so we're not cloning objects
# during loading. This will vary wildly depending on the needs of a
# project, so take care with this step.
# For our example, we will accomplish this by deleting saveable objects.
var save_nodes = get_tree().get_nodes_in_group("Persist")
for i in save_nodes:
i.queue_free()
# Load the file line by line and process that dictionary to restore
# the object it represents.
save_game.open("user://savegame.save", File.READ)
while save_game.get_position() < save_game.get_len():
# Get the saved dictionary from the next line in the save file
var node_data = parse_json(save_game.get_line())
# Firstly, we need to create the object and add it to the tree and set its position.
var new_object = load(node_data["filename"]).instance()
get_node(node_data["parent"]).add_child(new_object)
new_object.position = Vector2(node_data["pos_x"], node_data["pos_y"])
# Now we set the remaining variables.
for i in node_data.keys():
if i == "filename" or i == "parent" or i == "pos_x" or i == "pos_y":
continue
new_object.set(i, node_data[i])
save_game.close()
// Note: This can be called from anywhere inside the tree. This function is
// path independent.
public void LoadGame()
{
var saveGame = new File();
if (!saveGame.FileExists("user://savegame.save"))
return; // Error! We don't have a save to load.
// We need to revert the game state so we're not cloning objects during loading.
// This will vary wildly depending on the needs of a project, so take care with
// this step.
// For our example, we will accomplish this by deleting saveable objects.
var saveNodes = GetTree().GetNodesInGroup("Persist");
foreach (Node saveNode in saveNodes)
saveNode.QueueFree();
// Load the file line by line and process that dictionary to restore the object
// it represents.
saveGame.Open("user://savegame.save", (int)File.ModeFlags.Read);
while (saveGame.GetPosition() < save_game.GetLen())
{
// Get the saved dictionary from the next line in the save file
var nodeData = (Godot.Collections.Dictionary<string, object>)JSON.Parse(saveGame.GetLine()).Result;
// Firstly, we need to create the object and add it to the tree and set its position.
var newObjectScene = (PackedScene)ResourceLoader.Load(nodeData["Filename"].ToString());
var newObject = (Node)newObjectScene.Instance();
GetNode(nodeData["Parent"].ToString()).AddChild(newObject);
newObject.Set("Position", new Vector2((float)nodeData["PosX"], (float)nodeData["PosY"]));
// Now we set the remaining variables.
foreach (KeyValuePair<object, object> entry in nodeData)
{
string key = entry.Key.ToString();
if (key == "Filename" || key == "Parent" || key == "PosX" || key == "PosY")
continue;
newObject.Set(key, entry.Value);
}
}
saveGame.Close();
}
Now we can save and load an arbitrary number of objects laid out almost anywhere across the scene tree! Each object can store different data depending on what it needs to save.
Some notes¶
We have glossed over setting up the game state for loading. It’s ultimately up to the project creator where much of this logic goes. This is often complicated and will need to be heavily customized based on the needs of the individual project.
Additionally, our implementation assumes no Persist objects are children of other Persist objects. Otherwise, invalid paths would be created. To accommodate nested Persist objects, consider saving objects in stages. Load parent objects first so they are available for the add_child() call when child objects are loaded. You will also need a way to link children to parents as the NodePath will likely be invalid.
Encrypting save games¶
Why?¶
Because the world today is not the world of yesterday. A capitalist oligarchy runs the world and forces us to consume in order to keep the gears of this rotten society on track. As such, the biggest market for video game consumption today is the mobile one. It is a market of poor souls forced to compulsively consume digital content in order to forget the misery of their everyday life, commute, or just any other brief free moment they have that they are not using to produce goods or services for the ruling class. These individuals need to keep focusing on their video games (because not doing so will fill them with tremendous existential angst), so they go as far as spending money on them to extend their experience, and their preferred way of doing so is through in-app purchases and virtual currency.
But what if someone were to find a way to edit the saved games and assign the items and currency without effort? That would be terrible, because it would help players consume the content much faster, and therefore run out of it sooner than expected. If that happens, they will have nothing that avoids them to think, and the tremendous agony of realizing their own irrelevance would again take over their life.
No, we definitely do not want that to happen, so let’s see how to encrypt savegames and protect the world order.
How?¶
The class File can open a file at a location and read/write data (integers, strings and variants). It also supports encryption. To create an encrypted file, a passphrase must be provided, like this:
var f = File.new()
var err = f.open_encrypted_with_pass("user://savedata.bin", File.WRITE, "mypass")
f.store_var(game_state)
f.close()
var f = new File();
var err = f.OpenEncryptedWithPass("user://savedata.bin", (int)File.ModeFlags.Write, "mypass");
f.StoreVar(gameState);
f.Close();
This will make the file unreadable to users, but will still not prevent them from sharing savefiles. To solve this, use the device unique id or some unique user identifier, for example:
var f = File.new()
var err = f.open_encrypted_with_pass("user://savedata.bin", File.WRITE, OS.get_unique_id())
f.store_var(game_state)
f.close()
var f = new File();
var err = f.OpenEncryptedWithPass("user://savedata.bin", (int)File.ModeFlags.Write, OS.GetUniqueId());
f.StoreVar(gameState);
f.Close();
Note that OS.get_unique_id() does not work on UWP or HTML5.
That is all! Thank you for your cooperation, citizen.
Note
This method cannot really prevent players from editing their savegames locally because, since the encryption key is stored inside the game, the player can still decrypt and edit the file themselves. The only way to prevent this from being possible is to store the save data on a remote server, where players can only make authorized changes to their save data. If your game deals with real money, you need to be doing this anyway.
Internationalization¶
Internationalizing games¶
Introduction¶
Sería excelente que el mundo hablara solo un idioma (It would be great if the world spoke only one language). Unfortunately for us developers, that is not the case. While indie or niche games usually do not need localization, games targeting a more massive market often require localization. Godot offers many tools to make this process more straightforward, so this tutorial is more like a collection of tips and tricks.
Localization is usually done by specific studios hired for the job and, despite the huge amount of software and file formats available for this, the most common way to do localization to this day is still with spreadsheets. The process of creating the spreadsheets and importing them is already covered in the Importing translations tutorial, so this one could be seen more like a follow-up to that one.
Note
We will be using the official demo as an example; you can download it from the Asset Library.
Configuring the imported translation¶
Translations can get updated and re-imported when they change, but they still have to be added to the project. This is done in Project → Project Settings → Localization:
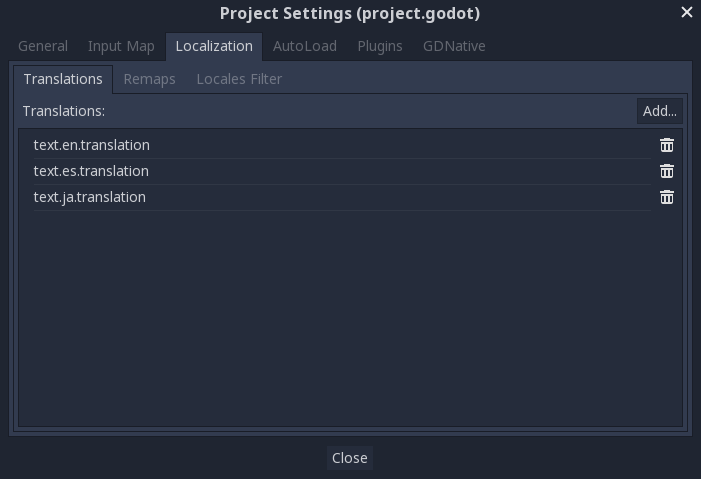
The above dialog is used to add or remove translations project-wide.
Localizing resources¶
It is also possible to instruct Godot to use alternate versions of assets (resources) depending on the current language. The Remaps tab can be used for this:
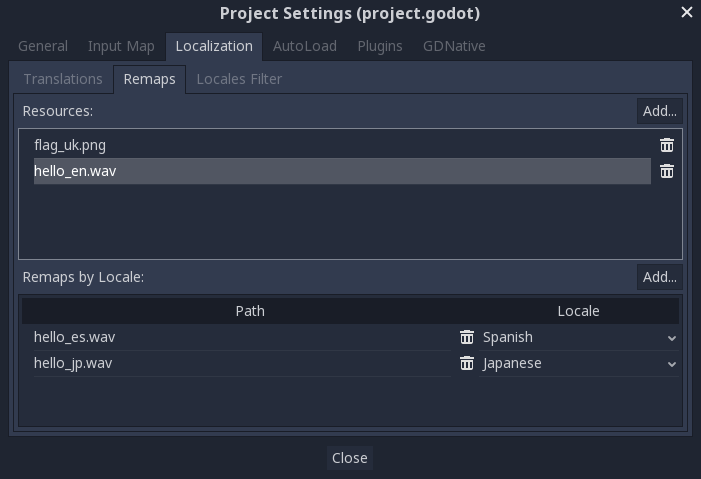
Select the resource to be remapped, then add some alternatives for each locale.
Converting keys to text¶
Some controls, such as Button and Label, will automatically fetch a translation if their text matches a translation key. For example, if a label’s text is “MAIN_SCREEN_GREETING1” and that key exists in the current translation, then the text will automatically be translated.
In code, the Object.tr() function can be used. This will just look up the text in the translations and convert it if found:
level.set_text(tr("LEVEL_5_NAME"))
status.set_text(tr("GAME_STATUS_" + str(status_index)))
Making controls resizable¶
The same text in different languages can vary greatly in length. For this, make sure to read the tutorial on Size and anchors, as dynamically adjusting control sizes may help. Container can be useful, as well as the text wrapping options available in Label.
TranslationServer¶
Godot has a server handling low-level translation management called the TranslationServer. Translations can be added or removed during run-time; the current language can also be changed at run-time.
Command line¶
Language can be tested when running Godot from the command line. For example, to test a game in French, the following argument can be supplied:
godot --language fr
Translating the project name¶
The project name becomes the app name when exporting to different
operating systems and platforms. To specify the project name in more
than one language, create a new setting application/name in the Project
Settings and append the locale identifier to it.
For instance, for Spanish, this would be application/name_es:
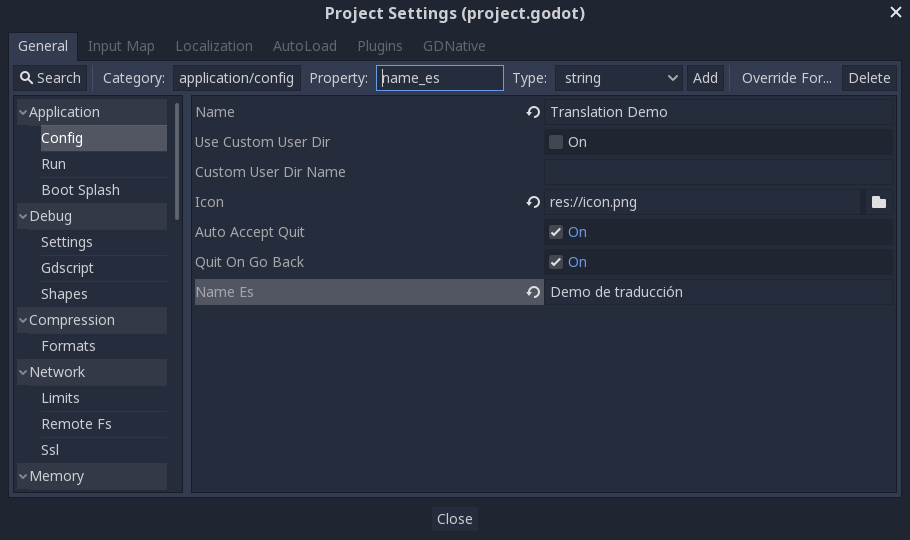
If you are unsure about the language code to use, refer to the list of locale codes.
Localization using gettext¶
In addition to Importing translations in CSV format, Godot
also supports loading translation files written in the GNU gettext
(.po) format.
Note
For an introduction to gettext, check out
A Quick Gettext Tutorial.
It’s written with C projects in mind, but much of the advice
also applies to Godot (with the exception of xgettext).
Advantages¶
- gettext is a standard format, which can be edited using any text editor or GUI editors such as Poedit.
- gettext is supported by translation platforms such as Transifex and Weblate, which makes it easier for people to collaborate to localization.
- Compared to CSV, gettext works better with version control systems like Git, as each locale has its own messages file.
- Multiline strings are more convenient to edit in gettext files compared to CSV files.
Disadvantages¶
- gettext is a more complex format than CSV and can be harder to grasp for people new to software localization.
- People who maintain localization files will have to install gettext tools
on their system. However, as Godot doesn’t use compiled message object files
(
.mo), translators can test their work without having to install gettext tools.
Caveats¶
- As Godot uses its own PO file parser behind the scenes (which is more limited than the reference GNU gettext implementation), some features such as pluralization aren’t supported.
Installing gettext tools¶
The command line gettext tools are required to perform maintenance operations, such as updating message files. Therefore, it’s strongly recommended to install them.
- Windows: Download an installer from this page. Any architecture and binary type (shared or static) works; if in doubt, choose the 64-bit static installer.
- macOS: Use Homebrew to install gettext with the
brew install gettextcommand. - Linux: On most distributions, install the
gettextpackage from your distribution’s package manager.
Creating the PO template (POT) manually¶
Godot currently doesn’t support extracting source strings using xgettext,
so the .pot file must be created manually. This file can be placed anywhere
in the project directory, but it’s recommended to keep it in a subdirectory, as
each locale will be defined in its own file.
Create a directory named locale in the project directory. In this directory,
save a file named messages.pot with the following contents:
# Don't remove the two lines below, they're required for gettext to work correctly.
msgid ""
msgstr ""
msgid "Hello world!"
msgstr ""
Messages in gettext are made of msgid and msgstr pairs.
msgid is the source string (usually in English), msgstr will be
the translated string.
The msgstr value in PO template files (.pot) should always be empty.
Localization will be done in the generated .po files instead.
Creating the PO template (POT) using pybabel¶
The Python tool pybabel has support for Godot and can be used to automatically create and update the POT file from your scene files and scripts.
After installing babel and babel-godot, for example using pip:
pip install babel babel-godot
Write a mapping file (for example babelrc) which will indicate which files
pybabel needs to process (note that we process GDScript as Python, which is
generally sufficient):
[python: **.gd]
encoding = utf-8
[godot_scene: **.tscn]
encoding = utf-8
You can then run pybabel like so:
pybabel extract -F babelrc -k text -k LineEdit/placeholder_text -k tr -o godot-l10n.pot .
Use the -k option to specify what needs to be extracted. In this case,
arguments to tr() will be translated, as well
as properties named “text” (commonly used by Control nodes) and LineEdit’s
“placeholder_text” property.
Creating a messages file from a PO template¶
The msginit command is used to turn a PO template into a messages file.
For instance, to create a French localization file, use the following command
while in the locale directory:
msginit --no-translator --input=messages.pot --locale=fr
The command above will create a file named fr.po in the same directory
as the PO template.
Alternatively, you can do that graphically using Poedit, or by uploading the POT file to your web platform of choice.
Loading a messages file in Godot¶
To register a messages file as a translation in a project, open the
Project Settings, then go to the Localization tab.
In Translations, click Add… then choose the .po file
in the file dialog. The locale will be inferred from the
"Language: <code>\n" property in the messages file.
Note
See Internationalizing games for more information on importing and testing translations in Godot.
Updating message files to follow the PO template¶
After updating the PO template, you will have to update message files so
that they contain new strings, while removing strings that are no longer
present in the PO template removed in the PO template. This can be done
automatically using the msgmerge tool:
# The order matters: specify the message file *then* the PO template!
msgmerge --update --backup=none fr.po messages.pot
If you want to keep a backup of the original message file (which would be
saved as fr.po~ in this example), remove the --backup=none argument.
Checking the validity of a PO file or template¶
It is possible to check whether a gettext file’s syntax is valid by running the command below:
msgfmt fr.po --check
If there are syntax errors or warnings, they will be displayed in the console.
Otherwise, msgfmt won’t output anything.
Locales¶
This is the list of supported locales and variants in the engine. It’s based on the Unix standard locale strings:
| Locale | Language and Variant |
|---|---|
| aa | Afar |
| aa_DJ | Afar (Djibouti) |
| aa_ER | Afar (Eritrea) |
| aa_ET | Afar (Ethiopia) |
| af | Afrikaans |
| af_ZA | Afrikaans (South Africa) |
| agr_PE | Aguaruna (Peru) |
| ak_GH | Akan (Ghana) |
| am_ET | Amharic (Ethiopia) |
| an_ES | Aragonese (Spain) |
| anp_IN | Angika (India) |
| ar | Arabic |
| ar_AE | Arabic (United Arab Emirates) |
| ar_BH | Arabic (Bahrain) |
| ar_DZ | Arabic (Algeria) |
| ar_EG | Arabic (Egypt) |
| ar_IQ | Arabic (Iraq) |
| ar_JO | Arabic (Jordan) |
| ar_KW | Arabic (Kuwait) |
| ar_LB | Arabic (Lebanon) |
| ar_LY | Arabic (Libya) |
| ar_MA | Arabic (Morocco) |
| ar_OM | Arabic (Oman) |
| ar_QA | Arabic (Qatar) |
| ar_SA | Arabic (Saudi Arabia) |
| ar_SD | Arabic (Sudan) |
| ar_SY | Arabic (Syria) |
| ar_TN | Arabic (Tunisia) |
| ar_YE | Arabic (Yemen) |
| as_IN | Assamese (India) |
| ast_ES | Asturian (Spain) |
| ayc_PE | Southern Aymara (Peru) |
| ay_PE | Aymara (Peru) |
| az_AZ | Azerbaijani (Azerbaijan) |
| be | Belarusian |
| be_BY | Belarusian (Belarus) |
| bem_ZM | Bemba (Zambia) |
| ber_DZ | Berber languages (Algeria) |
| ber_MA | Berber languages (Morocco) |
| bg | Bulgarian |
| bg_BG | Bulgarian (Bulgaria) |
| bhb_IN | Bhili (India) |
| bho_IN | Bhojpuri (India) |
| bi_TV | Bislama (Tuvalu) |
| bn | Bengali |
| bn_BD | Bengali (Bangladesh) |
| bn_IN | Bengali (India) |
| bo | Tibetan |
| bo_CN | Tibetan (China) |
| bo_IN | Tibetan (India) |
| br_FR | Breton (France) |
| brx_IN | Bodo (India) |
| bs_BA | Bosnian (Bosnia and Herzegovina) |
| byn_ER | Bilin (Eritrea) |
| ca | Catalan |
| ca_AD | Catalan (Andorra) |
| ca_ES | Catalan (Spain) |
| ca_FR | Catalan (France) |
| ca_IT | Catalan (Italy) |
| ce_RU | Chechen (Russia) |
| chr_US | Cherokee (United States) |
| cmn_TW | Mandarin Chinese (Taiwan) |
| crh_UA | Crimean Tatar (Ukraine) |
| csb_PL | Kashubian (Poland) |
| cs | Czech |
| cs_CZ | Czech (Czech Republic) |
| cv_RU | Chuvash (Russia) |
| cy_GB | Welsh (United Kingdom) |
| da | Danish |
| da_DK | Danish (Denmark) |
| de | German |
| de_AT | German (Austria) |
| de_BE | German (Belgium) |
| de_CH | German (Switzerland) |
| de_DE | German (Germany) |
| de_IT | German (Italy) |
| de_LU | German (Luxembourg) |
| doi_IN | Dogri (India) |
| dv_MV | Dhivehi (Maldives) |
| dz_BT | Dzongkha (Bhutan) |
| el | Greek |
| el_CY | Greek (Cyprus) |
| el_GR | Greek (Greece) |
| en | English |
| en_AG | English (Antigua and Barbuda) |
| en_AU | English (Australia) |
| en_BW | English (Botswana) |
| en_CA | English (Canada) |
| en_DK | English (Denmark) |
| en_GB | English (United Kingdom) |
| en_HK | English (Hong Kong) |
| en_IE | English (Ireland) |
| en_IL | English (Israel) |
| en_IN | English (India) |
| en_NG | English (Nigeria) |
| en_MT | English (Malta) |
| en_NZ | English (New Zealand) |
| en_PH | English (Philippines) |
| en_SG | English (Singapore) |
| en_US | English (United States) |
| en_ZA | English (South Africa) |
| en_ZM | English (Zambia) |
| en_ZW | English (Zimbabwe) |
| eo | Esperanto |
| es | Spanish |
| es_AR | Spanish (Argentina) |
| es_BO | Spanish (Bolivia) |
| es_CL | Spanish (Chile) |
| es_CO | Spanish (Colombia) |
| es_CR | Spanish (Costa Rica) |
| en_CU | Spanish (Cuba) |
| es_DO | Spanish (Dominican Republic) |
| es_EC | Spanish (Ecuador) |
| es_ES | Spanish (Spain) |
| es_GT | Spanish (Guatemala) |
| es_HN | Spanish (Honduras) |
| es_MX | Spanish (Mexico) |
| es_NI | Spanish (Nicaragua) |
| es_PA | Spanish (Panama) |
| es_PE | Spanish (Peru) |
| es_PR | Spanish (Puerto Rico) |
| es_PY | Spanish (Paraguay) |
| es_SV | Spanish (El Salvador) |
| es_US | Spanish (United States) |
| es_UY | Spanish (Uruguay) |
| es_VE | Spanish (Venezuela) |
| et | Estonian |
| et_EE | Estonian (Estonia) |
| eu | Basque |
| eu_ES | Basque (Spain) |
| fa | Persian |
| fa_IR | Persian (Iran) |
| ff_SN | Fulah (Senegal) |
| fi | Finnish |
| fi_FI | Finnish (Finland) |
| fil_PH | Filipino (Philippines) |
| fo_FO | Faroese (Faroe Islands) |
| fr | French |
| fr_BE | French (Belgium) |
| fr_CA | French (Canada) |
| fr_CH | French (Switzerland) |
| fr_FR | French (France) |
| fr_LU | French (Luxembourg) |
| fur_IT | Friulian (Italy) |
| fy_DE | Western Frisian (Germany) |
| fy_NL | Western Frisian (Netherlands) |
| ga | Irish |
| ga_IE | Irish (Ireland) |
| gd_GB | Scottish Gaelic (United Kingdom) |
| gez_ER | Geez (Eritrea) |
| gez_ET | Geez (Ethiopia) |
| gl_ES | Galician (Spain) |
| gu_IN | Gujarati (India) |
| gv_GB | Manx (United Kingdom) |
| hak_TW | Hakka Chinese (Taiwan) |
| ha_NG | Hausa (Nigeria) |
| he | Hebrew |
| he_IL | Hebrew (Israel) |
| hi | Hindi |
| hi_IN | Hindi (India) |
| hne_IN | Chhattisgarhi (India) |
| hr | Croatian |
| hr_HR | Croatian (Croatia) |
| hsb_DE | Upper Sorbian (Germany) |
| ht_HT | Haitian (Haiti) |
| hu | Hungarian |
| hu_HU | Hungarian (Hungary) |
| hus_MX | Huastec (Mexico) |
| hy_AM | Armenian (Armenia) |
| ia_FR | Interlingua (France) |
| id | Indonesian |
| id_ID | Indonesian (Indonesia) |
| ig_NG | Igbo (Nigeria) |
| ik_CA | Inupiaq (Canada) |
| is | Icelandic |
| is_IS | Icelandic (Iceland) |
| it | Italian |
| it_CH | Italian (Switzerland) |
| it_IT | Italian (Italy) |
| iu_CA | Inuktitut (Canada) |
| ja | Japanese |
| ja_JP | Japanese (Japan) |
| kab_DZ | Kabyle (Algeria) |
| ka_GE | Georgian (Georgia) |
| kk_KZ | Kazakh (Kazakhstan) |
| kl_GL | Kalaallisut (Greenland) |
| km_KH | Central Khmer (Cambodia) |
| kn_IN | Kannada (India) |
| kok_IN | Konkani (India) |
| ko | Korean |
| ko_KR | Korean (South Korea) |
| ks_IN | Kashmiri (India) |
| ku | Kurdish |
| ku_TR | Kurdish (Turkey) |
| kw_GB | Cornish (United Kingdom) |
| ky_KG | Kirghiz (Kyrgyzstan) |
| lb_LU | Luxembourgish (Luxembourg) |
| lg_UG | Ganda (Uganda) |
| li_BE | Limburgan (Belgium) |
| li_NL | Limburgan (Netherlands) |
| lij_IT | Ligurian (Italy) |
| ln_CD | Lingala (Congo) |
| lo_LA | Lao (Laos) |
| lt | Lithuanian |
| lt_LT | Lithuanian (Lithuania) |
| lv | Latvian |
| lv_LV | Latvian (Latvia) |
| lzh_TW | Literary Chinese (Taiwan) |
| mag_IN | Magahi (India) |
| mai_IN | Maithili (India) |
| mg_MG | Malagasy (Madagascar) |
| mh_MH | Marshallese (Marshall Islands) |
| mhr_RU | Eastern Mari (Russia) |
| mi_NZ | Maori (New Zealand) |
| miq_NI | Mískito (Nicaragua) |
| mk | Macedonian |
| mk_MK | Macedonian (Macedonia) |
| ml_IN | Malayalam (India) |
| mni_IN | Manipuri (India) |
| mn_MN | Mongolian (Mongolia) |
| mr_IN | Marathi (India) |
| ms | Malay |
| ms_MY | Malay (Malaysia) |
| mt | Maltese |
| mt_MT | Maltese (Malta) |
| my_MM | Burmese (Myanmar) |
| myv_RU | Erzya (Russia) |
| nah_MX | Nahuatl languages (Mexico) |
| nan_TW | Min Nan Chinese (Taiwan) |
| nb | Norwegian Bokmål |
| nb_NO | Norwegian Bokmål (Norway) |
| nds_DE | Low German (Germany) |
| nds_NL | Low German (Netherlands) |
| ne_NP | Nepali (Nepal) |
| nhn_MX | Central Nahuatl (Mexico) |
| niu_NU | Niuean (Niue) |
| niu_NZ | Niuean (New Zealand) |
| nl | Dutch |
| nl_AW | Dutch (Aruba) |
| nl_BE | Dutch (Belgium) |
| nl_NL | Dutch (Netherlands) |
| nn | Norwegian Nynorsk |
| nn_NO | Norwegian Nynorsk (Norway) |
| no | Norwegian |
| no_NO | Norwegian (Norway) |
| nr_ZA | South Ndebele (South Africa) |
| nso_ZA | Pedi (South Africa) |
| oc_FR | Occitan (France) |
| om | Oromo |
| om_ET | Oromo (Ethiopia) |
| om_KE | Oromo (Kenya) |
| or_IN | Oriya (India) |
| os_RU | Ossetian (Russia) |
| pa_IN | Panjabi (India) |
| pap | Papiamento |
| pap_AN | Papiamento (Netherlands Antilles) |
| pap_AW | Papiamento (Aruba) |
| pap_CW | Papiamento (Curaçao) |
| pa_PK | Panjabi (Pakistan) |
| pl | Polish |
| pl_PL | Polish (Poland) |
| pr | Pirate |
| ps_AF | Pushto (Afghanistan) |
| pt | Portuguese |
| pt_BR | Portuguese (Brazil) |
| pt_PT | Portuguese (Portugal) |
| quy_PE | Ayacucho Quechua (Peru) |
| quz_PE | Cusco Quechua (Peru) |
| raj_IN | Rajasthani (India) |
| ro | Romanian |
| ro_RO | Romanian (Romania) |
| ru | Russian |
| ru_RU | Russian (Russia) |
| ru_UA | Russian (Ukraine) |
| rw_RW | Kinyarwanda (Rwanda) |
| sa_IN | Sanskrit (India) |
| sat_IN | Santali (India) |
| sc_IT | Sardinian (Italy) |
| sco | Scots |
| sd_IN | Sindhi (India) |
| se_NO | Northern Sami (Norway) |
| sgs_LT | Samogitian (Lithuania) |
| shs_CA | Shuswap (Canada) |
| sid_ET | Sidamo (Ethiopia) |
| si_LK | Sinhala (Sri Lanka) |
| sk | Slovak |
| sk_SK | Slovak (Slovakia) |
| sl | Slovenian |
| so | Somali |
| so_DJ | Somali (Djibouti) |
| so_ET | Somali (Ethiopia) |
| so_KE | Somali (Kenya) |
| so_SO | Somali (Somalia) |
| son_ML | Songhai languages (Mali) |
| sq | Albanian |
| sq_AL | Albanian (Albania) |
| sq_KV | Albanian (Kosovo) |
| sq_MK | Albanian (Macedonia) |
| sr | Serbian |
| sr_BA | Serbian (Bosnia and Herzegovina) |
| sr_CS | Serbian (Serbia and Montenegro) |
| sr_ME | Serbian (Montenegro) |
| sr_RS | Serbian (Serbia) |
| ss_ZA | Swati (South Africa) |
| st_ZA | Southern Sotho (South Africa) |
| sv | Swedish |
| sv_FI | Swedish (Finland) |
| sv_SE | Swedish (Sweden) |
| sw_KE | Swahili (Kenya) |
| sw_TZ | Swahili (Tanzania) |
| szl_PL | Silesian (Poland) |
| ta | Tamil |
| ta_IN | Tamil (India) |
| ta_LK | Tamil (Sri Lanka) |
| tcy_IN | Tulu (India) |
| te_IN | Telugu (India) |
| tg_TJ | Tajik (Tajikistan) |
| the_NP | Chitwania Tharu (Nepal) |
| th | Thai |
| th_TH | Thai (Thailand) |
| th_TH_TH | Thai (Thailand,TH) |
| ti | Tigrinya |
| ti_ER | Tigrinya (Eritrea) |
| ti_ET | Tigrinya (Ethiopia) |
| tig_ER | Tigre (Eritrea) |
| tk_TM | Turkmen (Turkmenistan) |
| tl_PH | Tagalog (Philippines) |
| tn_ZA | Tswana (South Africa) |
| tr | Turkish |
| tr_CY | Turkish (Cyprus) |
| tr_TR | Turkish (Turkey) |
| ts_ZA | Tsonga (South Africa) |
| tt_RU | Tatar (Russia) |
| ug_CN | Uighur (China) |
| uk | Ukrainian |
| uk_UA | Ukrainian (Ukraine) |
| unm_US | Unami (United States) |
| ur | Urdu |
| ur_IN | Urdu (India) |
| ur_PK | Urdu (Pakistan) |
| uz | Uzbek |
| uz_UZ | Uzbek (Uzbekistan) |
| ve_ZA | Venda (South Africa) |
| vi | Vietnamese |
| vi_VN | Vietnamese (Vietnam) |
| wa_BE | Walloon (Belgium) |
| wae_CH | Walser (Switzerland) |
| wal_ET | Wolaytta (Ethiopia) |
| wo_SN | Wolof (Senegal) |
| xh_ZA | Xhosa (South Africa) |
| yi_US | Yiddish (United States) |
| yo_NG | Yoruba (Nigeria) |
| yue_HK | Yue Chinese (Hong Kong) |
| zh | Chinese |
| zh_CN | Chinese (China) |
| zh_HK | Chinese (Hong Kong) |
| zh_SG | Chinese (Singapore) |
| zh_TW | Chinese (Taiwan) |
| zu_ZA | Zulu (South Africa) |
GUI¶
GUI skinning¶
Oh, beautiful GUI!¶
This tutorial is about advanced skinning of an user interface. Most games generally don’t need this, as they end up just relying on Label, TextureRect, TextureButton and TextureProgress.
However, many types of games often need complex user interfaces, like MMOs, traditional RPGs, Simulators, Strategy, etc. These kinds of interface are also common in some games that include editors to create content, or interfaces for network connectivity.
Godot’s user interface uses these kinds of control with the default theme, but they can be skinned to resemble pretty much any kind of user interface.
Theme¶
The GUI is skinned through the Theme resource. Theme contains all the information required to change the entire visual styling of all controls. Theme options are named, so it’s not obvious which name changes what (especially from code), but several tools are provided. The ultimate place to look at what each theme option is for each control, which will always be more up to date than any documentation, is the file scene/resources/default_theme/default_theme.cpp. The rest of this document will explain the different tools used to customize the theme.
A Theme can be applied to any control in the scene. As a result, all children and grand-children controls will use that same theme, too (unless another theme is specified further down the tree). If a value is not found in a theme, it will be searched in themes higher up in the hierarchy, towards the root. If nothing was found, the default theme is used. This system allows for flexible overriding of themes in complex user interfaces.
Theme options¶
Each kind of option in a theme can be:
- An integer constant: A single numerical constant. Generally used to define spacing between components or alignment.
- A Color: A single color, with or without transparency. Colors are usually applied to fonts and icons.
- A Texture: A single image. Textures are not often used, but when they are, they represent handles to pick or icons in a complex control (such as a file dialog).
- A Font: Every control that uses text can be assigned the fonts used to draw strings.
- A StyleBox: Stylebox is a resource that defines how to draw a panel in varying sizes (more information on them later).
Every option is associated with:
- A name (the name of the option)
- A Control (the name of the control)
An example usage:
var t = Theme.new()
t.set_color("font_color", "Label", Color(1.0, 1.0, 1.0))
var l = Label.new()
l.set_theme(t)
var t = new Theme();
t.SetColor("fontColor", "Label", new Color(1.0f, 1.0f, 1.0f));
var l = new Label();
l.SetTheme(t);
In the example above, a new theme is created. The “font_color” option is changed and then applied to a label. As a result, the label (and all children and grandchildren labels) will use that color.
It is possible to override those options without using the theme directly, and only for a specific control, by using the override API in Control.add_color_override():
var l = Label.new()
l.add_color_override("font_color", Color(1.0, 1.0, 1.0))
var l = new Label();
l.AddColorOverride("fontColor", new Color(1.0f, 1.0f, 1.0f));
In the inline help of Godot (in the script tab) you can check which theme options are overridable, or check the Control class reference.
Customizing a control¶
If only a few controls need to be skinned, it is often not necessary to create a new theme. Controls offer their theme options as special kinds of properties. If checked, overriding will take place:
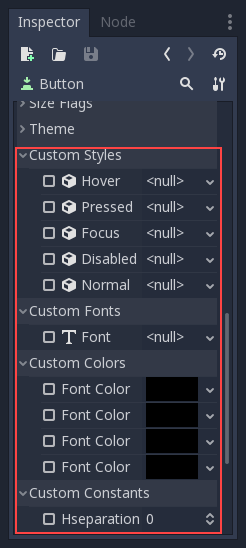
As can be seen in the image above, theme options have little check boxes. If checked, they can be used to override the value of the theme just for that control.
Creating a theme¶
The simplest way to create a theme is to edit a theme resource. Create a Theme from the resource menu; the editor will appear immediately. After that, save it (for example, with the name mytheme.theme):
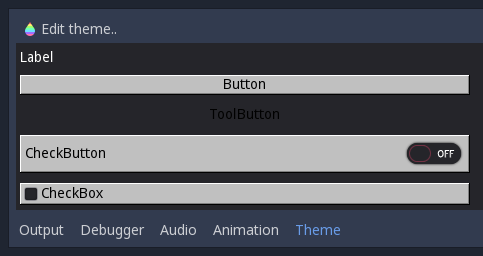
This will create an empty theme that can later be loaded and assigned to controls.
Example: theming a button¶
Download these assets (skin_assets.zip)
and add them to your project. Open the theme editor, click on “Edit Theme”
and select “Add Class Items”:
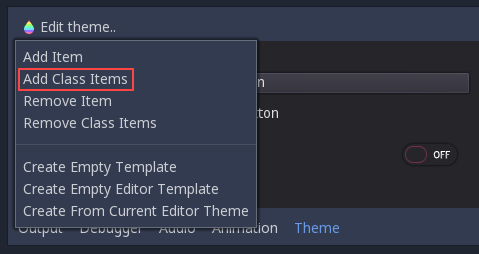
A menu will appear prompting the type of control to create. Select “Button”:
Immediately, all button theme options will appear in the property editor, where they can be edited:
From Styles, open the “Normal” drop-down menu next to where it probably
says “null” and create a “New StyleBoxTexture”, then
edit it. A texture stylebox basically contains a texture and the size of
the margins that will not stretch when the texture is stretched. This is
called “3x3” stretching:
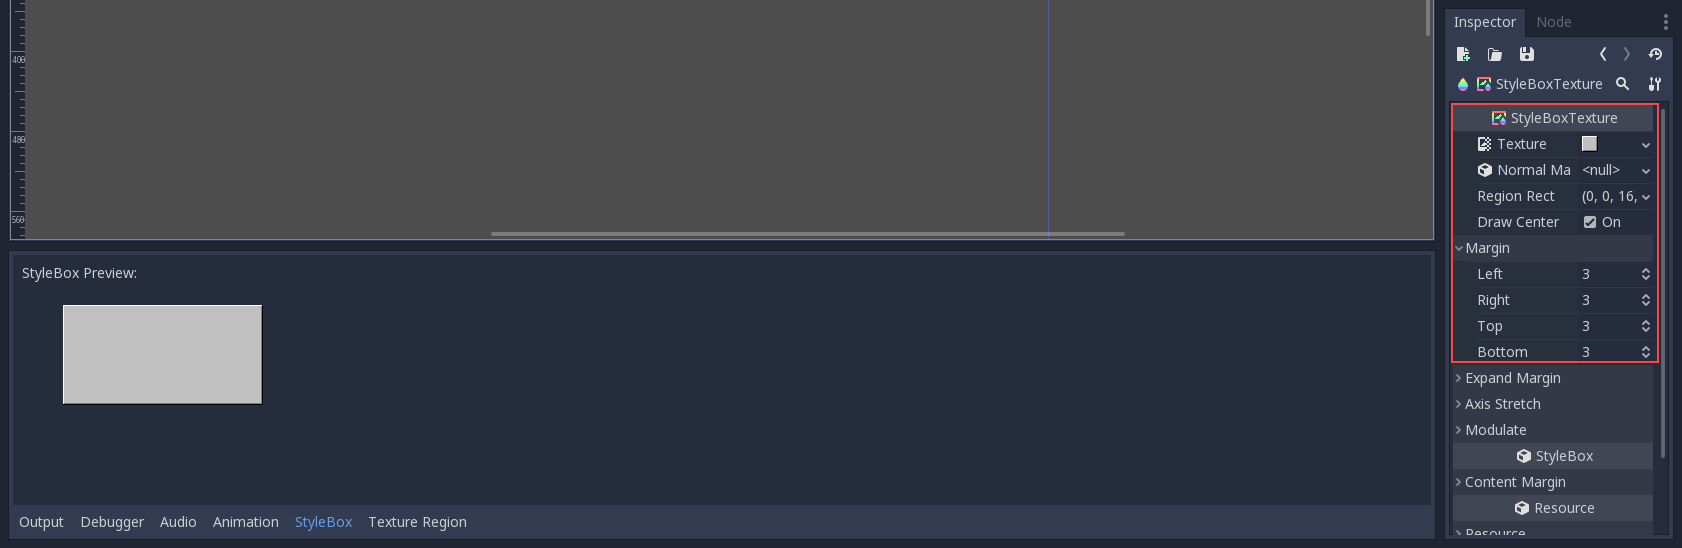
Repeat the steps and add the other assets. There is no hover or disabled image in the example files, so use the same stylebox as in normal. Set the supplied font as the button font and change the font color to black. Soon, your button will look different and retro:
Save this theme to the .theme file. Go to the 2D editor and create a few buttons:
Now, go to the root node of the scene and locate the “theme” property, replace it with the theme that was just created. It should look like this:
Congratulations! You have created a reusable GUI Theme!
Custom GUI controls¶
So many controls…¶
Yet there are never enough. Creating your own custom controls that act just the way you want them to is an obsession of almost every GUI programmer. Godot provides plenty of them, but they may not work exactly the way you want. Before contacting the developers with a pull-request to support diagonal scrollbars, at least it will be good to know how to create these controls easily from script.
Drawing¶
For drawing, it is recommended to check the Custom drawing in 2D tutorial. The same applies. Some functions are worth mentioning due to their usefulness when drawing, so they will be detailed next:
Checking control size¶
Unlike 2D nodes, “size” is important with controls, as it helps to
organize them in proper layouts. For this, the
Control.rect_size
property is provided. Checking it during _draw() is vital to ensure
everything is kept in-bounds.
Checking focus¶
Some controls (such as buttons or text editors) might provide input focus for keyboard or joypad input. Examples of this are entering text or pressing a button. This is controlled with the Control.focus_mode property. When drawing, and if the control supports input focus, it is always desired to show some sort of indicator (highlight, box, etc.) to indicate that this is the currently focused control. To check for this status, the Control.has_focus() method exists. Example
func _draw():
if has_focus():
draw_selected()
else:
draw_normal()
public override void _Draw()
{
if (HasFocus())
{
DrawSelected()
}
else
{
DrawNormal();
}
}
Sizing¶
As mentioned before, size is important to controls. This allows them to lay out properly, when set into grids, containers, or anchored. Controls, most of the time, provide a minimum size to help properly lay them out. For example, if controls are placed vertically on top of each other using a VBoxContainer, the minimum size will make sure your custom control is not squished by the other controls in the container.
To provide this callback, just override Control.get_minimum_size(), for example:
func get_minimum_size():
return Vector2(30, 30)
public override Vector2 _GetMinimumSize()
{
return new Vector2(20, 20);
}
Or alternatively, set it via function:
func _ready():
set_custom_minimum_size(Vector2(30, 30))
public override void _Ready()
{
SetCustomMinimumSize(new Vector2(20, 20));
}
Input¶
Controls provide a few helpers to make managing input events much easier than regular nodes.
Input events¶
There are a few tutorials about input before this one, but it’s worth mentioning that controls have a special input method that only works when:
- The mouse pointer is over the control.
- The button was pressed over this control (control always captures input until button is released)
- Control provides keyboard/joypad focus via Control.focus_mode.
This function is Control._gui_input(). Simply override it in your control. No processing needs to be set.
extends Control
func _gui_input(event):
if event is InputEventMouseButton and event.button_index == BUTTON_LEFT and event.pressed:
print("Left mouse button was pressed!")
public override void _GuiInput(InputEvent @event)
{
if (@event is InputEventMouseButton mbe && mbe.ButtonIndex == (int)ButtonList.Left && mbe.Pressed)
{
GD.Print("Left mouse button was pressed!");
}
}
For more information about events themselves, check the InputEvent tutorial.
Notifications¶
Controls also have many useful notifications for which no dedicated callback exists, but which can be checked with the _notification callback:
func _notification(what):
match what:
NOTIFICATION_MOUSE_ENTER:
pass # Mouse entered the area of this control.
NOTIFICATION_MOUSE_EXIT:
pass # Mouse exited the area of this control.
NOTIFICATION_FOCUS_ENTER:
pass # Control gained focus.
NOTIFICATION_FOCUS_EXIT:
pass # Control lost focus.
NOTIFICATION_THEME_CHANGED:
pass # Theme used to draw the control changed;
# update and redraw is recommended if using a theme.
NOTIFICATION_VISIBILITY_CHANGED:
pass # Control became visible/invisible;
# check new status with is_visible().
NOTIFICATION_RESIZED:
pass # Control changed size; check new size
# with get_size().
NOTIFICATION_MODAL_CLOSED:
pass # For modal pop-ups, notification
# that the pop-up was closed.
public override void _Notification(int what)
{
switch (what)
{
case NotificationMouseEnter:
// Mouse entered the area of this control.
break;
case NotificationMouseExit:
// Mouse exited the area of this control.
break;
case NotificationFocusEnter:
// Control gained focus.
break;
case NotificationFocusExit:
// Control lost focus.
break;
case NotificationThemeChanged:
// Theme used to draw the control changed;
// update and redraw is recommended if using a theme.
break;
case NotificationVisibilityChanged:
// Control became visible/invisible;
// check new status with is_visible().
break;
case NotificationResized:
// Control changed size; check new size with get_size().
break;
case NotificationModalClose:
// For modal pop-ups, notification that the pop-up was closed.
break;
}
}
Size and anchors¶
If a game was always going to be run on the same device and at the same resolution, positioning controls would be a simple matter of setting the position and size of each one of them. Unfortunately, that is rarely the case.
Only TVs nowadays have a standard resolution and aspect ratio. Everything else, from computer monitors to tablets, portable consoles and mobile phones have different resolutions and aspect ratios.
There are several ways to handle this, but for now, let’s just imagine that the screen resolution has changed and the controls need to be re-positioned. Some will need to follow the bottom of the screen, others the top of the screen, or maybe the right or left margins.
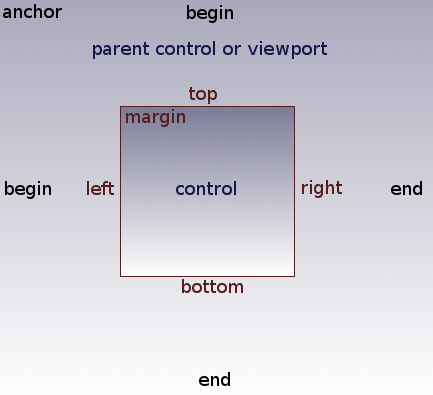
This is done by editing the margin properties of controls. Each control has four margins: left, right, bottom and top. By default, all of them represent a distance in pixels relative to the top-left corner of the parent control or (in case there is no parent control) the viewport.
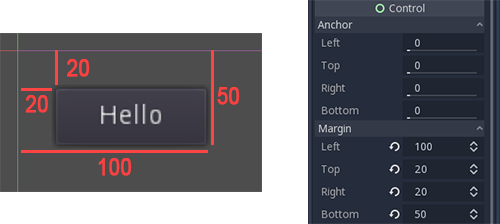
When horizontal (left,right) and/or vertical (top,bottom) anchors are changed to 1, the margin values become relative to the bottom-right corner of the parent control or viewport.
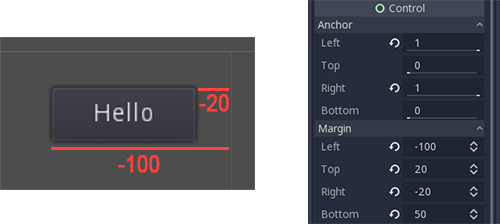
Here, the control is set to expand its bottom-right corner with that of the parent, so when re-sizing the parent, the control will always cover it, leaving a 20 pixel margin:
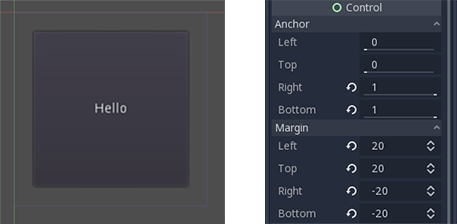
Centering a control¶
To center a control in its parent, set its anchors to 0.5 and each margin to half of its relevant dimension. For example, the code below shows how a TextureRect can be centered in its parent:
var rect = TextureRect.new()
rect.texture = load("res://icon.png")
rect.anchor_left = 0.5
rect.anchor_right = 0.5
rect.anchor_top = 0.5
rect.anchor_bottom = 0.5
var texture_size = rect.texture.get_size()
rect.margin_left = -texture_size.x / 2
rect.margin_right = -texture_size.x / 2
rect.margin_top = -texture_size.y / 2
rect.margin_bottom = -texture_size.y / 2
add_child(rect)
Setting each anchor to 0.5 moves the reference point for the margins to the center of its parent. From there, we set negative margins so that the control gets its natural size.
Containers¶
Anchors are an efficient way to handle different aspect ratios for basic multiple resolution handling in GUIs,
For more complex user interfaces, they can become difficult to use.
This is often the case of games, such as RPGs, online chats, tycoons or simulations. Another common case where more advanced layout features may be required is in-game tools (or simply just tools).
All these situations require a more capable OS-like user interface, with advanced layout and formatting. For that, Containers are more useful.
Container layout¶
Containers provide a huge amount of layout power (as an example, the Godot editor user interface is entirely done using them):

When a Container-derived node is used, all children Control nodes give up their own positioning ability. This means the Container will control their positioning and any attempt to manually alter these nodes will be either ignored or invalidated the next time their parent is resized.
Likewise, when a Container derived node is resized, all its children will be re-positioned according to it, with a behavior based on the type of container used:
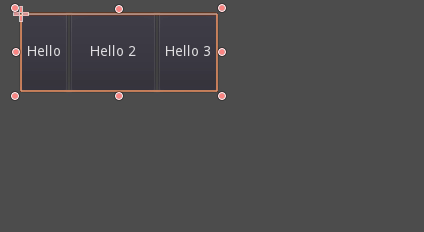
Example of HBoxContainer resizing children buttons.
The real strength of containers is that they can be nested (as nodes), allowing the creation of very complex layouts that resize effortlessly.
Size flags¶
When adding a node to a container, the way the container treats each child depends mainly on their size flags. These flags can be found by inspecting any control that is a child of a Container.

Size flags are independent for vertical and horizontal sizing and not all containers make use of them (but most do):
- Fill: Ensures the control fills the designated area within the container. No matter if a control expands or not (see below), it will only fill the designated area when this is toggled on (it is by default).
- Expand: Attempts to use as most space as possible in the parent container (in this each axis). Controls that don’t expand will be pushed away by those that do. Between those expanding, the amount of space they take from each other is determined by the Ratio (see below).
- Shrink Center When expanding (and if not filling), try to remain at the center of the expanded area (by default it remains at the left or top).
- Ratio Simple ratio of how much expanded controls take up the available space in relation to each other. A control with “2”, will take up twice as much available space as one with “1”.
Experimenting with these flags and different containers is recommended to get a better grasp on how they work.
Container types¶
Godot provides several container types out of the box as they serve different purposes:
Box Containers¶
Arrange child controls vertically or horizontally (via HBoxContainer and VBoxContainer). In the opposite of the designated direction (as in, vertical for an horizontal container), it just expands the children.
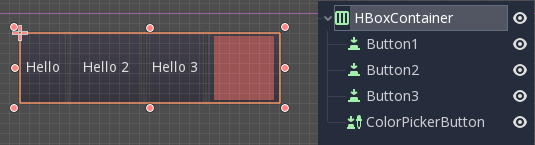
These containers make use of the Ratio property for children with the Expand flag set.
Grid Container¶
Arranges child controls in a grid layout (via GridContainer, amount of columns must be specified). Uses both the vertical and horizontal expand flags.
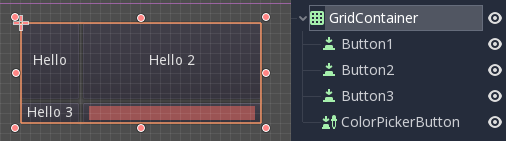
Margin Container¶
Child controls are expanded towards the bounds of this control (via MarginContainer). Padding will be added on the margins depending on the theme configuration.
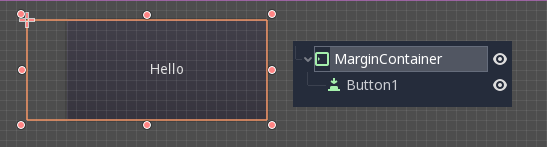
Again, keep in mind that the margins are a Theme value, so they need to be edited at the constants overrides section if desired for a single control:
Tab Container¶
Allows you to place several child controls stacked on top of each other (via TabContainer), with only the current one visible.
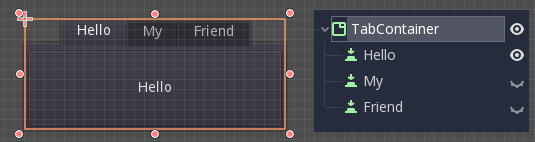
Changing the current one is done via tabs located at the top of the container, via clicking:
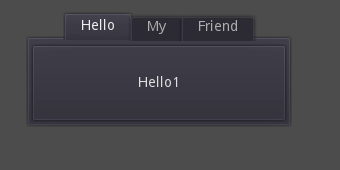
The titles are generated from the node names by default (although they can be overridden via TabContainer API).
Settings such as tab placement and StyleBox can be modified in the TabContainer theme overrides.
Split Container¶
Accepts only one or two children controls, then places them side to side with a divisor (via HSplitContainer and VSplitContainer). Respects both horizontal and vertical flags, as well as Ratio.
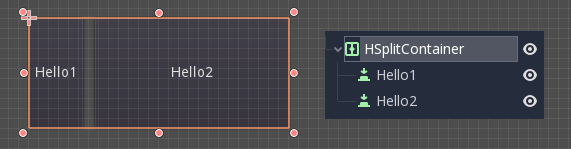
The divisor can be dragged around to change the size relation between both children:
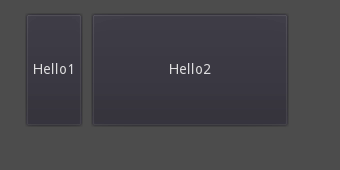
PanelContainer¶
Simple container that draws a StyleBox, then expands children to cover its whole area (via PanelContainer, respecting the StyleBox margins). It respects both the horizontal and vertical size flags.

This container is useful as top-level, or just to add custom backgrounds to sections of a layout.
ScrollContainer¶
Accepts a single child node. If this node is bigger than the container, scrollbars will be added to allow panning the node around (via ScrollContainer). Both vertical and horizontal size flags are respected, and the behavior can be turned on or off per axis in the properties.
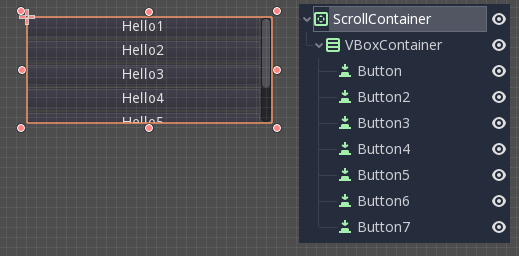
Mouse wheel and touch drag (when touch is available) are also valid ways to pan the child control around.
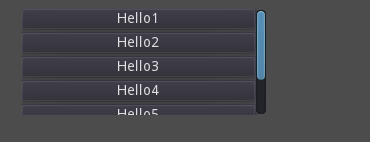
As in the example above, one of the most common ways to use this container is together with a VBoxContainer as child.
ViewportContainer¶
This is a special control that will only accept a single Viewport node as child, and it will display it as if it was an image (via ViewportContainer).
Creating custom Containers¶
It is possible to easily create a custom container using script. Here is an example of a simple container that fits children to its rect size:
extends Container
func _notification(what):
if (what==NOTIFICATION_SORT_CHILDREN):
# Must re-sort the children
for c in get_children():
# Fit to own size
fit_child_in_rect( c, Rect2( Vector2(), rect_size ) )
func set_some_setting():
# Some setting changed, ask for children re-sort
queue_sort()
BBCode in RichTextLabel¶
Introduction¶
Label nodes are great for displaying basic text but they have limits. If you want to change the color of the text, or its alignment, that change affects all of the text in the Label node. You can’t have only one part of the text be one color, or only one part of the text be centered. To get around this limitation you would use a RichTextLabel.
RichTextLabel allows the display of complex text markup in a Control. It has a built-in API for generating the markup, but can also parse a BBCode.
Note that the BBCode tags can also be used, to some extent, in the XML source of the class reference.
Using BBCode¶
For uniformly formatted text you can write in the “Text” property, but if you want
to use BBCode markup you should use the “Text” property in the “Bb Code” section
instead (bbcode_text). Writing to this property will trigger the parsing of your
markup to format the text as requested. Before this happens, you need to toggle the
“Enabled” checkbox in the “Bb Code” section (bbcode_enabled).
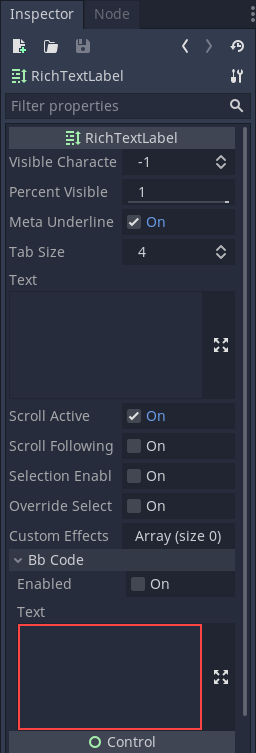
For example, BBCode [color=blue]blue[/color] would render the word “blue” with
a blue color.
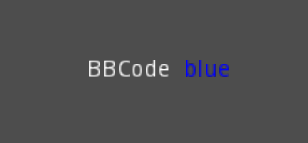
You’ll notice that after writing in the BBCode “Text” property the regular “Text” property now has the text without the BBCode. While the text property will be updated by the BBCode property, you can’t edit the text property or you’ll lose the BBCode markup. All changes to the text must be done in the BBCode parameter.
Note
For BBCode tags such as [b] (bold) or [i] (italics) to work you must
set up custom fonts for the RichTextLabel node first.
Reference¶
| Command | Tag | Description |
| bold | [b]{text}[/b] |
Makes {text} bold. |
| italics | [i]{text}[/i] |
Makes {text} italics. |
| underline | [u]{text}[/u] |
Makes {text} underline. |
| strikethrough | [s]{text}[/s] |
Makes {text} strikethrough. |
| code | [code]{text}[/code] |
Makes {text} monospace. |
| center | [center]{text}[/center] |
Makes {text} centered. |
| right | [right]{text}[/right] |
Makes {text} right-aligned. |
| fill | [fill]{text}[/fill] |
Makes {text} fill width. |
| indent | [indent]{text}[/indent] |
Increase indent level of {text}. |
| url | [url]{url}[/url] |
Show {url} as such. |
| url (ref) | [url=<url>]{text}[/url] |
Makes {text} reference <url>. |
| image | [img]{path}[/img] |
Insert image at resource {path}. |
| resized image | [img=<width>]{path}[/img] |
Insert image at resource {path} using <width> (keeps ratio). |
| resized image | [img=<width>x<height>]{path}[/img] |
Insert image at resource {path} using <width> & <height>. |
| font | [font=<path>]{text}[/font] |
Use custom font at <path> for {text}. |
| color | [color=<code/name>]{text}[/color] |
Change {text} color; use name or # format, such as #ff00ff. |
Built-in color names¶
List of valid color names for the [color=<name>] tag:
- aqua
- black
- blue
- fuchsia
- gray
- green
- lime
- maroon
- navy
- purple
- red
- silver
- teal
- white
- yellow
Hexadecimal color codes¶
For opaque RGB colors, any valid 6-digit hexadecimal code is supported, e.g. [color=#ffffff]white[/color].
For transparent RGB colors, any 8-digit hexadecimal code can be used, e.g. [color=#88ffffff]translucent white[/color].
In this case, note that the alpha channel is the first component of the color code, not the last one.
Image vertical offset¶
You use a custom font for your image in order to align it vertically.
- Create a
BitmapFontresource - Set this bitmap font with a positive value for the
ascentproperty, that’s your height offset - Set the BBCode tag this way:
[font=<font-path>][img]{image-path}[/img][/font]
Animation effects¶
BBCode can also be used to create different text animation effects. Five customizable effects are provided out of the box, and you can easily create your own.
Wave¶
Wave makes the text go up and down. Its tag format is [wave amp=50 freq=2][/wave].
amp controls how high and low the effect goes, and freq controls how fast the
text goes up and down.
Tornado¶
Tornao makes the text move around in a circle. Its tag format is
[tornado radius=5 freq=2][/tornado].
radius is the radius of the circle that controls the offset, freq is how
fast the text moves in a circle.
Shake¶
Shake makes the text shake. Its tag format is [shake rate=5 level=10][/shake].
rate controls how fast the text shakes, level controls how far the text is
offset from the origin.
Fade¶
Fade creates a fade effect over the text that is not animated. Its tag format is
[fade start=4 length=14][/fade].
start controls the starting position of the falloff relative to where the fade
command is inserted, length controls over how many characters should the fade
out take place.
Rainbow¶

Rainbow gives the text a rainbow color that changes over time. Its tag format is
[rainbow freq=0.2 sat=10 val=20][/rainbow].
freq is the number of full rainbow cycles per second, sat is the saturation
of the rainbow, val is the value of the rainbow.
Custom BBCode tags and text effects¶
You can extend the RichTextEffect resource type to create your own custom
BBCode tags. You begin by extending the RichTextEffect resource type. Add
the tool prefix to your GDScript file if you wish to have these custom effects run
within the editor itself. The RichTextLabel does not need to have a script attached,
nor does it need to be running in tool mode.
There is only one function that you need to extend: _process_custom_fx(char_fx).
Optionally, you can also provide a custom BBCode identifier simply by adding a member
name bbcode. The code will check the bbcode property automatically or will
use the name of the file to determine what the BBCode tag should be.
_process_custom_fx¶
This is where the logic of each effect takes place and is called once per character during the draw phase of text rendering. This passes in a CharFXTransform object, which holds a few variables to control how the associated character is rendered:
identityspecifies which custom effect is being processed. You should use that for code flow control.relative_indextells you how far into a given custom effect block you are in as an index.absolute_indextells you how far into the entire text you are as an index.elapsed_timeis the total amount of time the text effect has been running.visiblewill tell you whether the character is visible or not and will also allow you to hide a given portion of text.offsetis an offset position relative to where the given character should render under normal circumstances.coloris the color of a given character.- Finally,
envis a Dictionary of parameters assigned to a given custom effect. You can use get() with an optional default value to retrieve each parameter, if specified by the user. For example[custom_fx spread=0.5 color=#FFFF00]test[/custom_fx]would have a floatspreadand Colorcolorparameters in its ` env` Dictionary. See below for more usage examples.
The last thing to note about this function is that it is necessary to return a boolean
true value to verify that the effect processed correctly. This way, if there’s a problem
with rendering a given character, it will back out of rendering custom effects entirely until
the user fixes whatever error cropped up in their custom effect logic.
Here are some examples of custom effects:
Ghost¶
tool
extends RichTextEffect
# Syntax: [ghost freq=5.0 span=10.0][/ghost]
# Define the tag name.
var bbcode = "ghost"
func _process_custom_fx(char_fx):
# Get parameters, or use the provided default value if missing.
var speed = char_fx.env.get("freq", 5.0)
var span = char_fx.env.get("span", 10.0)
var alpha = sin(char_fx.elapsed_time * speed + (char_fx.absolute_index / span)) * 0.5 + 0.5
char_fx.color.a = alpha
return true
Pulse¶
tool
extends RichTextEffect
# Syntax: [pulse color=#00FFAA height=0.0 freq=2.0][/pulse]
# Define the tag name.
var bbcode = "pulse"
func _process_custom_fx(char_fx):
# Get parameters, or use the provided default value if missing.
var color = char_fx.env.get("color", char_fx.color)
var height = char_fx.env.get("height", 0.0)
var freq = char_fx.env.get("freq", 2.0)
var sined_time = (sin(char_fx.elapsed_time * freq) + 1.0) / 2.0
var y_off = sined_time * height
color.a = 1.0
char_fx.color = char_fx.color.linear_interpolate(color, sined_time)
char_fx.offset = Vector2(0, -1) * y_off
return true
Matrix¶
tool
extends RichTextEffect
# Syntax: [matrix clean=2.0 dirty=1.0 span=50][/matrix]
# Define the tag name.
var bbcode = "matrix"
func _process_custom_fx(char_fx):
# Get parameters, or use the provided default value if missing.
var clear_time = char_fx.env.get("clean", 2.0)
var dirty_time = char_fx.env.get("dirty", 1.0)
var text_span = char_fx.env.get("span", 50)
var value = char_fx.character
var matrix_time = fmod(char_fx.elapsed_time + (char_fx.absolute_index / float(text_span)), \
clear_time + dirty_time)
matrix_time = 0.0 if matrix_time < clear_time else \
(matrix_time - clear_time) / dirty_time
if value >= 65 && value < 126 && matrix_time > 0.0:
value -= 65
value = value + int(1 * matrix_time * (126 - 65))
value %= (126 - 65)
value += 65
char_fx.character = value
return true
This will add a few new BBCode commands, which can be used like so:
[center][ghost]This is a custom [matrix]effect[/matrix][/ghost] made in
[pulse freq=5.0 height=2.0][pulse color=#00FFAA freq=2.0]GDScript[/pulse][/pulse].[/center]
Viewports¶
Viewports¶
Introduction¶
Think of a Viewport as a screen onto which the game is projected. In order to see the game, we need to have a surface on which to draw it; that surface is the Root Viewport.
Viewports can also be added to the scene so that there are multiple surfaces to draw on. When we are drawing to a Viewport that is not the Root, we call it a render target. We can access the contents of a render target by accessing its corresponding texture. By using a Viewport as a render target, we can either render multiple scenes simultaneously or we can render to a texture which is applied to an object in the scene, for example a dynamic skybox.
Viewports have a variety of use cases, including:
- Rendering 3D objects within a 2D game
- Rendering 2D elements in a 3D game
- Rendering dynamic textures
- Generating procedural textures at runtime
- Rendering multiple cameras in the same scene
What all these use cases have in common is that you are given the ability to draw objects to a texture as if it were another screen and can then choose what to do with the resulting texture.
Input¶
Viewports are also responsible for delivering properly adjusted and scaled input events to all their children nodes. Typically, input is received by the nearest Viewport in the tree, but you can set Viewports not to receive input by checking ‘Disable Input’ to ‘on’; this will allow the next nearest Viewport in the tree to capture the input.
For more information on how Godot handles input, please read the Input Event Tutorial.
Listener¶
Godot supports 3D sound (in both 2D and 3D nodes); more on this can be found in the Audio Streams Tutorial. For this type of sound to be audible, the Viewport needs to be enabled as a listener (for 2D or 3D). If you are using a custom Viewport to display your World, don’t forget to enable this!
Cameras (2D & 3D)¶
When using a Camera / Camera2D, cameras will always display on the closest parent Viewport (going towards the root). For example, in the following hierarchy:
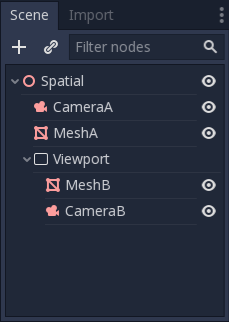
CameraA will display on the Root Viewport and it will draw MeshA. CameraB will be captured by the Viewport Node along with MeshB. Even though MeshB is in the scene hierarchy, it will still not be drawn to the Root Viewport. Similarly MeshA will not be visible from the Viewport node because Viewport nodes only capture nodes below them in the hierarchy.
There can only be one active camera per Viewport, so if there is more than one, make sure that the desired one has the “current” property set, or make it the current camera by calling:
camera.make_current()
By default, cameras will render all objects in their world. In 3D, cameras can use their cull_mask property combined with the VisualInstance’s layer property to restrict which objects are rendered.
Scale & stretching¶
Viewports have a “size” property, which represents the size of the Viewport in pixels. For Viewports which are children of ViewportContainers, these values are overridden, but for all others, this sets their resolution.
It is also possible to scale the 2D content and make the Viewport resolution different from the one specified in size, by calling:
viewport.set_size_override(true, Vector2(width, height)) # Custom size for 2D
viewport.set_size_override_stretch(true) # Enable stretch for custom size.
The root Viewport uses this for the stretch options in the project settings. For more information on scaling and stretching visit the Multiple Resolutions Tutorial
Worlds¶
For 3D, a Viewport will contain a World. This is basically the universe that links physics and rendering together. Spatial-base nodes will register using the World of the closest Viewport. By default, newly created Viewports do not contain a World but use the same as their parent Viewport (the root Viewport always contains a World, which is the one objects are rendered to by default). A World can be set in a Viewport using the “world” property, and that will separate all children nodes of that Viewport from interacting with the parent Viewport’s World. This is especially useful in scenarios where, for example, you might want to show a separate character in 3D imposed over the game (like in StarCraft).
As a helper for situations where you want to create Viewports that display single objects and don’t want to create a World, Viewport has the option to use its own World. This is useful when you want to instance 3D characters or objects in a 2D World.
For 2D, each Viewport always contains its own World2D. This suffices in most cases, but in case sharing them may be desired, it is possible to do so by setting the Viewport’s World2D manually.
For an example of how this works, see the demo projects 3D in 2D and 2D in 3D respectively.
Capture¶
It is possible to query a capture of the Viewport contents. For the root Viewport, this is effectively a screen capture. This is done with the following code:
# Retrieve the captured Image using get_data().
var img = get_viewport().get_texture().get_data()
# Flip on the y axis.
# You can also set "V Flip" to true if not on the Root Viewport.
img.flip_y()
# Convert Image to ImageTexture.
var tex = ImageTexture.new()
tex.create_from_image(img)
# Set Sprite Texture.
$sprite.texture = tex
But if you use this in _ready() or from the first frame of the Viewport’s initialization,
you will get an empty texture because there is nothing to get as texture. You can deal with
it using (for example):
# Wait until the frame has finished before getting the texture
yield(VisualServer, "frame_post_draw")
# You can get the image after this.
Viewport Container¶
If the Viewport is a child of a ViewportContainer, it will become active and display anything it has inside. The layout looks like this:
The Viewport will cover the area of its parent ViewportContainer completely
if Stretch is set to true in ViewportContainer.
Note: The size of the ViewportContainer cannot be smaller than the size of the Viewport.
Rendering¶
Due to the fact that the Viewport is an entryway into another rendering surface, it exposes a few rendering properties that can be different from the project settings. The first is MSAA; you can choose to use a different level of MSAA for each Viewport; the default behavior is DISABLED. You can also set the Viewport to use HDR, HDR is very useful for when you want to store values in the texture that are outside the range 0.0 - 1.0.
If you know how the Viewport is going to be used, you can set its Usage to either 3D or 2D. Godot will then restrict how the Viewport is drawn to in accordance with your choice; default is 3D. The 2D usage mode is slightly faster and uses less memory compared to the 3D one. It’s a good idea to set the Viewport’s Usage property to 2D if your viewport doesn’t render anything in 3D.
Note
If you need to render 3D shadows in the viewport, make sure to set the viewport’s Shadow Atlas Size property to a value higher than 0. Otherwise, shadows won’t be rendered. For reference, the Project Settings define it to 4096 by default.
Godot also provides a way of customizing how everything is drawn inside Viewports using “Debug Draw”. Debug Draw allows you to specify one of four options for how the Viewport will display things drawn inside it. Debug Draw is disabled by default.
A scene drawn with Debug Draw disabled
The other three options are Unshaded, Overdraw, and Wireframe. Unshaded draws the scene without using lighting information so all the objects appear flatly colored the color of their albedo.
The same scene with Debug Draw set to Unshaded
Overdraw draws the meshes semi-transparent with an additive blend so you can see how the meshes overlap.
The same scene with Debug Draw set to Overdraw
Lastly, Wireframe draws the scene using only the edges of triangles in the meshes.
Note
The effects of the Wireframe mode are only visible in the editor, not while the project is running.
Render target¶
When rendering to a Viewport, whatever is inside will not be visible in the scene editor. To display the contents, you have to draw the Viewport’s ViewportTexture somewhere. This can be requested via code using (for example):
# This gives us the ViewportTexture.
var rtt = viewport.get_texture()
sprite.texture = rtt
Or it can be assigned in the editor by selecting “New ViewportTexture”
and then selecting the Viewport you want to use.
Every frame, the Viewport’s texture is cleared away with the default clear color (or a transparent
color if Transparent BG is set to true). This can be changed by setting Clear Mode to Never or Next Frame.
As the name implies, Never means the texture will never be cleared, while next frame will
clear the texture on the next frame and then set itself to Never.
By default, re-rendering of the Viewport happens when the Viewport’s ViewportTexture has been drawn in a frame. If visible, it will be rendered; otherwise, it will not. This behavior can be changed to manual rendering (once), or always render, no matter if visible or not. This flexibility allows users to render an image once and then use the texture without incurring the cost of rendering every frame.
Make sure to check the Viewport demos! Viewport folder in the demos archive available to download, or https://github.com/godotengine/godot-demo-projects/tree/master/viewport
Multiple resolutions¶
The problem of multiple resolutions¶
Developers often have trouble understanding how to best support multiple resolutions in their games. For desktop and console games, this is more or less straightforward, as most screen aspect ratios are 16:9 and resolutions are standard (720p, 1080p, 1440p, 4K, …).
For mobile games, at first, it was easy. For many years, the iPhone and iPad used the same resolution. When Retina was implemented, they just doubled the pixel density; most developers had to supply assets in default and double resolutions.
Nowadays, this is no longer the case, as there are plenty of different screen sizes, densities, and aspect ratios. Non-conventional sizes are also becoming increasingly popular, such as ultrawide displays.
For 3D games, there is not much of a need to support multiple resolutions (from the aesthetic point of view). The 3D geometry will just fill the screen based on the field of view, disregarding the aspect ratio. The main reason one may want to support this, in this case, is for performance reasons (running in lower resolution to increase frames per second).
For 2D and game UIs, this is a different matter, as art needs to be created using specific pixel sizes in software such as Photoshop, GIMP or Krita.
Since layouts, aspect ratios, resolutions, and pixel densities can change so much, it is no longer possible to design UIs for every specific screen. Another method must be used.
One size fits all¶
The most common approach is to use a single base resolution and then fit it to everything else. This resolution is how most players are expected to play the game (given their hardware). For mobile, Google has useful stats online, and for desktop, Steam also does.
As an example, Steam shows that the most common primary display resolution is 1920×1080, so a sensible approach is to develop a game for this resolution, then handle scaling for different sizes and aspect ratios.
Godot provides a several useful tools to do this easily.
Base size¶
A base size for the window can be specified in the Project Settings under Display → Window.

However, what it does is not completely obvious; the engine will not attempt to switch the monitor to this resolution. Rather, think of this setting as the “design size”, i.e. the size of the area that you work with in the editor. This setting corresponds directly to the size of the blue rectangle in the 2D editor.
There is often a need to support devices with screen and window sizes that are different from this base size. Godot offers many ways to control how the viewport will be resized and stretched to different screen sizes.
Resizing¶
There are several types of devices, with several types of screens, which
in turn have different pixel density and resolutions. Handling all of
them can be a lot of work, so Godot tries to make the developer’s life a
little easier. The Viewport
node has several functions to handle resizing, and the root node of the
scene tree is always a viewport (scenes loaded are instanced as a child
of it, and it can always be accessed by calling
get_tree().get_root() or get_node("/root")).
In any case, while changing the root Viewport params is probably the most flexible way to deal with the problem, it can be a lot of work, code and guessing, so Godot provides a simple set of parameters in the project settings to handle multiple resolutions.
Stretch settings¶
Stretch settings are located in the project settings, it’s just a bunch of configuration variables that provide several options:

Stretch Mode¶
The Stretch Mode setting defines how the base size is stretched to fit the resolution of the window or screen.
The animations below use a “base size” of just 16×9 pixels to demonstrate the effect of different stretch modes. A single sprite, also 16×9 pixels in size, covers the entire viewport, and a diagonal Line2D is added on top of it:
Stretch Mode = Disabled (default): No stretching happens. One unit in the scene corresponds to one pixel on the screen. In this mode, the Stretch Aspect setting has no effect.
This is a good option if you want full control over every screen pixel, and is probably the best option for 3D games.
Stretch Mode = 2D: In this mode, the size specified in display/width and display/height in the project settings is stretched to cover the whole screen (taking the Stretch Aspect setting into account). This means that everything is rendered directly at the target resolution. 3D is largely unaffected, while in 2D, there is no longer a 1:1 correspondence between sprite pixels and screen pixels, which may result in scaling artifacts.
This is a good option if your 2D artwork has a sufficiently high resolution and does not require pixel-perfect rendering. Consider enabling texture filtering and mipmapping on your 2D textures and fonts.
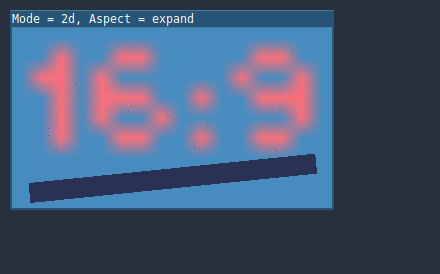
Stretch Mode = Viewport: Viewport scaling means that the size of the root Viewport is set precisely to the base size specified in the Project Settings’ Display section. The scene is rendered to this viewport first. Finally, this viewport is scaled to fit the screen (taking the Stretch Aspect setting into account).
This mode is useful when working with pixel-precise games, or for the sake of rendering to a lower resolution to improve performance.
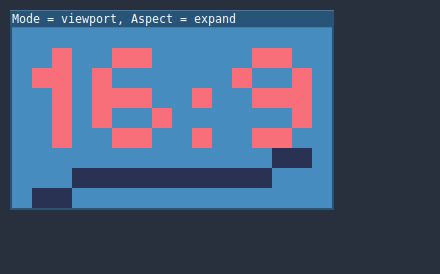
Stretch Aspect¶
The second setting is the stretch aspect. Note that this only takes effect if Stretch Mode is set to something other than Disabled.
In the animations below, you will notice gray and black areas. The black areas are added by the engine and cannot be drawn into. The gray areas are part of your scene, and can be drawn to. The gray areas correspond to the region outside the blue frame you see in the 2D editor.
Stretch Aspect = Ignore: Ignore the aspect ratio when stretching the screen. This means that the original resolution will be stretched to exactly fill the screen, even if it’s wider or narrower. This may result in nonuniform stretching: things looking wider or taller than designed.

Stretch Aspect = Keep: Keep aspect ratio when stretching the screen. This means that the viewport retains its original size regardless of the screen resolution, and black bars will be added to the top/bottom of the screen (“letterboxing”) or the sides (“pillarboxing”).
This is a good option if you know the aspect ratio of your target devices in advance, or if you don’t want to handle different aspect ratios.

Stretch Aspect = Keep Width: Keep aspect ratio when stretching the screen. If the screen is wider than the base size, black bars are added at the left and right (pillarboxing). But if the screen is taller than the base resolution, the viewport will be grown in the vertical direction (and more content will be visible to the bottom). You can also think of this as “Expand Vertically”.
This is usually the best option for creating GUIs or HUDs that scale, so some controls can be anchored to the bottom (Size and anchors).

Stretch Aspect = Keep Height: Keep aspect ratio when stretching the screen. If the screen is taller than the base size, black bars are added at the top and bottom (letterboxing). But if the screen is wider than the base resolution, the viewport will be grown in the horizontal direction (and more content will be visible to the right). You can also think of this as “Expand Horizontally”.
This is usually the best option for 2D games that scroll horizontally (like runners or platformers).

Stretch Aspect = Expand: Keep aspect ratio when stretching the screen, but keep neither the base width nor height. Depending on the screen aspect ratio, the viewport will either be larger in the horizontal direction (if the screen is wider than the base size) or in the vertical direction (if the screen is taller than the original size).
Stretch Shrink¶
The Shrink setting allows you to add an extra scaling factor on top of what the Stretch options above already provide. The default value of 1 means that no scaling occurs.
If, for example, you set Shrink to 4 and leave Stretch Mode on Disabled, each unit in your scene will correspond to 4×4 pixels on the screen.
If Stretch Mode is set to something other than Disabled, the size of the root viewport is scaled down by the Shrink factor, and pixels in the output are scaled up by the same amount. This is rarely useful for 2D games, but can be used to increase performance in 3D games by rendering them at a lower resolution.
From scripts¶
To configure stretching at runtime from a script, use the
get_tree().set_screen_stretch() function (see
SceneTree.set_screen_stretch()).
Reducing aliasing on downsampling¶
If the game has a very high base resolution (e.g. 3840×2160), aliasing might appear when downsampling to something considerably lower like 1280×720. Aliasing can be made less visible by shrinking all images by a factor of 2 upon loading. This can be done by calling the method below before the game data is loaded:
VisualServer.texture_set_shrink_all_x2_on_set_data(true)
Handling aspect ratios¶
Once scaling for different resolutions is accounted for, make sure that your user interface also scales for different aspect ratios. This can be done using anchors and/or containers.
Field of view scaling¶
The 3D Camera node’s Keep Aspect property defaults to the Keep Height scaling mode (also called Hor+). This is usually the best value for desktop games and mobile games in landscape mode, as widescreen displays will automatically use a wider field of view.
However, if your 3D game is intended to be played in portrait mode, it may make more sense to use Keep Width instead (also called Vert-). This way, smartphones with an aspect ratio taller than 16:9 (e.g. 19:9) will use a taller field of view, which is more logical here.
Using a Viewport as a texture¶
Introduction¶
This tutorial will introduce you to using the Viewport as a texture that can be applied to 3D objects. In order to do so, it will walk you through the process of making a procedural planet like the one below:
Note
This tutorial does not cover how to code a dynamic atmosphere like the one this planet has.
This tutorial assumes you are familiar with how to set up a basic scene including: a Camera, a light source, a Mesh Instance with a Primitive Mesh, and applying a Spatial Material to the mesh. The focus will be on using the Viewport to dynamically create textures that can be applied to the mesh.
During the course of this tutorial, we’ll cover the following topics:
- How to use a Viewport as a render texture
- Mapping a texture to a sphere with equirectangular mapping
- Fragment shader techniques for procedural planets
- Setting a Roughness map from a Viewport Texture
Setting up the Viewport¶
First, add a Viewport to the scene.
Next, set the size of the Viewport to (1024, 512). The
Viewport can actually be any size so long as the width is double the height.
The width needs to be double the height so that the image will accurately map onto the
sphere, as we will be using equirectangular projection, but more on that later.
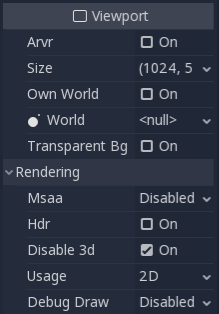
Next, disable HDR and disable 3D. We don’t need HDR because our planet’s surface will not be especially
bright, so values between 0 and 1 will be fine. And we will be using a ColorRect
to render the surface, so we don’t need 3D either.
Select the Viewport and add a ColorRect as a child.
Set the anchors “Right” and “Bottom” to 1, then make sure all the margins are set to 0. This
will ensure that the ColorRect takes up the entire Viewport.
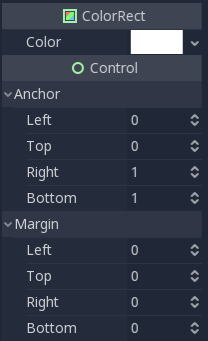
Next, we add a Shader Material to the ColorRect (ColorRect > CanvasItem > Material > Material > New ShaderMaterial).
Note
Basic familiarity with shading is recommended for this tutorial. However, even if you are new to shaders, all the code will be provided, so you should have no problem following along.
ColorRect > CanvasItem > Material > Material > click / Edit > ShaderMaterial > Shader > New Shader > click / Edit:
shader_type canvas_item;
void fragment() {
COLOR = vec4(UV.x, UV.y, 0.5, 1.0);
}
The above code renders a gradient like the one below.
Now we have the basics of a Viewport that we render to and we have a unique image that we can apply to the sphere.
Applying the texture¶
MeshInstance > GeometryInstance > Geometry > Material Override > New SpatialMaterial:
Now we go into the Mesh Instance and add a Spatial Material to it. No need for a special Shader Material (although that would be a good idea for more advanced effects, like the atmosphere in the example above).
MeshInstance > GeometryInstance > Geometry > Material Override > click / Edit:
Open the newly created Spatial Material and scroll down to the “Albedo” section and click beside the “Texture” property to add an Albedo Texture. Here we will apply the texture we made. Choose “New ViewportTexture”
Then, from the menu that pops up, select the Viewport that we rendered to earlier.
Your sphere should now be colored in with the colors we rendered to the Viewport.
Notice the ugly seam that forms where the texture wraps around? This is because we are picking a color based on UV coordinates and UV coordinates do not wrap around the texture. This is a classic problem in 2D map projection. Game developers often have a 2-dimensional map they want to project onto a sphere, but when it wraps around, it has large seams. There is an elegant workaround for this problem that we will illustrate in the next section.
Making the planet texture¶
So now, when we render to our Viewport, it appears magically on the sphere. But there is an ugly
seam created by our texture coordinates. So how do we get a range of coordinates that wrap around
the sphere in a nice way? One solution is to use a function that repeats on the domain of our texture.
sin and cos are two such functions. Let’s apply them to the texture and see what happens.
COLOR.xyz = vec3(sin(UV.x * 3.14159 * 4.0) * cos(UV.y * 3.14159 * 4.0) * 0.5 + 0.5);
Not too bad. If you look around, you can see that the seam has now disappeared, but in its place, we have pinching at the poles. This pinching is due to the way Godot maps textures to spheres in its Spatial Material. It uses a projection technique called equirectangular projection, which translates a spherical map onto a 2D plane.
Note
If you are interested in a little extra information on the technique, we will be converting from spherical coordinates into Cartesian coordinates. Spherical coordinates map the longitude and latitude of the sphere, while Cartesian coordinates are, for all intents and purposes, a vector from the center of the sphere to the point.
For each pixel, we will calculate its 3D position on the sphere. From that, we will use
3D noise to determine a color value. By calculating the noise in 3D, we solve the problem
of the pinching at the poles. To understand why, picture the noise being calculated across the
surface of the sphere instead of across the 2D plane. When you calculate across the
surface of the sphere, you never hit an edge, and hence you never create a seam or
a pinch point on the pole. The following code converts the UVs into Cartesian
coordinates.
float theta = UV.y * 3.14159;
float phi = UV.x * 3.14159 * 2.0;
vec3 unit = vec3(0.0, 0.0, 0.0);
unit.x = sin(phi) * sin(theta);
unit.y = cos(theta) * -1.0;
unit.z = cos(phi) * sin(theta);
unit = normalize(unit);
And if we use unit as an output COLOR value, we get:
Now that we can calculate the 3D position of the surface of the sphere, we can use 3D noise to make the planet. We will be using this noise function directly from a Shadertoy:
vec3 hash(vec3 p) {
p = vec3(dot(p, vec3(127.1, 311.7, 74.7)),
dot(p, vec3(269.5, 183.3, 246.1)),
dot(p, vec3(113.5, 271.9, 124.6)));
return -1.0 + 2.0 * fract(sin(p) * 43758.5453123);
}
float noise(vec3 p) {
vec3 i = floor(p);
vec3 f = fract(p);
vec3 u = f * f * (3.0 - 2.0 * f);
return mix(mix(mix(dot(hash(i + vec3(0.0, 0.0, 0.0)), f - vec3(0.0, 0.0, 0.0)),
dot(hash(i + vec3(1.0, 0.0, 0.0)), f - vec3(1.0, 0.0, 0.0)), u.x),
mix(dot(hash(i + vec3(0.0, 1.0, 0.0)), f - vec3(0.0, 1.0, 0.0)),
dot(hash(i + vec3(1.0, 1.0, 0.0)), f - vec3(1.0, 1.0, 0.0)), u.x), u.y),
mix(mix(dot(hash(i + vec3(0.0, 0.0, 1.0)), f - vec3(0.0, 0.0, 1.0)),
dot(hash(i + vec3(1.0, 0.0, 1.0)), f - vec3(1.0, 0.0, 1.0)), u.x),
mix(dot(hash(i + vec3(0.0, 1.0, 1.0)), f - vec3(0.0, 1.0, 1.0)),
dot(hash(i + vec3(1.0, 1.0, 1.0)), f - vec3(1.0, 1.0, 1.0)), u.x), u.y), u.z );
}
Note
All credit goes to the author, Inigo Quilez. It is published under the MIT licence.
Now to use noise, add the following to the fragment function:
float n = noise(unit * 5.0);
COLOR.xyz = vec3(n * 0.5 + 0.5);
Note
In order to highlight the texture, we set the material to unshaded.
You can see now that the noise indeed wraps seamlessly around the sphere. Although this looks nothing like the planet you were promised. So let’s move onto something more colorful.
Coloring the planet¶
Now to make the planet colors. While there are many ways to do this, for now, we will stick with a gradient between water and land.
To make a gradient in GLSL, we use the mix function. mix takes two values to interpolate
between and a third argument to choose how much to interpolate between them; in essence,
it mixes the two values together. In other APIs, this function is often called lerp.
However, lerp is typically reserved for mixing two floats together; mix can take any
values whether it be floats or vector types.
COLOR.xyz = mix(vec3(0.05, 0.3, 0.5), vec3(0.9, 0.4, 0.1), n * 0.5 + 0.5);
The first color is blue for the ocean. The second color is a kind of reddish color (because
all alien planets need red terrain). And finally, they are mixed together by n * 0.5 + 0.5.
n smoothly varies between -1 and 1. So we map it into the 0-1 range that mix expects.
Now you can see that the colors change between blue and red.

That is a little more blurry than we want. Planets typically have a relatively clear separation between
land and sea. In order to do that, we will change the last term to smoothstep(-0.1, 0.0, n).
And thus the whole line becomes:
COLOR.xyz = mix(vec3(0.05, 0.3, 0.5), vec3(0.9, 0.4, 0.1), smoothstep(-0.1, 0.0, n));
What smoothstep does is return 0 if the third argument is below the first and 1 if the
third argument is larger than the second and smoothly blends between 0 and 1 if the third number
is between the first and the second. So in this line, smoothstep returns 0 whenever n is less than -0.1
and it returns 1 whenever n is above 0.
One more thing to make this a little more planet-y. The land shouldn’t be so blobby; let’s make the edges
a little rougher. A trick that is often used in shaders to make rough looking terrain with noise is
to layer levels of noise over one another at various frequencies. We use one layer to make the
overall blobby structure of the continents. Then another layer breaks up the edges a bit, and then
another, and so on. What we will do is calculate n with four lines of shader code
instead of just one. n becomes:
float n = noise(unit * 5.0) * 0.5;
n += noise(unit * 10.0) * 0.25;
n += noise(unit * 20.0) * 0.125;
n += noise(unit * 40.0) * 0.0625;
And now the planet looks like:
And with shading turned back on, it looks like:
Making an ocean¶
One final thing to make this look more like a planet. The ocean and the land reflect light differently.
So we want the ocean to shine a little more than the land. We can do this by passing a fourth value
into the alpha channel of our output COLOR and using it as a Roughness map.
COLOR.a = 0.3 + 0.7 * smoothstep(-0.1, 0.0, n);
This line returns 0.3 for water and 1.0 for land. This means that the land is going to be quite
rough, while the water will be quite smooth.
And then, in the material, under the “Metallic” section, make sure Metallic is set to 0 and
Specular is set to 1. The reason for this is the water reflects light really well, but
isn’t metallic. These values are not physically accurate, but they are good enough for this demo.
Next, under the “Roughness” section, set Roughness to 1 and set the roughness texture to a
Viewport Texture pointing to our planet texture Viewport.
Finally, set the Texture Channel to Alpha. This instructs the renderer to use the alpha
channel of our output COLOR as the Roughness value.
You’ll notice that very little changes except that the planet is no longer reflecting the sky.
This is happening because, by default, when something is rendered with an
alpha value, it gets drawn as a transparent object over the background. And since the default background
of the Viewport is opaque, the alpha channel of the
Viewport Texture is 1, resulting in the planet texture being
drawn with slightly fainter colors and a Roughness value of 1 everywhere. To correct this, we
go into the Viewport and set “Transparent Bg” to on. Since we are now
rendering one transparent object on top of another, we want to enable blend_premul_alpha:
render_mode blend_premul_alpha;
This pre-multiplies the colors by the alpha value and then blends them correctly together. Typically,
when blending one transparent color on top of another, even if the background has an alpha of 0 (as it
does in this case), you end up with weird color bleed issues. Setting blend_premul_alpha fixes that.
Now the planet should look like it is reflecting light on the ocean but not the land. If you haven’t done so already, add an OmniLight to the scene so you can move it around and see the effect of the reflections on the ocean.
And there you have it. A procedural planet generated using a Viewport.
Custom post-processing¶
Introduction¶
Godot provides many post-processing effects out of the box, including Bloom, DOF, and SSAO. Sometimes you want to write your own custom effect. Here’s how you can do so.
Post-processing effects are shaders applied to a frame after Godot rendered it. You first want to render
your scene into a Viewport, then render the Viewport
inside a ViewportTexture and show it on the screen.
The easiest way to implement a custom post-processing shader is to use Godot’s built-in ability to read from the screen texture. If you’re not familiar with this, you should read the Screen Reading Shaders Tutorial first.
Note
As of the time of writing, Godot does not support rendering to multiple buffers at the same time. Your post-processing shader will not have access to normals or other render passes. You only have access to the rendered frame.
Single pass post-processing¶
You will need a Viewport to render your scene to, and a scene to render your
Viewport on the screen. You can use a ViewportContainer to display your Viewport on the entire screen or inside
another Control node.
Note
Rendering using a Viewport gives you control over
how the scene render, including the framerate, and you can use the
ViewportContainer to render 3D objects in a 2D scene.
For this demo, we will use a Node2D with a ViewportContainer and finally a
Viewport. Your Scene tab should look like this:
Inside the Viewport, you can have whatever you want. This will contain
your main scene. For this tutorial, we will use a field of random boxes:
Add a new ShaderMaterial to the ViewportContainer, and assign a new
shader resource to it. You can access your rendered Viewport with the built-in TEXTURE uniform.
Note
You can choose not to use a ViewportContainer, but if you do so, you will
need to create your own uniform in the shader and pass the Viewport texture in
manually, like so:
// Inside the Shader
uniform sampler2D ViewportTexture;
And you can pass the texture into the shader from GDScript like so:
# In GDScript
func _ready():
$Sprite.material.set_shader_param("ViewportTexture", $Viewport.get_texture())
Copy the following code to your shader. The above code is a single pass edge detection filter, a Sobel filter.
shader_type canvas_item;
void fragment() {
vec3 col = -8.0 * texture(TEXTURE, SCREEN_UV).xyz;
col += texture(TEXTURE, SCREEN_UV + vec2(0.0, SCREEN_PIXEL_SIZE.y)).xyz;
col += texture(TEXTURE, SCREEN_UV + vec2(0.0, -SCREEN_PIXEL_SIZE.y)).xyz;
col += texture(TEXTURE, SCREEN_UV + vec2(SCREEN_PIXEL_SIZE.x, 0.0)).xyz;
col += texture(TEXTURE, SCREEN_UV + vec2(-SCREEN_PIXEL_SIZE.x, 0.0)).xyz;
col += texture(TEXTURE, SCREEN_UV + SCREEN_PIXEL_SIZE.xy).xyz;
col += texture(TEXTURE, SCREEN_UV - SCREEN_PIXEL_SIZE.xy).xyz;
col += texture(TEXTURE, SCREEN_UV + vec2(-SCREEN_PIXEL_SIZE.x, SCREEN_PIXEL_SIZE.y)).xyz;
col += texture(TEXTURE, SCREEN_UV + vec2(SCREEN_PIXEL_SIZE.x, -SCREEN_PIXEL_SIZE.y)).xyz;
COLOR.xyz = col;
}
Note
The Sobel filter reads pixels in a 9x9 grid around the current pixel and adds them together, using weight. What makes it interesting is that it assigns weights to each pixel; +1 for each of the eight around the center and -8 for the center pixel. The choice of weights is called a “kernel”. You can use different kernels to create edge detection filters, outlines, and all sorts of effects.
Multi-pass post-processing¶
Some post-processing effects like blur are resource intensive. If you break them down in multiple passes however, you can make them run a lot faster. In a multipass material, each pass takes the result from the previous pass as an input and processes it.
To make a multi-pass post-processing shader, you stack Viewport nodes. In the example above, you
rendered the content of one Viewport object into the root Viewport, through a ViewportContainer
node. You can do the same thing for a multi-pass shader by rendering the content of one Viewport into
another and then rendering the last Viewport into the root Viewport.
Your scene hierarchy will look something like this:
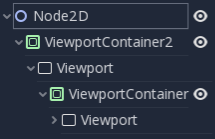
Godot will render the bottom Viewport node first. So if the order of the passes matters for your
shaders, make sure that you assign the shader you want to apply first to the lowest ViewportContainer in
the tree.
Note
You can also render your Viewports separately without nesting them like this. You just need to use two Viewports and to render them one after the other.
Apart from the node structure, the steps are the same as with the single-pass post-processing shader.
As an example, you could write a full screen Gaussian blur effect by attaching the following pieces of code to each of the ViewportContainers. The order in which you apply the shaders does not matter:
shader_type canvas_item;
//Blurs the screen in the X-direction.
void fragment() {
vec3 col = texture(TEXTURE, SCREEN_UV).xyz * 0.16;
col += texture(TEXTURE, SCREEN_UV + vec2(SCREEN_PIXEL_SIZE.x, 0.0)).xyz * 0.15;
col += texture(TEXTURE, SCREEN_UV + vec2(-SCREEN_PIXEL_SIZE.x, 0.0)).xyz * 0.15;
col += texture(TEXTURE, SCREEN_UV + vec2(2.0 * SCREEN_PIXEL_SIZE.x, 0.0)).xyz * 0.12;
col += texture(TEXTURE, SCREEN_UV + vec2(2.0 * -SCREEN_PIXEL_SIZE.x, 0.0)).xyz * 0.12;
col += texture(TEXTURE, SCREEN_UV + vec2(3.0 * SCREEN_PIXEL_SIZE.x, 0.0)).xyz * 0.09;
col += texture(TEXTURE, SCREEN_UV + vec2(3.0 * -SCREEN_PIXEL_SIZE.x, 0.0)).xyz * 0.09;
col += texture(TEXTURE, SCREEN_UV + vec2(4.0 * SCREEN_PIXEL_SIZE.x, 0.0)).xyz * 0.05;
col += texture(TEXTURE, SCREEN_UV + vec2(4.0 * -SCREEN_PIXEL_SIZE.x, 0.0)).xyz * 0.05;
COLOR.xyz = col;
}
shader_type canvas_item;
//Blurs the screen in the Y-direction.
void fragment() {
vec3 col = texture(TEXTURE, SCREEN_UV).xyz * 0.16;
col += texture(TEXTURE, SCREEN_UV + vec2(0.0, SCREEN_PIXEL_SIZE.y)).xyz * 0.15;
col += texture(TEXTURE, SCREEN_UV + vec2(0.0, -SCREEN_PIXEL_SIZE.y)).xyz * 0.15;
col += texture(TEXTURE, SCREEN_UV + vec2(0.0, 2.0 * SCREEN_PIXEL_SIZE.y)).xyz * 0.12;
col += texture(TEXTURE, SCREEN_UV + vec2(0.0, 2.0 * -SCREEN_PIXEL_SIZE.y)).xyz * 0.12;
col += texture(TEXTURE, SCREEN_UV + vec2(0.0, 3.0 * SCREEN_PIXEL_SIZE.y)).xyz * 0.09;
col += texture(TEXTURE, SCREEN_UV + vec2(0.0, 3.0 * -SCREEN_PIXEL_SIZE.y)).xyz * 0.09;
col += texture(TEXTURE, SCREEN_UV + vec2(0.0, 4.0 * SCREEN_PIXEL_SIZE.y)).xyz * 0.05;
col += texture(TEXTURE, SCREEN_UV + vec2(0.0, 4.0 * -SCREEN_PIXEL_SIZE.y)).xyz * 0.05;
COLOR.xyz = col;
}
Using the above code, you should end up with a full screen blur effect like below.
For more information on how Viewport nodes work, see the Viewports Tutorial.
Shading¶
Shading reference¶
Shaders¶
Introduction¶
Shaders are unique programs that run on the GPU. They are used to specify how to take mesh data (vertex positions, colors, normals, etc.) and draw them to the screen. Shaders do not process information the same way a normal program does because they are optimized for running on the GPU. One consequence of this is that shaders do not retain their data after they run; they output a final color to the screen and then move on. Accordingly, there is no way of accessing the color output from the last run of the shader.
Godot uses a shader language very similar to GLSL, but with added functionality and slightly less flexibility. The reason for doing this is that Godot integrates built-in functionality to make writing complex shaders substantially easier. Godot wraps the user-written shader code in code of its own. That way, Godot handles a lot of the low-level stuff that the user doesn’t need to worry about, and it is able to parse your shader code and use it to affect the rendering pipeline. For more advanced shaders, you can turn this functionality off using a render_mode.
This document provides you with some information about shaders, specific to Godot. For a detailed reference of the shading language in Godot see the Godot shading language doc.
Shader types¶
Instead of supplying a general purpose configuration for all uses (2D, 3D, particles), Godot shaders must specify what they are intended for. Different types support different render modes, built-in variables, and processing functions.
All shaders need to specify their type in the first line, in the following format:
shader_type spatial;
Valid types are:
- spatial: For 3D rendering.
- canvas_item: For 2D rendering.
- particles: For particle systems.
For detailed information on each shading type, see the corresponding reference document.
Render modes¶
Different shader types support different render modes. They are optional and, if specified, must
be after the shader_type. Render modes are used to alter the way built-in functionality is handled.
For example, it is common to use the render mode unshaded to skip the built-in light processor
function.
Render modes are specified underneath the shader type:
shader_type spatial;
render_mode unshaded, cull_disabled;
Each shader type has a different list of render modes available. See the document for each shader type for a complete list of render modes.
Processor functions¶
Depending on the shader type, different processor functions may be optionally overridden.
For “spatial” and “canvas_item”, it is possible to override vertex, fragment, and light.
For “particles”, only vertex can be overridden.
Vertex processor¶
The vertex processing function is called once for every vertex in “spatial” and “canvas_item” shaders.
For “particles” shaders, it is called once for every particle.
The vertex function is used to modify per-vertex information that will be passed on to the fragment
function. It can also be used to establish variables that will be sent to the fragment function by using
varyings(see other doc).
By default, Godot will take your vertex information and transform it accordingly to be drawn. If this is undesirable, you can use render modes to transform the data yourself; see the Spatial shader doc for an example of this.
Fragment processor¶
The fragment processing function is used to set up the Godot material parameters per pixel. This code
runs on every visible pixel the object or primitive draws. It is only available in “spatial” and
“canvas_item” shaders.
The standard use of the fragment function is to set up material properties that will be used to calculate
lighting. For example, you would set values for ROUGHNESS, RIM, or TRANSMISSION which would
tell the light function how the lights respond to that fragment. This makes it possible to control a complex
shading pipeline without the user having to write much code. If you don’t need this built-in functionality,
you can ignore it and write your own light processing function and Godot will optimize it away. For example,
if you do not write a value to RIM, Godot will not calculate rim lighting. During compilation, Godot checks
to see if RIM is used; if not, it cuts all the corresponding code out. Therefore, you will not
waste calculations on effects that you do not use.
Light processor¶
The light processor runs per pixel too, but also runs for every light that affects the object
(and does not run if no lights affect the object). It exists as a function called inside the
fragment processor and typically operates on the material properties setup inside the fragment
function.
The light processor works differently in 2D than it does in 3D; for a description of how it works
in each, see their documentation, CanvasItem shaders and
Spatial shaders, respectively.
Shading language¶
Introduction¶
Godot uses a shading language similar to GLSL ES 3.0. Most datatypes and functions are supported, and the few remaining ones will likely be added over time.
If you are already familiar with GLSL, the Godot Shader Migration Guide is a resource that will help you transition from regular GLSL to Godot’s shading language.
Data types¶
Most GLSL ES 3.0 datatypes are supported:
| Type | Description |
|---|---|
| void | Void datatype, useful only for functions that return nothing. |
| bool | Boolean datatype, can only contain true or false. |
| bvec2 | Two-component vector of booleans. |
| bvec3 | Three-component vector of booleans. |
| bvec4 | Four-component vector of booleans. |
| int | Signed scalar integer. |
| ivec2 | Two-component vector of signed integers. |
| ivec3 | Three-component vector of signed integers. |
| ivec4 | Four-component vector of signed integers. |
| uint | Unsigned scalar integer; can’t contain negative numbers. |
| uvec2 | Two-component vector of unsigned integers. |
| uvec3 | Three-component vector of unsigned integers. |
| uvec4 | Four-component vector of unsigned integers. |
| float | Floating point scalar. |
| vec2 | Two-component vector of floating point values. |
| vec3 | Three-component vector of floating point values. |
| vec4 | Four-component vector of floating point values. |
| mat2 | 2x2 matrix, in column major order. |
| mat3 | 3x3 matrix, in column major order. |
| mat4 | 4x4 matrix, in column major order. |
| sampler2D | Sampler type for binding 2D textures, which are read as float. |
| isampler2D | Sampler type for binding 2D textures, which are read as signed integer. |
| usampler2D | Sampler type for binding 2D textures, which are read as unsigned integer. |
| sampler2DArray | Sampler type for binding 2D texture arrays, which are read as float. |
| isampler2DArray | Sampler type for binding 2D texture arrays, which are read as signed integer. |
| usampler2DArray | Sampler type for binding 2D texture arrays, which are read as unsigned integer. |
| sampler3D | Sampler type for binding 3D textures, which are read as float. |
| isampler3D | Sampler type for binding 3D textures, which are read as signed integer. |
| usampler3D | Sampler type for binding 3D textures, which are read as unsigned integer. |
| samplerCube | Sampler type for binding Cubemaps, which are read as floats. |
Casting¶
Just like GLSL ES 3.0, implicit casting between scalars and vectors of the same size but different type is not allowed. Casting of types of different size is also not allowed. Conversion must be done explicitly via constructors.
Example:
float a = 2; // invalid
float a = 2.0; // valid
float a = float(2); // valid
Default integer constants are signed, so casting is always needed to convert to unsigned:
int a = 2; // valid
uint a = 2; // invalid
uint a = uint(2); // valid
Members¶
Individual scalar members of vector types are accessed via the “x”, “y”, “z” and “w” members. Alternatively, using “r”, “g”, “b” and “a” also works and is equivalent. Use whatever fits best for your needs.
For matrices, use the m[row][column] indexing syntax to access each scalar, or m[idx] to access
a vector by row index. For example, for accessing the y position of an object in a mat4 you use
m[3][1].
Constructing¶
Construction of vector types must always pass:
// The required amount of scalars
vec4 a = vec4(0.0, 1.0, 2.0, 3.0);
// Complementary vectors and/or scalars
vec4 a = vec4(vec2(0.0, 1.0), vec2(2.0, 3.0));
vec4 a = vec4(vec3(0.0, 1.0, 2.0), 3.0);
// A single scalar for the whole vector
vec4 a = vec4(0.0);
Construction of matrix types requires vectors of the same dimension as the matrix. You can
also build a diagonal matrix using matx(float) syntax. Accordingly, mat4(1.0) is
an identity matrix.
mat2 m2 = mat2(vec2(1.0, 0.0), vec2(0.0, 1.0));
mat3 m3 = mat3(vec3(1.0, 0.0, 0.0), vec3(0.0, 1.0, 0.0), vec3(0.0, 0.0, 1.0));
mat4 identity = mat4(1.0);
Matrices can also be built from a matrix of another dimension. There are two rules : If a larger matrix is constructed from a smaller matrix, the additional rows and columns are set to the values they would have in an identity matrix. If a smaller matrix is constructed from a larger matrix, the top, left submatrix of the larger matrix is used.
mat3 basis = mat3(WORLD_MATRIX);
mat4 m4 = mat4(basis);
mat2 m2 = mat2(m4);
Swizzling¶
It is possible to obtain any combination of components in any order, as long as the result is another vector type (or scalar). This is easier shown than explained:
vec4 a = vec4(0.0, 1.0, 2.0, 3.0);
vec3 b = a.rgb; // Creates a vec3 with vec4 components.
vec3 b = a.ggg; // Also valid; creates a vec3 and fills it with a single vec4 component.
vec3 b = a.bgr; // Order does not matter.
vec3 b = a.xyz; // Also rgba, xyzw are equivalent.
vec3 b = a.stp; // And stpq (for texture coordinates).
float c = b.w; // Invalid, because "w" is not present in vec3 b.
vec3 c = b.xrt; // Invalid, mixing different styles is forbidden.
b.rrr = a.rgb; // Invalid, assignment with duplication.
b.bgr = a.rgb; // Valid assignment.
Precision¶
It is possible to add precision modifiers to datatypes; use them for uniforms, variables, arguments and varyings:
lowp vec4 a = vec4(0.0, 1.0, 2.0, 3.0); // low precision, usually 8 bits per component mapped to 0-1
mediump vec4 a = vec4(0.0, 1.0, 2.0, 3.0); // medium precision, usually 16 bits or half float
highp vec4 a = vec4(0.0, 1.0, 2.0, 3.0); // high precision, uses full float or integer range (default)
Using lower precision for some operations can speed up the math involved (at the cost of less precision). This is rarely needed in the vertex processor function (where full precision is needed most of the time), but is often useful in the fragment processor.
Keep in mind that some architectures (mainly mobile) benefit a lot from this, but are also restricted (conversion between precisions has a cost). Please read the relevant documentation on the target architecture to find out more. In all honesty though, mobile drivers are buggy, so, to stay out of trouble, make simple shaders without specifying precision unless you really need to.
Arrays¶
Arrays are containers for multiple variables of a similar type. Note: As of Godot 3.2, only local and varying arrays have been implemented.
Local arrays¶
Local arrays are declared in functions. They can use all of the allowed datatypes, except samplers.
The array declaration follows a C-style syntax: typename + identifier + [array size].
void fragment() {
float arr[3];
}
They can be initialized at the beginning like:
float float_arr[3] = float[3] ( 1.0, 0.5, 0.0 ); // first constructor
int int_arr[3] = int[] ( 2, 1, 0 ); // second constructor
vec2 vec2_arr[3] = { vec2(1.0, 1.0), vec2(0.5, 0.5), vec2(0.0, 0.0) }; // third constructor
bool bool_arr[] = { true, true, false }; // fourth constructor - size is defined automatically from the element count
You can declare multiple arrays (even with different sizes) in one expression:
float a[3] = float[3] (1.0, 0.5, 0.0),
b[2] = {1.0, 0.5},
c[] = { 0.7 },
d = 0.0,
e[5];
To access an array element, use the indexing syntax:
float arr[3];
arr[0] = 1.0; // setter
COLOR.r = arr[0]; // getter
Arrays also have a built-in function .length() (not to be confused with the built-in length() function). It doesn’t accept any parameters and will return the array’s size.
float arr[] = { 0.0, 1.0, 0.5, -1.0 };
for (int i = 0; i < arr.length(); i++) {
// ...
}
Note: If you use an index below 0 or greater than array size - the shader will crash and break rendering. To prevent this, use length(), if, or clamp() functions to ensure the index is between 0 and the array’s length. Always carefully test and check your code. If you pass a constant expression or a simple number, the editor will check its bounds to prevent this crash.
Constants¶
Use the const keyword before the variable declaration to make that variable immutable, which means that it cannot be modified. All basic types, except samplers can be declared as constants. Accessing and using a constant value is slightly faster than using a uniform. Constants must be initialized at their declaration.
const vec2 a = vec2(0.0, 1.0);
vec2 b;
a = b; // invalid
b = a; // valid
Constants cannot be modified and additionally cannot have hints, but multiple of them (if they have the same type) can be declared in a single expression e.g
const vec2 V1 = vec2(1, 1), V2 = vec2(2, 2);
Similar to variables, arrays can also be declared with const.
const float arr[] = { 1.0, 0.5, 0.0 };
arr[0] = 1.0; // invalid
COLOR.r = arr[0]; // valid
Constants can be declared both globally (outside of any function) or locally (inside a function). Global constants are useful when you want to have access to a value throughout your shader that does not need to be modified. Like uniforms, global constants are shared between all shader stages, but they are not accessible outside of the shader.
shader_type spatial;
const float PI = 3.14159265358979323846;
Operators¶
Godot shading language supports the same set of operators as GLSL ES 3.0. Below is the list of them in precedence order:
| Precedence | Class | Operator |
| 1 (highest) | parenthetical grouping | () |
| 2 | unary | +, -, !, ~ |
| 3 | multiplicative | /, *, % |
| 4 | additive | +, - |
| 5 | bit-wise shift | <<, >> |
| 6 | relational | <, >, <=, >= |
| 7 | equality | ==, != |
| 8 | bit-wise and | & |
| 9 | bit-wise exclusive or | ^ |
| 10 | bit-wise inclusive or | | |
| 11 | logical and | && |
| 12 (lowest) | logical inclusive or | || |
Flow control¶
Godot Shading language supports the most common types of flow control:
// if and else
if (cond) {
} else {
}
// switch
switch(i) { // signed integer expression
case -1:
break;
case 0:
return; // break or return
case 1: // pass-through
case 2:
break;
//...
default: // optional
break;
}
// for loops
for (int i = 0; i < 10; i++) {
}
// while
while (true) {
}
// do while
do {
} while(true);
Keep in mind that, in modern GPUs, an infinite loop can exist and can freeze your application (including editor). Godot can’t protect you from this, so be careful not to make this mistake!
Discarding¶
Fragment and light functions can use the discard keyword. If used, the fragment is discarded and nothing is written.
Functions¶
It is possible to define functions in a Godot shader. They use the following syntax:
ret_type func_name(args) {
return ret_type; // if returning a value
}
// a more specific example:
int sum2(int a, int b) {
return a + b;
}
You can only use functions that have been defined above (higher in the editor) the function from which you are calling them.
Function arguments can have special qualifiers:
- in: Means the argument is only for reading (default).
- out: Means the argument is only for writing.
- inout: Means the argument is fully passed via reference.
Example below:
void sum2(int a, int b, inout int result) {
result = a + b;
}
Varyings¶
To send data from the vertex to the fragment processor function, varyings are used. They are set for every primitive vertex in the vertex processor, and the value is interpolated for every pixel in the fragment processor.
shader_type spatial;
varying vec3 some_color;
void vertex() {
some_color = NORMAL; // Make the normal the color.
}
void fragment() {
ALBEDO = some_color;
}
Varying can also be an array:
shader_type spatial;
varying float var_arr[3];
void vertex() {
var_arr[0] = 1.0;
var_arr[1] = 0.0;
}
void fragment() {
ALBEDO = vec3(var_arr[0], var_arr[1], var_arr[2]); // red color
}
Interpolation qualifiers¶
Certain values are interpolated during the shading pipeline. You can modify how these interpolations are done by using interpolation qualifiers.
shader_type spatial;
varying flat vec3 our_color;
void vertex() {
our_color = COLOR.rgb;
}
void fragment() {
ALBEDO = our_color;
}
There are two possible interpolation qualifiers:
| Qualifier | Description |
|---|---|
| flat | The value is not interpolated. |
| smooth | The value is interpolated in a perspective-correct fashion. This is the default. |
Uniforms¶
Passing values to shaders is possible. These are global to the whole shader and are called uniforms. When a shader is later assigned to a material, the uniforms will appear as editable parameters in it. Uniforms can’t be written from within the shader.
shader_type spatial;
uniform float some_value;
You can set uniforms in the editor in the material. Or you can set them through GDScript:
material.set_shader_param("some_value", some_value)
Note
The first argument to set_shader_param is the name of the uniform in the shader. It
must match exactly to the name of the uniform in the shader or else it will not be recognized.
Any GLSL type except for void can be a uniform. Additionally, Godot provides optional shader hints to make the compiler understand for what the uniform is used.
shader_type spatial;
uniform vec4 color : hint_color;
uniform float amount : hint_range(0, 1);
uniform vec4 other_color : hint_color = vec4(1.0);
It’s important to understand that textures that are supplied as color require hints for proper sRGB->linear conversion (i.e. hint_albedo), as Godot’s 3D engine renders in linear color space.
Full list of hints below:
| Type | Hint | Description |
|---|---|---|
| vec4 | hint_color | Used as color |
| int, float | hint_range(min,max [,step] ) | Used as range (with min/max/step) |
| sampler2D | hint_albedo | Used as albedo color, default white |
| sampler2D | hint_black_albedo | Used as albedo color, default black |
| sampler2D | hint_normal | Used as normalmap |
| sampler2D | hint_white | As value, default to white. |
| sampler2D | hint_black | As value, default to black |
| sampler2D | hint_aniso | As flowmap, default to right. |
GDScript uses different variable types than GLSL does, so when passing variables from GDScript to shaders, Godot converts the type automatically. Below is a table of the corresponding types:
| GDScript type | GLSL type |
|---|---|
| bool | bool |
| int | int |
| float | float |
| Vector2 | vec2 |
| Vector3 | vec3 |
| Color | vec4 |
| Transform | mat4 |
| Transform2D | mat4 |
Note
Be careful when setting shader uniforms from GDScript, no error will be thrown if the type does not match. Your shader will just exhibit undefined behaviour.
Uniforms can also be assigned default values:
shader_type spatial;
uniform vec4 some_vector = vec4(0.0);
uniform vec4 some_color : hint_color = vec4(1.0);
Built-in functions¶
A large number of built-in functions are supported, conforming to GLSL ES 3.0. When vec_type (float), vec_int_type, vec_uint_type, vec_bool_type nomenclature is used, it can be scalar or vector.
Note
For a list of the functions that are not available in the GLES2 backend, please see the Differences between GLES2 and GLES3 doc.
| Function | Description |
|---|---|
| vec_type radians ( vec_type degrees ) | Convert degrees to radians |
| vec_type degrees ( vec_type radians ) | Convert radians to degrees |
| vec_type sin ( vec_type x ) | Sine |
| vec_type cos ( vec_type x ) | Cosine |
| vec_type tan ( vec_type x ) | Tangent |
| vec_type asin ( vec_type x ) | Arc-Sine |
| vec_type acos ( vec_type x ) | Arc-Cosine |
| vec_type atan ( vec_type y_over_x ) | Arc-Tangent |
| vec_type atan ( vec_type y, vec_type x ) | Arc-Tangent to convert vector to angle |
| vec_type sinh ( vec_type x ) | Hyperbolic-Sine |
| vec_type cosh ( vec_type x ) | Hyperbolic-Cosine |
| vec_type tanh ( vec_type x ) | Hyperbolic-Tangent |
| vec_type asinh ( vec_type x ) | Inverse-Hyperbolic-Sine |
| vec_type acosh ( vec_type x ) | Inverse-Hyperbolic-Cosine |
| vec_type atanh ( vec_type x ) | Inverse-Hyperbolic-Tangent |
| vec_type pow ( vec_type x, vec_type y ) | Power |
| vec_type exp ( vec_type x ) | Base-e Exponential |
| vec_type exp2 ( vec_type x ) | Base-2 Exponential |
| vec_type log ( vec_type x ) | Natural Logarithm |
| vec_type log2 ( vec_type x ) | Base-2 Logarithm |
| vec_type sqrt ( vec_type x ) | Square Root |
| vec_type inversesqrt ( vec_type x ) | Inverse Square Root |
| vec_type abs ( vec_type x ) | Absolute |
| ivec_type abs ( ivec_type x ) | Absolute |
| vec_type sign ( vec_type x ) | Sign |
| ivec_type sign ( ivec_type x ) | Sign |
| vec_type floor ( vec_type x ) | Floor |
| vec_type round ( vec_type x ) | Round |
| vec_type roundEven ( vec_type x ) | Round nearest even |
| vec_type trunc ( vec_type x ) | Truncation |
| vec_type ceil ( vec_type x ) | Ceil |
| vec_type fract ( vec_type x ) | Fractional |
| vec_type mod ( vec_type x, vec_type y ) | Remainder |
| vec_type mod ( vec_type x , float y ) | Remainder |
| vec_type modf ( vec_type x, out vec_type i ) | Fractional of x, with i has integer part |
| vec_type min ( vec_type a, vec_type b ) | Minimum |
| vec_type max ( vec_type a, vec_type b ) | Maximum |
| vec_type clamp ( vec_type x, vec_type min, vec_type max ) | Clamp to Min-Max |
| vec_type mix ( float a, float b, float c ) | Linear Interpolate |
| vec_type mix ( vec_type a, vec_type b, float c ) | Linear Interpolate (Scalar Coef.) |
| vec_type mix ( vec_type a, vec_type b, vec_type c ) | Linear Interpolate (Vector Coef.) |
| vec_type mix ( vec_type a, vec_type b, bvec_type c ) | Linear Interpolate (Boolean-Vector Selection) |
| vec_type step ( vec_type a, vec_type b ) | b[i] < a[i] ? 0.0 : 1.0 |
| vec_type step ( float a, vec_type b) | b[i] < a ? 0.0 : 1.0 |
| vec_type smoothstep ( vec_type a, vec_type b, vec_type c ) | Hermite Interpolate |
| vec_type smoothstep ( float a, float b, vec_type c ) | Hermite Interpolate |
| bvec_type isnan ( vec_type x ) | Scalar, or vector component being NaN |
| bvec_type isinf ( vec_type x ) | Scalar, or vector component being INF |
| ivec_type floatBitsToInt ( vec_type x ) | Float->Int bit copying, no conversion |
| uvec_type floatBitsToUint ( vec_type x ) | Float->UInt bit copying, no conversion |
| vec_type intBitsToFloat ( ivec_type x ) | Int->Float bit copying, no conversion |
| vec_type uintBitsToFloat ( uvec_type x ) | UInt->Float bit copying, no conversion |
| float length ( vec_type x ) | Vector Length |
| float distance ( vec_type a, vec_type b ) | Distance between vectors i.e length(a - b) |
| float dot ( vec_type a, vec_type b ) | Dot Product |
| vec3 cross ( vec3 a, vec3 b ) | Cross Product |
| vec_type normalize ( vec_type x ) | Normalize to unit length |
| vec3 reflect ( vec3 I, vec3 N ) | Reflect |
| vec3 refract ( vec3 I, vec3 N, float eta ) | Refract |
| vec_type faceforward ( vec_type N, vec_type I, vec_type Nref ) | If dot(Nref, I) < 0, return N, otherwise –N |
| mat_type matrixCompMult ( mat_type x, mat_type y ) | Matrix Component Multiplication |
| mat_type outerProduct ( vec_type column, vec_type row ) | Matrix Outer Product |
| mat_type transpose ( mat_type m ) | Transpose Matrix |
| float determinant ( mat_type m ) | Matrix Determinant |
| mat_type inverse ( mat_type m ) | Inverse Matrix |
| bvec_type lessThan ( vec_type x, vec_type y ) | Bool vector cmp on < int/uint/float vectors |
| bvec_type greaterThan ( vec_type x, vec_type y ) | Bool vector cmp on > int/uint/float vectors |
| bvec_type lessThanEqual ( vec_type x, vec_type y ) | Bool vector cmp on <= int/uint/float vectors |
| bvec_type greaterThanEqual ( vec_type x, vec_type y ) | Bool vector cmp on >= int/uint/float vectors |
| bvec_type equal ( vec_type x, vec_type y ) | Bool vector cmp on == int/uint/float vectors |
| bvec_type notEqual ( vec_type x, vec_type y ) | Bool vector cmp on != int/uint/float vectors |
| bool any ( bvec_type x ) | Any component is true |
| bool all ( bvec_type x ) | All components are true |
| bvec_type not ( bvec_type x ) | Invert boolean vector |
| ivec2 textureSize ( sampler2D_type s, int lod ) | Get the size of a 2D texture |
| ivec3 textureSize ( sampler2DArray_type s, int lod ) | Get the size of a 2D texture array |
| ivec3 textureSize ( sampler3D s, int lod ) | Get the size of a 3D texture |
| ivec2 textureSize ( samplerCube s, int lod ) | Get the size of a Cube texture |
| vec4_type texture ( sampler2D_type s, vec2 uv [, float bias] ) | Perform a 2D texture read |
| vec4_type texture ( sampler2DArray_type s, vec3 uv [, float bias] ) | Perform a 2D texture array read |
| vec4_type texture ( sampler3D_type s, vec3 uv [, float bias] ) | Perform a 3D texture read |
| vec4 texture ( samplerCube s, vec3 uv [, float bias] ) | Perform an Cube texture read |
| vec4_type textureProj ( sampler2D_type s, vec3 uv [, float bias] ) | Perform a 2D texture read with projection |
| vec4_type textureProj ( sampler2D_type s, vec4 uv [, float bias] ) | Perform a 2D texture read with projection |
| vec4_type textureProj ( sampler3D_type s, vec4 uv [, float bias] ) | Perform a 3D texture read with projection |
| vec4_type textureLod ( sampler2D_type s, vec2 uv, float lod ) | Perform a 2D texture read at custom mipmap |
| vec4_type textureLod ( sampler2DArray_type s, vec3 uv, float lod ) | Perform a 2D texture array read at custom mipmap |
| vec4_type textureLod ( sampler3D_type s, vec3 uv, float lod ) | Perform a 3D texture read at custom mipmap |
| vec4 textureLod ( samplerCube s, vec3 uv, float lod ) | Perform a 3D texture read at custom mipmap |
| vec4_type textureProjLod ( sampler2D_type s, vec3 uv, float lod ) | Perform a 2D texture read with projection/lod |
| vec4_type textureProjLod ( sampler2D_type s, vec4 uv, float lod ) | Perform a 2D texture read with projection/lod |
| vec4_type textureProjLod ( sampler3D_type s, vec4 uv, float lod ) | Perform a 3D texture read with projection/lod |
| vec4_type texelFetch ( sampler2D_type s, ivec2 uv, int lod ) | Fetch a single texel using integer coords |
| vec4_type texelFetch ( sampler2DArray_type s, ivec3 uv, int lod ) | Fetch a single texel using integer coords |
| vec4_type texelFetch ( sampler3D_type s, ivec3 uv, int lod ) | Fetch a single texel using integer coords |
| vec_type dFdx ( vec_type p ) | Derivative in x using local differencing |
| vec_type dFdy ( vec_type p ) | Derivative in y using local differencing |
| vec_type fwidth ( vec_type p ) | Sum of absolute derivative in x and y |
Spatial shaders¶
Spatial shaders are used for shading 3D objects. They are the most complex type of shader Godot offers. Spatial shaders are highly configurable with different render modes and different rendering options (e.g. Subsurface Scattering, Transmission, Ambient Occlusion, Rim lighting etc). Users can optionally write vertex, fragment, and light processor functions to affect how objects are drawn.
Render modes¶
| Render mode | Description |
|---|---|
| blend_mix | Mix blend mode (alpha is transparency), default. |
| blend_add | Additive blend mode. |
| blend_sub | Subtractive blend mode. |
| blend_mul | Multiplicative blend mode. |
| depth_draw_opaque | Only draw depth for opaque geometry (not transparent). |
| depth_draw_always | Always draw depth (opaque and transparent). |
| depth_draw_never | Never draw depth. |
| depth_draw_alpha_prepass | Do opaque depth pre-pass for transparent geometry. |
| depth_test_disable | Disable depth testing. |
| cull_front | Cull front-faces. |
| cull_back | Cull back-faces (default). |
| cull_disabled | Culling disabled (double sided). |
| unshaded | Result is just albedo. No lighting/shading happens in material. |
| diffuse_lambert | Lambert shading for diffuse (default). |
| diffuse_lambert_wrap | Lambert wrapping (roughness dependent) for diffuse. |
| diffuse_oren_nayar | Oren Nayar for diffuse. |
| diffuse_burley | Burley (Disney PBS) for diffuse. |
| diffuse_toon | Toon shading for diffuse. |
| specular_schlick_ggx | Schlick-GGX for specular (default). |
| specular_blinn | Blinn for specular (compatibility). |
| specular_phong | Phong for specular (compatibility). |
| specular_toon | Toon for specular. |
| specular_disabled | Disable specular. |
| skip_vertex_transform | VERTEX/NORMAL/etc. need to be transformed manually in vertex function. |
| world_vertex_coords | VERTEX/NORMAL/etc. are modified in world coordinates instead of local. |
| ensure_correct_normals | Use when non-uniform scale is applied to mesh. |
| vertex_lighting | Use vertex-based lighting. |
| shadows_disabled | Disable computing shadows in shader. |
| ambient_light_disabled | Disable contribution from ambient light and radiance map. |
| shadow_to_opacity | Lighting modifies the alpha so shadowed areas are opaque and non-shadowed areas are transparent. Useful for overlaying shadows onto a camera feed in AR. |
Vertex built-ins¶
Values marked as “in” are read-only. Values marked as “out” are for optional writing and will not necessarily contain sensible values. Values marked as “inout” provide a sensible default value, and can optionally be written to. Samplers are not subjects of writing and they are not marked.
Vertex data (VERTEX, NORMAL, TANGENT, BITANGENT) are presented in local
model space. If not written to, these values will not be modified and be passed through
as they came.
They can optionally be presented in world space by using the world_vertex_coords render mode.
Users can disable the built-in modelview transform (projection will still happen later) and do it manually with the following code:
shader_type spatial;
render_mode skip_vertex_transform;
void vertex() {
VERTEX = (MODELVIEW_MATRIX * vec4(VERTEX, 1.0)).xyz;
NORMAL = (MODELVIEW_MATRIX * vec4(NORMAL, 0.0)).xyz;
// same as above for binormal and tangent, if normal mapping is used
}
Other built-ins, such as UV, UV2 and COLOR, are also passed through to the fragment function if not modified.
Users can override the modelview and projection transforms using the POSITION built-in. When POSITION is used,
the value from VERTEX is ignored and projection does not happen. However, the value passed to the fragment shader
still comes from VERTEX.
For instancing, the INSTANCE_CUSTOM variable contains the instance custom data. When using particles, this information is usually:
- x: Rotation angle in radians.
- y: Phase during lifetime (0 to 1).
- z: Animation frame.
This allows you to easily adjust the shader to a particle system using default particles material. When writing a custom particles shader, this value can be used as desired.
| Built-in | Description |
|---|---|
| in float TIME | Elapsed total time in seconds. |
| in vec2 VIEWPORT_SIZE | Size of viewport (in pixels). |
| inout mat4 WORLD_MATRIX | Model space to world space transform. |
| in mat4 INV_CAMERA_MATRIX | World space to view space transform. |
| inout mat4 PROJECTION_MATRIX | View space to clip space transform. |
| in mat4 CAMERA_MATRIX | View space to world space transform. |
| inout mat4 MODELVIEW_MATRIX | Model space to view space transform (use if possible). |
| inout mat4 INV_PROJECTION_MATRIX | Clip space to view space transform. |
| inout vec3 VERTEX | Vertex in local coordinates. |
| out vec4 POSITION | If written to, overrides final vertex position. |
| inout vec3 NORMAL | Normal in local coordinates. |
| inout vec3 TANGENT | Tangent in local coordinates. |
| inout vec3 BINORMAL | Binormal in local coordinates. |
| out float ROUGHNESS | Roughness for vertex lighting. |
| inout vec2 UV | UV main channel. |
| inout vec2 UV2 | UV secondary channel. |
| in bool OUTPUT_IS_SRGB | true when calculations happen in sRGB color space
(true in GLES2, false in GLES3). |
| inout vec4 COLOR | Color from vertices. |
| inout float POINT_SIZE | Point size for point rendering. |
| in int INSTANCE_ID | Instance ID for instancing. |
| in vec4 INSTANCE_CUSTOM | Instance custom data (for particles, mostly). |
Fragment built-ins¶
The default use of a Godot fragment processor function is to set up the material properties of your object and to let the built-in renderer handle the final shading. However, you are not required to use all these properties, and if you don’t write to them, Godot will optimize away the corresponding functionality.
| Built-in | Description |
|---|---|
| in float TIME | Elapsed total time in seconds. |
| in vec2 VIEWPORT_SIZE | Size of viewport (in pixels). |
| in vec4 FRAGCOORD | Coordinate of pixel center in screen space. xy specifies position in window, z
specifies fragment depth if DEPTH is not used. Origin is lower-left. |
| in mat4 WORLD_MATRIX | Model space to world space transform. |
| in mat4 INV_CAMERA_MATRIX | World space to view space transform. |
| in mat4 CAMERA_MATRIX | View space to world space transform. |
| in mat4 PROJECTION_MATRIX | View space to clip space transform. |
| in mat4 INV_PROJECTION_MATRIX | Clip space to view space transform. |
| in vec3 VERTEX | Vertex that comes from vertex function (default, in view space). |
| in vec3 VIEW | Vector from camera to fragment position (in view space). |
| in bool FRONT_FACING | true if current face is front face. |
| inout vec3 NORMAL | Normal that comes from vertex function (default, in view space). |
| inout vec3 TANGENT | Tangent that comes from vertex function. |
| inout vec3 BINORMAL | Binormal that comes from vertex function. |
| out vec3 NORMALMAP | Set normal here if reading normal from a texture instead of NORMAL. |
| out float NORMALMAP_DEPTH | Depth from variable above. Defaults to 1.0. |
| in vec2 UV | UV that comes from vertex function. |
| in vec2 UV2 | UV2 that comes from vertex function. |
| in bool OUTPUT_IS_SRGB | true when calculations happen in sRGB color space (true in GLES2, false in GLES3). |
| in vec4 COLOR | COLOR that comes from vertex function. |
| out vec3 ALBEDO | Albedo (default white). |
| out float ALPHA | Alpha (0..1); if written to, the material will go to the transparent pipeline. |
| out float ALPHA_SCISSOR | If written to, values below a certain amount of alpha are discarded. |
| out float METALLIC | Metallic (0..1). |
| out float SPECULAR | Specular. Defaults to 0.5, best not to modify unless you want to change IOR. |
| out float ROUGHNESS | Roughness (0..1). |
| out float RIM | Rim (0..1). If used, Godot calculates rim lighting. |
| out float RIM_TINT | Rim Tint, goes from 0 (white) to 1 (albedo). If used, Godot calculates rim lighting. |
| out float CLEARCOAT | Small added specular blob. If used, Godot calculates Clearcoat. |
| out float CLEARCOAT_GLOSS | Gloss of Clearcoat. If used, Godot calculates Clearcoat. |
| out float ANISOTROPY | For distorting the specular blob according to tangent space. |
| out vec2 ANISOTROPY_FLOW | Distortion direction, use with flowmaps. |
| out float SSS_STRENGTH | Strength of Subsurface Scattering. If used, Subsurface Scattering will be applied to object. |
| out vec3 TRANSMISSION | Transmission mask (default 0,0,0). Allows light to pass through object. Only applied if used. |
| out vec3 EMISSION | Emission color (can go over 1,1,1 for HDR). |
| out float AO | Strength of Ambient Occlusion. For use with pre-baked AO. |
| out float AO_LIGHT_AFFECT | How much AO affects lights (0..1; default 0). |
| sampler2D SCREEN_TEXTURE | Built-in Texture for reading from the screen. Mipmaps contain increasingly blurred copies. |
| sampler2D DEPTH_TEXTURE | Built-in Texture for reading depth from the screen. Must convert to linear using INV_PROJECTION. |
| out float DEPTH | Custom depth value (0..1). |
| in vec2 SCREEN_UV | Screen UV coordinate for current pixel. |
| in vec2 POINT_COORD | Point Coordinate for drawing points with POINT_SIZE. |
Light built-ins¶
Writing light processor functions is completely optional. You can skip the light function by setting
render_mode to unshaded. If no light function is written, Godot will use the material
properties written to in the fragment function to calculate the lighting for you (subject to
the render_mode).
To write a light function, assign something to DIFFUSE_LIGHT or SPECULAR_LIGHT. Assigning nothing
means no light is processed.
The light function is called for every light in every pixel. It is called within a loop for each light type.
Below is an example of a custom light function using a Lambertian lighting model:
void light() {
DIFFUSE_LIGHT += dot(NORMAL, LIGHT) * ATTENUATION * ALBEDO;
}
If you want the lights to add together, add the light contribution to DIFFUSE_LIGHT using +=, rather than overwriting it.
| Built-in | Description |
|---|---|
| in float TIME | Elapsed total time in seconds. |
| in vec2 VIEWPORT_SIZE | Size of viewport (in pixels). |
| in vec4 FRAGCOORD | Coordinate of pixel center in screen space.
xy specifies position in window, z
specifies fragment depth if DEPTH is not used.
Origin is lower-left. |
| in mat4 WORLD_MATRIX | Model space to world space transform. |
| in mat4 INV_CAMERA_MATRIX | World space to view space transform. |
| in mat4 CAMERA_MATRIX | View space to world space transform. |
| in mat4 PROJECTION_MATRIX | View space to clip space transform. |
| in mat4 INV_PROJECTION_MATRIX | Clip space to view space transform. |
| in vec3 NORMAL | Normal vector, in view space. |
| in vec2 UV | UV that comes from vertex function. |
| in vec2 UV2 | UV2 that comes from vertex function. |
| in vec3 VIEW | View vector, in view space. |
| in vec3 LIGHT | Light Vector, in view space. |
| in vec3 ATTENUATION | Attenuation based on distance or shadow. |
| in bool OUTPUT_IS_SRGB | true when calculations happen in sRGB color
space (true in GLES2, false in GLES3). |
| in vec3 ALBEDO | Base albedo. |
| in vec3 LIGHT_COLOR | Color of light multiplied by energy. |
| out float ALPHA | Alpha (0..1); if written to, the material will go to the transparent pipeline. |
| in float ROUGHNESS | Roughness. |
| in vec3 TRANSMISSION | Transmission mask from fragment function. |
| out vec3 DIFFUSE_LIGHT | Diffuse light result. |
| out vec3 SPECULAR_LIGHT | Specular light result. |
CanvasItem shaders¶
CanvasItem shaders are used to draw all 2D elements in Godot. These include all nodes that inherit from CanvasItems, and all GUI elements.
CanvasItem shaders contain less built-in variables and functionality than Spatial shaders, but they maintain the same basic structure with vertex, fragment, and light processor functions.
Render modes¶
| Render mode | Description |
|---|---|
| blend_mix | Mix blend mode (alpha is transparency), default. |
| blend_add | Additive blend mode. |
| blend_sub | Subtractive blend mode. |
| blend_mul | Multiplicative blend mode. |
| blend_premul_alpha | Pre-multiplied alpha blend mode. |
| blend_disabled | Disable blending, values (including alpha) are written as-is. |
| unshaded | Result is just albedo. No lighting/shading happens in material. |
| light_only | Only draw on light pass. |
| skip_vertex_transform | VERTEX/NORMAL/etc need to be transformed manually in vertex function. |
Vertex built-ins¶
Values marked as “in” are read-only. Values marked as “out” are for optional writing and will not necessarily contain sensible values. Values marked as “inout” provide a sensible default value, and can optionally be written to. Samplers are not subjects of writing and they are not marked.
Vertex data (VERTEX) is presented in local space (pixel coordinates, relative to the camera).
If not written to, these values will not be modified and be passed through as they came.
The user can disable the built-in modelview transform (projection will still happen later) and do it manually with the following code:
shader_type canvas_item;
render_mode skip_vertex_transform;
void vertex() {
VERTEX = (EXTRA_MATRIX * (WORLD_MATRIX * vec4(VERTEX, 0.0, 1.0))).xy;
}
Note
WORLD_MATRIX is actually a modelview matrix. It takes input in local space and transforms it
into view space.
In order to get the world space coordinates of a vertex, you have to pass in a custom uniform like so:
material.set_shader_param("global_transform", get_global_transform())
Then, in your vertex shader:
uniform mat4 global_transform;
varying vec2 world_position;
void vertex(){
world_position = (global_transform * vec4(VERTEX, 0.0, 1.0)).xy;
}
world_position can then be used in either the vertex or fragment functions.
Other built-ins, such as UV and COLOR, are also passed through to the fragment function if not modified.
For instancing, the INSTANCE_CUSTOM variable contains the instance custom data. When using particles, this information is usually:
- x: Rotation angle in radians.
- y: Phase during lifetime (0 to 1).
- z: Animation frame.
| Built-in | Description |
|---|---|
| in mat4 WORLD_MATRIX | Image space to view space transform. |
| in mat4 EXTRA_MATRIX | Extra transform. |
| in mat4 PROJECTION_MATRIX | View space to clip space transform. |
| in float TIME | Global time, in seconds. |
| in vec4 INSTANCE_CUSTOM | Instance custom data. |
| in bool AT_LIGHT_PASS | true if this is a light pass. |
| inout vec2 VERTEX | Vertex, in image space. |
| in vec2 TEXTURE_PIXEL_SIZE | Normalized pixel size of default 2D texture.
For a Sprite with a texture of size 64x32px,
TEXTURE_PIXEL_SIZE = vec2(1/64, 1/32) |
| inout vec2 UV | UV. |
| inout vec4 COLOR | Color from vertex primitive. |
| inout float POINT_SIZE | Point size for point drawing. |
Fragment built-ins¶
Certain Nodes (for example, Sprites) display a texture by default. However,
when a custom fragment function is attached to these nodes, the texture lookup needs to be done
manually. Godot does not provide the texture color in the COLOR built-in variable; to read
the texture color for such nodes, use:
COLOR = texture(TEXTURE, UV);
This differs from the behaviour of the built-in normal map. If a normal map is attached, Godot uses
it by default and assigns its value to the built-in NORMAL variable. If you are using a normal
map meant for use in 3D, it will appear inverted. In order to use it in your shader, you must assign
it to the NORMALMAP property. Godot will handle converting it for use in 2D and overwriting NORMAL.
NORMALMAP = texture(NORMAL_TEXTURE, UV).rgb;
| Built-in | Description |
|---|---|
| in vec4 FRAGCOORD | Coordinate of pixel center. In screen space. xy specifies
position in window, z specifies fragment depth if
DEPTH is not used. Origin is lower-left. |
| inout vec3 NORMAL | Normal read from NORMAL_TEXTURE. Writable. |
| out vec3 NORMALMAP | Configures normal maps meant for 3D for use in 2D. If used, overwrites NORMAL. |
| inout float NORMALMAP_DEPTH | Normalmap depth for scaling. |
| in vec2 UV | UV from vertex function. |
| inout vec4 COLOR | Color from vertex function and output fragment color. If unused, will be set to TEXTURE color. |
| in sampler2D TEXTURE | Default 2D texture. |
| in sampler2D NORMAL_TEXTURE | Default 2D normal texture. |
| in vec2 TEXTURE_PIXEL_SIZE | Normalized pixel size of default 2D texture.
For a Sprite with a texture of size 64x32px,
TEXTURE_PIXEL_SIZE = vec2(1/64, 1/32) |
| in vec2 SCREEN_UV | Screen UV for use with SCREEN_TEXTURE. |
| in vec2 SCREEN_PIXEL_SIZE | Size of individual pixels. Equal to inverse of resolution. |
| in vec2 POINT_COORD | Coordinate for drawing points. |
| in float TIME | Global time in seconds. |
| in bool AT_LIGHT_PASS | true if this is a light pass. |
| in sampler2D SCREEN_TEXTURE | Screen texture, mipmaps contain gaussian blurred versions. |
Light built-ins¶
Light processor functions work differently in 2D than they do in 3D. In CanvasItem shaders, the
shader is called once for the object being drawn, and then once for each light touching that
object in the scene. Use render_mode unshaded if you do not want any light passes to occur
for that object. Use render_mode light_only if you only want light passes to occur for
that object; this can be useful when you only want the object visible where it is covered by light.
When the shader is on a light pass, the AT_LIGHT_PASS variable will be true.
| Built-in | Description |
|---|---|
| in vec4 FRAGCOORD | Coordinate of pixel center. In screen space. xy specifies
position in window, z specifies fragment depth if
DEPTH is not used. Origin is lower-left. |
| in vec3 NORMAL | Input Normal. Although this value is passed in, normal calculation still happens outside of this function. |
| in vec2 UV | UV from vertex function, equivalent to the UV in the fragment function. |
| in vec4 COLOR | Input Color. This is the output of the fragment function with final modulation applied. |
| sampler2D TEXTURE | Current texture in use for CanvasItem. |
| in vec2 TEXTURE_PIXEL_SIZE | Normalized pixel size of default 2D texture.
For a Sprite with a texture of size 64x32px,
TEXTURE_PIXEL_SIZE = vec2(1/64, 1/32) |
| in vec2 SCREEN_UV | SCREEN_TEXTURE Coordinate (for using with screen texture). |
| in vec2 POINT_COORD | UV for Point Sprite. |
| in float TIME | Global time in seconds. |
| inout vec2 LIGHT_VEC | Vector from light to fragment in local coordinates. It can be modified to alter illumination direction when normal maps are used. |
| inout vec2 SHADOW_VEC | Vector from light to fragment in local coordinates. It can be modified to alter shadow computation. |
| inout float LIGHT_HEIGHT | Height of Light. Only effective when normals are used. |
| inout vec4 LIGHT_COLOR | Color of Light. |
| in vec2 LIGHT_UV | UV for Light texture. |
| out vec4 SHADOW_COLOR | Shadow Color of Light. |
| inout vec4 LIGHT | Value from the Light texture and output color. Can be modified. If not used, the light function is ignored. |
Particle shaders¶
Particle shaders are a special type of vertex shader that runs before the object is drawn. They are used for calculating material properties such as color, position, and rotation. They are drawn with any regular material for CanvasItem or Spatial, depending on whether they are 2D or 3D.
Particle shaders are unique because they are not used to draw the object itself; they are used to calculate particle properties, which are then used by the CanvasItem of Spatial shader. They contain only a vertex processor function that outputs multiple properties (see built-ins below).
Particle shaders use a transform feedback shader, which is a special type of vertex shader that runs on its own. It takes in data in a buffer like a regular vertex shader does, but it also outputs to data buffers instead of outputting to the fragment shader for pixel-processing. Because of this, transform feedback shaders can build on themselves each run, unlike other shaders that discard the data they have calculated once they draw to the frame buffer.
Note
Particle shaders are only available in the GLES3 backend. If you need particles in GLES2, use CPUParticles.
Render modes¶
| Render mode | Description |
|---|---|
| keep_data | Do not clear previous data on restart. |
| disable_force | Disable attractor force. (Not currently implemented in 3.1) |
| disable_velocity | Ignore VELOCITY value. |
Vertex built-ins¶
Values marked as “in” are read-only. Values marked as “out” are for optional writing and will not necessarily contain sensible values. Values marked as “inout” provide a sensible default value, and can optionally be written to. Samplers are not subjects of writing and they are not marked.
In order to use the COLOR variable in a SpatialMaterial, set use_vertex_as_albedo
to true. In a ShaderMaterial, access it with the COLOR variable.
| Built-in | Description |
|---|---|
| inout vec4 COLOR | Particle color, can be written to and accessed in mesh’s vertex function. |
| inout vec3 VELOCITY | Particle velocity, can be modified. |
| out float MASS | Particle mass, use for attractors (not implemented in 3.1). |
| inout bool ACTIVE | true when Particle is active, can be set to false. |
| in bool RESTART | true when particle must restart (lifetime cycled). |
| inout vec4 CUSTOM | Custom particle data. Accessible from shader of mesh as INSTANCE_CUSTOM. |
| inout mat4 TRANSFORM | Particle transform. |
| in float TIME | Global time in seconds. |
| in float LIFETIME | Particle lifetime. |
| in float DELTA | Delta process time. |
| in uint NUMBER | Unique number since emission start. |
| in int INDEX | Particle index (from total particles). |
| in mat4 EMISSION_TRANSFORM | Emitter transform (used for non-local systems). |
| in uint RANDOM_SEED | Random seed used as base for random. |
Your first shader¶
This tutorial series will walk you through writing your first shader. It is intended for people who have very little prior experience with shaders and want to get started with the basics. This tutorial will not cover advanced topics and it is not comprehensive. For a comprehensive and detailed overview of shaders in Godot see the Shading Reference Page.
“What are shaders” gives you a high-level overview of what shaders are and how they fit into the rendering pipeline.
The “your first shader” tutorials walk you through the process of writing a shader step-by-step.
For a more general introduction into shaders and the OpenGL Shading Language, use The Book of Shaders.
What are shaders?¶
Introduction¶
So, you have decided to give shaders a try. You have likely heard that they can be used to create interesting effects that run incredibly fast. You have also likely heard that they are terrifying. Both are true.
Shaders can be used to create a wide range of effects (in fact everything drawn in a modern rendering engine is done with shaders).
Writing shaders can also be very difficult for people unfamiliar with them. Godot tries to make writing shaders a little easier by exposing many useful built-in features and handling some of the lower-level initialization work for you. However, GLSL (the OpenGL Shading Language, which Godot uses) is still unintuitive and restricting, especially for users who are used to GDScript.
But what are they?¶
Shaders are a special kind of program that runs on Graphics Processing Units (GPUs). Most computers have some sort of GPU, either one integrated into their CPU or discrete (meaning it is a separate hardware component, for example, the typical graphics card). GPUs are especially useful for rendering because they are optimized for running thousands of instructions in parallel.
The output of the shader is typically the colored pixels of the object drawn to the viewport. But some shaders allow for specialized outputs (this is especially true for APIs like Vulkan). Shaders operate inside the shader pipeline. The standard process is the vertex -> fragment shader pipeline. The vertex shader is used to decided where each vertex (point in a 3D model, or corner of a Sprite) goes and the fragment shader decides what color individual pixels receive.
Suppose you want to update all the pixels in a texture to a given color, on the CPU you would write:
for x in range(width):
for y in range(height):
set_color(x, y, some_color)
In a shader you are given access only to the inside of the loop so what you write looks like this:
// function called for each pixel
void fragment() {
COLOR = some_color;
}
You have no control over how this function is called. So you have to design your shaders differently from how you would design programs on the CPU.
A consequence of the shader pipeline is that you cannot access the results from a previous run of the shader, you cannot access other pixels from the pixel being drawn, and you cannot write outside of the current pixel being drawn. This enables the GPU to execute the shader for different pixels in parallel, as they do not depend on each other. This lack of flexibility is designed to work with the GPU which allows shaders to be incredibly fast.
What can they do¶
- position vertices very fast
- compute color very fast
- compute lighting very fast
- lots and lots of math
What can’t they do¶
- draw outside mesh
- access other pixels from current pixel (or vertices)
- store previous iterations
- update on the fly (they can, but they need to be compiled)
Structure of a shader¶
In Godot, shaders are made up of 3 main functions: the vertex() function, the fragment()
function and the light() function.
The vertex() function runs over all the vertices in the mesh and sets their positions as well
as some other per-vertex variables.
The fragment() function runs for every pixel that is covered by the mesh. It uses the variables
from the vertex() function to run. The variables from the vertex() function are interpolated
between the vertices to provide the values for the fragment() function.
The light() function runs for every pixel and for every light. It takes variables from the
fragment() function and from previous runs of itself.
For more information about how shaders operate specifically in Godot see the Shaders doc.
Technical overview¶
GPUs are able to render graphics much faster than CPUs for a few reasons, but most notably, because they are able to run calculations massively in parallel. A CPU typically has 4 or 8 cores while a GPU typically has thousands. That means a GPU can do hundreds of tasks at once. GPU architects have exploited this in a way that allows for doing many calculations very quickly, but only when many or all cores are doing the same calculation at once, but with different data.
That is where shaders come in. The GPU will call the shader a bunch of times simultaneously, and then operate on different bits of data (vertices, or pixels). These bunches of data are often called wavefronts. A shader will run the same for every thread in the wavefront. For example, if a given GPU can handle 100 threads per wavefront, a wavefront will run on a 10x10 block of pixels together. And it will continue to run for all pixels in that wavefront until they are complete. Accordingly, if you have one pixel slower than the rest (due to excessive branching), the entire block will be slowed down, resulting in massively slower render times. This is different than CPU based operations, on a CPU if you can speed up even one pixel the entire rendering time will decrease. On a GPU, you have to speed up the entire wavefront to speed up rendering.
Your first CanvasItem shader¶
Introduction¶
Shaders are special programs that execute on the GPU and are used for rendering graphics. All modern rendering is done with shaders. For a more detailed description of what shaders are please see What are shaders.
This tutorial will focus on the practical aspects of writing shader programs by walking you through the process of writing a shader with both vertex and fragment functions. This tutorial targets absolute beginners to shaders.
Note
If you have experience writing shaders and are just looking for an overview of how shaders work in Godot, see the Shading Reference.
Setup¶
CanvasItem shaders are used to draw all 2D objects in Godot, while Spatial shaders are used to draw all 3D objects.
In order to use a shader it must be attached inside a Material which must be attached to an object. Materials are a type of Resource. To draw multiple objects with the same material, the material must be attached to each object.
All objects derived from a CanvasItem have a material property. This includes all GUI elements, Sprites, TileMaps, MeshInstance2Ds etc. They also have an option to inherit their parent’s material. This can be useful if you have a large number of nodes that you want to use the same material.
To begin, create a Sprite node. You can use any CanvasItem, but for this tutorial we will use a Sprite.
In the Inspector, click beside “Texture” where it says “[empty]” and select “Load”, then select “Icon.png”. For new projects, this is the Godot icon. You should now see the icon in the viewport.
Next, look down in the Inspector, under the CanvasItem section, click beside “Material” and select “New ShaderMaterial”. This creates a new Material resource. Click on the sphere that appears. Godot currently doesn’t know whether you are writing a CanvasItem Shader or a Spatial Shader and it previews the output of spatial shaders. So what you are seeing is the output of the default Spatial Shader.
Click beside “Shader” and select “New Shader”. Finally, click on the new shader resource and the shader editor will open. You are now ready to begin writing your first shader.
Your first CanvasItem shader¶
In Godot, all shaders start with a line specifying what type of shader they are. It uses the following format:
shader_type canvas_item;
Because we are writing a CanvasItem shader, we specify canvas_item in the first line. All our code will
go beneath this declaration.
This line tells the engine which built-in variables and functionality to supply you with.
In Godot you can override three functions to control how the shader operates; vertex, fragment, and light.
This tutorial will walk you through writing a shader with both vertex and fragment functions. Light
functions are significantly more complex than vertex and fragment functions and so will not be covered here.
Your first fragment function¶
The fragment function runs for every pixel in a Sprite and determines what color that pixel should be.
They are restricted to the pixels covered by the Sprite, that means you cannot use one to, for example, create an outline around a Sprite.
The most basic fragment function does nothing except assign a single color to every pixel.
We do so by writing a vec4 to the built-in variable COLOR. vec4 is shorthand for constructing
a vector with 4 numbers. For more information about vectors see the Vector math tutorial
COLOR is both an input variable to the fragment function and the final output from it.
void fragment(){
COLOR = vec4(0.4, 0.6, 0.9, 1.0);
}

Congratulations! You’re done. You have successfully written your first shader in Godot.
Now let’s make things more complex.
There are many inputs to the fragment function that you can use for calculating COLOR.
UV is one of them. UV coordinates are specified in your Sprite (without you knowing it!)
and they tell the shader where to read from textures for each part of the mesh.
In the fragment function you can only read from UV, but you can use it in other functions
or to assign values to COLOR directly.
UV varies between 0-1 from left-right and from top-bottom.
void fragment() {
COLOR = vec4(UV, 0.5, 1.0);
}
Using TEXTURE built-in¶
When you want to adjust a color in a Sprite you cannot just adjust the color from the texture manually like in the code below.
void fragment(){
//this shader will result in an all white rectangle
COLOR.b = 1.0;
}
The default fragment function reads from a texture and displays it. When you overwrite the default fragment function,
you lose that functionality, so you have to implement it yourself. You read from textures using the
texture function. Certain nodes, like Sprites, have a dedicated texture variable that can be accessed in the shader
using TEXTURE. Use it together with UV and texture to draw the Sprite.
void fragment(){
COLOR = texture(TEXTURE, UV); //read from texture
COLOR.b = 1.0; //set blue channel to 1.0
}

Uniform input¶
Uniform input is used to pass data into a shader that will be the same across the entire shader.
You can use uniforms by defining them at the top of your shader like so:
uniform float size;
For more information about usage see the Shading Language doc.
Add a uniform to change the amount of blue in our Sprite.
uniform float blue = 1.0; // you can assign a default value to uniforms
void fragment(){
COLOR = texture(TEXTURE, UV); //read from texture
COLOR.b = blue;
}
Now you can change the amount of blue in the Sprite from the editor. Look back at the Inspector under where you created your shader. You should see a section called “Shader Param”. Unfold that section and you will see the uniform you just declared. If you change the value in the editor, it will overwrite the default value you provided in the shader.
Interacting with shaders from code¶
You can change uniforms from code using the function set_shader_param() which is called on the node’s
material resource. With a Sprite node, the following code can be used to set the blue uniform.
var blue_value = 1.0
material.set_shader_param("blue", blue_value)
Note that the name of the uniform is a string. The string must match exactly with how it is written in the shader, including spelling and case.
Your first vertex function¶
Now that we have a fragment function, let’s write a vertex function.
Use the vertex function to calculate where on the screen each vertex should end up.
The most important variable in the vertex function is VERTEX. Initially, it specifies
the vertex coordinates in your model, but you also write to it to determine where to actually
draw those vertices. VERTEX is a vec2 that is initially presented in local-space
(i.e. not relative to the camera, viewport, or parent nodes).
You can offset the vertices by directly adding to VERTEX.
void vertex() {
VERTEX += vec2(10.0, 0.0);
}
Combined with the TIME built-in variable, this can be used for simple animation.
void vertex() {
// Animate Sprite moving in big circle around its location
VERTEX += vec2(cos(TIME)*100.0, sin(TIME)*100.0);
}
Conclusion¶
At their core, shaders do what you have seen so far, they compute VERTEX and COLOR. It is
up to you to dream up more complex mathematical strategies for assigning values to those variables.
For inspiration, take a look at some of the more advanced shader tutorials, and look at other sites like Shadertoy and The Book of Shaders.
Your first Spatial shader¶
You have decided to start writing your own custom Spatial shader. Maybe you saw a cool trick online that was done with shaders, or you have found that the SpatialMaterial isn’t quite meeting your needs. Either way, you have decided to write your own and now you need figure out where to start.
This tutorial will explain how to write a Spatial shader and will cover more topics than the CanvasItem tutorial.
Spatial shaders have more built-in functionality than CanvasItem shaders. The expectation with spatial shaders is that Godot has already provided the functionality for common use cases and all the user needs to do in the shader is set the proper parameters. This is especially true for a PBR (physically based rendering) workflow.
This is a two-part tutorial. In this first part we are going to go through how to make a simple terrain using vertex displacement from a heightmap in the vertex function. In the second part we are going to take the concepts from this tutorial and walk through how to set up custom materials in a fragment shader by writing an ocean water shader.
Note
This tutorial assumes some basic shader knowledge such as types (vec2, float,
sampler2D), and functions. If you are uncomfortable with these concepts it is
best to get a gentle introduction from The Book of Shaders before completing this tutorial.
Where to assign my material¶
In 3D, objects are drawn using Meshes. Meshes are a resource type that store geometry (the shape of your object) and materials (the color and how the object reacts to light) in units called “surfaces”. A Mesh can have multiple surfaces, or just one. Typically, you would import a mesh from another program (e.g. Blender). But Godot also has a few PrimitiveMeshes that allow you to add basic geometry to a scene without importing Meshes.
There are multiple node types that you can use to draw a mesh. The main one is MeshInstance, but you can also use Particles, MultiMeshes (with a MultiMeshInstance), or others.
Typically, a material is associated with a given surface in a mesh, but some nodes, like MeshInstance, allow you to override the material for a specific surface, or for all surfaces.
If you set a material on the surface or mesh itself, then all MeshInstances that share that mesh will share that material. However, if you want to reuse the same mesh across multiple mesh instances, but have different materials for each instance then you should set the material on the Meshinstance.
For this tutorial we will set our material on the mesh itself rather than taking advantage of the MeshInstance’s ability to override materials.
Setting up¶
Add a new MeshInstance node to your scene.
In the inspector tab beside “Mesh” click “[empty]” and select “New PlaneMesh”. Then click on the image of a plane that appears.
This adds a PlaneMesh to our scene.
Then, in the viewport, click in the upper left corner on the button that says “Perspective”. A menu will appear. In the middle of the menu are options for how to display the scene. Select ‘Display Wireframe’.
This will allow you to see the triangles making up the plane.
Now set Subdivide Width and Subdivide Depth to 32.
You can see that there are now many more triangles in the Mesh. This will give us more vertices to work with and thus allow us to add more detail.
PrimitiveMeshes, like PlaneMesh, only have one surface, so instead of an array of materials there is only one. Click beside “Material” where it says “[empty]” and select “New ShaderMaterial”. Then click the sphere that appears.
Now click beside “Shader” where it says “[empty]” and select “New Shader”.
The shader editor should now pop up and you are ready to begin writing your first Spatial shader!
Shader magic¶
Notice how there is already error? This is because the shader editor reloads shaders on
the fly. The first thing Godot shaders need is a declaration of what type of shader they are.
We set the variable shader_type to spatial because this is a spatial shader.
shader_type spatial;
Next we will define the vertex() function. The vertex() function determines where
the vertices of your Mesh appear in the final scene. We will be
using it to offset the height of each vertex and make our flat plane appear like a little terrain.
We define the vertex shader like so:
void vertex() {
}
With nothing in the vertex() function, Godot will use its default vertex shader. We can easily
start to make changes by adding a single line:
void vertex() {
VERTEX.y += cos(VERTEX.x) * sin(VERTEX.z);
}
Adding this line, you should get an image like the one below.
Okay, let’s unpack this. The y value of the VERTEX is being increased. And we are passing
the x and z components of the VERTEX as arguments to cos and sin; that gives us
a wave-like appearance across the x and z axes.
What we want to achieve is the look of little hills; after all. cos and sin already look kind of like
hills. We do so by scaling the inputs to the cos and sin functions.
void vertex() {
VERTEX.y += cos(VERTEX.x * 4.0) * sin(VERTEX.z * 4.0);
}
This looks better, but it is still too spiky and repetitive, let’s make it a little more interesting.
Noise heightmap¶
Noise is a very popular tool for faking the look of terrain. Think of it as similar to the cosine function where you have repeating hills except, with noise, each hill has a different height.
Godot provides the NoiseTexture resource for generating a noise texture that can be accessed from a shader.
To access a texture in a shader add the following code near the top of your shader, outside the
vertex() function.
uniform sampler2D noise;
This will allow you to send a noise texture to the shader. Now look in the inspecter under your material. You should see a section called “Shader Params”. If you open it up you will see a section called “noise”.
Click beside it where it says “[empty]” and select “New NoiseTexture”. Then in your NoiseTexture click beside where it says “Noise” and select “New OpenSimplexNoise”.
OpenSimplexNoise is used by the NoiseTexture to generate a heightmap.
Once you set it up and should look like this.
Now, access the noise texture using the texture() function. texture() takes a texture as the first
argument and a vec2 for the position on the texture as the second argument. We use the x and z
channels of VERTEX to determine where on the texture to look up. texture() returns a vec4 of the
r, g, b, a channels at the position. Since the noise texture is grayscale, all of the values are the same,
so we can use any one of the channels as the height. In this case we’ll use the r, or x channel.
float height = texture(noise, VERTEX.xz / 2.0 ).x; //divide by the size of the PlaneMesh
VERTEX.y += height;
Note: xyzw is the same as rgba in GLSL, so instead of texture().x above, we could use texture().r.
See the OpenGL documentation for more details.
Using this code you can see the texture creates random looking hills.
Right now it is too spiky, we want to soften the hills a bit. To do that we will use a uniform. You already used a uniform above to pass in the noise texture, now let’s learn how they work.
Uniforms¶
Uniform variables allow you to pass data from the game into the shader. They are
very useful for controlling shader effects. Uniforms can be almost any
datatype that can be used in the shader. To use a uniform, you declare it in
your Shader using the keyword uniform.
Let’s make a uniform that changes the height of the terrain.
uniform float height_scale = 0.5;
Godot lets you initialize a uniform with a value; here, height_scale is set to
0.5. You can set uniforms from GDScript by calling the function set_shader_param()
on the material corresponding to the shader. The value passed from GDScript takes
precedence over the value used to initialize it in the shader.
# called from the MeshInstance
mesh.material.set_shader_param("height_scale", 0.5)
Note
Changing uniforms from Spatial nodes is different than in CanvasItem nodes. Here,
we set the material inside the PlaneMesh resource. In other mesh resources you may
need to first access the material by calling surface_get_material(). While in
the MeshInstance you would access the material using get_surface_material() or
material_override.
Remember that the string passed into set_shader_param() must match the name
of the uniform variable in the Shader. You can use the uniform variable anywhere
inside your Shader. Here, we will use it to set the height value instead
of arbitrarily multiplying by 0.5.
VERTEX.y += height * height_scale;
Now it looks much better.
Using uniforms, we can even change the value every frame to animate the height of the terrain. Combined with Tweens, this can be especially useful for simple animations.
Interacting with light¶
First, turn wireframe off. To do so, click in the upper-left of the Viewport again, where it says “Perspective”, and select “Display Normal”.
Note how the mesh color goes flat. This is because the lighting on it is flat. Let’s add a light!
First, we will add an OmniLight to the scene.
You can see the light affecting the terrain, but it looks odd. The problem is the light is affecting the terrain as if it were a flat plane. This is because the light shader uses the normals from the Mesh to calculate light.
The normals are stored in the Mesh, but we are changing the shape of the Mesh in the shader, so the normals are no longer correct. To fix this, we can recalculate the normals in the shader or use a normal texture that corresponds to our noise. Godot makes both easy for us.
You can calculate the new normal manually in the vertex function and then just set NORMAL.
With NORMAL set, Godot will do all the difficult lighting calculations for us. We will cover
this method in the next part of this tutorial, for now we will read normals from a texture.
Instead we will rely on the NoiseTexture again to calculate normals for us. We do that by passing in a second noise texture.
uniform sampler2D normalmap;
Set this second uniform texture to another NoiseTexture with another OpenSimplexNoise. But this time, check off “As Normalmap”.
Now, because this is a normalmap and not a per-vertex normal, we are going to assign it in the fragment()
function. The fragment() function will be explained in more detail in the next part of this tutorial.
void fragment() {
}
When we have normals that correspond to a specific vertex we set NORMAL, but if you have a normalmap
that comes from a texture, set the normal using NORMALMAP. This way Godot will handle the wrapping the
texture around the mesh automatically.
Lastly, in order to ensure that we are reading from the same places on the noise texture and the normalmap
texture, we are going to pass the VERTEX.xz position from the vertex() function to the fragment()
function. We do that with varyings.
Above the vertex() define a vec2 called vertex_position. And inside the vertex() function
assign VERTEX.xz to vertex_position.
varying vec2 vertex_position;
void vertex() {
...
vertex_position = VERTEX.xz / 2.0;
}
And now we can access vertex_position from the fragment() function.
void fragment() {
NORMALMAP = texture(normalmap, vertex_position).xyz;
}
With the normals in place the light now reacts to the height of the mesh dynamically.
We can even drag the light around and the lighting will update automatically.
Here is the full code for this tutorial. You can see it is not very long as Godot handles most of the difficult stuff for you.
shader_type spatial;
uniform float height_scale = 0.5;
uniform sampler2D noise;
uniform sampler2D normalmap;
varying vec2 vertex_position;
void vertex() {
vertex_position = VERTEX.xz / 2.0;
float height = texture(noise, vertex_position).x * height_scale;
VERTEX.y += height * height_scale;
}
void fragment() {
NORMALMAP = texture(normalmap, vertex_position).xyz;
}
That is everything for this part. Hopefully, you now understand the basics of vertex shaders in Godot. In the next part of this tutorial we will write a fragment function to accompany this vertex function and we will cover a more advanced technique to turn this terrain into an ocean of moving waves.
Your first Spatial shader: part 2¶
From a high-level, what Godot does is give the user a bunch of parameters that can be optionally set
(AO, SSS_Strength, RIM, etc.). These parameters correspond to different complex effects
(Ambient Occlusion, SubSurface Scattering, Rim Lighting, etc.). When not written to, the code is thrown
out before it is compiled and so the shader does not incur the cost of the extra feature. This makes it
easy for users to have complex PBR-correct shading, without writing complex shaders. Of course, Godot
also allows you to ignore all these parameters and write a fully customized shader.
For a full list of these parameters see the spatial shader reference doc.
A difference between the vertex function and a fragment function is that the vertex function
runs per vertex and sets properties such as VERTEX (position) and NORMAL, while
the fragment shader runs per pixel and, most importantly, sets the ALBEDO color of the Mesh.
Your first spatial fragment function¶
As mentioned in the previous part of this tutorial. The standard use of the fragment function
in Godot is to set up different material properties and let Godot handle the rest. In order
to provide even more flexibility, Godot also provides things called render modes. Render
modes are set at the top of the shader, directly below shader_type, and they specify
what sort of functionality you want the built-in aspects of the shader to have.
For example, if you do not want to have lights affect an object, set the render mode to
unshaded:
render_mode unshaded;
You can also stack multiple render modes together. For example, if you want to use toon shading instead of more-realistic PBR shading, set the diffuse mode and specular mode to toon:
render_mode diffuse_toon, specular_toon;
This model of built-in functionality allows you to write complex custom shaders by changing only a few parameters.
For a full list of render modes see the Spatial shader reference.
In this part of the tutorial, we will walk through how to take the bumpy terrain from the previous part and turn it into an ocean.
First let’s set the color of the water. We do that by setting ALBEDO.
ALBEDO is a vec3 that contains the color of the object.
Let’s set it to a nice shade of blue.
void fragment() {
ALBEDO = vec3(0.1, 0.3, 0.5);
}
We set it to a very dark shade of blue because most of the blueness of the water will come from reflections from the sky.
The PBR model that Godot uses relies on two main parameters: METALLIC and ROUGHNESS.
ROUGHNESS specifies how smooth/rough the surface of a material is. A low ROUGHNESS will
make a material appear like a shiny plastic, while a high roughness makes the material appear
more solid in color.
METALLIC specifies how much like a metal the object is. It is better set close to 0 or 1.
Think of METALLIC as changing the balance between the reflection and the ALBEDO color. A
high METALLIC almost ignores ALBEDO altogether, and looks like a mirror of the sky. While
a low METALLIC has a more equal representation of sky color and ALBEDO color.
ROUGHNESS increases from 0 to 1 from left to right while METALLIC increase from
0 to 1 from top to bottom.
Note
METALLIC should be close to 0 or 1 for proper PBR shading. Only set it between
them for blending between materials.
Water is not a metal, so we will set its METALLIC property to 0.0. Water is also highly
reflective, so we will set its ROUGHNESS property to be quite low as well.
void fragment() {
METALLIC = 0.0;
ROUGHNESS = 0.01;
ALBEDO = vec3(0.1, 0.3, 0.5);
}
Now we have a smooth plastic looking surface. It is time to think about some particular properties of water that we want to emulate. There are two main ones that will take this from a weird plastic surface to nice stylized water. The first is specular reflections. Specular reflections are those bright spots you see from where the sun reflects directly into your eye. The second is fresnel reflectance. Fresnel reflectance is the property of objects to become more reflective at shallow angles. It is the reason why you can see into water below you, but farther away it reflects the sky.
In order to increase the specular reflections, we will do two things. First, we will change the render mode for specular to toon because the toon render mode has larger specular highlights.
render_mode specular_toon;
Second we will add rim lighting. Rim lighting increases the effect of light at glancing angles. Usually it is used to emulate the way light passes through fabric on the edges of an object, but we will use it here to help achieve a nice watery effect.
void fragment() {
RIM = 0.2;
METALLIC = 0.0;
ROUGHNESS = 0.01;
ALBEDO = vec3(0.1, 0.3, 0.5);
}
In order to add fresnal reflectance we will compute a fresnel term in our fragment shader.
We are not going to use a real fresnel term, instead we will approximate it using the dot
product of the NORMAL and VIEW vectors. The NORMAL vector points away from a
surface of the, while the VIEW vector is the direction between your eye and that point
on the surface. The dot product between them is a handy way to tell when you are looking
at the surface head-on your at a glancing angle.
float fresnel = sqrt(1.0 - dot(NORMAL, VIEW));
And mix it into both ROUGHNESS and ALBEDO. This is the benefit of ShaderMaterials over
SpatialMaterials. With SpatialMaterials we could set these properties with a texture, or to a flat
number. But with shaders we can set them based on any mathematical function that we can dream up.
void fragment() {
float fresnel = sqrt(1.0 - dot(NORMAL, VIEW));
RIM = 0.2;
METALLIC = 0.0;
ROUGHNESS = 0.01 * (1.0 - fresnel);
ALBEDO = vec3(0.1, 0.3, 0.5) + (0.1 * fresnel);
}
And now, with only 5 lines of code, you can have complex looking water. Now that we have
lighting, this water is looking too bright. Let’s darken it. This is done easily by
decreasing the values of the vec3 we pass into ALBEDO. Let’s set them to
vec3(0.01, 0.03, 0.05).
Animating with TIME¶
Going back to the vertex function, we can animated the waves using the built-in variable TIME.
TIME is a built-in variable that is accessible from the vertex and fragment functions.
In the last tutorial we calculated height by reading from a heightmap. For this tutorial,
we will do the same. Put the heightmap code in a function called height().
float height(vec2 position) {
return texture(noise, position / 10.0).x; //scaling factor is based on mesh size (This PlanMesh is 10x10)
}
In order to use TIME in the height() function we need to pass it in.
float height(vec2 position, float time) {
}
And make sure to correctly pass it in inside the vertex function.
void vertex() {
vec2 pos = VERTEX.xz;
float k = height(pos, TIME);
VERTEX.y = k;
}
Instead of using a normalmap to calculate normals. We are going to compute them manually in the
vertex() function. To do so use the following line of code.
NORMAL = normalize(vec3(k - height(pos + vec2(0.1, 0.0), TIME), 0.1, k - height(pos + vec2(0.0, 0.1), TIME)));
We need to compute NORMAL manually because in the next section we will be using math to create
complex-looking waves.
Now, we are going to make the height() function a little more complicated by offsetting position
by the cosine of TIME.
float height(vec2 position, float time) {
vec2 offset = 0.01 * cos(position + time);
return texture(noise, (position / 10.0) - offset).x;
}
This results in waves that move slowly, but not in a very natural way. The next section will dig deeper into using shaders to create more complex effects, in this case realistic waves, by adding a few more mathematical functions.
Advanced effects: waves¶
What makes shaders so powerful is that you can achieve complex effects by using math. To illustrate
this, we are going to take our waves to the next level by modifying the height() function and
by introducing a new function called wave().
wave() has one parameter, position, which is the same as it is in height().
We are going to call wave() multiple times in height() in order to fake the way waves look.
float wave(vec2 position){
position += texture(noise, position / 10.0).x * 2.0 - 1.0;
vec2 wv = 1.0 - abs(sin(position));
return pow(1.0 - pow(wv.x * wv.y, 0.65), 4.0);
}
At first this looks complicated. So let’s go through it line-by-line.
position += texture(noise, position / 10.0).x * 2.0 - 1.0;
Offset the position by the noise texture. This will make the waves curve so they are not straight lines
completely aligned with the grid.
vec2 wv = 1.0 - abs(sin(position));
Define a wave-like function using sin() and position. Normally sin() waves are very round.
We use abs() to absolute to give them a sharp ridge and constrain them to the 0-1 range. And then we
subtract it from 1.0 to put the peak on top.
return pow(1.0 - pow(wv.x * wv.y, 0.65), 4.0);
Multiply the x-directional wave by the y-directional wave and raise it to a power to sharpen the peaks.
Then subtract that from 1.0 so that the ridges become peaks and raise that to a power to sharpen the
ridges.
We can now replace the contents of our height() function with wave().
float height(vec2 position, float time) {
float h = wave(position);
}
Using this you get:
The shape of the sin wave is too obvious. So let’s spread the waves out a bit. We do this by scaling position.
float height(vec2 position, float time) {
float h = wave(position*0.4);
}
Now it looks much better.
We can do even better if we layer multiple waves on top of each other at varying frequencies and amplitudes. What this means is that we are going to scale position for each one to make the waves thinner or wider (frequency). And we are going to multiply the output of the wave to make them shorter or taller (amplitude).
Here is an example for how you could layer the four waves to achieve nicer looking waves.
float height(vec2 position, float time) {
float d = wave((position + time) * 0.4) * 0.3;
d += wave((position - time) * 0.3) * 0.3;
d += wave((position + time) * 0.5) * 0.2;
d += wave((position - time) * 0.6) * 0.2;
return d;
}
Note that we add time to two and subtract it from the other two. This makes the waves move in different directions
creating a complex effect. Also note that the amplitudes (the number the result is multiplied by) all
add up to 1.0. This keeps the wave in the 0-1 range.
With this code you should end up with more complex looking waves and all you had to do was add a little bit of math!
For more information about Spatial shaders read the Shading Language doc and the Spatial Shaders doc. Also look at more advanced tutorials in the Shading section and the 3D sections.
Shader materials¶
Introduction¶
For the most common cases, Godot provides ready to use materials for most types of shaders, such as SpatialMaterial, CanvasItemMaterial and ParticlesMaterial. They are flexible implementations that cover most use cases.
Shader materials allow writing a custom shader directly, for maximum flexibility. Examples of this are:
- Create procedural textures.
- Create complex texture blending effects.
- Create animated materials, or materials that change over time.
- Create refractive effects or other advanced effects.
- Create special lighting shaders for more exotic materials.
- Animate vertices, like tree leaves or grass.
- Create custom particle code.
- And much more!
Godot provides built in functionality to make frequent operations easier. Additionally, Godot’s shader editor will detect errors as you type, so you can see your edited shaders in real-time. It is also possible to edit shaders using a visual, node-based graph editor.
Creating a ShaderMaterial¶
Create a new ShaderMaterial in some object of your choice. Go to the “Material” property and create a ShaderMaterial.
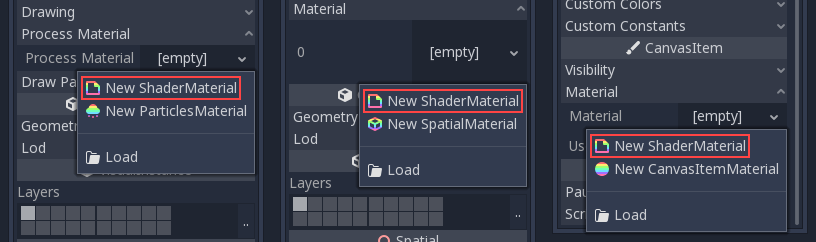
Next, click on the shader material to see its properties. From here you can create a shader or visual shader. Regular shaders use code to set their properties while a visual shader uses a node based workflow.
If you need to you can convert a visual shader to a text shader. However you can’t convert a text shader to a visual shader.
Choose one of them and you can start editing your shader.
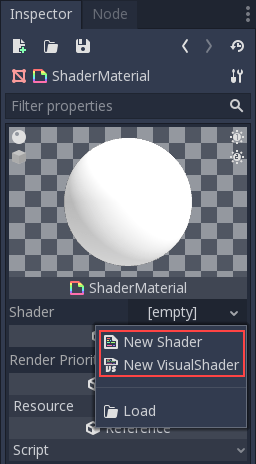
If you create a regular shader click on it and the shader editor will open.
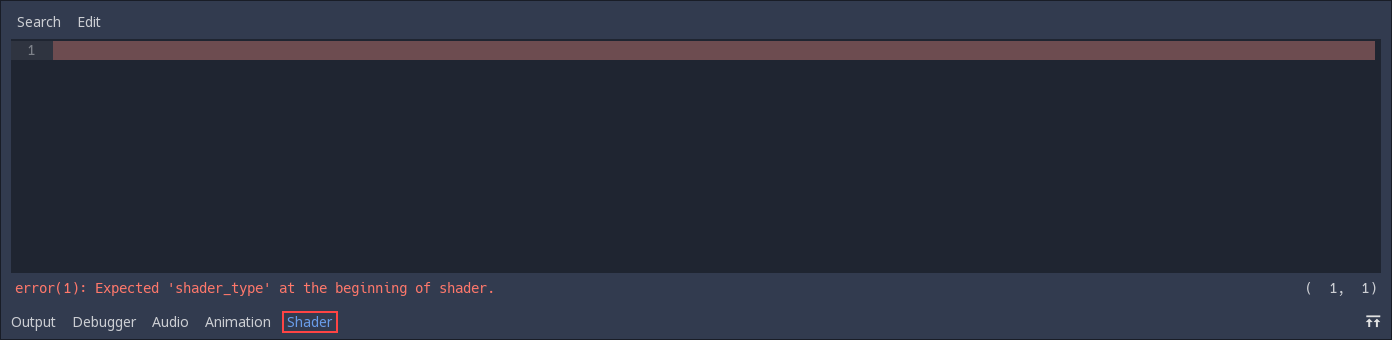
If you create a visual shader the visual shader editor will open automatically.
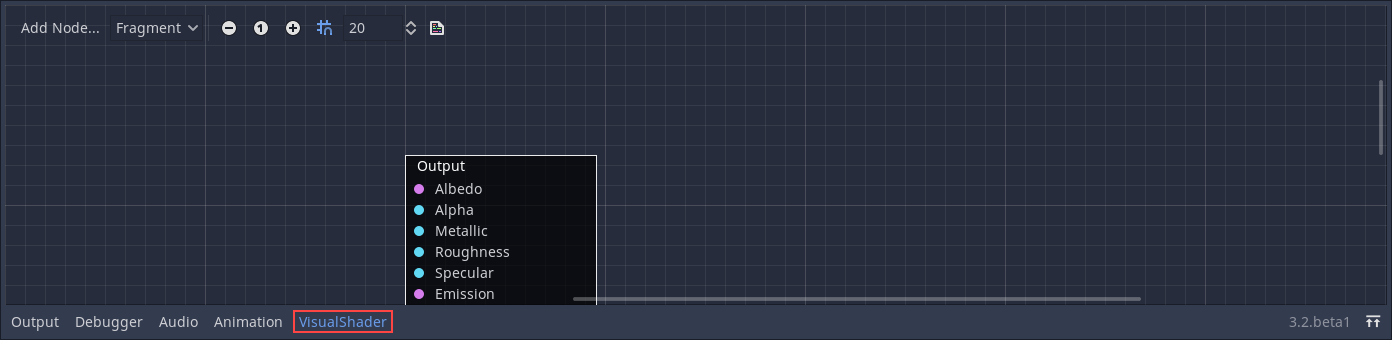
In the visual shader editor you can click a button and see what your visual shader looks like as shader code. This can be useful if you’re trying to replicate a text shader as nodes, or it can be used as a preview for converting your visual shader to a text shader.
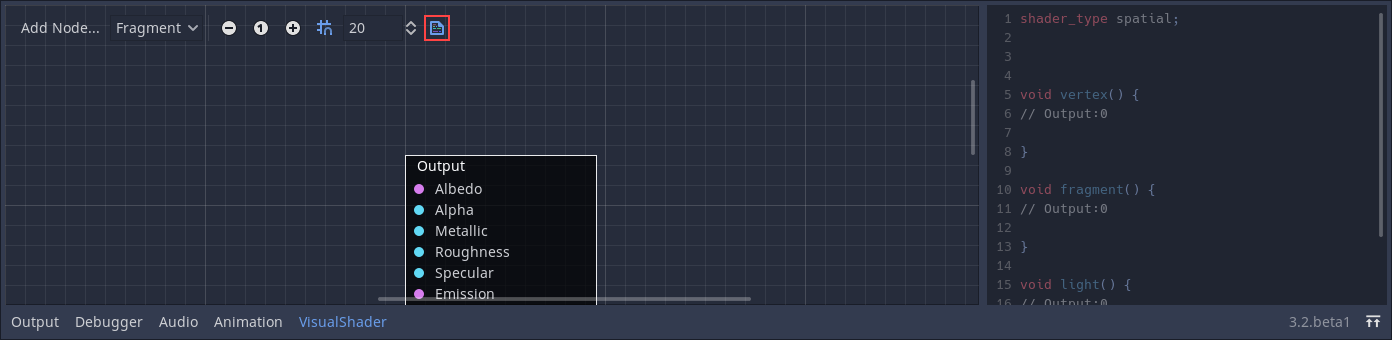
Note
To learn more about visual shaders, read VisualShaders.
Converting to ShaderMaterial¶
It is possible to convert from SpatialMaterial, CanvasItemMaterial and ParticlesMaterial to ShaderMaterial. To do so, go to the material properties and select the convert option.
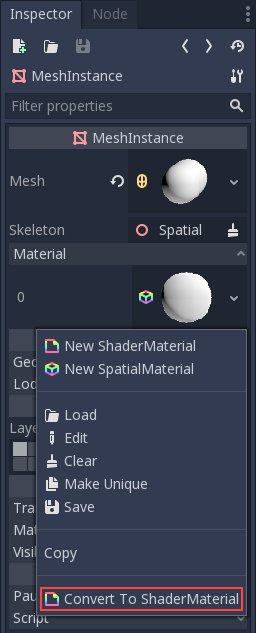
Note
Using the convert option will turn the SpatialMaterial into a ShaderMaterial with a text shader, not a visual shader.
VisualShaders¶
Just as VisualScript is an alternative for users that prefer a graphical approach to coding, VisualShaders are the visual alternative for creating shaders.
As shaders are inherently linked to visuals, the graph-based approach with previews of textures, materials, etc. offers a lot of additional convenience compared to purely script-based shaders. On the other hand, VisualShaders do not expose all features of the shader script and using both in parallel might be necessary for specific effects.
Note
If you are not familiar with shaders, start by reading What are shaders?.
Creating a VisualShader¶
VisualShaders can be created in any ShaderMaterial. To begin using
VisualShaders, create a new ShaderMaterial in an object of your choice.
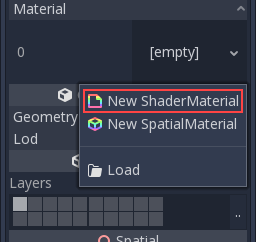
Then assign a VisualShader resource to the Shader property.
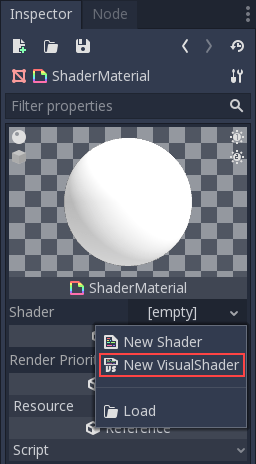
Click on the new VisualShader resource and the Visual Shader Editor will
open automatically. The layout of the Visual Shader Editor comprises two parts:
the upper toolbar and the graph itself.
From left to right in the toolbar:
- The
Add Nodebutton displays a popup menu to let you add nodes to the shader graph. - The drop-down menu is the shader type: Vertex, Fragment and Light. Like for script shaders, it defines what built-in nodes will be available.
- The following buttons and number input control the zooming level, grid snapping and distance between grid lines (in pixels).
- The last icon shows the generated shader code corresponding to your graph.
Note
Although VisualShaders do not require coding, they share the same logic with script shaders. It is advised to learn the basics of both to have a good understanding of the shading pipeline.
The visual shader graph is converted to a script shader behind the scene, and you can see this code by pressing the last button in the toolbar. This can be convenient to understand what a given node does and how to reproduce it in scripts.
Using the Visual Shader Editor¶
By default, every new VisualShader will have an output node. Every node
connection ends at one of the output node’s sockets. A node is the basic unit to
create your shader. To add a new node, click on the Add Node button on the
upper left corner or right click on any empty location in the graph, and a menu
will pop up.
This popup has the following properties:
- If you right-click on the graph, this menu will be called at the cursor position and the created node, in that case, will also be placed under that position; otherwise, it will be created at the graph’s center.
- It can be resized horizontally and vertically allowing more content to be shown. Size transform and tree content position are saved between the calls, so if you suddenly closed the popup you can easily restore its previous state.
- The
Expand AllandCollapse Alloptions in the drop-down option menu can be used to easily list the available nodes. - You can also drag and drop nodes from the popup onto the graph.
While the popup has nodes sorted in categories, it can seem overwhelming at first. Try to add some of the nodes, plug them in the output socket and observe what happens.
When connecting any scalar output to a vector input, all components of
the vector will take the value of the scalar.
When connecting any vector output to a scalar input, the value of the
scalar will be the average of the vector’s components.
Visual Shader nodes¶
Below are some special nodes that are worth knowing about. The list is not exhaustive and might be expanded with more nodes and examples.
Expression node¶
The Expression node allows you to write Godot Shading Language (GLSL-like)
expressions inside your visual shaders. The node has buttons to add any amount
of required input and output ports and can be resized. You can also set up the
name and type of each port. The expression you have entered will apply
immediately to the material (once the focus leaves the expression text box). Any
parsing or compilation errors will be printed to the Output tab. The outputs are
initialized to their zero value by default. The node is located under the
Special tab and can be used in all shader modes.
The possibilities of this node are almost limitless – you can write complex
procedures, and use all the power of text-based shaders, such as loops, the
discard keyword, extended types, etc. For example:
Fresnel node¶
The Fresnel node is designed to accept normal and view vectors and produces
a scalar which is the saturated dot product between them. Additionally, you can
setup the inversion and the power of equation. The Fresnel node is great for
adding a rim-like lighting effect to objects.
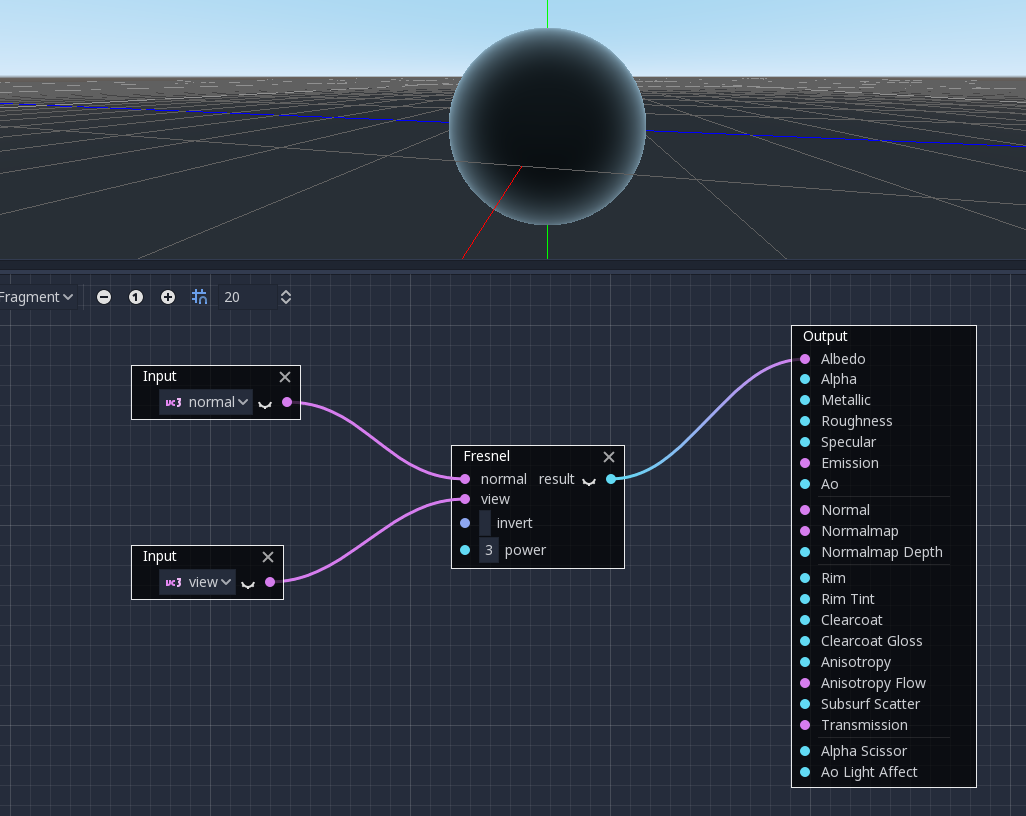
Boolean node¶
The Boolean node can be converted to Scalar or Vector to represent
0 or 1 and (0, 0, 0) or (1, 1, 1) respectively. This property
can be used to enable or disable some effect parts with one click.
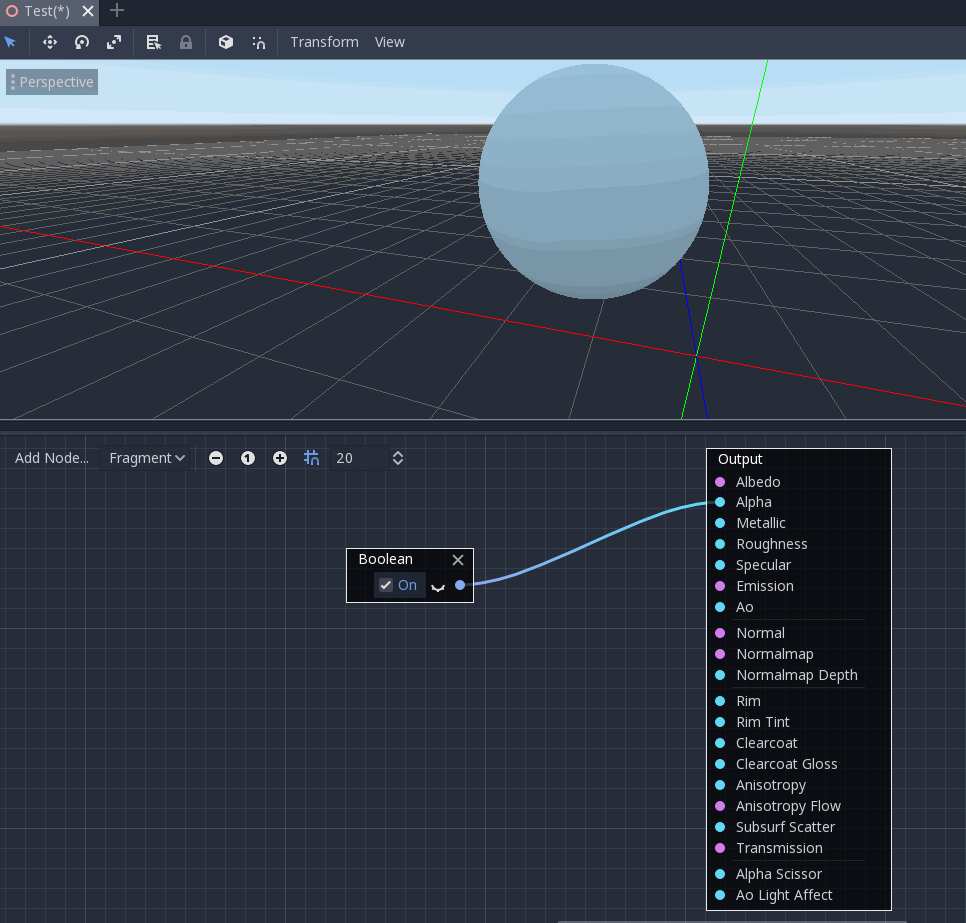
If node¶
The If node allows you to setup a vector which will be returned the result
of the comparison between a and b. There are three vectors which can be
returned: a == b (in that case the tolerance parameter is provided as a
comparison threshold – by default it is equal to the minimal value, i.e.
0.00001), a > b and a < b.
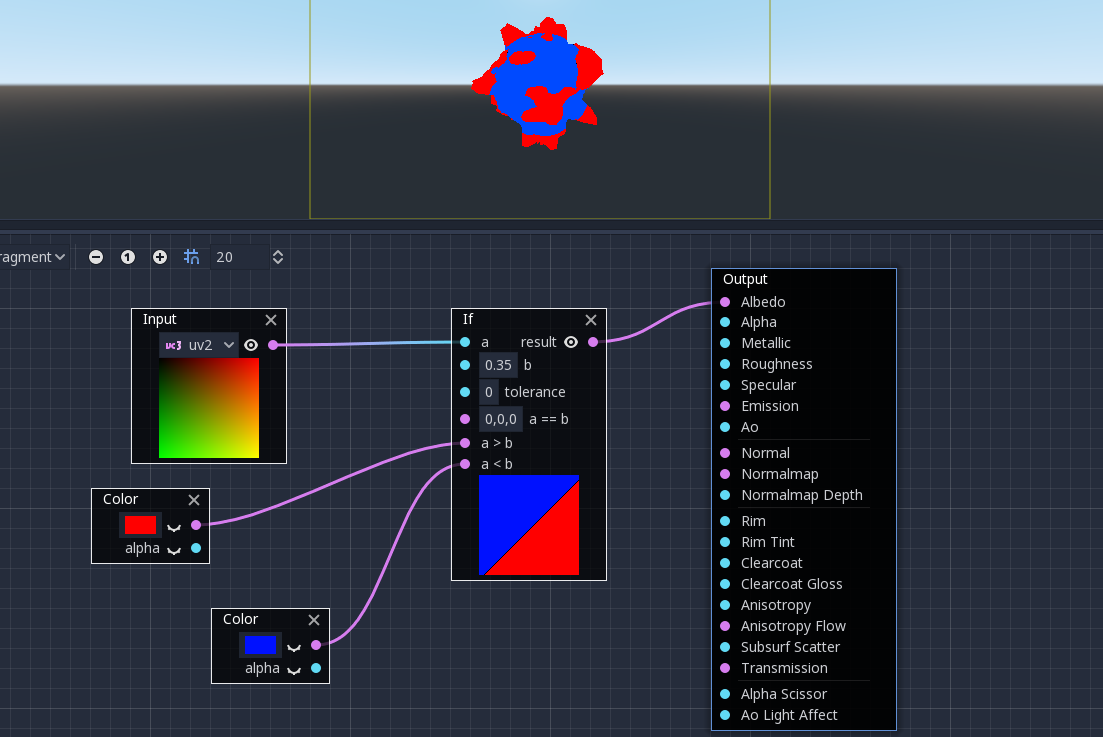
Switch node¶
The Switch node returns a vector if the boolean condition is true or
false. Boolean was introduced above. If you convert a vector to a true
boolean, all components of the vector should be above zero.
Note
The Switch node is only available on the GLES3 backed. If you are
targeting GLES2 devices, you cannot use switch statements.
Intro to shaders: 2D and 3D water¶
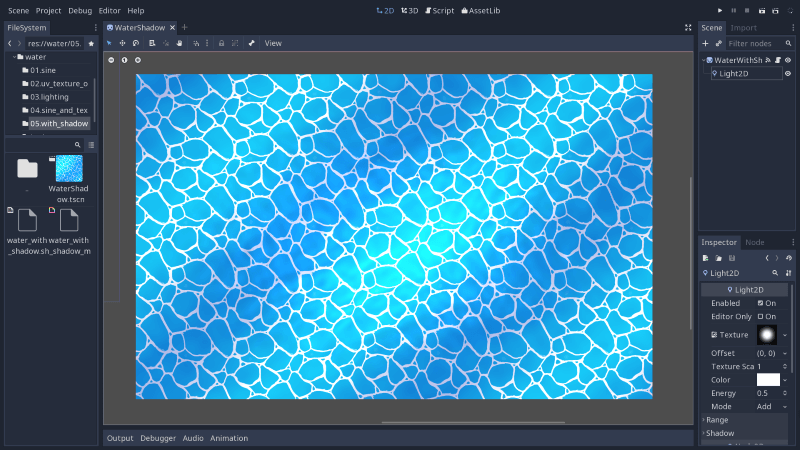
In this hands-on video series, you will create your first water shaders in 2D and in 3D. If you’re new to shaders, you should start 2D, because you need some basic understanding of the shading language, vertex and fragment shaders, to build upon. 3D adds quite a bit of complexity when it comes to writing shader programs, as you will see in the third video.
Download the source code¶
Download the intro to shaders project here to follow along:
2d_water_shader.zip.
It comes with a start folder to follow along with the 2D tutorials, and an end folder that contains the final code.
You will find the 3D water project on this GitHub repository. We didn’t include it here, as it is a little heavy.
Screen-reading shaders¶
Introduction¶
Very often, it is desired to make a shader that reads from the same screen to which it’s writing. 3D APIs, such as OpenGL or DirectX, make this very difficult because of internal hardware limitations. GPUs are extremely parallel, so reading and writing causes all sorts of cache and coherency problems. As a result, not even the most modern hardware supports this properly.
The workaround is to make a copy of the screen, or a part of the screen, to a back-buffer and then read from it while drawing. Godot provides a few tools that make this process easy!
SCREEN_TEXTURE built-in texture¶
Godot Shading language has a special texture, “SCREEN_TEXTURE” (and “DEPTH_TEXTURE” for depth, in the case of 3D). It takes as argument the UV of the screen and returns a vec3 RGB with the color. A special built-in varying: SCREEN_UV can be used to obtain the UV for the current fragment. As a result, this simple 2D fragment shader:
void fragment() {
COLOR = textureLod(SCREEN_TEXTURE, SCREEN_UV, 0.0);
}
results in an invisible object, because it just shows what lies behind.
The reason why textureLod must be used is because, when Godot copies back a chunk of the screen, it also does an efficient separatable gaussian blur to its mipmaps.
This allows for not only reading from the screen, but reading from it with different amounts of blur at no cost.
SCREEN_TEXTURE example¶
SCREEN_TEXTURE can be used for many things. There is a special demo for Screen Space Shaders, that you can download to see and learn. One example is a simple shader to adjust brightness, contrast and saturation:
shader_type canvas_item;
uniform float brightness = 1.0;
uniform float contrast = 1.0;
uniform float saturation = 1.0;
void fragment() {
vec3 c = textureLod(SCREEN_TEXTURE, SCREEN_UV, 0.0).rgb;
c.rgb = mix(vec3(0.0), c.rgb, brightness);
c.rgb = mix(vec3(0.5), c.rgb, contrast);
c.rgb = mix(vec3(dot(vec3(1.0), c.rgb) * 0.33333), c.rgb, saturation);
COLOR.rgb = c;
}
Behind the scenes¶
While this seems magical, it’s not. The SCREEN_TEXTURE built-in, when first found in a node that is about to be drawn, does a full-screen copy to a back-buffer. Subsequent nodes that use it in shaders will not have the screen copied for them, because this ends up being inefficient.
As a result, if shaders that use SCREEN_TEXTURE overlap, the second one will not use the result of the first one, resulting in unexpected visuals:
In the above image, the second sphere (top right) is using the same source for SCREEN_TEXTURE as the first one below, so the first one “disappears”, or is not visible.
In 3D, this is unavoidable because copying happens when opaque rendering completes.
In 2D, this can be corrected via the BackBufferCopy node, which can be instantiated between both spheres. BackBufferCopy can work by either specifying a screen region or the whole screen:
With correct back-buffer copying, the two spheres blend correctly:
Back-buffer logic¶
So, to make it clearer, here’s how the backbuffer copying logic works in Godot:
- If a node uses the SCREEN_TEXTURE, the entire screen is copied to the back buffer before drawing that node. This only happens the first time; subsequent nodes do not trigger this.
- If a BackBufferCopy node was processed before the situation in the point above (even if SCREEN_TEXTURE was not used), the behavior described in the point above does not happen. In other words, automatic copying of the entire screen only happens if SCREEN_TEXTURE is used in a node for the first time and no BackBufferCopy node (not disabled) was found before in tree-order.
- BackBufferCopy can copy either the entire screen or a region. If set to only a region (not the whole screen) and your shader uses pixels not in the region copied, the result of that read is undefined (most likely garbage from previous frames). In other words, it’s possible to use BackBufferCopy to copy back a region of the screen and then use SCREEN_TEXTURE on a different region. Avoid this behavior!
DEPTH_TEXTURE¶
For 3D Shaders, it’s also possible to access the screen depth buffer. For this, the DEPTH_TEXTURE built-in is used. This texture is not linear; it must be converted via the inverse projection matrix.
The following code retrieves the 3D position below the pixel being drawn:
void fragment() {
float depth = textureLod(DEPTH_TEXTURE, SCREEN_UV, 0.0).r;
vec4 upos = INV_PROJECTION_MATRIX * vec4(SCREEN_UV * 2.0 - 1.0, depth * 2.0 - 1.0, 1.0);
vec3 pixel_position = upos.xyz / upos.w;
}
Migrating to Godot’s shading language¶
Introduction¶
This document explains the differences between Godot’s shading language and GLSL and gives practical advice on how to migrate shaders from other sources, such as Shadertoy and The Book of Shaders, into Godot shaders.
For detailed information on Godot’s shading language, please refer to the Shading Language reference.
GLSL¶
Godot uses a shading language based on GLSL with the addition of a few quality-of-life features. Accordingly, most features available in GLSL are available in Godot’s shading language.
Shader programs¶
In GLSL, each shader uses a separate program. You have one program for the vertex shader and one
for the fragment shader. In Godot, you have a single shader that contains a vertex and/or a
fragment function. If you only choose to write one, Godot will supply the other.
Godot allows uniform variables and functions to be shared by defining the fragment and vertex shaders in one file. In GLSL, the vertex and fragment programs cannot share variables except when varyings are used.
Vertex attributes¶
In GLSL, you can pass in per-vertex information using attributes and have the flexibility to
pass in as much or as little as you want. In Godot, you have a set number of input attributes,
including VERTEX (position), COLOR, UV, UV2, NORMAL. For a complete list,
see the Shading language reference.
gl_Position¶
gl_Position receives the final position of a vertex specified in the vertex shader.
It is specified by the user in clip space. Typically, in GLSL, the model space vertex position
is passed in using a vertex attribute called position and you handle the
conversion from model space to clip space manually.
In Godot, VERTEX specifies the vertex position in model space at the beginning of the vertex
function. Godot also handles the final conversion to clip space after the user-defined vertex
function is run. If you want to skip the conversion from model to view space, you can set the
render_mode to skip_vertex_transform. If you want to skip all transforms, set
render_mode to skip_vertex_transform and set the PROJECTION_MATRIX to mat4(1.0)
in order to nullify the final transform from view space to clip space.
Varyings¶
Varyings are a type of variable that can be passed from the vertex shader to the fragment shader. In
modern GLSL (3.0 and up), varyings are defined with the in and out keywords. A variable going
out of the vertex shader is defined with out in the vertex shader and in inside the fragment shader.
Main¶
In GLSL, each shader program looks like a self-contained C-style program. Accordingly, the main entry point
is main. If you are copying a vertex shader, rename main to vertex and if you are copying a
fragment shader, rename main to fragment.
Constants¶
Godot currently does not support constants. You can fake the functionality by using a uniform initialized to the value, but you will not benefit from the increased speed from using a constant.
Macros¶
In keeping with its similarity to C, GLSL lets you use macros. Commonly #define is used to define
constants or small functions. There is no straightforward way to translate defines to Godot’s shading language.
If it is a function that is defined, then replace with a function, and if it is a constant, then replace with
a uniform. For other macros (#if, #ifdef, etc.), there is no equivalent because they run during the
pre-processing stage of compilation.
Variables¶
GLSL has many built-in variables that are hard-coded. These variables are not uniforms, so they are not editable from the main program.
| Variable | Type | Equivalent | Description |
|---|---|---|---|
| gl_FragColor | out vec4 | COLOR | Output color for each pixel. |
| gl_FragCoord | vec4 | FRAGCOORD | For full screen quads. For smaller quads, use UV. |
| gl_Position | vec4 | VERTEX | Position of Vertex, output from Vertex Shader. |
| gl_PointSize | float | POINT_SIZE | Size of Point primitive. |
| gl_PointCoord | vec2 | POINT_COORD | Position on point when drawing Point primitives. |
| gl_FrontFacing | bool | FRONT_FACING | True if front face of primitive. |
Coordinates¶
gl_FragCoord in GLSL and FRAGCOORD in the Godot shading language use the same coordinate system.
If using UV in Godot, the y-coordinate will be flipped upside down.
Precision¶
In GLSL, you can define the precision of a given type (float or int) at the top of the shader with the
precision keyword. In Godot, you can set the precision of individual variables as you need by placing
precision qualifiers lowp, mediump, and highp before the type when defining the variable. For
more information, see the Shading Language reference.
Shadertoy¶
Shadertoy is a website that makes it easy to write fragment shaders and create pure magic.
Shadertoy does not give the user full control over the shader. It handles all the input and uniforms and only lets the user write the fragment shader.
Types¶
Shadertoy uses the webgl spec, so it runs a slightly different version of GLSL. However, it still has the regular types, including Constants and macros.
mainImage¶
The main point of entry to a Shadertoy shader is the mainImage function. mainImage has two
parameters, fragColor and fragCoord, which correspond to COLOR and FRAGCOORD in Godot,
respectively. These parameters are handled automatically in Godot, so you do not need to include them
as parameters yourself. Anything in the mainImage function should be copied into the fragment
function when porting to Godot.
Variables¶
In order to make writing fragment shaders straightforward and easy, Shadertoy handles passing a lot of helpful information from the main program into the fragment shader for you. A few of these have no equivalents in Godot because Godot has chosen not to make them available by default. This is okay because Godot gives you the ability to make your own uniforms. For variables whose equivalents are listed as “Provide with Uniform”, users are responsible for creating that uniform themselves. The description gives the reader a hint about what they can pass in as a substitute.
| Variable | Type | Equivalent | Description |
|---|---|---|---|
| fragColor | out vec4 | COLOR | Output color for each pixel. |
| fragCoord | vec2 | FRAGCOORD.xy | For full screen quads. For smaller quads, use UV. |
| iResolution | vec3 | 1.0 / SCREEN_PIXEL_SIZE | Can also pass in manually. |
| iTime | float | TIME | Time since shader started. |
| iTimeDelta | float | Provide with Uniform | Time to render previous frame. |
| iFrame | float | Provide with Uniform | Frame number. |
| iChannelTime[4] | float | Provide with Uniform | Time since that particular texture started. |
| iMouse | vec4 | Provide with Uniform | Mouse position in pixel coordinates. |
| iDate | vec4 | Provide with Uniform | Current date, expressed in seconds. |
| iChannelResolution[4] | vec3 | 1.0 / TEXTURE_PIXEL_SIZE | Resolution of particular texture. |
| iChanneli | Sampler2D | TEXTURE | Godot provides only one built-in; user can make more. |
The Book of Shaders¶
Similar to Shadertoy, The Book of Shaders provides access to a fragment shader in the web browser, with which the user may interact. The user is restricted to writing fragment shader code with a set list of uniforms passed in and with no ability to add additional uniforms.
For further help on porting shaders to various frameworks generally, The Book of Shaders provides a page on running shaders in various frameworks.
Types¶
The Book of Shaders uses the webgl spec, so it runs a slightly different version of GLSL. However, it still has the regular types, including Constants and macros.
Main¶
The entry point for a Book of Shaders fragment shader is main, just like in GLSL. Everything written in
a Book of Shaders main function should be copied into Godot’s fragment function.
Variables¶
The Book of Shaders sticks closer to plain GLSL than Shadertoy does. It also implements fewer uniforms than Shadertoy.
| Variable | Type | Equivalent | Description |
|---|---|---|---|
| gl_FragColor | out vec4 | COLOR | Output color for each pixel. |
| gl_FragCoord | vec4 | FRAGCOORD | For full screen quads. For smaller quads, use UV. |
| u_resolution | vec2 | 1.0 / SCREEN_PIXEL_SIZE | Can also pass in manually. |
| u_time | float | TIME | Time since shader started. |
| u_mouse | vec2 | Provide with Uniform | Mouse position in pixel coordinates. |
Advanced post-processing¶
Introduction¶
This tutorial describes an advanced method for post-processing in Godot. In particular, it will explain how to write a post-processing shader that uses the depth buffer. You should already be familiar with post-processing generally and, in particular, with the methods outlined in the custom post-processing tutorial.
In the previous post-processing tutorial, we rendered the scene to a Viewport and then rendered the Viewport in a ViewportContainer to the main scene. One limitation of this method is that we could not access the depth buffer because the depth buffer is only available in spatial shaders and Viewports do not maintain depth information.
Full screen quad¶
In the custom post-processing tutorial, we covered how to use a Viewport to make custom post-processing effects. There are two main drawbacks of using a Viewport:
- The depth buffer cannot be accessed
- The effect of the post-processing shader is not visible in the editor
To get around the limitation on using the depth buffer, use a MeshInstance with a QuadMesh primitive. This allows us to use a spatial shader and to access the depth texture of the scene. Next, use a vertex shader to make the quad cover the screen at all times so that the post-processing effect will be applied at all times, including in the editor.
First, create a new MeshInstance and set its mesh to a QuadMesh. This creates a quad
centered at position (0, 0, 0) with a width and height of 1. Set the width
and height to 2. Right now, the quad occupies a position in world space at the
origin; however, we want it to move with the camera so that it always covers the
entire screen. To do this, we will bypass the coordinate transforms that translate
the vertex positions through the difference coordinate spaces and treat the vertices
as if they were already in clip space.
The vertex shader expects coordinates to be output in clip space, which are coordinates
ranging from -1 at the left and bottom of the screen to 1 at the top and right
of the screen. This is why the QuadMesh needs to have height and width of 2.
Godot handles the transform from model to view space to clip space behind the scenes,
so we need to nullify the effects of Godot’s transformations. We do this by setting the
POSITION built-in to our desired position. POSITION bypasses the built-in transformations
and sets the vertex position directly.
shader_type spatial;
void vertex() {
POSITION = vec4(VERTEX, 1.0);
}
Even with this vertex shader, the quad keeps disappearing. This is due to frustum culling, which is done on the CPU. Frustum culling uses the camera matrix and the AABBs of Meshes to determine if the Mesh will be visible before passing it to the GPU. The CPU has no knowledge of what we are doing with the vertices, so it assumes the coordinates specified refer to world positions, not clip space positions, which results in Godot culling the quad when we turn away from the center of the scene. In order to keep the quad from being culled, there are a few options:
- Add the QuadMesh as a child to the camera, so the camera is always pointed at it
- Set the Geometry property
extra_cull_marginas large as possible in the QuadMesh
The second option ensures that the quad is visible in the editor, while the first option guarantees that it will still be visible even if the camera moves outside the cull margin. You can also use both options.
Depth texture¶
To read from the depth texture, perform a texture lookup using texture() and
the uniform variable DEPTH_TEXTURE.
float depth = texture(DEPTH_TEXTURE, SCREEN_UV).x;
Note
Similar to accessing the screen texture, accessing the depth texture is only possible when reading from the current viewport. The depth texture cannot be accessed from another viewport to which you have rendered.
The values returned by DEPTH_TEXTURE are between 0 and 1 and are nonlinear.
When displaying depth directly from the DEPTH_TEXTURE, everything will look almost
white unless it is very close. This is because the depth buffer stores objects closer
to the camera using more bits than those further, so most of the detail in depth
buffer is found close to the camera. In order to make the depth value align with world or
model coordinates, we need to linearise the value. When we apply the projection matrix to the
vertex position, the z value is made nonlinear, so to linearise it, we multiply it by the
inverse of the projection matrix, which in Godot, is accessible with the variable
INV_PROJECTION_MATRIX.
Firstly, take the screen space coordinates and transform them into normalized device
coordinates (NDC). NDC run from -1 to 1, similar to clip space coordinates.
Reconstruct the NDC using SCREEN_UV for the x and y axis, and
the depth value for z.
void fragment() {
float depth = texture(DEPTH_TEXTURE, SCREEN_UV).x;
vec3 ndc = vec3(SCREEN_UV, depth) * 2.0 - 1.0;
}
Convert NDC to view space by multiplying the NDC by INV_PROJECTION_MATRIX.
Recall that view space gives positions relative to the camera, so the z value will give us
the distance to the point.
void fragment() {
...
vec4 view = INV_PROJECTION_MATRIX * vec4(ndc, 1.0);
view.xyz /= view.w;
float linear_depth = -view.z;
}
Because the camera is facing the negative z direction, the position will have a negative z value.
In order to get a usable depth value, we have to negate view.z.
The world position can be constructed from the depth buffer using the following code. Note
that the CAMERA_MATRIX is needed to transform the position from view space into world space, so
it needs to be passed to the fragment shader with a varying.
varying mat4 CAMERA;
void vertex() {
CAMERA = CAMERA_MATRIX;
}
void fragment() {
...
vec4 world = CAMERA * INV_PROJECTION_MATRIX * vec4(ndc, 1.0);
vec3 world_position = world.xyz / world.w;
}
An optimization¶
You can benefit from using a single large triangle rather than using a full screen quad. The reason for this is explained here. However, the benefit is quite small and only beneficial when running especially complex fragment shaders.
Set the Mesh in the MeshInstance to an ArrayMesh. An ArrayMesh is a tool that allows you to easily construct a Mesh from Arrays for vertices, normals, colors, etc.
Now, attach a script to the MeshInstance and use the following code:
extends MeshInstance
func _ready():
# Create a single triangle out of vertices:
var verts = PoolVector3Array()
verts.append(Vector3(-1.0, -1.0, 0.0))
verts.append(Vector3(-1.0, 3.0, 0.0))
verts.append(Vector3(3.0, -1.0, 0.0))
# Create an array of arrays.
# This could contain normals, colors, UVs, etc.
var mesh_array = []
mesh_array.resize(Mesh.ARRAY_MAX) #required size for ArrayMesh Array
mesh_array[Mesh.ARRAY_VERTEX] = verts #position of vertex array in ArrayMesh Array
# Create mesh from mesh_array:
mesh.add_surface_from_arrays(Mesh.PRIMITIVE_TRIANGLES, mesh_array)
Note
The triangle is specified in normalized device coordinates. Recall, NDC run
from -1 to 1 in both the x and y directions. This makes the screen
2 units wide and 2 units tall. In order to cover the entire screen with
a single triangle, use a triangle that is 4 units wide and 4
units tall, double its height and width.
Assign the same vertex shader from above and everything should look exactly the same.
The one drawback to using an ArrayMesh over using a QuadMesh is that the ArrayMesh is not visible in the editor because the triangle is not constructed until the scene is run. To get around that, construct a single triangle Mesh in a modelling program and use that in the MeshInstance instead.
Networking¶
High level multiplayer¶
High level vs low level API¶
The following explains the differences of high- and low-level networking in Godot as well as some fundamentals. If you want to jump in head-first and add networking to your first nodes, skip to Initializing the network below. But make sure to read the rest later on!
Godot always supported standard low-level networking via UDP, TCP and some higher level protocols such as SSL and HTTP. These protocols are flexible and can be used for almost anything. However, using them to synchronize game state manually can be a large amount of work. Sometimes that work can’t be avoided or is worth it, for example when working with a custom server implementation on the backend. But in most cases, it’s worthwhile to consider Godot’s high-level networking API, which sacrifices some of the fine-grained control of low-level networking for greater ease of use.
This is due to the inherent limitations of the low-level protocols:
- TCP ensures packets will always arrive reliably and in order, but latency is generally higher due to error correction. It’s also quite a complex protocol because it understands what a “connection” is, and optimizes for goals that often don’t suit applications like multiplayer games. Packets are buffered to be sent in larger batches, trading less per-packet overhead for higher latency. This can be useful for things like HTTP, but generally not for games. Some of this can be configured and disabled (e.g. by disabling “Nagle’s algorithm” for the TCP connection).
- UDP is a simpler protocol, which only sends packets (and has no concept of a “connection”). No error correction makes it pretty quick (low latency), but packets may be lost along the way or received in the wrong order. Added to that, the MTU (maximum packet size) for UDP is generally low (only a few hundred bytes), so transmitting larger packets means splitting them, reorganizing them and retrying if a part fails.
In general, TCP can be thought of as reliable, ordered, and slow; UDP as unreliable, unordered and fast. Because of the large difference in performance, it often makes sense to re-build the parts of TCP wanted for games (optional reliability and packet order), while avoiding the unwanted parts (congestion/traffic control features, Nagle’s algorithm, etc). Due to this, most game engines come with such an implementation, and Godot is no exception.
In summary, you can use the low-level networking API for maximum control and implement everything on top of bare network protocols or use the high-level API based on SceneTree that does most of the heavy lifting behind the scenes in a generally optimized way.
Note
Most of Godot’s supported platforms offer all or most of the mentioned high- and low-level networking features. As networking is always largely hardware and operating system dependent, however, some features may change or not be available on some target platforms. Most notably, the HTML5 platform currently only offers WebSocket support and lacks some of the higher level features as well as raw access to low-level protocols like TCP and UDP.
Note
More about TCP/IP, UDP, and networking: https://web.archive.org/web/20190406162102/https://gafferongames.com/post/udp_vs_tcp/
Gaffer On Games has a lot of useful articles about networking in Games (here), including the comprehensive introduction to networking models in games.
If you want to use your low-level networking library of choice instead of Godot’s built-in networking, see here for an example: https://github.com/PerduGames/gdnet3
Warning
Adding networking to your game comes with some responsibility. It can make your application vulnerable if done wrong and may lead to cheats or exploits. It may even allow an attacker to compromise the machines your application runs on and use your servers to send spam, attack others or steal your users data if they play your game.
This is always the case when networking is involved and has nothing to do with Godot. You can of course experiment, but when you release a networked application, always take care of any possible security concerns.
Mid level abstraction¶
Before going into how we would like to synchronize a game across the network, it can be helpful to understand how the base network API for synchronization works.
Godot uses a mid-level object NetworkedMultiplayerPeer. This object is not meant to be created directly, but is designed so that several implementations can provide it.
This object extends from PacketPeer, so it inherits all the useful methods for serializing, sending and receiving data. On top of that, it adds methods to set a peer, transfer mode, etc. It also includes signals that will let you know when peers connect or disconnect.
This class interface can abstract most types of network layers, topologies and libraries. By default, Godot provides an implementation based on ENet (NetworkedMultiplayerEnet), one based on WebRTC (WebRTCMultiplayer), and one based on WebSocket (WebSocketMultiplayerPeer), but this could be used to implement mobile APIs (for adhoc WiFi, Bluetooth) or custom device/console-specific networking APIs.
For most common cases, using this object directly is discouraged, as Godot provides even higher level networking facilities. Yet it is made available in case a game has specific needs for a lower level API.
Initializing the network¶
The object that controls networking in Godot is the same one that controls everything tree-related: SceneTree.
To initialize high level networking, the SceneTree must be provided a NetworkedMultiplayerPeer object.
To create that object, it first has to be initialized as a server or client.
Initializing as a server, listening on the given port, with a given maximum number of peers:
var peer = NetworkedMultiplayerENet.new()
peer.create_server(SERVER_PORT, MAX_PLAYERS)
get_tree().set_network_peer(peer)
Initializing as a client, connecting to a given IP and port:
var peer = NetworkedMultiplayerENet.new()
peer.create_client(SERVER_IP, SERVER_PORT)
get_tree().set_network_peer(peer)
Get the previously set network peer:
get_tree().get_network_peer()
Checking whether the tree is initialized as a server or client:
get_tree().is_network_server()
Terminating the networking feature:
get_tree().set_network_peer(null)
(Although it may make sense to send a message first to let the other peers know you’re going away instead of letting the connection close or timeout, depending on your game.)
Managing connections¶
Some games accept connections at any time, others during the lobby phase. Godot can be requested to no longer accept
connections at any point (see set_refuse_new_network_connections(bool) and related methods on SceneTree). To manage who connects, Godot provides the following signals in SceneTree:
Server and Clients:
network_peer_connected(int id)network_peer_disconnected(int id)
The above signals are called on every peer connected to the server (including on the server) when a new peer connects or disconnects. Clients will connect with a unique ID greater than 1, while network peer ID 1 is always the server. Anything below 1 should be handled as invalid. You can retrieve the ID for the local system via SceneTree.get_network_unique_id(). These IDs will be useful mostly for lobby management and should generally be stored, as they identify connected peers and thus players. You can also use IDs to send messages only to certain peers.
Clients:
connected_to_serverconnection_failedserver_disconnected
Again, all these functions are mainly useful for lobby management or for adding/removing players on the fly. For these tasks, the server clearly has to work as a server and you have to perform tasks manually such as sending a newly connected player information about other already connected players (e.g. their names, stats, etc).
Lobbies can be implemented any way you want, but the most common way is to use a node with the same name across scenes in all peers. Generally, an autoloaded node/singleton is a great fit for this, to always have access to, e.g. “/root/lobby”.
RPC¶
To communicate between peers, the easiest way is to use RPCs (remote procedure calls). This is implemented as a set of functions in Node:
rpc("function_name", <optional_args>)rpc_id(<peer_id>,"function_name", <optional_args>)rpc_unreliable("function_name", <optional_args>)rpc_unreliable_id(<peer_id>, "function_name", <optional_args>)
Synchronizing member variables is also possible:
rset("variable", value)rset_id(<peer_id>, "variable", value)rset_unreliable("variable", value)rset_unreliable_id(<peer_id>, "variable", value)
Functions can be called in two fashions:
- Reliable: the function call will arrive no matter what, but may take longer because it will be re-transmitted in case of failure.
- Unreliable: if the function call does not arrive, it will not be re-transmitted; but if it arrives, it will do it quickly.
In most cases, reliable is desired. Unreliable is mostly useful when synchronizing object positions (sync must happen constantly, and if a packet is lost, it’s not that bad because a new one will eventually arrive and it would likely be outdated because the object moved further in the meantime, even if it was resent reliably).
There is also the get_rpc_sender_id function in SceneTree, which can be used to check which peer (or peer ID) sent an RPC.
Back to lobby¶
Let’s get back to the lobby. Imagine that each player that connects to the server will tell everyone about it.
# Typical lobby implementation; imagine this being in /root/lobby.
extends Node
# Connect all functions
func _ready():
get_tree().connect("network_peer_connected", self, "_player_connected")
get_tree().connect("network_peer_disconnected", self, "_player_disconnected")
get_tree().connect("connected_to_server", self, "_connected_ok")
get_tree().connect("connection_failed", self, "_connected_fail")
get_tree().connect("server_disconnected", self, "_server_disconnected")
# Player info, associate ID to data
var player_info = {}
# Info we send to other players
var my_info = { name = "Johnson Magenta", favorite_color = Color8(255, 0, 255) }
func _player_connected(id):
# Called on both clients and server when a peer connects. Send my info to it.
rpc_id(id, "register_player", my_info)
func _player_disconnected(id):
player_info.erase(id) # Erase player from info.
func _connected_ok():
pass # Only called on clients, not server. Will go unused; not useful here.
func _server_disconnected():
pass # Server kicked us; show error and abort.
func _connected_fail():
pass # Could not even connect to server; abort.
remote func register_player(info):
# Get the id of the RPC sender.
var id = get_tree().get_rpc_sender_id()
# Store the info
player_info[id] = info
# Call function to update lobby UI here
You might have already noticed something different, which is the usage of the remote keyword on the register_player function:
remote func register_player(info):
This keyword has two main uses. The first is to let Godot know that this function can be called from RPC. If no keywords are added, Godot will block any attempts to call functions for security. This makes security work a lot easier (so a client can’t call a function to delete a file on another client’s system).
The second use is to specify how the function will be called via RPC. There are four different keywords:
remoteremotesyncmasterpuppet
The remote keyword means that the rpc() call will go via network and execute remotely.
The remotesync keyword means that the rpc() call will go via network and execute remotely, but will also execute locally (do a normal function call).
The others will be explained further down.
Note that you could also use the get_rpc_sender_id function on SceneTree to check which peer actually made the RPC call to register_player.
With this, lobby management should be more or less explained. Once you have your game going, you will most likely want to add some extra security to make sure clients don’t do anything funny (just validate the info they send from time to time, or before game start). For the sake of simplicity and because each game will share different information, this is not shown here.
Starting the game¶
Once enough players have gathered in the lobby, the server should probably start the game. This is nothing special in itself, but we’ll explain a few nice tricks that can be done at this point to make your life much easier.
Player scenes¶
In most games, each player will likely have its own scene. Remember that this is a multiplayer game, so in every peer you need to instance one scene for each player connected to it. For a 4 player game, each peer needs to instance 4 player nodes.
So, how to name such nodes? In Godot, nodes need to have a unique name. It must also be relatively easy for a player to tell which node represents each player ID.
The solution is to simply name the root nodes of the instanced player scenes as their network ID. This way, they will be the same in every peer and RPC will work great! Here is an example:
remote func pre_configure_game():
var selfPeerID = get_tree().get_network_unique_id()
# Load world
var world = load(which_level).instance()
get_node("/root").add_child(world)
# Load my player
var my_player = preload("res://player.tscn").instance()
my_player.set_name(str(selfPeerID))
my_player.set_network_master(selfPeerID) # Will be explained later
get_node("/root/world/players").add_child(my_player)
# Load other players
for p in player_info:
var player = preload("res://player.tscn").instance()
player.set_name(str(p))
player.set_network_master(p) # Will be explained later
get_node("/root/world/players").add_child(player)
# Tell server (remember, server is always ID=1) that this peer is done pre-configuring.
rpc_id(1, "done_preconfiguring", selfPeerID)
Note
Depending on when you execute pre_configure_game(), you may need to change any calls to add_child()
to be deferred via call_deferred(), as the SceneTree is locked while the scene is being created (e.g. when _ready() is being called).
Synchronizing game start¶
Setting up players might take different amounts of time for every peer due to lag, different hardware, or other reasons. To make sure the game will actually start when everyone is ready, pausing the game until all players are ready can be useful:
remote func pre_configure_game():
get_tree().set_pause(true) # Pre-pause
# The rest is the same as in the code in the previous section (look above)
When the server gets the OK from all the peers, it can tell them to start, as for example:
var players_done = []
remote func done_preconfiguring(who):
# Here are some checks you can do, for example
assert(get_tree().is_network_server())
assert(who in player_info) # Exists
assert(not who in players_done) # Was not added yet
players_done.append(who)
if players_done.size() == player_info.size():
rpc("post_configure_game")
remote func post_configure_game():
get_tree().set_pause(false)
# Game starts now!
Synchronizing the game¶
In most games, the goal of multiplayer networking is that the game runs synchronized on all the peers playing it. Besides supplying an RPC and remote member variable set implementation, Godot adds the concept of network masters.
Network master¶
The network master of a node is the peer that has the ultimate authority over it.
When not explicitly set, the network master is inherited from the parent node, which if not changed, is always going to be the server (ID 1). Thus the server has authority over all nodes by default.
The network master can be set
with the function Node.set_network_master(id, recursive) (recursive is true by default and means the network master is recursively set on all child nodes of the node as well).
Checking that a specific node instance on a peer is the network master for this node for all connected peers is done by calling Node.is_network_master(). This will return true when executed on the server and false on all client peers.
If you have paid attention to the previous example, it’s possible you noticed that each peer was set to have network master authority for their own player (Node) instead of the server:
[...]
# Load my player
var my_player = preload("res://player.tscn").instance()
my_player.set_name(str(selfPeerID))
my_player.set_network_master(selfPeerID) # The player belongs to this peer; it has the authority.
get_node("/root/world/players").add_child(my_player)
# Load other players
for p in player_info:
var player = preload("res://player.tscn").instance()
player.set_name(str(p))
player.set_network_master(p) # Each other connected peer has authority over their own player.
get_node("/root/world/players").add_child(player)
[...]
Each time this piece of code is executed on each peer, the peer makes itself master on the node it controls, and all other nodes remain as puppets with the server being their network master.
To clarify, here is an example of how this looks in the bomber demo:
Master and puppet keywords¶
The real advantage of this model is when used with the master/puppet keywords in GDScript (or their equivalent in C# and Visual Script).
Similarly to the remote keyword, functions can also be tagged with them:
Example bomb code:
for p in bodies_in_area:
if p.has_method("exploded"):
p.rpc("exploded", bomb_owner)
Example player code:
puppet func stun():
stunned = true
master func exploded(by_who):
if stunned:
return # Already stunned
rpc("stun")
stun() # Stun myself, could have used remotesync keyword too.
In the above example, a bomb explodes somewhere (likely managed by whoever is master). The bomb knows the bodies in the area, so it checks them
and checks that they contain an exploded function.
If they do, the bomb calls exploded on it. However, the exploded method in the player has a master keyword. This means that only the player
who is master for that instance will actually get the function.
This instance, then, calls the stun method in the same instances of that same player (but in different peers), and only those which are set as puppet,
making the player look stunned in all the peers (as well as the current, master one).
Note that you could also send the stun() message only to a specific player by using rpc_id(<id>, "exploded", bomb_owner).
This may not make much sense for an area-of-effect case like the bomb, but in other cases, like single target damage.
rpc_id(TARGET_PEER_ID, "stun") # Only stun the target peer
Making HTTP requests¶
The HTTPRequest node is the easiest way to make HTTP requests in Godot. It is backed by the more low-level HTTPClient, for which a tutorial is available here.
For the sake of this example, we will create a simple UI with a button, that when pressed will start the HTTP request to the specified URL.
Preparing scene¶
Create a new empty scene, add a CanvasLayer as the root node and add a script to it. Then add two child nodes to it: a Button and an HTTPRequest node. You will need to connect the following signals to the CanvasLayer script:
- Button.pressed: When the button is pressed, we will start the request.
- HTTPRequest.request_completed: When the request is completed, we will get the requested data as an argument.
Scripting¶
Below is all the code we need to make it work. The URL points to an online API mocker; it returns a pre-defined JSON string, which we will then parse to get access to the data.
extends CanvasLayer
func _ready():
$HTTPRequest.connect("request_completed", self, "_on_request_completed")
func _on_Button_pressed():
$HTTPRequest.request("http://www.mocky.io/v2/5185415ba171ea3a00704eed")
func _on_request_completed(result, response_code, headers, body):
var json = JSON.parse(body.get_string_from_utf8())
print(json.result)
With this, you should see (hello:world) printed on the console; hello being a key, and world being a value, both of them strings.
For more information on parsing JSON, see the class references for JSON and JSONParseResult.
Note that you may want to check whether the result equals RESULT_SUCCESS and whether a JSON parsing error occurred, see the JSON class reference and HTTPRequest for more.
Of course, you can also set custom HTTP headers. These are given as a string array, with each string containing a header in the format "header: value".
For example, to set a custom user agent (the HTTP user-agent header) you could use the following:
$HTTPRequest.request("http://www.mocky.io/v2/5185415ba171ea3a00704eed", ["user-agent: YourCustomUserAgent"])
Please note that, for SSL/TLS encryption and thus HTTPS URLs to work, you may need to take some steps as described here.
Also, when calling APIs using authorization, be aware that someone might analyse and decompile your released application and thus may gain access to any embedded authorization information like tokens, usernames or passwords. That means it is usually not a good idea to embed things such as database access credentials inside your game. Avoid providing information useful to an attacker whenever possible.
Sending data to server¶
Until now, we have limited ourselves to requesting data from a server. But what if you need to send data to the server? Here is a common way of doing it:
func _make_post_request(url, data_to_send, use_ssl):
# Convert data to json string:
var query = JSON.print(data_to_send)
# Add 'Content-Type' header:
var headers = ["Content-Type: application/json"]
$HTTPRequest.request(url, headers, use_ssl, HTTPClient.METHOD_POST, query)
Keep in mind that you have to wait for a request to finish before sending another one. Making multiple request at once requires you to have one node per request. A common strategy is to create and delete HTTPRequest nodes at runtime as necessary.
HTTP client class¶
HTTPClient provides low-level access to HTTP communication. For a higher-level interface, you may want to take a look at HTTPRequest first, which has a tutorial available here.
Here’s an example of using the HTTPClient class. It’s just a script, so it can be run by executing:
c:\godot> godot -s http_test.gd
It will connect and fetch a website.
extends SceneTree
# HTTPClient demo
# This simple class can do HTTP requests; it will not block, but it needs to be polled.
func _init():
var err = 0
var http = HTTPClient.new() # Create the Client.
err = http.connect_to_host("www.php.net", 80) # Connect to host/port.
assert(err == OK) # Make sure connection was OK.
# Wait until resolved and connected.
while http.get_status() == HTTPClient.STATUS_CONNECTING or http.get_status() == HTTPClient.STATUS_RESOLVING:
http.poll()
print("Connecting...")
OS.delay_msec(500)
assert(http.get_status() == HTTPClient.STATUS_CONNECTED) # Could not connect
# Some headers
var headers = [
"User-Agent: Pirulo/1.0 (Godot)",
"Accept: */*"
]
err = http.request(HTTPClient.METHOD_GET, "/ChangeLog-5.php", headers) # Request a page from the site (this one was chunked..)
assert(err == OK) # Make sure all is OK.
while http.get_status() == HTTPClient.STATUS_REQUESTING:
# Keep polling for as long as the request is being processed.
http.poll()
print("Requesting...")
if not OS.has_feature("web"):
OS.delay_msec(500)
else:
# Synchronous HTTP requests are not supported on the web,
# so wait for the next main loop iteration.
yield(Engine.get_main_loop(), "idle_frame")
assert(http.get_status() == HTTPClient.STATUS_BODY or http.get_status() == HTTPClient.STATUS_CONNECTED) # Make sure request finished well.
print("response? ", http.has_response()) # Site might not have a response.
if http.has_response():
# If there is a response...
headers = http.get_response_headers_as_dictionary() # Get response headers.
print("code: ", http.get_response_code()) # Show response code.
print("**headers:\\n", headers) # Show headers.
# Getting the HTTP Body
if http.is_response_chunked():
# Does it use chunks?
print("Response is Chunked!")
else:
# Or just plain Content-Length
var bl = http.get_response_body_length()
print("Response Length: ",bl)
# This method works for both anyway
var rb = PoolByteArray() # Array that will hold the data.
while http.get_status() == HTTPClient.STATUS_BODY:
# While there is body left to be read
http.poll()
var chunk = http.read_response_body_chunk() # Get a chunk.
if chunk.size() == 0:
# Got nothing, wait for buffers to fill a bit.
OS.delay_usec(1000)
else:
rb = rb + chunk # Append to read buffer.
# Done!
print("bytes got: ", rb.size())
var text = rb.get_string_from_ascii()
print("Text: ", text)
quit()
SSL certificates¶
Introduction¶
It is often desired to use SSL connections for communications to avoid “man in the middle” attacks. Godot has a connection wrapper, StreamPeerSSL, which can take a regular connection and add security around it. The HTTPClient class also supports HTTPS by using this same wrapper.
For SSL to work, certificates need to be provided. A .crt file must be specified in the project settings:
This file should contain any number of public certificates in PEM format.
Of course, remember to add .crt as filter so the exporter recognizes this when exporting your project.
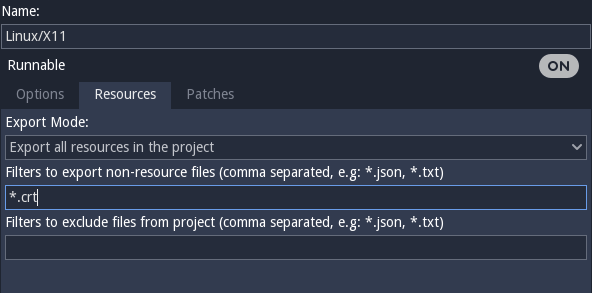
There are two ways to obtain certificates:
Approach 1: self signed cert¶
The first approach is the simplest: generate a private and public key pair and add the public key (in PEM format) to the .crt file. The private key should go to your server.
OpenSSL has some documentation about this. This approach also does not require domain validation nor requires you to spend a considerable amount of money in purchasing certificates from a CA.
Approach 2: CA cert¶
The second approach consists of using a certificate authority (CA) such as Verisign, Geotrust, etc. This is a more cumbersome process, but it’s more “official” and ensures your identity is clearly represented.
Unless you are working with large companies or corporations, or need to connect to someone else’s servers (i.e., connecting to Google or some other REST API provider via HTTPS), this method is not as useful.
Also, when using a CA issued cert, you must enable domain validation, to ensure the domain you are connecting to is the one intended, otherwise any website can issue any certificate in the same CA and it will work.
If you are using Linux, you can use the supplied certs file, generally located in:
/etc/ssl/certs/ca-certificates.crt
This file allows HTTPS connections to virtually any website (i.e., Google, Microsoft, etc.).
Or pick any of the more specific certificates there if you are connecting to a specific one.
WebSocket¶
HTML5 and WebSocket¶
The WebSocket protocol was standardized in 2011 with the original goal of allowing browsers to create stable and bidirectional connections with a server. Before that, browsers used to only support HTTPRequests, which is not well suited for bidirectional communication.
The protocol is quite simple, message based, and a very powerful tool to send push notifications to browsers, and has been used to implement chats, turn-based games, etc. It still uses a TCP connection, which is good for reliability but not for latency, so not good for real-time applications like VoIP and fast-paced games (see WebRTC for those use cases).
Due to its simplicity, its wide compatibility, and being easier to use than a raw TCP connection, WebSocket soon started to spread outside the browsers, in native applications as a mean to communicate with network servers.
Godot supports WebSocket in both native and HTML5 exports.
Using WebSocket in Godot¶
WebSocket is implemented in Godot via three main classes WebSocketClient, WebSocketServer, and WebSocketPeer. The WebSocket implementation is compatible with the High Level Multiplayer. See section on high-level multiplayer for more details.
Minimal client example¶
This example will show you how to create a WebSocket connection to a remote server, and how to send and receive data.
extends Node
# The URL we will connect to
export var websocket_url = "ws://echo.websocket.org"
# Our WebSocketClient instance
var _client = WebSocketClient.new()
func _ready():
# Connect base signals to get notified of connection open, close, and errors.
_client.connect("connection_closed", self, "_closed")
_client.connect("connection_error", self, "_closed")
_client.connect("connection_established", self, "_connected")
# This signal is emitted when not using the Multiplayer API every time
# a full packet is received.
# Alternatively, you could check get_peer(1).get_available_packets() in a loop.
_client.connect("data_received", self, "_on_data")
# Initiate connection to the given URL.
var err = _client.connect_to_url(websocket_url)
if err != OK:
print("Unable to connect")
set_process(false)
func _closed(was_clean = false):
# was_clean will tell you if the disconnection was correctly notified
# by the remote peer before closing the socket.
print("Closed, clean: ", was_clean)
set_process(false)
func _connected(proto = ""):
# This is called on connection, "proto" will be the selected WebSocket
# sub-protocol (which is optional)
print("Connected with protocol: ", proto)
# You MUST always use get_peer(1).put_packet to send data to server,
# and not put_packet directly when not using the MultiplayerAPI.
_client.get_peer(1).put_packet("Test packet".to_utf8())
func _on_data():
# Print the received packet, you MUST always use get_peer(1).get_packet
# to receive data from server, and not get_packet directly when not
# using the MultiplayerAPI.
print("Got data from server: ", _client.get_peer(1).get_packet().get_string_from_utf8())
func _process(delta):
# Call this in _process or _physics_process. Data transfer, and signals
# emission will only happen when calling this function.
_client.poll()
This will print:
Connected with protocol:
Got data from server: Test packet
Minimal server example¶
This example will show you how to create a WebSocket server that listen for remote connections, and how to send and receive data.
extends Node
# The port we will listen to
const PORT = 9080
# Our WebSocketServer instance
var _server = WebSocketServer.new()
func _ready():
# Connect base signals to get notified of new client connections,
# disconnections, and disconnect requests.
_server.connect("client_connected", self, "_connected")
_server.connect("client_disconnected", self, "_disconnected")
_server.connect("client_close_request", self, "_close_request")
# This signal is emitted when not using the Multiplayer API every time a
# full packet is received.
# Alternatively, you could check get_peer(PEER_ID).get_available_packets()
# in a loop for each connected peer.
_server.connect("data_received", self, "_on_data")
# Start listening on the given port.
var err = _server.listen(PORT)
if err != OK:
print("Unable to start server")
set_process(false)
func _connected(id, proto):
# This is called when a new peer connects, "id" will be the assigned peer id,
# "proto" will be the selected WebSocket sub-protocol (which is optional)
print("Client %d connected with protocol: %s" % [id, proto])
func _close_request(id, code, reason):
# This is called when a client notifies that it wishes to close the connection,
# providing a reason string and close code.
print("Client %d disconnecting with code: %d, reason: %s" % [id, code, reason])
func _disconnected(id, was_clean = false):
# This is called when a client disconnects, "id" will be the one of the
# disconnecting client, "was_clean" will tell you if the disconnection
# was correctly notified by the remote peer before closing the socket.
print("Client %d disconnected, clean: %s" % [id, str(was_clean)])
func _on_data(id):
# Print the received packet, you MUST always use get_peer(id).get_packet to receive data,
# and not get_packet directly when not using the MultiplayerAPI.
var pkt = _server.get_peer(id).get_packet()
print("Got data from client %d: %s ... echoing" % [id, pkt.get_string_from_utf8()])
_server.get_peer(id).put_packet(pkt)
func _process(delta):
# Call this in _process or _physics_process.
# Data transfer, and signals emission will only happen when calling this function.
_server.poll()
This will print (when a client connects) something similar to this:
Client 1348090059 connected with protocol: selected-protocol
Got data from client 1348090059: Test packet ... echoing
Advanced chat demo¶
A more advanced chat demo which optionally uses the multiplayer mid-level abstraction and a high level multiplayer demo are available in the godot demo projects under networking/websocket_chat and networking/websocket_multiplayer.
WebRTC¶
HTML5, WebSocket, WebRTC¶
One of Godot’s great features is its ability to export to the HTML5/WebAssembly platform, allowing your game to run directly in the browser when a user visit your webpage.
This is a great opportunity for both demos and full games, but used to come with some limitations. In the area of networking, browsers used to support only HTTPRequests until recently, when first WebSocket and then WebRTC were proposed as standards.
WebSocket¶
When the WebSocket protocol was standardized in December 2011, it allowed browsers to create stable and bidirectional connections to a WebSocket server. The protocol is quite simple, but a very powerful tool to send push notifications to browsers, and has been used to implement chats, turn-based games, etc.
WebSockets, though, still use a TCP connection, which is good for reliability but not for latency, so not good for real-time applications like VoIP and fast-paced games.
WebRTC¶
For this reason, since 2010, Google started working on a new technology called WebRTC, which later on, in 2017, became a W3C candidate recommendation. WebRTC is a much more complex set of specifications, and relies on many other technologies behind the scenes (ICE, DTLS, SDP) to provide fast, real-time, and secure communication between two peers.
The idea is to find the fastest route between the two peers and establish whenever possible a direct communication (i.e. try to avoid a relaying server).
However, this comes at a price, which is that some media information must be exchanged between the two peers before the communication can start (in the form of Session Description Protocol - SDP strings). This usually takes the form of a so-called WebRTC Signaling Server.
Peers connect to a signaling server (for example a WebSocket server) and send their media information. The server then relays this information to other peers, allowing them to establish the desired direct communication. Once this step is done, peers can disconnect from the signaling server and keep the direct Peer-to-Peer (P2P) connection open.
Using WebRTC in Godot¶
WebRTC is implemented in Godot via two main classes WebRTCPeerConnection and WebRTCDataChannel, plus the multiplayer API implementation WebRTCMultiplayer. See section on high-level multiplayer for more details.
Note
These classes are available automatically in HTML5, but require an external GDNative plugin on native (non-HTML5) platforms. Check out the webrtc-native plugin repository for instructions and to get the latest release.
Minimal connection example¶
This example will show you how to create a WebRTC connection between two peers in the same application. This is not very useful in real life, but will give you a good overview of how a WebRTC connection is set up.
extends Node
# Create the two peers
var p1 = WebRTCPeerConnection.new()
var p2 = WebRTCPeerConnection.new()
# And a negotiated channel for each each peer
var ch1 = p1.create_data_channel("chat", {"id": 1, "negotiated": true})
var ch2 = p2.create_data_channel("chat", {"id": 1, "negotiated": true})
func _ready():
# Connect P1 session created to itself to set local description
p1.connect("session_description_created", p1, "set_local_description")
# Connect P1 session and ICE created to p2 set remote description and candidates
p1.connect("session_description_created", p2, "set_remote_description")
p1.connect("ice_candidate_created", p2, "add_ice_candidate")
# Same for P2
p2.connect("session_description_created", p2, "set_local_description")
p2.connect("session_description_created", p1, "set_remote_description")
p2.connect("ice_candidate_created", p1, "add_ice_candidate")
# Let P1 create the offer
p1.create_offer()
# Wait a second and send message from P1
yield(get_tree().create_timer(1), "timeout")
ch1.put_packet("Hi from P1".to_utf8())
# Wait a second and send message from P2
yield(get_tree().create_timer(1), "timeout")
ch2.put_packet("Hi from P2".to_utf8())
func _process(_delta):
# Poll connections
p1.poll()
p2.poll()
# Check for messages
if ch1.get_ready_state() == ch1.STATE_OPEN and ch1.get_available_packet_count() > 0:
print("P1 received: ", ch1.get_packet().get_string_from_utf8())
if ch2.get_ready_state() == ch2.STATE_OPEN and ch2.get_available_packet_count() > 0:
print("P2 received: ", ch2.get_packet().get_string_from_utf8())
This will print:
P1 received: Hi from P1
P2 received: Hi from P2
Local signaling example¶
This example expands on the previous one, separating the peers in two different scenes, and using a singleton as a signaling server.
# An example P2P chat client (chat.gd)
extends Node
var peer = WebRTCPeerConnection.new()
# Create negotiated data channel
var channel = peer.create_data_channel("chat", {"negotiated": true, "id": 1})
func _ready():
# Connect all functions
peer.connect("ice_candidate_created", self, "_on_ice_candidate")
peer.connect("session_description_created", self, "_on_session")
# Register to the local signaling server (see below for the implementation)
Signaling.register(get_path())
func _on_ice_candidate(mid, index, sdp):
# Send the ICE candidate to the other peer via signaling server
Signaling.send_candidate(get_path(), mid, index, sdp)
func _on_session(type, sdp):
# Send the session to other peer via signaling server
Signaling.send_session(get_path(), type, sdp)
# Set generated description as local
peer.set_local_description(type, sdp)
func _process(delta):
# Always poll the connection frequently
peer.poll()
if channel.get_ready_state() == WebRTCDataChannel.STATE_OPEN:
while channel.get_available_packet_count() > 0:
print(get_path(), " received: ", channel.get_packet().get_string_from_utf8())
func send_message(message):
channel.put_packet(message.to_utf8())
And now for the local signaling server:
Note
This local signaling server is supposed to be used as a singleton to connect two peers in the same scene.
# A local signaling server. Add this to autoloads with name "Signaling" (/root/Signaling)
extends Node
# We will store the two peers here
var peers = []
func register(path):
assert(peers.size() < 2)
peers.append(path)
# If it's the second one, create an offer
if peers.size() == 2:
get_node(peers[0]).peer.create_offer()
func _find_other(path):
# Find the other registered peer.
for p in peers:
if p != path:
return p
return ""
func send_session(path, type, sdp):
var other = _find_other(path)
assert(other != "")
get_node(other).peer.set_remote_description(type, sdp)
func send_candidate(path, mid, index, sdp):
var other = _find_other(path)
assert(other != "")
get_node(other).peer.add_ice_candidate(mid, index, sdp)
Then you can use it like this:
# Main scene (main.gd)
extends Node
const Chat = preload("res://chat.gd")
func _ready():
var p1 = Chat.new()
var p2 = Chat.new()
add_child(p1)
add_child(p2)
yield(get_tree().create_timer(1), "timeout")
p1.send_message("Hi from %s" % p1.get_path())
# Wait a second and send message from P2
yield(get_tree().create_timer(1), "timeout")
p2.send_message("Hi from %s" % p2.get_path())
This will print something similar to this:
/root/main/@@3 received: Hi from /root/main/@@2
/root/main/@@2 received: Hi from /root/main/@@3
Remote signaling with WebSocket¶
A more advanced demo using WebSocket for signaling peers and WebRTCMultiplayer is available in the godot demo projects under networking/webrtc_signaling.
Asset Library¶
About the Asset Library¶
The Godot Asset Library, otherwise known as the AssetLib, is a repository of user-submitted Godot addons, scripts, tools and other resources, collectively referred to as assets. They’re available to all Godot users for download directly from within the engine, but it can also be accessed at Godot’s official website.
On the surface, the Asset Library might look and function similar to asset stores available for other engines, such as Unity’s Asset Store, or Unreal Engine’s Marketplace, where you can submit both freely-available assets, as well as paid, commercial ones. In addition, often times such assets are distributed under non-free, proprietary licenses, limiting what you can do with them.
The Asset Library is different - all assets are distributed free of charge, and under a host of open-source licenses (such as the MIT license, the GPL, and the Boost Software License). This makes the AssetLib more similar to the software repositories of a Linux distribution.
This set of pages will cover how to use the AssetLib (both from inside Godot, and on the website), how you can submit your own assets, and what the guidelines for submission are.
Please note that the AssetLib is relatively young - it may have various pain points, bugs and usability issues. As with all Godot projects, the code repository is available on GitHub, where you can submit pull requests and issues, so please do not hesitate to visit it!
Types of assets¶
Be aware that there are, broadly, two different types of assets you can post.
- Assets labeled as “Templates”, “Projects”, or “Demos” appear under the “Templates” tab in the Godot project manager. These assets are standalone Godot projects that can run by themselves.
- Other assets show up inside of the Godot editor under the “AssetLib” main screen tab, next to “2D”, “3D”, and “Script”. These assets are meant to be downloaded and placed into an existing Godot project.
Using the AssetLib¶
On the website¶
Overview¶
As mentioned before, you can access the web frontend of the AssetLib on Godot’s official website, and this is what it looks like when you first visit it:

At the top, you see the header, which takes you to various other parts of the AssetLib - at the moment, it’s empty, as we are not logged in.
Searching¶
In the center is the search bar + settings section, and the assets section below it - this lets you filter out certain kinds of assets based on a host of criteria. These include the asset category (such as 2D tools, scripts and demos), engine version they are intended for, sorting order (by update date, by name, etc.) and support level.
While most other filter settings should be fairly self-explanatory, it’s worth going over what “support level” means in the Asset Library. Currently there are three support levels, and each asset can belong to only one.
Official assets are created and maintained by the official Godot Engine developers. Currently, these include the official engine demos, which showcase how various areas of the engine work.
Community assets are submitted and maintained by the members of the Godot community.
Testing assets are works-in-progress, and may contain bugs and usability issues. They are not recommended for use in serious projects, but you are encouraged to download, test them, and submit issues to the original authors.
You can mix and match any of the search filters and criteria, and upon clicking the Search button, receive the list of all assets in the Library that match them.
Note that the search results are not updated in real-time, so you will have to re-submit the search query each time you change the query settings.
Breakdown of an asset¶
Now let’s take a look at what an asset’s page looks like and what it contains.
- Asset’s thumbnail/icon.
- Asset’s name.
- Current version number of the asset.
- Asset’s average rating, displayed in stars. (This is currently unimplemented.)
- Asset’s category, Godot version, and support status.
- Asset’s original author/submitter.
- The license the asset is distributed under.
- The date of the asset’s latest edit/update.
- A textual description of the asset.
- Links related to the asset (download link, file list, issue tracker).
- A SHA-256 hash of the asset, for download validation purposes.
- Images and videos showcasing the asset.
Registering and logging in¶
In order to upload assets to the AssetLib, you need to be logged in, and to do that, you need a registered user account. In the future, this may also give you access to other features, such as commenting on or rating the existing assets. You do not need to be logged in to browse and download the assets.
The login/registration page can be accessed from the AssetLib header.

From here, you can register your account, which requires a valid email address, a username, and a (preferably strong) password.

Then, you can use your username and password to log in.

This will change the look of the AssetLib header. Now you get access to a handful of new functions:
- The feed, which shows a list of status updates on your submitted assets (and possibly more in the future).
- A list of your uploaded assets.
- The ability to submit new assets.

You can learn how to submit assets to the Library, and what the asset submission guidelines are, in the next part of this tutorial, Submitting to the Asset Library.
In the editor¶
You can also access the AssetLib directly from Godot. It is available from two places - in the Project Manager’s Templates tab, and inside of a project, from the workspaces list.


Click on it, and Godot will fetch info about the assets from the AssetLib. Once it’s finished, you will see a window similar to what the AssetLib website looks like, with some differences:

Similarly to the web version of the AssetLib, here you can search for assets by category, name, and sort them by factors such as name or edit date.
Notably, you can only fetch assets for the current version of Godot you are running. Projects, Demos and Templates can be downloaded from from the Project Manager view of the AssetLib. Addons (tools, scripts, materials etc.) can be downloaded from the in-project AssetLib and added to the current project. In addition, unlike when using the web frontend, the search results are updated in real-time (you do not have to press Search after every change to your search query for the changes to take place).
In the future, you will be able to choose a different AssetLib provider to fetch assets from (using the Site dropdown menu), however currently only the official Godot website version of the AssetLib is supported, as well as the version that may be running on your local machine’s web server (the localhost option).
When you click on an asset, you will see more information about it.
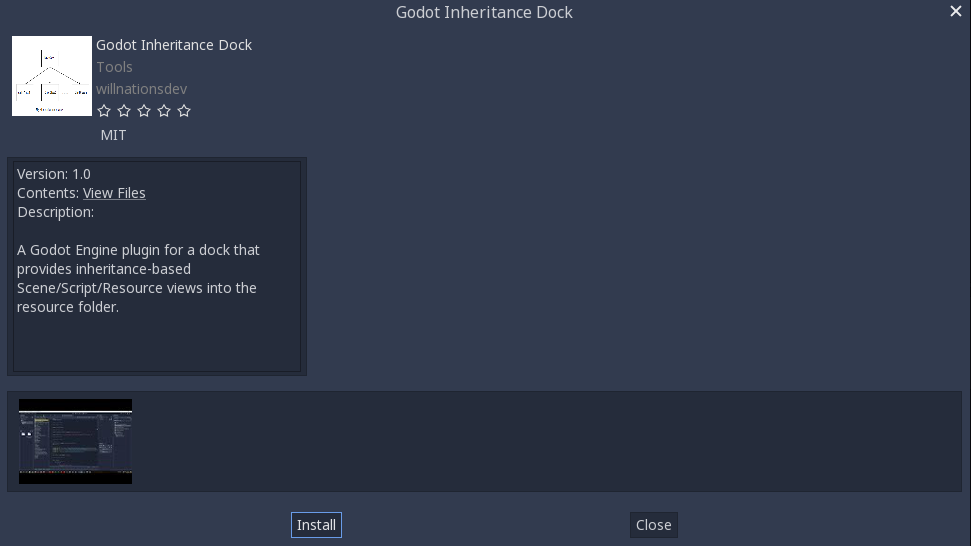
If you click on the Install button, Godot will fetch an archive of the asset, and will track download progress of it at the bottom of the editor window. If the download fails, you can retry it using the Retry button.

When it finishes, you can proceed to install it using the Install button. This will bring up the Package Installer window.
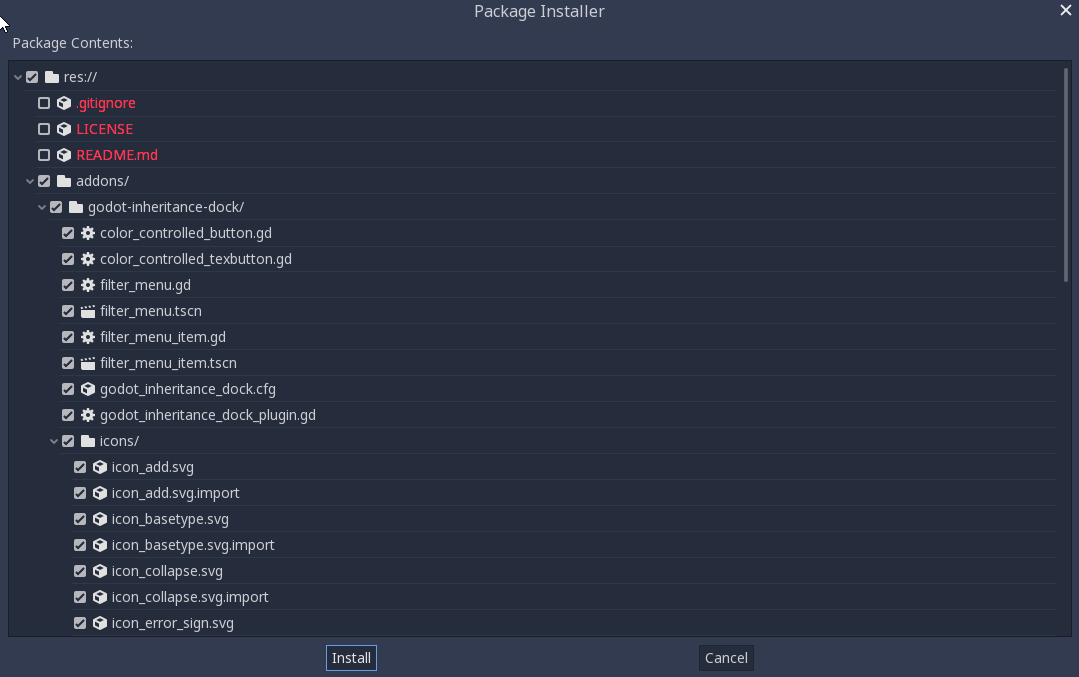
Here you can see a list of all the files that will be installed. You can tick off any of the files that you do not wish to install, and Godot will also inform you about any problems with files that it cannot install. These files will be shown in red, and hovering over them will show you a message stating why it cannot be installed.
Once you are done, you can press the Install button, which will unzip all the files in the archive, and import any assets contained therein, such as images or 3D models. Once this is done, you should see a message stating that the Package installation is complete.
You may also use the Import button to import asset archives obtained elsewhere (such as downloading them directly from the AssetLib web frontend), which will take you through the same package installation procedure as with the assets downloaded directly via Godot that we just covered.
Submitting to the Asset Library¶
Introduction¶
This tutorial aims to serve as a guide on how you can submit your own assets to the Godot Asset Library and share them with the Godot community.
As mentioned in the Using the AssetLib document, in order to be able to submit assets to the AssetLib, you need to have a registered account, and be logged in.
Submission guidelines¶
Before submitting your asset, please ensure it follows all of the requirements, and also consider following the recommendations.
Requirements¶
Generally speaking, most assets people submit to the asset library are accepted. However, in order for your asset to be accepted, there are a few requirements your asset needs to meet to be approved.
- The asset must work. If the asset doesn’t run or otherwise doesn’t work in the specified Godot version, then it will be rejected.
- No submodules, or any submodules must be non-essential. GitHub does not include submodules in the downloaded ZIP file, so if the asset needs the contents of the submodule, your asset won’t work.
- The license needs to be correct. The license listed on the asset library must match the license in the repository.
- Do not set the download commit to “master”. The asset library validates all assets with a SHA256 hash, so the version hosted on GitHub needs to be exactly the same. Instead of “master”, either specify a commit hash, or tag versions and specify a version number.
- Use proper English for the name and description of your asset. This includes using correct capitalization, and using full sentences in the description.
- The icon link must be a direct link. For icons hosted on GitHub, the link must start with “raw.githubusercontent.com”, not “github.com”.
Recommendations¶
These things are not required for your asset to be approved, but if you follow these recommendations, you can help make the asset library a better place for all users.
- Fix or suppress all script warnings. The warning system is there to help identify issues with your code, but people using your asset don’t need to see them.
- Make your code conform to the official style guides. Having a consistent style helps other people read your code, and it also helps if other people wish to contribute to your asset. See: the GDScript style guide or the C# style guide.
- If your asset is a library for working with other files, consider including example files in the asset.
- The icon should be a square, its aspect ratio should be 1:1. It should also ideally have a minimum resolution of 64x64 pixels.
- While the asset library allows more than just GitHub, consider hosting your asset’s source code on GitHub. Other services may not work reliably, and a lack of familiarity can be a barrier to contributors.
Submitting¶
Once you are logged in, you will be able to head over to the “Submit Assets” page of the AssetLib, which will look like this:
While it may look like a lot (and there is more as you scroll down), each field is described in terms of what you should put in. We will nonetheless go over what is required in the submission form here as well.
- Asset Name:
- The name of your asset. Should be a unique, descriptive title of what your asset is.
- Category:
- The category that your asset belongs to, and will be shown in search results. The category is split into Addons and Projects. In-editor, assets of the Project type (Templates, Demos, Projects) only show up when viewing the AssetLib from the Project Manager, while assets of the Addon type will only be visible from inside a project.
- Godot version:
- The version of the engine that the asset works with. Currently, it’s not possible to have a single asset entry contain downloads for multiple engine versions, so you may need to re-submit the asset multiple times, with an entry for each Godot version it supports. This is particularly important when dealing with major versions of the engine, such as Godot 2.x and Godot 3.x.
- Version:
- The version number of the asset. While you are free to choose and use any versioning scheme that you like, you may want to look into something such as SemVer if you want your asset’s versioning scheme to be clear and consistent. Note that there is also an internal version number, incremented every time the asset download URL is changed or updated.
- Repository host:
- Assets uploaded to the AssetLib are not hosted on it directly. Instead, they point to repositories hosted on third-party Git providers, such as GitHub, GitLab or Bitbucket. This is where you choose which provider your asset uses, so the site can compute the final download link.
- Repository URL:
- The URL to your asset’s files/webpage. This will vary based on your choice of provider, but it should look similar to https://github.com/<user>/<project>.
- Issues URL:
- The URL to your asset’s issue tracker. Again, this will differ from repository host to repository host, but will likely look similar to https://github.com/<user>/<project>/issues. You may leave this field empty if you use your provider’s issue tracker, and it’s part of the same repository.
- Download Commit/Tag:
- The commit or tag of the asset. For example, b1d3172f89b86e52465a74f63a74ac84c491d3e1 or v1.0. The site computes the actual download URL from this.
- Icon URL:
- The URL to your asset’s icon (which will be used as a thumbnail in the AssetLib search results and on the asset’s page). Should be an image in either the PNG or JPG format.
- License:
- The license under which you are distributing the asset. The list includes a variety of free and open-source software licenses, such as GPL (v2 and v3), MIT, BSD and Boost Software License. You can visit OpenSource.org for a detailed description of each of the listed licenses.
- Description:
- Finally, you can use the Description field for a textual overview of your asset, its features and behavior, a changelog, et cetera. In the future, formatting with Markdown will be supported, but currently, your only option is plain text.
You may also include up to three video and/or image previews, which will be shown at the bottom of the asset page. Use the “Enable” checkbox on each of the preview submission boxes to enable them.
- Type:
- Either an image, or a video.
- Image/YouTube URL:
- Either a link to the image, or to a video, hosted on YouTube.
- Thumbnail URL:
- A URL to an image that will be used as a thumbnail for the preview. This option will be removed eventually, and thumbnails will be automatically computed instead.
Once you are done, hit Submit. Your asset will be entered into the pending queue, which you can visit on the AssetLib here . The approval process is manual and may take up to a few days for your addon to be accepted (or rejected), so please be patient! You will be informed when your asset is reviewed. If it was rejected, you will be told why that may have been, and you will be able to submit it again with the appropriate changes. You may have some luck accelerating the approval process by messaging the moderators/assetlib reviewers on IRC (the #godotengine-atelier channel on Freenode), or the official Discord server.
VR¶
AR/VR primer¶
This tutorial gives you a springboard into the world of AR and VR in the Godot game engine.
A new architecture was introduced in Godot 3 called the AR/VR Server. On top of this architecture, specific implementations are available as interfaces, most of which are plugins based on GDNative. This tutorial focuses purely on the core elements abstracted by the core architecture. This architecture has enough features for you to create an entire VR experience that can then be deployed for various interfaces. However, each platform often has some unique features that are impossible to abstract. Such features will be documented on the relevant interfaces and fall outside of the scope of this primer.
AR/VR server¶
When Godot starts, each available interface will make itself known to the AR/VR server. GDNative interfaces are setup as singletons; as long as they are added to the list of GDNative singletons in your project, they will make themselves known to the server.
You can use the function get_interfaces() to return a list of available interfaces, but for this tutorial, we’re going to use the native mobile VR interface in our examples. This interface is a straightforward implementation that uses the 3DOF sensors on your phone for orientation and outputs a stereoscopic image to the screen. It is also available in the Godot core and outputs to screen on desktop, which makes it ideal for prototyping or a tutorial such as this one.
To enable an interface, you execute the following code:
var arvr_interface = ARVRServer.find_interface("Native mobile")
if arvr_interface and arvr_interface.initialize():
get_viewport().arvr = true
var arvrInterface = ARVRServer.FindInterface("Native mobile");
if (arvrInterface != null && arvrInterface.Initialize())
{
GetViewport().Arvr = true;
}
This code finds the interface we wish to use, initializes it and, if that is successful, binds the main viewport to the interface. This last step gives some control over the viewport to the interface, which automatically enables things like stereoscopic rendering on the viewport.
For our mobile VR interface, and any interface where the main input is directly displayed on screen, the main viewport needs to be the viewport where arvr is set to true. But for interfaces that render on an externally attached device, you can use a secondary viewport. In the latter case, a viewport that shows its output on screen will show an undistorted version of the left eye, while showing the fully processed stereoscopic output on the device.
Finally, you should only initialize an interface once; switching scenes and reinitializing interfaces will just introduce a lot of overhead. If you want to turn the headset off temporarily, just disable the viewport or set arvr to false on the viewport. In most scenarios though, you wouldn’t disable the headset once you’re in VR, this can be disconcerting to the gamer.
New AR/VR nodes¶
Three new node types have been added for supporting AR and VR in Godot and one additional node type especially for AR. These are:
- ARVROrigin - our origin point in the world
- ARVRCamera - a special subclass of the camera, which is positionally tracked
- ARVRController - a new spatial class, which tracks the location of a controller
- ARVRAnchor - an anchor point for an AR implementation mapping a real world location into your virtual world
The first two must exist in your scene for AR/VR to work and this tutorial focuses purely on them.
ARVROrigin is an important node, you must have one and only one of these somewhere in your scene. This node maps the center of your real world tracking space to a location in your virtual world. Everything else is positionally tracked in relation to this point. Where this point lies exactly differs from one implementation to another, but the best example to understand how this node works is to take a look at a room scale location. While we have functions to adjust the point to center it on the player by default, the origin point will be the center location of the room you are in. As you physically walk around the room, the location of the HMD is tracked in relation to this center position and the tracking is mirror in the virtual world.
To keep things simple, when you physically move around your room, the ARVR Origin point stays where it is, the position of the camera and controllers will be adjusted according to your movements. When you move through the virtual world, either through controller input or when you implement a teleport system, it is the position of the origin point which you will have to adjust.
ARVRCamera is the second node that must always be a part of your scene and it must always be a child node of your origin node. It is a subclass of Godot’s normal camera. However, its position is automatically updated each frame based on the physical orientation and position of the HMD. Also due to the precision required for rendering to an HMD or rendering an AR overlay over a real world camera, most of the standard camera properties are ignored. The only properties of the camera that are used are the near and far plane settings. The FOV, aspect ratio and projection mode are all ignored.
Note that, for our native mobile VR implementation, there is no positional tracking, only the orientation of the phone and by extension, the HMD is tracked. This implementation artificially places the camera at a height (Y) of 1.85.
Conclusion: your minimum setup in your scene to make AR or VR work should look like this:
And that’s all you need to get started. Obviously, you need to add something more into your scene, so there is something to see, but after that, you can export the game to your phone of choice, pop it into a viewer and away you go.
Other things to consider¶
There are a few other subjects that we need to briefly touch upon in this primer that are important to know.
The first are our units. In normal 3D games, you don’t have to think a lot about units. As long as everything is at the same scale, a box sized 1 unit by 1 unit by 1 unit can be any size from a cube you can hold in your hand to something the size of a building. In AR and VR, this changes because things in your virtual world are mapped to things in the real world. If you step 1 meter forward in the real world, but you only move 1 cm forward in your virtual world, you have a problem. The same with the position of your controllers; if they don’t appear in the right relative space, it breaks the immersion for the player. Most VR platforms, including our AR/VR Server, assume that 1 unit = 1 meter. The AR/VR server, however, has a property that, for convenience, is also exposed on the ARVROrigin node called world scale. For instance, setting this to a value of 10 changes our coordinate system so 10 units = 1 meter.
Performance is another thing that needs to be carefully considered. Especially VR taxes your game a lot more than most people realise. For mobile VR, you have to be extra careful here, but even for desktop games, there are three factors that make life extra difficult:
- You are rendering stereoscopic, two for the price of one. While not exactly doubling the work load and with things in the pipeline such as supporting the new MultiView OpenGL extension in mind, there still is an extra workload in rendering images for both eyes
- A normal game will run acceptably on 30fps and ideally manages 60fps. That gives you a big range to play with between lower end and higher end hardware. For any HMD application of AR or VR, however, 60fps is the absolute minimum and you should target your games to run at a stable 90fps to ensure your users don’t get motion sickness right off the bat.
- The high FOV and related lens distortion effect require many VR experiences to render at double the resolution. Yes a VIVE may only have a resolution of 1080x1200 per eye, we’re rendering each eye at 2160x2400 as a result. This is less of an issue for most AR applications.
All in all, the workload your GPU has in comparison with a normal 3D game is a fair amount higher. While things are in the pipeline to improve this, such as MultiView and foveated rendering, these aren’t supported on all devices. This is why you see many VR games using a more art style and if you pay close attention to those VR games that go for realism, you’ll probably notice they’re a bit more conservative on the effects or use some good old optical trickery.
VR starter tutorial¶
VR starter tutorial part 1¶
Introduction¶

This tutorial will show you how to make a beginner VR game project in Godot.
Keep in mind, one of the most important things when making VR content is getting the scale of your assets correct! It can take lots of practice and iterations to get this right, but there are a few things you can do to make it easier:
- In VR, 1 unit is typically considered 1 meter. If you design your assets around that standard, you can save yourself a lot of headache.
- In your 3D modeling program, see if there is a way to measure and use real world distances. In Blender, you can use the MeasureIt add-on; in Maya, you can use the Measure Tool.
- You can make rough models using a tool like Google Blocks, and then refine in another 3D modelling program.
- Test often, as the assets can look dramatically different in VR than on a flat screen!
Throughout the course of this tutorial, we will cover:
- How to tell Godot to run in VR.
- How to make a teleportation locomotion system that uses the VR controllers.
- How to make a artificial movement locomotion system that uses the VR controllers.
- How to create a RigidBody-based system that allows for picking up, dropping, and throwing RigidBody nodes using the VR controllers.
- How to create simple destroyable target.
- How to create some special RigidBody-based objects that can destroy the targets.
Tip
While this tutorial can be completed by beginners, it is highly advised to complete Your first game, if you are new to Godot and/or game development.
Some experience with making 3D games is required before going through this tutorial series. This tutorial assumes you have experience with the Godot editor, GDScript, and basic 3D game development. A OpenVR-ready headset and two OpenVR-ready controllers are required.
This tutorial was written and tested using a Windows Mixed Reality headset and controllers. This project has also been tested on the HTC Vive. Code adjustments may be required for other VR Headsets, such as the Oculus Rift.
The Godot project for this tutorial is found on the OpenVR GitHub repository. The starter assets for this tutorial can be found in the releases section on the GitHub repository. The starter assets contain some 3D models, sounds, scripts, and scenes that are configured for this tutorial.
Note
Credits for the assets provided:
- The sky panorama was created by CGTuts.
- The font used is Titillium-Regular
- The font is licensed under the SIL Open Font License, Version 1.1
- The audio used are from several different sources, all downloaded from the Sonniss #GameAudioGDC Bundle (License PDF)
- The folders where the audio files are stored have the same name as folders in the Sonniss audio bundle.
- The OpenVR addon was created by Bastiaan Olij and is released under the MIT license. It can be found both on the Godot Asset Library and on GitHub. 3rd party code and libraries used in the OpenVR addon may be under a different license.
- The initial project, 3D models, and scripts were created by TwistedTwigleg and is released under the MIT license.
Tip
You can find the finished project on the OpenVR GitHub repository.
Getting everything ready¶
If you have not already, go to the OpenVR GitHub repository and download the “Starter Assets” file from the releases. Once you have the starter assets downloaded, open up the project in Godot.
Note
The starter assets are not required to use the scripts provided in this tutorial. The starter assets include several premade scenes and scripts that will be used throughout the tutorial.
When the project is first loaded, the Game.tscn scene will be opened. This will be the main scene used for the tutorial. It includes several nodes and scenes already placed throughout the scene, some background music, and several GUI-related MeshInstance nodes.
The GUI-related MeshInstance nodes already have scripts attached to them. These scripts will set the texture of a Viewport
node to the albedo texture of the material of the MeshInstance node. This is used to display text within the VR project. Feel free to take a look
at the script, GUI.gd, if you want. We will not be going over how to to use Viewport nodes for displaying UI on MeshInstance
nodes in this tutorial .
If you are interested in how to use Viewport nodes for displaying UI on MeshInstance nodes, see the Using a Viewport as a texture tutorial. It covers how to use a Viewport as a render texture, along with how to apply that texture onto a MeshInstance node.
Before we jump into the tutorial, let’s take a moment to talk about how the nodes used for VR work.
The ARVROrigin node is the center point of the VR tracking system. The position of the ARVROrigin is the position the VR system considers the ‘center’ point on the floor. The ARVROrigin has a world scale property that effects the size of the user within the VR scene. For this tutorial, it is set to 1.4, as the world was originally just a tad to big. As mentioned earlier, keeping the scale relatively consistent is important in VR.
The ARVRCamera is the player’s headset and view into the scene. The ARVRCamera is offset on the Y axis by the VR user’s height, which will be important later when we add teleportation locomotoin. If the VR system supports room tracking, then the ARVRCamera will move as the player moves. This means that the ARVRCamera is not guaranteed to be in the same position as the ARVROrigin node.
The ARVRController node represents a VR controller. The ARVRController will follow the position and rotation of the VR
controller relative to the ARVROrigin node. All of the input for the VR controllers happens through the ARVRController node.
An ARVRController node with an ID of 1 represents the left VR controller, while an ARVRController controller with an
ID of 2 represents the right VR controller.
To summerize:
- The ARVROrigin node is the center of the VR tracking system and is positioned on the floor.
- The ARVRCamera is the player’s VR headset and view into the scene.
- The ARVRCamera node is offset on the Y axis by the user’s height.
- If the VR system supports room tracking, then the ARVRCamera node may be offset on the X and Z axes as the player moves.
- The ARVRController nodes represent the VR controllers and handle all of the input from the VR controllers.
Starting VR¶
Now that we have gone over the VR nodes, let’s start working on the project. While in Game.tscn, select the Game node and make a new script called Game.gd.
In the Game.gd file, add the following code:
extends Spatial
func _ready():
var VR = ARVRServer.find_interface("OpenVR")
if VR and VR.initialize():
get_viewport().arvr = true
get_viewport().hdr = false
OS.vsync_enabled = false
Engine.target_fps = 90
# Also, the physics FPS in the project settings is also 90 FPS. This makes the physics
# run at the same frame rate as the display, which makes things look smoother in VR!
using Godot;
using System;
public class Game : Spatial
{
public override void _Ready()
{
var vr = ARVRServer.FindInterface("OpenVR");
if (vr != null && vr.Initialize())
{
GetViewport().Arvr = true;
GetViewport().Hdr = false;
OS.VsyncEnabled = false;
Engine.TargetFps = 90;
// Also, the physics FPS in the project settings is also 90 FPS. This makes the physics
// run at the same frame rate as the display, which makes things look smoother in VR!
}
}
}
Let’s go over what this code does.
In the _ready function, we first get the OpenVR VR interface using the find_interface function in the ARVRServer and assign it to a variable
called VR. If the ARVRServer finds an interface with the name OpenVR, it will return it, otherwise it will return null.
Note
The OpenVR VR interface is not included with Godot by default. You will need to download the OpenVR asset from the Asset Library or GitHub.
The code then combines two conditionals, one to check if the VR variable is NOT null (if VR) and another calls the initialize function, which returns a boolean based on
whether the OpenVR interface was able to initialize or not. If both of these conditionals return true, then we can turn the main Godot Viewport into
an ARVR viewport.
If the VR interface initialized successfully, we then get the root Viewport and set the arvr property to true. This will tell Godot to use the initialized
ARVR interface to drive the Viewport display. After setting the arvr property to true, we set the hdr property to false. We do this because
most of the VR headsets do not currently support HDR rendering.
Note
HDR support will be available for VR in Godot 3.2.
Finally, we disable VSync so the Frames Per Second (FPS) is not capped by the computer monitor. After this we tell Godot to render at 90 frames per second, which is the
standard for most VR headsets. Without disabling VSync, the normal computer monitor may limit the frame rate of the VR headset to the frame rate of the computer monitor.
Note
In the project settings, under the Physics->Common tab, the physics FPS has been set to 90. This makes the physics engine run at the same frame rate as
the VR display, which makes physics reactions look smoother when in VR.
That is all we need to do for Godot to launch OpenVR within the project! Go ahead and give it a try if you want. Assuming everything works, you will be able to look around the world. If you have a VR headset with room tracking, then you will be able to move around the scene within the limits of the room tracking.
Creating the controllers¶
Right now all that the VR user can do is stand around, which isn’t really what we are going for unless we are working on a VR film. Lets write the code for the VR controllers. We are going to write all of the code for the VR controllers in one go, so the code is rather long. That said, once we are finished you will be able to teleport around the scene, artificially move using the touchpad/joystick on the VR controller, and be able to pick up, drop, and throw RigidBody-based nodes.
First we need to open the scene used for the VR controllers. Left_Controller.tscn or Right_Controller.tscn. Let’s briefly go over how the scene is setup.
How the VR controller scene is setup¶
In both scenes the root node is a ARVRController node. The only difference is that the Left_Controller scene has the Controller Id property set to 1 while
the Right_Controller has the Controller Id property set to 2.
Note
The ARVRServer attempts to use these two IDs for the left and right VR controllers. For VR systems that support more than 2 controllers/tracked-objects, these IDs may need adjusting.
Next is the Hand MeshInstance node. This node is used to display the hand mesh that will be used when the VR controller is not holding onto a
RigidBody node. The hand in the Left_Controller scene is a left hand, while the hand on the Right_Controller scene is a right hand.
The node named Raycast is a Raycast node that is used for aiming where to teleport to when the VR controller is teleporting.
The length of the Raycast is set to -16 on the Y axis and is rotated so that it points out of the pointer finger of the hand. The Raycast node has
a single child node, Mesh, that is a MeshInstance. This is used for visually showing where the teleportation Raycast is aiming.
The node named Area is a Area node will be used for grabbing RigidBody-based nodes when the VR controller grab mode is set to AREA.
The Area node has a single child node, CollisionShape, that defines a sphere CollisionShape. When the VR controller is not holding any objects and the grab button is pressed,
the first RigidBody-based node within the Area node will be picked up.
Next is a Position3D node called Grab_Pos. This is used to define the position that grabbed RigidBody nodes will follow then
they are held by the VR controller.
A large Area node called Sleep_Area is used to disable sleeping for any RigidBody nodes within its CollisionShape,
simple called CollisionShape. This is needed because if a RigidBody node falls asleep, then the VR controller will be unable to grab it.
By using Sleep_Area, we can write code that makes any RigidBody node within it not able to sleep, therefore allowing the VR controller to grab it.
An AudioStreamPlayer3D node called AudioStreamPlayer3D has a sound loaded that we will use when an object has been picked up, dropped
or thrown by the VR controller. While this is not necessary for the functionality of the VR controller, it makes grabbing and dropping objects feel more natural.
Finally, the last nodes are the Grab_Cast node and it’s only child node, Mesh. The Grab_Cast node will be used for grabbing RigidBody-based
nodes when the VR controller grab mode is set to RAYCAST. This will allow the VR controller to grab objects that are just slightly out of reach using a Raycast. The Mesh
node is used for visually showing where the teleportation Raycast is aiming.
That is a quick overview of how the VR controller scenes are setup, and how we will be using the nodes to provide the functionality for them. Now that we have looked at the VR controller scene, let’s write the code that will drive them.
The code for the VR controllers¶
Select the root node of the scene, either Right_Controller or Left_Controller, and make a new script called VR_Controller.gd. Both scenes will be using
the same script, so it doesn’t matter which you use first. With VR_Controller.gd opened, add the following code:
Tip
You can copy and paste the code from this page directly into the script editor.
If you do this, all of the code copied will be using spaces instead of tabs.
To convert the spaces to tabs in the script editor, click the Edit menu and select Convert Indent To Tabs.
This will convert all the spaces into tabs. You can select Convert Indent To Spaces to convert tabs back into spaces.
var controller_velocity = Vector3(0,0,0)
var prior_controller_position = Vector3(0,0,0)
var prior_controller_velocities = []
var held_object = null
var held_object_data = {"mode":RigidBody.MODE_RIGID, "layer":1, "mask":1}
var grab_area
var grab_raycast
var grab_mode = "AREA"
var grab_pos_node
var hand_mesh
var hand_pickup_drop_sound
var teleport_pos = Vector3.ZERO
var teleport_mesh
var teleport_button_down
var teleport_raycast
# A constant to define the dead zone for both the trackpad and the joystick.
# See (http://www.third-helix.com/2013/04/12/doing-thumbstick-dead-zones-right.html)
# for more information on what dead zones are, and how we are using them in this project.
const CONTROLLER_DEADZONE = 0.65
const MOVEMENT_SPEED = 1.5
const CONTROLLER_RUMBLE_FADE_SPEED = 2.0
var directional_movement = false
func _ready():
# Ignore the warnings the from the connect function calls.
# (We will not need the returned values for this tutorial)
# warning-ignore-all:return_value_discarded
teleport_raycast = get_node("RayCast")
teleport_mesh = get_tree().root.get_node("Game/Teleport_Mesh")
teleport_button_down = false
teleport_mesh.visible = false
teleport_raycast.visible = false
grab_area = get_node("Area")
grab_raycast = get_node("Grab_Cast")
grab_pos_node = get_node("Grab_Pos")
grab_mode = "AREA"
grab_raycast.visible = false
get_node("Sleep_Area").connect("body_entered", self, "sleep_area_entered")
get_node("Sleep_Area").connect("body_exited", self, "sleep_area_exited")
hand_mesh = get_node("Hand")
hand_pickup_drop_sound = get_node("AudioStreamPlayer3D")
connect("button_pressed", self, "button_pressed")
connect("button_release", self, "button_released")
func _physics_process(delta):
if rumble > 0:
rumble -= delta * CONTROLLER_RUMBLE_FADE_SPEED
if rumble < 0:
rumble = 0
if teleport_button_down == true:
teleport_raycast.force_raycast_update()
if teleport_raycast.is_colliding():
if teleport_raycast.get_collider() is StaticBody:
if teleport_raycast.get_collision_normal().y >= 0.85:
teleport_pos = teleport_raycast.get_collision_point()
teleport_mesh.global_transform.origin = teleport_pos
if get_is_active() == true:
_physics_process_update_controller_velocity(delta)
if held_object != null:
var held_scale = held_object.scale
held_object.global_transform = grab_pos_node.global_transform
held_object.scale = held_scale
_physics_process_directional_movement(delta);
func _physics_process_update_controller_velocity(delta):
controller_velocity = Vector3(0,0,0)
if prior_controller_velocities.size() > 0:
for vel in prior_controller_velocities:
controller_velocity += vel
controller_velocity = controller_velocity / prior_controller_velocities.size()
var relative_controller_position = (global_transform.origin - prior_controller_position)
controller_velocity += relative_controller_position
prior_controller_velocities.append(relative_controller_position)
prior_controller_position = global_transform.origin
controller_velocity /= delta;
if prior_controller_velocities.size() > 30:
prior_controller_velocities.remove(0)
func _physics_process_directional_movement(delta):
var trackpad_vector = Vector2(-get_joystick_axis(1), get_joystick_axis(0))
var joystick_vector = Vector2(-get_joystick_axis(5), get_joystick_axis(4))
if trackpad_vector.length() < CONTROLLER_DEADZONE:
trackpad_vector = Vector2(0,0)
else:
trackpad_vector = trackpad_vector.normalized() * ((trackpad_vector.length() - CONTROLLER_DEADZONE) / (1 - CONTROLLER_DEADZONE))
if joystick_vector.length() < CONTROLLER_DEADZONE:
joystick_vector = Vector2(0,0)
else:
joystick_vector = joystick_vector.normalized() * ((joystick_vector.length() - CONTROLLER_DEADZONE) / (1 - CONTROLLER_DEADZONE))
var forward_direction = get_parent().get_node("Player_Camera").global_transform.basis.z.normalized()
var right_direction = get_parent().get_node("Player_Camera").global_transform.basis.x.normalized()
# Because the trackpad and the joystick will both move the player, we can add them together and normalize
# the result, giving the combined movement direction
var movement_vector = (trackpad_vector + joystick_vector).normalized()
var movement_forward = forward_direction * movement_vector.x * delta * MOVEMENT_SPEED
var movement_right = right_direction * movement_vector.y * delta * MOVEMENT_SPEED
movement_forward.y = 0
movement_right.y = 0
if (movement_right.length() > 0 or movement_forward.length() > 0):
get_parent().global_translate(movement_right + movement_forward)
directional_movement = true
else:
directional_movement = false
func button_pressed(button_index):
if button_index == 15:
_on_button_pressed_trigger()
if button_index == 2:
_on_button_pressed_grab()
if button_index == 1:
_on_button_pressed_menu()
func _on_button_pressed_trigger():
if held_object == null:
if teleport_mesh.visible == false:
teleport_button_down = true
teleport_mesh.visible = true
teleport_raycast.visible = true
else:
if held_object is VR_Interactable_Rigidbody:
held_object.interact()
func _on_button_pressed_grab():
if teleport_button_down == true:
return
if held_object == null:
_pickup_rigidbody()
else:
_throw_rigidbody()
hand_pickup_drop_sound.play()
func _pickup_rigidbody():
var rigid_body = null
if grab_mode == "AREA":
var bodies = grab_area.get_overlapping_bodies()
if len(bodies) > 0:
for body in bodies:
if body is RigidBody:
if !("NO_PICKUP" in body):
rigid_body = body
break
elif grab_mode == "RAYCAST":
grab_raycast.force_raycast_update()
if (grab_raycast.is_colliding()):
var body = grab_raycast.get_collider()
if body is RigidBody:
if !("NO_PICKUP" in body):
rigid_body = body
if rigid_body != null:
held_object = rigid_body
held_object_data["mode"] = held_object.mode
held_object_data["layer"] = held_object.collision_layer
held_object_data["mask"] = held_object.collision_mask
held_object.mode = RigidBody.MODE_STATIC
held_object.collision_layer = 0
held_object.collision_mask = 0
hand_mesh.visible = false
grab_raycast.visible = false
if held_object is VR_Interactable_Rigidbody:
held_object.controller = self
held_object.picked_up()
func _throw_rigidbody():
if held_object == null:
return
held_object.mode = held_object_data["mode"]
held_object.collision_layer = held_object_data["layer"]
held_object.collision_mask = held_object_data["mask"]
held_object.apply_impulse(Vector3(0, 0, 0), controller_velocity)
if held_object is VR_Interactable_Rigidbody:
held_object.dropped()
held_object.controller = null
held_object = null
hand_mesh.visible = true
if grab_mode == "RAYCAST":
grab_raycast.visible = true
func _on_button_pressed_menu():
if grab_mode == "AREA":
grab_mode = "RAYCAST"
if held_object == null:
grab_raycast.visible = true
elif grab_mode == "RAYCAST":
grab_mode = "AREA"
grab_raycast.visible = false
func button_released(button_index):
if button_index == 15:
_on_button_released_trigger()
func _on_button_released_trigger():
if teleport_button_down == true:
if teleport_pos != null and teleport_mesh.visible == true:
var camera_offset = get_parent().get_node("Player_Camera").global_transform.origin - get_parent().global_transform.origin
camera_offset.y = 0
get_parent().global_transform.origin = teleport_pos - camera_offset
teleport_button_down = false
teleport_mesh.visible = false
teleport_raycast.visible = false
teleport_pos = null
func sleep_area_entered(body):
if "can_sleep" in body:
body.can_sleep = false
body.sleeping = false
func sleep_area_exited(body):
if "can_sleep" in body:
# Allow the CollisionBody to sleep by setting the "can_sleep" variable to true
body.can_sleep = true
This is quite a bit of code to go through. Let’s go through what the code does step-by-step.
Explaining the VR controller code¶
First, let’s go through all of the class variables in the script:
controller_velocity: A variable to hold a rough approximation of the VR controller’s velocity.prior_controller_position: A variable to hold the VR controller’s last position in 3D space.prior_controller_velocities: An Array to hold the last 30 calculated VR controller velocities. This is used to smooth the velocity calculations over time.held_object: A variable to hold a reference to the object the VR controller is holding. If the VR controller is not holding any objects, this variable will benull.held_object_data: A dictionary to hold data for the RigidBody node being held by the VR controller. This is used to reset the RigidBody’s data when it is no longer held.grab_area: A variable to hold the Area node used to grab objects with the VR controller.grab_raycast: A variable to hold the Raycast node used to grab objects with the VR controller.grab_mode: A variable to define the grab mode the VR controller is using. There are only two modes for grabbing objects in this tutorial,AREAandRAYCAST.grab_pos_node: A variable to hold the node that will be used to update the position and rotation of held objects.hand_mesh: A variable to hold the MeshInstance node that contains the hand mesh for the VR controller. This mesh will be shown when the VR controller is not holding anything.hand_pickup_drop_sound: A variable to hold the AudioStreamPlayer3D node that contains the pickup/drop sound.teleport_pos: A variable to hold the position the player will be teleported to when the VR controller teleports the player.teleport_mesh: A variable to hold the MeshInstance node used to show where the player is teleporting to.teleport_button_down: A variable used to track whether the controller’s teleport button is held down. This will be used to detect if this VR controller is trying to teleport the player.teleport_raycast: A variable to hold the Raycast node used to calculate the teleport position. This node also has a MeshInstance that acts as a ‘laser sight’ for aiming.CONTROLLER_DEADZONE: A constant to define the deadzone for both the trackpad and the joystick on the VR controller. See the note below for more information.MOVEMENT_SPEED: A constant to define the speed the player moves at when using the trackpad/joystick to move artificially.CONTROLLER_RUMBLE_FADE_SPEED: A constant to define how fast the VR controller rumble fades.directional_movement: A variable to hold whether this VR controller is moving the player using the touchpad/joystick.
Note
You can find a great article explaining all about how to handle touchpad/joystick dead zones here: http://www.third-helix.com/2013/04/12/doing-thumbstick-dead-zones-right.html
We are using a translated version of the scaled radial dead zone code provided in that article for the VR controller’s joystick/touchpad. The article is a great read, and I highly suggest giving it a look!
That is quite a few class variables. Most of them are used to hold references to nodes we will need throughout the code. Next let’s start looking at the functions, starting
with the _ready function.
_ready function step-by-step explanation¶First we tell Godot to silence the warnings about not using the values returned by the connect function. We will not need the returned
values for this tutorial.
Next we get the Raycast node we are going to use for determining the position for teleporting and assign it to the teleport_raycast variable.
We then get the MeshInstance node that we will use to show where the player will be teleporting to. The node we are using for teleporting
is a child of the Game scene. We do this so the teleport mesh node is not effected by changes in the VR controller, and so the teleport mesh can be used by both VR controllers.
Then the teleport_button_down variable is set to false, teleport_mesh.visible is set to false, and teleport_raycast.visible is set to false. This sets up the variables
for teleporting the player into their initial, not teleporting the player, state.
The code then gets the grab_area node, the grab_raycast node, and the grab_pos_node node and assigns them all to their respective variables for use later.
Next the grab_mode is set to AREA so the VR controller will attempt to grab objects using the Area node defined in grab_area when the VR controller’s
grab/grip button is pressed. We also set the grab_raycast node’s visible property to false so the ‘laser sight’ child node of grab_raycast is not visible.
After that we connect the body_entered and body_exited signals from the Sleep_Area node in the VR controller to the sleep_area_entered and sleep_area_exited functions.
The sleep_area_entered and sleep_area_exited functions will be used to make RigidBody nodes unable to sleep when nearby the VR controller.
Then the hand_mesh and hand_pickup_drop_sound nodes are gotten and assigned them to their respective variables for use later.
Finally, the button_pressed and button_release signals in the ARVRController node, which the VR controller extends, are connected to the
button_pressed and button_released functions respectively. This means that when a button on the VR controller is pressed or released, the button_pressed or button_released
functions defined in this script will be called.
_physics_process function step-by-step explanation¶First we check to see if the rumble variable is more than zero. If the rumble variable, which is a property of the ARVRController node, is more
than zero then the VR controller rumbles.
If the rumble variable is more than zero, then we reduce the rumble by CONTROLLER_RUMBLE_FADE_SPEED every second by subtracting CONTROLLER_RUMBLE_FADE_SPEED multiplied by delta.
There is then a if condition to check if rumble is less than zero, which sets rumble to zero if its value is less than zero.
This small section of code is all we need for reducing the VR controller’s rumble. Now when we set rumble to a value, this code will automatically make it fade over time.
The first section of code checks to see if the teleport_button_down variable is equal to true, which means this VR controller is trying to teleport.
If teleport_button_down is equal to true, we force the teleport_raycast Raycast node to update using the force_raycast_update function.
The force_raycast_update function will update the properties within the Raycast node with the latest version of the physics world.
The code then checks to see if the teleport_raycast collided with anything by checking of the is_colliding function in teleport_raycast is true. If the Raycast
collided with something, we then check to see if the PhysicsBody the raycast collided with is a StaticBody or not. We then check to
see if the collision normal vector returned by the raycast is greater than or equal to 0.85 on the Y axis.
Note
We do this because we do not want the user to be able to teleport onto RigidBody nodes and we only want the player to be able to teleport on floor-like surfaces.
If all these conditions are met, then we assign the teleport_pos variable to the get_collision_point function in teleport_raycast. This will assign teleport_pos to the
position the raycast collided at in world space. We then move the teleport_mesh to the world position stored in teleport_pos.
This section of code will get the position the player is aiming at with the teleportation raycast and update the teleportation mesh, giving a visual update on where the user will be teleporting to when the release the teleport button.
The next section of code first checks to see if the VR controller is active through the get_is_active function, which is defined by ARVRController. If the
VR controller is active, then it calls the _physics_process_update_controller_velocity function.
The _physics_process_update_controller_velocity function will calculate the VR controller’s velocity through changes in position. It is not perfect, but this process gets a rough
idea of the velocity of the VR controller, which is fine for the purposes of this tutorial.
The next section of code checks to see if the VR controller is holding an object by checking to see if the held_object variable is not equal to null.
If the VR controller is holding an object, we first store it’s scale in a temporary variable called held_scale. We then set the global_transform of the held object
to the global_transform of the held_object node. This will make the held object have the same position, rotation, and scale of the grab_pos_node node in world space.
However, because we do not want the held object to change in scale when it is grabbed, we need to set the scale property of the held_object node back to held_scale.
This section of code will keep the held object in the same position and rotation as the VR controller, keeping it synced with the VR controller.
Finally, the last section of code simply calls the _physics_process_directional_movement function. This function contains all of the code for moving the player when the
touchpad/joystick on the VR controller moves.
_physics_process_update_controller_velocity function step-by-step explanation¶First this function resets the controller_velocity variable to zero Vector3.
Then we check to see if there are any stored/cached VR controller velocities saved in the prior_controller_velocities array. We do this by checking to see if the size() function
returns a value greater than 0. If there are cached velocities within prior_controller_velocities, then we iterate through each of the stored velocities using a for loop.
For each of the cached velocities, we simply add its value to controller_velocity. Once the code has gone through all of the cached velocities in prior_controller_velocities,
we divide controller_velocity by the size of the prior_controller_velocities array, which will give us the combined velocity value. This helps take the previous velocities into
account, making the direction of the controller’s velocity more accurate.
Next we calculate the change in position the VR controller has taken since the last _physics_process function call. We do this by subtracting prior_controller_position from the
global position of the VR controller, global_transform.origin. This will give us a Vector3 that points from the position in prior_controller_position to
the current position of the VR controller, which we store in a variable called relative_controller_position.
Next we add the change in position to controller_velocity so the latest change in position is taken into account in the velocity calculation. We then add relative_controller_position
to prior_controller_velocities so it can be taken into account on the next calculation of the VR controller’s velocity.
Then prior_controller_position is updated with the global position of the VR controller, global_transform.origin. We then divide controller_velocity by delta so the velocity
is higher, giving results like those we expect, while still being relative to the amount of time that has passed. It is not a perfect solution, but the results look decent most of the time
and for the purposes of this tutorial, it is good enough.
Finally, the function checks to see if the prior_controller_velocities has more than 30 velocities cached by checking if the size() function returns a value greater than 30.
If there are more than 30 cached velocities stored in prior_controller_velocities, then we simply remove the oldest cached velocity by calling the remove function and passing in
a index position of 0.
What this function ultimately does is that it gets a rough idea of the VR controller’s velocity by calculating the VR controller’s relative changes in position
over the last thirty _physics_process calls. While this is not perfect, it gives a decent idea of how fast the VR controller is moving in 3D space.
_physics_process_directional_movement function step-by-step explanation¶First this function gets the axes for the trackpad and the joystick and assigns them to Vector2 variables called trackpad_vector and joystick_vector respectively.
Note
You may need to remap the joystick and/or touchpad index values depending on your VR headset and controller. The inputs in this tutorial are the index values of a Windows Mixed Reality headset.
Then trackpad_vector and joystick_vector have their deadzones account for. The code for this is detailed in the article below, with slight changes as the code is converted from
C# to GDScript.
Note
You can find a great article explaining all about how to handle touchpad/joystick dead zones here: http://www.third-helix.com/2013/04/12/doing-thumbstick-dead-zones-right.html
Once the trackpad_vector and joystick_vector variables have had their deadzones account for, the code then gets the forward and right direction vectors relative to the
global transform of the ARVRCamera. What this does is that it gives us vectors that point forward and right relative to the rotation of the user camera,
the ARVRCamera, in world space. These vectors point in the same direction of the blue and red arrows when you select an object in the Godot editor with
the local space mode button enabled. The forward direction vector is stored in a variable called forward_direction, while the right direction vector is stored in a variable
called right_direction.
Next the code adds the trackpad_vector and joystick_vector variables together and normalizes the results using the normalized function. This gives us the
combined movement direction of both input devices, so we can use a single Vector2 for moving the user. We assign the combined direction to a variable called movement_vector.
Then we calculate the distance the user will move forward, relative to the forward direction stored in forward_direction. To calculate this, we multiply forward_direction by movement_vector.x,
delta, and MOVEMENT_SPEED. This will give us the distance the user will move forward when the trackpad/joystick is pushed forward or backwards. We assign this to a variable called
movement_forward.
We do a similar calculation for the distance the user will move right, relative to the right direction stored in right_direction. To calculate the distance the user will move right,
we multiply right_direction by movement_vector.y, delta, and MOVEMENT_SPEED. This will give us the distance the user will move right when the trackpad/joystick is pushed right or left.
We assign this to a variable called movement_right.
Next we remove any movement on the Y axis of movement_forward and movement_right by assigning their Y values to 0. We do this so the user cannot fly/fall simply by moving the trackpad
or joystick. Without doing this, the player could fly in the direction they are facing.
Finally, we check to see if the length function on movement_right or movement_forward is greater than 0. If it is, then we need to move the user. To move the user, we perform a global
translation to the ARVROrigin node using get_parent().global_translate and pass in the movement_right variable with the movement_forward variable added to it. This
will move the player in the direction the trackpad/joystick is pointing, relative to the rotation of the VR headset. We also set the directional_movement variable to true so the code knows this
VR controller is moving the player.
If the length function on movement_right or movement_forward is less than or equal to 0, then we simply set the directional_movement variable to false so the code knows this VR
controller is not moving the player.
What this function ultimately does is takes the input from the VR controller’s trackpad and joystick and moves the player in the direction the player is pushing them. Movement is relative to the rotation of the VR headset, so if the player pushes forward and turns their head to the left, they will move to the left.
button_pressed function step-by-step explanation¶This function checks to see if the VR button that was just pressed is equal to one of the VR buttons used in this project. The button_index variable is passed in by the
button_pressed signal in ARVRController, which we connected in the _ready function.
There are only three buttons we are looking for in this project: the trigger button, the grab/grip button, and the menu button.
Note
You may need to remap these button index values depending on your VR headset and controller. The inputs in this tutorial are the index values of a Windows Mixed Reality headset.
First we check if the button_index is equal to 15, which should map to the trigger button on the VR controller. If the button pressed is the trigger button,
then the _on_button_pressed_trigger function is called.
If the button_index is equal to 2, then the grab button was just pressed. If the button pressed is the grab button, the _on_button_pressed_grab function is called.
Finally, if the button_index is equal to 1, then the menu button was just pressed. If the button pressed is the menu button, the _on_button_pressed_menu function is called.
_on_button_pressed_trigger function step-by-step explanation¶First this function checks to see if the VR controller is not holding by checking if held_object is equal to null. If the VR controller is not holding anything, then
we assume that the trigger press on the VR controller was for teleporting. We then make sure that teleport_mesh.visible is equal to false. We use this to tell if
the other VR controller is trying to teleport or not, as teleport_mesh will be visible if the other VR controller is teleporting.
If teleport_mesh.visible is equal to false, then we can teleport with this VR controller. We set the teleport_button_down variable to true, set
teleport_mesh.visible to true, and set teleport_raycast.visible to true. This will tell the code in _physics_process that this VR controller is going to
teleport, it will make the teleport_mesh visible so the user knows where the are teleporting to, and will make teleport_raycast visible to the player has a
‘laser sight’ they can use to aim the teleportation pos.
If held_object is not equal to null, then the VR controller is holding something. We then check to see if the object that is being held, held_object, extends
a class called VR_Interactable_Rigidbody. we have not made VR_Interactable_Rigidbody yet, but VR_Interactable_Rigidbody will be a custom class we will use
on all of the special/custom RigidBody-based nodes in the project.
Tip
Don’t worry, we will cover VR_Interactable_Rigidbody after this section!
If the held_object extends VR_Interactable_Rigidbody, then we call the interact function, so the held object can do whatever it is supposed to do when
the trigger is pressed and the object is held by the VR controller.
_on_button_pressed_grab function step-by-step explanation¶First this function checks to see if teleport_button_down is equal to true. If it is, then it calls return. We do this because we do not want the user to be
able to pick up objects while teleporting.
Then we check to see if the VR controller is currently not holding anything by checking if held_object is equal to null. If the VR controller is not holding anything,
then the _pickup_rigidbody function is called. If the VR controller is holding something, held_object is not equal to null, then the _throw_rigidbody function is called.
Finally, the pick-up/drop sound is played by calling the play function on hand_pickup_drop_sound.
_pickup_rigidbody function step-by-step explanation¶First the function makes a variable called rigid_body, which we’ll be using to store the RigidBody that the VR controller is going to
pick up, assuming there is a RigidBody to pick up.
Then the function checks to see if the grab_mode variable is equal to AREA. If it is, then it gets all of the PhysicsBody nodes within the grab_area using
the get_overlapping_bodies functions. This function will return an array of PhysicsBody nodes. We assign the array of PhysicsBody to a new
variable called bodies.
We then check to see if the length of the bodies variable is more than 0. If it is, we go through each of the PhysicsBody nodes in bodies using a for loop.
For each PhysicsBody node, we check if it is, or extends, a RigidBody node using if body is RigidBody, which will return true if the
PhysicsBody node is or extends the RigidBody node. If the object is a RigidBody, then we check to make sure there is not
a variable/constant called NO_PICKUP defined in the body. We do this because if you want to have RigidBody nodes that cannot be picked up, all you have to do is
define a constant/variable called NO_PICKUP and the VR controller will be unable to pick it up. If the RigidBody node does not have a variable/constant defined with
the name NO_PICKUP, then we assign the rigid_body variable to the RigidBody node and break the for loop.
What this section of code does is goes through all of the physics bodies within the grab_area and grabs the first RigidBody node that does not have a
variable/constant named NO_PICKUP and assigns it to the rigid_body variable so we can do some additional post processing later in this function.
If the grab_mode variable is not equal to AREA, we then check to see if it is equal to RAYCAST instead. If it is equal to RAYCAST, we force the grab_raycast node to update
using the force_raycast_update function. The force_raycast_update function will update the Raycast with the latest changes in the physics world. We then check
to see if the grab_raycast node collided with something using the is_colliding function, which will return true if the Raycast hit something.
If the grab_raycast hit something, we get the PhysicsBody node hit using the get_collider function. The code then checks to see if the node hit is
a RigidBody node using if body is RigidBody, which will return true if the PhysicsBody node is or extends the
RigidBody node. Then the code checks to see if the RigidBody node does not have a variable named NO_PICKUP, and if it does not,
then it assigns the RigidBody node to the rigid_body variable.
What this section of code does is sends the grab_raycast Raycast node out and checks if it collided with a RigidBody node that does
not have a variable/constant named NO_PICKUP. If it collided with a RigidBody without NO_PICKUP, it assigns the node to the rigid_body variable so we can do some
additional post processing later in this function.
The final section of code first checks to see if rigid_body is not equal to null. If rigid_body is not equal to null, then the VR controller found a
RigidBody-based node that can be picked up.
If there is a VR controller to pickup, we assign held_object to the RigidBody node stored in rigid_body. We then store the RigidBody node’s
mode, collision_layer, and collision_mask in held_object_data using mode, layer, and mask as keys for the respective values. This is so we can reapply them
later when the object is dropped by the VR controller.
We then set the RigidBody’s mode to MODE_STATIC, it’s collision_layer to zero, and it’s collision_mask to zero. This will make it where the held
RigidBody cannot interact with other objects in the physics world when held by the VR controller.
Next the hand_mesh MeshInstance is made invisible by setting the visible property to false. This is so the hand does not get in the way of the held object.
Likewise, the grab_raycast ‘laser sight’ is made invisible by setting the visible property to false.
Then the code checks to see if the held object extends a class called VR_Interactable_Rigidbody. If it does, then sets a variable called controller on held_object to self, and
calls the picked_up function on held_object. While we haven’t made VR_Interactable_Rigidbody just yet, what this will do is set tell the VR_Interactable_Rigidbody class that it is
being held by a VR controller, where the a reference to the controller is stored in the controller variable, through calling the picked_up function.
Tip
Don’t worry, we will cover VR_Interactable_Rigidbody after this section!
The code should make more sense after completing part 2 of this tutorial series, where we will actually be using VR_Interactable_Rigidbody.
What this section of code does is that if a RigidBody was found using the grab Area or Raycast, it sets it up so that it can be carried by the VR controller.
_throw_rigidbody function step-by-step explanation¶First the function checks to see if the VR controller is not holding any object by checking if the held_object variable is equal to null. If it is, then it simply
calls return so nothing happens. While this shouldn’t be possible, the _throw_rigidbody function should only be called if an object is held, this check helps ensure
that if something strange happens, this function will react as expected.
After checking if the VR controller is holding an object, we assume it is and set the stored RigidBody data back to the held object. We take the mode, layer and
mask data stored in the held_object_data dictionary and reapply it to the object in held_object. This will set the RigidBody back to the state it was prior to
being picked up.
Then we call apply_impulse on the held_object so that the RigidBody is thrown in the direction of the VR controller’s velocity, controller_velocity.
We then check to see if the object held extends a class called VR_Interactable_Rigidbody. If it does, then we call a function called dropped in held_object and set
held_object.controller to null. While we have not made VR_Interactable_Rigidbody yet, but what this will do is call the droppped function so the RigidBody
can do whatever it needs to do when dropped, and we set the controller variable to null so that the RigidBody knows that it is not being held.
Tip
Don’t worry, we will cover VR_Interactable_Rigidbody after this section!
The code should make more sense after completing part 2 of this tutorial series, where we will actually be using VR_Interactable_Rigidbody.
Regardless of whether held_object extends VR_Interactable_Rigidbody or not, we then set held_object to null so the VR controller knows it is no longer holding anything.
Because the VR controller is no longer holding anything, we make the hand_mesh visible by setting hand_mesh.visible to true.
Finally, if the grab_mode variable is set to RAYCAST, we set grab_raycast.visible to true so the ‘laser sight’ for the Raycast in grab_raycast is visible.
button_released function step-by-step explanation¶The only section of code in this function checks to see if the index of the button that was just released, button_index, is equal to 15, which should map to the trigger button
on the VR controller. The button_index variable is passed in by the button_release signal in ARVRController, which we connected in the _ready function.
If the trigger button was just released, then the _on_button_released_trigger function is called.
_on_button_released_trigger function step-by-step explanation¶The only section of code in this function first checks to see if the VR controller is trying to teleport by checking if the teleport_button_down variable is equal to true.
If the teleport_button_down variable is equal to true, the code then checks if there is a teleport position set and whether the teleport mesh is visible. It does this by
checking to see if teleport_pos is not equal to null and if teleport_mesh.visible is equal to true.
If there is a teleport position set and the teleport mesh is visible, the code then calculates the offset from the camera to the ARVROrigin node, which is assumed to be the
parent node of the VR controller. To calculate the offset, the global position (global_transform.origin) of the Player_Camera node has the global position of the ARVROrigin
subtracted from it. This will result in a vector that points from the ARVROrigin to the ARVRCamera, which we store in a variable called camera_offset.
The reason we need to know the offset is because some VR headsets use room tracking, where the player’s camera can be offset from the ARVROrigin node. Because of this, when we teleport we want to keep the offset created by room tracking so that when the player teleports, the offset created by the room tracking is not applied. Without this, if you moved in a room and then teleported, instead of appearing at the position you wanted to teleport at, your position would be offset by the amount of distance you have from the ARVROrigin node.
Now that we know the offset from the VR camera to the VR origin, we need to remove the difference on the Y axis. We do this because we do not want to offset based on the user’s height.
If we did not do this, when teleporting the player’s head would be level with the ground.
Then we can ‘teleport’ the player by setting the global position (global_transform.origin) of the ARVROrigin node to the position stored in teleport_pos with camera_offset subtracted from it.
This will teleport the player and remove the room tracking offset, so the user appears exactly where they want when teleporting.
Finally, regardless of whether the VR controller teleported the user or not, we reset the teleport related variables. teleport_button_down is set to false, teleport_mesh.visible is
set to false so the mesh is invisible, teleport_raycast.visible is set to false, and teleport_pos is set to null.
sleep_area_entered function step-by-step explanation¶The only section of code in this function checks to see if the PhysicsBody node that entered the Sleep_Area node
has a variable called can_sleep. If it does, then it sets the can_sleep variable to false and sets the sleeping variable to false.
Without doing this, sleeping PhysicsBody nodes would not be able to be picked up by the VR controller, even if the VR controller is at the same position as the PhysicsBody node. To work around this, we simply ‘wake up’ PhysicsBody nodes that are close to the VR controller.
sleep_area_exited function step-by-step explanation¶The only section of code in this function checks to see if the PhysicsBody node that entered the Sleep_Area node
has a variable called can_sleep. If it does, then it sets the can_sleep variable to true.
This allows RigidBody nodes that leave the Sleep_Area to sleep again, saving performance.
Okay, whew! That was a lot of code! Add the same script, VR_Controller.gd to the other VR controller scene so both VR controllers have the same script.
Now we just need to do one thing before testing the project! Right now we are referencing a class called VR_Interactable_Rigidbody, but we have not defined it yet.
While we will not be using VR_Interactable_Rigidbody in this tutorial, let’s create it real quick so the project can be run.
Creating a base class for interactable VR objects¶
With the Script tab still open, create a new GDScript called VR_Interactable_Rigidbody.gd.
Tip
You can create GDScripts in the Script tab by pressing File -> New Script....
Once you have VR_Interactable_Rigidbody.gd open, add the following code:
extends RigidBody
# (Ignore the unused variable warning)
# warning-ignore:unused_class_variable
var controller = null
func _ready():
pass
func interact():
pass
func picked_up():
pass
func dropped():
pass
Let’s quickly go through what this script.
First we start the script with class_name VR_Interactable_Rigidbody. What this does is that it tells Godot that this GDScript is a new class that called VR_Interactable_Rigidbody.
This allows us to compare nodes against the VR_Interactable_Rigidbody class in other script files without having to load the script directly or do anything special. We can compare
the class just like all of the built-in Godot classes.
Next is a class variable called controller. controller will be used to hold a reference to the VR controller that is currently holding the object. If a VR controller is not
holding the object, then the controller variable will be null. The reason we need to have a reference to the VR controller is so held objects can access VR controller specific
data, like controller_velocity.
Finally, we have four functions. The _ready function is defined by Godot and all we do is simply have pass as there is nothing we need to do when the object is added to the scene
in VR_Interactable_Rigidbody.
The interact function is a stub function that will be called when the interact button on the VR controller, the trigger in this case, is pressed while the object is held.
Tip
A stub function is a function that is defined but does not have any code. Stub functions are generally designed to be overwritten or extended. In this project, we are using the stub functions so there is a consistent interface across all interactable RigidBody objects.
The picked_up and dropped functions are stub functions that will be called when the object is picked up and dropped by the VR controller.
That is all we need to do for now! In the next part of this tutorial series, we’ll start making special interactable RigidBody objects.
Now that the base class is defined, the code in the VR controller should work. Go ahead and try the game again, and you should find you can teleport around by pressing the touch pad, and can grab and throw objects using the grab/grip buttons.
Now, you may want to try moving using the trackpads and/or joysticks, but it may make you motion sick!
One of the main reasons this can make you feel motion sick is because your vision tells you that you are moving, while your body is not moving. This conflict of signals can make the body feel sick. Let’s add a vignette shader to help reduce motion sickness while moving in VR!
Reducing motion sickness¶
Note
There are plenty of ways to reduce motion sickness in VR, and there is no one perfect way to reduce motion sickness. See this page on the Oculus Developer Center for more information on how to implement locomotion and reducing motion sickness.
To help reduce motion sickness while moving, we are going to add a vignette effect that will only be visible while the player moves.
First, quickly switch back to Game.tscn`. Under the ARVROrigin node there is a child node called Movement_Vignette. This node is going to apply a simple
vignette to the VR headset when the player is moving using the VR controllers. This should help reduce motion sickness.
Open up Movement_Vignette.tscn, which you can find in the Scenes folder. The scene is just a ColorRect node with a custom
shader. Feel free to look at the custom shader if you want, it is just a slightly modified version of the vignette shader you can find in the
Godot demo repository.
Let’s write the code that will make the vignette shader visible when the player is moving. Select the Movement_Vignette node and create a new script called Movement_Vignette.gd.
Add the following code:
extends Control
var controller_one
var controller_two
func _ready():
yield(get_tree(), "idle_frame")
yield(get_tree(), "idle_frame")
yield(get_tree(), "idle_frame")
yield(get_tree(), "idle_frame")
var interface = ARVRServer.primary_interface
if interface == null:
set_process(false)
printerr("Movement_Vignette: no VR interface found!")
return
rect_size = interface.get_render_targetsize()
rect_position = Vector2(0,0)
controller_one = get_parent().get_node("Left_Controller")
controller_two = get_parent().get_node("Right_Controller")
visible = false
func _process(_delta):
if (controller_one == null or controller_two == null):
return
if (controller_one.directional_movement == true or controller_two.directional_movement == true):
visible = true
else:
visible = false
Because this script is fairly brief, let’s quickly go over what it does.
Explaining the vignette code¶
There are two class variables, controller_one and controller_two. These variables will hold references to the left and right VR controllers.
In the _ready function first waits for four frames using yield. The reason we are waiting four frames is because we want to ensure the VR interface is ready
and accessible.
After waiting the primary VR interface is retrieved using ARVRServer.primary_interface, which is assigned to a variable called interface.
The code then checks to see if interface is equal to null. If interface is equal to null, then _process is disabled using set_process with a value of false.
If interface is not null, then we set the rect_size of the vignette shader to the render size of the VR viewport so it takes up the entire screen. We need to do this because
different VR headsets have different resolutions and aspect ratios, so we need to resize the node accordingly. We also set the rect_position of the vignette shader to zero so it
is in the correct position relative to the screen.
The left and right VR controllers are then retrieved and assigned to controller_one and controller_two respectively. Finally, the vignette shader is made invisible by default
by setting it’s visible property to false.
In _process the code first checks if either controller_one or controller_two are equal to null. If either node is equal to null, then return is called so
nothing happens.
Then the code checks to see if either of the VR controllers are moving the player using the touchpad/joystick by checking if directional_movement is equal to true in
controller_one or controller_two. If either of the VR controllers are moving the player, then the vignette shader makes itself visible by setting it’s visible property
to true. If neither VR controller is moving the player, so directional_movement is false in both VR controllers, than the vignette shader makes itself invisible by setting
it’s visible property to false.
That is the whole script! Now that we have written the code, go ahead and try moving around with the trackpad and/or joystick. You should find that it is less motion sickness-inducing then before!
Note
As previously mentioned, there are plenty of ways to reduce motion sickness in VR. Check out this page on the Oculus Developer Center for more information on how to implement locomotion and reducing motion sickness.
Final notes¶
Now you have fully working VR controllers that can move around the environment and interact with RigidBody-based objects. In the next part of this tutorial series, we will be creating some special RigidBody-based objects for the player to use!
Warning
You can download the finished project for this tutorial series on the Godot OpenVR GitHub repository, under the releases tab!
VR starter tutorial part 2¶
Introduction¶
In this part of the VR starter tutorial series, we will be adding a number of special RigidBody-based nodes that can be used in VR.
This continues from where we left on in the last tutorial part, where we just finished getting the VR controllers working and defined a custom
class called VR_Interactable_Rigidbody.
Tip
You can find the finished project on the OpenVR GitHub repository.
Adding destroyable targets¶
Before we make any of the special RigidBody-based nodes, we need something for them to do. Let’s make a simple sphere target that will break into a bunch of pieces when destroyed.
Open up Sphere_Target.tscn, which is in the Scenes folder. The scene is fairly simple, with just a StaticBody with a sphere shaped
CollisionShape, a MeshInstance node displaying a sphere mesh, and an AudioStreamPlayer3D node.
The special RigidBody nodes will handle damaging the sphere, which is why we are using a StaticBody node instead of something like an Area or RigidBody node. Outside of that, there isn’t really a lot to talk about, so let’s move straight into writing the code.
Select the Sphere_Target_Root node and make a new script called Sphere_Target.gd. Add the following code:
extends Spatial
var destroyed = false
var destroyed_timer = 0
const DESTROY_WAIT_TIME = 80
var health = 80
const RIGID_BODY_TARGET = preload("res://Assets/RigidBody_Sphere.scn")
func _ready():
set_physics_process(false)
func _physics_process(delta):
destroyed_timer += delta
if destroyed_timer >= DESTROY_WAIT_TIME:
queue_free()
func damage(damage):
if destroyed == true:
return
health -= damage
if health <= 0:
get_node("CollisionShape").disabled = true
get_node("Shpere_Target").visible = false
var clone = RIGID_BODY_TARGET.instance()
add_child(clone)
clone.global_transform = global_transform
destroyed = true
set_physics_process(true)
get_node("AudioStreamPlayer").play()
get_tree().root.get_node("Game").remove_sphere()
Let’s go over how this script works.
Explaining the Sphere Target code¶
First, let’s go through all of the class variables in the script:
destroyed: A variable to track whether the sphere target has been destroyed.destroyed_timer: A variable to track how long the sphere target has been destroyed.DESTROY_WAIT_TIME: A constant to define the length of time the target can be destroyed for before it frees/deletes itself.health: A variable to store the amount of health the sphere target has.RIGID_BODY_TARGET: A constant to hold the scene of the destroyed sphere target.
Note
Feel free to check out the RIGID_BODY_TARGET scene. It is just a bunch of RigidBody nodes and a broken sphere model.
We’ll be instancing this scene so when the target is destroyed, it looks like it broke into a bunch of pieces.
_ready function step-by-step explanation¶All the _ready function does is that it stops the _physics_process from being called by calling set_physics_process and passing false.
The reason we do this is because all of the code in _physics_process is for destroying this node when enough time has passed, which we only want to
do when the target has been destroyed.
_physics_process function step-by-step explanation¶First this function adds time, delta, to the destroyed_timer variable. It then checks to see if destroyed_timer is greater than or equal to
DESTROY_WAIT_TIME. If destroyed_timer is greater than or equal to DESTROY_WAIT_TIME, then the sphere target frees/deletes itself by calling
the queue_free function.
damage function step-by-step explanation¶The damage function will be called by the special RigidBody nodes, which will pass the amount of damage done to the target, which is a function argument
variable called damage. The damage variable will hold the amount of damage the special RigidBody node did to the sphere target.
First this function checks to make sure the target is not already destroyed by checking if the destroyed variable is equal to true. If destroyed is equal to true, then
the function calls return so none of the other code is called. This is just a safety check so that if two things damage the target at exactly the same time, the target cannot be
destroyed twice.
Next the function removes the amount of damage taken, damage, from the target’s health, health. If then checks to see if health is equal to zero or less, meaning that the
target has just been destroyed.
If the target has just been destroyed, then we disable the CollisionShape by setting it’s disabled property to true. We then make the Sphere_Target
MeshInstance invisible by setting the visible property to false. We do this so the target can no longer effect the physics world and so the non-broken target mesh is not visible.
After this the function then instances the RIGID_BODY_TARGET scene and adds it as a child of the target. It then sets the global_transform of the newly instanced scene, called clone, to the
global_transform of the non-broken target. This makes it where the broken target starts at the same position as the non-broken target with the same rotation and scale.
Then the function sets the destroyed variable to true so the target knows it has been destroyed and calls the set_physics_process function and passes true. This will start
executing the code in _physics_process so that after DESTROY_WAIT_TIME seconds have passed, the sphere target will free/destroy itself.
The function then gets the AudioStreamPlayer3D node and calls the play function so it plays its sound.
Finally, the remove_sphere function is called in Game.gd. To get Game.gd, the code uses the scene tree and works its way from the root of the scene tree to the root of the
Game.tscn scene.
Adding the remove_sphere function to Game.gd¶
You may have noticed we are calling a function in Game.gd, called remove_sphere, that we have not defined yet. Open up Game.gd and
add the following additional class variables:
var spheres_left = 10
var sphere_ui = null
spheres_left: The amount of sphere targets left in the world. In the providedGamescene, there are10spheres, so that is the initial value.sphere_ui: A reference to the sphere UI. We will use this later in the tutorial to display the amount of spheres left in the world.
With these variables defined, we can now add the remove_sphere function. Add the following code to Game.gd:
func remove_sphere():
spheres_left -= 1
if sphere_ui != null:
sphere_ui.update_ui(spheres_left)
Let’s go through what this function does real quick:
First, it removes one from the spheres_left variable. It then checks to see if the sphere_ui variable is not equal to null, and if it is not
equal to null it calls the update_ui function on sphere_ui, passing in the number of spheres as an argument to the function.
Note
We will add the code for sphere_ui later in this tutorial!
Now the Sphere_Target is ready to be used, but we don’t have any way to destroy it. Let’s fix that by adding some special RigidBody-based nodes
that can damage the targets.
Adding a pistol¶
Let’s add a pistol as the first interactable RigidBody node. Open up Pistol.tscn, which you can find in the Scenes folder.
Let’s quickly go over a few things of note in Pistol.tscn real quick before we add the code.
All of the nodes in Pistol.tscn expect the root node are rotated. This is so the pistol is in the correct rotation relative to the VR controller when it is picked up. The root node
is a RigidBody node, which we need because we’re going to use the VR_Interactable_Rigidbody class we created in the last part of this tutorial series.
There is a MeshInstance node called Pistol_Flash, which is a simple mesh that we will be using to simulate the muzzle flash on the end of the pistol’s barrel.
A MeshInstance node called LaserSight is used to as a guide for aiming the pistol, and it follows the direction of the Raycast node,
called Raycast, that the pistol uses to detect if its ‘bullet’ hit something. Finally, there is an AudioStreamPlayer3D node at the end of the
pistol that we will use to play the sound of the pistol firing.
Feel free to look at the other parts of the scene if you want. Most of the scene is fairly straightforward, with the major changes mentioned above. Select the RigidBody
node called Pistol and make a new script called Pistol.gd. Add the following code:
extends VR_Interactable_Rigidbody
var flash_mesh
const FLASH_TIME = 0.25
var flash_timer = 0
var laser_sight_mesh
var pistol_fire_sound
var raycast
const BULLET_DAMAGE = 20
const COLLISION_FORCE = 1.5
func _ready():
flash_mesh = get_node("Pistol_Flash")
flash_mesh.visible = false
laser_sight_mesh = get_node("LaserSight")
laser_sight_mesh.visible = false
raycast = get_node("RayCast")
pistol_fire_sound = get_node("AudioStreamPlayer3D")
func _physics_process(delta):
if flash_timer > 0:
flash_timer -= delta
if flash_timer <= 0:
flash_mesh.visible = false
func interact():
if flash_timer <= 0:
flash_timer = FLASH_TIME
flash_mesh.visible = true
raycast.force_raycast_update()
if raycast.is_colliding():
var body = raycast.get_collider()
var direction_vector = raycast.global_transform.basis.z.normalized()
var raycast_distance = raycast.global_transform.origin.distance_to(raycast.get_collision_point())
if body.has_method("damage"):
body.damage(BULLET_DAMAGE)
elif body is RigidBody:
var collision_force = (COLLISION_FORCE / raycast_distance) * body.mass
body.apply_impulse((raycast.global_transform.origin - body.global_transform.origin).normalized(), direction_vector * collision_force)
pistol_fire_sound.play()
if controller != null:
controller.rumble = 0.25
func picked_up():
laser_sight_mesh.visible = true
func dropped():
laser_sight_mesh.visible = false
Let’s go over how this script works.
Explaining the pistol code¶
First, notice how instead of extends RigidBody, we instead have extends VR_Interactable_Rigidbody. This makes it where the pistol script extends the
VR_Interactable_Rigidbody class so the VR controllers know this object can be interacted with and that the functions defined in VR_Interactable_Rigidbody
can be called when this object is held by a VR controller.
Next, let’s look at the class variables:
flash_mesh: A variable to hold the MeshInstance node that is used to simulate muzzle flash on the pistol.FLASH_TIME: A constant to define how long the muzzle flash will be visible. This will also define how fast the pistol can fire.flash_timer: A variable to hold the amount of time the muzzle flash has been visible for.laser_sight_mesh: A variable to hold the MeshInstance node that acts as the pistol’s ‘laser sight’.pistol_fire_sound: A variable to hold the AudioStreamPlayer3D node used for the pistol’s firing sound.raycast: A variable to hold the Raycast node that is used for calculating the bullet’s position and normal when the pistol is fired.BULLET_DAMAGE: A constant to define the amount of damage a single bullet from the pistol does.COLLISION_FORCE: A constant that defines the amount of force that is applied to RigidBody nodes when the pistol’s bullet collides.
_ready function step-by-step explanation¶This function gets the nodes and assigns them to their proper variables. For the flash_mesh and laser_sight_mesh nodes, both have their visible property set to false
so they are not visible initially.
_physics_process function step-by-step explanation¶The _physics_process function first checks to see if the pistol’s muzzle flash is visible by checking if flash_timer is more than zero. If flash_timer is more than
zero, then we remove time, delta from it. Next we check if the flash_timer variable is zero or less now that we removed delta from it. If it is, then the pistol
muzzle flash timer just finished and so we need to make flash_mesh invisible by setting it’s visible property to false.
interact function step-by-step explanation¶The interact function first checks to see if the pistol’s muzzle flash is invisible by checking to see if flash_timer is less than or equal to zero. We do this so we
can limit the rate of fire of the pistol to the length of time the muzzle flash is visible, which is a simple solution for limiting how fast the player can fire.
If flash_timer is zero or less, we then set flash_timer to FLASH_TIME so there is a delay before the pistol can fire again. After that we set flash_mesh.visible
to true so the muzzle flash at the end of the pistol is visible while flash_timer is more than zero.
Next we call the force_raycast_update function on the Raycast node in raycast so that it gets the latest collision info from the physics world.
We then check if the raycast hit something by checking if the is_colliding function is equal to true.
If the raycast hit something, then we get the PhysicsBody it collided with through the get_collider function. We assign the
hit PhysicsBody to a variable called body.
We then get the direction of the Raycast by getting it’s positive Z directional axis from the Basis on the raycast node’s global_transform.
This will give us the direction the raycast is pointing on the Z axis, which is the same direction as the blue arrow on the Spatial gizmo when
Local space mode is enabled in the Godot editor. We store this direction in a variable called direction_vector.
Next we get the distance from the Raycast origin to the Raycast collision point by getting the distance from the global position, global_transform.origin
of the raycast node to the collision point of the Raycast, raycast.get_collision_point, using the distance_to function. This will give us the distance the
Raycast traveled before it collided, which we store in a variable called raycast_distance.
Then the code checks if the PhysicsBody, body, has a function/method called damage using the has_method function. If the PhysicsBody
has a function/method called damage, then we call the damage function and pass BULLET_DAMAGE so it takes damage from the bullet colliding into it.
Regardless of whether the PhysicsBody has a damage function, we then check to see if body is a RigidBody-based node. If body is a
RigidBody-based node, then we want to push it when the bullet collides.
To calculate the amount of force applied, we simply take COLLISION_FORCE and divide it by raycast_distance, then we multiply the whole thing by body.mass. We store this calculation in
a variable called collision_force. This will make collisions over a shorter distance apply move force than those over longer distances, giving a slightly more realistic collision response.
We then push the RigidBody using the apply_impulse function, where the position is a zero Vector3 so the force is applied from the center, and the collision force is the collision_force variable we calculated.
Regardless of whether the raycast variable hit something or not, we then play the pistol shot sound by calling the play function on the pistol_fire_sound variable.
Finally, we check to see if the pistol is being held by a VR controller by checking to see if the controller variable is not equal to null. If it is not equal to null,
we then set the rumble property of the VR controller to 0.25, so there is a slight rumble when the pistol fires.
picked_up function step-by-step explanation¶This function simply makes the laser_sight_mesh MeshInstance visible by setting the visible property to true.
dropped function step-by-step explanation¶This function simply makes the laser_sight_mesh MeshInstance invisible by setting the visible property to false.
Pistol finished¶
That is all we need to do to have working pistols in the project! Go ahead and run the project. If you climb up the stairs and grab the pistols, you can fire them at the sphere targets in the scene using the trigger button on the VR controller! If you fire at the targets long enough, they will break into pieces.
Adding a shotgun¶
Next let’s add a shotgun to the VR project.
Adding a special shotgun RigidBody should be fairly straightforward, as almost everything with the shotgun is the same as the pistol.
Open up Shotgun.tscn, which you can find in the Scenes folder and take a look at the scene. Almost everything is the same as in Pistol.tscn.
The only thing that is different, beyond name changes, is that instead of a single Raycast, there are five Raycast nodes.
This is because a shotgun generally fires in a cone shape, so we are going to emulate that effect by having several Raycast nodes that will rotate
randomly in a cone shape when the shotgun fires.
Outside of that, everything is more or less the same as Pistol.tscn.
Let’s write the code for the shotgun. Select the RigidBody node called Shotgun and make a new script called Shotgun.gd. Add the following code:
extends VR_Interactable_Rigidbody
var flash_mesh
const FLASH_TIME = 0.25
var flash_timer = 0
var laser_sight_mesh
var shotgun_fire_sound
var raycasts
const BULLET_DAMAGE = 30
const COLLISION_FORCE = 4
func _ready():
flash_mesh = get_node("Shotgun_Flash")
flash_mesh.visible = false
laser_sight_mesh = get_node("LaserSight")
laser_sight_mesh.visible = false
raycasts = get_node("Raycasts")
shotgun_fire_sound = get_node("AudioStreamPlayer3D")
func _physics_process(delta):
if flash_timer > 0:
flash_timer -= delta
if flash_timer <= 0:
flash_mesh.visible = false
func interact():
if flash_timer <= 0:
flash_timer = FLASH_TIME
flash_mesh.visible = true
for raycast in raycasts.get_children():
if not raycast is RayCast:
continue
raycast.rotation_degrees = Vector3(90 + rand_range(10, -10), 0, rand_range(10, -10))
raycast.force_raycast_update()
if raycast.is_colliding():
var body = raycast.get_collider()
var direction_vector = raycasts.global_transform.basis.z.normalized()
var raycast_distance = raycasts.global_transform.origin.distance_to(raycast.get_collision_point())
if body.has_method("damage"):
body.damage(BULLET_DAMAGE)
if body is RigidBody:
var collision_force = (COLLISION_FORCE / raycast_distance) * body.mass
body.apply_impulse((raycast.global_transform.origin - body.global_transform.origin).normalized(), direction_vector * collision_force)
shotgun_fire_sound.play()
if controller != null:
controller.rumble = 0.25
func picked_up():
laser_sight_mesh.visible = true
func dropped():
laser_sight_mesh.visible = false
The majority of this code is exactly the same as the code for the pistol with just a few minor changes that are primarily just different names. Due to how similar these scripts are, let’s just focus on the changes.
Explaining the shotgun code¶
Like with the pistol, the shotgun extends VR_Interactable_Rigidbody so the VR controllers know that this object can be interacted with and what functions are
available.
There is only one new class variable:
raycasts: A variable to hold the node that has all of the Raycast nodes as its children.
The new class variable replaces the raycast variable from Pistol.gd, because with the shotgun we need to process multiple Raycast nodes
instead of just one. All of the other class variables are the same as Pistol.gd and function the same way, some just are renamed to be non-pistol specific.
interact function step-by-step explanation¶The interact function first checks to see if the shotgun’s muzzle flash is invisible by checking to see if flash_timer is less than or equal to zero. We do this so we
can limit the rate of fire of the shotgun to the length of time the muzzle flash is visible, which is a simple solution for limiting how fast the player can fire.
If flash_timer is zero or less, we then set flash_timer to FLASH_TIME so there is a delay before the shotgun can fire again. After that we set flash_mesh.visible
to true so the muzzle flash at the end of the shotgun is visible while flash_timer is more than zero.
Next we call the force_raycast_update function on the Raycast node in raycast so that it gets the latest collision info from the physics world.
We then check if the raycast hit something by checking if the is_colliding function is equal to true.
Next we go through each of the child nodes of the raycasts variable using a for loop. This way the code will go through each of the Raycast nodes
that are children of the raycasts variable.
For each node, we check to see if raycast is not a Raycast node. If the node is not a Raycast node, we simply use continue to skip it.
Next we rotate the raycast node randomly around a small 10 degrees cone by settings the rotation_degrees variable of the raycast to a Vector3 where the X and Z axis
are a random number from -10 to 10. This random number is selected using the rand_range function.
Then we call the force_raycast_update function on the Raycast node in raycast so that it gets the latest collision info from the physics world.
We then check if the raycast hit something by checking if the is_colliding function is equal to true.
The rest of the code is exactly the same, but this process is repeated for each Raycast node that is a child of the raycasts variable.
If the raycast hit something, then we get the PhysicsBody it collided with through the get_collider function. We assign the
hit PhysicsBody to a variable called body.
We then get the direction of the raycast by getting it’s positive Z directional axis from the Basis on the raycast node’s global_transform.
This will give us the direction the raycast is pointing on the Z axis, which is the same direction as the blue arrow on the Spatial gizmo when
Local space mode is enabled in the Godot editor. We store this direction in a variable called direction_vector.
Next we get the distance from the raycast origin to the raycast collision point by getting the distance from the global position, global_transform.origin of the raycast
node to the collision point of the raycast, raycast.get_collision_point, using the distance_to function. This will give us the distance the Raycast
traveled before it collided, which we store in a variable called raycast_distance.
Then the code checks if the PhysicsBody, body, has a function/method called damage using the has_method function. If the PhysicsBody
has a function/method called damage, then we call the damage function and pass BULLET_DAMAGE so it takes damage from the bullet colliding into it.
Regardless of whether the PhysicsBody has a damage function, we then check to see if body is a RigidBody-based node. If body is a
RigidBody-based node, then we want to push it when the bullet collides.
To calculate the amount of force applied, we simply take COLLISION_FORCE and divide it by raycast_distance, then we multiply the whole thing by body.mass. We store this calculation in
a variable called collision_force. This will make collisions over a shorter distance apply move force than those over longer distances, giving a slightly more realistic collision response.
We then push the RigidBody using the apply_impulse function, where the position is a zero Vector3 so the force is applied from the center,
and the collision force is the collision_force variable we calculated.
Once all of the Raycasts in the raycast variable have been iterated over, we then play the shotgun shot sound by calling the play function on the shotgun_fire_sound variable.
Finally, we check to see if the shotgun is being held by a VR controller by checking to see if the controller variable is not equal to null. If it is not equal to null,
we then set the rumble property of the VR controller to 0.25, so there is a slight rumble when the shotgun fires.
Shotgun finished¶
Everything else is exactly the same as the pistol, with at most just some simple name changes.
Now the shotgun is finished! You can find the shotgun in the sample scene by looking around the back of one of the walls (not in the building though!).
Adding a bomb¶
Okay, let’s add a different special RigidBody. Instead of adding something that shoots, let’s add something we can throw - a bomb!
Open up Bomb.tscn, which is in the Scenes folder.
The root node is a RigidBody node that we’ll be extending to use VR_Interactable_Rigidbody, which has a CollisionShape
like the other special RigidBody nodes we’ve made so far. Likewise, there is a MeshInstance called Bomb that is used to
display the mesh for the bomb.
Then we have an Area node simply called Area that has a large CollisionShape as its child. We’ll use this Area
node to effect anything within it when the bomb explodes. Essentially, this Area node will be the blast radius for the bomb.
There is also a couple Particles nodes. One of the Particles nodes are for the smoke coming out of the bomb’s fuse, while another is for the explosion. You can take a look at the ParticlesMaterial resources, which define how the particles work, if you want. We will not be covering how the particles work in this tutorial due to it being outside of the scope of this tutorial.
There is one thing with the Particles nodes that we need to make note of. If you select the Explosion_Particles node, you’ll find that its lifetime property
is set to 0.75 and that the one shot checkbox is enabled. This means that the particles will only play once, and the particles will last for 0.75 seconds.
We’ll need to know this so we can time the removal of the bomb with the end of the explosion Particles.
Let’s write the code for the bomb. Select the Bomb RigidBody node and make a new script called Bomb.gd. Add the following code:
extends VR_Interactable_Rigidbody
var bomb_mesh
const FUSE_TIME = 4
var fuse_timer = 0
var explosion_area
const EXPLOSION_DAMAGE = 100
const EXPLOSION_TIME = 0.75
var explosion_timer = 0
var exploded = false
const COLLISION_FORCE = 8
var fuse_particles
var explosion_particles
var explosion_sound
func _ready():
bomb_mesh = get_node("Bomb")
explosion_area = get_node("Area")
fuse_particles = get_node("Fuse_Particles")
explosion_particles = get_node("Explosion_Particles")
explosion_sound = get_node("AudioStreamPlayer3D")
set_physics_process(false)
func _physics_process(delta):
if fuse_timer < FUSE_TIME:
fuse_timer += delta
if fuse_timer >= FUSE_TIME:
fuse_particles.emitting = false
explosion_particles.one_shot = true
explosion_particles.emitting = true
bomb_mesh.visible = false
collision_layer = 0
collision_mask = 0
mode = RigidBody.MODE_STATIC
for body in explosion_area.get_overlapping_bodies():
if body == self:
pass
else:
if body.has_method("damage"):
body.damage(EXPLOSION_DAMAGE)
if body is RigidBody:
var direction_vector = body.global_transform.origin - global_transform.origin
var bomb_distance = direction_vector.length()
var collision_force = (COLLISION_FORCE / bomb_distance) * body.mass
body.apply_impulse(Vector3.ZERO, direction_vector.normalized() * collision_force)
exploded = true
explosion_sound.play()
if exploded:
explosion_timer += delta
if explosion_timer >= EXPLOSION_TIME:
explosion_area.monitoring = false
if controller != null:
controller.held_object = null
controller.hand_mesh.visible = true
if controller.grab_mode == "RAYCAST":
controller.grab_raycast.visible = true
queue_free()
func interact():
set_physics_process(true)
fuse_particles.emitting = true
Let’s go over how this script works.
Explaining the bomb code¶
Like with the other special RigidBody nodes, the bomb extends VR_Interactable_Rigidbody so the VR controllers know this object can be interacted with and
that the functions defined defined in VR_Interactable_Rigidbody can be called when this object is held by a VR controller.
Next, let’s look at the class variables:
bomb_mesh: A variable to hold the MeshInstance node that is used for the non-exploded bomb.FUSE_TIME: A constant to define how long the fuse will ‘burn’ before the bomb explodesfuse_timer: A variable to hold the length of time that has passed since the bomb’s fuse has started to burn.explosion_area: A variable to hold the Area node used to detect objects within the bomb’s explosion.EXPLOSION_DAMAGE: A constant to define how much damage is applied with the bomb explodes.EXPLOSION_TIME: A constant to define how long the bomb will last in the scene after it explodes. This value should be the same as thelifetimeproperty of the explosion Particles node.explosion_timerA variable to hold the length of time that has passed since the bomb exploded.exploded: A variable to hold whether the bomb has exploded or not.COLLISION_FORCE: A constant that defines the amount of force that is applied to RigidBody nodes when the bomb explodes.fuse_particles: A variable to hold a reference to the Particles node used for the bomb’s fuse.explosion_particles: A variable to hold a reference to the Particles node used for the bomb’s explosion.explosion_sound: A variable to hold a reference to the AudioStreamPlayer3D node used for the explosion sound.
_ready function step-by-step explanation¶The _ready function first gets all of the nodes from the bomb scene and assigns them to their respective class variables for later use.
Then we call set_physics_process and pass false so _physics_process is not executed. We do this because the code in _physics_process will start burning
the fuse and exploding the bomb, which we only want to do when the user interacts with the bomb. If we did not disable _physics_process, the bomb’s fuse would start
before the user has a chance to get to the bomb.
_physics_process function step-by-step explanation¶The _physics_process function first checks to see if fuse_timer is less than FUSE_TIME. If it is, then the bomb’s fuse is still burning.
If the bomb’s fuse is still burning, we then add time, delta, to the fuse_timer variable. We then check to see if fuse_timer is more than or equal to FUSE_TIME
now that we have added delta to it. If fuse_timer is more than or equal to FUSE_TIME, then the fuse has just finished and we need to explode the bomb.
To explode the bomb, we first stop emitting particles for the fuse by setting emitting to false on fuse_particles. We then tell the explosion Particles
node, explosion_particles, to emit all of its particle in a single shot by setting one_shot to true. After that, we set emitting to true on explosion_particles so it looks
like the bomb has exploded. To help make it look like the bomb exploded, we hide the bomb MeshInstance node by setting bomb_mesh.visible to false.
To keep the bomb from colliding with other objects in the physics world, we set the collision_layer and collision_mask properties of the bomb to 0. We also
change the RigidBody mode to MODE_STATIC so the bomb RigidBody does not move.
Then we need to get all of the PhysicsBody nodes within the explosion_area node. To do this, we use the get_overlapping_bodies in a for loop. The get_overlapping_bodies
function will return an array of PhysicsBody nodes within the Area node, which is exactly what we are looking for.
For each PhysicsBody node, which we store in a variable called body, we check to see if it is equal to self. We do this so the bomb does not accidentally explode
itself, as the explosion_area could potentially detect the Bomb RigidBody as a PhysicsBody within the explosion area.
If the PhysicsBody node, body, is not the bomb, then we first check to see if the PhysicsBody node has a function
called damage. If the PhysicsBody node has a function called damage, we call it and pass EXPLOSION_DAMAGE to it so it takes damage from the explosion.
Next we check to see if the PhysicsBody node is a RigidBody. If body is a RigidBody, we want to move it
when the bomb explodes.
To move the RigidBody node when the bomb explodes, we first need to calculate the direction from the bomb to the RigidBody node. To do this
we subtract the global position of the bomb, global_transform.origin from the global position of the RigidBody. This will give us a Vector3
that points from the bomb to the RigidBody node. We store this Vector3 in a variable called direction_vector.
We then calculate the distance the RigidBody is from the bomb by using the length function on direction_vector. We store the distance in a variable called
bomb_distance.
We then calculate the amount of force the bomb will be applied to the RigidBody node when the bomb explodes by dividing COLLISION_FORCE by
bomb_distance, and multiplying that by collision_force. This will make it so if the RigidBody node is closer to the bomb, it will be pushed farther.
Finally, we push the RigidBody node using the apply_impulse function, with a Vector3 position of zero and collision_force
multiplied by direction_vector.normalized as the force. This will send the RigidBody node flying when the bomb explodes.
After we have looped through all of the PhysicsBody nodes within the explosion_area, we set the exploded variable to true so the code knows the bomb
exploded and call play on explosion_sound so the sound of an explosion is played.
Alright, the next section of code starts by first checking if exploded is equal to true.
If exploded is equal to true, then that means the bomb is waiting for the explosion particles to finish before it frees/destroys itself. We add time, delta, to
explosion_timer so we can track how long it has been since the bomb has exploded.
If explosion_timer is greater than or equal to EXPLOSION_TIME after we added delta, then the explosion timer just finished.
If the explosion timer just finished, we set explosion_area.monitoring to false. The reason we do this is because there was a bug that would print an error when you
freed/deleted an Area node when the monitoring property was true. To make sure this doesn’t happen, we simply set monitoring to false on explosion_area.
Next we check to see if the bomb is being held by a VR controller by checking to see if the controller variable is not equal to null. If the bomb is being held by a VR controller,
we set the held_object property of the VR controller, controller, to null. Because the VR controller is no longer holding anything, we make the VR controller’s hand mesh
visible by setting controller.hand_mesh.visible to true. Then we check to see if the VR controller grab mode is RAYCAST, and if it is we set controller.grab_raycast.visible to
true so the ‘laser sight’ for the grab raycast is visible.
Finally, regardless if the bomb is being held by a VR controller or not, we call queue_free so the bomb scene is freed/removed from the scene.
interact function step-by-step explanation¶First the interact function calls set_physics_process and passes true so the code in _physics_process starts executing. This will start the bomb’s fuse and
eventually lead to the bomb exploding.
Finally, we start the fuse particles by setting fuse_particles.visible to true.
Bomb finished¶
Now the bomb is ready to go! You can find the bombs in the orange building.
Because of how we are calculating the VR controller’s velocity, it is easiest to throw the bombs using a thrusting-like motion instead of a more natural throwing-like motion. The smooth curve of a throwing-like motion is harder to track with the code we are using for calculating the velocity of the VR controllers, so it does not always work correctly and can lead inaccurately calculated velocities.
Adding a sword¶
Let’s add one last special RigidBody-based node that can destroy targets. Let’s add a sword so we can slice through the targets!
Open up Sword.tscn, which you can find in the Scenes folder.
There is not a whole lot going on here. All of the child nodes of the root Sword RigidBody node are rotated to they are positioned correctly when the
VR controller picks them up, there is a MeshInstance node for displaying the sword, and there is an AudioStreamPlayer3D
node that holds a sound for the sword colliding with something.
There is one thing that is slightly different though. There is a KinematicBody node called Damage_Body. If you take a look at it, you’ll find that it
is not on any collision layers, and is instead only on a single collision mask. This is so the KinematicBody will not effect other
PhysicsBody nodes in the scene, but it will still be effected by PhysicsBody nodes.
We are going to use the Damage_Body KinematicBody node to detect the collision point and normal when the sword collides with something in the scene.
Tip
While this is perhaps not the best way of getting the collision information from a performance point of view, it does give us a lot of information we can use for post-processing! Using a KinematicBody this way means we can detect exactly where ths sword collided with other PhysicsBody nodes.
That is really the only thing note worthy about the sword scene. Select the Sword RigidBody node and make a new script called Sword.gd.
Add the following code:
extends VR_Interactable_Rigidbody
const SWORD_DAMAGE = 2
const COLLISION_FORCE = 0.15
var damage_body = null
func _ready():
damage_body = get_node("Damage_Body")
damage_body.add_collision_exception_with(self)
sword_noise = get_node("AudioStreamPlayer3D")
func _physics_process(_delta):
var collision_results = damage_body.move_and_collide(Vector3.ZERO, true, true, true);
if (collision_results != null):
if collision_results.collider.has_method("damage"):
collision_results.collider.damage(SWORD_DAMAGE)
if collision_results.collider is RigidBody:
if controller == null:
collision_results.collider.apply_impulse(
collision_results.position,
collision_results.normal * linear_velocity * COLLISION_FORCE)
else:
collision_results.collider.apply_impulse(
collision_results.position,
collision_results.normal * controller.controller_velocity * COLLISION_FORCE)
sword_noise.play()
Let’s go over how this script works!
Explaining the sword code¶
Like with the other special RigidBody nodes, the sword extends VR_Interactable_Rigidbody so the VR controllers know this object can be interacted with and
that the functions defined defined in VR_Interactable_Rigidbody can be called when this object is held by a VR controller.
Next, let’s look at the class variables:
SWORD_DAMAGE: A constant to define the amount of damage the sword does. This damage is applied to every object in the sword on every_physics_processcallCOLLISION_FORCE: A constant that defines the amount of force applied to RigidBody nodes when the sword collides with a PhysicsBody.damage_body: A variable to hold the KinematicBody node used to detect whether the sword is stabbing a PhysicsBody node or not.sword_noise: A variable to hold the AudioStreamPlayer3D node used to play a sound when the sword collides with something.
_ready function step-by-step explanation¶All we are doing in the _ready function is getting the Damage_Body KinematicBody node and assigning it to damage_body.
Because we do not want the sword to detect a collision with the root RigidBody node of the sword, we call
add_collision_exception_with on damage_body and pass self so the sword will not be detected.
Finally, we get the AudioStreamPlayer3D node for the sword collision sound and apply it to the sword_noise variable.
_physics_process function step-by-step explanation¶First we need to determine whether the sword is colliding with something or not. To do this, we use the move_and_collide function of the damage_body node.
Unlike how move_and_collide is normally used, we are not passing a velocity and instead are passing an empty Vector3. Because we do not
want the damage_body node to move, we set the test_only argument (the fourth argument) as true so the KinematicBody generates
collision info without actually causing any collisions within the collision world.
The move_and_collide function will return a KinematicCollision class that has all of the information we need for detecting collisions
on the sword. We assign the return value of move_and_collide to a variable called collision_results.
Next we check to see if collision_results is not equal to null. If collision_results is not equal to null, then we know that the sword has collided with something.
We then check to see if the PhysicsBody the sword collided with has a function/method called damage using the has_method function. If the
PhysicsBody has a function called damage_body, we call it and pass the amount of damage the sword does, SWORD_DAMAGE, to it.
Next we check to see if the PhysicsBody the sword collided with is a RigidBody. If what the sword collided with is a
RigidBody node, we then check to see if the sword is being held by a VR controller or not by checking to see if controller is equal to null.
If the sword is not being held by a VR controller, controller is equal to null, then we move the RigidBody node the sword collided with using
the apply_impulse function. For the position of the apply_impulse function, we use collision_position variable stored within the KinematicCollision
class in collision_results. For the velocity of the apply_impulse function, we use the collision_normal multiplied by the linear_velocity of the sword’s
RigidBody node multiplied by COLLISION_FORCE.
If the sword is being held by a VR controller, controller is not equal to null, then we move the RigidBody node the sword collided with using
the apply_impulse function. For the position of the apply_impulse function, we use collision_position variable stored within the KinematicCollision
class in collision_results. For the velocity of the apply_impulse function, we use the collision_normal multiplied by the VR controller’s velocity multiplied by COLLISION_FORCE.
Finally, regardless of whether the PhysicsBody is a RigidBody or not, we play the sound of the sword colliding with
something by calling play on sword_noise.
Sword finished¶
With that done, you can now slice through the targets! You can find the sword in the corner in between the shotgun and the pistol.
Updating the target UI¶
Let’s update the UI as the sphere targets are destroyed.
Open up Main_VR_GUI.tscn, which you can find in the Scenes folder.
Feel free to look at how the scene is setup if you want, but in an effort to keep this tutorial from becoming too long, we will not be covering the scene setup in this tutorial.
Expand the GUI Viewport node and then select the Base_Control node. Add a new script called Base_Control.gd, and add the following:
extends Control
var sphere_count_label
func _ready():
sphere_count_label = get_node("Label_Sphere_Count")
get_tree().root.get_node("Game").sphere_ui = self
func update_ui(sphere_count):
if sphere_count > 0:
sphere_count_label.text = str(sphere_count) + " Spheres remaining"
else:
sphere_count_label.text = "No spheres remaining! Good job!"
Let’s go over how this script works real quick.
First, in _ready, we get the Label that shows how many spheres are left and assign it to the sphere_count_label class variable.
Next, we get Game.gd by using get_tree().root and assign sphere_ui to this script.
In update_ui, we change the sphere Label’s text. If there is at least one sphere remaining, we change the text to show how many spheres are still
left in the world. If there are no more spheres remaining, we change the text and congratulate the player.
Adding the final special RigidBody¶
Finally, before we finish this tutorial, let’s add a way to reset the game while in VR.
Open up Reset_Box.tscn, which you will find in Scenes. Select the Reset_Box RigidBody node and make a new script called Reset_Box.gd.
Add the following code:
extends VR_Interactable_Rigidbody
var start_transform
var reset_timer = 0
const RESET_TIME = 10
const RESET_MIN_DISTANCE = 1
func _ready():
start_transform = global_transform
func _physics_process(delta):
if start_transform.origin.distance_to(global_transform.origin) >= RESET_MIN_DISTANCE:
reset_timer += delta
if reset_timer >= RESET_TIME:
global_transform = start_transform
reset_timer = 0
func interact():
# (Ignore the unused variable warning)
# warning-ignore:return_value_discarded
get_tree().change_scene("res://Game.tscn")
func dropped():
global_transform = start_transform
reset_timer = 0
Let’s quickly go over how this script works.
Explaining the reset box code¶
Like with the other special RigidBody-based objects we’ve created, the reset box extends VR_Interactable_Rigidbody.
The start_transform class variable will store the global transform of the reset box when the game starts, the reset_timer class variable will hold the length of
time that has passed since the reset box’s position has moved, the RESET_TIME constant defines the length of time the reset box has to wait before being reset, and
the RESET_MIN_DISTANCE constant defines how far the reset box has to be away from it’s initial position before the reset timer starts.
In the _ready function all we are doing is storing the global_transform of the reset position when the scene starts. This is so we can reset the position, rotation, and scale
of the reset box object to this initial transform when enough time has passed.
In the _physics_process function, the code checks to see if the reset box’s initial position to the reset box’s current position is farther than RESET_MIN_DISTANCE. If it is
farther, then it starts adding time, delta, to reset_timer. Once reset_timer is more than or equal to RESET_TIME, we reset the global_transform to the start_transform
so the reset box is back in its initial position. We then set reset_timer to 0.
The interact function simply reloads the Game.tscn scene using get_tree().change_scene. This will reload the game scene, resetting everything.
Finally, the dropped function resets the global_transform to the initial transform in start_transform so the reset box has its initial position/rotation. Then reset_timer is
set to 0 so the timer is reset.
Reset box finished¶
With that done, when you grab and interact with the reset box, the entire scene will reset/restart and you can destroy all the targets again!
Note
Resetting the scene abruptly without any sort of transition can lead to discomfort in VR.
Final notes¶
Whew! That was a lot of work.
Now you have a fully working VR project with multiple different types of special RigidBody-based nodes that can be used and extended. Hopefully this will help serve as an introduction to making fully-featured VR games in Godot! The code and concepts detailed in this tutorial can be expanded on to make puzzle games, action games, story-based games, and more!
Warning
You can download the finished project for this tutorial series on the OpenVR GitHub repository, under the releases tab!
Plugins¶
Editor plugins¶
Installing plugins¶
Godot features an editor plugin system with numerous plugins developed by the community. Plugins can extend the editor’s functionality with new nodes, additional docks, convenience features, and more.
Finding plugins¶
The preferred way to find Godot plugins is to use the Asset Library. While it can be browsed online, it’s more convenient to use it directly from the editor. To do so, click the AssetLib tab at the top of the editor:

You can also find assets on code hosting websites such as GitHub.
Note
Some repositories describe themselves as “plugins” but may not actually be editor plugins. This is especially the case for scripts that are intended to be used in a running project. You don’t need to enable such plugins to use them. Download them and extract the files in your project folder.
One way to distinguish editor plugins from non-editor plugins is to look for
a plugin.cfg file in the repository that hosts the plugin. If the
repository contains a plugin.cfg file in a folder placed in the
addons/ folder, then it is an editor plugin.
Installing a plugin¶
To install a plugin, download it as a ZIP archive. On the Asset Library, this can be done using the Download button, either from the editor or using the Web interface.
On GitHub, if a plugin has tags (versions) declared, go to the Releases tab to download a stable release. This ensures you download a version that was declared to be stable by its author.
On GitHub, if the plugin doesn’t have any tags declared, use the Download ZIP button to download a ZIP of the latest revision:
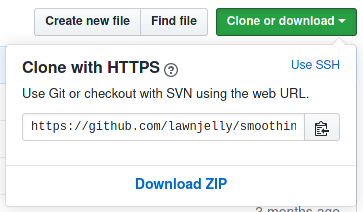
Extract the ZIP archive and move the addons/ folder it contains into your
project folder. If your project already contains an addons/ folder, move the
plugin’s addons/ folder into your project folder to merge the new folder
contents with the existing one. Your file manager may ask you whether to write
into the folder; answer Yes. No files will be overwritten in the process.
Enabling a plugin¶
To enable the freshly installed plugin, open Project > Project Settings at the top of the editor then go the Plugins tab. If the plugin was packaged correctly, you should see it in the list of plugins. Click on the gray Inactive text and choose Active to enable the plugin. The word Active will display in green to confirm the plugin was enabled.
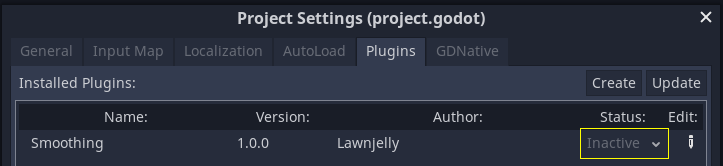
You can use the plugin immediately after enabling it; there’s no need to restart the editor. Likewise, disabling a plugin can be done without having to restart the editor.
Making plugins¶
About plugins¶
A plugin is a great way to extend the editor with useful tools. It can be made entirely with GDScript and standard scenes, without even reloading the editor. Unlike modules, you don’t need to create C++ code nor recompile the engine. While this makes plugins less powerful, there are still many things you can do with them. Note that a plugin is similar to any scene you can already make, except it is created using a script to add editor functionality.
This tutorial will guide you through the creation of two simple plugins so you can understand how they work and be able to develop your own. The first will be a custom node that you can add to any scene in the project and the other will be a custom dock added to the editor.
Creating a plugin¶
Before starting, create a new empty project wherever you want. This will serve as a base to develop and test the plugins.
The first thing you need for the editor to identify a new plugin is to
create two files: a plugin.cfg for configuration and a tool script with the
functionality. Plugins have a standard path like addons/plugin_name inside
the project folder. Godot provides a dialog for generating those files and
placing them where they need to be.
In the main toolbar, click the Project dropdown. Then click
Project Settings.... Go to the Plugins tab and then click
on the Create button in the top-right.
You will see the dialog appear, like so:

The placeholder text in each field describes how it affects the plugin’s creation of the files and the config file’s values.
To continue with the example, use the following values:
Plugin Name: My Custom Node
Subfolder: my_custom_node
Description: A custom node made to extend the Godot Engine.
Author: Your Name Here
Version: 1.0.0
Language: GDScript
Script Name: custom_node.gd
Activate now: No
You should end up with a directory structure like this:
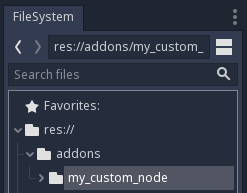
plugin.cfg is a simple INI file with metadata about your plugin.
The name and description help people undersatnd what it does.
Your name helps you get properly credited for your work.
The version number helps others know if they have an outdated version;
if you are unsure on how to come up with the version number, check out Semantic Versioning.
The main script file will instruct Godot what your plugin does in the editor
once it is active.
The script file¶
Upon creation of the plugin, the dialog will automatically open the
EditorPlugin script for you. The script has two requirements that you cannot
change: it must be a tool script, or else it will not load properly in the
editor, and it must inherit from EditorPlugin.
Warning
In addition to the EditorPlugin script, any other GDScript that your plugin uses
must also be a tool. Any GDScript without tool imported into the editor
will act like an empty file!
It’s important to deal with initialization and clean-up of resources. A good practice is to use the virtual function _enter_tree() to initialize your plugin and _exit_tree() to clean it up. Thankfully, the dialog generates these callbacks for you. Your script should look something like this:
tool
extends EditorPlugin
func _enter_tree():
# Initialization of the plugin goes here
pass
func _exit_tree():
# Clean-up of the plugin goes here
pass
#if TOOLS
using Godot;
using System;
[Tool]
public class CustomNode : EditorPlugin
{
public override void _EnterTree()
{
// Initialization of the plugin goes here
}
public override void _ExitTree()
{
// Clean-up of the plugin goes here
}
}
#endif
This is a good template to use when creating new plugins.
A custom node¶
Sometimes you want a certain behavior in many nodes, such as a custom scene or control that can be reused. Instancing is helpful in a lot of cases, but sometimes it can be cumbersome, especially if you’re using it in many projects. A good solution to this is to make a plugin that adds a node with a custom behavior.
Warning
Nodes added via an EditorPlugin are “CustomType” nodes. While they work with any scripting language, they have fewer features than the Script Class system. If you are writing GDScript or NativeScript, we recommend using them instead.
To create a new node type, you can use the function
add_custom_type() from the
EditorPlugin class. This function can add new types to the editor
(nodes or resources). However, before you can create the type, you need a script
that will act as the logic for the type. While that script doesn’t have to use
the tool keyword, it can be added so the script runs in the editor.
For this tutorial, we’ll create a simple button that prints a message when clicked. For that, we’ll need a simple script that extends from Button. It could also extend BaseButton if you prefer:
tool
extends Button
func _enter_tree():
connect("pressed", self, "clicked")
func clicked():
print("You clicked me!")
using Godot;
using System;
[Tool]
public class MyButton : Button
{
public override void _EnterTree()
{
Connect("pressed", this, "clicked");
}
public void clicked()
{
GD.Print("You clicked me!");
}
}
That’s it for our basic button. You can save this as my_button.gd inside the
plugin folder. You’ll also need a 16×16 icon to show in the scene tree. If you
don’t have one, you can grab the default one from the engine and save it in your
addons/my_custom_node folder as icon.png, or use the default Godot logo
(preload(“res://icon.png”)). You can also use SVG icons if desired.
Now, we need to add it as a custom type so it shows on the Create New Node
dialog. For that, change the custom_node.gd script to the following:
tool
extends EditorPlugin
func _enter_tree():
# Initialization of the plugin goes here
# Add the new type with a name, a parent type, a script and an icon
add_custom_type("MyButton", "Button", preload("my_button.gd"), preload("icon.png"))
func _exit_tree():
# Clean-up of the plugin goes here
# Always remember to remove it from the engine when deactivated
remove_custom_type("MyButton")
#if TOOLS
using Godot;
using System;
[Tool]
public class CustomNode : EditorPlugin
{
public override void _EnterTree()
{
// Initialization of the plugin goes here
// Add the new type with a name, a parent type, a script and an icon
var script = GD.Load<Script>("MyButton.cs");
var texture = GD.Load<Texture>("icon.png");
AddCustomType("MyButton", "Button", script, texture);
}
public override void _ExitTree()
{
// Clean-up of the plugin goes here
// Always remember to remove it from the engine when deactivated
RemoveCustomType("MyButton");
}
}
#endif
With that done, the plugin should already be available in the plugin list in the Project Settings, so activate it as explained in Checking the results.
Then try it out by adding your new node:
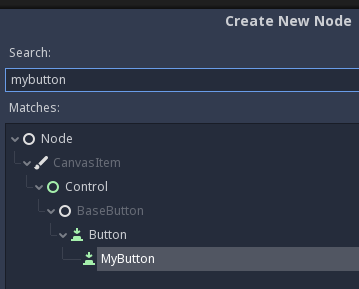
When you add the node, you can see that it already has the script you created attached to it. Set a text to the button, save and run the scene. When you click the button, you can see some text in the console:
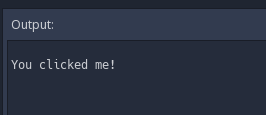
A custom dock¶
Sometimes, you need to extend the editor and add tools that are always available. An easy way to do it is to add a new dock with a plugin. Docks are just scenes based on Control, so they are created in a way similar to usual GUI scenes.
Creating a custom dock is done just like a custom node. Create a new
plugin.cfg file in the addons/my_custom_dock folder, then
add the following content to it:
[plugin]
name="My Custom Dock"
description="A custom dock made so I can learn how to make plugins."
author="Your Name Here"
version="1.0"
script="custom_dock.gd"
[plugin]
name="My Custom Dock"
description="A custom dock made so I can learn how to make plugins."
author="Your Name Here"
version="1.0"
script="CustomDock.cs"
Then create the script custom_dock.gd in the same folder. Fill it with the
template we’ve seen before to get a
good start.
Since we’re trying to add a new custom dock, we need to create the contents of the dock. This is nothing more than a standard Godot scene: just create a new scene in the editor then edit it.
For an editor dock, the root node must be a Control or one of its child classes. For this tutorial, you can create a single button. The name of the root node will also be the name that appears on the dock tab, so be sure to give it a short and descriptive name. Also, don’t forget to add some text to your button.
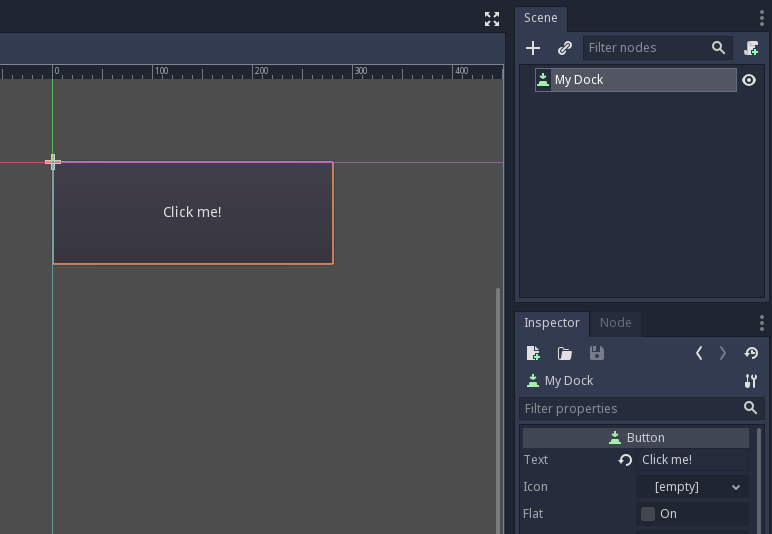
Save this scene as my_dock.tscn. Now, we need to grab the scene we created
then add it as a dock in the editor. For this, you can rely on the function
add_control_to_dock() from the
EditorPlugin class.
You need to select a dock position and define the control to add (which is the scene you just created). Don’t forget to remove the dock when the plugin is deactivated. The script could look like this:
tool
extends EditorPlugin
# A class member to hold the dock during the plugin life cycle
var dock
func _enter_tree():
# Initialization of the plugin goes here
# Load the dock scene and instance it
dock = preload("res://addons/my_custom_dock/my_dock.tscn").instance()
# Add the loaded scene to the docks
add_control_to_dock(DOCK_SLOT_LEFT_UL, dock)
# Note that LEFT_UL means the left of the editor, upper-left dock
func _exit_tree():
# Clean-up of the plugin goes here
# Remove the dock
remove_control_from_docks(dock)
# Erase the control from the memory
dock.free()
#if TOOLS
using Godot;
using System;
[Tool]
public class CustomDock : EditorPlugin
{
Control dock;
public override void _EnterTree()
{
dock = (Control)GD.Load<PackedScene>("addons/my_custom_dock/my_dock.tscn").Instance();
AddControlToDock(DockSlot.LeftUl, dock);
}
public override void _ExitTree()
{
// Clean-up of the plugin goes here
// Remove the dock
RemoveControlFromDocks(dock);
// Erase the control from the memory
dock.Free();
}
}
#endif
Note that, while the dock will initially appear at its specified position, the user can freely change its position and save the resulting layout.
Checking the results¶
It’s now time to check the results of your work. Open the Project Settings and click on the Plugins tab. Your plugin should be the only one on the list. If it is not showing, click on the Update button in the top-right corner.

You can see the plugin is inactive on the Status column; click on the status to select Active. The dock should become visible before you even close the settings window. You should now have a custom dock:

Going beyond¶
Now that you’ve learned how to make basic plugins, you can extend the editor in several ways. Lots of functionality can be added to the editor with GDScript; it is a powerful way to create specialized editors without having to delve into C++ modules.
You can make your own plugins to help yourself and share them in the Asset Library so that people can benefit from your work.
Making main screen plugins¶
What this tutorial covers¶
As seen in the Making plugins page, making a basic plugin that extends the editor is fairly easy. This plugin mechanism also allows you to create new UIs in the central part of the editor, similarly to the basic 2D, 3D, Script and AssetLib views. Such editor plugins are referred as “Main screen plugins”.
This tutorial leads you through the creation of a basic main screen plugin. With this plugin example, we want to demonstrate:
- Creating a main screen plugin
- Linking the main screen to another plugin GUI element (such as a Tab panel, similar to the Inspector tab)
For the sake of simplicity, the two GUI elements of our main screen plugin will both consist in a Label and a Button. Pressing one element’s button will display some text on the other’s label node.
Initializing the plugin¶
The plugin itself is a Godot project. It is best to set its contents in an
addons/my_plugin_name/ structure. The only files that lie in the root folder
are the project.godot file, and the project icon.
In the addons/my_plugin_name/ folder, we create the plugin.cfg file as
described in the Making plugins page.
[plugin]
name="Main screen plugin demo"
description="A plugin that adds a main screen panel and a side-panel which communicate with each other."
author="Your Name Here"
version="1.0.0"
script="main_screen_plugin.gd"
We also initialize the file targeted by the script= property of the .cfg
file. In our example, main_screen_plugin.gd.
tool
extends EditorPlugin
func _enter_tree():
pass
func _exit_tree():
pass
func has_main_screen():
return true
func make_visible(visible):
pass
func get_plugin_name():
return "Main Screen Plugin"
func get_plugin_icon():
return get_editor_interface().get_base_control().get_icon("Node", "EditorIcons")
The important part in this script is the has_main_screen() function, which is
overloaded so it returns true. This function is automatically called by the
editor on plugin activation, to tell it that this plugin adds a new center view to
the editor. For now, we’ll leave this script as-is and we’ll come back to it
later.
Scenes¶
The main_screen_plugin.gd file will be responsible for each of our plugin’s
UI element instantiation, and it will also manage the communication between them.
As a matter of fact, we wish to design each UI element in their own scene.
Different scenes are not aware of each other unless they are both children of a
parent scene, yet they will then require get_node("../sibling") accessors.
Such practice is more likely to produce errors at runtime, especially if these
scenes do not share the same parent node. This is why, they should only be
allowed to access their children.
So, in order to communicate information to another scene, the best design is to
define signals. If a user action in a UI scene #1 has to trigger something in
another UI scene #2, then this user action has to emit a signal from scene #1,
and scene #2 will be connected to that signal. Since all of our UI scenes will
be instanced by main_screen_plugin.gd script, this one script will also
connect each of them to the required signals.
Note
If the main_screen_plugin.gd instantiates the UI scenes, won’t
they be sibling nodes then?
Not necessarily: this script may add all UI scenes as children of the same node
of the editor’s scene tree - but maybe it won’t. And the main_screen_plugin.gd
script will not be the parent node of any instantiated scene because it is a
script, not a node! This script will only hold references to instantiated
scenes.
Main screen scene¶
Create a new scene with a Panel root node. Select this root node,
and in the viewport, click the Layout menu and select Full Rect.
You also need to enable the Expand vertical size flag in the inspector.
The panel now uses all the space available in the viewport.
Now, let’s add a new script on the root node. Name it main_panel.gd.
We then add 2 children to this Panel node: first a Button node. Place it
anywhere on the Panel. Then add a Label node.
Now we need to define a behaviour when this button is pressed. This is covered
by the Handling a signal page, so this
part will not be described in details in this tutorial.
Select the Button node and click the Node side dock.
Select the pressed() signal and click the Connect button (you can also
double-click the pressed() signal instead). In the window that opened,
select the Panel node (we will centralize all behaviors in its attached
script). Keep the default function name, make sure that the Make function
toggle is ON and hit Connect. This creates an _on_Button_pressed()
function in the main_panel.gd script, that will be called every time the
button is pressed.
As the button gets pressed, we want the side-panel’s Label node to show a
specific text. As explained above, we cannot directly access the target scene,
so we’ll emit a signal instead. The main_screen_plugin.gd script will then
connect this signal to the target scene. Let’s continue in the main_panel.gd
script:
tool
extends Panel
signal main_button_pressed(value)
func _on_Button_pressed():
emit_signal("main_button_pressed", "Hello from main screen!")
In the same way, this main scene’s Label node has to show a value when it
receives a specific signal. Let’s create a new
_on_side_button_pressed(text_to_show) function for this purpose:
func _on_side_button_pressed(text_to_show):
$Label.text = text_to_show
We are done for the main screen panel. Save the scene as main_panel.tscn.
Tabbed panel scene¶
The tabbed panel scene is almost identical to the main panel scene. You can
either duplicate the main_panel.tscn file and name the new file
side_panel.tscn, or re-create it from a new scene by following the previous
section again. However, you will have to create a new script and attach it to
the Panel root node. Save it as side_panel.gd. Its content is slightly
different, as the signal emitted and the target function have different names.
Here is the script’s full content:
tool
extends Panel
signal side_button_pressed(value)
func _on_Button_pressed():
emit_signal("side_button_pressed", "Hello from side panel!")
func _on_main_button_pressed(text_to_show):
$Label.text = text_to_show
Connecting the two scenes in the plugin script¶
We now need to update the main_screen_plugin.gd script so the plugin
instances our 2 GUI scenes and places them at the right places in the editor.
Here is the full main.gd:
tool
extends EditorPlugin
const MainPanel = preload("res://addons/my_plugin_name/main_panel.tscn")
const SidePanel = preload("res://addons/my_plugin_name/side_panel.tscn")
var main_panel_instance
var side_panel_instance
func _enter_tree():
main_panel_instance = MainPanel.instance()
side_panel_instance = SidePanel.instance()
# Add the main panel to the editor's main viewport.
get_editor_interface().get_editor_viewport().add_child(main_panel_instance)
# Add the side panel to the Upper Left (UL) dock slot of the left part of the editor.
# The editor has 4 dock slots (UL, UR, BL, BR) on each side (left/right) of the main screen.
add_control_to_dock(DOCK_SLOT_LEFT_UL, side_panel_instance)
# Hide the main panel
make_visible(false)
func _exit_tree():
main_panel_instance.queue_free()
side_panel_instance.queue_free()
func _ready():
main_panel_instance.connect("main_button_pressed", side_panel_instance, "_on_main_button_pressed")
side_panel_instance.connect("side_button_pressed", main_panel_instance, "_on_side_button_pressed")
func has_main_screen():
return true
func make_visible(visible):
if visible:
main_panel_instance.show()
else:
main_panel_instance.hide()
func get_plugin_name():
return "Main Screen Plugin"
func get_plugin_icon():
# Must return some kind of Texture for the icon.
return get_editor_interface().get_base_control().get_icon("Node", "EditorIcons")
A couple of specific lines were added. First, we defined the constants that
contain our 2 GUI packed scenes (MainPanel and SidePanel). We will use
these resources to instance both scenes.
The _enter_tree() function is called before _ready(). This is where we
actually instance the 2 GUI scenes, and add them as children of specific parts
of the editor. The side panel case is similar to the example shown in
Making plugins page: we add the scene in an editor dock. We specified
it will be placed in the left-side dock, upper-left tab.
EditorPlugin class does not provide any function to add an element in the
main viewport. We thus have to use the
get_editor_interface().get_editor_viewport() to obtain this viewport and add
our main panel instance as a child to it. We call the make_visible(false)
function to hide the main panel so it is not directly shown when first
activating the plugin.
The _exit_tree() is pretty straightforward. It is automatically called when
the plugin is deactivated. It is then important to queue_free() the elements
previously instanced to preserve memory. If you don’t, the elements will
effectively be invisible in the editor, but they will remain present in the
memory. Multiple de-activations/re-activations will then increase memory usage
without any way to free it, which is not good.
Finally the make_visible() function is overridden to hide or show the main
panel as needed. This function is automatically called by the editor when the
user clicks on another main viewport button such as 2D, 3D or Script.
Try the plugin¶
Activate the plugin in the Project Settings. You’ll observe a new button next to 2D, 3D, Script above the main viewport. You’ll also notice a new tab in the left dock. Try to click the buttons in both side and main panels: events are emitted and caught by the corresponding target scene to change the Label caption inside it.
If you would like to see a more complete example of what main screen plugins are capable of, check out the 2.5D demo projects here: https://github.com/godotengine/godot-demo-projects/tree/master/misc/2.5d
Import plugins¶
Note
This tutorial assumes you already know how to make generic plugins. If in doubt, refer to the Making plugins page. This also assumes you are acquainted with Godot’s import system.
Introduction¶
An import plugin is a special type of editor tool that allows custom resources to be imported by Godot and be treated as first-class resources. The editor itself comes bundled with a lot of import plugins to handle the common resources like PNG images, Collada and glTF models, Ogg Vorbis sounds, and many more.
This tutorial will show you how to create a simple import plugin to load a custom text file as a material resource. This text file will contain three numeric values separated by comma, which represents the three channels of a color, and the resulting color will be used as the albedo (main color) of the imported material. In this example it will contain the pure blue color (zero red, zero green, and full blue):
0,0,255
Configuration¶
First we need a generic plugin that will handle the initialization and
destruction of our import plugin. Let’s add the plugin.cfg file first:
[plugin]
name="Silly Material Importer"
description="Imports a 3D Material from an external text file."
author="Yours Truly"
version="1.0"
script="material_import.gd"
Then we need the material_import.gd file to add and remove the import plugin
when needed:
# material_import.gd
tool
extends EditorPlugin
var import_plugin
func _enter_tree():
import_plugin = preload("import_plugin.gd").new()
add_import_plugin(import_plugin)
func _exit_tree():
remove_import_plugin(import_plugin)
import_plugin = null
When this plugin is activated, it will create a new instance of the import
plugin (which we’ll soon make) and add it to the editor using the
add_import_plugin() method. We store
a reference to it in a class member import_plugin so we can refer to it
later when removing it. The
remove_import_plugin() method is
called when the plugin is deactivated to clean up the memory and let the editor
know the import plugin isn’t available anymore.
Note that the import plugin is a reference type, so it doesn’t need to be
explicitly released from memory with the free() function. It will be
released automatically by the engine when it goes out of scope.
The EditorImportPlugin class¶
The main character of the show is the EditorImportPlugin class. It is responsible for implementing the methods that are called by Godot when it needs to know how to deal with files.
Let’s begin to code our plugin, one method at time:
# import_plugin.gd
tool
extends EditorImportPlugin
func get_importer_name():
return "demos.sillymaterial"
The first method is the get_importer_name(). This is a unique name for your plugin that is used by Godot to know which import was used in a certain file. When the files needs to be reimported, the editor will know which plugin to call.
func get_visible_name():
return "Silly Material"
The get_visible_name() method is responsible for returning the name of the type it imports and it will be shown to the user in the Import dock.
You should choose this name as a continuation to “Import as”, e.g. “Import as Silly Material”. You can name it whatever you want but we recommend a descriptive name for your plugin.
func get_recognized_extensions():
return ["mtxt"]
Godot’s import system detects file types by their extension. In the get_recognized_extensions() method you return an array of strings to represent each extension that this plugin can understand. If an extension is recognized by more than one plugin, the user can select which one to use when importing the files.
Tip
Common extensions like .json and .txt might be used by many
plugins. Also, there could be files in the project that are just data
for the game and should not be imported. You have to be careful when
importing to validate the data. Never expect the file to be well-formed.
func get_save_extension():
return "material"
The imported files are saved in the .import folder at the project’s root.
Their extension should match the type of resource you are importing, but since
Godot can’t tell what you’ll use (because there might be multiple valid
extensions for the same resource), you need to declare what will be used in
the import.
Since we’re importing a Material, we’ll use the special extension for such
resource types. If you are importing a scene, you can use scn. Generic
resources can use the res extension. However, this is not enforced in any
way by the engine.
func get_resource_type():
return "SpatialMaterial"
The imported resource has a specific type, so the editor can know which property slot it belongs to. This allows drag and drop from the FileSystem dock to a property in the Inspector.
In our case it’s a SpatialMaterial, which can be applied to 3D objects.
Note
If you need to import different types from the same extension, you have to create multiple import plugins. You can abstract the import code on another file to avoid duplication in this regard.
Options and presets¶
Your plugin can provide different options to allow the user to control how the resource will be imported. If a set of selected options is common, you can also create different presets to make it easier for the user. The following image shows how the options will appear in the editor:

Since there might be many presets and they are identified with a number, it’s a good practice to use an enum so you can refer to them using names.
tool
extends EditorImportPlugin
enum Presets { PRESET_DEFAULT }
...
Now that the enum is defined, let’s keep looking at the methods of an import plugin:
func get_preset_count():
return Presets.size()
The get_preset_count() method
returns the amount of presets that this plugins defines. We only have one preset
now, but we can make this method future-proof by returning the size of our
Presets enumeration.
func get_preset_name(preset):
match preset:
PRESET_DEFAULT:
return "Default"
_:
return "Unknown"
Here we have the get_preset_name() method, which gives names to the presets as they will be presented to the user, so be sure to use short and clear names.
We can use the match statement here to make the code more structured. This
way it’s easy to add new presets in the future. We use the catch all pattern to
return something too. Although Godot won’t ask for presets beyond the preset
count you defined, it’s always better to be on the safe side.
If you have only one preset you could simply return its name directly, but if you do this you have to be careful when you add more presets.
func get_import_options(preset):
match preset:
PRESET_DEFAULT:
return [{
"name": "use_red_anyway",
"default_value": false
}]
_:
return []
This is the method which defines the available options. get_import_options() returns an array of dictionaries, and each dictionary contains a few keys that are checked to customize the option as its shown to the user. The following table shows the possible keys:
| Key | Type | Description |
|---|---|---|
name |
String | The name of the option. When showed, underscores become spaces and first letters are capitalized. |
default_value |
Any | The default value of the option for this preset. |
property_hint |
Enum value | One of the PropertyHint values to use as hint. |
hint_string |
String | The hint text of the property. The same as you’d add in the export statement in GDScript. |
usage |
Enum value | One of the PropertyUsageFlags values to define the usage. |
The name and default_value keys are mandatory, the rest are optional.
Note that the get_import_options method receives the preset number, so you
can configure the options for each different preset (especially the default
value). In this example we use the match statement, but if you have lots of
options and the presets only change the value you may want to create the array
of options first and then change it based on the preset.
Warning
The get_import_options method is called even if you don’t
define presets (by making get_preset_count return zero). You
have to return an array even it’s empty, otherwise you can get
errors.
func get_option_visibility(option, options):
return true
For the
get_option_visibility()
method, we simply return true because all of our options (i.e. the single
one we defined) are visible all the time.
If you need to make certain option visible only if another is set with a certain value, you can add the logic in this method.
The import method¶
The heavy part of the process, responsible for converting the files into resources, is covered by the import() method. Our sample code is a bit long, so let’s split in a few parts:
func import(source_file, save_path, options, r_platform_variants, r_gen_files):
var file = File.new()
var err = file.open(source_file, File.READ)
if err != OK:
return err
var line = file.get_line()
file.close()
The first part of our import method opens and reads the source file. We use the
File class to do that, passing the source_file
parameter which is provided by the editor.
If there’s an error when opening the file, we return it to let the editor know that the import wasn’t successful.
var channels = line.split(",")
if channels.size() != 3:
return ERR_PARSE_ERROR
var color
if options.use_red_anyway:
color = Color8(255, 0, 0)
else:
color = Color8(int(channels[0]), int(channels[1]), int(channels[2]))
This code takes the line of the file it read before and splits it in pieces that are separated by a comma. If there are more or less than the three values, it considers the file invalid and reports an error.
Then it creates a new Color variable and sets its values
according to the input file. If the use_red_anyway option is enabled, then
it sets the color as a pure red instead.
var material = SpatialMaterial.new()
material.albedo_color = color
This part makes a new SpatialMaterial that is the imported resource. We create a new instance of it and then set its albedo color as the value we got before.
return ResourceSaver.save("%s.%s" % [save_path, get_save_extension()], material)
This is the last part and quite an important one, because here we save the made
resource to the disk. The path of the saved file is generated and informed by
the editor via the save_path parameter. Note that this comes without the
extension, so we add it using string formatting. For
this we call the get_save_extension method that we defined earlier, so we
can be sure that they won’t get out of sync.
We also return the result from the ResourceSaver.save() method, so if there’s an error in this step, the editor will know about it.
Platform variants and generated files¶
You may have noticed that our plugin ignored two arguments of the import
method. Those are return arguments (hence the r at the beginning of their
name), which means that the editor will read from them after calling your import
method. Both of them are arrays that you can fill with information.
The r_platform_variants argument is used if you need to import the resource
differently depending on the target platform. While it’s called platform
variants, it is based on the presence of feature tags,
so even the same platform can have multiple variants depending on the setup.
To import a platform variant, you need to save it with the feature tag before
the extension, and then push the tag to the r_platform_variants array so the
editor can know that you did.
For example, let’s say we save a different material for a mobile platform. We would need to do something like the following:
r_platform_variants.push_back("mobile")
return ResourceSaver.save("%s.%s.%s" % [save_path, "mobile", get_save_extension()], mobile_material)
The r_gen_files argument is meant for extra files that are generated during
your import process and need to be kept. The editor will look at it to
understand the dependencies and make sure the extra file is not inadvertently
deleted.
This is also an array and should be filled with full paths of the files you save. As an example, let’s create another material for the next pass and save it in a different file:
var next_pass = SpatialMaterial.new()
next_pass.albedo_color = color.inverted()
var next_pass_path = "%s.next_pass.%s" % [save_path, get_save_extension()]
err = ResourceSaver.save(next_pass_path, next_pass)
if err != OK:
return err
r_gen_files.push_back(next_pass_path)
Trying the plugin¶
This has been theoretical, but now that the import plugin is done, let’s
test it. Make sure you created the sample file (with the contents described in
the introduction section) and save it as test.mtxt. Then activate the plugin
in the Project Settings.
If everything goes well, the import plugin is added to the editor and the file system is scanned, making the custom resource appear on the FileSystem dock. If you select it and focus the Import dock, you can see the only option to select there.
Create a MeshInstance node in the scene, and for its Mesh property set up a new SphereMesh. Unfold the Material section in the Inspector and then drag the file from the FileSystem dock to the material property. The object will update in the viewport with the blue color of the imported material.
Go to Import dock, enable the “Use Red Anyway” option, and click on “Reimport”. This will update the imported material and should automatically update the view showing the red color instead.
And that’s it! Your first import plugin is done! Now get creative and make plugins for your own beloved formats. This can be quite useful to write your data in a custom format and then use it in Godot as if they were native resources. This shows how the import system is powerful and extendable.
Spatial gizmo plugins¶
Introduction¶
Spatial gizmo plugins are used by the editor and custom plugins to define the gizmos attached to any kind of Spatial node.
This tutorial will show you the two main approaches to defining your own custom gizmos. The first option works well for simple gizmos and creates less clutter in your plugin structure, while the second one will let you store some per-gizmo data.
Note
This tutorial assumes you already know how to make generic plugins. If in doubt, refer to the Making plugins page.
The EditorSpatialGizmoPlugin¶
Regardless of the approach we choose, we will need to create a new EditorSpatialGizmoPlugin. This will allow us to set a name for the new gizmo type and define other behaviors such as whether the gizmo can be hidden or not.
This would be a basic setup:
# MyCustomGizmoPlugin.gd
extends EditorSpatialGizmoPlugin
func get_name():
return "CustomNode"
# MyCustomEditorPlugin.gd
tool
extends EditorPlugin
const MyCustomGizmoPlugin = preload("res://addons/my-addon/MyCustomGizmoPlugin.gd")
var gizmo_plugin = MyCustomGizmoPlugin.new()
func _enter_tree():
add_spatial_gizmo_plugin(gizmo_plugin)
func _exit_tree():
remove_spatial_gizmo_plugin(gizmo_plugin)
For simple gizmos, just inheriting EditorSpatialGizmoPlugin is enough. If you want to store some per-gizmo data or you are porting a Godot 3.0 gizmo to 3.1+, you should go with the second approach.
Simple approach¶
The first step is to, in our custom gizmo plugin, override the has_gizmo()
method so that it returns true when the spatial parameter is of our target type.
# ...
func has_gizmo(spatial):
return spatial is MyCustomSpatial
# ...
Then we can override methods like redraw() or all the handle related ones.
# ...
func _init():
create_material("main", Color(1, 0, 0))
create_handles_material("handles")
func redraw(gizmo):
gizmo.clear()
var spatial = gizmo.get_spatial_node()
var lines = PoolVector3Array()
lines.push_back(Vector3(0, 1, 0))
lines.push_back(Vector3(0, spatial.my_custom_value, 0))
var handles = PoolVector3Array()
handles.push_back(Vector3(0, 1, 0))
handles.push_back(Vector3(0, spatial.my_custom_value, 0))
gizmo.add_lines(lines, get_material("main", gizmo), false)
gizmo.add_handles(handles, get_material("handles", gizmo))
# ...
Note that we created a material in the _init method, and retrieved it in the redraw method using get_material(). This method retrieves one of the material’s variants depending on the state of the gizmo (selected and/or editable).
So the final plugin would look somewhat like this:
extends EditorSpatialGizmoPlugin
const MyCustomSpatial = preload("res://addons/my-addon/MyCustomSpatial.gd")
func _init():
create_material("main", Color(1,0,0))
create_handles_material("handles")
func has_gizmo(spatial):
return spatial is MyCustomSpatial
func redraw(gizmo):
gizmo.clear()
var spatial = gizmo.get_spatial_node()
var lines = PoolVector3Array()
lines.push_back(Vector3(0, 1, 0))
lines.push_back(Vector3(0, spatial.my_custom_value, 0))
var handles = PoolVector3Array()
handles.push_back(Vector3(0, 1, 0))
handles.push_back(Vector3(0, spatial.my_custom_value, 0))
gizmo.add_lines(lines, get_material("main", gizmo), false)
gizmo.add_handles(handles, get_material("handles", gizmo))
# you should implement the rest of handle-related callbacks
# (get_handle_name(), get_handle_value(), commit_handle()...)
Note that we just added some handles in the redraw method, but we still need to implement the rest of handle-related callbacks in EditorSpatialGizmoPlugin to get properly working handles.
Alternative approach¶
In some cases we want to provide our own implementation of EditorSpatialGizmo, maybe because we want to have some state stored in each gizmo or because we are porting an old gizmo plugin and we don’t want to go through the rewriting process.
In these cases all we need to do is, in our new gizmo plugin, override create_gizmo(), so it returns our custom gizmo implementation for the Spatial nodes we want to target.
# MyCustomGizmoPlugin.gd
extends EditorSpatialGizmoPlugin
const MyCustomSpatial = preload("res://addons/my-addon/MyCustomSpatial.gd")
const MyCustomGizmo = preload("res://addons/my-addon/MyCustomGizmo.gd")
func _init():
create_material("main", Color(1, 0, 0))
create_handles_material("handles")
func create_gizmo(spatial):
if spatial is MyCustomSpatial:
return MyCustomGizmo.new()
else:
return null
This way all the gizmo logic and drawing methods can be implemented in a new clas extending EditorSpatialGizmo, like so:
# MyCustomGizmo.gd
extends EditorSpatialGizmo
# You can store data in the gizmo itself (more useful when working with handles)
var gizmo_size = 3.0
func redraw():
clear()
var spatial = get_spatial_node()
var lines = PoolVector3Array()
lines.push_back(Vector3(0, 1, 0))
lines.push_back(Vector3(gizmo_size, spatial.my_custom_value, 0))
var handles = PoolVector3Array()
handles.push_back(Vector3(0, 1, 0))
handles.push_back(Vector3(gizmo_size, spatial.my_custom_value, 0))
var material = get_plugin().get_material("main", self)
add_lines(lines, material, false)
var handles_material = get_plugin().get_material("handles", self)
add_handles(handles, handles_material)
# you should implement the rest of handle-related callbacks
# (get_handle_name(), get_handle_value(), commit_handle()...)
Note that we just added some handles in the redraw method, but we still need to implement the rest of handle-related callbacks in EditorSpatialGizmo to get properly working handles.
Inspector plugins¶
The inspector dock supports custom plugins to create your own widgets for editing properties. This tutorial explains how to use the EditorInspectorPlugin and EditorProperty classes to write such plugins with the example of creating a custom value editor.
Setup¶
Just like Making plugins, we start out by making a new plugin,
getting a plugin.cfg file created, and start with our
EditorPlugin. However, instead of using
add_custom_node or add_control_to_dock we’ll use
add_inspector_plugin.
tool extends EditorPlugin
var plugin: EditorInspectorPlugin
func _enter_tree():
# EditorInspectorPlugin is a resource, so we use `new()` instead of `instance()`.
plugin = preload("res://addons/MyPlugin/MyInspectorPlugin.gd").new()
add_inspector_plugin(plugin)
func _exit_tree():
remove_inspector_plugin(plugin)
EditorInspectorPlugin¶
To actually connect into the Inspector, we create a EditorInspectorPlugin class. This script provides the “hooks” to the inspector. Thanks to this class, the editor will call the functions within the EditorInspectorPlugin while it goes through the process of building the UI for the inspector. The script is used to check if we should enable ourselves for any Object that is currently in the inspector (including any Resource that is embedded!).
Once enabled, EditorInspectorPlugin has methods that allow for adding EditorProperty nodes or just custom Control nodes to the beginning and end of the inspector for that Object, or for overriding or changing existing property editors.
# MyInspectorPlugin.gd
extends EditorInspectorPlugin
func can_handle(object):
# Here you can specify which object types (classes) should be handled by
# this plugin. For example if the plugin is specific to your player
# class defined with `class_name MyPlayer`, you can do:
# `return object is MyPlayer`
# In this example we'll support all objects, so:
return true
func parse_property(object, type, path, hint, hint_text, usage):
# We will handle properties of type integer.
if type == TYPE_INT:
# Register *an instance* of the custom property editor that we'll define next.
add_property_editor(path, MyIntEditor.new())
# We return `true` to notify the inspector that we'll be handling
# this integer property, so it doesn't need to parse other plugins
# (including built-in ones) for an appropriate editor.
return true
else:
return false
EditorProperty¶
Next, we define the actual EditorProperty custom value editor that we want instantiated to edit integers. This is a custom Control and we can add any kinds of additional nodes to make advanced widgets to embed in the inspector.
# MyIntEditor.gd
extends EditorProperty
class_name MyIntEditor
var updating = false
var spin = EditorSpinSlider.new()
func _init():
# We'll add an EditorSpinSlider control, which is the same that the
# inspector already uses for integer and float edition.
# If you want to put the editor below the property name, use:
# `set_bottom_editor(spin)`
# Otherwise to put it inline with the property name use:
add_child(spin)
# To remember focus when selected back:
add_focusable(spin)
# Setup the EditorSpinSlider
spin.set_min(0)
spin.set_max(1000)
spin.connect("value_changed", self, "_spin_changed")
func _spin_changed(value):
if (updating):
return
emit_changed(get_edited_property(), value)
func update_property():
var new_value = get_edited_object()[get_edited_property()]
updating = true
spin.set_value(new_value)
updating = false
Visual Shader plugins¶
Visual Shader plugins are used to create custom VisualShader nodes in GDScript.
The creation process is different from usual editor plugins. You do not need to
create a plugin.cfg file to register it; instead, create and save a script
file and it will be ready to use, provided the custom node is registered with
class_name.
This short tutorial will explain how to make a Perlin-3D noise node (original code from this GPU noise shaders plugin.
Create a Sprite and assign a ShaderMaterial to its material slot:
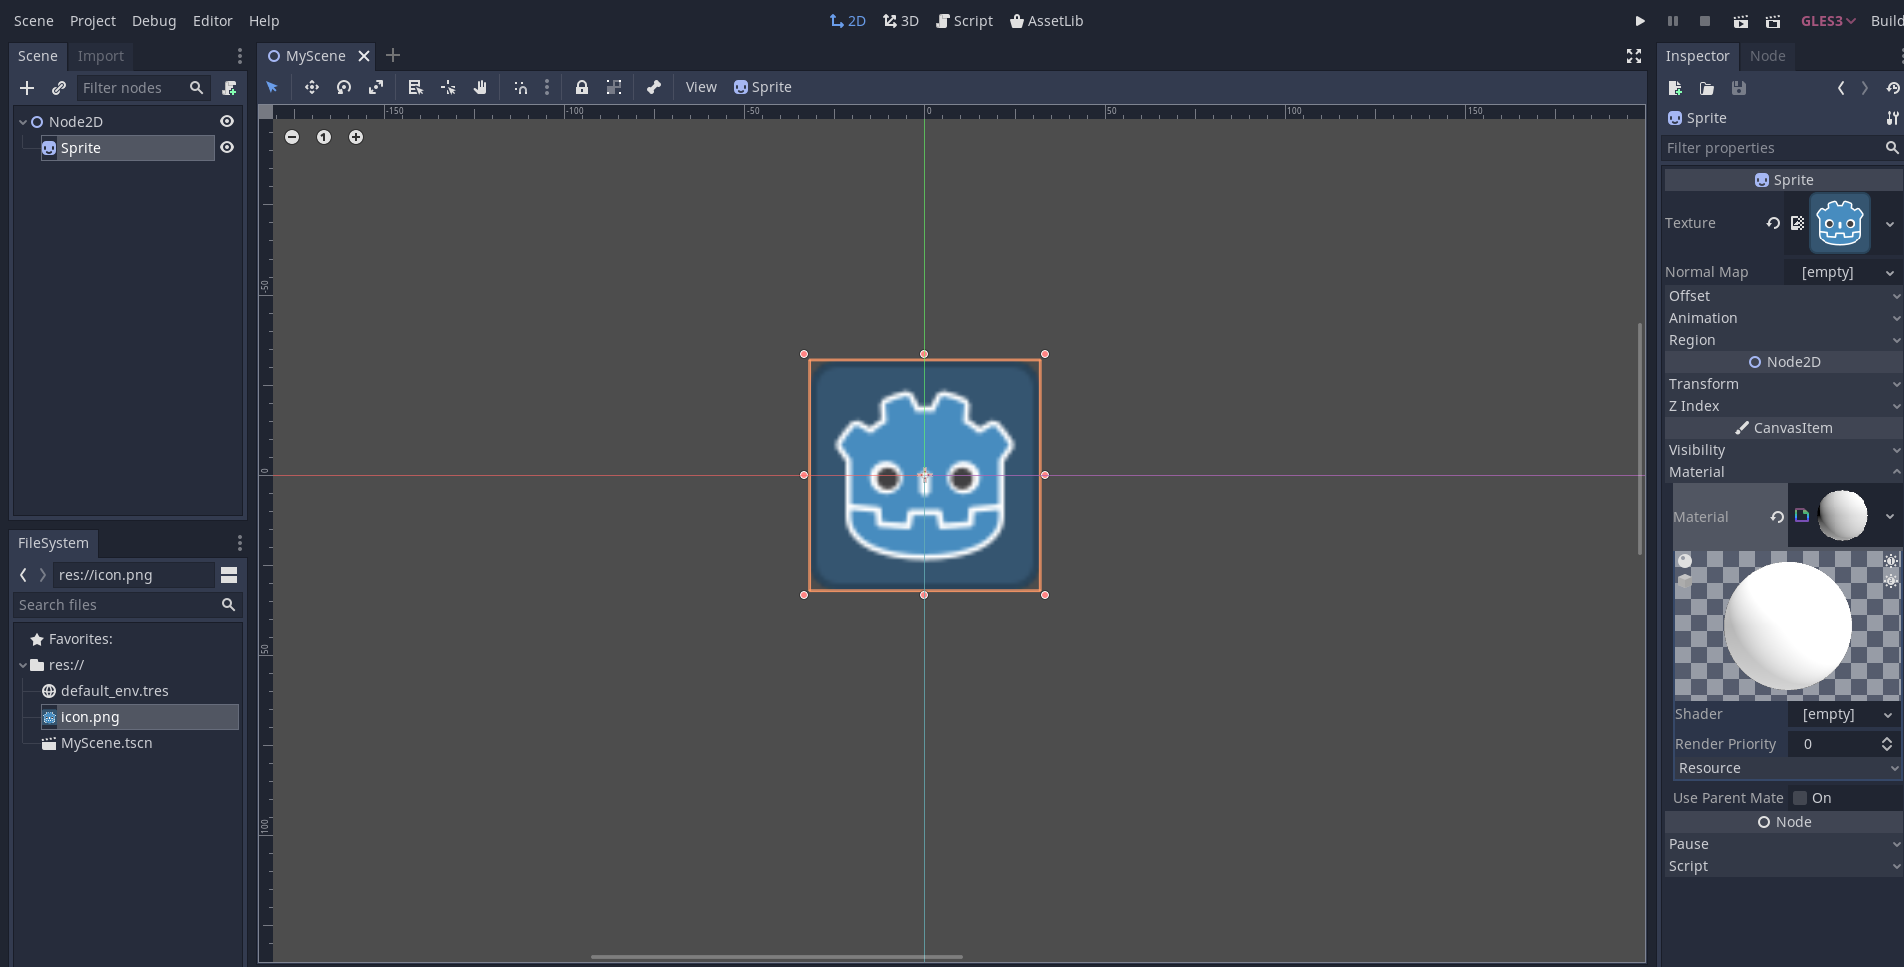
Assign VisualShader to the shader slot of the material:
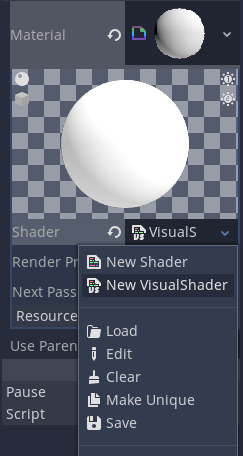
Don’t forget to change its mode to “CanvasItem” (if you are using a Sprite):
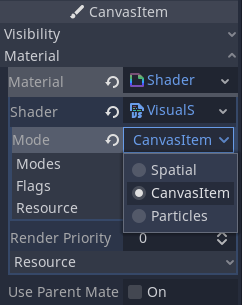
Create a script which derives from VisualShaderNodeCustom. This is all you need to initialize your plugin.
# PerlinNoise3D.gd
tool
extends VisualShaderNodeCustom
class_name VisualShaderNodePerlinNoise3D
func _get_name():
return "PerlinNoise3D"
func _get_category():
return "MyShaderNodes"
func _get_description():
return "Classic Perlin-Noise-3D function (by Curly-Brace)"
func _get_return_icon_type():
return VisualShaderNode.PORT_TYPE_SCALAR
func _get_input_port_count():
return 4
func _get_input_port_name(port):
match port:
0:
return "uv"
1:
return "offset"
2:
return "scale"
3:
return "time"
func _get_input_port_type(port):
match port:
0:
return VisualShaderNode.PORT_TYPE_VECTOR
1:
return VisualShaderNode.PORT_TYPE_VECTOR
2:
return VisualShaderNode.PORT_TYPE_SCALAR
3:
return VisualShaderNode.PORT_TYPE_SCALAR
func _get_output_port_count():
return 1
func _get_output_port_name(port):
return "result"
func _get_output_port_type(port):
return VisualShaderNode.PORT_TYPE_SCALAR
func _get_global_code(mode):
return """
vec3 mod289_3(vec3 x) {
return x - floor(x * (1.0 / 289.0)) * 289.0;
}
vec4 mod289_4(vec4 x) {
return x - floor(x * (1.0 / 289.0)) * 289.0;
}
vec4 permute(vec4 x) {
return mod289_4(((x * 34.0) + 1.0) * x);
}
vec4 taylorInvSqrt(vec4 r) {
return 1.79284291400159 - 0.85373472095314 * r;
}
vec3 fade(vec3 t) {
return t * t * t * (t * (t * 6.0 - 15.0) + 10.0);
}
// Classic Perlin noise
float cnoise(vec3 P) {
vec3 Pi0 = floor(P); // Integer part for indexing.
vec3 Pi1 = Pi0 + vec3(1.0); // Integer part + 1.
Pi0 = mod289_3(Pi0);
Pi1 = mod289_3(Pi1);
vec3 Pf0 = fract(P); // Fractional part for interpolation.
vec3 Pf1 = Pf0 - vec3(1.0); // Fractional part - 1.0.
vec4 ix = vec4(Pi0.x, Pi1.x, Pi0.x, Pi1.x);
vec4 iy = vec4(Pi0.yy, Pi1.yy);
vec4 iz0 = vec4(Pi0.z);
vec4 iz1 = vec4(Pi1.z);
vec4 ixy = permute(permute(ix) + iy);
vec4 ixy0 = permute(ixy + iz0);
vec4 ixy1 = permute(ixy + iz1);
vec4 gx0 = ixy0 * (1.0 / 7.0);
vec4 gy0 = fract(floor(gx0) * (1.0 / 7.0)) - 0.5;
gx0 = fract(gx0);
vec4 gz0 = vec4(0.5) - abs(gx0) - abs(gy0);
vec4 sz0 = step(gz0, vec4(0.0));
gx0 -= sz0 * (step(0.0, gx0) - 0.5);
gy0 -= sz0 * (step(0.0, gy0) - 0.5);
vec4 gx1 = ixy1 * (1.0 / 7.0);
vec4 gy1 = fract(floor(gx1) * (1.0 / 7.0)) - 0.5;
gx1 = fract(gx1);
vec4 gz1 = vec4(0.5) - abs(gx1) - abs(gy1);
vec4 sz1 = step(gz1, vec4(0.0));
gx1 -= sz1 * (step(0.0, gx1) - 0.5);
gy1 -= sz1 * (step(0.0, gy1) - 0.5);
vec3 g000 = vec3(gx0.x, gy0.x, gz0.x);
vec3 g100 = vec3(gx0.y, gy0.y, gz0.y);
vec3 g010 = vec3(gx0.z, gy0.z, gz0.z);
vec3 g110 = vec3(gx0.w, gy0.w, gz0.w);
vec3 g001 = vec3(gx1.x, gy1.x, gz1.x);
vec3 g101 = vec3(gx1.y, gy1.y, gz1.y);
vec3 g011 = vec3(gx1.z, gy1.z, gz1.z);
vec3 g111 = vec3(gx1.w, gy1.w, gz1.w);
vec4 norm0 = taylorInvSqrt(vec4(dot(g000, g000), dot(g010, g010), dot(g100, g100), dot(g110, g110)));
g000 *= norm0.x;
g010 *= norm0.y;
g100 *= norm0.z;
g110 *= norm0.w;
vec4 norm1 = taylorInvSqrt(vec4(dot(g001, g001), dot(g011, g011), dot(g101, g101), dot(g111, g111)));
g001 *= norm1.x;
g011 *= norm1.y;
g101 *= norm1.z;
g111 *= norm1.w;
float n000 = dot(g000, Pf0);
float n100 = dot(g100, vec3(Pf1.x, Pf0.yz));
float n010 = dot(g010, vec3(Pf0.x, Pf1.y, Pf0.z));
float n110 = dot(g110, vec3(Pf1.xy, Pf0.z));
float n001 = dot(g001, vec3(Pf0.xy, Pf1.z));
float n101 = dot(g101, vec3(Pf1.x, Pf0.y, Pf1.z));
float n011 = dot(g011, vec3(Pf0.x, Pf1.yz));
float n111 = dot(g111, Pf1);
vec3 fade_xyz = fade(Pf0);
vec4 n_z = mix(vec4(n000, n100, n010, n110), vec4(n001, n101, n011, n111), fade_xyz.z);
vec2 n_yz = mix(n_z.xy, n_z.zw, fade_xyz.y);
float n_xyz = mix(n_yz.x, n_yz.y, fade_xyz.x);
return 2.2 * n_xyz;
}
"""
func _get_code(input_vars, output_vars, mode, type):
return output_vars[0] + " = cnoise(vec3((%s.xy + %s.xy) * %s, %s)) * 0.5 + 0.5" % [input_vars[0], input_vars[1], input_vars[2], input_vars[3]]
Save it and open the Visual Shader. You should see your new node type within the member’s dialog (if you can’t see your new node, try restarting the editor):

Place it on a graph and connect the required ports:
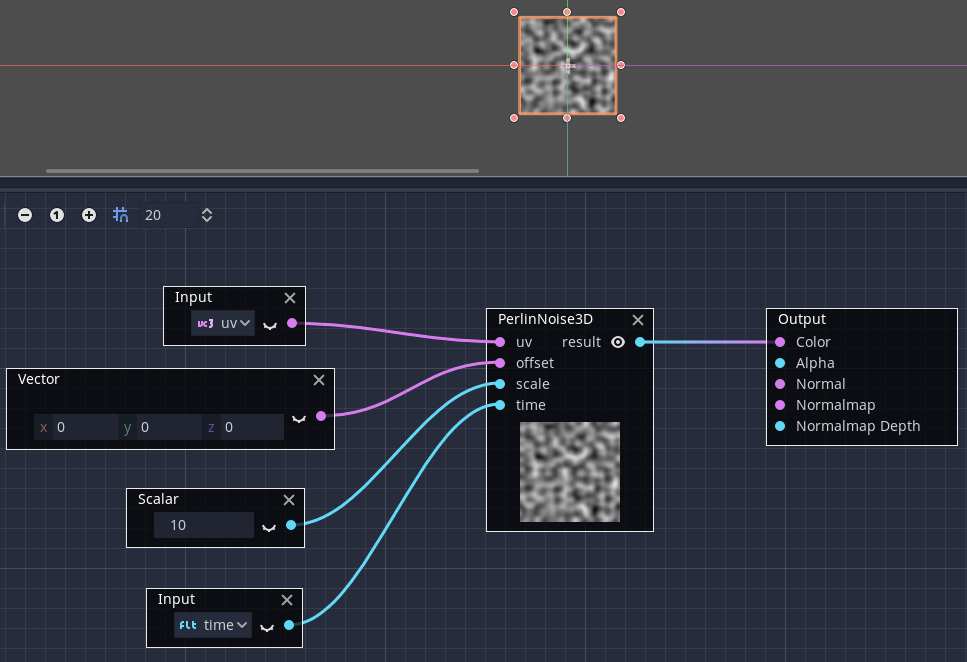
That is everything you need to do, as you can see it is easy to create your own custom VisualShader nodes!
GDNative¶
GDNative C example¶
Introduction¶
This tutorial will introduce you to the bare minimum required to create GDNative modules. This should be your starting point into the world of GDNative. Understanding the contents of this tutorial will help you in understanding all that is to come after this.
Before we begin, you can download the source code to the example object we describe below in the GDNative-demos repository.
This example project also contains a SConstruct file that makes compiling a little easier, but in this tutorial we’ll be doing things by hand to understand the process.
GDNative can be used to create several types of additions to Godot, using interfaces such as PluginScript or ARVRInterfaceGDNative. In this tutorial we are going to look at creating a NativeScript module. NativeScript allows you to write logic in C or C++ in a similar fashion as you would write a GDScript file. We’ll be creating the C equivalent of this GDScript:
extends Reference
var data
func _ready():
data = "World from GDScript!"
func get_data():
return data
Future tutorials will focus on the other types of GDNative modules and explain when and how to use each of them.
Prerequisites¶
Before we start you’ll need a few things:
- A Godot executable for your target version.
- A C compiler. On Linux, install
gccorclangfrom your package manager. On macOS, you can install Xcode from the Mac App Store. On Windows, you can use Visual Studio 2015 or later, or MinGW-w64. - A Git clone of the godot_headers repository: these are the C headers for Godot’s public API exposed to GDNative.
For the latter, we suggest that you create a dedicated folder for this GDNative example project, open a terminal in that folder and execute:
git clone https://github.com/GodotNativeTools/godot_headers
This will download the required files into that folder.
Tip
If you plan to use Git for your GDNative project, you can also add
godot_headers as a Git submodule.
Note
The godot_headers repository has different branches. As Godot evolves,
so does GDNative. While we try to preserve compatibility between version,
you should always build your GDNative module against headers matching the
Godot stable branch (e.g. 3.1) and ideally actual release (e.g.
3.1.1-stable) that you use.
GDNative modules built against older versions of the Godot headers may
work with newer versions of the engine, but not the other way around.
The master branch of the godot_headers repository is kept in line with
the master branch of Godot and thus contains the GDNative class and
structure definitions that will work with the latest development builds.
If you want to write a GDNative module for a stable version of Godot, look at
the available Git tags (with git tags) for the one matching your engine
version. In the godot_headers repository, such tags are prefixed with
godot-, so you can e.g. checkout the godot-3.1.1-stable tag for use with
Godot 3.1.1. In your cloned repository, you can do:
git checkout godot-3.1.1-stable
If a tag matching your stable release is missing for any reason, you can fall
back to the matching stable branch (e.g. 3.1), which you would also check
out with git checkout 3.1.
If you are building Godot from source with your own changes that impact
GDNative, you can find the updated class and structure definition in
<godotsource>/modules/gdnative/include
Our C source¶
Let’s start by writing our main code. Eventually, we want to end up with a file structure that looks along those lines:
+ <your development folder>
+ godot_headers
- <lots of files here>
+ simple
+ bin
- libsimple.dll/so/dylib
- libsimple.gdnlib
- simple.gdns
main.tscn
project.godot
+ src
- simple.c
Open up Godot and create a new project called “simple” alongside your
godot_headers Git clone. This will create the simple folder and
project.godot file. Then manually create a src folder alongside the
simple folder, and a bin subfolder in the simple folder.
We’re going to start by having a look at what our simple.c file contains.
Now, for our example here we’re making a single C source file without a header
to keep things simple. Once you start writing bigger projects it is advisable
to break your project up into multiple files. That however falls outside of the
scope of this tutorial.
We’ll be looking at the source code bit by bit so all the parts below should all be put together into one big file. Each section will be explained as we add it.
#include <gdnative_api_struct.gen.h>
#include <string.h>
const godot_gdnative_core_api_struct *api = NULL;
const godot_gdnative_ext_nativescript_api_struct *nativescript_api = NULL;
The above code includes the GDNative API struct header and a standard header that we will use further down for string operations. It then defines two pointers to two different structs. GDNative supports a large collection of functions for calling back into the main Godot executable. In order for your module to have access to these functions, GDNative provides your application with a struct containing pointers to all these functions.
To keep this implementation modular and easily extendable, the core functions are available directly through the “core” API struct, but additional functions have their own “GDNative structs” that are accessible through extensions.
In our example, we access one of these extension to gain access to the functions specifically needed for NativeScript.
A NativeScript behaves like any other script in Godot. Because the NativeScript API is rather low level, it requires the library to specify many things more verbosely than other scripting systems, such as GDScript. When a NativeScript instance gets created, a library-given constructor gets called. When that instance gets destroyed, the given destructor will be executed.
void *simple_constructor(godot_object *p_instance, void *p_method_data);
void simple_destructor(godot_object *p_instance, void *p_method_data, void *p_user_data);
godot_variant simple_get_data(godot_object *p_instance, void *p_method_data,
void *p_user_data, int p_num_args, godot_variant **p_args);
These are forward declarations for the functions we’ll be implementing for our
object. A constructor and destructor is needed. Additionally, the object will
have a single method called get_data.
Next up is the first of the entry points Godot will call when our dynamic
library is loaded. These methods are all prefixed with godot_ (you can
change this later on) followed by their name. gdnative_init is a function
that initializes our dynamic library. Godot will give it a pointer to a
structure that contains various bits of information we may find useful among
which the pointers to our API structures.
For any additional API structures we need to loop through our extensions array and check the type of extension.
void GDN_EXPORT godot_gdnative_init(godot_gdnative_init_options *p_options) {
api = p_options->api_struct;
// Now find our extensions.
for (int i = 0; i < api->num_extensions; i++) {
switch (api->extensions[i]->type) {
case GDNATIVE_EXT_NATIVESCRIPT: {
nativescript_api = (godot_gdnative_ext_nativescript_api_struct *)api->extensions[i];
}; break;
default: break;
}
}
}
Next up is gdnative_terminate which is called before the library is
unloaded. Godot will unload the library when no object uses it anymore. Here,
you can do any cleanup you may need to do. For our example, we’re simply going
to clear our API pointers.
void GDN_EXPORT godot_gdnative_terminate(godot_gdnative_terminate_options *p_options) {
api = NULL;
nativescript_api = NULL;
}
Finally we have nativescript_init which is the most important function we’ll
need today. This function will be called by Godot as part of loading a GDNative
library and communicates back to the engine what objects we make available.
void GDN_EXPORT godot_nativescript_init(void *p_handle) {
godot_instance_create_func create = { NULL, NULL, NULL };
create.create_func = &simple_constructor;
godot_instance_destroy_func destroy = { NULL, NULL, NULL };
destroy.destroy_func = &simple_destructor;
nativescript_api->godot_nativescript_register_class(p_handle, "Simple", "Reference",
create, destroy);
godot_instance_method get_data = { NULL, NULL, NULL };
get_data.method = &simple_get_data;
godot_method_attributes attributes = { GODOT_METHOD_RPC_MODE_DISABLED };
nativescript_api->godot_nativescript_register_method(p_handle, "Simple", "get_data",
attributes, get_data);
}
We first tell the engine which classes are implemented by calling
nativescript_register_class. The first parameter here is the handle pointer
given to us. The second is the name of our object class. The third is the type
of object in Godot that we ‘inherit’ from; this is not true inheritance but it’s
close enough. Finally, our fourth and fifth parameters are descriptions for our
constructor and destructor.
We then tell Godot about our methods (well our one method in this case), by
calling nativescript_register_method for each method of our class. In our
case, that is just get_data. Our first parameter is yet again our handle
pointer. The second is again the name of the object class we’re registering. The
third is the name of our function as it will be known to GDScript. The fourth is
our attributes setting (see godot_method_rpc_mode enum in
godot_headers/nativescript/godot_nativescript.h for possible values). The
fifth and final parameter is a description of which function to call when the
method gets called.
The description struct instance_method contains the function pointer to the
function itself as first field. The other two fields in these structs are for
specifying per-method userdata. The second is the method_data field which is
passed on every function call as the p_method_data argument. This is useful
to reuse one function for different methods on possibly multiple different
script-classes. If the method_data value is a pointer to memory that needs
to be freed, the third free_func field can contain a pointer to a function
that will free that memory. That free function gets called when the script
itself (not instance!) gets unloaded (so usually at library-unload time).
Now, it’s time to start working on the functions of our object. First, we define a structure that we use to store the member data of an instance of our GDNative class.
typedef struct user_data_struct {
char data[256];
} user_data_struct;
And then, we define our constructor. All we do in our constructor is allocate memory for our structure and fill it with some data. Note that we use Godot’s memory functions so the memory gets tracked and then return the pointer to our new structure. This pointer will act as our instance identifier in case multiple objects are instantiated.
This pointer will be passed to any of our functions related to our object as a
parameter called p_user_data, and can both be used to identify our instance
and to access its member data.
void *simple_constructor(godot_object *p_instance, void *p_method_data) {
user_data_struct *user_data = api->godot_alloc(sizeof(user_data_struct));
strcpy(user_data->data, "World from GDNative!");
return user_data;
}
Our destructor is called when Godot is done with our object and we free our instances’ member data.
void simple_destructor(godot_object *p_instance, void *p_method_data, void *p_user_data) {
api->godot_free(p_user_data);
}
And finally, we implement our get_data function. Data is always sent and
returned as variants so in order to return our data, which is a string, we first
need to convert our C string to a Godot string object, and then copy that string
object into the variant we are returning.
godot_variant simple_get_data(godot_object *p_instance, void *p_method_data,
void *p_user_data, int p_num_args, godot_variant **p_args) {
godot_string data;
godot_variant ret;
user_data_struct *user_data = (user_data_struct *)p_user_data;
api->godot_string_new(&data);
api->godot_string_parse_utf8(&data, user_data->data);
api->godot_variant_new_string(&ret, &data);
api->godot_string_destroy(&data);
return ret;
}
Strings are heap-allocated in Godot, so they have a destructor which frees the
memory. Destructors are named godot_TYPENAME_destroy. When a Variant gets
created with a String, it references the String. That means that the original
String can be “destroyed” to decrease the ref-count. If that does not happen the
String memory will leak since the ref-count will never be zero and the memory
never deallocated. The returned variant gets automatically destroyed by Godot.
Note
In more complex operations it can be confusing the keep track of which value
needs to be deallocated and which does not. As a general rule: call
godot_TYPENAME_destroy when a C++ destructor would be called instead.
The String destructor would be called in C++ after the Variant was created,
so the same is necessary in C.
The variant we return is destroyed automatically by Godot.
And that is the whole source code of our module.
Compiling¶
We now need to compile our source code. As mentioned our example project on GitHub contains a SCons configuration that does all the hard work for you, but for our tutorial here we are going to call the compilers directly.
Assuming you are sticking to the folder structure suggested above, it is best to
open a terminal session in the src folder and execute the commands from
there. Make sure to create the bin folder before you proceed.
On Linux:
gcc -std=c11 -fPIC -c -I../godot_headers simple.c -o simple.o
gcc -rdynamic -shared simple.o -o ../simple/bin/libsimple.so
On macOS:
clang -std=c11 -fPIC -c -I../godot_headers simple.c -o simple.os
clang -dynamiclib simple.os -o ../simple/bin/libsimple.dylib
On Windows:
cl /Fosimple.obj /c simple.c /nologo -EHsc -DNDEBUG /MD /I. /I..\godot_headers
link /nologo /dll /out:..\simple\bin\libsimple.dll /implib:..\simple\bin\libsimple.lib simple.obj
Note
On the Windows build you also end up with a libsimple.lib library. This
is a library that you can compile into a project to provide access to the
DLL. We get it as a byproduct and we do not need it :)
When exporting your game for release this file will be ignored.
Creating the GDNativeLibrary (.gdnlib) file¶
With our module compiled, we now need to create a corresponding
GDNativeLibrary resource with .gdnlib
extension which we place alongside our dynamic libraries. This file tells Godot
what dynamic libraries are part of our module and need to be loaded per
platform.
We can use Godot to generate this file, so open the “simple” project in the editor.
Start by clicking the create resource button in the Inspector:
And select GDNativeLibrary:
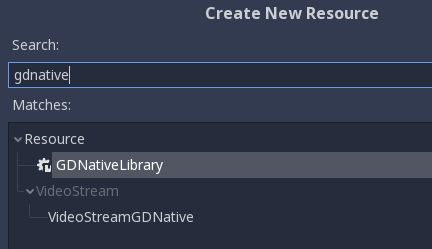
You should see a contextual editor appear in the bottom panel. Use the “Expand Bottom Panel” button in the bottom right to expand it to full height:
General properties¶
In the Inspector, you have various properties to control loading the library.
If Load Once is enabled, our library is loaded only once and each individual script that uses our library will use the same data. Any variable you define globally will be accessible from any instance of your object you create. If Load Once is disabled, a new copy of the library is loaded into memory each time a script accesses the library.
If Singleton is enabled, our library is automatically loaded and a function
called godot_gdnative_singleton is called. We’ll leave that for another
tutorial.
The Symbol Prefix is a prefix for our core functions, such as godot_ in
godot_nativescript_init seen earlier. If you use multiple GDNative libraries
that you wish to statically link, you will have to use different prefixes. This
again is a subject to dive into deeper in a separate tutorial, it is only needed
at this time for deployment to iOS as this platform does not like dynamic
libraries.
Reloadable defines whether the library should be reloaded when the editor loses and gains focus, typically to pick up new or modified symbols from any change made to the library externally.
Platform libraries¶
The GDNativeLibrary editor plugin lets you configure two things for each platform and architecture that you aim to support.
The Dynamic Library column (entry section in the saved file) tells us for
each platform and feature combination which dynamic library has to be loaded.
This also informs the exporter which files need to be exported when exporting to
a specific platform.
The Dependencies column (also dependencies section) tells Godot what other
files need to be exported for each platform in order for our library to work.
Say that your GDNative module uses another DLL to implement functionality from a
3rd party library, this is where you list that DLL.
For our example, we only built libraries for Linux, macOS and/or Windows, so you can link them in the relevant fields by clicking the folder button. If you built all three libraries, you should have something like this:
Saving the resource¶
We can then save our GDNativeLibrary resource as bin/libsimple.gdnlib with
the Save button in the Inspector:
The file is saved in a text-based format and should have contents similar to this:
[general]
singleton=false
load_once=true
symbol_prefix="godot_"
reloadable=true
[entry]
OSX.64="res://bin/libsimple.dylib"
OSX.32="res://bin/libsimple.dylib"
Windows.64="res://bin/libsimple.dll"
X11.64="res://bin/libsimple.so"
[dependencies]
OSX.64=[ ]
OSX.32=[ ]
Windows.64=[ ]
X11.64=[ ]
Creating the NativeScript (.gdns) file¶
With our .gdnlib file we’ve told Godot how to load our library, now we need
to tell it about our “Simple” object class. We do this by creating a
NativeScript resource file with .gdns extension.
Like done for the GDNativeLibrary resource, click the button to create a new
resource in the Inspector and select NativeScript:
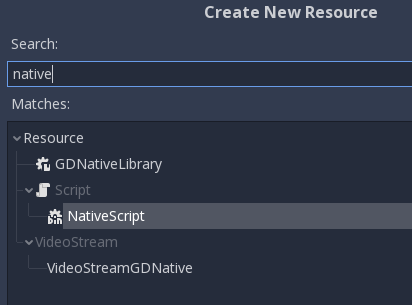
The inspector will show a few properties that we need to fill. As Class Name
we enter “Simple” which is the object class name that we declared in our C
source when calling godot_nativescript_register_class. We also need to
select our .gdnlib file by clicking on Library and selecting Load:
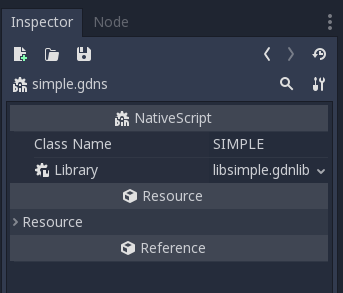
Finally click on the save icon and save this as bin/simple.gdns:
Now it’s time to build our scene. Add a Control node to your scene as your root
and call it main. Then add a Button and a Label as child nodes. Place them
somewhere nice on screen and give your button a name.
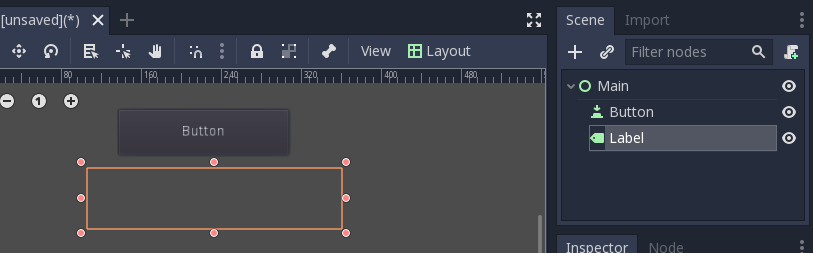
Select the control node and attach a script to it:
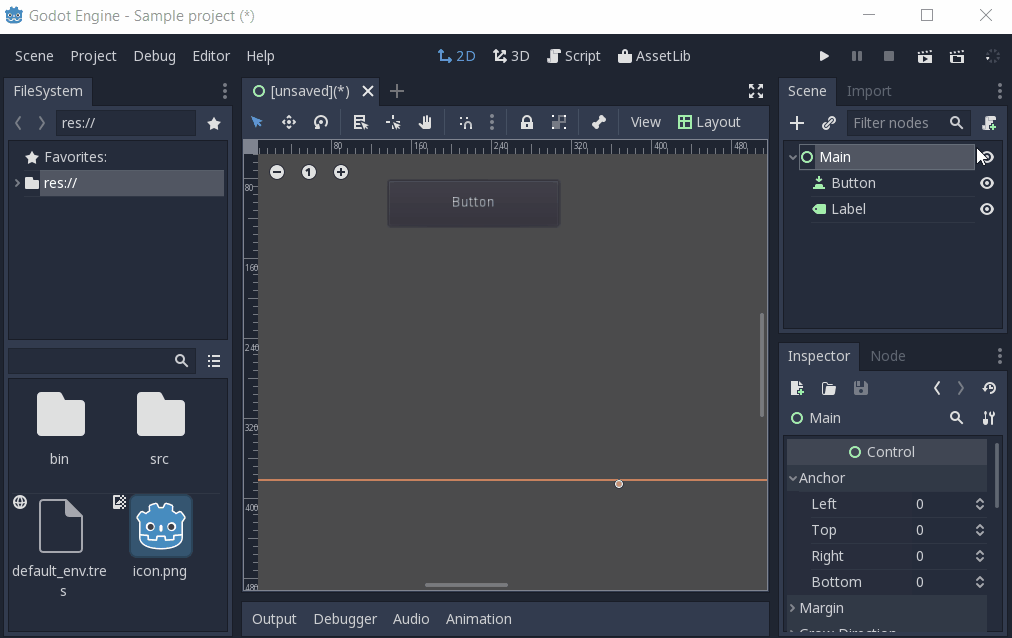
Next link up the pressed signal on the button to your script:
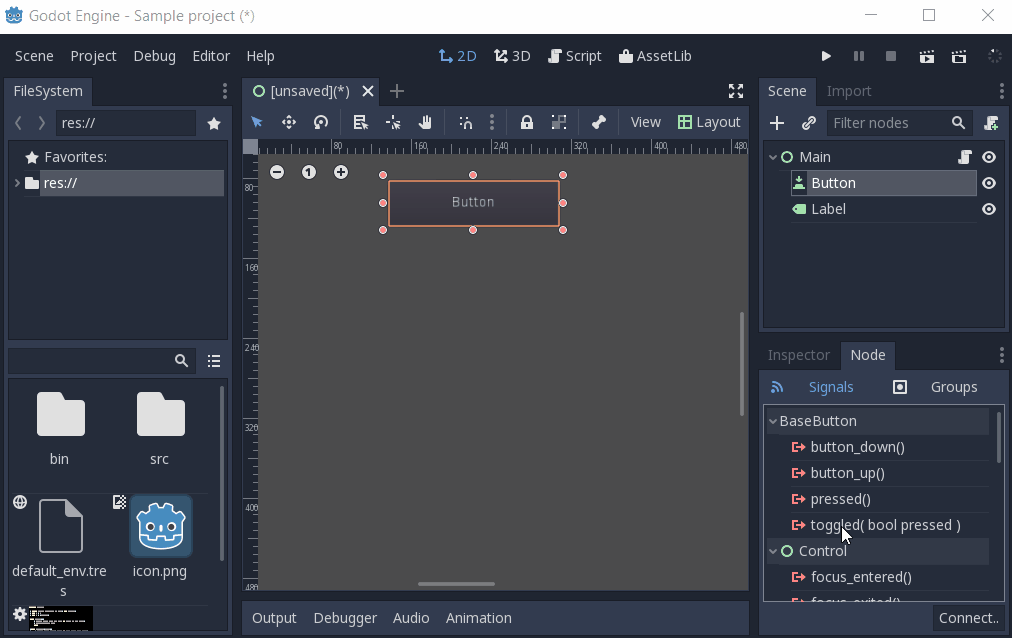
Don’t forget to save your scene, call it main.tscn.
Now we can implement our main.gd code:
extends Control
# load the Simple library
onready var data = preload("res://bin/simple.gdns").new()
func _on_Button_pressed():
$Label.text = "Data = " + data.get_data()
After all that, our project should work. The first time you run it Godot will
ask you what your main scene is and you select your main.tscn file and
presto:
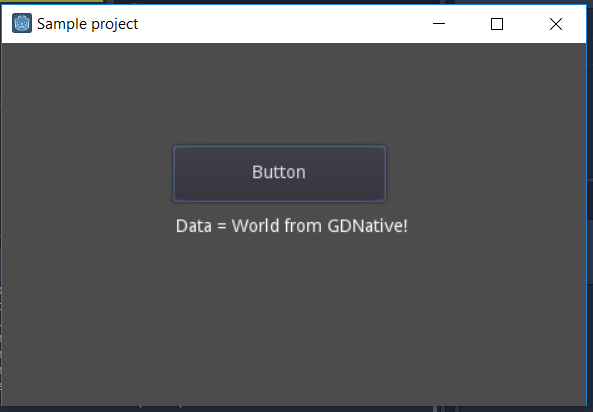
GDNative C++ example¶
Introduction¶
This tutorial builds on top of the information given in the GDNative C example, so we highly recommend you read that first.
The C++ bindings for GDNative are built on top of the NativeScript GDNative API and provide a nicer way to “extend” nodes in Godot using C++. This is equivalent to writing scripts in GDScript, but in C++ instead.
Godot 3.1 saw the introduction of the NativeScript 1.1 additions that enabled the GDNative team to build a nicer C++ bindings library. These changes have now been merged into the master branch and will be the way we go forward. If you want to write a C++ GDNative plugin that also supports Godot 3.0 you will need to use the 3.0 branch and the NativeScript 1.0 syntax. We’ll be showing them side by side in this writeup.
You can download the full example we’ll be creating in this tutorial on GitHub.
Setting up the project¶
There are a few prerequisites you’ll need:
- a Godot 3.x executable,
- a C++ compiler,
- SCons as a build tool,
- a copy of the godot-cpp repository.
See also Compiling as the build tools are identical to the ones you need to compile Godot from source.
You can download these repositories from GitHub or let Git do the work for you.
Note that these repositories now have different branches for different versions
of Godot. GDNative modules written for an earlier version of Godot will work in
newer versions (with the exception of one breaking change in ARVR interfaces
between 3.0 and 3.1) but not vice versa so make sure you download the correct
branch. Also note that the version of Godot you use to generate the api.json
with becomes your minimum version.
If you are versioning your project using Git, it is a good idea to add them as Git submodules:
mkdir gdnative_cpp_example
cd gdnative_cpp_example
git init
git submodule add https://github.com/GodotNativeTools/godot-cpp
cd godot-cpp
git submodule update --init
mkdir gdnative_cpp_example
cd gdnative_cpp_example
git init
git submodule add -b 3.0 https://github.com/GodotNativeTools/godot-cpp
cd godot-cpp
git submodule update --init
If you decide to just download the repositories or clone them into your project folder, make sure to keep the folder layout identical to the one described here, as much of the code we’ll be showcasing here assumes the project follows this layout.
Do make sure you clone recursive to pull in both repositories:
mkdir gdnative_cpp_example
cd gdnative_cpp_example
git clone --recursive https://github.com/GodotNativeTools/godot-cpp
mkdir gdnative_cpp_example
cd gdnative_cpp_example
git clone --recursive -b 3.0 https://github.com/GodotNativeTools/godot-cpp
Note
godot-cpp now includes godot_headers as a nested submodule, if you’ve
manually downloaded them please make sure to place godot_headers inside
of the godot-cpp folder.
You don’t have to do it this way but we’ve found it easiest to manage. If you decide to just download the repositories or just clone them into your folder, make sure to keep the folder layout the same as we’ve setup here as much of the code we’ll be showcasing here assumes the project has this layout.
If you cloned the example from the link specified in the introduction, the submodules are not automatically initialized. You will need to execute the following commands:
cd gdnative_cpp_example
git submodule update --init --recursive
This will clone these two repositories into your project folder.
Building the C++ bindings¶
Now that we’ve downloaded our prerequisites, it is time to build the C++ bindings.
The repository contains a copy of the metadata for the current Godot release, but if you need to build these bindings for a newer version of Godot, simply call the Godot executable:
godot --gdnative-generate-json-api api.json
Place the resulting api.json file in the project folder and add
use_custom_api_file=yes custom_api_file=../api.json to the scons command
below.
To generate and compile the bindings, use this command (replacing <platform>
with windows, linux or osx depending on your OS):
To speed up compilation, add -jN at the end of the SCons command line where N is the number of CPU threads you have on your system. The example below uses 4 threads.
cd godot-cpp
scons platform=<platform> generate_bindings=yes -j4
cd ..
This step will take a while. When it is completed, you should have static
libraries that can be compiled into your project stored in godot-cpp/bin/.
At some point in the future, compiled binaries will be available, making this step optional.
Note
You may need to add bits=64 to the command on Windows or Linux. We’re
still working on better auto detection.
Creating a simple plugin¶
Now it’s time to build an actual plugin. We’ll start by creating an empty Godot project in which we’ll place a few files.
Open Godot and create a new project. For this example, we will place it in a
folder called demo inside our GDNative module’s folder structure.
In our demo project, we’ll create a scene containing a Node called “Main” and
we’ll save it as main.tscn. We’ll come back to that later.
Back in the top-level GDNative module folder, we’re also going to create a
subfolder called src in which we’ll place our source files.
You should now have demo, godot-cpp, godot_headers, and src
directories in your GDNative module.
In the src folder, we’ll start with creating our header file for the
GDNative node we’ll be creating. We will name it gdexample.h:
#ifndef GDEXAMPLE_H
#define GDEXAMPLE_H
#include <Godot.hpp>
#include <Sprite.hpp>
namespace godot {
class GDExample : public Sprite {
GODOT_CLASS(GDExample, Sprite)
private:
float time_passed;
public:
static void _register_methods();
GDExample();
~GDExample();
void _init(); // our initializer called by Godot
void _process(float delta);
};
}
#endif
#ifndef GDEXAMPLE_H
#define GDEXAMPLE_H
#include <Godot.hpp>
#include <Sprite.hpp>
namespace godot {
class GDExample : public godot::GodotScript<Sprite> {
GODOT_CLASS(GDExample)
private:
float time_passed;
public:
static void _register_methods();
GDExample();
~GDExample();
void _process(float delta);
};
}
#endif
There are a few things of note to the above. We’re including Godot.hpp which
contains all our basic definitions. After that, we include Sprite.hpp which
contains bindings to the Sprite class. We’ll be extending this class in our
module.
We’re using the namespace godot, since everything in GDNative is defined
within this namespace.
Then we have our class definition, which inherits from our Sprite through a
container class. We’ll see a few side effects of this later on. The
GODOT_CLASS macro sets up a few internal things for us.
After that, we declare a single member variable called time_passed.
In the next block we’re defining our methods, we obviously have our constructor and destructor defined, but there are two other functions that will likely look familiar to some, and one new method.
The first is _register_methods, which is a static function that Godot will
call to find out which methods can be called on our NativeScript and which
properties it exposes. The second is our _process function, which will work
exactly the same as the _process function you’re used to in GDScript. The
third is our _init function which is called after Godot has properly set up
our object. It has to exist even if you don’t place any code in it.
Let’s implement our functions by creating our gdexample.cpp file:
#include "gdexample.h"
using namespace godot;
void GDExample::_register_methods() {
register_method("_process", &GDExample::_process);
}
GDExample::GDExample() {
}
GDExample::~GDExample() {
// add your cleanup here
}
void GDExample::_init() {
// initialize any variables here
time_passed = 0.0;
}
void GDExample::_process(float delta) {
time_passed += delta;
Vector2 new_position = Vector2(10.0 + (10.0 * sin(time_passed * 2.0)), 10.0 + (10.0 * cos(time_passed * 1.5)));
set_position(new_position);
}
#include "gdexample.h"
using namespace godot;
void GDExample::_register_methods() {
register_method((char *)"_process", &GDExample::_process);
}
GDExample::GDExample() {
// Initialize any variables here
time_passed = 0.0;
}
GDExample::~GDExample() {
// Add your cleanup procedure here
}
void GDExample::_process(float delta) {
time_passed += delta;
Vector2 new_position = Vector2(10.0 + (10.0 * sin(time_passed * 2.0)), 10.0 + (10.0 * cos(time_passed * 1.5)));
owner->set_position(new_position);
}
This one should be straightforward. We’re implementing each method of our class
that we defined in our header file. Note that the register_method call
must expose the _process method, otherwise Godot will not be able to use
it. However, we do not have to tell Godot about our constructor, destructor and
_init functions.
The other method of note is our _process function, which simply keeps track
of how much time has passed and calculates a new position for our sprite using a
simple sine and cosine function. What stands out is calling
owner->set_position to call one of the build in methods of our Sprite. This
is because our class is a container class; owner points to the actual Sprite
node our script relates to. In the upcoming NativeScript 1.1, set_position
can be called directly on our class.
There is one more C++ file we need; we’ll name it gdlibrary.cpp. Our
GDNative plugin can contain multiple NativeScripts, each with their own header
and source file like we’ve implemented GDExample up above. What we need now
is a small bit of code that tells Godot about all the NativeScripts in our
GDNative plugin.
#include "gdexample.h"
extern "C" void GDN_EXPORT godot_gdnative_init(godot_gdnative_init_options *o) {
godot::Godot::gdnative_init(o);
}
extern "C" void GDN_EXPORT godot_gdnative_terminate(godot_gdnative_terminate_options *o) {
godot::Godot::gdnative_terminate(o);
}
extern "C" void GDN_EXPORT godot_nativescript_init(void *handle) {
godot::Godot::nativescript_init(handle);
godot::register_class<godot::GDExample>();
}
Note that we are not using the godot namespace here, since the three
functions implemented here need to be defined without a namespace.
The godot_gdnative_init and godot_gdnative_terminate functions get
called respectively when Godot loads our plugin and when it unloads it. All
we’re doing here is parse through the functions in our bindings module to
initialize them, but you might have to set up more things depending on your
needs.
The important function is the third function called godot_nativescript_init.
We first call a function in our bindings library that does its usual stuff.
After that, we call the function register_class for each of our classes in
our library.
Compiling the plugin¶
We cannot easily write by hand a SConstruct file that SCons would use for
building. For the purpose of this example, just use
this hardcoded SConstruct file we’ve
prepared. We’ll cover a more customizable, detailed example on how to use these
build files in a subsequent tutorial.
Note
This SConstruct file was written to be used with the latest godot-cpp
master, you may need to make small changes using it with older versions or
refer to the SConstruct file in the Godot 3.0 documentation.
Once you’ve downloaded the SConstruct file, place it in your GDNative module
folder besides godot-cpp, godot_headers and demo, then run:
scons platform=<platform>
You should now be able to find the module in demo/bin/<platform>.
Note
Here, we’ve compiled both godot-cpp and our gdexample library as debug
builds. For optimized builds, you should compile them using the
target=release switch.
Using the GDNative module¶
Before we jump back into Godot, we need to create two more files in
demo/bin/. Both can be created using the Godot editor, but it may be faster
to create them directly.
The first one is a file that lets Godot know what dynamic libraries should be
loaded for each platform and is called gdexample.gdnlib.
[general]
singleton=false
load_once=true
symbol_prefix="godot_"
reloadable=false
[entry]
X11.64="res://bin/x11/libgdexample.so"
Windows.64="res://bin/win64/libgdexample.dll"
OSX.64="res://bin/osx/libgdexample.dylib"
[dependencies]
X11.64=[]
Windows.64=[]
OSX.64=[]
This file contains a general section that controls how the module is loaded.
It also contains a prefix section which should be left on godot_ for now. If
you change this, you’ll need to rename various functions that are used as entry
points. This was added for the iPhone platform because it doesn’t allow dynamic
libraries to be deployed, yet GDNative modules are linked statically.
The entry section is the important bit: it tells Godot the location of the
dynamic library in the project’s filesystem for each supported platform. It will
also result in just that file being exported when you export the project,
which means the data pack won’t contain libraries that are incompatible with the
target platform.
Finally, the dependencies section allows you to name additional dynamic
libraries that should be included as well. This is important when your GDNative
plugin implements someone else’s library and requires you to supply a
third-party dynamic library with your project.
If you double click on the gdexample.gdnlib file within Godot, you’ll see
there are far more options to set:
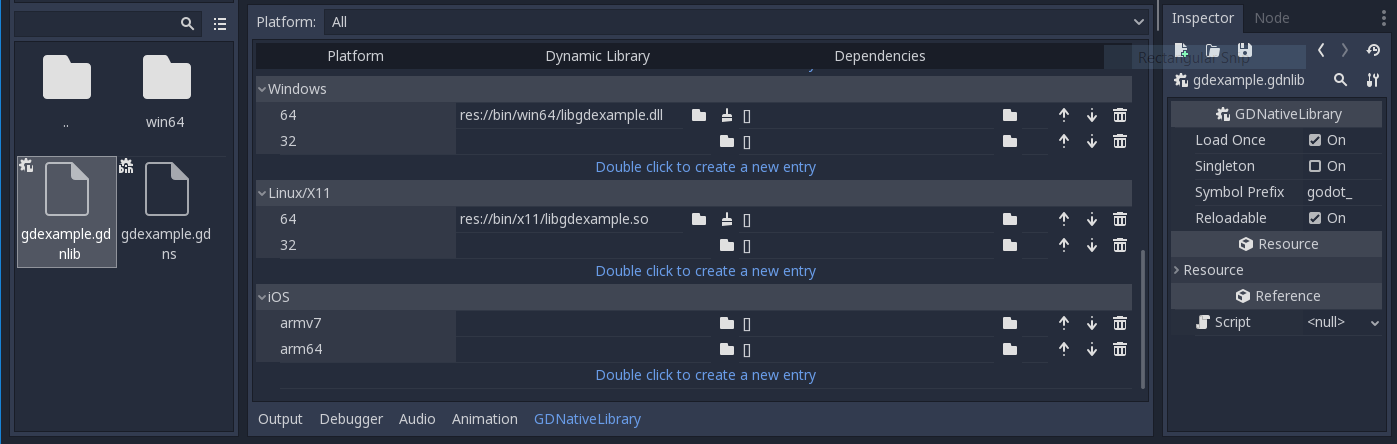
The second file we need to create is a file used by each NativeScript we’ve
added to our plugin. We’ll name it gdexample.gdns for our gdexample
NativeScript.
[gd_resource type="NativeScript" load_steps=2 format=2]
[ext_resource path="res://bin/gdexample.gdnlib" type="GDNativeLibrary" id=1]
[resource]
resource_name = "gdexample"
class_name = "GDExample"
library = ExtResource( 1 )
This is a standard Godot resource; you could just create it directly in your
scene, but saving it to a file makes it much easier to reuse it in other places.
This resource points to our gdnlib file, so that Godot can know which dynamic
library contains our NativeScript. It also defines the class_name which
identifies the NativeScript in our plugin we want to use.
Time to jump back into Godot. We load up the main scene we created way back in the beginning and now add a Sprite to our scene:

We’re going to assign the Godot logo to this sprite as our texture, disable the
centered property and drag our gdexample.gdns file onto the script
property of the sprite:
We’re finally ready to run the project:
Adding properties¶
GDScript allows you to add properties to your script using the export
keyword. In GDNative you have to register the properties and there are two ways
of doing this. You can either bind directly to a member or use a setter and
getter function.
Note
There is a third option, just like in GDScript you can directly implement the
_get_property_list, _get and _set methods of an object but that
goes far beyond the scope of this tutorial.
We’ll examine both starting with the direct bind. Lets add a property that allows us to control the amplitude of our wave.
In our gdexample.h file we simply need to add a member variable like so:
...
private:
float time_passed;
float amplitude;
...
In our gdexample.cpp file we need to make a number of changes, we will only
show the methods we end up changing, don’t remove the lines we’re omitting:
void GDExample::_register_methods() {
register_method("_process", &GDExample::_process);
register_property<GDExample, float>("amplitude", &GDExample::amplitude, 10.0);
}
void GDExample::_init() {
// initialize any variables here
time_passed = 0.0;
amplitude = 10.0;
}
void GDExample::_process(float delta) {
time_passed += delta;
Vector2 new_position = Vector2(
amplitude + (amplitude * sin(time_passed * 2.0)),
amplitude + (amplitude * cos(time_passed * 1.5))
);
set_position(new_position);
}
void GDExample::_register_methods() {
register_method((char *)"_process", &GDExample::_process);
register_property<GDExample, float>("amplitude", &GDExample::amplitude, 10.0);
}
GDExample::GDExample() {
// initialize any variables here
time_passed = 0.0;
amplitude = 10.0;
}
void GDExample::_process(float delta) {
time_passed += delta;
Vector2 new_position = Vector2(
amplitude + (amplitude * sin(time_passed * 2.0)),
amplitude + (amplitude * cos(time_passed * 1.5))
);
owner->set_position(new_position);
}
Once you compile the module with these changes in place you will see that a property has been added to our interface. You can now change this property and when you run your project, you will see that our Godot icon travels along a larger figure.
Note
The reloadable property in the gdexample.gdnlib file must be set to
true for the Godot editor to automatically pick up the newly added
property.
However, this setting should be used with care especially when tool classes are used, as the editor might hold objects then that have script instances attached to them that are managed by a GDNative library.
Lets do the same but for the speed of our animation and use a setter and getter
function. Our gdexample.h header file again only needs a few more lines of
code:
...
float amplitude;
float speed;
...
void _process(float delta);
void set_speed(float p_speed);
float get_speed();
...
This requires a few more changes to our gdexample.cpp file, again we’re only
showing the methods that have changed so don’t remove anything we’re omitting:
void GDExample::_register_methods() {
register_method("_process", &GDExample::_process);
register_property<GDExample, float>("amplitude", &GDExample::amplitude, 10.0);
register_property<GDExample, float>("speed", &GDExample::set_speed, &GDExample::get_speed, 1.0);
}
void GDExample::_init() {
// initialize any variables here
time_passed = 0.0;
amplitude = 10.0;
speed = 1.0;
}
void GDExample::_process(float delta) {
time_passed += speed * delta;
Vector2 new_position = Vector2(
amplitude + (amplitude * sin(time_passed * 2.0)),
amplitude + (amplitude * cos(time_passed * 1.5))
);
set_position(new_position);
}
void GDExample::set_speed(float p_speed) {
speed = p_speed;
}
float GDExample::get_speed() {
return speed;
}
void GDExample::_register_methods() {
register_method((char *)"_process", &GDExample::_process);
register_property<GDExample, float>("amplitude", &GDExample::amplitude, 10.0);
register_property<GDExample, float>("speed", &GDExample::set_speed, &GDExample::get_speed, 1.0);
}
GDExample::GDExample() {
// initialize any variables here
time_passed = 0.0;
amplitude = 10.0;
speed = 1.0;
}
void GDExample::_process(float delta) {
time_passed += speed * delta;
Vector2 new_position = Vector2(
amplitude + (amplitude * sin(time_passed * 2.0)),
amplitude + (amplitude * cos(time_passed * 1.5))
);
owner->set_position(new_position);
}
void GDExample::set_speed(float p_speed) {
speed = p_speed;
}
float GDExample::get_speed() {
return speed;
}
Now when the project is compiled we’ll see another property called speed. Changing its value will make the animation go faster or slower.
For this example there is no obvious advantage of using a setter and getter. It is just more code to write. For a simple example as this there may be a good reason for a setter if you want to react on the variable being changed but in many cases just binding the variable will be enough.
Getters and setters become far more useful in more complex scenarios where you need to make additional choices based on the state of your object.
Note
For simplicity we’ve left out the optional parameters in the
register_property<class, type> method call. These parameters are
rpc_mode, usage, hint and hint_string. These can be used to
further configure how properties are displayed and set on the Godot side.
Modern C++ compilers are able to infer the class and variable type and allow
you to omit the <GDExample, float> part of our register_property
method. We’ve had mixed experiences with this however.
Signals¶
Last but not least, signals fully work in GDNative as well. Having your module
react to a signal given out by another object requires you to call connect
on that object. We can’t think of a good example for our wobbling Godot icon, we
would need to showcase a far more complete example.
This however is the required syntax:
some_other_node->connect("the_signal", this, "my_method");
some_other_node->connect("the_signal", owner, "my_method");
Note that you can only call my_method if you’ve previously registered it in
your _register_methods method.
Having your object sending out signals is far more common. For our wobbling Godot icon we’ll do something silly just to show how it works. We’re going to emit a signal every time a second has passed and pass the new location along.
In our gdexample.h header file we just need to define a new member
time_emit:
...
float time_passed;
float time_emit;
float amplitude;
...
The changes in gdexample.cpp are a bit more elaborate this time. First
you’ll need to set time_emit = 0.0; in either our _init method or in our
constructor. But the other two needed changes we’ll look at one by one.
In our _register_methods method we need to declare our signal and we do this
as follows:
void GDExample::_register_methods() {
register_method("_process", &GDExample::_process);
register_property<GDExample, float>("amplitude", &GDExample::amplitude, 10.0);
register_property<GDExample, float>("speed", &GDExample::set_speed, &GDExample::get_speed, 1.0);
register_signal<GDExample>((char *)"position_changed", "node", GODOT_VARIANT_TYPE_OBJECT, "new_pos", GODOT_VARIANT_TYPE_VECTOR2);
}
void GDExample::_register_methods() {
register_method((char *)"_process", &GDExample::_process);
register_property<GDExample, float>("amplitude", &GDExample::amplitude, 10.0);
register_property<GDExample, float>("speed", &GDExample::set_speed, &GDExample::get_speed, 1.0);
Dictionary args;
args[Variant("node")] = Variant(Variant::OBJECT);
args[Variant("new_pos")] = Variant(Variant::VECTOR2);
register_signal<GDExample>((char *)"position_changed", args);
}
Here we see a nice improvement in the latest version of godot-cpp where our
register_signal method can be a single call first taking the signals name,
then having pairs of values specifying the parameter name and type of each
parameter we’ll send along with this signal.
For NativeScript 1.0 we first build a dictionary in which we tell Godot about the types of arguments we will pass to our signal, and then register it.
Next we’ll need to change our _process method:
void GDExample::_process(float delta) {
time_passed += speed * delta;
Vector2 new_position = Vector2(
amplitude + (amplitude * sin(time_passed * 2.0)),
amplitude + (amplitude * cos(time_passed * 1.5))
);
set_position(new_position);
time_emit += delta;
if (time_emit > 1.0) {
emit_signal("position_changed", this, new_position);
time_emit = 0.0;
}
}
void GDExample::_process(float delta) {
time_passed += speed * delta;
Vector2 new_position = Vector2(
amplitude + (amplitude * sin(time_passed * 2.0)),
amplitude + (amplitude * cos(time_passed * 1.5))
);
owner->set_position(new_position);
time_emit += delta;
if (time_emit > 1.0) {
Array args;
args.push_back(Variant(owner));
args.push_back(Variant(new_position));
owner->emit_signal("position_changed", args);
time_emit = 0.0;
}
}
After a second has passed we emit our signal and reset our counter. Again in the
new version of godot-cpp we can add our parameter values directly to
emit_signal. In NativeScript 1.0 We first build an array of values and then
call emit_signal.
Once compiled we can go into Godot and select our sprite node. On our Node
tab we find our new signal and link it up by pressing connect. We’ve added a
script on our main node and implemented our signal like this:
extends Node
func _on_Sprite_position_changed(node, new_pos):
print("The position of " + node.name + " is now " + str(new_pos))
Every second we simply output our position to the console.
NativeScript 1.1 vs NativeScript 1.0¶
So far in our example above there doesn’t seem to be a lot of difference between
the old and new syntax. The class is defined slightly differently and we no
longer use the owner member to call methods on the Godot side of our object.
A lot of the improvements are hidden under the hood.
This example only deals with simple variables and simple methods. Especially once you start passing references to other objects or when you start calling methods that require more complex parameters, NativeScript 1.1 does start to show its benefits.
Next steps¶
The above is only a simple example, but we hope it shows you the basics. You can build upon this example to create full-fledged scripts to control nodes in Godot using C++.
You should be able to edit and recompile the plugin while the Godot editor remains open; just rerun the project after the library has finished building.
Android plugins¶
Creating Android plugins¶
Introduction¶
Making video games portable is all fine and dandy, until mobile gaming monetization shows up.
This area is complex, usually a mobile game that monetizes needs special connections to a server for things like:
- Analytics
- In-app purchases
- Receipt validation
- Install tracking
- Ads
- Video ads
- Cross-promotion
- In-game soft & hard currencies
- Promo codes
- A/B testing
- Login
- Cloud saves
- Leaderboards and scores
- User support & feedback
- Posting to Facebook, Twitter, etc.
- Push notifications
On iOS, you can write a C++ module and take advantage of the C++/ObjC intercommunication. Even using GDNative is possible to make it a plug-in.
On Android, interfacing with C++ through JNI (Java Native Interface) isn’t as flexible, so writing plugins is considerably more work.
It is also possible that you just want to do modifications to the Android export template, and by using a plugin your project can remain compatible with newer Godot versions (as the android source template will get updated on each release).
Maybe REST¶
Most of these APIs allow communication via REST/JSON APIs. If the API is relatively simple and does not require complex authentication, this may be a better idea than writing a specific Android plugin.
Godot has great support for HTTP, HTTPS and JSON, so an API implemented this way will work on every platform, too.
Of course, in most of the cases, it’s easier to just write an Android plugin, so keep reading.
Android plugin¶
Writing an Android plugin is now possible, beginning with Godot 3.2. It’s also pretty easy! Re-compiling the engine is no longer needed.
Before anything, make sure you understand how to set up a custom build environment for Android.
Your plugin needs to be in a folder other than “build/” inside the “res://android” directory (which was created by following the link above). Any name is fine, so name it according to the SDK you will implement (or just your plugin name).
Once created, there are certain rules to follow, but they are simple.
Android directories¶
Inside your plugin folder, you can use the standard folders as if they were from an Android Gradle project. Examples of this are:
src/ - For Java source code, same as in your Android project
res/ - For resources
aidl/ - For interfaces
assets/ - For assets that will be included as-is on export
libs/debug - For debug JNI libraries
libs/release - For release JNI libraries
Gradle will treat them as part of the project automatically when building, same as the default project files.
“Chunk” files¶
It is now possible to modify “AndroidManifest.xml” and build.gradle in “res://android/build” directly and Godot will keep your changes when building. The problem, however, is that if you update Godot, you will also need to update the build/ folder and your changes will be lost.
To overcome this, the Godot Android Plugin system lets you create chunk files, where you can specify little bits that can be inserted in both “AndroidManifest.xml” and build.gradle. They are inserted every time Godot builds the project for export or deploy.
This file allows to insert bits of chunk into AndroidManifest.xml, the following are supported tags and are entirely optional:
[user_permissions]
Any bit of text below this tag is inserted inside the <manifest> tag of the file. This is often used for permission tags.
[application]
Any bit of text below this tag inside the <application> tag of the file. Many SDKs require this.
[application_attribs]
These are attributes you can add at the end of the <application> tag. Some SDKs require this.
This file allows to insert bits of chunk into build.gradle, the following are supported and are entirely optional:
[buildscript_repositories]
Any bit of text below this tag is inserted inside the buildscript.repositories section of the build file.
[buildscript_dependencies]
Any bit of text below this tag is inserted inside the buildscript.dependencies section of the build file.
[allprojects_repositories]
Any bit of text below this tag is inserted inside the allprojects.repositories section of the build file.
[dependencies]
Any bit of text below this tag is inserted inside the dependencies section of the build file.
[android_defaultconfig]
Any bit of text below this tag is inserted inside the android.defaultconfig section of the build file.
[global]
Any bit of text below this tag is inserted inside the global scope of the build file.
Java singleton¶
An Android plugin will usually have a singleton class that will load it,
this class inherits from Godot.SingletonBase. Resource identifiers for
any additional resources you have provided for the module will be in the
com.godot.game.R class, so you’ll likely want to import it.
A singleton object template follows:
package org.godotengine.godot;
import android.app.Activity;
import android.content.Intent;
import android.content.Context;
import com.godot.game.R;
import javax.microedition.khronos.opengles.GL10;
public class MySingleton extends Godot.SingletonBase {
protected Activity appActivity;
protected Context appContext;
private Godot activity = null;
private int instanceId = 0;
public String myFunction(String p_str) {
// A function to bind.
return "Hello " + p_str;
}
public void getInstanceId(int pInstanceId) {
// You will need to call this method from Godot and pass in the get_instance_id().
instanceId = pInstanceId;
}
static public Godot.SingletonBase initialize(Activity p_activity) {
return new MySingleton(p_activity);
}
public MySingleton(Activity p_activity) {
// Register class name and functions to bind.
registerClass("MySingleton", new String[]
{
"myFunction",
"getInstanceId"
});
this.appActivity = p_activity;
this.appContext = appActivity.getApplicationContext();
// You might want to try initializing your singleton here, but android
// threads are weird and this runs in another thread, so to interact with Godot you usually have to do.
this.activity = (Godot)p_activity;
this.activity.runOnUiThread(new Runnable() {
public void run() {
// Useful way to get config info from "project.godot".
String key = GodotLib.getGlobal("plugin/api_key");
// SDK.initializeHere();
}
});
}
// Forwarded callbacks you can reimplement, as SDKs often need them.
protected void onMainActivityResult(int requestCode, int resultCode, Intent data) {}
protected void onMainRequestPermissionsResult(int requestCode, String[] permissions, int[] grantResults) {}
protected void onMainPause() {}
protected void onMainResume() {}
protected void onMainDestroy() {}
protected void onGLDrawFrame(GL10 gl) {}
protected void onGLSurfaceChanged(GL10 gl, int width, int height) {} // Singletons will always miss first 'onGLSurfaceChanged' call.
}
Calling back to Godot¶
Calling back to Godot from Java is a little more difficult. The instance
ID of the script must be known first, this is obtained by calling
get_instance_ID() on the script. This returns an integer that can be
passed to Java.
From Java, use the calldeferred function to communicate back with Godot.
Java will most likely run in a separate thread, so calls are deferred:
GodotLib.calldeferred(<instanceid>, "<function>", new Object[]{param1, param2, etc});
Godot will detect this singleton and initialize it at the proper time.
Using it from GDScript¶
First you will need to add your singleton into the android modules to be loaded. Go to “Project > Project Settings”.
Then on the tab “General” go to the “Android” section, and fill the Modules part with your module name.
The module should include the full Java path. For our example: org/godotengine/godot/MySingleton.
Then, from your script:
if Engine.has_singleton("MySingleton"):
var singleton = Engine.get_singleton("MySingleton")
print(singleton.myFunction("World"))
Troubleshooting¶
Godot crashes upon load¶
Check adb logcat for possible problems, then:
- Make sure libgodot_android.so is in the
libs/armeabifolder - Check that the methods used in the Java singleton only use simple Java datatypes, more complex ones are not supported.
Future¶
Godot has an experimental Java API Wrapper that allows to use the entire Java API from GDScript.
It’s simple to use and it’s used like this:
class = JavaClassWrapper.wrap(<javaclass as text>)
This is most likely not functional yet, if you want to test it and help us make it work, contact us on irc.freenode.org:#godotengine-devel.
Platform-specific¶
Android in-app purchases¶
Godot engine has integrated GooglePaymentsV3 module with which we can implement in-app purchases in our game.
The Godot engine demo project repository has an android-iap example project. It includes a gdscript interface for android IAP.
Check the repository here https://github.com/godotengine/godot-demo-projects
Find the iap.gd script in
godot-demo-projects/misc/android_iap
Add it to the Autoload list and name it as IAP so that we can reference it anywhere in the game.
Getting the product details¶
When starting our game, we will need to get the item details from Google such as the product price, description and localized price string etc.
#First listen to the sku details update callback
IAP.connect("sku_details_complete",self,"sku_details_complete")
#Then ask google the details for these items
IAP.sku_details_query(["pid1","pid2"]) #pid1 and pid2 are our product ids entered in Googleplay dashboard
#This will be called when sku details are retrieved successfully
func sku_details_complete():
print(IAP.sku_details) #This will print the details as JSON format, refer the format in iap.gd
print(IAP.sku_details["pid1"].price) #print formatted localized price
We can use the IAP details to display the title, price and/or description on our shop scene.
Check if user purchased an item¶
When starting our game, we can check if the user has purchased any product. YOU SHOULD DO THIS ONLY AFTER 2/3 SECONDS AFTER YOUR GAME IS LOADED. If we do this as the first thing when the game is launched, IAP might not be initialized and our game will crash on start.
#Add a listener first
IAP.connect("has_purchased",self,"iap_has_purchased")
IAP.request_purchased() #Ask Google for all purchased items
#This will call for each and every user purchased products
func iap_has_purchased(item_name):
print(item_name) #print the name of purchased items
Google IAP policy says the game should restore the user’s purchases if the user replaces their phone or reinstalls the same app. We can use the above code to check what products the user has purchased and we can make our game respond accordingly.
Simple Purchase¶
We can put this purchase logic on a product’s buy button.
#First listen for purchase_success callback
IAP.connect("purchase_success",self,"purchase_success_callback")
#Then call purchase like this
IAP.purchase("pid1") #replace pid1 with your product id
IAP.purchase("pid2") #replace pid2 with your another product id
#This function will be called when the purchase is a success
func purchase_success_callback(item):
print(item + " has purchased")
We can also implement other signals for the purchase flow and improve the user experience as you needed.
purchase_fail - When the purchase is failed due to any reason
purchase_cancel - When the user cancels the purchase
purchase_owned - When the user already bought the product earlier
Consumables and Non-Consumables¶
There are two types of products - consumables and non-consumables. Consumables are purchased and used, for eg: healing potions which can be purchased again and again. Non-consumables are one time purchases, for eg: Level packs.
Google doesn’t have this separation in their dashboard. If our product is a consumable, and if a user has purchased it, it will not be available for purchase until it is consumed. So we should call the consume method for our consumables and don’t call consume for your non-consumables.
IAP.connect("consume_success",self,"on_consume_success")
IAP.consume("pid")
func on_consume_success(item):
print(item + " consumed")
If our game has only consumables, we don’t have to do this. We can set it to consume the item automatically after a purchase.
IAP.set_auto_consume(true)
If our game has only non-consumables, we can
IAP.set_auto_consume(false)
We should set the auto consume value only once when the game starts.
Testing¶
If we add a gmail id as a tester in Google dashboard, that tester can purchase items and they will not be charged. Another way to test IAP is using redeem codes generated by us for our game because the purchase flow is the same.
Third way of testing is in development side. If we put the product ids as shown below, we will get a static fixed response according to the product id. This is a quick way of testing things before going to the dashboard.
- android.test.purchased
- android.test.canceled
- android.test.refunded
- android.test.item_unavailable
Services for iOS¶
At the moment, there are two iOS APIs partially implemented, GameCenter and Storekit. Both use the same model of asynchronous calls explained below.
Asynchronous methods¶
When requesting an asynchronous operation, the method will look like this:
Error purchase(Variant p_params);
The parameter will usually be a Dictionary, with the information necessary to make the request, and the call will have two phases. First, the method will immediately return an Error value. If the Error is not ‘OK’, the call operation is completed, with an error probably caused locally (no internet connection, API incorrectly configured, etc). If the error value is ‘OK’, a response event will be produced and added to the ‘pending events’ queue. Example:
func on_purchase_pressed():
var result = InAppStore.purchase( { "product_id": "my_product" } )
if result == OK:
animation.play("busy") # show the "waiting for response" animation
else:
show_error()
# put this on a 1 second timer or something
func check_events():
while InAppStore.get_pending_event_count() > 0:
var event = InAppStore.pop_pending_event()
if event.type == "purchase":
if event.result == "ok":
show_success(event.product_id)
else:
show_error()
Remember that when a call returns OK, the API will always produce an event through the pending_event interface, even if it’s an error, or a network timeout, etc. You should be able to, for example, safely block the interface waiting for a reply from the server. If any of the APIs don’t behave this way it should be treated as a bug.
The pending event interface consists of two methods:
get_pending_event_count()Returns the number of pending events on the queue.Variant pop_pending_event()Pops the first event from the queue and returns it.
Store Kit¶
Implemented in platform/iphone/in_app_store.mm.
The Store Kit API is accessible through the “InAppStore” singleton (will always be available from gdscript). It is initialized automatically. It has three methods for purchasing:
Error purchase(Variant p_params);Error request_product_info(Variant p_params);Error restore_purchases();
and the pending_event interface
int get_pending_event_count();
Variant pop_pending_event();
purchase¶
Purchases a product id through the Store Kit API.
Parameters¶
Takes a Dictionary as a parameter, with one field, product_id, a
string with your product id. Example:
var result = InAppStore.purchase( { "product_id": "my_product" } )
Response event¶
The response event will be a dictionary with the following fields:
On error:
{
"type": "purchase",
"result": "error",
"product_id": "the product id requested"
}
On success:
{
"type": "purchase",
"result": "ok",
"product_id": "the product id requested"
}
request_product_info¶
Requests the product info on a list of product IDs.
Parameters¶
Takes a Dictionary as a parameter, with one field, product_ids, a
string array with a list of product ids. Example:
var result = InAppStore.request_product_info( { "product_ids": ["my_product1", "my_product2"] } )
Response event¶
The response event will be a dictionary with the following fields:
{
"type": "product_info",
"result": "ok",
"invalid_ids": [ list of requested ids that were invalid ],
"ids": [ list of ids that were valid ],
"titles": [ list of valid product titles (corresponds with list of valid ids) ],
"descriptions": [ list of valid product descriptions ] ,
"prices": [ list of valid product prices ],
"localized_prices": [ list of valid product localized prices ],
}
restore_purchases¶
Restores previously made purchases on user’s account. This will create response events for each previously purchased product id.
Response event¶
The response events will be dictionaries with the following fields:
{
"type": "restore",
"result": "ok",
"product id": "product id of restored purchase"
}
Game Center¶
Implemented in platform/iphone/game_center.mm.
The Game Center API is available through the “GameCenter” singleton. It has 8 methods:
bool is_authenticated();Error post_score(Variant p_score);Error award_achievement(Variant p_params);void reset_achievements();void request_achievements();void request_achievement_descriptions();Error show_game_center(Variant p_params);Error request_identity_verification_signature();
plus the standard pending event interface.
post_score¶
Posts a score to a Game Center leaderboard.
Parameters¶
Takes a Dictionary as a parameter, with two fields:
scorea float numbercategorya string with the category name
Example:
var result = GameCenter.post_score( { "score": 100, "category": "my_leaderboard", } )
Response event¶
The response event will be a dictionary with the following fields:
On error:
{
"type": "post_score",
"result": "error",
"error_code": the value from NSError::code,
"error_description": the value from NSError::localizedDescription,
}
On success:
{
"type": "post_score",
"result": "ok",
}
award_achievement¶
Modifies the progress of a Game Center achievement.
Parameters¶
Takes a Dictionary as a parameter, with 3 fields:
name(string) the achievement nameprogress(float) the achievement progress from 0.0 to 100.0 (passed toGKAchievement::percentComplete)show_completion_banner(bool) whether Game Center should display an achievement banner at the top of the screen
Example:
var result = award_achievement( { "name": "hard_mode_completed", "progress": 6.1 } )
Response event¶
The response event will be a dictionary with the following fields:
On error:
{
"type": "award_achievement",
"result": "error",
"error_code": the error code taken from NSError::code,
}
On success:
{
"type": "award_achievement",
"result": "ok",
}
reset_achievements¶
Clears all Game Center achievements. The function takes no parameters.
Response event¶
The response event will be a dictionary with the following fields:
On error:
{
"type": "reset_achievements",
"result": "error",
"error_code": the value from NSError::code
}
On success:
{
"type": "reset_achievements",
"result": "ok",
}
request_achievements¶
Request all the Game Center achievements the player has made progress on. The function takes no parameters.
Response event¶
The response event will be a dictionary with the following fields:
On error:
{
"type": "achievements",
"result": "error",
"error_code": the value from NSError::code
}
On success:
{
"type": "achievements",
"result": "ok",
"names": [ list of the name of each achievement ],
"progress": [ list of the progress made on each achievement ]
}
request_achievement_descriptions¶
Request the descriptions of all existing Game Center achievements regardless of progress. The function takes no parameters.
Response event¶
The response event will be a dictionary with the following fields:
On error:
{
"type": "achievement_descriptions",
"result": "error",
"error_code": the value from NSError::code
}
On success:
{
"type": "achievement_descriptions",
"result": "ok",
"names": [ list of the name of each achievement ],
"titles": [ list of the title of each achievement ]
"unachieved_descriptions": [ list of the description of each achievement when it is unachieved ]
"achieved_descriptions": [ list of the description of each achievement when it is achieved ]
"maximum_points": [ list of the points earned by completing each achievement ]
"hidden": [ list of booleans indicating whether each achievement is initially visible ]
"replayable": [ list of booleans indicating whether each achievement can be earned more than once ]
}
show_game_center¶
Displays the built in Game Center overlay showing leaderboards, achievements, and challenges.
Parameters¶
Takes a Dictionary as a parameter, with two fields:
view(string) (optional) the name of the view to present. Accepts “default”, “leaderboards”, “achievements”, or “challenges”. Defaults to “default”.leaderboard_name(string) (optional) the name of the leaderboard to present. Only used when “view” is “leaderboards” (or “default” is configured to show leaderboards). If not specified, Game Center will display the aggregate leaderboard.
Examples:
var result = show_game_center( { "view": "leaderboards", "leaderboard_name": "best_time_leaderboard" } )
var result = show_game_center( { "view": "achievements" } )
Response event¶
The response event will be a dictionary with the following fields:
On close:
{
"type": "show_game_center",
"result": "ok",
}
Multi-platform games¶
When working on a multi-platform game, you won’t always have the “GameCenter” singleton available (for example when running on PC or Android). Because the gdscript compiler looks up the singletons at compile time, you can’t just query the singletons to see and use what you need inside a conditional block, you need to also define them as valid identifiers (local variable or class member). This is an example of how to work around this in a class:
var GameCenter = null # define it as a class member
func post_score(p_score):
if GameCenter == null:
return
GameCenter.post_score( { "value": p_score, "category": "my_leaderboard" } )
func check_events():
while GameCenter.get_pending_event_count() > 0:
# do something with events here
pass
func _ready():
# check if the singleton exists
if Globals.has_singleton("GameCenter"):
GameCenter = Globals.get_singleton("GameCenter")
# connect your timer here to the "check_events" function
Customizing the Web export HTML page¶
Rather than the default HTML page that comes with the export templates, it is
also possible to use a custom HTML page. This allows drastic customization of
the final web presentation and behavior. The path to the custom HTML page is
specified in the export options as Html/Custom Html Shell.
The default HTML page is available in the Godot Engine repository at /misc/dist/html/full-size.html. Some simple use-cases where customizing the default page is useful include:
- Loading files from a different directory
- Loading a
.zipfile instead of a.pckfile as main pack- Loading engine files from a different directory than the main pack file
- Adding a click-to-play button so games can be started in full-screen mode
- Loading some extra files before the engine starts, so they are available in the file system later
- Passing custom “command line” arguments, e.g.
-sto start a MainLoop script
Another sample HTML page is available at /misc/dist/html/fixed-size.html. This page uses a fixed size canvas with an output widget below. However, the F12 browser console should be preferred as it can display additional information, such as WebGL errors.
Placeholder substitution¶
When exporting the game, several placeholders in the HTML page are replaced with values depending on the export:
| Placeholder | Substituted by |
|---|---|
$GODOT_BASENAME |
Basename of exported files without suffixes,
e.g. game when exporting game.html |
$GODOT_DEBUG_ENABLED |
true if debugging, false otherwise |
$GODOT_HEAD_INCLUDE |
Custom string to include just before the end
of the HTML <head> element |
The HTML file must evaluate the JavaScript file $GODOT_BASENAME.js. This
file defines a global Engine object used to start the engine, see
below for details.
The boot splash image is exported as $GODOT_BASENAME.png and can be used
e.g. in <img /> elements.
$GODOT_DEBUG_ENABLED can be useful to optionally display e.g. an output
console or other debug tools.
$GODOT_HEAD_INCLUDE is replaced with the string specified by the export
option Html/Head Include.
The Engine object¶
The JavaScript global object Engine is defined by $GODOT_BASENAME.js
and serves as an interface to the engine start-up process.
The API is based on and requires basic understanding of Promises.
The object itself has only the following methods:
-
Engine.load(basePath)¶ Load the engine from the passed base path.
Arguments: - basePath (string) – Base path of the engine to load.
Returns: Promise which resolves once the engine is loaded.
-
Engine.unload()¶ Unload the engine to free memory.
This is called automatically once the engine is started unless explicitly disabled using
engine.setUnloadAfterInit().
-
Engine.isWebGLAvailable([majorVersion = 1])¶ Check whether WebGL is available.
Arguments: - majorVersion (number) – The major WebGL version to check for. Defaults to 1 for WebGL 1.0.
Returns: trueif the given major version of WebGL is available,falseotherwise.
-
Engine.setWebAssemblyFilenameExtension(extension)¶ When loading the engine, the filename extension of the WebAssembly module is assumed to be
wasm. This function allows usage of an alternate extension.Engine.setWebAssemblyFilenameExtension('dat'); // Load 'mygame.dat' as WebAssembly module. Engine.load('mygame');
This is useful for outdated hosts that only accept uploads of files with certain filename extensions.
Arguments: - extension (string) – Filename extension without preceding dot.
Note
Depending on the host, using an alternate filename extension can prevent some start-up optimizations. This occurs when the file is delivered with a MIME-type other than application/wasm.
Starting an Engine instance¶
Engine() also acts a class:
-
class
Engine()¶ An instance of the engine that can be started, usually a game.
Instantiate the class using the new operator:
var engine = new Engine();
This yields an Engine() instance, referred to as engine with a
lower-case e from here.
To start such an instance, the global Engine object must be loaded,
then the engine instance must be initialized and finally started.
-
engine.init([basePath])¶ Initialize the instance. The instance can then be started with one of the
startfunctions, usuallyengine.startGame().Arguments: - basePath (string) – The base path to the engine, same as in
Engine.load(). Must be passed only if the engine hasn’t been loaded yet.
Returns: Promise that resolves once the engine is loaded and initialized.
- basePath (string) – The base path to the engine, same as in
-
engine.preloadFile(file[, path])¶ Load a file so it is available in the file system once the instance runs. Must be called before starting the instance.
Arguments: - file –
If type is string, the file will be loaded from that path.
If type is
ArrayBufferor a view on one, the buffer will used as the content of the file. - path (string) – Path by which the file will be available. Mandatory if
fileis not a string. If not passed, the path is derived from the URL of the loaded file.
Returns: Promise that resolves once the file is preloaded.
- file –
-
engine.start([arg1, arg2, …])¶ Starts the instance of the engine, using the passed strings as command line arguments. This allows great control over how the engine is started, but usually the other methods starting with
engine.startare simpler and should be used instead.If the instance has not yet been initialized with
engine.init(), it will be.The engine must be loaded beforehand.
Requires that the engine has been loaded, and that a canvas can be found on the page.
Arguments: - variadic (string) – Command line arguments.
Returns: Promise that resolves once the engine started.
-
engine.startGame(execName, mainPack)¶ Initializes the engine if not yet initialized, loads the executable, and starts the game with the main pack loaded from the passed URL.
If the engine isn’t loaded yet, the base path of the passed executable name will be used to load the engine.
Arguments: - execName (string) – Executable’s name (URL) to start. Also used as base path to load the engine if not loaded already. Should not contain the file’s extension.
- mainPack (string) – Path (URL) to the main pack to start.
Returns: Promise that resolves once the game started.
Configuring start-up behaviour¶
Beside starting the engine, other methods of the engine instance allow configuring the behavior:
-
engine.setUnloadAfterInit(enabled)¶ Specify whether the Engine will be unloaded automatically after the instance is initialized.
This frees browser memory by unloading files that are no longer needed once the instance is initialized. However, if more instances of the engine will be started, the Engine will have to be loaded again.
Enabled by default.
Arguments: - enabled (boolean) –
trueif the engine shall be unloaded after initializing,falseotherwise.
- enabled (boolean) –
-
engine.setCanvas(canvasElem)¶ Specify a canvas to use.
By default, the first canvas element on the page is used for rendering.
Arguments: - canvasElem (HTMLCanvasElement) – The canvas to use.
-
engine.setCanvasResizedOnStart(enabled)¶ Specifies whether the canvas will be resized to the width and height specified in the project settings on start.
Enabled by default.
Arguments: - enabled (boolean) –
trueif the canvas shall be resized on start,falseotherwise.
- enabled (boolean) –
-
engine.setLocale(locale)¶ By default, the engine will try to guess the locale to use from the JavaScript environment. It is usually preferable to use a server-side user-specified locale, or at least use the locale requested in the HTTP
Accept-Languageheader. This method allows specifying such a custom locale string.For example, with PHP:
engine.setLocale(<?php echo Locale::acceptFromHttp($_SERVER['HTTP_ACCEPT_LANGUAGE']); ?>);
Arguments: - locale (string) – Locale.
See also
List of locales.
-
engine.setExecutableName(execName)¶ Specify the virtual filename of the executable.
A real executable file doesn’t exist for the HTML5 platform. However, a virtual filename is stored by the engine for compatibility with other platforms.
By default, the base name of the loaded engine files is used. This method allows specifying another name.
This affects the output of OS.get_executable_path() and the automatically started main pack,
ExecutableName.pck.Arguments: - execName (string) – Executable name.
Customizing the presentation¶
The following methods are used to implement the presentation:
-
engine.setProgressFunc(callback)¶ Set the callback for displaying download progress.
Arguments: - callback (function) – Callback called once per frame with two number arguments: bytes loaded so far, and total bytes to load.
function printProgress(current, total) { console.log("Loaded " + current + " of " + total + " bytes"); } engine.setProgressFunc(printProgress);
If the total is 0, it couldn’t be calculated. Possible reasons include:
- Files are delivered with server-side chunked compression
- Files are delivered with server-side compression on Chromium
- Not all file downloads have started yet (usually on servers without multi-threading)
Note
For ease of use, the callback is only called once per frame, so that usage of
requestAnimationFrame()is not necessary.
-
engine.setStdoutFunc(callback)¶ Specify the standard output stream callback.
Arguments: - callback (function) – Callback function called with one argument, the string to print.
function printStdout(text) { console.log(text); } engine.setStdoutFunc(printStdout);
This method should usually only be used in debug pages. The
$GODOT_DEBUG_ENABLEDplaceholder can be used to check for this.By default,
console.log()is used.
-
engine.setStderrFunc(callback)¶ Specify the standard error stream callback.
Arguments: - callback (function) – Callback function called with one argument, the string to print.
function printStderr(text) { console.warn("Error: " + text); } engine.setStderrFunc(printStderr);
This method should usually only be used in debug pages. The
$GODOT_DEBUG_ENABLEDplaceholder can be used to check for this.By default,
console.warn()is used.
Accessing the Emscripten Module¶
If you know what you’re doing, you can access the runtime environment
(Emscripten’s Module) as engine.rtenv. Check the official Emscripten
documentation for information on how to use it:
https://kripken.github.io/emscripten-site/docs/api_reference/module.html
Console support in Godot¶
Official support¶
Godot currently does not officially support consoles (except the Xbox One using UWP).
The reasons for this are:
- To develop for consoles, one must be licensed as a company. As an open source project, Godot does not have such a legal figure.
- Console SDKs are secret and covered by non-disclosure agreements. Even if we could get access to them, we could not publish the platform-specific code under an open source license.
- Consoles require specialized hardware to develop for, so regular individuals can’t create games for them anyway.
However, it is still possible to port your games to consoles thanks to services provided by third-party companies.
Third-party support¶
Console ports of Godot are offered by third-party companies (which have ported Godot on their own). These companies also offer publishing of your games to various consoles.
Following is the list of providers:
- Lone Wolf Technology offers Switch, PS4 and Xbox One porting and publishing of Godot games.
- Pineapple Works offers Switch and Xbox One porting and publishing of Godot games.
If your company offers porting and/or publishing services for Godot games, feel free to open an issue or pull request to add your company to the list above.
Multi-threading¶
Using multiple threads¶
Threads¶
Threads allow simultaneous execution of code. It allows off-loading work from the main thread.
Godot supports threads and provides many handy functions to use them.
Note
If using other languages (C#, C++), it may be easier to use the threading classes they support.
Creating a Thread¶
Creating a thread is very simple, just use the following code:
var thread
# The thread will start here.
func _ready():
thread = Thread.new()
# Third argument is optional userdata, it can be any variable.
thread.start(self, "_thread_function", "Wafflecopter")
# Run here and exit.
# The argument is the userdata passed from start().
# If no argument was passed, this one still needs to
# be here and it will be null.
func _thread_function(userdata):
# Print the userdata ("Wafflecopter")
print("I'm a thread! Userdata is: ", userdata)
# Thread must be disposed (or "joined"), for portability.
func _exit_tree():
thread.wait_to_finish()
Your function will, then, run in a separate thread until it returns. Even if the function has returned already, the thread must collect it, so call Thread.wait_to_finish(), which will wait until the thread is done (if not done yet), then properly dispose of it.
Mutexes¶
Accessing objects or data from multiple threads is not always supported (if you do it, it will cause unexpected behaviors or crashes). Read the Thread safe APIs to understand which engine APIs support multiple thread access.
When processing your own data or calling your own functions, as a rule, try to avoid accessing the same data directly from different threads. You may run into synchronization problems, as the data is not always updated between CPU cores when modified. Always use a Mutex when accessing a piece of data from different threads.
When calling Mutex.lock(), a thread ensures that all other threads will be blocked (put on suspended state) if they try to lock the same mutex. When the mutex is unlocked by calling Mutex.unlock(), the other threads will be allowed to proceed with the lock (but only one at a time).
Here is an example of using a Mutex:
var counter = 0
var mutex
var thread
# The thread will start here.
func _ready():
mutex = Mutex.new()
thread = Thread.new()
thread.start(self, "_thread_function")
# Increase value, protect it with Mutex.
mutex.lock()
counter += 1
mutex.unlock()
# Increment the value from the thread, too.
func _thread_function(userdata):
mutex.lock()
counter += 1
mutex.unlock()
# Thread must be disposed (or "joined"), for portability.
func _exit_tree():
thread.wait_to_finish()
print("Counter is: ", counter) # Should be 2.
Semaphores¶
Sometimes you want your thread to work “on demand”. In other words, tell it when to work and let it suspend when it isn’t doing anything. For this, Semaphores are used. The function Semaphore.wait() is used in the thread to suspend it until some data arrives.
The main thread, instead, uses Semaphore.post() to signal that data is ready to be processed:
var counter = 0
var mutex
var semaphore
var thread
var exit_thread = false
# The thread will start here.
func _ready():
mutex = Mutex.new()
semaphore = Semaphore.new()
exit_thread = false
thread = Thread.new()
thread.start(self, "_thread_function")
func _thread_function(userdata):
while true:
semaphore.wait() # Wait until posted.
mutex.lock()
var should_exit = exit_thread # Protect with Mutex.
mutex.unlock()
if should_exit:
break
mutex.lock()
counter += 1 # Increment counter, protect with Mutex.
mutex.unlock()
func increment_counter():
semaphore.post() # Make the thread process.
func get_counter():
mutex.lock()
# Copy counter, protect with Mutex.
var counter_value = counter
mutex.unlock()
return counter_value
# Thread must be disposed (or "joined"), for portability.
func _exit_tree():
# Set exit condition to true.
mutex.lock()
exit_thread = true # Protect with Mutex.
mutex.unlock()
# Unblock by posting.
semaphore.post()
# Wait until it exits.
thread.wait_to_finish()
# Print the counter.
print("Counter is: ", counter)
Thread safe APIs¶
Threads¶
Threads are used to balance processing power across CPUs and cores. Godot supports multithreading, but not in the whole engine.
Below is a list of ways multithreading can be used in different areas of Godot.
Global scope¶
Global Scope singletons are all thread safe. Accessing servers from threads is supported (for VisualServer and Physics servers, ensure threaded or thread safe operation is enabled in the project settings!).
This makes them ideal for code that creates dozens of thousands of instances in servers and controls them from threads. Of course, it requires a bit more code, as this is used directly and not within the scene tree.
Scene tree¶
Interacting with the active scene tree is NOT thread safe. Make sure to use mutexes when sending data between threads. If you want to call functions from a thread, the call_deferred function may be used:
# Unsafe:
node.add_child(child_node)
# Safe:
node.call_deferred("add_child", child_node)
However, creating scene chunks (nodes in tree arrangement) outside the active tree is fine. This way, parts of a scene can be built or instantiated in a thread, then added in the main thread:
var enemy_scene = load("res://enemy_scene.scn").instance()
var enemy = enemy_scene.instance()
enemy.add_child(weapon) # Set a weapon.
world.call_deferred("add_child", enemy)
Still, this is only really useful if you have one thread loading data. Attempting to load or create scene chunks from multiple threads may work, but you risk resources (which are only loaded once in Godot) tweaked by the multiple threads, resulting in unexpected behaviors or crashes.
Only use more than one thread to generate scene data if you really know what you are doing and you are sure that a single resource is not being used or set in multiple ones. Otherwise, you are safer just using the servers API (which is fully thread-safe) directly and not touching scene or resources.
GDScript arrays, dictionaries¶
In GDScript, reading and writing elements from multiple threads is ok, but anything that changes the container size (resizing, adding or removing elements) requires locking a mutex.
Resources¶
Modifying a unique resource from multiple threads is not supported, but loading them on threads or handling a reference is perfectly supported. Scenes, textures, meshes, etc. Can be loaded and manipulated on threads, then added to the active scene in the main thread.
Creating content¶
Procedural geometry¶
There are many ways to procedurally generate geometry in Godot. In this tutorial series we will explore a few of them. Each technique has its own benefits and drawbacks, so it is best to understand each one and how it can be useful in a given situation.
Using the ArrayMesh¶
This tutorial will present the basics of using an ArrayMesh
To do so, we will use the function add_surface_from_arrays(), which takes up to four parameters. The first two are required, while the second two are optional.
The first is the PrimitiveType, this is an OpenGL concept that instructs the GPU
how to arrange the primitive based on the vertices given whether it is triangles,
lines, points, etc. A complete list can be found under the Mesh
class reference page.
The second is the actual Array that stores the mesh information. The array is a normal Godot array that
is constructed with empty brackets []. It stores a Pool**Array (e.g. PoolVector3Array,
PoolIntArray, etc.) for each type of information.
ARRAY_VERTEX= 0 | PoolVector3Array or PoolVector2ArrayARRAY_NORMAL= 1 | PoolVector3ArrayARRAY_TANGENT= 2 | PoolRealArray of groups of 4 floats. first 3 floats determine the tangent, and the last the binormal direction as -1 or 1.ARRAY_COLOR= 3 | PoolColorArrayARRAY_TEX_UV= 4 | PoolVector2Array or PoolVector3ArrayARRAY_TEX_UV2= 5 | PoolVector2Array or PoolVector3ArrayARRAY_BONES= 6 | PoolRealArray of groups of 4 floats or PoolIntArray of groups of 4 intsARRAY_WEIGHTS= 7 | PoolRealArray of groups of 4 floatsARRAY_INDEX= 8 | PoolIntArray
The Array of vertices is always required. All the others are optional and will only be used if included.
Each array needs to have the same number of elements as the vertex array except for the index array. For arrays like tangents, an element is a group of 4 floats. So the array size will be four times the size of the vertex array size, but they will have the same number of elements
The index array is unique.
The third parameter is an array of blendshapes for the Mesh to use. While this tutorial does not cover using blendshapes, it is possible to specify them when creating a surface from arrays.
The last parameter is the compress flags which specifies which arrays to store with half as many bits. The values can be found in the classref for VisualServer under ArrayFormat.
For normal usage you will find it is best to leave the last two parameters empty.
ArrayMesh¶
Add an ArrayMesh to a MeshInstance. Normally, adding an ArrayMesh in the editor is not useful, but in this case it allows as to access the ArrayMesh from code without creating one.
Next, add a script to the MeshInstance.
Under _ready(), create a new Array.
var arr = []
This will be the array that we keep our surface information in, it will hold
all the arrays of data that the surface needs. Godot will expect it to be of
size Mesh.ARRAY_MAX, so resize it accordingly.
var arr = []
arr.resize(Mesh.ARRAY_MAX)
Next create the arrays for each data type you will use.
var verts = PoolVector3Array()
var uvs = PoolVector2Array()
var normals = PoolVector3Array()
var indices = PoolIntArray()
Once you have filled your data arrays with your geometry you can create a mesh
by adding each array to surface_array and then committing to the mesh.
arr[Mesh.ARRAY_VERTEX] = verts
arr[Mesh.ARRAY_TEX_UV] = uvs
arr[Mesh.ARRAY_NORMAL] = normals
arr[Mesh.ARRAY_INDEX] = indices
mesh.add_surface_from_arrays(Mesh.PRIMITIVE_TRIANGLES, arr) # No blendshapes or compression used.
Note
In this example, we used Mesh.PRIMITIVE_TRIANGLES, but you can use any primitive type
available from mesh.
Put together the full code looks like:
extends MeshInstance
func _ready():
var arr = []
arr.resize(Mesh.ARRAY_MAX)
# PoolVectorXXArrays for mesh construction.
var verts = PoolVector3Array()
var uvs = PoolVector2Array()
var normals = PoolVector3Array()
var indices = PoolIntArray()
#######################################
## Insert code here to generate mesh ##
#######################################
# Assign arrays to mesh array.
arr[Mesh.ARRAY_VERTEX] = verts
arr[Mesh.ARRAY_TEX_UV] = uvs
arr[Mesh.ARRAY_NORMAL] = normals
arr[Mesh.ARRAY_INDEX] = indices
# Create mesh surface from mesh array.
mesh.add_surface_from_arrays(Mesh.PRIMITIVE_TRIANGLES, arr) # No blendshapes or compression used.
The code that goes in the middle can be whatever you want. Below we will present some example code that could go in the middle.
Generating geometry¶
Here is sample code for generating a sphere. Although the code is presented in GDScript, there is nothing Godot specific about the approach to generating it. This implementation has nothing in particular to do with ArrayMeshes and is just a generic approach to generating a sphere. If you are having trouble understanding it or want to learn more about procedural geometry in general, you can use any tutorial that you find online.
extends MeshInstance
var rings = 50
var radial_segments = 50
var height = 1
var radius = 1
func _ready():
# Set up the PoolVectorXArrays.
# Vertex indices.
var thisrow = 0
var prevrow = 0
var point = 0
# Loop over rings.
for i in range(rings + 1):
var v = float(i) / rings
var w = sin(PI * v)
var y = cos(PI * v)
# Loop over segments in ring.
for j in range(radial_segments):
var u = float(j) / radial_segments
var x = sin(u * PI * 2.0)
var z = cos(u * PI * 2.0)
var vert = Vector3(x * radius * w, y, z * radius * w)
verts.append(vert)
normals.append(vert.normalized())
uvs.append(Vector2(u, v))
point += 1
# Create triangles in ring using indices.
if i > 0 and j > 0:
indices.append(prevrow + j - 1)
indices.append(prevrow + j)
indices.append(thisrow + j - 1)
indices.append(prevrow + j)
indices.append(thisrow + j)
indices.append(thisrow + j - 1)
if i > 0:
indices.append(prevrow + radial_segments - 1)
indices.append(prevrow)
indices.append(thisrow + radial_segments - 1)
indices.append(prevrow)
indices.append(prevrow + radial_segments)
indices.append(thisrow + radial_segments - 1)
prevrow = thisrow
thisrow = point
# Commit to the ArrayMesh.
Combined with the code above, this code will generate a sphere.
When it comes to generating geometry with the ArrayMesh you need to understand what goes in each array and then you can follow tutorials for any language/engine and convert it into Godot.
Saving¶
Finally, Godot provides a single method to save ArrayMeshes using the ResourceSaver class. This is useful when you want to generate a mesh and then use it later without having to re-generate.
# Saves mesh to a .tres file with compression enabled.
ResourceSaver.save("res://sphere.tres", mesh, 32)
Using the MeshDataTool¶
The MeshDataTool is not used to generate geometry. But it is helpful for dynamically altering geometry, for example if you want to write a script to tessellate, simplify, or deform meshes.
The MeshDataTool is not as fast as altering arrays directly using ArrayMesh. However, it provides more information and tools to work with meshes than the ArrayMesh does. When the MeshDataTool is used, it calculates mesh data that is not available in ArrayMeshes such as faces and edges, which are necessary for certain mesh algorithms. If you do not need this extra information then it may be better to use an ArrayMesh.
Note
MeshDataTool can only be used on Meshes that use the PrimitiveType Mesh.PRIMITIVE_TRIANGLES.
As an example, let’s walk through the process of deforming the mesh generated in the ArrayMesh tutorial.
Assume the mesh is stored in an ArrayMesh named mesh. We then initialize the MeshDataTool from
mesh by calling create_from_surface(). If there is already data initialized in the MeshDataTool
calling create_from_surface() will clear it for you. Alternatively, you can call clear() yourself
before re-using the MeshDataTool
var mdt = MeshDataTool.new()
mdt.create_from_surface(mesh)
create_from_surface() uses the vertex arrays from the ArrayMesh to calculate two additional arrays,
one for edges and one for faces.
An edge is a connection between any two vertices. Each edge in the edge array contains a reference to the two vertices it is composed of, and up to two faces that it is contained within.
A face is a triangle made up of three vertices and three corresponding edges. Each face in the face array contains a reference to the three triangles and three edges it is composed of.
The vertex array contains edges, faces, normals, color, tangent, uv, uv2, bones, and weight information connected with each vertex.
To access information from these arrays you use a function of the form get_****():
mdt.get_vertex_count() # Returns number of vertices in vertex array.
mdt.get_vertex_faces(0) # Returns array of faces that contain vertex[0].
mdt.get_face_normal(1) # Calculates and returns face normal.
mdt.get_edge_vertex(10, 1) # Returns the second vertex comprsing edge at index 10.
What you choose to do with these functions is up to you. A common use case is to iterate over all vertices and transform them in some way:
for i in range(get_vertex_count):
var vert = mdt.get_vertex(i)
vert *= 2.0 # Scales the vertex by doubling size.
mdt.set_vertex(i, vert)
Finally, commit_to_surface() adds a new surface to the ArrayMesh. So if you are dynamically
updating an existing ArrayMesh, first delete the existing surface before adding a new one.
mesh.surface_remove(0) # Deletes the first surface of the mesh.
mdt.commit_to_surface(mesh)
Below is a complete example that creates a pulsing blob complete with new normals and vertex colors.
extends MeshInstance
var sn = OpenSimplexNoise.new()
var mdt = MeshDataTool.new()
func _ready():
sn.period = 0.7
mdt.create_from_surface(mesh, 0)
for i in range(mdt.get_vertex_count()):
var vertex = mdt.get_vertex(i).normalized()
# Push out vertex by noise.
vertex = vertex * (sn.get_noise_3dv(vertex) * 0.5 + 0.75)
mdt.set_vertex(i, vertex)
# Calculate vertex normals, face-by-face.
for i in range(mdt.get_face_count()):
# Get the index in the vertex array.
var a = mdt.get_face_vertex(i, 0)
var b = mdt.get_face_vertex(i, 1)
var c = mdt.get_face_vertex(i, 2)
# Get vertex position using vertex index.
var ap = mdt.get_vertex(a)
var bp = mdt.get_vertex(b)
var cp = mdt.get_vertex(c)
# Calculate face normal.
var n = (bp - cp).cross(ap - bp).normalized()
# Add face normal to current vertex normal.
# This will not result in perfect normals, but it will be close.
mdt.set_vertex_normal(a, n + mdt.get_vertex_normal(a))
mdt.set_vertex_normal(b, n + mdt.get_vertex_normal(b))
mdt.set_vertex_normal(c, n + mdt.get_vertex_normal(c))
# Run through vertices one last time to normalize normals and
# set color to normal.
for i in range(mdt.get_vertex_count()):
var v = mdt.get_vertex_normal(i).normalized()
mdt.set_vertex_normal(i, v)
mdt.set_vertex_color(i, Color(v.x, v.y, v.z))
mesh.surface_remove(0)
mdt.commit_to_surface(mesh)
Using the SurfaceTool¶
The SurfaceTool provides a useful interface for constructing geometry. The interface is similar to the ImmediateGeometry node. You set each per-vertex attribute (e.g. normal, uv, color) and then when you add a vertex it captures the attributes.
The SurfaceTool also provides some useful helper functions like index() and generate_normals().
Attributes are added before each vertex is added:
st.add_normal() # Overwritten by normal below.
st.add_normal() # Added to next vertex.
st.add_color() # Added to next vertex.
st.add_vertex() # Captures normal and color above.
st.add_normal() # Normal never added to a vertex.
When finished generating your geometry with the SurfaceTool
call commit() to finished generating the mesh. If an ArrayMesh is passed
to commit() then it appends a new surface to the end of the ArrayMesh. While if nothing is passed
in, commit() returns an ArrayMesh.
st.commit(mesh)
# Or:
var mesh = st.commit()
Code creates a triangle with indices
var st = SurfaceTool.new()
st.begin(Mesh.PRIMITIVE_TRIANGLES)
# Prepare attributes for add_vertex.
st.add_normal(Vector3(0, 0, 1))
st.add_uv(Vector2(0, 0))
# Call last for each vertex, adds the above attributes.
st.add_vertex(Vector3(-1, -1, 0))
st.add_normal(Vector3(0, 0, 1))
st.add_uv(Vector2(0, 1))
st.add_vertex(Vector3(-1, 1, 0))
st.add_normal(Vector3(0, 0, 1))
st.add_uv(Vector2(1, 1))
st.add_vertex(Vector3(1, 1, 0))
# Commit to a mesh.
var mesh = st.commit()
You can optionally add an index array, either by calling add_index() and adding
vertices to the index array or by calling index() which shrinks the vertex array
to remove duplicate vertices.
# Creates a quad from four corner vertices.
# Add_index does not need to be called before add_vertex.
st.add_index(0)
st.add_index(1)
st.add_index(2)
st.add_index(1)
st.add_index(3)
st.add_index(2)
# Or alternatively:
st.index()
Similarly, if you have an index array, but you want each vertex to be unique (e.g. because
you want to use unique normals or colors per face instead of per-vertex), you can call deindex().
st.deindex()
If you don’t add custom normals yourself, you can add them using generate_normals(). The same goes for tangents.
st.generate_normals()
st.generate_tangents()
By default, when generating normals, they will be calculated on a per-face basis. If you want
smooth vertex normals, when adding vertices, call add_smooth_group(). add_smooth_group()
needs to be called while building the geometry, e.g. before the call to add_vertex()
(if non-indexed) or add_index() (if indexed).
Using ImmediateGeometry¶
Unlike the SurfaceTool or ArrayMesh, ImmediateGeometry is an actual node. Being an node makes it quick to add to a scene and get visual output. It uses an “OpenGL 1.x” style API like the SurfaceTool, but it’s actually designed to create content on the fly.
Generating complex geometry (several thousand vertices) with this node is inefficient, even if it’s done only once. Instead, it is designed to generate simple geometry that changes every frame.
Before starting, you should clear the geometry by calling clear(). This ensures that
you are not building upon the geometry from the previous frame. If you want to keep geometry between frames, do
not call clear().
To begin generating geometry you must call begin(). begin() takes a PrimitiveType as an argument.
PrimitiveType is an OpenGL concept that instructs the GPU how to arrange the primitive based on the
vertices given whether it is triangles, lines, points, etc. A complete list can be found under
the Mesh class reference page.
Once you have called begin() you are ready to start adding vertices. You add vertices one at a time.
First you add vertex specific attributes such as normals or UVs using set_****() (e.g. set_normal()).
Then you call add_vertex() to add a vertex with those attributes. For example:
# Add a vertex with normal and uv.
set_normal(Vector3(0, 1, 0))
set_uv(Vector2(1, 1))
add_vertex(Vector3(0, 0, 1))
Only attributes added before the call to add_vertex() will be included in that vertex.
Finally, once you have added all your vertices call end() to signal that you have finished generating the mesh.
The example code below draws a single triangle.
extends ImmediateGeometry
func _process(_delta):
# Clean up before drawing.
clear()
# Begin draw.
begin(Mesh.PRIMITIVE_TRIANGLES)
# Prepare attributes for add_vertex.
set_normal(Vector3(0, 0, 1))
set_uv(Vector2(0, 0))
# Call last for each vertex, adds the above attributes.
add_vertex(Vector3(-1, -1, 0))
set_normal(Vector3(0, 0, 1))
set_uv(Vector2(0, 1))
add_vertex(Vector3(-1, 1, 0))
set_normal(Vector3(0, 0, 1))
set_uv(Vector2(1, 1))
add_vertex(Vector3(1, 1, 0))
# End drawing.
end()
What is geometry?¶
Geometry is a fancy way of saying shape. In computer graphics, geometry is typically represented by an array of positions called “vertices”. In Godot, geometry is represented by Meshes.
What is a Mesh?¶
Many things in Godot have mesh in their name: the Mesh, the ArrayMesh, the MeshInstance, the MultiMesh, and the MultiMeshInstance. While they are all related, they have slightly different uses.
Meshes and ArrayMeshes are resources that are drawn using a MeshInstance node. Resources like Meshes and ArrayMeshes cannot be added to the scene directly. A MeshInstance represents one instance of a mesh in your scene. You can reuse a single mesh in multiple MeshInstances to draw it in different parts of your scene with different materials or transformations (scale, rotation, position etc.).
If you are going to draw the same object many times, it can be helpful to use a MultiMesh with a MultiMeshInstance. The MultiMeshInstance draws meshes thousands of times very cheaply. It takes advantage of hardware instancing in order to do so. The drawback with using a MultiMeshInstance is that you are limited to one material for all instances. It uses an instance array to store different colors and transformations for each instance, but all the instances use the same material.
What a Mesh is¶
A Mesh is composed of one or more surfaces. A surface is an array composed of multiple sub-arrays containing vertices, normals, UVs, etc. Normally the process of constructing surfaces and meshes is hidden from the user in the VisualServer, but with ArrayMeshes, the user can construct a Mesh manually by passing in an array containing the surface information.
Surfaces¶
Each surface has its own material. Alternatively, you can override the material for all surfaces
in the Mesh when you use a MeshInstance using MeshInstance.override_material.
Surface array¶
The surface array is an array of length ArrayMesh.ARRAY_MAX. Each position in the array is
filled with a sub-array containing per-vertex information. For example, the array located at
ArrayMesh.ARRAY_NORMAL is a PoolVector3Array of vertex normals.
The surface array can be indexed or non-indexed. Creating a non-indexed array is as easy as not assigning
an array at the index ArrayMesh.ARRAY_INDEX. A non-indexed array stores unique vertex information for
every triangle, meaning that when two triangle share a vertex, the vertex is duplicated in the array. An
indexed surface array only stores vertex information for each unique vertex and then also stores an array
of indices which maps out how to construct the triangles from the vertex array. In general, using an indexed
array is faster, but it means you have to share vertex data between triangles, which is not always desired
(e.g. when you want per-face normals).
Tools¶
Godot provides different ways of accessing and working with geometry. More information on each will be provided in the following tutorials.
ArrayMesh¶
The ArrayMesh resource extends Mesh to add a few different quality of life functions, and most importantly, the ability to construct a Mesh surface through scripting.
For more information about the ArrayMesh, please see the ArrayMesh tutorial.
MeshDataTool¶
The MeshDataTool is a resource that converts Mesh data into arrays of vertices, faces, and edges that can be modified at runtime.
For more information about the MeshDataTool, please see the MeshDataTool tutorial.
SurfaceTool¶
The SurfaceTool allows the creation of Meshes using an OpenGL 1.x immediate mode style interface.
For more information about the SurfaceTool, please see the SurfaceTool tutorial.
ImmediateGeometry¶
ImmediateGeometry is a node that uses an immediate mode style interface (like SurfaceTool) to draw objects. The difference between ImmediateGeometry and the SurfaceTool is that ImmediateGeometry is a node itself that can be added to the scene tree and is drawn directly from the code. The SurfaceTool generates a Mesh that needs to be added a MeshInstance to be seen.
ImmediateGeometry is useful for prototyping because of the straightforward API, but it is slow because the geometry is rebuilt every frame. It is most useful for quickly adding simple geometry to debug visually (e.g. by drawing lines to visualize physics raycasts etc.).
For more information about ImmediateGeometry, please see the ImmediateGeometry tutorial.
Which one should I use?¶
Which method you use depends on what you are trying to do and what kind of procedure you are comfortable with.
Both SurfaceTool and ArrayMesh are excellent for generating static geometry (meshes) that don’t change over time.
Using an ArrayMesh is slightly faster than using a SurfaceTool, but the API is more a little more challenging.
Additionally, SurfaceTool has a few quality of life methods such as generate_normals() and index().
ImmediateGeometry regenerates the mesh every frame, so it is much slower than ArrayMesh or SurfaceTool. However, if you need the geometry to change every frame anyway it provides a much easier interface that may even be a little faster than generating an ArrayMesh every frame.
The MeshDataTool is not fast, but it gives you access to all kinds of properties of the mesh that you don’t get with the others (edges, faces, etc.). It is incredibly useful when you need that sort of data to transform the mesh, but it is not a good idea to use if that information is not needed. The MeshDataTool is best used if you are going to be using an algorithm that requires access to the face or edge array.
Making trees¶
This is a short tutorial on how to make trees and other types of vegetation from scratch.
The aim is to not focus on the modelling techniques (there are plenty of tutorials about that), but how to make them look good in Godot.
Start with a tree¶
I took this tree from SketchFab:
https://sketchfab.com/models/ea5e6ed7f9d6445ba69589d503e8cebf
and opened it in Blender.
Paint with vertex colors¶
The first thing you may want to do is to use the vertex colors to paint how much the tree will sway when there is wind. Just use the vertex color painting tool of your favorite 3D modelling program and paint something like this:
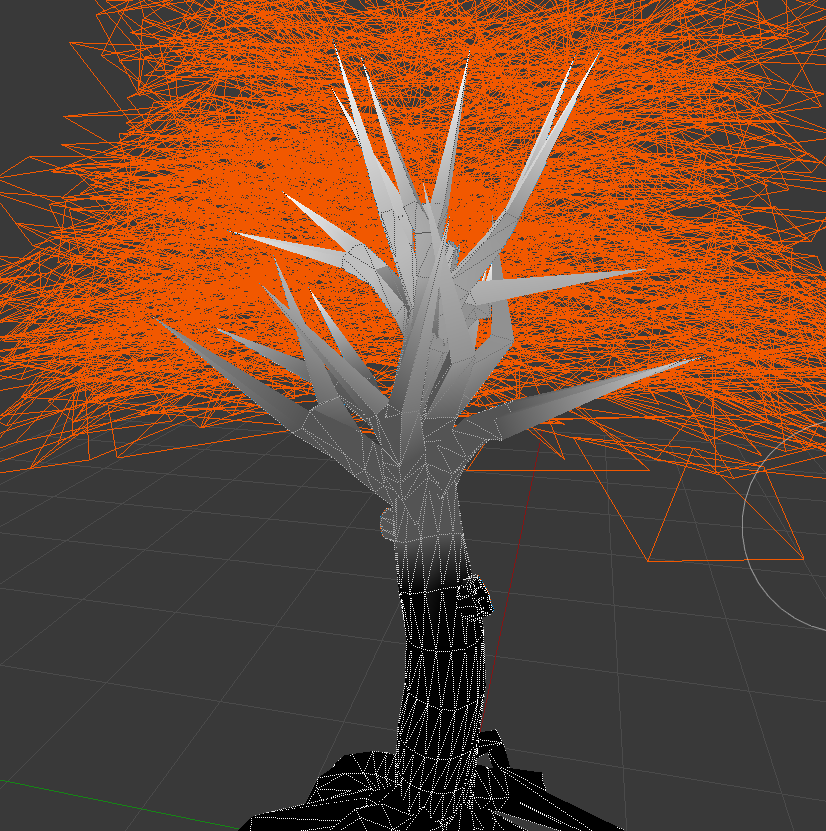
This is a bit exaggerated, but the idea is that color indicates how much sway affects every part of the tree. This scale here represents it better:
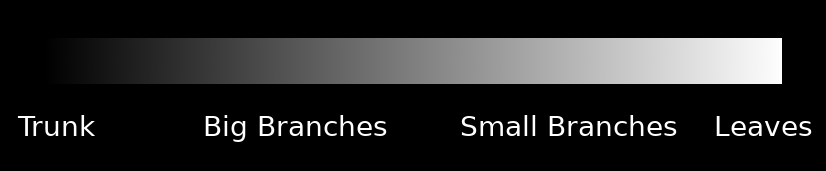
Write a custom shader for the leaves¶
This is a simple example of a shader for leaves:
shader_type spatial;
render_mode depth_draw_alpha_prepass, cull_disabled, world_vertex_coords;
This is a spatial shader. There is no front/back culling (so leaves can be seen from both sides), and alpha prepass is used, so there are less depth artifacts that result from using transparency (and leaves cast shadow). Finally, for the sway effect, world coordinates are recommended, so the tree can be duplicated, moved, etc. and it will still work together with other trees.
uniform sampler2D texture_albedo : hint_albedo;
uniform vec4 transmission : hint_color;
Here, the texture is read, as well as a transmission color, which is used to add some back-lighting to the leaves, simulating subsurface scattering.
uniform float sway_speed = 1.0;
uniform float sway_strength = 0.05;
uniform float sway_phase_len = 8.0;
void vertex() {
float strength = COLOR.r * sway_strength;
VERTEX.x += sin(VERTEX.x * sway_phase_len * 1.123 + TIME * sway_speed) * strength;
VERTEX.y += sin(VERTEX.y * sway_phase_len + TIME * sway_speed * 1.12412) * strength;
VERTEX.z += sin(VERTEX.z * sway_phase_len * 0.9123 + TIME * sway_speed * 1.3123) * strength;
}
This is the code to create the sway of the leaves. It’s basic (just uses a sinewave multiplying by the time and axis position, but works well). Notice that the strength is multiplied by the color. Every axis uses a different small near 1.0 multiplication factor so axes don’t appear in sync.
Finally all that is left is the fragment shader:
void fragment() {
vec4 albedo_tex = texture(texture_albedo,UV);
ALBEDO = albedo_tex.rgb;
ALPHA = albedo_tex.a;
METALLIC = 0.0;
ROUGHNESS = 1.0;
TRANSMISSION = transmission.rgb;
}
And this is pretty much it.
The trunk shader is similar, except it does not write to the alpha channel (thus no alpha prepass is needed) and does not require transmission to work. Both shaders can be improved by adding normal mapping, AO and other maps.
Improving the shader¶
There are many more resources on how to do this that you can read. Now that you know the basics, a recommended read is the chapter from GPU Gems3 about how Crysis does this (focus mostly on the sway code, as many other techniques shown there are obsolete):
https://developer.nvidia.com/gpugems/GPUGems3/gpugems3_ch16.html
Optimization¶
Optimization using Servers¶
Engines like Godot provide increased ease of use thanks to their high level constructs and features. Most of them are accessed and used via the Scene System. Using nodes and resources simplifies project organization and asset management in complex games.
There are, of course, always drawbacks:
- There is an extra layer of complexity
- Performance is lower than using simple APIs directly
- It is not possible to use multiple threads to control them
- More memory is needed.
In many cases, this is not really a problem (Godot is very optimized, and most operations are handled with signals, so no polling is required). Still, sometimes it can be. For example, dealing with tens of thousands of instances for something that needs to be processed every frame can be a bottleneck.
This type of situation makes programmers regret they are using a game engine and wish they could go back to a more handcrafted, low level implementation of game code.
Still, Godot is designed to work around this problem.
Servers¶
One of the most interesting design decisions for Godot, is the fact that the whole scene system is optional. While it is not currently possible to compile it out, it can be completely bypassed.
At the core, Godot uses the concept of Servers. They are very low level APIs to control rendering, physics, sound, etc. The scene system is built on top of them and uses them directly. The most common servers are:
- VisualServer: handles everything related to graphics.
- PhysicsServer: handles everything related to 3D physics.
- Physics2DServer: handles everything related to 2D physics.
- AudioServer: handles everything related to audio.
Just explore their APIs and you will realize that the all functions provided are low-level implementations of everything Godot allows you to do.
RIDs¶
The key to using servers is understanding Resource ID (RID) objects. These are opaque handles to the server implementation. They are allocated and freed manually. Almost every function in the servers requires RIDs to access the actual resource.
Most Godot nodes and resources contain these RIDs from the servers internally, and they can be obtained with different functions. In fact, anything that inherits Resource can be directly casted to an RID (not all resources contain an RID, though, in such cases the RID will be empty). In fact, resources can be passed to server APIs as RIDs. Just make sure to keep references to the resources outside the server, because if the resource is erased, the internal RID is erased too.
For nodes, there are many functions available:
- For CanvasItem, the CanvasItem.get_canvas_item() method will return the canvas item RID in the server.
- For CanvasLayer, the CanvasLayer.get_canvas() method will return the canvas RID in the server.
- For Viewport, the Viewport.get_viewport_rid() method will return the viewport RID in the server.
- For 3D, the World resource (obtainable in the Viewport and Spatial nodes) contains functions to get the VisualServer Scenario, and the PhysicsServer Space. This allows creating 3D objects directly with the server API and using them.
- For 2D, the World2D resource (obtainable in the Viewport and CanvasItem nodes) contains functions to get the VisualServer Canvas, and the Physics2DServer Space. This allows creating 2D objects directly with the server API and using them.
- The VisualInstance class, allows getting the scenario instance and instance base via the VisualInstance.get_instance() and VisualInstance.get_base() respectively.
Just explore the nodes and resources you are familiar with and find the functions to obtain the server RIDs.
It is not advised to control RIDs from objects that already have a node associated. Instead, server functions should always be used for creating and controlling new ones and interacting with the existing ones.
Creating a sprite¶
This is a simple example of how to create a sprite from code and move it using the low-level CanvasItem API.
extends Node2D
# VisualServer expects references to be kept around
var sprite
func _ready():
# Create a canvas item, child of this node.
var ci_rid = VisualServer.canvas_item_create()
# Make this node the parent.
VisualServer.canvas_item_set_parent(ci_rid, get_canvas_item())
# Draw a sprite on it.
# Remember, keep this reference.
sprite = load("res://mysprite.png")
# Add it, centered.
VisualServer.canvas_item_add_texture_rect(ci_rid, Rect2(sprite.get_size() / 2, sprite.get_size()), sprite)
# Add the item, rotated 45 degrees and translated.
var xform = Transform2D().rotated(deg2rad(45)).translated(Vector2(20, 30))
VisualServer.canvas_item_set_transform(ci_rid, xform)
The Canvas Item API in the server allows you to add draw primitives to it. Once added, they can’t be modified. The Item needs to be cleared and the primitives re-added (this is not the case for setting the transform, which can be done as many times as desired).
Primitives are cleared this way:
VisualServer.canvas_item_clear(ci_rid)
Instantiating a Mesh into 3D space¶
The 3D APIs are different than the 2D ones, so the instantiation API must be used.
extends Spatial
# VisualServer expects references to be kept around
var mesh
func _ready():
# Create a visual instance (for 3D).
var instance = VisualServer.instance_create()
# Set the scenario from the world, this ensures it
# appears with the same objects as the scene.
var scenario = get_world().scenario
VisualServer.instance_set_scenario(instance, scenario)
# Add a mesh to it.
# Remember, keep the reference.
mesh = load("res://mymesh.obj")
VisualServer.instance_set_base(instance, mesh)
# Move the mesh around.
var xform = Transform(Basis(), Vector3(20, 100, 0))
VisualServer.instance_set_transform(instance, xform)
Creating a 2D RigidBody and moving a sprite with it¶
This creates a RigidBody2D using the Physics2DServer API, and moves a CanvasItem when the body moves.
# Physics2DServer expects references to be kept around
var body
var shape
func _body_moved(state, index):
# Created your own canvas item, use it here.
VisualServer.canvas_item_set_transform(canvas_item, state.transform)
func _ready():
# Create the body.
body = Physics2DServer.body_create()
Physics2DServer.body_set_mode(body, Physics2DServer.BODY_MODE_RIGID)
# Add a shape.
shape = RectangleShape2D.new()
shape.extents = Vector2(10, 10)
# Make sure to keep the shape reference!
Physics2DServer.body_add_shape(body, shape)
# Set space, so it collides in the same space as current scene.
Physics2DServer.body_set_space(body, get_world_2d().space)
# Move initial position.
Physics2DServer.body_set_state(body, Physics2DServer.BODY_STATE_TRANSFORM, Transform2D(0, Vector2(10, 20)))
# Add the transform callback, when body moves
# The last parameter is optional, can be used as index
# if you have many bodies and a single callback.
Physics2DServer.body_set_force_integration_callback(body, self, "_body_moved", 0)
The 3D version should be very similar, as 2D and 3D physics servers are identical (using RigidBody and PhysicsServer respectively).
Getting data from the servers¶
Try to never request any information from VisualServer, PhysicsServer or Physics2DServer
by calling functions unless you know what you are doing. These servers will often run asynchronously
for performance and calling any function that returns a value will stall them and force them to process
anything pending until the function is actually called. This will severely decrease performance if you
call them every frame (and it won’t be obvious why).
Because of this, most APIs in such servers are designed so it’s not even possible to request information back, until it’s actual data that can be saved.
Optimization using MultiMeshes¶
For large amount of instances (in the thousands), that need to be constantly processed (and certain amount of control needs to be retained), using servers directly is the recommended optimization.
When the amount of objects reach the hundreds of thousands or millions, none of these approaches are efficient anymore. Still, depending on the requirements, there is one more optimization possible.
MultiMeshes¶
A MultiMesh is a single draw primitive that can draw up to millions of objects in one go. It’s extremely efficient because it uses the GPU hardware to do this (in OpenGL ES 2.0, it’s less efficient because there is no hardware support for it, though).
The only drawback is that there is no screen or frustum culling possible for individual instances. This means, that millions of objects will be always or never drawn, depending on the visibility of the whole MultiMesh. It is possible to provide a custom visibility rect for them, but it will always be all-or-none visibility.
If the objects are simple enough (just a couple of vertices), this is generally not much of a problem as most modern GPUs are optimized for this use case. A workaround is to create several MultiMeshes for different areas of the world.
It is also possible to execute some logic inside the vertex shader (using the INSTANCE_ID or
INSTANCE_CUSTOM built-in constants). For an example of animating thousands of objects in a MultiMesh,
see the Animating thousands of fish tutorial. Information
to the shader can be provided via textures (there are floating point Image formats
which are ideal for this).
Another alternative is to use GDNative and C++, which should be extremely efficient (it’s possible to set the entire state for all objects using linear memory via the VisualServer.multimesh_set_as_bulk_array() function). This way, the array can be created with multiple threads, then set in one call, providing high cache efficiency.
Finally, it’s not required to have all MultiMesh instances visible. The amount of visible ones can be controlled with the MultiMesh.visible_instance_count property. The typical workflow is to allocate the maximum amount of instances that will be used, then change the amount visible depending on how many are currently needed.
Multimesh example¶
Here is an example of using a MultiMesh from code. Languages other than GDScript may be more efficient for millions of objects, but for a few thousands, GDScript should be fine.
extends MultiMeshInstance
func _ready():
# Create the multimesh.
multimesh = MultiMesh.new()
# Set the format first.
multimesh.transform_format = MultiMesh.TRANSFORM_3D
multimesh.color_format = MultiMesh.COLOR_NONE
multimesh.custom_data_format = MultiMesh.CUSTOM_DATA_NONE
# Then resize (otherwise, changing the format is not allowed).
multimesh.instance_count = 10000
# Maybe not all of them should be visible at first.
multimesh.visible_instance_count = 1000
# Set the transform of the instances.
for i in multimesh.visible_instance_count:
multimesh.set_instance_transform(i, Transform(Basis(), Vector3(i * 20, 0, 0)))
using System;
public class MultiMeshInstance : Godot.MultiMeshInstance
{
public override void _Ready()
{
// Create the multimesh.
var multimesh = new MultiMesh();
// Set the format first.
multimesh.TransformFormat = MultiMesh.TransformFormatEnum.Transform3d;
multimesh.ColorFormat = MultiMesh.ColorFormatEnum.None;
multimesh.CustomDataFormat = MultiMesh.CustomDataFormatEnum.None;
// Then resize (otherwise, changing the format is not allowed)
multimesh.InstanceCount = 1000;
// Maybe not all of them should be visible at first.
multimesh.VisibleInstanceCount = 1000;
// Set the transform of the instances.
for (int i = 0; i < multimesh.VisibleInstanceCount; i++)
{
multimesh.SetInstanceTransform(i, new Transform(new Basis(), new Vector3(i * 20, 0, 0)));
}
}
}
Miscellaneous¶
Fixing jitter and stutter¶
What are jitter and stutter?¶
Jitter and stutter are two different alterations to visible motion of objects on screen that may affect a game, even when running at full speed. These effects are mostly visible in games where the world moves at a constant speed in a fixed direction, like runners or platformers.
Distinguishing between them¶
A game running at a normal framerate without exhibiting any effect will appear smooth:
A game exhibiting jitter will shake constantly in a very subtle way:
Finally, a game exhibiting stutter will appear smooth, but appear to stop or roll back a frame every few seconds:
Jitter¶
There can be many causes of jitter, the most typical one happens when the game physics frequency (usually 60 Hz) runs at a different resolution than the monitor refresh rate. Check whether your monitor refresh rate is different from 60 Hz.
This is generally not a problem, given that refresh rates higher than 60 Hz are barely visible to the human eye, and starting with Godot 3.1, a frame timer was introduced that tries to synchronize with refresh as best as possible.
Sometimes only some objects appear to jitter (character or background). This happens when they are processed in different time sources (one is processed in the physics step while another is processed in the idle step). Godot 3.1 does some improvements to this, from allowing kinematic bodies to be animated in the regular _process loop, to further fixes in the frame timer.
Stutter¶
Stutter may happen due to two different reasons. The first, and most obvious one, is the game not being able to keep full framerate performance. Solving this is game specific and will require optimization.
The second is more complicated, because it is often not associated to the engine or game but the underlying operating system. Here is some information regarding stutter on different OSs.
Windows¶
Windows is known to cause stutter in windowed games. This mostly depends on the hardware installed, drivers version and processes running in parallel (e.g. having many browser tabs open may cause stutter in a running game). To avoid this, starting with 3.1, Godot raises the game priority to “Above Normal”. This helps considerably but may not completely eliminate stutter.
Eliminating this completely requires giving your game full privileges to become “time critical”, which is not advised. Some games may do it, but it is advised to learn to live with this problem, as it is common for Windows games and most users won’t play games windowed (games that are played in a window, e.g. puzzle games, will usually not exhibit this problem anyway).
For fullscreen, Windows gives special priority to the game so stutter is no longer visible and very rare. This is how most games are played.
Linux (X11)¶
Stutter may be visible on Desktop Linux, but this is usually associated with different video drivers and compositors. Nouveau drivers often exhibit this, while AMD or NVidia proprietary don’t. Some compositors may also trigger this problem (e.g. KWin), so it is advised to try using a different one to rule it out as the cause.
There is no workaround for driver or compositor stuttering other than reporting it as an issue to the driver or compositor developers.
macOS¶
Generally, macOS is stutter-free, although recently some bugs were reported when running on fullscreen (this is a macOS bug). If you have a machine exhibiting this behavior, please let us know.
Android¶
Generally, Android is stutter and jitter-free because the running activity gets all the priority. That said, there may be problematic devices (older Kindle Fire is known to be one). If you see this problem on Android, please let us know.
iOS¶
iOS devices are generally stutter-free, but older devices running newer versions of the operating system may exhibit problems. This is generally unavoidable.
Reporting stutter or jitter problems¶
If you are reporting a stutter or jitter problem (opening an issue) not caused by any of the above reasons, please specify very clearly all the information possible about device, operating system, driver versions, etc. This may help to better troubleshoot it.
Also make sure to use the correct term (jitter or stutter) based on the exhibited behavior. This will help understand your issue much faster. Provide a project that can be used to reproduce the issue, and if possible a screen capture demonstrating the bug.
Handling quit requests¶
Quitting¶
Most platforms have the option to request the application to quit. On desktops, this is usually done with the “x” icon on the window title bar. On Android, the back button is used to quit when on the main screen (and to go back otherwise).
Handling the notification¶
On desktop platforms, the MainLoop
has a special MainLoop.NOTIFICATION_WM_QUIT_REQUEST notification that is
sent to all nodes when quitting is requested.
On Android, MainLoop.NOTIFICATION_WM_GO_BACK_REQUEST is sent instead.
Pressing the Back button will exit the application if
Application > Config > Quit On Go Back is checked in the Project Settings
(which is the default).
Note
MainLoop.NOTIFICATION_WM_GO_BACK_REQUEST isn’t supported on iOS, as
iOS devices don’t have a physical Back button.
Handling the notification is done as follows (on any node):
func _notification(what):
if what == MainLoop.NOTIFICATION_WM_QUIT_REQUEST:
get_tree().quit() # default behavior
public override void _Notification(int what)
{
if (what == MainLoop.NotificationWmQuitRequest)
GetTree().Quit(); // default behavior
}
When developing mobile apps, quitting is not desired unless the user is on the main screen, so the behavior can be changed.
It is important to note that by default, Godot apps have the built-in behavior to quit when quit is requested, this can be changed:
get_tree().set_auto_accept_quit(false)
GetTree().SetAutoAcceptQuit(false);
Pausing games¶
Pause?¶
In most games it is desirable to, at some point, interrupt the game to do something else, such as taking a break or changing options. However this is not as simple as it seems. The game might be stopped, but it might be desirable that some menus and animations continue working.
Implementing a fine-grained control for what can be paused (and what can not) is a lot of work, so a simple framework for pausing is provided in Godot.
How pausing works¶
To set pause mode, the pause state must be set. This is done by assigning
true to the SceneTree.paused property:
get_tree().paused = true
GetTree().Paused = true;
Doing so will have the following behavior:
- 2D and 3D physics will be stopped.
_processand_physics_processwill not be called anymore in nodes._inputand_input_eventwill not be called anymore either.
This effectively stops the whole game. Calling this function from a script, by default, will result in an unrecoverable state (nothing will work anymore!).
White-listing nodes¶
Before enabling pause, make sure that nodes that must keep working during pause are white-listed. This is done by editing the “Pause Mode” property in a node:
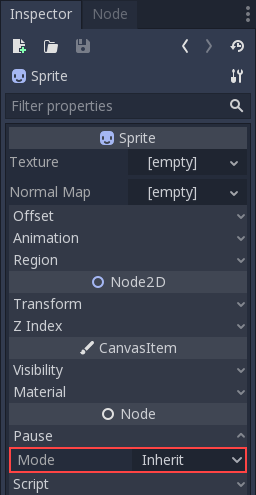
You can achieve the same result in code:
func _ready():
pause_mode = Node.PAUSE_MODE_PROCESS
By default all nodes have this property in the “Inherit” state. This means, that they will only process (or not) depending on what this same property is set on the parent node. If the parent is set to “Inherit” , then the grandparent will be checked and so on. Ultimately, if a state can’t be found in any of the grandparents, the pause state in SceneTree is used. This means that, by default, when the game is paused every node will be paused.
So the three possible states for a node are:
- Inherit: Process depending on the state of the parent, grandparent, etc. The first parent that has a non-Inherit state.
- Stop: Stop the node no matter what (and children in Inherit mode). When paused this node will not process.
- Process: Process the node no matter what (and children in Inherit mode). Paused or not this node will process.
Example¶
An example of this is creating a popup or panel with controls inside, and set its pause mode to “Process” then hide it:
Just by setting the root of the pause popup to “Process”, all children and grandchildren will inherit that state. This way, this branch of the scene tree will continue working when paused.
Finally, make it so when a pause button is pressed (any button will do), enable the pause and show the pause screen.
func _on_pause_button_pressed():
get_tree().paused = true
$pause_popup.show()
public void _on_pause_button_pressed()
{
GetTree().Paused = true;
GetNode<Control>("pause_popup").Show();
}
To remove the pause, do the opposite when the pause screen is closed:
func _on_pause_popup_close_pressed():
$pause_popup.hide()
get_tree().paused = false
public void _on_pause_popup_close_pressed()
{
GetNode<Control>("pause_popup").Hide();
GetTree().Paused = false;
}
And that should be all!
Binary serialization API¶
Introduction¶
Godot has a simple serialization API based on Variant. It’s used for
converting data types to an array of bytes efficiently. This API is used
in the functions get_var and store_var of File
as well as the packet APIs for PacketPeer. This format
is not used for binary scenes and resources.
Packet specification¶
The packet is designed to be always padded to 4 bytes. All values are little endian encoded. All packets have a 4 byte header representing an integer, specifying the type of data:
| Type | Value |
|---|---|
| 0 | null |
| 1 | bool |
| 2 | integer |
| 3 | float |
| 4 | string |
| 5 | vector2 |
| 6 | rect2 |
| 7 | vector3 |
| 8 | transform2d |
| 9 | plane |
| 10 | quat |
| 11 | aabb |
| 12 | basis |
| 13 | transform |
| 14 | color |
| 15 | node path |
| 16 | rid |
| 17 | object |
| 18 | dictionary |
| 19 | array |
| 20 | raw array |
| 21 | int array |
| 22 | real array |
| 23 | string array |
| 24 | vector2 array |
| 25 | vector3 array |
| 26 | color array |
| 27 | max |
Following this is the actual packet contents, which varies for each type of packet:
0: null¶
4: String¶
| Offset | Len | Type | Description |
|---|---|---|---|
| 4 | 4 | Integer | String Length (in Bytes) |
| 8 | X | Bytes | UTF-8 Encoded String |
This field is padded to 4 bytes.
6: Rect2¶
| Offset | Len | Type | Description |
|---|---|---|---|
| 4 | 4 | Float | X Coordinate |
| 8 | 4 | Float | Y Coordinate |
| 12 | 4 | Float | X Size |
| 16 | 4 | Float | Y Size |
7: Vector3¶
| Offset | Len | Type | Description |
|---|---|---|---|
| 4 | 4 | Float | X Coordinate |
| 8 | 4 | Float | Y Coordinate |
| 12 | 4 | Float | Z Coordinate |
8: Transform2D¶
| Offset | Len | Type | Description |
|---|---|---|---|
| 4 | 4 | Float | [0][0] |
| 8 | 4 | Float | [0][1] |
| 12 | 4 | Float | [1][0] |
| 16 | 4 | Float | [1][1] |
| 20 | 4 | Float | [2][0] |
| 24 | 4 | Float | [2][1] |
9: Plane¶
| Offset | Len | Type | Description |
|---|---|---|---|
| 4 | 4 | Float | Normal X |
| 8 | 4 | Float | Normal Y |
| 12 | 4 | Float | Normal Z |
| 16 | 4 | Float | Distance |
10: Quat¶
| Offset | Len | Type | Description |
|---|---|---|---|
| 4 | 4 | Float | Imaginary X |
| 8 | 4 | Float | Imaginary Y |
| 12 | 4 | Float | Imaginary Z |
| 16 | 4 | Float | Real W |
11: AABB¶
| Offset | Len | Type | Description |
|---|---|---|---|
| 4 | 4 | Float | X Coordinate |
| 8 | 4 | Float | Y Coordinate |
| 12 | 4 | Float | Z Coordinate |
| 16 | 4 | Float | X Size |
| 20 | 4 | Float | Y Size |
| 24 | 4 | Float | Z Size |
12: Basis¶
| Offset | Len | Type | Description |
|---|---|---|---|
| 4 | 4 | Float | [0][0] |
| 8 | 4 | Float | [0][1] |
| 12 | 4 | Float | [0][2] |
| 16 | 4 | Float | [1][0] |
| 20 | 4 | Float | [1][1] |
| 24 | 4 | Float | [1][2] |
| 28 | 4 | Float | [2][0] |
| 32 | 4 | Float | [2][1] |
| 36 | 4 | Float | [2][2] |
13: Transform¶
| Offset | Len | Type | Description |
|---|---|---|---|
| 4 | 4 | Float | [0][0] |
| 8 | 4 | Float | [0][1] |
| 12 | 4 | Float | [0][2] |
| 16 | 4 | Float | [1][0] |
| 20 | 4 | Float | [1][1] |
| 24 | 4 | Float | [1][2] |
| 28 | 4 | Float | [2][0] |
| 32 | 4 | Float | [2][1] |
| 36 | 4 | Float | [2][2] |
| 40 | 4 | Float | [3][0] |
| 44 | 4 | Float | [3][1] |
| 48 | 4 | Float | [3][2] |
14: Color¶
| Offset | Len | Type | Description |
|---|---|---|---|
| 4 | 4 | Float | Red (0..1) |
| 8 | 4 | Float | Green (0..1) |
| 12 | 4 | Float | Blue (0..1) |
| 16 | 4 | Float | Alpha (0..1) |
15: NodePath¶
| Offset | Len | Type | Description |
|---|---|---|---|
| 4 | 4 | Integer | String Length, or New Format (val&0x80000000!=0 and NameCount=val&0x7FFFFFFF) |
For new format:¶
| Offset | Len | Type | Description |
|---|---|---|---|
| 4 | 4 | Integer | Sub-Name Count |
| 8 | 4 | Integer | Flags (absolute: val&1 != 0 ) |
For each Name and Sub-Name
| Offset | Len | Type | Description |
|---|---|---|---|
| X+0 | 4 | Integer | String Length |
| X+4 | X | Bytes | UTF-8 Encoded String |
Every name string is padded to 4 bytes.
18: Dictionary¶
| Offset | Len | Type | Description |
|---|---|---|---|
| 4 | 4 | Integer | val&0x7FFFFFFF = elements, val&0x80000000 = shared (bool) |
Then what follows is, for amount of “elements”, pairs of key and value, one after the other, using this same format.
19: Array¶
| Offset | Len | Type | Description |
|---|---|---|---|
| 4 | 4 | Integer | val&0x7FFFFFFF = elements, val&0x80000000 = shared (bool) |
Then what follows is, for amount of “elements”, values one after the other, using this same format.
20: PoolByteArray¶
| Offset | Len | Type | Description |
|---|---|---|---|
| 4 | 4 | Integer | Array Length (Bytes) |
| 8..8+length | 1 | Byte | Byte (0..255) |
The array data is padded to 4 bytes.
21: PoolIntArray¶
| Offset | Len | Type | Description |
|---|---|---|---|
| 4 | 4 | Integer | Array Length (Integers) |
| 8..8+length*4 | 4 | Integer | 32 Bits Signed Integer |
22: PoolRealArray¶
| Offset | Len | Type | Description |
|---|---|---|---|
| 4 | 4 | Integer | Array Length (Floats) |
| 8..8+length*4 | 4 | Integer | 32 Bits IEE 754 Float |
23: PoolStringArray¶
| Offset | Len | Type | Description |
|---|---|---|---|
| 4 | 4 | Integer | Array Length (Strings) |
For each String:
| Offset | Len | Type | Description |
|---|---|---|---|
| X+0 | 4 | Integer | String Length |
| X+4 | X | Bytes | UTF-8 Encoded String |
Every string is padded to 4 bytes.
24: PoolVector2Array¶
| Offset | Len | Type | Description |
|---|---|---|---|
| 4 | 4 | Integer | Array Length |
| 8..8+length*8 | 4 | Float | X Coordinate |
| 8..12+length*8 | 4 | Float | Y Coordinate |
25: PoolVector3Array¶
| Offset | Len | Type | Description |
|---|---|---|---|
| 4 | 4 | Integer | Array Length |
| 8..8+length*12 | 4 | Float | X Coordinate |
| 8..12+length*12 | 4 | Float | Y Coordinate |
| 8..16+length*12 | 4 | Float | Z Coordinate |
26: PoolColorArray¶
| Offset | Len | Type | Description |
|---|---|---|---|
| 4 | 4 | Integer | Array Length |
| 8..8+length*16 | 4 | Float | Red (0..1) |
| 8..12+length*16 | 4 | Float | Green (0..1) |
| 8..16+length*16 | 4 | Float | Blue (0..1) |
| 8..20+length*16 | 4 | Float | Alpha (0..1) |
Running code in the editor¶
What is tool?¶
tool is a powerful line of code that, when added at the top of your script, makes it execute in the editor. You can also decide which parts of the script execute in the editor, which in game, and which in both.
You can use it for doing many things, but it is mostly useful in level design for visually presenting things that are hard to predict ourselves. Here are some use cases:
- If you have a cannon that shoots cannonballs affected by physics (gravity), you can draw cannonball’s trajectory in the editor, making level design a lot easier.
- If you have jumppads with varying jump heights, you can draw the maximum jump height a player would reach if it jumped on one, also making level design easier.
- If your player doesn’t use a sprite, but draws itself using code, you can make that drawing code execute in the editor to see your player.
Danger
tool scripts run inside the editor, and let you access the scene tree
of the currently edited scene. This is a powerful feature which also comes
with caveats, as the editor does not include protections for potential
misuse of tool scripts.
Be extremely cautious when manipulating the scene tree, especially via
Node.queue_free, as it can cause
crashes if you free a node while the editor runs logic involving it.
How to use it¶
To turn a script into a tool, add tool keyword at the top of your code.
To check if you are currently in the editor, use: Engine.editor_hint.
For example, if you want to execute some code only in editor, use:
if Engine.editor_hint:
# Code to execute when in editor.
On the other hand, if you want to execute code only in game, simply negate previous expression:
if not Engine.editor_hint:
# Code to execute when in game.
Pieces of code that are not having any of the 2 conditions above will run both in editor and in game.
Here is how a _process() function might look like for you:
func _process(delta):
if Engine.editor_hint:
# Code to execute in editor.
if not Engine.editor_hint:
# Code to execute in game.
# Code to execute both in editor and in game.
Note
Modifications in editor are permanent. In our case, when we remove the script, the node will keep its rotation direction. Be careful so that you don’t make unwanted modifications.
Try it out¶
Add a Sprite node to your scene and set the texture to Godot icon. Attach and open a script, and change it to this:
tool
extends Sprite
func _process(delta):
rotation_degrees += 180 * delta
Save the script and return to the editor. You should now see your object rotate. If you run the game, it will also rotate.
Note
If you don’t see the changes, reload the scene (close it and open it again).
Now let’s choose which code runs when. Modify your _process() function to look like this:
func _process(delta):
if Engine.editor_hint:
rotation_degrees += 180 * delta
else:
rotation_degrees -= 180 * delta
Save the script. Now the object will spin clockwise in the editor, but if you run the game, it will spin counter-clockwise.
Note
Code from other nodes doesn’t run in the editor. Your access to other nodes is limited. You can access the tree and nodes, and their default properties, but you can’t access user variables. If you want to do so, other nodes have to run in the editor too. AutoLoad nodes cannot be accessed in the editor at all.
Warning
Using tool improperly can yield many errors. It is advised to first write the code how you want it, and only then add the tool keyword to the top. Also make sure you divide your code into part that runs in editor and part that runs in game. This way you can find your bug easier.
Change scenes manually¶
Sometimes it helps to have more control over how one swaps scenes around. As mentioned above, a Viewport’s child nodes will render to the image it generates. This holds true even for nodes outside of the “current” scene. Autoloads fall into this category, but so do scenes which one instances and adds to the tree at runtime:
var simultaneous_scene = preload("res://levels/level2.tscn")
func _add_a_scene_manually():
# This is like autoloading the scene, only
# it happens after already loading the main scene.
get_tree().get_root().add_child(simultaneous_scene)
public PackedScene simultaneousScene;
public MyClass()
{
simultaneousScene = (PackedScene)ResourceLoader.Load("res://levels/level2.tscn");
}
public void _AddASceneManually()
{
// This is like autoloading the scene, only
// it happens after already loading the main scene.
GetTree().GetRoot().AddChild(simultaneousScene);
}
To complete the cycle and swap out the new scene with the old one, developers have a choice to make. Many strategies exist for removing a scene from view of the Viewport. The tradeoffs involve balancing operation speed and memory consumption as well as balancing data access and integrity.
We can delete the existing scene. SceneTree.change_scene() and SceneTree.change_scene_to() will delete the current scene immediately. Developers can also delete the main scene though. Assuming the root node’s name is “Main”, one could do
get_node("/root/Main").free()to delete the whole scene.Unloads memory.
- Pro: RAM is no longer dragging the dead weight.
- Con: Returning to that scene is now more expensive since it must be loaded back into memory again (takes time AND memory). Not a problem if returning soon is unnecessary.
- Con: No longer have access to that scene’s data. Not a problem if using that data soon is unnecessary.
- Note: It can be useful to preserve the data in a soon-to-be-deleted scene by re-attaching one or more of its nodes to a different scene, or even directly to the SceneTree.
Processing stops.
- Pro: No nodes means no process, physics process, or input handling. The CPU is available to work on the new scene’s contents.
- Con: Those nodes’ processing and input handling no longer operate. Not a problem if using the updated data is unnecessary.
We can hide the existing scene. By changing the visibility or collision detection of the nodes, we can hide the entire node sub-tree from the player’s perspective.
Memory still exists.
- Pro: One can still access the data if need be.
- Pro: There’s no need to move any more nodes around to save data.
- Con: More data is being kept in memory which will be become a problem on memory-sensitive platforms like web or mobile.
Processing continues.
- Pro: Data continues to receive processing updates, so the scene will keep updated any data within it that relies on delta time or frame data.
- Pro: Nodes are still members of groups (since groups belong to the SceneTree).
- Con: The CPU’s attention is now divided between both scenes. Too much load could result in low frame rates. One should be sure to test performance as they go to ensure the target platform can support the load they are giving it.
We can remove the existing scene from the tree. Assign a variable to the existing scene’s root node. Then use Node.remove_child(Node) to detach the entire scene from the tree.
- Memory still exists (similar pros/cons as with hiding it from view).
- Processing stops (similar pros/cons as with deleting it completely).
- Pro: This variation of “hiding” it is much easier to show/hide. Rather than potentially keeping track of multiple changes to the scene, one must only call the one method add/remove_child pair of methods. It is similar to disabling game objects in other engines.
- Con: Unlike with hiding it from view only, the data contained within the scene will become stale if it relies on delta time, input, groups, or other data that is derived from SceneTree access.
There are also cases where one may wish to have many scenes present at the same time. Perhaps one is adding their own singleton at runtime, or preserving a a scene’s data between scene changes (adding the scene to the root node).
get_tree().get_root().add_child(scene)
GetTree().GetRoot().AddChild(scene);
Perhaps instead they wish to display multiple scenes at the same time using a ViewportContainers. This is optimal in cases where the intent is to render different content in different parts of the screen. Minimaps and split-screen multiplayer are good examples.
Each option will have cases where it is best appropriate, so one must examine the effects of each and determine what path best fits their unique situation.
Differences between GLES2 and GLES3¶
This page documents the differences between GLES2 and GLES3 that are by design and are not the result of bugs. There may be differences that are unintentional, but they should be reported as bugs.
Note
“GLES2” and “GLES3” are the names used in Godot for the two OpenGL-based rendering backends. In terms of graphics APIs, the GLES2 backend maps to OpenGL 2.1 on desktop, OpenGL ES 2.0 on mobile and WebGL 1.0 on the web. The GLES3 backend maps to OpenGL 3.3 on desktop, OpenGL ES 3.0 on mobile and WebGL 2.0 on the web.
Particles¶
GLES2 cannot use the Particles or Particles2D nodes as they require advanced GPU features. Instead, use CPUParticles or CPUParticles2D, which provides a similar interface to a ParticlesMaterial.
Tip
Particles and Particles2D can be converted to their CPU equivalent node with the “Convert to CPUParticles” option in the editor.
SCREEN_TEXTURE mip-maps¶
In GLES2, SCREEN_TEXTURE (accessed via a ShaderMaterial) does not have
computed mip-maps. So when accessing at a different LOD, the texture will not appear blurry.
DEPTH_TEXTURE¶
While GLES2 supports DEPTH_TEXTURE in shaders, it may not work on some old hardware (especially mobile).
Color space¶
GLES2 and GLES3 are in different color spaces. This means that colors will appear slightly different between them especially when lighting is used.
If your game is going to use both GLES2 and GLES3, you can use an if
statement check and see if the output is in sRGB, using OUTPUT_IS_SRGB. OUTPUT_IS_SRGB is
true in GLES2 and false in GLES3.
HDR¶
GLES2 is not capable of using High Dynamic Range (HDR) rendering features. If HDR is set for your
project, or for a given viewport, Godot will still user Low Dynamic Range (LDR) which limits
viewport values to the 0-1 range.
SpatialMaterial features¶
In GLES2, the following advanced rendering features in the SpatialMaterial are missing:
- Refraction
- Subsurface scattering
- Anisotropy
- Clearcoat
- Depth mapping
When using SpatialMaterials they will not even appear in the editor.
In custom ShaderMaterials, you can set values for these features but they
will be non-functional. For example, you will still be able to set the SSS built-in (which normally adds
subsurface scattering) in your shader, but nothing will happen.
Environment features¶
In GLES2, the following features in the Environment are missing:
- Auto exposure
- Tonemapping
- Screen space reflections
- Screen space ambient occlusion
That means that in GLES2 environments you can only set:
- Sky (including procedural sky)
- Ambient light
- Fog
- Depth of field
- Glow (also known as bloom)
- Adjustment
GIProbes¶
GIProbes do not work in GLES2. Instead use Baked Lightmaps. For a description of how baked lightmaps work see the Baked Lightmaps tutorial.
Contact shadows¶
The shadow_contact property of Lights is not supported in GLES2 and so does nothing.
Light performance¶
In GLES2, performance scales poorly with several lights, as each light is processed in a separate render pass (in opposition to GLES3 which is all done in a single pass). Try to limit scenes to as few lights as possible in order to achieve greatest performance.
Texture compression¶
On mobile, GLES2 requires ETC texture compression, while GLES3 requires ETC2. ETC2 is enabled by default,
so if exporting to mobile using GLES2 make sure to set the project setting
rendering/vram_compression/import_etc and then reimport textures.
Warning
Since ETC doesn’t support transparency, you must reimport textures that contain an alpha channel to use the Uncompressed, Lossy or Lossless compression mode (instead of Video RAM). This can be done in the Import dock after selecting them in the FileSystem dock.
Blend shapes¶
Blend shapes are not supported in GLES2.
Shading language¶
GLES3 provides many built-in functions that GLES2 does not. Below is a list of functions that are not available or are have limited support in GLES2.
For a complete list of built-in GLSL functions see the Shading Language doc.
| Function | |
|---|---|
| vec_type modf ( vec_type x, out vec_type i ) | |
| vec_int_type floatBitsToInt ( vec_type x ) | |
| vec_uint_type floatBitsToUint ( vec_type x ) | |
| vec_type intBitsToFloat ( vec_int_type x ) | |
| vec_type uintBitsToFloat ( vec_uint_type x ) | |
| ivec2 textureSize ( sampler2D_type s, int lod ) | See workaround below |
| ivec2 textureSize ( samplerCube s, int lod ) | See workaround below |
| vec4_type texture ( sampler_type s, vec_type uv [, float bias] ) | bias not available in vertex shader |
| vec4_type textureProj ( sampler_type s, vec_type uv [, float bias] ) | |
| vec4_type textureLod ( sampler_type s, vec_type uv, float lod ) | Only available in vertex shader on some hardware |
| vec4_type textureProjLod ( sampler_type s, vec_type uv, float lod ) | |
| vec4_type textureGrad ( sampler_type s, vec_type uv, vec_type dPdx, vec_type dPdy) | |
| vec_type dFdx ( vec_type p ) | |
| vec_type dFdy ( vec_type p ) | |
| vec_type fwidth ( vec_type p ) |
Note
Functions not in GLES2’s GLSL were added with Godots own shader standard library. These functions may perform worse in GLES2 compared to GLES3.
textureSize() workaround¶
GLES2 does not support textureSize(). You can get the size of a texture the old fashioned way by passing in a
uniform with the texture size yourself.
// In the shader:
uniform sampler2D textureName;
uniform vec2 textureName_size;
# In GDScript:
material_name.set_shader_param("textureName", my_texture)
material_name.set_shader_param("textureName_size", my_texture_size)
Built in variables and render modes¶
Godot also provides many built-in variables and render modes. Some cannot be supported in GLES2. Below is a list of built-in variables and render modes that, when written to, will have no effect or could even cause issues when using the GLES2 backend.
| Variable / Render Mode |
|---|
ensure_correct_normals |
INSTANCE_ID |
DEPTH |
ANISOTROPY |
ANISOTROPY_FLOW |
SSS_STRENGTH |
Instancing with signals¶
Signals provide a way to decouple game objects, allowing you to avoid forcing a
fixed arrangement of nodes. One sign that a signal might be called for is when
you find yourself using get_parent(). Referring directly to a node’s parent
means that you can’t easily move that node to another location in the scene tree.
This can be especially problematic when you are instancing objects at runtime
and may want to place them in an arbitrary location in the running scene tree.
Below we’ll consider an example of such a situation: firing bullets.
Shooting example¶
Consider a player character that can rotate and shoot towards the mouse. Every time the mouse button is clicked, we create an instance of the bullet at the player’s location. See Instancing for details.
We’ll use an Area2D for the bullet, which moves in a straight line at a
given velocity:
extends Area2D
var velocity = Vector2.ZERO
func _physics_process(delta):
position += velocity * delta
public class Bullet : Area2D
{
Vector2 Velocity = new Vector2();
public override void _PhysicsProcess(float delta)
{
Position += Velocity * delta;
}
}
However, if the bullets are added as children of the player, then they will remain “attached” to the player as it rotates:
Instead, we need the bullets to be independent of the player’s movement - once fired, they should continue traveling in a straight line and the player can no longer affect them. Instead of being added to the scene tree as a child of the player, it makes more sense to add the bullet as a child of the “main” game scene, which may be the player’s parent or even further up the tree.
You could do this by adding the bullet to the main scene directly:
var bullet_instance = Bullet.instance()
get_parent().add_child(bullet_instance)
Node bulletInstance = Bullet.Instance();
GetParent().AddChild(bulletInstance);
However, this will lead to a different problem. Now if you try to test your “Player” scene independently, it will crash on shooting, because there is no parent node to access. This makes it a lot harder to test your player code independently and also means that if you decide to change your main scene’s node structure, the player’s parent may no longer be the appropriate node to receive the bullets.
The solution to this is to use a signal to “emit” the bullets from the player. The player then has no need to “know” what happens to the bullets after that - whatever node is connected to the signal can “receive” the bullets and take the appropriate action to spawn them.
Here is the code for the player using signals to emit the bullet:
extends Sprite
signal shoot(bullet, direction, location)
var Bullet = preload("res://Bullet.tscn")
func _input(event):
if event is InputEventMouseButton:
if event.button_index == BUTTON_LEFT and event.pressed:
emit_signal("shoot", Bullet, rotation, position)
func _process(delta):
look_at(get_global_mouse_position())
public class Player : Sprite
{
[Signal]
delegate void Shoot(PackedScene bullet, Vector2 direction, Vector2 location);
private PackedScene _bullet = GD.Load<PackedScene>("res://Bullet.tscn");
public override void _Input(InputEvent event)
{
if (input is InputEventMouseButton mouseButton)
{
if (mouseButton.ButtonIndex == (int)ButtonList.Left && mouseButton.Pressed)
{
EmitSignal(nameof(Shoot), _bullet, Rotation, Position);
}
}
}
public override _Process(float delta)
{
LookAt(GetGlobalMousePosition());
}
}
In the main scene, we then connect the player’s signal (it will appear in the “Node” tab).
func _on_Player_shoot(Bullet, direction, location):
var b = Bullet.instance()
add_child(b)
b.rotation = direction
b.position = location
b.velocity = b.velocity.rotated(direction)
public void _on_Player_Shoot(PackedScene bullet, Vector2 direction, Vector2 location)
{
var bulletInstance = (Bullet)bullet.Instance();
AddChild(bulletInstance);
bulletInstance.Rotation = direction;
bulletInstance.Position = location;
bulletInstance.Velocity = bulletInstance.Velocity.Rotated(direction);
}
Now the bullets will maintain their own movement independent of the player’s rotation:
State design pattern¶
Introduction¶
Scripting a game can be difficult when there are many states that need to handled, but only one script can be attached to a node at a time. Instead of creating a state machine within the player’s control script, it would make development simpler if the states were separated out into different classes.
There are many ways to implement a state machine with Godot, and some other methods are below:
- The player can have a child node for each state, which are called when utilized.
- Enums can be used in conjunction with a match statement.
- The state scripts themselves could be swapped out from a node dynamically at run-time.
This tutorial will focus only on adding and removing nodes which have a state script attached. Each state script will be an implementation of a different state.
Note
There is a great resource explaining the concept of the state design pattern here: https://gameprogrammingpatterns.com/state.html
Script setup¶
The feature of inheritance is useful for getting started with this design principle. A class should be created that describes the base features of the player. For now, a player will be limited to two actions: move left, move right. This means there will be two states: idle and run.
Below is the generic state, from which all other states will inherit.
# state.gd
extends Node2D
class_name State
var change_state
var animated_sprite
var persistent_state
var velocity
# Writing _delta instead of delta here prevents the unused variable warning.
func _physics_process(_delta):
persistent_state.move_and_slide(persistent_state.velocity, Vector2.UP)
func setup(change_state, animated_sprite, persistent_state):
self.change_state = change_state
self.animated_sprite = animated_sprite
self.persistent_state = persistent_state
func move_left():
pass
func move_right():
pass
A few notes on the above script. First, this implementation uses a
setup(change_state, animated_sprite, persistent_state) method to assign
references. These references will be instantiated in the parent of this state. This helps with something
in programming known as cohesion. The state of the player does not want the responsibility of creating
these variables, but does want to be able to use them. However, this does make the state coupled to the
state’s parent. This means that the state is highly reliant on whether it has a parent which contains
these variables. So, remember that coupling and cohesion are important concepts when it comes to code management.
Note
See the following page for more details on cohesion and coupling: https://courses.cs.washington.edu/courses/cse403/96sp/coupling-cohesion.html
Second, there are some methods in the script for moving, but no implementation. The state script
just uses pass to show that it will not execute any instructions when the methods are called. This is important.
Third, the _physics_process(delta) method is actually implemented here. This allows the states to have a default
_phyics_process(delta) implementation where velocity is used to move the player. The way that the states can modify
the movement of the player is to use the velocity variable defined in their base class.
Finally, this script is actually being designated as a class named State. This makes refactoring the code
easier, since the file path from using the load() and preload() functions in godot will not be needed.
So, now that there is a base state, the two states discussed earlier can be implemented.
# idle_state.gd
extends State
class_name IdleState
func _ready():
animated_sprite.play("idle")
func _flip_direction():
animated_sprite.flip_h = not animated_sprite.flip_h
func move_left():
if animated_sprite.flip_h:
change_state.call_func("run")
else:
_flip_direction()
func move_right():
if not animated_sprite.flip_h:
change_state.call_func("run")
else:
_flip_direction()
# run_state.gd
extends State
class_name RunState
var move_speed = Vector2(180, 0)
var min_move_speed = 0.005
var friction = 0.32
func _ready():
animated_sprite.play("run")
if animated_sprite.flip_h:
move_speed.x *= -1
persistent_state.velocity += move_speed
func _physics_process(_delta):
if abs(velocity) < min_move_speed:
change_state.call_func("idle")
persistent_state.velocity.x *= friction
func move_left():
if animated_sprite.flip_h:
persistent_state.velocity += move_speed
else:
change_state.call_func("idle")
func move_right():
if not animated_sprite.flip_h:
persistent_state.velocity += move_speed
else:
change_state.call_func("idle")
Note
The since the Run and Idle states extend from State which extends Node2D, the function
_physics_process(delta) is called from the bottom-up meaning Run and Idle will call their
implementation of _physics_process(delta), then State will call its implementation, then Node2D
will call its own implementation and so on. This may seem strange, but it is only relevant for predefined functions
such as _ready(), _process(delta), etc. Custom functions use the normal inheritance rules of overriding
the base implementation.
There is a round-about method for obtaining a state instance. A state factory can be used.
# state_factory.gd
class_name StateFactory
var states
func _init():
states = {
"idle": IdleState,
"run": RunState
}
func get_state(state_name):
if states.has(state_name):
return states.get(state_name)
else:
printerr("No state ", state_name, " in state factory!")
This will look for states in a dictionary and return the state if found.
Now that all the states are defined with their own scripts, it is time to figure out
how those references that passed to them will be instantiated. Since these references
will not change it makes sense to call this new script persistent_state.gd.
# persistent_state.gd
extends KinematicBody2D
class_name PersistentState
var state
var state_factory
var velocity = Vector2()
func _ready():
state_factory = StateFactory.new()
change_state("idle")
# Input code was placed here for tutorial purposes.
func _process(_delta):
if Input.is_action_pressed("ui_left"):
move_left()
elif Input.is_action_pressed("ui_right"):
move_right()
func move_left():
state.move_left()
func move_right():
state.move_right()
func change_state(new_state_name):
state.queue_free()
state = state_factory.get_state(new_state_name).new()
state.setup(funcref(self, "change_state"), $AnimatedSprite, self)
state.name = "current_state"
add_child(state)
Note
The persistent_state.gd script contains code for detecting input. This was to make the tutorial simple, but it is not usually
best practice to do this.
Project setup¶
This tutorial made an assumption that the node it would be attached to contained a child node which is an AnimatedSprite. There is also the assumption that this AnimatedSprite has at least two animations, the idle and run animations. Also, the top-level node is assumed to be a KinematicBody2D.

Note
The zip file of the llama used in this tutorial is here.
The source was from piskel_llama, but
I couldn’t find the original creator information on that page though…
There is also a good tutorial for sprite animation already. See 2D Sprite Animation.
So, the only script that must be attached is persistent_state.gd, which should be attached to the top node of the
player, which is a KinematicBody2D.
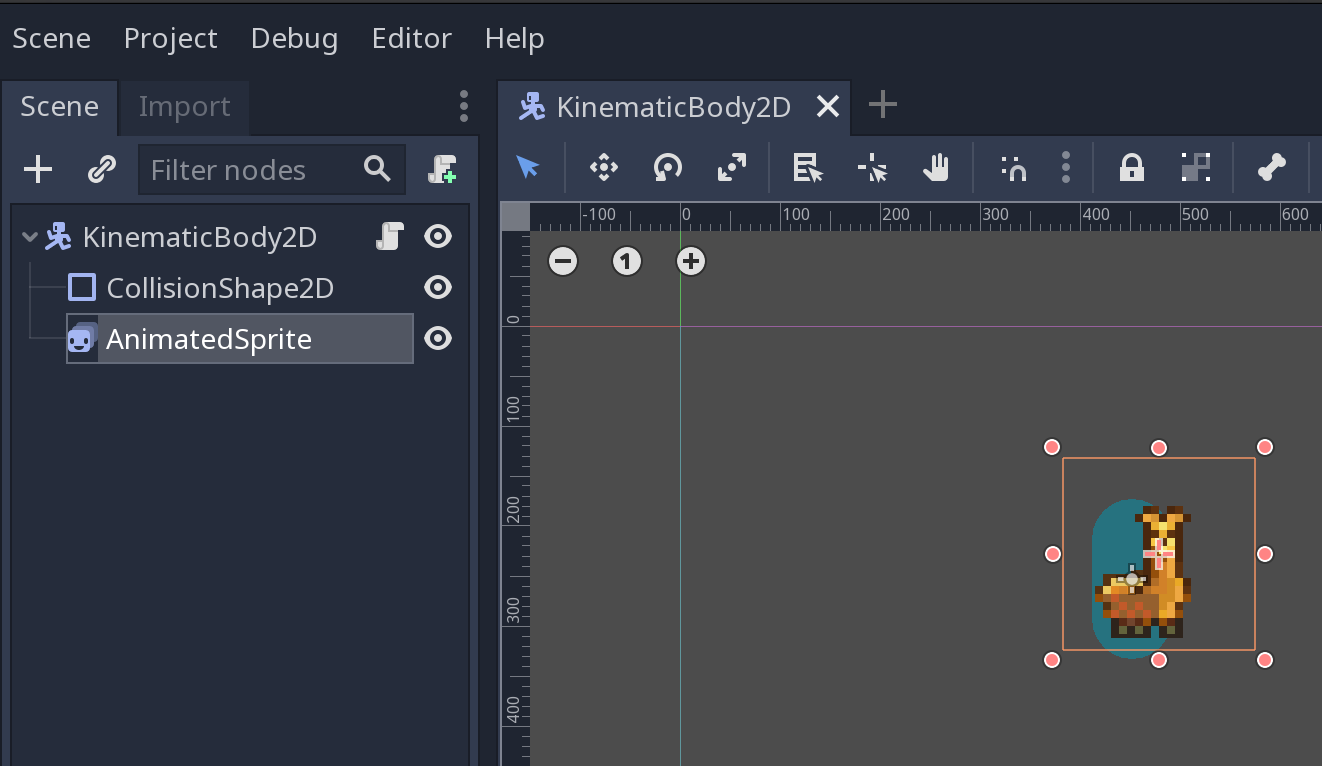
Now the player has utilized the state design pattern to implement its two different states. The nice part of this pattern is that if one wanted to add another state, then it would involve creating another class that need only focus on itself and how it changes to another state. Each state is functionally separated and instantiated dynamically.
Debug¶
Overview of debugging tools¶
This guide will give you an overview of the available debugging tools in the engine.
Godot comes with a powerful debugger and profilers to track down bugs, inspect your game at runtime, monitor essential metrics, and measure performances. It also offers options to visualize collision boxes and navigation polygons in the running game.
Finally, you have options to debug the game running on a remote device and to reload changes to your scenes or your code while the game is running.
Debug menu options¶
There are a few common debug options you can toggle on or off when running your game in the editor, which can help you in debugging your game.
You can find these options in the Debug editor menu.
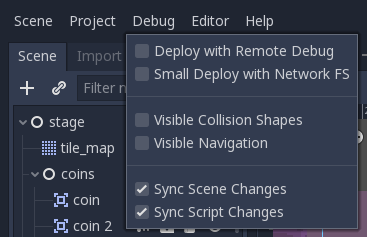
Here are the descriptions of the options:
Deploy with Remote Debug¶
When exporting and deploying, the resulting executable will attempt to connect to the IP of your computer for debugging.
Small Deploy with Network FS¶
This option speeds up testing for games with a large footprint on remote devices.
When Small Deploy with Network FS is on, instead of exporting the full game, deploying the game builds a minimal executable. The editor then provides files from the project over the network.
Also, on Android, the game is deployed using the USB cable to speed up deployment.
Visible Collision Shapes¶
This option makes collision shapes and raycast nodes visible in the running game.
Sync Scene Changes¶
With this option, any change you make to a scene in the editor at runtime appears instantly. When used remotely on a device, this is more efficient with the network filesystem.
Sync Script Changes¶
Any script that is saved will be reloaded on the running game. When used remotely on a device, this is more efficient with the network filesystem.
Script editor debug tools and options¶
The script editor has its own set of debug tools for use with breakpoints and two options. The breakpoint tools can also be found in the Debugger tab of the debugger.
The Break button causes a break in the script like a breakpoint would. Continue makes the game continue after pausing at a breakpoint. Step Over goes to the next line of code, and Step Into goes into a function if possible. Otherwise, it does the same thing as Step Over.
The Keep Debugger Open option keeps the debugger open after a scene has been closed. And the Debug with External Editor option lets you debug your game with an external editor.
Debug project settings¶
In the project settings, there is a Debug category with three subcategories which control different things.
Settings¶
These are some general settings such as printing the current FPS to the Output panel, the maximum amount of functions when profiling and others.
GDScript¶
These settings allow you to toggle specific GDScript warnings, such as for unused variables. You can also turn off warnings completely.
Shapes¶
Shapes are where you can adjust the color of shapes that only appear for debugging purposes, such as collision and navigation shapes.
Debugging tools¶
You can find the debugger in the bottom panel. Click on Debugger to open it.
The debugger is split into several tabs, each focusing on a specific task.
Debugger¶
The debugger tab opens automatically when the GDScript compiler reaches a breakpoint in your code.
It gives you a stack trace, information about the state of the object, and buttons to control the program’s execution.
You can use the buttons in the top-right to:
- Skip all breakpoints. That way, you can save breakpoints for future debugging sessions.
- Copy the current error message.
- Step Into the code. This button takes you to the next line of code, and if it’s a function, it steps line-by-line through the function.
- Step Over the code. This button goes to the next line of code, but it doesn’t step line-by-line through functions.
- Break. This button pauses the game’s execution.
- Continue. This button resumes the game after a breakpoint or pause.
Errors¶
This is where errors and warning messages are printed while running the game.
Profiler¶
The debugger comes with three profilers for your processor, network operations, and video memory.
The profiler is used to show why individual frames take as long as they do to process and render.
Unlike other debugging tools, the profiler does not start automatically. It can be started at any time during gameplay by pressing the start button. You can even start the profiler before opening the game to profile startup performance. It can also be started and stopped while the game is running without losing information from when it was last running. The information it records won’t go away unless you click clear, or close the game, reopen it and start the profiler again.
After starting and stopping the profiler you should see things being kept track of on the left and a graph on the right. The items listed on the left are everything that contributes to frame time, and they should each have a value for time and calls for the current frame you are looking at.
The frame number in the top right tells you which frame you are currently looking at. You can change this by using the up or down arrows, typing in the frame number, or clicking on the graph.
If you want to add something to your graph, or think it looks too cluttered, you can check and uncheck the box next to an item to add or remove it from the graph.
Network Profiler¶
The Network Profiler contains a list of all the nodes that communicate over the multiplayer API and, for each one, some counters on the amount of incoming and outgoing network interactions. It also features a bandwidth meter that displays the total bandwidth usage at any given moment.
Monitors¶
The monitors are graphs of several aspects of the game while its running such as FPS, memory usage, how many nodes are in a scene and more. All monitors keep track of stats automatically, so even if one monitor isn’t open while the game is running, you can open it later and see how the values changed.
Video Memory¶
The Video Mem tab lists the video memory usage of the running game and the resources using it.
Misc¶
The Misc tab contains tools to identify the control nodes you are clicking at runtime:
- Clicked Control tells you where the clicked node is in the scene tree.
- Clicked Control Type tells you the type of the node you clicked is.
Remote in scene dock¶
When running a game in the editor two options appear at the top of the Scene dock, Remote and Local. While using Remote you can inspect or change the nodes’ parameters in the running project.
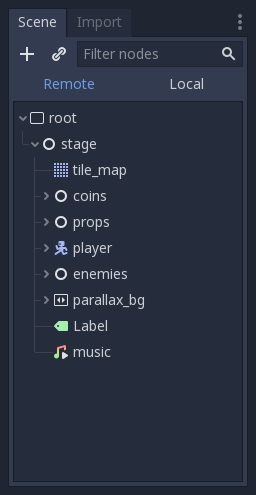
Note
Some editor settings related to debugging can be found inside the Editor Settings, under the Network > Debug and Debugger sections.
Legal¶
Complying with Licenses¶
What are licenses?¶
Godot is created and distributed under the MIT License. It doesn’t have a sole owner either, as every contributor that submits code to the project does it under this same license and keeps ownership of the contribution.
The license is the legal requirement for you (or your company) to use and distribute the software (and derivative projects, including games made with it). Your game or project can have a different license, but it still needs to comply with the original one.
Requirements¶
In the case of the MIT license, the only requirement is to include the license text somewhere in your game or derivative project.
This text reads as follows:
This game uses Godot Engine, available under the following license:
Copyright (c) 2007-2020 Juan Linietsky, Ariel Manzur. Copyright (c) 2014-2020 Godot Engine contributors.
Permission is hereby granted, free of charge, to any person obtaining a copy of this software and associated documentation files (the “Software”), to deal in the Software without restriction, including without limitation the rights to use, copy, modify, merge, publish, distribute, sublicense, and/or sell copies of the Software, and to permit persons to whom the Software is furnished to do so, subject to the following conditions:
The above copyright notice and this permission notice shall be included in all copies or substantial portions of the Software.
THE SOFTWARE IS PROVIDED “AS IS”, WITHOUT WARRANTY OF ANY KIND, EXPRESS OR IMPLIED, INCLUDING BUT NOT LIMITED TO THE WARRANTIES OF MERCHANTABILITY, FITNESS FOR A PARTICULAR PURPOSE AND NONINFRINGEMENT. IN NO EVENT SHALL THE AUTHORS OR COPYRIGHT HOLDERS BE LIABLE FOR ANY CLAIM, DAMAGES OR OTHER LIABILITY, WHETHER IN AN ACTION OF CONTRACT, TORT OR OTHERWISE, ARISING FROM, OUT OF OR IN CONNECTION WITH THE SOFTWARE OR THE USE OR OTHER DEALINGS IN THE SOFTWARE.
Note
Your games do not need to be under the same license. You are free to release your Godot projects under any license and to create commercial games with the engine.
Inclusion¶
The license does not specify how it has to be included, so anything is valid as long as it can be displayed under some condition. These are the most common approaches (only need to implement one of them, not all).
Credits screen¶
Include the above license text somewhere in the credits screen. It can be at the bottom after showing the rest of the credits. Most large studios use this approach with open source licenses.
Licenses screen¶
Some games have a special menu (often in the settings) to display licenses.
Output log¶
Just printing the licensing text using a print() function may be enough on platforms where a global output log is readable (as an example, mobile devices).
Accompanying file¶
If the game is distributed on desktop operating systems, a file containing the license can be added to the software that is installed to the user PC.
Printed manual¶
If the game includes printed manuals, license text can be included there.
Third Party licenses¶
Godot itself contains software written by third parties. Most of it does not require license inclusion, but some do. Make sure to do it if you are using them. Here is a list of which ones require it:
FreeType¶
Godot uses FreeType to render fonts. Its license requires attribution, so the following text must be included together with the Godot license:
Portions of this software are copyright © <year> The FreeType Project (www.freetype.org). All rights reserved.
ENet¶
If the project being created is a multiplayer game using the ENet driver, ENet has similar licensing terms as Godot
Copyright (c) 2002-2016 Lee Salzman
Permission is hereby granted, free of charge, to any person obtaining a copy of this software and associated documentation files (the “Software”), to deal in the Software without restriction, including without limitation the rights to use, copy, modify, merge, publish, distribute, sublicense, and/or sell copies of the Software, and to permit persons to whom the Software is furnished to do so, subject to the following conditions:
The above copyright notice and this permission notice shall be included in all copies or substantial portions of the Software.
THE SOFTWARE IS PROVIDED “AS IS”, WITHOUT WARRANTY OF ANY KIND, EXPRESS OR IMPLIED, INCLUDING BUT NOT LIMITED TO THE WARRANTIES OF MERCHANTABILITY, FITNESS FOR A PARTICULAR PURPOSE AND NONINFRINGEMENT. IN NO EVENT SHALL THE AUTHORS OR COPYRIGHT HOLDERS BE LIABLE FOR ANY CLAIM, DAMAGES OR OTHER LIABILITY, WHETHER IN AN ACTION OF CONTRACT, TORT OR OTHERWISE, ARISING FROM, OUT OF OR IN CONNECTION WITH THE SOFTWARE OR THE USE OR OTHER DEALINGS IN THE SOFTWARE.
MBedTLS¶
If the project is done with Godot 3.1 or above and it utilizes SSL (usually through HTTP requests), the MBedTLS Apache license needs to be complied by including the following text:
MBedTLS is Copyright (C) 2013-2019 ARM
Licensed under the Apache License, Version 2.0 (the “License”); you may not use this file except in compliance with the License. You may obtain a copy of the License at
http://www.apache.org/licenses/LICENSE-2.0
Unless required by applicable law or agreed to in writing, software distributed under the License is distributed on an “AS IS” BASIS, WITHOUT WARRANTIES OR CONDITIONS OF ANY KIND, either express or implied. See the License for the specific language governing permissions and limitations under the License.
Keep in mind that Godot 2.x and 3.0 use OpenSSL instead.
Compiling¶
Getting the source¶
Downloading the Godot source code¶
Before getting into the SCons build system and compiling Godot, you need to actually download the Godot source code.
The source code is available on GitHub
and while you can manually download it via the website, in general you want to
do it via the git version control system.
If you don’t know much about git yet, there are a great number of
tutorials available on various websites.
In general, you need to install git and/or one of the various GUI clients.
Afterwards, to get the latest development version of the Godot source code
(the unstable master branch), you can use git clone.
If you are using the git command line client, this is done by entering
the following in a terminal:
git clone https://github.com/godotengine/godot.git
For any stable release, visit the release page and click on the link for the release you want. You can then download and extract the source from the download link on the page.
There are also generally branches besides master for each major version.
After downloading the Godot source code, you can continue to compiling Godot.
Introduction to the buildsystem¶
SCons¶
Godot uses SCons to build. We love it, we are not changing it for anything else. We are not even sure other build systems are up to the task of building Godot. We constantly get requests to move the build system to CMake, or Visual Studio, but this is not going to happen. There are many reasons why we have chosen SCons over other alternatives, for example:
- Godot can be compiled for a dozen different platforms: all PC platforms, all mobile platforms, many consoles, and WebAssembly.
- Developers often need to compile for several of the platforms at the same time, or even different targets of the same platform. They can’t afford reconfiguring and rebuilding the project each time. SCons can do this with no sweat, without breaking the builds.
- SCons will never break a build no matter how many changes, configurations, additions, removals etc. You have more chances to die struck by lightning than needing to clean and rebuild in SCons.
- Godot build process is not simple. Several files are generated by code (binders), others are parsed (shaders), and others need to offer customization (plugins). This requires complex logic which is easier to write in an actual programming language (like Python) rather than using a mostly macro-based language only meant for building.
- Godot build process makes heavy use of cross-compiling tools. Each platform has a specific detection process, and all these must be handled as specific cases with special code written for each.
So, please try to keep an open mind and get at least a little familiar with it if you are planning to build Godot yourself.
Setup¶
Please refer to the documentation for Compiling for Android, Compiling for iOS, Compiling for macOS, Compiling for Universal Windows Platform, Compiling for the Web, Compiling for Windows and Compiling for X11 (Linux, *BSD).
Note that for Windows/Visual Studio, you need to use x86_x64 Cross Tools
Command Prompt for VS 2017 or similar, depending on your install, instead of
the standard Windows command prompt to enter the commands below.
Platform selection¶
Godot’s build system will begin by detecting the platforms it can build for. If not detected, the platform will simply not appear on the list of available platforms. The build requirements for each platform are described in the rest of this tutorial section.
SCons is invoked by just calling scons. If no platform is specified,
SCons will detect the target platform automatically based on the host platform.
It will then start building for the target platform right away.
To list the available target platforms, use scons platform=list:
user@host:~/godot$ scons platform=list
scons: Reading SConscript files ...
The following platforms are available:
android
javascript
server
windows
x11
Please run SCons again and select a valid platform: platform=<string>
To build for a platform (for example, x11), run with the platform= (or
p= to make it short) argument:
user@host:~/godot$ scons platform=x11
This will start the build process, which will take a while. If you want
SCons to build faster, use the -j <cores> parameter to specify how many
cores will be used for the build. Or leave it using one core, so you
can use your computer for something else :)
Example for using 4 cores:
user@host:~/godot$ scons platform=x11 -j 4
Resulting binary¶
The resulting binaries will be placed in the bin/ subdirectory,
generally with this naming convention:
godot.<platform>.[opt].[tools/debug].<architecture>[extension]
For the previous build attempt, the result would look like this:
user@host:~/godot$ ls bin
bin/godot.x11.tools.64
This means that the binary is for X11, is not optimized, has tools (the whole editor) compiled in, and is meant for 64 bits.
A Windows binary with the same configuration will look like this:
C:\godot> dir bin/
godot.windows.tools.64.exe
Copy that binary to any location you like, as it contains the project manager, editor and all means to execute the game. However, it lacks the data to export it to the different platforms. For that the export templates are needed (which can be either downloaded from godotengine.org, or you can build them yourself).
Aside from that, there are a few standard options that can be set in all build targets, and which will be explained below.
Tools¶
Tools are enabled by default in all PC targets (Linux, Windows, macOS), disabled for everything else. Disabling tools produces a binary that can run projects but that does not include the editor or the project manager.
scons platform=<platform> tools=yes/no
Target¶
Target controls optimization and debug flags. Each mode means:
- debug: Build with C++ debugging symbols, runtime checks (performs checks and reports error) and none to little optimization.
- release_debug: Build without C++ debugging symbols and optimization, but keep the runtime checks (performs checks and reports errors). Official editor binaries use this configuration.
- release: Build without symbols, with optimization and with little
to no runtime checks. This target can’t be used together with
tools=yes, as the editor requires some debug functionality and run-time checks to run.
scons platform=<platform> target=debug/release_debug/release
This flag appends the .debug suffix (for debug), or .tools (for debug
with tools enabled). When optimization is enabled (release), it appends
the .opt suffix.
Bits¶
Bits is meant to control the CPU or OS version intended to run the binaries. It is focused mostly on desktop platforms and ignored everywhere else.
- 32: Build binaries for 32-bit platforms.
- 64: Build binaries for 64-bit platforms.
- default: Build for the architecture that matches the host platform.
scons platform=<platform> bits=default/32/64
This flag appends .32 or .64 suffixes to resulting binaries when
relevant. If bits=default is used, the suffix will match the detected
architecture.
Other build options¶
There are several other build options that you can use to configure the way Godot should be built (compiler, debug options, etc.) as well as the features to include/disable.
Check the output of scons --help for details about each option for
the version you are willing to compile.
Export templates¶
Official export templates are downloaded from the Godot Engine site: godotengine.org. However, you might want to build them yourself (in case you want newer ones, you are using custom modules, or simply don’t trust your own shadow).
If you download the official export templates package and unzip it, you will notice that most files are optimized binaries or packages for each platform:
android_debug.apk
android_release.apk
javascript_debug.zip
javascript_release.zip
linux_server_32
linux_server_64
linux_x11_32_debug
linux_x11_32_release
linux_x11_64_debug
linux_x11_64_release
osx.zip
version.txt
windows_32_debug.exe
windows_32_release.exe
windows_64_debug.exe
windows_64_release.exe
To create those yourself, follow the instructions detailed for each platform in this same tutorial section. Each platform explains how to create its own template.
The version.txt file should contain the corresponding Godot version
identifier. This file is used to install export templates in a version-specific
directory to avoid conflicts. For instance, if you are building export templates
for Godot 3.1.1, version.txt should contain 3.1.1.stable on the first
line (and nothing else). This version identifier is based on the major,
minor, patch (if present) and status lines of the
version.py file in the Godot Git repository.
If you are developing for multiple platforms, macOS is definitely the most convenient host platform for cross-compilation, since you can cross-compile for almost every target (except for UWP). Linux and Windows come in second place, but Linux has the advantage of being the easier platform to set this up.
Compiling for Windows¶
Requirements¶
For compiling under Windows, the following is required:
- Visual Studio Community, version 2015 (14.0) or later. VS 2019 is recommended. Make sure to read “Installing Visual Studio caveats” below or you will have to run/download the installer again.
- MinGW-w64 with GCC can be used as an alternative to Visual Studio.
Be sure to install/configure it to use the
posixthread model. - Python 3.5+
- SCons build system. If using Visual Studio 2019, you must have SCons 3.1.1 or later.
- Optional - yasm (for WebM SIMD optimizations)
Note
If you have Scoop installed, you can easily install MinGW and other dependencies using the following command:
scoop install gcc python scons yasm make
Note
If you have MSYS2 installed, you can easily install MinGW and other dependencies using the following command:
pacman -S mingw-w64-x86_64-python3-pip \
mingw-w64-x86_64-gcc mingw-w64-x86_64-yasm \
mingw-w64-i686-python3-pip mingw-w64-i686-gcc \
mingw-w64-i686-yasm make
For each MSYS2 MinGW subsystem, you should then run
`pip install scons` in its shell.
See also
For a general overview of SCons usage for Godot, see Introduction to the buildsystem.
Setting up SCons¶
First, make sure to enable the option to add Python to the PATH in
the Python installer. The SCons installer should then detect and use
the existing Python installation.
To check whether you have installed Python and SCons correctly, you can
type python --version and scons --version into a command prompt
(cmd.exe).
If the commands above don’t work, make sure to add Python to your PATH
environment variable after installing it, then check again.
You can do so by running the Python installer again and enabling the option
to add Python to the PATH.
Installing Visual Studio caveats¶
If installing Visual Studio 2017 or 2019, make sure to enable C++ in the list of workflows to install.
If installing Visual Studio 2015, make sure to run a Custom installation instead of Typical and select C++ as a language there.
If you’ve already made the mistake of installing Visual Studio without C++ support, run the installer again; it should present you a Modify button. Running the installer from Add/Remove Programs will only give you a Repair option, which won’t let you install C++ tools.
Downloading Godot’s source¶
Godot’s source code is hosted on GitHub. Downloading it (cloning) using Git is recommended.
The tutorial will assume from now on that you placed the source code in
C:\godot.
Compiling¶
Selecting a compiler¶
SCons will automatically find and use an existing Visual Studio installation.
If you do not have Visual Studio installed, it will attempt to use
MinGW instead. If you already have Visual Studio installed and want to
use MinGW, pass use_mingw=yes to the SCons command line.
During development, using the Visual Studio compiler is usually a better idea, as it links the Godot binary much faster than MinGW. However, MinGW can produce more optimized binaries using link-time optimization (see below), making it a better choice for production use.
Running SCons¶
After opening a command prompt, change to the root directory of
the engine source code (using cd) and type:
C:\godot> scons platform=windows
You can specify a number of CPU threads to use to speed up the build:
C:\godot> scons -j6 platform=windows
In general, it is OK to have at least as many threads compiling Godot as you have cores in your CPU, if not one or two more. Feel free to add the -j option to any SCons command you see below.
Note
When compiling with multiple CPU threads, SCons may warn about pywin32 being missing. You can safely ignore this warning.
If all goes well, the resulting binary executable will be placed in
C:\godot\bin\ with the name godot.windows.tools.32.exe or
godot.windows.tools.64.exe.
Note
By default, SCons will build a binary matching your CPU architecture,
but this can be overridden using bits=64 or bits=32.
This executable file contains the whole engine and runs without any dependencies. Running it will bring up the Project Manager.
Note
If you are compiling Godot for production use, then you can
make the final executable smaller and faster by adding the
SCons option target=release_debug.
If you are compiling Godot with MinGW, you can make the binary
even smaller and faster by adding the SCons option use_lto=yes.
As link-time optimization is a memory-intensive process,
this will require about 3 GB of available RAM while compiling.
Development in Visual Studio or other IDEs¶
For most projects, using only scripting is enough but when development in C++ is needed, for creating modules or extending the engine, working with an IDE is usually desirable.
You can create a Visual Studio solution via SCons by running SCons with
the vsproj=yes parameter, like this:
scons p=windows vsproj=yes
You will be able to open Godot’s source in a Visual Studio solution now, and able to build Godot using Visual Studio’s Build button.
If you need to edit the build commands, they are located in “Godot” project settings, NMAKE sheet. SCons is called at the end of the commands. If you make a mistake, copy the command from one of the other build configurations (debug, release_debug, release) or architectures (Win32/x64); they are equivalent.
Cross-compiling for Windows from other operating systems¶
If you are a Linux or macOS user, you need to install MinGW-w64, which typically comes in 32-bit and 64-bit variants. The package names may differ based on your distribution, here are some known ones:
| Arch Linux | Install mingw-w64-gcc from the AUR. |
| Debian / Ubuntu | apt install mingw-w64
|
| Fedora | dnf install mingw64-gcc-c++ mingw64-winpthreads-static \
mingw32-gcc-c++ mingw32-winpthreads-static
|
| macOS | brew install mingw-w64
|
| Mageia | urpmi mingw64-gcc-c++ mingw64-winpthreads-static \
mingw32-gcc-c++ mingw32-winpthreads-static
|
Before attempting the compilation, SCons will check for
the following binaries in your PATH environment variable:
i686-w64-mingw32-gcc
x86_64-w64-mingw32-gcc
If the binaries are not located in the PATH (e.g. /usr/bin),
you can define the following environment variables to give a hint to
the build system:
export MINGW32_PREFIX="/path/to/i686-w64-mingw32-"
export MINGW64_PREFIX="/path/to/x86_64-w64-mingw32-"
To make sure you are doing things correctly, executing the following in the shell should result in a working compiler (the version output may differ based on your system):
user@host:~$ ${MINGW32_PREFIX}gcc --version
i686-w64-mingw32-gcc (GCC) 6.1.0 20160427 (Mageia MinGW 6.1.0-1.mga6)
Troubleshooting¶
Cross-compiling from some Ubuntu versions may lead to this bug, due to a default configuration lacking support for POSIX threading.
You can change that configuration following those instructions, for 64-bit:
sudo update-alternatives --config x86_64-w64-mingw32-gcc
<choose x86_64-w64-mingw32-gcc-posix from the list>
sudo update-alternatives --config x86_64-w64-mingw32-g++
<choose x86_64-w64-mingw32-g++-posix from the list>
And for 32-bit:
sudo update-alternatives --config i686-w64-mingw32-gcc
<choose i686-w64-mingw32-gcc-posix from the list>
sudo update-alternatives --config i686-w64-mingw32-g++
<choose i686-w64-mingw32-g++-posix from the list>
Creating Windows export templates¶
Windows export templates are created by compiling Godot without the editor, with the following flags:
C:\godot> scons platform=windows tools=no target=release_debug bits=32
C:\godot> scons platform=windows tools=no target=release bits=32
C:\godot> scons platform=windows tools=no target=release_debug bits=64
C:\godot> scons platform=windows tools=no target=release bits=64
If you plan on replacing the standard export templates, copy these to the
following location, replacing <version> with the version identifier
(such as 3.1.1.stable or 3.2.dev):
%USERPROFILE%\AppData\Roaming\Godot\templates\<version>\
With the following names:
windows_32_debug.exe
windows_32_release.exe
windows_64_debug.exe
windows_64_release.exe
However, if you are using custom modules or custom engine code, you may instead want to configure your binaries as custom export templates here:
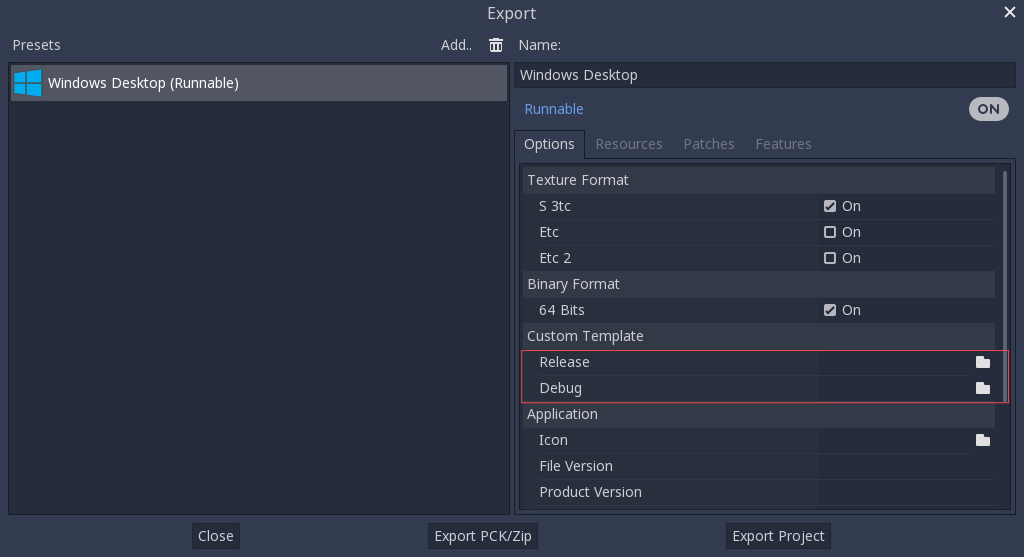
You don’t need to copy them in this case, just reference the resulting
files in the bin\ directory of your Godot source folder, so the next
time you build, you will automatically have the custom templates referenced.
Compiling for X11 (Linux, *BSD)¶
Requirements¶
For compiling under Linux or other Unix variants, the following is required:
- GCC or Clang
- Python 3.5+
- SCons build system (3.0 or later for Python 3)
- pkg-config (used to detect the dependencies below)
- X11, Xcursor, Xinerama, Xi and XRandR development libraries
- MesaGL development libraries
- ALSA development libraries
- PulseAudio development libraries
- Optional - libudev (build with
udev=yes) - Optional - yasm (for WebM SIMD optimizations)
See also
For a general overview of SCons usage for Godot, see Introduction to the buildsystem.
Distro-specific one-liners¶
| Alpine Linux | apk add scons pkgconf gcc g++ libx11-dev libxcursor-dev libxinerama-dev libxi-dev libxrandr-dev \
libexecinfo-dev
|
| Arch Linux | pacman -S --needed scons pkgconf gcc libxcursor libxinerama libxi libxrandr mesa glu libglvnd \
alsa-lib pulseaudio yasm
|
| Debian / Ubuntu | sudo apt-get install build-essential scons pkg-config libx11-dev libxcursor-dev libxinerama-dev \
libgl1-mesa-dev libglu-dev libasound2-dev libpulse-dev libudev-dev libxi-dev libxrandr-dev yasm
|
| Fedora | sudo dnf install scons pkgconfig libX11-devel libXcursor-devel libXrandr-devel libXinerama-devel \
libXi-devel mesa-libGL-devel mesa-libGLU-devel alsa-lib-devel pulseaudio-libs-devel \
libudev-devel yasm
|
| FreeBSD | sudo pkg install scons pkgconf xorg-libraries libXcursor libXrandr libXi xorgproto libGLU alsa-lib \
pulseaudio yasm
|
| Gentoo | emerge -an dev-util/scons x11-libs/libX11 x11-libs/libXcursor x11-libs/libXinerama x11-libs/libXi \
media-libs/mesa media-libs/glu media-libs/alsa-lib media-sound/pulseaudio dev-lang/yasm
|
| Mageia | urpmi scons task-c++-devel pkgconfig "pkgconfig(alsa)" "pkgconfig(glu)" "pkgconfig(libpulse)" \
"pkgconfig(udev)" "pkgconfig(x11)" "pkgconfig(xcursor)" "pkgconfig(xinerama)" "pkgconfig(xi)" \
"pkgconfig(xrandr)" yasm
|
| OpenBSD | pkg_add python scons llvm yasm
|
| openSUSE | sudo zypper install scons pkgconfig libX11-devel libXcursor-devel libXrandr-devel libXinerama-devel \
libXi-devel Mesa-libGL-devel alsa-devel libpulse-devel libudev-devel libGLU1 yasm
|
| Solus | sudo eopkg install -c system.devel scons libxcursor-devel libxinerama-devel libxi-devel \
libxrandr-devel mesalib-devel libglu alsa-lib-devel pulseaudio-devel yasm
|
Compiling¶
Start a terminal, go to the root dir of the engine source code and type:
user@host:~/godot$ scons -j8 platform=x11
A good rule of thumb for the -j (jobs) flag, is to have at least as many
threads compiling Godot as you have cores in your CPU, if not one or two more.
Feel free to add the -j option to any SCons command you see below.
If all goes well, the resulting binary executable will be placed in the “bin” subdirectory. This executable file contains the whole engine and runs without any dependencies. Executing it will bring up the project manager.
Note
If you wish to compile using Clang rather than GCC, use this command:
user@host:~/godot$ scons platform=x11 use_llvm=yes
Using Clang appears to be a requirement for OpenBSD, otherwise fonts would not build.
Note
If you are compiling Godot for production use, then you can
make the final executable smaller and faster by adding the
SCons option target=release_debug.
If you are compiling Godot with GCC, you can make the binary
even smaller and faster by adding the SCons option use_lto=yes.
As link-time optimization is a memory-intensive process,
this will require about 3 GB of available RAM while compiling.
Building export templates¶
Warning
Linux binaries usually won’t run on distributions that are older than the distribution they were built on. If you wish to distribute binaries that work on most distributions, you should build them on an old distribution such as Ubuntu 16.04. You can use a virtual machine or a container to set up a suitable build environment.
To build X11 (Linux, *BSD) export templates, run the build system with the following parameters:
- (32 bits)
user@host:~/godot$ scons platform=x11 tools=no target=release bits=32
user@host:~/godot$ scons platform=x11 tools=no target=release_debug bits=32
- (64 bits)
user@host:~/godot$ scons platform=x11 tools=no target=release bits=64
user@host:~/godot$ scons platform=x11 tools=no target=release_debug bits=64
Note that cross-compiling for the opposite bits (64/32) as your host platform is not always straight-forward and might need a chroot environment.
To create standard export templates, the resulting files must be copied to:
$HOME/.local/share/godot/templates/[gd-version]/
and named like this (even for *BSD which is seen as “Linux X11” by Godot):
linux_x11_32_debug
linux_x11_32_release
linux_x11_64_debug
linux_x11_64_release
However, if you are writing your custom modules or custom C++ code, you might instead want to configure your binaries as custom export templates here:
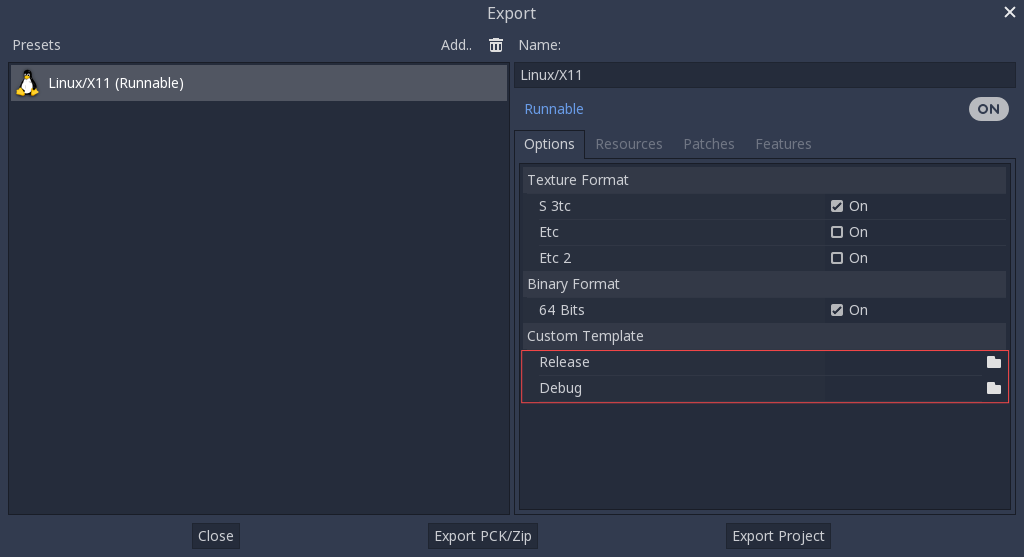
You don’t even need to copy them, you can just reference the resulting
files in the bin/ directory of your Godot source folder, so the next
time you build, you automatically have the custom templates referenced.
Using Clang and LLD for faster development¶
You can also use Clang and LLD to build Godot. This has two upsides compared to the default GCC + GNU ld setup:
- LLD links Godot significantly faster compared to GNU ld or gold. This leads to faster iteration times.
- Clang tends to give more useful error messages compared to GCC.
To do so, install Clang and the lld package from your distribution’s package manager
then use the following SCons command:
user@host:~/godot$ scons platform=x11 use_llvm=yes use_lld=yes
It’s still recommended to use GCC for production builds as they can be compiled using link-time optimization, making the resulting binaries smaller and faster.
Compiling for macOS¶
Requirements¶
For compiling under macOS, the following is required:
- Python 3.5+
- SCons build system.
- Xcode (or the more lightweight Command Line Tools for Xcode).
- Optional - yasm (for WebM SIMD optimizations).
Note
If you have Homebrew installed, you can easily install SCons and yasm using the following command:
brew install scons yasm
Installing Homebrew will also fetch the Command Line Tools for Xcode automatically if you don’t have them already.
See also
For a general overview of SCons usage for Godot, see Introduction to the buildsystem.
Compiling¶
Start a terminal, go to the root directory of the engine source code and type:
scons platform=osx --jobs=$(sysctl -n hw.logicalcpu)
If all goes well, the resulting binary executable will be placed in the
bin/ subdirectory. This executable file contains the whole engine and
runs without any dependencies. Executing it will bring up the project
manager.
To create an .app like in the official builds, you need to use the template
located in misc/dist/osx_tools.app. Typically, for an optimized editor
binary built with scons p=osx target=release_debug:
user@host:~/godot$ cp -r misc/dist/osx_tools.app ./Godot.app
user@host:~/godot$ mkdir -p Godot.app/Contents/MacOS
user@host:~/godot$ cp bin/godot.osx.tools.64 Godot.app/Contents/MacOS/Godot
user@host:~/godot$ chmod +x Godot.app/Contents/MacOS/Godot
Cross-compiling for macOS from Linux¶
It is possible to compile for macOS in a Linux environment (and maybe also in Windows using the Windows Subsystem for Linux). For that, you’ll need to install OSXCross to be able to use macOS as a target. First, follow the instructions to install it:
Clone the OSXCross repository somewhere on your machine (or download a ZIP file and extract it somewhere), e.g.:
user@host:~$ git clone --depth=1 https://github.com/tpoechtrager/osxcross.git "$HOME/osxcross"
- Follow the instructions to package the SDK: https://github.com/tpoechtrager/osxcross#packaging-the-sdk
- Follow the instructions to install OSXCross: https://github.com/tpoechtrager/osxcross#installation
After that, you will need to define the OSXCROSS_ROOT as the path to
the OSXCross installation (the same place where you cloned the
repository/extracted the zip), e.g.:
user@host:~$ export OSXCROSS_ROOT="$HOME/osxcross"
Now you can compile with SCons like you normally would:
user@host:~/godot$ scons platform=osx
If you have an OSXCross SDK version different from the one expected by the SCons buildsystem, you can specify a custom one with the osxcross_sdk argument:
user@host:~/godot$ scons platform=osx osxcross_sdk=darwin15
Compiling for Android¶
Note¶
In most cases, using the built-in deployer and export templates is good enough. Compiling the Android APK manually is mostly useful for custom builds or custom packages for the deployer.
Also, you still need to follow the steps mentioned in the Exporting for Android tutorial before attempting to build a custom export template.
Requirements¶
For compiling under Windows, Linux or macOS, the following is required:
- Python 3.5+
- SCons build system
- Android SDK (command-line tools are sufficient)
- Required SDK components will be automatically installed by Gradle (except the NDK)
- Android NDK r17 or later
- Gradle (will be downloaded and installed automatically if missing)
- JDK 8 (either OpenJDK or Oracle JDK)
- JDK 9 or later are not currently supported
- You can download a build from ojdkbuild
See also
For a general overview of SCons usage for Godot, see Introduction to the buildsystem.
Setting up the buildsystem¶
Set the environment variable ANDROID_HOME to point to the Android
SDK. If you downloaded the Android command-line tools, this would be
the folder where you extracted the contents of the ZIP archive.
Later on, gradlew will install necessary SDK components in this folder.
However, you need to accept the SDK component licenses before they can be
downloaded by Gradle. This can be done by running the following command
from the root of the SDK directory, then answering all the prompts
with y:
tools/bin/sdkmanager --licenses
Set the environment variable ANDROID_NDK_ROOT to point to the
Android NDK. You also might need to set the variable ANDROID_NDK_HOME
to the same path, especially if you are using custom Android modules,
since some Gradle plugins rely on the NDK and use this variable to
determine its location.
To set those environment variables on Windows, press Windows + R, type “control system”, then click on Advanced system settings in the left pane, then click on Environment variables on the window that appears.
To set those environment variables on Linux or macOS, use
export ANDROID_HOME=/path/to/android-sdk and
export ANDROID_NDK_ROOT=/path/to/android-ndk
where /path/to/android-sdk and /path/to/android-ndk point to
the root of the SDK and NDK directories.
Building the export templates¶
Godot needs two export templates for Android: the optimized “release”
template (android_release.apk) and the debug template (android_debug.apk).
As Google will require all APKs to include ARMv8 (64-bit) libraries starting
from August 2019, the commands below will build an APK containing both
ARMv7 and ARMv8 libraries.
Compiling the standard export templates is done by calling SCons with the following arguments:
- Release template (used when exporting with Debugging Enabled unchecked)
scons platform=android target=release android_arch=armv7
scons platform=android target=release android_arch=arm64v8
cd platform/android/java
# On Windows
.\gradlew generateGodotTemplates
# On Linux and macOS
./gradlew generateGodotTemplates
The resulting APK will be located at bin/android_release.apk.
- Debug template (used when exporting with Debugging Enabled checked)
scons platform=android target=release_debug android_arch=armv7
scons platform=android target=release_debug android_arch=arm64v8
cd platform/android/java
# On Windows
.\gradlew generateGodotTemplates
# On Linux and macOS
./gradlew generateGodotTemplates
The resulting APK will be located at bin/android_debug.apk.
Adding support for x86 devices¶
If you also want to include support for x86 and x86-64 devices, run the SCons
command a third and fourth time with the android_arch=x86, and
android_arch=x86_64 arguments before building the APK with Gradle. For
example, for the release template:
scons platform=android target=release android_arch=armv7
scons platform=android target=release android_arch=arm64v8
scons platform=android target=release android_arch=x86
scons platform=android target=release android_arch=x86_64
cd platform/android/java
# On Windows
.\gradlew generateGodotTemplates
# On Linux and macOS
./gradlew generateGodotTemplates
This will create a fat binary that works on all platforms. The final APK size of exported projects will depend on the platforms you choose to support when exporting; in other words, unused platforms will be removed from the APK.
Cleaning the generated export templates¶
You can use the following commands to remove the generated export templates:
cd platform/android/java
# On Windows
.\gradlew cleanGodotTemplates
# On Linux and macOS
./gradlew cleanGodotTemplates
Using the export templates¶
Godot needs release and debug APKs that were compiled against the same version/commit as the editor. If you are using official binaries for the editor, make sure to install the matching export templates, or build your own from the same version.
When exporting your game, Godot opens the APK, changes a few things inside and adds your files.
Installing the templates¶
The newly-compiled templates (android_debug.apk
and android_release.apk) must be copied to Godot’s templates folder
with their respective names. The templates folder can be located in:
- Windows:
%APPDATA%\Godot\templates\<version>\ - Linux:
$HOME/.local/share/godot/templates/<version>/ - macOS:
$HOME/Library/Application Support/Godot/templates/<version>/
<version> is of the form major.minor[.patch].status using values from
version.py in your Godot source repository (e.g. 3.0.5.stable or 3.1.dev).
You also need to write this same version string to a version.txt file located
next to your export templates.
However, if you are writing your custom modules or custom C++ code, you might instead want to configure your APKs as custom export templates here:
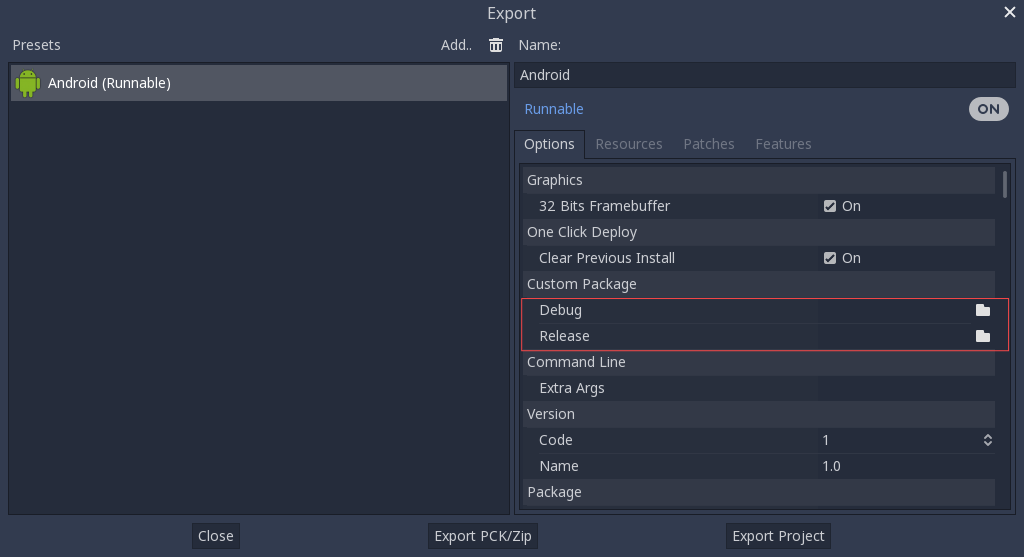
You don’t even need to copy them, you can just reference the resulting
file in the bin\ directory of your Godot source folder, so that the
next time you build you will automatically have the custom templates
referenced.
Troubleshooting¶
Application not installed¶
Android might complain the application is not correctly installed. If so:
- Check that the debug keystore is properly generated.
- Check that the jarsigner executable is from JDK 8.
If it still fails, open a command line and run logcat:
adb logcat
Then check the output while the application is installed; the error message should be presented there. Seek assistance if you can’t figure it out.
Application exits immediately¶
If the application runs but exits immediately, this might be due to one of the following reasons:
- Make sure to use export templates that match your editor version; if you use a new Godot version, you have to update the templates too.
libgodot_android.sois not inlibs/<android_arch>/where<android_arch>is the device’s architecture.- The device’s architecture does not match the exported one(s). Make sure your templates were built for that device’s architecture, and that the export settings included support for that architecture.
In any case, adb logcat should also show the cause of the error.
Compiling for iOS¶
Requirements¶
- SCons (you can get it from macports, you should be able to run
sconsin a terminal when installed) - Xcode 10.0 (or later) with the iOS (10.0) SDK and the command line tools.
See also
For a general overview of SCons usage for Godot, see Introduction to the buildsystem.
Compiling¶
Open a Terminal, go to the root dir of the engine source code and type:
$ scons p=iphone target=debug
for a debug build, or:
$ scons p=iphone target=release
for a release build (check platform/iphone/detect.py for the compiler
flags used for each configuration).
Alternatively, you can run
$ scons p=iphone arch=x86_64 target=debug
for a Simulator executable.
For recent devices, Apple requires 64-bit versions of application binaries when you are uploading to the Apple Store. The best way to provide these is to create a bundle in which there are both 32-bit and 64-bit binaries, so every device will be able to run the game.
It can be done in three steps: first compile the 32-bit version, then compile the 64-bit version and then use lipo to bundle them into one “universal” binary.
All those steps can be performed with following commands:
$ scons p=iphone tools=no target=release arch=arm
$ scons p=iphone tools=no target=release arch=arm64
$ lipo -create bin/libgodot.iphone.opt.arm.a bin/libgodot.iphone.opt.arm64.a -output bin/libgodot.iphone.release.fat.a
$ lipo -create bin/libgodot_camera_module.iphone.opt.arm.a bin/libgodot_camera_module.iphone.opt.arm64.a -output bin/libgodot_camera_module.iphone.release.fat.a
$ lipo -create bin/libgodot_arkit_module.iphone.opt.arm.a bin/libgodot_arkit_module.iphone.opt.arm64.a -output bin/libgodot_arkit_module.iphone.release.fat.a
If you also want to provide a simulator build (reduces the chance of any linker errors with dependencies), you’ll need to build and lipo the x86_64 architecture as well.
$ scons p=iphone tools=no target=release arch=arm
$ scons p=iphone tools=no target=release arch=arm64
$ scons p=iphone tools=no target=release arch=x86_64
$ lipo -create bin/libgodot.iphone.opt.arm.a bin/libgodot.iphone.opt.arm64.a bin/libgodot.iphone.opt.x86_64.a -output bin/libgodot.iphone.release.fat.a
$ lipo -create bin/libgodot_camera_module.iphone.opt.arm.a bin/libgodot_camera_module.iphone.opt.arm64.a bin/libgodot_camera_module.iphone.opt.x86_64.a -output bin/libgodot_camera_module.iphone.release.fat.a
$ lipo -create bin/libgodot_arkit_module.iphone.opt.arm.a bin/libgodot_arkit_module.iphone.opt.arm64.a bin/libgodot_arkit_module.iphone.opt.x86_64.a -output bin/libgodot_arkit_module.iphone.release.fat.a
Run¶
To run on a device or simulator, follow these instructions: Exporting for iOS.
Replace or add your executable to the Xcode project, and change the “executable name” property on Info.plist accordingly if you use an alternative build.
Cross-compiling for iOS on Linux¶
The procedure for this is somewhat complex and requires a lot of steps, but once you have the environment properly configured it will be easy to compile Godot for iOS anytime you want.
Disclaimer¶
While it is possible to compile for iOS on a Linux environment, Apple is very restrictive about the tools to be used (especially hardware-wise), allowing pretty much only their products to be used for development. So this is not official. However, a statement from Apple in 2010 says they relaxed some of the App Store review guidelines to allow any tool to be used, as long as the resulting binary does not download any code, which means it should be OK to use the procedure described here and cross-compiling the binary.
Requirements¶
- XCode with the iOS SDK (a dmg image)
- Clang >= 3.5 for your development
machine installed and in the
PATH. It has to be version >= 3.5 to targetarm64architecture. - Fuse for mounting and umounting the dmg image.
- darling-dmg, which
needs to be built from source. The procedure for that is explained
below.
- For building darling-dmg, you’ll need the development packages of the following libraries: fuse, icu, openssl, zlib, bzip2.
- cctools-port
for the needed build tools. The procedure for building is quite
peculiar and is described below.
- This also has some extra dependencies: automake, autogen, libtool.
Configuring the environment¶
darling-dmg¶
Clone the repository on your machine:
$ git clone https://github.com/darlinghq/darling-dmg.git
Build it:
$ cd darling-dmg
$ mkdir build
$ cd build
$ cmake .. -DCMAKE_BUILD_TYPE=Release
$ make -j 4 # The number is the amount of cores your processor has, for faster build
$ cd ../..
Preparing the SDK¶
Mount the XCode image:
$ mkdir xcode
$ ./darling-dmg/build/darling-dmg /path/to/Xcode_7.1.1.dmg xcode
[...]
Everything looks OK, disk mounted
Extract the iOS SDK:
$ mkdir -p iPhoneSDK/iPhoneOS9.1.sdk
$ cp -r xcode/Xcode.app/Contents/Developer/Platforms/iPhoneOS.platform/Developer/SDKs/iPhoneOS.sdk/* iPhoneSDK/iPhoneOS9.1.sdk
$ cp -r xcode/Xcode.app/Contents/Developer/Toolchains/XcodeDefault.xctoolchain/usr/include/c++/* iPhoneSDK/iPhoneOS9.1.sdk/usr/include/c++
$ fusermount -u xcode # unmount the image
Pack the SDK:
$ cd iPhoneSDK
$ tar -cf - * | xz -9 -c - > iPhoneOS9.1.sdk.tar.xz
Toolchain¶
Build cctools:
$ git clone https://github.com/tpoechtrager/cctools-port.git
$ cd cctools-port/usage_examples/ios_toolchain
$ ./build.sh /path/iPhoneOS9.1.sdk.tar.xz arm64
Copy the tools to a nicer place. Note that the SCons scripts for
building will look under usr/bin inside the directory you provide
for the toolchain binaries, so you must copy to such subdirectory, akin
to the following commands:
$ mkdir -p /home/user/iostoolchain/usr
$ cp -r target/bin /home/user/iostoolchain/usr/
Now you should have the iOS toolchain binaries in
/home/user/iostoolchain/usr/bin.
Compiling Godot for iPhone¶
Once you’ve done the above steps, you should keep two things in your environment: the built toolchain and the iPhoneOS SDK directory. Those can stay anywhere you want since you have to provide their paths to the SCons build command.
For the iPhone platform to be detected, you need the OSXCROSS_IOS
environment variable defined to anything.
$ export OSXCROSS_IOS=anything
Now you can compile for iPhone using SCons like the standard Godot way, with some additional arguments to provide the correct paths:
$ scons -j 4 platform=iphone arch=arm target=release_debug IPHONESDK="/path/to/iPhoneSDK" IPHONEPATH="/path/to/iostoolchain" ios_triple="arm-apple-darwin11-"
$ scons -j 4 platform=iphone arch=arm64 target=release_debug IPHONESDK="/path/to/iPhoneSDK" IPHONEPATH="/path/to/iostoolchain" ios_triple="arm-apple-darwin11-"
Producing fat binaries¶
Apple requires a fat binary with both architectures (armv7 and
arm64) in a single file. To do this, use the
arm-apple-darwin11-lipo executable. The following example assumes
you are in the root Godot source directory:
$ /path/to/iostoolchain/usr/bin/arm-apple-darwin11-lipo -create bin/libgodot.iphone.opt.debug.arm.a bin/libgodot.iphone.opt.debug.arm64.a -output bin/libgodot.iphone.debug.fat.a
$ /path/to/iostoolchain/usr/bin/arm-apple-darwin11-lipo -create bin/libgodot_camera_module.iphone.opt.debug.arm.a bin/libgodot_camera_module.iphone.opt.debug.arm64.a -output bin/libgodot_camera_module.iphone.debug.fat.a
$ /path/to/iostoolchain/usr/bin/arm-apple-darwin11-lipo -create bin/libgodot_arkit_module.iphone.opt.debug.arm.a bin/libgodot_arkit_module.iphone.opt.debug.arm64.a -output bin/libgodot_arkit_module.iphone.debug.fat.a
Then you will have iOS fat binaries in bin directory.
Compiling for Universal Windows Platform¶
Requirements¶
- SCons (see Compiling for Windows for more details).
- Visual Studio 2015 Update 2. It may work with earlier versions. See Compiling for Windows about the caveats of installing it and the various prompts.
- Windows 10 SDK (can be selected in Visual Studio installation).
- ANGLE source. Use the
ms_master(default) branch. Keep it in a path without spaces to avoid problems.
Note
The ANGLE repo by Microsoft has been discontinued and the
ms_master branch has been cleared out.
As a temporary workaround however, it is still possible to download an older state of the source code via commit c61d048.
This page will eventually be updated in the future to reflect the new build instructions.
See also
For a general overview of SCons usage for Godot, see Introduction to the buildsystem.
Compiling¶
You need to open a proper Visual Studio prompt for the target architecture you want to build. Check Compiling for Windows to see how these prompts work.
There are three target architectures for UWP: x86 (32-bits), x64 (64-bits)
and ARM (32-bits). For the latter, you can run vcvarsall.bat with
x86_arm or amd64_arm as argument to set the environment.
Set the ANGLE_SRC_PATH to the directory where you downloaded the ANGLE
source code. The build process will also build ANGLE to produce the
required DLLs for the selected architecture.
Once you’re set, run the SCons command similarly to the other platforms:
C:\godot>scons platform=uwp
Creating UWP export templates¶
To export using the editor you need to properly build package the templates.
You need all three architectures with debug and release templates to
be able to export.
Open the command prompt for one architecture and run SCons twice (once for each target):
C:\godot>scons platform=uwp target=release_debug
C:\godot>scons platform=uwp target=release
Repeat for the other architectures.
In the end your bin folder will have the .exe binaries with a name
like godot.uwp.opt.debug.32.x86.exe (with variations for each
target/arch).
Copy one of these to misc/dist/uwp_template inside the Godot source
folder and rename the binary to godot.uwp.exe. From the ANGLE source,
under winrt/10/src/Release_%arch% (where %arch% can be Win32,
x64 or ARM), get the libEGL.dll and the libGLESv2.dll,
putting them along with the executable.
Add the files in the uwp_template folder to a ZIP. Rename the resulting
Zip according to the target/architecture of the template:
uwp_x86_debug.zip
uwp_x86_release.zip
uwp_x64_debug.zip
uwp_x64_release.zip
uwp_arm_debug.zip
uwp_arm_release.zip
Move those templates to the [versionstring]\templates folder in Godot
settings path, where versionstring is the version of Godot you have compiled
the export templates for - e.g. 3.0.alpha for the alpha version of Godot 3.
If you don’t want to replace the templates, you can set the “Custom Package”
property in the export window.
Running UWP apps with Visual Studio¶
If you want to debug the UWP port or simply run your apps without packaging and signing, you can deploy and launch them using Visual Studio. It might be the easiest way if you are testing on a device such as a Windows Phone or an Xbox One.
Within the ANGLE source folder, open templates and double-click the
install.bat script file. This will install the Visual Studio project
templates for ANGLE apps.
If you have not built Godot yet, open the winrt/10/src/angle.sln solution
from the ANGLE source and build it to Release/Win32 target. You may also need
to build it for ARM if you plan to run on a device. You can also use MSBuild if
you’re comfortable with the command line.
Create a new Windows App project using the “App for OpenGL ES
(Windows Universal)” project template, which can be found under the
Visual C++/Windows/Universal category.
This is a base project with the ANGLE dependencies already set up. However, by
default it picks the debug version of the DLLs which usually have poor
performance. So in the “Binaries” filter, click in each of the DLLs there
and in the “Properties” window and change the relative path from
Debug_Win32 to Release_Win32 (or Release_ARM for devices).
In the same “Binaries” filter, select “Add > Existing Item” and point to the
Godot executable for UWP you have. In the “Properties” window, set “Content”
to True so it’s included in the project.
Right-click the Package.appxmanifest file and select “Open With… > XML
(Text) Editor”. In the Package/Applications/Application element, replace
the Executable attribute from $targetnametoken$.exe to
godot.uwp.exe (or whatever your Godot executable is called). Also change
the EntryPoint attribute to GodotUWP.App. This will ensure that
the Godot executable is correctly called when the app starts.
Create a folder (not a filter) called game in your Visual Studio project
folder and there you can put either a data.pck file or your Godot project
files. After that, make sure to include it all with the “Add > Existing Item”
command and set their “Content” property to True so they’re copied to the
app.
To ease the workflow, you can open the “Solution Properties” and in the “Configuration” section untick the “Build” option for the app. You still have to build it at least once to generate some needed files, you can do so by right-clicking the project (not the solution) in the “Solution Explorer” and selecting “Build”.
Now you can just run the project and your app should open. You can also use the “Start Without Debugging” option from the “Debug” menu (or press Ctrl + F5) to make it launch faster.
Compiling for the Web¶
Requirements¶
To compile export templates for the Web, the following is required:
- Emscripten 1.38.27+: If the version available per package manager is not recent enough, the best alternative is to install using the Emscripten SDK
- Python 3.5+
- SCons build system
See also
For a general overview of SCons usage for Godot, see Introduction to the buildsystem.
Building export templates¶
Before starting, confirm that the Emscripten configuration file exists and
specifies all settings correctly. This file is available as ~/.emscripten
on UNIX-like systems and %USERPROFILE%\.emscripten on Windows. It’s usually
written by the Emscripten SDK, e.g. when invoking emsdk activate latest,
or by your package manager. It’s also created when starting Emscripten’s
emcc program if the file doesn’t exist.
Attention
On Windows, make sure to escape backslashes of paths within the Emscripten
configuration file as double backslashes \\ or use Unix-style paths with a
single forward slash /.
Open a terminal and navigate to the root directory of the engine source code.
Then instruct SCons to build the JavaScript platform. Specify target as
either release for a release build or release_debug for a debug build:
scons platform=javascript tools=no target=release
scons platform=javascript tools=no target=release_debug
By default, the JavaScript singleton will be built
into the engine. Since eval() calls can be a security concern, the
javascript_eval option can be used to build without the singleton:
scons platform=javascript tools=no target=release javascript_eval=no
scons platform=javascript tools=no target=release_debug javascript_eval=no
The engine will now be compiled to WebAssembly by Emscripten. Once finished,
the resulting file will be placed in the bin subdirectory. Its name is
godot.javascript.opt.zip for release or godot.javascript.opt.debug.zip
for debug.
Finally, rename the zip archive to webassembly_release.zip for the
release template:
mv bin/godot.javascript.opt.zip bin/webassembly_release.zip
And webassembly_debug.zip for the debug template:
mv bin/godot.javascript.opt.debug.zip bin/webassembly_debug.zip
Building per asm.js translation or LLVM backend¶
WebAssembly can be compiled in two ways: The default is to first compile to
asm.js, a highly optimizable subset of JavaScript, using Emscripten’s
fastcomp fork of LLVM. This code is then translated to WebAssembly using a
tool called asm2wasm. Emscripten automatically takes care of both
processes, we simply run SCons.
The other method uses LLVM’s WebAssembly backend. This backend is available starting with LLVM 8 or in development builds. Emscripten manages this process as well, so we just invoke SCons.
In order to choose one of the two methods, the LLVM_ROOT variable in the
Emscripten configuration file is used. If it points to a directory containing
binaries of Emscripten’s fastcomp fork of clang, asm2wasm is used.
This is the default in a normal Emscripten installation. Otherwise,
LLVM binaries built with the WebAssembly backend will be expected and
the LLVM’s WebAssembly backend is used.
Compiling with Mono¶
Requirements¶
- Mono 5.12.0 or greater
- MSBuild
- NuGet
- pkg-config
You may need to import necessary certificates for NuGet to perform HTTPS requests.
The recommended method is to use curl’s CA (Certificate Autorities) certificate bundle.
Run the following commands to download and import it.
On Windows, you can run it from the Mono command line prompt (or the regular prompt if you added Mono’s bin directory to your PATH environment variable):
curl -LO https://curl.haxx.se/ca/cacert.pem
cert-sync --user cacert.pem
Alternatively, you can use the following command, though it’s deprecated and may not work correctly:
mozroots --import --sync
Environment variables¶
By default, SCons will try to find Mono in the Windows Registry on Windows or
via pkg-config on other platforms. You can specify a different installation
directory by passing the mono_prefix command-line option to SCons; e.g.
scons [...] mono_prefix=%ProgramFiles%/Mono.
This is the directory that contains the subdirectories include and lib.
Enable the Mono module¶
By default, the Mono module is disabled when building. To enable it, add the
option module_mono_enabled=yes to the SCons command line.
Generate the glue¶
Glue sources are the wrapper functions that will be called by managed methods.
These source files must be generated before building your final binaries. In
order to generate them, first, you must build a temporary Godot binary with the
options tools=yes and mono_glue=no:
scons p=<platform> tools=yes module_mono_enabled=yes mono_glue=no
After the build finishes, you need to run the compiled executable with the
parameter --generate-mono-glue followed by the path to an output directory.
This path must be modules/mono/glue in the Godot directory:
<godot_binary> --generate-mono-glue modules/mono/glue
This command will tell Godot to generate the file modules/mono/glue/mono_glue.gen.cpp
and the C# solution for the Godot API at modules/mono/glue/Managed/Generated.
Once these files are generated, you can build Godot for all the desired targets
without having to repeat this process.
<godot_binary> refers to the tools binary you compiled above with the Mono
module enabled. Its exact name will differ based on your system and
configuration, but should be of the form
bin/godot.<platform>.tools.<bits>.mono, e.g. bin/godot.x11.tools.64.mono
or bin/godot.windows.tools.64.exe. Be especially aware of the .mono
suffix! If you’ve previously compiled Godot without Mono support, you might have
similarly named binaries without this suffix. These binaries can’t be used to
generate the Mono glue.
Notes¶
- Do not build your final binaries with
mono_glue=no. This disables C# scripting. This option must be used only for the temporary binary that will generate the glue. Godot will print a warning at startup if it was built without the glue sources. - The glue sources must be regenerated every time the ClassDB-registered API changes. That is, for example, when a new method is registered to the scripting API or one of the parameters of such a method changes. Godot will print an error at startup if there is an API mismatch between ClassDB and the glue sources.
Rebuild with Mono glue¶
Once you have generated the Mono glue, you can build the final binary with
mono_glue=yes. This is the default value for mono_glue, so you can also
omit it. To build a Mono-enabled editor:
scons p=<platform> tools=yes module_mono_enabled=yes mono_glue=yes
And Mono-enabled export templates:
scons p=<platform> tools=no module_mono_enabled=yes mono_glue=yes
If everything went well, apart from the normal output, SCons should have created
the following files in the bin directory:
- If you’re not linking the Mono runtime statically, the build script will place
the Mono runtime shared library (
monosgen-2.0) next to the Godot binary in the output directory. Make sure to include this library when distributing Godot. When targeting Android, no extra steps are required as this library is automatically copied to#platform/android/java/libsand Gradle takes care of the rest. - Unlike “classical” Godot builds, when building with the Mono module enabled (and depending on the target platform), a data directory may be created both for the editor and for export templates. This directory is important for proper functioning and must be distributed together with Godot. More details about this directory in Data directory.
Examples¶
Example (Windows)¶
# Build temporary binary
scons p=windows tools=yes module_mono_enabled=yes mono_glue=no
# Generate glue sources
bin\godot.windows.tools.64.mono --generate-mono-glue modules/mono/glue
### Build binaries normally
# Editor
scons p=windows target=release_debug tools=yes module_mono_enabled=yes
# Export templates
scons p=windows target=release_debug tools=no module_mono_enabled=yes
scons p=windows target=release tools=no module_mono_enabled=yes
Example (X11)¶
# Build temporary binary
scons p=x11 tools=yes module_mono_enabled=yes mono_glue=no
# Generate glue sources
bin/godot.x11.tools.64.mono --generate-mono-glue modules/mono/glue
### Build binaries normally
# Editor
scons p=x11 target=release_debug tools=yes module_mono_enabled=yes
# Export templates
scons p=x11 target=release_debug tools=no module_mono_enabled=yes
scons p=x11 target=release tools=no module_mono_enabled=yes
Data directory¶
The data directory is a dependency for Godot binaries built with the Mono module enabled. It contains important files for the correct functioning of Godot. It must be distributed together with the Godot executable.
Note
The information below doesn’t apply to Android, as there is no data directory for that platform.
Export templates¶
The name of the data directory for an export template differs based on the
configuration it was built with. The format is
data.mono.<platform>.<bits>.<target>, e.g. data.mono.x11.32.release_debug or
data.mono.windows.64.release.
This directory must be placed with its original name next to the Godot export
templates. When exporting a project, Godot will also copy this directory with
the game executable but the name will be changed to data_<APPNAME>, where
<APPNAME> is the application name as specified in the project setting
application/config/name.
In the case of macOS, where the export template is compressed as a ZIP archive, the contents of the data directory can be placed in the following locations inside the ZIP archive:
bin/data.mono.<platform>.<bits>.<target>/Mono/lib |
/osx_template.app/Contents/Frameworks/GodotSharp/Mono/lib |
bin/data.mono.<platform>.<bits>.<target>/Mono/etc |
/osx_template.app/Contents/Resources/GodotSharp/Mono/etc |
Editor¶
The name of the data directory for the Godot editor will always be
GodotSharp. The contents of this directory are the following:
ApiMono(optional)Tools
The Api subdirectory contains the Godot API assemblies. On macOS, if the
Godot editor is distributed as a bundle, the contents of the data directory may
be placed in the following locations:
bin/data.mono.<platform>.<bits>.<target>/Api |
<bundle_name>.app/Contents/Frameworks/GodotSharp/Api |
bin/data.mono.<platform>.<bits>.<target>/Mono/lib |
<bundle_name>.app/Contents/Frameworks/GodotSharp/Mono/lib |
bin/data.mono.<platform>.<bits>.<target>/Mono/etc |
<bundle_name>.app/Contents/Resources/GodotSharp/Mono/etc |
bin/data.mono.<platform>.<bits>.<target>/Tools |
<bundle_name>.app/Contents/Frameworks/GodotSharp/Tools |
The Mono subdirectory is optional. It will be needed when distributing the
editor, as issues can arise when the user-installed Mono version isn’t identical
to the one the Godot editor was built with. Pass copy_mono_root=yes to SCons
when building the editor in order to create this folder and its contents.
The Tools subdirectory contains tools required by the editor, like the
GodotTools assemblies and its dependencies.
Targeting Android¶
Compiling the Android export templates with Mono is a bit simpler than it is for the desktop platforms, as there are no additional steps required after building. There is no need to worry about run-time dependencies like a data directory or the shared library (when dynamically linking) as those are automatically added to the Gradle project.
Before building Godot, you need to cross compile the Mono runtime for the target architectures. We recommend using these build scripts. They simplify this process but also include some patches needed for proper functioning with Godot. See the README on the link above for instructions on how to use the scripts.
Once you’ve built Mono, you can proceed to build Godot with the instructions
described in this page and the
Compiling for Android page. Make sure
to let SCons know about the location of the Mono runtime you’ve just built:
scons [...] mono_prefix="$HOME/mono-installs/android-armeabi-v7a-release"
(This path may be different on your system, depending on the options you used
to build Mono).
Command-line options¶
The following is the list of command-line options available when building with the Mono module:
- module_mono_enabled: Build Godot with the Mono module enabled (yes | no)
- mono_glue: Whether to include the glue source files in the build
and define
MONO_GLUE_DISABLEDas a preprocessor macro (yes | no) - mono_prefix: Path to the Mono installation directory for the target platform and architecture
- xbuild_fallback: Whether to fallback to xbuild if MSBuild is not available (yes | no)
- mono_static: Whether to link the Mono runtime statically (yes | no)
- copy_mono_root: Whether to copy the Mono framework assemblies and configuration files required by the Godot editor (yes | no)
Optimizing a build for size¶
Rationale¶
Sometimes, it is desired to optimize a build for size rather than speed. This means not compiling unused functions from the engine, as well as using specific compiler flags to aid on decreasing build size. Common situations include creating builds for mobile and Web platforms.
This tutorial aims to give an overview on different methods to create a smaller binary. Before continuing, it is recommended to read the previous tutorials on compiling Godot for each platform.
Disabling 3D¶
For 2D games, having the whole 3D engine available usually makes no sense. Because of this, there is a build flag to disable it:
scons p=windows target=release tools=no disable_3d=yes
Tools must be disabled in order to use this flag, as the editor is not designed to operate without 3D support. Without it, the binary size can be reduced by about 15%.
Disabling advanced GUI nodes¶
Most small games don’t require complex GUI controls such as Tree, ItemList, TextEditor or GraphEdit. They can be disabled using a build flag:
scons p=windows target=release tools=no disable_advanced_gui=yes
Disabling unwanted modules¶
A lot of Godot’s functions are offered as modules. You can see a list of modules with the following command:
scons --help
The list of modules that can be disabled will appear, together with all build options. If you are working on a simple 2D game, you could disable a lot of them:
scons p=windows target=release tools=no module_arkit_enabled=no module_assimp_enabled=no module_bmp_enabled=no module_bullet_enabled=no module_camera_enabled=no module_csg_enabled=no module_dds_enabled=no module_enet_enabled=no module_etc_enabled=no module_gdnative_enabled=no module_gridmap_enabled=no module_hdr_enabled=no module_jsonrpc_enabled=no module_mbedtls_enabled=no module_mobile_vr_enabled=no module_opensimplex_enabled=no module_opus_enabled=no module_pvr_enabled=no module_recast_enabled=no module_regex_enabled=no module_squish_enabled=no module_svg_enabled=no module_tga_enabled=no module_theora_enabled=no module_tinyexr_enabled=no module_upnp_enabled=no module_vhacd_enabled=no module_vorbis_enabled=no module_webm_enabled=no module_webp_enabled=no module_webrtc_enabled=no module_websocket_enabled=no module_xatlas_unwrap_enabled=no
If this proves not to work for your use case, you should review the list of modules and see which ones you actually still need for your game (e.g. you might want to keep networking-related modules, regex support, or theora/webm to play videos).
Optimizing for size instead of speed¶
Godot 3.1 onwards allows to compile using size optimizations.
To enable this, just set the optimize flag to size:
scons p=windows target=release tools=no optimize=size
Some platforms such as WebAssembly already use this mode by default.
Compiling with link-time optimization¶
Enabling link-time optimization produces more efficient binaries, both in terms of performance and file size. It works by eliminating duplicate template functions and unused code. It can currently be used with the GCC and MSVC compilers:
scons p=windows target=release tools=no use_lto=yes
Linking becomes much slower with this option, so it should be used only for release builds.
Stripping binaries¶
If you build from source, remember to strip debug symbols from binaries:
strip godot.64
Using UPX to compress binaries¶
If you are targeting desktop platforms, the UPX compressor can be used. This can reduce binary size considerably.
However, keep in mind that some antivirus programs may detect UPX-packed binaries as a virus. Therefore, if you are releasing a commercial game, make sure to sign your binaries or use a platform that will distribute them.
Compiling with script encryption key¶
The export dialog gives you the option to encrypt your scripts with an 256bit AES key, when releasing your game. This will make sure your scripts are not stored in plain text and can not easily be ripped by some script kiddie. Of course the key needs to be stored in the binary, but if it’s compiled, optimized and without symbols, it would take some effort to find it.
For this to work, you need to build the export templates from source, with that same key.
Step by step¶
Generate a 256bit AES key in HEX. You can use the aes-256-cbc variant from this service.
Alternatively, you can generate it yourself by using OpenSSL:
openssl enc -aes-256-cbc -k secret -P -md sha1 > godot.gdkey
This should output the following to
godot.gdkeyfile:salt=5786FE8B91CA048A key=D2F90FCC4FCA64B8990F916EF5A73230C1841601D1EA06B2380EC0F530E4EF85 iv =047C353AEC9E6C211515E3341BF9C61B
You can generate the key without redirecting the output to a file, but that way you can minimize the risk of exposing the key.
Set this key as environment variable in the console that you will use to compile Godot, like this:
export SCRIPT_AES256_ENCRYPTION_KEY="your_generated_key"
set SCRIPT_AES256_ENCRYPTION_KEY=your_generated_key
Compile Godot export templates and set them as custom export templates in the export preset options.
Set the encryption key in the
Scripttab of the export preset: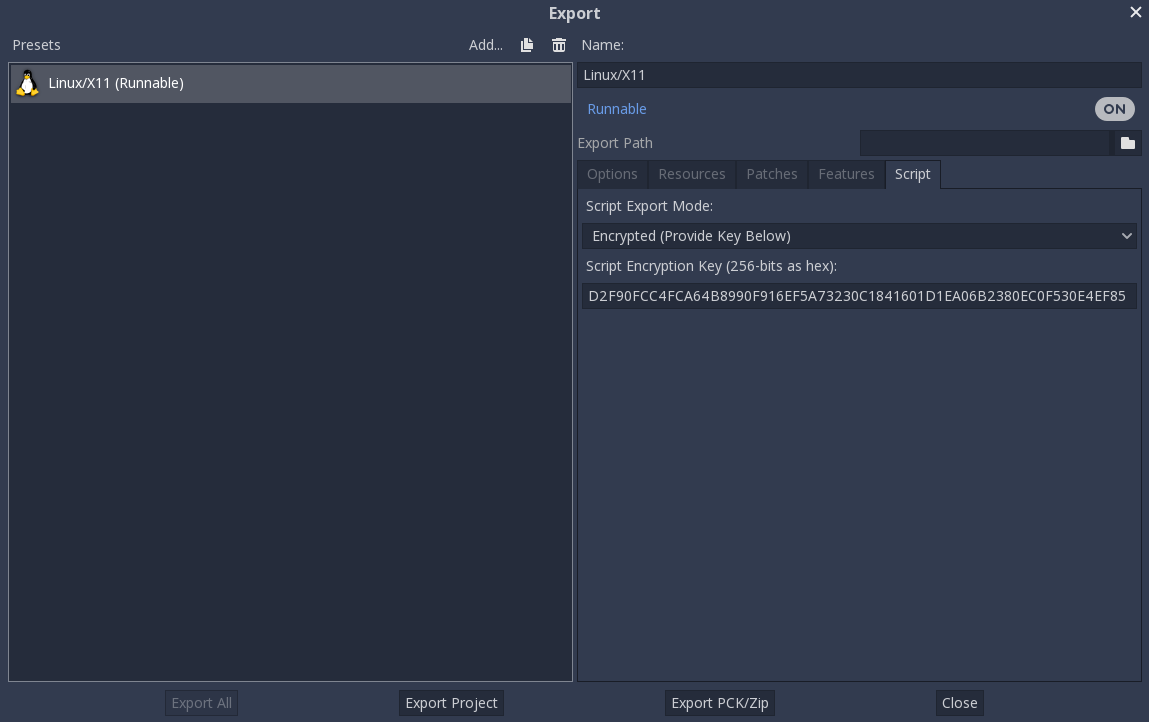
Export the project. The game should run with encrypted scripts now.
Possible Errors¶
If you get an error like below, it means the key wasn’t properly included in your Godot build. Godot is encrypting the scripts during export, but can’t read them at runtime.
ERROR: open_and_parse: Condition ' String::md5(md5.digest) != String::md5(md5d) ' is true. returned: ERR_FILE_CORRUPT
At: core/io/file_access_encrypted.cpp:103
ERROR: load_byte_code: Condition ' err ' is true. returned: err
At: modules/gdscript/gdscript.cpp:755
ERROR: load: Condition ' err != OK ' is true. returned: RES()
At: modules/gdscript/gdscript.cpp:2135
ERROR: Failed loading resource: res://Node2D.gde
At: core/io/resource_loader.cpp:279
ERROR: poll: res://Node2D.tscn:3 - Parse Error: [ext_resource] referenced nonexistent resource at: res://Node2D.gd
At: scene/resources/scene_format_text.cpp:439
ERROR: load: Condition ' err != OK ' is true. returned: RES()
At: core/io/resource_loader.cpp:202
ERROR: Failed loading resource: res://Node2D.tscn
At: core/io/resource_loader.cpp:279
ERROR: Failed loading scene: res://Node2D.tscn
At: main/main.cpp:1727
WARNING: cleanup: ObjectDB Instances still exist!
At: core/object.cpp:2081
ERROR: clear: Resources Still in use at Exit!
At: core/resource.cpp:425
Engine development¶
Introduction to Godot development¶
This page is meant to introduce the global organization of Godot Engine’s source code, and give useful tips for extending/fixing the engine on the C++ side.
Architecture diagram¶
The following diagram describes the architecture used by Godot, from the core components down to the abstracted drivers, via the scene structure and the servers.
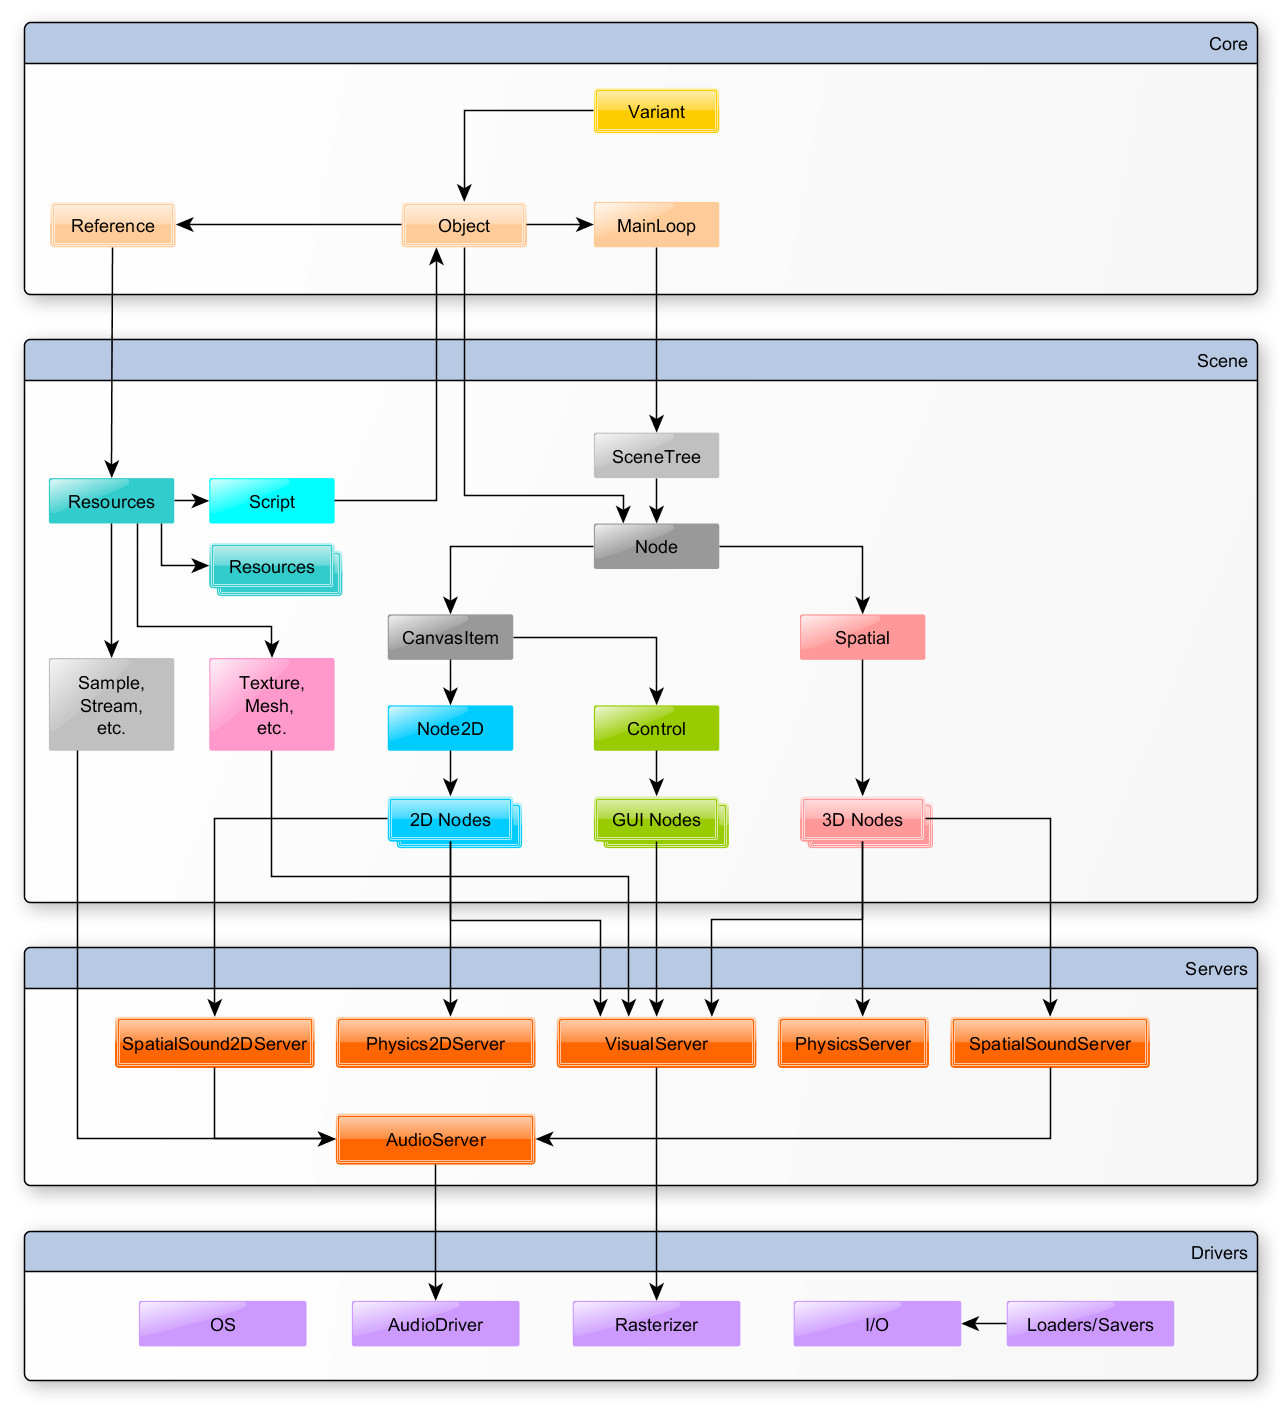
Debugging the editor with gdb¶
If you are writing or correcting bugs affecting Godot Engine’s editor,
remember that the binary will by default run the project manager first,
and then only run the editor in another process once you’ve selected a
project. To launch a project directly, you need to run the editor by
passing the -e argument to Godot Engine’s binary from within your
project’s folder. Typically:
$ cd ~/myproject
$ gdb godot
> run -e
Or:
$ gdb godot
> run -e --path ~/myproject
Configuring an IDE¶
We assume that you have already cloned and compiled Godot.
You can easily develop Godot with any text editor and by invoking scons
on the command line, but if you want to work with an IDE (Integrated
Development Environment), here are setup instructions for some popular ones:
- Qt Creator (all desktop platforms)
- Kdevelop (all desktop platforms)
- Xcode (macOS)
- Visual Studio (Windows)
- Visual Studio Code (all desktop platforms)
- Android Studio (all desktop platforms)
- CLion (all desktop platforms)
It is possible to use other IDEs, but their setup is not documented yet.
Qt Creator¶
Importing the project¶
- Choose New Project -> Import Project -> Import Existing Project.
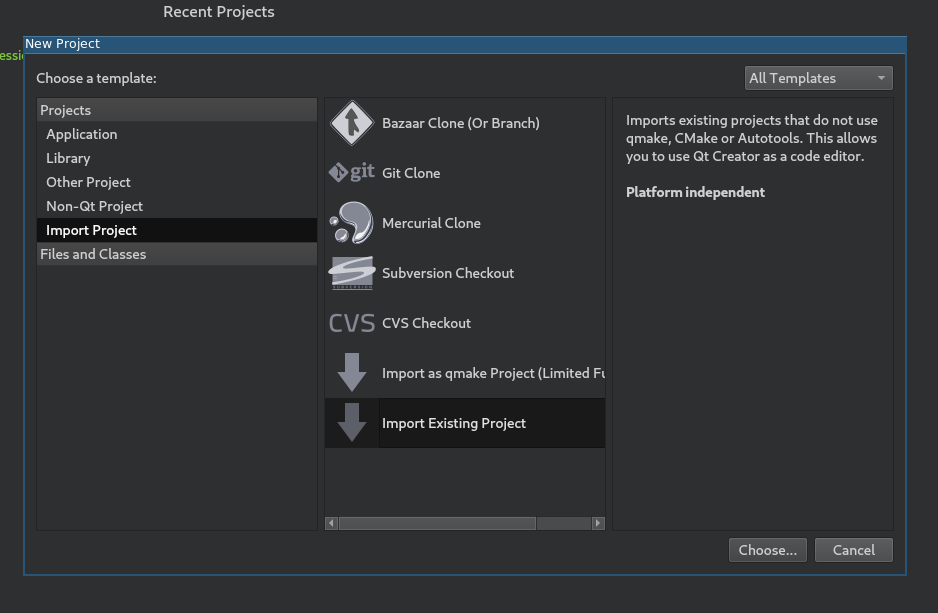
- Set the path to your Godot root directory and enter the project name.
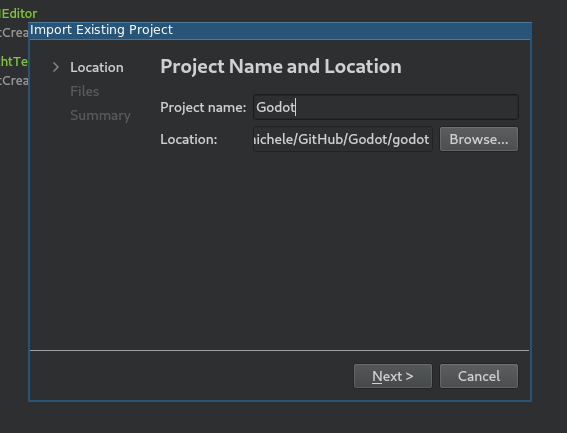
- Here you can choose which folders and files will be visible to the project. C/C++ files are added automatically. Potentially useful additions: *.py for buildsystem files, *.java for Android development, *.mm for macOS. Click “Next”.
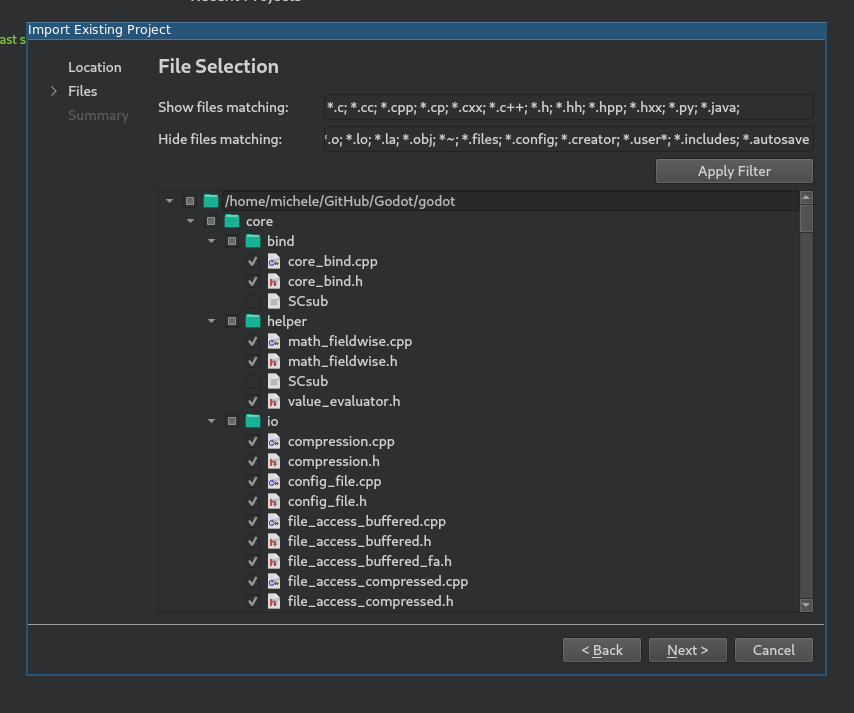
- Click Finish.
- Add a line containing
.to project_name.includes to get working code completion.
Build and run¶
Build configuration:
- Click on Projects and open the Build tab.
- Delete the pre-defined
makebuild step.
- Click Add Build Step -> Custom Process Step.
- Type
sconsin the Command field. If it fails with ‘Could not start process “scons”’, it can mean thatsconsis not in yourPATHenvironment variable, so you may have to use the full path to the SCons binary. - Fill the Arguments field with your compilation options. (e.g.:
p=x11 target=debug -j 4)
Run configuration:
- Open the Run tab.
- Point the Executable to your compiled Godot binary (e.g:
%{buildDir}/bin/godot.x11.opt.tools.64) - If you want to run a specific game or project, point Working directory to the game directory.
- If you want to run the editor, add
-eto the Command line arguments field.
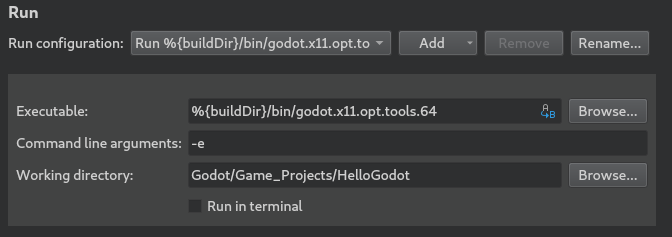
Updating sources after pulling latest commits¶
As a developer you usually want to frequently pull the latest commits from the upstream git repository or a specific fork etc. However this brings a little problem with it: as the development continues, source files (and folders) are added or removed. These changes needs to be reflected in your project files for Qt Creator too, so you continue to have a nice experience coding in it. A simple way to check is to right click at your root folder in the “Projects View” and click on “Edit files…”
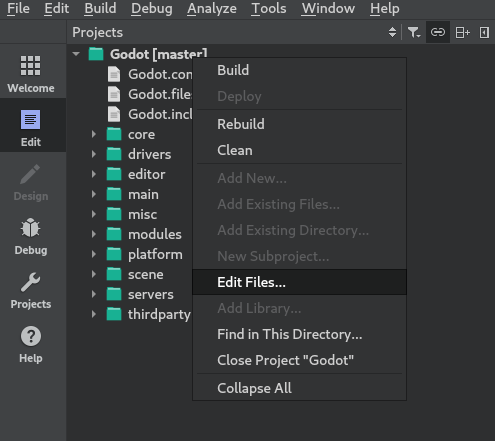
Now a new dialog should appear that is similar in functionality to the one in the third step of the “Importing the project” section. Here you can check whether you want to add/remove specific files and/or folders. You can chose by clicking with your mouse or just simply by clicking the “Apply Filter” button. A simple click on “Ok” and you’re ready to continue your work.
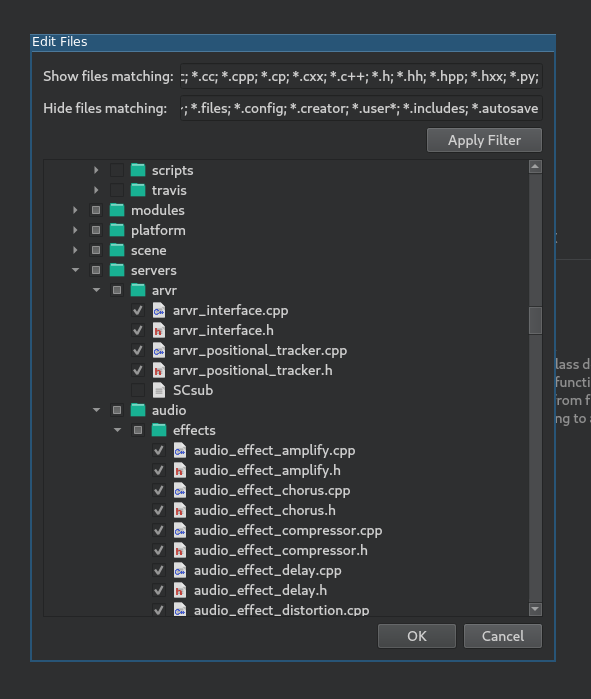
Code style configuration¶
Developers must follow the project’s code style and IDE should help them to do it. By default, Qt Creator does use spaces for indentation which is incorrect for Godot project. You can change this behavior by changing the “Code Style” in Options -> C++.
Click on Edit to change the current settings, then click on Copy Built-in Code Style button to set a new code style. Set a name for it (e.g. Godot) and change the Tab policy to be Tabs Only.
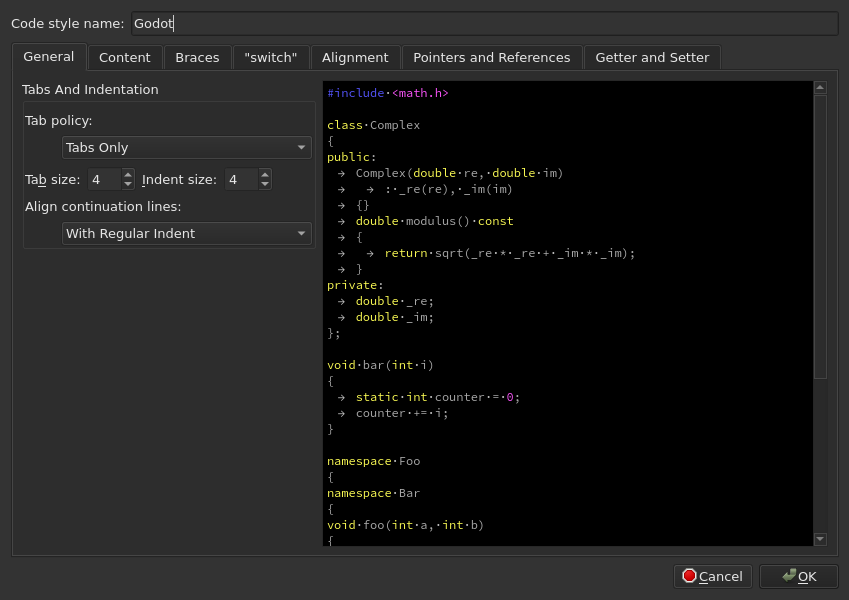
KDevelop¶
KDevelop is a free, open source IDE for all desktop platforms.
You can find a video tutorial here. Or you may follow this text version tutorial.
Start by opening KDevelop and choosing “open project”.
Choose the directory where you cloned Godot.
On the next screen, choose “Custom Build System” for the Project manager.
Now that the project has been imported, open the project configuration.
Add the following includes/imports:
. // a dot to indicate the root of the Godot project
core/
core/os/
core/math/
drivers/
platform/x11/ // make that platform/osx/ if you're using macOS
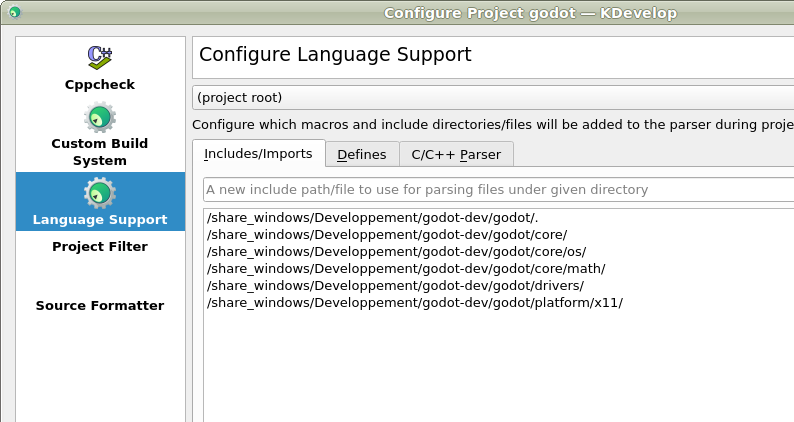
Apply the changes.
Switch to the “Custom Build System” tab. Add a build configuration
and keep the build directory blank. Enable build tools and add scons
as the executable then add platform=x11 target=debug (platform=osx
if you’re on macOS) as the arguments.
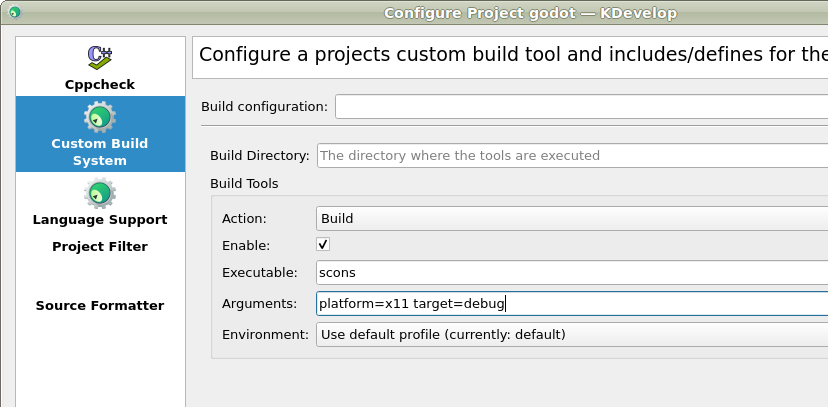
Next we need to tell KDevelop where to find the binary. From the “Run” menu, choose “Configure Launches”.
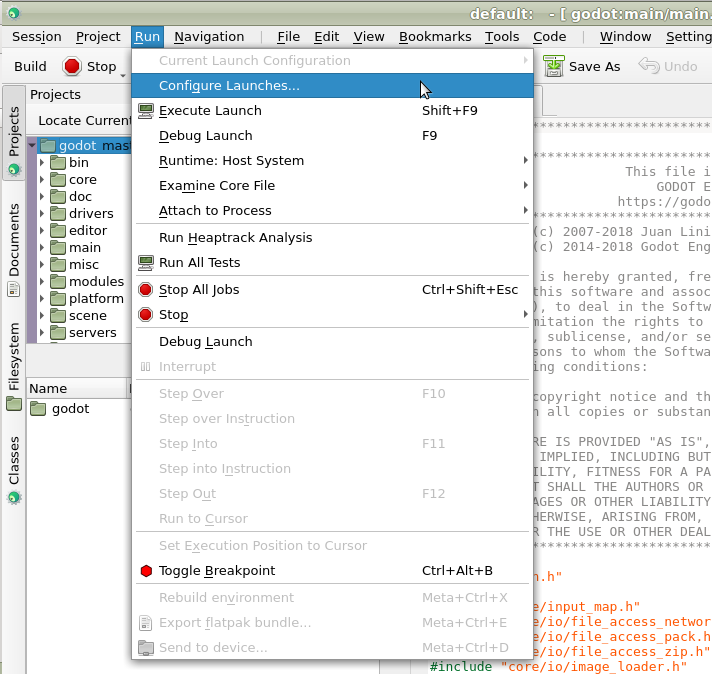
Click “Add” if no launcher exists. Then add the path to your
executable in the executable section. Your executable should be located
in the bin/ sub-directory and should be named something like
godot.x11.tools.64 (the name could be different depending on your
platform and depending on your build options).
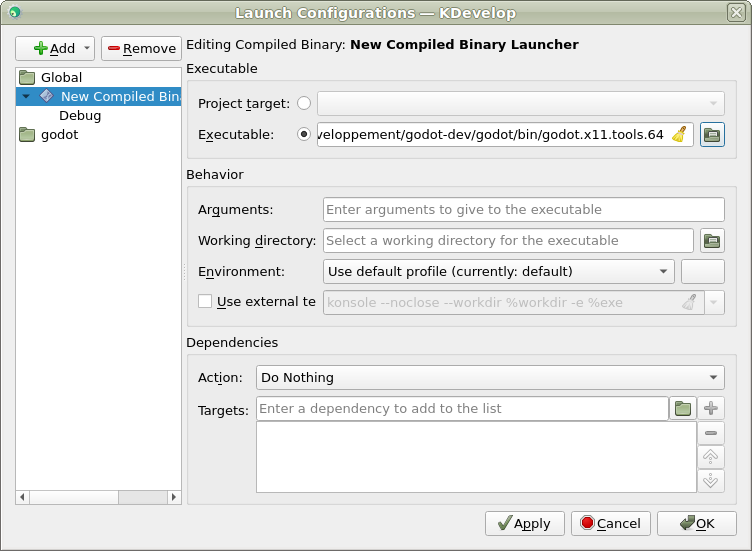
That’s it! Now you should be good to go :)
Xcode¶
Project setup¶
- Create an Xcode external build project anywhere
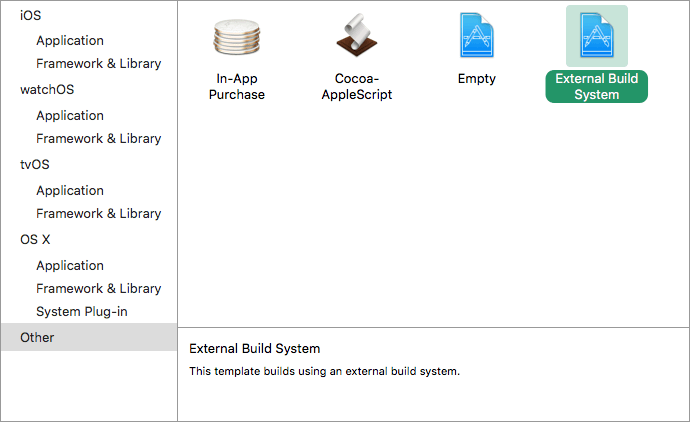
- Set the Build tool to the path to scons
Modify Build Target’s Xcode Info Tab:
- Set Arguments to something like: platform=osx tools=yes bits=64 target=debug
- Set Directory to the path to Godot’s source folder. Keep it blank if project is already there.
- You may uncheck Pass build settings in environment
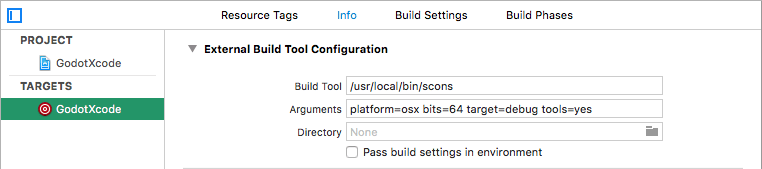
Add a Command Line Target:
- Go to Xcode File > New > Target… and add a new Xcode command line target
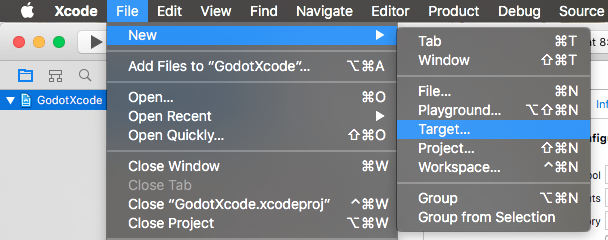
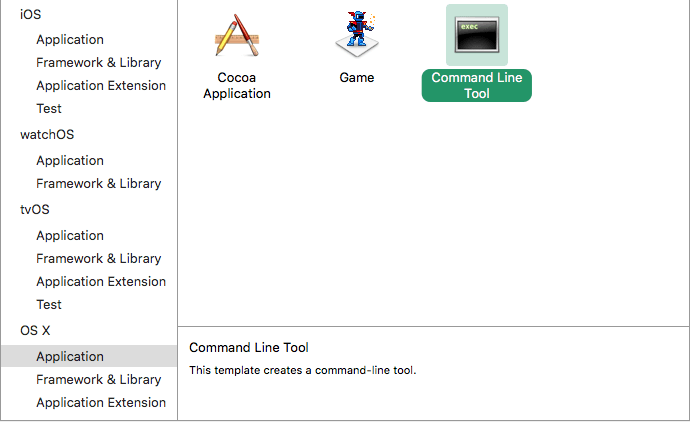
- Name it something so you know not to compile with this target
- e.g.
GodotXcodeIndex - Goto the newly created target’s Build Settings tab and search for Header Search Paths
- Set Header Search Paths to an absolute path to Godot’s source folder
- Make it recursive by adding two *’s to the end of the path
- e.g.
/Users/me/repos/godot-source/\**
Add Godot Source to the Project:
- Drag and drop Godot source into project file browser.
- Uncheck Create External Build System
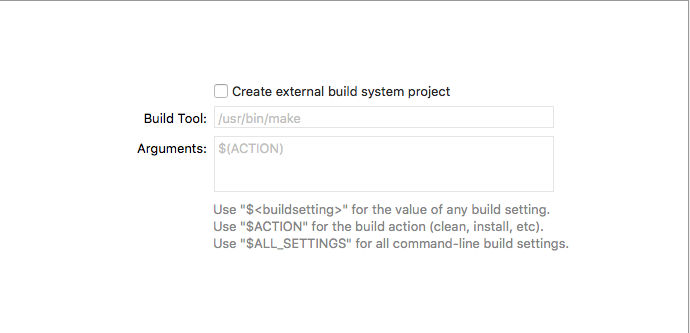
- Click Next
- Select create groups
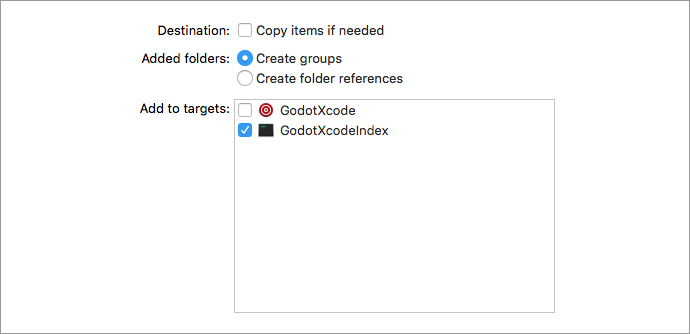
- Check off only your command line target in the Add to targets section
- Click finish. Xcode will now index the files.
- Grab a cup of coffee… Maybe make something to eat, too
- You should have jump to definition, auto completion, and full syntax highlighting when it is done.
Scheme setup¶
Edit Build Scheme of External Build Target:
- Open scheme editor of external build target
- Expand the Build menu
- Goto Post Actions
- Add a new script run action, select your project in
Provide build settings fromas this allows you to use${PROJECT_DIR}variable.
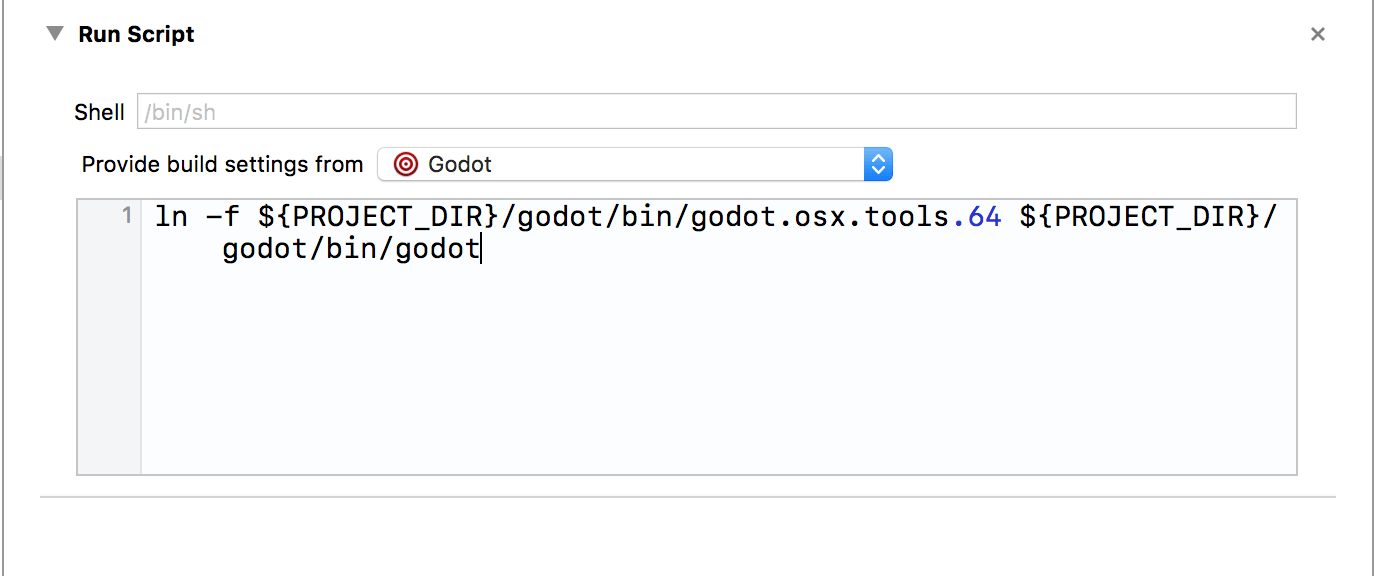
- Write a script that gives the binary a name that Xcode will recognize
- e.g.
ln -f ${PROJECT_DIR}/godot/bin/godot.osx.tools.64 ${PROJECT_DIR}/godot/bin/godot - Build the external build target
Edit Run Scheme of External Build Target:
- Open the scheme editor again
- Click Run

- Set the Executable to the file you linked in your post build action script
- Check Debug executable if it isn’t already
- You can go to Arguments tab and add an -e and a -path to a project to debug the editor not the project selection screen
Test it:
- Set a breakpoint in platform/osx/godot_main_osx.mm
- It should break at the point!
Visual Studio Code¶
- Ensure that C/C++ extension is installed. You can find instructions in docs.
- Open cloned godot folder in VS Code with
File > Open Folder...
In order to build the project, you need two configuration files: launch.json and tasks.json. To create them:
- Open Debug view by pressing Ctrl + Shift + D and select cogwheel with an orange dot:

- Select C++ (GDB/LLDB) (it might be named differently on macOS or Windows)
- Update launch.json to match:
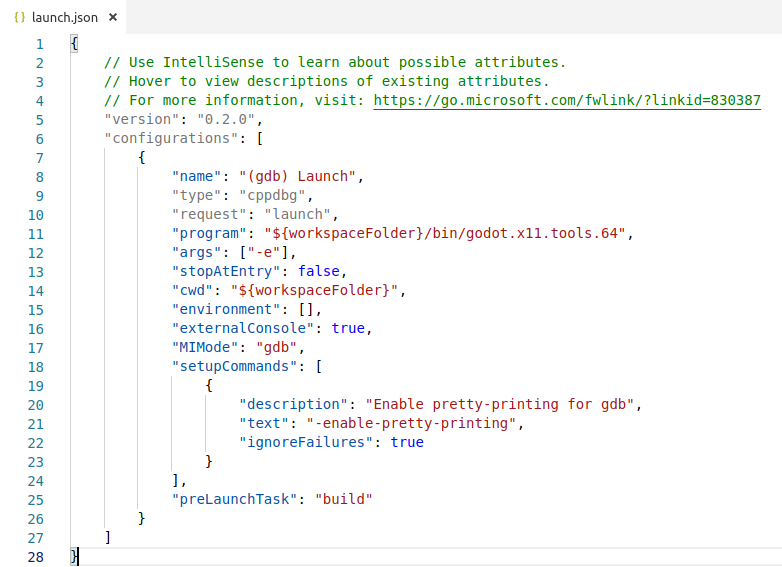
(Note that godot.x11.tools.64 in “program” value might be named differently on macOS or Windows)
- Create tasks.json by starting the Debug process with F5. VS Code will show a dialog with a Configure Task button. Tap it and select Create tasks.json file from template, then select Others
- Update tasks.json to match:
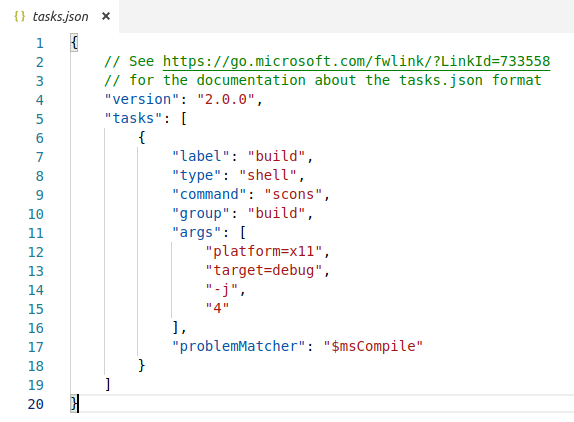
(Note that platform=x11 will be different for macOX and Windows)
- You can now start the Debug process again to test that everything works.
- If the build phase fails, check the console for hints. On Linux it’s most likely that some dependencies are missing. Check Compiling for X11 (Linux, *BSD)
Android Studio¶
Android Studio is a JetBrains IDE for Android development. It has a feature-rich editor which supports Java and C/C++, so it can be used for development of the Godot core engine, and Android platform codebases.
Project setup¶
- From the Android Studio Welcome to Android Studio window, select Open an existing Android Studio project

- Navigate to
<godot root directory>/platform/android/javaand select thesettings.gradlegradle file. - Android Studio will import and index the project.
- To build the project, follow the compiling instructions.
CLion¶
CLion is a commercial IDE for C++. It requires a CMakeLists.txt file as a project file, which is problematic for Godot which uses the SCons buildsystem and not CMake. However, there is a CMakeLists.txt configuration for Android Studio which can also be used by CLion.
- Choose File -> Open.
- Navigation to your Godot Git clone, and select the folder
platform/android/java/lib(theCMakeLists.txtfile is located there). Select the folder, not theCMakeLists.txt file. Then click Ok.
- If this popup window appears, select This window to open the project.

- Choose Tools -> CMake -> Change Project Root and select the root Godot folder.
- You should be now be able to see all the project files. Autocomplete should work, when the project finish indexing.
Core types¶
Godot has a rich set of classes and templates that compose its core, and everything is built upon them.
This reference will try to list them in order for their better understanding.
Definitions¶
Godot uses the standard C98 datatypes, such as uint8_t,
uint32_t, int64_t, etc. which are nowadays supported by every
compiler. Reinventing the wheel for those is not fun, as it makes code
more difficult to read.
In general, care is not taken to use the most efficient datatype for a
given task unless using large structures or arrays. int is used
through most of the code unless necessary. This is done because nowadays
every device has at least a 32 bits bus and can do such operations in
one cycle. It makes code more readable too.
For files or memory sizes, size_t is used, which is warranted to be
64 bits.
For Unicode characters, CharType instead of wchar_t is used, because many architectures have 4 bytes long wchar_t, where 2 bytes might be desired. However, by default, this has not been forced and CharType maps directly to wchar_t.
References:¶
Memory model¶
PC is a wonderful architecture. Computers often have gigabytes of RAM, terabytes of storage and gigahertz of CPU, and when an application needs more resources the OS will swap out the inactive ones. Other architectures (like mobile or consoles) are in general more limited.
The most common memory model is the heap, where an application will request a region of memory, and the underlying OS will try to fit it somewhere and return it. This often works best and is flexible, but over time and with abuse, this can lead to segmentation.
Segmentation slowly creates holes that are too small for most common allocations, so that memory is wasted. There is a lot of literature about heap and segmentation, so this topic will not be developed further here. Modern operating systems use paged memory, which helps mitigate the problem of segmentation but doesn’t solve it.
However, in many studies and tests, it is shown that given enough memory, if the maximum allocation size is below a given threshold in proportion to the maximum heap size and proportion of memory intended to be unused, segmentation will not be a problem over time as it will remain constant. In other words, leave 10-20% of your memory free and perform all small allocations and you are fine.
Godot ensures that all objects that can be allocated dynamically are small (less than a few kb at most). But what happens if an allocation is too large (like an image or mesh geometry or large array)? In this case Godot has the option to use a dynamic memory pool. This memory needs to be locked to be accessed, and if an allocation runs out of memory, the pool will be rearranged and compacted on demand. Depending on the need of the game, the programmer can configure the dynamic memory pool size.
Allocating memory¶
Godot has many tools for tracking memory usage in a game, especially during debug. Because of this, the regular C and C++ library calls should not be used. Instead, a few other ones are provided.
For C-style allocation, Godot provides a few macros:
memalloc()
memrealloc()
memfree()
These are equivalent to the usual malloc, realloc, free of the standard C library.
For C++-style allocation, special macros are provided:
memnew( Class / Class(args) )
memdelete( instance )
memnew_arr( Class , amount )
memdelete_arr( pointer to array )
which are equivalent to new, delete, new[] and delete[].
memnew/memdelete also use a little C++ magic and notify Objects right after they are created, and right before they are deleted.
For dynamic memory, the PoolVector<> template is provided. PoolVector is a standard vector class, and is very similar to vector in the C++ standard library. To create a PoolVector buffer, use this:
PoolVector<int> data;
PoolVector can be accessed using the [] operator and a few helpers exist for this:
PoolVector<int>::Read r = data.read()
int someint = r[4]
PoolVector<int>::Write w = data.write()
w[4] = 22;
These operations allow fast read/write from PoolVectors and keep it locked until they go out of scope. However, PoolVectors should be used for small, dynamic memory operations, as read() and write() are too slow for a large amount of accesses.
References:¶
Containers¶
Godot provides also a set of common containers:
- Vector
- List
- Set
- Map
They are simple and aim to be as minimal as possible, as templates in C++ are often inlined and make the binary size much fatter, both in debug symbols and code. List, Set and Map can be iterated using pointers, like this:
for(List<int>::Element *E=somelist.front();E;E=E->next()) {
print_line(E->get()); // print the element
}
The Vector<> class also has a few nice features:
- It does copy on write, so making copies of it is cheap as long as they are not modified.
- It supports multi-threading, by using atomic operations on the reference counter.
References:¶
String¶
Godot also provides a String class. This class has a huge amount of features, full Unicode support in all the functions (like case operations) and utf8 parsing/extracting, as well as helpers for conversion and visualization.
References:¶
StringName¶
StringNames are like a String, but they are unique. Creating a StringName from a string results in a unique internal pointer for all equal strings. StringNames are useful for using strings as identifier, as comparing them is basically comparing a pointer.
Creation of a StringName (especially a new one) is slow, but comparison is fast.
References:¶
Math types¶
There are several linear math types available in the core/math directory.
NodePath¶
This is a special datatype used for storing paths in a scene tree and referencing them fast.
References:¶
Variant class¶
About¶
Variant is the most important datatype of Godot, it’s the most important class in the engine. A Variant takes up only 20 bytes and can store almost any engine datatype inside of it. Variants are rarely used to hold information for long periods of time, instead they are used mainly for communication, editing, serialization and generally moving data around.
A Variant can:
- Store almost any datatype
- Perform operations between many variants (GDScript uses Variant as its atomic/native datatype).
- Be hashed, so it can be compared quickly to other variants
- Be used to convert safely between datatypes
- Be used to abstract calling methods and their arguments (Godot exports all its functions through variants)
- Be used to defer calls or move data between threads.
- Be serialized as binary and stored to disk, or transferred via network.
- Be serialized to text and use it for printing values and editable settings.
- Work as an exported property, so the editor can edit it universally.
- Be used for dictionaries, arrays, parsers, etc.
Basically, thanks to the Variant class, writing Godot itself was a much, much easier task, as it allows for highly dynamic constructs not common of C++ with little effort. Become a friend of Variant today.
References:¶
Containers: Dictionary and Array¶
Both are implemented using variants. A Dictionary can match any datatype used as key to any other datatype. An Array just holds an array of Variants. Of course, a Variant can also hold a Dictionary and an Array inside, making it even more flexible.
Modifications to a container will modify all references to it. A Mutex should be created to lock it if multi threaded access is desired.
Copy-on-write (COW) mode support for containers was dropped with Godot 3.0.
References:¶
Object class¶
General definition¶
Object is the base class for almost everything. Most classes in Godot inherit directly or indirectly from it. Objects provide reflection and editable properties, and declaring them is a matter of using a single macro like this.
class CustomObject : public Object {
GDCLASS(CustomObject, Object); // this is required to inherit
};
This makes Objects gain a lot of functionality, like for example
obj = memnew(CustomObject);
print_line("Object class: ", obj->get_class()); // print object class
obj2 = Object::cast_to<OtherClass>(obj); // converting between classes, this also works without RTTI enabled.
References:¶
Registering an Object¶
ClassDB is a static class that holds the entire list of registered classes that inherit from Object, as well as dynamic bindings to all their methods properties and integer constants.
Classes are registered by calling:
ClassDB::register_class<MyCustomClass>()
Registering it will allow the class to be instanced by scripts, code, or creating them again when deserializing.
Registering as virtual is the same but it can’t be instanced.
ClassDB::register_virtual_class<MyCustomClass>()
Object-derived classes can override the static function
static void _bind_methods(). When one class is registered, this
static function is called to register all the object methods,
properties, constants, etc. It’s only called once. If an Object derived
class is instanced but has not been registered, it will be registered as
virtual automatically.
Inside _bind_methods, there are a couple of things that can be done.
Registering functions is one:
ClassDB::register_method(D_METHOD("methodname", "arg1name", "arg2name"), &MyCustomMethod);
Default values for arguments can be passed in reverse order:
ClassDB::register_method(D_METHOD("methodname", "arg1name", "arg2name"), &MyCustomType::method, DEFVAL(-1)); // default value for arg2name
D_METHOD is a macro that converts “methodname” to a StringName for more
efficiency. Argument names are used for introspection, but when
compiling on release, the macro ignores them, so the strings are unused
and optimized away.
Check _bind_methods of Control or Object for more examples.
If just adding modules and functionality that is not expected to be
documented as thoroughly, the D_METHOD() macro can safely be ignored and a
string passing the name can be passed for brevity.
References:¶
Constants¶
Classes often have enums such as:
enum SomeMode {
MODE_FIRST,
MODE_SECOND
};
For these to work when binding to methods, the enum must be declared convertible to int, for this a macro is provided:
VARIANT_ENUM_CAST(MyClass::SomeMode); // now functions that take SomeMode can be bound.
The constants can also be bound inside _bind_methods, by using:
BIND_CONSTANT(MODE_FIRST);
BIND_CONSTANT(MODE_SECOND);
Properties (set/get)¶
Objects export properties, properties are useful for the following:
- Serializing and deserializing the object.
- Creating a list of editable values for the Object derived class.
Properties are usually defined by the PropertyInfo() class. Usually constructed as:
PropertyInfo(type, name, hint, hint_string, usage_flags)
For example:
PropertyInfo(Variant::INT, "amount", PROPERTY_HINT_RANGE, "0,49,1", PROPERTY_USAGE_EDITOR)
This is an integer property, named “amount”, hint is a range, range goes from 0 to 49 in steps of 1 (integers). It is only usable for the editor (edit value visually) but won’t be serialized.
Another example:
PropertyInfo(Variant::STRING, "modes", PROPERTY_HINT_ENUM, "Enabled,Disabled,Turbo")
This is a string property, can take any string but the editor will only allow the defined hint ones. Since no usage flags were specified, the default ones are PROPERTY_USAGE_STORAGE and PROPERTY_USAGE_EDITOR.
There are plenty of hints and usage flags available in object.h, give them a check.
Properties can also work like C# properties and be accessed from script using indexing, but this usage is generally discouraged, as using functions is preferred for legibility. Many properties are also bound with categories, such as “animation/frame” which also make indexing impossible unless using operator [].
From _bind_methods(), properties can be created and bound as long as
set/get functions exist. Example:
ADD_PROPERTY(PropertyInfo(Variant::INT, "amount"), "set_amount", "get_amount")
This creates the property using the setter and the getter.
Binding properties using _set/_get/_get_property_list¶
An additional method of creating properties exists when more flexibility is desired (i.e. adding or removing properties on context).
The following functions can be overridden in an Object derived class, they are NOT virtual, DO NOT make them virtual, they are called for every override and the previous ones are not invalidated (multilevel call).
void _get_property_info(List<PropertyInfo> *r_props); // return list of properties
bool _get(const StringName &p_property, Variant &r_value) const; // return true if property was found
bool _set(const StringName &p_property, const Variant &p_value); // return true if property was found
This is also a little less efficient since p_property must be
compared against the desired names in serial order.
Dynamic casting¶
Godot provides dynamic casting between Object-derived classes, for example:
void somefunc(Object *some_obj) {
Button *button = Object::cast_to<Button>(some_obj);
}
If cast fails, NULL is returned. This system uses RTTI, but it also works fine (although a bit slower) when RTTI is disabled. This is useful on platforms where a small binary size is ideal, such as HTML5 or consoles (with low memory footprint).
Signals¶
Objects can have a set of signals defined (similar to Delegates in other languages). Connecting to them is rather easy:
obj->connect(<signal>, target_instance, target_method)
// for example:
obj->connect("enter_tree", this, "_node_entered_tree")
The method _node_entered_tree must be registered to the class using
ClassDB::register_method (explained before).
Adding signals to a class is done in _bind_methods, using the
ADD_SIGNAL macro, for example:
ADD_SIGNAL(MethodInfo("been_killed"))
References¶
Reference inherits from Object and holds a reference count. It is the base for reference counted object types. Declaring them must be done using Ref<> template. For example:
class MyReference: public Reference {
GDCLASS(MyReference, Reference);
};
Ref<MyReference> myref(memnew(MyReference));
myref is reference counted. It will be freed when no more Ref<>
templates point to it.
References:¶
Resources:¶
Resource inherits from Reference, so all resources
are reference counted. Resources can optionally contain a path, which
reference a file on disk. This can be set with resource.set_path(path).
This is normally done by the resource loader though. No two different
resources can have the same path, attempt to do so will result in an error.
Resources without a path are fine too.
References:¶
Resource loading¶
Resources can be loaded with the ResourceLoader API, like this:
Ref<Resource> res = ResourceLoader::load("res://someresource.res")
If a reference to that resource has been loaded previously and is in memory, the resource loader will return that reference. This means that there can be only one resource loaded from a file referenced on disk at the same time.
- resourceinteractiveloader (TODO)
References:¶
Resource saving¶
Saving a resource can be done with the resource saver API:
ResourceSaver::save("res://someresource.res", instance)
Instance will be saved. Sub resources that have a path to a file will be saved as a reference to that resource. Sub resources without a path will be bundled with the saved resource and assigned sub-IDs, like “res://someresource.res::1”. This also helps to cache them when loaded.
References:¶
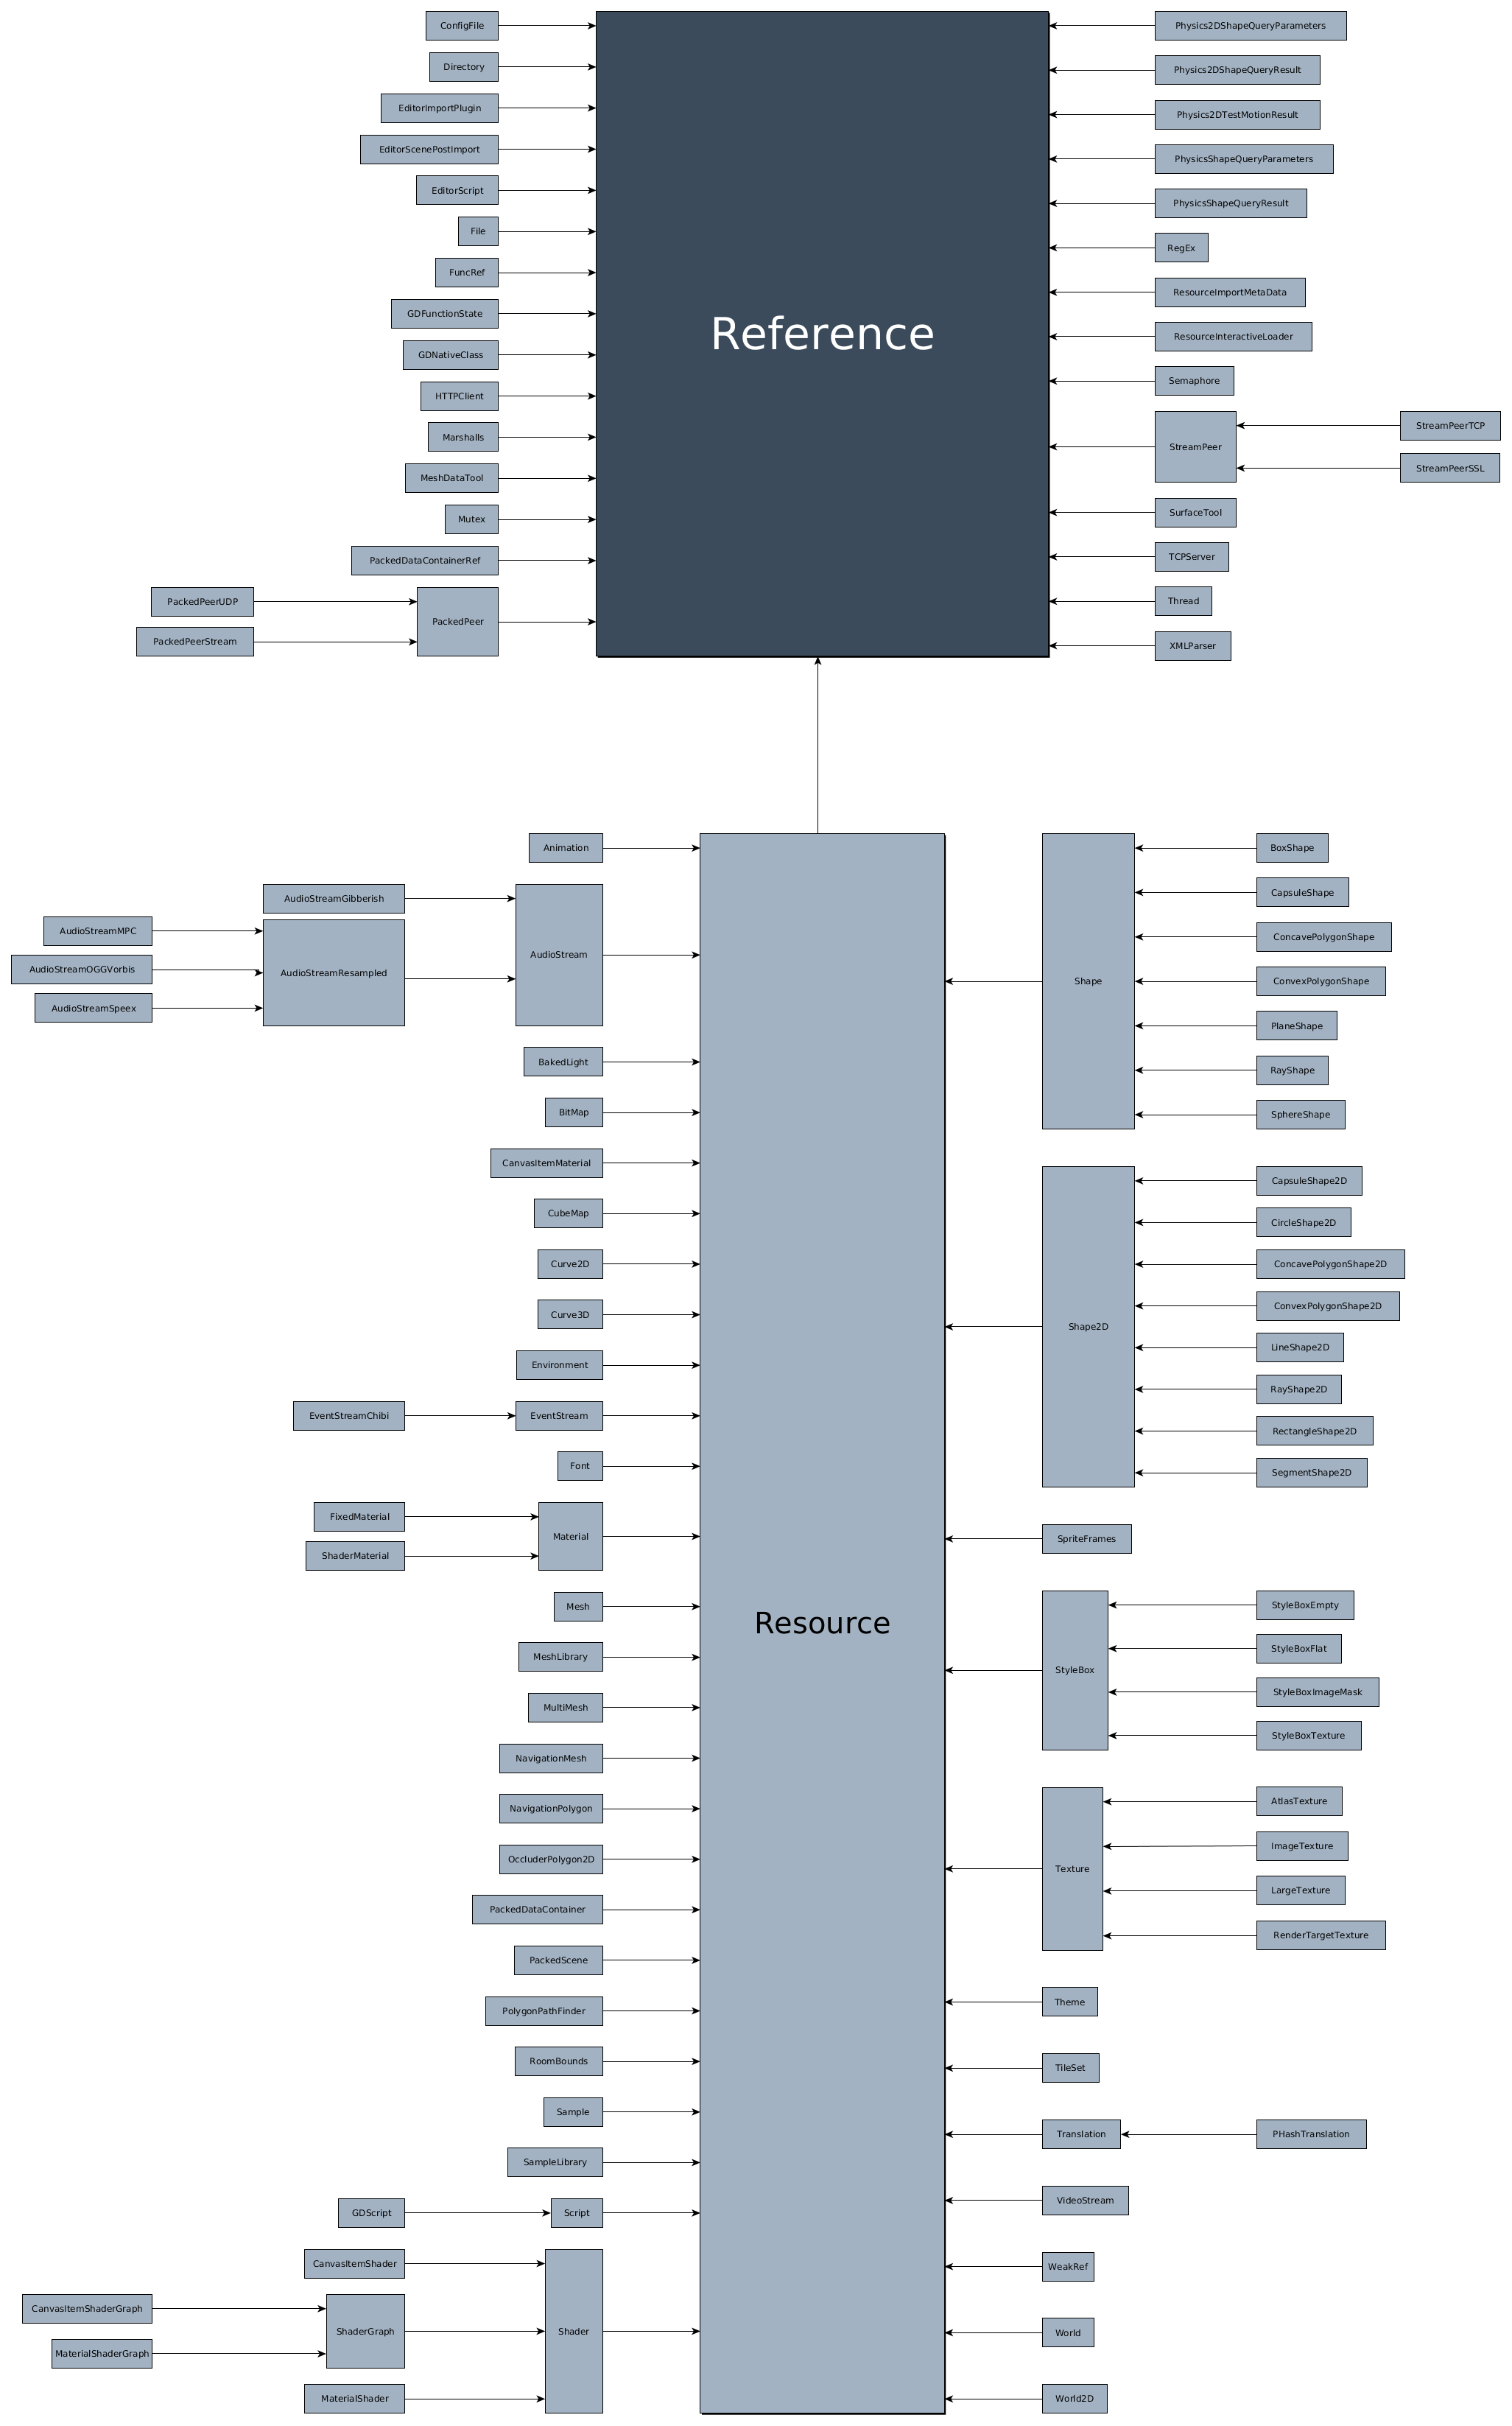
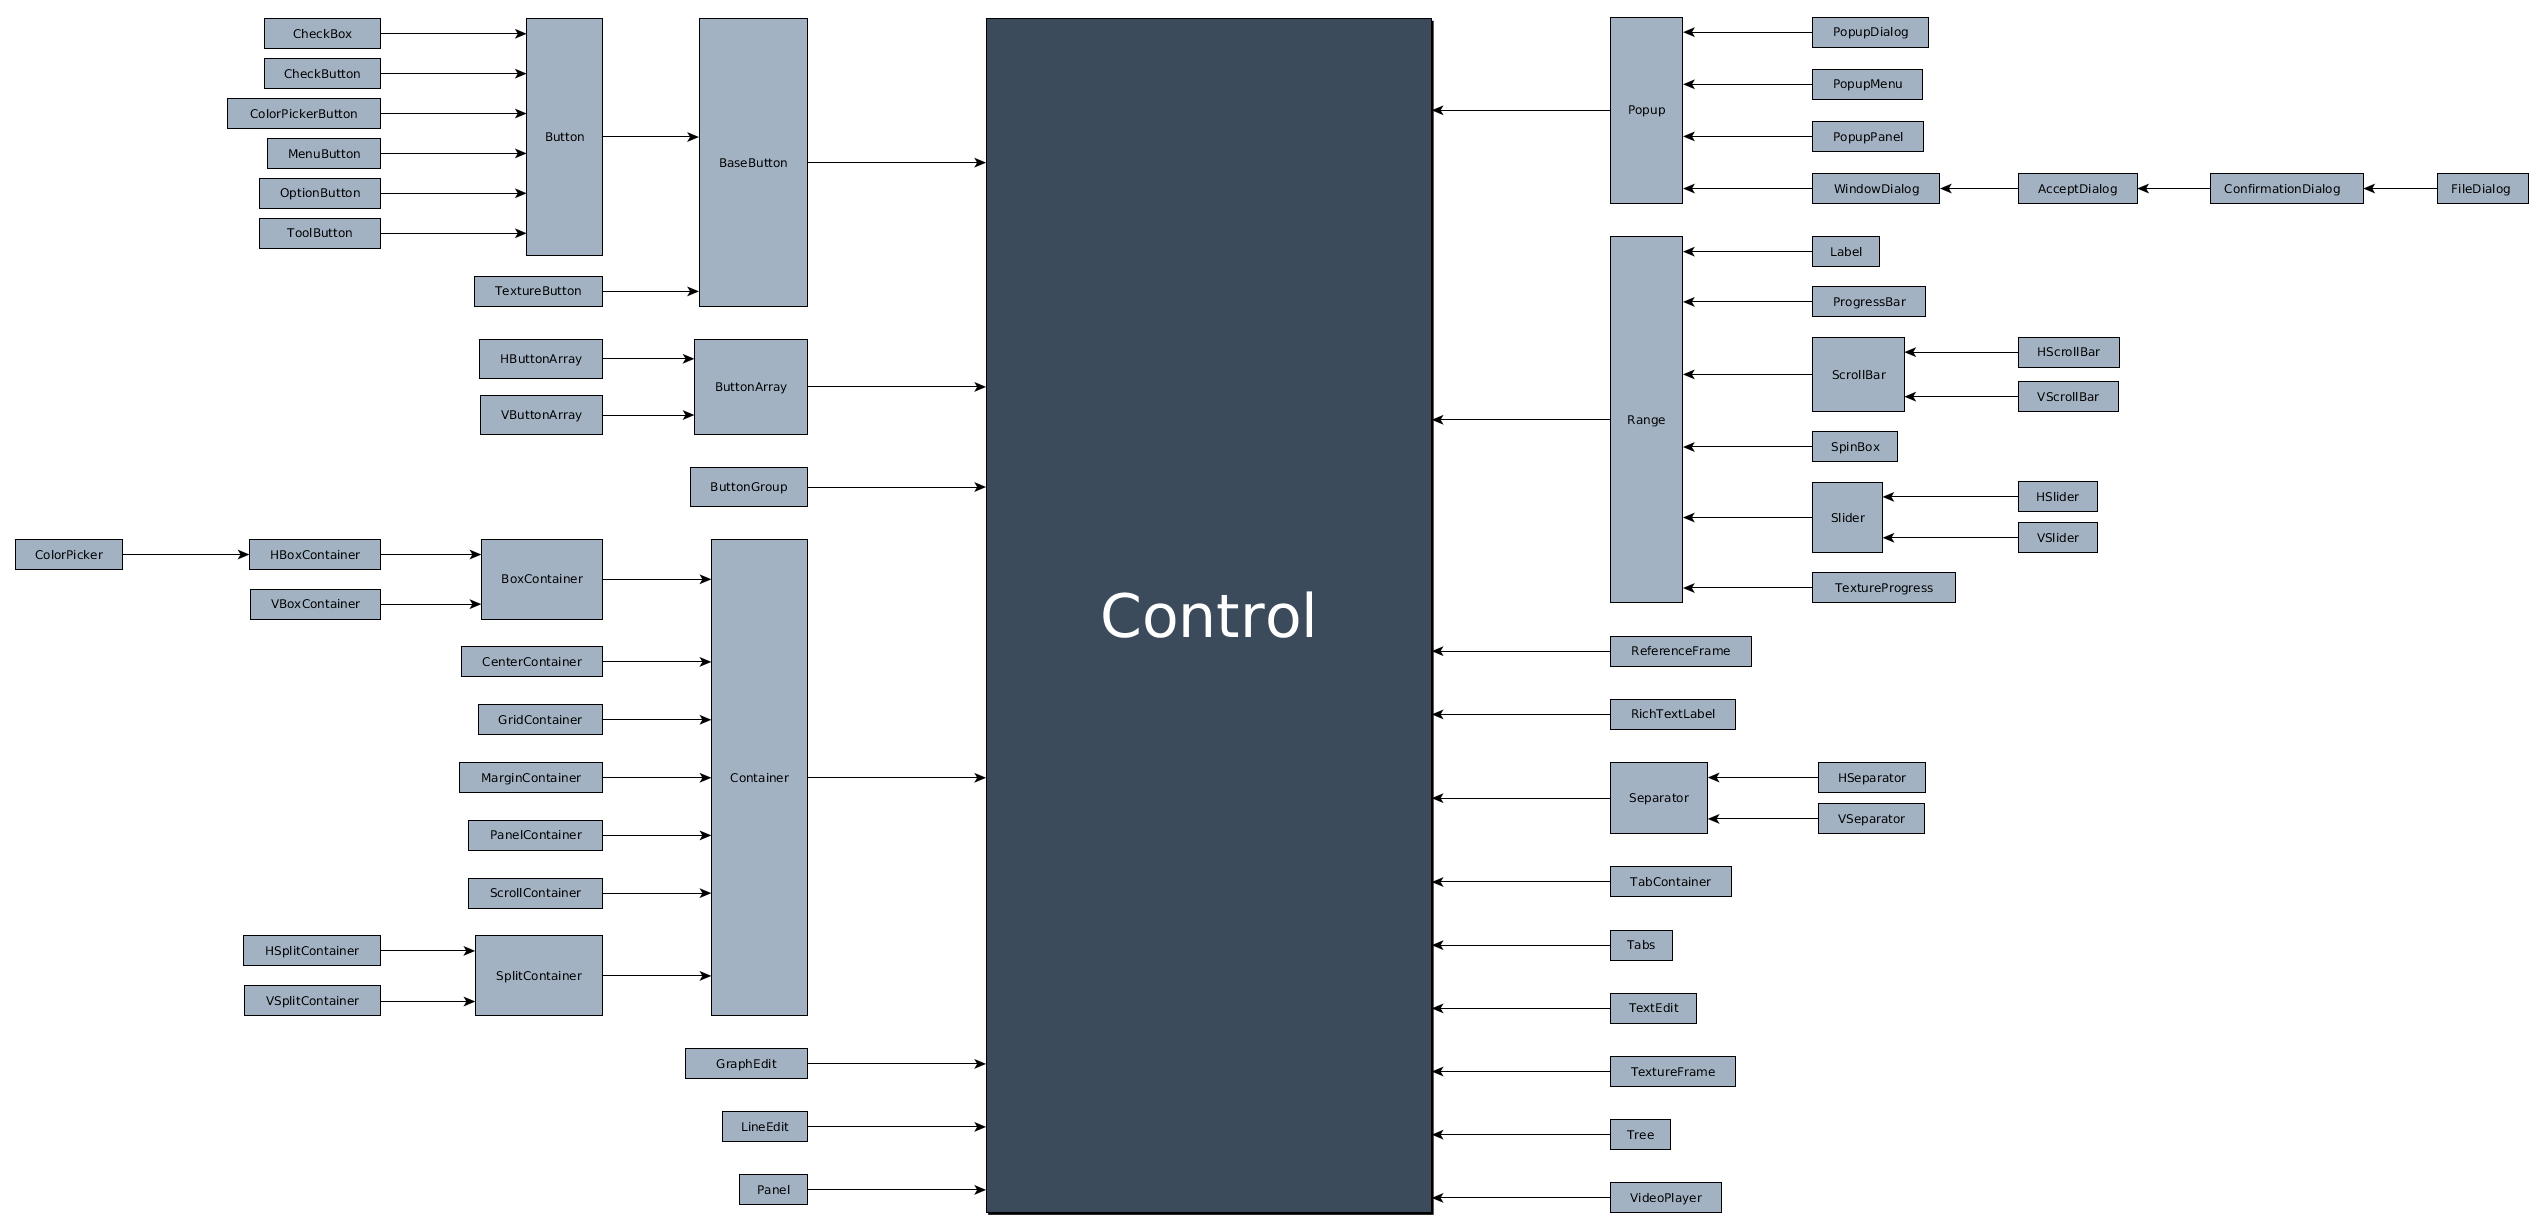
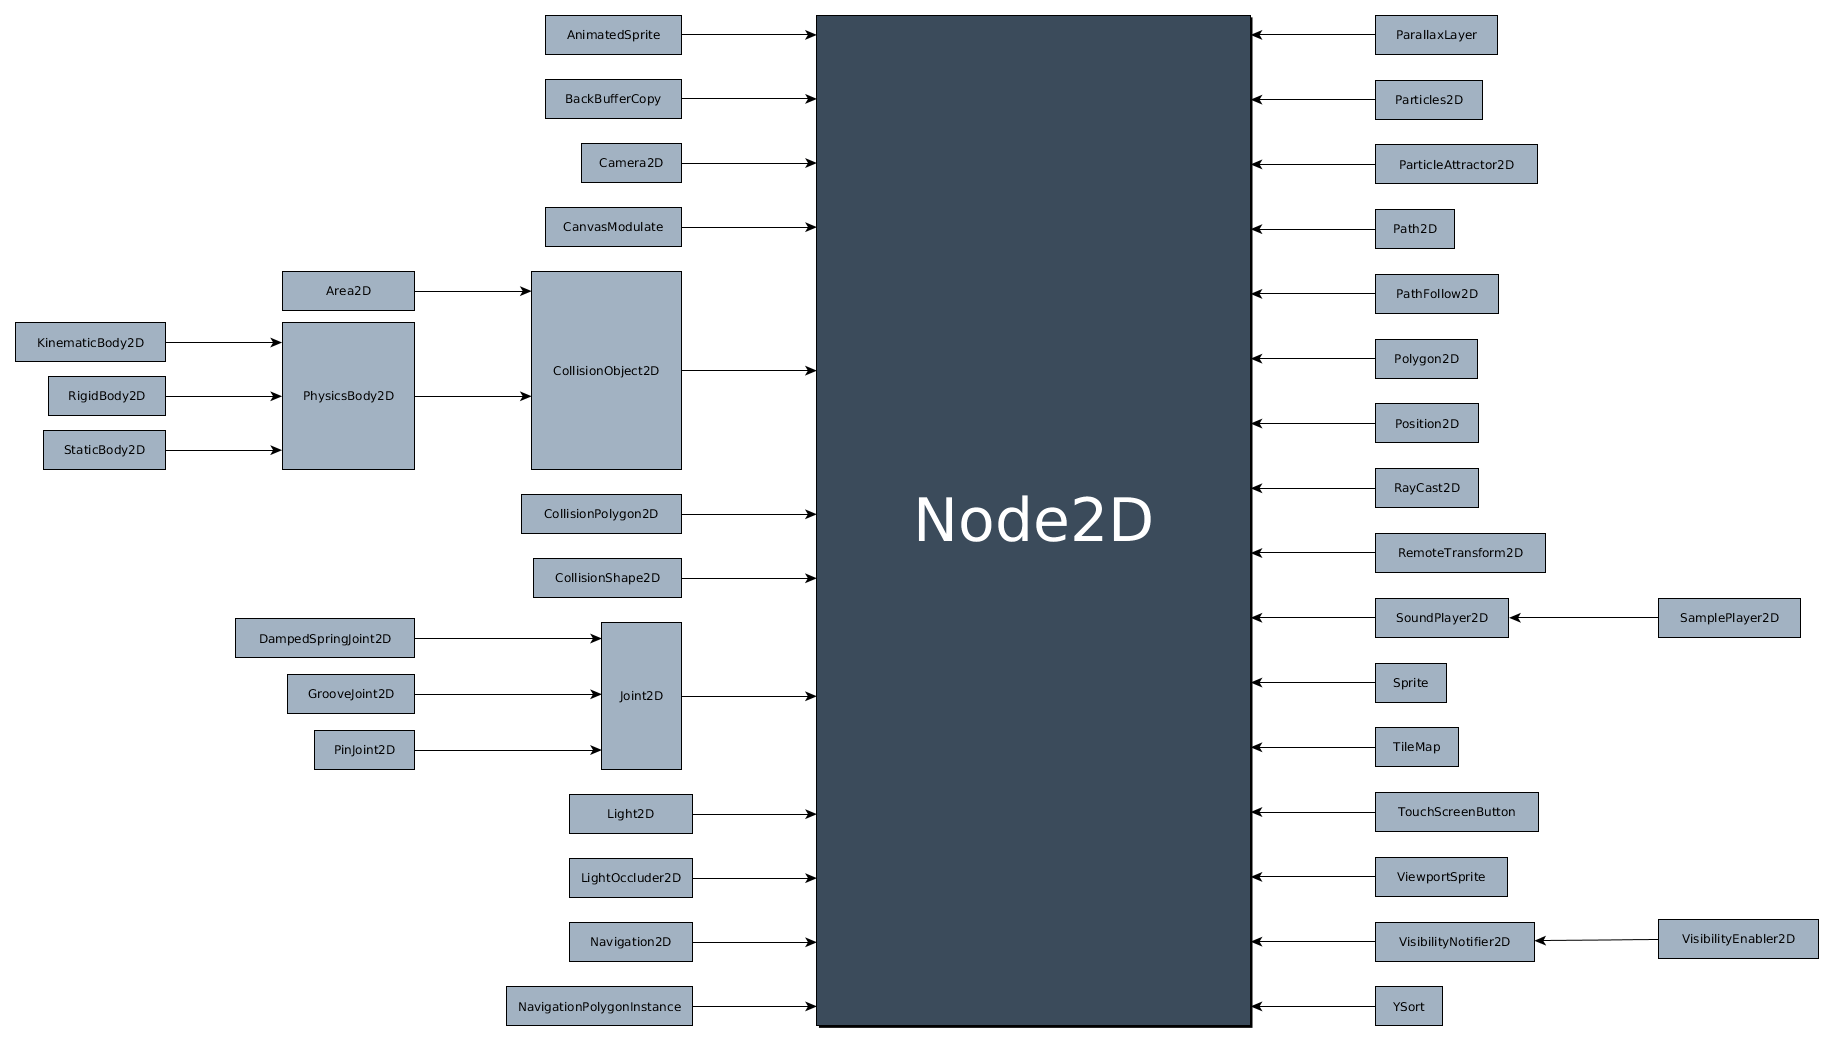
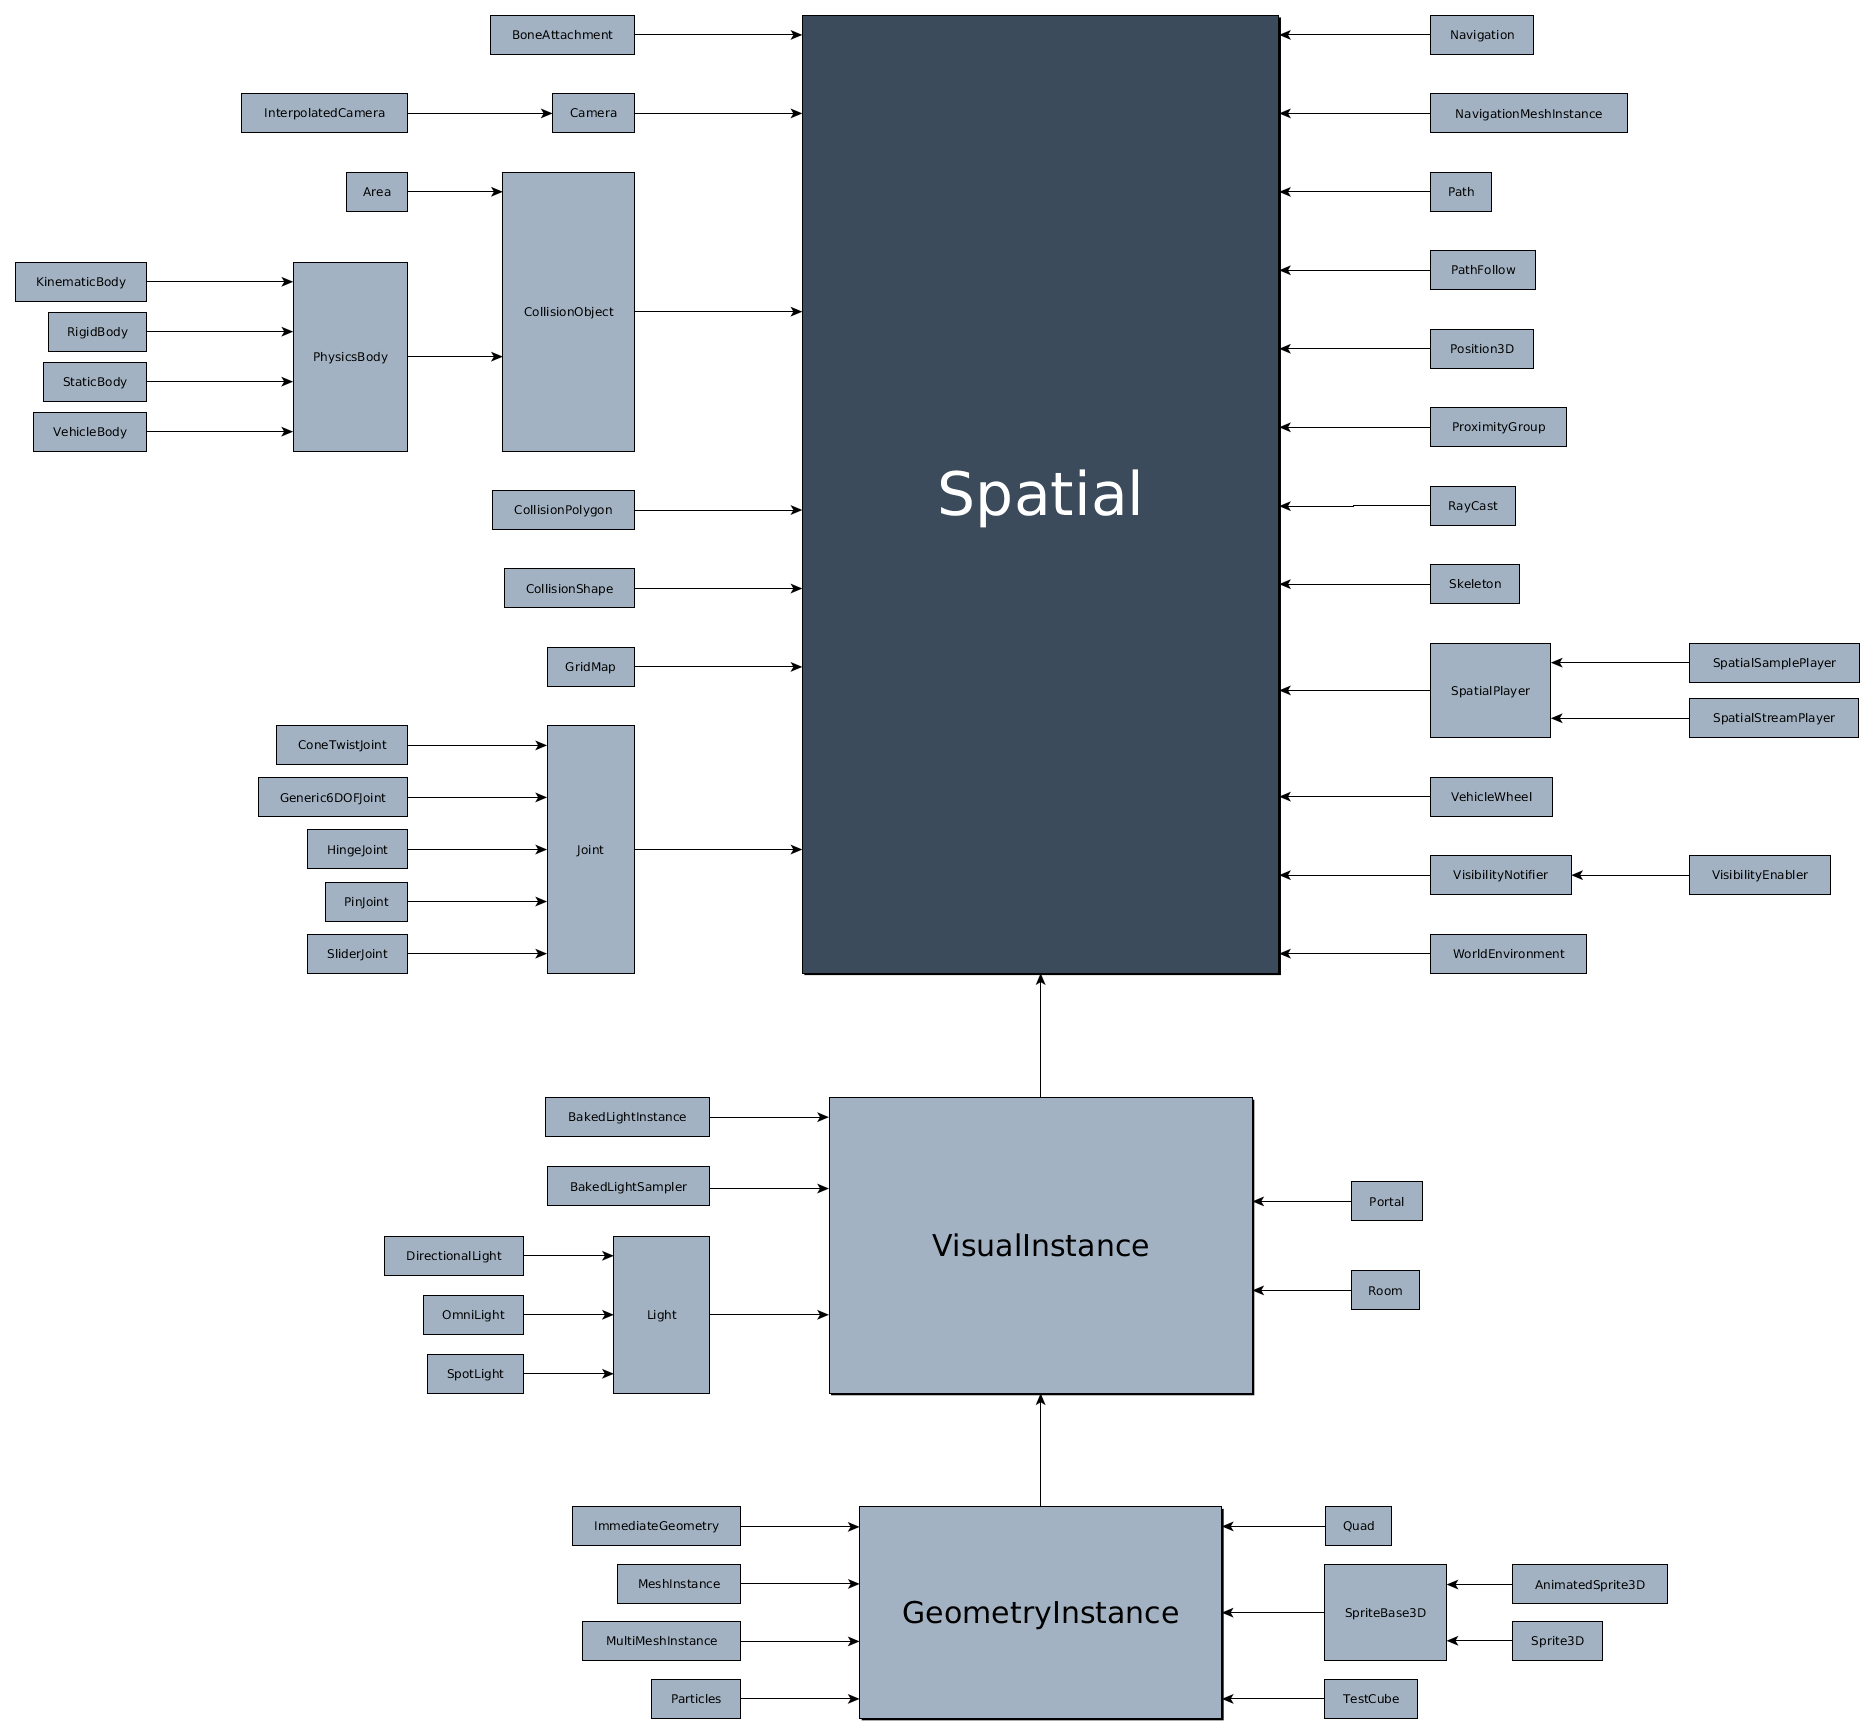
Custom modules in C++¶
Modules¶
Godot allows extending the engine in a modular way. New modules can be created and then enabled/disabled. This allows for adding new engine functionality at every level without modifying the core, which can be split for use and reuse in different modules.
Modules are located in the modules/ subdirectory of the build system.
By default, many different modules exist, such as GDScript (which, yes,
is not part of the base engine), the Mono runtime, a regular expressions
module, and others. As many new modules as desired can be
created and combined, and the SCons build system will take care of it
transparently.
What for?¶
While it’s recommended that most of a game be written in scripting (as it is an enormous time saver), it’s perfectly possible to use C++ instead. Adding C++ modules can be useful in the following scenarios:
- Binding an external library to Godot (like PhysX, FMOD, etc).
- Optimize critical parts of a game.
- Adding new functionality to the engine and/or editor.
- Porting an existing game.
- Write a whole, new game in C++ because you can’t live without C++.
Creating a new module¶
Before creating a module, make sure to download the source code of Godot and manage to compile it. There are tutorials in the documentation for this.
To create a new module, the first step is creating a directory inside
modules/. If you want to maintain the module separately, you can checkout
a different VCS into modules and use it.
The example module will be called “summator”, and is placed inside the
Godot source tree (C:\godot refers to wherever the Godot sources are
located):
C:\godot> cd modules
C:\godot\modules> mkdir summator
C:\godot\modules> cd summator
C:\godot\modules\summator>
Inside we will create a simple summator class:
/* summator.h */
#ifndef SUMMATOR_H
#define SUMMATOR_H
#include "core/reference.h"
class Summator : public Reference {
GDCLASS(Summator, Reference);
int count;
protected:
static void _bind_methods();
public:
void add(int p_value);
void reset();
int get_total() const;
Summator();
};
#endif // SUMMATOR_H
And then the cpp file.
/* summator.cpp */
#include "summator.h"
void Summator::add(int p_value) {
count += p_value;
}
void Summator::reset() {
count = 0;
}
int Summator::get_total() const {
return count;
}
void Summator::_bind_methods() {
ClassDB::bind_method(D_METHOD("add", "value"), &Summator::add);
ClassDB::bind_method(D_METHOD("reset"), &Summator::reset);
ClassDB::bind_method(D_METHOD("get_total"), &Summator::get_total);
}
Summator::Summator() {
count = 0;
}
Then, the new class needs to be registered somehow, so two more files need to be created:
register_types.h
register_types.cpp
With the following contents:
/* register_types.h */
void register_summator_types();
void unregister_summator_types();
/* yes, the word in the middle must be the same as the module folder name */
/* register_types.cpp */
#include "register_types.h"
#include "core/class_db.h"
#include "summator.h"
void register_summator_types() {
ClassDB::register_class<Summator>();
}
void unregister_summator_types() {
// Nothing to do here in this example.
}
Next, we need to create a SCsub file so the build system compiles
this module:
# SCsub
Import('env')
env.add_source_files(env.modules_sources, "*.cpp") # Add all cpp files to the build
With multiple sources, you can also add each file individually to a Python string list:
src_list = ["summator.cpp", "other.cpp", "etc.cpp"]
env.add_source_files(env.modules_sources, src_list)
This allows for powerful possibilities using Python to construct the file list using loops and logic statements. Look at some of the other modules that ship with Godot by default for examples.
To add include directories for the compiler to look at you can append it to the environment’s paths:
env.Append(CPPPATH=["mylib/include"]) # this is a relative path
env.Append(CPPPATH=["#myotherlib/include"]) # this is an 'absolute' path
If you want to add custom compiler flags when building your module, you need to clone env first, so it won’t add those flags to whole Godot build (which can cause errors). Example SCsub with custom flags:
# SCsub
Import('env')
module_env = env.Clone()
module_env.add_source_files(env.modules_sources, "*.cpp")
module_env.Append(CCFLAGS=['-O2']) # Flags for C and C++ code
module_env.Append(CXXFLAGS=['-std=c++11']) # Flags for C++ code only
And finally, the configuration file for the module, this is a simple
python script that must be named config.py:
# config.py
def can_build(env, platform):
return True
def configure(env):
pass
The module is asked if it’s OK to build for the specific platform (in
this case, True means it will build for every platform).
And that’s it. Hope it was not too complex! Your module should look like this:
godot/modules/summator/config.py
godot/modules/summator/summator.h
godot/modules/summator/summator.cpp
godot/modules/summator/register_types.h
godot/modules/summator/register_types.cpp
godot/modules/summator/SCsub
You can then zip it and share the module with everyone else. When building for every platform (instructions in the previous sections), your module will be included.
Note
There is a parameter limit of 5 in C++ modules for things such
as subclasses. This can be raised to 13 by including the header
file core/method_bind_ext.gen.inc.
Using the module¶
You can now use your newly created module from any script:
var s = Summator.new()
s.add(10)
s.add(20)
s.add(30)
print(s.get_total())
s.reset()
The output will be 60.
See also
The previous Summator example is great for small, custom modules, but what if you want to use a larger, external library? Refer to Binding to external libraries for details about binding to external libraries.
Warning
If your module is meant to be accessed from the running project (not just from the editor), you must also recompile every export template you plan to use, then specify the path to the custom template in each export preset. Otherwise, you’ll get errors when running the project as the module isn’t compiled in the export template. See the Compiling pages for more information.
Improving the build system for development¶
So far we defined a clean and simple SCsub that allows us to add the sources of our new module as part of the Godot binary.
This static approach is fine when we want to build a release version of our game given we want all the modules in a single binary.
However the trade-off is every single change means a full recompilation of the game. Even if SCons is able to detect and recompile only the file that have changed, finding such files and eventually linking the final binary is a long and costly part.
The solution to avoid such a cost is to build our own module as a shared library that will be dynamically loaded when starting our game’s binary.
# SCsub
Import('env')
sources = [
"register_types.cpp",
"summator.cpp"
]
# First, create a custom env for the shared library.
module_env = env.Clone()
module_env.Append(CCFLAGS=['-fPIC']) # Needed to compile shared library
# We don't want godot's dependencies to be injected into our shared library.
module_env['LIBS'] = []
# Now define the shared library. Note that by default it would be built
# into the module's folder, however it's better to output it into `bin`
# next to the Godot binary.
shared_lib = module_env.SharedLibrary(target='#bin/summator', source=sources)
# Finally notify the main env it has our shared lirary as a new dependency.
# To do so, SCons wants the name of the lib with it custom suffixes
# (e.g. ".x11.tools.64") but without the final ".so".
# We pass this along with the directory of our library to the main env.
shared_lib_shim = shared_lib[0].name.rsplit('.', 1)[0]
env.Append(LIBS=[shared_lib_shim])
env.Append(LIBPATH=['#bin'])
Once compiled, we should end up with a bin directory containing both the
godot* binary and our libsummator*.so. However given the .so is not in
a standard directory (like /usr/lib), we have to help our binary find it
during runtime with the LD_LIBRARY_PATH environ variable:
user@host:~/godot$ export LD_LIBRARY_PATH=`pwd`/bin/
user@host:~/godot$ ./bin/godot*
note: Pay attention you have to export the environ variable otherwise
you won’t be able to play your project from within the editor.
On top of that, it would be nice to be able to select whether to compile our module as shared library (for development) or as a part of the Godot binary (for release). To do that we can define a custom flag to be passed to SCons using the ARGUMENT command:
# SCsub
Import('env')
sources = [
"register_types.cpp",
"summator.cpp"
]
module_env = env.Clone()
module_env.Append(CCFLAGS=['-O2'])
module_env.Append(CXXFLAGS=['-std=c++11'])
if ARGUMENTS.get('summator_shared', 'no') == 'yes':
# Shared lib compilation
module_env.Append(CCFLAGS=['-fPIC'])
module_env['LIBS'] = []
shared_lib = module_env.SharedLibrary(target='#bin/summator', source=sources)
shared_lib_shim = shared_lib[0].name.rsplit('.', 1)[0]
env.Append(LIBS=[shared_lib_shim])
env.Append(LIBPATH=['#bin'])
else:
# Static compilation
module_env.add_source_files(env.modules_sources, sources)
Now by default scons command will build our module as part of Godot’s binary
and as a shared library when passing summator_shared=yes.
Finally you can even speedup build further by explicitly specifying your shared module as target in the scons command:
user@host:~/godot$ scons summator_shared=yes platform=x11 bin/libsummator.x11.tools.64.so
Writing custom documentation¶
Writing documentation may seem like a boring task, but it is highly recommended to document your newly created module in order to make it easier for users to benefit from it. Not to mention that the code you’ve written one year ago may become indistinguishable from the code that was written by someone else, so be kind to your future self!
There are several steps in order to setup custom docs for the module:
Make a new directory in the root of the module. The directory name can be anything, but we’ll be using the
doc_classesname throughout this section.Append the following code snippet to
config.py:def get_doc_classes(): return [ "ClassName", ] def get_doc_path(): return "doc_classes"
The get_doc_classes() method is necessary for the build system to
know which documentation classes of the module must be merged, since the module
may contain several classes. Replace ClassName with the name of the class
you want to write documentation for. If you need docs for more than one class,
append those as well.
The get_doc_path() method is used by the build system to determine
the location of the docs. In our case, they will be located in the doc_classes
directory.
Run command:
godot --doctool <path>
This will dump the engine API reference to the given <path> in XML format.
Notice that you’ll need to configure your PATH to locate Godot’s executable,
and make sure that you have write access rights. If not, you might encounter an
error similar to the following:
ERROR: Can't write doc file: docs/doc/classes/@GDScript.xml
At: editor/doc/doc_data.cpp:956
- Get generated doc file from
godot/doc/classes/ClassName.xml - Copy this file to
doc_classes, optionally edit it, then compile the engine.
The build system will fetch the documentation files from the doc_classes directory
and merge them with the base types. Once the compilation process is finished,
the docs will become accessible within the engine’s built-in documentation system.
In order to keep documentation up-to-date, all you’ll have to do is simply modify
one of the ClassName.xml files and recompile the engine from now on.
Adding custom editor icons¶
Similarly to how you can write self-contained documentation within a module, you can also create your own custom icons for classes to appear in the editor.
For the actual process of creating editor icons to be integrated within the engine, please refer to Editor icons first.
Once you’ve created your icon(s), proceed with the following steps:
- Make a new directory in the root of the module named
icons. This is the default path for the engine to look for module’s editor icons. - Move your newly created
svgicons (optimized or not) into that folder. - Recompile the engine and run the editor. Now the icon(s) will appear in editor’s interface where appropriate.
If you’d like to store your icons somewhere else within your module,
add the following code snippet to config.py to override the default path:
def get_icons_path(): return "path/to/icons"
Summing up¶
Remember to:
- use
GDCLASSmacro for inheritance, so Godot can wrap it - use
_bind_methodsto bind your functions to scripting, and to allow them to work as callbacks for signals.
But this is not all, depending what you do, you will be greeted with some (hopefully positive) surprises.
- If you inherit from Node (or any derived node type, such as Sprite), your new class will appear in the editor, in the inheritance tree in the “Add Node” dialog.
- If you inherit from Resource, it will appear in the resource list, and all the exposed properties can be serialized when saved/loaded.
- By this same logic, you can extend the Editor and almost any area of the engine.
Binding to external libraries¶
Modules¶
The Summator example in Custom modules in C++ is great for small, custom modules, but what if you want to use a larger, external library? Let’s look at an example using Festival, a speech synthesis (text-to-speech) library written in C++.
To bind to an external library, set up a module directory similar to the Summator example:
godot/modules/tts/
Next, you will create a header file with a simple TTS class:
/* tts.h */
#ifndef GODOT_TTS_H
#define GODOT_TTS_H
#include "core/reference.h"
class TTS : public Reference {
GDCLASS(TTS, Reference);
protected:
static void _bind_methods();
public:
bool say_text(String p_txt);
TTS();
};
#endif // GODOT_TTS_H
And then you’ll add the cpp file.
/* tts.cpp */
#include "tts.h"
#include <festival.h>
bool TTS::say_text(String p_txt) {
//convert Godot String to Godot CharString to C string
return festival_say_text(p_txt.ascii().get_data());
}
void TTS::_bind_methods() {
ClassDB::bind_method(D_METHOD("say_text", "txt"), &TTS::say_text);
}
TTS::TTS() {
festival_initialize(true, 210000); //not the best way to do it as this should only ever be called once.
}
Just as before, the new class needs to be registered somehow, so two more files need to be created:
register_types.h
register_types.cpp
With the following contents:
/* register_types.h */
void register_tts_types();
void unregister_tts_types();
/* yes, the word in the middle must be the same as the module folder name */
/* register_types.cpp */
#include "register_types.h"
#include "core/class_db.h"
#include "tts.h"
void register_tts_types() {
ClassDB::register_class<TTS>();
}
void unregister_tts_types() {
// Nothing to do here in this example.
}
Next, you need to create a SCsub file so the build system compiles
this module:
# SCsub
Import('env')
env_tts = env.Clone()
env_tts.add_source_files(env.modules_sources, "*.cpp") # Add all cpp files to the build
You’ll need to install the external library on your machine to get the .a library files. See the library’s official documentation for specific instructions on how to do this for your operation system. We’ve included the installation commands for Linux below, for reference.
sudo apt-get install festival festival-dev <-- Installs festival and speech_tools libraries
apt-cache search festvox-* <-- Displays list of voice packages
sudo apt-get install festvox-don festvox-rablpc16k festvox-kallpc16k festvox-kdlpc16k <-- Installs voices
Note
Important: The voices that Festival uses (and any other potential external/3rd-party resource) all have varying licenses and terms of use; some (if not most) of them may be be problematic with Godot, even if the Festival Library itself is MIT License compatible. Please be sure to check the licenses and terms of use.
The external library will also need to be installed inside your module to make the source files accessible to the compiler, while also keeping the module code self-contained. The festival and speech_tools libraries can be installed from the modules/tts/ directory via git using the following commands:
git clone https://github.com/festvox/festival
git clone https://github.com/festvox/speech_tools
If you don’t want the external repository source files committed to your repository, you can link to them instead by adding them as submodules (from within the modules/tts/ directory), as seen below:
git submodule add https://github.com/festvox/festival
git submodule add https://github.com/festvox/speech_tools
Note
Important: Please note that Git submodules are not used in the Godot repository. If you are developing a module to be merged into the main Godot repository, you should not use submodules. If your module doesn’t get merged in, you can always try to implement the external library as a GDNative C++ plugin.
To add include directories for the compiler to look at you can append it to the environment’s paths:
env_tts.Append(CPPPATH=["speech_tools/include", "festival/src/include"]) # this is a path relative to /modules/tts/
# http://www.cstr.ed.ac.uk/projects/festival/manual/festival_28.html#SEC132 <-- Festival library documentation
env_tts.Append(LIBPATH=['libpath']) # this is a path relative to /modules/tts/ where your .a library files reside
# You should check with the documentation of the external library to see which library files should be included/linked
env_tts.Append(LIBS=['Festival', 'estools', 'estbase', 'eststring'])
If you want to add custom compiler flags when building your module, you need to clone env first, so it won’t add those flags to whole Godot build (which can cause errors). Example SCsub with custom flags:
# SCsub
Import('env')
env_tts = env.Clone()
env_tts.add_source_files(env.modules_sources, "*.cpp")
env_tts.Append(CCFLAGS=['-O2']) # Flags for C and C++ code
env_tts.Append(CXXFLAGS=['-std=c++11']) # Flags for C++ code only
The final module should look like this:
godot/modules/tts/festival/
godot/modules/tts/libpath/libestbase.a
godot/modules/tts/libpath/libestools.a
godot/modules/tts/libpath/libeststring.a
godot/modules/tts/libpath/libFestival.a
godot/modules/tts/speech_tools/
godot/modules/tts/config.py
godot/modules/tts/tts.h
godot/modules/tts/tts.cpp
godot/modules/tts/register_types.h
godot/modules/tts/register_types.cpp
godot/modules/tts/SCsub
Using the module¶
You can now use your newly created module from any script:
var t = TTS.new()
var script = "Hello world. This is a test!"
var is_spoken = t.say_text(script)
print('is_spoken: ', is_spoken)
And the output will be is_spoken: True if the text is spoken.
Custom resource format loaders¶
Introduction¶
ResourceFormatLoader is a factory interface for loading file assets. Resources are primary containers. When load is called on the same file path again, the previous loaded Resource will be referenced. Naturally, loaded resources must be stateless.
This guide assumes the reader knows how to create C++ modules and Godot data types. If not, refer to this guide Custom modules in C++.
References¶
What for?¶
- Adding new support for many file formats
- Audio formats
- Video formats
- Machine learning models
Creating a ResourceFormatLoader¶
Each file format consist of a data container and a ResourceFormatLoader.
ResourceFormatLoaders are usually simple classes which return all the necessary metadata for supporting new extensions in Godot. The class must the return the format name and the extension string.
In addition, ResourceFormatLoaders must convert file paths into
resources with the load function. To load a resource, load must
read and handle data serialization.
/* resource_loader_json.h */
#ifndef RESOURCE_LOADER_JSON_H
#define RESOURCE_LOADER_JSON_H
#include "core/io/resource_loader.h"
class ResourceFormatLoaderJson : public ResourceFormatLoader {
GDCLASS(ResourceFormatLoaderJson, ResourceFormatLoader);
public:
virtual RES load(const String &p_path, const String &p_original_path, Error *r_error = NULL);
virtual void get_recognized_extensions(List<String> *r_extensions) const;
virtual bool handles_type(const String &p_type) const;
virtual String get_resource_type(const String &p_path) const;
};
#endif // RESOURCE_LOADER_JSON_H
/* resource_loader_json.cpp */
#include "resource_loader_json.h"
#include "resource_json.h"
RES ResourceFormatLoaderJson::load(const String &p_path, const String &p_original_path, Error *r_error) {
Ref<JsonResource> json = memnew(JsonResource);
if (r_error) {
*r_error = OK;
}
Error err = json->load_file(p_path);
return json;
}
void ResourceFormatLoaderJson::get_recognized_extensions(List<String> *r_extensions) const {
if (!r_extensions->find("json")) {
r_extensions->push_back("json");
}
}
String ResourceFormatLoaderJson::get_resource_type(const String &p_path) const {
return "Resource";
}
bool ResourceFormatLoaderJson::handles_type(const String &p_type) const {
return ClassDB::is_parent_class(p_type, "Resource");
}
Creating a ResourceFormatSaver¶
If you’d like to be able to edit and save a resource, you can implement a
ResourceFormatSaver:
/* resource_saver_json.h */
#ifndef RESOURCE_SAVER_JSON_H
#define RESOURCE_SAVER_JSON_H
#include "core/io/resource_saver.h"
class ResourceFormatSaverJson : public ResourceFormatSaver {
GDCLASS(ResourceFormatSaverJson, ResourceFormatSaver);
public:
virtual Error save(const String &p_path, const RES &p_resource, uint32_t p_flags = 0);
virtual bool recognize(const RES &p_resource) const;
virtual void get_recognized_extensions(const RES &p_resource, List<String> *r_extensions) const;
};
#endif // RESOURCE_SAVER_JSON_H
/* resource_saver_json.cpp */
#include "resource_saver_json.h"
#include "resource_json.h"
#include "scene/resources/resource_format_text.h"
Error ResourceFormatSaverJson::save(const String &p_path, const RES &p_resource, uint32_t p_flags) {
Ref<JsonResource> json = memnew(JsonResource);
Error error = json->save_file(p_path, p_resource);
return error;
}
bool ResourceFormatSaverJson::recognize(const RES &p_resource) const {
return Object::cast_to<JsonResource>(*p_resource) != NULL;
}
void ResourceFormatSaverJson::get_recognized_extensions(const RES &p_resource, List<String> *r_extensions) const {
if (Object::cast_to<JsonResource>(*p_resource)) {
r_extensions->push_back("json");
}
}
Creating custom data types¶
Godot may not have a proper substitute within its Core types or managed resources. Godot needs a new registered data type to understand additional binary formats such as machine learning models.
Here is an example of creating a custom datatype:
/* resource_json.h */
#ifndef RESOURCE_JSON_H
#define RESOURCE_JSON_H
#include "core/io/json.h"
#include "core/variant_parser.h"
class JsonResource : public Resource {
GDCLASS(JsonResource, Resource);
protected:
static void _bind_methods() {
ClassDB::bind_method(D_METHOD("set_dict", "dict"), &JsonResource::set_dict);
ClassDB::bind_method(D_METHOD("get_dict"), &JsonResource::get_dict);
ADD_PROPERTY(PropertyInfo(Variant::DICTIONARY, "content"), "set_dict", "get_dict");
}
private:
Dictionary content;
public:
Error load_file(const String &p_path);
Error save_file(const String &p_path, const RES &p_resource);
void set_dict(const Dictionary &p_dict);
Dictionary get_dict();
};
#endif // RESOURCE_JSON_H
/* resource_json.cpp */
#include "resource_json.h"
Error JsonResource::load_file(const String &p_path) {
Error error;
FileAccess *file = FileAccess::open(p_path, FileAccess::READ, &error);
if (error != OK) {
if (file) {
file->close();
}
return error;
}
String json_string = String("");
while (!file->eof_reached()) {
json_string += file->get_line();
}
file->close();
String error_string;
int error_line;
JSON json;
Variant result;
error = json.parse(json_string, result, error_string, error_line);
if (error != OK) {
file->close();
return error;
}
content = Dictionary(result);
return OK;
}
Error JsonResource::save_file(const String &p_path, const RES &p_resource) {
Error error;
FileAccess *file = FileAccess::open(p_path, FileAccess::WRITE, &error);
if (error != OK) {
if (file) {
file->close();
}
return error;
}
Ref<JsonResource> json_ref = p_resource.get_ref_ptr();
JSON json;
file->store_string(json.print(json_ref->get_dict(), " "));
file->close();
return OK;
}
void JsonResource::set_dict(const Dictionary &p_dict) {
content = p_dict;
}
Dictionary JsonResource::get_dict() {
return content;
}
Considerations¶
Some libraries may not define certain common routines such as IO handling. Therefore, Godot call translations are required.
For example, here is the code for translating FileAccess
calls into std::istream.
#include "core/os/file_access.h"
#include <istream>
#include <streambuf>
class GodotFileInStreamBuf : public std::streambuf {
public:
GodotFileInStreamBuf(FileAccess *fa) {
_file = fa;
}
int underflow() {
if (_file->eof_reached()) {
return EOF;
} else {
size_t pos = _file->get_position();
uint8_t ret = _file->get_8();
_file->seek(pos); // Required since get_8() advances the read head.
return ret;
}
}
int uflow() {
return _file->eof_reached() ? EOF : _file->get_8();
}
private:
FileAccess *_file;
};
References¶
Registering the new file format¶
Godot registers ResourcesFormatLoader with a ResourceLoader
handler. The handler selects the proper loader automatically
when load is called.
/* register_types.h */
void register_json_types();
void unregister_json_types();
/* register_types.cpp */
#include "register_types.h"
#include "core/class_db.h"
#include "resource_loader_json.h"
#include "resource_saver_json.h"
#include "resource_json.h"
static Ref<ResourceFormatLoaderJson> json_loader;
static Ref<ResourceFormatSaverJson> json_saver;
void register_json_types() {
ClassDB::register_class<JsonResource>();
json_loader.instance();
ResourceLoader::add_resource_format_loader(json_loader);
json_saver.instance();
ResourceSaver::add_resource_format_saver(json_saver);
}
void unregister_json_types() {
ResourceLoader::remove_resource_format_loader(json_loader);
json_loader.unref();
ResourceSaver::remove_resource_format_saver(json_saver);
json_saver.unref();
}
References¶
Loading it on GDScript¶
Save a file called demo.json with the following contents and place it in the
project’s root folder:
{
"savefilename": "demo.json",
"demo": [
"welcome",
"to",
"godot",
"resource",
"loaders"
]
}
Then attach the following script to any node:
extends Node
onready var json_resource = load("res://demo.json")
func _ready():
print(json_resource.get_dict())
Custom AudioStreams¶
Introduction¶
AudioStream is the base class of all audio emitting objects. AudioStreamPlayer binds onto an AudioStream to emit PCM data into an AudioServer which manages audio drivers.
All audio resources require two audio based classes: AudioStream and AudioStreamPlayback. As a data container, AudioStream contains the resource and exposes itself to GDScript. AudioStream references its own internal custom AudioStreamPlayback which translates AudioStream into PCM data.
This guide assumes the reader knows how to create C++ modules. If not, refer to this guide Custom modules in C++.
What for?¶
- Binding external libraries (like Wwise, FMOD, etc).
- Adding custom audio queues
- Adding support for more audio formats
Create an AudioStream¶
An AudioStream consists of three components: data container, stream name, and an AudioStreamPlayback friend class generator. Audio data can be loaded in a number of ways such as with an internal counter for a tone generator, internal/external buffer, or a file reference.
Some AudioStreams need to be stateless such as objects loaded from
ResourceLoader. ResourceLoader loads once and references the same
object regardless how many times load is called on a specific resource.
Therefore, playback state must be self contained in AudioStreamPlayback.
/* audiostream_mytone.h */
#include "core/reference.h"
#include "core/resource.h"
#include "servers/audio/audio_stream.h"
class AudioStreamMyTone : public AudioStream {
GDCLASS(AudioStreamMyTone, AudioStream)
private:
friend class AudioStreamPlaybackMyTone;
uint64_t pos;
int mix_rate;
bool stereo;
int hz;
public:
void reset();
void set_position(uint64_t pos);
virtual Ref<AudioStreamPlayback> instance_playback();
virtual String get_stream_name() const;
void gen_tone(int16_t *pcm_buf, int size);
virtual float get_length() const { return 0; } // if supported, otherwise return 0
AudioStreamMyTone();
protected:
static void _bind_methods();
};
/* audiostream_mytone.cpp */
#include "audiostream_mytone.h"
AudioStreamMyTone::AudioStreamMyTone()
: mix_rate(44100), stereo(false), hz(639) {
}
Ref<AudioStreamPlayback> AudioStreamMyTone::instance_playback() {
Ref<AudioStreamPlaybackMyTone> talking_tree;
talking_tree.instance();
talking_tree->base = Ref<AudioStreamMyTone>(this);
return talking_tree;
}
String AudioStreamMyTone::get_stream_name() const {
return "MyTone";
}
void AudioStreamMyTone::reset() {
set_position(0);
}
void AudioStreamMyTone::set_position(uint64_t p) {
pos = p;
}
void AudioStreamMyTone::gen_tone(int16_t *pcm_buf, int size) {
for (int i = 0; i < size; i++) {
pcm_buf[i] = 32767.0 * sin(2.0 * Math_PI * double(pos + i) / (double(mix_rate) / double(hz)));
}
pos += size;
}
void AudioStreamMyTone::_bind_methods() {
ClassDB::bind_method(D_METHOD("reset"), &AudioStreamMyTone::reset);
ClassDB::bind_method(D_METHOD("get_stream_name"), &AudioStreamMyTone::get_stream_name);
}
References:¶
Create an AudioStreamPlayback¶
AudioStreamPlayer uses mix callback to obtain PCM data. The callback must match sample rate and fill the buffer.
Since AudioStreamPlayback is controlled by the audio thread, i/o and dynamic memory allocation are forbidden.
/* audiostreamplayer_mytone.h */
#include "core/reference.h"
#include "core/resource.h"
#include "servers/audio/audio_stream.h"
class AudioStreamPlaybackMyTone : public AudioStreamPlayback {
GDCLASS(AudioStreamPlaybackMyTone, AudioStreamPlayback)
friend class AudioStreamMyTone;
private:
enum {
PCM_BUFFER_SIZE = 4096
};
enum {
MIX_FRAC_BITS = 13,
MIX_FRAC_LEN = (1 << MIX_FRAC_BITS),
MIX_FRAC_MASK = MIX_FRAC_LEN - 1,
};
void *pcm_buffer;
Ref<AudioStreamMyTone> base;
bool active;
public:
virtual void start(float p_from_pos = 0.0);
virtual void stop();
virtual bool is_playing() const;
virtual int get_loop_count() const; // times it looped
virtual float get_playback_position() const;
virtual void seek(float p_time);
virtual void mix(AudioFrame *p_buffer, float p_rate_scale, int p_frames);
virtual float get_length() const; // if supported, otherwise return 0
AudioStreamPlaybackMyTone();
~AudioStreamPlaybackMyTone();
};
/* audiostreamplayer_mytone.cpp */
#include "audiostreamplayer_mytone.h"
#include "core/math/math_funcs.h"
#include "core/print_string.h"
AudioStreamPlaybackMyTone::AudioStreamPlaybackMyTone()
: active(false) {
AudioServer::get_singleton()->lock();
pcm_buffer = AudioServer::get_singleton()->audio_data_alloc(PCM_BUFFER_SIZE);
zeromem(pcm_buffer, PCM_BUFFER_SIZE);
AudioServer::get_singleton()->unlock();
}
AudioStreamPlaybackMyTone::~AudioStreamPlaybackMyTone() {
if(pcm_buffer) {
AudioServer::get_singleton()->audio_data_free(pcm_buffer);
pcm_buffer = NULL;
}
}
void AudioStreamPlaybackMyTone::stop() {
active = false;
base->reset();
}
void AudioStreamPlaybackMyTone::start(float p_from_pos) {
seek(p_from_pos);
active = true;
}
void AudioStreamPlaybackMyTone::seek(float p_time) {
float max = get_length();
if (p_time < 0) {
p_time = 0;
}
base->set_position(uint64_t(p_time * base->mix_rate) << MIX_FRAC_BITS);
}
void AudioStreamPlaybackMyTone::mix(AudioFrame *p_buffer, float p_rate, int p_frames) {
ERR_FAIL_COND(!active);
if (!active) {
return;
}
zeromem(pcm_buffer, PCM_BUFFER_SIZE);
int16_t *buf = (int16_t *)pcm_buffer;
base->gen_tone(buf, p_frames);
for(int i = 0; i < p_frames; i++) {
float sample = float(buf[i]) / 32767.0;
p_buffer[i] = AudioFrame(sample, sample);
}
}
int AudioStreamPlaybackMyTone::get_loop_count() const {
return 0;
}
float AudioStreamPlaybackMyTone::get_playback_position() const {
return 0.0;
}
float AudioStreamPlaybackMyTone::get_length() const {
return 0.0;
}
bool AudioStreamPlaybackMyTone::is_playing() const {
return active;
}
Resampling¶
Godot’s AudioServer currently uses 44100 Hz sample rate. When other sample rates are needed such as 48000, either provide one or use AudioStreamPlaybackResampled. Godot provides cubic interpolation for audio resampling.
Instead of overloading mix, AudioStreamPlaybackResampled uses _mix_internal to
query AudioFrames and get_stream_sampling_rate to query current mix rate.
#include "core/reference.h"
#include "core/resource.h"
#include "servers/audio/audio_stream.h"
class AudioStreamMyToneResampled;
class AudioStreamPlaybackResampledMyTone : public AudioStreamPlaybackResampled {
GDCLASS(AudioStreamPlaybackResampledMyTone, AudioStreamPlaybackResampled)
friend class AudioStreamMyToneResampled;
private:
enum {
PCM_BUFFER_SIZE = 4096
};
enum {
MIX_FRAC_BITS = 13,
MIX_FRAC_LEN = (1 << MIX_FRAC_BITS),
MIX_FRAC_MASK = MIX_FRAC_LEN - 1,
};
void *pcm_buffer;
Ref<AudioStreamMyToneResampled> base;
bool active;
protected:
virtual void _mix_internal(AudioFrame *p_buffer, int p_frames);
public:
virtual void start(float p_from_pos = 0.0);
virtual void stop();
virtual bool is_playing() const;
virtual int get_loop_count() const; // times it looped
virtual float get_playback_position() const;
virtual void seek(float p_time);
virtual float get_length() const; // if supported, otherwise return 0
virtual float get_stream_sampling_rate();
AudioStreamPlaybackResampledMyTone();
~AudioStreamPlaybackResampledMyTone();
};
#include "mytone_audiostream_resampled.h"
#include "core/math/math_funcs.h"
#include "core/print_string.h"
AudioStreamPlaybackResampledMyTone::AudioStreamPlaybackResampledMyTone()
: active(false) {
AudioServer::get_singleton()->lock();
pcm_buffer = AudioServer::get_singleton()->audio_data_alloc(PCM_BUFFER_SIZE);
zeromem(pcm_buffer, PCM_BUFFER_SIZE);
AudioServer::get_singleton()->unlock();
}
AudioStreamPlaybackResampledMyTone::~AudioStreamPlaybackResampledMyTone() {
if (pcm_buffer) {
AudioServer::get_singleton()->audio_data_free(pcm_buffer);
pcm_buffer = NULL;
}
}
void AudioStreamPlaybackResampledMyTone::stop() {
active = false;
base->reset();
}
void AudioStreamPlaybackResampledMyTone::start(float p_from_pos) {
seek(p_from_pos);
active = true;
}
void AudioStreamPlaybackResampledMyTone::seek(float p_time) {
float max = get_length();
if (p_time < 0) {
p_time = 0;
}
base->set_position(uint64_t(p_time * base->mix_rate) << MIX_FRAC_BITS);
}
void AudioStreamPlaybackResampledMyTone::_mix_internal(AudioFrame *p_buffer, int p_frames) {
ERR_FAIL_COND(!active);
if (!active) {
return;
}
zeromem(pcm_buffer, PCM_BUFFER_SIZE);
int16_t *buf = (int16_t *)pcm_buffer;
base->gen_tone(buf, p_frames);
for(int i = 0; i < p_frames; i++) {
float sample = float(buf[i]) / 32767.0;
p_buffer[i] = AudioFrame(sample, sample);
}
}
float AudioStreamPlaybackResampledMyTone::get_stream_sampling_rate() {
return float(base->mix_rate);
}
int AudioStreamPlaybackResampledMyTone::get_loop_count() const {
return 0;
}
float AudioStreamPlaybackResampledMyTone::get_playback_position() const {
return 0.0;
}
float AudioStreamPlaybackResampledMyTone::get_length() const {
return 0.0;
}
bool AudioStreamPlaybackResampledMyTone::is_playing() const {
return active;
}
Custom Godot servers¶
Introduction¶
Godot implements multi-threading as servers. Servers are daemons which manages data, processes, and pushes the result. Servers implement the mediator pattern which interprets resource ID and process data for the engine and other modules. In addition, the server claims ownership for its RID allocations.
This guide assumes the reader knows how to create C++ modules and Godot data types. If not, refer to Custom modules in C++.
What for?¶
- Adding artificial intelligence.
- Adding custom asynchronous threads.
- Adding support for a new input device.
- Adding writing threads.
- Adding a custom VoIP protocol.
- And more…
Creating a Godot server¶
At minimum, a server must have a static instance, a sleep timer, a thread loop, an initialization state and a cleanup procedure.
#ifndef HILBERT_HOTEL_H
#define HILBERT_HOTEL_H
#include "core/list.h"
#include "core/object.h"
#include "core/os/thread.h"
#include "core/os/mutex.h"
#include "core/rid.h"
#include "core/set.h"
#include "core/variant.h"
class HilbertHotel : public Object {
GDCLASS(HilbertHotel, Object);
static HilbertHotel *singleton;
static void thread_func(void *p_udata);
private:
bool thread_exited;
mutable bool exit_thread;
Thread *thread;
Mutex *mutex;
public:
static HilbertHotel *get_singleton();
Error init();
void lock();
void unlock();
void finish();
protected:
static void _bind_methods();
private:
uint64_t counter;
RID_Owner<InfiniteBus> bus_owner;
// https://github.com/godotengine/godot/blob/master/core/rid.h#L196
Set<RID> buses;
void _emit_occupy_room(uint64_t room, RID rid);
public:
RID create_bus();
Variant get_bus_info(RID id);
bool empty();
bool delete_bus(RID id);
void clear();
void register_rooms();
HilbertHotel();
};
#endif
#include "hilbert_hotel.h"
#include "core/dictionary.h"
#include "core/list.h"
#include "core/os/os.h"
#include "core/variant.h"
#include "prime_225.h"
void HilbertHotel::thread_func(void *p_udata) {
HilbertHotel *ac = (HilbertHotel *) p_udata;
uint64_t msdelay = 1000;
while (!ac->exit_thread) {
if (!ac->empty()) {
ac->lock();
ac->register_rooms();
ac->unlock();
}
OS::get_singleton()->delay_usec(msdelay * 1000);
}
}
Error HilbertHotel::init() {
thread_exited = false;
counter = 0;
mutex = Mutex::create();
thread = Thread::create(HilbertHotel::thread_func, this);
return OK;
}
HilbertHotel *HilbertHotel::singleton = NULL;
HilbertHotel *HilbertHotel::get_singleton() {
return singleton;
}
void HilbertHotel::register_rooms() {
for (Set<RID>::Element *e = buses.front(); e; e = e->next()) {
auto bus = bus_owner.getornull(e->get());
if (bus) {
uint64_t room = bus->next_room();
_emit_occupy_room(room, bus->get_self());
}
}
}
void HilbertHotel::unlock() {
if (!thread || !mutex) {
return;
}
mutex->unlock();
}
void HilbertHotel::lock() {
if (!thread || !mutex) {
return;
}
mutex->lock();
}
void HilbertHotel::_emit_occupy_room(uint64_t room, RID rid) {
_HilbertHotel::get_singleton()->_occupy_room(room, rid);
}
Variant HilbertHotel::get_bus_info(RID id) {
InfiniteBus *)bus = bus_owner.getornull(id);
if (bus) {
Dictionary d;
d["prime"] = bus->get_bus_num();
d["current_room"] = bus->get_current_room();
return d;
}
return Variant();
}
void HilbertHotel::finish() {
if (!thread) {
return;
}
exit_thread = true;
Thread::wait_to_finish(thread);
memdelete(thread);
if (mutex) {
memdelete(mutex);
}
thread = NULL;
}
RID HilbertHotel::create_bus() {
lock();
InfiniteBus *ptr = memnew(InfiniteBus(PRIME[counter++]));
RID ret = bus_owner.make_rid(ptr);
ptr->set_self(ret);
buses.insert(ret);
unlock();
return ret;
}
// https://github.com/godotengine/godot/blob/master/core/rid.h#L187
bool HilbertHotel::delete_bus(RID id) {
if (bus_owner.owns(id)) {
lock();
InfiniteBus *b = bus_owner.get(id);
bus_owner.free(id);
buses.erase(id);
memdelete(b);
unlock();
return true;
}
return false;
}
void HilbertHotel::clear() {
for (Set<RID>::Element *e = buses.front(); e; e = e->next()) {
delete_bus(e->get());
}
}
bool HilbertHotel::empty() {
return buses.size() <= 0;
}
void HilbertHotel::_bind_methods() {
}
HilbertHotel::HilbertHotel() {
singleton = this;
}
/* prime_225.h */
#include "core/int_types.h"
const uint64_t PRIME[225] = {
2,3,5,7,11,13,17,19,23,
29,31,37,41,43,47,53,59,61,
67,71,73,79,83,89,97,101,103,
107,109,113,127,131,137,139,149,151,
157,163,167,173,179,181,191,193,197,
199,211,223,227,229,233,239,241,251,
257,263,269,271,277,281,283,293,307,
311,313,317,331,337,347,349,353,359,
367,373,379,383,389,397,401,409,419,
421,431,433,439,443,449,457,461,463,
467,479,487,491,499,503,509,521,523,
541,547,557,563,569,571,577,587,593,
599,601,607,613,617,619,631,641,643,
647,653,659,661,673,677,683,691,701,
709,719,727,733,739,743,751,757,761,
769,773,787,797,809,811,821,823,827,
829,839,853,857,859,863,877,881,883,
887,907,911,919,929,937,941,947,953,
967,971,977,983,991,997,1009,1013,1019,
1021,1031,1033,1039,1049,1051,1061,1063,1069,
1087,1091,1093,1097,1103,1109,1117,1123,1129,
1151,1153,1163,1171,1181,1187,1193,1201,1213,
1217,1223,1229,1231,1237,1249,1259,1277,1279,
1283,1289,1291,1297,1301,1303,1307,1319,1321,
1327,1361,1367,1373,1381,1399,1409,1423,1427
};
Custom managed resource data¶
Godot servers implement a mediator pattern. All data types inherit RID_Data.
RID_Owner<MyRID_Data> owns the object when make_rid is called. During debug mode only,
RID_Owner maintains a list of RIDs. In practice, RIDs are similar to writing
object-oriented C code.
class InfiniteBus : public RID_Data {
RID self;
private:
uint64_t prime_num;
uint64_t num;
public:
uint64_t next_room() {
return prime_num * num++;
}
uint64_t get_bus_num() const {
return prime_num;
}
uint64_t get_current_room() const {
return prime_num * num;
}
_FORCE_INLINE_ void set_self(const RID &p_self) {
self = p_self;
}
_FORCE_INLINE_ RID get_self() const {
return self;
}
InfiniteBus(uint64_t prime) : prime_num(prime), num(1) {};
~InfiniteBus() {};
}
References¶
Registering the class in GDScript¶
Servers are allocated in register_types.cpp. The constructor sets the static
instance and init() creates the managed thread; unregister_types.cpp
cleans up the server.
Since a Godot server class creates an instance and binds it to a static singleton, binding the class might not reference the correct instance. Therefore, a dummy class must be created to reference the proper Godot server.
In register_server_types(), Engine::get_singleton()->add_singleton
is used to register the dummy class in GDScript.
/* register_types.cpp */
#include "register_types.h"
#include "core/class_db.h"
#include "core/engine.h"
#include "hilbert_hotel.h"
static HilbertHotel *hilbert_hotel = NULL;
static _HilbertHotel *_hilbert_hotel = NULL;
void register_hilbert_hotel_types() {
hilbert_hotel = memnew(HilbertHotel);
hilbert_hotel->init();
_hilbert_hotel = memnew(_HilbertHotel);
ClassDB::register_class<_HilbertHotel>();
Engine::get_singleton()->add_singleton(Engine::Singleton("HilbertHotel", _HilbertHotel::get_singleton()));
}
void unregister_hilbert_hotel_types() {
if (hilbert_hotel) {
hilbert_hotel->finish();
memdelete(hilbert_hotel);
}
if (_hilbert_hotel) {
memdelete(_hilbert_hotel);
}
}
/* register_types.h */
/* Yes, the word in the middle must be the same as the module folder name */
void register_hilbert_hotel_types();
void unregister_hilbert_hotel_types();
Bind methods¶
The dummy class binds singleton methods to GDScript. In most cases, the dummy class methods wraps around.
Variant _HilbertHotel::get_bus_info(RID id) {
return HilbertHotel::get_singleton()->get_bus_info(id);
}
Binding Signals
It is possible to emit signals to GDScript by calling the GDScript dummy object.
void HilbertHotel::_emit_occupy_room(uint64_t room, RID rid) {
_HilbertHotel::get_singleton()->_occupy_room(room, rid);
}
class _HilbertHotel : public Object {
GDCLASS(_HilbertHotel, Object);
friend class HilbertHotel;
static _HilbertHotel *singleton;
protected:
static void _bind_methods();
private:
void _occupy_room(int room_number, RID bus);
public:
RID create_bus();
void connect_signals();
bool delete_bus(RID id);
static _HilbertHotel *get_singleton();
Variant get_bus_info(RID id);
_HilbertHotel();
~_HilbertHotel();
};
#endif
_HilbertHotel *_HilbertHotel::singleton = NULL;
_HilbertHotel *_HilbertHotel::get_singleton() { return singleton; }
RID _HilbertHotel::create_bus() {
return HilbertHotel::get_singleton()->create_bus();
}
bool _HilbertHotel::delete_bus(RID rid) {
return HilbertHotel::get_singleton()->delete_bus(rid);
}
void _HilbertHotel::_occupy_room(int room_number, RID bus) {
emit_signal("occupy_room", room_number, bus);
}
Variant _HilbertHotel::get_bus_info(RID id) {
return HilbertHotel::get_singleton()->get_bus_info(id);
}
void _HilbertHotel::_bind_methods() {
ClassDB::bind_method(D_METHOD("get_bus_info", "r_id"), &_HilbertHotel::get_bus_info);
ClassDB::bind_method(D_METHOD("create_bus"), &_HilbertHotel::create_bus);
ClassDB::bind_method(D_METHOD("delete_bus"), &_HilbertHotel::delete_bus);
ADD_SIGNAL(MethodInfo("occupy_room", PropertyInfo(Variant::INT, "room_number"), PropertyInfo(Variant::_RID, "r_id")));
}
void _HilbertHotel::connect_signals() {
HilbertHotel::get_singleton()->connect("occupy_room", _HilbertHotel::get_singleton(), "_occupy_room");
}
_HilbertHotel::_HilbertHotel() {
singleton = this;
}
_HilbertHotel::~_HilbertHotel() {
}
MessageQueue¶
In order to send commands into SceneTree, MessageQueue is a thread-safe buffer
to queue set and call methods for other threads. To queue a command, obtain
the target object RID and use either push_call, push_set, or push_notification
to execute the desired behavior. The queue will be flushed whenever either
SceneTree::idle or SceneTree::iteration is executed.
References:¶
Summing it up¶
Here is the GDScript sample code:
extends Node
func _ready():
print("Start debugging")
HilbertHotel.connect("occupy_room", self, "_print_occupy_room")
var rid = HilbertHotel.create_bus()
OS.delay_msec(2000)
HilbertHotel.create_bus()
OS.delay_msec(2000)
HilbertHotel.create_bus()
OS.delay_msec(2000)
print(HilbertHotel.get_bus_info(rid))
HilbertHotel.delete_bus(rid)
print("Ready done")
func _print_occupy_room(room_number, r_id):
print("Room number: " + str(room_number) + ", RID: " + str(r_id))
print(HilbertHotel.get_bus_info(r_id))
Notes¶
- The actual Hilbert Hotel is impossible.
- Connecting signal example code is pretty hacky.
Editor development¶
Introduction¶
As the engine is constantly evolving and new features are being added, it is important to familiarize yourself with the editor and tools development in C++. Without the editor, some of the engine’s internal functionality would become unaccessible and make the development not intuitive.
Editor icons¶
When a new class is created and exposed to scripting, the editor’s interface will display it with a default icon representing the base class it inherits from. Yet in most cases it is recommended to create icons for new classes to improve the user experience.
Creating icons¶
In order to create new icons, you first need a vector graphics editor installed. For instance, you can use the open-source Inkscape editor.
Clone the godot-design repository containing all the original editor icons:
git clone https://github.com/godotengine/godot-design
The icons must be created in a vector graphics editor in svg format. You
can use engine/icons/inkscape_template.svg with default icon properties
already set up.
Once you’re satisfied with the icon’s design, save the icon in
engine/icons/svg/ folder. But in order for the engine to automatically
pick up the icons, each icon’s filename:
Must be prefixed with
icon_.PascalCasename should be converted tosnake_case, so words are separated by_whenever case changes, and uppercase acronyms must also have all letters, numbers, and special characters separated as distinct words. Some examples:Name Filename Polygon2Dicon_polygon_2_d.svgCSGPolygonicon_c_s_g_polygon.svgCPUParticles2Dicon_c_p_u_particles_2_d.svgC#icon_c_#.svg
Icon optimization¶
Because the editor renders the svg’s at runtime, they need to be small
in size, so they can be efficiently parsed. Editor icons must be first
optimized before being added to the engine, to do so:
Add them to the
engine/icons/svgfolder.Run the
optimize.pyscript. You must have thescourpackage installed:pip install scour cd godot-design/engine/icons && ./optimize.py
The optimized icons will be generated in the engine/icons/optimized folder.
Integrating and sharing the icons¶
If you’re contributing to the engine itself, you should make a pull request to
add optimized icons to godot/editor/icons in the main repository. Recompile
the engine to make sure it does pick up new icons for classes. Once merged,
don’t forget to add the original version of the icons to the godot-design
repository so that the icon can be improved upon by other contributors.
It’s also possible to create custom icons within a module. If you’re creating your own module and don’t plan to integrate it with Godot, you don’t need to make a separate pull request for your icons to be available within the editor as they can be self-contained.
For specific instructions on how to create module icons, refer to Creating custom module icons.
Troubleshooting¶
If icons don’t appear in the editor make sure that:
- Each icon’s filename matches the naming requirement as described previously.
modules/svgis enabled (should be enabled by default). Without it, icons won’t appear in the editor at all.
References:¶
Godot file formats¶
TSCN file format¶
The TSCN (text scene) file format represents a single scene tree inside
Godot. TSCN files have the advantage of being mostly human-readable and easy for
version control systems to manage. During import, TSCN files are compiled into
binary .scn files stored inside the .import folder. This reduces the data
size and speeds up loading.
The ESCN (exported scene) file format is identical to the TSCN file format, but is used to indicate to Godot that the file has been exported from another program and should not be edited by the user from within Godot.
For those looking for a complete description, the parsing is handled in the file
resource_format_text.cpp
in the ResourceFormatLoaderText class.
File structure¶
There are five main sections inside the TSCN file:
- File Descriptor
- External resources
- Internal resources
- Nodes
- Connections
The file descriptor looks like [gd_scene load_steps=1 format=2] and should
be the first entry in the file. The load_steps parameter should (in theory)
be the number of resources within the file. However, in practice, its value seems
not to matter.
These sections should appear in order, but it can be hard to distinguish them.
The only difference between them is the first element in the heading for all of
the items in the section. For example, the heading of all external resources
should start with [ext_resource .....].
A TSCN file may contain single-line comments starting with a semicolon (;).
However, comments will be discarded when saving the file using the Godot editor.
Entries inside the file¶
A heading looks like
[<resource_type> key=value key=value key=value ...]
where resource_type is one of:
ext_resourcesub_resourcenodeconnection
Below every heading comes zero or more key = value pairs. The
values can be complex datatypes such as Arrays, Transforms, Colors, and
so on. For example, a spatial node looks like:
[node name="Cube" type="Spatial" parent="."]
transform=Transform( 1.0, 0.0, 0.0 ,0.0, 1.0, 0.0, 0.0, 0.0, 1.0, 0.0, 0.0, 0.0 )
The scene tree¶
The scene tree is made up of… nodes! The heading of each node consists of
its name, parent and (most of the time) a type. For example
[node type="Camera" name="PlayerCamera" parent="Player/Head"]
Other valid keywords include:
instanceinstance_placeholderownerindex(if two nodes have the same name)groups
The first node in the file, which is also the scene root, must not have a
parent=Path/To/Node entry in its heading. All scene files should have
exactly one scene root. If it doesn’t, Godot will fail to import the file.
The parent path of other nodes should be absolute, but shouldn’t contain
the scene root’s name. If the node is a direct child of the scene root,
the path should be ".". Here is an example scene tree
(but without any node content):
[node name="Player" type="Spatial"] ; The scene root
[node name="Arm" parent="." type="Spatial"] ; Parented to the scene root
[node name="Hand" parent="Arm" type="Spatial"]
[node name="Finger" parent="Arm/Hand" type="Spatial"]
Similar to the internal resource, the document for each node is currently incomplete. Fortunately, it is easy to find out because you can simply save a file with that node in it. Some example nodes are:
[node type="CollisionShape" name="SphereCollision" parent="SpherePhysics"]
shape = SubResource(8)
transform = Transform( 1.0 , 0.0 , -0.0 , 0.0 , -4.371138828673793e-08 , 1.0 , -0.0 , -1.0 , -4.371138828673793e-08 ,0.0 ,0.0 ,-0.0 )
[node type="MeshInstance" name="Sphere" parent="SpherePhysics"]
mesh = SubResource(9)
transform = Transform( 1.0 , 0.0 , -0.0 , 0.0 , 1.0 , -0.0 , -0.0 , -0.0 , 1.0 ,0.0 ,0.0 ,-0.0 )
[node type="OmniLight" name="Lamp" parent="."]
light_energy = 1.0
light_specular = 1.0
transform = Transform( -0.29086464643478394 , -0.7711008191108704 , 0.5663931369781494 , -0.05518905818462372 , 0.6045246720314026 , 0.7946722507476807 , -0.9551711678504944 , 0.199883371591568 , -0.21839118003845215 ,4.076245307922363 ,7.3235554695129395 ,-1.0054539442062378 )
omni_range = 30
shadow_enabled = true
light_negative = false
light_color = Color( 1.0, 1.0, 1.0, 1.0 )
[node type="Camera" name="Camera" parent="."]
projection = 0
near = 0.10000000149011612
fov = 50
transform = Transform( 0.6859206557273865 , -0.32401350140571594 , 0.6515582203865051 , 0.0 , 0.8953956365585327 , 0.44527143239974976 , -0.7276763319969177 , -0.3054208755493164 , 0.6141703724861145 ,14.430776596069336 ,10.093015670776367 ,13.058500289916992 )
far = 100.0
NodePath¶
A tree structure is not enough to represent the whole scene. Godot uses a
NodePath(Path/To/Node) structure to refer to another node or attribute of
the node anywhere in the scene tree. For instance, MeshInstance uses
NodePath() to point to its skeleton. Likewise, Animation tracks use
NodePath() to point to node properties to animate.
[node name="mesh" type="MeshInstance" parent="Armature001"]
mesh = SubResource(1)
skeleton = NodePath("..:")
[sub_resource id=3 type="Animation"]
...
tracks/0/type = "transform
tracks/0/path = NodePath("Cube:")
...
Skeleton¶
The Skeleton node inherits the Spatial node, but also may have a list of bones
described in key-value pairs in the format bones/Id/Attribute=Value. The
bone attributes consist of:
nameparentrestposeenabledbound_children
namemust be the first attribute of each bone.parentis the index of parent bone in the bone list, with parent index, the bone list is built to a bone tree.restis the transform matrix of bone in its “resting” position.poseis the pose matrix; userestas the basis.bound_childrenis a list ofNodePath()which point to BoneAttachments belonging to this bone.
Here’s an example of a skeleton node with two bones:
[node name="Skeleton" type="Skeleton" parent="Armature001" index="0"]
bones/0/name = "Bone.001"
bones/0/parent = -1
bones/0/rest = Transform( 1, 0, 0, 0, 0, -1, 0, 1, 0, 0.038694, 0.252999, 0.0877164 )
bones/0/pose = Transform( 1.0, 0.0, -0.0, 0.0, 1.0, -0.0, -0.0, -0.0, 1.0, 0.0, 0.0, -0.0 )
bones/0/enabled = true
bones/0/bound_children = [ ]
bones/1/name = "Bone.002"
bones/1/parent = 0
bones/1/rest = Transform( 0.0349042, 0.99939, 0.000512929, -0.721447, 0.0248417, 0.692024, 0.691589, -0.0245245, 0.721874, 0, 5.96046e-08, -1.22688 )
bones/1/pose = Transform( 1.0, 0.0, -0.0, 0.0, 1.0, -0.0, -0.0, -0.0, 1.0, 0.0, 0.0, -0.0 )
bones/1/enabled = true
bones/1/bound_children = [ ]
BoneAttachment¶
BoneAttachment node is an intermediate node to describe some node being parented
to a single bone in a Skeleton node. The BoneAttachment has a
bone_name=NameOfBone attribute, and the corresponding bone being the parent has the
BoneAttachment node in its bound_children list.
An example of one MeshInstance parented to a bone in Skeleton:
[node name="Armature" type="Skeleton" parent="."]
transform = Transform(1.0, 0.0, 0.0, 0.0, 1.0, 0.0, 0.0, 0.0, 1.0, -0.0219986, 0.0125825, 0.0343127)
bones/0/name = "Bone"
bones/0/parent = -1
bones/0/rest = Transform(1.0, 0.0, 0.0, 0.0, 0.0, -1.0, 0.0, 1.0, 0.0, 0.0, 0.0, 0.0)
bones/0/pose = Transform(1.0, 0.0, 0.0, 0.0, 1.0, 0.0, 0.0, 0.0, 1.0, 0.0, 0.0, 0.0)
bones/0/enabled = true
bones/0/bound_children = [NodePath("BoneAttachment:")]
[node name="BoneAttachment" type="BoneAttachment" parent="Armature"]
bone_name = "Bone"
[node name="Cylinder" type="MeshInstance" parent="Armature/BoneAttachment"]
mesh = SubResource(1)
transform = Transform(1.0, 0.0, 0.0, 0.0, 1.86265e-09, 1.0, 0.0, -1.0, 0.0, 0.0219986, -0.0343127, 2.25595)
AnimationPlayer¶
AnimationPlayer works as an animation library. It stores animations listed in
the format anim/Name=SubResource(ResourceId); each line refers to an
Animation resource. All the animation resources use the root node of
AnimationPlayer. The root node is stored as
root_node=NodePath(Path/To/Node).
[node name="AnimationPlayer" type="AnimationPlayer" parent="." index="1"]
root_node = NodePath("..")
autoplay = ""
playback_process_mode = 1
playback_default_blend_time = 0.0
playback_speed = 1.0
anims/default = SubResource( 2 )
blend_times = [ ]
Resources¶
Resources are components that make up the nodes. For example, a MeshInstance node will have an accompanying ArrayMesh resource. The ArrayMesh resource may be either internal or external to the TSCN file.
References to the resources are handled by id numbers in the resource’s
heading. External resources and internal resources are referred to with
ExtResource(id) and SubResource(id), respectively. Because there
have different methods to refer to internal and external resources, you can have
the same ID for both an internal and external resource.
For example, to refer to the resource [ext_resource id=3 type="PackedScene"
path=....], you would use ExtResource(3).
External resources¶
External resources are links to resources not contained within the TSCN file itself. An external resource consists of a path, a type and an ID.
Godot always generates absolute paths relative to the resource directory and
thus prefixed with res://, but paths relative to the TSCN file’s location
are also valid.
Some example external resources are:
[ext_resource path="res://characters/player.dae" type="PackedScene" id=1]
[ext_resource path="metal.tres" type="Material" id=2]
Like TSCN files, a TRES file may contain single-line comments starting with a
semicolon (;). However, comments will be discarded when saving the resource
using the Godot editor.
Internal resources¶
A TSCN file can contain meshes, materials and other data. These are contained in
the internal resources section of the file. The heading for an internal
resource looks similar to those of external resources, except that it doesn’t
have a path. Internal resources also have key=value pairs under each
heading. For example, a capsule collision shape looks like:
[sub_resource type="CapsuleShape" id=2]
radius = 0.5
height = 3.0
Some internal resources contain links to other internal resources (such as a mesh having a material). In this case, the referring resource must appear before the reference to it. This means that order matters in the file’s internal resources section.
Unfortunately, documentation on the formats for these subresources isn’t complete. Some examples can be found by inspecting saved resource files, but others can only be found by looking through Godot’s source.
ArrayMesh¶
ArrayMesh consists of several surfaces, each in the format surface\Index={}.
Each surface is a set of vertices and a material.
TSCN files support two surface formats:
- For the old format, each surface has three essential keys:
primitivearraysmorph_arraysprimitiveis an enumerate variable,primitive=4which isPRIMITIVE_TRIANGLESis frequently used.arraysis a two-dimensional array, it contains:- Vertex positions array
- Tangents array
- Vertex colors array
- UV array 1
- UV array 2
- Bone indexes array
- Bone weights array
- Vertex indexes array
morph_arraysis an array of morphs. Each morph is exactly anarrayswithout the vertex indexes array.
An example of ArrayMesh:
[sub_resource id=1 type="ArrayMesh"]
surfaces/0 = {
"primitive":4,
"arrays":[
Vector3Array(0.0, 1.0, -1.0, 0.866025, -1.0, -0.5, 0.0, -1.0, -1.0, 0.866025, 1.0, -0.5, 0.866025, -1.0, 0.5, 0.866025, 1.0, 0.5, -8.74228e-08, -1.0, 1.0, -8.74228e-08, 1.0, 1.0, -0.866025, -1.0, 0.5, -0.866025, 1.0, 0.5, -0.866025, -1.0, -0.5, -0.866025, 1.0, -0.5),
Vector3Array(0.0, 0.609973, -0.792383, 0.686239, -0.609973, -0.396191, 0.0, -0.609973, -0.792383, 0.686239, 0.609973, -0.396191, 0.686239, -0.609973, 0.396191, 0.686239, 0.609973, 0.396191, 0.0, -0.609973, 0.792383, 0.0, 0.609973, 0.792383, -0.686239, -0.609973, 0.396191, -0.686239, 0.609973, 0.396191, -0.686239, -0.609973, -0.396191, -0.686239, 0.609973, -0.396191),
null, ; No Tangents,
null, ; no Vertex Colors,
null, ; No UV1,
null, ; No UV2,
null, ; No Bones,
null, ; No Weights,
IntArray(0, 2, 1, 3, 1, 4, 5, 4, 6, 7, 6, 8, 0, 5, 9, 9, 8, 10, 11, 10, 2, 1, 10, 8, 0, 1, 3, 3, 4, 5, 5, 6, 7, 7, 8, 9, 5, 0, 3, 0, 9, 11, 9, 5, 7, 9, 10, 11, 11, 2, 0, 10, 1, 2, 1, 6, 4, 6, 1, 8)
],
"morph_arrays":[]
}
Animation¶
An animation resource consists of tracks. Besides, it has length, loop
and step applied to all the tracks.
lengthandstepare both durations in seconds.
Each track is described by a list of key-value pairs in the format
tracks/Id/Attribute. Each track includes:
typepathinterpkeysloop_wrapimportedenabled
The
typemust be the first attribute of each track. The value oftypecan be:transformvaluemethod
The
pathhas the formatNodePath(Path/To/Node:attribute). It’s the path to the animated node or attribute, relative to the root node defined in the AnimationPlayer.The
interpis the method to interpolate frames from the keyframes. it is a enum variable and can has value:- 0 (constant)
- 1 (linear)
- 2 (cubic)
The
keyscorrespond to the keyframes. It appears as aPoolRealArray(), but may have a different structure for tracks with different types.- A Transform track uses every 12 real numbers in the
keysto describe a keyframe. The first number is the timestamp. The second number is the transition followed by a 3-number translation vector, followed by a 4-number rotation quaternion (X, Y, Z, W) and finally a 3-number scale vector. The default transition in a Transform track is 1.0.
- A Transform track uses every 12 real numbers in the
[sub_resource type="Animation" id=2]
length = 4.95833
loop = false
step = 0.1
tracks/0/type = "transform"
tracks/0/path = NodePath("Armature001")
tracks/0/interp = 1
tracks/0/loop_wrap = true
tracks/0/imported = true
tracks/0/enabled = true
tracks/0/keys = PoolRealArray( 0, 1, -0.0358698, -0.829927, 0.444204, 0, 0, 0, 1, 0.815074, 0.815074, 0.815074, 4.95833, 1, -0.0358698, -0.829927, 0.444204, 0, 0, 0, 1, 0.815074, 0.815074, 0.815074 )
tracks/1/type = "transform"
tracks/1/path = NodePath("Armature001/Skeleton:Bone.001")
tracks/1/interp = 1
tracks/1/loop_wrap = true
tracks/1/imported = true
tracks/1/enabled = false
tracks/1/keys = PoolRealArray( 0, 1, 0, 5.96046e-08, 0, 0, 0, 0, 1, 1, 1, 1, 4.95833, 1, 0, 5.96046e-08, 0, 0, 0, 0, 1, 1, 1, 1 )
Contributing¶
Ways to contribute¶
Godot Engine is a non-profit, community-driven free and open source project. Almost all (but our lead dev Juan, more on that below) developers are working pro bono on their free time, out of personal interest and for the love of creating a libre engine of exceptional quality.
This means that to thrive, Godot needs as many users as possible to get involved by contributing to the engine. There are many ways to contribute to such a big project, making it possible for everybody to bring something positive to the engine, regardless of their skill set:
- Be part of the community. The best way to contribute to Godot and help it become ever better is simply to use the engine and promote it by word-of-mouth, in the credits or splash screen of your games, blog posts, tutorials, videos, demos, gamedev or free software events, support on the Q&A, IRC, forums, Discord, etc. Participate! Being a user and advocate helps spread the word about our great engine, which has no marketing budget and can therefore only rely on its community to become more mainstream.
- Make games. It’s no secret that, to convince new users and especially the industry at large that Godot is a relevant market player, we need great games made with Godot. We know that the engine has a lot of potential, both for 2D and 3D games, but given its young age we still lack big releases that will draw attention to Godot. So keep working on your awesome projects, each new game increases our credibility on the gamedev market!
- Get involved in the engine’s development. This can be by contributing code via pull requests, testing the development snapshots or directly the git master branch, report bugs or suggest enhancements on the issue tracker, improve the official documentation (both the class reference and tutorials) and its translations. The following sections will cover each of those “direct” ways of contributing to the engine.
- Donate. Godot is a non-profit project, but it can still benefit from user donations for many things. Apart from usual expenses such as hosting costs or promotional material on events, we also use donation money to acquire hardware when necessary (e.g. we used donation money to buy a Macbook Pro to implement Retina/HiDPI support and various other macOS-related features). Most importantly, we also used donation money to hire core developers so they can work full-time on the engine. Even with a low monthly wage, we need a steady donation income to continue doing this, which has been very beneficial to the project so far. So if you want to donate some money to the project, check our website for details.
Contributing code¶
The possibility to study, use, modify and redistribute modifications of the engine’s source code are the fundamental rights that Godot’s MIT license grants you, making it free and open source software.
As such, everyone is entitled to modify Godot’s source code, and send those modifications back to the upstream project in the form of a patch (a text file describing the changes in a ready-to-apply manner) or - in the modern workflow that we use - via a so-called “pull request” (PR), i.e. a proposal to directly merge one or more git commits (patches) into the main development branch.
Contributing code changes upstream has two big advantages:
- Your own code will be reviewed and improved by other developers, and will be further maintained directly in the upstream project, so you won’t have to reapply your own changes every time you move to a newer version. On the other hand it comes with a responsibility, as your changes have to be generic enough to be beneficial to all users, and not just your project; so in some cases it might still be relevant to keep your changes only for your own project, if they are too specific.
- The whole community will benefit from your work, and other contributors will behave the same way, contributing code that will be beneficial to you. At the time of this writing, more than 300 developers have contributed code changes to the engine!
To ensure good collaboration and overall quality, the Godot developers enforce some rules for code contributions, for example regarding the style to use in the C++ code (indentation, brackets, etc.) or the git and PR workflow.
A good place to start is by searching for issues tagged as junior jobs (or Hacktoberfest during October) on GitHub.
See also
Technical details about the PR workflow are outlined in a specific section, Pull request workflow.
Details about the code style guidelines and the clang-format
tool used to enforce them are outlined in
Code style guidelines.
Testing and reporting issues¶
Another great way of contributing to the engine is to test development releases or the development branch and to report issues. It is also helpful to report issues discovered in stable releases, so that they can be fixed in the development branch and in future maintenance releases.
Testing development versions¶
To help with the testing, you have several possibilities:
- Compile the engine from source yourself, following the instructions of the Compiling page for your platform.
- Test official pre-release binaries when they are announced (usually on the blog and other community platforms), such as alpha, beta and release candidate (RC) builds.
- Test “trusted” unofficial builds of the development branch; just ask community members for reliable providers. Whenever possible, it’s best to use official binaries or to compile yourself though, to be sure about the provenance of your binaries.
As mentioned previously, it is also helpful to keep your eyes peeled for potential bugs that might still be present in the stable releases, especially when using some niche features of the engine which might get less testing by the developers.
Filing an issue on GitHub¶
Godot uses GitHub’s issue tracker for bug reports and enhancement suggestions. You will need a GitHub account to be able to open a new issue there, and click on the “New issue” button.
When you report a bug, you should keep in mind that the process is similar to an appointment with your doctor. You noticed symptoms that make you think that something might be wrong (the engine crashes, some features don’t work as expected, etc.). It’s the role of the bug triaging team and the developers to then help make the diagnosis of the issue you met, so that the actual cause of the bug can be identified and addressed.
You should therefore always ask yourself: what is relevant information to give so that other Godot contributors can understand the bug, identify it and hopefully fix it. Here are some of the most important infos that you should always provide:
- Operating system. Sometimes bugs are system-specific, i.e. they happen only on Windows, or only on Linux, etc. That’s particularly relevant for all bugs related to OS interfaces, such as file management, input, window management, audio, etc.
- Hardware. Sometimes bugs are hardware-specific, i.e. they happen only on certain processors, graphic cards, etc. If you are able to, it can be helpful to include information on your hardware.
- Godot version. This is a must have. Some issues might be relevant in the current stable release, but fixed in the development branch, or the other way around. You might also be using an obsolete version of Godot and experiencing a known issue fixed in a later version, so knowing this from the start helps to speed up the diagnosis.
- How to reproduce the bug. In the majority of cases, bugs are reproducible, i.e. it is possible to trigger them reliably by following some steps. Please always describe those steps as clearly as possible, so that everyone can try to reproduce the issue and confirm it. Ideally, make a demo project that reproduces this issue out of the box, zip it and attach it to the issue (you can do this by drag and drop). Even if you think that the issue is trivial to reproduce, adding a minimal project that lets reproduce it is a big added value. You have to keep in mind that there are thousands of issues in the tracker, and developers can only dedicate little time to each issue.
When you click the “New issue” button, you should be presented with a text area prefilled with our issue template. Please try to follow it so that all issues are consistent and provide the required information.
Contributing to the documentation¶
There are two separate resources referred to as “documentation” in Godot:
- The class reference. This is the documentation for the complete Godot API as exposed to GDScript and the other scripting languages. It can be consulted offline, directly in Godot’s code editor, or online at Godot API. To contribute to the class reference, you have to edit the doc/base/classes.xml in Godot’s git repository, and make a pull request. See Contribute to the Class Reference for more details.
- The tutorials and engine documentation and its translations. This is the part you are reading now, which is distributed in the HTML, PDF and EPUB formats. Its contents are generated from plain text files in the reStructured Text (rst) format, to which you can contribute via pull requests on the godot-docs GitHub repository. See Documentation guidelines for more details.
Best practices for engine contributors¶
Introduction¶
Godot has a large amount of users who have the ability to contribute, given the project itself is aimed mainly at users with the ability to do programming. Despite this, not all of them have the same level of experience working in large projects or in software engineering, which can lead to common misunderstandings and bad practices during the process of contributing code to the project.
Language¶
The scope of this document is to be a list of best practices for contributors to follow, as well as to creating a language they can use to refer to common situations that arise in the process of submitting their contributions.
While some may find it useful to extend this to general software development, our intention is to just restrict to situations that are most common in our project.
Contributions are most of the time categorized as bug fixes, enhancements or new features. To abstract this idea, we will call them Solutions, because they always seek to solve something that can be described as a Problem.
Best Practices¶
#1: The problem always comes first¶
Many contributors are extremely creative and just enjoy the process of designing abstract data structures, creating nice user interfaces,or simply love programming. Whatever the case may be, they come up with cool ideas, which may not be actually solving any actual problems.
These are usually called Solutions in search of a problem. In an ideal world, they would not be harmful but, in reality, code takes time to write, takes space as source and binary and requires maintenance once it exists. Avoiding the addition of anything unnecessary is always considered a good practice in software development.
#2: The problem has to exist¶
This is a variation of the previous practice. I believe most developers agree that adding anything unnecessary is not a good idea, but what constitutes what is necessary and what isn’t?
The answer to this question is that the problem needs to exist. It must not be speculation or a belief. The user must be using the software as intended to create something they need. In this process, the user may stumble into a problem that requires a solution in order to continue, or in order to achieve greater productivity. In this case, a solution is needed.
Believing that problems may arise in the future and that the software needs to be ready to solve them by the time they appear is called “Future proofing” and its characterized by lines of thought such as:
- I think it would be useful for users to…
- I think users will eventually need to…
This is generally considered a bad habit, because trying to solve problems that don’t actually exist in the present will very often lead to code that will be written but never used, or to code that is considerably more complex to use and maintain than it needs to be.
#3: The problem has to be complex or frequent¶
Software is designed to solve problems, but we can’t expect it to solve every problem that exists under the sun. As a game engine, Godot will solve problems for you, so it helps you to make games better and faster, but it won’t make the entire game for you. A line must be drawn somewhere.
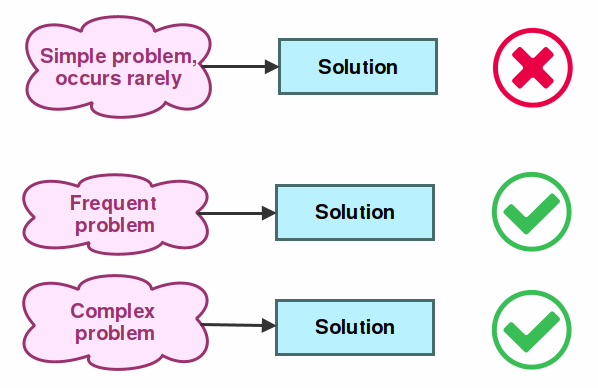
Whether a problem is worth solving is determined by the difficulty the user has to work around it. This difficulty can be expressed as:
- The complexity of the problem
- The frequency the problem
If the problem is too complex for most users to solve, the software must offer a ready made solution for it. Likewise, if the problem is easy for the user to workaround, offering such a solution is unnecessary and it’s up to the user to do it.
The exception, however, is when the user stumbles into this problem frequently enough that having to do the simple solution every time becomes an annoyance. In this case, the software must offer a solution to simplify this use case.
In our experience, in most cases it’s usually obvious to tell when a problem is complex or frequent, but cases may arise where drawing this line is difficult. This is why discussing with other developers (next point) is always advised.
#4: The solution must be discussed with others¶
It is often the case that, when users stumble upon problems, they are only immersed in their own project, so they will naturally try to solve the problem from their own perspective, thinking only about their use case.
Because of this, user proposed solutions don’t always contemplate other use cases that developers are often aware of, so they are often biased towards their own requirements.

For developers, the perspective is different. They may find the user’s problem too unique to justify a solution (instead of an user workaround), or maybe they will suggest a partial (usually simpler or lower level) solution that applies to a wider range of known problems, and leave the rest of the solution up to the user.
In any case, before attempting a contribution, it is important to discuss the actual problems with the other developers or contributors, so a better agreement on implementation can be reached.
The only exception, in this case, is when an area of code has a clear owner (agreed by the other contributors), who talks to users directly and has the most knowledge to implement a solution directly.
#5: To each problem, its own solution¶
For programmers, it is always a most enjoyable challenge to find the most optimal solutions to problems. Things, however, may go overboard sometimes and programmers will try to come up with solutions that solve as many problems as possible.
The situation will often take a turn for the worse when, in order to make this solution appear even more fantastic and flexible, the pure speculation-based problems (as described in #2) also make their appearance on stage.
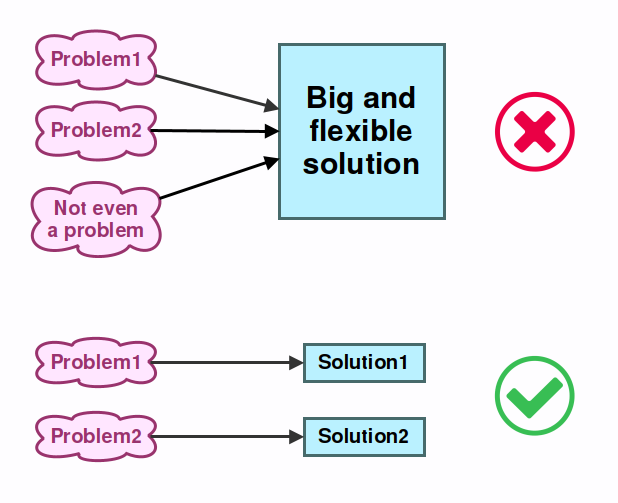
The main problem is that, in reality, it rarely works this way. Most of the time, just writing an individual solution to each problem results in code that is simpler and more maintainable.
Additionally, solutions that target individual problems are better for the users, as they find something that does exactly what they need, without having to learn and remember a more complex system they will only need for simple tasks.
Big and flexible solutions also have an additional drawback which is that, over time, they rarely are flexible enough for all users, which keep requesting more functions added (and making the API and codebase more and more complex).
#6: Cater to common use cases, leave the door open for the rare ones¶
This is a continuation of the previous point, which further explains why this way of thinking and designing software is preferred.
As mentioned before (in point #2), it is very difficult for us (as human beings who design software) to actually understand all future user needs. Trying to write very flexible structures that cater to many use cases at once is often a mistake.
We may come up with something we believe is brilliant, but when it’s actually used, we will find that users will never even use half of it, or that they will require features that don’t quite accommodate our original design, forcing us to either throw it away or make it even more complex.
The question is then, how to design software that gives users what we know they need, but that is flexible enough to allow them to do what we don’t know they might need in the future?
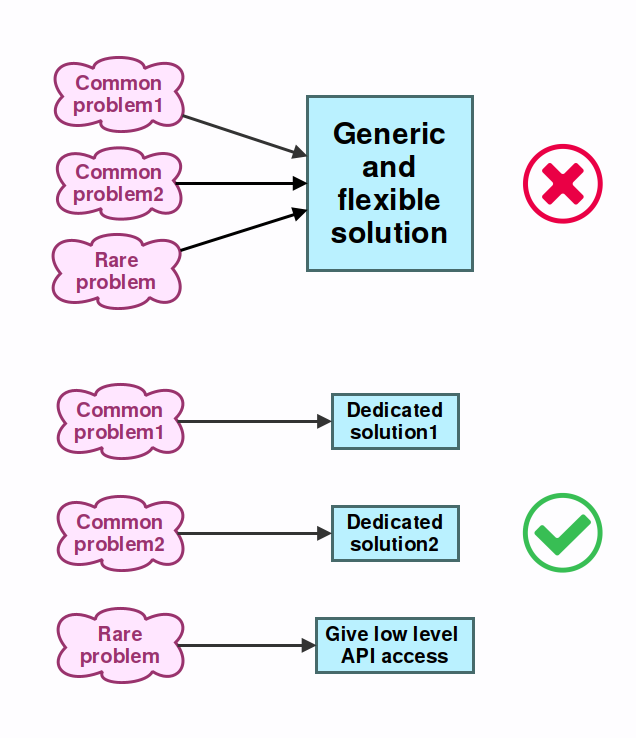
The answer to this question is that, to ensure users still can do what they want to do, we need to give them access to a low level API that they can use to achieve what they want, even if it’s more work for them because it means reimplementing some of the logic that already exists.
In real-life scenarios, these use cases will be at most rare and uncommon anyway, so it makes sense a custom solution needs to be written. This is why it’s important to still provide users the basic building blocks to do it.
#7: Solutions must be local¶
When looking for a solution to a problem, be it implementing a new feature or fixing a bug, sometimes the easiest path is to add data or a new function in the core layers of code.
The main problem here is, adding something to the core layers that will only be used from a single location far away will not only make the code more difficult to follow (split in two), but also make the core API larger, more complex, more difficult to understand in general.
This is bad, because readability and cleanness of core APIs is always of extreme importance given how much code relies from it, and because it’s key for new contributors as a starting point to learning the codebase.
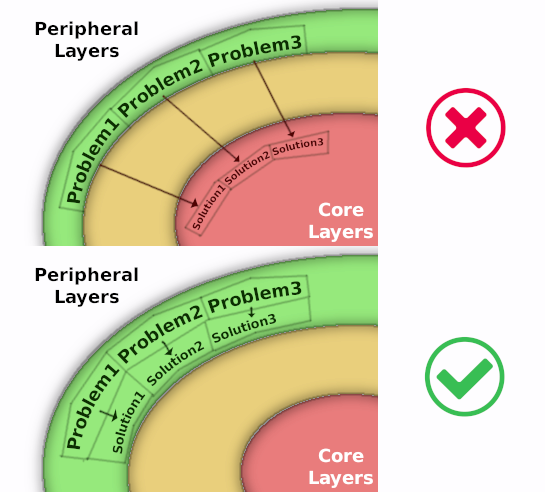
The common reasoning for wanting to do this is that it’s usually less code to simply add a hack in the core layers.
Despite this, this practice is not advised. Generally, the code for a solution should be closer to where the problem originates, even if it involves more code, duplicated, more complex or is less efficient. More creativity might be needed, but this path is always the advised one.
#8: Don’t use complex canned solutions for simple problems¶
Not every problem has a simple solution and, many times, the right choice is to use a third party library to solve the problem.
As Godot requires to be shipped in a large amount of platforms, we just can’t link libraries dynamically. Instead, we bundle them in our source tree.
As a result, we are very picky with what goes in, and we tend to prefer smaller libraries (in fact, single header ones are our favorite). Only in cases where there is no other choice we end up bundling something larger.
Pull request workflow¶
The so-called “PR workflow” used by Godot is common to many projects using Git, and should be familiar to veteran free software contributors. The idea is that only a small number (if any) commit directly to the master branch. Instead, contributors fork the project (i.e. create a copy of it, which they can modify as they wish), and then use the GitHub interface to request a pull from one of their fork’s branches to one branch of the original (often named upstream) repository.
The resulting pull request (PR) can then be reviewed by other contributors, which might approve it, reject it, or most often request that modifications be done. Once approved, the PR can then be merged by one of the core developers, and its commit(s) will become part of the target branch (usually the master branch).
We will go together through an example to show the typical workflow and associated Git commands. But first, let’s have a quick look at the organisation of Godot’s Git repository.
Git source repository¶
The repository on GitHub is a Git code repository together with an embedded issue tracker and PR system.
Note
If you are contributing to the documentation, its repository can be found here.
The Git version control system is the tool used to keep track of successive edits to the source code - to contribute efficiently to Godot, learning the basics of the Git command line is highly recommended. There exist some graphical interfaces for Git, but they usually encourage users to take bad habits regarding the Git and PR workflow, and we therefore recommend not to use them. In particular, we advise not to use GitHub’s online editor for code contributions (although it’s tolerated for small fixes or documentation changes) as it enforces one commit per file and per modification, which quickly leads to PRs with an unreadable Git history (especially after peer review).
See also
The first sections of Git’s “Book” are a good introduction to the tool’s philosophy and the various commands you need to master in your daily workflow. You can read them online on the Git SCM website.
The branches on the Git repository are organized as follows:
- The
masterbranch is where the development of the next major version occurs. As a development branch, it can be unstable and is not meant for use in production. This is where PRs should be done in priority. - The stable branches are named after their version, e.g.
3.1and2.1. They are used to backport bugfixes and enhancements from themasterbranch to the currently maintained stable release (e.g. 3.1.2 or 2.1.6). As a rule of thumb, the last stable branch is maintained until the next major version (e.g. the3.0branch was maintained until the release of Godot 3.1). If you want to make PRs against a maintained stable branch, you will have to check if your changes are also relevant for themasterbranch. - There might be feature branches at time, usually meant to be merged into
the
masterbranch at some time.
Forking and cloning¶
The first step is to fork the godotengine/godot repository on GitHub. To do so, you will need to have a GitHub account and to be logged in. In the top right corner of the repository’s GitHub page, you should see the “Fork” button as shown below:

Click it, and after a while you should be redirected to your own fork of the Godot repo, with your GitHub username as namespace:

You can then clone your fork, i.e. create a local copy of the online repository (in Git speak, the origin remote). If you haven’t already, download Git from its website if you’re using Windows or macOS, or install it through your package manager if you’re using Linux.
Note
If you are on Windows, open Git Bash to type commands. macOS and Linux users can use their respective terminals.
To clone your fork from GitHub, use the following command:
$ git clone https://github.com/USERNAME/godot
Note
In our examples, the “$” character denotes the command line prompt on typical UNIX shells. It is not part of the command and should not be typed.
After a little while, you should have a godot directory in your current
working directory. Move into it using the cd command:
$ cd godot
We will start by setting up a reference to the original repository that we forked:
$ git remote add upstream https://github.com/godotengine/godot
$ git fetch upstream
This will create a reference named upstream pointing to the original
godotengine/godot repository. This will be useful when you want to pull new
commits from its master branch to update your fork. You have another
remote reference named origin, which points to your fork.
You only need to do the above steps once, as long as you keep that local
godot folder (which you can move around if you want, the relevant
metadata is hidden in its .git subfolder).
Note
Branch it, pull it, code it, stage it, commit, push it, rebase it… technologic.
This bad take on Daft Punk’s Technologic shows the general conception Git beginners have of its workflow: lots of strange commands to learn by copy and paste, hoping they will work as expected. And that’s actually not a bad way to learn, as long as you’re curious and don’t hesitate to question your search engine when lost, so we will give you the basic commands to know when working in Git.
In the following, we will assume that you want to implement a feature in
Godot’s project manager, which is coded in the editor/project_manager.cpp
file.
Branching¶
By default, the git clone should have put you on the master branch of
your fork (origin). To start your own feature development, we will create
a feature branch:
# Create the branch based on the current branch (master)
$ git branch better-project-manager
# Change the current branch to the new one
$ git checkout better-project-manager
This command is equivalent:
# Change the current branch to a new named one, based on the current branch
$ git checkout -b better-project-manager
If you want to go back to the master branch, you’d use:
$ git checkout master
You can see which branch you are currently on with the git branch
command:
$ git branch
2.1
* better-project-manager
master
Updating your branch¶
This would not be needed the first time (just after you forked the upstream
repository). However, the next time you want to work on something, you will
notice that your fork’s master is several commits behind the upstream
master branch: pull requests from other contributors would have been merged
in the meantime.
To ensure there won’t be conflicts between the feature you develop and the
current upstream master branch, you will have to update your branch by
pulling the upstream branch.
$ git pull upstream master
However, if you had local commits, this method will create a so-called “merge
commit”, and you will soon hear from fellow contributors that those are not
wanted in PRs. To update the branch without creating a merge commit,
you will have to use the --rebase option, so that your local commits are
replayed on top of the updated upstream master branch. It will effectively
modify the Git history of your branch, but that is for the greater good.
Therefore, the command that you should (almost) always use is:
$ git pull --rebase upstream master
If you have already pushed the merge commit without using rebase, or
have made any other changes that have resulted in undesired history, you may
use a hard reset to revert to a specific commit and try again:
$ git reset --hard [The ID of the last desired commit]
Once you have done this, you may run --rebase to merge master correctly.
If you have already pushed the wrong commits to your remote branch,
you will have to force push by using git push --force.
Warning
git reset --hard can be a dangerous operation, especially
if you have untracked or uncommitted changes. However, if
you have committed changes that you reset using git reset --hard,
you may still be able to recover them by resetting to a commit ID
found with the git reflog command.
Making changes¶
You would then do your changes to our example’s
editor/project_manager.cpp file with your usual development environment
(text editor, IDE, etc.).
By default, those changes are unstaged. The staging area is a layer between
your working directory (where you make your modifications) and the local git
repository (the commits and all the metadata in the .git folder). To
bring changes from the working directory to the Git repository, you need to
stage them with the git add command, and then to commit them with the
git commit command.
There are various commands you should know to review your current work, before staging it, while it is staged, and after it has been committed.
git diffwill show you the current unstaged changes, i.e. the differences between your working directory and the staging area.git checkout -- <files>will undo the unstaged changes to the given files.git add <files>will stage the changes on the listed files.git diff --stagedwill show the current staged changes, i.e. the differences between the staging area and the last commit.git reset HEAD <files>will unstage changes to the listed files.git statuswill show you what are the currently staged and unstaged modifications.git commitwill commit the staged files. It will open a text editor (you can define the one you want to use with theGIT_EDITORenvironment variable or thecore.editorsetting in your Git configuration) to let you write a commit log. You can usegit commit -m "Cool commit log"to write the log directly.git logwill show you the last commits of your current branch. If you did local commits, they should be shown at the top.git showwill show you the changes of the last commit. You can also specify a commit hash to see the changes for that commit.
That’s a lot to memorize! Don’t worry, just check this cheat sheet when you need to make changes, and learn by doing.
Here’s how the shell history could look like on our example:
# It's nice to know where you're starting from
$ git log
# Do changes to the project manager with the nano text editor
$ nano editor/project_manager.cpp
# Find an unrelated bug in Control and fix it
$ nano scene/gui/control.cpp
# Review changes
$ git status
$ git diff
# We'll do two commits for our unrelated changes,
# starting by the Control changes necessary for the PM enhancements
$ git add scene/gui/control.cpp
$ git commit -m "Fix handling of margins in Control"
# Check we did good
$ git log
$ git show
$ git status
# Make our second commit
$ git add editor/project_manager.cpp
$ git commit -m "Add a pretty banner to the project manager"
$ git log
With this, we should have two new commits in our better-project-manager
branch which were not in the master branch. They are still only local
though, the remote fork does not know about them, nor does the upstream repo.
Pushing changes to a remote¶
That’s where git push will come into play. In Git, a commit is always
done in the local repository (unlike Subversion where a commit will modify
the remote repository directly). You need to push the new commits to a
remote branch to share them with the world. The syntax for this is:
$ git push <remote> <local branch>[:<remote branch>]
The part about the remote branch can be omitted if you want it to have the same name as the local branch, which is our case in this example, so we will do:
$ git push origin better-project-manager
Git will ask you for your username and password, and the changes will be sent to your remote. If you check the fork’s page on GitHub, you should see a new branch with your added commits.
Issuing a pull request¶
When you load your fork’s branch on GitHub, you should see a line saying
“This branch is 2 commits ahead of godotengine:master.” (and potentially some
commits behind, if your master branch was out of sync with the upstream
master branch.

On that line, there is a “Pull request” link. Clicking it will open a form that will let you issue a pull request on the godotengine/godot upstream repository. It should show you your two commits, and state “Able to merge”. If not (e.g. it has way more commits, or says there are merge conflicts), don’t create the PR, something went wrong. Go to IRC and ask for support :)
Use an explicit title for the PR and put the necessary details in the comment area. You can drag and drop screenshots, GIFs or zipped projects if relevant, to showcase what your work implements. Click “Create a pull request”, and tadaa!
Modifying a pull request¶
While it is reviewed by other contributors, you will often need to make changes to your yet-unmerged PR, either because contributors requested them, or because you found issues yourself while testing.
The good news is that you can modify a pull request simply by acting on the branch you made the pull request from. You can e.g. make a new commit on that branch, push it to your fork, and the PR will be updated automatically:
# Check out your branch again if you had changed in the meantime
$ git checkout better-project-manager
# Fix a mistake
$ nano editor/project_manager.cpp
$ git add editor/project_manager.cpp
$ git commit -m "Fix a typo in the banner's title"
$ git push origin better-project-manager
That should do the trick, but…
Mastering the PR workflow: the rebase¶
On the situation outlined above, your fellow contributors who are particularly pedantic regarding the Git history might ask your to rebase your branch to squash or meld the last two commits together (i.e. the two related to the project manager), as the second commit basically fixes an issue in the first one.
Once the PR is merged, it is not relevant for a changelog reader that the PR author made mistakes; instead, we want to keep only commits that bring from one working state to another working state.
To squash those two commits together, we will have to rewrite history. Right, we have that power. You may read that it’s a bad practice, and it’s true when it comes to branches of the upstream repo. But in your fork, you can do whatever you want, and everything is allowed to get neat PRs :)
We will use the interactive rebase git rebase -i to do this. This
command takes a commit hash as argument, and will let you modify all commits
between that commit hash and the last one of the branch, the so-called
HEAD. In our example, we want to act on the last two commits, so we will
do:
# The HEAD~X syntax means X commits before HEAD
$ git rebase -i HEAD~2
This will open a text editor with:
pick 1b4aad7 Add a pretty banner to the project manager
pick e07077e Fix a typo in the banner's title
The editor will also show instructions regarding how you can act on those commits. In particular, it should tell you that “pick” means to use that commit (do nothing), and that “squash” and “fixup” can be used to meld the commit in its parent commit. The difference between “squash” and “fixup” is that “fixup” will discard the commit log from the squashed commit. In our example, we are not interested in keeping the log of the “Fix a typo” commit, so we use:
pick 1b4aad7 Add a pretty banner to the project manager
fixup e07077e Fix a typo in the banner's title
Upon saving and quitting the editor, the rebase will occur. The second commit
will be melded into the first one, and git log and git show should
now confirm that you have only one commit with the changes from both previous
commits.
Note
You could have avoided this rebase by using git commit --amend
when fixing the typo. This command will write the staged changes
directly into the last commit (HEAD), instead of creating a new
commit like we did in this example. So it is equivalent to what we
did with a new commit and then a rebase to mark it as “fixup”.
But! You rewrote the history, and now your local and remote branches have diverged. Indeed, commit 1b4aad7 in the above example will have changed, and therefore got a new commit hash. If you try to push to your remote branch, it will raise an error:
$ git push origin better-project-manager
To https://github.com/akien-mga/godot
! [rejected] better-project-manager -> better-project-manager (non-fast-forward)
error: failed to push some refs to 'https://akien-mga@github.com/akien-mga/godot'
hint: Updates were rejected because the tip of your current branch is behind
hint: its remote counterpart.
This is a sane behaviour, Git will not let you push changes that would override remote content. But that’s actually what we want to do here, so we will have to force it:
$ git push --force origin better-project-manager
And tadaa! Git will happily replace your remote branch with what you had
locally (so make sure that’s what you wanted, using git log). This will
also update the PR accordingly.
Deleting a Git branch¶
After your pull request gets merged, there’s one last thing you should do: delete your Git branch for the PR. There won’t be issues if you don’t delete your branch, but it’s good practice to do so. You’ll need to do this twice, once for the local branch and another for the remote branch on GitHub.
To delete our better project manager branch locally, use this command:
$ git branch -d better-project-manager
Alternatively, if the branch hadn’t been merged yet and we wanted to delete it anyway, instead
of -d you would use -D.
Next, to delete the remote branch on GitHub use this command:
$ git push origin -d better-project-manager
Code style guidelines¶
When contributing to Godot’s source code, you will be expected to follow the style guidelines outlined below. Some of them are checked via the Continuous Integration process and reviewers will ask you to fix potential issues, so best setup your system as outlined below to ensure all your commits follow the guidelines.
C++ and Objective-C¶
There are no written guidelines, but the code style agreed upon by the developers is enforced via the clang-format code beautifier, which takes care for you of all our conventions. To name a few:
- Indentation and alignment are both tab based (respectively one and two tabs)
- One space around math and assignments operators as well as after commas
- Pointer and reference operators are affixed to the variable identifier, not to the type name
- See further down regarding header includes
The rules used by clang-format are outlined in the .clang-format file of the Godot repository.
As long as you ensure that your style matches the surrounding code and that you not introducing trailing whitespace or space-based indentation, you should be fine. If you plan to contribute regularly however, we strongly advise that you setup clang-format locally to check and automatically fix all your commits.
Warning
Godot’s code style should not be applied to thirdparty code, i.e. that is included in Godot’s source tree but was not written specifically for our project. Such code usually come from different upstream projects with their own style guides (or lack thereof), and don’t want to introduce differences that would make syncing with upstream repositories harder.
Thirdparty code is usually included in the thirdparty/ folder
and can thus easily be excluded from formatting scripts. For the
rare cases where a thirdparty code snippet needs to be included
directly within a Godot file, you can use
/* clang-format off */ and /* clang-format on */ to tell
clang-format to ignore a chunk of code.
Using clang-format locally¶
First of all, you will need to install clang-format. As of now, you need to use clang-format 8.x to be compatible with Godot’s format. Later versions might be suitable, but previous versions had bugs that will cause formatting changes to the current code base.
Installation¶
Here’s how to install clang-format:
- Linux: It will usually be available out-of-the-box with the clang toolchain packaged by your distribution. If your distro version is not the required one, you can download a pre-compiled version from the LLVM website, or if you are on a Debian derivative, use the upstream repos.
- macOS and Windows: You can download precompiled binaries from the
LLVM website. You may need to add
the path to the binary’s folder to your system’s
PATHenvironment variable to be able to callclang-formatout of the box.
You then have different possibilities to apply clang-format to your changes:
Manual usage¶
You can apply clang-format manually one or more files with the following command:
clang-format -i <path/to/file(s)>
-imeans that the changes should be written directly to the file (by default clang-format would only output the fixed version to the terminal).- The path can point to several files, either one after the other or using
wildcards like in a typical Unix shell. Be careful when globbing so that
you don’t run clang-format on compiled objects (.o and .a files) that are
in Godot’s tree. So better use
core/*.{cpp,h}thancore/*.
Pre-commit hook¶
For ease of use, we provide a pre-commit hook for Git that will run clang-format automatically on all your commits to check them, and let you apply its changes in the final commit.
This “hook” is a script which can be found in misc/hooks, refer to that
folder’s README.md for installation instructions.
If your clang-format is not in the PATH, you may have to edit the
pre-commit-clang-format to point to the correct binary for it to work.
The hook was tested on Linux and macOS, but should also work in the Git Shell
on Windows.
IDE plugin¶
Most IDEs or code editors have beautifier plugins that can be configured to run clang-format automatically, for example each time you save a file.
Here is a non-exhaustive list of beautifier plugins for some IDEs:
- Qt Creator: Beautifier plugin
- Visual Studio Code: Clang-Format
- Visual Studio: ClangFormat
- vim: vim-clang-format
(Pull requests welcome to extend this list with tested plugins.)
Header includes¶
When adding new C++ or Objective-C files or including new headers in existing ones, the following rules should be followed:
- The first lines in the file should be Godot’s copyright header and MIT license, copy-pasted from another file. Make sure to adjust the filename.
- In a
.hheader, include guards should be used with the formFILENAME_H. - In a
.cppfile (e.g.filename.cpp), the first include should be the one where the class is declared (e.g.#include "filename.h"), followed by an empty line for separation. - Then come headers from Godot’s own code base, included in alphabetical order
(enforced by
clang-format) with paths relative to the root folder. Those includes should be done with quotes, e.g.#include "core/object.h". The block of Godot header includes should then be followed by an empty line for separation. - Finally, thirdparty headers (either from
thirdpartyor from the system’s include paths) come next and should be included with the < and > symbols, e.g.#include <png.h>. The block of thirdparty headers should also be followed by an empty line for separation. - Godot and thirdparty headers should be included in the file that requires them, i.e. in the .h header if used in the declarative code or in the .cpp if used only in the imperative code.
Example:
/*************************************************************************/
/* my_new_file.h */
/*************************************************************************/
/* This file is part of: */
/* GODOT ENGINE */
/* https://godotengine.org */
/*************************************************************************/
/* Copyright (c) 2007-2020 Juan Linietsky, Ariel Manzur. */
/* Copyright (c) 2014-2020 Godot Engine contributors (cf. AUTHORS.md) */
/* */
/* Permission is hereby granted, free of charge, to any person obtaining */
/* a copy of this software and associated documentation files (the */
/* "Software"), to deal in the Software without restriction, including */
/* without limitation the rights to use, copy, modify, merge, publish, */
/* distribute, sublicense, and/or sell copies of the Software, and to */
/* permit persons to whom the Software is furnished to do so, subject to */
/* the following conditions: */
/* */
/* The above copyright notice and this permission notice shall be */
/* included in all copies or substantial portions of the Software. */
/* */
/* THE SOFTWARE IS PROVIDED "AS IS", WITHOUT WARRANTY OF ANY KIND, */
/* EXPRESS OR IMPLIED, INCLUDING BUT NOT LIMITED TO THE WARRANTIES OF */
/* MERCHANTABILITY, FITNESS FOR A PARTICULAR PURPOSE AND NONINFRINGEMENT.*/
/* IN NO EVENT SHALL THE AUTHORS OR COPYRIGHT HOLDERS BE LIABLE FOR ANY */
/* CLAIM, DAMAGES OR OTHER LIABILITY, WHETHER IN AN ACTION OF CONTRACT, */
/* TORT OR OTHERWISE, ARISING FROM, OUT OF OR IN CONNECTION WITH THE */
/* SOFTWARE OR THE USE OR OTHER DEALINGS IN THE SOFTWARE. */
/*************************************************************************/
#ifndef MY_NEW_FILE_H
#define MY_NEW_FILE_H
#include "core/hash_map.h"
#include "core/list.h"
#include "scene/gui/control.h
#include <png.h>
...
#endif // MY_NEW_FILE_H
/*************************************************************************/
/* my_new_file.cpp */
/*************************************************************************/
/* This file is part of: */
/* GODOT ENGINE */
/* https://godotengine.org */
/*************************************************************************/
/* Copyright (c) 2007-2020 Juan Linietsky, Ariel Manzur. */
/* Copyright (c) 2014-2020 Godot Engine contributors (cf. AUTHORS.md) */
/* */
/* Permission is hereby granted, free of charge, to any person obtaining */
/* a copy of this software and associated documentation files (the */
/* "Software"), to deal in the Software without restriction, including */
/* without limitation the rights to use, copy, modify, merge, publish, */
/* distribute, sublicense, and/or sell copies of the Software, and to */
/* permit persons to whom the Software is furnished to do so, subject to */
/* the following conditions: */
/* */
/* The above copyright notice and this permission notice shall be */
/* included in all copies or substantial portions of the Software. */
/* */
/* THE SOFTWARE IS PROVIDED "AS IS", WITHOUT WARRANTY OF ANY KIND, */
/* EXPRESS OR IMPLIED, INCLUDING BUT NOT LIMITED TO THE WARRANTIES OF */
/* MERCHANTABILITY, FITNESS FOR A PARTICULAR PURPOSE AND NONINFRINGEMENT.*/
/* IN NO EVENT SHALL THE AUTHORS OR COPYRIGHT HOLDERS BE LIABLE FOR ANY */
/* CLAIM, DAMAGES OR OTHER LIABILITY, WHETHER IN AN ACTION OF CONTRACT, */
/* TORT OR OTHERWISE, ARISING FROM, OUT OF OR IN CONNECTION WITH THE */
/* SOFTWARE OR THE USE OR OTHER DEALINGS IN THE SOFTWARE. */
/*************************************************************************/
#include "my_new_file.h"
#include "core/math/math_funcs.h"
#include "scene/gui/line_edit.h
#include <zlib.h>
#include <zstd.h>
Java¶
Godot’s Java code (mostly in platform/android) is also enforced via
clang-format, so see the instructions above to set it up. Keep in mind that
this style guide only applies to code written and maintained by Godot, not
thirdparty code such as the java/src/com/google subfolder.
Python¶
Godot’s SCons buildsystem is written in Python, and various scripts included in the source tree are also using Python.
For those, we follow the PEP-8 style guide, this is however not as strongly enforced as for the C++ code. If you are so inclined, you can check and format your Python changes using autopep8.
Bug triage guidelines¶
This page describes the typical workflow of the bug triage team aka bugsquad when handling issues and pull requests on Godot’s GitHub repository. It is bound to evolve together with the bugsquad, so do not hesitate to propose modifications to the following guidelines.
Issues management¶
GitHub proposes various features to manage issues:
- Set one or several labels from a predefined list
- Set one milestone from a predefined list
- Keep track of the issue in the project dashboard
- Define one contributor as “assignee” among the Godot engine organization members
As the Godot engine organization on GitHub currently has a restricted number of contributors, we do not use assignees extensively for now. All contributors are welcome to take on any issue, if relevant after mentioning it on the issue ticket and/or discussing the best way to resolve it with other developers.
For the time being we do not use the project dashboard feature either.
As far as possible, we try to assign labels (and milestones, when relevant) to both issues and pull requests.
Labels¶
The following labels are currently defined in the Godot repository:
Categories:
- Archived: either a duplicate of another issue, or invalid. Such an issue would also be closed.
- Bug: describes something that is not working properly.
- Confirmed: has been confirmed by at least one other contributor than the bug reporter (typically for Bug reports). The purpose of this label is to let developers know which issues are still reproducible when they want to select what to work on. It is therefore a good practice to add in a comment on what platform and what version or commit of Godot the issue could be reproduced; if a developer looks at the issue one year later, the Confirmed label may not be relevant anymore.
- Discussion: the issue is not consensual and needs further discussion to define what exactly should be done to address the topic.
- Documentation: issue related to the documentation. Mainly to request enhancements in the API documentation. Issues related to the ReadTheDocs documentation should be filed on the godot-docs repository.
- Enhancement: describes a proposed enhancement to an existing functionality.
- Feature proposal: describes a wish for a new feature to be implemented.
- Junior job: the issue is assumed to be an easy one to fix, which makes it a great fit for junior contributors who need to become familiar with the code base.
- Needs rebase: the issue need a git rebase to be merged.
- Needs testing: the issue/pull request could not be completely tested and thus need further testing. This can mean that it needs to be tested on different hardware/software configurations or even that the steps to reproduce are not certain.
- PR welcome / hero wanted!: Contributions for issues with these labels are especially welcome. Note that this doesn’t mean you can’t work on issues without these labels.
- Tracker: issue used to track other issues (like all issues related to the plugin system).
- Usability: issues that directly impact user usability.
The categories are used for general triage of the issues. They can be combined in some way when relevant, e.g. an issue can be labelled Enhancement and Usability at the same time if it’s an issue to improve usability. Or Feature proposal and Discussion if it’s a non-consensual feature request, or one that is not precise enough to be worked on.
Topics:
- Assetlib: relates to issues with the asset library.
- Audio: relates to the audio features (low and high level).
- Buildsystem: relates to building issues, either linked to the SCons buildsystem or to compiler peculiarities.
- Core: anything related to the core engine. It might be further split later on as it’s a pretty big topic.
- Drivers: relates to issues with the drivers used by the engine.
- Editor: relates to issues in the editor (mainly UI).
- GDNative: relates to the GDNative module.
- GDScript: relates to GDScript.
- Mono: relates to the C# / Mono bindings.
- Network: relates to networking.
- Physics: relates to the physics engine (2D/3D).
- Plugin: relates to problems encountered while writing plugins.
- Porting: relates to some specific platforms.
- Rendering: relates to the 2D and 3D rendering engines.
- VisualScript: relates to issues with the visual scripting language.
Issues would typically correspond to only one topic, though it’s not unthinkable to see issues that fit two bills. The general idea is that there will be specialized contributors teams behind all topics, so they can focus on the issues labelled with their team’s topic.
Platforms:
Android, HTML5, iOS, Linux, macOS, Windows, UWP
By default, it is assumed that a given issue applies to all platforms. If one of the platform labels is used, it is then exclusive and the previous assumption doesn’t stand anymore (so if it’s a bug on e.g. Android and Linux exclusively, select those two platforms).
Milestones¶
Milestones correspond to planned future versions of Godot for which there is an existing roadmap. Issues that fit in the said roadmap should be filed under the corresponding milestone; if they don’t correspond to any current roadmap, they should be left without milestone. As a rule of thumb, an issue corresponds to a given milestone if it concerns a feature that is new in the milestone, or a critical bug that can’t be accepted in any future stable release, or anything that Juan wants to work on right now :)
Contributors are free to pick issues regardless of their assigned milestone; if a fix is proposed for a bug that was not deemed urgent and thus without milestone, it would likely still be very welcome.
Documentation guidelines¶
This page describes the rules to follow if you want to contribute to Godot Engine by writing or reviewing documentation, or by translating existing documentation. Also have a look at README of the godot-docs GitHub repository and the docs front page on what steps to follow and how to contact the docs team.
How to contribute¶
Creating or modifying documentation pages is mainly done via the godot-docs GitHub repository. The HTML (or PDF and EPUB) documentation is generated from the .rst files (reStructuredText markup language) in that repository. Modifying those pages in a pull request and getting it merged will trigger a rebuild of the online documentation.
See also
For details on Git usage and the pull request workflow, please refer to the Pull request workflow page. Most of what it describes regarding the main godotengine/godot repository is also valid for the docs repository.
The README.md file contains all the information you need to get you started, please read it. In particular, it contains some tips and tricks and links to reference documentation about the reStructuredText markup language.
Warning
If you want to edit the API reference, please note that it
should not be done in the godot-docs repository. Instead, you
should edit the doc/classes/* XML files of Godot’s
main repository. These files are then later used to generate the
in-editor documentation as well as the API reference of the
online docs. Read more here: Contribute to the Class Reference.
The ‘Edit on GitHub’ link¶
If you’re reading documentation on docs.godotengine.org, you’ll see an
Edit on GitHub hyperlink at the top right of the page. Once you’ve created a
GitHub account, you can propose changes to a page you’re reading as follows:
- Click the Edit on GitHub button.
- On the GitHub page you’re taken to, click the pencil icon in the top-right corner near the Raw, Blame and History buttons. It has the tooltip “Edit the file in a fork of this project”.
- Complete all the edits you want to make for that page.
- Summarise the changes you made in the form at the bottom of the page and click the button labelled Propose file change when done.
- On the following screens, click the Create pull request button until you
see a message like
Open. yourGitHubUsername wants to merge 1 commit into godotengine:master from yourGitHubUsername:patch-6. - A reviewer will evaluate your changes and incorporate them into the docs if they’re judged to improve them. You might also be asked to make modifications to your changes before they’re included.
What makes good documentation?¶
Documentation should be well written in plain English, using well-formed sentences and various levels of sections and subsections. It should be clear and objective. Also have a look at the Docs writing guidelines.
We differentiate tutorial pages from other documentation pages by these definitions:
- Tutorial: a page aiming at explaining how to use one or more concepts in the editor or scripts in order to achieve a specific goal with a learning purpose (e.g. “Making a simple 2d Pong game”, “Applying forces to an object”).
- Documentation: a page describing precisely one and only one concept at a time, if possible exhaustively (e.g. the list of methods of the Sprite class, or an overview of the input management in Godot).
You are free to write the kind of documentation you wish, as long as you respect the following rules (and the ones on the repo).
Titles¶
Always begin pages with their title and a Sphinx reference name:
.. _doc_insert_your_title_here:
Insert your title here
======================
The reference allows to link to this page using the :ref: format, e.g.
:ref:`doc_insert_your_title_here` would link to the above example page
(note the lack of leading underscore in the reference).
Also, avoid American CamelCase titles: title’s first word should begin with a capitalized letter, and every following word should not. Thus, this is a good example:
- Insert your title here
And this is a bad example:
- Insert Your Title Here
Only project, people and node class names should have capitalized first letter.
Translating existing pages¶
You can help to translate the official Godot documentation on our Hosted Weblate.
There also is the official Godot I18N repository. where you can see when the data was last synced.
License¶
This documentation and every page it contains is published under the terms of the Creative Commons Attribution 3.0 license (CC-BY-3.0), with attribution to “Juan Linietsky, Ariel Manzur and the Godot community”.
By contributing to the documentation on the GitHub repository, you agree that your changes are distributed under this license.
Docs writing guidelines¶
The Godot community is rich and international. Users come from all around the world. Some of them are young, and many aren’t native English speakers. That’s why we must all write using a clear and a common language. For the class reference, the goal is to make it easy to read for everyone and precise.
In summary, always try to:
- Use the direct voice
- Use precise action verbs
- Avoid verbs that end in -ing
- Remove unnecessary adverbs and adjectives.
- Ban these 8 words: obvious, simple, basic, easy, actual, just, clear, and however
- Use explicit references
- Use ‘s to show possession
- Use the Oxford comma
There are 3 rules to describe classes:
- Give an overview of the node in the brief description
- Mention what methods return if it’s useful
- Use “if true” to describe booleans
Note
A technical writer’s job is to pack as much information as possible into the smallest and clearest sentences possible. These guidelines will help you work towards that goal.
7 rules for clear English¶
Use the direct voice¶
Use the direct voice when possible. Take the classes, methods, and constants you describe as the subject. It’s natural to write using the passive voice, but it’s harder to read and produces longer sentences.
Passive:
The man **was bitten** by the dog.
Active:
The dog bit the man.
Don’t use the passive voice:
void edit_set_pivot ( Vector2 pivot )
[...] This method **is implemented** only in some nodes that inherit Node2D.
Do use the node’s name as a noun:
void edit_set_pivot ( Vector2 pivot )
[...] Only some Node2Ds **implement** this method.
Use precise action verbs¶
Favor precise yet common verbs over generic ones like make, set,
and any expression you can replace with a single word.
Don’t repeat the method’s name. It already states it sets the pivot value to a new one:
void edit_set_pivot ( Vector2 pivot )
Set the pivot position of the 2D node to [code]pivot[/code] value. [...]
Do explain what’s the consequence of this “set”: use precise verbs
like place, position, rotate, fade, etc.
void edit_set_pivot ( Vector2 pivot )
Position the node's pivot to the [code]pivot[/code] value. [...]
Avoid verbs that end in -ing¶
The progressive forms describe continuous actions. E.g. “is calling”, “is moving”.
Don’t use the progressive form for instant changes.
Vector2 move ( Vector2 rel_vec )
Move the body in the given direction, **stopping** if there is an obstacle. [...]
Do use simple present, preterit or future.
Vector2 move ( Vector2 rel_vec )
Moves the body in the vector's direction. The body **stops** if it collides with an obstacle. [...]
You may use the progressive tense to describe actions that are continuous in time. Anything like animation or coroutines.
Tip
Verbs can turn into adjectival nouns with -ing. This is not a
conjugation, so you may use them: the remaining movement,
the missing file, etc.
Remove unnecessary adverbs and adjectives¶
Write as few adjectives and adverbs as possible. Only use them if they add key information to the description.
Don’t use redundant or meaningless adverbs. Words that lengthen the documentation but don’t add any information:
**Basically** a big texture [...]
Do write short sentences in a simple, descriptive language:
A big texture [...]
Ban these 8 words¶
Don’t ever use these 8 banned words:
- obvious
- simple
- basic
- easy
- actual
- just
- clear
- however (some uses)
Game creation and programming aren’t simple, and nothing’s easy to
someone learning to use the API for the first time. Other words in the
list, like just or actual won’t add any info to the sentence.
Don’t use corresponding adverbs either: obviously, simply, basically,
easily, actually, clearly.
Don’t example. The banned words lengthen the description and take attention away from the most important info:
**TextureRect**
Control frame that **simply** draws an assigned texture. It can stretch or not. It's a **simple** way to **just** show an image in a UI.
Do remove them:
**TextureRect**
[Control] node that displays a texture. The texture can stretch to the node's bounding box or stay in the center. Useful to display sprites in your UIs.
“Simple” never helps. Remember, for other users, anything could be complex or frustrate them. There’s nothing like a good old it’s simple to make you cringe. Here’s the old brief description, the first sentence on the Timer node’s page:
**Timer**
A **simple** Timer node.
Do explain what the node does instead:
**Timer**
Calls a function of your choice after a certain duration.
Don’t use “basic”, it is too vague:
**Vector3**
Vector class, which performs **basic** 3D vector math operations.
Do use the brief description to offer an overview of the node:
**Vector3**
Provides essential math functions to manipulate 3D vectors: cross product, normalize, rotate, etc.
Use explicit references¶
Favor explicit references over implicit ones.
Don’t use words like “the former”, “the latter”, etc. They’re not the most common in English, and they require you to check the reference.
[code]w[/code] and [code]h[/code] define right and bottom margins. The **latter** two resize the texture so it fits in the defined margin.
Do repeat words. They remove all ambiguity:
[code]w[/code] and [code]h[/code] define right and bottom margins. **[code]w[/code] and [code]h[/code]** resize the texture so it fits the margin.
If you need to repeat the same variable name 3 or 4 times, you probably need to rephrase your description.
Use ‘s to show possession¶
Avoid “The milk of the cow”. It feels unnatural in English. Write “The cow’s milk” instead.
Don’t write “of the X”:
The region **of the AtlasTexture that is** used.
Do use 's. It lets you put the main subject at the start of the
sentence, and keep it short:
The **AtlasTexture's** used region.
Use the Oxford comma to enumerate anything¶
From the Oxford dictionary:
The ‘Oxford comma’ is an optional comma before the word ‘and’ at the end of a list: We sell books, videos, and magazines.
[…] Not all writers and publishers use it, but it can clarify the meaning of a sentence when the items in a list are not single words: These items are available in black and white, red and yellow, and blue and green.
Don’t leave the last element of a list without a comma:
Create a KinematicBody2D node, a CollisionShape2D node and a sprite node.
Do add a comma before and or or, for the last element of a list with more than two elements.
Create a KinematicBody2D node, a CollisionShape2D node, and a sprite node.
How to write methods and classes¶
Dynamic vs static typing¶
The code examples in the documentation should follow a consistent style not to confuse users. As static type hints are an optional feature of GDScript, we chose to stick to writing dynamic code. This leads to writing GDScript that is concise and accessible.
The exception is topics that explain static typing concepts to users.
Don’t add a type hint with a colon or by casting:
const MainAttack := preload("res://fire_attack.gd")
var hit_points := 5
var name: String = "Bob"
var body_sprite := $Sprite as Sprite
Do write constants variables with dynamic typing:
const MainAttack = preload("res://fire_attack.gd")
var hit_points = 5
var name = "Bob"
var body_sprite = $Sprite
Don’t write functions with inferred arguments or return types:
func choose(arguments: Array):
# Chooses one of the arguments from array with equal chances
randomize()
var size := arguments.size()
var choice: int = randi() % size
return arguments[choice]
Do write functions using dynamic typing:
func choose(arguments):
# Chooses one of the arguments from array with equal chances
randomize()
var size = arguments.size()
var choice = randi() % size
return arguments[choice]
Use real-world code examples where appropriate¶
Real-world examples are more accessible to beginners than abstract foos and
bars. You can also copy them directly from your game projects, ensuring that
any code snippet compiles without errors.
Writing var speed = 10 rather than var my_var = 10 allows beginners to
understand code better. It gives them a frame of reference as to where they
could use the code snippets in a live project.
Don’t write made-up examples:
onready var a = preload("res://MyPath")
onready var my_node = $MyNode
func foo():
# Do stuff
Do write concrete examples:
onready var sfx_player_gun = preload("res://Assets/Sound/SFXPlayerGun.ogg")
onready var audio_player = $Audio/AudioStreamPlayer
func play_shooting_sound():
audio_player.stream = sfx_player_gun
audio_player.play()
Of course, there are times when using real-world examples is impractical. In
those situations, you should still avoid using names such as my_var,
foo() or my_func() and consider more meaningful names for your examples.
Give an overview of the node in the brief description¶
The brief description is the reference’s most important sentence. It’s the user’s first contact with a node:
- It’s the only description in the “Create New Node” dialog.
- It’s at the top of every page in the reference
The brief description should explain the node’s role and its functionality, in up to 200 characters.
Don’t write tiny and vague summaries:
**Node2D**
Base node for 2D system.
Do give an overview of the node’s functionality:
**Node2D**
2D game object, parent of all 2D related nodes. Has a position, rotation, scale and z-index.
Use the node’s full description to provide more information, and a code example, if possible.
Mention what methods return if it’s useful¶
Some methods return important values. Describe them at the end of the
description, ideally on a new line. No need to mention the return values
for any method whose name starts with set or get.
Don’t use the passive voice:
Vector2 move ( Vector2 rel_vec )
[...] The returned vector is how much movement was remaining before being stopped.
Do always use “Returns”.
Vector2 move ( Vector2 rel_vec )
[...] Returns the remaining movement before the body was stopped.
Notice the exception to the “direct voice” rule: with the move method,
an external collider can influence the method and the body that calls
move. In this case, you can use the passive voice.
Use “if true” to describe booleans¶
For boolean member variables, always use if true and/or
if false, to stay explicit. Controls whether or not may be
ambiguous and won’t work for every member variable.
Also surround boolean values, variable names and methods with [code][/code].
Do start with “if true”:
Timer.autostart
If [code]true[/code], the timer will automatically start when entering the scene tree.
Use [code] around arguments¶
In the class reference, always surround arguments with [code][/code]. In the
documentation and in Godot, it will display like this. When you edit XML
files in the Godot repository, replace existing arguments written like ‘this’ or
`this` with [code]this[/code].
Common vocabulary to use in Godot’s documentation¶
The developers chose some specific words to refer to areas of the interface. They’re used in the sources, in the documentation, and you should always use them instead of synonyms, so the users know what you’re talking about.
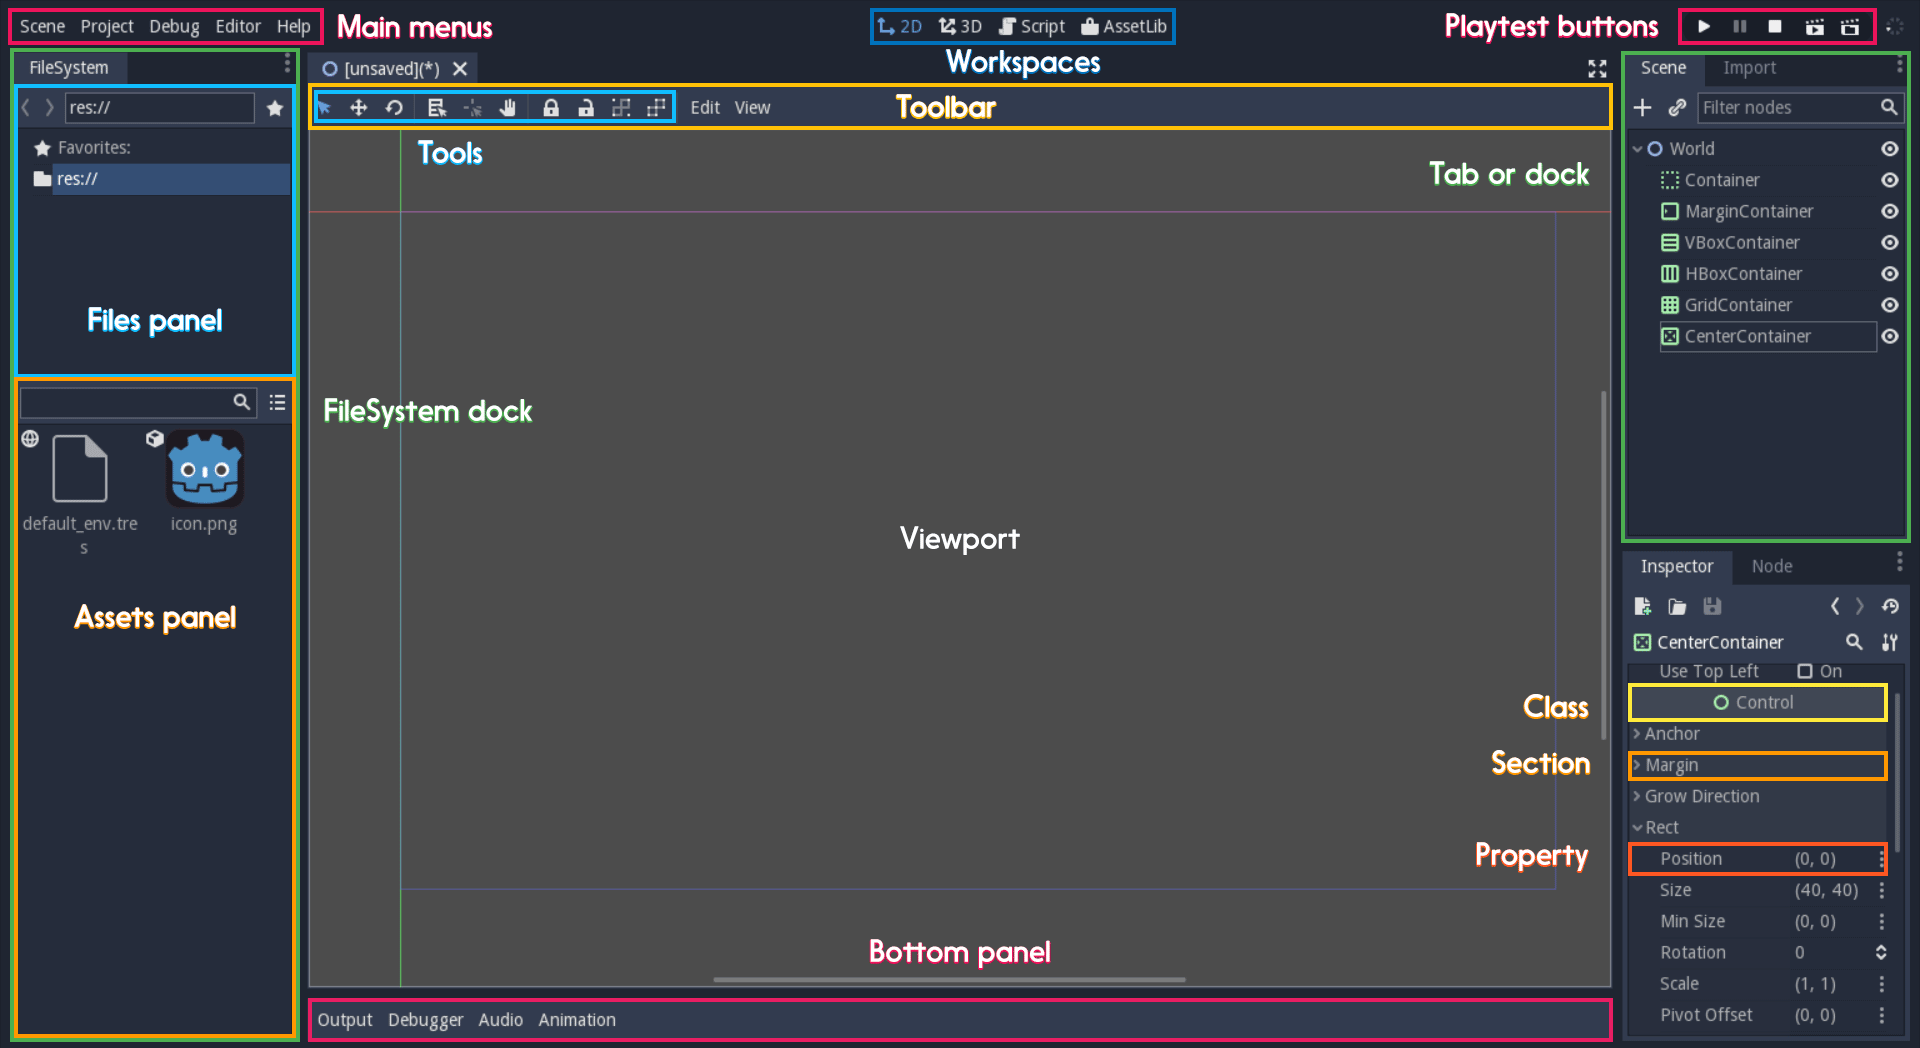
Overview of the interface and common vocabulary
In the top left corner of the editor lie the main menus. In the
center, the buttons change the workspace. And together the buttons
in the top right are the playtest buttons. The area in the center,
that displays the 2D or the 3D space, is the viewport. At its top,
you find a list of tools inside the toolbar.
The tabs or dockable panels on either side of the viewport are
docks. You have the FileSystem dock, the Scene dock that
contains your scene tree, the Import dock, the Node dock, and
the Inspector or Inspector dock. With the default layout you may
call the tabbed docks tabs: the Scene tab, the Node tab…
The Animation, Debugger, etc. at the bottom of the viewport are
panels. Together they make up the bottom panels.
Foldable areas of the Inspector are sections. The node’s parent
class names, which you can’t fold, are Classes e.g. the
KinematicBody2D class. And individual lines with key-value pairs are
properties. E.g. position or modulate color are both
properties.
Keyboard shortcut guidelines¶
Keyboard and mouse shortcuts should make use of the :kbd: tag, which allows
shortcuts to stand out from the rest of the text and inline code. Use the
compact form for modifier keys (Ctrl/Cmd) instead of their spelled
out form (Control/Command). For combinations, use the + symbol
with a space on either side of the symbol.
Make sure to mention shortcuts that differ on macOS compared to other platforms.
On macOS, Cmd often replaces Ctrl in keyboard shortcuts.
Try to integrate the shortcut into sentences the best you can. Here are some
examples with the :kbd: tag left as-is for better visibility:
- Press
:kbd:`Ctrl + Alt + T`to toggle the panel (:kbd:`Cmd + Alt + T`on macOS). - Press
:kbd:`Space`and hold the left mouse button to pan in the 2D editor. - Press
:kbd:`Shift + Up Arrow`to move the node upwards by 8 pixels.
Image contribution guidelines¶
A significant part of the documentation is images, and there are several important guidelines to follow.
First, you should always be using the default editor theme and text when taking screenshots.
To improve the apperance of 3D screenshots, use 4× MSAA, enable anisotropic filtering on the project’s textures, and set the anisotropic filter quality to 16× in Project Settings.
Screenshot sizes should not exceed 1920×1080 to ensure fast loading on slower connections.
When you need to highlight an area of the editor to show something, like a button or option, use a 2 pixel thick outline without a bevel.
Before you add or replace any images in the documentation, they should be run through a PNG compressor to save size. The built in lossless compressor in programs like Krita or Photoshop should be enough. For heavier images, also look into using a lossy compressor, such as pngquant where almost no image quality is lost during compression.
Contribute to the Class Reference¶
Godot ships with many nodes and singletons to help you develop your games. Each is a class, documented in the class reference. This reference is essential for anyone learning the engine: it is available both online and in the engine.
But it’s incomplete. Some methods, variables and signals lack descriptions. Others changed with recent releases and need updates. The developers can’t write the entire reference on their own. Godot needs you, and all of us, to contribute.
Important: If you are planning to make larger changes or a more substantial contribution, it is usually a good idea to create an issue (or a comment in an existing one) to let others know so they don’t start working on the same thing too.
Note
This guide is available as a video tutorial on YouTube.
How to contribute¶
The class reference lies in the following XML files, in Godot’s GitHub repository: doc/classes/.
There are 5 steps to update the class reference (full guide below):
- Fork Godot’s repository
- Clone your fork on your computer
- Edit the class file in
doc/classes/to write documentation - Commit your changes and push them to your fork
- Make a pull request on the Godot repository
Warning
Always use these XML files to edit the API reference. Do not edit the generated .rst files in the online documentation, hosted in the godot-docs repository.
Get started with GitHub¶
If you’re new to git and GitHub, this guide will help you get started. You’ll learn to:
- Fork and clone Godot’s repository
- Keep your fork up to date with other contributors
- Create a pull request so your improvements end in the official docs
Note
If you’re new to git, the version-control system Godot uses, go through GitHub’s interactive guide. You’ll learn some essential vocabulary and get a sense for the tool.
Fork Godot¶
Fork the Godot Engine into a GitHub repository of your own.
Clone the repository on your computer:
git clone https://github.com/your_name/godot.git
Create a new branch to make your changes. It makes it a lot easier to sync your improvements with other docs writers, and it’s easier to cleanup your repository clean if you have any issues with git.
git checkout -b your-new-branch-name
The new branch is the same as your master branch, until you start to write API docs. In the doc/ folder, you’ll find the class reference.
How to keep your local clone up-to-date¶
Other writers contribute to Godot’s documentation. Your local repository will fall behind it, and you’ll have to synchronize it. Especially if other contributors update the class reference while you work on it.
First add an upstream git remote to work with. Remotes are links to online repositories you can download new files from.
git remote add upstream https://github.com/godotengine/godot
You can check the list of all remote servers with:
git remote -v
You should have two: origin, your fork on github, that git adds by default, and upstream, that you just added:
origin https://github.com/your_name/godot.git (fetch)
origin https://github.com/your_name/godot.git (push)
upstream https://github.com/godotengine/godot.git (fetch)
upstream https://github.com/godotengine/godot.git (push)
Each time you want to sync your branch to the state of the upstream repository, enter:
git pull --rebase upstream master
This command will first fetch, or download the latest version of the Godot repository. Then, it will reapply your local changes on top.
If you made changes you don’t want to keep in your local branch, use the following commands instead:
git fetch upstream
git reset --hard upstream master
Warning: The above command will reset your branch to the state of the upstream master branch. It will discard all local changes. Make sure to only run this before you make important changes.
Another option is to delete the branch you’re working on, synchronize the master branch with the Godot repository, and create a brand new branch:
git checkout master
git branch -d your-new-branch-name
git pull --rebase upstream master
git checkout -b your-new-branch-name
If you’re feeling lost by now, come to our IRC channels and ask for help. Experienced git users will give you a hand.
Updating the documentation template¶
When classes are modified in the source code, the documentation template might become outdated. To make sure that you are editing an up-to-date version, you first need to compile Godot (you can follow the Introduction to the buildsystem page), and then run the following command (assuming 64-bit Linux):
./bin/godot.x11.tools.64 --doctool .
The xml files in doc/classes should then be up-to-date with current Godot Engine features. You can then check what changed using the git diff command. If there are changes to other classes than the one you are planning to document, please commit those changes first before starting to edit the template:
git add doc/classes/*.xml
git commit -m "Sync classes reference template with current code base"
You are now ready to edit this file to add stuff.
Note: If this has been done recently by another contributor, you don’t forcefully need to go through these steps (unless you know that the class you plan to edit has been modified recently).
Push and request a pull of your changes¶
Once your modifications are finished, push your changes on your GitHub repository:
git add doc/classes/<edited_file>.xml
git commit -m "Explain your modifications."
git push
When it’s done, you can ask for a Pull Request via the GitHub UI of your Godot fork.
Warning
Although you can edit files on GitHub, it’s not recommended. As hundreds of contributors work on Godot, the git history must stay clean. Each commit should bundle all related improvements you make to the class reference, a new feature, bug fixes… When you edit from GitHub, it will create a new branch and a Pull Request every time you want to save it. If a few days pass before your changes get a review, you won’t be able to update to the latest version of the repository cleanly. Also, it’s harder to keep clean indents from GitHub. And they’re very important in the docs.
TL;DR: If you don’t know what you’re doing exactly, do not edit files from GitHub.
How to edit class XML¶
Edit the file for your chosen class in doc/classes/ to update the class reference. The folder contains an XML file for each class. The XML lists the constants and methods you’ll find in the class reference. Godot generates and updates the XML automatically.
Edit it using your favourite text editor. If you use a code editor, make sure that it doesn’t change the indent style: tabs for the XML, and 4 spaces inside BBcode-style blocks. More on that below.
If you need to check that the modifications you’ve made are correct in the generated documentation, build Godot as described here, run the editor and open the help for the page you modified.
How to write the class reference¶
Each class has a brief and a long description. The brief description is always at the top of the page, while the full description lies below the list of methods, variables and constants. Methods, member variables, constants and signals are in separate categories or XML nodes. For each, learn how they work in Godot’s source code, and fill their <description>.
Our job is to add the missing text between these marks:
- <description></description>
- <brief_description></brief_description>
- <constant></constant>
- <method></method>
- <member></member>
- <signal></signal>
Write in a clear and simple language. Always follow the writing guidelines to keep your descriptions short and easy to read. Do not leave empty lines in the descriptions: each line in the XML file will result in a new paragraph.
Here’s how a class looks like in XML:
<class name="Node2D" inherits="CanvasItem" category="Core">
<brief_description>
Base node for 2D system.
</brief_description>
<description>
Base node for 2D system. Node2D contains a position, rotation and scale, which is used to position and animate. It can alternatively be used with a custom 2D transform ([Matrix32]). A tree of Node2Ds allows complex hierarchies for animation and positioning.
</description>
<methods>
<method name="set_pos">
<argument index="0" name="pos" type="Vector2">
</argument>
<description>
Sets the position of the 2D node.
</description>
</method>
[...]
<method name="edit_set_pivot">
<argument index="0" name="arg0" type="Vector2">
</argument>
<description>
</description>
</method>
</methods>
<members>
<member name="global_position" type="Vector2" setter="set_global_position" getter="get_global_position" brief="">
</member>
[...]
<member name="z_as_relative" type="bool" setter="set_z_as_relative" getter="is_z_relative" brief="">
</member>
</members>
<constants>
</constants>
</class>
Use a code editor like Vim, Atom, Code, Notepad++ or anything similar to edit the file quickly. Use the search function to find classes fast.
Improve formatting with BBcode style tags¶
Godot’s class reference supports BBcode-like tags. They add nice formatting to the text. Here’s the list of available tags:
| Tag | Effect | Usage | Result |
|---|---|---|---|
| [Class] | Link a class | Move the [Sprite]. | Move the Sprite. |
| [method methodname] | Link to a method in this class | Call [method hide]. | See hide. |
| [method Class.methodname] | Link to another class’s method | Call [method Spatial.hide]. | See hide. |
| [member membername] | Link to a member in this class | Get [member scale]. | Get scale. |
| [member Class.membername] | Link to another class’s member | Get [member Node2D.scale]. | Get scale. |
| [signal signalname] | Link to a signal in this class | Emit [signal renamed]. | Emit renamed. |
| [signal Class.signalname] | Link to another class’s signal | Emit [signal Node.renamed]. | Emit renamed. |
| [b] [/b] | Bold | Some [b]bold[/b] text. | Some bold text. |
| [i] [/i] | Italic | Some [i]italic[/i] text. | Some italic text. |
| [code] [/code] | Monospace | Some [code]monospace[/code] text. | Some monospace text. |
| [codeblock] [/codeblock] | Multiline preformatted block | See below. | See below. |
Use [codeblock] for pre-formatted code blocks. Inside [codeblock], always use four spaces for indentation (the parser will delete tabs). Example:
[codeblock]
func _ready():
var sprite = get_node("Sprite")
print(sprite.get_pos())
[/codeblock]
Will display as:
func _ready():
var sprite = get_node("Sprite")
print(sprite.get_pos())
I don’t know what this method does!¶
No problem. Leave it behind, and list the methods you skipped when you request a pull of your changes. Another writer will take care of it.
You can still have a look at the methods’ implementation in Godot’s source code on GitHub. Also, if you have doubts, feel free to ask on the Q&A website and on IRC (freenode, #godotengine).
Localization¶
The documentation can be translated in any language on Hosted Weblate.
Translated strings are synced manually by documentation maintainers in the godot-docs-l10n repository.
Languages with a good level of completion have their own localized
instances of ReadTheDocs. Open an issue on the godot-docs-l10n
repository if you think that a new language is complete enough to get
its own instance.
Community channels¶
So, where is the Godot community and where can you ask questions and get help?
Note that some of these channels are run and moderated by members of the Godot community or third parties.
A brief overview over these and other channels is also available on the Godot website.
IRC on Freenode¶
Other chats¶
Language-based communities¶
- Brazilian Portuguese: Godot Brasil (Discord)
- French: Godot Francophone Officiel (Discord)
- French: SoloCode Godot (Discord)
- German: Deutsche Godot Community (Discord)
- Swedish: Swedish Godot Community (Discord)
Forum¶
Tutorials and resources¶
This is a list of third-party tutorials and resources created by the Godot community. For resources, remember that there is the official Godot Asset Library full of official and community resources too! Also have a look at this huge list over at Reddit.
Think there is something missing here? Feel free to submit a Pull Request as always.
Where to start¶
The Godot video tutorials by GDQuest, Game from Scratch and KidsCanCode are well-regarded in the community and often recommended as a gentle introduction to beginners.
If you’re interested in Visual Scripting, Emilio’s tutorials may be worth a look.
Some of the others mentioned below provide more advanced tutorials, e.g. on 3D or shaders.
Video tutorials¶
- Emilio (2D, GDScript and VisualScript).
- GDQuest (2D and 3D, GDScript, VisualScript and C#).
- Game Endeavor (2D, GDScript).
- Game from Scratch (2D and 3D, GDScript and C#).
- HeartBeast (2D, GDScript).
- Jeremy Bullock (2D and 3D, GDScript, VisualScript and C#).
- KidsCanCode (2D and 3D, GDScript and VisualScript).
- Mister Taft Creates (2D, GDScript).
- Miziziziz (2D, GDScript).
- P1X / Krzysztof Jankowski (3D).
- Pigdev (2D, GDScript).
- Steincodes (2D, GDScript and VisualScript).
- TheBuffED (2D, GDScript).
- Code with Tom (2D and 3D, GDScript).
- BornCG (3D, GDScript).
Text tutorials¶
Godot API¶
@C#¶
@GDScript¶
Built-in GDScript functions.
Description¶
List of core built-in GDScript functions. Math functions and other utilities. Everything else is provided by objects. (Keywords: builtin, built in, global functions.)
Methods¶
Constants¶
- PI = 3.141593 — Constant that represents how many times the diameter of a circle fits around its perimeter.
- TAU = 6.283185 — The circle constant, the circumference of the unit circle.
- INF = inf — A positive infinity. (For negative infinity, use -INF).
- NAN = nan — Macro constant that expands to an expression of type float that represents a NaN.
The NaN values are used to identify undefined or non-representable values for floating-point elements, such as the square root of negative numbers or the result of 0/0.
Method Descriptions¶
Returns a color constructed from integer red, green, blue, and alpha channels. Each channel should have 8 bits of information ranging from 0 to 255.
r8 red channel
g8 green channel
b8 blue channel
a8 alpha channel
red = Color8(255, 0, 0)
Returns a color according to the standardized name with alpha ranging from 0 to 1.
red = ColorN("red", 1)
Supported color names are the same as the constants defined in Color.
Returns the absolute value of parameter s (i.e. unsigned value, works for integer and float).
# a is 1
a = abs(-1)
Returns the arc cosine of s in radians. Use to get the angle of cosine s.
# c is 0.523599 or 30 degrees if converted with rad2deg(s)
c = acos(0.866025)
Returns the arc sine of s in radians. Use to get the angle of sine s.
# s is 0.523599 or 30 degrees if converted with rad2deg(s)
s = asin(0.5)
- void assert ( bool condition )
Asserts that the condition is true . If the condition is false, an error is generated and the program is halted until you resume it. Only executes in debug builds, or when running the game from the editor. Use it for debugging purposes, to make sure a statement is true during development.
# Imagine we always want speed to be between 0 and 20
speed = -10
assert(speed < 20) # True, the program will continue
assert(speed >= 0) # False, the program will stop
assert(speed >= 0 && speed < 20) # You can also combine the two conditional statements in one check
Returns the arc tangent of s in radians. Use it to get the angle from an angle’s tangent in trigonometry: atan(tan(angle)) == angle.
The method cannot know in which quadrant the angle should fall. See atan2 if you always want an exact angle.
a = atan(0.5) # a is 0.463648
Returns the arc tangent of y/x in radians. Use to get the angle of tangent y/x. To compute the value, the method takes into account the sign of both arguments in order to determine the quadrant.
a = atan2(0, -1) # a is 3.141593
- Variant bytes2var ( PoolByteArray bytes, bool allow_objects=false )
Decodes a byte array back to a value. When allow_objects is true decoding objects is allowed.
WARNING: Deserialized object can contain code which gets executed. Do not use this option if the serialized object comes from untrusted sources to avoid potential security threats (remote code execution).
Converts a 2D point expressed in the cartesian coordinate system (X and Y axis) to the polar coordinate system (a distance from the origin and an angle).
Rounds s upward, returning the smallest integral value that is not less than s.
i = ceil(1.45) # i is 2
i = ceil(1.001) # i is 2
Returns a character as a String of the given Unicode code point (which is compatible with ASCII code).
a = char(65) # a is "A"
a = char(65 + 32) # a is "a"
a = char(8364) # a is "€"
This is the inverse of ord.
Clamps value and returns a value not less than min and not more than max.
speed = 1000
# a is 20
a = clamp(speed, 1, 20)
speed = -10
# a is 1
a = clamp(speed, 1, 20)
Converts from a type to another in the best way possible. The type parameter uses the Variant.Type values.
a = Vector2(1, 0)
# Prints 1
print(a.length())
a = convert(a, TYPE_STRING)
# Prints 6 as "(1, 0)" is 6 characters
print(a.length())
Returns the cosine of angle s in radians.
# Prints 1 then -1
print(cos(PI * 2))
print(cos(PI))
Returns the hyperbolic cosine of s in radians.
# Prints 1.543081
print(cosh(1))
Converts from decibels to linear energy (audio).
Deprecated alias for step_decimals.
Returns the result of value decreased by step * amount.
# a = 59
a = dectime(60, 10, 0.1))
Returns degrees converted to radians.
# r is 3.141593
r = deg2rad(180)
- Object dict2inst ( Dictionary dict )
Converts a previously converted instance to a dictionary, back into an instance. Useful for deserializing.
Easing function, based on exponent. 0 is constant, 1 is linear, 0 to 1 is ease-in, 1+ is ease out. Negative values are in-out/out in.
The natural exponential function. It raises the mathematical constant e to the power of s and returns it.
e has an approximate value of 2.71828.
For exponents to other bases use the method pow.
a = exp(2) # Approximately 7.39
Rounds s to the closest smaller integer and returns it.
# a is 2.0
a = floor(2.99)
# a is -3.0
a = floor(-2.99)
Note: This method returns a float. If you need an integer, you can use int(s) directly.
Returns the floating-point remainder of a/b, keeping the sign of a.
# Remainder is 1.5
var remainder = fmod(7, 5.5)
For the integer remainder operation, use the % operator.
Returns the floating-point modulus of a/b that wraps equally in positive and negative.
var i = -6
while i < 5:
prints(i, fposmod(i, 3))
i += 1
Produces:
-6 0
-5 1
-4 2
-3 0
-2 1
-1 2
0 0
1 1
2 2
3 0
4 1
Returns a reference to the specified function funcname in the instance node. As functions aren’t first-class objects in GDscript, use funcref to store a FuncRef in a variable and call it later.
func foo():
return("bar")
a = funcref(self, "foo")
print(a.call_func()) # Prints bar
- Array get_stack ( )
Returns an array of dictionaries representing the current call stack.
func _ready():
foo()
func foo():
bar()
func bar():
print(get_stack())
would print
[{function:bar, line:12, source:res://script.gd}, {function:foo, line:9, source:res://script.gd}, {function:_ready, line:6, source:res://script.gd}]
Returns the integer hash of the variable passed.
print(hash("a")) # Prints 177670
- Dictionary inst2dict ( Object inst )
Returns the passed instance converted to a dictionary (useful for serializing).
var foo = "bar"
func _ready():
var d = inst2dict(self)
print(d.keys())
print(d.values())
Prints out:
[@subpath, @path, foo]
[, res://test.gd, bar]
Returns the Object that corresponds to instance_id. All Objects have a unique instance ID.
var foo = "bar"
func _ready():
var id = get_instance_id()
var inst = instance_from_id(id)
print(inst.foo) # Prints bar
Returns a normalized value considering the given range. This is the opposite of lerp.
var middle = lerp(20, 30, 0.75)
# `middle` is now 27.5.
# Now, we pretend to have forgotten the original ratio and want to get it back.
var ratio = inverse_lerp(20, 30, 27.5)
# `ratio` is now 0.75.
Returns true if a and b are approximately equal to each other.
Returns whether s is an infinity value (either positive infinity or negative infinity).
Returns whether instance is a valid object (e.g. has not been deleted from memory).
Returns whether s is a NaN (Not-A-Number) value.
Returns true if s is zero or almost zero.
Returns length of Variant var. Length is the character count of String, element count of Array, size of Dictionary, etc.
Note: Generates a fatal error if Variant can not provide a length.
a = [1, 2, 3, 4]
len(a) # Returns 4
Linearly interpolates between two values by a normalized value. This is the opposite of inverse_lerp.
If the from and to arguments are of type int or float, the return value is a float.
If both are of the same vector type (Vector2, Vector3 or Color), the return value will be of the same type (lerp then calls the vector type’s linear_interpolate method).
lerp(0, 4, 0.75) # Returns 3.0
lerp(Vector2(1, 5), Vector2(3, 2), 0.5) # Returns Vector2(2, 3.5)
Linearly interpolates between two angles (in radians) by a normalized value.
Similar to lerp, but interpolates correctly when the angles wrap around TAU.
extends Sprite
var elapsed = 0.0
func _process(delta):
var min_angle = deg2rad(0.0)
var max_angle = deg2rad(90.0)
rotation = lerp_angle(min_angle, max_angle, elapsed)
elapsed += delta
Converts from linear energy to decibels (audio). This can be used to implement volume sliders that behave as expected (since volume isn’t linear). Example:
# "Slider" refers to a node that inherits Range such as HSlider or VSlider.
# Its range must be configured to go from 0 to 1.
# Change the bus name if you'd like to change the volume of a specific bus only.
AudioServer.set_bus_volume_db(AudioServer.get_bus_index("Master"), linear2db($Slider.value))
Loads a resource from the filesystem located at path.
Note: Resource paths can be obtained by right-clicking on a resource in the FileSystem dock and choosing Copy Path.
# Load a scene called main located in the root of the project directory.
var main = load("res://main.tscn")
Important: The path must be absolute, a local path will just return null.
Natural logarithm. The amount of time needed to reach a certain level of continuous growth.
Note: This is not the same as the “log” function on most calculators, which uses a base 10 logarithm.
log(10) # Returns 2.302585
Returns the maximum of two values.
max(1, 2) # Returns 2
max(-3.99, -4) # Returns -3.99
Returns the minimum of two values.
min(1, 2) # Returns 1
min(-3.99, -4) # Returns -4
Moves from toward to by the delta value.
Use a negative delta value to move away.
move_toward(10, 5, 4) # Returns 6
Returns the nearest larger power of 2 for integer value.
nearest_po2(3) # Returns 4
nearest_po2(4) # Returns 4
nearest_po2(5) # Returns 8
Returns an integer representing the Unicode code point of the given Unicode character char.
a = ord("A") # a is 65
a = ord("a") # a is 97
a = ord("€") # a is 8364
This is the inverse of char.
Parse JSON text to a Variant (use typeof to check if it is what you expect).
Be aware that the JSON specification does not define integer or float types, but only a number type. Therefore, parsing a JSON text will convert all numerical values to float types.
Note that JSON objects do not preserve key order like Godot dictionaries, thus you should not rely on keys being in a certain order if a dictionary is constructed from JSON. In contrast, JSON arrays retain the order of their elements:
p = parse_json('["a", "b", "c"]')
if typeof(p) == TYPE_ARRAY:
print(p[0]) # Prints a
else:
print("unexpected results")
Converts a 2D point expressed in the polar coordinate system (a distance from the origin r and an angle th) to the cartesian coordinate system (X and Y axis).
Returns the integer modulus of a/b that wraps equally in positive and negative.
var i = -6
while i < 5:
prints(i, posmod(i, 3))
i += 1
Produces:
-6 0
-5 1
-4 2
-3 0
-2 1
-1 2
0 0
1 1
2 2
3 0
4 1
Returns the result of x raised to the power of y.
pow(2, 5) # Returns 32
Returns a resource from the filesystem that is loaded during script parsing.
Note: Resource paths can be obtained by right clicking on a resource in the Assets Panel and choosing “Copy Path”.
# Load a scene called main located in the root of the project directory.
var main = preload("res://main.tscn")
- void print ( … ) vararg
Converts one or more arguments to strings in the best way possible and prints them to the console.
a = [1, 2, 3]
print("a", "b", a) # Prints ab[1, 2, 3]
- void print_debug ( … ) vararg
Like print, but prints only when used in debug mode.
- void print_stack ( )
Prints a stack track at code location, only works when running with debugger turned on.
Output in the console would look something like this:
Frame 0 - res://test.gd:16 in function '_process'
- void printerr ( … ) vararg
Prints one or more arguments to strings in the best way possible to standard error line.
printerr("prints to stderr")
- void printraw ( … ) vararg
Prints one or more arguments to strings in the best way possible to console. No newline is added at the end.
printraw("A")
printraw("B")
# Prints AB
Note: Due to limitations with Godot’s built-in console, this only prints to the terminal. If you need to print in the editor, use another method, such as print.
- void prints ( … ) vararg
Prints one or more arguments to the console with a space between each argument.
prints("A", "B", "C") # Prints A B C
- void printt ( … ) vararg
Prints one or more arguments to the console with a tab between each argument.
printt("A", "B", "C") # Prints A B C
- void push_error ( String message )
Pushes an error message to Godot’s built-in debugger and to the OS terminal.
push_error("test error") # Prints "test error" to debugger and terminal as error call
- void push_warning ( String message )
Pushes a warning message to Godot’s built-in debugger and to the OS terminal.
push_warning("test warning") # Prints "test warning" to debugger and terminal as warning call
Converts from radians to degrees.
rad2deg(0.523599) # Returns 30
Random range, any floating point value between from and to.
prints(rand_range(0, 1), rand_range(0, 1)) # Prints e.g. 0.135591 0.405263
Random from seed: pass a seed, and an array with both number and new seed is returned. “Seed” here refers to the internal state of the pseudo random number generator. The internal state of the current implementation is 64 bits.
- float randf ( )
Returns a random floating point value on the interval [0, 1].
randf() # Returns e.g. 0.375671
- int randi ( )
Returns a random unsigned 32 bit integer. Use remainder to obtain a random value in the interval [0, N - 1] (where N is smaller than 2^32).
randi() # Returns random integer between 0 and 2^32 - 1
randi() % 20 # Returns random integer between 0 and 19
randi() % 100 # Returns random integer between 0 and 99
randi() % 100 + 1 # Returns random integer between 1 and 100
- void randomize ( )
Randomizes the seed (or the internal state) of the random number generator. Current implementation reseeds using a number based on time.
func _ready():
randomize()
- Array range ( … ) vararg
Returns an array with the given range. Range can be 1 argument N (0 to N-1), two arguments (initial, final-1) or three arguments (initial, final-1, increment).
for i in range(4):
print(i)
for i in range(2, 5):
print(i)
for i in range(0, 6, 2):
print(i)
Output:
0
1
2
3
2
3
4
0
2
4
Maps a value from range [istart, istop] to [ostart, ostop].
range_lerp(75, 0, 100, -1, 1) # Returns 0.5
Returns the integral value that is nearest to s, with halfway cases rounded away from zero.
round(2.6) # Returns 3
- void seed ( int seed )
Sets seed for the random number generator.
my_seed = "Godot Rocks"
seed(my_seed.hash())
Returns the sign of s: -1 or 1. Returns 0 if s is 0.
sign(-6) # Returns -1
sign(0) # Returns 0
sign(6) # Returns 1
Returns the sine of angle s in radians.
sin(0.523599) # Returns 0.5
Returns the hyperbolic sine of s.
a = log(2.0) # Returns 0.693147
sinh(a) # Returns 0.75
Returns a number smoothly interpolated between the from and to, based on the weight. Similar to lerp, but interpolates faster at the beginning and slower at the end.
smoothstep(0, 2, 0.5) # Returns 0.15
smoothstep(0, 2, 1.0) # Returns 0.5
smoothstep(0, 2, 2.0) # Returns 1.0
Returns the square root of s.
sqrt(9) # Returns 3
Returns the position of the first non-zero digit, after the decimal point. Note that the maximum return value is 10, which is a design decision in the implementation.
# n is 0
n = step_decimals(5)
# n is 4
n = step_decimals(1.0005)
# n is 9
n = step_decimals(0.000000005)
Snaps float value s to a given step. This can also be used to round a floating point number to an arbitrary number of decimals.
stepify(100, 32) # Returns 96
stepify(3.14159, 0.01) # Returns 3.14
- String str ( … ) vararg
Converts one or more arguments to string in the best way possible.
var a = [10, 20, 30]
var b = str(a);
len(a) # Returns 3
len(b) # Returns 12
Converts a formatted string that was returned by var2str to the original value.
a = '{ "a": 1, "b": 2 }'
b = str2var(a)
print(b["a"]) # Prints 1
Returns the tangent of angle s in radians.
tan(deg2rad(45)) # Returns 1
Returns the hyperbolic tangent of s.
a = log(2.0) # Returns 0.693147
tanh(a) # Returns 0.6
Converts a Variant var to JSON text and return the result. Useful for serializing data to store or send over the network.
a = { "a": 1, "b": 2 }
b = to_json(a)
print(b) # {"a":1, "b":2}
Returns whether the given class exists in ClassDB.
type_exists("Sprite") # Returns true
type_exists("Variant") # Returns false
Returns the internal type of the given Variant object, using the Variant.Type values.
p = parse_json('["a", "b", "c"]')
if typeof(p) == TYPE_ARRAY:
print(p[0]) # Prints a
else:
print("unexpected results")
Checks that json is valid JSON data. Returns an empty string if valid, or an error message otherwise.
j = to_json([1, 2, 3])
v = validate_json(j)
if not v:
print("valid")
else:
prints("invalid", v)
- PoolByteArray var2bytes ( Variant var, bool full_objects=false )
Encodes a variable value to a byte array. When full_objects is true encoding objects is allowed (and can potentially include code).
Converts a Variant var to a formatted string that can later be parsed using str2var.
a = { "a": 1, "b": 2 }
print(var2str(a))
prints
{
"a": 1,
"b": 2
}
Returns a weak reference to an object.
A weak reference to an object is not enough to keep the object alive: when the only remaining references to a referent are weak references, garbage collection is free to destroy the referent and reuse its memory for something else. However, until the object is actually destroyed the weak reference may return the object even if there are no strong references to it.
Wraps float value between min and max.
Usable for creating loop-alike behavior or infinite surfaces.
# a is 0.5
a = wrapf(10.5, 0.0, 10.0)
# a is 9.5
a = wrapf(-0.5, 0.0, 10.0)
# Infinite loop between 0.0 and 0.99
f = wrapf(f + 0.1, 0.0, 1.0)
# Infinite rotation (in radians)
angle = wrapf(angle + 0.1, 0.0, TAU)
Note: If you just want to wrap between 0.0 and n (where n is a positive floating-point value), it is better for performance to use the fmod method like fmod(number, n).
wrapf is more flexible than using the fmod approach by giving the user a simple control over the minimum value. It also fully supports negative numbers, e.g.
# Infinite rotation (in radians)
angle = wrapf(angle + 0.1, -PI, PI)
Wraps integer value between min and max.
Usable for creating loop-alike behavior or infinite surfaces.
# a is 0
a = wrapi(10, 0, 10)
# a is 9
a = wrapi(-1, 0, 10)
# Infinite loop between 0 and 9
frame = wrapi(frame + 1, 0, 10)
Note: If you just want to wrap between 0 and n (where n is a positive integer value), it is better for performance to use the modulo operator like number % n.
wrapi is more flexible than using the modulo approach by giving the user a simple control over the minimum value. It also fully supports negative numbers, e.g.
# result is -2
var result = wrapi(-6, -5, -1)
- GDScriptFunctionState yield ( Object object=null, String signal=”” )
Stops the function execution and returns the current suspended state to the calling function.
From the caller, call GDScriptFunctionState.resume on the state to resume execution. This invalidates the state. Within the resumed function, yield() returns whatever was passed to the resume() function call.
If passed an object and a signal, the execution is resumed when the object emits the given signal. In this case, yield() returns the argument passed to emit_signal() if the signal takes only one argument, or an array containing all the arguments passed to emit_signal() if the signal takes multiple arguments.
You can also use yield to wait for a function to finish:
func _ready():
yield(countdown(), "completed") # waiting for the countdown() function to complete
print('Ready')
func countdown():
yield(get_tree(), "idle_frame") # returns a GDScriptFunctionState object to _ready()
print(3)
yield(get_tree().create_timer(1.0), "timeout")
print(2)
yield(get_tree().create_timer(1.0), "timeout")
print(1)
yield(get_tree().create_timer(1.0), "timeout")
# prints:
# 3
# 2
# 1
# Ready
When yielding on a function, the completed signal will be emitted automatically when the function returns. It can, therefore, be used as the signal parameter of the yield method to resume.
In order to yield on a function, the resulting function should also return a GDScriptFunctionState. Notice yield(get_tree(), "idle_frame") from the above example.
@GlobalScope¶
Global scope constants and variables.
Description¶
Global scope constants and variables. This is all that resides in the globals, constants regarding error codes, scancodes, property hints, etc.
Singletons are also documented here, since they can be accessed from anywhere.
Properties¶
Enumerations¶
enum Margin:
- MARGIN_LEFT = 0 — Left margin, usually used for Control or StyleBox-derived classes.
- MARGIN_TOP = 1 — Top margin, usually used for Control or StyleBox-derived classes.
- MARGIN_RIGHT = 2 — Right margin, usually used for Control or StyleBox-derived classes.
- MARGIN_BOTTOM = 3 — Bottom margin, usually used for Control or StyleBox-derived classes.
enum Corner:
- CORNER_TOP_LEFT = 0 — Top-left corner.
- CORNER_TOP_RIGHT = 1 — Top-right corner.
- CORNER_BOTTOM_RIGHT = 2 — Bottom-right corner.
- CORNER_BOTTOM_LEFT = 3 — Bottom-left corner.
enum Orientation:
- VERTICAL = 1 — General vertical alignment, usually used for Separator, ScrollBar, Slider, etc.
- HORIZONTAL = 0 — General horizontal alignment, usually used for Separator, ScrollBar, Slider, etc.
enum HAlign:
- HALIGN_LEFT = 0 — Horizontal left alignment, usually for text-derived classes.
- HALIGN_CENTER = 1 — Horizontal center alignment, usually for text-derived classes.
- HALIGN_RIGHT = 2 — Horizontal right alignment, usually for text-derived classes.
enum VAlign:
- VALIGN_TOP = 0 — Vertical top alignment, usually for text-derived classes.
- VALIGN_CENTER = 1 — Vertical center alignment, usually for text-derived classes.
- VALIGN_BOTTOM = 2 — Vertical bottom alignment, usually for text-derived classes.
enum KeyList:
- KEY_ESCAPE = 16777217 — Escape key.
- KEY_TAB = 16777218 — Tab key.
- KEY_BACKTAB = 16777219 — Shift+Tab key.
- KEY_BACKSPACE = 16777220 — Backspace key.
- KEY_ENTER = 16777221 — Return key (on the main keyboard).
- KEY_KP_ENTER = 16777222 — Enter key on the numeric keypad.
- KEY_INSERT = 16777223 — Insert key.
- KEY_DELETE = 16777224 — Delete key.
- KEY_PAUSE = 16777225 — Pause key.
- KEY_PRINT = 16777226 — Print Screen key.
- KEY_SYSREQ = 16777227 — System Request key.
- KEY_CLEAR = 16777228 — Clear key.
- KEY_HOME = 16777229 — Home key.
- KEY_END = 16777230 — End key.
- KEY_LEFT = 16777231 — Left arrow key.
- KEY_UP = 16777232 — Up arrow key.
- KEY_RIGHT = 16777233 — Right arrow key.
- KEY_DOWN = 16777234 — Down arrow key.
- KEY_PAGEUP = 16777235 — Page Up key.
- KEY_PAGEDOWN = 16777236 — Page Down key.
- KEY_SHIFT = 16777237 — Shift key.
- KEY_CONTROL = 16777238 — Control key.
- KEY_META = 16777239 — Meta key.
- KEY_ALT = 16777240 — Alt key.
- KEY_CAPSLOCK = 16777241 — Caps Lock key.
- KEY_NUMLOCK = 16777242 — Num Lock key.
- KEY_SCROLLLOCK = 16777243 — Scroll Lock key.
- KEY_F1 = 16777244 — F1 key.
- KEY_F2 = 16777245 — F2 key.
- KEY_F3 = 16777246 — F3 key.
- KEY_F4 = 16777247 — F4 key.
- KEY_F5 = 16777248 — F5 key.
- KEY_F6 = 16777249 — F6 key.
- KEY_F7 = 16777250 — F7 key.
- KEY_F8 = 16777251 — F8 key.
- KEY_F9 = 16777252 — F9 key.
- KEY_F10 = 16777253 — F10 key.
- KEY_F11 = 16777254 — F11 key.
- KEY_F12 = 16777255 — F12 key.
- KEY_F13 = 16777256 — F13 key.
- KEY_F14 = 16777257 — F14 key.
- KEY_F15 = 16777258 — F15 key.
- KEY_F16 = 16777259 — F16 key.
- KEY_KP_MULTIPLY = 16777345 — Multiply (*) key on the numeric keypad.
- KEY_KP_DIVIDE = 16777346 — Divide (/) key on the numeric keypad.
- KEY_KP_SUBTRACT = 16777347 — Subtract (-) key on the numeric keypad.
- KEY_KP_PERIOD = 16777348 — Period (.) key on the numeric keypad.
- KEY_KP_ADD = 16777349 — Add (+) key on the numeric keypad.
- KEY_KP_0 = 16777350 — Number 0 on the numeric keypad.
- KEY_KP_1 = 16777351 — Number 1 on the numeric keypad.
- KEY_KP_2 = 16777352 — Number 2 on the numeric keypad.
- KEY_KP_3 = 16777353 — Number 3 on the numeric keypad.
- KEY_KP_4 = 16777354 — Number 4 on the numeric keypad.
- KEY_KP_5 = 16777355 — Number 5 on the numeric keypad.
- KEY_KP_6 = 16777356 — Number 6 on the numeric keypad.
- KEY_KP_7 = 16777357 — Number 7 on the numeric keypad.
- KEY_KP_8 = 16777358 — Number 8 on the numeric keypad.
- KEY_KP_9 = 16777359 — Number 9 on the numeric keypad.
- KEY_SUPER_L = 16777260 — Left Super key (Windows key).
- KEY_SUPER_R = 16777261 — Right Super key (Windows key).
- KEY_MENU = 16777262 — Context menu key.
- KEY_HYPER_L = 16777263 — Left Hyper key.
- KEY_HYPER_R = 16777264 — Right Hyper key.
- KEY_HELP = 16777265 — Help key.
- KEY_DIRECTION_L = 16777266 — Left Direction key.
- KEY_DIRECTION_R = 16777267 — Right Direction key.
- KEY_BACK = 16777280 — Back key.
- KEY_FORWARD = 16777281 — Forward key.
- KEY_STOP = 16777282 — Stop key.
- KEY_REFRESH = 16777283 — Refresh key.
- KEY_VOLUMEDOWN = 16777284 — Volume down key.
- KEY_VOLUMEMUTE = 16777285 — Mute volume key.
- KEY_VOLUMEUP = 16777286 — Volume up key.
- KEY_BASSBOOST = 16777287 — Bass Boost key.
- KEY_BASSUP = 16777288 — Bass up key.
- KEY_BASSDOWN = 16777289 — Bass down key.
- KEY_TREBLEUP = 16777290 — Treble up key.
- KEY_TREBLEDOWN = 16777291 — Treble down key.
- KEY_MEDIAPLAY = 16777292 — Media play key.
- KEY_MEDIASTOP = 16777293 — Media stop key.
- KEY_MEDIAPREVIOUS = 16777294 — Previous song key.
- KEY_MEDIANEXT = 16777295 — Next song key.
- KEY_MEDIARECORD = 16777296 — Media record key.
- KEY_HOMEPAGE = 16777297 — Home page key.
- KEY_FAVORITES = 16777298 — Favorites key.
- KEY_SEARCH = 16777299 — Search key.
- KEY_STANDBY = 16777300 — Standby key.
- KEY_OPENURL = 16777301 — Open URL / Launch Browser key.
- KEY_LAUNCHMAIL = 16777302 — Launch Mail key.
- KEY_LAUNCHMEDIA = 16777303 — Launch Media key.
- KEY_LAUNCH0 = 16777304 — Launch Shortcut 0 key.
- KEY_LAUNCH1 = 16777305 — Launch Shortcut 1 key.
- KEY_LAUNCH2 = 16777306 — Launch Shortcut 2 key.
- KEY_LAUNCH3 = 16777307 — Launch Shortcut 3 key.
- KEY_LAUNCH4 = 16777308 — Launch Shortcut 4 key.
- KEY_LAUNCH5 = 16777309 — Launch Shortcut 5 key.
- KEY_LAUNCH6 = 16777310 — Launch Shortcut 6 key.
- KEY_LAUNCH7 = 16777311 — Launch Shortcut 7 key.
- KEY_LAUNCH8 = 16777312 — Launch Shortcut 8 key.
- KEY_LAUNCH9 = 16777313 — Launch Shortcut 9 key.
- KEY_LAUNCHA = 16777314 — Launch Shortcut A key.
- KEY_LAUNCHB = 16777315 — Launch Shortcut B key.
- KEY_LAUNCHC = 16777316 — Launch Shortcut C key.
- KEY_LAUNCHD = 16777317 — Launch Shortcut D key.
- KEY_LAUNCHE = 16777318 — Launch Shortcut E key.
- KEY_LAUNCHF = 16777319 — Launch Shortcut F key.
- KEY_UNKNOWN = 33554431 — Unknown key.
- KEY_SPACE = 32 — Space key.
- KEY_EXCLAM = 33 — ! key.
- KEY_QUOTEDBL = 34 — ” key.
- KEY_NUMBERSIGN = 35 — # key.
- KEY_DOLLAR = 36 — $ key.
- KEY_PERCENT = 37 — % key.
- KEY_AMPERSAND = 38 — & key.
- KEY_APOSTROPHE = 39 — ‘ key.
- KEY_PARENLEFT = 40 — ( key.
- KEY_PARENRIGHT = 41 — ) key.
- KEY_ASTERISK = 42 — * key.
- KEY_PLUS = 43 — + key.
- KEY_COMMA = 44 — , key.
- KEY_MINUS = 45 — - key.
- KEY_PERIOD = 46 — . key.
- KEY_SLASH = 47 — / key.
- KEY_0 = 48 — Number 0.
- KEY_1 = 49 — Number 1.
- KEY_2 = 50 — Number 2.
- KEY_3 = 51 — Number 3.
- KEY_4 = 52 — Number 4.
- KEY_5 = 53 — Number 5.
- KEY_6 = 54 — Number 6.
- KEY_7 = 55 — Number 7.
- KEY_8 = 56 — Number 8.
- KEY_9 = 57 — Number 9.
- KEY_COLON = 58 — : key.
- KEY_SEMICOLON = 59 — ; key.
- KEY_LESS = 60 — < key.
- KEY_EQUAL = 61 — = key.
- KEY_GREATER = 62 — > key.
- KEY_QUESTION = 63 — ? key.
- KEY_AT = 64 — @ key.
- KEY_A = 65 — A key.
- KEY_B = 66 — B key.
- KEY_C = 67 — C key.
- KEY_D = 68 — D key.
- KEY_E = 69 — E key.
- KEY_F = 70 — F key.
- KEY_G = 71 — G key.
- KEY_H = 72 — H key.
- KEY_I = 73 — I key.
- KEY_J = 74 — J key.
- KEY_K = 75 — K key.
- KEY_L = 76 — L key.
- KEY_M = 77 — M key.
- KEY_N = 78 — N key.
- KEY_O = 79 — O key.
- KEY_P = 80 — P key.
- KEY_Q = 81 — Q key.
- KEY_R = 82 — R key.
- KEY_S = 83 — S key.
- KEY_T = 84 — T key.
- KEY_U = 85 — U key.
- KEY_V = 86 — V key.
- KEY_W = 87 — W key.
- KEY_X = 88 — X key.
- KEY_Y = 89 — Y key.
- KEY_Z = 90 — Z key.
- KEY_BRACKETLEFT = 91 — [ key.
- KEY_BACKSLASH = 92 — \ key.
- KEY_BRACKETRIGHT = 93 — ] key.
- KEY_ASCIICIRCUM = 94 — ^ key.
- KEY_UNDERSCORE = 95 — _ key.
- KEY_QUOTELEFT = 96 — ` key.
- KEY_BRACELEFT = 123 — { key.
- KEY_BAR = 124 — | key.
- KEY_BRACERIGHT = 125 — } key.
- KEY_ASCIITILDE = 126 — ~ key.
- KEY_NOBREAKSPACE = 160 — Non-breakable space key.
- KEY_EXCLAMDOWN = 161 — ¡ key.
- KEY_CENT = 162 — ¢ key.
- KEY_STERLING = 163 — £ key.
- KEY_CURRENCY = 164 — ¤ key.
- KEY_YEN = 165 — ¥ key.
- KEY_BROKENBAR = 166 — ¦ key.
- KEY_SECTION = 167 — § key.
- KEY_DIAERESIS = 168 — ¨ key.
- KEY_COPYRIGHT = 169 — © key.
- KEY_ORDFEMININE = 170 — ª key.
- KEY_GUILLEMOTLEFT = 171 — « key.
- KEY_NOTSIGN = 172 — ¬ key.
- KEY_HYPHEN = 173 — Soft hyphen key.
- KEY_REGISTERED = 174 — ® key.
- KEY_MACRON = 175 — ¯ key.
- KEY_DEGREE = 176 — ° key.
- KEY_PLUSMINUS = 177 — ± key.
- KEY_TWOSUPERIOR = 178 — ² key.
- KEY_THREESUPERIOR = 179 — ³ key.
- KEY_ACUTE = 180 — ´ key.
- KEY_MU = 181 — µ key.
- KEY_PARAGRAPH = 182 — ¶ key.
- KEY_PERIODCENTERED = 183 — · key.
- KEY_CEDILLA = 184 — ¸ key.
- KEY_ONESUPERIOR = 185 — ¹ key.
- KEY_MASCULINE = 186 — º key.
- KEY_GUILLEMOTRIGHT = 187 — » key.
- KEY_ONEQUARTER = 188 — ¼ key.
- KEY_ONEHALF = 189 — ½ key.
- KEY_THREEQUARTERS = 190 — ¾ key.
- KEY_QUESTIONDOWN = 191 — ¿ key.
- KEY_AGRAVE = 192 — À key.
- KEY_AACUTE = 193 — Á key.
- KEY_ACIRCUMFLEX = 194 — Â key.
- KEY_ATILDE = 195 — Ã key.
- KEY_ADIAERESIS = 196 — Ä key.
- KEY_ARING = 197 — Å key.
- KEY_AE = 198 — Æ key.
- KEY_CCEDILLA = 199 — Ç key.
- KEY_EGRAVE = 200 — È key.
- KEY_EACUTE = 201 — É key.
- KEY_ECIRCUMFLEX = 202 — Ê key.
- KEY_EDIAERESIS = 203 — Ë key.
- KEY_IGRAVE = 204 — Ì key.
- KEY_IACUTE = 205 — Í key.
- KEY_ICIRCUMFLEX = 206 — Î key.
- KEY_IDIAERESIS = 207 — Ï key.
- KEY_ETH = 208 — Ð key.
- KEY_NTILDE = 209 — Ñ key.
- KEY_OGRAVE = 210 — Ò key.
- KEY_OACUTE = 211 — Ó key.
- KEY_OCIRCUMFLEX = 212 — Ô key.
- KEY_OTILDE = 213 — Õ key.
- KEY_ODIAERESIS = 214 — Ö key.
- KEY_MULTIPLY = 215 — × key.
- KEY_OOBLIQUE = 216 — Ø key.
- KEY_UGRAVE = 217 — Ù key.
- KEY_UACUTE = 218 — Ú key.
- KEY_UCIRCUMFLEX = 219 — Û key.
- KEY_UDIAERESIS = 220 — Ü key.
- KEY_YACUTE = 221 — Ý key.
- KEY_THORN = 222 — Þ key.
- KEY_SSHARP = 223 — ß key.
- KEY_DIVISION = 247 — ÷ key.
- KEY_YDIAERESIS = 255 — ÿ key.
enum KeyModifierMask:
- KEY_CODE_MASK = 33554431 — Key Code mask.
- KEY_MODIFIER_MASK = -16777216 — Modifier key mask.
- KEY_MASK_SHIFT = 33554432 — Shift key mask.
- KEY_MASK_ALT = 67108864 — Alt key mask.
- KEY_MASK_META = 134217728 — Meta key mask.
- KEY_MASK_CTRL = 268435456 — Ctrl key mask.
- KEY_MASK_CMD = 268435456 — Command key mask. On macOS, this is equivalent to KEY_MASK_META. On other platforms, this is equivalent to KEY_MASK_CTRL. This mask should be preferred to KEY_MASK_META or KEY_MASK_CTRL for system shortcuts as it handles all platforms correctly.
- KEY_MASK_KPAD = 536870912 — Keypad key mask.
- KEY_MASK_GROUP_SWITCH = 1073741824 — Group Switch key mask.
- BUTTON_LEFT = 1 — Left mouse button.
- BUTTON_RIGHT = 2 — Right mouse button.
- BUTTON_MIDDLE = 3 — Middle mouse button.
- BUTTON_XBUTTON1 = 8 — Extra mouse button 1 (only present on some mice).
- BUTTON_XBUTTON2 = 9 — Extra mouse button 2 (only present on some mice).
- BUTTON_WHEEL_UP = 4 — Mouse wheel up.
- BUTTON_WHEEL_DOWN = 5 — Mouse wheel down.
- BUTTON_WHEEL_LEFT = 6 — Mouse wheel left button (only present on some mice).
- BUTTON_WHEEL_RIGHT = 7 — Mouse wheel right button (only present on some mice).
- BUTTON_MASK_LEFT = 1 — Left mouse button mask.
- BUTTON_MASK_RIGHT = 2 — Right mouse button mask.
- BUTTON_MASK_MIDDLE = 4 — Middle mouse button mask.
- BUTTON_MASK_XBUTTON1 = 128 — Extra mouse button 1 mask.
- BUTTON_MASK_XBUTTON2 = 256 — Extra mouse button 2 mask.
enum JoystickList:
- JOY_BUTTON_0 = 0 — Gamepad button 0.
- JOY_BUTTON_1 = 1 — Gamepad button 1.
- JOY_BUTTON_2 = 2 — Gamepad button 2.
- JOY_BUTTON_3 = 3 — Gamepad button 3.
- JOY_BUTTON_4 = 4 — Gamepad button 4.
- JOY_BUTTON_5 = 5 — Gamepad button 5.
- JOY_BUTTON_6 = 6 — Gamepad button 6.
- JOY_BUTTON_7 = 7 — Gamepad button 7.
- JOY_BUTTON_8 = 8 — Gamepad button 8.
- JOY_BUTTON_9 = 9 — Gamepad button 9.
- JOY_BUTTON_10 = 10 — Gamepad button 10.
- JOY_BUTTON_11 = 11 — Gamepad button 11.
- JOY_BUTTON_12 = 12 — Gamepad button 12.
- JOY_BUTTON_13 = 13 — Gamepad button 13.
- JOY_BUTTON_14 = 14 — Gamepad button 14.
- JOY_BUTTON_15 = 15 — Gamepad button 15.
- JOY_BUTTON_MAX = 16 — Represents the maximum number of joystick buttons supported.
- JOY_SONY_CIRCLE = 1 — DualShock circle button.
- JOY_SONY_X = 0 — DualShock X button.
- JOY_SONY_SQUARE = 2 — DualShock square button.
- JOY_SONY_TRIANGLE = 3 — DualShock triangle button.
- JOY_XBOX_B = 1 — Xbox controller B button.
- JOY_XBOX_A = 0 — Xbox controller A button.
- JOY_XBOX_X = 2 — Xbox controller X button.
- JOY_XBOX_Y = 3 — Xbox controller Y button.
- JOY_DS_A = 1 — Nintendo controller A button.
- JOY_DS_B = 0 — Nintendo controller B button.
- JOY_DS_X = 3 — Nintendo controller X button.
- JOY_DS_Y = 2 — Nintendo controller Y button.
- JOY_VR_GRIP = 2 — Grip (side) buttons on a VR controller.
- JOY_VR_PAD = 14 — Push down on the touchpad or main joystick on a VR controller.
- JOY_VR_TRIGGER = 15 — Trigger on a VR controller.
- JOY_OCULUS_AX = 7 — A button on the right Oculus Touch controller, X button on the left controller (also when used in OpenVR).
- JOY_OCULUS_BY = 1 — B button on the right Oculus Touch controller, Y button on the left controller (also when used in OpenVR).
- JOY_OCULUS_MENU = 3 — Menu button on either Oculus Touch controller.
- JOY_OPENVR_MENU = 1 — Menu button in OpenVR (Except when Oculus Touch controllers are used).
- JOY_SELECT = 10 — Gamepad button Select.
- JOY_START = 11 — Gamepad button Start.
- JOY_DPAD_UP = 12 — Gamepad DPad up.
- JOY_DPAD_DOWN = 13 — Gamepad DPad down.
- JOY_DPAD_LEFT = 14 — Gamepad DPad left.
- JOY_DPAD_RIGHT = 15 — Gamepad DPad right.
- JOY_L = 4 — Gamepad left Shoulder button.
- JOY_L2 = 6 — Gamepad left trigger.
- JOY_L3 = 8 — Gamepad left stick click.
- JOY_R = 5 — Gamepad right Shoulder button.
- JOY_R2 = 7 — Gamepad right trigger.
- JOY_R3 = 9 — Gamepad right stick click.
- JOY_AXIS_0 = 0 — Gamepad left stick horizontal axis.
- JOY_AXIS_1 = 1 — Gamepad left stick vertical axis.
- JOY_AXIS_2 = 2 — Gamepad right stick horizontal axis.
- JOY_AXIS_3 = 3 — Gamepad right stick vertical axis.
- JOY_AXIS_4 = 4 — Generic gamepad axis 4.
- JOY_AXIS_5 = 5 — Generic gamepad axis 5.
- JOY_AXIS_6 = 6 — Gamepad left trigger analog axis.
- JOY_AXIS_7 = 7 — Gamepad right trigger analog axis.
- JOY_AXIS_8 = 8 — Generic gamepad axis 8.
- JOY_AXIS_9 = 9 — Generic gamepad axis 9.
- JOY_AXIS_MAX = 10 — Represents the maximum number of joystick axes supported.
- JOY_ANALOG_LX = 0 — Gamepad left stick horizontal axis.
- JOY_ANALOG_LY = 1 — Gamepad left stick vertical axis.
- JOY_ANALOG_RX = 2 — Gamepad right stick horizontal axis.
- JOY_ANALOG_RY = 3 — Gamepad right stick vertical axis.
- JOY_ANALOG_L2 = 6 — Gamepad left analog trigger.
- JOY_ANALOG_R2 = 7 — Gamepad right analog trigger.
- JOY_VR_ANALOG_TRIGGER = 2 — VR Controller analog trigger.
- JOY_VR_ANALOG_GRIP = 4 — VR Controller analog grip (side buttons).
- JOY_OPENVR_TOUCHPADX = 0 — OpenVR touchpad X axis (Joystick axis on Oculus Touch and Windows MR controllers).
- JOY_OPENVR_TOUCHPADY = 1 — OpenVR touchpad Y axis (Joystick axis on Oculus Touch and Windows MR controllers).
enum MidiMessageList:
- MIDI_MESSAGE_NOTE_OFF = 8 — MIDI note OFF message.
- MIDI_MESSAGE_NOTE_ON = 9 — MIDI note ON message.
- MIDI_MESSAGE_AFTERTOUCH = 10 — MIDI aftertouch message.
- MIDI_MESSAGE_CONTROL_CHANGE = 11 — MIDI control change message.
- MIDI_MESSAGE_PROGRAM_CHANGE = 12 — MIDI program change message.
- MIDI_MESSAGE_CHANNEL_PRESSURE = 13 — MIDI channel pressure message.
- MIDI_MESSAGE_PITCH_BEND = 14 — MIDI pitch bend message.
enum Error:
- OK = 0 — Methods that return Error return OK when no error occurred. Note that many functions don’t return an error code but will print error messages to standard output.
Since OK has value 0, and all other failure codes are positive integers, it can also be used in boolean checks, e.g.:
var err = method_that_returns_error()
if err != OK:
print("Failure!)
# Or, equivalent:
if err:
print("Still failing!)
- FAILED = 1 — Generic error.
- ERR_UNAVAILABLE = 2 — Unavailable error.
- ERR_UNCONFIGURED = 3 — Unconfigured error.
- ERR_UNAUTHORIZED = 4 — Unauthorized error.
- ERR_PARAMETER_RANGE_ERROR = 5 — Parameter range error.
- ERR_OUT_OF_MEMORY = 6 — Out of memory (OOM) error.
- ERR_FILE_NOT_FOUND = 7 — File: Not found error.
- ERR_FILE_BAD_DRIVE = 8 — File: Bad drive error.
- ERR_FILE_BAD_PATH = 9 — File: Bad path error.
- ERR_FILE_NO_PERMISSION = 10 — File: No permission error.
- ERR_FILE_ALREADY_IN_USE = 11 — File: Already in use error.
- ERR_FILE_CANT_OPEN = 12 — File: Can’t open error.
- ERR_FILE_CANT_WRITE = 13 — File: Can’t write error.
- ERR_FILE_CANT_READ = 14 — File: Can’t read error.
- ERR_FILE_UNRECOGNIZED = 15 — File: Unrecognized error.
- ERR_FILE_CORRUPT = 16 — File: Corrupt error.
- ERR_FILE_MISSING_DEPENDENCIES = 17 — File: Missing dependencies error.
- ERR_FILE_EOF = 18 — File: End of file (EOF) error.
- ERR_CANT_OPEN = 19 — Can’t open error.
- ERR_CANT_CREATE = 20 — Can’t create error.
- ERR_QUERY_FAILED = 21 — Query failed error.
- ERR_ALREADY_IN_USE = 22 — Already in use error.
- ERR_LOCKED = 23 — Locked error.
- ERR_TIMEOUT = 24 — Timeout error.
- ERR_CANT_CONNECT = 25 — Can’t connect error.
- ERR_CANT_RESOLVE = 26 — Can’t resolve error.
- ERR_CONNECTION_ERROR = 27 — Connection error.
- ERR_CANT_ACQUIRE_RESOURCE = 28 — Can’t acquire resource error.
- ERR_CANT_FORK = 29 — Can’t fork process error.
- ERR_INVALID_DATA = 30 — Invalid data error.
- ERR_INVALID_PARAMETER = 31 — Invalid parameter error.
- ERR_ALREADY_EXISTS = 32 — Already exists error.
- ERR_DOES_NOT_EXIST = 33 — Does not exist error.
- ERR_DATABASE_CANT_READ = 34 — Database: Read error.
- ERR_DATABASE_CANT_WRITE = 35 — Database: Write error.
- ERR_COMPILATION_FAILED = 36 — Compilation failed error.
- ERR_METHOD_NOT_FOUND = 37 — Method not found error.
- ERR_LINK_FAILED = 38 — Linking failed error.
- ERR_SCRIPT_FAILED = 39 — Script failed error.
- ERR_CYCLIC_LINK = 40 — Cycling link (import cycle) error.
- ERR_INVALID_DECLARATION = 41 — Invalid declaration error.
- ERR_DUPLICATE_SYMBOL = 42 — Duplicate symbol error.
- ERR_PARSE_ERROR = 43 — Parse error.
- ERR_BUSY = 44 — Busy error.
- ERR_SKIP = 45 — Skip error.
- ERR_HELP = 46 — Help error.
- ERR_BUG = 47 — Bug error.
- ERR_PRINTER_ON_FIRE = 48 — Printer on fire error. (This is an easter egg, no engine methods return this error code.)
enum PropertyHint:
- PROPERTY_HINT_NONE = 0 — No hint for the edited property.
- PROPERTY_HINT_RANGE = 1 — Hints that an integer or float property should be within a range specified via the hint string
"min,max"or"min,max,step". The hint string can optionally include"or_greater"and/or"or_lesser"to allow manual input going respectively above the max or below the min values. Example:"-360,360,1,or_greater,or_lesser". - PROPERTY_HINT_EXP_RANGE = 2 — Hints that an integer or float property should be within an exponential range specified via the hint string
"min,max"or"min,max,step". The hint string can optionally include"or_greater"and/or"or_lesser"to allow manual input going respectively above the max or below the min values. Example:"0.01,100,0.01,or_greater". - PROPERTY_HINT_ENUM = 3 — Hints that an integer, float or string property is an enumerated value to pick in a list specified via a hint string such as
"Hello,Something,Else". - PROPERTY_HINT_EXP_EASING = 4 — Hints that a float property should be edited via an exponential easing function. The hint string can include
"attenuation"to flip the curve horizontally and/or"inout"to also include in/out easing. - PROPERTY_HINT_LENGTH = 5 — Deprecated hint, unused.
- PROPERTY_HINT_KEY_ACCEL = 7 — Deprecated hint, unused.
- PROPERTY_HINT_FLAGS = 8 — Hints that an integer property is a bitmask with named bit flags. For example, to allow toggling bits 0, 1, 2 and 4, the hint could be something like
"Bit0,Bit1,Bit2,,Bit4". - PROPERTY_HINT_LAYERS_2D_RENDER = 9 — Hints that an integer property is a bitmask using the optionally named 2D render layers.
- PROPERTY_HINT_LAYERS_2D_PHYSICS = 10 — Hints that an integer property is a bitmask using the optionally named 2D physics layers.
- PROPERTY_HINT_LAYERS_3D_RENDER = 11 — Hints that an integer property is a bitmask using the optionally named 3D render layers.
- PROPERTY_HINT_LAYERS_3D_PHYSICS = 12 — Hints that an integer property is a bitmask using the optionally named 3D physics layers.
- PROPERTY_HINT_FILE = 13 — Hints that a string property is a path to a file. Editing it will show a file dialog for picking the path. The hint string can be a set of filters with wildcards like
"*.png,*.jpg". - PROPERTY_HINT_DIR = 14 — Hints that a string property is a path to a directory. Editing it will show a file dialog for picking the path.
- PROPERTY_HINT_GLOBAL_FILE = 15 — Hints that a string property is an absolute path to a file outside the project folder. Editing it will show a file dialog for picking the path. The hint string can be a set of filters with wildcards like
"*.png,*.jpg". - PROPERTY_HINT_GLOBAL_DIR = 16 — Hints that a string property is an absolute path to a directory outside the project folder. Editing it will show a file dialog for picking the path.
- PROPERTY_HINT_RESOURCE_TYPE = 17 — Hints that a property is an instance of a Resource-derived type, optionally specified via the hint string (e.g.
"Texture"). Editing it will show a popup menu of valid resource types to instantiate. - PROPERTY_HINT_MULTILINE_TEXT = 18 — Hints that a string property is text with line breaks. Editing it will show a text input field where line breaks can be typed.
- PROPERTY_HINT_PLACEHOLDER_TEXT = 19 — Hints that a string property should have a placeholder text visible on its input field, whenever the property is empty. The hint string is the placeholder text to use.
- PROPERTY_HINT_COLOR_NO_ALPHA = 20 — Hints that a color property should be edited without changing its alpha component, i.e. only R, G and B channels are edited.
- PROPERTY_HINT_IMAGE_COMPRESS_LOSSY = 21 — Hints that an image is compressed using lossy compression.
- PROPERTY_HINT_IMAGE_COMPRESS_LOSSLESS = 22 — Hints that an image is compressed using lossless compression.
enum PropertyUsageFlags:
- PROPERTY_USAGE_STORAGE = 1 — The property is serialized and saved in the scene file (default).
- PROPERTY_USAGE_EDITOR = 2 — The property is shown in the editor inspector (default).
- PROPERTY_USAGE_NETWORK = 4 — Deprecated usage flag, unused.
- PROPERTY_USAGE_EDITOR_HELPER = 8 — Deprecated usage flag, unused.
- PROPERTY_USAGE_CHECKABLE = 16 — The property can be checked in the editor inspector.
- PROPERTY_USAGE_CHECKED = 32 — The property is checked in the editor inspector.
- PROPERTY_USAGE_INTERNATIONALIZED = 64 — The property is a translatable string.
- PROPERTY_USAGE_GROUP = 128 — Used to group properties together in the editor.
- PROPERTY_USAGE_CATEGORY = 256 — Used to categorize properties together in the editor.
- PROPERTY_USAGE_NO_INSTANCE_STATE = 2048 — The property does not save its state in PackedScene.
- PROPERTY_USAGE_RESTART_IF_CHANGED = 4096 — Editing the property prompts the user for restarting the editor.
- PROPERTY_USAGE_SCRIPT_VARIABLE = 8192 — The property is a script variable which should be serialized and saved in the scene file.
- PROPERTY_USAGE_DEFAULT = 7 — Default usage (storage, editor and network).
- PROPERTY_USAGE_DEFAULT_INTL = 71 — Default usage for translatable strings (storage, editor, network and internationalized).
- PROPERTY_USAGE_NOEDITOR = 5 — Default usage but without showing the property in the editor (storage, network).
enum MethodFlags:
- METHOD_FLAG_NORMAL = 1 — Flag for a normal method.
- METHOD_FLAG_EDITOR = 2 — Flag for an editor method.
- METHOD_FLAG_NOSCRIPT = 4 — Deprecated method flag, unused.
- METHOD_FLAG_CONST = 8 — Flag for a constant method.
- METHOD_FLAG_REVERSE = 16 — Deprecated method flag, unused.
- METHOD_FLAG_VIRTUAL = 32 — Flag for a virtual method.
- METHOD_FLAG_FROM_SCRIPT = 64 — Deprecated method flag, unused.
- METHOD_FLAGS_DEFAULT = 1 — Default method flags.
enum Variant.Type:
- TYPE_NIL = 0 — Variable is
null. - TYPE_BOOL = 1 — Variable is of type bool.
- TYPE_INT = 2 — Variable is of type int.
- TYPE_REAL = 3 — Variable is of type float (real).
- TYPE_STRING = 4 — Variable is of type String.
- TYPE_VECTOR2 = 5 — Variable is of type Vector2.
- TYPE_RECT2 = 6 — Variable is of type Rect2.
- TYPE_VECTOR3 = 7 — Variable is of type Vector3.
- TYPE_TRANSFORM2D = 8 — Variable is of type Transform2D.
- TYPE_PLANE = 9 — Variable is of type Plane.
- TYPE_QUAT = 10 — Variable is of type Quat.
- TYPE_AABB = 11 — Variable is of type AABB.
- TYPE_BASIS = 12 — Variable is of type Basis.
- TYPE_TRANSFORM = 13 — Variable is of type Transform.
- TYPE_COLOR = 14 — Variable is of type Color.
- TYPE_NODE_PATH = 15 — Variable is of type NodePath.
- TYPE_RID = 16 — Variable is of type RID.
- TYPE_OBJECT = 17 — Variable is of type Object.
- TYPE_DICTIONARY = 18 — Variable is of type Dictionary.
- TYPE_ARRAY = 19 — Variable is of type Array.
- TYPE_RAW_ARRAY = 20 — Variable is of type PoolByteArray.
- TYPE_INT_ARRAY = 21 — Variable is of type PoolIntArray.
- TYPE_REAL_ARRAY = 22 — Variable is of type PoolRealArray.
- TYPE_STRING_ARRAY = 23 — Variable is of type PoolStringArray.
- TYPE_VECTOR2_ARRAY = 24 — Variable is of type PoolVector2Array.
- TYPE_VECTOR3_ARRAY = 25 — Variable is of type PoolVector3Array.
- TYPE_COLOR_ARRAY = 26 — Variable is of type PoolColorArray.
- TYPE_MAX = 27 — Represents the size of the Variant.Type enum.
enum Variant.Operator:
- OP_EQUAL = 0 — Equality operator (
==). - OP_NOT_EQUAL = 1 — Inequality operator (
!=). - OP_LESS = 2 — Less than operator (
<). - OP_LESS_EQUAL = 3 — Less than or equal operator (
<=). - OP_GREATER = 4 — Greater than operator (
>). - OP_GREATER_EQUAL = 5 — Greater than or equal operator (
>=). - OP_ADD = 6 — Addition operator (
+). - OP_SUBTRACT = 7 — Subtraction operator (
-). - OP_MULTIPLY = 8 — Multiplication operator (
*). - OP_DIVIDE = 9 — Division operator (
/). - OP_NEGATE = 10 — Unary negation operator (
-). - OP_POSITIVE = 11 — Unary plus operator (
+). - OP_MODULE = 12 — Remainder/modulo operator (
%). - OP_STRING_CONCAT = 13 — String concatenation operator (
+). - OP_SHIFT_LEFT = 14 — Left shift operator (
<<). - OP_SHIFT_RIGHT = 15 — Right shift operator (
>>). - OP_BIT_AND = 16 — Bitwise AND operator (
&). - OP_BIT_OR = 17 — Bitwise OR operator (
|). - OP_BIT_XOR = 18 — Bitwise XOR operator (
^). - OP_BIT_NEGATE = 19 — Bitwise NOT operator (
~). - OP_AND = 20 — Logical AND operator (
andor&&). - OP_OR = 21 — Logical OR operator (
oror||). - OP_XOR = 22 — Logical XOR operator (not implemented in GDScript).
- OP_NOT = 23 — Logical NOT operator (
notor!). - OP_IN = 24 — Logical IN operator (
in). - OP_MAX = 25 — Represents the size of the Variant.Operator enum.
Constants¶
- SPKEY = 16777216 — Scancodes with this bit applied are non-printable.
Property Descriptions¶
- ARVRServer ARVRServer
The ARVRServer singleton.
- AudioServer AudioServer
The AudioServer singleton.
- CameraServer CameraServer
The CameraServer singleton.
- ClassDB ClassDB
The ClassDB singleton.
- Engine Engine
The Engine singleton.
- Geometry Geometry
The Geometry singleton.
- IP IP
The IP singleton.
- Input Input
The Input singleton.
- InputMap InputMap
The InputMap singleton.
- JSON JSON
The JSON singleton.
- JavaClassWrapper JavaClassWrapper
The JavaClassWrapper singleton.
Note: Only implemented on Android.
- JavaScript JavaScript
The JavaScript singleton.
Note: Only implemented on HTML5.
- Marshalls Marshalls
The Marshalls singleton.
The EditorNavigationMeshGenerator singleton.
- OS OS
The OS singleton.
- Performance Performance
The Performance singleton.
- Physics2DServer Physics2DServer
The Physics2DServer singleton.
- PhysicsServer PhysicsServer
The PhysicsServer singleton.
- ProjectSettings ProjectSettings
The ProjectSettings singleton.
- ResourceLoader ResourceLoader
The ResourceLoader singleton.
- ResourceSaver ResourceSaver
The ResourceSaver singleton.
- TranslationServer TranslationServer
The TranslationServer singleton.
- VisualScriptEditor VisualScriptEditor
The VisualScriptEditor singleton.
- VisualServer VisualServer
The VisualServer singleton.
@NativeScript¶
@VisualScript¶
Built-in visual script functions.
Description¶
A list of built-in visual script functions, see VisualScriptBuiltinFunc and VisualScript.
AABB¶
Axis-Aligned Bounding Box.
Description¶
AABB consists of a position, a size, and several utility functions. It is typically used for fast overlap tests.
Properties¶
| Vector3 | end | Vector3( 0, 0, 0 ) |
| Vector3 | position | Vector3( 0, 0, 0 ) |
| Vector3 | size | Vector3( 0, 0, 0 ) |
Methods¶
| AABB | AABB ( Vector3 position, Vector3 size ) |
| bool | encloses ( AABB with ) |
| AABB | expand ( Vector3 to_point ) |
| float | get_area ( ) |
| Vector3 | get_endpoint ( int idx ) |
| Vector3 | get_longest_axis ( ) |
| int | get_longest_axis_index ( ) |
| float | get_longest_axis_size ( ) |
| Vector3 | get_shortest_axis ( ) |
| int | get_shortest_axis_index ( ) |
| float | get_shortest_axis_size ( ) |
| Vector3 | get_support ( Vector3 dir ) |
| AABB | grow ( float by ) |
| bool | has_no_area ( ) |
| bool | has_no_surface ( ) |
| bool | has_point ( Vector3 point ) |
| AABB | intersection ( AABB with ) |
| bool | intersects ( AABB with ) |
| bool | intersects_plane ( Plane plane ) |
| bool | intersects_segment ( Vector3 from, Vector3 to ) |
| bool | is_equal_approx ( AABB aabb ) |
| AABB | merge ( AABB with ) |
Property Descriptions¶
- Vector3 end
| Default | Vector3( 0, 0, 0 ) |
Ending corner. This is calculated as position + size. Changing this property changes size accordingly.
- Vector3 position
| Default | Vector3( 0, 0, 0 ) |
Beginning corner.
- Vector3 size
| Default | Vector3( 0, 0, 0 ) |
Size from position to end.
Method Descriptions¶
Optional constructor, accepts position and size.
Returns true if this AABB completely encloses another one.
Returns this AABB expanded to include a given point.
- float get_area ( )
Returns the volume of the AABB.
Gets the position of the 8 endpoints of the AABB in space.
- Vector3 get_longest_axis ( )
Returns the normalized longest axis of the AABB.
- int get_longest_axis_index ( )
Returns the index of the longest axis of the AABB (according to Vector3’s AXIS_* constants).
- float get_longest_axis_size ( )
Returns the scalar length of the longest axis of the AABB.
- Vector3 get_shortest_axis ( )
Returns the normalized shortest axis of the AABB.
- int get_shortest_axis_index ( )
Returns the index of the shortest axis of the AABB (according to Vector3::AXIS* enum).
- float get_shortest_axis_size ( )
Returns the scalar length of the shortest axis of the AABB.
Returns the support point in a given direction. This is useful for collision detection algorithms.
Returns a copy of the AABB grown a given amount of units towards all the sides.
- bool has_no_area ( )
Returns true if the AABB is flat or empty.
- bool has_no_surface ( )
Returns true if the AABB is empty.
Returns true if the AABB contains a point.
Returns the intersection between two AABB. An empty AABB (size 0,0,0) is returned on failure.
Returns true if the AABB overlaps with another.
Returns true if the AABB is on both sides of a plane.
Returns true if the AABB intersects the line segment between from and to.
Returns true if this AABB and aabb are approximately equal, by calling @GDScript.is_equal_approx on each component.
Returns a larger AABB that contains both this AABB and with.
AcceptDialog¶
Inherits: WindowDialog < Popup < Control < CanvasItem < Node < Object
Inherited By: ConfirmationDialog
Base dialog for user notification.
Description¶
This dialog is useful for small notifications to the user about an event. It can only be accepted or closed, with the same result.
Properties¶
| bool | dialog_autowrap | false |
| bool | dialog_hide_on_ok | true |
| String | dialog_text | "" |
| String | window_title | O: "Alert!" |
Methods¶
| Button | add_button ( String text, bool right=false, String action=”” ) |
| Button | add_cancel ( String name ) |
| Label | get_label ( ) |
| Button | get_ok ( ) |
| void | register_text_enter ( Node line_edit ) |
Signals¶
- confirmed ( )
Emitted when the dialog is accepted, i.e. the OK button is pressed.
- custom_action ( String action )
Emitted when a custom button is pressed. See add_button.
Property Descriptions¶
- bool dialog_autowrap
| Default | false |
| Setter | set_autowrap(value) |
| Getter | has_autowrap() |
Sets autowrapping for the text in the dialog.
- bool dialog_hide_on_ok
| Default | true |
| Setter | set_hide_on_ok(value) |
| Getter | get_hide_on_ok() |
If true, the dialog is hidden when the OK button is pressed. You can set it to false if you want to do e.g. input validation when receiving the confirmed signal, and handle hiding the dialog in your own logic.
Note: Some nodes derived from this class can have a different default value, and potentially their own built-in logic overriding this setting. For example FileDialog defaults to false, and has its own input validation code that is called when you press OK, which eventually hides the dialog if the input is valid. As such, this property can’t be used in FileDialog to disable hiding the dialog when pressing OK.
- String dialog_text
| Default | "" |
| Setter | set_text(value) |
| Getter | get_text() |
The text displayed by the dialog.
Method Descriptions¶
Adds a button with label text and a custom action to the dialog and returns the created button. action will be passed to the custom_action signal when pressed.
If true, right will place the button to the right of any sibling buttons.
Adds a button with label name and a cancel action to the dialog and returns the created button.
- Label get_label ( )
Returns the label used for built-in text.
- Button get_ok ( )
Returns the OK Button instance.
- void register_text_enter ( Node line_edit )
Registers a LineEdit in the dialog. When the enter key is pressed, the dialog will be accepted.
AnimatedSprite¶
Inherits: Node2D < CanvasItem < Node < Object
Sprite node that can use multiple textures for animation.
Description¶
Animations are created using a SpriteFrames resource, which can be configured in the editor via the SpriteFrames panel.
Properties¶
| String | animation | "default" |
| bool | centered | true |
| bool | flip_h | false |
| bool | flip_v | false |
| int | frame | 0 |
| SpriteFrames | frames | |
| Vector2 | offset | Vector2( 0, 0 ) |
| bool | playing | false |
| float | speed_scale | 1.0 |
Signals¶
- animation_finished ( )
Emitted when the animation is finished (when it plays the last frame). If the animation is looping, this signal is emitted every time the last frame is drawn.
- frame_changed ( )
Emitted when frame changed.
Property Descriptions¶
- String animation
| Default | "default" |
| Setter | set_animation(value) |
| Getter | get_animation() |
The current animation from the frames resource. If this value changes, the frame counter is reset.
- bool centered
| Default | true |
| Setter | set_centered(value) |
| Getter | is_centered() |
If true, texture will be centered.
- bool flip_h
| Default | false |
| Setter | set_flip_h(value) |
| Getter | is_flipped_h() |
If true, texture is flipped horizontally.
- bool flip_v
| Default | false |
| Setter | set_flip_v(value) |
| Getter | is_flipped_v() |
If true, texture is flipped vertically.
- int frame
| Default | 0 |
| Setter | set_frame(value) |
| Getter | get_frame() |
The displayed animation frame’s index.
- SpriteFrames frames
| Setter | set_sprite_frames(value) |
| Getter | get_sprite_frames() |
The SpriteFrames resource containing the animation(s).
- Vector2 offset
| Default | Vector2( 0, 0 ) |
| Setter | set_offset(value) |
| Getter | get_offset() |
The texture’s drawing offset.
- bool playing
| Default | false |
If true, the animation is currently playing.
- float speed_scale
| Default | 1.0 |
| Setter | set_speed_scale(value) |
| Getter | get_speed_scale() |
The animation speed is multiplied by this value.
Method Descriptions¶
- bool is_playing ( ) const
Returns true if an animation is currently being played.
Plays the animation named anim. If no anim is provided, the current animation is played. If backwards is true, the animation will be played in reverse.
- void stop ( )
Stops the current animation (does not reset the frame counter).
AnimatedSprite3D¶
Inherits: SpriteBase3D < GeometryInstance < VisualInstance < Spatial < Node < Object
2D sprite node in 3D world, that can use multiple 2D textures for animation.
Description¶
Animations are created using a SpriteFrames resource, which can be configured in the editor via the SpriteFrames panel.
Property Descriptions¶
- String animation
| Default | "default" |
| Setter | set_animation(value) |
| Getter | get_animation() |
The current animation from the frames resource. If this value changes, the frame counter is reset.
- int frame
| Default | 0 |
| Setter | set_frame(value) |
| Getter | get_frame() |
The displayed animation frame’s index.
- SpriteFrames frames
| Setter | set_sprite_frames(value) |
| Getter | get_sprite_frames() |
The SpriteFrames resource containing the animation(s).
- bool playing
| Default | false |
If true, the animation is currently playing.
AnimatedTexture¶
Inherits: Texture < Resource < Reference < Object
Proxy texture for simple frame-based animations.
Description¶
AnimatedTexture is a resource format for frame-based animations, where multiple textures can be chained automatically with a predefined delay for each frame. Unlike AnimationPlayer or AnimatedSprite, it isn’t a Node, but has the advantage of being usable anywhere a Texture resource can be used, e.g. in a TileSet.
The playback of the animation is controlled by the fps property as well as each frame’s optional delay (see set_frame_delay). The animation loops, i.e. it will restart at frame 0 automatically after playing the last frame.
AnimatedTexture currently requires all frame textures to have the same size, otherwise the bigger ones will be cropped to match the smallest one. Also, it doesn’t support AtlasTexture. Each frame needs to be separate image.
Methods¶
| float | get_frame_delay ( int frame ) const |
| Texture | get_frame_texture ( int frame ) const |
| void | set_frame_delay ( int frame, float delay ) |
| void | set_frame_texture ( int frame, Texture texture ) |
Constants¶
- MAX_FRAMES = 256 — The maximum number of frames supported by
AnimatedTexture. If you need more frames in your animation, use AnimationPlayer or AnimatedSprite.
Property Descriptions¶
- float fps
| Default | 4.0 |
| Setter | set_fps(value) |
| Getter | get_fps() |
Animation speed in frames per second. This value defines the default time interval between two frames of the animation, and thus the overall duration of the animation loop based on the frames property. A value of 0 means no predefined number of frames per second, the animation will play according to each frame’s frame delay (see set_frame_delay).
For example, an animation with 8 frames, no frame delay and a fps value of 2 will run for 4 seconds, with each frame lasting 0.5 seconds.
- int frames
| Default | 1 |
| Setter | set_frames(value) |
| Getter | get_frames() |
Number of frames to use in the animation. While you can create the frames independently with set_frame_texture, you need to set this value for the animation to take new frames into account. The maximum number of frames is MAX_FRAMES.
Method Descriptions¶
Returns the given frame’s delay value.
Returns the given frame’s Texture.
Sets an additional delay (in seconds) between this frame and the next one, that will be added to the time interval defined by fps. By default, frames have no delay defined. If a delay value is defined, the final time interval between this frame and the next will be 1.0 / fps + delay.
For example, for an animation with 3 frames, 2 FPS and a frame delay on the second frame of 1.2, the resulting playback will be:
Frame 0: 0.5 s (1 / fps)
Frame 1: 1.7 s (1 / fps + 1.2)
Frame 2: 0.5 s (1 / fps)
Total duration: 2.7 s
Assigns a Texture to the given frame. Frame IDs start at 0, so the first frame has ID 0, and the last frame of the animation has ID frames - 1.
You can define any number of textures up to MAX_FRAMES, but keep in mind that only frames from 0 to frames - 1 will be part of the animation.
Animation¶
Inherits: Resource < Reference < Object
Contains data used to animate everything in the engine.
Description¶
An Animation resource contains data used to animate everything in the engine. Animations are divided into tracks, and each track must be linked to a node. The state of that node can be changed through time, by adding timed keys (events) to the track.
# This creates an animation that makes the node "Enemy" move to the right by
# 100 pixels in 1 second.
var animation = Animation.new()
var track_index = animation.add_track(Animation.TYPE_VALUE)
animation.track_set_path(track_index, "Enemy:position.x")
animation.track_insert_key(track_index, 0.0, 0)
animation.track_insert_key(track_index, 0.5, 100)
Animations are just data containers, and must be added to nodes such as an AnimationPlayer or AnimationTreePlayer to be played back. Animation tracks have different types, each with its own set of dedicated methods. Check TrackType to see available types.
Methods¶
Signals¶
- tracks_changed ( )
Emitted when there’s a change in the list of tracks, e.g. tracks are added, moved or have changed paths.
Enumerations¶
enum TrackType:
- TYPE_VALUE = 0 — Value tracks set values in node properties, but only those which can be Interpolated.
- TYPE_TRANSFORM = 1 — Transform tracks are used to change node local transforms or skeleton pose bones. Transitions are interpolated.
- TYPE_METHOD = 2 — Method tracks call functions with given arguments per key.
- TYPE_BEZIER = 3 — Bezier tracks are used to interpolate a value using custom curves. They can also be used to animate sub-properties of vectors and colors (e.g. alpha value of a Color).
- TYPE_AUDIO = 4 — Audio tracks are used to play an audio stream with either type of AudioStreamPlayer. The stream can be trimmed and previewed in the animation.
- TYPE_ANIMATION = 5 — Animation tracks play animations in other AnimationPlayer nodes.
enum InterpolationType:
- INTERPOLATION_NEAREST = 0 — No interpolation (nearest value).
- INTERPOLATION_LINEAR = 1 — Linear interpolation.
- INTERPOLATION_CUBIC = 2 — Cubic interpolation.
enum UpdateMode:
- UPDATE_CONTINUOUS = 0 — Update between keyframes.
- UPDATE_DISCRETE = 1 — Update at the keyframes and hold the value.
- UPDATE_TRIGGER = 2 — Update at the keyframes.
- UPDATE_CAPTURE = 3 — Same as linear interpolation, but also interpolates from the current value (i.e. dynamically at runtime) if the first key isn’t at 0 seconds.
Property Descriptions¶
- float length
| Default | 1.0 |
| Setter | set_length(value) |
| Getter | get_length() |
The total length of the animation (in seconds).
Note: Length is not delimited by the last key, as this one may be before or after the end to ensure correct interpolation and looping.
- bool loop
| Default | false |
| Setter | set_loop(value) |
| Getter | has_loop() |
A flag indicating that the animation must loop. This is uses for correct interpolation of animation cycles, and for hinting the player that it must restart the animation.
- float step
| Default | 0.1 |
| Setter | set_step(value) |
| Getter | get_step() |
The animation step value.
Method Descriptions¶
Adds a track to the Animation.
Returns the animation name at the key identified by key_idx. The track_idx must be the index of an Animation Track.
Inserts a key with value animation at the given time (in seconds). The track_idx must be the index of an Animation Track.
Sets the key identified by key_idx to value animation. The track_idx must be the index of an Animation Track.
Returns the end offset of the key identified by key_idx. The track_idx must be the index of an Audio Track.
End offset is the number of seconds cut off at the ending of the audio stream.
Returns the start offset of the key identified by key_idx. The track_idx must be the index of an Audio Track.
Start offset is the number of seconds cut off at the beginning of the audio stream.
Returns the audio stream of the key identified by key_idx. The track_idx must be the index of an Audio Track.
- int audio_track_insert_key ( int track_idx, float time, Resource stream, float start_offset=0, float end_offset=0 )
Inserts an Audio Track key at the given time in seconds. The track_idx must be the index of an Audio Track.
stream is the AudioStream resource to play. start_offset is the number of seconds cut off at the beginning of the audio stream, while end_offset is at the ending.
Sets the end offset of the key identified by key_idx to value offset. The track_idx must be the index of an Audio Track.
Sets the start offset of the key identified by key_idx to value offset. The track_idx must be the index of an Audio Track.
Sets the stream of the key identified by key_idx to value offset. The track_idx must be the index of an Audio Track.
Returns the in handle of the key identified by key_idx. The track_idx must be the index of a Bezier Track.
Returns the out handle of the key identified by key_idx. The track_idx must be the index of a Bezier Track.
Returns the value of the key identified by key_idx. The track_idx must be the index of a Bezier Track.
- int bezier_track_insert_key ( int track_idx, float time, float value, Vector2 in_handle=Vector2( 0, 0 ), Vector2 out_handle=Vector2( 0, 0 ) )
Inserts a Bezier Track key at the given time in seconds. The track_idx must be the index of a Bezier Track.
in_handle is the left-side weight of the added Bezier curve point, out_handle is the right-side one, while value is the actual value at this point.
Returns the interpolated value at the given time (in seconds). The track_idx must be the index of a Bezier Track.
Sets the in handle of the key identified by key_idx to value in_handle. The track_idx must be the index of a Bezier Track.
Sets the out handle of the key identified by key_idx to value out_handle. The track_idx must be the index of a Bezier Track.
Sets the value of the key identified by key_idx to the given value. The track_idx must be the index of a Bezier Track.
- void clear ( )
Clear the animation (clear all tracks and reset all).
Adds a new track that is a copy of the given track from to_animation.
Returns the index of the specified track. If the track is not found, return -1.
- int get_track_count ( ) const
Returns the amount of tracks in the animation.
- PoolIntArray method_track_get_key_indices ( int track_idx, float time_sec, float delta ) const
Returns all the key indices of a method track, given a position and delta time.
Returns the method name of a method track.
Returns the arguments values to be called on a method track for a given key in a given track.
- void remove_track ( int track_idx )
Removes a track by specifying the track index.
Finds the key index by time in a given track. Optionally, only find it if the exact time is given.
Returns true if the track at idx wraps the interpolation loop. New tracks wrap the interpolation loop by default.
- InterpolationType track_get_interpolation_type ( int track_idx ) const
Returns the interpolation type of a given track.
Returns the amount of keys in a given track.
Returns the time at which the key is located.
Returns the transition curve (easing) for a specific key (see the built-in math function @GDScript.ease).
Returns the value of a given key in a given track.
Gets the path of a track. For more information on the path format, see track_set_path.
Gets the type of a track.
Insert a generic key in a given track.
Returns true if the track at index idx is enabled.
Returns true if the given track is imported. Else, return false.
- void track_move_down ( int track_idx )
Moves a track down.
Changes the index position of track idx to the one defined in to_idx.
- void track_move_up ( int track_idx )
Moves a track up.
Removes a key by index in a given track.
Removes a key by position (seconds) in a given track.
Enables/disables the given track. Tracks are enabled by default.
Sets the given track as imported or not.
If true, the track at idx wraps the interpolation loop.
- void track_set_interpolation_type ( int track_idx, InterpolationType interpolation )
Sets the interpolation type of a given track.
Sets the time of an existing key.
Sets the transition curve (easing) for a specific key (see the built-in math function @GDScript.ease).
Sets the value of an existing key.
Sets the path of a track. Paths must be valid scene-tree paths to a node, and must be specified starting from the parent node of the node that will reproduce the animation. Tracks that control properties or bones must append their name after the path, separated by ":".
For example, "character/skeleton:ankle" or "character/mesh:transform/local".
Swaps the track idx’s index position with the track with_idx.
- int transform_track_insert_key ( int track_idx, float time, Vector3 location, Quat rotation, Vector3 scale )
Insert a transform key for a transform track.
Returns the interpolated value of a transform track at a given time (in seconds). An array consisting of 3 elements: position (Vector3), rotation (Quat) and scale (Vector3).
- PoolIntArray value_track_get_key_indices ( int track_idx, float time_sec, float delta ) const
Returns all the key indices of a value track, given a position and delta time.
- UpdateMode value_track_get_update_mode ( int track_idx ) const
Returns the update mode of a value track.
- void value_track_set_update_mode ( int track_idx, UpdateMode mode )
Sets the update mode (see UpdateMode) of a value track.
AnimationNode¶
Inherits: Resource < Reference < Object
Inherited By: AnimationNodeAdd2, AnimationNodeAdd3, AnimationNodeBlend2, AnimationNodeBlend3, AnimationNodeOneShot, AnimationNodeOutput, AnimationNodeTimeScale, AnimationNodeTimeSeek, AnimationNodeTransition, AnimationRootNode
Base resource for AnimationTree nodes.
Description¶
Base resource for AnimationTree nodes. In general, it’s not used directly, but you can create custom ones with custom blending formulas.
Inherit this when creating nodes mainly for use in AnimationNodeBlendTree, otherwise AnimationRootNode should be used instead.
Tutorials¶
Properties¶
| bool | filter_enabled |
Methods¶
| void | add_input ( String name ) |
| void | blend_animation ( String animation, float time, float delta, bool seeked, float blend ) |
| float | blend_input ( int input_index, float time, bool seek, float blend, FilterAction filter=0, bool optimize=true ) |
| float | blend_node ( String name, AnimationNode node, float time, bool seek, float blend, FilterAction filter=0, bool optimize=true ) |
| String | get_caption ( ) virtual |
| Object | get_child_by_name ( String name ) virtual |
| Dictionary | get_child_nodes ( ) virtual |
| int | get_input_count ( ) const |
| String | get_input_name ( int input ) |
| Variant | get_parameter ( String name ) const |
| Variant | get_parameter_default_value ( String name ) virtual |
| Array | get_parameter_list ( ) virtual |
| String | has_filter ( ) virtual |
| bool | is_path_filtered ( NodePath path ) const |
| void | process ( float time, bool seek ) virtual |
| void | remove_input ( int index ) |
| void | set_filter_path ( NodePath path, bool enable ) |
| void | set_parameter ( String name, Variant value ) |
Signals¶
- removed_from_graph ( )
Called when the node was removed from the graph.
- tree_changed ( )
Emitted by nodes that inherit from this class and that have an internal tree when one of their nodes changes. The nodes that emit this signal are AnimationNodeBlendSpace1D, AnimationNodeBlendSpace2D, AnimationNodeStateMachine, and AnimationNodeBlendTree.
Enumerations¶
enum FilterAction:
- FILTER_IGNORE = 0 — Do not use filtering.
- FILTER_PASS = 1 — Paths matching the filter will be allowed to pass.
- FILTER_STOP = 2 — Paths matching the filter will be discarded.
- FILTER_BLEND = 3 — Paths matching the filter will be blended (by the blend value).
Property Descriptions¶
- bool filter_enabled
| Setter | set_filter_enabled(value) |
| Getter | is_filter_enabled() |
If true, filtering is enabled.
Method Descriptions¶
- void add_input ( String name )
Adds an input to the node. This is only useful for nodes created for use in an AnimationNodeBlendTree.
Blend an animation by blend amount (name must be valid in the linked AnimationPlayer). A time and delta may be passed, as well as whether seek happened.
- float blend_input ( int input_index, float time, bool seek, float blend, FilterAction filter=0, bool optimize=true )
Blend an input. This is only useful for nodes created for an AnimationNodeBlendTree. The time parameter is a relative delta, unless seek is true, in which case it is absolute. A filter mode may be optionally passed (see FilterAction for options).
- float blend_node ( String name, AnimationNode node, float time, bool seek, float blend, FilterAction filter=0, bool optimize=true )
Blend another animation node (in case this node contains children animation nodes). This function is only useful if you inherit from AnimationRootNode instead, else editors will not display your node for addition.
- String get_caption ( ) virtual
Gets the text caption for this node (used by some editors).
Gets a child node by index (used by editors inheriting from AnimationRootNode).
- Dictionary get_child_nodes ( ) virtual
Gets all children nodes in order as a name: node dictionary. Only useful when inheriting AnimationRootNode.
- int get_input_count ( ) const
Amount of inputs in this node, only useful for nodes that go into AnimationNodeBlendTree.
Gets the name of an input by index.
Gets the value of a parameter. Parameters are custom local memory used for your nodes, given a resource can be reused in multiple trees.
Gets the default value of a parameter. Parameters are custom local memory used for your nodes, given a resource can be reused in multiple trees.
- Array get_parameter_list ( ) virtual
Gets the property information for parameter. Parameters are custom local memory used for your nodes, given a resource can be reused in multiple trees. Format is similar to Object.get_property_list.
- String has_filter ( ) virtual
Returns true whether you want the blend tree editor to display filter editing on this node.
Returns true whether a given path is filtered.
User-defined callback called when a custom node is processed. The time parameter is a relative delta, unless seek is true, in which case it is absolute.
Here, call the blend_input, blend_node or blend_animation functions. You can also use get_parameter and set_parameter to modify local memory.
This function should return the time left for the current animation to finish (if unsure, pass the value from the main blend being called).
- void remove_input ( int index )
Removes an input, call this only when inactive.
Adds or removes a path for the filter.
Sets a custom parameter. These are used as local storage, because resources can be reused across the tree or scenes.
AnimationNodeAdd2¶
Inherits: AnimationNode < Resource < Reference < Object
Blends two animations additively inside of an AnimationNodeBlendTree.
Description¶
A resource to add to an AnimationNodeBlendTree. Blends two animations additively based on an amount value in the [0.0, 1.0] range.
Tutorials¶
Property Descriptions¶
- bool sync
| Default | false |
| Setter | set_use_sync(value) |
| Getter | is_using_sync() |
If true, sets the optimization to false when calling AnimationNode.blend_input, forcing the blended animations to update every frame.
AnimationNodeAdd3¶
Inherits: AnimationNode < Resource < Reference < Object
Blends two of three animations additively inside of an AnimationNodeBlendTree.
Description¶
A resource to add to an AnimationNodeBlendTree. Blends two animations together additively out of three based on a value in the [-1.0, 1.0] range.
This node has three inputs:
- The base animation to add to
- A -add animation to blend with when the blend amount is in the
[-1.0, 0.0]range. - A +add animation to blend with when the blend amount is in the
[0.0, 1.0]range
Tutorials¶
Property Descriptions¶
- bool sync
| Default | false |
| Setter | set_use_sync(value) |
| Getter | is_using_sync() |
If true, sets the optimization to false when calling AnimationNode.blend_input, forcing the blended animations to update every frame.
AnimationNodeAnimation¶
Inherits: AnimationRootNode < AnimationNode < Resource < Reference < Object
Input animation to use in an AnimationNodeBlendTree.
Description¶
A resource to add to an AnimationNodeBlendTree. Only features one output set using the animation property. Use it as an input for AnimationNode that blend animations together.
Tutorials¶
Property Descriptions¶
- String animation
| Default | "" |
| Setter | set_animation(value) |
| Getter | get_animation() |
Animation to use as an output. It is one of the animations provided by AnimationTree.anim_player.
AnimationNodeBlend2¶
Inherits: AnimationNode < Resource < Reference < Object
Blends two animations linearly inside of an AnimationNodeBlendTree.
Description¶
A resource to add to an AnimationNodeBlendTree. Blends two animations linearly based on an amount value in the [0.0, 1.0] range.
Tutorials¶
Property Descriptions¶
- bool sync
| Default | false |
| Setter | set_use_sync(value) |
| Getter | is_using_sync() |
If true, sets the optimization to false when calling AnimationNode.blend_input, forcing the blended animations to update every frame.
AnimationNodeBlend3¶
Inherits: AnimationNode < Resource < Reference < Object
Blends two of three animations linearly inside of an AnimationNodeBlendTree.
Description¶
A resource to add to an AnimationNodeBlendTree. Blends two animations together linearly out of three based on a value in the [-1.0, 1.0] range.
This node has three inputs:
- The base animation
- A -blend animation to blend with when the blend amount is in the
[-1.0, 0.0]range. - A +blend animation to blend with when the blend amount is in the
[0.0, 1.0]range
Tutorials¶
Property Descriptions¶
- bool sync
| Default | false |
| Setter | set_use_sync(value) |
| Getter | is_using_sync() |
If true, sets the optimization to false when calling AnimationNode.blend_input, forcing the blended animations to update every frame.
AnimationNodeBlendSpace1D¶
Inherits: AnimationRootNode < AnimationNode < Resource < Reference < Object
Blends linearly between two of any number of AnimationNode of any type placed on a virtual axis.
Description¶
A resource to add to an AnimationNodeBlendTree.
This is a virtual axis on which you can add any type of AnimationNode using add_blend_point.
Outputs the linear blend of the two AnimationNodes closest to the node’s current value.
You can set the extents of the axis using the min_space and max_space.
Tutorials¶
Methods¶
| void | add_blend_point ( AnimationRootNode node, float pos, int at_index=-1 ) |
| int | get_blend_point_count ( ) const |
| AnimationRootNode | get_blend_point_node ( int point ) const |
| float | get_blend_point_position ( int point ) const |
| void | remove_blend_point ( int point ) |
| void | set_blend_point_node ( int point, AnimationRootNode node ) |
| void | set_blend_point_position ( int point, float pos ) |
Property Descriptions¶
- float max_space
| Default | 1.0 |
| Setter | set_max_space(value) |
| Getter | get_max_space() |
The blend space’s axis’s upper limit for the points’ position. See add_blend_point.
- float min_space
| Default | -1.0 |
| Setter | set_min_space(value) |
| Getter | get_min_space() |
The blend space’s axis’s lower limit for the points’ position. See add_blend_point.
- float snap
| Default | 0.1 |
| Setter | set_snap(value) |
| Getter | get_snap() |
Position increment to snap to when moving a point on the axis.
- String value_label
| Default | "value" |
| Setter | set_value_label(value) |
| Getter | get_value_label() |
Label of the virtual axis of the blend space.
Method Descriptions¶
- void add_blend_point ( AnimationRootNode node, float pos, int at_index=-1 )
Adds a new point that represents a node on the virtual axis at a given position set by pos. You can insert it at a specific index using the at_index argument. If you use the default value for at_index, the point is inserted at the end of the blend points array.
- int get_blend_point_count ( ) const
Returns the number of points on the blend axis.
- AnimationRootNode get_blend_point_node ( int point ) const
Returns the AnimationNode referenced by the point at index point.
Returns the position of the point at index point.
- void remove_blend_point ( int point )
Removes the point at index point from the blend axis.
- void set_blend_point_node ( int point, AnimationRootNode node )
Changes the AnimationNode referenced by the point at index point.
Updates the position of the point at index point on the blend axis.
AnimationNodeBlendSpace2D¶
Inherits: AnimationRootNode < AnimationNode < Resource < Reference < Object
Blends linearly between three AnimationNode of any type placed in a 2D space.
Description¶
A resource to add to an AnimationNodeBlendTree.
This node allows you to blend linearly between three animations using a Vector2 weight.
You can add vertices to the blend space with add_blend_point and automatically triangulate it by setting auto_triangles to true. Otherwise, use add_triangle and remove_triangle to create up the blend space by hand.
Tutorials¶
Properties¶
| bool | auto_triangles | true |
| BlendMode | blend_mode | 0 |
| Vector2 | max_space | Vector2( 1, 1 ) |
| Vector2 | min_space | Vector2( -1, -1 ) |
| Vector2 | snap | Vector2( 0.1, 0.1 ) |
| String | x_label | "x" |
| String | y_label | "y" |
Methods¶
| void | add_blend_point ( AnimationRootNode node, Vector2 pos, int at_index=-1 ) |
| void | add_triangle ( int x, int y, int z, int at_index=-1 ) |
| int | get_blend_point_count ( ) const |
| AnimationRootNode | get_blend_point_node ( int point ) const |
| Vector2 | get_blend_point_position ( int point ) const |
| int | get_triangle_count ( ) const |
| int | get_triangle_point ( int triangle, int point ) |
| void | remove_blend_point ( int point ) |
| void | remove_triangle ( int triangle ) |
| void | set_blend_point_node ( int point, AnimationRootNode node ) |
| void | set_blend_point_position ( int point, Vector2 pos ) |
Signals¶
- triangles_updated ( )
Emitted every time the blend space’s triangles are created, removed, or when one of their vertices changes position.
Enumerations¶
enum BlendMode:
- BLEND_MODE_INTERPOLATED = 0 — The interpolation between animations is linear.
- BLEND_MODE_DISCRETE = 1 — The blend space plays the animation of the node the blending position is closest to. Useful for frame-by-frame 2D animations.
- BLEND_MODE_DISCRETE_CARRY = 2 — Similar to BLEND_MODE_DISCRETE, but starts the new animation at the last animation’s playback position.
Property Descriptions¶
- bool auto_triangles
| Default | true |
| Setter | set_auto_triangles(value) |
| Getter | get_auto_triangles() |
If true, the blend space is triangulated automatically. The mesh updates every time you add or remove points with add_blend_point and remove_blend_point.
- BlendMode blend_mode
| Default | 0 |
| Setter | set_blend_mode(value) |
| Getter | get_blend_mode() |
Controls the interpolation between animations. See BlendMode constants.
- Vector2 max_space
| Default | Vector2( 1, 1 ) |
| Setter | set_max_space(value) |
| Getter | get_max_space() |
The blend space’s X and Y axes’ upper limit for the points’ position. See add_blend_point.
- Vector2 min_space
| Default | Vector2( -1, -1 ) |
| Setter | set_min_space(value) |
| Getter | get_min_space() |
The blend space’s X and Y axes’ lower limit for the points’ position. See add_blend_point.
- Vector2 snap
| Default | Vector2( 0.1, 0.1 ) |
| Setter | set_snap(value) |
| Getter | get_snap() |
Position increment to snap to when moving a point.
- String x_label
| Default | "x" |
| Setter | set_x_label(value) |
| Getter | get_x_label() |
Name of the blend space’s X axis.
- String y_label
| Default | "y" |
| Setter | set_y_label(value) |
| Getter | get_y_label() |
Name of the blend space’s Y axis.
Method Descriptions¶
- void add_blend_point ( AnimationRootNode node, Vector2 pos, int at_index=-1 )
Adds a new point that represents a node at the position set by pos. You can insert it at a specific index using the at_index argument. If you use the default value for at_index, the point is inserted at the end of the blend points array.
Creates a new triangle using three points x, y, and z. Triangles can overlap. You can insert the triangle at a specific index using the at_index argument. If you use the default value for at_index, the point is inserted at the end of the blend points array.
- int get_blend_point_count ( ) const
Returns the number of points in the blend space.
- AnimationRootNode get_blend_point_node ( int point ) const
Returns the AnimationRootNode referenced by the point at index point.
Returns the position of the point at index point.
- int get_triangle_count ( ) const
Returns the number of triangles in the blend space.
Returns the position of the point at index point in the triangle of index triangle.
- void remove_blend_point ( int point )
Removes the point at index point from the blend space.
- void remove_triangle ( int triangle )
Removes the triangle at index triangle from the blend space.
- void set_blend_point_node ( int point, AnimationRootNode node )
Changes the AnimationNode referenced by the point at index point.
Updates the position of the point at index point on the blend axis.
AnimationNodeBlendTree¶
Inherits: AnimationRootNode < AnimationNode < Resource < Reference < Object
AnimationTree node resource that contains many blend type nodes.
Description¶
This node may contain a sub-tree of any other blend type nodes, such as mix, blend2, blend3, one shot, etc. This is one of the most commonly used roots.
Tutorials¶
Properties¶
| Vector2 | graph_offset | Vector2( 0, 0 ) |
Methods¶
| void | add_node ( String name, AnimationNode node, Vector2 position=Vector2( 0, 0 ) ) |
| void | connect_node ( String input_node, int input_index, String output_node ) |
| void | disconnect_node ( String input_node, int input_index ) |
| AnimationNode | get_node ( String name ) const |
| Vector2 | get_node_position ( String name ) const |
| bool | has_node ( String name ) const |
| void | remove_node ( String name ) |
| void | rename_node ( String name, String new_name ) |
| void | set_node_position ( String name, Vector2 position ) |
Constants¶
- CONNECTION_OK = 0 — The connection was successful.
- CONNECTION_ERROR_NO_INPUT = 1 — The input node is
null. - CONNECTION_ERROR_NO_INPUT_INDEX = 2 — The specified input port is out of range.
- CONNECTION_ERROR_NO_OUTPUT = 3 — The output node is
null. - CONNECTION_ERROR_SAME_NODE = 4 — Input and output nodes are the same.
- CONNECTION_ERROR_CONNECTION_EXISTS = 5 — The specified connection already exists.
Property Descriptions¶
- Vector2 graph_offset
| Default | Vector2( 0, 0 ) |
| Setter | set_graph_offset(value) |
| Getter | get_graph_offset() |
The global offset of all sub-nodes.
Method Descriptions¶
- void add_node ( String name, AnimationNode node, Vector2 position=Vector2( 0, 0 ) )
Adds an AnimationNode at the given position. The name is used to identify the created sub-node later.
Connects the output of an AnimationNode as input for another AnimationNode, at the input port specified by input_index.
Disconnects the node connected to the specified input.
- AnimationNode get_node ( String name ) const
Returns the sub-node with the specified name.
Returns the position of the sub-node with the specified name.
Returns true if a sub-node with specified name exists.
- void remove_node ( String name )
Removes a sub-node.
Changes the name of a sub-node.
Modifies the position of a sub-node.
AnimationNodeOneShot¶
Inherits: AnimationNode < Resource < Reference < Object
Plays an animation once in AnimationNodeBlendTree.
Description¶
A resource to add to an AnimationNodeBlendTree. This node will execute a sub-animation and return once it finishes. Blend times for fading in and out can be customized, as well as filters.
Tutorials¶
Properties¶
| bool | autorestart | false |
| float | autorestart_delay | 1.0 |
| float | autorestart_random_delay | 0.0 |
| float | fadein_time | 0.1 |
| float | fadeout_time | 0.1 |
| bool | sync | false |
Methods¶
| MixMode | get_mix_mode ( ) const |
| void | set_mix_mode ( MixMode mode ) |
Property Descriptions¶
- bool autorestart
| Default | false |
| Setter | set_autorestart(value) |
| Getter | has_autorestart() |
If true, the sub-animation will restart automatically after finishing.
- float autorestart_delay
| Default | 1.0 |
| Setter | set_autorestart_delay(value) |
| Getter | get_autorestart_delay() |
The delay after which the automatic restart is triggered, in seconds.
- float autorestart_random_delay
| Default | 0.0 |
| Setter | set_autorestart_random_delay(value) |
| Getter | get_autorestart_random_delay() |
If autorestart is true, a random additional delay (in seconds) between 0 and this value will be added to autorestart_delay.
- float fadein_time
| Default | 0.1 |
| Setter | set_fadein_time(value) |
| Getter | get_fadein_time() |
- float fadeout_time
| Default | 0.1 |
| Setter | set_fadeout_time(value) |
| Getter | get_fadeout_time() |
- bool sync
| Default | false |
| Setter | set_use_sync(value) |
| Getter | is_using_sync() |
AnimationNodeOutput¶
Inherits: AnimationNode < Resource < Reference < Object
Generic output node to be added to AnimationNodeBlendTree.
Tutorials¶
AnimationNodeStateMachine¶
Inherits: AnimationRootNode < AnimationNode < Resource < Reference < Object
State machine for control of animations.
Description¶
Contains multiple nodes representing animation states, connected in a graph. Node transitions can be configured to happen automatically or via code, using a shortest-path algorithm. Retrieve the AnimationNodeStateMachinePlayback object from the AnimationTree node to control it programmatically.
Example:
var state_machine = $AnimationTree.get("parameters/playback")
state_machine.travel("some_state")
Tutorials¶
Methods¶
Method Descriptions¶
- void add_node ( String name, AnimationNode node, Vector2 position=Vector2( 0, 0 ) )
Adds a new node to the graph. The position is used for display in the editor.
- void add_transition ( String from, String to, AnimationNodeStateMachineTransition transition )
Adds a transition between the given nodes.
- String get_end_node ( ) const
Returns the graph’s end node.
- Vector2 get_graph_offset ( ) const
Returns the draw offset of the graph. Used for display in the editor.
- AnimationNode get_node ( String name ) const
Returns the animation node with the given name.
- String get_node_name ( AnimationNode node ) const
Returns the given animation node’s name.
Returns the given node’s coordinates. Used for display in the editor.
- String get_start_node ( ) const
Returns the graph’s end node.
- AnimationNodeStateMachineTransition get_transition ( int idx ) const
Returns the given transition.
- int get_transition_count ( ) const
Returns the number of connections in the graph.
Returns the given transition’s start node.
Returns the given transition’s end node.
Returns true if the graph contains the given node.
Returns true if there is a transition between the given nodes.
- void remove_node ( String name )
Deletes the given node from the graph.
Deletes the transition between the two specified nodes.
- void remove_transition_by_index ( int idx )
Deletes the given transition by index.
Renames the given node.
- void set_end_node ( String name )
Sets the given node as the graph end point.
- void set_graph_offset ( Vector2 offset )
Sets the draw offset of the graph. Used for display in the editor.
Sets the node’s coordinates. Used for display in the editor.
- void set_start_node ( String name )
Sets the given node as the graph start point.
AnimationNodeStateMachinePlayback¶
Inherits: Resource < Reference < Object
Playback control for AnimationNodeStateMachine.
Description¶
Allows control of AnimationTree state machines created with AnimationNodeStateMachine. Retrieve with $AnimationTree.get("parameters/playback").
Example:
var state_machine = $AnimationTree.get("parameters/playback")
state_machine.travel("some_state")
Tutorials¶
Methods¶
| String | get_current_node ( ) const |
| PoolStringArray | get_travel_path ( ) const |
| bool | is_playing ( ) const |
| void | start ( String node ) |
| void | stop ( ) |
| void | travel ( String to_node ) |
Method Descriptions¶
- String get_current_node ( ) const
Returns the currently playing animation state.
- PoolStringArray get_travel_path ( ) const
Returns the current travel path as computed internally by the A* algorithm.
- bool is_playing ( ) const
Returns true if an animation is playing.
- void start ( String node )
Starts playing the given animation.
- void stop ( )
Stops the currently playing animation.
- void travel ( String to_node )
Transitions from the current state to another one, following the shortest path.
AnimationNodeStateMachineTransition¶
Inherits: Resource < Reference < Object
Tutorials¶
Properties¶
| String | advance_condition | "" |
| bool | auto_advance | false |
| bool | disabled | false |
| int | priority | 1 |
| SwitchMode | switch_mode | 0 |
| float | xfade_time | 0.0 |
Enumerations¶
enum SwitchMode:
- SWITCH_MODE_IMMEDIATE = 0 — Switch to the next state immediately. The current state will end and blend into the beginning of the new one.
- SWITCH_MODE_SYNC = 1 — Switch to the next state immediately, but will seek the new state to the playback position of the old state.
- SWITCH_MODE_AT_END = 2 — Wait for the current state playback to end, then switch to the beginning of the next state animation.
Property Descriptions¶
- String advance_condition
| Default | "" |
| Setter | set_advance_condition(value) |
| Getter | get_advance_condition() |
Turn on auto advance when this condition is set. The provided name will become a boolean parameter on the AnimationTree that can be controlled from code (see https://docs.godotengine.org/en/latest/tutorials/animation/animation_tree.html#controlling-from-code). For example, if AnimationTree.tree_root is an AnimationNodeStateMachine and advance_condition is set to "idle":
$animation_tree["parameters/conditions/idle"] = is_on_floor and (linear_velocity.x == 0)
- bool auto_advance
| Default | false |
| Setter | set_auto_advance(value) |
| Getter | has_auto_advance() |
Turn on the transition automatically when this state is reached. This works best with SWITCH_MODE_AT_END.
- bool disabled
| Default | false |
| Setter | set_disabled(value) |
| Getter | is_disabled() |
Don’t use this transition during AnimationNodeStateMachinePlayback.travel or auto_advance.
- int priority
| Default | 1 |
| Setter | set_priority(value) |
| Getter | get_priority() |
Lower priority transitions are preferred when travelling through the tree via AnimationNodeStateMachinePlayback.travel or auto_advance.
- SwitchMode switch_mode
| Default | 0 |
| Setter | set_switch_mode(value) |
| Getter | get_switch_mode() |
The transition type.
- float xfade_time
| Default | 0.0 |
| Setter | set_xfade_time(value) |
| Getter | get_xfade_time() |
The time to cross-fade between this state and the next.
AnimationNodeTimeScale¶
Inherits: AnimationNode < Resource < Reference < Object
A time-scaling animation node to be used with AnimationTree.
Description¶
Allows scaling the speed of the animation (or reversing it) in any children nodes. Setting it to 0 will pause the animation.
Tutorials¶
AnimationNodeTimeSeek¶
Inherits: AnimationNode < Resource < Reference < Object
A time-seeking animation node to be used with AnimationTree.
Description¶
This node can be used to cause a seek command to happen to any sub-children of the graph. After setting the time, this value returns to -1.
Tutorials¶
AnimationNodeTransition¶
Inherits: AnimationNode < Resource < Reference < Object
A generic animation transition node for AnimationTree.
Description¶
Simple state machine for cases which don’t require a more advanced AnimationNodeStateMachine. Animations can be connected to the inputs and transition times can be specified.
Tutorials¶
Properties¶
| int | input_count | 0 |
| float | xfade_time | 0.0 |
Methods¶
| String | get_input_caption ( int input ) const |
| bool | is_input_set_as_auto_advance ( int input ) const |
| void | set_input_as_auto_advance ( int input, bool enable ) |
| void | set_input_caption ( int input, String caption ) |
Property Descriptions¶
- int input_count
| Default | 0 |
| Setter | set_enabled_inputs(value) |
| Getter | get_enabled_inputs() |
The number of available input ports for this node.
- float xfade_time
| Default | 0.0 |
| Setter | set_cross_fade_time(value) |
| Getter | get_cross_fade_time() |
Cross-fading time (in seconds) between each animation connected to the inputs.
AnimationPlayer¶
Container and player of Animation resources.
Description¶
An animation player is used for general-purpose playback of Animation resources. It contains a dictionary of animations (referenced by name) and custom blend times between their transitions. Additionally, animations can be played and blended in different channels.
AnimationPlayer is more suited than Tween for animations where you know the final values in advance. For example, fading a screen in and out is more easily done with an AnimationPlayer node thanks to the animation tools provided by the editor. That particular example can also be implemented with a Tween node, but it requires doing everything by code.
Updating the target properties of animations occurs at process time.
Tutorials¶
Properties¶
Methods¶
| Error | add_animation ( String name, Animation animation ) |
| void | advance ( float delta ) |
| String | animation_get_next ( String anim_from ) const |
| void | animation_set_next ( String anim_from, String anim_to ) |
| void | clear_caches ( ) |
| void | clear_queue ( ) |
| String | find_animation ( Animation animation ) const |
| Animation | get_animation ( String name ) const |
| PoolStringArray | get_animation_list ( ) const |
| float | get_blend_time ( String anim_from, String anim_to ) const |
| float | get_playing_speed ( ) const |
| PoolStringArray | get_queue ( ) |
| bool | has_animation ( String name ) const |
| bool | is_playing ( ) const |
| void | play ( String name=”“, float custom_blend=-1, float custom_speed=1.0, bool from_end=false ) |
| void | play_backwards ( String name=”“, float custom_blend=-1 ) |
| void | queue ( String name ) |
| void | remove_animation ( String name ) |
| void | rename_animation ( String name, String newname ) |
| void | seek ( float seconds, bool update=false ) |
| void | set_blend_time ( String anim_from, String anim_to, float sec ) |
| void | stop ( bool reset=true ) |
Signals¶
If the currently being played animation changes, this signal will notify of such change.
- animation_finished ( String anim_name )
Notifies when an animation finished playing.
- animation_started ( String anim_name )
Notifies when an animation starts playing.
- caches_cleared ( )
Notifies when the caches have been cleared, either automatically, or manually via clear_caches.
Enumerations¶
enum AnimationProcessMode:
- ANIMATION_PROCESS_PHYSICS = 0 — Process animation during the physics process. This is especially useful when animating physics bodies.
- ANIMATION_PROCESS_IDLE = 1 — Process animation during the idle process.
- ANIMATION_PROCESS_MANUAL = 2 — Do not process animation. Use advance to process the animation manually.
enum AnimationMethodCallMode:
- ANIMATION_METHOD_CALL_DEFERRED = 0 — Batch method calls during the animation process, then do the calls after events are processed. This avoids bugs involving deleting nodes or modifying the AnimationPlayer while playing.
- ANIMATION_METHOD_CALL_IMMEDIATE = 1 — Make method calls immediately when reached in the animation.
Property Descriptions¶
- String assigned_animation
| Setter | set_assigned_animation(value) |
| Getter | get_assigned_animation() |
If playing, the current animation; otherwise, the animation last played. When set, would change the animation, but would not play it unless currently playing. See also current_animation.
- String autoplay
| Default | "" |
| Setter | set_autoplay(value) |
| Getter | get_autoplay() |
The name of the animation to play when the scene loads.
- String current_animation
| Default | "" |
| Setter | set_current_animation(value) |
| Getter | get_current_animation() |
The name of the current animation, “” if not playing anything. When being set, does not restart the animation. See also play.
- float current_animation_length
| Getter | get_current_animation_length() |
The length (in seconds) of the currently being played animation.
- float current_animation_position
| Getter | get_current_animation_position() |
The position (in seconds) of the currently playing animation.
- AnimationMethodCallMode method_call_mode
| Default | 0 |
| Setter | set_method_call_mode(value) |
| Getter | get_method_call_mode() |
The call mode to use for Call Method tracks.
- bool playback_active
| Setter | set_active(value) |
| Getter | is_active() |
If true, updates animations in response to process-related notifications.
- float playback_default_blend_time
| Default | 0.0 |
| Setter | set_default_blend_time(value) |
| Getter | get_default_blend_time() |
The default time in which to blend animations. Ranges from 0 to 4096 with 0.01 precision.
- AnimationProcessMode playback_process_mode
| Default | 1 |
| Setter | set_animation_process_mode(value) |
| Getter | get_animation_process_mode() |
The process notification in which to update animations.
- float playback_speed
| Default | 1.0 |
| Setter | set_speed_scale(value) |
| Getter | get_speed_scale() |
The speed scaling ratio. For instance, if this value is 1, then the animation plays at normal speed. If it’s 0.5, then it plays at half speed. If it’s 2, then it plays at double speed.
- NodePath root_node
| Default | NodePath("..") |
| Setter | set_root(value) |
| Getter | get_root() |
The node from which node path references will travel.
Method Descriptions¶
Adds animation to the player accessible with the key name.
- void advance ( float delta )
Shifts position in the animation timeline and immediately updates the animation. delta is the time in seconds to shift. Events between the current frame and delta are handled.
Returns the name of the next animation in the queue.
Triggers the anim_to animation when the anim_from animation completes.
- void clear_caches ( )
AnimationPlayer caches animated nodes. It may not notice if a node disappears; clear_caches forces it to update the cache again.
- void clear_queue ( )
Clears all queued, unplayed animations.
Returns the name of animation or an empty string if not found.
Returns the Animation with key name or null if not found.
- PoolStringArray get_animation_list ( ) const
Returns the list of stored animation names.
Gets the blend time (in seconds) between two animations, referenced by their names.
- float get_playing_speed ( ) const
Gets the actual playing speed of current animation or 0 if not playing. This speed is the playback_speed property multiplied by custom_speed argument specified when calling the play method.
- PoolStringArray get_queue ( )
Returns a list of the animation names that are currently queued to play.
Returns true if the AnimationPlayer stores an Animation with key name.
- bool is_playing ( ) const
Returns true if playing an animation.
Plays the animation with key name. Custom blend times and speed can be set. If custom_speed is negative and from_end is true, the animation will play backwards (which is equivalent to calling play_backwards).
The AnimationPlayer keeps track of its current or last played animation with assigned_animation. If this method is called with that same animation name, or with no name parameter, the assigned animation will resume playing if it was paused, or restart if it was stopped (see stop for both pause and stop). If the animation was already playing, it will keep playing.
Note: The animation will be updated the next time the AnimationPlayer is processed. If other variables are updated at the same time this is called, they may be updated too early. To perform the update immediately, call advance(0).
Plays the animation with key name in reverse.
This method is a shorthand for play with custom_speed = -1.0 and from_end = true, so see its description for more information.
- void queue ( String name )
Queues an animation for playback once the current one is done.
Note: If a looped animation is currently playing, the queued animation will never play unless the looped animation is stopped somehow.
- void remove_animation ( String name )
Removes the animation with key name.
Renames an existing animation with key name to newname.
Seeks the animation to the seconds point in time (in seconds). If update is true, the animation updates too, otherwise it updates at process time. Events between the current frame and seconds are skipped.
Specifies a blend time (in seconds) between two animations, referenced by their names.
- void stop ( bool reset=true )
Stops or pauses the currently playing animation. If reset is true, the animation position is reset to 0 and the playback speed is reset to 1.0.
If reset is false, the current_animation_position will be kept and calling play or play_backwards without arguments or with the same animation name as assigned_animation will resume the animation.
AnimationRootNode¶
Inherits: AnimationNode < Resource < Reference < Object
Inherited By: AnimationNodeAnimation, AnimationNodeBlendSpace1D, AnimationNodeBlendSpace2D, AnimationNodeBlendTree, AnimationNodeStateMachine
AnimationTree¶
A node to be used for advanced animation transitions in an AnimationPlayer.
Properties¶
| bool | active | false |
| NodePath | anim_player | NodePath("") |
| AnimationProcessMode | process_mode | 1 |
| NodePath | root_motion_track | NodePath("") |
| AnimationNode | tree_root |
Methods¶
| void | advance ( float delta ) |
| Transform | get_root_motion_transform ( ) const |
| void | rename_parameter ( String old_name, String new_name ) |
Enumerations¶
enum AnimationProcessMode:
- ANIMATION_PROCESS_PHYSICS = 0 — The animations will progress during the physics frame (i.e. Node._physics_process).
- ANIMATION_PROCESS_IDLE = 1 — The animations will progress during the idle frame (i.e. Node._process).
- ANIMATION_PROCESS_MANUAL = 2 — The animations will only progress manually (see advance).
Property Descriptions¶
- bool active
| Default | false |
| Setter | set_active(value) |
| Getter | is_active() |
If true, the AnimationTree will be processing.
- NodePath anim_player
| Default | NodePath("") |
| Setter | set_animation_player(value) |
| Getter | get_animation_player() |
The path to the AnimationPlayer used for animating.
- AnimationProcessMode process_mode
| Default | 1 |
| Setter | set_process_mode(value) |
| Getter | get_process_mode() |
The process mode of this AnimationTree. See AnimationProcessMode for available modes.
- NodePath root_motion_track
| Default | NodePath("") |
| Setter | set_root_motion_track(value) |
| Getter | get_root_motion_track() |
- AnimationNode tree_root
| Setter | set_tree_root(value) |
| Getter | get_tree_root() |
The root animation node of this AnimationTree. See AnimationNode.
AnimationTreePlayer¶
Animation player that uses a node graph for blending animations.
Description¶
A node graph tool for blending multiple animations bound to an AnimationPlayer. Especially useful for animating characters or other skeleton-based rigs. It can combine several animations to form a desired pose.
It takes Animations from an AnimationPlayer node and mixes them depending on the graph.
Tutorials¶
Properties¶
| bool | active | false |
| NodePath | base_path | NodePath("..") |
| NodePath | master_player | NodePath("") |
| AnimationProcessMode | playback_process_mode | 1 |
Methods¶
Enumerations¶
enum NodeType:
- NODE_OUTPUT = 0 — Output node.
- NODE_ANIMATION = 1 — Animation node.
- NODE_ONESHOT = 2 — OneShot node.
- NODE_MIX = 3 — Mix node.
- NODE_BLEND2 = 4 — Blend2 node.
- NODE_BLEND3 = 5 — Blend3 node.
- NODE_BLEND4 = 6 — Blend4 node.
- NODE_TIMESCALE = 7 — TimeScale node.
- NODE_TIMESEEK = 8 — TimeSeek node.
- NODE_TRANSITION = 9 — Transition node.
enum AnimationProcessMode:
- ANIMATION_PROCESS_PHYSICS = 0 — Process animation during the physics process. This is especially useful when animating physics bodies.
- ANIMATION_PROCESS_IDLE = 1 — Process animation during the idle process.
Property Descriptions¶
- bool active
| Default | false |
| Setter | set_active(value) |
| Getter | is_active() |
If true, the AnimationTreePlayer is able to play animations.
- NodePath base_path
| Default | NodePath("..") |
| Setter | set_base_path(value) |
| Getter | get_base_path() |
The node from which to relatively access other nodes.
It accesses the bones, so it should point to the same node the AnimationPlayer would point its Root Node at.
- NodePath master_player
| Default | NodePath("") |
| Setter | set_master_player(value) |
| Getter | get_master_player() |
The path to the AnimationPlayer from which this AnimationTreePlayer binds animations to animation nodes.
Once set, Animation nodes can be added to the AnimationTreePlayer.
- AnimationProcessMode playback_process_mode
| Default | 1 |
| Setter | set_animation_process_mode(value) |
| Getter | get_animation_process_mode() |
The thread in which to update animations.
Method Descriptions¶
Adds a type node to the graph with name id.
- void advance ( float delta )
Shifts position in the animation timeline. delta is the time in seconds to shift. Events between the current frame and delta are handled.
Returns the AnimationPlayer’s Animation bound to the AnimationTreePlayer’s animation node with name id.
Returns the name of the master_player’s Animation bound to this animation node.
Returns the absolute playback timestamp of the animation node with name id.
Binds a new Animation from the master_player to the AnimationTreePlayer’s animation node with name id.
If enable is true, the animation node with ID id turns off the track modifying the property at path. The modified node’s children continue to animate.
Binds the Animation named source from master_player to the animation node id. Recalculates caches.
Returns whether node id and dst_id are connected at the specified slot.
Returns the blend amount of a Blend2 node given its name.
Sets the blend amount of a Blend2 node given its name and value.
A Blend2 node blends two animations (A and B) with the amount between 0 and 1.
At 0, output is input A. Towards 1, the influence of A gets lessened, the influence of B gets raised. At 1, output is input B.
If enable is true, the Blend2 node with name id turns off the track modifying the property at path. The modified node’s children continue to animate.
Returns the blend amount of a Blend3 node given its name.
Sets the blend amount of a Blend3 node given its name and value.
A Blend3 Node blends three animations (A, B-, B+) with the amount between -1 and 1.
At -1, output is input B-. From -1 to 0, the influence of B- gets lessened, the influence of A gets raised and the influence of B+ is 0. At 0, output is input A. From 0 to 1, the influence of A gets lessened, the influence of B+ gets raised and the influence of B+ is 0. At 1, output is input B+.
Returns the blend amount of a Blend4 node given its name.
Sets the blend amount of a Blend4 node given its name and value.
A Blend4 Node blends two pairs of animations.
The two pairs are blended like Blend2 and then added together.
Connects node id to dst_id at the specified input slot.
Disconnects nodes connected to id at the specified input slot.
- PoolStringArray get_node_list ( )
Returns a PoolStringArray containing the name of all nodes.
Returns the mix amount of a Mix node given its name.
Sets the mix amount of a Mix node given its name and value.
A Mix node adds input b to input a by the amount given by ratio.
Check if a node exists (by name).
Returns the input count for a given node. Different types of nodes have different amount of inputs.
Returns the input source for a given node input.
Returns position of a node in the graph given its name.
Gets the node type, will return from NodeType enum.
Renames a node in the graph.
Sets the position of a node in the graph given its name and position.
Returns the autostart delay of a OneShot node given its name.
Returns the autostart random delay of a OneShot node given its name.
Returns the fade in time of a OneShot node given its name.
Returns the fade out time of a OneShot node given its name.
Returns whether a OneShot node will auto restart given its name.
Returns whether a OneShot node is active given its name.
Sets the autorestart property of a OneShot node given its name and value.
Sets the autorestart delay of a OneShot node given its name and value in seconds.
Sets the autorestart random delay of a OneShot node given its name and value in seconds.
Sets the fade in time of a OneShot node given its name and value in seconds.
Sets the fade out time of a OneShot node given its name and value in seconds.
If enable is true, the OneShot node with ID id turns off the track modifying the property at path. The modified node’s children continue to animate.
- void oneshot_node_start ( String id )
Starts a OneShot node given its name.
- void oneshot_node_stop ( String id )
Stops the OneShot node with name id.
- void recompute_caches ( )
Manually recalculates the cache of track information generated from animation nodes. Needed when external sources modify the animation nodes’ state.
- void remove_node ( String id )
Removes the animation node with name id.
- void reset ( )
Resets this AnimationTreePlayer.
Returns the time scale value of the TimeScale node with name id.
Sets the time scale of the TimeScale node with name id to scale.
The TimeScale node is used to speed Animations up if the scale is above 1 or slow them down if it is below 1.
If applied after a blend or mix, affects all input animations to that blend or mix.
Sets the time seek value of the TimeSeek node with name id to seconds.
This functions as a seek in the Animation or the blend or mix of Animations input in it.
Deletes the input at input_idx for the transition node with name id.
Returns the index of the currently evaluated input for the transition node with name id.
Returns the number of inputs for the transition node with name id. You can add inputs by right-clicking on the transition node.
Returns the cross fade time for the transition node with name id.
Returns true if the input at input_idx on the transition node with name id is set to automatically advance to the next input upon completion.
The transition node with name id sets its current input at input_idx.
The transition node with name id advances to its next input automatically when the input at input_idx completes.
Resizes the number of inputs available for the transition node with name id.
The transition node with name id sets its cross fade time to time_sec.
Area¶
Inherits: CollisionObject < Spatial < Node < Object
General-purpose area node for detection and 3D physics influence.
Description¶
3D area that detects CollisionObject nodes overlapping, entering, or exiting. Can also alter or override local physics parameters (gravity, damping).
Properties¶
| float | angular_damp | 0.1 |
| String | audio_bus_name | "Master" |
| bool | audio_bus_override | false |
| int | collision_layer | 1 |
| int | collision_mask | 1 |
| float | gravity | 9.8 |
| float | gravity_distance_scale | 0.0 |
| bool | gravity_point | false |
| Vector3 | gravity_vec | Vector3( 0, -1, 0 ) |
| float | linear_damp | 0.1 |
| bool | monitorable | true |
| bool | monitoring | true |
| float | priority | 0.0 |
| float | reverb_bus_amount | 0.0 |
| bool | reverb_bus_enable | false |
| String | reverb_bus_name | "Master" |
| float | reverb_bus_uniformity | 0.0 |
| SpaceOverride | space_override | 0 |
Methods¶
| bool | get_collision_layer_bit ( int bit ) const |
| bool | get_collision_mask_bit ( int bit ) const |
| Array | get_overlapping_areas ( ) const |
| Array | get_overlapping_bodies ( ) const |
| bool | overlaps_area ( Node area ) const |
| bool | overlaps_body ( Node body ) const |
| void | set_collision_layer_bit ( int bit, bool value ) |
| void | set_collision_mask_bit ( int bit, bool value ) |
Signals¶
- area_entered ( Area area )
Emitted when another area enters.
- area_exited ( Area area )
Emitted when another area exits.
Emitted when another area enters, reporting which areas overlapped. shape_owner_get_owner(shape_find_owner(shape)) returns the parent object of the owner of the shape.
Emitted when another area exits, reporting which areas were overlapping.
- body_entered ( Node body )
Emitted when a physics body enters.
The body argument can either be a PhysicsBody or a GridMap instance (while GridMaps are not physics body themselves, they register their tiles with collision shapes as a virtual physics body).
- body_exited ( Node body )
Emitted when a physics body exits.
The body argument can either be a PhysicsBody or a GridMap instance (while GridMaps are not physics body themselves, they register their tiles with collision shapes as a virtual physics body).
Emitted when a physics body enters, reporting which shapes overlapped.
The body argument can either be a PhysicsBody or a GridMap instance (while GridMaps are not physics body themselves, they register their tiles with collision shapes as a virtual physics body).
Emitted when a physics body exits, reporting which shapes were overlapping.
The body argument can either be a PhysicsBody or a GridMap instance (while GridMaps are not physics body themselves, they register their tiles with collision shapes as a virtual physics body).
Enumerations¶
enum SpaceOverride:
- SPACE_OVERRIDE_DISABLED = 0 — This area does not affect gravity/damping.
- SPACE_OVERRIDE_COMBINE = 1 — This area adds its gravity/damping values to whatever has been calculated so far (in priority order).
- SPACE_OVERRIDE_COMBINE_REPLACE = 2 — This area adds its gravity/damping values to whatever has been calculated so far (in priority order), ignoring any lower priority areas.
- SPACE_OVERRIDE_REPLACE = 3 — This area replaces any gravity/damping, even the defaults, ignoring any lower priority areas.
- SPACE_OVERRIDE_REPLACE_COMBINE = 4 — This area replaces any gravity/damping calculated so far (in priority order), but keeps calculating the rest of the areas.
Property Descriptions¶
- float angular_damp
| Default | 0.1 |
| Setter | set_angular_damp(value) |
| Getter | get_angular_damp() |
The rate at which objects stop spinning in this area. Represents the angular velocity lost per second. Values range from 0 (no damping) to 1 (full damping).
- String audio_bus_name
| Default | "Master" |
| Setter | set_audio_bus(value) |
| Getter | get_audio_bus() |
The name of the area’s audio bus.
- bool audio_bus_override
| Default | false |
| Setter | set_audio_bus_override(value) |
| Getter | is_overriding_audio_bus() |
If true, the area’s audio bus overrides the default audio bus.
- int collision_layer
| Default | 1 |
| Setter | set_collision_layer(value) |
| Getter | get_collision_layer() |
The area’s physics layer(s). Collidable objects can exist in any of 32 different layers. A contact is detected if object A is in any of the layers that object B scans, or object B is in any layers that object A scans. See also collision_mask.
- int collision_mask
| Default | 1 |
| Setter | set_collision_mask(value) |
| Getter | get_collision_mask() |
The physics layers this area scans to determine collision detection.
- float gravity
| Default | 9.8 |
| Setter | set_gravity(value) |
| Getter | get_gravity() |
The area’s gravity intensity (ranges from -1024 to 1024). This value multiplies the gravity vector. This is useful to alter the force of gravity without altering its direction.
- float gravity_distance_scale
| Default | 0.0 |
| Setter | set_gravity_distance_scale(value) |
| Getter | get_gravity_distance_scale() |
The falloff factor for point gravity. The greater the value, the faster gravity decreases with distance.
- bool gravity_point
| Default | false |
| Setter | set_gravity_is_point(value) |
| Getter | is_gravity_a_point() |
If true, gravity is calculated from a point (set via gravity_vec). See also space_override.
- Vector3 gravity_vec
| Default | Vector3( 0, -1, 0 ) |
| Setter | set_gravity_vector(value) |
| Getter | get_gravity_vector() |
The area’s gravity vector (not normalized). If gravity is a point (see gravity_point), this will be the point of attraction.
- float linear_damp
| Default | 0.1 |
| Setter | set_linear_damp(value) |
| Getter | get_linear_damp() |
The rate at which objects stop moving in this area. Represents the linear velocity lost per second. Values range from 0 (no damping) to 1 (full damping).
- bool monitorable
| Default | true |
| Setter | set_monitorable(value) |
| Getter | is_monitorable() |
If true, other monitoring areas can detect this area.
- bool monitoring
| Default | true |
| Setter | set_monitoring(value) |
| Getter | is_monitoring() |
If true, the area detects bodies or areas entering and exiting it.
- float priority
| Default | 0.0 |
| Setter | set_priority(value) |
| Getter | get_priority() |
The area’s priority. Higher priority areas are processed first.
- float reverb_bus_amount
| Default | 0.0 |
| Setter | set_reverb_amount(value) |
| Getter | get_reverb_amount() |
The degree to which this area applies reverb to its associated audio. Ranges from 0 to 1 with 0.1 precision.
- bool reverb_bus_enable
| Default | false |
| Setter | set_use_reverb_bus(value) |
| Getter | is_using_reverb_bus() |
If true, the area applies reverb to its associated audio.
- String reverb_bus_name
| Default | "Master" |
| Setter | set_reverb_bus(value) |
| Getter | get_reverb_bus() |
The reverb bus name to use for this area’s associated audio.
- float reverb_bus_uniformity
| Default | 0.0 |
| Setter | set_reverb_uniformity(value) |
| Getter | get_reverb_uniformity() |
The degree to which this area’s reverb is a uniform effect. Ranges from 0 to 1 with 0.1 precision.
- SpaceOverride space_override
| Default | 0 |
| Setter | set_space_override_mode(value) |
| Getter | get_space_override_mode() |
Override mode for gravity and damping calculations within this area. See SpaceOverride for possible values.
Method Descriptions¶
Returns an individual bit on the layer mask.
Returns an individual bit on the collision mask.
- Array get_overlapping_areas ( ) const
Returns a list of intersecting Areas. For performance reasons (collisions are all processed at the same time) this list is modified once during the physics step, not immediately after objects are moved. Consider using signals instead.
- Array get_overlapping_bodies ( ) const
Returns a list of intersecting PhysicsBodys. For performance reasons (collisions are all processed at the same time) this list is modified once during the physics step, not immediately after objects are moved. Consider using signals instead.
If true, the given area overlaps the Area.
Note: The result of this test is not immediate after moving objects. For performance, list of overlaps is updated once per frame and before the physics step. Consider using signals instead.
If true, the given physics body overlaps the Area.
Note: The result of this test is not immediate after moving objects. For performance, list of overlaps is updated once per frame and before the physics step. Consider using signals instead.
The body argument can either be a PhysicsBody or a GridMap instance (while GridMaps are not physics body themselves, they register their tiles with collision shapes as a virtual physics body).
Set/clear individual bits on the layer mask. This simplifies editing this Area’s layers.
Set/clear individual bits on the collision mask. This simplifies editing which Area layers this Area scans.
Area2D¶
Inherits: CollisionObject2D < Node2D < CanvasItem < Node < Object
2D area for detection and 2D physics influence.
Description¶
2D area that detects CollisionObject2D nodes overlapping, entering, or exiting. Can also alter or override local physics parameters (gravity, damping).
Tutorials¶
Properties¶
| float | angular_damp | 1.0 |
| String | audio_bus_name | "Master" |
| bool | audio_bus_override | false |
| int | collision_layer | 1 |
| int | collision_mask | 1 |
| float | gravity | 98.0 |
| float | gravity_distance_scale | 0.0 |
| bool | gravity_point | false |
| Vector2 | gravity_vec | Vector2( 0, 1 ) |
| float | linear_damp | 0.1 |
| bool | monitorable | true |
| bool | monitoring | true |
| float | priority | 0.0 |
| SpaceOverride | space_override | 0 |
Methods¶
| bool | get_collision_layer_bit ( int bit ) const |
| bool | get_collision_mask_bit ( int bit ) const |
| Array | get_overlapping_areas ( ) const |
| Array | get_overlapping_bodies ( ) const |
| bool | overlaps_area ( Node area ) const |
| bool | overlaps_body ( Node body ) const |
| void | set_collision_layer_bit ( int bit, bool value ) |
| void | set_collision_mask_bit ( int bit, bool value ) |
Signals¶
- area_entered ( Area2D area )
Emitted when another area enters.
- area_exited ( Area2D area )
Emitted when another area exits.
Emitted when another area enters, reporting which shapes overlapped. shape_owner_get_owner(shape_find_owner(shape)) returns the parent object of the owner of the shape.
Emitted when another area exits, reporting which shapes were overlapping.
- body_entered ( Node body )
Emitted when a physics body enters.
The body argument can either be a PhysicsBody2D or a TileMap instance (while TileMaps are not physics body themselves, they register their tiles with collision shapes as a virtual physics body).
- body_exited ( Node body )
Emitted when a physics body exits.
The body argument can either be a PhysicsBody2D or a TileMap instance (while TileMaps are not physics body themselves, they register their tiles with collision shapes as a virtual physics body).
Emitted when a physics body enters, reporting which shapes overlapped.
The body argument can either be a PhysicsBody2D or a TileMap instance (while TileMaps are not physics body themselves, they register their tiles with collision shapes as a virtual physics body).
Emitted when a physics body exits, reporting which shapes were overlapping.
The body argument can either be a PhysicsBody2D or a TileMap instance (while TileMaps are not physics body themselves, they register their tiles with collision shapes as a virtual physics body).
Enumerations¶
enum SpaceOverride:
- SPACE_OVERRIDE_DISABLED = 0 — This area does not affect gravity/damping.
- SPACE_OVERRIDE_COMBINE = 1 — This area adds its gravity/damping values to whatever has been calculated so far (in priority order).
- SPACE_OVERRIDE_COMBINE_REPLACE = 2 — This area adds its gravity/damping values to whatever has been calculated so far (in priority order), ignoring any lower priority areas.
- SPACE_OVERRIDE_REPLACE = 3 — This area replaces any gravity/damping, even the defaults, ignoring any lower priority areas.
- SPACE_OVERRIDE_REPLACE_COMBINE = 4 — This area replaces any gravity/damping calculated so far (in priority order), but keeps calculating the rest of the areas.
Property Descriptions¶
- float angular_damp
| Default | 1.0 |
| Setter | set_angular_damp(value) |
| Getter | get_angular_damp() |
The rate at which objects stop spinning in this area. Represents the angular velocity lost per second. Values range from 0 (no damping) to 1 (full damping).
- String audio_bus_name
| Default | "Master" |
| Setter | set_audio_bus_name(value) |
| Getter | get_audio_bus_name() |
The name of the area’s audio bus.
- bool audio_bus_override
| Default | false |
| Setter | set_audio_bus_override(value) |
| Getter | is_overriding_audio_bus() |
If true, the area’s audio bus overrides the default audio bus.
- int collision_layer
| Default | 1 |
| Setter | set_collision_layer(value) |
| Getter | get_collision_layer() |
The area’s physics layer(s). Collidable objects can exist in any of 32 different layers. A contact is detected if object A is in any of the layers that object B scans, or object B is in any layers that object A scans. See also collision_mask.
- int collision_mask
| Default | 1 |
| Setter | set_collision_mask(value) |
| Getter | get_collision_mask() |
The physics layers this area scans to determine collision detection.
- float gravity
| Default | 98.0 |
| Setter | set_gravity(value) |
| Getter | get_gravity() |
The area’s gravity intensity (ranges from -1024 to 1024). This value multiplies the gravity vector. This is useful to alter the force of gravity without altering its direction.
- float gravity_distance_scale
| Default | 0.0 |
| Setter | set_gravity_distance_scale(value) |
| Getter | get_gravity_distance_scale() |
The falloff factor for point gravity. The greater the value, the faster gravity decreases with distance.
- bool gravity_point
| Default | false |
| Setter | set_gravity_is_point(value) |
| Getter | is_gravity_a_point() |
If true, gravity is calculated from a point (set via gravity_vec). See also space_override.
- Vector2 gravity_vec
| Default | Vector2( 0, 1 ) |
| Setter | set_gravity_vector(value) |
| Getter | get_gravity_vector() |
The area’s gravity vector (not normalized). If gravity is a point (see gravity_point), this will be the point of attraction.
- float linear_damp
| Default | 0.1 |
| Setter | set_linear_damp(value) |
| Getter | get_linear_damp() |
The rate at which objects stop moving in this area. Represents the linear velocity lost per second. Values range from 0 (no damping) to 1 (full damping).
- bool monitorable
| Default | true |
| Setter | set_monitorable(value) |
| Getter | is_monitorable() |
If true, other monitoring areas can detect this area.
- bool monitoring
| Default | true |
| Setter | set_monitoring(value) |
| Getter | is_monitoring() |
If true, the area detects bodies or areas entering and exiting it.
- float priority
| Default | 0.0 |
| Setter | set_priority(value) |
| Getter | get_priority() |
The area’s priority. Higher priority areas are processed first.
- SpaceOverride space_override
| Default | 0 |
| Setter | set_space_override_mode(value) |
| Getter | get_space_override_mode() |
Override mode for gravity and damping calculations within this area. See SpaceOverride for possible values.
Method Descriptions¶
Returns an individual bit on the layer mask. Describes whether other areas will collide with this one on the given layer.
Returns an individual bit on the collision mask. Describes whether this area will collide with others on the given layer.
- Array get_overlapping_areas ( ) const
Returns a list of intersecting Area2Ds. For performance reasons (collisions are all processed at the same time) this list is modified once during the physics step, not immediately after objects are moved. Consider using signals instead.
- Array get_overlapping_bodies ( ) const
Returns a list of intersecting PhysicsBody2Ds. For performance reasons (collisions are all processed at the same time) this list is modified once during the physics step, not immediately after objects are moved. Consider using signals instead.
If true, the given area overlaps the Area2D.
Note: The result of this test is not immediate after moving objects. For performance, list of overlaps is updated once per frame and before the physics step. Consider using signals instead.
If true, the given physics body overlaps the Area2D.
Note: The result of this test is not immediate after moving objects. For performance, list of overlaps is updated once per frame and before the physics step. Consider using signals instead.
The body argument can either be a PhysicsBody2D or a TileMap instance (while TileMaps are not physics body themselves, they register their tiles with collision shapes as a virtual physics body).
Set/clear individual bits on the layer mask. This makes getting an area in/out of only one layer easier.
Set/clear individual bits on the collision mask. This makes selecting the areas scanned easier.
Array¶
Generic array datatype.
Description¶
Generic array which can contain several elements of any type, accessible by a numerical index starting at 0. Negative indices can be used to count from the back, like in Python (-1 is the last element, -2 the second to last, etc.).
Example:
var array = ["One", 2, 3, "Four"]
print(array[0]) # One.
print(array[2]) # 3.
print(array[-1]) # Four.
array[2] = "Three"
print(array[-2]) # Three.
Arrays can be concatenated using the + operator:
var array1 = ["One", 2]
var array2 = [3, "Four"]
print(array1 + array2) # ["One", 2, 3, "Four"]
Arrays are always passed by reference.
Methods¶
Method Descriptions¶
- Array Array ( PoolColorArray from )
Constructs an array from a PoolColorArray.
- Array Array ( PoolVector3Array from )
Constructs an array from a PoolVector3Array.
- Array Array ( PoolVector2Array from )
Constructs an array from a PoolVector2Array.
- Array Array ( PoolStringArray from )
Constructs an array from a PoolStringArray.
- Array Array ( PoolRealArray from )
Constructs an array from a PoolRealArray.
- Array Array ( PoolIntArray from )
Constructs an array from a PoolIntArray.
- Array Array ( PoolByteArray from )
Constructs an array from a PoolByteArray.
- void append ( Variant value )
Appends an element at the end of the array (alias of push_back).
- Variant back ( )
Returns the last element of the array, or null if the array is empty.
Finds the index of an existing value (or the insertion index that maintains sorting order, if the value is not yet present in the array) using binary search. Optionally, a before specifier can be passed. If false, the returned index comes after all existing entries of the value in the array.
Note: Calling bsearch on an unsorted array results in unexpected behavior.
Finds the index of an existing value (or the insertion index that maintains sorting order, if the value is not yet present in the array) using binary search and a custom comparison method. Optionally, a before specifier can be passed. If false, the returned index comes after all existing entries of the value in the array. The custom method receives two arguments (an element from the array and the value searched for) and must return true if the first argument is less than the second, and return false otherwise.
Note: Calling bsearch on an unsorted array results in unexpected behavior.
- void clear ( )
Clears the array. This is equivalent to using resize with a size of 0.
Returns the number of times an element is in the array.
Returns a copy of the array.
If deep is true, a deep copy is performed: all nested arrays and dictionaries are duplicated and will not be shared with the original array. If false, a shallow copy is made and references to the original nested arrays and dictionaries are kept, so that modifying a sub-array or dictionary in the copy will also impact those referenced in the source array.
- bool empty ( )
Returns true if the array is empty.
- void erase ( Variant value )
Removes the first occurrence of a value from the array.
Searches the array for a value and returns its index or -1 if not found. Optionally, the initial search index can be passed.
Searches the array in reverse order for a value and returns its index or -1 if not found.
- Variant front ( )
Returns the first element of the array, or null if the array is empty.
Returns true if the array contains the given value.
["inside", 7].has("inside") == true
["inside", 7].has("outside") == false
["inside", 7].has(7) == true
["inside", 7].has("7") == false
- int hash ( )
Returns a hashed integer value representing the array contents.
Inserts a new element at a given position in the array. The position must be valid, or at the end of the array (pos == size()).
- void invert ( )
Reverses the order of the elements in the array.
- Variant max ( )
Returns the maximum value contained in the array if all elements are of comparable types. If the elements can’t be compared, null is returned.
- Variant min ( )
Returns the minimum value contained in the array if all elements are of comparable types. If the elements can’t be compared, null is returned.
- Variant pop_back ( )
Removes and returns the last element of the array. Returns null if the array is empty.
- Variant pop_front ( )
Removes and returns the first element of the array. Returns null if the array is empty.
- void push_back ( Variant value )
Appends an element at the end of the array.
- void push_front ( Variant value )
Adds an element at the beginning of the array.
- void remove ( int position )
Removes an element from the array by index.
- void resize ( int size )
Resizes the array to contain a different number of elements. If the array size is smaller, elements are cleared, if bigger, new elements are null.
Searches the array in reverse order. Optionally, a start search index can be passed. If negative, the start index is considered relative to the end of the array.
- void shuffle ( )
Shuffles the array such that the items will have a random order. This method uses the global random number generator common to methods such as @GDScript.randi. Call @GDScript.randomize to ensure that a new seed will be used each time if you want non-reproducible shuffling.
- int size ( )
Returns the number of elements in the array.
Duplicates the subset described in the function and returns it in an array, deeply copying the array if deep is true. Lower and upper index are inclusive, with the step describing the change between indices while slicing.
- void sort ( )
Sorts the array.
Note: Strings are sorted in alphabetical order (as opposed to natural order). This may lead to unexpected behavior when sorting an array of strings ending with a sequence of numbers. Consider the following example:
var strings = ["string1", "string2", "string10", "string11"]
strings.sort()
print(strings) # Prints [string1, string10, string11, string2]
Sorts the array using a custom method. The arguments are an object that holds the method and the name of such method. The custom method receives two arguments (a pair of elements from the array) and must return either true or false.
Note: you cannot randomize the return value as the heapsort algorithm expects a deterministic result. Doing so will result in unexpected behavior.
class MyCustomSorter:
static func sort_ascending(a, b):
if a[0] < b[0]:
return true
return false
var my_items = [[5, "Potato"], [9, "Rice"], [4, "Tomato"]]
my_items.sort_custom(MyCustomSorter, "sort_ascending")
print(my_items) # Prints [[4, Tomato], [5, Potato], [9, Rice]].
ArrayMesh¶
Inherits: Mesh < Resource < Reference < Object
Mesh type that provides utility for constructing a surface from arrays.
Description¶
The ArrayMesh is used to construct a Mesh by specifying the attributes as arrays.
The most basic example is the creation of a single triangle:
var vertices = PoolVector3Array()
vertices.push_back(Vector3(0, 1, 0))
vertices.push_back(Vector3(1, 0, 0))
vertices.push_back(Vector3(0, 0, 1))
# Initialize the ArrayMesh.
var arr_mesh = ArrayMesh.new()
var arrays = []
arrays.resize(ArrayMesh.ARRAY_MAX)
arrays[ArrayMesh.ARRAY_VERTEX] = vertices
# Create the Mesh.
arr_mesh.add_surface_from_arrays(Mesh.PRIMITIVE_TRIANGLES, arrays)
var m = MeshInstance.new()
m.mesh = arr_mesh
The MeshInstance is ready to be added to the SceneTree to be shown.
Tutorials¶
Properties¶
| BlendShapeMode | blend_shape_mode | 1 |
| AABB | custom_aabb | AABB( 0, 0, 0, 0, 0, 0 ) |
Methods¶
| void | add_blend_shape ( String name ) |
| void | add_surface_from_arrays ( PrimitiveType primitive, Array arrays, Array blend_shapes=[ ], int compress_flags=97280 ) |
| void | clear_blend_shapes ( ) |
| int | get_blend_shape_count ( ) const |
| String | get_blend_shape_name ( int index ) const |
| Error | lightmap_unwrap ( Transform transform, float texel_size ) |
| void | regen_normalmaps ( ) |
| int | surface_find_by_name ( String name ) const |
| int | surface_get_array_index_len ( int surf_idx ) const |
| int | surface_get_array_len ( int surf_idx ) const |
| int | surface_get_format ( int surf_idx ) const |
| String | surface_get_name ( int surf_idx ) const |
| PrimitiveType | surface_get_primitive_type ( int surf_idx ) const |
| void | surface_remove ( int surf_idx ) |
| void | surface_set_name ( int surf_idx, String name ) |
| void | surface_update_region ( int surf_idx, int offset, PoolByteArray data ) |
Enumerations¶
enum ArrayType:
- ARRAY_VERTEX = 0 — PoolVector3Array, PoolVector2Array, or Array of vertex positions.
- ARRAY_NORMAL = 1 — PoolVector3Array of vertex normals.
- ARRAY_TANGENT = 2 — PoolRealArray of vertex tangents. Each element in groups of 4 floats, first 3 floats determine the tangent, and the last the binormal direction as -1 or 1.
- ARRAY_COLOR = 3 — PoolColorArray of vertex colors.
- ARRAY_TEX_UV = 4 — PoolVector2Array for UV coordinates.
- ARRAY_TEX_UV2 = 5 — PoolVector2Array for second UV coordinates.
- ARRAY_BONES = 6 — PoolRealArray or PoolIntArray of bone indices. Each element in groups of 4 floats.
- ARRAY_WEIGHTS = 7 — PoolRealArray of bone weights. Each element in groups of 4 floats.
- ARRAY_INDEX = 8 — PoolIntArray of integers used as indices referencing vertices, colors, normals, tangents, and textures. All of those arrays must have the same number of elements as the vertex array. No index can be beyond the vertex array size. When this index array is present, it puts the function into “index mode,” where the index selects the *i*’th vertex, normal, tangent, color, UV, etc. This means if you want to have different normals or colors along an edge, you have to duplicate the vertices.
For triangles, the index array is interpreted as triples, referring to the vertices of each triangle. For lines, the index array is in pairs indicating the start and end of each line.
- ARRAY_MAX = 9 — Represents the size of the ArrayType enum.
enum ArrayFormat:
- ARRAY_FORMAT_VERTEX = 1 — Array format will include vertices (mandatory).
- ARRAY_FORMAT_NORMAL = 2 — Array format will include normals.
- ARRAY_FORMAT_TANGENT = 4 — Array format will include tangents.
- ARRAY_FORMAT_COLOR = 8 — Array format will include a color array.
- ARRAY_FORMAT_TEX_UV = 16 — Array format will include UVs.
- ARRAY_FORMAT_TEX_UV2 = 32 — Array format will include another set of UVs.
- ARRAY_FORMAT_BONES = 64 — Array format will include bone indices.
- ARRAY_FORMAT_WEIGHTS = 128 — Array format will include bone weights.
- ARRAY_FORMAT_INDEX = 256 — Index array will be used.
Constants¶
- NO_INDEX_ARRAY = -1 — Default value used for index_array_len when no indices are present.
- ARRAY_WEIGHTS_SIZE = 4 — Amount of weights/bone indices per vertex (always 4).
Property Descriptions¶
- BlendShapeMode blend_shape_mode
| Default | 1 |
| Setter | set_blend_shape_mode(value) |
| Getter | get_blend_shape_mode() |
Sets the blend shape mode to one of BlendShapeMode.
- AABB custom_aabb
| Default | AABB( 0, 0, 0, 0, 0, 0 ) |
| Setter | set_custom_aabb(value) |
| Getter | get_custom_aabb() |
Overrides the AABB with one defined by user for use with frustum culling. Especially useful to avoid unexpected culling when using a shader to offset vertices.
Method Descriptions¶
- void add_blend_shape ( String name )
Adds name for a blend shape that will be added with add_surface_from_arrays. Must be called before surface is added.
- void add_surface_from_arrays ( PrimitiveType primitive, Array arrays, Array blend_shapes=[ ], int compress_flags=97280 )
Creates a new surface.
Surfaces are created to be rendered using a primitive, which may be any of the types defined in PrimitiveType. (As a note, when using indices, it is recommended to only use points, lines or triangles.) Mesh.get_surface_count will become the surf_idx for this new surface.
The arrays argument is an array of arrays. See ArrayType for the values used in this array. For example, arrays[0] is the array of vertices. That first vertex sub-array is always required; the others are optional. Adding an index array puts this function into “index mode” where the vertex and other arrays become the sources of data and the index array defines the vertex order. All sub-arrays must have the same length as the vertex array or be empty, except for ARRAY_INDEX if it is used.
Adding an index array puts this function into “index mode” where the vertex and other arrays become the sources of data, and the index array defines the order of the vertices.
Godot uses clockwise winding order for front faces of triangle primitive modes.
- void clear_blend_shapes ( )
Removes all blend shapes from this ArrayMesh.
- int get_blend_shape_count ( ) const
Returns the number of blend shapes that the ArrayMesh holds.
Returns the name of the blend shape at this index.
Will perform a UV unwrap on the ArrayMesh to prepare the mesh for lightmapping.
- void regen_normalmaps ( )
Will regenerate normal maps for the ArrayMesh.
Returns the index of the first surface with this name held within this ArrayMesh. If none are found, -1 is returned.
Returns the length in indices of the index array in the requested surface (see add_surface_from_arrays).
Returns the length in vertices of the vertex array in the requested surface (see add_surface_from_arrays).
Returns the format mask of the requested surface (see add_surface_from_arrays).
Gets the name assigned to this surface.
- PrimitiveType surface_get_primitive_type ( int surf_idx ) const
Returns the primitive type of the requested surface (see add_surface_from_arrays).
- void surface_remove ( int surf_idx )
Removes a surface at position surf_idx, shifting greater surfaces one surf_idx slot down.
Sets a name for a given surface.
- void surface_update_region ( int surf_idx, int offset, PoolByteArray data )
Updates a specified region of mesh arrays on the GPU.
Warning: Only use if you know what you are doing. You can easily cause crashes by calling this function with improper arguments.
ARVRAnchor¶
Inherits: Spatial < Node < Object
An anchor point in AR space.
Description¶
The ARVRAnchor point is a spatial node that maps a real world location identified by the AR platform to a position within the game world. For example, as long as plane detection in ARKit is on, ARKit will identify and update the position of planes (tables, floors, etc) and create anchors for them.
This node is mapped to one of the anchors through its unique ID. When you receive a signal that a new anchor is available, you should add this node to your scene for that anchor. You can predefine nodes and set the ID; the nodes will simply remain on 0,0,0 until a plane is recognized.
Keep in mind that, as long as plane detection is enabled, the size, placing and orientation of an anchor will be updated as the detection logic learns more about the real world out there especially if only part of the surface is in view.
Methods¶
| String | get_anchor_name ( ) const |
| bool | get_is_active ( ) const |
| Mesh | get_mesh ( ) const |
| Plane | get_plane ( ) const |
| Vector3 | get_size ( ) const |
Signals¶
- mesh_updated ( Mesh mesh )
Emitted when the mesh associated with the anchor changes or when one becomes available. This is especially important for topology that is constantly being mesh_updated.
Property Descriptions¶
- int anchor_id
| Default | 1 |
| Setter | set_anchor_id(value) |
| Getter | get_anchor_id() |
The anchor’s ID. You can set this before the anchor itself exists. The first anchor gets an ID of 1, the second an ID of 2, etc. When anchors get removed, the engine can then assign the corresponding ID to new anchors. The most common situation where anchors “disappear” is when the AR server identifies that two anchors represent different parts of the same plane and merges them.
Method Descriptions¶
- String get_anchor_name ( ) const
Returns the name given to this anchor.
- bool get_is_active ( ) const
Returns true if the anchor is being tracked and false if no anchor with this ID is currently known.
- Mesh get_mesh ( ) const
If provided by the ARVRInterface, this returns a mesh object for the anchor. For an anchor, this can be a shape related to the object being tracked or it can be a mesh that provides topology related to the anchor and can be used to create shadows/reflections on surfaces or for generating collision shapes.
- Plane get_plane ( ) const
Returns a plane aligned with our anchor; handy for intersection testing.
- Vector3 get_size ( ) const
Returns the estimated size of the plane that was detected. Say when the anchor relates to a table in the real world, this is the estimated size of the surface of that table.
ARVRCamera¶
Inherits: Camera < Spatial < Node < Object
A camera node with a few overrules for AR/VR applied, such as location tracking.
Description¶
This is a helper spatial node for our camera; note that, if stereoscopic rendering is applicable (VR-HMD), most of the camera properties are ignored, as the HMD information overrides them. The only properties that can be trusted are the near and far planes.
The position and orientation of this node is automatically updated by the ARVR Server to represent the location of the HMD if such tracking is available and can thus be used by game logic. Note that, in contrast to the ARVR Controller, the render thread has access to the most up-to-date tracking data of the HMD and the location of the ARVRCamera can lag a few milliseconds behind what is used for rendering as a result.
ARVRController¶
Inherits: Spatial < Node < Object
A spatial node representing a spatially-tracked controller.
Description¶
This is a helper spatial node that is linked to the tracking of controllers. It also offers several handy passthroughs to the state of buttons and such on the controllers.
Controllers are linked by their ID. You can create controller nodes before the controllers are available. If your game always uses two controllers (one for each hand), you can predefine the controllers with ID 1 and 2; they will become active as soon as the controllers are identified. If you expect additional controllers to be used, you should react to the signals and add ARVRController nodes to your scene.
The position of the controller node is automatically updated by the ARVRServer. This makes this node ideal to add child nodes to visualize the controller.
Properties¶
| int | controller_id | 1 |
| float | rumble | 0.0 |
Methods¶
| String | get_controller_name ( ) const |
| TrackerHand | get_hand ( ) const |
| bool | get_is_active ( ) const |
| float | get_joystick_axis ( int axis ) const |
| int | get_joystick_id ( ) const |
| Mesh | get_mesh ( ) const |
| int | is_button_pressed ( int button ) const |
Signals¶
- button_pressed ( int button )
Emitted when a button on this controller is pressed.
- button_release ( int button )
Emitted when a button on this controller is released.
- mesh_updated ( Mesh mesh )
Emitted when the mesh associated with the controller changes or when one becomes available. Generally speaking this will be a static mesh after becoming available.
Property Descriptions¶
- int controller_id
| Default | 1 |
| Setter | set_controller_id(value) |
| Getter | get_controller_id() |
The controller’s ID.
A controller ID of 0 is unbound and will always result in an inactive node. Controller ID 1 is reserved for the first controller that identifies itself as the left-hand controller and ID 2 is reserved for the first controller that identifies itself as the right-hand controller.
For any other controller that the ARVRServer detects, we continue with controller ID 3.
When a controller is turned off, its slot is freed. This ensures controllers will keep the same ID even when controllers with lower IDs are turned off.
- float rumble
| Default | 0.0 |
| Setter | set_rumble(value) |
| Getter | get_rumble() |
The degree to which the controller vibrates. Ranges from 0.0 to 1.0 with precision .01. If changed, updates ARVRPositionalTracker.rumble accordingly.
This is a useful property to animate if you want the controller to vibrate for a limited duration.
Method Descriptions¶
- String get_controller_name ( ) const
If active, returns the name of the associated controller if provided by the AR/VR SDK used.
- TrackerHand get_hand ( ) const
Returns the hand holding this controller, if known. See TrackerHand.
- bool get_is_active ( ) const
Returns true if the bound controller is active. ARVR systems attempt to track active controllers.
Returns the value of the given axis for things like triggers, touchpads, etc. that are embedded into the controller.
- int get_joystick_id ( ) const
Returns the ID of the joystick object bound to this. Every controller tracked by the ARVRServer that has buttons and axis will also be registered as a joystick within Godot. This means that all the normal joystick tracking and input mapping will work for buttons and axis found on the AR/VR controllers. This ID is purely offered as information so you can link up the controller with its joystick entry.
- Mesh get_mesh ( ) const
If provided by the ARVRInterface, this returns a mesh associated with the controller. This can be used to visualize the controller.
Returns true if the button at index button is pressed. See JoystickList, in particular the JOY_VR_* constants.
ARVRInterface¶
Inherited By: ARVRInterfaceGDNative, MobileVRInterface
Base class for an AR/VR interface implementation.
Description¶
This class needs to be implemented to make an AR or VR platform available to Godot and these should be implemented as C++ modules or GDNative modules (note that for GDNative the subclass ARVRScriptInterface should be used). Part of the interface is exposed to GDScript so you can detect, enable and configure an AR or VR platform.
Interfaces should be written in such a way that simply enabling them will give us a working setup. You can query the available interfaces through ARVRServer.
Properties¶
| bool | ar_is_anchor_detection_enabled | false |
| bool | interface_is_initialized | false |
| bool | interface_is_primary | false |
Methods¶
| int | get_camera_feed_id ( ) |
| int | get_capabilities ( ) const |
| String | get_name ( ) const |
| Vector2 | get_render_targetsize ( ) |
| Tracking_status | get_tracking_status ( ) const |
| bool | initialize ( ) |
| bool | is_stereo ( ) |
| void | uninitialize ( ) |
Enumerations¶
enum Capabilities:
- ARVR_NONE = 0 — No ARVR capabilities.
- ARVR_MONO = 1 — This interface can work with normal rendering output (non-HMD based AR).
- ARVR_STEREO = 2 — This interface supports stereoscopic rendering.
- ARVR_AR = 4 — This interface supports AR (video background and real world tracking).
- ARVR_EXTERNAL = 8 — This interface outputs to an external device. If the main viewport is used, the on screen output is an unmodified buffer of either the left or right eye (stretched if the viewport size is not changed to the same aspect ratio of get_render_targetsize). Using a separate viewport node frees up the main viewport for other purposes.
enum Eyes:
- EYE_MONO = 0 — Mono output, this is mostly used internally when retrieving positioning information for our camera node or when stereo scopic rendering is not supported.
- EYE_LEFT = 1 — Left eye output, this is mostly used internally when rendering the image for the left eye and obtaining positioning and projection information.
- EYE_RIGHT = 2 — Right eye output, this is mostly used internally when rendering the image for the right eye and obtaining positioning and projection information.
enum Tracking_status:
- ARVR_NORMAL_TRACKING = 0 — Tracking is behaving as expected.
- ARVR_EXCESSIVE_MOTION = 1 — Tracking is hindered by excessive motion (the player is moving faster than tracking can keep up).
- ARVR_INSUFFICIENT_FEATURES = 2 — Tracking is hindered by insufficient features, it’s too dark (for camera-based tracking), player is blocked, etc.
- ARVR_UNKNOWN_TRACKING = 3 — We don’t know the status of the tracking or this interface does not provide feedback.
- ARVR_NOT_TRACKING = 4 — Tracking is not functional (camera not plugged in or obscured, lighthouses turned off, etc.).
Property Descriptions¶
- bool ar_is_anchor_detection_enabled
| Default | false |
| Setter | set_anchor_detection_is_enabled(value) |
| Getter | get_anchor_detection_is_enabled() |
On an AR interface, true if anchor detection is enabled.
- bool interface_is_initialized
| Default | false |
| Setter | set_is_initialized(value) |
| Getter | is_initialized() |
true if this interface been initialized.
- bool interface_is_primary
| Default | false |
| Setter | set_is_primary(value) |
| Getter | is_primary() |
true if this is the primary interface.
Method Descriptions¶
- int get_camera_feed_id ( )
If this is an AR interface that requires displaying a camera feed as the background, this method returns the feed ID in the CameraServer for this interface.
- int get_capabilities ( ) const
Returns a combination of Capabilities flags providing information about the capabilities of this interface.
- String get_name ( ) const
Returns the name of this interface (OpenVR, OpenHMD, ARKit, etc).
- Vector2 get_render_targetsize ( )
Returns the resolution at which we should render our intermediate results before things like lens distortion are applied by the VR platform.
- Tracking_status get_tracking_status ( ) const
If supported, returns the status of our tracking. This will allow you to provide feedback to the user whether there are issues with positional tracking.
- bool initialize ( )
Call this to initialize this interface. The first interface that is initialized is identified as the primary interface and it will be used for rendering output.
After initializing the interface you want to use you then need to enable the AR/VR mode of a viewport and rendering should commence.
Note: You must enable the AR/VR mode on the main viewport for any device that uses the main output of Godot, such as for mobile VR.
If you do this for a platform that handles its own output (such as OpenVR) Godot will show just one eye without distortion on screen. Alternatively, you can add a separate viewport node to your scene and enable AR/VR on that viewport. It will be used to output to the HMD, leaving you free to do anything you like in the main window, such as using a separate camera as a spectator camera or rendering something completely different.
While currently not used, you can activate additional interfaces. You may wish to do this if you want to track controllers from other platforms. However, at this point in time only one interface can render to an HMD.
- bool is_stereo ( )
Returns true if the current output of this interface is in stereo.
- void uninitialize ( )
Turns the interface off.
ARVRInterfaceGDNative¶
Inherits: ARVRInterface < Reference < Object
GDNative wrapper for an ARVR interface.
Description¶
This is a wrapper class for GDNative implementations of the ARVR interface. To use a GDNative ARVR interface, simply instantiate this object and set your GDNative library containing the ARVR interface implementation.
ARVROrigin¶
Inherits: Spatial < Node < Object
The origin point in AR/VR.
Description¶
This is a special node within the AR/VR system that maps the physical location of the center of our tracking space to the virtual location within our game world.
There should be only one of these nodes in your scene and you must have one. All the ARVRCamera, ARVRController and ARVRAnchor nodes should be direct children of this node for spatial tracking to work correctly.
It is the position of this node that you update when your character needs to move through your game world while we’re not moving in the real world. Movement in the real world is always in relation to this origin point.
For example, if your character is driving a car, the ARVROrigin node should be a child node of this car. Or, if you’re implementing a teleport system to move your character, you should change the position of this node.
Properties¶
| float | world_scale | 1.0 |
Property Descriptions¶
- float world_scale
| Default | 1.0 |
| Setter | set_world_scale(value) |
| Getter | get_world_scale() |
Allows you to adjust the scale to your game’s units. Most AR/VR platforms assume a scale of 1 game world unit = 1 real world meter.
Note: This method is a passthrough to the ARVRServer itself.
ARVRPositionalTracker¶
Inherits: Object
A tracked object.
Description¶
An instance of this object represents a device that is tracked, such as a controller or anchor point. HMDs aren’t represented here as they are handled internally.
As controllers are turned on and the AR/VR interface detects them, instances of this object are automatically added to this list of active tracking objects accessible through the ARVRServer.
The ARVRController and ARVRAnchor both consume objects of this type and should be used in your project. The positional trackers are just under-the-hood objects that make this all work. These are mostly exposed so that GDNative-based interfaces can interact with them.
Methods¶
| TrackerHand | get_hand ( ) const |
| int | get_joy_id ( ) const |
| Mesh | get_mesh ( ) const |
| String | get_name ( ) const |
| Basis | get_orientation ( ) const |
| Vector3 | get_position ( ) const |
| int | get_tracker_id ( ) const |
| bool | get_tracks_orientation ( ) const |
| bool | get_tracks_position ( ) const |
| Transform | get_transform ( bool adjust_by_reference_frame ) const |
| TrackerType | get_type ( ) const |
Enumerations¶
enum TrackerHand:
- TRACKER_HAND_UNKNOWN = 0 — The hand this tracker is held in is unknown or not applicable.
- TRACKER_LEFT_HAND = 1 — This tracker is the left hand controller.
- TRACKER_RIGHT_HAND = 2 — This tracker is the right hand controller.
Property Descriptions¶
- float rumble
| Default | 0.0 |
| Setter | set_rumble(value) |
| Getter | get_rumble() |
The degree to which the tracker rumbles. Ranges from 0.0 to 1.0 with precision .01.
Method Descriptions¶
- TrackerHand get_hand ( ) const
Returns the hand holding this tracker, if known. See TrackerHand constants.
- int get_joy_id ( ) const
If this is a controller that is being tracked, the controller will also be represented by a joystick entry with this ID.
- Mesh get_mesh ( ) const
Returns the mesh related to a controller or anchor point if one is available.
- String get_name ( ) const
Returns the controller or anchor point’s name if available.
- Basis get_orientation ( ) const
Returns the controller’s orientation matrix.
- Vector3 get_position ( ) const
Returns the world-space controller position.
- int get_tracker_id ( ) const
Returns the internal tracker ID. This uniquely identifies the tracker per tracker type and matches the ID you need to specify for nodes such as the ARVRController and ARVRAnchor nodes.
- bool get_tracks_orientation ( ) const
Returns true if this device tracks orientation.
- bool get_tracks_position ( ) const
Returns true if this device tracks position.
Returns the transform combining this device’s orientation and position.
- TrackerType get_type ( ) const
Returns the tracker’s type.
ARVRServer¶
Inherits: Object
Server for AR and VR features.
Description¶
The AR/VR server is the heart of our Advanced and Virtual Reality solution and handles all the processing.
Properties¶
| ARVRInterface | primary_interface | |
| float | world_scale | 1.0 |
Methods¶
| void | center_on_hmd ( RotationMode rotation_mode, bool keep_height ) |
| ARVRInterface | find_interface ( String name ) const |
| Transform | get_hmd_transform ( ) |
| ARVRInterface | get_interface ( int idx ) const |
| int | get_interface_count ( ) const |
| Array | get_interfaces ( ) const |
| int | get_last_commit_usec ( ) |
| int | get_last_frame_usec ( ) |
| int | get_last_process_usec ( ) |
| Transform | get_reference_frame ( ) const |
| ARVRPositionalTracker | get_tracker ( int idx ) const |
| int | get_tracker_count ( ) const |
Signals¶
- interface_added ( String interface_name )
Emitted when a new interface has been added.
- interface_removed ( String interface_name )
Emitted when an interface is removed.
Emitted when a new tracker has been added. If you don’t use a fixed number of controllers or if you’re using ARVRAnchors for an AR solution, it is important to react to this signal to add the appropriate ARVRController or ARVRAnchor nodes related to this new tracker.
Emitted when a tracker is removed. You should remove any ARVRController or ARVRAnchor points if applicable. This is not mandatory, the nodes simply become inactive and will be made active again when a new tracker becomes available (i.e. a new controller is switched on that takes the place of the previous one).
Enumerations¶
enum TrackerType:
- TRACKER_CONTROLLER = 1 — The tracker tracks the location of a controller.
- TRACKER_BASESTATION = 2 — The tracker tracks the location of a base station.
- TRACKER_ANCHOR = 4 — The tracker tracks the location and size of an AR anchor.
- TRACKER_ANY_KNOWN = 127 — Used internally to filter trackers of any known type.
- TRACKER_UNKNOWN = 128 — Used internally if we haven’t set the tracker type yet.
- TRACKER_ANY = 255 — Used internally to select all trackers.
enum RotationMode:
- RESET_FULL_ROTATION = 0 — Fully reset the orientation of the HMD. Regardless of what direction the user is looking to in the real world. The user will look dead ahead in the virtual world.
- RESET_BUT_KEEP_TILT = 1 — Resets the orientation but keeps the tilt of the device. So if we’re looking down, we keep looking down but heading will be reset.
- DONT_RESET_ROTATION = 2 — Does not reset the orientation of the HMD, only the position of the player gets centered.
Property Descriptions¶
- ARVRInterface primary_interface
| Setter | set_primary_interface(value) |
| Getter | get_primary_interface() |
The primary ARVRInterface currently bound to the ARVRServer.
- float world_scale
| Default | 1.0 |
| Setter | set_world_scale(value) |
| Getter | get_world_scale() |
Allows you to adjust the scale to your game’s units. Most AR/VR platforms assume a scale of 1 game world unit = 1 real world meter.
Method Descriptions¶
- void center_on_hmd ( RotationMode rotation_mode, bool keep_height )
This is an important function to understand correctly. AR and VR platforms all handle positioning slightly differently.
For platforms that do not offer spatial tracking, our origin point (0,0,0) is the location of our HMD, but you have little control over the direction the player is facing in the real world.
For platforms that do offer spatial tracking, our origin point depends very much on the system. For OpenVR, our origin point is usually the center of the tracking space, on the ground. For other platforms, it’s often the location of the tracking camera.
This method allows you to center your tracker on the location of the HMD. It will take the current location of the HMD and use that to adjust all your tracking data; in essence, realigning the real world to your player’s current position in the game world.
For this method to produce usable results, tracking information must be available. This often takes a few frames after starting your game.
You should call this method after a few seconds have passed. For instance, when the user requests a realignment of the display holding a designated button on a controller for a short period of time, or when implementing a teleport mechanism.
- ARVRInterface find_interface ( String name ) const
Finds an interface by its name. For instance, if your project uses capabilities of an AR/VR platform, you can find the interface for that platform by name and initialize it.
- Transform get_hmd_transform ( )
Returns the primary interface’s transformation.
- ARVRInterface get_interface ( int idx ) const
Returns the interface registered at a given index in our list of interfaces.
- int get_interface_count ( ) const
Returns the number of interfaces currently registered with the AR/VR server. If your project supports multiple AR/VR platforms, you can look through the available interface, and either present the user with a selection or simply try to initialize each interface and use the first one that returns true.
- Array get_interfaces ( ) const
Returns a list of available interfaces the ID and name of each interface.
- int get_last_commit_usec ( )
Returns the absolute timestamp (in μs) of the last ARVRServer commit of the AR/VR eyes to VisualServer. The value comes from an internal call to OS.get_ticks_usec.
- int get_last_frame_usec ( )
Returns the duration (in μs) of the last frame. This is computed as the difference between get_last_commit_usec and get_last_process_usec when committing.
- int get_last_process_usec ( )
Returns the absolute timestamp (in μs) of the last ARVRServer process callback. The value comes from an internal call to OS.get_ticks_usec.
- Transform get_reference_frame ( ) const
Returns the reference frame transform. Mostly used internally and exposed for GDNative build interfaces.
- ARVRPositionalTracker get_tracker ( int idx ) const
Returns the positional tracker at the given ID.
- int get_tracker_count ( ) const
Returns the number of trackers currently registered.
AStar¶
An implementation of A* to find shortest paths among connected points in space.
Description¶
A* (A star) is a computer algorithm that is widely used in pathfinding and graph traversal, the process of plotting short paths among vertices (points), passing through a given set of edges (segments). It enjoys widespread use due to its performance and accuracy. Godot’s A* implementation uses points in three-dimensional space and Euclidean distances by default.
You must add points manually with add_point and create segments manually with connect_points. Then you can test if there is a path between two points with the are_points_connected function, get a path containing indices by get_id_path, or one containing actual coordinates with get_point_path.
It is also possible to use non-Euclidean distances. To do so, create a class that extends AStar and override methods _compute_cost and _estimate_cost. Both take two indices and return a length, as is shown in the following example.
class MyAStar:
extends AStar
func _compute_cost(u, v):
return abs(u - v)
func _estimate_cost(u, v):
return min(0, abs(u - v) - 1)
_estimate_cost should return a lower bound of the distance, i.e. _estimate_cost(u, v) <= _compute_cost(u, v). This serves as a hint to the algorithm because the custom _compute_cost might be computation-heavy. If this is not the case, make _estimate_cost return the same value as _compute_cost to provide the algorithm with the most accurate information.
Methods¶
Method Descriptions¶
Called when computing the cost between two connected points.
Note that this function is hidden in the default AStar class.
Called when estimating the cost between a point and the path’s ending point.
Note that this function is hidden in the default AStar class.
Adds a new point at the given position with the given identifier. The algorithm prefers points with lower weight_scale to form a path. The id must be 0 or larger, and the weight_scale must be 1 or larger.
var astar = AStar.new()
astar.add_point(1, Vector3(1, 0, 0), 4) # Adds the point (1, 0, 0) with weight_scale 4 and id 1
If there already exists a point for the given id, its position and weight scale are updated to the given values.
Returns whether the two given points are directly connected by a segment. If bidirectional is false, returns whether movement from id to to_id is possible through this segment.
- void clear ( )
Clears all the points and segments.
Creates a segment between the given points. If bidirectional is false, only movement from id to to_id is allowed, not the reverse direction.
var astar = AStar.new()
astar.add_point(1, Vector3(1, 1, 0))
astar.add_point(2, Vector3(0, 5, 0))
astar.connect_points(1, 2, false)
Deletes the segment between the given points. If bidirectional is false, only movement from id to to_id is prevented, and a unidirectional segment possibly remains.
- int get_available_point_id ( ) const
Returns the next available point ID with no point associated to it.
Returns the ID of the closest point to to_position, optionally taking disabled points into account. Returns -1 if there are no points in the points pool.
Returns the closest position to to_position that resides inside a segment between two connected points.
var astar = AStar.new()
astar.add_point(1, Vector3(0, 0, 0))
astar.add_point(2, Vector3(0, 5, 0))
astar.connect_points(1, 2)
var res = astar.get_closest_position_in_segment(Vector3(3, 3, 0)) # Returns (0, 3, 0)
The result is in the segment that goes from y = 0 to y = 5. It’s the closest position in the segment to the given point.
- PoolIntArray get_id_path ( int from_id, int to_id )
Returns an array with the IDs of the points that form the path found by AStar between the given points. The array is ordered from the starting point to the ending point of the path.
var astar = AStar.new()
astar.add_point(1, Vector3(0, 0, 0))
astar.add_point(2, Vector3(0, 1, 0), 1) # Default weight is 1
astar.add_point(3, Vector3(1, 1, 0))
astar.add_point(4, Vector3(2, 0, 0))
astar.connect_points(1, 2, false)
astar.connect_points(2, 3, false)
astar.connect_points(4, 3, false)
astar.connect_points(1, 4, false)
var res = astar.get_id_path(1, 3) # Returns [1, 2, 3]
If you change the 2nd point’s weight to 3, then the result will be [1, 4, 3] instead, because now even though the distance is longer, it’s “easier” to get through point 4 than through point 2.
- int get_point_capacity ( ) const
Returns the capacity of the structure backing the points, useful in conjunction with reserve_space.
- PoolIntArray get_point_connections ( int id )
Returns an array with the IDs of the points that form the connection with the given point.
var astar = AStar.new()
astar.add_point(1, Vector3(0, 0, 0))
astar.add_point(2, Vector3(0, 1, 0))
astar.add_point(3, Vector3(1, 1, 0))
astar.add_point(4, Vector3(2, 0, 0))
astar.connect_points(1, 2, true)
astar.connect_points(1, 3, true)
var neighbors = astar.get_point_connections(1) # Returns [2, 3]
- int get_point_count ( ) const
Returns the number of points currently in the points pool.
- PoolVector3Array get_point_path ( int from_id, int to_id )
Returns an array with the points that are in the path found by AStar between the given points. The array is ordered from the starting point to the ending point of the path.
Returns the position of the point associated with the given id.
Returns the weight scale of the point associated with the given id.
- Array get_points ( )
Returns an array of all points.
Returns whether a point associated with the given id exists.
Returns whether a point is disabled or not for pathfinding. By default, all points are enabled.
- void remove_point ( int id )
Removes the point associated with the given id from the points pool.
- void reserve_space ( int num_nodes )
Reserves space internally for num_nodes points, useful if you’re adding a known large number of points at once, for a grid for instance. New capacity must be greater or equals to old capacity.
Disables or enables the specified point for pathfinding. Useful for making a temporary obstacle.
Sets the position for the point with the given id.
Sets the weight_scale for the point with the given id.
AStar2D¶
AStar class representation that uses 2D vectors as edges.
Methods¶
Method Descriptions¶
Adds a new point at the given position with the given identifier. The algorithm prefers points with lower weight_scale to form a path. The id must be 0 or larger, and the weight_scale must be 1 or larger.
var astar = AStar2D.new()
astar.add_point(1, Vector2(1, 0), 4) # Adds the point (1, 0) with weight_scale 4 and id 1
If there already exists a point for the given id, its position and weight scale are updated to the given values.
Returns whether there is a connection/segment between the given points.
- void clear ( )
Clears all the points and segments.
Creates a segment between the given points. If bidirectional is false, only movement from id to to_id is allowed, not the reverse direction.
var astar = AStar2D.new()
astar.add_point(1, Vector2(1, 1))
astar.add_point(2, Vector2(0, 5))
astar.connect_points(1, 2, false)
Deletes the segment between the given points.
- int get_available_point_id ( ) const
Returns the next available point ID with no point associated to it.
Returns the ID of the closest point to to_position, optionally taking disabled points into account. Returns -1 if there are no points in the points pool.
Returns the closest position to to_position that resides inside a segment between two connected points.
var astar = AStar2D.new()
astar.add_point(1, Vector2(0, 0))
astar.add_point(2, Vector2(0, 5))
astar.connect_points(1, 2)
var res = astar.get_closest_position_in_segment(Vector2(3, 3)) # Returns (0, 3)
The result is in the segment that goes from y = 0 to y = 5. It’s the closest position in the segment to the given point.
- PoolIntArray get_id_path ( int from_id, int to_id )
Returns an array with the IDs of the points that form the path found by AStar2D between the given points. The array is ordered from the starting point to the ending point of the path.
var astar = AStar2D.new()
astar.add_point(1, Vector2(0, 0))
astar.add_point(2, Vector2(0, 1), 1) # Default weight is 1
astar.add_point(3, Vector2(1, 1))
astar.add_point(4, Vector2(2, 0))
astar.connect_points(1, 2, false)
astar.connect_points(2, 3, false)
astar.connect_points(4, 3, false)
astar.connect_points(1, 4, false)
var res = astar.get_id_path(1, 3) # Returns [1, 2, 3]
If you change the 2nd point’s weight to 3, then the result will be [1, 4, 3] instead, because now even though the distance is longer, it’s “easier” to get through point 4 than through point 2.
- int get_point_capacity ( ) const
Returns the capacity of the structure backing the points, useful in conjunction with reserve_space.
- PoolIntArray get_point_connections ( int id )
Returns an array with the IDs of the points that form the connection with the given point.
var astar = AStar2D.new()
astar.add_point(1, Vector2(0, 0))
astar.add_point(2, Vector2(0, 1))
astar.add_point(3, Vector2(1, 1))
astar.add_point(4, Vector2(2, 0))
astar.connect_points(1, 2, true)
astar.connect_points(1, 3, true)
var neighbors = astar.get_point_connections(1) # Returns [2, 3]
- int get_point_count ( ) const
Returns the number of points currently in the points pool.
- PoolVector2Array get_point_path ( int from_id, int to_id )
Returns an array with the points that are in the path found by AStar2D between the given points. The array is ordered from the starting point to the ending point of the path.
Returns the position of the point associated with the given id.
Returns the weight scale of the point associated with the given id.
- Array get_points ( )
Returns an array of all points.
Returns whether a point associated with the given id exists.
Returns whether a point is disabled or not for pathfinding. By default, all points are enabled.
- void remove_point ( int id )
Removes the point associated with the given id from the points pool.
- void reserve_space ( int num_nodes )
Reserves space internally for num_nodes points, useful if you’re adding a known large number of points at once, for a grid for instance. New capacity must be greater or equals to old capacity.
Disables or enables the specified point for pathfinding. Useful for making a temporary obstacle.
Sets the position for the point with the given id.
Sets the weight_scale for the point with the given id.
AtlasTexture¶
Inherits: Texture < Resource < Reference < Object
Packs multiple small textures in a single, bigger one. Helps to optimize video memory costs and render calls.
Description¶
Texture resource aimed at managing big textures files that pack multiple smaller textures. Consists of a Texture, a margin that defines the border width, and a region that defines the actual area of the AtlasTexture.
Properties¶
| Texture | atlas | |
| bool | filter_clip | false |
| int | flags | O: 0 |
| Rect2 | margin | Rect2( 0, 0, 0, 0 ) |
| Rect2 | region | Rect2( 0, 0, 0, 0 ) |
Property Descriptions¶
- Texture atlas
| Setter | set_atlas(value) |
| Getter | get_atlas() |
The texture that contains the atlas. Can be any Texture subtype.
- bool filter_clip
| Default | false |
| Setter | set_filter_clip(value) |
| Getter | has_filter_clip() |
If true, clips the area outside of the region to avoid bleeding of the surrounding texture pixels.
- Rect2 margin
| Default | Rect2( 0, 0, 0, 0 ) |
| Setter | set_margin(value) |
| Getter | get_margin() |
The margin around the region. The Rect2’s Rect2.size parameter (“w” and “h” in the editor) resizes the texture so it fits within the margin.
- Rect2 region
| Default | Rect2( 0, 0, 0, 0 ) |
| Setter | set_region(value) |
| Getter | get_region() |
The AtlasTexture’s used region.
AudioBusLayout¶
Inherits: Resource < Reference < Object
Stores information about the audio buses.
Description¶
Stores position, muting, solo, bypass, effects, effect position, volume, and the connections between buses. See AudioServer for usage.
AudioEffect¶
Inherits: Resource < Reference < Object
Inherited By: AudioEffectAmplify, AudioEffectChorus, AudioEffectCompressor, AudioEffectDelay, AudioEffectDistortion, AudioEffectEQ, AudioEffectFilter, AudioEffectLimiter, AudioEffectPanner, AudioEffectPhaser, AudioEffectPitchShift, AudioEffectRecord, AudioEffectReverb, AudioEffectSpectrumAnalyzer, AudioEffectStereoEnhance
Audio effect for audio.
Description¶
Base resource for audio bus. Applies an audio effect on the bus that the resource is applied on.
AudioEffectAmplify¶
Inherits: AudioEffect < Resource < Reference < Object
Adds an amplifying audio effect to an audio bus.
Increases or decreases the volume of the selected audio bus.
Description¶
Increases or decreases the volume being routed through the audio bus.
AudioEffectBandLimitFilter¶
Inherits: AudioEffectFilter < AudioEffect < Resource < Reference < Object
Adds a band limit filter to the audio bus.
Description¶
Limits the frequencies in a range around the AudioEffectFilter.cutoff_hz and allows frequencies outside of this range to pass.
AudioEffectBandPassFilter¶
Inherits: AudioEffectFilter < AudioEffect < Resource < Reference < Object
Adds a band pass filter to the audio bus.
Description¶
Attenuates the frequencies inside of a range around the AudioEffectFilter.cutoff_hz and cuts frequencies outside of this band.
AudioEffectChorus¶
Inherits: AudioEffect < Resource < Reference < Object
Adds a chorus audio effect.
Description¶
Adds a chorus audio effect. The effect applies a filter with voices to duplicate the audio source and manipulate it through the filter.
Properties¶
Methods¶
| float | get_voice_cutoff_hz ( int voice_idx ) const |
| float | get_voice_delay_ms ( int voice_idx ) const |
| float | get_voice_depth_ms ( int voice_idx ) const |
| float | get_voice_level_db ( int voice_idx ) const |
| float | get_voice_pan ( int voice_idx ) const |
| float | get_voice_rate_hz ( int voice_idx ) const |
| void | set_voice_cutoff_hz ( int voice_idx, float cutoff_hz ) |
| void | set_voice_delay_ms ( int voice_idx, float delay_ms ) |
| void | set_voice_depth_ms ( int voice_idx, float depth_ms ) |
| void | set_voice_level_db ( int voice_idx, float level_db ) |
| void | set_voice_pan ( int voice_idx, float pan ) |
| void | set_voice_rate_hz ( int voice_idx, float rate_hz ) |
Property Descriptions¶
- float dry
| Default | 1.0 |
| Setter | set_dry(value) |
| Getter | get_dry() |
The effect’s raw signal.
- float voice/1/cutoff_hz
| Default | 8000.0 |
| Setter | set_voice_cutoff_hz(value) |
| Getter | get_voice_cutoff_hz() |
The voice’s cutoff frequency.
- float voice/1/delay_ms
| Default | 15.0 |
| Setter | set_voice_delay_ms(value) |
| Getter | get_voice_delay_ms() |
The voice’s signal delay.
- float voice/1/depth_ms
| Default | 2.0 |
| Setter | set_voice_depth_ms(value) |
| Getter | get_voice_depth_ms() |
The voice filter’s depth.
- float voice/1/level_db
| Default | 0.0 |
| Setter | set_voice_level_db(value) |
| Getter | get_voice_level_db() |
The voice’s volume.
- float voice/1/pan
| Default | -0.5 |
| Setter | set_voice_pan(value) |
| Getter | get_voice_pan() |
The voice’s pan level.
- float voice/1/rate_hz
| Default | 0.8 |
| Setter | set_voice_rate_hz(value) |
| Getter | get_voice_rate_hz() |
The voice’s filter rate.
- float voice/2/cutoff_hz
| Default | 8000.0 |
| Setter | set_voice_cutoff_hz(value) |
| Getter | get_voice_cutoff_hz() |
The voice’s cutoff frequency.
- float voice/2/delay_ms
| Default | 20.0 |
| Setter | set_voice_delay_ms(value) |
| Getter | get_voice_delay_ms() |
The voice’s signal delay.
- float voice/2/depth_ms
| Default | 3.0 |
| Setter | set_voice_depth_ms(value) |
| Getter | get_voice_depth_ms() |
The voice filter’s depth.
- float voice/2/level_db
| Default | 0.0 |
| Setter | set_voice_level_db(value) |
| Getter | get_voice_level_db() |
The voice’s volume.
- float voice/2/pan
| Default | 0.5 |
| Setter | set_voice_pan(value) |
| Getter | get_voice_pan() |
The voice’s pan level.
- float voice/2/rate_hz
| Default | 1.2 |
| Setter | set_voice_rate_hz(value) |
| Getter | get_voice_rate_hz() |
The voice’s filter rate.
- float voice/3/cutoff_hz
| Setter | set_voice_cutoff_hz(value) |
| Getter | get_voice_cutoff_hz() |
The voice’s cutoff frequency.
- float voice/3/delay_ms
| Setter | set_voice_delay_ms(value) |
| Getter | get_voice_delay_ms() |
The voice’s signal delay.
- float voice/3/depth_ms
| Setter | set_voice_depth_ms(value) |
| Getter | get_voice_depth_ms() |
The voice filter’s depth.
- float voice/3/level_db
| Setter | set_voice_level_db(value) |
| Getter | get_voice_level_db() |
The voice’s volume.
- float voice/3/pan
| Setter | set_voice_pan(value) |
| Getter | get_voice_pan() |
The voice’s pan level.
- float voice/3/rate_hz
| Setter | set_voice_rate_hz(value) |
| Getter | get_voice_rate_hz() |
The voice’s filter rate.
- float voice/4/cutoff_hz
| Setter | set_voice_cutoff_hz(value) |
| Getter | get_voice_cutoff_hz() |
The voice’s cutoff frequency.
- float voice/4/delay_ms
| Setter | set_voice_delay_ms(value) |
| Getter | get_voice_delay_ms() |
The voice’s signal delay.
- float voice/4/depth_ms
| Setter | set_voice_depth_ms(value) |
| Getter | get_voice_depth_ms() |
The voice filter’s depth.
- float voice/4/level_db
| Setter | set_voice_level_db(value) |
| Getter | get_voice_level_db() |
The voice’s volume.
- float voice/4/pan
| Setter | set_voice_pan(value) |
| Getter | get_voice_pan() |
The voice’s pan level.
- float voice/4/rate_hz
| Setter | set_voice_rate_hz(value) |
| Getter | get_voice_rate_hz() |
The voice’s filter rate.
- int voice_count
| Default | 2 |
| Setter | set_voice_count(value) |
| Getter | get_voice_count() |
The amount of voices in the effect.
- float wet
| Default | 0.5 |
| Setter | set_wet(value) |
| Getter | get_wet() |
The effect’s processed signal.
AudioEffectCompressor¶
Inherits: AudioEffect < Resource < Reference < Object
Adds a compressor audio effect to an audio bus.
Reduces sounds that exceed a certain threshold level, smooths out the dynamics and increases the overall volume.
Description¶
Dynamic range compressor reduces the level of the sound when the amplitude goes over a certain threshold in Decibels. One of the main uses of a compressor is to increase the dynamic range by clipping as little as possible (when sound goes over 0dB).
Compressor has many uses in the mix:
- In the Master bus to compress the whole output (although an AudioEffectLimiter is probably better).
- In voice channels to ensure they sound as balanced as possible.
- Sidechained. This can reduce the sound level sidechained with another audio bus for threshold detection. This technique is common in video game mixing to the level of music and SFX while voices are being heard.
- Accentuates transients by using a wider attack, making effects sound more punchy.
Properties¶
| float | attack_us | 20.0 |
| float | gain | 0.0 |
| float | mix | 1.0 |
| float | ratio | 4.0 |
| float | release_ms | 250.0 |
| String | sidechain | "" |
| float | threshold | 0.0 |
Property Descriptions¶
- float attack_us
| Default | 20.0 |
| Setter | set_attack_us(value) |
| Getter | get_attack_us() |
Compressor’s reaction time when the signal exceeds the threshold, in microseconds. Value can range from 20 to 2000.
- float gain
| Default | 0.0 |
| Setter | set_gain(value) |
| Getter | get_gain() |
Gain applied to the output signal.
- float mix
| Default | 1.0 |
| Setter | set_mix(value) |
| Getter | get_mix() |
Balance between original signal and effect signal. Value can range from 0 (totally dry) to 1 (totally wet).
- float ratio
| Default | 4.0 |
| Setter | set_ratio(value) |
| Getter | get_ratio() |
Amount of compression applied to the audio once it passes the threshold level. The higher the ratio, the more the loud parts of the audio will be compressed. Value can range from 1 to 48.
- float release_ms
| Default | 250.0 |
| Setter | set_release_ms(value) |
| Getter | get_release_ms() |
Compressor’s delay time to stop reducing the signal after the signal level falls below the threshold, in milliseconds. Value can range from 20 to 2000.
- String sidechain
| Default | "" |
| Setter | set_sidechain(value) |
| Getter | get_sidechain() |
Reduce the sound level using another audio bus for threshold detection.
- float threshold
| Default | 0.0 |
| Setter | set_threshold(value) |
| Getter | get_threshold() |
The level above which compression is applied to the audio. Value can range from -60 to 0.
AudioEffectDelay¶
Inherits: AudioEffect < Resource < Reference < Object
Adds a delay audio effect to an audio bus. Plays input signal back after a period of time.
Two tap delay and feedback options.
Description¶
Plays input signal back after a period of time. The delayed signal may be played back multiple times to create the sound of a repeating, decaying echo. Delay effects range from a subtle echo effect to a pronounced blending of previous sounds with new sounds.
Properties¶
| float | dry | 1.0 |
| bool | feedback/active | false |
| float | feedback/delay_ms | 340.0 |
| float | feedback/level_db | -6.0 |
| float | feedback/lowpass | 16000.0 |
| bool | tap1/active | true |
| float | tap1/delay_ms | 250.0 |
| float | tap1/level_db | -6.0 |
| float | tap1/pan | 0.2 |
| bool | tap2/active | true |
| float | tap2/delay_ms | 500.0 |
| float | tap2/level_db | -12.0 |
| float | tap2/pan | -0.4 |
Property Descriptions¶
- float dry
| Default | 1.0 |
| Setter | set_dry(value) |
| Getter | get_dry() |
Output percent of original sound. At 0, only delayed sounds are output. Value can range from 0 to 1.
- bool feedback/active
| Default | false |
| Setter | set_feedback_active(value) |
| Getter | is_feedback_active() |
If true, feedback is enabled.
- float feedback/delay_ms
| Default | 340.0 |
| Setter | set_feedback_delay_ms(value) |
| Getter | get_feedback_delay_ms() |
Feedback delay time in milliseconds.
- float feedback/level_db
| Default | -6.0 |
| Setter | set_feedback_level_db(value) |
| Getter | get_feedback_level_db() |
Sound level for tap1.
- float feedback/lowpass
| Default | 16000.0 |
| Setter | set_feedback_lowpass(value) |
| Getter | get_feedback_lowpass() |
Low-pass filter for feedback, in Hz. Frequencies below this value are filtered out of the source signal.
- bool tap1/active
| Default | true |
| Setter | set_tap1_active(value) |
| Getter | is_tap1_active() |
If true, tap1 will be enabled.
- float tap1/delay_ms
| Default | 250.0 |
| Setter | set_tap1_delay_ms(value) |
| Getter | get_tap1_delay_ms() |
tap1 delay time in milliseconds.
- float tap1/level_db
| Default | -6.0 |
| Setter | set_tap1_level_db(value) |
| Getter | get_tap1_level_db() |
Sound level for tap1.
- float tap1/pan
| Default | 0.2 |
| Setter | set_tap1_pan(value) |
| Getter | get_tap1_pan() |
Pan position for tap1. Value can range from -1 (fully left) to 1 (fully right).
- bool tap2/active
| Default | true |
| Setter | set_tap2_active(value) |
| Getter | is_tap2_active() |
If true, tap2 will be enabled.
- float tap2/delay_ms
| Default | 500.0 |
| Setter | set_tap2_delay_ms(value) |
| Getter | get_tap2_delay_ms() |
Tap2 delay time in milliseconds.
- float tap2/level_db
| Default | -12.0 |
| Setter | set_tap2_level_db(value) |
| Getter | get_tap2_level_db() |
Sound level for tap2.
- float tap2/pan
| Default | -0.4 |
| Setter | set_tap2_pan(value) |
| Getter | get_tap2_pan() |
Pan position for tap2. Value can range from -1 (fully left) to 1 (fully right).
AudioEffectDistortion¶
Inherits: AudioEffect < Resource < Reference < Object
Adds a distortion audio effect to an Audio bus.
Modify the sound to make it dirty.
Description¶
Modify the sound and make it dirty. Different types are available: clip, tan, lo-fi (bit crushing), overdrive, or waveshape.
By distorting the waveform the frequency content change, which will often make the sound “crunchy” or “abrasive”. For games, it can simulate sound coming from some saturated device or speaker very efficiently.
Properties¶
| float | drive | 0.0 |
| float | keep_hf_hz | 16000.0 |
| Mode | mode | 0 |
| float | post_gain | 0.0 |
| float | pre_gain | 0.0 |
Enumerations¶
enum Mode:
- MODE_CLIP = 0 — Digital distortion effect which cuts off peaks at the top and bottom of the waveform.
- MODE_ATAN = 1
- MODE_LOFI = 2 — Low-resolution digital distortion effect. You can use it to emulate the sound of early digital audio devices.
- MODE_OVERDRIVE = 3 — Emulates the warm distortion produced by a field effect transistor, which is commonly used in solid-state musical instrument amplifiers.
- MODE_WAVESHAPE = 4 — Waveshaper distortions are used mainly by electronic musicians to achieve an extra-abrasive sound.
Property Descriptions¶
- float drive
| Default | 0.0 |
| Setter | set_drive(value) |
| Getter | get_drive() |
Distortion power. Value can range from 0 to 1.
- float keep_hf_hz
| Default | 16000.0 |
| Setter | set_keep_hf_hz(value) |
| Getter | get_keep_hf_hz() |
High-pass filter, in Hz. Frequencies higher than this value will not be affected by the distortion. Value can range from 1 to 20000.
- Mode mode
| Default | 0 |
| Setter | set_mode(value) |
| Getter | get_mode() |
Distortion type.
- float post_gain
| Default | 0.0 |
| Setter | set_post_gain(value) |
| Getter | get_post_gain() |
Increases or decreases the volume after the effect. Value can range from -80 to 24.
- float pre_gain
| Default | 0.0 |
| Setter | set_pre_gain(value) |
| Getter | get_pre_gain() |
Increases or decreases the volume before the effect. Value can range from -60 to 60.
AudioEffectEQ¶
Inherits: AudioEffect < Resource < Reference < Object
Inherited By: AudioEffectEQ10, AudioEffectEQ21, AudioEffectEQ6
Base class for audio equalizers. Gives you control over frequencies.
Use it to create a custom equalizer if AudioEffectEQ6, AudioEffectEQ10 or AudioEffectEQ21 don’t fit your needs.
Description¶
AudioEffectEQ gives you control over frequencies. Use it to compensate for existing deficiencies in audio. AudioEffectEQs are useful on the Master bus to completely master a mix and give it more character. They are also useful when a game is run on a mobile device, to adjust the mix to that kind of speakers (it can be added but disabled when headphones are plugged).
Methods¶
| int | get_band_count ( ) const |
| float | get_band_gain_db ( int band_idx ) const |
| void | set_band_gain_db ( int band_idx, float volume_db ) |
AudioEffectEQ10¶
Inherits: AudioEffectEQ < AudioEffect < Resource < Reference < Object
Adds a 10-band equalizer audio effect to an Audio bus. Gives you control over frequencies from 31 Hz to 16000 Hz.
Each frequency can be modulated between -60/+24 dB.
Description¶
Frequency bands:
Band 1: 31 Hz
Band 2: 62 Hz
Band 3: 125 Hz
Band 4: 250 Hz
Band 5: 500 Hz
Band 6: 1000 Hz
Band 7: 2000 Hz
Band 8: 4000 Hz
Band 9: 8000 Hz
Band 10: 16000 Hz
See also AudioEffectEQ, AudioEffectEQ6, AudioEffectEQ21.
AudioEffectEQ21¶
Inherits: AudioEffectEQ < AudioEffect < Resource < Reference < Object
Adds a 21-band equalizer audio effect to an Audio bus. Gives you control over frequencies from 22 Hz to 22000 Hz.
Each frequency can be modulated between -60/+24 dB.
Description¶
Frequency bands:
Band 1: 22 Hz
Band 2: 32 Hz
Band 3: 44 Hz
Band 4: 63 Hz
Band 5: 90 Hz
Band 6: 125 Hz
Band 7: 175 Hz
Band 8: 250 Hz
Band 9: 350 Hz
Band 10: 500 Hz
Band 11: 700 Hz
Band 12: 1000 Hz
Band 13: 1400 Hz
Band 14: 2000 Hz
Band 15: 2800 Hz
Band 16: 4000 Hz
Band 17: 5600 Hz
Band 18: 8000 Hz
Band 19: 11000 Hz
Band 20: 16000 Hz
Band 21: 22000 Hz
See also AudioEffectEQ, AudioEffectEQ6, AudioEffectEQ10.
AudioEffectEQ6¶
Inherits: AudioEffectEQ < AudioEffect < Resource < Reference < Object
Adds a 6-band equalizer audio effect to an Audio bus. Gives you control over frequencies from 32 Hz to 10000 Hz.
Each frequency can be modulated between -60/+24 dB.
Description¶
Frequency bands:
Band 1: 32 Hz
Band 2: 100 Hz
Band 3: 320 Hz
Band 4: 1000 Hz
Band 5: 3200 Hz
Band 6: 10000 Hz
See also AudioEffectEQ, AudioEffectEQ10, AudioEffectEQ21.
AudioEffectFilter¶
Inherits: AudioEffect < Resource < Reference < Object
Inherited By: AudioEffectBandLimitFilter, AudioEffectBandPassFilter, AudioEffectHighPassFilter, AudioEffectHighShelfFilter, AudioEffectLowPassFilter, AudioEffectLowShelfFilter, AudioEffectNotchFilter
Adds a filter to the audio bus.
Property Descriptions¶
- float cutoff_hz
| Default | 2000.0 |
| Setter | set_cutoff(value) |
| Getter | get_cutoff() |
Threshold frequency for the filter, in Hz.
- FilterDB db
| Default | 0 |
| Setter | set_db(value) |
| Getter | get_db() |
- float gain
| Default | 1.0 |
| Setter | set_gain(value) |
| Getter | get_gain() |
Gain amount of the frequencies after the filter.
- float resonance
| Default | 0.5 |
| Setter | set_resonance(value) |
| Getter | get_resonance() |
Amount of boost in the overtones near the cutoff frequency.
AudioEffectHighPassFilter¶
Inherits: AudioEffectFilter < AudioEffect < Resource < Reference < Object
Adds a high-pass filter to the Audio Bus.
Description¶
Cuts frequencies lower than the AudioEffectFilter.cutoff_hz and allows higher frequencies to pass.
AudioEffectHighShelfFilter¶
Inherits: AudioEffectFilter < AudioEffect < Resource < Reference < Object
AudioEffectLimiter¶
Inherits: AudioEffect < Resource < Reference < Object
Adds a soft-clip limiter audio effect to an Audio bus.
Description¶
A limiter is similar to a compressor, but it’s less flexible and designed to disallow sound going over a given dB threshold. Adding one in the Master bus is always recommended to reduce the effects of clipping.
Soft clipping starts to reduce the peaks a little below the threshold level and progressively increases its effect as the input level increases such that the threshold is never exceeded.
Properties¶
| float | ceiling_db | -0.1 |
| float | soft_clip_db | 2.0 |
| float | soft_clip_ratio | 10.0 |
| float | threshold_db | 0.0 |
Property Descriptions¶
- float ceiling_db
| Default | -0.1 |
| Setter | set_ceiling_db(value) |
| Getter | get_ceiling_db() |
The waveform’s maximum allowed value, in decibels. Value can range from -20 to -0.1.
- float soft_clip_db
| Default | 2.0 |
| Setter | set_soft_clip_db(value) |
| Getter | get_soft_clip_db() |
Applies a gain to the limited waves, in decibels. Value can range from 0 to 6.
- float soft_clip_ratio
| Default | 10.0 |
| Setter | set_soft_clip_ratio(value) |
| Getter | get_soft_clip_ratio() |
- float threshold_db
| Default | 0.0 |
| Setter | set_threshold_db(value) |
| Getter | get_threshold_db() |
Threshold from which the limiter begins to be active, in decibels. Value can range from -30 to 0.
AudioEffectLowPassFilter¶
Inherits: AudioEffectFilter < AudioEffect < Resource < Reference < Object
Adds a low-pass filter to the Audio bus.
Description¶
Cuts frequencies higher than the AudioEffectFilter.cutoff_hz and allows lower frequencies to pass.
AudioEffectLowShelfFilter¶
Inherits: AudioEffectFilter < AudioEffect < Resource < Reference < Object
AudioEffectNotchFilter¶
Inherits: AudioEffectFilter < AudioEffect < Resource < Reference < Object
Adds a notch filter to the Audio bus.
Description¶
Attenuates frequencies in a narrow band around the AudioEffectFilter.cutoff_hz and cuts frequencies outside of this range.
AudioEffectPanner¶
Inherits: AudioEffect < Resource < Reference < Object
Adds a panner audio effect to an Audio bus. Pans sound left or right.
Description¶
Determines how much of an audio signal is sent to the left and right buses.
AudioEffectPhaser¶
Inherits: AudioEffect < Resource < Reference < Object
Adds a phaser audio effect to an Audio bus.
Combines the original signal with a copy that is slightly out of phase with the original.
Description¶
Combines phase-shifted signals with the original signal. The movement of the phase-shifted signals is controlled using a low-frequency oscillator.
Properties¶
| float | depth | 1.0 |
| float | feedback | 0.7 |
| float | range_max_hz | 1600.0 |
| float | range_min_hz | 440.0 |
| float | rate_hz | 0.5 |
Property Descriptions¶
- float depth
| Default | 1.0 |
| Setter | set_depth(value) |
| Getter | get_depth() |
Governs how high the filter frequencies sweep. Low value will primarily affect bass frequencies. High value can sweep high into the treble. Value can range from 0.1 to 4.
- float feedback
| Default | 0.7 |
| Setter | set_feedback(value) |
| Getter | get_feedback() |
Output percent of modified sound. Value can range from 0.1 to 0.9.
- float range_max_hz
| Default | 1600.0 |
| Setter | set_range_max_hz(value) |
| Getter | get_range_max_hz() |
Determines the maximum frequency affected by the LFO modulations, in Hz. Value can range from 10 to 10000.
- float range_min_hz
| Default | 440.0 |
| Setter | set_range_min_hz(value) |
| Getter | get_range_min_hz() |
Determines the minimum frequency affected by the LFO modulations, in Hz. Value can range from 10 to 10000.
- float rate_hz
| Default | 0.5 |
| Setter | set_rate_hz(value) |
| Getter | get_rate_hz() |
Adjusts the rate in Hz at which the effect sweeps up and down across the frequency range.
AudioEffectPitchShift¶
Inherits: AudioEffect < Resource < Reference < Object
Adds a pitch-shifting audio effect to an Audio bus.
Raises or lowers the pitch of original sound.
Description¶
Allows modulation of pitch independently of tempo. All frequencies can be increased/decreased with minimal effect on transients.
Properties¶
| FFT_Size | fft_size | 3 |
| int | oversampling | 4 |
| float | pitch_scale | 1.0 |
Enumerations¶
enum FFT_Size:
- FFT_SIZE_256 = 0
- FFT_SIZE_512 = 1
- FFT_SIZE_1024 = 2
- FFT_SIZE_2048 = 3
- FFT_SIZE_4096 = 4
- FFT_SIZE_MAX = 5 — Represents the size of the FFT_Size enum.
Property Descriptions¶
- FFT_Size fft_size
| Default | 3 |
| Setter | set_fft_size(value) |
| Getter | get_fft_size() |
- int oversampling
| Default | 4 |
| Setter | set_oversampling(value) |
| Getter | get_oversampling() |
- float pitch_scale
| Default | 1.0 |
| Setter | set_pitch_scale(value) |
| Getter | get_pitch_scale() |
Pitch value. Can range from 0 (-1 octave) to 16 (+16 octaves).
AudioEffectRecord¶
Inherits: AudioEffect < Resource < Reference < Object
Audio effect used for recording sound from a microphone.
Tutorials¶
Methods¶
| AudioStreamSample | get_recording ( ) const |
| bool | is_recording_active ( ) const |
| void | set_recording_active ( bool record ) |
Property Descriptions¶
- Format format
| Default | 1 |
| Setter | set_format(value) |
| Getter | get_format() |
Specifies the format in which the sample will be recorded. See Format for available formats.
Method Descriptions¶
- AudioStreamSample get_recording ( ) const
Returns the recorded sample.
- bool is_recording_active ( ) const
Returns whether the recording is active or not.
- void set_recording_active ( bool record )
If true, the sound will be recorded. Note that restarting the recording will remove the previously recorded sample.
AudioEffectReverb¶
Inherits: AudioEffect < Resource < Reference < Object
Adds a reverberation audio effect to an Audio bus.
Simulates the sound of acoustic environments such as rooms, concert halls, caverns, or an open spaces.
Description¶
Simulates rooms of different sizes. Its parameters can be adjusted to simulate the sound of a specific room.
Properties¶
| float | damping | 0.5 |
| float | dry | 1.0 |
| float | hipass | 0.0 |
| float | predelay_feedback | 0.4 |
| float | predelay_msec | 150.0 |
| float | room_size | 0.8 |
| float | spread | 1.0 |
| float | wet | 0.5 |
Property Descriptions¶
- float damping
| Default | 0.5 |
| Setter | set_damping(value) |
| Getter | get_damping() |
Defines how reflective the imaginary room’s walls are. Value can range from 0 to 1.
- float dry
| Default | 1.0 |
| Setter | set_dry(value) |
| Getter | get_dry() |
Output percent of original sound. At 0, only modified sound is outputted. Value can range from 0 to 1.
- float hipass
| Default | 0.0 |
| Setter | set_hpf(value) |
| Getter | get_hpf() |
High-pass filter passes signals with a frequency higher than a certain cutoff frequency and attenuates signals with frequencies lower than the cutoff frequency. Value can range from 0 to 1.
- float predelay_feedback
| Default | 0.4 |
| Setter | set_predelay_feedback(value) |
| Getter | get_predelay_feedback() |
Output percent of predelay. Value can range from 0 to 1.
- float predelay_msec
| Default | 150.0 |
| Setter | set_predelay_msec(value) |
| Getter | get_predelay_msec() |
Time between the original signal and the early reflections of the reverb signal, in milliseconds.
- float room_size
| Default | 0.8 |
| Setter | set_room_size(value) |
| Getter | get_room_size() |
Dimensions of simulated room. Bigger means more echoes. Value can range from 0 to 1.
- float spread
| Default | 1.0 |
| Setter | set_spread(value) |
| Getter | get_spread() |
Widens or narrows the stereo image of the reverb tail. 1 means fully widens. Value can range from 0 to 1.
- float wet
| Default | 0.5 |
| Setter | set_wet(value) |
| Getter | get_wet() |
Output percent of modified sound. At 0, only original sound is outputted. Value can range from 0 to 1.
AudioEffectSpectrumAnalyzer¶
Inherits: AudioEffect < Resource < Reference < Object
Properties¶
| float | buffer_length | 2.0 |
| FFT_Size | fft_size | 2 |
| float | tap_back_pos | 0.01 |
AudioEffectSpectrumAnalyzerInstance¶
Inherits: AudioEffectInstance < Reference < Object
Methods¶
| Vector2 | get_magnitude_for_frequency_range ( float from_hz, float to_hz, MagnitudeMode mode=1 ) const |
Enumerations¶
enum MagnitudeMode:
- MAGNITUDE_AVERAGE = 0 — Use the average value as magnitude.
- MAGNITUDE_MAX = 1 — Use the maximum value as magnitude.
Method Descriptions¶
- Vector2 get_magnitude_for_frequency_range ( float from_hz, float to_hz, MagnitudeMode mode=1 ) const
AudioEffectStereoEnhance¶
Inherits: AudioEffect < Resource < Reference < Object
Properties¶
| float | pan_pullout | 1.0 |
| float | surround | 0.0 |
| float | time_pullout_ms | 0.0 |
AudioServer¶
Inherits: Object
Server interface for low-level audio access.
Description¶
AudioServer is a low-level server interface for audio access. It is in charge of creating sample data (playable audio) as well as its playback via a voice interface.
Tutorials¶
Methods¶
Enumerations¶
enum SpeakerMode:
- SPEAKER_MODE_STEREO = 0 — Two or fewer speakers were detected.
- SPEAKER_SURROUND_31 = 1 — A 3.1 channel surround setup was detected.
- SPEAKER_SURROUND_51 = 2 — A 5.1 channel surround setup was detected.
- SPEAKER_SURROUND_71 = 3 — A 7.1 channel surround setup was detected.
Property Descriptions¶
- int bus_count
| Default | 1 |
| Setter | set_bus_count(value) |
| Getter | get_bus_count() |
Number of available audio buses.
- String device
| Default | "Default" |
| Setter | set_device(value) |
| Getter | get_device() |
Name of the current device for audio output (see get_device_list).
- float global_rate_scale
| Default | 1.0 |
| Setter | set_global_rate_scale(value) |
| Getter | get_global_rate_scale() |
Scales the rate at which audio is played (i.e. setting it to 0.5 will make the audio be played twice as fast).
Method Descriptions¶
- void add_bus ( int at_position=-1 )
Adds a bus at at_position.
- void add_bus_effect ( int bus_idx, AudioEffect effect, int at_position=-1 )
Adds an AudioEffect effect to the bus bus_idx at at_position.
- String capture_get_device ( )
Name of the current device for audio input (see capture_get_device_list).
- Array capture_get_device_list ( )
Returns the names of all audio input devices detected on the system.
- void capture_set_device ( String name )
Sets which audio input device is used for audio capture.
- AudioBusLayout generate_bus_layout ( ) const
Generates an AudioBusLayout using the available buses and effects.
Returns the amount of channels of the bus at index bus_idx.
- AudioEffect get_bus_effect ( int bus_idx, int effect_idx )
Returns the AudioEffect at position effect_idx in bus bus_idx.
Returns the number of effects on the bus at bus_idx.
- AudioEffectInstance get_bus_effect_instance ( int bus_idx, int effect_idx, int channel=0 )
Returns the AudioEffectInstance assigned to the given bus and effect indices (and optionally channel).
Returns the index of the bus with the name bus_name.
Returns the name of the bus with the index bus_idx.
Returns the peak volume of the left speaker at bus index bus_idx and channel index channel.
Returns the peak volume of the right speaker at bus index bus_idx and channel index channel.
Returns the name of the bus that the bus at index bus_idx sends to.
Returns the volume of the bus at index bus_idx in dB.
- Array get_device_list ( )
Returns the names of all audio devices detected on the system.
- float get_mix_rate ( ) const
Returns the sample rate at the output of the AudioServer.
- float get_output_latency ( ) const
Returns the audio driver’s output latency.
- SpeakerMode get_speaker_mode ( ) const
Returns the speaker configuration.
- float get_time_since_last_mix ( ) const
Returns the relative time since the last mix occurred.
- float get_time_to_next_mix ( ) const
Returns the relative time until the next mix occurs.
If true, the bus at index bus_idx is bypassing effects.
If true, the effect at index effect_idx on the bus at index bus_idx is enabled.
If true, the bus at index bus_idx is muted.
If true, the bus at index bus_idx is in solo mode.
- void lock ( )
Locks the audio driver’s main loop.
Note: Remember to unlock it afterwards.
Moves the bus from index index to index to_index.
- void remove_bus ( int index )
Removes the bus at index index.
Removes the effect at index effect_idx from the bus at index bus_idx.
If true, the bus at index bus_idx is bypassing effects.
If true, the effect at index effect_idx on the bus at index bus_idx is enabled.
- void set_bus_layout ( AudioBusLayout bus_layout )
Overwrites the currently used AudioBusLayout.
If true, the bus at index bus_idx is muted.
Sets the name of the bus at index bus_idx to name.
Connects the output of the bus at bus_idx to the bus named send.
If true, the bus at index bus_idx is in solo mode.
Sets the volume of the bus at index bus_idx to volume_db.
Swaps the position of two effects in bus bus_idx.
- void unlock ( )
Unlocks the audio driver’s main loop. (After locking it, you should always unlock it.)
AudioStream¶
Inherits: Resource < Reference < Object
Inherited By: AudioStreamGenerator, AudioStreamMicrophone, AudioStreamOGGVorbis, AudioStreamRandomPitch, AudioStreamSample
Base class for audio streams.
Description¶
Base class for audio streams. Audio streams are used for sound effects and music playback, and support WAV (via AudioStreamSample) and OGG (via AudioStreamOGGVorbis) file formats.
Tutorials¶
Methods¶
| float | get_length ( ) const |
AudioStreamGenerator¶
Inherits: AudioStream < Resource < Reference < Object
Properties¶
| float | buffer_length | 0.5 |
| float | mix_rate | 44100.0 |
AudioStreamGeneratorPlayback¶
Inherits: AudioStreamPlaybackResampled < AudioStreamPlayback < Reference < Object
Methods¶
| bool | can_push_buffer ( int amount ) const |
| void | clear_buffer ( ) |
| int | get_frames_available ( ) const |
| int | get_skips ( ) const |
| bool | push_buffer ( PoolVector2Array frames ) |
| bool | push_frame ( Vector2 frame ) |
AudioStreamMicrophone¶
Inherits: AudioStream < Resource < Reference < Object
AudioStreamOGGVorbis¶
Inherits: AudioStream < Resource < Reference < Object
OGG Vorbis audio stream driver.
Description¶
OGG Vorbis audio stream driver.
Properties¶
| PoolByteArray | data | PoolByteArray( ) |
| bool | loop | false |
| float | loop_offset | 0.0 |
Property Descriptions¶
- PoolByteArray data
| Default | PoolByteArray( ) |
| Setter | set_data(value) |
| Getter | get_data() |
Contains the audio data in bytes.
- bool loop
| Default | false |
| Setter | set_loop(value) |
| Getter | has_loop() |
If true, the stream will automatically loop when it reaches the end.
- float loop_offset
| Default | 0.0 |
| Setter | set_loop_offset(value) |
| Getter | get_loop_offset() |
Time in seconds at which the stream starts after being looped.
AudioStreamPlayback¶
Inherited By: AudioStreamPlaybackResampled
Meta class for playing back audio.
Description¶
Can play, loop, pause a scroll through audio. See AudioStream and AudioStreamOGGVorbis for usage.
AudioStreamPlaybackResampled¶
Inherits: AudioStreamPlayback < Reference < Object
Inherited By: AudioStreamGeneratorPlayback
AudioStreamPlayer¶
Plays back audio non-positionally.
Description¶
Plays an audio stream non-positionally.
Tutorials¶
Properties¶
| bool | autoplay | false |
| String | bus | "Master" |
| MixTarget | mix_target | 0 |
| float | pitch_scale | 1.0 |
| bool | playing | false |
| AudioStream | stream | |
| bool | stream_paused | false |
| float | volume_db | 0.0 |
Methods¶
| float | get_playback_position ( ) |
| AudioStreamPlayback | get_stream_playback ( ) |
| void | play ( float from_position=0.0 ) |
| void | seek ( float to_position ) |
| void | stop ( ) |
Enumerations¶
enum MixTarget:
- MIX_TARGET_STEREO = 0 — The audio will be played only on the first channel.
- MIX_TARGET_SURROUND = 1 — The audio will be played on all surround channels.
- MIX_TARGET_CENTER = 2 — The audio will be played on the second channel, which is usually the center.
Property Descriptions¶
- bool autoplay
| Default | false |
| Setter | set_autoplay(value) |
| Getter | is_autoplay_enabled() |
If true, audio plays when added to scene tree.
- String bus
| Default | "Master" |
| Setter | set_bus(value) |
| Getter | get_bus() |
Bus on which this audio is playing.
- MixTarget mix_target
| Default | 0 |
| Setter | set_mix_target(value) |
| Getter | get_mix_target() |
If the audio configuration has more than two speakers, this sets the target channels. See MixTarget constants.
- float pitch_scale
| Default | 1.0 |
| Setter | set_pitch_scale(value) |
| Getter | get_pitch_scale() |
Changes the pitch and the tempo of the audio.
- bool playing
| Default | false |
| Getter | is_playing() |
If true, audio is playing.
- AudioStream stream
| Setter | set_stream(value) |
| Getter | get_stream() |
The AudioStream object to be played.
- bool stream_paused
| Default | false |
| Setter | set_stream_paused(value) |
| Getter | get_stream_paused() |
If true, the playback is paused. You can resume it by setting stream_paused to false.
- float volume_db
| Default | 0.0 |
| Setter | set_volume_db(value) |
| Getter | get_volume_db() |
Volume of sound, in dB.
Method Descriptions¶
- float get_playback_position ( )
Returns the position in the AudioStream in seconds.
- AudioStreamPlayback get_stream_playback ( )
Returns the AudioStreamPlayback object associated with this AudioStreamPlayer.
- void play ( float from_position=0.0 )
Plays the audio from the given from_position, in seconds.
- void seek ( float to_position )
Sets the position from which audio will be played, in seconds.
- void stop ( )
Stops the audio.
AudioStreamPlayer2D¶
Inherits: Node2D < CanvasItem < Node < Object
Plays audio in 2D.
Description¶
Plays audio that dampens with distance from screen center.
Tutorials¶
Properties¶
| int | area_mask | 1 |
| float | attenuation | 1.0 |
| bool | autoplay | false |
| String | bus | "Master" |
| float | max_distance | 2000.0 |
| float | pitch_scale | 1.0 |
| bool | playing | false |
| AudioStream | stream | |
| bool | stream_paused | false |
| float | volume_db | 0.0 |
Methods¶
| float | get_playback_position ( ) |
| AudioStreamPlayback | get_stream_playback ( ) |
| void | play ( float from_position=0.0 ) |
| void | seek ( float to_position ) |
| void | stop ( ) |
Property Descriptions¶
- int area_mask
| Default | 1 |
| Setter | set_area_mask(value) |
| Getter | get_area_mask() |
Areas in which this sound plays.
- float attenuation
| Default | 1.0 |
| Setter | set_attenuation(value) |
| Getter | get_attenuation() |
Dampens audio over distance with this as an exponent.
- bool autoplay
| Default | false |
| Setter | set_autoplay(value) |
| Getter | is_autoplay_enabled() |
If true, audio plays when added to scene tree.
- String bus
| Default | "Master" |
| Setter | set_bus(value) |
| Getter | get_bus() |
Bus on which this audio is playing.
- float max_distance
| Default | 2000.0 |
| Setter | set_max_distance(value) |
| Getter | get_max_distance() |
Maximum distance from which audio is still hearable.
- float pitch_scale
| Default | 1.0 |
| Setter | set_pitch_scale(value) |
| Getter | get_pitch_scale() |
Changes the pitch and the tempo of the audio.
- bool playing
| Default | false |
| Getter | is_playing() |
If true, audio is playing.
- AudioStream stream
| Setter | set_stream(value) |
| Getter | get_stream() |
The AudioStream object to be played.
- bool stream_paused
| Default | false |
| Setter | set_stream_paused(value) |
| Getter | get_stream_paused() |
If true, the playback is paused. You can resume it by setting stream_paused to false.
- float volume_db
| Default | 0.0 |
| Setter | set_volume_db(value) |
| Getter | get_volume_db() |
Base volume without dampening.
Method Descriptions¶
- float get_playback_position ( )
Returns the position in the AudioStream.
- AudioStreamPlayback get_stream_playback ( )
Returns the AudioStreamPlayback object associated with this AudioStreamPlayer2D.
- void play ( float from_position=0.0 )
Plays the audio from the given position from_position, in seconds.
- void seek ( float to_position )
Sets the position from which audio will be played, in seconds.
- void stop ( )
Stops the audio.
AudioStreamPlayer3D¶
Inherits: Spatial < Node < Object
Plays 3D sound in 3D space.
Description¶
Plays a sound effect with directed sound effects, dampens with distance if needed, generates effect of hearable position in space.
Tutorials¶
Properties¶
| int | area_mask | 1 |
| float | attenuation_filter_cutoff_hz | 5000.0 |
| float | attenuation_filter_db | -24.0 |
| AttenuationModel | attenuation_model | 0 |
| bool | autoplay | false |
| String | bus | "Master" |
| DopplerTracking | doppler_tracking | 0 |
| float | emission_angle_degrees | 45.0 |
| bool | emission_angle_enabled | false |
| float | emission_angle_filter_attenuation_db | -12.0 |
| float | max_db | 3.0 |
| float | max_distance | 0.0 |
| OutOfRangeMode | out_of_range_mode | 0 |
| float | pitch_scale | 1.0 |
| bool | playing | false |
| AudioStream | stream | |
| bool | stream_paused | false |
| float | unit_db | 0.0 |
| float | unit_size | 1.0 |
Methods¶
| float | get_playback_position ( ) |
| AudioStreamPlayback | get_stream_playback ( ) |
| void | play ( float from_position=0.0 ) |
| void | seek ( float to_position ) |
| void | stop ( ) |
Enumerations¶
enum AttenuationModel:
- ATTENUATION_INVERSE_DISTANCE = 0 — Linear dampening of loudness according to distance.
- ATTENUATION_INVERSE_SQUARE_DISTANCE = 1 — Squared dampening of loudness according to distance.
- ATTENUATION_LOGARITHMIC = 2 — Logarithmic dampening of loudness according to distance.
- ATTENUATION_DISABLED = 3 — No dampening of loudness according to distance.
enum OutOfRangeMode:
- OUT_OF_RANGE_MIX = 0 — Mix this audio in, even when it’s out of range.
- OUT_OF_RANGE_PAUSE = 1 — Pause this audio when it gets out of range.
enum DopplerTracking:
- DOPPLER_TRACKING_DISABLED = 0 — Disables doppler tracking.
- DOPPLER_TRACKING_IDLE_STEP = 1 — Executes doppler tracking in idle step.
- DOPPLER_TRACKING_PHYSICS_STEP = 2 — Executes doppler tracking in physics step.
Property Descriptions¶
- int area_mask
| Default | 1 |
| Setter | set_area_mask(value) |
| Getter | get_area_mask() |
Areas in which this sound plays.
- float attenuation_filter_cutoff_hz
| Default | 5000.0 |
| Setter | set_attenuation_filter_cutoff_hz(value) |
| Getter | get_attenuation_filter_cutoff_hz() |
Dampens audio above this frequency, in Hz.
- float attenuation_filter_db
| Default | -24.0 |
| Setter | set_attenuation_filter_db(value) |
| Getter | get_attenuation_filter_db() |
Amount how much the filter affects the loudness, in dB.
- AttenuationModel attenuation_model
| Default | 0 |
| Setter | set_attenuation_model(value) |
| Getter | get_attenuation_model() |
Decides if audio should get quieter with distance linearly, quadratically, logarithmically, or not be affected by distance, effectively disabling attenuation.
- bool autoplay
| Default | false |
| Setter | set_autoplay(value) |
| Getter | is_autoplay_enabled() |
If true, audio plays when added to scene tree.
- String bus
| Default | "Master" |
| Setter | set_bus(value) |
| Getter | get_bus() |
Bus on which this audio is playing.
- DopplerTracking doppler_tracking
| Default | 0 |
| Setter | set_doppler_tracking(value) |
| Getter | get_doppler_tracking() |
Decides in which step the Doppler effect should be calculated.
- float emission_angle_degrees
| Default | 45.0 |
| Setter | set_emission_angle(value) |
| Getter | get_emission_angle() |
The angle in which the audio reaches cameras undampened.
- bool emission_angle_enabled
| Default | false |
| Setter | set_emission_angle_enabled(value) |
| Getter | is_emission_angle_enabled() |
If true, the audio should be dampened according to the direction of the sound.
- float emission_angle_filter_attenuation_db
| Default | -12.0 |
| Setter | set_emission_angle_filter_attenuation_db(value) |
| Getter | get_emission_angle_filter_attenuation_db() |
Dampens audio if camera is outside of emission_angle_degrees and emission_angle_enabled is set by this factor, in dB.
- float max_db
| Default | 3.0 |
| Setter | set_max_db(value) |
| Getter | get_max_db() |
Sets the absolute maximum of the soundlevel, in dB.
- float max_distance
| Default | 0.0 |
| Setter | set_max_distance(value) |
| Getter | get_max_distance() |
Sets the distance from which the out_of_range_mode takes effect. Has no effect if set to 0.
- OutOfRangeMode out_of_range_mode
| Default | 0 |
| Setter | set_out_of_range_mode(value) |
| Getter | get_out_of_range_mode() |
Decides if audio should pause when source is outside of max_distance range.
- float pitch_scale
| Default | 1.0 |
| Setter | set_pitch_scale(value) |
| Getter | get_pitch_scale() |
Changes the pitch and the tempo of the audio.
- bool playing
| Default | false |
| Getter | is_playing() |
If true, audio is playing.
- AudioStream stream
| Setter | set_stream(value) |
| Getter | get_stream() |
The AudioStream object to be played.
- bool stream_paused
| Default | false |
| Setter | set_stream_paused(value) |
| Getter | get_stream_paused() |
If true, the playback is paused. You can resume it by setting stream_paused to false.
- float unit_db
| Default | 0.0 |
| Setter | set_unit_db(value) |
| Getter | get_unit_db() |
Base sound level unaffected by dampening, in dB.
- float unit_size
| Default | 1.0 |
| Setter | set_unit_size(value) |
| Getter | get_unit_size() |
Factor for the attenuation effect.
Method Descriptions¶
- float get_playback_position ( )
Returns the position in the AudioStream.
- AudioStreamPlayback get_stream_playback ( )
Returns the AudioStreamPlayback object associated with this AudioStreamPlayer3D.
- void play ( float from_position=0.0 )
Plays the audio from the given position from_position, in seconds.
- void seek ( float to_position )
Sets the position from which audio will be played, in seconds.
- void stop ( )
Stops the audio.
AudioStreamRandomPitch¶
Inherits: AudioStream < Resource < Reference < Object
Plays audio with random pitch shifting.
Description¶
Randomly varies pitch on each start.
Properties¶
| AudioStream | audio_stream | |
| float | random_pitch | 1.1 |
Property Descriptions¶
- AudioStream audio_stream
| Setter | set_audio_stream(value) |
| Getter | get_audio_stream() |
The current AudioStream.
- float random_pitch
| Default | 1.1 |
| Setter | set_random_pitch(value) |
| Getter | get_random_pitch() |
The intensity of random pitch variation.
AudioStreamSample¶
Inherits: AudioStream < Resource < Reference < Object
Stores audio data loaded from WAV files.
Description¶
AudioStreamSample stores sound samples loaded from WAV files. To play the stored sound, use an AudioStreamPlayer (for non-positional audio) or AudioStreamPlayer2D/AudioStreamPlayer3D (for positional audio). The sound can be looped.
This class can also be used to store dynamically-generated PCM audio data.
Properties¶
| PoolByteArray | data | PoolByteArray( ) |
| Format | format | 0 |
| int | loop_begin | 0 |
| int | loop_end | 0 |
| LoopMode | loop_mode | 0 |
| int | mix_rate | 44100 |
| bool | stereo | false |
Methods¶
| Error | save_to_wav ( String path ) |
Enumerations¶
enum Format:
- FORMAT_8_BITS = 0 — 8-bit audio codec.
- FORMAT_16_BITS = 1 — 16-bit audio codec.
- FORMAT_IMA_ADPCM = 2 — Audio is compressed using IMA ADPCM.
enum LoopMode:
- LOOP_DISABLED = 0 — Audio does not loop.
- LOOP_FORWARD = 1 — Audio loops the data between loop_begin and loop_end playing forward only.
- LOOP_PING_PONG = 2 — Audio loops the data between loop_begin and loop_end playing back and forth.
- LOOP_BACKWARD = 3 — Audio loops the data between loop_begin and loop_end playing backward only.
Property Descriptions¶
- PoolByteArray data
| Default | PoolByteArray( ) |
| Setter | set_data(value) |
| Getter | get_data() |
Contains the audio data in bytes.
Note: This property expects signed PCM8 data. To convert unsigned PCM8 to signed PCM8, subtract 128 from each byte.
- Format format
| Default | 0 |
| Setter | set_format(value) |
| Getter | get_format() |
Audio format. See Format constants for values.
- int loop_begin
| Default | 0 |
| Setter | set_loop_begin(value) |
| Getter | get_loop_begin() |
Loop start in bytes.
- int loop_end
| Default | 0 |
| Setter | set_loop_end(value) |
| Getter | get_loop_end() |
Loop end in bytes.
- LoopMode loop_mode
| Default | 0 |
| Setter | set_loop_mode(value) |
| Getter | get_loop_mode() |
Loop mode. See LoopMode constants for values.
- int mix_rate
| Default | 44100 |
| Setter | set_mix_rate(value) |
| Getter | get_mix_rate() |
The sample rate for mixing this audio.
- bool stereo
| Default | false |
| Setter | set_stereo(value) |
| Getter | is_stereo() |
If true, audio is stereo.
BackBufferCopy¶
Inherits: Node2D < CanvasItem < Node < Object
Copies a region of the screen (or the whole screen) to a buffer so it can be accessed in your shader scripts through the texture(SCREEN_TEXTURE, ...) function.
Description¶
Node for back-buffering the currently-displayed screen. The region defined in the BackBufferCopy node is bufferized with the content of the screen it covers, or the entire screen according to the copy mode set. Use the texture(SCREEN_TEXTURE, ...) function in your shader scripts to access the buffer.
Enumerations¶
enum CopyMode:
- COPY_MODE_DISABLED = 0 — Disables the buffering mode. This means the BackBufferCopy node will directly use the portion of screen it covers.
- COPY_MODE_RECT = 1 — BackBufferCopy buffers a rectangular region.
- COPY_MODE_VIEWPORT = 2 — BackBufferCopy buffers the entire screen.
Property Descriptions¶
- CopyMode copy_mode
| Default | 1 |
| Setter | set_copy_mode(value) |
| Getter | get_copy_mode() |
Buffer mode. See CopyMode constants.
- Rect2 rect
| Default | Rect2( -100, -100, 200, 200 ) |
| Setter | set_rect(value) |
| Getter | get_rect() |
The area covered by the BackBufferCopy. Only used if copy_mode is COPY_MODE_RECT.
BakedLightmap¶
Inherits: VisualInstance < Spatial < Node < Object
Prerendered indirect light map for a scene.
Description¶
Baked lightmaps are an alternative workflow for adding indirect (or baked) lighting to a scene. Unlike the GIProbe approach, baked lightmaps work fine on low-end PCs and mobile devices as they consume almost no resources in run-time.
Tutorials¶
Properties¶
| float | bake_cell_size | 0.25 |
| float | bake_default_texels_per_unit | 20.0 |
| float | bake_energy | 1.0 |
| Vector3 | bake_extents | Vector3( 10, 10, 10 ) |
| bool | bake_hdr | false |
| BakeMode | bake_mode | 0 |
| float | bake_propagation | 1.0 |
| BakeQuality | bake_quality | 1 |
| float | capture_cell_size | 0.5 |
| String | image_path | "." |
| BakedLightmapData | light_data |
Enumerations¶
enum BakeQuality:
- BAKE_QUALITY_LOW = 0 — The lowest bake quality mode. Fastest to calculate.
- BAKE_QUALITY_MEDIUM = 1 — The default bake quality mode.
- BAKE_QUALITY_HIGH = 2 — The highest bake quality mode. Takes longer to calculate.
enum BakeMode:
- BAKE_MODE_CONE_TRACE = 0 — Less precise but faster bake mode.
- BAKE_MODE_RAY_TRACE = 1 — More precise bake mode but can take considerably longer to bake.
enum BakeError:
- BAKE_ERROR_OK = 0 — Baking was successful.
- BAKE_ERROR_NO_SAVE_PATH = 1 — Returns if no viable save path is found. This can happen where an image_path is not specified or when the save location is invalid.
- BAKE_ERROR_NO_MESHES = 2 — Currently unused.
- BAKE_ERROR_CANT_CREATE_IMAGE = 3 — Returns when the baker cannot save per-mesh textures to file.
- BAKE_ERROR_USER_ABORTED = 4 — Returns if user cancels baking.
Property Descriptions¶
- float bake_cell_size
| Default | 0.25 |
| Setter | set_bake_cell_size(value) |
| Getter | get_bake_cell_size() |
Grid subdivision size for lightmapper calculation. The default value will work for most cases. Increase for better lighting on small details or if your scene is very large.
- float bake_default_texels_per_unit
| Default | 20.0 |
| Setter | set_bake_default_texels_per_unit(value) |
| Getter | get_bake_default_texels_per_unit() |
If a Mesh.lightmap_size_hint isn’t specified, the lightmap baker will dynamically set the lightmap size using this value. This value is measured in texels per world unit. The maximum lightmap texture size is 4096x4096.
- float bake_energy
| Default | 1.0 |
| Setter | set_energy(value) |
| Getter | get_energy() |
Multiplies the light sources’ intensity by this value. For instance, if the value is set to 2, lights will be twice as bright. If the value is set to 0.5, lights will be half as bright.
- Vector3 bake_extents
| Default | Vector3( 10, 10, 10 ) |
| Setter | set_extents(value) |
| Getter | get_extents() |
The size of the affected area.
- bool bake_hdr
| Default | false |
| Setter | set_hdr(value) |
| Getter | is_hdr() |
If true, the lightmap can capture light values greater than 1.0. Turning this off will result in a smaller file size.
- BakeMode bake_mode
| Default | 0 |
| Setter | set_bake_mode(value) |
| Getter | get_bake_mode() |
Lightmapping mode. See BakeMode.
- float bake_propagation
| Default | 1.0 |
| Setter | set_propagation(value) |
| Getter | get_propagation() |
Defines how far the light will travel before it is no longer effective. The higher the number, the farther the light will travel. For instance, if the value is set to 2, the light will go twice as far. If the value is set to 0.5, the light will only go half as far.
- BakeQuality bake_quality
| Default | 1 |
| Setter | set_bake_quality(value) |
| Getter | get_bake_quality() |
Three quality modes are available. Higher quality requires more rendering time. See BakeQuality.
- float capture_cell_size
| Default | 0.5 |
| Setter | set_capture_cell_size(value) |
| Getter | get_capture_cell_size() |
Grid size used for real-time capture information on dynamic objects. Cannot be larger than bake_cell_size.
- String image_path
| Default | "." |
| Setter | set_image_path(value) |
| Getter | get_image_path() |
The location where lightmaps will be saved.
- BakedLightmapData light_data
| Setter | set_light_data(value) |
| Getter | get_light_data() |
The calculated light data.
BakedLightmapData¶
Inherits: Resource < Reference < Object
Properties¶
| AABB | bounds | AABB( 0, 0, 0, 0, 0, 0 ) |
| Transform | cell_space_transform | Transform( 1, 0, 0, 0, 1, 0, 0, 0, 1, 0, 0, 0 ) |
| int | cell_subdiv | 1 |
| float | energy | 1.0 |
| PoolByteArray | octree | PoolByteArray( ) |
Methods¶
| void | add_user ( NodePath path, Texture lightmap, int instance ) |
| void | clear_users ( ) |
| int | get_user_count ( ) const |
| Texture | get_user_lightmap ( int user_idx ) const |
| NodePath | get_user_path ( int user_idx ) const |
Property Descriptions¶
- AABB bounds
| Default | AABB( 0, 0, 0, 0, 0, 0 ) |
| Setter | set_bounds(value) |
| Getter | get_bounds() |
- Transform cell_space_transform
| Default | Transform( 1, 0, 0, 0, 1, 0, 0, 0, 1, 0, 0, 0 ) |
| Setter | set_cell_space_transform(value) |
| Getter | get_cell_space_transform() |
- int cell_subdiv
| Default | 1 |
| Setter | set_cell_subdiv(value) |
| Getter | get_cell_subdiv() |
- float energy
| Default | 1.0 |
| Setter | set_energy(value) |
| Getter | get_energy() |
- PoolByteArray octree
| Default | PoolByteArray( ) |
| Setter | set_octree(value) |
| Getter | get_octree() |
BaseButton¶
Inherits: Control < CanvasItem < Node < Object
Inherited By: Button, LinkButton, TextureButton
Base class for different kinds of buttons.
Description¶
BaseButton is the abstract base class for buttons, so it shouldn’t be used directly (it doesn’t display anything). Other types of buttons inherit from it.
Properties¶
| ActionMode | action_mode | 1 |
| int | button_mask | 1 |
| bool | disabled | false |
| FocusMode | enabled_focus_mode | 2 |
| FocusMode | focus_mode | O: 2 |
| ButtonGroup | group | |
| bool | keep_pressed_outside | false |
| bool | pressed | false |
| ShortCut | shortcut | |
| bool | shortcut_in_tooltip | true |
| bool | toggle_mode | false |
Methods¶
| void | _pressed ( ) virtual |
| void | _toggled ( bool button_pressed ) virtual |
| DrawMode | get_draw_mode ( ) const |
| bool | is_hovered ( ) const |
Signals¶
- button_down ( )
Emitted when the button starts being held down.
- button_up ( )
Emitted when the button stops being held down.
- pressed ( )
Emitted when the button is toggled or pressed. This is on button_down if action_mode is ACTION_MODE_BUTTON_PRESS and on button_up otherwise.
- toggled ( bool button_pressed )
Emitted when the button was just toggled between pressed and normal states (only if toggle_mode is active). The new state is contained in the button_pressed argument.
Enumerations¶
- DRAW_NORMAL = 0 — The normal state (i.e. not pressed, not hovered, not toggled and enabled) of buttons.
- DRAW_PRESSED = 1 — The state of buttons are pressed.
- DRAW_HOVER = 2 — The state of buttons are hovered.
- DRAW_DISABLED = 3 — The state of buttons are disabled.
- DRAW_HOVER_PRESSED = 4 — The state of buttons are both hovered and pressed.
- ACTION_MODE_BUTTON_PRESS = 0 — Require just a press to consider the button clicked.
- ACTION_MODE_BUTTON_RELEASE = 1 — Require a press and a subsequent release before considering the button clicked.
Property Descriptions¶
- ActionMode action_mode
| Default | 1 |
| Setter | set_action_mode(value) |
| Getter | get_action_mode() |
Determines when the button is considered clicked, one of the ActionMode constants.
- int button_mask
| Default | 1 |
| Setter | set_button_mask(value) |
| Getter | get_button_mask() |
Binary mask to choose which mouse buttons this button will respond to.
To allow both left-click and right-click, use BUTTON_MASK_LEFT | BUTTON_MASK_RIGHT.
- bool disabled
| Default | false |
| Setter | set_disabled(value) |
| Getter | is_disabled() |
If true, the button is in disabled state and can’t be clicked or toggled.
- FocusMode enabled_focus_mode
| Default | 2 |
| Setter | set_enabled_focus_mode(value) |
| Getter | get_enabled_focus_mode() |
Focus access mode to use when switching between enabled/disabled (see Control.focus_mode and disabled).
- ButtonGroup group
| Setter | set_button_group(value) |
| Getter | get_button_group() |
ButtonGroup associated to the button.
- bool keep_pressed_outside
| Default | false |
| Setter | set_keep_pressed_outside(value) |
| Getter | is_keep_pressed_outside() |
If true, the button stays pressed when moving the cursor outside the button while pressing it.
- bool pressed
| Default | false |
| Setter | set_pressed(value) |
| Getter | is_pressed() |
If true, the button’s state is pressed. Means the button is pressed down or toggled (if toggle_mode is active).
- ShortCut shortcut
| Setter | set_shortcut(value) |
| Getter | get_shortcut() |
ShortCut associated to the button.
- bool shortcut_in_tooltip
| Default | true |
| Setter | set_shortcut_in_tooltip(value) |
| Getter | is_shortcut_in_tooltip_enabled() |
If true, the button will add information about its shortcut in the tooltip.
- bool toggle_mode
| Default | false |
| Setter | set_toggle_mode(value) |
| Getter | is_toggle_mode() |
If true, the button is in toggle mode. Makes the button flip state between pressed and unpressed each time its area is clicked.
Method Descriptions¶
- void _pressed ( ) virtual
Called when the button is pressed.
- void _toggled ( bool button_pressed ) virtual
Called when the button is toggled (only if toggle_mode is active).
- DrawMode get_draw_mode ( ) const
Returns the visual state used to draw the button. This is useful mainly when implementing your own draw code by either overriding _draw() or connecting to “draw” signal. The visual state of the button is defined by the DrawMode enum.
- bool is_hovered ( ) const
Returns true if the mouse has entered the button and has not left it yet.
Basis¶
3×3 matrix datatype.
Description¶
3×3 matrix used for 3D rotation and scale. Contains 3 vector fields X, Y and Z as its columns, which can be interpreted as the local basis vectors of a transformation. Can also be accessed as array of 3D vectors. These vectors are orthogonal to each other, but are not necessarily normalized (due to scaling). Almost always used as an orthogonal basis for a Transform.
For such use, it is composed of a scaling and a rotation matrix, in that order (M = R.S).
Tutorials¶
Methods¶
| Basis | Basis ( Quat from ) |
| Basis | Basis ( Vector3 from ) |
| Basis | Basis ( Vector3 axis, float phi ) |
| Basis | Basis ( Vector3 x_axis, Vector3 y_axis, Vector3 z_axis ) |
| float | determinant ( ) |
| Vector3 | get_euler ( ) |
| int | get_orthogonal_index ( ) |
| Quat | get_rotation_quat ( ) |
| Vector3 | get_scale ( ) |
| Basis | inverse ( ) |
| bool | is_equal_approx ( Basis b, float epsilon=1e-05 ) |
| Basis | orthonormalized ( ) |
| Basis | rotated ( Vector3 axis, float phi ) |
| Basis | scaled ( Vector3 scale ) |
| Basis | slerp ( Basis b, float t ) |
| float | tdotx ( Vector3 with ) |
| float | tdoty ( Vector3 with ) |
| float | tdotz ( Vector3 with ) |
| Basis | transposed ( ) |
| Vector3 | xform ( Vector3 v ) |
| Vector3 | xform_inv ( Vector3 v ) |
Constants¶
- IDENTITY = Basis( 1, 0, 0, 0, 1, 0, 0, 0, 1 ) — The identity basis. This is identical to calling
Basis()without any parameters. This constant can be used to make your code clearer. - FLIP_X = Basis( -1, 0, 0, 0, 1, 0, 0, 0, 1 ) — The basis that will flip something along the X axis when used in a transformation.
- FLIP_Y = Basis( 1, 0, 0, 0, -1, 0, 0, 0, 1 ) — The basis that will flip something along the Y axis when used in a transformation.
- FLIP_Z = Basis( 1, 0, 0, 0, 1, 0, 0, 0, -1 ) — The basis that will flip something along the Z axis when used in a transformation.
Property Descriptions¶
- Vector3 x
| Default | Vector3( 1, 0, 0 ) |
The basis matrix’s X vector.
- Vector3 y
| Default | Vector3( 0, 1, 0 ) |
The basis matrix’s Y vector.
- Vector3 z
| Default | Vector3( 0, 0, 1 ) |
The basis matrix’s Z vector.
Method Descriptions¶
Create a rotation matrix from the given quaternion.
Create a rotation matrix (in the YXZ convention: first Z, then X, and Y last) from the specified Euler angles, given in the vector format as (X angle, Y angle, Z angle).
Create a rotation matrix which rotates around the given axis by the specified angle, in radians. The axis must be a normalized vector.
Create a matrix from 3 axis vectors.
- float determinant ( )
Returns the determinant of the matrix.
- Vector3 get_euler ( )
Returns the basis’s rotation in the form of Euler angles (in the YXZ convention: first Z, then X, and Y last). The returned vector contains the rotation angles in the format (X angle, Y angle, Z angle). See get_rotation_quat if you need a quaternion instead.
- int get_orthogonal_index ( )
This function considers a discretization of rotations into 24 points on unit sphere, lying along the vectors (x,y,z) with each component being either -1, 0, or 1, and returns the index of the point best representing the orientation of the object. It is mainly used by the grid map editor. For further details, refer to the Godot source code.
- Quat get_rotation_quat ( )
Returns the basis’s rotation in the form of a quaternion. See get_euler if you need Euler angles, but keep in mind quaternions should generally be preferred to Euler angles.
- Vector3 get_scale ( )
Assuming that the matrix is the combination of a rotation and scaling, return the absolute value of scaling factors along each axis.
- Basis inverse ( )
Returns the inverse of the matrix.
Returns true if this basis and b are approximately equal, by calling is_equal_approx on each component.
- Basis orthonormalized ( )
Returns the orthonormalized version of the matrix (useful to call from time to time to avoid rounding error for orthogonal matrices). This performs a Gram-Schmidt orthonormalization on the basis of the matrix.
Introduce an additional rotation around the given axis by phi (radians). The axis must be a normalized vector.
Introduce an additional scaling specified by the given 3D scaling factor.
Assuming that the matrix is a proper rotation matrix, slerp performs a spherical-linear interpolation with another rotation matrix.
Transposed dot product with the X axis of the matrix.
Transposed dot product with the Y axis of the matrix.
Transposed dot product with the Z axis of the matrix.
- Basis transposed ( )
Returns the transposed version of the matrix.
Returns a vector transformed (multiplied) by the matrix.
Returns a vector transformed (multiplied) by the transposed matrix.
Note: This results in a multiplication by the inverse of the matrix only if it represents a rotation-reflection.
BitMap¶
Inherits: Resource < Reference < Object
Boolean matrix.
Description¶
A two-dimensional array of boolean values, can be used to efficiently store a binary matrix (every matrix element takes only one bit) and query the values using natural cartesian coordinates.
Methods¶
| void | create ( Vector2 size ) |
| void | create_from_image_alpha ( Image image, float threshold=0.1 ) |
| bool | get_bit ( Vector2 position ) const |
| Vector2 | get_size ( ) const |
| int | get_true_bit_count ( ) const |
| void | grow_mask ( int pixels, Rect2 rect ) |
| Array | opaque_to_polygons ( Rect2 rect, float epsilon=2.0 ) const |
| void | set_bit ( Vector2 position, bool bit ) |
| void | set_bit_rect ( Rect2 rect, bool bit ) |
Method Descriptions¶
- void create ( Vector2 size )
Creates a bitmap with the specified size, filled with false.
Creates a bitmap that matches the given image dimensions, every element of the bitmap is set to false if the alpha value of the image at that position is equal to threshold or less, and true in other case.
Returns bitmap’s value at the specified position.
- Vector2 get_size ( ) const
Returns bitmap’s dimensions.
- int get_true_bit_count ( ) const
Returns the amount of bitmap elements that are set to true.
Sets the bitmap’s element at the specified position, to the specified value.
Sets a rectangular portion of the bitmap to the specified value.
BitmapFont¶
Inherits: Font < Resource < Reference < Object
Renders text using fonts under the BMFont format.
Handles files with the .fnt extension.
Description¶
Renders text using *.fnt fonts containing texture atlases. Supports distance fields. For using vector font files like TTF directly, see DynamicFont.
Properties¶
| float | ascent | 0.0 |
| bool | distance_field | false |
| BitmapFont | fallback | |
| float | height | 1.0 |
Methods¶
| void | add_char ( int character, int texture, Rect2 rect, Vector2 align=Vector2( 0, 0 ), float advance=-1 ) |
| void | add_kerning_pair ( int char_a, int char_b, int kerning ) |
| void | add_texture ( Texture texture ) |
| void | clear ( ) |
| Error | create_from_fnt ( String path ) |
| Vector2 | get_char_size ( int char, int next=0 ) const |
| int | get_kerning_pair ( int char_a, int char_b ) const |
| Texture | get_texture ( int idx ) const |
| int | get_texture_count ( ) const |
Property Descriptions¶
- float ascent
| Default | 0.0 |
| Setter | set_ascent(value) |
| Getter | get_ascent() |
Ascent (number of pixels above the baseline).
- bool distance_field
| Default | false |
| Setter | set_distance_field_hint(value) |
| Getter | is_distance_field_hint() |
If true, distance field hint is enabled.
- BitmapFont fallback
| Setter | set_fallback(value) |
| Getter | get_fallback() |
The fallback font.
- float height
| Default | 1.0 |
| Setter | set_height(value) |
| Getter | get_height() |
Total font height (ascent plus descent) in pixels.
Method Descriptions¶
- void add_char ( int character, int texture, Rect2 rect, Vector2 align=Vector2( 0, 0 ), float advance=-1 )
Adds a character to the font, where character is the Unicode value, texture is the texture index, rect is the region in the texture (in pixels!), align is the (optional) alignment for the character and advance is the (optional) advance.
Adds a kerning pair to the BitmapFont as a difference. Kerning pairs are special cases where a typeface advance is determined by the next character.
- void add_texture ( Texture texture )
Adds a texture to the BitmapFont.
- void clear ( )
Clears all the font data and settings.
Creates a BitmapFont from the *.fnt file at path.
Returns the size of a character, optionally taking kerning into account if the next character is provided.
Returns a kerning pair as a difference.
Returns the font atlas texture at index idx.
- int get_texture_count ( ) const
Returns the number of textures in the BitmapFont atlas.
Bone2D¶
Inherits: Node2D < CanvasItem < Node < Object
Joint used with Skeleton2D to control and animate other nodes.
Description¶
Use a hierarchy of Bone2D bound to a Skeleton2D to control, and animate other Node2D nodes.
You can use Bone2D and Skeleton2D nodes to animate 2D meshes created with the Polygon 2D UV editor.
Each bone has a rest transform that you can reset to with apply_rest. These rest poses are relative to the bone’s parent.
If in the editor, you can set the rest pose of an entire skeleton using a menu option, from the code, you need to iterate over the bones to set their individual rest poses.
Properties¶
| float | default_length | 16.0 |
| Transform2D | rest | Transform2D( 0, 0, 0, 0, 0, 0 ) |
Methods¶
| void | apply_rest ( ) |
| int | get_index_in_skeleton ( ) const |
| Transform2D | get_skeleton_rest ( ) const |
Property Descriptions¶
- float default_length
| Default | 16.0 |
| Setter | set_default_length(value) |
| Getter | get_default_length() |
Length of the bone’s representation drawn in the editor’s viewport in pixels.
- Transform2D rest
| Default | Transform2D( 0, 0, 0, 0, 0, 0 ) |
| Setter | set_rest(value) |
| Getter | get_rest() |
Rest transform of the bone. You can reset the node’s transforms to this value using apply_rest.
Method Descriptions¶
- void apply_rest ( )
Stores the node’s current transforms in rest.
- int get_index_in_skeleton ( ) const
Returns the node’s index as part of the entire skeleton. See Skeleton2D.
- Transform2D get_skeleton_rest ( ) const
Returns the node’s rest Transform2D if it doesn’t have a parent, or its rest pose relative to its parent.
BoneAttachment¶
Inherits: Spatial < Node < Object
A node that will attach to a bone.
bool¶
Boolean built-in type.
Description¶
Boolean is a built-in type. It can represent any data type that is either a true or false value. You can think of it as an switch with on or off (1 or 0) setting. It’s often used as part of programming logic in condition statements like if statements.
Note: In a code below if can_shoot is equivalent of if can_shoot == true. It is good practice to follow the natural spoken language structure when possible. Use if can_shoot rather than if can_shoot == true and use if not can_shoot rather than if can_shoot == false.
var can_shoot = true
func shoot():
if can_shoot:
# Perform shooting actions here.
The following code will only create a bullet if both conditions are met: action “shoot” is pressed and if can_shoot is true.
Note: Input.is_action_pressed("shoot") is also a boolean that is true when “shoot” is pressed and false when “shoot” isn’t pressed.
var can_shoot = true
func shoot():
if can_shoot and Input.is_action_pressed("shoot"):
create_bullet()
The following code will set can_shoot to false and start a timer. This will prevent player from shooting until the timer runs out. Next can_shoot will be set to true again allowing player to shoot once again.
var can_shoot = true
onready var cool_down = $CoolDownTimer
func shoot():
if can_shoot and Input.is_action_pressed("shoot"):
create_bullet()
can_shoot = false
cool_down.start()
func _on_CoolDownTimer_timeout():
can_shoot = true
Method Descriptions¶
Cast an int value to a boolean value, this method will return true if called with an integer value different to 0 and false in other case.
Cast a float value to a boolean value, this method will return true if called with a floating-point value different to 0 and false in other case.
Cast a String value to a boolean value, this method will return true if called with a non-empty string and false in other case. Examples: bool("False") returns true, bool("") returns false.
BoxContainer¶
Inherits: Container < Control < CanvasItem < Node < Object
Inherited By: ColorPicker, HBoxContainer, VBoxContainer
Base class for box containers.
Description¶
Arranges child controls vertically or horizontally, and rearranges the controls automatically when their minimum size changes.
Properties¶
| AlignMode | alignment | 0 |
| MouseFilter | mouse_filter | O: 1 |
Methods¶
| void | add_spacer ( bool begin ) |
Enumerations¶
enum AlignMode:
- ALIGN_BEGIN = 0 — Aligns children with the beginning of the container.
- ALIGN_CENTER = 1 — Aligns children with the center of the container.
- ALIGN_END = 2 — Aligns children with the end of the container.
Property Descriptions¶
- AlignMode alignment
| Default | 0 |
| Setter | set_alignment(value) |
| Getter | get_alignment() |
The alignment of the container’s children (must be one of ALIGN_BEGIN, ALIGN_CENTER or ALIGN_END).
BoxShape¶
Inherits: Shape < Resource < Reference < Object
Box shape resource.
Description¶
3D box shape that can be a child of a PhysicsBody or Area.
BulletPhysicsDirectBodyState¶
Inherits: PhysicsDirectBodyState < Object
BulletPhysicsServer¶
Inherits: PhysicsServer < Object
Button¶
Inherits: BaseButton < Control < CanvasItem < Node < Object
Inherited By: CheckBox, CheckButton, ColorPickerButton, MenuButton, OptionButton, ToolButton
Standard themed Button.
Description¶
Button is the standard themed button. It can contain text and an icon, and will display them according to the current Theme.
Properties¶
| TextAlign | align | 1 |
| bool | clip_text | false |
| bool | expand_icon | false |
| bool | flat | false |
| Texture | icon | |
| String | text | "" |
Theme Properties¶
| StyleBox | disabled | |
| StyleBox | focus | |
| Font | font | |
| Color | font_color | Color( 0.88, 0.88, 0.88, 1 ) |
| Color | font_color_disabled | Color( 0.9, 0.9, 0.9, 0.2 ) |
| Color | font_color_hover | Color( 0.94, 0.94, 0.94, 1 ) |
| Color | font_color_pressed | Color( 1, 1, 1, 1 ) |
| StyleBox | hover | |
| int | hseparation | 2 |
| StyleBox | normal | |
| StyleBox | pressed |
Enumerations¶
- ALIGN_LEFT = 0 — Align the text to the left.
- ALIGN_CENTER = 1 — Align the text to the center.
- ALIGN_RIGHT = 2 — Align the text to the right.
Property Descriptions¶
- TextAlign align
| Default | 1 |
| Setter | set_text_align(value) |
| Getter | get_text_align() |
Text alignment policy for the button’s text, use one of the TextAlign constants.
- bool clip_text
| Default | false |
| Setter | set_clip_text(value) |
| Getter | get_clip_text() |
When this property is enabled, text that is too large to fit the button is clipped, when disabled the Button will always be wide enough to hold the text.
- bool expand_icon
| Default | false |
| Setter | set_expand_icon(value) |
| Getter | is_expand_icon() |
When enabled, the button’s icon will expand/shrink to fit the button’s size while keeping its aspect.
- bool flat
| Default | false |
| Setter | set_flat(value) |
| Getter | is_flat() |
Flat buttons don’t display decoration.
- Texture icon
| Setter | set_button_icon(value) |
| Getter | get_button_icon() |
Button’s icon, if text is present the icon will be placed before the text.
- String text
| Default | "" |
| Setter | set_text(value) |
| Getter | get_text() |
The button’s text that will be displayed inside the button’s area.
ButtonGroup¶
Inherits: Resource < Reference < Object
Group of Buttons.
Description¶
Group of Button. All direct and indirect children buttons become radios. Only one allows being pressed.
BaseButton.toggle_mode should be true.
Methods¶
| Array | get_buttons ( ) |
| BaseButton | get_pressed_button ( ) |
Method Descriptions¶
- Array get_buttons ( )
Returns an Array of Buttons who have this as their ButtonGroup (see BaseButton.group).
- BaseButton get_pressed_button ( )
Returns the current pressed button.
Camera¶
Inherits: Spatial < Node < Object
Inherited By: ARVRCamera, ClippedCamera, InterpolatedCamera
Camera node, displays from a point of view.
Description¶
Camera is a special node that displays what is visible from its current location. Cameras register themselves in the nearest Viewport node (when ascending the tree). Only one camera can be active per viewport. If no viewport is available ascending the tree, the camera will register in the global viewport. In other words, a camera just provides 3D display capabilities to a Viewport, and, without one, a scene registered in that Viewport (or higher viewports) can’t be displayed.
Properties¶
| int | cull_mask | 1048575 |
| bool | current | false |
| DopplerTracking | doppler_tracking | 0 |
| Environment | environment | |
| float | far | 100.0 |
| float | fov | 70.0 |
| Vector2 | frustum_offset | Vector2( 0, 0 ) |
| float | h_offset | 0.0 |
| KeepAspect | keep_aspect | 1 |
| float | near | 0.05 |
| Projection | projection | 0 |
| float | size | 1.0 |
| float | v_offset | 0.0 |
Methods¶
| void | clear_current ( bool enable_next=true ) |
| RID | get_camera_rid ( ) const |
| Transform | get_camera_transform ( ) const |
| bool | get_cull_mask_bit ( int layer ) const |
| Array | get_frustum ( ) const |
| bool | is_position_behind ( Vector3 world_point ) const |
| void | make_current ( ) |
| Vector3 | project_local_ray_normal ( Vector2 screen_point ) const |
| Vector3 | project_position ( Vector2 screen_point, float z_depth ) const |
| Vector3 | project_ray_normal ( Vector2 screen_point ) const |
| Vector3 | project_ray_origin ( Vector2 screen_point ) const |
| void | set_cull_mask_bit ( int layer, bool enable ) |
| void | set_frustum ( float size, Vector2 offset, float z_near, float z_far ) |
| void | set_orthogonal ( float size, float z_near, float z_far ) |
| void | set_perspective ( float fov, float z_near, float z_far ) |
| Vector2 | unproject_position ( Vector3 world_point ) const |
Enumerations¶
enum Projection:
- PROJECTION_PERSPECTIVE = 0 — Perspective projection. Objects on the screen becomes smaller when they are far away.
- PROJECTION_ORTHOGONAL = 1 — Orthogonal projection, also known as orthographic projection. Objects remain the same size on the screen no matter how far away they are.
- PROJECTION_FRUSTUM = 2 — Frustum projection. This mode allows adjusting frustum_offset to create “tilted frustum” effects.
enum KeepAspect:
- KEEP_WIDTH = 0 — Preserves the horizontal aspect ratio; also known as Vert- scaling. This is usually the best option for projects running in portrait mode, as taller aspect ratios will benefit from a wider vertical FOV.
- KEEP_HEIGHT = 1 — Preserves the vertical aspect ratio; also known as Hor+ scaling. This is usually the best option for projects running in landscape mode, as wider aspect ratios will automatically benefit from a wider horizontal FOV.
enum DopplerTracking:
- DOPPLER_TRACKING_DISABLED = 0 — Disables Doppler effect simulation (default).
- DOPPLER_TRACKING_IDLE_STEP = 1 — Simulate Doppler effect by tracking positions of objects that are changed in
_process. Changes in the relative velocity of this camera compared to those objects affect how Audio is perceived (changing the Audio’spitch shift). - DOPPLER_TRACKING_PHYSICS_STEP = 2 — Simulate Doppler effect by tracking positions of objects that are changed in
_physics_process. Changes in the relative velocity of this camera compared to those objects affect how Audio is perceived (changing the Audio’spitch shift).
Property Descriptions¶
- int cull_mask
| Default | 1048575 |
| Setter | set_cull_mask(value) |
| Getter | get_cull_mask() |
The culling mask that describes which 3D render layers are rendered by this camera.
- bool current
| Default | false |
| Setter | set_current(value) |
| Getter | is_current() |
If true, the ancestor Viewport is currently using this camera.
- DopplerTracking doppler_tracking
| Default | 0 |
| Setter | set_doppler_tracking(value) |
| Getter | get_doppler_tracking() |
If not DOPPLER_TRACKING_DISABLED, this camera will simulate the Doppler effect for objects changed in particular _process methods. See DopplerTracking for possible values.
- Environment environment
| Setter | set_environment(value) |
| Getter | get_environment() |
The Environment to use for this camera.
- float far
| Default | 100.0 |
| Setter | set_zfar(value) |
| Getter | get_zfar() |
The distance to the far culling boundary for this camera relative to its local Z axis.
- float fov
| Default | 70.0 |
| Setter | set_fov(value) |
| Getter | get_fov() |
The camera’s field of view angle (in degrees). Only applicable in perspective mode. Since keep_aspect locks one axis, fov sets the other axis’ field of view angle.
- Vector2 frustum_offset
| Default | Vector2( 0, 0 ) |
| Setter | set_frustum_offset(value) |
| Getter | get_frustum_offset() |
The camera’s frustum offset. This can be changed from the default to create “tilted frustum” effects such as Y-shearing.
- float h_offset
| Default | 0.0 |
| Setter | set_h_offset(value) |
| Getter | get_h_offset() |
The horizontal (X) offset of the camera viewport.
- KeepAspect keep_aspect
| Default | 1 |
| Setter | set_keep_aspect_mode(value) |
| Getter | get_keep_aspect_mode() |
The axis to lock during fov/size adjustments. Can be either KEEP_WIDTH or KEEP_HEIGHT.
- float near
| Default | 0.05 |
| Setter | set_znear(value) |
| Getter | get_znear() |
The distance to the near culling boundary for this camera relative to its local Z axis.
- Projection projection
| Default | 0 |
| Setter | set_projection(value) |
| Getter | get_projection() |
The camera’s projection mode. In PROJECTION_PERSPECTIVE mode, objects’ Z distance from the camera’s local space scales their perceived size.
- float size
| Default | 1.0 |
| Setter | set_size(value) |
| Getter | get_size() |
The camera’s size measured as 1/2 the width or height. Only applicable in orthogonal mode. Since keep_aspect locks on axis, size sets the other axis’ size length.
- float v_offset
| Default | 0.0 |
| Setter | set_v_offset(value) |
| Getter | get_v_offset() |
The vertical (Y) offset of the camera viewport.
Method Descriptions¶
- void clear_current ( bool enable_next=true )
If this is the current camera, remove it from being current. If enable_next is true, request to make the next camera current, if any.
- RID get_camera_rid ( ) const
Returns the camera’s RID from the VisualServer.
- Transform get_camera_transform ( ) const
Gets the camera transform. Subclassed cameras such as InterpolatedCamera may provide different transforms than the Node transform.
Returns true if the given layer in the cull_mask is enabled, false otherwise.
- Array get_frustum ( ) const
Returns the camera’s frustum planes in world-space units as an array of Planes in the following order: near, far, left, top, right, bottom. Not to be confused with frustum_offset.
Returns true if the given position is behind the camera.
Note: A position which returns false may still be outside the camera’s field of view.
- void make_current ( )
Makes this camera the current camera for the Viewport (see class description). If the camera node is outside the scene tree, it will attempt to become current once it’s added.
Returns a normal vector from the screen point location directed along the camera. Orthogonal cameras are normalized. Perspective cameras account for perspective, screen width/height, etc.
Returns the 3D point in worldspace that maps to the given 2D coordinate in the Viewport rectangle on a plane that is the given z_depth distance into the scene away from the camera.
Returns a normal vector in worldspace, that is the result of projecting a point on the Viewport rectangle by the camera projection. This is useful for casting rays in the form of (origin, normal) for object intersection or picking.
Returns a 3D position in worldspace, that is the result of projecting a point on the Viewport rectangle by the camera projection. This is useful for casting rays in the form of (origin, normal) for object intersection or picking.
Enables or disables the given layer in the cull_mask.
Sets the camera projection to frustum mode (see PROJECTION_FRUSTUM), by specifying a size, an offset, and the z_near and z_far clip planes in world-space units.
Sets the camera projection to orthogonal mode (see PROJECTION_ORTHOGONAL), by specifying a size, and the z_near and z_far clip planes in world-space units. (As a hint, 2D games often use this projection, with values specified in pixels.)
Sets the camera projection to perspective mode (see PROJECTION_PERSPECTIVE), by specifying a fov (field of view) angle in degrees, and the z_near and z_far clip planes in world-space units.
Returns the 2D coordinate in the Viewport rectangle that maps to the given 3D point in worldspace.
Camera2D¶
Inherits: Node2D < CanvasItem < Node < Object
Camera node for 2D scenes.
Description¶
Camera node for 2D scenes. It forces the screen (current layer) to scroll following this node. This makes it easier (and faster) to program scrollable scenes than manually changing the position of CanvasItem-based nodes.
This node is intended to be a simple helper to get things going quickly and it may happen that more functionality is desired to change how the camera works. To make your own custom camera node, simply inherit from Node2D and change the transform of the canvas by calling get_viewport().set_canvas_transform(m) in Viewport.
Properties¶
| AnchorMode | anchor_mode | 1 |
| bool | current | false |
| Node | custom_viewport | |
| float | drag_margin_bottom | 0.2 |
| bool | drag_margin_h_enabled | false |
| float | drag_margin_left | 0.2 |
| float | drag_margin_right | 0.2 |
| float | drag_margin_top | 0.2 |
| bool | drag_margin_v_enabled | false |
| bool | editor_draw_drag_margin | false |
| bool | editor_draw_limits | false |
| bool | editor_draw_screen | true |
| int | limit_bottom | 10000000 |
| int | limit_left | -10000000 |
| int | limit_right | 10000000 |
| bool | limit_smoothed | false |
| int | limit_top | -10000000 |
| Vector2 | offset | Vector2( 0, 0 ) |
| float | offset_h | 0.0 |
| float | offset_v | 0.0 |
| Camera2DProcessMode | process_mode | 1 |
| bool | rotating | false |
| bool | smoothing_enabled | false |
| float | smoothing_speed | 5.0 |
| Vector2 | zoom | Vector2( 1, 1 ) |
Methods¶
| void | align ( ) |
| void | clear_current ( ) |
| void | force_update_scroll ( ) |
| Vector2 | get_camera_position ( ) const |
| Vector2 | get_camera_screen_center ( ) const |
| float | get_drag_margin ( Margin margin ) const |
| int | get_limit ( Margin margin ) const |
| void | make_current ( ) |
| void | reset_smoothing ( ) |
| void | set_drag_margin ( Margin margin, float drag_margin ) |
| void | set_limit ( Margin margin, int limit ) |
Enumerations¶
enum AnchorMode:
- ANCHOR_MODE_FIXED_TOP_LEFT = 0 — The camera’s position is fixed so that the top-left corner is always at the origin.
- ANCHOR_MODE_DRAG_CENTER = 1 — The camera’s position takes into account vertical/horizontal offsets and the screen size.
enum Camera2DProcessMode:
- CAMERA2D_PROCESS_PHYSICS = 0 — The camera updates with the
_physics_processcallback. - CAMERA2D_PROCESS_IDLE = 1 — The camera updates with the
_processcallback.
Property Descriptions¶
- AnchorMode anchor_mode
| Default | 1 |
| Setter | set_anchor_mode(value) |
| Getter | get_anchor_mode() |
The Camera2D’s anchor point. See AnchorMode constants.
- bool current
| Default | false |
| Getter | is_current() |
If true, the camera is the active camera for the current scene. Only one camera can be current, so setting a different camera current will disable this one.
- Node custom_viewport
| Setter | set_custom_viewport(value) |
| Getter | get_custom_viewport() |
The custom Viewport node attached to the Camera2D. If null or not a Viewport, uses the default viewport instead.
- float drag_margin_bottom
| Default | 0.2 |
| Setter | set_drag_margin(value) |
| Getter | get_drag_margin() |
Bottom margin needed to drag the camera. A value of 1 makes the camera move only when reaching the edge of the screen.
- bool drag_margin_h_enabled
| Default | false |
| Setter | set_h_drag_enabled(value) |
| Getter | is_h_drag_enabled() |
If true, the camera only moves when reaching the horizontal drag margins. If false, the camera moves horizontally regardless of margins.
- float drag_margin_left
| Default | 0.2 |
| Setter | set_drag_margin(value) |
| Getter | get_drag_margin() |
Left margin needed to drag the camera. A value of 1 makes the camera move only when reaching the edge of the screen.
- float drag_margin_right
| Default | 0.2 |
| Setter | set_drag_margin(value) |
| Getter | get_drag_margin() |
Right margin needed to drag the camera. A value of 1 makes the camera move only when reaching the edge of the screen.
- float drag_margin_top
| Default | 0.2 |
| Setter | set_drag_margin(value) |
| Getter | get_drag_margin() |
Top margin needed to drag the camera. A value of 1 makes the camera move only when reaching the edge of the screen.
- bool drag_margin_v_enabled
| Default | false |
| Setter | set_v_drag_enabled(value) |
| Getter | is_v_drag_enabled() |
If true, the camera only moves when reaching the vertical drag margins. If false, the camera moves vertically regardless of margins.
- bool editor_draw_drag_margin
| Default | false |
| Setter | set_margin_drawing_enabled(value) |
| Getter | is_margin_drawing_enabled() |
If true, draws the camera’s drag margin rectangle in the editor.
- bool editor_draw_limits
| Default | false |
| Setter | set_limit_drawing_enabled(value) |
| Getter | is_limit_drawing_enabled() |
If true, draws the camera’s limits rectangle in the editor.
- bool editor_draw_screen
| Default | true |
| Setter | set_screen_drawing_enabled(value) |
| Getter | is_screen_drawing_enabled() |
If true, draws the camera’s screen rectangle in the editor.
- int limit_bottom
| Default | 10000000 |
| Setter | set_limit(value) |
| Getter | get_limit() |
Bottom scroll limit in pixels. The camera stops moving when reaching this value.
- int limit_left
| Default | -10000000 |
| Setter | set_limit(value) |
| Getter | get_limit() |
Left scroll limit in pixels. The camera stops moving when reaching this value.
- int limit_right
| Default | 10000000 |
| Setter | set_limit(value) |
| Getter | get_limit() |
Right scroll limit in pixels. The camera stops moving when reaching this value.
- bool limit_smoothed
| Default | false |
| Setter | set_limit_smoothing_enabled(value) |
| Getter | is_limit_smoothing_enabled() |
If true, the camera smoothly stops when reaches its limits.
- int limit_top
| Default | -10000000 |
| Setter | set_limit(value) |
| Getter | get_limit() |
Top scroll limit in pixels. The camera stops moving when reaching this value.
- Vector2 offset
| Default | Vector2( 0, 0 ) |
| Setter | set_offset(value) |
| Getter | get_offset() |
The camera’s offset, useful for looking around or camera shake animations.
- float offset_h
| Default | 0.0 |
| Setter | set_h_offset(value) |
| Getter | get_h_offset() |
The horizontal offset of the camera, relative to the drag margins.
Note: Offset H is used only to force offset relative to margins. It’s not updated in any way if drag margins are enabled and can be used to set initial offset.
- float offset_v
| Default | 0.0 |
| Setter | set_v_offset(value) |
| Getter | get_v_offset() |
The vertical offset of the camera, relative to the drag margins.
Note: Used the same as offset_h.
- Camera2DProcessMode process_mode
| Default | 1 |
| Setter | set_process_mode(value) |
| Getter | get_process_mode() |
The camera’s process callback. See Camera2DProcessMode.
- bool rotating
| Default | false |
| Setter | set_rotating(value) |
| Getter | is_rotating() |
If true, the camera rotates with the target.
- bool smoothing_enabled
| Default | false |
| Setter | set_enable_follow_smoothing(value) |
| Getter | is_follow_smoothing_enabled() |
If true, the camera smoothly moves towards the target at smoothing_speed.
- float smoothing_speed
| Default | 5.0 |
| Setter | set_follow_smoothing(value) |
| Getter | get_follow_smoothing() |
Speed in pixels per second of the camera’s smoothing effect when smoothing_enabled is true.
- Vector2 zoom
| Default | Vector2( 1, 1 ) |
| Setter | set_zoom(value) |
| Getter | get_zoom() |
The camera’s zoom relative to the viewport. Values larger than Vector2(1, 1) zoom out and smaller values zoom in. For an example, use Vector2(0.5, 0.5) for a 2× zoom-in, and Vector2(4, 4) for a 4× zoom-out.
Method Descriptions¶
- void align ( )
Aligns the camera to the tracked node.
- void clear_current ( )
Removes any Camera2D from the ancestor Viewport’s internal currently-assigned camera.
- void force_update_scroll ( )
Forces the camera to update scroll immediately.
- Vector2 get_camera_position ( ) const
Returns the camera position.
- Vector2 get_camera_screen_center ( ) const
Returns the location of the Camera2D’s screen-center, relative to the origin.
Returns the specified margin. See also drag_margin_bottom, drag_margin_top, drag_margin_left, and drag_margin_right.
Returns the specified camera limit. See also limit_bottom, limit_top, limit_left, and limit_right.
- void make_current ( )
Make this the current 2D camera for the scene (viewport and layer), in case there are many cameras in the scene.
- void reset_smoothing ( )
Sets the camera’s position immediately to its current smoothing destination.
This has no effect if smoothing is disabled.
Sets the specified margin. See also drag_margin_bottom, drag_margin_top, drag_margin_left, and drag_margin_right.
Sets the specified camera limit. See also limit_bottom, limit_top, limit_left, and limit_right.
CameraFeed¶
A camera feed gives you access to a single physical camera attached to your device.
Description¶
A camera feed gives you access to a single physical camera attached to your device. When enabled, Godot will start capturing frames from the camera which can then be used.
Note: Many cameras will return YCbCr images which are split into two textures and need to be combined in a shader. Godot does this automatically for you if you set the environment to show the camera image in the background.
Properties¶
| bool | feed_is_active | false |
| Transform2D | feed_transform | Transform2D( 1, 0, 0, -1, 0, 1 ) |
Methods¶
| int | get_id ( ) const |
| String | get_name ( ) const |
| FeedPosition | get_position ( ) const |
Enumerations¶
enum FeedDataType:
- FEED_NOIMAGE = 0 — No image set for the feed.
- FEED_RGB = 1 — Feed supplies RGB images.
- FEED_YCBCR = 2 — Feed supplies YCbCr images that need to be converted to RGB.
- FEED_YCBCR_SEP = 3 — Feed supplies separate Y and CbCr images that need to be combined and converted to RGB.
enum FeedPosition:
- FEED_UNSPECIFIED = 0 — Unspecified position.
- FEED_FRONT = 1 — Camera is mounted at the front of the device.
- FEED_BACK = 2 — Camera is mounted at the back of the device.
Property Descriptions¶
- bool feed_is_active
| Default | false |
| Setter | set_active(value) |
| Getter | is_active() |
If true, the feed is active.
- Transform2D feed_transform
| Default | Transform2D( 1, 0, 0, -1, 0, 1 ) |
| Setter | set_transform(value) |
| Getter | get_transform() |
The transform applied to the camera’s image.
Method Descriptions¶
- int get_id ( ) const
Returns the unique ID for this feed.
- String get_name ( ) const
Returns the camera’s name.
- FeedPosition get_position ( ) const
Returns the position of camera on the device.
CameraServer¶
Inherits: Object
Server keeping track of different cameras accessible in Godot.
Description¶
The CameraServer keeps track of different cameras accessible in Godot. These are external cameras such as webcams or the cameras on your phone.
It is notably used to provide AR modules with a video feed from the camera.
Methods¶
| void | add_feed ( CameraFeed feed ) |
| Array | feeds ( ) |
| CameraFeed | get_feed ( int index ) |
| int | get_feed_count ( ) |
| void | remove_feed ( CameraFeed feed ) |
Signals¶
- camera_feed_added ( int id )
Emitted when a CameraFeed is added (e.g. webcam is plugged in).
- camera_feed_removed ( int id )
Emitted when a CameraFeed is removed (e.g. webcam is unplugged).
Enumerations¶
enum FeedImage:
- FEED_RGBA_IMAGE = 0 — The RGBA camera image.
- FEED_YCBCR_IMAGE = 0 — The YCbCr camera image.
- FEED_Y_IMAGE = 0 — The Y component camera image.
- FEED_CBCR_IMAGE = 1 — The CbCr component camera image.
Method Descriptions¶
- void add_feed ( CameraFeed feed )
Adds a camera feed to the camera server.
- Array feeds ( )
Returns an array of CameraFeeds.
- CameraFeed get_feed ( int index )
Returns the CameraFeed with this id.
- int get_feed_count ( )
Returns the number of CameraFeeds registered.
- void remove_feed ( CameraFeed feed )
Removes a CameraFeed.
CameraTexture¶
Inherits: Texture < Resource < Reference < Object
Texture provided by a CameraFeed.
Description¶
This texture gives access to the camera texture provided by a CameraFeed.
Note: Many cameras supply YCbCr images which need to be converted in a shader.
Properties¶
| int | camera_feed_id | 0 |
| bool | camera_is_active | false |
| int | flags | O: 0 |
| FeedImage | which_feed | 0 |
Property Descriptions¶
- int camera_feed_id
| Default | 0 |
| Setter | set_camera_feed_id(value) |
| Getter | get_camera_feed_id() |
The ID of the CameraFeed for which we want to display the image.
- bool camera_is_active
| Default | false |
| Setter | set_camera_active(value) |
| Getter | get_camera_active() |
Convenience property that gives access to the active property of the CameraFeed.
- FeedImage which_feed
| Default | 0 |
| Setter | set_which_feed(value) |
| Getter | get_which_feed() |
Which image within the CameraFeed we want access to, important if the camera image is split in a Y and CbCr component.
CanvasItem¶
Base class of anything 2D.
Description¶
Base class of anything 2D. Canvas items are laid out in a tree; children inherit and extend their parent’s transform. CanvasItem is extended by Control for anything GUI-related, and by Node2D for anything related to the 2D engine.
Any CanvasItem can draw. For this, update must be called, then NOTIFICATION_DRAW will be received on idle time to request redraw. Because of this, canvas items don’t need to be redrawn on every frame, improving the performance significantly. Several functions for drawing on the CanvasItem are provided (see draw_* functions). However, they can only be used inside the Object._notification, signal or _draw virtual functions.
Canvas items are drawn in tree order. By default, children are on top of their parents so a root CanvasItem will be drawn behind everything. This behavior can be changed on a per-item basis.
A CanvasItem can also be hidden, which will also hide its children. It provides many ways to change parameters such as modulation (for itself and its children) and self modulation (only for itself), as well as its blend mode.
Ultimately, a transform notification can be requested, which will notify the node that its global position changed in case the parent tree changed.
Properties¶
| int | light_mask | 1 |
| Material | material | |
| Color | modulate | Color( 1, 1, 1, 1 ) |
| Color | self_modulate | Color( 1, 1, 1, 1 ) |
| bool | show_behind_parent | false |
| bool | show_on_top | |
| bool | use_parent_material | false |
| bool | visible | true |
Methods¶
| void | _draw ( ) virtual |
| void | draw_arc ( Vector2 center, float radius, float start_angle, float end_angle, int point_count, Color color, float width=1.0, bool antialiased=false ) |
| float | draw_char ( Font font, Vector2 position, String char, String next, Color modulate=Color( 1, 1, 1, 1 ) ) |
| void | draw_circle ( Vector2 position, float radius, Color color ) |
| void | draw_colored_polygon ( PoolVector2Array points, Color color, PoolVector2Array uvs=PoolVector2Array( ), Texture texture=null, Texture normal_map=null, bool antialiased=false ) |
| void | draw_line ( Vector2 from, Vector2 to, Color color, float width=1.0, bool antialiased=false ) |
| void | draw_mesh ( Mesh mesh, Texture texture, Texture normal_map=null, Transform2D transform=Transform2D( 1, 0, 0, 1, 0, 0 ), Color modulate=Color( 1, 1, 1, 1 ) ) |
| void | draw_multiline ( PoolVector2Array points, Color color, float width=1.0, bool antialiased=false ) |
| void | draw_multiline_colors ( PoolVector2Array points, PoolColorArray colors, float width=1.0, bool antialiased=false ) |
| void | draw_multimesh ( MultiMesh multimesh, Texture texture, Texture normal_map=null ) |
| void | draw_polygon ( PoolVector2Array points, PoolColorArray colors, PoolVector2Array uvs=PoolVector2Array( ), Texture texture=null, Texture normal_map=null, bool antialiased=false ) |
| void | draw_polyline ( PoolVector2Array points, Color color, float width=1.0, bool antialiased=false ) |
| void | draw_polyline_colors ( PoolVector2Array points, PoolColorArray colors, float width=1.0, bool antialiased=false ) |
| void | draw_primitive ( PoolVector2Array points, PoolColorArray colors, PoolVector2Array uvs, Texture texture=null, float width=1.0, Texture normal_map=null ) |
| void | draw_rect ( Rect2 rect, Color color, bool filled=true, float width=1.0, bool antialiased=false ) |
| void | draw_set_transform ( Vector2 position, float rotation, Vector2 scale ) |
| void | draw_set_transform_matrix ( Transform2D xform ) |
| void | draw_string ( Font font, Vector2 position, String text, Color modulate=Color( 1, 1, 1, 1 ), int clip_w=-1 ) |
| void | draw_style_box ( StyleBox style_box, Rect2 rect ) |
| void | draw_texture ( Texture texture, Vector2 position, Color modulate=Color( 1, 1, 1, 1 ), Texture normal_map=null ) |
| void | draw_texture_rect ( Texture texture, Rect2 rect, bool tile, Color modulate=Color( 1, 1, 1, 1 ), bool transpose=false, Texture normal_map=null ) |
| void | draw_texture_rect_region ( Texture texture, Rect2 rect, Rect2 src_rect, Color modulate=Color( 1, 1, 1, 1 ), bool transpose=false, Texture normal_map=null, bool clip_uv=true ) |
| void | force_update_transform ( ) |
| RID | get_canvas ( ) const |
| RID | get_canvas_item ( ) const |
| Transform2D | get_canvas_transform ( ) const |
| Vector2 | get_global_mouse_position ( ) const |
| Transform2D | get_global_transform ( ) const |
| Transform2D | get_global_transform_with_canvas ( ) const |
| Vector2 | get_local_mouse_position ( ) const |
| Transform2D | get_transform ( ) const |
| Rect2 | get_viewport_rect ( ) const |
| Transform2D | get_viewport_transform ( ) const |
| World2D | get_world_2d ( ) const |
| void | hide ( ) |
| bool | is_local_transform_notification_enabled ( ) const |
| bool | is_set_as_toplevel ( ) const |
| bool | is_transform_notification_enabled ( ) const |
| bool | is_visible_in_tree ( ) const |
| Vector2 | make_canvas_position_local ( Vector2 screen_point ) const |
| InputEvent | make_input_local ( InputEvent event ) const |
| void | set_as_toplevel ( bool enable ) |
| void | set_notify_local_transform ( bool enable ) |
| void | set_notify_transform ( bool enable ) |
| void | show ( ) |
| void | update ( ) |
Signals¶
- draw ( )
Emitted when the CanvasItem must redraw. This can only be connected realtime, as deferred will not allow drawing.
- hide ( )
Emitted when becoming hidden.
- item_rect_changed ( )
Emitted when the item rect has changed.
- visibility_changed ( )
Emitted when the visibility (hidden/visible) changes.
Enumerations¶
enum BlendMode:
- BLEND_MODE_MIX = 0 — Mix blending mode. Colors are assumed to be independent of the alpha (opacity) value.
- BLEND_MODE_ADD = 1 — Additive blending mode.
- BLEND_MODE_SUB = 2 — Subtractive blending mode.
- BLEND_MODE_MUL = 3 — Multiplicative blending mode.
- BLEND_MODE_PREMULT_ALPHA = 4 — Mix blending mode. Colors are assumed to be premultiplied by the alpha (opacity) value.
- BLEND_MODE_DISABLED = 5 — Disables blending mode. Colors including alpha are written as-is. Only applicable for render targets with a transparent background. No lighting will be applied.
Constants¶
- NOTIFICATION_TRANSFORM_CHANGED = 2000 — The
CanvasItem’s transform has changed. This notification is only received if enabled by set_notify_transform or set_notify_local_transform. - NOTIFICATION_DRAW = 30 — The
CanvasItemis requested to draw. - NOTIFICATION_VISIBILITY_CHANGED = 31 — The
CanvasItem’s visibility has changed. - NOTIFICATION_ENTER_CANVAS = 32 — The
CanvasItemhas entered the canvas. - NOTIFICATION_EXIT_CANVAS = 33 — The
CanvasItemhas exited the canvas.
Property Descriptions¶
- int light_mask
| Default | 1 |
| Setter | set_light_mask(value) |
| Getter | get_light_mask() |
The rendering layers in which this CanvasItem responds to Light2D nodes.
- Material material
| Setter | set_material(value) |
| Getter | get_material() |
The material applied to textures on this CanvasItem.
- Color modulate
| Default | Color( 1, 1, 1, 1 ) |
| Setter | set_modulate(value) |
| Getter | get_modulate() |
The color applied to textures on this CanvasItem.
- Color self_modulate
| Default | Color( 1, 1, 1, 1 ) |
| Setter | set_self_modulate(value) |
| Getter | get_self_modulate() |
The color applied to textures on this CanvasItem. This is not inherited by children CanvasItems.
- bool show_behind_parent
| Default | false |
| Setter | set_draw_behind_parent(value) |
| Getter | is_draw_behind_parent_enabled() |
If true, the object draws behind its parent.
- bool show_on_top
If true, the object draws on top of its parent.
- bool use_parent_material
| Default | false |
| Setter | set_use_parent_material(value) |
| Getter | get_use_parent_material() |
If true, the parent CanvasItem’s material property is used as this one’s material.
- bool visible
| Default | true |
| Setter | set_visible(value) |
| Getter | is_visible() |
If true, this CanvasItem is drawn. For controls that inherit Popup, the correct way to make them visible is to call one of the multiple popup*() functions instead.
Method Descriptions¶
- void _draw ( ) virtual
Overridable function called by the engine (if defined) to draw the canvas item.
- void draw_arc ( Vector2 center, float radius, float start_angle, float end_angle, int point_count, Color color, float width=1.0, bool antialiased=false )
Draws an arc between the given angles. The larger the value of point_count, the smoother the curve.
- float draw_char ( Font font, Vector2 position, String char, String next, Color modulate=Color( 1, 1, 1, 1 ) )
Draws a string character using a custom font. Returns the advance, depending on the character width and kerning with an optional next character.
Draws a colored circle.
- void draw_colored_polygon ( PoolVector2Array points, Color color, PoolVector2Array uvs=PoolVector2Array( ), Texture texture=null, Texture normal_map=null, bool antialiased=false )
Draws a colored polygon of any amount of points, convex or concave.
Draws a line from a 2D point to another, with a given color and width. It can be optionally antialiased.
- void draw_mesh ( Mesh mesh, Texture texture, Texture normal_map=null, Transform2D transform=Transform2D( 1, 0, 0, 1, 0, 0 ), Color modulate=Color( 1, 1, 1, 1 ) )
Draws a Mesh in 2D, using the provided texture. See MeshInstance2D for related documentation.
- void draw_multiline ( PoolVector2Array points, Color color, float width=1.0, bool antialiased=false )
Draws multiple, parallel lines with a uniform color. width and antialiased are currently not implemented and have no effect.
- void draw_multiline_colors ( PoolVector2Array points, PoolColorArray colors, float width=1.0, bool antialiased=false )
Draws multiple, parallel lines with a uniform width, segment-by-segment coloring, and optional antialiasing. Colors assigned to line segments match by index between points and colors.
Draws a MultiMesh in 2D with the provided texture. See MultiMeshInstance2D for related documentation.
- void draw_polygon ( PoolVector2Array points, PoolColorArray colors, PoolVector2Array uvs=PoolVector2Array( ), Texture texture=null, Texture normal_map=null, bool antialiased=false )
Draws a polygon of any amount of points, convex or concave.
- void draw_polyline ( PoolVector2Array points, Color color, float width=1.0, bool antialiased=false )
Draws interconnected line segments with a uniform color and width and optional antialiasing.
- void draw_polyline_colors ( PoolVector2Array points, PoolColorArray colors, float width=1.0, bool antialiased=false )
Draws interconnected line segments with a uniform width, segment-by-segment coloring, and optional antialiasing. Colors assigned to line segments match by index between points and colors.
- void draw_primitive ( PoolVector2Array points, PoolColorArray colors, PoolVector2Array uvs, Texture texture=null, float width=1.0, Texture normal_map=null )
Draws a custom primitive. 1 point for a point, 2 points for a line, 3 points for a triangle and 4 points for a quad.
- void draw_rect ( Rect2 rect, Color color, bool filled=true, float width=1.0, bool antialiased=false )
Draws a rectangle. If filled is true, the rectangle will be filled with the color specified. If filled is false, the rectangle will be drawn as a stroke with the color and width specified. If antialiased is true, the lines will be antialiased.
Note: width and antialiased are only effective if filled is false.
Sets a custom transform for drawing via components. Anything drawn afterwards will be transformed by this.
- void draw_set_transform_matrix ( Transform2D xform )
Sets a custom transform for drawing via matrix. Anything drawn afterwards will be transformed by this.
- void draw_string ( Font font, Vector2 position, String text, Color modulate=Color( 1, 1, 1, 1 ), int clip_w=-1 )
Draws a string using a custom font.
Draws a styled rectangle.
- void draw_texture ( Texture texture, Vector2 position, Color modulate=Color( 1, 1, 1, 1 ), Texture normal_map=null )
Draws a texture at a given position.
- void draw_texture_rect ( Texture texture, Rect2 rect, bool tile, Color modulate=Color( 1, 1, 1, 1 ), bool transpose=false, Texture normal_map=null )
Draws a textured rectangle at a given position, optionally modulated by a color. If transpose is true, the texture will have its X and Y coordinates swapped.
- void draw_texture_rect_region ( Texture texture, Rect2 rect, Rect2 src_rect, Color modulate=Color( 1, 1, 1, 1 ), bool transpose=false, Texture normal_map=null, bool clip_uv=true )
Draws a textured rectangle region at a given position, optionally modulated by a color. If transpose is true, the texture will have its X and Y coordinates swapped.
- void force_update_transform ( )
Forces the transform to update. Transform changes in physics are not instant for performance reasons. Transforms are accumulated and then set. Use this if you need an up-to-date transform when doing physics operations.
- RID get_canvas ( ) const
Returns the RID of the World2D canvas where this item is in.
- RID get_canvas_item ( ) const
Returns the canvas item RID used by VisualServer for this item.
- Transform2D get_canvas_transform ( ) const
Returns the transform matrix of this item’s canvas.
- Vector2 get_global_mouse_position ( ) const
Returns the global position of the mouse.
- Transform2D get_global_transform ( ) const
Returns the global transform matrix of this item.
- Transform2D get_global_transform_with_canvas ( ) const
Returns the global transform matrix of this item in relation to the canvas.
- Vector2 get_local_mouse_position ( ) const
Returns the mouse position relative to this item’s position.
- Transform2D get_transform ( ) const
Returns the transform matrix of this item.
- Rect2 get_viewport_rect ( ) const
Returns the viewport’s boundaries as a Rect2.
- Transform2D get_viewport_transform ( ) const
Returns this item’s transform in relation to the viewport.
- World2D get_world_2d ( ) const
Returns the World2D where this item is in.
- void hide ( )
Hide the CanvasItem if it’s currently visible.
- bool is_local_transform_notification_enabled ( ) const
Returns true if local transform notifications are communicated to children.
- bool is_set_as_toplevel ( ) const
Returns true if the node is set as top-level. See set_as_toplevel.
- bool is_transform_notification_enabled ( ) const
Returns true if global transform notifications are communicated to children.
- bool is_visible_in_tree ( ) const
Returns true if the node is present in the SceneTree, its visible property is true and its inherited visibility is also true.
Assigns screen_point as this node’s new local transform.
- InputEvent make_input_local ( InputEvent event ) const
Transformations issued by event’s inputs are applied in local space instead of global space.
- void set_as_toplevel ( bool enable )
If enable is true, the node won’t inherit its transform from parent canvas items.
- void set_notify_local_transform ( bool enable )
If enable is true, children will be updated with local transform data.
- void set_notify_transform ( bool enable )
If enable is true, children will be updated with global transform data.
- void show ( )
Show the CanvasItem if it’s currently hidden. For controls that inherit Popup, the correct way to make them visible is to call one of the multiple popup*() functions instead.
- void update ( )
Queue the CanvasItem for update. NOTIFICATION_DRAW will be called on idle time to request redraw.
CanvasItemMaterial¶
Inherits: Material < Resource < Reference < Object
A material for CanvasItems.
Description¶
CanvasItemMaterials provide a means of modifying the textures associated with a CanvasItem. They specialize in describing blend and lighting behaviors for textures. Use a ShaderMaterial to more fully customize a material’s interactions with a CanvasItem.
Properties¶
| BlendMode | blend_mode | 0 |
| LightMode | light_mode | 0 |
| int | particles_anim_h_frames | |
| bool | particles_anim_loop | |
| int | particles_anim_v_frames | |
| bool | particles_animation | false |
Enumerations¶
enum BlendMode:
- BLEND_MODE_MIX = 0 — Mix blending mode. Colors are assumed to be independent of the alpha (opacity) value.
- BLEND_MODE_ADD = 1 — Additive blending mode.
- BLEND_MODE_SUB = 2 — Subtractive blending mode.
- BLEND_MODE_MUL = 3 — Multiplicative blending mode.
- BLEND_MODE_PREMULT_ALPHA = 4 — Mix blending mode. Colors are assumed to be premultiplied by the alpha (opacity) value.
enum LightMode:
- LIGHT_MODE_NORMAL = 0 — Render the material using both light and non-light sensitive material properties.
- LIGHT_MODE_UNSHADED = 1 — Render the material as if there were no light.
- LIGHT_MODE_LIGHT_ONLY = 2 — Render the material as if there were only light.
Property Descriptions¶
- BlendMode blend_mode
| Default | 0 |
| Setter | set_blend_mode(value) |
| Getter | get_blend_mode() |
The manner in which a material’s rendering is applied to underlying textures.
- LightMode light_mode
| Default | 0 |
| Setter | set_light_mode(value) |
| Getter | get_light_mode() |
The manner in which material reacts to lighting.
- int particles_anim_h_frames
| Setter | set_particles_anim_h_frames(value) |
| Getter | get_particles_anim_h_frames() |
The number of columns in the spritesheet assigned as Texture for a Particles2D or CPUParticles2D.
Note: This property is only used and visible in the editor if particles_animation is true.
- bool particles_anim_loop
| Setter | set_particles_anim_loop(value) |
| Getter | get_particles_anim_loop() |
If true, the particles animation will loop.
Note: This property is only used and visible in the editor if particles_animation is true.
- int particles_anim_v_frames
| Setter | set_particles_anim_v_frames(value) |
| Getter | get_particles_anim_v_frames() |
The number of rows in the spritesheet assigned as Texture for a Particles2D or CPUParticles2D.
Note: This property is only used and visible in the editor if particles_animation is true.
- bool particles_animation
| Default | false |
| Setter | set_particles_animation(value) |
| Getter | get_particles_animation() |
If true, enable spritesheet-based animation features when assigned to Particles2D and CPUParticles2D nodes. The ParticlesMaterial.anim_speed or CPUParticles2D.anim_speed should also be set to a positive value for the animation to play.
This property (and other particles_anim_* properties that depend on it) has no effect on other types of nodes.
CanvasLayer¶
Inherited By: ParallaxBackground
Canvas drawing layer.
Description¶
Canvas drawing layer. CanvasItem nodes that are direct or indirect children of a CanvasLayer will be drawn in that layer. The layer is a numeric index that defines the draw order. The default 2D scene renders with index 0, so a CanvasLayer with index -1 will be drawn below, and one with index 1 will be drawn above. This is very useful for HUDs (in layer 1+ or above), or backgrounds (in layer -1 or below).
Tutorials¶
Properties¶
| Node | custom_viewport | |
| bool | follow_viewport_enable | false |
| float | follow_viewport_scale | 1.0 |
| int | layer | 1 |
| Vector2 | offset | Vector2( 0, 0 ) |
| float | rotation | 0.0 |
| float | rotation_degrees | 0.0 |
| Vector2 | scale | Vector2( 1, 1 ) |
| Transform2D | transform | Transform2D( 1, 0, 0, 1, 0, 0 ) |
Methods¶
| RID | get_canvas ( ) const |
Property Descriptions¶
- Node custom_viewport
| Setter | set_custom_viewport(value) |
| Getter | get_custom_viewport() |
The custom Viewport node assigned to the CanvasLayer. If null, uses the default viewport instead.
- bool follow_viewport_enable
| Default | false |
| Setter | set_follow_viewport(value) |
| Getter | is_following_viewport() |
Sets the layer to follow the viewport in order to simulate a pseudo 3D effect.
- float follow_viewport_scale
| Default | 1.0 |
| Setter | set_follow_viewport_scale(value) |
| Getter | get_follow_viewport_scale() |
Scales the layer when using follow_viewport_enable. Layers moving into the foreground should have increasing scales, while layers moving into the background should have decreasing scales.
- int layer
| Default | 1 |
| Setter | set_layer(value) |
| Getter | get_layer() |
Layer index for draw order. Lower values are drawn first.
- Vector2 offset
| Default | Vector2( 0, 0 ) |
| Setter | set_offset(value) |
| Getter | get_offset() |
The layer’s base offset.
- float rotation
| Default | 0.0 |
| Setter | set_rotation(value) |
| Getter | get_rotation() |
The layer’s rotation in radians.
- float rotation_degrees
| Default | 0.0 |
| Setter | set_rotation_degrees(value) |
| Getter | get_rotation_degrees() |
The layer’s rotation in degrees.
- Vector2 scale
| Default | Vector2( 1, 1 ) |
| Setter | set_scale(value) |
| Getter | get_scale() |
The layer’s scale.
- Transform2D transform
| Default | Transform2D( 1, 0, 0, 1, 0, 0 ) |
| Setter | set_transform(value) |
| Getter | get_transform() |
The layer’s transform.
CapsuleMesh¶
Inherits: PrimitiveMesh < Mesh < Resource < Reference < Object
Class representing a capsule-shaped PrimitiveMesh.
Description¶
Class representing a capsule-shaped PrimitiveMesh.
Properties¶
| float | mid_height | 1.0 |
| int | radial_segments | 64 |
| float | radius | 1.0 |
| int | rings | 8 |
Property Descriptions¶
- float mid_height
| Default | 1.0 |
| Setter | set_mid_height(value) |
| Getter | get_mid_height() |
Height of the capsule mesh from the center point.
- int radial_segments
| Default | 64 |
| Setter | set_radial_segments(value) |
| Getter | get_radial_segments() |
Number of radial segments on the capsule mesh.
- float radius
| Default | 1.0 |
| Setter | set_radius(value) |
| Getter | get_radius() |
Radius of the capsule mesh.
- int rings
| Default | 8 |
| Setter | set_rings(value) |
| Getter | get_rings() |
Number of rings along the height of the capsule.
CapsuleShape¶
Inherits: Shape < Resource < Reference < Object
Capsule shape for collisions.
Description¶
Capsule shape for collisions.
CapsuleShape2D¶
Inherits: Shape2D < Resource < Reference < Object
Capsule shape for 2D collisions.
Description¶
Capsule shape for 2D collisions.
CenterContainer¶
Inherits: Container < Control < CanvasItem < Node < Object
Keeps children controls centered.
Description¶
CenterContainer keeps children controls centered. This container keeps all children to their minimum size, in the center.
Properties¶
| bool | use_top_left | false |
CharFXTransform¶
Controls how an individual character will be displayed in a RichTextEffect.
Description¶
By setting various properties on this object, you can control how individual characters will be displayed in a RichTextEffect.
Tutorials¶
Properties¶
| int | absolute_index | 0 |
| int | character | 0 |
| Color | color | Color( 0, 0, 0, 1 ) |
| float | elapsed_time | 0.0 |
| Dictionary | env | {} |
| Vector2 | offset | Vector2( 0, 0 ) |
| int | relative_index | 0 |
| bool | visible | true |
Property Descriptions¶
- int absolute_index
| Default | 0 |
| Setter | set_absolute_index(value) |
| Getter | get_absolute_index() |
The index of the current character (starting from 0). Setting this property won’t affect drawing.
- int character
| Default | 0 |
| Setter | set_character(value) |
| Getter | get_character() |
The Unicode codepoint the character will use. This only affects non-whitespace characters. @GDScript.ord can be useful here. For example, the following will replace all characters with asterisks:
# `char_fx` is the CharFXTransform parameter from `_process_custom_fx()`.
# See the RichTextEffect documentation for details.
char_fx.character = ord("*")
- Color color
| Default | Color( 0, 0, 0, 1 ) |
| Setter | set_color(value) |
| Getter | get_color() |
The color the character will be drawn with.
- float elapsed_time
| Default | 0.0 |
| Setter | set_elapsed_time(value) |
| Getter | get_elapsed_time() |
The time elapsed since the RichTextLabel was added to the scene tree (in seconds). Time stops when the project is paused, unless the RichTextLabel’s Node.pause_mode is set to Node.PAUSE_MODE_PROCESS.
Note: Time still passes while the RichTextLabel is hidden.
- Dictionary env
| Default | {} |
| Setter | set_environment(value) |
| Getter | get_environment() |
Contains the arguments passed in the opening BBCode tag. By default, arguments are strings; if their contents match a type such as bool, int or float, they will be converted automatically. Color codes in the form #rrggbb or #rgb will be converted to an opaque Color. String arguments may not contain spaces, even if they’re quoted. If present, quotes will also be present in the final string.
For example, the opening BBCode tag [example foo=hello bar=true baz=42 color=#ffffff] will map to the following Dictionary:
{"foo": "hello", "bar": true, "baz": 42, "color": Color(1, 1, 1, 1)}
- Vector2 offset
| Default | Vector2( 0, 0 ) |
| Setter | set_offset(value) |
| Getter | get_offset() |
The position offset the character will be drawn with (in pixels).
- int relative_index
| Default | 0 |
| Setter | set_relative_index(value) |
| Getter | get_relative_index() |
The index of the current character (starting from 0). Setting this property won’t affect drawing.
- bool visible
| Default | true |
| Setter | set_visibility(value) |
| Getter | is_visible() |
If true, the character will be drawn. If false, the character will be hidden. Characters around hidden characters will reflow to take the space of hidden characters. If this is not desired, set their color to Color(1, 1, 1, 0) instead.
CheckBox¶
Inherits: Button < BaseButton < Control < CanvasItem < Node < Object
Binary choice user interface widget. See also CheckButton.
Description¶
A checkbox allows the user to make a binary choice (choosing only one of two possible options). It’s similar to CheckButton in functionality, but it has a different apperance. To follow established UX patterns, it’s recommended to use CheckBox when toggling it has no immediate effect on something. For instance, it should be used when toggling it will only do something once a confirmation button is pressed.
Theme Properties¶
| int | check_vadjust | 0 |
| Texture | checked | |
| StyleBox | disabled | |
| StyleBox | focus | |
| Font | font | |
| Color | font_color | Color( 0.88, 0.88, 0.88, 1 ) |
| Color | font_color_disabled | Color( 0.9, 0.9, 0.9, 0.2 ) |
| Color | font_color_hover | Color( 0.94, 0.94, 0.94, 1 ) |
| Color | font_color_hover_pressed | Color( 1, 1, 1, 1 ) |
| Color | font_color_pressed | Color( 1, 1, 1, 1 ) |
| StyleBox | hover | |
| StyleBox | hover_pressed | |
| int | hseparation | 4 |
| StyleBox | normal | |
| StyleBox | pressed | |
| Texture | radio_checked | |
| Texture | radio_unchecked | |
| Texture | unchecked |
CheckButton¶
Inherits: Button < BaseButton < Control < CanvasItem < Node < Object
Checkable button. See also CheckBox.
Description¶
CheckButton is a toggle button displayed as a check field. It’s similar to CheckBox in functionality, but it has a different apperance. To follow established UX patterns, it’s recommended to use CheckButton when toggling it has an immediate effect on something. For instance, it should be used if toggling it enables/disables a setting without requiring the user to press a confirmation button.
Theme Properties¶
| int | check_vadjust | 0 |
| StyleBox | disabled | |
| StyleBox | focus | |
| Font | font | |
| Color | font_color | Color( 0.88, 0.88, 0.88, 1 ) |
| Color | font_color_disabled | Color( 0.9, 0.9, 0.9, 0.2 ) |
| Color | font_color_hover | Color( 0.94, 0.94, 0.94, 1 ) |
| Color | font_color_hover_pressed | Color( 1, 1, 1, 1 ) |
| Color | font_color_pressed | Color( 1, 1, 1, 1 ) |
| StyleBox | hover | |
| StyleBox | hover_pressed | |
| int | hseparation | 4 |
| StyleBox | normal | |
| Texture | off | |
| Texture | off_disabled | |
| Texture | on | |
| Texture | on_disabled | |
| StyleBox | pressed |
CircleShape2D¶
Inherits: Shape2D < Resource < Reference < Object
Circular shape for 2D collisions.
Description¶
Circular shape for 2D collisions. This shape is useful for modeling balls or small characters and its collision detection with everything else is very fast.
ClassDB¶
Inherits: Object
Class information repository.
Description¶
Provides access to metadata stored for every available class.
Methods¶
Method Descriptions¶
Returns true if you can instance objects from the specified class, false in other case.
Returns whether the specified class is available or not.
Returns a category associated with the class for use in documentation and the Asset Library. Debug mode required.
Returns the value of the integer constant name of class or its ancestry. Always returns 0 when the constant could not be found.
- PoolStringArray class_get_integer_constant_list ( String class, bool no_inheritance=false ) const
Returns an array with the names all the integer constants of class or its ancestry.
Returns an array with all the methods of class or its ancestry if no_inheritance is false. Every element of the array is a Dictionary with the following keys: args, default_args, flags, id, name, return: (class_name, hint, hint_string, name, type, usage).
Returns the value of property of class or its ancestry.
Returns an array with all the properties of class or its ancestry if no_inheritance is false.
- Dictionary class_get_signal ( String class, String signal ) const
Returns the signal data of class or its ancestry. The returned value is a Dictionary with the following keys: args, default_args, flags, id, name, return: (class_name, hint, hint_string, name, type, usage).
Returns an array with all the signals of class or its ancestry if no_inheritance is false. Every element of the array is a Dictionary as described in class_get_signal.
Returns whether class or its ancestry has an integer constant called name or not.
Returns whether class (or its ancestry if no_inheritance is false) has a method called method or not.
Returns whether class or its ancestry has a signal called signal or not.
Sets property value of class to value.
- PoolStringArray get_class_list ( ) const
Returns the names of all the classes available.
- PoolStringArray get_inheriters_from_class ( String class ) const
Returns the names of all the classes that directly or indirectly inherit from class.
Returns the parent class of class.
Creates an instance of class.
Returns whether this class is enabled or not.
Returns whether inherits is an ancestor of class or not.
ClippedCamera¶
Inherits: Camera < Spatial < Node < Object
A Camera that includes collision.
Description¶
This node extends Camera to add collisions with Area and/or PhysicsBody nodes. The camera cannot move through colliding objects.
Properties¶
| bool | clip_to_areas | false |
| bool | clip_to_bodies | true |
| int | collision_mask | 1 |
| float | margin | 0.0 |
| ProcessMode | process_mode | 0 |
Methods¶
| void | add_exception ( Object node ) |
| void | add_exception_rid ( RID rid ) |
| void | clear_exceptions ( ) |
| float | get_clip_offset ( ) const |
| bool | get_collision_mask_bit ( int bit ) const |
| void | remove_exception ( Object node ) |
| void | remove_exception_rid ( RID rid ) |
| void | set_collision_mask_bit ( int bit, bool value ) |
Enumerations¶
enum ProcessMode:
- CLIP_PROCESS_PHYSICS = 0 — The camera updates with the
_physics_processcallback. - CLIP_PROCESS_IDLE = 1 — The camera updates with the
_processcallback.
Property Descriptions¶
- bool clip_to_areas
| Default | false |
| Setter | set_clip_to_areas(value) |
| Getter | is_clip_to_areas_enabled() |
If true, the camera stops on contact with Areas.
- bool clip_to_bodies
| Default | true |
| Setter | set_clip_to_bodies(value) |
| Getter | is_clip_to_bodies_enabled() |
If true, the camera stops on contact with PhysicsBodys.
- int collision_mask
| Default | 1 |
| Setter | set_collision_mask(value) |
| Getter | get_collision_mask() |
The camera’s collision mask. Only objects in at least one collision layer matching the mask will be detected.
- float margin
| Default | 0.0 |
| Setter | set_margin(value) |
| Getter | get_margin() |
The camera’s collision margin. The camera can’t get closer than this distance to a colliding object.
- ProcessMode process_mode
| Default | 0 |
| Setter | set_process_mode(value) |
| Getter | get_process_mode() |
The camera’s process callback. See ProcessMode.
Method Descriptions¶
- void add_exception ( Object node )
Adds a collision exception so the camera does not collide with the specified node.
- void add_exception_rid ( RID rid )
Adds a collision exception so the camera does not collide with the specified RID.
- void clear_exceptions ( )
Removes all collision exceptions.
- float get_clip_offset ( ) const
Returns the distance the camera has been offset due to a collision.
Returns true if the specified bit index is on.
Note: Bit indices range from 0-19.
- void remove_exception ( Object node )
Removes a collision exception with the specified node.
- void remove_exception_rid ( RID rid )
Removes a collision exception with the specified RID.
Sets the specified bit index to the value.
Note: Bit indices range from 0-19.
CollisionObject¶
Inherits: Spatial < Node < Object
Inherited By: Area, PhysicsBody
Base node for collision objects.
Description¶
CollisionObject is the base class for physics objects. It can hold any number of collision Shapes. Each shape must be assigned to a shape owner. The CollisionObject can have any number of shape owners. Shape owners are not nodes and do not appear in the editor, but are accessible through code using the shape_owner_* methods.
Properties¶
| bool | input_capture_on_drag | false |
| bool | input_ray_pickable | true |
Methods¶
| void | _input_event ( Object camera, InputEvent event, Vector3 click_position, Vector3 click_normal, int shape_idx ) virtual |
| int | create_shape_owner ( Object owner ) |
| RID | get_rid ( ) const |
| Array | get_shape_owners ( ) |
| bool | is_shape_owner_disabled ( int owner_id ) const |
| void | remove_shape_owner ( int owner_id ) |
| int | shape_find_owner ( int shape_index ) const |
| void | shape_owner_add_shape ( int owner_id, Shape shape ) |
| void | shape_owner_clear_shapes ( int owner_id ) |
| Object | shape_owner_get_owner ( int owner_id ) const |
| Shape | shape_owner_get_shape ( int owner_id, int shape_id ) const |
| int | shape_owner_get_shape_count ( int owner_id ) const |
| int | shape_owner_get_shape_index ( int owner_id, int shape_id ) const |
| Transform | shape_owner_get_transform ( int owner_id ) const |
| void | shape_owner_remove_shape ( int owner_id, int shape_id ) |
| void | shape_owner_set_disabled ( int owner_id, bool disabled ) |
| void | shape_owner_set_transform ( int owner_id, Transform transform ) |
Signals¶
- input_event ( Node camera, InputEvent event, Vector3 click_position, Vector3 click_normal, int shape_idx )
Emitted when _input_event receives an event. See its description for details.
- mouse_entered ( )
Emitted when the mouse pointer enters any of this object’s shapes.
- mouse_exited ( )
Emitted when the mouse pointer exits all this object’s shapes.
Property Descriptions¶
- bool input_capture_on_drag
| Default | false |
| Setter | set_capture_input_on_drag(value) |
| Getter | get_capture_input_on_drag() |
If true, the CollisionObject will continue to receive input events as the mouse is dragged across its shapes.
- bool input_ray_pickable
| Default | true |
| Setter | set_ray_pickable(value) |
| Getter | is_ray_pickable() |
If true, the CollisionObject’s shapes will respond to RayCasts.
Method Descriptions¶
- void _input_event ( Object camera, InputEvent event, Vector3 click_position, Vector3 click_normal, int shape_idx ) virtual
Accepts unhandled InputEvents. click_position is the clicked location in world space and click_normal is the normal vector extending from the clicked surface of the Shape at shape_idx. Connect to the input_event signal to easily pick up these events.
Creates a new shape owner for the given object. Returns owner_id of the new owner for future reference.
- RID get_rid ( ) const
Returns the object’s RID.
- Array get_shape_owners ( )
Returns an Array of owner_id identifiers. You can use these ids in other methods that take owner_id as an argument.
If true, the shape owner and its shapes are disabled.
- void remove_shape_owner ( int owner_id )
Removes the given shape owner.
Returns the owner_id of the given shape.
Adds a Shape to the shape owner.
- void shape_owner_clear_shapes ( int owner_id )
Removes all shapes from the shape owner.
Returns the parent object of the given shape owner.
Returns the Shape with the given id from the given shape owner.
Returns the number of shapes the given shape owner contains.
Returns the child index of the Shape with the given id from the given shape owner.
Returns the shape owner’s Transform.
Removes a shape from the given shape owner.
If true, disables the given shape owner.
Sets the Transform of the given shape owner.
CollisionObject2D¶
Inherits: Node2D < CanvasItem < Node < Object
Inherited By: Area2D, PhysicsBody2D
Base node for 2D collision objects.
Description¶
CollisionObject2D is the base class for 2D physics objects. It can hold any number of 2D collision Shape2Ds. Each shape must be assigned to a shape owner. The CollisionObject2D can have any number of shape owners. Shape owners are not nodes and do not appear in the editor, but are accessible through code using the shape_owner_* methods.
Properties¶
| bool | input_pickable | true |
Methods¶
Signals¶
- input_event ( Node viewport, InputEvent event, int shape_idx )
Emitted when an input event occurs. Requires input_pickable to be true and at least one collision_layer bit to be set. See _input_event for details.
- mouse_entered ( )
Emitted when the mouse pointer enters any of this object’s shapes. Requires input_pickable to be true and at least one collision_layer bit to be set.
- mouse_exited ( )
Emitted when the mouse pointer exits all this object’s shapes. Requires input_pickable to be true and at least one collision_layer bit to be set.
Property Descriptions¶
- bool input_pickable
| Default | true |
| Setter | set_pickable(value) |
| Getter | is_pickable() |
If true, this object is pickable. A pickable object can detect the mouse pointer entering/leaving, and if the mouse is inside it, report input events. Requires at least one collision_layer bit to be set.
Method Descriptions¶
- void _input_event ( Object viewport, InputEvent event, int shape_idx ) virtual
Accepts unhandled InputEvents. Requires input_pickable to be true. shape_idx is the child index of the clicked Shape2D. Connect to the input_event signal to easily pick up these events.
Creates a new shape owner for the given object. Returns owner_id of the new owner for future reference.
- RID get_rid ( ) const
Returns the object’s RID.
Returns the one_way_collision_margin of the shape owner identified by given owner_id.
- Array get_shape_owners ( )
Returns an Array of owner_id identifiers. You can use these ids in other methods that take owner_id as an argument.
If true, the shape owner and its shapes are disabled.
Returns true if collisions for the shape owner originating from this CollisionObject2D will not be reported to collided with CollisionObject2Ds.
- void remove_shape_owner ( int owner_id )
Removes the given shape owner.
Returns the owner_id of the given shape.
Adds a Shape2D to the shape owner.
- void shape_owner_clear_shapes ( int owner_id )
Removes all shapes from the shape owner.
Returns the parent object of the given shape owner.
Returns the Shape2D with the given id from the given shape owner.
Returns the number of shapes the given shape owner contains.
Returns the child index of the Shape2D with the given id from the given shape owner.
- Transform2D shape_owner_get_transform ( int owner_id ) const
Returns the shape owner’s Transform2D.
Removes a shape from the given shape owner.
If true, disables the given shape owner.
If enable is true, collisions for the shape owner originating from this CollisionObject2D will not be reported to collided with CollisionObject2Ds.
Sets the one_way_collision_margin of the shape owner identified by given owner_id to margin pixels.
- void shape_owner_set_transform ( int owner_id, Transform2D transform )
Sets the Transform2D of the given shape owner.
CollisionPolygon¶
Inherits: Spatial < Node < Object
Editor-only class for defining a collision polygon in 3D space.
Description¶
Allows editing a collision polygon’s vertices on a selected plane. Can also set a depth perpendicular to that plane. This class is only available in the editor. It will not appear in the scene tree at run-time. Creates a Shape for gameplay. Properties modified during gameplay will have no effect.
Property Descriptions¶
- float depth
| Default | 1.0 |
| Setter | set_depth(value) |
| Getter | get_depth() |
Length that the resulting collision extends in either direction perpendicular to its polygon.
- bool disabled
| Default | false |
| Setter | set_disabled(value) |
| Getter | is_disabled() |
If true, no collision will be produced.
- PoolVector2Array polygon
| Default | PoolVector2Array( ) |
| Setter | set_polygon(value) |
| Getter | get_polygon() |
Array of vertices which define the polygon.
Note: The returned value is a copy of the original. Methods which mutate the size or properties of the return value will not impact the original polygon. To change properties of the polygon, assign it to a temporary variable and make changes before reassigning the polygon member.
CollisionPolygon2D¶
Inherits: Node2D < CanvasItem < Node < Object
Defines a 2D collision polygon.
Description¶
Provides a 2D collision polygon to a CollisionObject2D parent. Polygons can be drawn in the editor or specified by a list of vertices.
Properties¶
| BuildMode | build_mode | 0 |
| bool | disabled | false |
| bool | one_way_collision | false |
| float | one_way_collision_margin | 1.0 |
| PoolVector2Array | polygon | PoolVector2Array( ) |
Enumerations¶
enum BuildMode:
- BUILD_SOLIDS = 0 — Collisions will include the polygon and its contained area.
- BUILD_SEGMENTS = 1 — Collisions will only include the polygon edges.
Property Descriptions¶
- BuildMode build_mode
| Default | 0 |
| Setter | set_build_mode(value) |
| Getter | get_build_mode() |
Collision build mode. Use one of the BuildMode constants.
- bool disabled
| Default | false |
| Setter | set_disabled(value) |
| Getter | is_disabled() |
If true, no collisions will be detected.
- bool one_way_collision
| Default | false |
| Setter | set_one_way_collision(value) |
| Getter | is_one_way_collision_enabled() |
If true, only edges that face up, relative to CollisionPolygon2D’s rotation, will collide with other objects.
- float one_way_collision_margin
| Default | 1.0 |
| Setter | set_one_way_collision_margin(value) |
| Getter | get_one_way_collision_margin() |
The margin used for one-way collision (in pixels). Higher values will make the shape thicker, and work better for colliders that enter the polygon at a high velocity.
- PoolVector2Array polygon
| Default | PoolVector2Array( ) |
| Setter | set_polygon(value) |
| Getter | get_polygon() |
The polygon’s list of vertices. The final point will be connected to the first. The returned value is a clone of the PoolVector2Array, not a reference.
CollisionShape¶
Inherits: Spatial < Node < Object
Node that represents collision shape data in 3D space.
Description¶
Editor facility for creating and editing collision shapes in 3D space. You can use this node to represent all sorts of collision shapes, for example, add this to an Area to give it a detection shape, or add it to a PhysicsBody to create a solid object. IMPORTANT: this is an Editor-only helper to create shapes, use CollisionObject.shape_owner_get_shape to get the actual shape.
Tutorials¶
Methods¶
| void | make_convex_from_brothers ( ) |
| void | resource_changed ( Resource resource ) |
Property Descriptions¶
- bool disabled
| Default | false |
| Setter | set_disabled(value) |
| Getter | is_disabled() |
A disabled collision shape has no effect in the world.
- Shape shape
| Setter | set_shape(value) |
| Getter | get_shape() |
The actual shape owned by this collision shape.
Method Descriptions¶
- void make_convex_from_brothers ( )
Sets the collision shape’s shape to the addition of all its convexed MeshInstance siblings geometry.
- void resource_changed ( Resource resource )
If this method exists within a script it will be called whenever the shape resource has been modified.
CollisionShape2D¶
Inherits: Node2D < CanvasItem < Node < Object
Node that represents collision shape data in 2D space.
Description¶
Editor facility for creating and editing collision shapes in 2D space. You can use this node to represent all sorts of collision shapes, for example, add this to an Area2D to give it a detection shape, or add it to a PhysicsBody2D to create a solid object. IMPORTANT: this is an Editor-only helper to create shapes, use CollisionObject2D.shape_owner_get_shape to get the actual shape.
Tutorials¶
Properties¶
| bool | disabled | false |
| bool | one_way_collision | false |
| float | one_way_collision_margin | 1.0 |
| Shape2D | shape |
Property Descriptions¶
- bool disabled
| Default | false |
| Setter | set_disabled(value) |
| Getter | is_disabled() |
A disabled collision shape has no effect in the world.
- bool one_way_collision
| Default | false |
| Setter | set_one_way_collision(value) |
| Getter | is_one_way_collision_enabled() |
Sets whether this collision shape should only detect collision on one side (top or bottom).
- float one_way_collision_margin
| Default | 1.0 |
| Setter | set_one_way_collision_margin(value) |
| Getter | get_one_way_collision_margin() |
The margin used for one-way collision (in pixels). Higher values will make the shape thicker, and work better for colliders that enter the shape at a high velocity.
- Shape2D shape
| Setter | set_shape(value) |
| Getter | get_shape() |
The actual shape owned by this collision shape.
Color¶
Color in RGBA format with some support for ARGB format.
Description¶
A color is represented by red, green, and blue (r, g, b) components. Additionally, a represents the alpha component, often used for transparency. Values are in floating-point and usually range from 0 to 1. Some properties (such as CanvasItem.modulate) may accept values greater than 1.
You can also create a color from standardized color names by using @GDScript.ColorN or directly using the color constants defined here. The standardized color set is based on the X11 color names.
Properties¶
| float | a | 1.0 |
| int | a8 | 255 |
| float | b | 0.0 |
| int | b8 | 0 |
| float | g | 0.0 |
| int | g8 | 0 |
| float | h | 0.0 |
| float | r | 0.0 |
| int | r8 | 0 |
| float | s | 0.0 |
| float | v | 0.0 |
Methods¶
| Color | Color ( String from ) |
| Color | Color ( int from ) |
| Color | Color ( float r, float g, float b ) |
| Color | Color ( float r, float g, float b, float a ) |
| Color | blend ( Color over ) |
| Color | contrasted ( ) |
| Color | darkened ( float amount ) |
| Color | from_hsv ( float h, float s, float v, float a=1.0 ) |
| float | gray ( ) |
| Color | inverted ( ) |
| bool | is_equal_approx ( Color color ) |
| Color | lightened ( float amount ) |
| Color | linear_interpolate ( Color b, float t ) |
| int | to_abgr32 ( ) |
| int | to_abgr64 ( ) |
| int | to_argb32 ( ) |
| int | to_argb64 ( ) |
| String | to_html ( bool with_alpha=true ) |
| int | to_rgba32 ( ) |
| int | to_rgba64 ( ) |
Constants¶
- gray = Color( 0.75, 0.75, 0.75, 1 ) — Gray color.
- aliceblue = Color( 0.94, 0.97, 1, 1 ) — Alice blue color.
- antiquewhite = Color( 0.98, 0.92, 0.84, 1 ) — Antique white color.
- aqua = Color( 0, 1, 1, 1 ) — Aqua color.
- aquamarine = Color( 0.5, 1, 0.83, 1 ) — Aquamarine color.
- azure = Color( 0.94, 1, 1, 1 ) — Azure color.
- beige = Color( 0.96, 0.96, 0.86, 1 ) — Beige color.
- bisque = Color( 1, 0.89, 0.77, 1 ) — Bisque color.
- black = Color( 0, 0, 0, 1 ) — Black color.
- blanchedalmond = Color( 1, 0.92, 0.8, 1 ) — Blanche almond color.
- blue = Color( 0, 0, 1, 1 ) — Blue color.
- blueviolet = Color( 0.54, 0.17, 0.89, 1 ) — Blue violet color.
- brown = Color( 0.65, 0.16, 0.16, 1 ) — Brown color.
- burlywood = Color( 0.87, 0.72, 0.53, 1 ) — Burly wood color.
- cadetblue = Color( 0.37, 0.62, 0.63, 1 ) — Cadet blue color.
- chartreuse = Color( 0.5, 1, 0, 1 ) — Chartreuse color.
- chocolate = Color( 0.82, 0.41, 0.12, 1 ) — Chocolate color.
- coral = Color( 1, 0.5, 0.31, 1 ) — Coral color.
- cornflower = Color( 0.39, 0.58, 0.93, 1 ) — Cornflower color.
- cornsilk = Color( 1, 0.97, 0.86, 1 ) — Corn silk color.
- crimson = Color( 0.86, 0.08, 0.24, 1 ) — Crimson color.
- cyan = Color( 0, 1, 1, 1 ) — Cyan color.
- darkblue = Color( 0, 0, 0.55, 1 ) — Dark blue color.
- darkcyan = Color( 0, 0.55, 0.55, 1 ) — Dark cyan color.
- darkgoldenrod = Color( 0.72, 0.53, 0.04, 1 ) — Dark goldenrod color.
- darkgray = Color( 0.66, 0.66, 0.66, 1 ) — Dark gray color.
- darkgreen = Color( 0, 0.39, 0, 1 ) — Dark green color.
- darkkhaki = Color( 0.74, 0.72, 0.42, 1 ) — Dark khaki color.
- darkmagenta = Color( 0.55, 0, 0.55, 1 ) — Dark magenta color.
- darkolivegreen = Color( 0.33, 0.42, 0.18, 1 ) — Dark olive green color.
- darkorange = Color( 1, 0.55, 0, 1 ) — Dark orange color.
- darkorchid = Color( 0.6, 0.2, 0.8, 1 ) — Dark orchid color.
- darkred = Color( 0.55, 0, 0, 1 ) — Dark red color.
- darksalmon = Color( 0.91, 0.59, 0.48, 1 ) — Dark salmon color.
- darkseagreen = Color( 0.56, 0.74, 0.56, 1 ) — Dark sea green color.
- darkslateblue = Color( 0.28, 0.24, 0.55, 1 ) — Dark slate blue color.
- darkslategray = Color( 0.18, 0.31, 0.31, 1 ) — Dark slate gray color.
- darkturquoise = Color( 0, 0.81, 0.82, 1 ) — Dark turquoise color.
- darkviolet = Color( 0.58, 0, 0.83, 1 ) — Dark violet color.
- deeppink = Color( 1, 0.08, 0.58, 1 ) — Deep pink color.
- deepskyblue = Color( 0, 0.75, 1, 1 ) — Deep sky blue color.
- dimgray = Color( 0.41, 0.41, 0.41, 1 ) — Dim gray color.
- dodgerblue = Color( 0.12, 0.56, 1, 1 ) — Dodger blue color.
- firebrick = Color( 0.7, 0.13, 0.13, 1 ) — Firebrick color.
- floralwhite = Color( 1, 0.98, 0.94, 1 ) — Floral white color.
- forestgreen = Color( 0.13, 0.55, 0.13, 1 ) — Forest green color.
- fuchsia = Color( 1, 0, 1, 1 ) — Fuchsia color.
- gainsboro = Color( 0.86, 0.86, 0.86, 1 ) — Gainsboro color.
- ghostwhite = Color( 0.97, 0.97, 1, 1 ) — Ghost white color.
- gold = Color( 1, 0.84, 0, 1 ) — Gold color.
- goldenrod = Color( 0.85, 0.65, 0.13, 1 ) — Goldenrod color.
- green = Color( 0, 1, 0, 1 ) — Green color.
- greenyellow = Color( 0.68, 1, 0.18, 1 ) — Green yellow color.
- honeydew = Color( 0.94, 1, 0.94, 1 ) — Honeydew color.
- hotpink = Color( 1, 0.41, 0.71, 1 ) — Hot pink color.
- indianred = Color( 0.8, 0.36, 0.36, 1 ) — Indian red color.
- indigo = Color( 0.29, 0, 0.51, 1 ) — Indigo color.
- ivory = Color( 1, 1, 0.94, 1 ) — Ivory color.
- khaki = Color( 0.94, 0.9, 0.55, 1 ) — Khaki color.
- lavender = Color( 0.9, 0.9, 0.98, 1 ) — Lavender color.
- lavenderblush = Color( 1, 0.94, 0.96, 1 ) — Lavender blush color.
- lawngreen = Color( 0.49, 0.99, 0, 1 ) — Lawn green color.
- lemonchiffon = Color( 1, 0.98, 0.8, 1 ) — Lemon chiffon color.
- lightblue = Color( 0.68, 0.85, 0.9, 1 ) — Light blue color.
- lightcoral = Color( 0.94, 0.5, 0.5, 1 ) — Light coral color.
- lightcyan = Color( 0.88, 1, 1, 1 ) — Light cyan color.
- lightgoldenrod = Color( 0.98, 0.98, 0.82, 1 ) — Light goldenrod color.
- lightgray = Color( 0.83, 0.83, 0.83, 1 ) — Light gray color.
- lightgreen = Color( 0.56, 0.93, 0.56, 1 ) — Light green color.
- lightpink = Color( 1, 0.71, 0.76, 1 ) — Light pink color.
- lightsalmon = Color( 1, 0.63, 0.48, 1 ) — Light salmon color.
- lightseagreen = Color( 0.13, 0.7, 0.67, 1 ) — Light sea green color.
- lightskyblue = Color( 0.53, 0.81, 0.98, 1 ) — Light sky blue color.
- lightslategray = Color( 0.47, 0.53, 0.6, 1 ) — Light slate gray color.
- lightsteelblue = Color( 0.69, 0.77, 0.87, 1 ) — Light steel blue color.
- lightyellow = Color( 1, 1, 0.88, 1 ) — Light yellow color.
- lime = Color( 0, 1, 0, 1 ) — Lime color.
- limegreen = Color( 0.2, 0.8, 0.2, 1 ) — Lime green color.
- linen = Color( 0.98, 0.94, 0.9, 1 ) — Linen color.
- magenta = Color( 1, 0, 1, 1 ) — Magenta color.
- maroon = Color( 0.69, 0.19, 0.38, 1 ) — Maroon color.
- mediumaquamarine = Color( 0.4, 0.8, 0.67, 1 ) — Medium aquamarine color.
- mediumblue = Color( 0, 0, 0.8, 1 ) — Medium blue color.
- mediumorchid = Color( 0.73, 0.33, 0.83, 1 ) — Medium orchid color.
- mediumpurple = Color( 0.58, 0.44, 0.86, 1 ) — Medium purple color.
- mediumseagreen = Color( 0.24, 0.7, 0.44, 1 ) — Medium sea green color.
- mediumslateblue = Color( 0.48, 0.41, 0.93, 1 ) — Medium slate blue color.
- mediumspringgreen = Color( 0, 0.98, 0.6, 1 ) — Medium spring green color.
- mediumturquoise = Color( 0.28, 0.82, 0.8, 1 ) — Medium turquoise color.
- mediumvioletred = Color( 0.78, 0.08, 0.52, 1 ) — Medium violet red color.
- midnightblue = Color( 0.1, 0.1, 0.44, 1 ) — Midnight blue color.
- mintcream = Color( 0.96, 1, 0.98, 1 ) — Mint cream color.
- mistyrose = Color( 1, 0.89, 0.88, 1 ) — Misty rose color.
- moccasin = Color( 1, 0.89, 0.71, 1 ) — Moccasin color.
- navajowhite = Color( 1, 0.87, 0.68, 1 ) — Navajo white color.
- navyblue = Color( 0, 0, 0.5, 1 ) — Navy blue color.
- oldlace = Color( 0.99, 0.96, 0.9, 1 ) — Old lace color.
- olive = Color( 0.5, 0.5, 0, 1 ) — Olive color.
- olivedrab = Color( 0.42, 0.56, 0.14, 1 ) — Olive drab color.
- orange = Color( 1, 0.65, 0, 1 ) — Orange color.
- orangered = Color( 1, 0.27, 0, 1 ) — Orange red color.
- orchid = Color( 0.85, 0.44, 0.84, 1 ) — Orchid color.
- palegoldenrod = Color( 0.93, 0.91, 0.67, 1 ) — Pale goldenrod color.
- palegreen = Color( 0.6, 0.98, 0.6, 1 ) — Pale green color.
- paleturquoise = Color( 0.69, 0.93, 0.93, 1 ) — Pale turquoise color.
- palevioletred = Color( 0.86, 0.44, 0.58, 1 ) — Pale violet red color.
- papayawhip = Color( 1, 0.94, 0.84, 1 ) — Papaya whip color.
- peachpuff = Color( 1, 0.85, 0.73, 1 ) — Peach puff color.
- peru = Color( 0.8, 0.52, 0.25, 1 ) — Peru color.
- pink = Color( 1, 0.75, 0.8, 1 ) — Pink color.
- plum = Color( 0.87, 0.63, 0.87, 1 ) — Plum color.
- powderblue = Color( 0.69, 0.88, 0.9, 1 ) — Powder blue color.
- purple = Color( 0.63, 0.13, 0.94, 1 ) — Purple color.
- rebeccapurple = Color( 0.4, 0.2, 0.6, 1 ) — Rebecca purple color.
- red = Color( 1, 0, 0, 1 ) — Red color.
- rosybrown = Color( 0.74, 0.56, 0.56, 1 ) — Rosy brown color.
- royalblue = Color( 0.25, 0.41, 0.88, 1 ) — Royal blue color.
- saddlebrown = Color( 0.55, 0.27, 0.07, 1 ) — Saddle brown color.
- salmon = Color( 0.98, 0.5, 0.45, 1 ) — Salmon color.
- sandybrown = Color( 0.96, 0.64, 0.38, 1 ) — Sandy brown color.
- seagreen = Color( 0.18, 0.55, 0.34, 1 ) — Sea green color.
- seashell = Color( 1, 0.96, 0.93, 1 ) — Seashell color.
- sienna = Color( 0.63, 0.32, 0.18, 1 ) — Sienna color.
- silver = Color( 0.75, 0.75, 0.75, 1 ) — Silver color.
- skyblue = Color( 0.53, 0.81, 0.92, 1 ) — Sky blue color.
- slateblue = Color( 0.42, 0.35, 0.8, 1 ) — Slate blue color.
- slategray = Color( 0.44, 0.5, 0.56, 1 ) — Slate gray color.
- snow = Color( 1, 0.98, 0.98, 1 ) — Snow color.
- springgreen = Color( 0, 1, 0.5, 1 ) — Spring green color.
- steelblue = Color( 0.27, 0.51, 0.71, 1 ) — Steel blue color.
- tan = Color( 0.82, 0.71, 0.55, 1 ) — Tan color.
- teal = Color( 0, 0.5, 0.5, 1 ) — Teal color.
- thistle = Color( 0.85, 0.75, 0.85, 1 ) — Thistle color.
- tomato = Color( 1, 0.39, 0.28, 1 ) — Tomato color.
- transparent = Color( 1, 1, 1, 0 ) — Transparent color (white with no alpha).
- turquoise = Color( 0.25, 0.88, 0.82, 1 ) — Turquoise color.
- violet = Color( 0.93, 0.51, 0.93, 1 ) — Violet color.
- webgray = Color( 0.5, 0.5, 0.5, 1 ) — Web gray color.
- webgreen = Color( 0, 0.5, 0, 1 ) — Web green color.
- webmaroon = Color( 0.5, 0, 0, 1 ) — Web maroon color.
- webpurple = Color( 0.5, 0, 0.5, 1 ) — Web purple color.
- wheat = Color( 0.96, 0.87, 0.7, 1 ) — Wheat color.
- white = Color( 1, 1, 1, 1 ) — White color.
- whitesmoke = Color( 0.96, 0.96, 0.96, 1 ) — White smoke color.
- yellow = Color( 1, 1, 0, 1 ) — Yellow color.
- yellowgreen = Color( 0.6, 0.8, 0.2, 1 ) — Yellow green color.
Property Descriptions¶
- float a
| Default | 1.0 |
Alpha value (range 0 to 1).
- int a8
| Default | 255 |
Alpha value (range 0 to 255).
- float b
| Default | 0.0 |
Blue value (range 0 to 1).
- int b8
| Default | 0 |
Blue value (range 0 to 255).
- float g
| Default | 0.0 |
Green value (range 0 to 1).
- int g8
| Default | 0 |
Green value (range 0 to 255).
- float h
| Default | 0.0 |
HSV hue value (range 0 to 1).
- float r
| Default | 0.0 |
Red value (range 0 to 1).
- int r8
| Default | 0 |
Red value (range 0 to 255).
- float s
| Default | 0.0 |
HSV saturation value (range 0 to 1).
- float v
| Default | 0.0 |
HSV value (range 0 to 1).
Method Descriptions¶
Constructs a color from an HTML hexadecimal color string in ARGB or RGB format. See also @GDScript.ColorN.
# Each of the following creates the same color RGBA(178, 217, 10, 255).
var c1 = Color("#ffb2d90a") # ARGB format with "#".
var c2 = Color("ffb2d90a") # ARGB format.
var c3 = Color("#b2d90a") # RGB format with "#".
var c4 = Color("b2d90a") # RGB format.
Constructs a color from a 32-bit integer (each byte represents a component of the RGBA profile).
var c = Color(274) # Equivalent to RGBA(0, 0, 1, 18)
Constructs a color from an RGB profile using values between 0 and 1. Alpha will always be 1.
var c = Color(0.2, 1.0, 0.7) # Equivalent to RGBA(51, 255, 178, 255)
Constructs a color from an RGBA profile using values between 0 and 1.
var c = Color(0.2, 1.0, 0.7, 0.8) # Equivalent to RGBA(51, 255, 178, 204)
Returns a new color resulting from blending this color over another. If the color is opaque, the result is also opaque. The second color may have a range of alpha values.
var bg = Color(0.0, 1.0, 0.0, 0.5) # Green with alpha of 50%
var fg = Color(1.0, 0.0, 0.0, 0.5) # Red with alpha of 50%
var blended_color = bg.blend(fg) # Brown with alpha of 75%
- Color contrasted ( )
Returns the most contrasting color.
var c = Color(0.3, 0.4, 0.9)
var contrasted_color = c.contrasted() # Equivalent to RGBA(204, 229, 102, 255)
Returns a new color resulting from making this color darker by the specified percentage (ratio from 0 to 1).
var green = Color(0.0, 1.0, 0.0)
var darkgreen = green.darkened(0.2) # 20% darker than regular green
Constructs a color from an HSV profile. h, s, and v are values between 0 and 1.
var c = Color.from_hsv(0.58, 0.5, 0.79, 0.8) # Equivalent to HSV(210, 50, 79, 0.8) or Color8(100, 151, 201, 0.8)
- float gray ( )
Returns the color’s grayscale representation.
The gray value is calculated as (r + g + b) / 3.
var c = Color(0.2, 0.45, 0.82)
var gray = c.gray() # A value of 0.466667
- Color inverted ( )
Returns the inverted color (1 - r, 1 - g, 1 - b, a).
var c = Color(0.3, 0.4, 0.9)
var inverted_color = c.inverted() # A color of an RGBA(178, 153, 26, 255)
Returns true if this color and color are approximately equal, by running @GDScript.is_equal_approx on each component.
Returns a new color resulting from making this color lighter by the specified percentage (ratio from 0 to 1).
var green = Color(0.0, 1.0, 0.0)
var lightgreen = green.lightened(0.2) # 20% lighter than regular green
Returns the linear interpolation with another color. The interpolation factor t is between 0 and 1.
var c1 = Color(1.0, 0.0, 0.0)
var c2 = Color(0.0, 1.0, 0.0)
var li_c = c1.linear_interpolate(c2, 0.5) # A color of an RGBA(128, 128, 0, 255)
- int to_abgr32 ( )
Returns the color’s 32-bit integer in ABGR format (each byte represents a component of the ABGR profile). ABGR is the reversed version of the default format.
var c = Color(1, 0.5, 0.2)
print(c.to_abgr32()) # Prints 4281565439
- int to_abgr64 ( )
Returns the color’s 64-bit integer in ABGR format (each word represents a component of the ABGR profile). ABGR is the reversed version of the default format.
var c = Color(1, 0.5, 0.2)
print(c.to_abgr64()) # Prints -225178692812801
- int to_argb32 ( )
Returns the color’s 32-bit integer in ARGB format (each byte represents a component of the ARGB profile). ARGB is more compatible with DirectX.
var c = Color(1, 0.5, 0.2)
print(c.to_argb32()) # Prints 4294934323
- int to_argb64 ( )
Returns the color’s 64-bit integer in ARGB format (each word represents a component of the ARGB profile). ARGB is more compatible with DirectX.
var c = Color(1, 0.5, 0.2)
print(c.to_argb64()) # Prints -2147470541
Returns the color’s HTML hexadecimal color string in ARGB format (ex: ff34f822).
Setting with_alpha to false excludes alpha from the hexadecimal string.
var c = Color(1, 1, 1, 0.5)
var s1 = c.to_html() # Returns "7fffffff"
var s2 = c.to_html(false) # Returns "ffffff"
- int to_rgba32 ( )
Returns the color’s 32-bit integer in RGBA format (each byte represents a component of the RGBA profile). RGBA is Godot’s default format.
var c = Color(1, 0.5, 0.2)
print(c.to_rgba32()) # Prints 4286526463
- int to_rgba64 ( )
Returns the color’s 64-bit integer in RGBA format (each word represents a component of the RGBA profile). RGBA is Godot’s default format.
var c = Color(1, 0.5, 0.2)
print(c.to_rgba64()) # Prints -140736629309441
ColorPicker¶
Inherits: BoxContainer < Container < Control < CanvasItem < Node < Object
Color picker control.
Description¶
Control node displaying a color picker widget. It’s useful for selecting a color from an RGB/RGBA colorspace.
Properties¶
| Color | color | Color( 1, 1, 1, 1 ) |
| bool | deferred_mode | false |
| bool | edit_alpha | true |
| bool | hsv_mode | false |
| bool | presets_enabled | true |
| bool | presets_visible | true |
| bool | raw_mode | false |
Methods¶
| void | add_preset ( Color color ) |
| void | erase_preset ( Color color ) |
| PoolColorArray | get_presets ( ) const |
Theme Properties¶
| Texture | add_preset | |
| Texture | color_hue | |
| Texture | color_sample | |
| int | h_width | 30 |
| int | label_width | 10 |
| int | margin | 4 |
| Texture | overbright_indicator | |
| Texture | preset_bg | |
| Texture | screen_picker | |
| int | sv_height | 256 |
| int | sv_width | 256 |
Signals¶
- color_changed ( Color color )
Emitted when the color is changed.
- preset_added ( Color color )
Emitted when a preset is added.
- preset_removed ( Color color )
Emitted when a preset is removed.
Property Descriptions¶
- Color color
| Default | Color( 1, 1, 1, 1 ) |
| Setter | set_pick_color(value) |
| Getter | get_pick_color() |
The currently selected color.
- bool deferred_mode
| Default | false |
| Setter | set_deferred_mode(value) |
| Getter | is_deferred_mode() |
If true, the color will apply only after the user releases the mouse button, otherwise it will apply immediately even in mouse motion event (which can cause performance issues).
- bool edit_alpha
| Default | true |
| Setter | set_edit_alpha(value) |
| Getter | is_editing_alpha() |
If true, shows an alpha channel slider (transparency).
- bool hsv_mode
| Default | false |
| Setter | set_hsv_mode(value) |
| Getter | is_hsv_mode() |
If true, allows editing the color with Hue/Saturation/Value sliders.
Note: Cannot be enabled if raw mode is on.
- bool presets_enabled
| Default | true |
| Setter | set_presets_enabled(value) |
| Getter | are_presets_enabled() |
If true, the “add preset” button is enabled.
- bool presets_visible
| Default | true |
| Setter | set_presets_visible(value) |
| Getter | are_presets_visible() |
If true, saved color presets are visible.
- bool raw_mode
| Default | false |
| Setter | set_raw_mode(value) |
| Getter | is_raw_mode() |
If true, allows the color R, G, B component values to go beyond 1.0, which can be used for certain special operations that require it (like tinting without darkening or rendering sprites in HDR).
Note: Cannot be enabled if HSV mode is on.
Method Descriptions¶
- void add_preset ( Color color )
Adds the given color to a list of color presets. The presets are displayed in the color picker and the user will be able to select them.
Note: the presets list is only for this color picker.
- void erase_preset ( Color color )
Removes the given color from the list of color presets of this color picker.
- PoolColorArray get_presets ( ) const
Returns the list of colors in the presets of the color picker.
ColorPickerButton¶
Inherits: Button < BaseButton < Control < CanvasItem < Node < Object
Button that pops out a ColorPicker.
Description¶
Encapsulates a ColorPicker making it accessible by pressing a button. Pressing the button will toggle the ColorPicker visibility.
Methods¶
| ColorPicker | get_picker ( ) |
| PopupPanel | get_popup ( ) |
Theme Properties¶
| Texture | bg | |
| StyleBox | disabled | |
| StyleBox | focus | |
| Font | font | |
| Color | font_color | Color( 1, 1, 1, 1 ) |
| Color | font_color_disabled | Color( 0.9, 0.9, 0.9, 0.3 ) |
| Color | font_color_hover | Color( 1, 1, 1, 1 ) |
| Color | font_color_pressed | Color( 0.8, 0.8, 0.8, 1 ) |
| StyleBox | hover | |
| int | hseparation | 2 |
| StyleBox | normal | |
| StyleBox | pressed |
Signals¶
- color_changed ( Color color )
Emitted when the color changes.
- picker_created ( )
Emitted when the ColorPicker is created (the button is pressed for the first time).
- popup_closed ( )
Emitted when the ColorPicker is closed.
Property Descriptions¶
- Color color
| Default | Color( 0, 0, 0, 1 ) |
| Setter | set_pick_color(value) |
| Getter | get_pick_color() |
The currently selected color.
- bool edit_alpha
| Default | true |
| Setter | set_edit_alpha(value) |
| Getter | is_editing_alpha() |
If true, the alpha channel in the displayed ColorPicker will be visible.
Method Descriptions¶
- ColorPicker get_picker ( )
Returns the ColorPicker that this node toggles.
- PopupPanel get_popup ( )
Returns the control’s PopupPanel which allows you to connect to popup signals. This allows you to handle events when the ColorPicker is shown or hidden.
ColorRect¶
Inherits: Control < CanvasItem < Node < Object
Colored rectangle.
Description¶
Displays a colored rectangle.
ConcavePolygonShape¶
Inherits: Shape < Resource < Reference < Object
Concave polygon shape.
Description¶
Concave polygon shape resource, which can be set into a PhysicsBody or area. This shape is created by feeding a list of triangles.
Note: when used for collision, ConcavePolygonShape is intended to work with static PhysicsBody nodes like StaticBody and will not work with KinematicBody or RigidBody with a mode other than Static.
Methods¶
| PoolVector3Array | get_faces ( ) const |
| void | set_faces ( PoolVector3Array faces ) |
Method Descriptions¶
- PoolVector3Array get_faces ( ) const
Returns the faces (an array of triangles).
- void set_faces ( PoolVector3Array faces )
Sets the faces (an array of triangles).
ConcavePolygonShape2D¶
Inherits: Shape2D < Resource < Reference < Object
Concave polygon 2D shape resource for physics.
Description¶
Concave polygon 2D shape resource for physics. It is made out of segments and is optimal for complex polygonal concave collisions. However, it is not advised to use for RigidBody2D nodes. A CollisionPolygon2D in convex decomposition mode (solids) or several convex objects are advised for that instead. Otherwise, a concave polygon 2D shape is better for static collisions.
The main difference between a ConvexPolygonShape2D and a ConcavePolygonShape2D is that a concave polygon assumes it is concave and uses a more complex method of collision detection, and a convex one forces itself to be convex in order to speed up collision detection.
Properties¶
| PoolVector2Array | segments | PoolVector2Array( ) |
Property Descriptions¶
- PoolVector2Array segments
| Default | PoolVector2Array( ) |
| Setter | set_segments(value) |
| Getter | get_segments() |
The array of points that make up the ConcavePolygonShape2D’s line segments.
ConeTwistJoint¶
Inherits: Joint < Spatial < Node < Object
A twist joint between two 3D bodies.
Description¶
The joint can rotate the bodies across an axis defined by the local x-axes of the Joint.
The twist axis is initiated as the X axis of the Joint.
Once the Bodies swing, the twist axis is calculated as the middle of the x-axes of the Joint in the local space of the two Bodies.
Properties¶
| float | bias | 0.3 |
| float | relaxation | 1.0 |
| float | softness | 0.8 |
| float | swing_span | 45.0 |
| float | twist_span | 180.0 |
Enumerations¶
enum Param:
- PARAM_SWING_SPAN = 0 — Swing is rotation from side to side, around the axis perpendicular to the twist axis.
The swing span defines, how much rotation will not get corrected along the swing axis.
Could be defined as looseness in the ConeTwistJoint.
If below 0.05, this behavior is locked.
- PARAM_TWIST_SPAN = 1 — Twist is the rotation around the twist axis, this value defined how far the joint can twist.
Twist is locked if below 0.05.
- PARAM_BIAS = 2 — The speed with which the swing or twist will take place.
The higher, the faster.
- PARAM_SOFTNESS = 3 — The ease with which the joint starts to twist. If it’s too low, it takes more force to start twisting the joint.
- PARAM_RELAXATION = 4 — Defines, how fast the swing- and twist-speed-difference on both sides gets synced.
- PARAM_MAX = 5 — Represents the size of the Param enum.
Property Descriptions¶
- float bias
| Default | 0.3 |
| Setter | set_param(value) |
| Getter | get_param() |
The speed with which the swing or twist will take place.
The higher, the faster.
- float relaxation
| Default | 1.0 |
| Setter | set_param(value) |
| Getter | get_param() |
Defines, how fast the swing- and twist-speed-difference on both sides gets synced.
- float softness
| Default | 0.8 |
| Setter | set_param(value) |
| Getter | get_param() |
The ease with which the joint starts to twist. If it’s too low, it takes more force to start twisting the joint.
- float swing_span
| Default | 45.0 |
Swing is rotation from side to side, around the axis perpendicular to the twist axis.
The swing span defines, how much rotation will not get corrected along the swing axis.
Could be defined as looseness in the ConeTwistJoint.
If below 0.05, this behavior is locked.
- float twist_span
| Default | 180.0 |
Twist is the rotation around the twist axis, this value defined how far the joint can twist.
Twist is locked if below 0.05.
ConfigFile¶
Helper class to handle INI-style files.
Description¶
This helper class can be used to store Variant values on the filesystem using INI-style formatting. The stored values are identified by a section and a key:
[section]
some_key=42
string_example="Hello World!"
a_vector=Vector3( 1, 0, 2 )
The stored data can be saved to or parsed from a file, though ConfigFile objects can also be used directly without accessing the filesystem.
The following example shows how to parse an INI-style file from the system, read its contents and store new values in it:
var config = ConfigFile.new()
var err = config.load("user://settings.cfg")
if err == OK: # If not, something went wrong with the file loading
# Look for the display/width pair, and default to 1024 if missing
var screen_width = config.get_value("display", "width", 1024)
# Store a variable if and only if it hasn't been defined yet
if not config.has_section_key("audio", "mute"):
config.set_value("audio", "mute", false)
# Save the changes by overwriting the previous file
config.save("user://settings.cfg")
Keep in mind that section and property names can’t contain spaces. Anything after a space will be ignored on save and on load.
ConfigFiles can also contain manually written comment lines starting with a semicolon (;). Those lines will be ignored when parsing the file. Note that comments will be lost when saving the ConfigFile. This can still be useful for dedicated server configuration files, which are typically never overwritten without explicit user action.
Methods¶
| void | erase_section ( String section ) |
| void | erase_section_key ( String section, String key ) |
| PoolStringArray | get_section_keys ( String section ) const |
| PoolStringArray | get_sections ( ) const |
| Variant | get_value ( String section, String key, Variant default=null ) const |
| bool | has_section ( String section ) const |
| bool | has_section_key ( String section, String key ) const |
| Error | load ( String path ) |
| Error | load_encrypted ( String path, PoolByteArray key ) |
| Error | load_encrypted_pass ( String path, String password ) |
| Error | parse ( String data ) |
| Error | save ( String path ) |
| Error | save_encrypted ( String path, PoolByteArray key ) |
| Error | save_encrypted_pass ( String path, String password ) |
| void | set_value ( String section, String key, Variant value ) |
Method Descriptions¶
- void erase_section ( String section )
Deletes the specified section along with all the key-value pairs inside. Raises an error if the section does not exist.
Deletes the specified key in a section. Raises an error if either the section or the key do not exist.
- PoolStringArray get_section_keys ( String section ) const
Returns an array of all defined key identifiers in the specified section. Raises an error and returns an empty array if the section does not exist.
- PoolStringArray get_sections ( ) const
Returns an array of all defined section identifiers.
Returns the current value for the specified section and key. If either the section or the key do not exist, the method returns the fallback default value. If default is not specified or set to null, an error is also raised.
Returns true if the specified section exists.
Returns true if the specified section-key pair exists.
Loads the config file specified as a parameter. The file’s contents are parsed and loaded in the ConfigFile object which the method was called on.
Returns one of the Error code constants (OK on success).
- Error load_encrypted ( String path, PoolByteArray key )
Loads the encrypted config file specified as a parameter, using the provided key to decrypt it. The file’s contents are parsed and loaded in the ConfigFile object which the method was called on.
Returns one of the Error code constants (OK on success).
Loads the encrypted config file specified as a parameter, using the provided password to decrypt it. The file’s contents are parsed and loaded in the ConfigFile object which the method was called on.
Returns one of the Error code constants (OK on success).
Parses the the passed string as the contents of a config file. The string is parsed and loaded in the ConfigFile object which the method was called on.
Returns one of the Error code constants (OK on success).
Saves the contents of the ConfigFile object to the file specified as a parameter. The output file uses an INI-style structure.
Returns one of the Error code constants (OK on success).
- Error save_encrypted ( String path, PoolByteArray key )
Saves the contents of the ConfigFile object to the AES-256 encrypted file specified as a parameter, using the provided key to encrypt it. The output file uses an INI-style structure.
Returns one of the Error code constants (OK on success).
Saves the contents of the ConfigFile object to the AES-256 encrypted file specified as a parameter, using the provided password to encrypt it. The output file uses an INI-style structure.
Returns one of the Error code constants (OK on success).
Assigns a value to the specified key of the specified section. If either the section or the key do not exist, they are created. Passing a null value deletes the specified key if it exists, and deletes the section if it ends up empty once the key has been removed.
ConfirmationDialog¶
Inherits: AcceptDialog < WindowDialog < Popup < Control < CanvasItem < Node < Object
Inherited By: EditorFileDialog, FileDialog, ScriptCreateDialog
Dialog for confirmation of actions.
Description¶
Dialog for confirmation of actions. This dialog inherits from AcceptDialog, but has by default an OK and Cancel button (in host OS order).
To get cancel action, you can use:
get_cancel().connect("pressed", self, "cancelled").
Methods¶
| Button | get_cancel ( ) |
Container¶
Inherits: Control < CanvasItem < Node < Object
Inherited By: BoxContainer, CenterContainer, EditorProperty, GraphNode, GridContainer, MarginContainer, PanelContainer, ScrollContainer, SplitContainer, TabContainer, ViewportContainer
Base node for containers.
Description¶
Base node for containers. A Container contains other controls and automatically arranges them in a certain way.
A Control can inherit this to create custom container classes.
Methods¶
| void | fit_child_in_rect ( Control child, Rect2 rect ) |
| void | queue_sort ( ) |
Constants¶
- NOTIFICATION_SORT_CHILDREN = 50 — Notification for when sorting the children, it must be obeyed immediately.
Method Descriptions¶
Fit a child control in a given rect. This is mainly a helper for creating custom container classes.
- void queue_sort ( )
Queue resort of the contained children. This is called automatically anyway, but can be called upon request.
Control¶
Inherits: CanvasItem < Node < Object
Inherited By: BaseButton, ColorRect, Container, GraphEdit, ItemList, Label, LineEdit, NinePatchRect, Panel, Popup, Range, ReferenceRect, RichTextLabel, Separator, Tabs, TextEdit, TextureRect, Tree, VideoPlayer
All user interface nodes inherit from Control. A control’s anchors and margins adapt its position and size relative to its parent.
Description¶
Base class for all UI-related nodes. Control features a bounding rectangle that defines its extents, an anchor position relative to its parent control or the current viewport, and margins that represent an offset to the anchor. The margins update automatically when the node, any of its parents, or the screen size change.
For more information on Godot’s UI system, anchors, margins, and containers, see the related tutorials in the manual. To build flexible UIs, you’ll need a mix of UI elements that inherit from Control and Container nodes.
User Interface nodes and input
Godot sends input events to the scene’s root node first, by calling Node._input. Node._input forwards the event down the node tree to the nodes under the mouse cursor, or on keyboard focus. To do so, it calls MainLoop._input_event. Call accept_event so no other node receives the event. Once you accepted an input, it becomes handled so Node._unhandled_input will not process it.
Only one Control node can be in keyboard focus. Only the node in focus will receive keyboard events. To get the focus, call grab_focus. Control nodes lose focus when another node grabs it, or if you hide the node in focus.
Sets mouse_filter to MOUSE_FILTER_IGNORE to tell a Control node to ignore mouse or touch events. You’ll need it if you place an icon on top of a button.
Theme resources change the Control’s appearance. If you change the Theme on a Control node, it affects all of its children. To override some of the theme’s parameters, call one of the add_*_override methods, like add_font_override. You can override the theme with the inspector.
Tutorials¶
Properties¶
| float | anchor_bottom | 0.0 |
| float | anchor_left | 0.0 |
| float | anchor_right | 0.0 |
| float | anchor_top | 0.0 |
| FocusMode | focus_mode | 0 |
| NodePath | focus_neighbour_bottom | NodePath("") |
| NodePath | focus_neighbour_left | NodePath("") |
| NodePath | focus_neighbour_right | NodePath("") |
| NodePath | focus_neighbour_top | NodePath("") |
| NodePath | focus_next | NodePath("") |
| NodePath | focus_previous | NodePath("") |
| GrowDirection | grow_horizontal | 1 |
| GrowDirection | grow_vertical | 1 |
| String | hint_tooltip | "" |
| float | margin_bottom | 0.0 |
| float | margin_left | 0.0 |
| float | margin_right | 0.0 |
| float | margin_top | 0.0 |
| CursorShape | mouse_default_cursor_shape | 0 |
| MouseFilter | mouse_filter | 0 |
| bool | rect_clip_content | false |
| Vector2 | rect_global_position | |
| Vector2 | rect_min_size | Vector2( 0, 0 ) |
| Vector2 | rect_pivot_offset | Vector2( 0, 0 ) |
| Vector2 | rect_position | Vector2( 0, 0 ) |
| float | rect_rotation | 0.0 |
| Vector2 | rect_scale | Vector2( 1, 1 ) |
| Vector2 | rect_size | Vector2( 0, 0 ) |
| int | size_flags_horizontal | 1 |
| float | size_flags_stretch_ratio | 1.0 |
| int | size_flags_vertical | 1 |
| Theme | theme |
Methods¶
Signals¶
- focus_entered ( )
Emitted when the node gains keyboard focus.
- focus_exited ( )
Emitted when the node loses keyboard focus.
- gui_input ( InputEvent event )
Emitted when the node receives an InputEvent.
- minimum_size_changed ( )
Emitted when the node’s minimum size changes.
- modal_closed ( )
Emitted when a modal Control is closed. See show_modal.
- mouse_entered ( )
Emitted when the mouse enters the control’s Rect area, provided its mouse_filter lets the event reach it.
- mouse_exited ( )
Emitted when the mouse leaves the control’s Rect area, provided its mouse_filter lets the event reach it.
- resized ( )
Emitted when the control changes size.
- size_flags_changed ( )
Emitted when one of the size flags changes. See size_flags_horizontal and size_flags_vertical.
Enumerations¶
enum FocusMode:
- FOCUS_NONE = 0 — The node cannot grab focus. Use with focus_mode.
- FOCUS_CLICK = 1 — The node can only grab focus on mouse clicks. Use with focus_mode.
- FOCUS_ALL = 2 — The node can grab focus on mouse click or using the arrows and the Tab keys on the keyboard. Use with focus_mode.
enum CursorShape:
- CURSOR_ARROW = 0 — Show the system’s arrow mouse cursor when the user hovers the node. Use with mouse_default_cursor_shape.
- CURSOR_IBEAM = 1 — Show the system’s I-beam mouse cursor when the user hovers the node. The I-beam pointer has a shape similar to “I”. It tells the user they can highlight or insert text.
- CURSOR_POINTING_HAND = 2 — Show the system’s pointing hand mouse cursor when the user hovers the node.
- CURSOR_CROSS = 3 — Show the system’s cross mouse cursor when the user hovers the node.
- CURSOR_WAIT = 4 — Show the system’s wait mouse cursor, often an hourglass, when the user hovers the node.
- CURSOR_BUSY = 5 — Show the system’s busy mouse cursor when the user hovers the node. Often an hourglass.
- CURSOR_DRAG = 6 — Show the system’s drag mouse cursor, often a closed fist or a cross symbol, when the user hovers the node. It tells the user they’re currently dragging an item, like a node in the Scene dock.
- CURSOR_CAN_DROP = 7 — Show the system’s drop mouse cursor when the user hovers the node. It can be an open hand. It tells the user they can drop an item they’re currently grabbing, like a node in the Scene dock.
- CURSOR_FORBIDDEN = 8 — Show the system’s forbidden mouse cursor when the user hovers the node. Often a crossed circle.
- CURSOR_VSIZE = 9 — Show the system’s vertical resize mouse cursor when the user hovers the node. A double-headed vertical arrow. It tells the user they can resize the window or the panel vertically.
- CURSOR_HSIZE = 10 — Show the system’s horizontal resize mouse cursor when the user hovers the node. A double-headed horizontal arrow. It tells the user they can resize the window or the panel horizontally.
- CURSOR_BDIAGSIZE = 11 — Show the system’s window resize mouse cursor when the user hovers the node. The cursor is a double-headed arrow that goes from the bottom left to the top right. It tells the user they can resize the window or the panel both horizontally and vertically.
- CURSOR_FDIAGSIZE = 12 — Show the system’s window resize mouse cursor when the user hovers the node. The cursor is a double-headed arrow that goes from the top left to the bottom right, the opposite of CURSOR_BDIAGSIZE. It tells the user they can resize the window or the panel both horizontally and vertically.
- CURSOR_MOVE = 13 — Show the system’s move mouse cursor when the user hovers the node. It shows 2 double-headed arrows at a 90 degree angle. It tells the user they can move a UI element freely.
- CURSOR_VSPLIT = 14 — Show the system’s vertical split mouse cursor when the user hovers the node. On Windows, it’s the same as CURSOR_VSIZE.
- CURSOR_HSPLIT = 15 — Show the system’s horizontal split mouse cursor when the user hovers the node. On Windows, it’s the same as CURSOR_HSIZE.
- CURSOR_HELP = 16 — Show the system’s help mouse cursor when the user hovers the node, a question mark.
enum LayoutPreset:
- PRESET_TOP_LEFT = 0 — Snap all 4 anchors to the top-left of the parent control’s bounds. Use with set_anchors_preset.
- PRESET_TOP_RIGHT = 1 — Snap all 4 anchors to the top-right of the parent control’s bounds. Use with set_anchors_preset.
- PRESET_BOTTOM_LEFT = 2 — Snap all 4 anchors to the bottom-left of the parent control’s bounds. Use with set_anchors_preset.
- PRESET_BOTTOM_RIGHT = 3 — Snap all 4 anchors to the bottom-right of the parent control’s bounds. Use with set_anchors_preset.
- PRESET_CENTER_LEFT = 4 — Snap all 4 anchors to the center of the left edge of the parent control’s bounds. Use with set_anchors_preset.
- PRESET_CENTER_TOP = 5 — Snap all 4 anchors to the center of the top edge of the parent control’s bounds. Use with set_anchors_preset.
- PRESET_CENTER_RIGHT = 6 — Snap all 4 anchors to the center of the right edge of the parent control’s bounds. Use with set_anchors_preset.
- PRESET_CENTER_BOTTOM = 7 — Snap all 4 anchors to the center of the bottom edge of the parent control’s bounds. Use with set_anchors_preset.
- PRESET_CENTER = 8 — Snap all 4 anchors to the center of the parent control’s bounds. Use with set_anchors_preset.
- PRESET_LEFT_WIDE = 9 — Snap all 4 anchors to the left edge of the parent control. The left margin becomes relative to the left edge and the top margin relative to the top left corner of the node’s parent. Use with set_anchors_preset.
- PRESET_TOP_WIDE = 10 — Snap all 4 anchors to the top edge of the parent control. The left margin becomes relative to the top left corner, the top margin relative to the top edge, and the right margin relative to the top right corner of the node’s parent. Use with set_anchors_preset.
- PRESET_RIGHT_WIDE = 11 — Snap all 4 anchors to the right edge of the parent control. The right margin becomes relative to the right edge and the top margin relative to the top right corner of the node’s parent. Use with set_anchors_preset.
- PRESET_BOTTOM_WIDE = 12 — Snap all 4 anchors to the bottom edge of the parent control. The left margin becomes relative to the bottom left corner, the bottom margin relative to the bottom edge, and the right margin relative to the bottom right corner of the node’s parent. Use with set_anchors_preset.
- PRESET_VCENTER_WIDE = 13 — Snap all 4 anchors to a vertical line that cuts the parent control in half. Use with set_anchors_preset.
- PRESET_HCENTER_WIDE = 14 — Snap all 4 anchors to a horizontal line that cuts the parent control in half. Use with set_anchors_preset.
- PRESET_WIDE = 15 — Snap all 4 anchors to the respective corners of the parent control. Set all 4 margins to 0 after you applied this preset and the
Controlwill fit its parent control. This is equivalent to the “Full Rect” layout option in the editor. Use with set_anchors_preset.
enum LayoutPresetMode:
- PRESET_MODE_MINSIZE = 0 — The control will be resized to its minimum size.
- PRESET_MODE_KEEP_WIDTH = 1 — The control’s width will not change.
- PRESET_MODE_KEEP_HEIGHT = 2 — The control’s height will not change.
- PRESET_MODE_KEEP_SIZE = 3 — The control’s size will not change.
enum SizeFlags:
- SIZE_FILL = 1 — Tells the parent Container to expand the bounds of this node to fill all the available space without pushing any other node. Use with size_flags_horizontal and size_flags_vertical.
- SIZE_EXPAND = 2 — Tells the parent Container to let this node take all the available space on the axis you flag. If multiple neighboring nodes are set to expand, they’ll share the space based on their stretch ratio. See size_flags_stretch_ratio. Use with size_flags_horizontal and size_flags_vertical.
- SIZE_EXPAND_FILL = 3 — Sets the node’s size flags to both fill and expand. See the 2 constants above for more information.
- SIZE_SHRINK_CENTER = 4 — Tells the parent Container to center the node in itself. It centers the control based on its bounding box, so it doesn’t work with the fill or expand size flags. Use with size_flags_horizontal and size_flags_vertical.
- SIZE_SHRINK_END = 8 — Tells the parent Container to align the node with its end, either the bottom or the right edge. It doesn’t work with the fill or expand size flags. Use with size_flags_horizontal and size_flags_vertical.
enum MouseFilter:
- MOUSE_FILTER_STOP = 0 — The control will receive mouse button input events through _gui_input if clicked on. And the control will receive the mouse_entered and mouse_exited signals. These events are automatically marked as handled, and they will not propagate further to other controls. This also results in blocking signals in other controls.
- MOUSE_FILTER_PASS = 1 — The control will receive mouse button input events through _gui_input if clicked on. And the control will receive the mouse_entered and mouse_exited signals. If this control does not handle the event, the parent control (if any) will be considered, and so on until there is no more parent control to potentially handle it. This also allows signals to fire in other controls. Even if no control handled it at all, the event will still be handled automatically, so unhandled input will not be fired.
- MOUSE_FILTER_IGNORE = 2 — The control will not receive mouse button input events through _gui_input. The control will also not receive the mouse_entered nor mouse_exited signals. This will not block other controls from receiving these events or firing the signals. Ignored events will not be handled automatically.
enum GrowDirection:
- GROW_DIRECTION_BEGIN = 0 — The control will grow to the left or top to make up if its minimum size is changed to be greater than its current size on the respective axis.
- GROW_DIRECTION_END = 1 — The control will grow to the right or bottom to make up if its minimum size is changed to be greater than its current size on the respective axis.
- GROW_DIRECTION_BOTH = 2 — The control will grow in both directions equally to make up if its minimum size is changed to be greater than its current size.
enum Anchor:
- ANCHOR_BEGIN = 0 — Snaps one of the 4 anchor’s sides to the origin of the node’s
Rect, in the top left. Use it with one of theanchor_*member variables, like anchor_left. To change all 4 anchors at once, use set_anchors_preset. - ANCHOR_END = 1 — Snaps one of the 4 anchor’s sides to the end of the node’s
Rect, in the bottom right. Use it with one of theanchor_*member variables, like anchor_left. To change all 4 anchors at once, use set_anchors_preset.
Constants¶
- NOTIFICATION_RESIZED = 40 — Sent when the node changes size. Use rect_size to get the new size.
- NOTIFICATION_MOUSE_ENTER = 41 — Sent when the mouse pointer enters the node.
- NOTIFICATION_MOUSE_EXIT = 42 — Sent when the mouse pointer exits the node.
- NOTIFICATION_FOCUS_ENTER = 43 — Sent when the node grabs focus.
- NOTIFICATION_FOCUS_EXIT = 44 — Sent when the node loses focus.
- NOTIFICATION_THEME_CHANGED = 45 — Sent when the node’s theme changes, right before Godot redraws the control. Happens when you call one of the
add_*_overridemethods. - NOTIFICATION_MODAL_CLOSE = 46 — Sent when an open modal dialog closes. See show_modal.
- NOTIFICATION_SCROLL_BEGIN = 47 — Sent when this node is inside a ScrollContainer which has begun being scrolled.
- NOTIFICATION_SCROLL_END = 48 — Sent when this node is inside a ScrollContainer which has stopped being scrolled.
Property Descriptions¶
- float anchor_bottom
| Default | 0.0 |
| Getter | get_anchor() |
Anchors the bottom edge of the node to the origin, the center, or the end of its parent control. It changes how the bottom margin updates when the node moves or changes size. You can use one of the Anchor constants for convenience.
- float anchor_left
| Default | 0.0 |
| Getter | get_anchor() |
Anchors the left edge of the node to the origin, the center or the end of its parent control. It changes how the left margin updates when the node moves or changes size. You can use one of the Anchor constants for convenience.
- float anchor_right
| Default | 0.0 |
| Getter | get_anchor() |
Anchors the right edge of the node to the origin, the center or the end of its parent control. It changes how the right margin updates when the node moves or changes size. You can use one of the Anchor constants for convenience.
- float anchor_top
| Default | 0.0 |
| Getter | get_anchor() |
Anchors the top edge of the node to the origin, the center or the end of its parent control. It changes how the top margin updates when the node moves or changes size. You can use one of the Anchor constants for convenience.
- FocusMode focus_mode
| Default | 0 |
| Setter | set_focus_mode(value) |
| Getter | get_focus_mode() |
The focus access mode for the control (None, Click or All). Only one Control can be focused at the same time, and it will receive keyboard signals.
- NodePath focus_neighbour_bottom
| Default | NodePath("") |
| Setter | set_focus_neighbour(value) |
| Getter | get_focus_neighbour() |
Tells Godot which node it should give keyboard focus to if the user presses the down arrow on the keyboard or down on a gamepad by default. You can change the key by editing the ui_down input action. The node must be a Control. If this property is not set, Godot will give focus to the closest Control to the bottom of this one.
- NodePath focus_neighbour_left
| Default | NodePath("") |
| Setter | set_focus_neighbour(value) |
| Getter | get_focus_neighbour() |
Tells Godot which node it should give keyboard focus to if the user presses the left arrow on the keyboard or left on a gamepad by default. You can change the key by editing the ui_left input action. The node must be a Control. If this property is not set, Godot will give focus to the closest Control to the left of this one.
- NodePath focus_neighbour_right
| Default | NodePath("") |
| Setter | set_focus_neighbour(value) |
| Getter | get_focus_neighbour() |
Tells Godot which node it should give keyboard focus to if the user presses the right arrow on the keyboard or right on a gamepad by default. You can change the key by editing the ui_right input action. The node must be a Control. If this property is not set, Godot will give focus to the closest Control to the bottom of this one.
- NodePath focus_neighbour_top
| Default | NodePath("") |
| Setter | set_focus_neighbour(value) |
| Getter | get_focus_neighbour() |
Tells Godot which node it should give keyboard focus to if the user presses the top arrow on the keyboard or top on a gamepad by default. You can change the key by editing the ui_top input action. The node must be a Control. If this property is not set, Godot will give focus to the closest Control to the bottom of this one.
- NodePath focus_next
| Default | NodePath("") |
| Setter | set_focus_next(value) |
| Getter | get_focus_next() |
Tells Godot which node it should give keyboard focus to if the user presses Tab on a keyboard by default. You can change the key by editing the ui_focus_next input action.
If this property is not set, Godot will select a “best guess” based on surrounding nodes in the scene tree.
- NodePath focus_previous
| Default | NodePath("") |
| Setter | set_focus_previous(value) |
| Getter | get_focus_previous() |
Tells Godot which node it should give keyboard focus to if the user presses Shift+Tab on a keyboard by default. You can change the key by editing the ui_focus_prev input action.
If this property is not set, Godot will select a “best guess” based on surrounding nodes in the scene tree.
- GrowDirection grow_horizontal
| Default | 1 |
| Setter | set_h_grow_direction(value) |
| Getter | get_h_grow_direction() |
Controls the direction on the horizontal axis in which the control should grow if its horizontal minimum size is changed to be greater than its current size, as the control always has to be at least the minimum size.
- GrowDirection grow_vertical
| Default | 1 |
| Setter | set_v_grow_direction(value) |
| Getter | get_v_grow_direction() |
Controls the direction on the vertical axis in which the control should grow if its vertical minimum size is changed to be greater than its current size, as the control always has to be at least the minimum size.
- String hint_tooltip
| Default | "" |
| Setter | set_tooltip(value) |
Changes the tooltip text. The tooltip appears when the user’s mouse cursor stays idle over this control for a few moments, provided that the mouse_filter property is not MOUSE_FILTER_IGNORE. You can change the time required for the tooltip to appear with gui/timers/tooltip_delay_sec option in Project Settings.
- float margin_bottom
| Default | 0.0 |
| Setter | set_margin(value) |
| Getter | get_margin() |
Distance between the node’s bottom edge and its parent control, based on anchor_bottom.
Margins are often controlled by one or multiple parent Container nodes, so you should not modify them manually if your node is a direct child of a Container. Margins update automatically when you move or resize the node.
- float margin_left
| Default | 0.0 |
| Setter | set_margin(value) |
| Getter | get_margin() |
Distance between the node’s left edge and its parent control, based on anchor_left.
Margins are often controlled by one or multiple parent Container nodes, so you should not modify them manually if your node is a direct child of a Container. Margins update automatically when you move or resize the node.
- float margin_right
| Default | 0.0 |
| Setter | set_margin(value) |
| Getter | get_margin() |
Distance between the node’s right edge and its parent control, based on anchor_right.
Margins are often controlled by one or multiple parent Container nodes, so you should not modify them manually if your node is a direct child of a Container. Margins update automatically when you move or resize the node.
- float margin_top
| Default | 0.0 |
| Setter | set_margin(value) |
| Getter | get_margin() |
Distance between the node’s top edge and its parent control, based on anchor_top.
Margins are often controlled by one or multiple parent Container nodes, so you should not modify them manually if your node is a direct child of a Container. Margins update automatically when you move or resize the node.
- CursorShape mouse_default_cursor_shape
| Default | 0 |
| Setter | set_default_cursor_shape(value) |
| Getter | get_default_cursor_shape() |
The default cursor shape for this control. Useful for Godot plugins and applications or games that use the system’s mouse cursors.
Note: On Linux, shapes may vary depending on the cursor theme of the system.
- MouseFilter mouse_filter
| Default | 0 |
| Setter | set_mouse_filter(value) |
| Getter | get_mouse_filter() |
Controls whether the control will be able to receive mouse button input events through _gui_input and how these events should be handled. Also controls whether the control can receive the mouse_entered, and mouse_exited signals. See the constants to learn what each does.
- bool rect_clip_content
| Default | false |
| Setter | set_clip_contents(value) |
| Getter | is_clipping_contents() |
Enables whether rendering of children should be clipped to this control’s rectangle. If true, parts of a child which would be visibly outside of this control’s rectangle will not be rendered.
- Vector2 rect_global_position
| Getter | get_global_position() |
The node’s global position, relative to the world (usually to the top-left corner of the window).
- Vector2 rect_min_size
| Default | Vector2( 0, 0 ) |
| Setter | set_custom_minimum_size(value) |
| Getter | get_custom_minimum_size() |
The minimum size of the node’s bounding rectangle. If you set it to a value greater than (0, 0), the node’s bounding rectangle will always have at least this size, even if its content is smaller. If it’s set to (0, 0), the node sizes automatically to fit its content, be it a texture or child nodes.
- Vector2 rect_pivot_offset
| Default | Vector2( 0, 0 ) |
| Setter | set_pivot_offset(value) |
| Getter | get_pivot_offset() |
By default, the node’s pivot is its top-left corner. When you change its rect_scale, it will scale around this pivot. Set this property to rect_size / 2 to center the pivot in the node’s rectangle.
- Vector2 rect_position
| Default | Vector2( 0, 0 ) |
| Getter | get_position() |
The node’s position, relative to its parent. It corresponds to the rectangle’s top-left corner. The property is not affected by rect_pivot_offset.
- float rect_rotation
| Default | 0.0 |
| Setter | set_rotation_degrees(value) |
| Getter | get_rotation_degrees() |
The node’s rotation around its pivot, in degrees. See rect_pivot_offset to change the pivot’s position.
- Vector2 rect_scale
| Default | Vector2( 1, 1 ) |
| Setter | set_scale(value) |
| Getter | get_scale() |
The node’s scale, relative to its rect_size. Change this property to scale the node around its rect_pivot_offset.
- Vector2 rect_size
| Default | Vector2( 0, 0 ) |
| Getter | get_size() |
The size of the node’s bounding rectangle, in pixels. Container nodes update this property automatically.
- int size_flags_horizontal
| Default | 1 |
| Setter | set_h_size_flags(value) |
| Getter | get_h_size_flags() |
Tells the parent Container nodes how they should resize and place the node on the X axis. Use one of the SizeFlags constants to change the flags. See the constants to learn what each does.
- float size_flags_stretch_ratio
| Default | 1.0 |
| Setter | set_stretch_ratio(value) |
| Getter | get_stretch_ratio() |
If the node and at least one of its neighbours uses the SIZE_EXPAND size flag, the parent Container will let it take more or less space depending on this property. If this node has a stretch ratio of 2 and its neighbour a ratio of 1, this node will take two thirds of the available space.
- int size_flags_vertical
| Default | 1 |
| Setter | set_v_size_flags(value) |
| Getter | get_v_size_flags() |
Tells the parent Container nodes how they should resize and place the node on the Y axis. Use one of the SizeFlags constants to change the flags. See the constants to learn what each does.
- Theme theme
| Setter | set_theme(value) |
| Getter | get_theme() |
Changing this property replaces the current Theme resource this node and all its Control children use.
Method Descriptions¶
- bool _clips_input ( ) virtual
Virtual method to be implemented by the user. Returns whether _gui_input should not be called for children controls outside this control’s rectangle. Input will be clipped to the Rect of this Control. Similar to rect_clip_content, but doesn’t affect visibility.
If not overridden, defaults to false.
- Vector2 _get_minimum_size ( ) virtual
Virtual method to be implemented by the user. Returns the minimum size for this control. Alternative to rect_min_size for controlling minimum size via code. The actual minimum size will be the max value of these two (in each axis separately).
If not overridden, defaults to Vector2.ZERO.
- void _gui_input ( InputEvent event ) virtual
Virtual method to be implemented by the user. Use this method to process and accept inputs on UI elements. See accept_event.
Example: clicking a control.
func _gui_input(event):
if event is InputEventMouseButton:
if event.button_index == BUTTON_LEFT and event.pressed:
print("I've been clicked D:")
The event won’t trigger if:
* clicking outside the control (see has_point);
* control has mouse_filter set to MOUSE_FILTER_IGNORE;
* control is obstructed by another Control on top of it, which doesn’t have mouse_filter set to MOUSE_FILTER_IGNORE;
* control’s parent has mouse_filter set to MOUSE_FILTER_STOP or has accepted the event;
* it happens outside parent’s rectangle and the parent has either rect_clip_content or _clips_input enabled.
Virtual method to be implemented by the user. Returns a Control node that should be used as a tooltip instead of the default one. Use for_text parameter to determine what text the tooltip should contain (likely the contents of hint_tooltip).
The returned node must be of type Control or Control-derieved. It can have child nodes of any type. It is freed when the tooltip disappears, so make sure you always provide a new instance, not e.g. a node from scene. When null or non-Control node is returned, the default tooltip will be used instead.
Note: The tooltip is shrunk to minimal size. If you want to ensure it’s fully visible, you might want to set its rect_min_size to some non-zero value.
Example of usage with custom-constructed node:
func _make_custom_tooltip(for_text):
var label = Label.new()
label.text = for_text
return label
Example of usage with custom scene instance:
func _make_custom_tooltip(for_text):
var tooltip = preload("SomeTooltipScene.tscn").instance()
tooltip.get_node("Label").text = for_text
return tooltip
- void accept_event ( )
Marks an input event as handled. Once you accept an input event, it stops propagating, even to nodes listening to Node._unhandled_input or Node._unhandled_key_input.
Overrides the Color with given name in the theme resource the control uses. If the color is empty or invalid, the override is cleared and the color from assigned Theme is used.
Overrides an integer constant with given name in the theme resource the control uses. If the constant is empty or invalid, the override is cleared and the constant from assigned Theme is used.
Overrides the font with given name in the theme resource the control uses. If font is empty or invalid, the override is cleared and the font from assigned Theme is used.
Overrides the icon with given name in the theme resource the control uses. If icon is empty or invalid, the override is cleared and the icon from assigned Theme is used.
Overrides the Shader with given name in the theme resource the control uses. If shader is empty or invalid, the override is cleared and the shader from assigned Theme is used.
Overrides the StyleBox with given name in the theme resource the control uses. If stylebox is empty or invalid, the override is cleared and the StyleBox from assigned Theme is used.
Godot calls this method to test if data from a control’s get_drag_data can be dropped at position. position is local to this control.
This method should only be used to test the data. Process the data in drop_data.
func can_drop_data(position, data):
# Check position if it is relevant to you
# Otherwise, just check data
return typeof(data) == TYPE_DICTIONARY and data.has("expected")
Godot calls this method to pass you the data from a control’s get_drag_data result. Godot first calls can_drop_data to test if data is allowed to drop at position where position is local to this control.
func can_drop_data(position, data):
return typeof(data) == TYPE_DICTIONARY and data.has("color")
func drop_data(position, data):
color = data["color"]
Forces drag and bypasses get_drag_data and set_drag_preview by passing data and preview. Drag will start even if the mouse is neither over nor pressed on this control.
The methods can_drop_data and drop_data must be implemented on controls that want to receive drop data.
Returns the anchor identified by margin constant from Margin enum. A getter method for anchor_bottom, anchor_left, anchor_right and anchor_top.
- Vector2 get_begin ( ) const
Returns margin_left and margin_top. See also rect_position.
Returns a color from assigned Theme with given name and associated with Control of given type.
func _ready():
modulate = get_color("font_color", "Button") #get the color defined for button fonts
- Vector2 get_combined_minimum_size ( ) const
Returns combined minimum size from rect_min_size and get_minimum_size.
Returns a constant from assigned Theme with given name and associated with Control of given type.
- CursorShape get_cursor_shape ( Vector2 position=Vector2( 0, 0 ) ) const
Returns the mouse cursor shape the control displays on mouse hover. See CursorShape.
Godot calls this method to get data that can be dragged and dropped onto controls that expect drop data. Returns null if there is no data to drag. Controls that want to receive drop data should implement can_drop_data and drop_data. position is local to this control. Drag may be forced with force_drag.
A preview that will follow the mouse that should represent the data can be set with set_drag_preview. A good time to set the preview is in this method.
func get_drag_data(position):
var mydata = make_data()
set_drag_preview(make_preview(mydata))
return mydata
- Vector2 get_end ( ) const
Returns margin_right and margin_bottom.
Returns the focus neighbour identified by margin constant from Margin enum. A getter method for focus_neighbour_bottom, focus_neighbour_left, focus_neighbour_right and focus_neighbour_top.
- Control get_focus_owner ( ) const
Returns the control that has the keyboard focus or null if none.
Returns a font from assigned Theme with given name and associated with Control of given type.
- Rect2 get_global_rect ( ) const
Returns the position and size of the control relative to the top-left corner of the screen. See rect_position and rect_size.
Returns an icon from assigned Theme with given name and associated with Control of given type.
Returns the anchor identified by margin constant from Margin enum. A getter method for margin_bottom, margin_left, margin_right and margin_top.
- Vector2 get_minimum_size ( ) const
Returns the minimum size for this control. See rect_min_size.
- Vector2 get_parent_area_size ( ) const
Returns the width/height occupied in the parent control.
- Control get_parent_control ( ) const
Returns the parent control node.
- Rect2 get_rect ( ) const
Returns the position and size of the control relative to the top-left corner of the parent Control. See rect_position and rect_size.
- float get_rotation ( ) const
Returns the rotation (in radians).
Returns a StyleBox from assigned Theme with given name and associated with Control of given type.
Returns the tooltip, which will appear when the cursor is resting over this control. See hint_tooltip.
- void grab_click_focus ( )
Creates an InputEventMouseButton that attempts to click the control. If the event is received, the control acquires focus.
func _process(delta):
grab_click_focus() #when clicking another Control node, this node will be clicked instead
- void grab_focus ( )
Steal the focus from another control and become the focused control (see focus_mode).
Returns true if Color with given name and associated with Control of given type exists in assigned Theme.
Returns true if Color with given name has a valid override in this Control node.
Returns true if constant with given name and associated with Control of given type exists in assigned Theme.
Returns true if constant with given name has a valid override in this Control node.
- bool has_focus ( ) const
Returns true if this is the current focused control. See focus_mode.
Returns true if font with given name and associated with Control of given type exists in assigned Theme.
Returns true if font with given name has a valid override in this Control node.
Returns true if icon with given name and associated with Control of given type exists in assigned Theme.
Returns true if icon with given name has a valid override in this Control node.
Virtual method to be implemented by the user. Returns whether the given point is inside this control.
If not overridden, default behavior is checking if the point is within control’s Rect.
Note: If you want to check if a point is inside the control, you can use get_rect().has_point(point).
Returns true if Shader with given name has a valid override in this Control node.
Returns true if StyleBox with given name and associated with Control of given type exists in assigned Theme.
Returns true if StyleBox with given name has a valid override in this Control node.
- void minimum_size_changed ( )
Invalidates the size cache in this node and in parent nodes up to toplevel. Intended to be used with get_minimum_size when the return value is changed. Setting rect_min_size directly calls this method automatically.
- void release_focus ( )
Give up the focus. No other control will be able to receive keyboard input.
- void set_anchor ( Margin margin, float anchor, bool keep_margin=false, bool push_opposite_anchor=true )
Sets the anchor identified by margin constant from Margin enum to value anchor. A setter method for anchor_bottom, anchor_left, anchor_right and anchor_top.
If keep_margin is true, margins aren’t updated after this operation.
If push_opposite_anchor is true and the opposite anchor overlaps this anchor, the opposite one will have its value overridden. For example, when setting left anchor to 1 and the right anchor has value of 0.5, the right anchor will also get value of 1. If push_opposite_anchor was false, the left anchor would get value 0.5.
- void set_anchor_and_margin ( Margin margin, float anchor, float offset, bool push_opposite_anchor=false )
Works the same as set_anchor, but instead of keep_margin argument and automatic update of margin, it allows to set the margin offset yourself (see set_margin).
- void set_anchors_and_margins_preset ( LayoutPreset preset, LayoutPresetMode resize_mode=0, int margin=0 )
Sets both anchor preset and margin preset. See set_anchors_preset and set_margins_preset.
- void set_anchors_preset ( LayoutPreset preset, bool keep_margins=false )
Sets the anchors to a preset from LayoutPreset enum. This is code equivalent of using the Layout menu in 2D editor.
If keep_margins is true, control’s position will also be updated.
- void set_begin ( Vector2 position )
Sets margin_left and margin_top at the same time. Equivalent of changing rect_position.
- void set_drag_forwarding ( Control target )
Forwards the handling of this control’s drag and drop to target control.
Forwarding can be implemented in the target control similar to the methods get_drag_data, can_drop_data, and drop_data but with two differences:
- The function name must be suffixed with _fw
- The function must take an extra argument that is the control doing the forwarding
# ThisControl.gd
extends Control
func _ready():
set_drag_forwarding(target_control)
# TargetControl.gd
extends Control
func can_drop_data_fw(position, data, from_control):
return true
func drop_data_fw(position, data, from_control):
my_handle_data(data)
func get_drag_data_fw(position, from_control):
set_drag_preview(my_preview)
return my_data()
- void set_drag_preview ( Control control )
Shows the given control at the mouse pointer. A good time to call this method is in get_drag_data. The control must not be in the scene tree.
export (Color, RGBA) var color = Color(1, 0, 0, 1)
func get_drag_data(position):
# Use a control that is not in the tree
var cpb = ColorPickerButton.new()
cpb.color = color
cpb.rect_size = Vector2(50, 50)
set_drag_preview(cpb)
return color
- void set_end ( Vector2 position )
Sets margin_right and margin_bottom at the same time.
Sets the anchor identified by margin constant from Margin enum to Control at neighbor node path. A setter method for focus_neighbour_bottom, focus_neighbour_left, focus_neighbour_right and focus_neighbour_top.
Sets the rect_global_position to given position.
If keep_margins is true, control’s anchors will be updated instead of margins.
Sets the margin identified by margin constant from Margin enum to given offset. A setter method for margin_bottom, margin_left, margin_right and margin_top.
- void set_margins_preset ( LayoutPreset preset, LayoutPresetMode resize_mode=0, int margin=0 )
Sets the margins to a preset from LayoutPreset enum. This is code equivalent of using the Layout menu in 2D editor.
Use parameter resize_mode with constants from LayoutPresetMode to better determine the resulting size of the Control. Constant size will be ignored if used with presets that change size, e.g. PRESET_LEFT_WIDE.
Use parameter margin to determine the gap between the Control and the edges.
Sets the rect_position to given position.
If keep_margins is true, control’s anchors will be updated instead of margins.
- void set_rotation ( float radians )
Sets the rotation (in radians).
Sets the size (see rect_size).
If keep_margins is true, control’s anchors will be updated instead of margins.
- void show_modal ( bool exclusive=false )
Displays a control as modal. Control must be a subwindow. Modal controls capture the input signals until closed or the area outside them is accessed. When a modal control loses focus, or the ESC key is pressed, they automatically hide. Modal controls are used extensively for popup dialogs and menus.
If exclusive is true, other controls will not receive input and clicking outside this control will not close it.
- void warp_mouse ( Vector2 to_position )
Moves the mouse cursor to to_position, relative to rect_position of this Control.
ConvexPolygonShape¶
Inherits: Shape < Resource < Reference < Object
Convex polygon shape for 3D physics.
Description¶
Convex polygon shape resource, which can be added to a PhysicsBody or area.
Properties¶
| PoolVector3Array | points | PoolVector3Array( ) |
Property Descriptions¶
- PoolVector3Array points
| Default | PoolVector3Array( ) |
| Setter | set_points(value) |
| Getter | get_points() |
The list of 3D points forming the convex polygon shape.
ConvexPolygonShape2D¶
Inherits: Shape2D < Resource < Reference < Object
Convex polygon shape for 2D physics.
Description¶
Convex polygon shape for 2D physics. A convex polygon, whatever its shape, is internally decomposed into as many convex polygons as needed to ensure all collision checks against it are always done on convex polygons (which are faster to check).
The main difference between a ConvexPolygonShape2D and a ConcavePolygonShape2D is that a concave polygon assumes it is concave and uses a more complex method of collision detection, and a convex one forces itself to be convex in order to speed up collision detection.
Properties¶
| PoolVector2Array | points | PoolVector2Array( ) |
Methods¶
| void | set_point_cloud ( PoolVector2Array point_cloud ) |
Property Descriptions¶
- PoolVector2Array points
| Default | PoolVector2Array( ) |
| Setter | set_points(value) |
| Getter | get_points() |
The polygon’s list of vertices. Can be in either clockwise or counterclockwise order.
Method Descriptions¶
- void set_point_cloud ( PoolVector2Array point_cloud )
Based on the set of points provided, this creates and assigns the points property using the convex hull algorithm. Removing all unneeded points. See Geometry.convex_hull_2d for details.
CPUParticles¶
Inherits: GeometryInstance < VisualInstance < Spatial < Node < Object
CPU-based 3D particle emitter.
Description¶
CPU-based 3D particle node used to create a variety of particle systems and effects.
See also Particles, which provides the same functionality with hardware acceleration, but may not run on older devices.
Properties¶
Methods¶
| void | convert_from_particles ( Node particles ) |
| float | get_param ( Parameter param ) const |
| Curve | get_param_curve ( Parameter param ) const |
| float | get_param_randomness ( Parameter param ) const |
| bool | get_particle_flag ( Flags flag ) const |
| void | restart ( ) |
| void | set_param ( Parameter param, float value ) |
| void | set_param_curve ( Parameter param, Curve curve ) |
| void | set_param_randomness ( Parameter param, float randomness ) |
| void | set_particle_flag ( Flags flag, bool enable ) |
Enumerations¶
enum DrawOrder:
- DRAW_ORDER_INDEX = 0 — Particles are drawn in the order emitted.
- DRAW_ORDER_LIFETIME = 1 — Particles are drawn in order of remaining lifetime.
- DRAW_ORDER_VIEW_DEPTH = 2 — Particles are drawn in order of depth.
enum Parameter:
- PARAM_INITIAL_LINEAR_VELOCITY = 0 — Use with set_param, set_param_randomness, and set_param_curve to set initial velocity properties.
- PARAM_ANGULAR_VELOCITY = 1 — Use with set_param, set_param_randomness, and set_param_curve to set angular velocity properties.
- PARAM_ORBIT_VELOCITY = 2 — Use with set_param, set_param_randomness, and set_param_curve to set orbital velocity properties.
- PARAM_LINEAR_ACCEL = 3 — Use with set_param, set_param_randomness, and set_param_curve to set linear acceleration properties.
- PARAM_RADIAL_ACCEL = 4 — Use with set_param, set_param_randomness, and set_param_curve to set radial acceleration properties.
- PARAM_TANGENTIAL_ACCEL = 5 — Use with set_param, set_param_randomness, and set_param_curve to set tangential acceleration properties.
- PARAM_DAMPING = 6 — Use with set_param, set_param_randomness, and set_param_curve to set damping properties.
- PARAM_ANGLE = 7 — Use with set_param, set_param_randomness, and set_param_curve to set angle properties.
- PARAM_SCALE = 8 — Use with set_param, set_param_randomness, and set_param_curve to set scale properties.
- PARAM_HUE_VARIATION = 9 — Use with set_param, set_param_randomness, and set_param_curve to set hue variation properties.
- PARAM_ANIM_SPEED = 10 — Use with set_param, set_param_randomness, and set_param_curve to set animation speed properties.
- PARAM_ANIM_OFFSET = 11 — Use with set_param, set_param_randomness, and set_param_curve to set animation offset properties.
- PARAM_MAX = 12 — Represents the size of the Parameter enum.
enum Flags:
- FLAG_ALIGN_Y_TO_VELOCITY = 0 — Use with set_particle_flag to set flag_align_y.
- FLAG_ROTATE_Y = 1 — Use with set_particle_flag to set flag_rotate_y.
- FLAG_DISABLE_Z = 2 — Use with set_particle_flag to set flag_disable_z.
- FLAG_MAX = 3 — Represents the size of the Flags enum.
enum EmissionShape:
- EMISSION_SHAPE_POINT = 0 — All particles will be emitted from a single point.
- EMISSION_SHAPE_SPHERE = 1 — Particles will be emitted in the volume of a sphere.
- EMISSION_SHAPE_BOX = 2 — Particles will be emitted in the volume of a box.
- EMISSION_SHAPE_POINTS = 3 — Particles will be emitted at a position chosen randomly among emission_points. Particle color will be modulated by emission_colors.
- EMISSION_SHAPE_DIRECTED_POINTS = 4 — Particles will be emitted at a position chosen randomly among emission_points. Particle velocity and rotation will be set based on emission_normals. Particle color will be modulated by emission_colors.
- EMISSION_SHAPE_MAX = 5 — Represents the size of the EmissionShape enum.
Property Descriptions¶
- int amount
| Default | 8 |
| Setter | set_amount(value) |
| Getter | get_amount() |
Number of particles emitted in one emission cycle.
- float angle
| Default | 0.0 |
| Setter | set_param(value) |
| Getter | get_param() |
Initial rotation applied to each particle, in degrees.
- Curve angle_curve
| Setter | set_param_curve(value) |
| Getter | get_param_curve() |
Each particle’s rotation will be animated along this Curve.
- float angle_random
| Default | 0.0 |
| Setter | set_param_randomness(value) |
| Getter | get_param_randomness() |
Rotation randomness ratio.
- float angular_velocity
| Default | 0.0 |
| Setter | set_param(value) |
| Getter | get_param() |
Initial angular velocity applied to each particle. Sets the speed of rotation of the particle.
- Curve angular_velocity_curve
| Setter | set_param_curve(value) |
| Getter | get_param_curve() |
Each particle’s angular velocity will vary along this Curve.
- float angular_velocity_random
| Default | 0.0 |
| Setter | set_param_randomness(value) |
| Getter | get_param_randomness() |
Angular velocity randomness ratio.
- float anim_offset
| Default | 0.0 |
| Setter | set_param(value) |
| Getter | get_param() |
Particle animation offset.
- Curve anim_offset_curve
| Setter | set_param_curve(value) |
| Getter | get_param_curve() |
Each particle’s animation offset will vary along this Curve.
- float anim_offset_random
| Default | 0.0 |
| Setter | set_param_randomness(value) |
| Getter | get_param_randomness() |
Animation offset randomness ratio.
- float anim_speed
| Default | 0.0 |
| Setter | set_param(value) |
| Getter | get_param() |
Particle animation speed.
- Curve anim_speed_curve
| Setter | set_param_curve(value) |
| Getter | get_param_curve() |
Each particle’s animation speed will vary along this Curve.
- float anim_speed_random
| Default | 0.0 |
| Setter | set_param_randomness(value) |
| Getter | get_param_randomness() |
Animation speed randomness ratio.
- Color color
| Default | Color( 1, 1, 1, 1 ) |
| Setter | set_color(value) |
| Getter | get_color() |
Unused for 3D particles.
- Gradient color_ramp
| Setter | set_color_ramp(value) |
| Getter | get_color_ramp() |
Unused for 3D particles.
- float damping
| Default | 0.0 |
| Setter | set_param(value) |
| Getter | get_param() |
The rate at which particles lose velocity.
- Curve damping_curve
| Setter | set_param_curve(value) |
| Getter | get_param_curve() |
Damping will vary along this Curve.
- float damping_random
| Default | 0.0 |
| Setter | set_param_randomness(value) |
| Getter | get_param_randomness() |
Damping randomness ratio.
- Vector3 direction
| Default | Vector3( 1, 0, 0 ) |
| Setter | set_direction(value) |
| Getter | get_direction() |
Unit vector specifying the particles’ emission direction.
- DrawOrder draw_order
| Default | 0 |
| Setter | set_draw_order(value) |
| Getter | get_draw_order() |
Particle draw order. Uses DrawOrder values.
- Vector3 emission_box_extents
| Setter | set_emission_box_extents(value) |
| Getter | get_emission_box_extents() |
The rectangle’s extents if emission_shape is set to EMISSION_SHAPE_BOX.
- PoolColorArray emission_colors
| Default | PoolColorArray( ) |
| Setter | set_emission_colors(value) |
| Getter | get_emission_colors() |
Sets the Colors to modulate particles by when using EMISSION_SHAPE_POINTS or EMISSION_SHAPE_DIRECTED_POINTS.
- PoolVector3Array emission_normals
| Setter | set_emission_normals(value) |
| Getter | get_emission_normals() |
Sets the direction the particles will be emitted in when using EMISSION_SHAPE_DIRECTED_POINTS.
- PoolVector3Array emission_points
| Default | PoolVector3Array( ) |
| Setter | set_emission_points(value) |
| Getter | get_emission_points() |
Sets the initial positions to spawn particles when using EMISSION_SHAPE_POINTS or EMISSION_SHAPE_DIRECTED_POINTS.
- EmissionShape emission_shape
| Default | 0 |
| Setter | set_emission_shape(value) |
| Getter | get_emission_shape() |
Particles will be emitted inside this region. See EmissionShape for possible values.
- float emission_sphere_radius
| Setter | set_emission_sphere_radius(value) |
| Getter | get_emission_sphere_radius() |
The sphere’s radius if EmissionShape is set to EMISSION_SHAPE_SPHERE.
- bool emitting
| Default | true |
| Setter | set_emitting(value) |
| Getter | is_emitting() |
If true, particles are being emitted.
- float explosiveness
| Default | 0.0 |
| Setter | set_explosiveness_ratio(value) |
| Getter | get_explosiveness_ratio() |
How rapidly particles in an emission cycle are emitted. If greater than 0, there will be a gap in emissions before the next cycle begins.
- int fixed_fps
| Default | 0 |
| Setter | set_fixed_fps(value) |
| Getter | get_fixed_fps() |
The particle system’s frame rate is fixed to a value. For instance, changing the value to 2 will make the particles render at 2 frames per second. Note this does not slow down the particle system itself.
- bool flag_align_y
| Default | false |
| Setter | set_particle_flag(value) |
| Getter | get_particle_flag() |
Align Y axis of particle with the direction of its velocity.
- bool flag_disable_z
| Default | false |
| Setter | set_particle_flag(value) |
| Getter | get_particle_flag() |
If true, particles will not move on the z axis.
- bool flag_rotate_y
| Default | false |
| Setter | set_particle_flag(value) |
| Getter | get_particle_flag() |
If true, particles rotate around Y axis by angle.
- float flatness
| Default | 0.0 |
| Setter | set_flatness(value) |
| Getter | get_flatness() |
Amount of spread in Y/Z plane. A value of 1 restricts particles to X/Z plane.
- bool fract_delta
| Default | true |
| Setter | set_fractional_delta(value) |
| Getter | get_fractional_delta() |
If true, results in fractional delta calculation which has a smoother particles display effect.
- Vector3 gravity
| Default | Vector3( 0, -9.8, 0 ) |
| Setter | set_gravity(value) |
| Getter | get_gravity() |
Gravity applied to every particle.
- float hue_variation
| Default | 0.0 |
| Setter | set_param(value) |
| Getter | get_param() |
Initial hue variation applied to each particle.
- Curve hue_variation_curve
| Setter | set_param_curve(value) |
| Getter | get_param_curve() |
Each particle’s hue will vary along this Curve.
- float hue_variation_random
| Default | 0.0 |
| Setter | set_param_randomness(value) |
| Getter | get_param_randomness() |
Hue variation randomness ratio.
- float initial_velocity
| Default | 0.0 |
| Setter | set_param(value) |
| Getter | get_param() |
Initial velocity magnitude for each particle. Direction comes from spread and the node’s orientation.
- float initial_velocity_random
| Default | 0.0 |
| Setter | set_param_randomness(value) |
| Getter | get_param_randomness() |
Initial velocity randomness ratio.
- float lifetime
| Default | 1.0 |
| Setter | set_lifetime(value) |
| Getter | get_lifetime() |
Amount of time each particle will exist.
- float lifetime_randomness
| Default | 0.0 |
| Setter | set_lifetime_randomness(value) |
| Getter | get_lifetime_randomness() |
Particle lifetime randomness ratio.
- float linear_accel
| Default | 0.0 |
| Setter | set_param(value) |
| Getter | get_param() |
Linear acceleration applied to each particle in the direction of motion.
- Curve linear_accel_curve
| Setter | set_param_curve(value) |
| Getter | get_param_curve() |
Each particle’s linear acceleration will vary along this Curve.
- float linear_accel_random
| Default | 0.0 |
| Setter | set_param_randomness(value) |
| Getter | get_param_randomness() |
Linear acceleration randomness ratio.
- bool local_coords
| Default | true |
| Setter | set_use_local_coordinates(value) |
| Getter | get_use_local_coordinates() |
If true, particles use the parent node’s coordinate space. If false, they use global coordinates.
- Mesh mesh
| Setter | set_mesh(value) |
| Getter | get_mesh() |
The Mesh used for each particle. If null, particles will be spheres.
- bool one_shot
| Default | false |
| Setter | set_one_shot(value) |
| Getter | get_one_shot() |
If true, only one emission cycle occurs. If set true during a cycle, emission will stop at the cycle’s end.
- float orbit_velocity
| Setter | set_param(value) |
| Getter | get_param() |
Orbital velocity applied to each particle. Makes the particles circle around origin in the local XY plane. Specified in number of full rotations around origin per second.
This property is only available when flag_disable_z is true.
- Curve orbit_velocity_curve
| Setter | set_param_curve(value) |
| Getter | get_param_curve() |
Each particle’s orbital velocity will vary along this Curve.
- float orbit_velocity_random
| Setter | set_param_randomness(value) |
| Getter | get_param_randomness() |
Orbital velocity randomness ratio.
- float preprocess
| Default | 0.0 |
| Setter | set_pre_process_time(value) |
| Getter | get_pre_process_time() |
Particle system starts as if it had already run for this many seconds.
- float radial_accel
| Default | 0.0 |
| Setter | set_param(value) |
| Getter | get_param() |
Radial acceleration applied to each particle. Makes particle accelerate away from origin.
- Curve radial_accel_curve
| Setter | set_param_curve(value) |
| Getter | get_param_curve() |
Each particle’s radial acceleration will vary along this Curve.
- float radial_accel_random
| Default | 0.0 |
| Setter | set_param_randomness(value) |
| Getter | get_param_randomness() |
Radial acceleration randomness ratio.
- float randomness
| Default | 0.0 |
| Setter | set_randomness_ratio(value) |
| Getter | get_randomness_ratio() |
Emission lifetime randomness ratio.
- float scale_amount
| Default | 1.0 |
| Setter | set_param(value) |
| Getter | get_param() |
Initial scale applied to each particle.
- Curve scale_amount_curve
| Setter | set_param_curve(value) |
| Getter | get_param_curve() |
Each particle’s scale will vary along this Curve.
- float scale_amount_random
| Default | 0.0 |
| Setter | set_param_randomness(value) |
| Getter | get_param_randomness() |
Scale randomness ratio.
- float speed_scale
| Default | 1.0 |
| Setter | set_speed_scale(value) |
| Getter | get_speed_scale() |
Particle system’s running speed scaling ratio. A value of 0 can be used to pause the particles.
- float spread
| Default | 45.0 |
| Setter | set_spread(value) |
| Getter | get_spread() |
Each particle’s initial direction range from +spread to -spread degrees. Applied to X/Z plane and Y/Z planes.
- float tangential_accel
| Default | 0.0 |
| Setter | set_param(value) |
| Getter | get_param() |
Tangential acceleration applied to each particle. Tangential acceleration is perpendicular to the particle’s velocity giving the particles a swirling motion.
- Curve tangential_accel_curve
| Setter | set_param_curve(value) |
| Getter | get_param_curve() |
Each particle’s tangential acceleration will vary along this Curve.
- float tangential_accel_random
| Default | 0.0 |
| Setter | set_param_randomness(value) |
| Getter | get_param_randomness() |
Tangential acceleration randomness ratio.
Method Descriptions¶
- void convert_from_particles ( Node particles )
Sets this node’s properties to match a given Particles node with an assigned ParticlesMaterial.
Returns the base value of the parameter specified by Parameter.
Returns the Curve of the parameter specified by Parameter.
Returns the randomness factor of the parameter specified by Parameter.
Returns the enabled state of the given flag (see Flags for options).
- void restart ( )
Restarts the particle emitter.
Sets the base value of the parameter specified by Parameter.
Sets the Curve of the parameter specified by Parameter.
Sets the randomness factor of the parameter specified by Parameter.
Enables or disables the given flag (see Flags for options).
CPUParticles2D¶
Inherits: Node2D < CanvasItem < Node < Object
CPU-based 2D particle emitter.
Description¶
CPU-based 2D particle node used to create a variety of particle systems and effects.
See also Particles2D, which provides the same functionality with hardware acceleration, but may not run on older devices.
Tutorials¶
Properties¶
Methods¶
| void | convert_from_particles ( Node particles ) |
| float | get_param ( Parameter param ) const |
| Curve | get_param_curve ( Parameter param ) const |
| float | get_param_randomness ( Parameter param ) const |
| bool | get_particle_flag ( Flags flag ) const |
| void | restart ( ) |
| void | set_param ( Parameter param, float value ) |
| void | set_param_curve ( Parameter param, Curve curve ) |
| void | set_param_randomness ( Parameter param, float randomness ) |
| void | set_particle_flag ( Flags flag, bool enable ) |
Enumerations¶
enum DrawOrder:
- DRAW_ORDER_INDEX = 0 — Particles are drawn in the order emitted.
- DRAW_ORDER_LIFETIME = 1 — Particles are drawn in order of remaining lifetime.
enum Parameter:
- PARAM_INITIAL_LINEAR_VELOCITY = 0 — Use with set_param, set_param_randomness, and set_param_curve to set initial velocity properties.
- PARAM_ANGULAR_VELOCITY = 1 — Use with set_param, set_param_randomness, and set_param_curve to set angular velocity properties.
- PARAM_ORBIT_VELOCITY = 2 — Use with set_param, set_param_randomness, and set_param_curve to set orbital velocity properties.
- PARAM_LINEAR_ACCEL = 3 — Use with set_param, set_param_randomness, and set_param_curve to set linear acceleration properties.
- PARAM_RADIAL_ACCEL = 4 — Use with set_param, set_param_randomness, and set_param_curve to set radial acceleration properties.
- PARAM_TANGENTIAL_ACCEL = 5 — Use with set_param, set_param_randomness, and set_param_curve to set tangential acceleration properties.
- PARAM_DAMPING = 6 — Use with set_param, set_param_randomness, and set_param_curve to set damping properties.
- PARAM_ANGLE = 7 — Use with set_param, set_param_randomness, and set_param_curve to set angle properties.
- PARAM_SCALE = 8 — Use with set_param, set_param_randomness, and set_param_curve to set scale properties.
- PARAM_HUE_VARIATION = 9 — Use with set_param, set_param_randomness, and set_param_curve to set hue variation properties.
- PARAM_ANIM_SPEED = 10 — Use with set_param, set_param_randomness, and set_param_curve to set animation speed properties.
- PARAM_ANIM_OFFSET = 11 — Use with set_param, set_param_randomness, and set_param_curve to set animation offset properties.
- PARAM_MAX = 12 — Represents the size of the Parameter enum.
enum Flags:
- FLAG_ALIGN_Y_TO_VELOCITY = 0 — Use with set_particle_flag to set flag_align_y.
- FLAG_ROTATE_Y = 1 — Present for consistency with 3D particle nodes, not used in 2D.
- FLAG_DISABLE_Z = 2 — Present for consistency with 3D particle nodes, not used in 2D.
- FLAG_MAX = 3 — Represents the size of the Flags enum.
enum EmissionShape:
- EMISSION_SHAPE_POINT = 0 — All particles will be emitted from a single point.
- EMISSION_SHAPE_SPHERE = 1 — Particles will be emitted on the surface of a sphere flattened to two dimensions.
- EMISSION_SHAPE_RECTANGLE = 2 — Particles will be emitted in the area of a rectangle.
- EMISSION_SHAPE_POINTS = 3 — Particles will be emitted at a position chosen randomly among emission_points. Particle color will be modulated by emission_colors.
- EMISSION_SHAPE_DIRECTED_POINTS = 4 — Particles will be emitted at a position chosen randomly among emission_points. Particle velocity and rotation will be set based on emission_normals. Particle color will be modulated by emission_colors.
- EMISSION_SHAPE_MAX = 5 — Represents the size of the EmissionShape enum.
Property Descriptions¶
- int amount
| Default | 8 |
| Setter | set_amount(value) |
| Getter | get_amount() |
Number of particles emitted in one emission cycle.
- float angle
| Default | 0.0 |
| Setter | set_param(value) |
| Getter | get_param() |
Initial rotation applied to each particle, in degrees.
- Curve angle_curve
| Setter | set_param_curve(value) |
| Getter | get_param_curve() |
Each particle’s rotation will be animated along this Curve.
- float angle_random
| Default | 0.0 |
| Setter | set_param_randomness(value) |
| Getter | get_param_randomness() |
Rotation randomness ratio.
- float angular_velocity
| Default | 0.0 |
| Setter | set_param(value) |
| Getter | get_param() |
Initial angular velocity applied to each particle. Sets the speed of rotation of the particle.
- Curve angular_velocity_curve
| Setter | set_param_curve(value) |
| Getter | get_param_curve() |
Each particle’s angular velocity will vary along this Curve.
- float angular_velocity_random
| Default | 0.0 |
| Setter | set_param_randomness(value) |
| Getter | get_param_randomness() |
Angular velocity randomness ratio.
- float anim_offset
| Default | 0.0 |
| Setter | set_param(value) |
| Getter | get_param() |
Particle animation offset.
- Curve anim_offset_curve
| Setter | set_param_curve(value) |
| Getter | get_param_curve() |
Each particle’s animation offset will vary along this Curve.
- float anim_offset_random
| Default | 0.0 |
| Setter | set_param_randomness(value) |
| Getter | get_param_randomness() |
Animation offset randomness ratio.
- float anim_speed
| Default | 0.0 |
| Setter | set_param(value) |
| Getter | get_param() |
Particle animation speed.
- Curve anim_speed_curve
| Setter | set_param_curve(value) |
| Getter | get_param_curve() |
Each particle’s animation speed will vary along this Curve.
- float anim_speed_random
| Default | 0.0 |
| Setter | set_param_randomness(value) |
| Getter | get_param_randomness() |
Animation speed randomness ratio.
- Color color
| Default | Color( 1, 1, 1, 1 ) |
| Setter | set_color(value) |
| Getter | get_color() |
Each particle’s initial color. If texture is defined, it will be multiplied by this color.
- Gradient color_ramp
| Setter | set_color_ramp(value) |
| Getter | get_color_ramp() |
Each particle’s color will vary along this Gradient.
- float damping
| Default | 0.0 |
| Setter | set_param(value) |
| Getter | get_param() |
The rate at which particles lose velocity.
- Curve damping_curve
| Setter | set_param_curve(value) |
| Getter | get_param_curve() |
Damping will vary along this Curve.
- float damping_random
| Default | 0.0 |
| Setter | set_param_randomness(value) |
| Getter | get_param_randomness() |
Damping randomness ratio.
- Vector2 direction
| Default | Vector2( 1, 0 ) |
| Setter | set_direction(value) |
| Getter | get_direction() |
Unit vector specifying the particles’ emission direction.
- DrawOrder draw_order
| Default | 0 |
| Setter | set_draw_order(value) |
| Getter | get_draw_order() |
Particle draw order. Uses DrawOrder values.
- PoolColorArray emission_colors
| Setter | set_emission_colors(value) |
| Getter | get_emission_colors() |
Sets the Colors to modulate particles by when using EMISSION_SHAPE_POINTS or EMISSION_SHAPE_DIRECTED_POINTS.
- PoolVector2Array emission_normals
| Setter | set_emission_normals(value) |
| Getter | get_emission_normals() |
Sets the direction the particles will be emitted in when using EMISSION_SHAPE_DIRECTED_POINTS.
- PoolVector2Array emission_points
| Setter | set_emission_points(value) |
| Getter | get_emission_points() |
Sets the initial positions to spawn particles when using EMISSION_SHAPE_POINTS or EMISSION_SHAPE_DIRECTED_POINTS.
- Vector2 emission_rect_extents
| Setter | set_emission_rect_extents(value) |
| Getter | get_emission_rect_extents() |
The rectangle’s extents if emission_shape is set to EMISSION_SHAPE_RECTANGLE.
- EmissionShape emission_shape
| Default | 0 |
| Setter | set_emission_shape(value) |
| Getter | get_emission_shape() |
Particles will be emitted inside this region. See EmissionShape for possible values.
- float emission_sphere_radius
| Setter | set_emission_sphere_radius(value) |
| Getter | get_emission_sphere_radius() |
The sphere’s radius if emission_shape is set to EMISSION_SHAPE_SPHERE.
- bool emitting
| Default | true |
| Setter | set_emitting(value) |
| Getter | is_emitting() |
If true, particles are being emitted.
- float explosiveness
| Default | 0.0 |
| Setter | set_explosiveness_ratio(value) |
| Getter | get_explosiveness_ratio() |
How rapidly particles in an emission cycle are emitted. If greater than 0, there will be a gap in emissions before the next cycle begins.
- int fixed_fps
| Default | 0 |
| Setter | set_fixed_fps(value) |
| Getter | get_fixed_fps() |
The particle system’s frame rate is fixed to a value. For instance, changing the value to 2 will make the particles render at 2 frames per second. Note this does not slow down the simulation of the particle system itself.
- bool flag_align_y
| Default | false |
| Setter | set_particle_flag(value) |
| Getter | get_particle_flag() |
Align Y axis of particle with the direction of its velocity.
- bool fract_delta
| Default | true |
| Setter | set_fractional_delta(value) |
| Getter | get_fractional_delta() |
If true, results in fractional delta calculation which has a smoother particles display effect.
- Vector2 gravity
| Default | Vector2( 0, 98 ) |
| Setter | set_gravity(value) |
| Getter | get_gravity() |
Gravity applied to every particle.
- float hue_variation
| Default | 0.0 |
| Setter | set_param(value) |
| Getter | get_param() |
Initial hue variation applied to each particle.
- Curve hue_variation_curve
| Setter | set_param_curve(value) |
| Getter | get_param_curve() |
Each particle’s hue will vary along this Curve.
- float hue_variation_random
| Default | 0.0 |
| Setter | set_param_randomness(value) |
| Getter | get_param_randomness() |
Hue variation randomness ratio.
- float initial_velocity
| Default | 0.0 |
| Setter | set_param(value) |
| Getter | get_param() |
Initial velocity magnitude for each particle. Direction comes from spread and the node’s orientation.
- float initial_velocity_random
| Default | 0.0 |
| Setter | set_param_randomness(value) |
| Getter | get_param_randomness() |
Initial velocity randomness ratio.
- float lifetime
| Default | 1.0 |
| Setter | set_lifetime(value) |
| Getter | get_lifetime() |
Amount of time each particle will exist.
- float lifetime_randomness
| Default | 0.0 |
| Setter | set_lifetime_randomness(value) |
| Getter | get_lifetime_randomness() |
Particle lifetime randomness ratio.
- float linear_accel
| Default | 0.0 |
| Setter | set_param(value) |
| Getter | get_param() |
Linear acceleration applied to each particle in the direction of motion.
- Curve linear_accel_curve
| Setter | set_param_curve(value) |
| Getter | get_param_curve() |
Each particle’s linear acceleration will vary along this Curve.
- float linear_accel_random
| Default | 0.0 |
| Setter | set_param_randomness(value) |
| Getter | get_param_randomness() |
Linear acceleration randomness ratio.
- bool local_coords
| Default | true |
| Setter | set_use_local_coordinates(value) |
| Getter | get_use_local_coordinates() |
If true, particles use the parent node’s coordinate space. If false, they use global coordinates.
- Texture normalmap
| Setter | set_normalmap(value) |
| Getter | get_normalmap() |
Normal map to be used for the texture property.
- bool one_shot
| Default | false |
| Setter | set_one_shot(value) |
| Getter | get_one_shot() |
If true, only one emission cycle occurs. If set true during a cycle, emission will stop at the cycle’s end.
- float orbit_velocity
| Default | 0.0 |
| Setter | set_param(value) |
| Getter | get_param() |
Orbital velocity applied to each particle. Makes the particles circle around origin. Specified in number of full rotations around origin per second.
- Curve orbit_velocity_curve
| Setter | set_param_curve(value) |
| Getter | get_param_curve() |
Each particle’s orbital velocity will vary along this Curve.
- float orbit_velocity_random
| Default | 0.0 |
| Setter | set_param_randomness(value) |
| Getter | get_param_randomness() |
Orbital velocity randomness ratio.
- float preprocess
| Default | 0.0 |
| Setter | set_pre_process_time(value) |
| Getter | get_pre_process_time() |
Particle system starts as if it had already run for this many seconds.
- float radial_accel
| Default | 0.0 |
| Setter | set_param(value) |
| Getter | get_param() |
Radial acceleration applied to each particle. Makes particle accelerate away from origin.
- Curve radial_accel_curve
| Setter | set_param_curve(value) |
| Getter | get_param_curve() |
Each particle’s radial acceleration will vary along this Curve.
- float radial_accel_random
| Default | 0.0 |
| Setter | set_param_randomness(value) |
| Getter | get_param_randomness() |
Radial acceleration randomness ratio.
- float randomness
| Default | 0.0 |
| Setter | set_randomness_ratio(value) |
| Getter | get_randomness_ratio() |
Emission lifetime randomness ratio.
- float scale_amount
| Default | 1.0 |
| Setter | set_param(value) |
| Getter | get_param() |
Initial scale applied to each particle.
- Curve scale_amount_curve
| Setter | set_param_curve(value) |
| Getter | get_param_curve() |
Each particle’s scale will vary along this Curve.
- float scale_amount_random
| Default | 0.0 |
| Setter | set_param_randomness(value) |
| Getter | get_param_randomness() |
Scale randomness ratio.
- float speed_scale
| Default | 1.0 |
| Setter | set_speed_scale(value) |
| Getter | get_speed_scale() |
Particle system’s running speed scaling ratio. A value of 0 can be used to pause the particles.
- float spread
| Default | 45.0 |
| Setter | set_spread(value) |
| Getter | get_spread() |
Each particle’s initial direction range from +spread to -spread degrees.
- float tangential_accel
| Default | 0.0 |
| Setter | set_param(value) |
| Getter | get_param() |
Tangential acceleration applied to each particle. Tangential acceleration is perpendicular to the particle’s velocity giving the particles a swirling motion.
- Curve tangential_accel_curve
| Setter | set_param_curve(value) |
| Getter | get_param_curve() |
Each particle’s tangential acceleration will vary along this Curve.
- float tangential_accel_random
| Default | 0.0 |
| Setter | set_param_randomness(value) |
| Getter | get_param_randomness() |
Tangential acceleration randomness ratio.
- Texture texture
| Setter | set_texture(value) |
| Getter | get_texture() |
Particle texture. If null, particles will be squares.
Method Descriptions¶
- void convert_from_particles ( Node particles )
Sets this node’s properties to match a given Particles2D node with an assigned ParticlesMaterial.
Returns the base value of the parameter specified by Parameter.
Returns the Curve of the parameter specified by Parameter.
Returns the randomness factor of the parameter specified by Parameter.
Returns the enabled state of the given flag (see Flags for options).
- void restart ( )
Restarts the particle emitter.
Sets the base value of the parameter specified by Parameter.
Sets the Curve of the parameter specified by Parameter.
Sets the randomness factor of the parameter specified by Parameter.
Enables or disables the given flag (see Flags for options).
Crypto¶
Access to advanced cryptographic functionalities.
Description¶
The Crypto class allows you to access some more advanced cryptographic functionalities in Godot.
For now, this includes generating cryptographically secure random bytes, and RSA keys and self-signed X509 certificates generation. More functionalities are planned for future releases.
extends Node
var crypto = Crypto.new()
var key = CryptoKey.new()
var cert = X509Certificate.new()
func _ready():
# Generate new RSA key.
key = crypto.generate_rsa(4096)
# Generate new self-signed certificate with the given key.
cert = crypto.generate_self_signed_certificate(key, "CN=mydomain.com,O=My Game Company,C=IT")
# Save key and certificate in the user folder.
key.save("user://generated.key")
cert.save("user://generated.crt")
Note: Not available in HTML5 exports.
Methods¶
| PoolByteArray | generate_random_bytes ( int size ) |
| CryptoKey | generate_rsa ( int size ) |
| X509Certificate | generate_self_signed_certificate ( CryptoKey key, String issuer_name=”CN=myserver,O=myorganisation,C=IT”, String not_before=”20140101000000”, String not_after=”20340101000000” ) |
Method Descriptions¶
- PoolByteArray generate_random_bytes ( int size )
Generates a PoolByteArray of cryptographically secure random bytes with given size.
Generates an RSA CryptoKey that can be used for creating self-signed certificates and passed to StreamPeerSSL.accept_stream.
- X509Certificate generate_self_signed_certificate ( CryptoKey key, String issuer_name=”CN=myserver,O=myorganisation,C=IT”, String not_before=”20140101000000”, String not_after=”20340101000000” )
Generates a self-signed X509Certificate from the given CryptoKey and issuer_name. The certificate validity will be defined by not_before and not_after (first valid date and last valid date). The issuer_name must contain at least “CN=” (common name, i.e. the domain name), “O=” (organization, i.e. your company name), “C=” (country, i.e. 2 lettered ISO-3166 code of the country the organization is based in).
A small example to generate an RSA key and a X509 self-signed certificate.
var crypto = Crypto.new()
# Generate 4096 bits RSA key.
var key = crypto.generate_rsa(4096)
# Generate self-signed certificate using the given key.
var cert = crypto.generate_self_signed_certificate(key, "CN=example.com,O=A Game Company,C=IT")
CryptoKey¶
Inherits: Resource < Reference < Object
A cryptographic key (RSA).
Description¶
The CryptoKey class represents a cryptographic key. Keys can be loaded and saved like any other Resource.
They can be used to generate a self-signed X509Certificate via Crypto.generate_self_signed_certificate and as private key in StreamPeerSSL.accept_stream along with the appropriate certificate.
Note: Not available in HTML5 exports.
CSGBox¶
Inherits: CSGPrimitive < CSGShape < GeometryInstance < VisualInstance < Spatial < Node < Object
A CSG Box shape.
Description¶
This node allows you to create a box for use with the CSG system.
Property Descriptions¶
- float depth
| Default | 2.0 |
| Setter | set_depth(value) |
| Getter | get_depth() |
Depth of the box measured from the center of the box.
- float height
| Default | 2.0 |
| Setter | set_height(value) |
| Getter | get_height() |
Height of the box measured from the center of the box.
- Material material
| Setter | set_material(value) |
| Getter | get_material() |
The material used to render the box.
- float width
| Default | 2.0 |
| Setter | set_width(value) |
| Getter | get_width() |
Width of the box measured from the center of the box.
CSGCombiner¶
Inherits: CSGShape < GeometryInstance < VisualInstance < Spatial < Node < Object
A CSG node that allows you to combine other CSG modifiers.
Description¶
For complex arrangements of shapes, it is sometimes needed to add structure to your CSG nodes. The CSGCombiner node allows you to create this structure. The node encapsulates the result of the CSG operations of its children. In this way, it is possible to do operations on one set of shapes that are children of one CSGCombiner node, and a set of separate operations on a second set of shapes that are children of a second CSGCombiner node, and then do an operation that takes the two end results as its input to create the final shape.
CSGCylinder¶
Inherits: CSGPrimitive < CSGShape < GeometryInstance < VisualInstance < Spatial < Node < Object
A CSG Cylinder shape.
Description¶
This node allows you to create a cylinder (or cone) for use with the CSG system.
Properties¶
| bool | cone | false |
| float | height | 1.0 |
| Material | material | |
| float | radius | 1.0 |
| int | sides | 8 |
| bool | smooth_faces | true |
Property Descriptions¶
- bool cone
| Default | false |
| Setter | set_cone(value) |
| Getter | is_cone() |
If true a cone is created, the radius will only apply to one side.
- float height
| Default | 1.0 |
| Setter | set_height(value) |
| Getter | get_height() |
The height of the cylinder.
- Material material
| Setter | set_material(value) |
| Getter | get_material() |
The material used to render the cylinder.
- float radius
| Default | 1.0 |
| Setter | set_radius(value) |
| Getter | get_radius() |
The radius of the cylinder.
- int sides
| Default | 8 |
| Setter | set_sides(value) |
| Getter | get_sides() |
The number of sides of the cylinder, the higher this number the more detail there will be in the cylinder.
- bool smooth_faces
| Default | true |
| Setter | set_smooth_faces(value) |
| Getter | get_smooth_faces() |
If true the normals of the cylinder are set to give a smooth effect making the cylinder seem rounded. If false the cylinder will have a flat shaded look.
CSGMesh¶
Inherits: CSGPrimitive < CSGShape < GeometryInstance < VisualInstance < Spatial < Node < Object
A CSG Mesh shape that uses a mesh resource.
Description¶
This CSG node allows you to use any mesh resource as a CSG shape, provided it is closed, does not self-intersect, does not contain internal faces and has no edges that connect to more then two faces.
CSGPolygon¶
Inherits: CSGPrimitive < CSGShape < GeometryInstance < VisualInstance < Spatial < Node < Object
Extrudes a 2D polygon shape to create a 3D mesh.
Description¶
This node takes a 2D polygon shape and extrudes it to create a 3D mesh.
Properties¶
| float | depth | 1.0 |
| Material | material | |
| Mode | mode | 0 |
| bool | path_continuous_u | |
| float | path_interval | |
| bool | path_joined | |
| bool | path_local | |
| NodePath | path_node | |
| PathRotation | path_rotation | |
| PoolVector2Array | polygon | PoolVector2Array( 0, 0, 0, 1, 1, 1, 1, 0 ) |
| bool | smooth_faces | false |
| float | spin_degrees | |
| int | spin_sides |
Enumerations¶
enum Mode:
- MODE_DEPTH = 0 — Shape is extruded to depth.
- MODE_SPIN = 1 — Shape is extruded by rotating it around an axis.
- MODE_PATH = 2 — Shape is extruded along a path set by a Shape set in path_node.
enum PathRotation:
- PATH_ROTATION_POLYGON = 0 — Slice is not rotated.
- PATH_ROTATION_PATH = 1 — Slice is rotated around the up vector of the path.
- PATH_ROTATION_PATH_FOLLOW = 2 — Slice is rotate to match the path exactly.
Property Descriptions¶
- float depth
| Default | 1.0 |
| Setter | set_depth(value) |
| Getter | get_depth() |
Extrusion depth when mode is MODE_DEPTH.
- Material material
| Setter | set_material(value) |
| Getter | get_material() |
Material to use for the resulting mesh.
- Mode mode
| Default | 0 |
| Setter | set_mode(value) |
| Getter | get_mode() |
Extrusion mode.
- bool path_continuous_u
| Setter | set_path_continuous_u(value) |
| Getter | is_path_continuous_u() |
If true the u component of our uv will continuously increase in unison with the distance traveled along our path when mode is MODE_PATH.
- float path_interval
| Setter | set_path_interval(value) |
| Getter | get_path_interval() |
Interval at which a new extrusion slice is added along the path when mode is MODE_PATH.
- bool path_joined
| Setter | set_path_joined(value) |
| Getter | is_path_joined() |
If true the start and end of our path are joined together ensuring there is no seam when mode is MODE_PATH.
- bool path_local
| Setter | set_path_local(value) |
| Getter | is_path_local() |
If false we extrude centered on our path, if true we extrude in relation to the position of our CSGPolygon when mode is MODE_PATH.
- NodePath path_node
| Setter | set_path_node(value) |
| Getter | get_path_node() |
The Shape object containing the path along which we extrude when mode is MODE_PATH.
- PathRotation path_rotation
| Setter | set_path_rotation(value) |
| Getter | get_path_rotation() |
The method by which each slice is rotated along the path when mode is MODE_PATH.
- PoolVector2Array polygon
| Default | PoolVector2Array( 0, 0, 0, 1, 1, 1, 1, 0 ) |
| Setter | set_polygon(value) |
| Getter | get_polygon() |
Point array that defines the shape that we’ll extrude.
- bool smooth_faces
| Default | false |
| Setter | set_smooth_faces(value) |
| Getter | get_smooth_faces() |
Generates smooth normals so smooth shading is applied to our mesh.
- float spin_degrees
| Setter | set_spin_degrees(value) |
| Getter | get_spin_degrees() |
Degrees to rotate our extrusion for each slice when mode is MODE_SPIN.
- int spin_sides
| Setter | set_spin_sides(value) |
| Getter | get_spin_sides() |
CSGPrimitive¶
Inherits: CSGShape < GeometryInstance < VisualInstance < Spatial < Node < Object
Inherited By: CSGBox, CSGCylinder, CSGMesh, CSGPolygon, CSGSphere, CSGTorus
Base class for CSG primitives.
Description¶
Parent class for various CSG primitives. It contains code and functionality that is common between them. It cannot be used directly. Instead use one of the various classes that inherit from it.
Properties¶
| bool | invert_faces | false |
CSGShape¶
Inherits: GeometryInstance < VisualInstance < Spatial < Node < Object
Inherited By: CSGCombiner, CSGPrimitive
The CSG base class.
Description¶
This is the CSG base class that provides CSG operation support to the various CSG nodes in Godot.
Properties¶
| bool | calculate_tangents | true |
| int | collision_layer | 1 |
| int | collision_mask | 1 |
| Operation | operation | 0 |
| float | snap | 0.001 |
| bool | use_collision | false |
Methods¶
| bool | get_collision_layer_bit ( int bit ) const |
| bool | get_collision_mask_bit ( int bit ) const |
| Array | get_meshes ( ) const |
| bool | is_root_shape ( ) const |
| void | set_collision_layer_bit ( int bit, bool value ) |
| void | set_collision_mask_bit ( int bit, bool value ) |
Enumerations¶
enum Operation:
- OPERATION_UNION = 0 — Geometry of both primitives is merged, intersecting geometry is removed.
- OPERATION_INTERSECTION = 1 — Only intersecting geometry remains, the rest is removed.
- OPERATION_SUBTRACTION = 2 — The second shape is subtracted from the first, leaving a dent with its shape.
Property Descriptions¶
- bool calculate_tangents
| Default | true |
| Setter | set_calculate_tangents(value) |
| Getter | is_calculating_tangents() |
Calculate tangents for the CSG shape which allows the use of normal maps. This is only applied on the root shape, this setting is ignored on any child.
- int collision_layer
| Default | 1 |
| Setter | set_collision_layer(value) |
| Getter | get_collision_layer() |
The physics layers this area is in.
Collidable objects can exist in any of 32 different layers. These layers work like a tagging system, and are not visual. A collidable can use these layers to select with which objects it can collide, using the collision_mask property.
A contact is detected if object A is in any of the layers that object B scans, or object B is in any layer scanned by object A.
- int collision_mask
| Default | 1 |
| Setter | set_collision_mask(value) |
| Getter | get_collision_mask() |
The physics layers this CSG shape scans for collisions.
- Operation operation
| Default | 0 |
| Setter | set_operation(value) |
| Getter | get_operation() |
The operation that is performed on this shape. This is ignored for the first CSG child node as the operation is between this node and the previous child of this nodes parent.
- float snap
| Default | 0.001 |
| Setter | set_snap(value) |
| Getter | get_snap() |
Snap makes the mesh snap to a given distance so that the faces of two meshes can be perfectly aligned. A lower value results in greater precision but may be harder to adjust.
- bool use_collision
| Default | false |
| Setter | set_use_collision(value) |
| Getter | is_using_collision() |
Adds a collision shape to the physics engine for our CSG shape. This will always act like a static body. Note that the collision shape is still active even if the CSG shape itself is hidden.
Method Descriptions¶
Returns an individual bit on the collision mask.
Returns an individual bit on the collision mask.
- Array get_meshes ( ) const
Returns an Array with two elements, the first is the Transform of this node and the second is the root Mesh of this node. Only works when this node is the root shape.
- bool is_root_shape ( ) const
Returns true if this is a root shape and is thus the object that is rendered.
Sets individual bits on the layer mask. Use this if you only need to change one layer’s value.
Sets individual bits on the collision mask. Use this if you only need to change one layer’s value.
CSGSphere¶
Inherits: CSGPrimitive < CSGShape < GeometryInstance < VisualInstance < Spatial < Node < Object
A CSG Sphere shape.
Description¶
This node allows you to create a sphere for use with the CSG system.
Properties¶
| Material | material | |
| int | radial_segments | 12 |
| float | radius | 1.0 |
| int | rings | 6 |
| bool | smooth_faces | true |
Property Descriptions¶
- Material material
| Setter | set_material(value) |
| Getter | get_material() |
The material used to render the sphere.
- int radial_segments
| Default | 12 |
| Setter | set_radial_segments(value) |
| Getter | get_radial_segments() |
Number of vertical slices for the sphere.
- float radius
| Default | 1.0 |
| Setter | set_radius(value) |
| Getter | get_radius() |
Radius of the sphere.
- int rings
| Default | 6 |
| Setter | set_rings(value) |
| Getter | get_rings() |
Number of horizontal slices for the sphere.
- bool smooth_faces
| Default | true |
| Setter | set_smooth_faces(value) |
| Getter | get_smooth_faces() |
If true the normals of the sphere are set to give a smooth effect making the sphere seem rounded. If false the sphere will have a flat shaded look.
CSGTorus¶
Inherits: CSGPrimitive < CSGShape < GeometryInstance < VisualInstance < Spatial < Node < Object
A CSG Torus shape.
Description¶
This node allows you to create a torus for use with the CSG system.
Properties¶
| float | inner_radius | 2.0 |
| Material | material | |
| float | outer_radius | 3.0 |
| int | ring_sides | 6 |
| int | sides | 8 |
| bool | smooth_faces | true |
Property Descriptions¶
- float inner_radius
| Default | 2.0 |
| Setter | set_inner_radius(value) |
| Getter | get_inner_radius() |
The inner radius of the torus.
- Material material
| Setter | set_material(value) |
| Getter | get_material() |
The material used to render the torus.
- float outer_radius
| Default | 3.0 |
| Setter | set_outer_radius(value) |
| Getter | get_outer_radius() |
The outer radius of the torus.
- int ring_sides
| Default | 6 |
| Setter | set_ring_sides(value) |
| Getter | get_ring_sides() |
The number of edges each ring of the torus is constructed of.
- int sides
| Default | 8 |
| Setter | set_sides(value) |
| Getter | get_sides() |
The number of slices the torus is constructed of.
- bool smooth_faces
| Default | true |
| Setter | set_smooth_faces(value) |
| Getter | get_smooth_faces() |
If true the normals of the torus are set to give a smooth effect making the torus seem rounded. If false the torus will have a flat shaded look.
CSharpScript¶
CubeMap¶
Inherits: Resource < Reference < Object
A CubeMap is a 6-sided 3D texture.
Description¶
A 6-sided 3D texture typically used for faking reflections. It can be used to make an object look as if it’s reflecting its surroundings. This usually delivers much better performance than other reflection methods.
Properties¶
| int | flags | 7 |
| float | lossy_storage_quality | 0.7 |
| Storage | storage_mode | 0 |
Methods¶
| int | get_height ( ) const |
| Image | get_side ( Side side ) const |
| int | get_width ( ) const |
| void | set_side ( Side side, Image image ) |
Enumerations¶
enum Storage:
- STORAGE_RAW = 0 — Store the
CubeMapwithout any compression. - STORAGE_COMPRESS_LOSSY = 1 — Store the
CubeMapwith strong compression that reduces image quality. - STORAGE_COMPRESS_LOSSLESS = 2 — Store the
CubeMapwith moderate compression that doesn’t reduce image quality.
enum Side:
- SIDE_LEFT = 0 — Identifier for the left face of the
CubeMap. - SIDE_RIGHT = 1 — Identifier for the right face of the
CubeMap. - SIDE_BOTTOM = 2 — Identifier for the bottom face of the
CubeMap. - SIDE_TOP = 3 — Identifier for the top face of the
CubeMap. - SIDE_FRONT = 4 — Identifier for the front face of the
CubeMap. - SIDE_BACK = 5 — Identifier for the back face of the
CubeMap.
enum Flags:
- FLAG_MIPMAPS = 1 — Generate mipmaps, to enable smooth zooming out of the texture.
- FLAG_REPEAT = 2 — Repeat (instead of clamp to edge).
- FLAG_FILTER = 4 — Turn on magnifying filter, to enable smooth zooming in of the texture.
- FLAGS_DEFAULT = 7 — Default flags. Generate mipmaps, repeat, and filter are enabled.
Property Descriptions¶
- int flags
| Default | 7 |
| Setter | set_flags(value) |
| Getter | get_flags() |
The render flags for the CubeMap. See the Flags constants for details.
- float lossy_storage_quality
| Default | 0.7 |
| Setter | set_lossy_storage_quality(value) |
| Getter | get_lossy_storage_quality() |
The lossy storage quality of the CubeMap if the storage mode is set to STORAGE_COMPRESS_LOSSY.
- Storage storage_mode
| Default | 0 |
| Setter | set_storage(value) |
| Getter | get_storage() |
The CubeMap’s storage mode. See Storage constants.
CubeMesh¶
Inherits: PrimitiveMesh < Mesh < Resource < Reference < Object
Generate an axis-aligned cuboid PrimitiveMesh.
Description¶
Generate an axis-aligned cuboid PrimitiveMesh.
The cube’s UV layout is arranged in a 3×2 layout that allows texturing each face individually. To apply the same texture on all faces, change the material’s UV property to Vector3(3, 2, 1).
Properties¶
| Vector3 | size | Vector3( 2, 2, 2 ) |
| int | subdivide_depth | 0 |
| int | subdivide_height | 0 |
| int | subdivide_width | 0 |
Property Descriptions¶
- Vector3 size
| Default | Vector3( 2, 2, 2 ) |
| Setter | set_size(value) |
| Getter | get_size() |
Size of the cuboid mesh.
- int subdivide_depth
| Default | 0 |
| Setter | set_subdivide_depth(value) |
| Getter | get_subdivide_depth() |
Number of extra edge loops inserted along the Z axis.
- int subdivide_height
| Default | 0 |
| Setter | set_subdivide_height(value) |
| Getter | get_subdivide_height() |
Number of extra edge loops inserted along the Y axis.
- int subdivide_width
| Default | 0 |
| Setter | set_subdivide_width(value) |
| Getter | get_subdivide_width() |
Number of extra edge loops inserted along the X axis.
Curve¶
Inherits: Resource < Reference < Object
A mathematic curve.
Description¶
A curve that can be saved and re-used for other objects. By default, it ranges between 0 and 1 on the Y axis and positions points relative to the 0.5 Y position.
Methods¶
| int | add_point ( Vector2 position, float left_tangent=0, float right_tangent=0, TangentMode left_mode=0, TangentMode right_mode=0 ) |
| void | bake ( ) |
| void | clean_dupes ( ) |
| void | clear_points ( ) |
| int | get_point_count ( ) const |
| TangentMode | get_point_left_mode ( int index ) const |
| float | get_point_left_tangent ( int index ) const |
| Vector2 | get_point_position ( int index ) const |
| TangentMode | get_point_right_mode ( int index ) const |
| float | get_point_right_tangent ( int index ) const |
| float | interpolate ( float offset ) const |
| float | interpolate_baked ( float offset ) |
| void | remove_point ( int index ) |
| void | set_point_left_mode ( int index, TangentMode mode ) |
| void | set_point_left_tangent ( int index, float tangent ) |
| int | set_point_offset ( int index, float offset ) |
| void | set_point_right_mode ( int index, TangentMode mode ) |
| void | set_point_right_tangent ( int index, float tangent ) |
| void | set_point_value ( int index, float y ) |
Enumerations¶
enum TangentMode:
- TANGENT_FREE = 0 — The tangent on this side of the point is user-defined.
- TANGENT_LINEAR = 1 — The curve calculates the tangent on this side of the point as the slope halfway towards the adjacent point.
- TANGENT_MODE_COUNT = 2 — The total number of available tangent modes.
Property Descriptions¶
- int bake_resolution
| Default | 100 |
| Setter | set_bake_resolution(value) |
| Getter | get_bake_resolution() |
The number of points to include in the baked (i.e. cached) curve data.
- float max_value
| Default | 1.0 |
| Setter | set_max_value(value) |
| Getter | get_max_value() |
The maximum value the curve can reach.
- float min_value
| Default | 0.0 |
| Setter | set_min_value(value) |
| Getter | get_min_value() |
The minimum value the curve can reach.
Method Descriptions¶
- int add_point ( Vector2 position, float left_tangent=0, float right_tangent=0, TangentMode left_mode=0, TangentMode right_mode=0 )
Adds a point to the curve. For each side, if the *_mode is TANGENT_LINEAR, the *_tangent angle (in degrees) uses the slope of the curve halfway to the adjacent point. Allows custom assignments to the *_tangent angle if *_mode is set to TANGENT_FREE.
- void bake ( )
Recomputes the baked cache of points for the curve.
- void clean_dupes ( )
Removes points that are closer than CMP_EPSILON (0.00001) units to their neighbor on the curve.
- void clear_points ( )
Removes all points from the curve.
- int get_point_count ( ) const
Returns the number of points describing the curve.
- TangentMode get_point_left_mode ( int index ) const
Returns the left TangentMode for the point at index.
Returns the left tangent angle (in degrees) for the point at index.
Returns the curve coordinates for the point at index.
- TangentMode get_point_right_mode ( int index ) const
Returns the right TangentMode for the point at index.
Returns the right tangent angle (in degrees) for the point at index.
Returns the Y value for the point that would exist at the X position offset along the curve.
Returns the Y value for the point that would exist at the X position offset along the curve using the baked cache. Bakes the curve’s points if not already baked.
- void remove_point ( int index )
Removes the point at index from the curve.
- void set_point_left_mode ( int index, TangentMode mode )
Sets the left TangentMode for the point at index to mode.
Sets the left tangent angle for the point at index to tangent.
Sets the offset from 0.5.
- void set_point_right_mode ( int index, TangentMode mode )
Sets the right TangentMode for the point at index to mode.
Sets the right tangent angle for the point at index to tangent.
Assigns the vertical position y to the point at index.
Curve2D¶
Inherits: Resource < Reference < Object
Describes a Bézier curve in 2D space.
Description¶
This class describes a Bézier curve in 2D space. It is mainly used to give a shape to a Path2D, but can be manually sampled for other purposes.
It keeps a cache of precalculated points along the curve, to speed up further calculations.
Properties¶
| float | bake_interval | 5.0 |
Methods¶
| void | add_point ( Vector2 position, Vector2 in=Vector2( 0, 0 ), Vector2 out=Vector2( 0, 0 ), int at_position=-1 ) |
| void | clear_points ( ) |
| float | get_baked_length ( ) const |
| PoolVector2Array | get_baked_points ( ) const |
| float | get_closest_offset ( Vector2 to_point ) const |
| Vector2 | get_closest_point ( Vector2 to_point ) const |
| int | get_point_count ( ) const |
| Vector2 | get_point_in ( int idx ) const |
| Vector2 | get_point_out ( int idx ) const |
| Vector2 | get_point_position ( int idx ) const |
| Vector2 | interpolate ( int idx, float t ) const |
| Vector2 | interpolate_baked ( float offset, bool cubic=false ) const |
| Vector2 | interpolatef ( float fofs ) const |
| void | remove_point ( int idx ) |
| void | set_point_in ( int idx, Vector2 position ) |
| void | set_point_out ( int idx, Vector2 position ) |
| void | set_point_position ( int idx, Vector2 position ) |
| PoolVector2Array | tessellate ( int max_stages=5, float tolerance_degrees=4 ) const |
Property Descriptions¶
- float bake_interval
| Default | 5.0 |
| Setter | set_bake_interval(value) |
| Getter | get_bake_interval() |
The distance in pixels between two adjacent cached points. Changing it forces the cache to be recomputed the next time the get_baked_points or get_baked_length function is called. The smaller the distance, the more points in the cache and the more memory it will consume, so use with care.
Method Descriptions¶
- void add_point ( Vector2 position, Vector2 in=Vector2( 0, 0 ), Vector2 out=Vector2( 0, 0 ), int at_position=-1 )
Adds a point to a curve at position, with control points in and out.
If at_position is given, the point is inserted before the point number at_position, moving that point (and every point after) after the inserted point. If at_position is not given, or is an illegal value (at_position <0 or at_position >= [method get_point_count]), the point will be appended at the end of the point list.
- void clear_points ( )
Removes all points from the curve.
- float get_baked_length ( ) const
Returns the total length of the curve, based on the cached points. Given enough density (see bake_interval), it should be approximate enough.
- PoolVector2Array get_baked_points ( ) const
Returns the cache of points as a PoolVector2Array.
Returns the closest offset to to_point. This offset is meant to be used in interpolate_baked.
to_point must be in this curve’s local space.
Returns the closest point (in curve’s local space) to to_point.
to_point must be in this curve’s local space.
- int get_point_count ( ) const
Returns the number of points describing the curve.
Returns the position of the control point leading to the vertex idx. If the index is out of bounds, the function sends an error to the console, and returns (0, 0).
Returns the position of the control point leading out of the vertex idx. If the index is out of bounds, the function sends an error to the console, and returns (0, 0).
Returns the position of the vertex idx. If the index is out of bounds, the function sends an error to the console, and returns (0, 0).
Returns the position between the vertex idx and the vertex idx + 1, where t controls if the point is the first vertex (t = 0.0), the last vertex (t = 1.0), or in between. Values of t outside the range (0.0 >= t <=1) give strange, but predictable results.
If idx is out of bounds it is truncated to the first or last vertex, and t is ignored. If the curve has no points, the function sends an error to the console, and returns (0, 0).
Returns a point within the curve at position offset, where offset is measured as a pixel distance along the curve.
To do that, it finds the two cached points where the offset lies between, then interpolates the values. This interpolation is cubic if cubic is set to true, or linear if set to false.
Cubic interpolation tends to follow the curves better, but linear is faster (and often, precise enough).
Returns the position at the vertex fofs. It calls interpolate using the integer part of fofs as idx, and its fractional part as t.
- void remove_point ( int idx )
Deletes the point idx from the curve. Sends an error to the console if idx is out of bounds.
Sets the position of the control point leading to the vertex idx. If the index is out of bounds, the function sends an error to the console.
Sets the position of the control point leading out of the vertex idx. If the index is out of bounds, the function sends an error to the console.
Sets the position for the vertex idx. If the index is out of bounds, the function sends an error to the console.
- PoolVector2Array tessellate ( int max_stages=5, float tolerance_degrees=4 ) const
Returns a list of points along the curve, with a curvature controlled point density. That is, the curvier parts will have more points than the straighter parts.
This approximation makes straight segments between each point, then subdivides those segments until the resulting shape is similar enough.
max_stages controls how many subdivisions a curve segment may face before it is considered approximate enough. Each subdivision splits the segment in half, so the default 5 stages may mean up to 32 subdivisions per curve segment. Increase with care!
tolerance_degrees controls how many degrees the midpoint of a segment may deviate from the real curve, before the segment has to be subdivided.
Curve3D¶
Inherits: Resource < Reference < Object
Describes a Bézier curve in 3D space.
Description¶
This class describes a Bézier curve in 3D space. It is mainly used to give a shape to a Path, but can be manually sampled for other purposes.
It keeps a cache of precalculated points along the curve, to speed up further calculations.
Properties¶
| float | bake_interval | 0.2 |
| bool | up_vector_enabled | true |
Methods¶
Property Descriptions¶
- float bake_interval
| Default | 0.2 |
| Setter | set_bake_interval(value) |
| Getter | get_bake_interval() |
The distance in meters between two adjacent cached points. Changing it forces the cache to be recomputed the next time the get_baked_points or get_baked_length function is called. The smaller the distance, the more points in the cache and the more memory it will consume, so use with care.
- bool up_vector_enabled
| Default | true |
| Setter | set_up_vector_enabled(value) |
| Getter | is_up_vector_enabled() |
If true, the curve will bake up vectors used for orientation. This is used when PathFollow.rotation_mode is set to PathFollow.ROTATION_ORIENTED. Changing it forces the cache to be recomputed.
Method Descriptions¶
- void add_point ( Vector3 position, Vector3 in=Vector3( 0, 0, 0 ), Vector3 out=Vector3( 0, 0, 0 ), int at_position=-1 )
Adds a point to a curve at position, with control points in and out.
If at_position is given, the point is inserted before the point number at_position, moving that point (and every point after) after the inserted point. If at_position is not given, or is an illegal value (at_position <0 or at_position >= [method get_point_count]), the point will be appended at the end of the point list.
- void clear_points ( )
Removes all points from the curve.
- float get_baked_length ( ) const
Returns the total length of the curve, based on the cached points. Given enough density (see bake_interval), it should be approximate enough.
- PoolVector3Array get_baked_points ( ) const
Returns the cache of points as a PoolVector3Array.
- PoolRealArray get_baked_tilts ( ) const
Returns the cache of tilts as a PoolRealArray.
- PoolVector3Array get_baked_up_vectors ( ) const
Returns the cache of up vectors as a PoolVector3Array.
If up_vector_enabled is false, the cache will be empty.
Returns the closest offset to to_point. This offset is meant to be used in interpolate_baked or interpolate_baked_up_vector.
to_point must be in this curve’s local space.
Returns the closest point (in curve’s local space) to to_point.
to_point must be in this curve’s local space.
- int get_point_count ( ) const
Returns the number of points describing the curve.
Returns the position of the control point leading to the vertex idx. If the index is out of bounds, the function sends an error to the console, and returns (0, 0, 0).
Returns the position of the control point leading out of the vertex idx. If the index is out of bounds, the function sends an error to the console, and returns (0, 0, 0).
Returns the position of the vertex idx. If the index is out of bounds, the function sends an error to the console, and returns (0, 0, 0).
Returns the tilt angle in radians for the point idx. If the index is out of bounds, the function sends an error to the console, and returns 0.
Returns the position between the vertex idx and the vertex idx + 1, where t controls if the point is the first vertex (t = 0.0), the last vertex (t = 1.0), or in between. Values of t outside the range (0.0 >= t <=1) give strange, but predictable results.
If idx is out of bounds it is truncated to the first or last vertex, and t is ignored. If the curve has no points, the function sends an error to the console, and returns (0, 0, 0).
Returns a point within the curve at position offset, where offset is measured as a pixel distance along the curve.
To do that, it finds the two cached points where the offset lies between, then interpolates the values. This interpolation is cubic if cubic is set to true, or linear if set to false.
Cubic interpolation tends to follow the curves better, but linear is faster (and often, precise enough).
Returns an up vector within the curve at position offset, where offset is measured as a distance in 3D units along the curve.
To do that, it finds the two cached up vectors where the offset lies between, then interpolates the values. If apply_tilt is true, an interpolated tilt is applied to the interpolated up vector.
If the curve has no up vectors, the function sends an error to the console, and returns (0, 1, 0).
Returns the position at the vertex fofs. It calls interpolate using the integer part of fofs as idx, and its fractional part as t.
- void remove_point ( int idx )
Deletes the point idx from the curve. Sends an error to the console if idx is out of bounds.
Sets the position of the control point leading to the vertex idx. If the index is out of bounds, the function sends an error to the console.
Sets the position of the control point leading out of the vertex idx. If the index is out of bounds, the function sends an error to the console.
Sets the position for the vertex idx. If the index is out of bounds, the function sends an error to the console.
Sets the tilt angle in radians for the point idx. If the index is out of bounds, the function sends an error to the console.
The tilt controls the rotation along the look-at axis an object traveling the path would have. In the case of a curve controlling a PathFollow, this tilt is an offset over the natural tilt the PathFollow calculates.
- PoolVector3Array tessellate ( int max_stages=5, float tolerance_degrees=4 ) const
Returns a list of points along the curve, with a curvature controlled point density. That is, the curvier parts will have more points than the straighter parts.
This approximation makes straight segments between each point, then subdivides those segments until the resulting shape is similar enough.
max_stages controls how many subdivisions a curve segment may face before it is considered approximate enough. Each subdivision splits the segment in half, so the default 5 stages may mean up to 32 subdivisions per curve segment. Increase with care!
tolerance_degrees controls how many degrees the midpoint of a segment may deviate from the real curve, before the segment has to be subdivided.
CurveTexture¶
Inherits: Texture < Resource < Reference < Object
A texture that shows a curve.
CylinderMesh¶
Inherits: PrimitiveMesh < Mesh < Resource < Reference < Object
Class representing a cylindrical PrimitiveMesh.
Description¶
Class representing a cylindrical PrimitiveMesh. This class can be used to create cones by setting either the top_radius or bottom_radius properties to 0.0.
Properties¶
| float | bottom_radius | 1.0 |
| float | height | 2.0 |
| int | radial_segments | 64 |
| int | rings | 4 |
| float | top_radius | 1.0 |
Property Descriptions¶
- float bottom_radius
| Default | 1.0 |
| Setter | set_bottom_radius(value) |
| Getter | get_bottom_radius() |
Bottom radius of the cylinder.
- float height
| Default | 2.0 |
| Setter | set_height(value) |
| Getter | get_height() |
Full height of the cylinder.
- int radial_segments
| Default | 64 |
| Setter | set_radial_segments(value) |
| Getter | get_radial_segments() |
Number of radial segments on the cylinder.
- int rings
| Default | 4 |
| Setter | set_rings(value) |
| Getter | get_rings() |
Number of edge rings along the height of the cylinder.
- float top_radius
| Default | 1.0 |
| Setter | set_top_radius(value) |
| Getter | get_top_radius() |
Top radius of the cylinder.
CylinderShape¶
Inherits: Shape < Resource < Reference < Object
Cylinder shape for collisions.
Description¶
Cylinder shape for collisions.
DampedSpringJoint2D¶
Inherits: Joint2D < Node2D < CanvasItem < Node < Object
Damped spring constraint for 2D physics.
Description¶
Damped spring constraint for 2D physics. This resembles a spring joint that always wants to go back to a given length.
Property Descriptions¶
- float damping
| Default | 1.0 |
| Setter | set_damping(value) |
| Getter | get_damping() |
The spring joint’s damping ratio. A value between 0 and 1. When the two bodies move into different directions the system tries to align them to the spring axis again. A high damping value forces the attached bodies to align faster.
- float length
| Default | 50.0 |
| Setter | set_length(value) |
| Getter | get_length() |
The spring joint’s maximum length. The two attached bodies cannot stretch it past this value.
- float rest_length
| Default | 0.0 |
| Setter | set_rest_length(value) |
| Getter | get_rest_length() |
When the bodies attached to the spring joint move they stretch or squash it. The joint always tries to resize towards this length.
- float stiffness
| Default | 20.0 |
| Setter | set_stiffness(value) |
| Getter | get_stiffness() |
The higher the value, the less the bodies attached to the joint will deform it. The joint applies an opposing force to the bodies, the product of the stiffness multiplied by the size difference from its resting length.
Dictionary¶
Dictionary type.
Description¶
Dictionary type. Associative container which contains values referenced by unique keys. Dictionary are composed of pairs of keys (which must be unique) and values. You can define a dictionary by placing a comma separated list of key: value pairs in curly braces {}.
Erasing elements while iterating over them is not supported.
Creating a dictionary:
var my_dir = {} # Creates an empty dictionary.
var points_dir = {"White": 50, "Yellow": 75, "Orange": 100}
var my_dir = {
key1: value1,
key2: value2,
key3: value3,
}
You can access values of a dictionary by referencing appropriate key in above example points_dir["White"] would return value of 50.
export(String, "White", "Yellow", "Orange") var my_color
var points_dir = {"White": 50, "Yellow": 75, "Orange": 100}
func _ready():
var points = points_dir[my_color]
In the above code points will be assigned the value that is paired with the appropriate color selected in my_color.
Dictionaries can contain more complex data:
my_dir = {"First Array": [1, 2, 3, 4]} # Assigns an Array to a String key.
To add a key to an existing dictionary, access it like an existing key and assign to it:
var points_dir = {"White": 50, "Yellow": 75, "Orange": 100}
var points_dir["Blue"] = 150 # Add "Blue" as a key and assign 150 as its value.
Finally, dictionaries can contain different types of keys and values in the same dictionary:
var my_dir = {"String Key": 5, 4: [1, 2, 3], 7: "Hello"} # This is a valid dictionary.
Note: Unlike Arrays you can’t compare dictionaries directly:
array1 = [1, 2, 3]
array2 = [1, 2, 3]
func compare_arrays():
print(array1 == array2) # Will print true.
dir1 = {"a": 1, "b": 2, "c": 3}
dir2 = {"a": 1, "b": 2, "c": 3}
func compare_dictionaries():
print(dir1 == dir2) # Will NOT print true.
You need to first calculate the dictionary’s hash with hash before you can compare them:
dir1 = {"a": 1, "b": 2, "c": 3}
dir2 = {"a": 1, "b": 2, "c": 3}
func compare_dictionaries():
print(dir1.hash() == dir2.hash()) # Will print true.
Tutorials¶
Methods¶
| void | clear ( ) |
| Dictionary | duplicate ( bool deep=false ) |
| bool | empty ( ) |
| bool | erase ( Variant key ) |
| Variant | get ( Variant key, Variant default=null ) |
| bool | has ( Variant key ) |
| bool | has_all ( Array keys ) |
| int | hash ( ) |
| Array | keys ( ) |
| int | size ( ) |
| Array | values ( ) |
Method Descriptions¶
- void clear ( )
Clear the dictionary, removing all key/value pairs.
- Dictionary duplicate ( bool deep=false )
Creates a copy of the dictionary, and returns it.
- bool empty ( )
Returns true if the dictionary is empty.
Erase a dictionary key/value pair by key. Returns true if the given key was present in the dictionary, false otherwise. Does not erase elements while iterating over the dictionary.
Returns the current value for the specified key in the Dictionary. If the key does not exist, the method returns the value of the optional default argument, or null if it is omitted.
Returns true if the dictionary has a given key.
Returns true if the dictionary has all of the keys in the given array.
- int hash ( )
Returns a hashed integer value representing the dictionary contents. This can be used to compare dictionaries by value:
var dict1 = {0: 10}
var dict2 = {0: 10}
# The line below prints `true`, whereas it would have printed `false` if both variables were compared directly.
print(dict1.hash() == dict2.hash())
- Array keys ( )
Returns the list of keys in the Dictionary.
- int size ( )
Returns the size of the dictionary (in pairs).
- Array values ( )
Returns the list of values in the Dictionary.
DirectionalLight¶
Inherits: Light < VisualInstance < Spatial < Node < Object
Directional light from a distance, as from the Sun.
Description¶
A directional light is a type of Light node that models an infinite number of parallel rays covering the entire scene. It is used for lights with strong intensity that are located far away from the scene to model sunlight or moonlight. The worldspace location of the DirectionalLight transform (origin) is ignored. Only the basis is used to determine light direction.
Tutorials¶
Properties¶
Enumerations¶
enum ShadowMode:
- SHADOW_ORTHOGONAL = 0 — Renders the entire scene’s shadow map from an orthogonal point of view. May result in blockier shadows on close objects.
- SHADOW_PARALLEL_2_SPLITS = 1 — Splits the view frustum in 2 areas, each with its own shadow map.
- SHADOW_PARALLEL_4_SPLITS = 2 — Splits the view frustum in 4 areas, each with its own shadow map.
enum ShadowDepthRange:
- SHADOW_DEPTH_RANGE_STABLE = 0 — Keeps the shadow stable when the camera moves, at the cost of lower effective shadow resolution.
- SHADOW_DEPTH_RANGE_OPTIMIZED = 1 — Tries to achieve maximum shadow resolution. May result in saw effect on shadow edges.
Property Descriptions¶
- float directional_shadow_bias_split_scale
| Default | 0.25 |
| Setter | set_param(value) |
| Getter | get_param() |
Amount of extra bias for shadow splits that are far away. If self-shadowing occurs only on the splits far away, increasing this value can fix them.
- bool directional_shadow_blend_splits
| Default | false |
| Setter | set_blend_splits(value) |
| Getter | is_blend_splits_enabled() |
If true, shadow detail is sacrificed in exchange for smoother transitions between splits.
- ShadowDepthRange directional_shadow_depth_range
| Default | 0 |
| Setter | set_shadow_depth_range(value) |
| Getter | get_shadow_depth_range() |
Optimizes shadow rendering for detail versus movement. See ShadowDepthRange.
- float directional_shadow_max_distance
| Default | 100.0 |
| Setter | set_param(value) |
| Getter | get_param() |
The maximum distance for shadow splits.
- ShadowMode directional_shadow_mode
| Default | 2 |
| Setter | set_shadow_mode(value) |
| Getter | get_shadow_mode() |
The light’s shadow rendering algorithm. See ShadowMode.
- float directional_shadow_normal_bias
| Default | 0.8 |
| Setter | set_param(value) |
| Getter | get_param() |
Can be used to fix special cases of self shadowing when objects are perpendicular to the light.
- float directional_shadow_split_1
| Default | 0.1 |
| Setter | set_param(value) |
| Getter | get_param() |
The distance from camera to shadow split 1. Relative to directional_shadow_max_distance. Only used when directional_shadow_mode is SHADOW_PARALLEL_2_SPLITS or SHADOW_PARALLEL_4_SPLITS.
- float directional_shadow_split_2
| Default | 0.2 |
| Setter | set_param(value) |
| Getter | get_param() |
The distance from shadow split 1 to split 2. Relative to directional_shadow_max_distance. Only used when directional_shadow_mode is SHADOW_PARALLEL_2_SPLITS or SHADOW_PARALLEL_4_SPLITS.
- float directional_shadow_split_3
| Default | 0.5 |
| Setter | set_param(value) |
| Getter | get_param() |
The distance from shadow split 2 to split 3. Relative to directional_shadow_max_distance. Only used when directional_shadow_mode is SHADOW_PARALLEL_4_SPLITS.
Directory¶
Type used to handle the filesystem.
Description¶
Directory type. It is used to manage directories and their content (not restricted to the project folder).
When creating a new Directory, its default opened directory will be res://. This may change in the future, so it is advised to always use open to initialize your Directory where you want to operate, with explicit error checking.
Here is an example on how to iterate through the files of a directory:
func dir_contents(path):
var dir = Directory.new()
if dir.open(path) == OK:
dir.list_dir_begin()
var file_name = dir.get_next()
while file_name != "":
if dir.current_is_dir():
print("Found directory: " + file_name)
else:
print("Found file: " + file_name)
file_name = dir.get_next()
else:
print("An error occurred when trying to access the path.")
Tutorials¶
Methods¶
| Error | change_dir ( String todir ) |
| Error | copy ( String from, String to ) |
| bool | current_is_dir ( ) const |
| bool | dir_exists ( String path ) |
| bool | file_exists ( String path ) |
| String | get_current_dir ( ) |
| int | get_current_drive ( ) |
| String | get_drive ( int idx ) |
| int | get_drive_count ( ) |
| String | get_next ( ) |
| int | get_space_left ( ) |
| Error | list_dir_begin ( bool skip_navigational=false, bool skip_hidden=false ) |
| void | list_dir_end ( ) |
| Error | make_dir ( String path ) |
| Error | make_dir_recursive ( String path ) |
| Error | open ( String path ) |
| Error | remove ( String path ) |
| Error | rename ( String from, String to ) |
Method Descriptions¶
Changes the currently opened directory to the one passed as an argument. The argument can be relative to the current directory (e.g. newdir or ../newdir), or an absolute path (e.g. /tmp/newdir or res://somedir/newdir).
Returns one of the Error code constants (OK on success).
Copies the from file to the to destination. Both arguments should be paths to files, either relative or absolute. If the destination file exists and is not access-protected, it will be overwritten.
Returns one of the Error code constants (OK on success).
- bool current_is_dir ( ) const
Returns whether the current item processed with the last get_next call is a directory (. and .. are considered directories).
Returns whether the target directory exists. The argument can be relative to the current directory, or an absolute path.
Returns whether the target file exists. The argument can be relative to the current directory, or an absolute path.
- String get_current_dir ( )
Returns the absolute path to the currently opened directory (e.g. res://folder or C:\tmp\folder).
- int get_current_drive ( )
Returns the currently opened directory’s drive index. See get_drive to convert returned index to the name of the drive.
On Windows, returns the name of the drive (partition) passed as an argument (e.g. C:). On other platforms, or if the requested drive does not existed, the method returns an empty String.
- int get_drive_count ( )
On Windows, returns the number of drives (partitions) mounted on the current filesystem. On other platforms, the method returns 0.
- String get_next ( )
Returns the next element (file or directory) in the current directory (including . and .., unless skip_navigational was given to list_dir_begin).
The name of the file or directory is returned (and not its full path). Once the stream has been fully processed, the method returns an empty String and closes the stream automatically (i.e. list_dir_end would not be mandatory in such a case).
- int get_space_left ( )
On UNIX desktop systems, returns the available space on the current directory’s disk. On other platforms, this information is not available and the method returns 0 or -1.
Initializes the stream used to list all files and directories using the get_next function, closing the current opened stream if needed. Once the stream has been processed, it should typically be closed with list_dir_end.
If skip_navigational is true, . and .. are filtered out.
If skip_hidden is true, hidden files are filtered out.
- void list_dir_end ( )
Closes the current stream opened with list_dir_begin (whether it has been fully processed with get_next or not does not matter).
Creates a directory. The argument can be relative to the current directory, or an absolute path. The target directory should be placed in an already existing directory (to create the full path recursively, see make_dir_recursive).
Returns one of the Error code constants (OK on success).
Creates a target directory and all necessary intermediate directories in its path, by calling make_dir recursively. The argument can be relative to the current directory, or an absolute path.
Returns one of the Error code constants (OK on success).
Opens an existing directory of the filesystem. The path argument can be within the project tree (res://folder), the user directory (user://folder) or an absolute path of the user filesystem (e.g. /tmp/folder or C:\tmp\folder).
Returns one of the Error code constants (OK on success).
Deletes the target file or an empty directory. The argument can be relative to the current directory, or an absolute path. If the target directory is not empty, the operation will fail.
Returns one of the Error code constants (OK on success).
Renames (move) the from file to the to destination. Both arguments should be paths to files, either relative or absolute. If the destination file exists and is not access-protected, it will be overwritten.
Returns one of the Error code constants (OK on success).
DynamicFont¶
Inherits: Font < Resource < Reference < Object
DynamicFont renders vector font files at runtime.
Description¶
DynamicFont renders vector font files (such as TTF or OTF) dynamically at runtime instead of using a prerendered texture atlas like BitmapFont. This trades the faster loading time of BitmapFonts for the ability to change font parameters like size and spacing during runtime. DynamicFontData is used for referencing the font file paths. DynamicFont also supports defining one or more fallbacks fonts, which will be used when displaying a character not supported by the main font.
DynamicFont uses the FreeType library for rasterization.
var dynamic_font = DynamicFont.new()
dynamic_font.font_data = load("res://BarlowCondensed-Bold.ttf")
dynamic_font.size = 64
$"Label".set("custom_fonts/font", dynamic_font)
Properties¶
| int | extra_spacing_bottom | 0 |
| int | extra_spacing_char | 0 |
| int | extra_spacing_space | 0 |
| int | extra_spacing_top | 0 |
| DynamicFontData | font_data | |
| Color | outline_color | Color( 1, 1, 1, 1 ) |
| int | outline_size | 0 |
| int | size | 16 |
| bool | use_filter | false |
| bool | use_mipmaps | false |
Methods¶
| void | add_fallback ( DynamicFontData data ) |
| DynamicFontData | get_fallback ( int idx ) const |
| int | get_fallback_count ( ) const |
| int | get_spacing ( int type ) const |
| void | remove_fallback ( int idx ) |
| void | set_fallback ( int idx, DynamicFontData data ) |
| void | set_spacing ( int type, int value ) |
Enumerations¶
enum SpacingType:
- SPACING_TOP = 0 — Spacing at the top.
- SPACING_BOTTOM = 1 — Spacing at the bottom.
- SPACING_CHAR = 2 — Character spacing.
- SPACING_SPACE = 3 — Space spacing.
Property Descriptions¶
- int extra_spacing_bottom
| Default | 0 |
| Setter | set_spacing(value) |
| Getter | get_spacing() |
Extra spacing at the bottom in pixels.
- int extra_spacing_char
| Default | 0 |
| Setter | set_spacing(value) |
| Getter | get_spacing() |
Extra character spacing in pixels.
- int extra_spacing_space
| Default | 0 |
| Setter | set_spacing(value) |
| Getter | get_spacing() |
Extra space spacing in pixels.
- int extra_spacing_top
| Default | 0 |
| Setter | set_spacing(value) |
| Getter | get_spacing() |
Extra spacing at the top in pixels.
- DynamicFontData font_data
| Setter | set_font_data(value) |
| Getter | get_font_data() |
The font data.
- Color outline_color
| Default | Color( 1, 1, 1, 1 ) |
| Setter | set_outline_color(value) |
| Getter | get_outline_color() |
The font outline’s color.
Note: It’s recommended to leave this at the default value so that you can adjust it in individual controls. For example, if the outline is made black here, it won’t be possible to change its color using a Label’s font outline modulate theme item.
- int outline_size
| Default | 0 |
| Setter | set_outline_size(value) |
| Getter | get_outline_size() |
The font outline’s thickness in pixels (not relative to the font size).
- int size
| Default | 16 |
| Setter | set_size(value) |
| Getter | get_size() |
The font size in pixels.
- bool use_filter
| Default | false |
| Setter | set_use_filter(value) |
| Getter | get_use_filter() |
If true, filtering is used. This makes the font blurry instead of pixelated when scaling it if font oversampling is disabled or ineffective. It’s recommended to enable this when using the font in a control whose size changes over time, unless a pixel art aesthetic is desired.
- bool use_mipmaps
| Default | false |
| Setter | set_use_mipmaps(value) |
| Getter | get_use_mipmaps() |
If true, mipmapping is used. This improves the font’s appearance when downscaling it if font oversampling is disabled or ineffective.
Method Descriptions¶
- void add_fallback ( DynamicFontData data )
Adds a fallback font.
- DynamicFontData get_fallback ( int idx ) const
Returns the fallback font at index idx.
- int get_fallback_count ( ) const
Returns the number of fallback fonts.
Returns the spacing for the given type (see SpacingType).
- void remove_fallback ( int idx )
Removes the fallback font at index idx.
- void set_fallback ( int idx, DynamicFontData data )
Sets the fallback font at index idx.
Sets the spacing for type (see SpacingType) to value in pixels (not relative to the font size).
DynamicFontData¶
Inherits: Resource < Reference < Object
Used with DynamicFont to describe the location of a font file.
Description¶
Used with DynamicFont to describe the location of a vector font file for dynamic rendering at runtime.
Enumerations¶
enum Hinting:
- HINTING_NONE = 0 — Disables font hinting (smoother but less crisp).
- HINTING_LIGHT = 1 — Use the light font hinting mode.
- HINTING_NORMAL = 2 — Use the default font hinting mode (crisper but less smooth).
Property Descriptions¶
- bool antialiased
| Default | true |
| Setter | set_antialiased(value) |
| Getter | is_antialiased() |
If true, the font is rendered with anti-aliasing.
- String font_path
| Default | "" |
| Setter | set_font_path(value) |
| Getter | get_font_path() |
The path to the vector font file.
- Hinting hinting
| Default | 2 |
| Setter | set_hinting(value) |
| Getter | get_hinting() |
The font hinting mode used by FreeType. See Hinting for options.
EditorExportPlugin¶
A script that is executed when exporting projects.
Methods¶
| void | _export_begin ( PoolStringArray features, bool is_debug, String path, int flags ) virtual |
| void | _export_end ( ) virtual |
| void | _export_file ( String path, String type, PoolStringArray features ) virtual |
| void | add_file ( String path, PoolByteArray file, bool remap ) |
| void | add_ios_bundle_file ( String path ) |
| void | add_ios_cpp_code ( String code ) |
| void | add_ios_framework ( String path ) |
| void | add_ios_linker_flags ( String flags ) |
| void | add_ios_plist_content ( String plist_content ) |
| void | add_shared_object ( String path, PoolStringArray tags ) |
| void | skip ( ) |
Method Descriptions¶
- void _export_begin ( PoolStringArray features, bool is_debug, String path, int flags ) virtual
Virtual method to be overridden by the user. It is called when the export starts and provides all information about the export.
- void _export_end ( ) virtual
Virtual method to be overridden by the user. Called when the export is finished.
- void _export_file ( String path, String type, PoolStringArray features ) virtual
- void add_file ( String path, PoolByteArray file, bool remap )
- void add_ios_bundle_file ( String path )
- void add_ios_cpp_code ( String code )
- void add_ios_framework ( String path )
- void add_ios_linker_flags ( String flags )
- void add_ios_plist_content ( String plist_content )
- void skip ( )
EditorFeatureProfile¶
Methods¶
| String | get_feature_name ( Feature feature ) |
| bool | is_class_disabled ( String class_name ) const |
| bool | is_class_editor_disabled ( String class_name ) const |
| bool | is_class_property_disabled ( String class_name, String property ) const |
| bool | is_feature_disabled ( Feature feature ) const |
| Error | load_from_file ( String path ) |
| Error | save_to_file ( String path ) |
| void | set_disable_class ( String class_name, bool disable ) |
| void | set_disable_class_editor ( String class_name, bool disable ) |
| void | set_disable_class_property ( String class_name, String property, bool disable ) |
| void | set_disable_feature ( Feature feature, bool disable ) |
Enumerations¶
enum Feature:
- FEATURE_3D = 0
- FEATURE_SCRIPT = 1
- FEATURE_ASSET_LIB = 2
- FEATURE_SCENE_TREE = 3
- FEATURE_IMPORT_DOCK = 4
- FEATURE_NODE_DOCK = 5
- FEATURE_FILESYSTEM_DOCK = 6
- FEATURE_MAX = 7 — Represents the size of the Feature enum.
EditorFileDialog¶
Inherits: ConfirmationDialog < AcceptDialog < WindowDialog < Popup < Control < CanvasItem < Node < Object
A modified version of FileDialog used by the editor.
Properties¶
| Access | access | 0 |
| String | current_dir | "res://" |
| String | current_file | "" |
| String | current_path | "res://" |
| bool | dialog_hide_on_ok | O: false |
| bool | disable_overwrite_warning | false |
| DisplayMode | display_mode | 0 |
| Mode | mode | 4 |
| bool | resizable | O: true |
| bool | show_hidden_files | false |
| String | window_title | O: "Save a File" |
Methods¶
| void | add_filter ( String filter ) |
| void | clear_filters ( ) |
| VBoxContainer | get_vbox ( ) |
| void | invalidate ( ) |
Signals¶
- dir_selected ( String dir )
Emitted when a directory is selected.
- file_selected ( String path )
Emitted when a file is selected.
- files_selected ( PoolStringArray paths )
Emitted when multiple files are selected.
Enumerations¶
enum Mode:
- MODE_OPEN_FILE = 0 — The
EditorFileDialogcan select only one file. Accepting the window will open the file. - MODE_OPEN_FILES = 1 — The
EditorFileDialogcan select multiple files. Accepting the window will open all files. - MODE_OPEN_DIR = 2 — The
EditorFileDialogcan select only one directory. Accepting the window will open the directory. - MODE_OPEN_ANY = 3 — The
EditorFileDialogcan select a file or directory. Accepting the window will open it. - MODE_SAVE_FILE = 4 — The
EditorFileDialogcan select only one file. Accepting the window will save the file.
enum Access:
- ACCESS_RESOURCES = 0 — The
EditorFileDialogcan only viewres://directory contents. - ACCESS_USERDATA = 1 — The
EditorFileDialogcan only viewuser://directory contents. - ACCESS_FILESYSTEM = 2 — The
EditorFileDialogcan view the entire local file system.
enum DisplayMode:
- DISPLAY_THUMBNAILS = 0 — The
EditorFileDialogdisplays resources as thumbnails. - DISPLAY_LIST = 1 — The
EditorFileDialogdisplays resources as a list of filenames.
Property Descriptions¶
- Access access
| Default | 0 |
| Setter | set_access(value) |
| Getter | get_access() |
The location from which the user may select a file, including res://, user://, and the local file system.
- String current_dir
| Default | "res://" |
| Setter | set_current_dir(value) |
| Getter | get_current_dir() |
The currently occupied directory.
- String current_file
| Default | "" |
| Setter | set_current_file(value) |
| Getter | get_current_file() |
The currently selected file.
- String current_path
| Default | "res://" |
| Setter | set_current_path(value) |
| Getter | get_current_path() |
The file system path in the address bar.
- bool disable_overwrite_warning
| Default | false |
| Setter | set_disable_overwrite_warning(value) |
| Getter | is_overwrite_warning_disabled() |
If true, the EditorFileDialog will not warn the user before overwriting files.
- DisplayMode display_mode
| Default | 0 |
| Setter | set_display_mode(value) |
| Getter | get_display_mode() |
The view format in which the EditorFileDialog displays resources to the user.
- Mode mode
| Default | 4 |
| Setter | set_mode(value) |
| Getter | get_mode() |
The purpose of the EditorFileDialog, which defines the allowed behaviors.
| Default | false |
| Setter | set_show_hidden_files(value) |
| Getter | is_showing_hidden_files() |
If true, hidden files and directories will be visible in the EditorFileDialog.
Method Descriptions¶
- void add_filter ( String filter )
Adds a comma-delimited file extension filter option to the EditorFileDialog with an optional semi-colon-delimited label.
For example, "*.tscn, *.scn; Scenes" results in filter text “Scenes (*.tscn, *.scn)”.
- void clear_filters ( )
Removes all filters except for “All Files (*)”.
- VBoxContainer get_vbox ( )
Returns the VBoxContainer used to display the file system.
- void invalidate ( )
Notify the EditorFileDialog that its view of the data is no longer accurate. Updates the view contents on next view update.
EditorFileSystem¶
Resource filesystem, as the editor sees it.
Description¶
This object holds information of all resources in the filesystem, their types, etc.
Methods¶
| String | get_file_type ( String path ) const |
| EditorFileSystemDirectory | get_filesystem ( ) |
| EditorFileSystemDirectory | get_filesystem_path ( String path ) |
| float | get_scanning_progress ( ) const |
| bool | is_scanning ( ) const |
| void | scan ( ) |
| void | scan_sources ( ) |
| void | update_file ( String path ) |
| void | update_script_classes ( ) |
Signals¶
- filesystem_changed ( )
Emitted if the filesystem changed.
- resources_reimported ( PoolStringArray resources )
Remitted if a resource is reimported.
- resources_reload ( PoolStringArray resources )
- sources_changed ( bool exist )
Emitted if the source of any imported file changed.
Method Descriptions¶
Gets the type of the file, given the full path.
- EditorFileSystemDirectory get_filesystem ( )
Gets the root directory object.
- EditorFileSystemDirectory get_filesystem_path ( String path )
Returns a view into the filesystem at path.
- float get_scanning_progress ( ) const
Returns the scan progress for 0 to 1 if the FS is being scanned.
- bool is_scanning ( ) const
Returns true of the filesystem is being scanned.
- void scan ( )
Scan the filesystem for changes.
- void scan_sources ( )
Check if the source of any imported resource changed.
- void update_file ( String path )
Update a file information. Call this if an external program (not Godot) modified the file.
- void update_script_classes ( )
Scans the script files and updates the list of custom class names.
EditorFileSystemDirectory¶
Inherits: Object
A directory for the resource filesystem.
Description¶
A more generalized, low-level variation of the directory concept.
Methods¶
| int | find_dir_index ( String name ) const |
| int | find_file_index ( String name ) const |
| String | get_file ( int idx ) const |
| int | get_file_count ( ) const |
| bool | get_file_import_is_valid ( int idx ) const |
| String | get_file_path ( int idx ) const |
| String | get_file_script_class_extends ( int idx ) const |
| String | get_file_script_class_name ( int idx ) const |
| String | get_file_type ( int idx ) const |
| String | get_name ( ) |
| EditorFileSystemDirectory | get_parent ( ) |
| String | get_path ( ) const |
| EditorFileSystemDirectory | get_subdir ( int idx ) |
| int | get_subdir_count ( ) const |
Method Descriptions¶
Returns the index of the directory with name name or -1 if not found.
Returns the index of the file with name name or -1 if not found.
Returns the name of the file at index idx.
- int get_file_count ( ) const
Returns the number of files in this directory.
Returns true if the file at index idx imported properly.
Returns the path to the file at index idx.
Returns the file extension of the file at index idx.
- String get_name ( )
Returns the name of this directory.
- EditorFileSystemDirectory get_parent ( )
Returns the parent directory for this directory or null if called on a directory at res:// or user://.
- String get_path ( ) const
Returns the path to this directory.
- EditorFileSystemDirectory get_subdir ( int idx )
Returns the subdirectory at index idx.
- int get_subdir_count ( ) const
Returns the number of subdirectories in this directory.
EditorImportPlugin¶
Inherits: ResourceImporter < Reference < Object
Registers a custom resource importer in the editor. Use the class to parse any file and import it as a new resource type.
Description¶
EditorImportPlugins provide a way to extend the editor’s resource import functionality. Use them to import resources from custom files or to provide alternatives to the editor’s existing importers. Register your EditorPlugin with EditorPlugin.add_import_plugin.
EditorImportPlugins work by associating with specific file extensions and a resource type. See get_recognized_extensions and get_resource_type. They may optionally specify some import presets that affect the import process. EditorImportPlugins are responsible for creating the resources and saving them in the .import directory.
Below is an example EditorImportPlugin that imports a Mesh from a file with the extension “.special” or “.spec”:
tool
extends EditorImportPlugin
func get_importer_name():
return "my.special.plugin"
func get_visible_name():
return "Special Mesh Importer"
func get_recognized_extensions():
return ["special", "spec"]
func get_save_extension():
return "mesh"
func get_resource_type():
return "Mesh"
func get_preset_count():
return 1
func get_preset_name(i):
return "Default"
func get_import_options(i):
return [{"name": "my_option", "default_value": false}]
func import(source_file, save_path, options, platform_variants, gen_files):
var file = File.new()
if file.open(source_file, File.READ) != OK:
return FAILED
var mesh = Mesh.new()
# Fill the Mesh with data read in "file", left as an exercise to the reader
var filename = save_path + "." + get_save_extension()
ResourceSaver.save(filename, mesh)
return OK
Tutorials¶
Methods¶
| Array | get_import_options ( int preset ) virtual |
| int | get_import_order ( ) virtual |
| String | get_importer_name ( ) virtual |
| bool | get_option_visibility ( String option, Dictionary options ) virtual |
| int | get_preset_count ( ) virtual |
| String | get_preset_name ( int preset ) virtual |
| float | get_priority ( ) virtual |
| Array | get_recognized_extensions ( ) virtual |
| String | get_resource_type ( ) virtual |
| String | get_save_extension ( ) virtual |
| String | get_visible_name ( ) virtual |
| int | import ( String source_file, String save_path, Dictionary options, Array platform_variants, Array gen_files ) virtual |
Method Descriptions¶
Gets the options and default values for the preset at this index. Returns an Array of Dictionaries with the following keys: name, default_value, property_hint (optional), hint_string (optional), usage (optional).
- int get_import_order ( ) virtual
Gets the order of this importer to be run when importing resources. Higher values will be called later. Use this to ensure the importer runs after the dependencies are already imported.
- String get_importer_name ( ) virtual
Gets the unique name of the importer.
- bool get_option_visibility ( String option, Dictionary options ) virtual
- int get_preset_count ( ) virtual
Gets the number of initial presets defined by the plugin. Use get_import_options to get the default options for the preset and get_preset_name to get the name of the preset.
Gets the name of the options preset at this index.
- float get_priority ( ) virtual
Gets the priority of this plugin for the recognized extension. Higher priority plugins will be preferred. The default priority is 1.0.
- Array get_recognized_extensions ( ) virtual
Gets the list of file extensions to associate with this loader (case-insensitive). e.g. ["obj"].
- String get_resource_type ( ) virtual
Gets the Godot resource type associated with this loader. e.g. "Mesh" or "Animation".
- String get_save_extension ( ) virtual
Gets the extension used to save this resource in the .import directory.
- String get_visible_name ( ) virtual
Gets the name to display in the import window.
EditorInspector¶
Inherits: ScrollContainer < Container < Control < CanvasItem < Node < Object
A tab used to edit properties of the selected node.
Description¶
The editor inspector is by default located on the right-hand side of the editor. It’s used to edit the properties of the selected node. For example, you can select a node such as Sprite2D then edit its transform through the inspector tool. The editor inspector is an essential tool in the game development workflow.
Signals¶
- object_id_selected ( int id )
- property_edited ( String property )
- property_keyed ( String property )
- property_selected ( String property )
- restart_requested ( )
Method Descriptions¶
- void refresh ( )
EditorInspectorPlugin¶
Plugin for adding custom property editors on inspector.
Description¶
This plugins allows adding custom property editors to EditorInspector.
Plugins are registered via EditorPlugin.add_inspector_plugin.
When an object is edited, the can_handle function is called and must return true if the object type is supported.
If supported, the function parse_begin will be called, allowing to place custom controls at the beginning of the class.
Subsequently, the parse_category and parse_property are called for every category and property. They offer the ability to add custom controls to the inspector too.
Finally parse_end will be called.
On each of these calls, the “add” functions can be called.
Methods¶
| void | add_custom_control ( Control control ) |
| void | add_property_editor ( String property, Control editor ) |
| void | add_property_editor_for_multiple_properties ( String label, PoolStringArray properties, Control editor ) |
| bool | can_handle ( Object object ) virtual |
| void | parse_begin ( Object object ) virtual |
| void | parse_category ( Object object, String category ) virtual |
| void | parse_end ( ) virtual |
| bool | parse_property ( Object object, int type, String path, int hint, String hint_text, int usage ) virtual |
Method Descriptions¶
- void add_custom_control ( Control control )
Adds a custom control, not necessarily a property editor.
Adds a property editor, this must inherit EditorProperty.
- void add_property_editor_for_multiple_properties ( String label, PoolStringArray properties, Control editor )
Adds an editor that allows modifying multiple properties, this must inherit EditorProperty.
Returns true if this object can be handled by this plugin.
- void parse_begin ( Object object ) virtual
Called to allow adding controls at the beginning of the list.
Called to allow adding controls at the beginning of the category.
- void parse_end ( ) virtual
Called to allow adding controls at the end of the list.
- bool parse_property ( Object object, int type, String path, int hint, String hint_text, int usage ) virtual
Called to allow adding property specific editors to the inspector. Usually these inherit EditorProperty. Returning true removes the built-in editor for this property, otherwise allows to insert a custom editor before the built-in one.
EditorInterface¶
Godot editor’s interface.
Description¶
EditorInterface gives you control over Godot editor’s window. It allows customizing the window, saving and (re-)loading scenes, rendering mesh previews, inspecting and editing resources and objects, and provides access to EditorSettings, EditorFileSystem, EditorResourcePreview, ScriptEditor, the editor viewport, and information about scenes.
Methods¶
Method Descriptions¶
- void edit_resource ( Resource resource )
Edits the given Resource.
- Control get_base_control ( )
Returns the main container of Godot editor’s window. You can use it, for example, to retrieve the size of the container and place your controls accordingly.
- String get_current_path ( ) const
- Node get_edited_scene_root ( )
Returns the edited (current) scene’s root Node.
- EditorSettings get_editor_settings ( )
Returns the EditorSettings.
- Control get_editor_viewport ( )
Returns the editor Viewport.
- EditorInspector get_inspector ( ) const
- Array get_open_scenes ( ) const
Returns an Array with the file paths of the currently opened scenes.
- EditorFileSystem get_resource_filesystem ( )
Returns the EditorFileSystem.
- EditorResourcePreview get_resource_previewer ( )
Returns the EditorResourcePreview.
- ScriptEditor get_script_editor ( )
Returns the ScriptEditor.
- String get_selected_path ( ) const
- EditorSelection get_selection ( )
Returns the EditorSelection.
Shows the given property on the given object in the Editor’s Inspector dock.
Returns the enabled status of a plugin. The plugin name is the same as its directory name.
Returns mesh previews rendered at the given size as an Array of Textures.
- void open_scene_from_path ( String scene_filepath )
Opens the scene at the given path.
- void reload_scene_from_path ( String scene_filepath )
Reloads the scene at the given path.
- Error save_scene ( )
Saves the scene. Returns either OK or ERR_CANT_CREATE (see @GlobalScope constants).
Saves the scene as a file at path.
- void select_file ( String file )
Selects the file, with the path provided by file, in the FileSystem dock.
- void set_distraction_free_mode ( bool enter )
- void set_main_screen_editor ( String name )
Sets the enabled status of a plugin. The plugin name is the same as its directory name.
EditorPlugin¶
Used by the editor to extend its functionality.
Description¶
Plugins are used by the editor to extend functionality. The most common types of plugins are those which edit a given node or resource type, import plugins and export plugins. See also EditorScript to add functions to the editor.
Tutorials¶
Methods¶
Signals¶
- main_screen_changed ( String screen_name )
Emitted when user changes the workspace (2D, 3D, Script, AssetLib). Also works with custom screens defined by plugins.
- resource_saved ( Resource resource )
- scene_changed ( Node scene_root )
Emitted when the scene is changed in the editor. The argument will return the root node of the scene that has just become active. If this scene is new and empty, the argument will be null.
- scene_closed ( String filepath )
Emitted when user closes a scene. The argument is file path to a closed scene.
Enumerations¶
enum CustomControlContainer:
- CONTAINER_TOOLBAR = 0
- CONTAINER_SPATIAL_EDITOR_MENU = 1
- CONTAINER_SPATIAL_EDITOR_SIDE_LEFT = 2
- CONTAINER_SPATIAL_EDITOR_SIDE_RIGHT = 3
- CONTAINER_SPATIAL_EDITOR_BOTTOM = 4
- CONTAINER_CANVAS_EDITOR_MENU = 5
- CONTAINER_CANVAS_EDITOR_SIDE_LEFT = 6
- CONTAINER_CANVAS_EDITOR_SIDE_RIGHT = 7
- CONTAINER_CANVAS_EDITOR_BOTTOM = 8
- CONTAINER_PROPERTY_EDITOR_BOTTOM = 9
- CONTAINER_PROJECT_SETTING_TAB_LEFT = 10
- CONTAINER_PROJECT_SETTING_TAB_RIGHT = 11
enum DockSlot:
- DOCK_SLOT_LEFT_UL = 0
- DOCK_SLOT_LEFT_BL = 1
- DOCK_SLOT_LEFT_UR = 2
- DOCK_SLOT_LEFT_BR = 3
- DOCK_SLOT_RIGHT_UL = 4
- DOCK_SLOT_RIGHT_BL = 5
- DOCK_SLOT_RIGHT_UR = 6
- DOCK_SLOT_RIGHT_BR = 7
- DOCK_SLOT_MAX = 8 — Represents the size of the DockSlot enum.
Method Descriptions¶
Adds a script at path to the Autoload list as name.
- ToolButton add_control_to_bottom_panel ( Control control, String title )
Adds a control to the bottom panel (together with Output, Debug, Animation, etc). Returns a reference to the button added. It’s up to you to hide/show the button when needed. When your plugin is deactivated, make sure to remove your custom control with remove_control_from_bottom_panel and free it with Node.queue_free.
- void add_control_to_container ( CustomControlContainer container, Control control )
Adds a custom control to a container (see CustomControlContainer). There are many locations where custom controls can be added in the editor UI.
Please remember that you have to manage the visibility of your custom controls yourself (and likely hide it after adding it).
When your plugin is deactivated, make sure to remove your custom control with remove_control_from_container and free it with Node.queue_free.
Adds the control to a specific dock slot (see DockSlot for options).
If the dock is repositioned and as long as the plugin is active, the editor will save the dock position on further sessions.
When your plugin is deactivated, make sure to remove your custom control with remove_control_from_docks and free it with Node.queue_free.
Adds a custom type, which will appear in the list of nodes or resources. An icon can be optionally passed.
When given node or resource is selected, the base type will be instanced (ie, “Spatial”, “Control”, “Resource”), then the script will be loaded and set to this object.
You can use the virtual method handles to check if your custom object is being edited by checking the script or using the is keyword.
During run-time, this will be a simple object with a script so this function does not need to be called then.
- void add_export_plugin ( EditorExportPlugin plugin )
- void add_import_plugin ( EditorImportPlugin importer )
- void add_inspector_plugin ( EditorInspectorPlugin plugin )
- void add_scene_import_plugin ( EditorSceneImporter scene_importer )
- void add_spatial_gizmo_plugin ( EditorSpatialGizmoPlugin plugin )
Adds a custom menu item to Project > Tools as name that calls callback on an instance of handler with a parameter ud when user activates it.
Adds a custom submenu under Project > Tools > name. submenu should be an object of class PopupMenu. This submenu should be cleaned up using remove_tool_menu_item(name).
- void apply_changes ( ) virtual
This method is called when the editor is about to save the project, switch to another tab, etc. It asks the plugin to apply any pending state changes to ensure consistency.
This is used, for example, in shader editors to let the plugin know that it must apply the shader code being written by the user to the object.
- bool build ( ) virtual
- void clear ( ) virtual
Clear all the state and reset the object being edited to zero. This ensures your plugin does not keep editing a currently existing node, or a node from the wrong scene.
- void disable_plugin ( ) virtual
Called by the engine when the user disables the EditorPlugin in the Plugin tab of the project settings window.
- void edit ( Object object ) virtual
This function is used for plugins that edit specific object types (nodes or resources). It requests the editor to edit the given object.
- void enable_plugin ( ) virtual
Called by the engine when the user enables the EditorPlugin in the Plugin tab of the project settings window.
- void forward_canvas_draw_over_viewport ( Control overlay ) virtual
- void forward_canvas_force_draw_over_viewport ( Control overlay ) virtual
- bool forward_canvas_gui_input ( InputEvent event ) virtual
Called when there is a root node in the current edited scene, handles is implemented and an InputEvent happens in the 2D viewport. Intercepts the InputEvent, if return true EditorPlugin consumes the event, otherwise forwards event to other Editor classes. Example:
# Prevents the InputEvent to reach other Editor classes
func forward_canvas_gui_input(event):
var forward = true
return forward
Must return false in order to forward the InputEvent to other Editor classes. Example:
# Consumes InputEventMouseMotion and forwards other InputEvent types
func forward_canvas_gui_input(event):
var forward = false
if event is InputEventMouseMotion:
forward = true
return forward
- bool forward_spatial_gui_input ( Camera camera, InputEvent event ) virtual
Called when there is a root node in the current edited scene, handles is implemented and an InputEvent happens in the 3D viewport. Intercepts the InputEvent, if return true EditorPlugin consumes the event, otherwise forwards event to other Editor classes. Example:
# Prevents the InputEvent to reach other Editor classes
func forward_spatial_gui_input(camera, event):
var forward = true
return forward
Must return false in order to forward the InputEvent to other Editor classes. Example:
# Consumes InputEventMouseMotion and forwards other InputEvent types
func forward_spatial_gui_input(camera, event):
var forward = false
if event is InputEventMouseMotion:
forward = true
return forward
- PoolStringArray get_breakpoints ( ) virtual
This is for editors that edit script-based objects. You can return a list of breakpoints in the format (script:line), for example: res://path_to_script.gd:25.
- EditorInterface get_editor_interface ( )
Returns the EditorInterface object that gives you control over Godot editor’s window and its functionalities.
- Texture get_plugin_icon ( ) virtual
Override this method in your plugin to return a Texture in order to give it an icon.
For main screen plugins, this appears at the top of the screen, to the right of the “2D”, “3D”, “Script”, and “AssetLib” buttons.
Ideally, the plugin icon should be white with a transparent background and 16x16 pixels in size.
func get_plugin_icon():
# You can use a custom icon:
return preload("res://addons/my_plugin/my_plugin_icon.svg")
# Or use a built-in icon:
return get_editor_interface().get_base_control().get_icon("Node", "EditorIcons")
- String get_plugin_name ( ) virtual
Override this method in your plugin to provide the name of the plugin when displayed in the Godot editor.
For main screen plugins, this appears at the top of the screen, to the right of the “2D”, “3D”, “Script”, and “AssetLib” buttons.
- ScriptCreateDialog get_script_create_dialog ( )
Gets the Editor’s dialogue used for making scripts.
Note: Users can configure it before use.
- Dictionary get_state ( ) virtual
Gets the state of your plugin editor. This is used when saving the scene (so state is kept when opening it again) and for switching tabs (so state can be restored when the tab returns).
- UndoRedo get_undo_redo ( )
Gets the undo/redo object. Most actions in the editor can be undoable, so use this object to make sure this happens when it’s worth it.
- void get_window_layout ( ConfigFile layout ) virtual
Gets the GUI layout of the plugin. This is used to save the project’s editor layout when queue_save_layout is called or the editor layout was changed(For example changing the position of a dock).
Implement this function if your plugin edits a specific type of object (Resource or Node). If you return true, then you will get the functions edit and make_visible called when the editor requests them. If you have declared the methods forward_canvas_gui_input and forward_spatial_gui_input these will be called too.
- bool has_main_screen ( ) virtual
Returns true if this is a main screen editor plugin (it goes in the workspace selector together with 2D, 3D, Script and AssetLib).
- void hide_bottom_panel ( )
- void make_bottom_panel_item_visible ( Control item )
- void make_visible ( bool visible ) virtual
This function will be called when the editor is requested to become visible. It is used for plugins that edit a specific object type.
Remember that you have to manage the visibility of all your editor controls manually.
- void queue_save_layout ( ) const
Queue save the project’s editor layout.
- void remove_autoload_singleton ( String name )
Removes an Autoload name from the list.
- void remove_control_from_bottom_panel ( Control control )
Removes the control from the bottom panel. You have to manually Node.queue_free the control.
- void remove_control_from_container ( CustomControlContainer container, Control control )
Removes the control from the specified container. You have to manually Node.queue_free the control.
- void remove_control_from_docks ( Control control )
Removes the control from the dock. You have to manually Node.queue_free the control.
- void remove_custom_type ( String type )
Removes a custom type added by add_custom_type.
- void remove_export_plugin ( EditorExportPlugin plugin )
- void remove_import_plugin ( EditorImportPlugin importer )
- void remove_inspector_plugin ( EditorInspectorPlugin plugin )
- void remove_scene_import_plugin ( EditorSceneImporter scene_importer )
- void remove_spatial_gizmo_plugin ( EditorSpatialGizmoPlugin plugin )
Removes a menu name from Project > Tools.
- void save_external_data ( ) virtual
This method is called after the editor saves the project or when it’s closed. It asks the plugin to save edited external scenes/resources.
- void set_force_draw_over_forwarding_enabled ( )
- void set_input_event_forwarding_always_enabled ( )
Use this method if you always want to receive inputs from 3D view screen inside forward_spatial_gui_input. It might be especially usable if your plugin will want to use raycast in the scene.
- void set_state ( Dictionary state ) virtual
Restore the state saved by get_state.
- void set_window_layout ( ConfigFile layout ) virtual
Restore the plugin GUI layout saved by get_window_layout.
- int update_overlays ( ) const
Updates the overlays of the editor (2D/3D) viewport.
EditorProperty¶
Inherits: Container < Control < CanvasItem < Node < Object
Custom control to edit properties for adding into the inspector.
Description¶
This control allows property editing for one or multiple properties into EditorInspector. It is added via EditorInspectorPlugin.
Properties¶
| bool | checkable | false |
| bool | checked | false |
| bool | draw_red | false |
| bool | keying | false |
| String | label | "" |
| bool | read_only | false |
Methods¶
| void | add_focusable ( Control control ) |
| void | emit_changed ( String property, Variant value, String field=”“, bool changing=false ) |
| Object | get_edited_object ( ) |
| String | get_edited_property ( ) |
| String | get_tooltip_text ( ) const |
| void | set_bottom_editor ( Control editor ) |
| void | update_property ( ) virtual |
Signals¶
- multiple_properties_changed ( PoolStringArray properties, Array value )
Emit it if you want multiple properties modified at the same time. Do not use if added via EditorInspectorPlugin.parse_property.
Used by sub-inspectors. Emit it if what was selected was an Object ID.
Do not emit this manually, use the emit_changed method instead.
Emitted when a property was checked. Used internally.
- property_keyed ( String property )
Emit it if you want to add this value as an animation key (check for keying being enabled first).
Emit it if you want to key a property with a single value.
If you want a sub-resource to be edited, emit this signal with the resource.
Emitted when selected. Used internally.
Property Descriptions¶
- bool checkable
| Default | false |
| Setter | set_checkable(value) |
| Getter | is_checkable() |
Used by the inspector, set when property is checkable.
- bool checked
| Default | false |
| Setter | set_checked(value) |
| Getter | is_checked() |
Used by the inspector, when the property is checked.
- bool draw_red
| Default | false |
| Setter | set_draw_red(value) |
| Getter | is_draw_red() |
Used by the inspector, when the property must draw with error color.
- bool keying
| Default | false |
| Setter | set_keying(value) |
| Getter | is_keying() |
Used by the inspector, when the property can add keys for animation.
- String label
| Default | "" |
| Setter | set_label(value) |
| Getter | get_label() |
Sets this property to change the label (if you want to show one).
- bool read_only
| Default | false |
| Setter | set_read_only(value) |
| Getter | is_read_only() |
Used by the inspector, when the property is read-only.
Method Descriptions¶
- void add_focusable ( Control control )
If any of the controls added can gain keyboard focus, add it here. This ensures that focus will be restored if the inspector is refreshed.
If one or several properties have changed, this must be called. field is used in case your editor can modify fields separately (as an example, Vector3.x). The changing argument avoids the editor requesting this property to be refreshed (leave as false if unsure).
- Object get_edited_object ( )
Gets the edited object.
- String get_edited_property ( )
Gets the edited property. If your editor is for a single property (added via EditorInspectorPlugin.parse_property), then this will return the property.
- String get_tooltip_text ( ) const
Override if you want to allow a custom tooltip over your property.
- void set_bottom_editor ( Control editor )
Adds controls with this function if you want them on the bottom (below the label).
- void update_property ( ) virtual
When this virtual function is called, you must update your editor.
EditorResourceConversionPlugin¶
EditorResourcePreview¶
Helper to generate previews of resources or files.
Description¶
This object is used to generate previews for resources of files.
Methods¶
| void | add_preview_generator ( EditorResourcePreviewGenerator generator ) |
| void | check_for_invalidation ( String path ) |
| void | queue_edited_resource_preview ( Resource resource, Object receiver, String receiver_func, Variant userdata ) |
| void | queue_resource_preview ( String path, Object receiver, String receiver_func, Variant userdata ) |
| void | remove_preview_generator ( EditorResourcePreviewGenerator generator ) |
Signals¶
- preview_invalidated ( String path )
Emitted if a preview was invalidated (changed). path corresponds to the path of the preview.
Method Descriptions¶
- void add_preview_generator ( EditorResourcePreviewGenerator generator )
Create an own, custom preview generator.
- void check_for_invalidation ( String path )
Check if the resource changed, if so, it will be invalidated and the corresponding signal emitted.
- void queue_edited_resource_preview ( Resource resource, Object receiver, String receiver_func, Variant userdata )
Queue a resource being edited for preview (using an instance). Once the preview is ready, your receiver.receiver_func will be called either containing the preview texture or an empty texture (if no preview was possible). Callback must have the format: (path,texture,userdata). Userdata can be anything.
- void queue_resource_preview ( String path, Object receiver, String receiver_func, Variant userdata )
Queue a resource file for preview (using a path). Once the preview is ready, your receiver.receiver_func will be called either containing the preview texture or an empty texture (if no preview was possible). Callback must have the format: (path,texture,userdata). Userdata can be anything.
- void remove_preview_generator ( EditorResourcePreviewGenerator generator )
Removes a custom preview generator.
EditorResourcePreviewGenerator¶
Custom generator of previews.
Description¶
Custom code to generate previews. Please check file_dialog/thumbnail_size in EditorSettings to find out the right size to do previews at.
Methods¶
| bool | can_generate_small_preview ( ) virtual |
| Texture | generate ( Resource from, Vector2 size ) virtual |
| Texture | generate_from_path ( String path, Vector2 size ) virtual |
| bool | generate_small_preview_automatically ( ) virtual |
| bool | handles ( String type ) virtual |
Method Descriptions¶
- bool can_generate_small_preview ( ) virtual
If this function returns true, the generator will call generate or generate_from_path for small previews as well.
By default, it returns false.
Generate a preview from a given resource with the specified size. This must always be implemented.
Returning an empty texture is an OK way to fail and let another generator take care.
Care must be taken because this function is always called from a thread (not the main thread).
Generate a preview directly from a path with the specified size. Implementing this is optional, as default code will load and call generate.
Returning an empty texture is an OK way to fail and let another generator take care.
Care must be taken because this function is always called from a thread (not the main thread).
- bool generate_small_preview_automatically ( ) virtual
If this function returns true, the generator will automatically generate the small previews from the normal preview texture generated by the methods generate or generate_from_path.
By default, it returns false.
Returns true if your generator supports the resource of type type.
EditorSceneImporter¶
Inherited By: EditorSceneImporterAssimp
Imports scenes from third-parties’ 3D files.
Methods¶
| Array | _get_extensions ( ) virtual |
| int | _get_import_flags ( ) virtual |
| Animation | _import_animation ( String path, int flags, int bake_fps ) virtual |
| Node | _import_scene ( String path, int flags, int bake_fps ) virtual |
| Animation | import_animation_from_other_importer ( String path, int flags, int bake_fps ) |
| Node | import_scene_from_other_importer ( String path, int flags, int bake_fps ) |
Constants¶
- IMPORT_SCENE = 1
- IMPORT_ANIMATION = 2
- IMPORT_ANIMATION_DETECT_LOOP = 4
- IMPORT_ANIMATION_OPTIMIZE = 8
- IMPORT_ANIMATION_FORCE_ALL_TRACKS_IN_ALL_CLIPS = 16
- IMPORT_ANIMATION_KEEP_VALUE_TRACKS = 32
- IMPORT_GENERATE_TANGENT_ARRAYS = 256
- IMPORT_FAIL_ON_MISSING_DEPENDENCIES = 512
- IMPORT_MATERIALS_IN_INSTANCES = 1024
- IMPORT_USE_COMPRESSION = 2048
EditorSceneImporterAssimp¶
Inherits: EditorSceneImporter < Reference < Object
FBX 3D asset importer based on Assimp.
Description¶
This is an FBX 3D asset importer based on Assimp. It currently has many known limitations and works best with static meshes. Most animated meshes won’t import correctly.
If exporting a FBX scene from Autodesk Maya, use these FBX export settings:
- Smoothing Groups
- Smooth Mesh
- Triangluate (for meshes with blend shapes)
- Bake Animation
- Resample All
- Deformed Models
- Skins
- Blend Shapes
- Curve Filters
- Constant Key Reducer
- Auto Tangents Only
- *Do not check* Constraints (as it will break the file)
- Can check Embed Media (embeds textures into the exported FBX file)
- Note that when importing embedded media, the texture and mesh will be a single immutable file.
- You will have to re-export then re-import the FBX if the texture has changed.
- Units: Centimeters
- Up Axis: Y
- Binary format in FBX 2017
EditorScenePostImport¶
Post-processes scenes after import.
Description¶
Imported scenes can be automatically modified right after import by setting their Custom Script Import property to a tool script that inherits from this class.
The post_import callback receives the imported scene’s root node and returns the modified version of the scene. Usage example:
tool # Needed so it runs in editor
extends EditorScenePostImport
# This sample changes all node names
# Called right after the scene is imported and gets the root node
func post_import(scene):
# Change all node names to "modified_[oldnodename]"
iterate(scene)
return scene # Remember to return the imported scene
func iterate(node):
if node != null:
node.name = "modified_" + node.name
for child in node.get_children():
iterate(child)
Tutorials¶
Methods¶
| String | get_source_file ( ) const |
| String | get_source_folder ( ) const |
| Object | post_import ( Object scene ) virtual |
Method Descriptions¶
- String get_source_file ( ) const
Returns the source file path which got imported (e.g. res://scene.dae).
- String get_source_folder ( ) const
Returns the resource folder the imported scene file is located in.
Called after the scene was imported. This method must return the modified version of the scene.
EditorScript¶
Base script that can be used to add extension functions to the editor.
Description¶
Scripts extending this class and implementing its _run method can be executed from the Script Editor’s File > Run menu option (or by pressing Ctrl+Shift+X) while the editor is running. This is useful for adding custom in-editor functionality to Godot. For more complex additions, consider using EditorPlugins instead.
Note: Extending scripts need to have tool mode enabled.
Example script:
tool
extends EditorScript
func _run():
print("Hello from the Godot Editor!")
Note: The script is run in the Editor context, which means the output is visible in the console window started with the Editor (stdout) instead of the usual Godot Output dock.
Methods¶
| void | _run ( ) virtual |
| void | add_root_node ( Node node ) |
| EditorInterface | get_editor_interface ( ) |
| Node | get_scene ( ) |
Method Descriptions¶
- void _run ( ) virtual
This method is executed by the Editor when File > Run is used.
- void add_root_node ( Node node )
Adds node as a child of the root node in the editor context.
Warning: The implementation of this method is currently disabled.
- EditorInterface get_editor_interface ( )
Returns the EditorInterface singleton instance.
- Node get_scene ( )
Returns the Editor’s currently active scene.
EditorSelection¶
Inherits: Object
Manages the SceneTree selection in the editor.
Description¶
This object manages the SceneTree selection in the editor.
Methods¶
| void | add_node ( Node node ) |
| void | clear ( ) |
| Array | get_selected_nodes ( ) |
| Array | get_transformable_selected_nodes ( ) |
| void | remove_node ( Node node ) |
Method Descriptions¶
- void add_node ( Node node )
Adds a node to the selection.
- void clear ( )
Clear the selection.
- Array get_selected_nodes ( )
Gets the list of selected nodes.
- Array get_transformable_selected_nodes ( )
Gets the list of selected nodes, optimized for transform operations (i.e. moving them, rotating, etc). This list avoids situations where a node is selected and also child/grandchild.
- void remove_node ( Node node )
Removes a node from the selection.
EditorSettings¶
Inherits: Resource < Reference < Object
Object that holds the project-independent editor settings.
Description¶
Object that holds the project-independent editor settings. These settings are generally visible in the Editor > Editor Settings menu.
Accessing the settings is done by using the regular Object API, such as:
settings.set(prop,value)
settings.get(prop)
list_of_settings = settings.get_property_list()
Methods¶
| void | add_property_info ( Dictionary info ) |
| void | erase ( String property ) |
| PoolStringArray | get_favorites ( ) const |
| Variant | get_project_metadata ( String section, String key, Variant default=null ) const |
| String | get_project_settings_dir ( ) const |
| PoolStringArray | get_recent_dirs ( ) const |
| Variant | get_setting ( String name ) const |
| String | get_settings_dir ( ) const |
| bool | has_setting ( String name ) const |
| bool | property_can_revert ( String name ) |
| Variant | property_get_revert ( String name ) |
| void | set_favorites ( PoolStringArray dirs ) |
| void | set_initial_value ( String name, Variant value, bool update_current ) |
| void | set_project_metadata ( String section, String key, Variant data ) |
| void | set_recent_dirs ( PoolStringArray dirs ) |
| void | set_setting ( String name, Variant value ) |
Constants¶
- NOTIFICATION_EDITOR_SETTINGS_CHANGED = 10000 — Emitted when editor settings change. It used by various editor plugins to update their visuals on theme changes or logic on configuration changes.
Method Descriptions¶
- void add_property_info ( Dictionary info )
Adds a custom property info to a property. The dictionary must contain:
name: String (the name of the property)type: int (see Variant.Type)- optionally
hint: int (see PropertyHint) andhint_string: String
Example:
editor_settings.set("category/property_name", 0)
var property_info = {
"name": "category/property_name",
"type": TYPE_INT,
"hint": PROPERTY_HINT_ENUM,
"hint_string": "one,two,three"
}
editor_settings.add_property_info(property_info)
- void erase ( String property )
Erase a given setting (pass full property path).
- PoolStringArray get_favorites ( ) const
Gets the list of favorite files and directories for this project.
- String get_project_settings_dir ( ) const
Gets the specific project settings path. Projects all have a unique sub-directory inside the settings path where project specific settings are saved.
- PoolStringArray get_recent_dirs ( ) const
Gets the list of recently visited folders in the file dialog for this project.
- String get_settings_dir ( ) const
Gets the global settings path for the engine. Inside this path, you can find some standard paths such as:
settings/tmp - Used for temporary storage of files
settings/templates - Where export templates are located
- void set_favorites ( PoolStringArray dirs )
Sets the list of favorite files and directories for this project.
- void set_recent_dirs ( PoolStringArray dirs )
Sets the list of recently visited folders in the file dialog for this project.
EditorSpatialGizmo¶
Inherits: SpatialGizmo < Reference < Object
Custom gizmo for editing Spatial objects.
Description¶
Custom gizmo that is used for providing custom visualization and editing (handles) for 3D Spatial objects. See EditorSpatialGizmoPlugin for more information.
Methods¶
| void | add_collision_segments ( PoolVector3Array segments ) |
| void | add_collision_triangles ( TriangleMesh triangles ) |
| void | add_handles ( PoolVector3Array handles, Material material, bool billboard=false, bool secondary=false ) |
| void | add_lines ( PoolVector3Array lines, Material material, bool billboard=false, Color modulate=Color( 1, 1, 1, 1 ) ) |
| void | add_mesh ( ArrayMesh mesh, bool billboard=false, SkinReference skeleton=null, Material material=null ) |
| void | add_unscaled_billboard ( Material material, float default_scale=1, Color modulate=Color( 1, 1, 1, 1 ) ) |
| void | clear ( ) |
| void | commit_handle ( int index, Variant restore, bool cancel=false ) virtual |
| String | get_handle_name ( int index ) virtual |
| Variant | get_handle_value ( int index ) virtual |
| EditorSpatialGizmoPlugin | get_plugin ( ) const |
| Spatial | get_spatial_node ( ) const |
| bool | is_handle_highlighted ( int index ) virtual |
| void | redraw ( ) virtual |
| void | set_handle ( int index, Camera camera, Vector2 point ) virtual |
| void | set_hidden ( bool hidden ) |
| void | set_spatial_node ( Node node ) |
Method Descriptions¶
- void add_collision_segments ( PoolVector3Array segments )
- void add_collision_triangles ( TriangleMesh triangles )
Adds collision triangles to the gizmo for picking. A TriangleMesh can be generated from a regular Mesh too. Call this function during redraw.
- void add_handles ( PoolVector3Array handles, Material material, bool billboard=false, bool secondary=false )
Adds a list of handles (points) which can be used to deform the object being edited.
There are virtual functions which will be called upon editing of these handles. Call this function during redraw.
- void add_lines ( PoolVector3Array lines, Material material, bool billboard=false, Color modulate=Color( 1, 1, 1, 1 ) )
Adds lines to the gizmo (as sets of 2 points), with a given material. The lines are used for visualizing the gizmo. Call this function during redraw.
- void add_mesh ( ArrayMesh mesh, bool billboard=false, SkinReference skeleton=null, Material material=null )
- void add_unscaled_billboard ( Material material, float default_scale=1, Color modulate=Color( 1, 1, 1, 1 ) )
Adds an unscaled billboard for visualization. Call this function during redraw.
- void clear ( )
Commit a handle being edited (handles must have been previously added by add_handles).
If the cancel parameter is true, an option to restore the edited value to the original is provided.
Gets the name of an edited handle (handles must have been previously added by add_handles).
Handles can be named for reference to the user when editing.
Gets actual value of a handle. This value can be anything and used for eventually undoing the motion when calling commit_handle.
- EditorSpatialGizmoPlugin get_plugin ( ) const
Returns the EditorSpatialGizmoPlugin that owns this gizmo. It’s useful to retrieve materials using EditorSpatialGizmoPlugin.get_material.
- Spatial get_spatial_node ( ) const
Returns the Spatial node associated with this gizmo.
Gets whether a handle is highlighted or not.
- void redraw ( ) virtual
This function is called when the Spatial this gizmo refers to changes (the Spatial.update_gizmo is called).
This function is used when the user drags a gizmo handle (previously added with add_handles) in screen coordinates.
The Camera is also provided so screen coordinates can be converted to raycasts.
- void set_spatial_node ( Node node )
EditorSpatialGizmoPlugin¶
Inherits: Resource < Reference < Object
Used by the editor to define Spatial gizmo types.
Description¶
EditorSpatialGizmoPlugin allows you to define a new type of Gizmo. There are two main ways to do so: extending EditorSpatialGizmoPlugin for the simpler gizmos, or creating a new EditorSpatialGizmo type. See the tutorial in the documentation for more info.
Tutorials¶
Methods¶
Method Descriptions¶
- void add_material ( String name, SpatialMaterial material )
Adds a new material to the internal material list for the plugin. It can then be accessed with get_material. Should not be overridden.
Override this method to define whether the gizmo can be hidden or not. Returns true if not overridden.
- void commit_handle ( EditorSpatialGizmo gizmo, int index, Variant restore, bool cancel=false ) virtual
Override this method to commit gizmo handles. Called for this plugin’s active gizmos.
- EditorSpatialGizmo create_gizmo ( Spatial spatial ) virtual
Override this method to return a custom EditorSpatialGizmo for the spatial nodes of your choice, return null for the rest of nodes. See also has_gizmo.
Creates a handle material with its variants (selected and/or editable) and adds them to the internal material list. They can then be accessed with get_material and used in EditorSpatialGizmo.add_handles. Should not be overridden.
- void create_icon_material ( String name, Texture texture, bool on_top=false, Color color=Color( 1, 1, 1, 1 ) )
Creates an icon material with its variants (selected and/or editable) and adds them to the internal material list. They can then be accessed with get_material and used in EditorSpatialGizmo.add_unscaled_billboard. Should not be overridden.
- void create_material ( String name, Color color, bool billboard=false, bool on_top=false, bool use_vertex_color=false )
Creates an unshaded material with its variants (selected and/or editable) and adds them to the internal material list. They can then be accessed with get_material and used in EditorSpatialGizmo.add_mesh and EditorSpatialGizmo.add_lines. Should not be overridden.
- String get_handle_name ( EditorSpatialGizmo gizmo, int index ) virtual
Override this method to provide gizmo’s handle names. Called for this plugin’s active gizmos.
- Variant get_handle_value ( EditorSpatialGizmo gizmo, int index ) virtual
Gets actual value of a handle from gizmo. Called for this plugin’s active gizmos.
- SpatialMaterial get_material ( String name, EditorSpatialGizmo gizmo )
Gets material from the internal list of materials. If an EditorSpatialGizmo is provided, it will try to get the corresponding variant (selected and/or editable).
- String get_name ( ) virtual
Override this method to provide the name that will appear in the gizmo visibility menu.
- String get_priority ( ) virtual
Override this method to define which Spatial nodes have a gizmo from this plugin. Whenever a Spatial node is added to a scene this method is called, if it returns true the node gets a generic EditorSpatialGizmo assigned and is added to this plugin’s list of active gizmos.
- bool is_handle_highlighted ( EditorSpatialGizmo gizmo, int index ) virtual
Gets whether a handle is highlighted or not. Called for this plugin’s active gizmos.
Override this method to define whether Spatial with this gizmo should be selecteble even when the gizmo is hidden.
- void redraw ( EditorSpatialGizmo gizmo ) virtual
Callback to redraw the provided gizmo. Called for this plugin’s active gizmos.
- void set_handle ( EditorSpatialGizmo gizmo, int index, Camera camera, Vector2 point ) virtual
Update the value of a handle after it has been updated. Called for this plugin’s active gizmos.
EditorVCSInterface¶
Inherits: Object
Version Control System (VCS) interface which reads and writes to the local VCS in use.
Description¶
Used by the editor to display VCS extracted information in the editor. The implementation of this API is included in VCS addons, which are essentially GDNative plugins that need to be put into the project folder. These VCS addons are scripts which are attached (on demand) to the object instance of EditorVCSInterface. All the functions listed below, instead of performing the task themselves, they call the internally defined functions in the VCS addons to provide a plug-n-play experience.
Methods¶
| void | commit ( String msg ) |
| Array | get_file_diff ( String file_path ) |
| Dictionary | get_modified_files_data ( ) |
| String | get_project_name ( ) |
| String | get_vcs_name ( ) |
| bool | initialize ( String project_root_path ) |
| bool | is_addon_ready ( ) |
| bool | is_vcs_initialized ( ) |
| bool | shut_down ( ) |
| void | stage_file ( String file_path ) |
| void | unstage_file ( String file_path ) |
Method Descriptions¶
- void commit ( String msg )
Creates a version commit if the addon is initialized, else returns without doing anything. Uses the files which have been staged previously, with the commit message set to a value as provided as in the argument.
Returns an Array of Dictionary objects containing the diff output from the VCS in use, if a VCS addon is initialized, else returns an empty Array object. The diff contents also consist of some contextual lines which provide context to the observed line change in the file.
Each Dictionary object has the line diff contents under the keys:
"content"to store a String containing the line contents"status"to store a String which contains"+"in case the content is a line addition but it stores a"-"in case of deletion and an empty string in the case the line content is neither an addition nor a deletion."new_line_number"to store an integer containing the new line number of the line content."line_count"to store an integer containing the number of lines in the line content."old_line_number"to store an integer containing the old line number of the line content."offset"to store the offset of the line change since the first contextual line content.
- Dictionary get_modified_files_data ( )
Returns a Dictionary containing the path of the detected file change mapped to an integer signifying what kind of a change the corresponding file has experienced.
The following integer values are being used to signify that the detected file is:
0: New to the VCS working directory1: Modified2: Renamed3: Deleted4: Typechanged
- String get_project_name ( )
Returns the project name of the VCS working directory.
- String get_vcs_name ( )
Returns the name of the VCS if the VCS has been initialized, else return an empty string.
Initializes the VCS addon if not already. Uses the argument value as the path to the working directory of the project. Creates the initial commit if required. Returns true if no failure occurs, else returns false.
- bool is_addon_ready ( )
Returns true if the addon is ready to respond to function calls, else returns false.
- bool is_vcs_initialized ( )
Returns true if the VCS addon has been initialized, else returns false.
- bool shut_down ( )
Shuts down the VCS addon to allow cleanup code to run on call. Returns true is no failure occurs, else returns false.
- void stage_file ( String file_path )
Stages the file which should be committed when commit is called. Argument should contain the absolute path.
- void unstage_file ( String file_path )
Unstages the file which was staged previously to be committed, so that it is no longer committed when commit is called. Argument should contain the absolute path.
EncodedObjectAsID¶
Holds a reference to an Object’s instance ID.
Description¶
Utility class which holds a reference to the internal identifier of an Object instance, as given by Object.get_instance_id. This ID can then be used to retrieve the object instance with @GDScript.instance_from_id.
This class is used internally by the editor inspector and script debugger, but can also be used in plugins to pass and display objects as their IDs.
Property Descriptions¶
- int object_id
| Default | 0 |
| Setter | set_object_id(value) |
| Getter | get_object_id() |
The Object identifier stored in this EncodedObjectAsID instance. The object instance can be retrieved with @GDScript.instance_from_id.
Engine¶
Inherits: Object
Access to basic engine properties.
Description¶
The Engine class allows you to query and modify the project’s run-time parameters, such as frames per second, time scale, and others.
Properties¶
| bool | editor_hint | true |
| int | iterations_per_second | 60 |
| float | physics_jitter_fix | 0.5 |
| int | target_fps | 0 |
| float | time_scale | 1.0 |
Methods¶
| Dictionary | get_author_info ( ) const |
| Array | get_copyright_info ( ) const |
| Dictionary | get_donor_info ( ) const |
| int | get_frames_drawn ( ) |
| float | get_frames_per_second ( ) const |
| int | get_idle_frames ( ) const |
| Dictionary | get_license_info ( ) const |
| String | get_license_text ( ) const |
| MainLoop | get_main_loop ( ) const |
| int | get_physics_frames ( ) const |
| float | get_physics_interpolation_fraction ( ) const |
| Object | get_singleton ( String name ) const |
| Dictionary | get_version_info ( ) const |
| bool | has_singleton ( String name ) const |
| bool | is_in_physics_frame ( ) const |
Property Descriptions¶
- bool editor_hint
| Default | true |
| Setter | set_editor_hint(value) |
| Getter | is_editor_hint() |
If true, it is running inside the editor. Useful for tool scripts.
- int iterations_per_second
| Default | 60 |
| Setter | set_iterations_per_second(value) |
| Getter | get_iterations_per_second() |
The number of fixed iterations per second. This controls how often physics simulation and Node._physics_process methods are run. This value should generally always be set to 60 or above, as Godot doesn’t interpolate the physics step. As a result, values lower than 60 will look stuttery. This value can be increased to make input more reactive or work around tunneling issues, but keep in mind doing so will increase CPU usage.
- float physics_jitter_fix
| Default | 0.5 |
| Setter | set_physics_jitter_fix(value) |
| Getter | get_physics_jitter_fix() |
Controls how much physics ticks are synchronized with real time. For 0 or less, the ticks are synchronized. Such values are recommended for network games, where clock synchronization matters. Higher values cause higher deviation of in-game clock and real clock, but allows to smooth out framerate jitters. The default value of 0.5 should be fine for most; values above 2 could cause the game to react to dropped frames with a noticeable delay and are not recommended.
- int target_fps
| Default | 0 |
| Setter | set_target_fps(value) |
| Getter | get_target_fps() |
The desired frames per second. If the hardware cannot keep up, this setting may not be respected. A value of 0 means no limit.
- float time_scale
| Default | 1.0 |
| Setter | set_time_scale(value) |
| Getter | get_time_scale() |
Controls how fast or slow the in-game clock ticks versus the real life one. It defaults to 1.0. A value of 2.0 means the game moves twice as fast as real life, whilst a value of 0.5 means the game moves at half the regular speed.
Method Descriptions¶
- Dictionary get_author_info ( ) const
Returns engine author information in a Dictionary.
lead_developers - Array of Strings, lead developer names
founders - Array of Strings, founder names
project_managers - Array of Strings, project manager names
developers - Array of Strings, developer names
- Array get_copyright_info ( ) const
Returns an Array of copyright information Dictionaries.
name - String, component name
parts - Array of Dictionaries {files, copyright, license} describing subsections of the component
- Dictionary get_donor_info ( ) const
Returns a Dictionary of Arrays of donor names.
{platinum_sponsors, gold_sponsors, mini_sponsors, gold_donors, silver_donors, bronze_donors}
- int get_frames_drawn ( )
Returns the total number of frames drawn. If the render loop is disabled with --disable-render-loop via command line, this returns 0. See also get_idle_frames.
- float get_frames_per_second ( ) const
Returns the frames per second of the running game.
- int get_idle_frames ( ) const
Returns the total number of frames passed since engine initialization which is advanced on each idle frame, regardless of whether the render loop is enabled. See also get_frames_drawn.
- Dictionary get_license_info ( ) const
Returns Dictionary of licenses used by Godot and included third party components.
- String get_license_text ( ) const
Returns Godot license text.
- MainLoop get_main_loop ( ) const
Returns the main loop object (see MainLoop and SceneTree).
- int get_physics_frames ( ) const
Returns the total number of frames passed since engine initialization which is advanced on each physics frame.
- float get_physics_interpolation_fraction ( ) const
Returns the fraction through the current physics tick we are at the time of rendering the frame. This can be used to implement fixed timestep interpolation.
Returns a global singleton with given name. Often used for plugins, e.g. GodotPayments.
- Dictionary get_version_info ( ) const
Returns the current engine version information in a Dictionary.
major - Holds the major version number as an int
minor - Holds the minor version number as an int
patch - Holds the patch version number as an int
hex - Holds the full version number encoded as a hexadecimal int with one byte (2 places) per number (see example below)
status - Holds the status (e.g. “beta”, “rc1”, “rc2”, … “stable”) as a String
build - Holds the build name (e.g. “custom_build”) as a String
hash - Holds the full Git commit hash as a String
year - Holds the year the version was released in as an int
string - major + minor + patch + status + build in a single String
The hex value is encoded as follows, from left to right: one byte for the major, one byte for the minor, one byte for the patch version. For example, “3.1.12” would be 0x03010C. Note: It’s still an int internally, and printing it will give you its decimal representation, which is not particularly meaningful. Use hexadecimal literals for easy version comparisons from code:
if Engine.get_version_info().hex >= 0x030200:
# Do things specific to version 3.2 or later
else:
# Do things specific to versions before 3.2
Returns true if a singleton with given name exists in global scope.
- bool is_in_physics_frame ( ) const
Returns true if the game is inside the fixed process and physics phase of the game loop.
Environment¶
Inherits: Resource < Reference < Object
Resource for environment nodes (like WorldEnvironment) that define multiple rendering options.
Description¶
Resource for environment nodes (like WorldEnvironment) that define multiple environment operations (such as background Sky or Color, ambient light, fog, depth-of-field…). These parameters affect the final render of the scene. The order of these operations is:
- Depth of Field Blur
- Glow
- Tonemap (Auto Exposure)
- Adjustments
Properties¶
Methods¶
| bool | is_glow_level_enabled ( int idx ) const |
| void | set_glow_level ( int idx, bool enabled ) |
Enumerations¶
enum BGMode:
- BG_KEEP = 5 — Keeps on screen every pixel drawn in the background. This is the fastest background mode, but it can only be safely used in fully-interior scenes (no visible sky or sky reflections). If enabled in a scene where the background is visible, “ghost trail” artifacts will be visible when moving the camera.
- BG_CLEAR_COLOR = 0 — Clears the background using the clear color defined in ProjectSettings.rendering/environment/default_clear_color.
- BG_COLOR = 1 — Clears the background using a custom clear color.
- BG_SKY = 2 — Displays a user-defined sky in the background.
- BG_COLOR_SKY = 3 — Clears the background using a custom clear color and allows defining a sky for shading and reflection. This mode is slightly faster than BG_SKY and should be preferred in scenes where reflections can be visible, but the sky itself never is (e.g. top-down camera).
- BG_CANVAS = 4 — Displays a CanvasLayer in the background.
- BG_CAMERA_FEED = 6 — Displays a camera feed in the background.
- BG_MAX = 7 — Represents the size of the BGMode enum.
enum GlowBlendMode:
- GLOW_BLEND_MODE_ADDITIVE = 0 — Additive glow blending mode. Mostly used for particles, glows (bloom), lens flare, bright sources.
- GLOW_BLEND_MODE_SCREEN = 1 — Screen glow blending mode. Increases brightness, used frequently with bloom.
- GLOW_BLEND_MODE_SOFTLIGHT = 2 — Soft light glow blending mode. Modifies contrast, exposes shadows and highlights (vivid bloom).
- GLOW_BLEND_MODE_REPLACE = 3 — Replace glow blending mode. Replaces all pixels’ color by the glow value. This can be used to simulate a full-screen blur effect by tweaking the glow parameters to match the original image’s brightness.
enum ToneMapper:
- TONE_MAPPER_LINEAR = 0 — Linear tonemapper operator. Reads the linear data and passes it on unmodified.
- TONE_MAPPER_REINHARDT = 1 — Reinhardt tonemapper operator. Performs a variation on rendered pixels’ colors by this formula:
color = color / (1 + color). - TONE_MAPPER_FILMIC = 2 — Filmic tonemapper operator.
- TONE_MAPPER_ACES = 3 — Academy Color Encoding System tonemapper operator.
enum DOFBlurQuality:
- DOF_BLUR_QUALITY_LOW = 0 — Low depth-of-field blur quality (fastest).
- DOF_BLUR_QUALITY_MEDIUM = 1 — Medium depth-of-field blur quality.
- DOF_BLUR_QUALITY_HIGH = 2 — High depth-of-field blur quality (slowest).
enum SSAOBlur:
- SSAO_BLUR_DISABLED = 0 — No blur for the screen-space ambient occlusion effect (fastest).
- SSAO_BLUR_1x1 = 1 — 1×1 blur for the screen-space ambient occlusion effect.
- SSAO_BLUR_2x2 = 2 — 2×2 blur for the screen-space ambient occlusion effect.
- SSAO_BLUR_3x3 = 3 — 3×3 blur for the screen-space ambient occlusion effect (slowest).
enum SSAOQuality:
- SSAO_QUALITY_LOW = 0 — Low quality for the screen-space ambient occlusion effect (fastest).
- SSAO_QUALITY_MEDIUM = 1 — Low quality for the screen-space ambient occlusion effect.
- SSAO_QUALITY_HIGH = 2 — Low quality for the screen-space ambient occlusion effect (slowest).
Property Descriptions¶
- float adjustment_brightness
| Default | 1.0 |
| Setter | set_adjustment_brightness(value) |
| Getter | get_adjustment_brightness() |
The global brightness value of the rendered scene. Effective only if adjustment_enabled is true.
- Texture adjustment_color_correction
| Setter | set_adjustment_color_correction(value) |
| Getter | get_adjustment_color_correction() |
Applies the provided Texture resource to affect the global color aspect of the rendered scene. Effective only if adjustment_enabled is true.
- float adjustment_contrast
| Default | 1.0 |
| Setter | set_adjustment_contrast(value) |
| Getter | get_adjustment_contrast() |
The global contrast value of the rendered scene (default value is 1). Effective only if adjustment_enabled is true.
- bool adjustment_enabled
| Default | false |
| Setter | set_adjustment_enable(value) |
| Getter | is_adjustment_enabled() |
If true, enables the adjustment_* properties provided by this resource. If false, modifications to the adjustment_* properties will have no effect on the rendered scene.
- float adjustment_saturation
| Default | 1.0 |
| Setter | set_adjustment_saturation(value) |
| Getter | get_adjustment_saturation() |
The global color saturation value of the rendered scene (default value is 1). Effective only if adjustment_enabled is true.
- Color ambient_light_color
| Default | Color( 0, 0, 0, 1 ) |
| Setter | set_ambient_light_color(value) |
| Getter | get_ambient_light_color() |
The ambient light’s Color.
- float ambient_light_energy
| Default | 1.0 |
| Setter | set_ambient_light_energy(value) |
| Getter | get_ambient_light_energy() |
The ambient light’s energy. The higher the value, the stronger the light.
- float ambient_light_sky_contribution
| Default | 1.0 |
| Setter | set_ambient_light_sky_contribution(value) |
| Getter | get_ambient_light_sky_contribution() |
Defines the amount of light that the sky brings on the scene. A value of 0 means that the sky’s light emission has no effect on the scene illumination, thus all ambient illumination is provided by the ambient light. On the contrary, a value of 1 means that all the light that affects the scene is provided by the sky, thus the ambient light parameter has no effect on the scene.
- bool auto_exposure_enabled
| Default | false |
| Setter | set_tonemap_auto_exposure(value) |
| Getter | get_tonemap_auto_exposure() |
If true, enables the tonemapping auto exposure mode of the scene renderer. If true, the renderer will automatically determine the exposure setting to adapt to the scene’s illumination and the observed light.
- float auto_exposure_max_luma
| Default | 8.0 |
| Setter | set_tonemap_auto_exposure_max(value) |
| Getter | get_tonemap_auto_exposure_max() |
The maximum luminance value for the auto exposure.
- float auto_exposure_min_luma
| Default | 0.05 |
| Setter | set_tonemap_auto_exposure_min(value) |
| Getter | get_tonemap_auto_exposure_min() |
The minimum luminance value for the auto exposure.
- float auto_exposure_scale
| Default | 0.4 |
| Setter | set_tonemap_auto_exposure_grey(value) |
| Getter | get_tonemap_auto_exposure_grey() |
The scale of the auto exposure effect. Affects the intensity of auto exposure.
- float auto_exposure_speed
| Default | 0.5 |
| Setter | set_tonemap_auto_exposure_speed(value) |
| Getter | get_tonemap_auto_exposure_speed() |
The speed of the auto exposure effect. Affects the time needed for the camera to perform auto exposure.
- int background_camera_feed_id
| Default | 1 |
| Setter | set_camera_feed_id(value) |
| Getter | get_camera_feed_id() |
The ID of the camera feed to show in the background.
- int background_canvas_max_layer
| Default | 0 |
| Setter | set_canvas_max_layer(value) |
| Getter | get_canvas_max_layer() |
The maximum layer ID to display. Only effective when using the BG_CANVAS background mode.
- Color background_color
| Default | Color( 0, 0, 0, 1 ) |
| Setter | set_bg_color(value) |
| Getter | get_bg_color() |
The Color displayed for clear areas of the scene. Only effective when using the BG_COLOR or BG_COLOR_SKY background modes).
- float background_energy
| Default | 1.0 |
| Setter | set_bg_energy(value) |
| Getter | get_bg_energy() |
The power of the light emitted by the background.
- BGMode background_mode
| Default | 0 |
| Setter | set_background(value) |
| Getter | get_background() |
The background mode. See BGMode for possible values.
- Sky background_sky
| Setter | set_sky(value) |
| Getter | get_sky() |
The Sky resource defined as background.
- float background_sky_custom_fov
| Default | 0.0 |
| Setter | set_sky_custom_fov(value) |
| Getter | get_sky_custom_fov() |
The Sky resource’s custom field of view.
- Basis background_sky_orientation
| Default | Basis( 1, 0, 0, 0, 1, 0, 0, 0, 1 ) |
| Setter | set_sky_orientation(value) |
| Getter | get_sky_orientation() |
The Sky resource’s rotation expressed as a Basis.
- Vector3 background_sky_rotation
| Default | Vector3( 0, 0, 0 ) |
| Setter | set_sky_rotation(value) |
| Getter | get_sky_rotation() |
The Sky resource’s rotation expressed as Euler angles in radians.
- Vector3 background_sky_rotation_degrees
| Default | Vector3( 0, 0, 0 ) |
| Setter | set_sky_rotation_degrees(value) |
| Getter | get_sky_rotation_degrees() |
The Sky resource’s rotation expressed as Euler angles in degrees.
- float dof_blur_far_amount
| Default | 0.1 |
| Setter | set_dof_blur_far_amount(value) |
| Getter | get_dof_blur_far_amount() |
The amount of far blur for the depth-of-field effect.
- float dof_blur_far_distance
| Default | 10.0 |
| Setter | set_dof_blur_far_distance(value) |
| Getter | get_dof_blur_far_distance() |
The distance from the camera where the far blur effect affects the rendering.
- bool dof_blur_far_enabled
| Default | false |
| Setter | set_dof_blur_far_enabled(value) |
| Getter | is_dof_blur_far_enabled() |
If true, enables the depth-of-field far blur effect.
- DOFBlurQuality dof_blur_far_quality
| Default | 1 |
| Setter | set_dof_blur_far_quality(value) |
| Getter | get_dof_blur_far_quality() |
The depth-of-field far blur’s quality. Higher values can mitigate the visible banding effect seen at higher strengths, but are much slower.
- float dof_blur_far_transition
| Default | 5.0 |
| Setter | set_dof_blur_far_transition(value) |
| Getter | get_dof_blur_far_transition() |
The length of the transition between the no-blur area and far blur.
- float dof_blur_near_amount
| Default | 0.1 |
| Setter | set_dof_blur_near_amount(value) |
| Getter | get_dof_blur_near_amount() |
The amount of near blur for the depth-of-field effect.
- float dof_blur_near_distance
| Default | 2.0 |
| Setter | set_dof_blur_near_distance(value) |
| Getter | get_dof_blur_near_distance() |
Distance from the camera where the near blur effect affects the rendering.
- bool dof_blur_near_enabled
| Default | false |
| Setter | set_dof_blur_near_enabled(value) |
| Getter | is_dof_blur_near_enabled() |
If true, enables the depth-of-field near blur effect.
- DOFBlurQuality dof_blur_near_quality
| Default | 1 |
| Setter | set_dof_blur_near_quality(value) |
| Getter | get_dof_blur_near_quality() |
The depth-of-field near blur’s quality. Higher values can mitigate the visible banding effect seen at higher strengths, but are much slower.
- float dof_blur_near_transition
| Default | 1.0 |
| Setter | set_dof_blur_near_transition(value) |
| Getter | get_dof_blur_near_transition() |
The length of the transition between the near blur and no-blur area.
- Color fog_color
| Default | Color( 0.5, 0.6, 0.7, 1 ) |
| Setter | set_fog_color(value) |
| Getter | get_fog_color() |
The fog’s Color.
- float fog_depth_begin
| Default | 10.0 |
| Setter | set_fog_depth_begin(value) |
| Getter | get_fog_depth_begin() |
The fog’s depth starting distance from the camera.
- float fog_depth_curve
| Default | 1.0 |
| Setter | set_fog_depth_curve(value) |
| Getter | get_fog_depth_curve() |
The fog depth’s intensity curve. A number of presets are available in the Inspector by right-clicking the curve.
- bool fog_depth_enabled
| Default | true |
| Setter | set_fog_depth_enabled(value) |
| Getter | is_fog_depth_enabled() |
If true, the depth fog effect is enabled. When enabled, fog will appear in the distance (relative to the camera).
- float fog_depth_end
| Default | 100.0 |
| Setter | set_fog_depth_end(value) |
| Getter | get_fog_depth_end() |
The fog’s depth end distance from the camera. If this value is set to 0, it will be equal to the current camera’s Camera.far value.
- bool fog_enabled
| Default | false |
| Setter | set_fog_enabled(value) |
| Getter | is_fog_enabled() |
If true, fog effects are enabled. fog_height_enabled and/or fog_depth_enabled must be set to true to actually display fog.
- float fog_height_curve
| Default | 1.0 |
| Setter | set_fog_height_curve(value) |
| Getter | get_fog_height_curve() |
The height fog’s intensity. A number of presets are available in the Inspector by right-clicking the curve.
- bool fog_height_enabled
| Default | false |
| Setter | set_fog_height_enabled(value) |
| Getter | is_fog_height_enabled() |
If true, the height fog effect is enabled. When enabled, fog will appear in a defined height range, regardless of the distance from the camera. This can be used to simulate “deep water” effects with a lower performance cost compared to a dedicated shader.
- float fog_height_max
| Default | 0.0 |
| Setter | set_fog_height_max(value) |
| Getter | get_fog_height_max() |
The Y coordinate where the height fog will be the most intense. If this value is greater than fog_height_min, fog will be displayed from bottom to top. Otherwise, it will be displayed from top to bottom.
- float fog_height_min
| Default | 10.0 |
| Setter | set_fog_height_min(value) |
| Getter | get_fog_height_min() |
The Y coordinate where the height fog will be the least intense. If this value is greater than fog_height_max, fog will be displayed from top to bottom. Otherwise, it will be displayed from bottom to top.
- float fog_sun_amount
| Default | 0.0 |
| Setter | set_fog_sun_amount(value) |
| Getter | get_fog_sun_amount() |
The intensity of the depth fog color transition when looking towards the sun. The sun’s direction is determined automatically using the DirectionalLight node in the scene.
- Color fog_sun_color
| Default | Color( 1, 0.9, 0.7, 1 ) |
| Setter | set_fog_sun_color(value) |
| Getter | get_fog_sun_color() |
The depth fog’s Color when looking towards the sun.
- float fog_transmit_curve
| Default | 1.0 |
| Setter | set_fog_transmit_curve(value) |
| Getter | get_fog_transmit_curve() |
The intensity of the fog light transmittance effect. Amount of light that the fog transmits.
- bool fog_transmit_enabled
| Default | false |
| Setter | set_fog_transmit_enabled(value) |
| Getter | is_fog_transmit_enabled() |
Enables fog’s light transmission effect. If true, light will be more visible in the fog to simulate light scattering as in real life.
- bool glow_bicubic_upscale
| Default | false |
| Setter | set_glow_bicubic_upscale(value) |
| Getter | is_glow_bicubic_upscale_enabled() |
Smooths out the blockiness created by sampling higher levels, at the cost of performance.
Note: When using the GLES2 renderer, this is only available if the GPU supports the GL_EXT_gpu_shader4 extension.
- GlowBlendMode glow_blend_mode
| Default | 2 |
| Setter | set_glow_blend_mode(value) |
| Getter | get_glow_blend_mode() |
The glow blending mode.
- float glow_bloom
| Default | 0.0 |
| Setter | set_glow_bloom(value) |
| Getter | get_glow_bloom() |
The bloom’s intensity. If set to a value higher than 0, this will make glow visible in areas darker than the glow_hdr_threshold.
- bool glow_enabled
| Default | false |
| Setter | set_glow_enabled(value) |
| Getter | is_glow_enabled() |
If true, the glow effect is enabled.
- float glow_hdr_luminance_cap
| Default | 12.0 |
| Setter | set_glow_hdr_luminance_cap(value) |
| Getter | get_glow_hdr_luminance_cap() |
The higher threshold of the HDR glow. Areas brighter than this threshold will be clamped for the purposes of the glow effect.
- float glow_hdr_scale
| Default | 2.0 |
| Setter | set_glow_hdr_bleed_scale(value) |
| Getter | get_glow_hdr_bleed_scale() |
The bleed scale of the HDR glow.
- float glow_hdr_threshold
| Default | 1.0 |
| Setter | set_glow_hdr_bleed_threshold(value) |
| Getter | get_glow_hdr_bleed_threshold() |
The lower threshold of the HDR glow. When using the GLES2 renderer (which doesn’t support HDR), this needs to be below 1.0 for glow to be visible. A value of 0.9 works well in this case.
- float glow_intensity
| Default | 0.8 |
| Setter | set_glow_intensity(value) |
| Getter | get_glow_intensity() |
The glow intensity. When using the GLES2 renderer, this should be increased to 1.5 to compensate for the lack of HDR rendering.
- bool glow_levels/1
| Default | false |
| Setter | set_glow_level(value) |
| Getter | is_glow_level_enabled() |
If true, the 1st level of glow is enabled. This is the most “local” level (least blurry).
- bool glow_levels/2
| Default | false |
| Setter | set_glow_level(value) |
| Getter | is_glow_level_enabled() |
If true, the 2th level of glow is enabled.
- bool glow_levels/3
| Default | true |
| Setter | set_glow_level(value) |
| Getter | is_glow_level_enabled() |
If true, the 3th level of glow is enabled.
- bool glow_levels/4
| Default | false |
| Setter | set_glow_level(value) |
| Getter | is_glow_level_enabled() |
If true, the 4th level of glow is enabled.
- bool glow_levels/5
| Default | true |
| Setter | set_glow_level(value) |
| Getter | is_glow_level_enabled() |
If true, the 5th level of glow is enabled.
- bool glow_levels/6
| Default | false |
| Setter | set_glow_level(value) |
| Getter | is_glow_level_enabled() |
If true, the 6th level of glow is enabled.
- bool glow_levels/7
| Default | false |
| Setter | set_glow_level(value) |
| Getter | is_glow_level_enabled() |
If true, the 7th level of glow is enabled. This is the most “global” level (blurriest).
- float glow_strength
| Default | 1.0 |
| Setter | set_glow_strength(value) |
| Getter | get_glow_strength() |
The glow strength. When using the GLES2 renderer, this should be increased to 1.3 to compensate for the lack of HDR rendering.
- float ss_reflections_depth_tolerance
| Default | 0.2 |
| Setter | set_ssr_depth_tolerance(value) |
| Getter | get_ssr_depth_tolerance() |
The depth tolerance for screen-space reflections.
- bool ss_reflections_enabled
| Default | false |
| Setter | set_ssr_enabled(value) |
| Getter | is_ssr_enabled() |
If true, screen-space reflections are enabled. Screen-space reflections are more accurate than reflections from GIProbes or ReflectionProbes, but are slower and can’t reflect surfaces occluded by others.
- float ss_reflections_fade_in
| Default | 0.15 |
| Setter | set_ssr_fade_in(value) |
| Getter | get_ssr_fade_in() |
The fade-in distance for screen-space reflections. Affects the area from the reflected material to the screen-space reflection).
- float ss_reflections_fade_out
| Default | 2.0 |
| Setter | set_ssr_fade_out(value) |
| Getter | get_ssr_fade_out() |
The fade-out distance for screen-space reflections. Affects the area from the screen-space reflection to the “global” reflection.
- int ss_reflections_max_steps
| Default | 64 |
| Setter | set_ssr_max_steps(value) |
| Getter | get_ssr_max_steps() |
The maximum number of steps for screen-space reflections. Higher values are slower.
- bool ss_reflections_roughness
| Default | true |
| Setter | set_ssr_rough(value) |
| Getter | is_ssr_rough() |
If true, screen-space reflections will take the material roughness into account.
- float ssao_ao_channel_affect
| Default | 0.0 |
| Setter | set_ssao_ao_channel_affect(value) |
| Getter | get_ssao_ao_channel_affect() |
The screen-space ambient occlusion intensity on materials that have an AO texture defined. Values higher than 0 will make the SSAO effect visible in areas darkened by AO textures.
- float ssao_bias
| Default | 0.01 |
| Setter | set_ssao_bias(value) |
| Getter | get_ssao_bias() |
The screen-space ambient occlusion bias. This should be kept high enough to prevent “smooth” curves from being affected by ambient occlusion.
- SSAOBlur ssao_blur
| Default | 3 |
| Setter | set_ssao_blur(value) |
| Getter | get_ssao_blur() |
The screen-space ambient occlusion blur quality. See SSAOBlur for possible values.
- Color ssao_color
| Default | Color( 0, 0, 0, 1 ) |
| Setter | set_ssao_color(value) |
| Getter | get_ssao_color() |
The screen-space ambient occlusion color.
- float ssao_edge_sharpness
| Default | 4.0 |
| Setter | set_ssao_edge_sharpness(value) |
| Getter | get_ssao_edge_sharpness() |
The screen-space ambient occlusion edge sharpness.
- bool ssao_enabled
| Default | false |
| Setter | set_ssao_enabled(value) |
| Getter | is_ssao_enabled() |
If true, the screen-space ambient occlusion effect is enabled. This darkens objects’ corners and cavities to simulate ambient light not reaching the entire object as in real life. This works well for small, dynamic objects, but baked lighting or ambient occlusion textures will do a better job at displaying ambient occlusion on large static objects. This is a costly effect and should be disabled first when running into performance issues.
- float ssao_intensity
| Default | 1.0 |
| Setter | set_ssao_intensity(value) |
| Getter | get_ssao_intensity() |
The primary screen-space ambient occlusion intensity. See also ssao_radius.
- float ssao_intensity2
| Default | 1.0 |
| Setter | set_ssao_intensity2(value) |
| Getter | get_ssao_intensity2() |
The secondary screen-space ambient occlusion intensity. See also ssao_radius2.
- float ssao_light_affect
| Default | 0.0 |
| Setter | set_ssao_direct_light_affect(value) |
| Getter | get_ssao_direct_light_affect() |
The screen-space ambient occlusion intensity in direct light. In real life, ambient occlusion only applies to indirect light, which means its effects can’t be seen in direct light. Values higher than 0 will make the SSAO effect visible in direct light.
- SSAOQuality ssao_quality
| Default | 1 |
| Setter | set_ssao_quality(value) |
| Getter | get_ssao_quality() |
The screen-space ambient occlusion quality. Higher qualities will make better use of small objects for ambient occlusion, but are slower.
- float ssao_radius
| Default | 1.0 |
| Setter | set_ssao_radius(value) |
| Getter | get_ssao_radius() |
The primary screen-space ambient occlusion radius.
- float ssao_radius2
| Default | 0.0 |
| Setter | set_ssao_radius2(value) |
| Getter | get_ssao_radius2() |
The secondary screen-space ambient occlusion radius. If set to a value higher than 0, enables the secondary screen-space ambient occlusion effect which can be used to improve the effect’s appearance (at the cost of performance).
- float tonemap_exposure
| Default | 1.0 |
| Setter | set_tonemap_exposure(value) |
| Getter | get_tonemap_exposure() |
The default exposure used for tonemapping.
- ToneMapper tonemap_mode
| Default | 0 |
| Setter | set_tonemapper(value) |
| Getter | get_tonemapper() |
The tonemapping mode to use. Tonemapping is the process that “converts” HDR values to be suitable for rendering on a LDR display. (Godot doesn’t support rendering on HDR displays yet.)
- float tonemap_white
| Default | 1.0 |
| Setter | set_tonemap_white(value) |
| Getter | get_tonemap_white() |
The white reference value for tonemapping. Only effective if the tonemap_mode isn’t set to TONE_MAPPER_LINEAR.
Method Descriptions¶
Returns true if the glow level idx is specified, false otherwise.
Enables or disables the glow level at index idx. Each level relies on the previous level. This means that enabling higher glow levels will slow down the glow effect rendering, even if previous levels aren’t enabled.
Expression¶
A class that stores an expression you can execute.
Description¶
An expression can be made of any arithmetic operation, built-in math function call, method call of a passed instance, or built-in type construction call.
An example expression text using the built-in math functions could be sqrt(pow(3,2) + pow(4,2)).
In the following example we use a LineEdit node to write our expression and show the result.
onready var expression = Expression.new()
func _ready():
$LineEdit.connect("text_entered", self, "_on_text_entered")
func _on_text_entered(command):
var error = expression.parse(command, [])
if error != OK:
print(expression.get_error_text())
return
var result = expression.execute([], null, true)
if not expression.has_execute_failed():
$LineEdit.text = str(result)
Methods¶
| Variant | execute ( Array inputs=[ ], Object base_instance=null, bool show_error=true ) |
| String | get_error_text ( ) const |
| bool | has_execute_failed ( ) const |
| Error | parse ( String expression, PoolStringArray input_names=PoolStringArray( ) ) |
Method Descriptions¶
Executes the expression that was previously parsed by parse and returns the result. Before you use the returned object, you should check if the method failed by calling has_execute_failed.
If you defined input variables in parse, you can specify their values in the inputs array, in the same order.
- String get_error_text ( ) const
Returns the error text if parse has failed.
- bool has_execute_failed ( ) const
Returns true if execute has failed.
- Error parse ( String expression, PoolStringArray input_names=PoolStringArray( ) )
Parses the expression and returns an Error code.
You can optionally specify names of variables that may appear in the expression with input_names, so that you can bind them when it gets executed.
File¶
Type to handle file reading and writing operations.
Description¶
File type. This is used to permanently store data into the user device’s file system and to read from it. This can be used to store game save data or player configuration files, for example.
Here’s a sample on how to write and read from a file:
func save(content):
var file = File.new()
file.open("user://save_game.dat", File.WRITE)
file.store_string(content)
file.close()
func load():
var file = File.new()
file.open("user://save_game.dat", File.READ)
var content = file.get_as_text()
file.close()
return content
Tutorials¶
Properties¶
| bool | endian_swap | false |
Methods¶
Enumerations¶
enum ModeFlags:
- READ = 1 — Opens the file for read operations.
- WRITE = 2 — Opens the file for write operations. Create it if the file does not exist and truncate if it exists.
- READ_WRITE = 3 — Opens the file for read and write operations. Does not truncate the file.
- WRITE_READ = 7 — Opens the file for read and write operations. Create it if the file does not exist and truncate if it exists.
enum CompressionMode:
Property Descriptions¶
- bool endian_swap
| Default | false |
| Setter | set_endian_swap(value) |
| Getter | get_endian_swap() |
If true, the file’s endianness is swapped. Use this if you’re dealing with files written on big-endian machines.
Note: This is about the file format, not CPU type. This is always reset to false whenever you open the file.
Method Descriptions¶
- void close ( )
Closes the currently opened file.
- bool eof_reached ( ) const
Returns true if the file cursor has read past the end of the file.
Note: This function will still return false while at the end of the file and only activates when reading past it. This can be confusing but it conforms to how low-level file access works in all operating systems. There is always get_len and get_position to implement a custom logic.
Returns true if the file exists in the given path.
Note: Many resources types are imported (e.g. textures or sound files), and that their source asset will not be included in the exported game, as only the imported version is used (in the res://.import folder). To check for the existence of such resources while taking into account the remapping to their imported location, use ResourceLoader.exists. Typically, using File.file_exists on an imported resource would work while you are developing in the editor (the source asset is present in res://, but fail when exported).
- int get_16 ( ) const
Returns the next 16 bits from the file as an integer.
- int get_32 ( ) const
Returns the next 32 bits from the file as an integer.
- int get_64 ( ) const
Returns the next 64 bits from the file as an integer.
- int get_8 ( ) const
Returns the next 8 bits from the file as an integer.
- String get_as_text ( ) const
Returns the whole file as a String.
Text is interpreted as being UTF-8 encoded.
- PoolByteArray get_buffer ( int len ) const
Returns next len bytes of the file as a PoolByteArray.
- PoolStringArray get_csv_line ( String delim=”,” ) const
Returns the next value of the file in CSV (Comma-Separated Values) format. You can pass a different delimiter delim to use other than the default "," (comma). This delimiter must be one-character long.
Text is interpreted as being UTF-8 encoded.
- float get_double ( ) const
Returns the next 64 bits from the file as a floating-point number.
- Error get_error ( ) const
Returns the last error that happened when trying to perform operations. Compare with the ERR_FILE_* constants from Error.
- float get_float ( ) const
Returns the next 32 bits from the file as a floating-point number.
- int get_len ( ) const
Returns the size of the file in bytes.
- String get_line ( ) const
Returns the next line of the file as a String.
Text is interpreted as being UTF-8 encoded.
Returns an MD5 String representing the file at the given path or an empty String on failure.
Returns the last time the file was modified in unix timestamp format or returns a String “ERROR IN file”. This unix timestamp can be converted to datetime by using OS.get_datetime_from_unix_time.
- String get_pascal_string ( )
Returns a String saved in Pascal format from the file.
Text is interpreted as being UTF-8 encoded.
- String get_path ( ) const
Returns the path as a String for the current open file.
- String get_path_absolute ( ) const
Returns the absolute path as a String for the current open file.
- int get_position ( ) const
Returns the file cursor’s position.
- float get_real ( ) const
Returns the next bits from the file as a floating-point number.
Returns a SHA-256 String representing the file at the given path or an empty String on failure.
Returns the next Variant value from the file. If allow_objects is true, decoding objects is allowed.
Warning: Deserialized objects can contain code which gets executed. Do not use this option if the serialized object comes from untrusted sources to avoid potential security threats such as remote code execution.
- bool is_open ( ) const
Returns true if the file is currently opened.
Opens the file for writing or reading, depending on the flags.
- Error open_compressed ( String path, ModeFlags mode_flags, CompressionMode compression_mode=0 )
Opens a compressed file for reading or writing.
- Error open_encrypted ( String path, ModeFlags mode_flags, PoolByteArray key )
Opens an encrypted file in write or read mode. You need to pass a binary key to encrypt/decrypt it.
Opens an encrypted file in write or read mode. You need to pass a password to encrypt/decrypt it.
- void seek ( int position )
Changes the file reading/writing cursor to the specified position (in bytes from the beginning of the file).
- void seek_end ( int position=0 )
Changes the file reading/writing cursor to the specified position (in bytes from the end of the file).
Note: This is an offset, so you should use negative numbers or the cursor will be at the end of the file.
- void store_16 ( int value )
Stores an integer as 16 bits in the file.
- void store_32 ( int value )
Stores an integer as 32 bits in the file.
- void store_64 ( int value )
Stores an integer as 64 bits in the file.
- void store_8 ( int value )
Stores an integer as 8 bits in the file.
- void store_buffer ( PoolByteArray buffer )
Stores the given array of bytes in the file.
- void store_csv_line ( PoolStringArray values, String delim=”,” )
Store the given PoolStringArray in the file as a line formatted in the CSV (Comma-Separated Values) format. You can pass a different delimiter delim to use other than the default "," (comma). This delimiter must be one-character long.
Text will be encoded as UTF-8.
- void store_double ( float value )
Stores a floating-point number as 64 bits in the file.
- void store_float ( float value )
Stores a floating-point number as 32 bits in the file.
- void store_line ( String line )
Stores the given String as a line in the file.
Text will be encoded as UTF-8.
- void store_pascal_string ( String string )
Stores the given String as a line in the file in Pascal format (i.e. also store the length of the string).
Text will be encoded as UTF-8.
- void store_real ( float value )
Stores a floating-point number in the file.
- void store_string ( String string )
Stores the given String in the file.
Text will be encoded as UTF-8.
Stores any Variant value in the file. If full_objects is true, encoding objects is allowed (and can potentially include code).
FileDialog¶
Inherits: ConfirmationDialog < AcceptDialog < WindowDialog < Popup < Control < CanvasItem < Node < Object
Dialog for selecting files or directories in the filesystem.
Description¶
FileDialog is a preset dialog used to choose files and directories in the filesystem. It supports filter masks.
Properties¶
| Access | access | 0 |
| String | current_dir | "res://" |
| String | current_file | "" |
| String | current_path | "res://" |
| bool | dialog_hide_on_ok | O: false |
| PoolStringArray | filters | PoolStringArray( ) |
| Mode | mode | 4 |
| bool | mode_overrides_title | true |
| bool | show_hidden_files | false |
| String | window_title | O: "Save a File" |
Methods¶
| void | add_filter ( String filter ) |
| void | clear_filters ( ) |
| void | deselect_items ( ) |
| LineEdit | get_line_edit ( ) |
| VBoxContainer | get_vbox ( ) |
| void | invalidate ( ) |
Theme Properties¶
| Color | files_disabled | Color( 0, 0, 0, 0.7 ) |
| Texture | folder | |
| Color | folder_icon_modulate | Color( 1, 1, 1, 1 ) |
| Texture | parent_folder | |
| Texture | reload | |
| Texture | toggle_hidden |
Signals¶
- dir_selected ( String dir )
Emitted when the user selects a directory.
- file_selected ( String path )
Emitted when the user selects a file by double-clicking it or pressing the OK button.
- files_selected ( PoolStringArray paths )
Emitted when the user selects multiple files.
Enumerations¶
enum Mode:
- MODE_OPEN_FILE = 0 — The dialog allows selecting one, and only one file.
- MODE_OPEN_FILES = 1 — The dialog allows selecting multiple files.
- MODE_OPEN_DIR = 2 — The dialog only allows selecting a directory, disallowing the selection of any file.
- MODE_OPEN_ANY = 3 — The dialog allows selecting one file or directory.
- MODE_SAVE_FILE = 4 — The dialog will warn when a file exists.
enum Access:
- ACCESS_RESOURCES = 0 — The dialog only allows accessing files under the Resource path (
res://). - ACCESS_USERDATA = 1 — The dialog only allows accessing files under user data path (
user://). - ACCESS_FILESYSTEM = 2 — The dialog allows accessing files on the whole file system.
Property Descriptions¶
- Access access
| Default | 0 |
| Setter | set_access(value) |
| Getter | get_access() |
The file system access scope. See enum Access constants.
- String current_dir
| Default | "res://" |
| Setter | set_current_dir(value) |
| Getter | get_current_dir() |
The current working directory of the file dialog.
- String current_file
| Default | "" |
| Setter | set_current_file(value) |
| Getter | get_current_file() |
The currently selected file of the file dialog.
- String current_path
| Default | "res://" |
| Setter | set_current_path(value) |
| Getter | get_current_path() |
The currently selected file path of the file dialog.
- PoolStringArray filters
| Default | PoolStringArray( ) |
| Setter | set_filters(value) |
| Getter | get_filters() |
The available file type filters. For example, this shows only .png and .gd files: set_filters(PoolStringArray(["*.png ; PNG Images","*.gd ; GDScript Files"])).
- Mode mode
| Default | 4 |
| Setter | set_mode(value) |
| Getter | get_mode() |
The dialog’s open or save mode, which affects the selection behavior. See enum Mode constants.
- bool mode_overrides_title
| Default | true |
| Setter | set_mode_overrides_title(value) |
| Getter | is_mode_overriding_title() |
If true, changing the Mode property will set the window title accordingly (e.g. setting mode to MODE_OPEN_FILE will change the window title to “Open a File”).
| Default | false |
| Setter | set_show_hidden_files(value) |
| Getter | is_showing_hidden_files() |
If true, the dialog will show hidden files.
Method Descriptions¶
- void add_filter ( String filter )
Adds filter as a custom filter; filter should be of the form "filename.extension ; Description". For example, "*.png ; PNG Images".
- void clear_filters ( )
Clear all the added filters in the dialog.
- void deselect_items ( )
Clear currently selected items in the dialog.
- LineEdit get_line_edit ( )
Returns the LineEdit for the selected file.
- VBoxContainer get_vbox ( )
Returns the vertical box container of the dialog, custom controls can be added to it.
- void invalidate ( )
Invalidate and update the current dialog content list.
float¶
Float built-in type.
Description¶
Float built-in type.
Method Descriptions¶
Cast a bool value to a floating-point value, float(true) will be equal to 1.0 and float(false) will be equal to 0.0.
Cast an int value to a floating-point value, float(1) will be equal to 1.0.
Cast a String value to a floating-point value. This method accepts float value strings like "1.23" and exponential notation strings for its parameter so calling float("1e3") will return 1000.0 and calling float("1e-3") will return 0.001. Calling this method with an invalid float string will return 0. This method stops parsing at the first invalid character and will return the parsed result so far, so calling float("1a3") will return 1 while calling float("1e3a2") will return 1000.0.
Font¶
Inherits: Resource < Reference < Object
Inherited By: BitmapFont, DynamicFont
Internationalized font and text drawing support.
Description¶
Font contains a Unicode-compatible character set, as well as the ability to draw it with variable width, ascent, descent and kerning. For creating fonts from TTF files (or other font formats), see the editor support for fonts.
Methods¶
| void | draw ( RID canvas_item, Vector2 position, String string, Color modulate=Color( 1, 1, 1, 1 ), int clip_w=-1, Color outline_modulate=Color( 1, 1, 1, 1 ) ) const |
| float | draw_char ( RID canvas_item, Vector2 position, int char, int next=-1, Color modulate=Color( 1, 1, 1, 1 ), bool outline=false ) const |
| float | get_ascent ( ) const |
| float | get_descent ( ) const |
| float | get_height ( ) const |
| Vector2 | get_string_size ( String string ) const |
| Vector2 | get_wordwrap_string_size ( String string, float width ) const |
| bool | has_outline ( ) const |
| bool | is_distance_field_hint ( ) const |
| void | update_changes ( ) |
Method Descriptions¶
- void draw ( RID canvas_item, Vector2 position, String string, Color modulate=Color( 1, 1, 1, 1 ), int clip_w=-1, Color outline_modulate=Color( 1, 1, 1, 1 ) ) const
Draw string into a canvas item using the font at a given position, with modulate color, and optionally clipping the width. position specifies the baseline, not the top. To draw from the top, ascent must be added to the Y axis.
- float draw_char ( RID canvas_item, Vector2 position, int char, int next=-1, Color modulate=Color( 1, 1, 1, 1 ), bool outline=false ) const
Draw character char into a canvas item using the font at a given position, with modulate color, and optionally kerning if next is passed. clipping the width. position specifies the baseline, not the top. To draw from the top, ascent must be added to the Y axis. The width used by the character is returned, making this function useful for drawing strings character by character.
- float get_ascent ( ) const
Returns the font ascent (number of pixels above the baseline).
- float get_descent ( ) const
Returns the font descent (number of pixels below the baseline).
- float get_height ( ) const
Returns the total font height (ascent plus descent) in pixels.
Returns the size of a string, taking kerning and advance into account.
Returns the size that the string would have with word wrapping enabled with a fixed width.
- bool has_outline ( ) const
Returns true if the font has an outline.
- bool is_distance_field_hint ( ) const
- void update_changes ( )
After editing a font (changing size, ascent, char rects, etc.). Call this function to propagate changes to controls that might use it.
FuncRef¶
Reference to a function in an object.
Description¶
In GDScript, functions are not first-class objects. This means it is impossible to store them directly as variables, return them from another function, or pass them as arguments.
However, by creating a FuncRef using the @GDScript.funcref function, a reference to a function in a given object can be created, passed around and called.
Methods¶
| Variant | call_func ( … ) vararg |
| Variant | call_funcv ( Array arg_array ) |
| bool | is_valid ( ) const |
| void | set_function ( String name ) |
| void | set_instance ( Object instance ) |
Method Descriptions¶
- Variant call_func ( … ) vararg
Calls the referenced function previously set by set_function or @GDScript.funcref.
Calls the referenced function previously set by set_function or @GDScript.funcref. Contrarily to call_func, this method does not support a variable number of arguments but expects all parameters to be passed via a single Array.
- bool is_valid ( ) const
Returns whether the object still exists and has the function assigned.
- void set_function ( String name )
The name of the referenced function to call on the object, without parentheses or any parameters.
- void set_instance ( Object instance )
The object containing the referenced function. This object must be of a type actually inheriting from Object, not a built-in type such as int, Vector2 or Dictionary.
GDNative¶
Properties¶
| GDNativeLibrary | library |
Methods¶
| Variant | call_native ( String calling_type, String procedure_name, Array arguments ) |
| bool | initialize ( ) |
| bool | terminate ( ) |
GDNativeLibrary¶
Inherits: Resource < Reference < Object
An external library containing functions or script classes to use in Godot.
Description¶
A GDNative library can implement NativeScripts, global functions to call with the GDNative class, or low-level engine extensions through interfaces such as ARVRInterfaceGDNative. The library must be compiled for each platform and architecture that the project will run on.
Tutorials¶
Properties¶
| ConfigFile | config_file | |
| bool | load_once | true |
| bool | reloadable | true |
| bool | singleton | false |
| String | symbol_prefix | "godot_" |
Methods¶
| PoolStringArray | get_current_dependencies ( ) const |
| String | get_current_library_path ( ) const |
Property Descriptions¶
- ConfigFile config_file
| Setter | set_config_file(value) |
| Getter | get_config_file() |
This resource in INI-style ConfigFile format, as in .gdnlib files.
- bool load_once
| Default | true |
| Setter | set_load_once(value) |
| Getter | should_load_once() |
If true, Godot loads only one copy of the library and each script that references the library will share static data like static or global variables.
If false, Godot loads a separate copy of the library into memory for each script that references it.
- bool reloadable
| Default | true |
| Setter | set_reloadable(value) |
| Getter | is_reloadable() |
If true, the editor will temporarily unload the library whenever the user switches away from the editor window, allowing the user to recompile the library without restarting Godot.
Note: If the library defines tool scripts that run inside the editor, reloadable must be false. Otherwise, the editor will attempt to unload the tool scripts while they’re in use and crash.
- bool singleton
| Default | false |
| Setter | set_singleton(value) |
| Getter | is_singleton() |
If true, Godot loads the library at startup rather than the first time a script uses the library, calling {prefix}gdnative_singleton after initializing the library (where {prefix} is the value of symbol_prefix). The library remains loaded as long as Godot is running.
Note: A singleton library cannot be reloadable.
- String symbol_prefix
| Default | "godot_" |
| Setter | set_symbol_prefix(value) |
| Getter | get_symbol_prefix() |
The prefix this library’s entry point functions begin with. For example, a GDNativeLibrary would declare its gdnative_init function as godot_gdnative_init by default.
On platforms that require statically linking libraries (currently only iOS), each library must have a different symbol_prefix.
Method Descriptions¶
- PoolStringArray get_current_dependencies ( ) const
Returns paths to all dependency libraries for the current platform and architecture.
- String get_current_library_path ( ) const
Returns the path to the dynamic library file for the current platform and architecture.
GDScript¶
Inherits: Script < Resource < Reference < Object
A script implemented in the GDScript programming language.
Description¶
A script implemented in the GDScript programming language. The script extends the functionality of all objects that instance it.
new creates a new instance of the script. Object.set_script extends an existing object, if that object’s class matches one of the script’s base classes.
Methods¶
| PoolByteArray | get_as_byte_code ( ) const |
| Variant | new ( … ) vararg |
Method Descriptions¶
- PoolByteArray get_as_byte_code ( ) const
Returns byte code for the script source code.
- Variant new ( … ) vararg
Returns a new instance of the script.
For example:
var MyClass = load("myclass.gd")
var instance = MyClass.new()
assert(instance.get_script() == MyClass)
GDScriptFunctionState¶
State of a function call after yielding.
Description¶
Calling @GDScript.yield within a function will cause that function to yield and return its current state as an object of this type. The yielded function call can then be resumed later by calling resume on this state object.
Method Descriptions¶
Check whether the function call may be resumed. This is not the case if the function state was already resumed.
If extended_check is enabled, it also checks if the associated script and object still exist. The extended check is done in debug mode as part of resume, but you can use this if you know you may be trying to resume without knowing for sure the object and/or script have survived up to that point.
Resume execution of the yielded function call.
If handed an argument, return the argument from the @GDScript.yield call in the yielded function call. You can pass e.g. an Array to hand multiple arguments.
This function returns what the resumed function call returns, possibly another function state if yielded again.
GDScriptNativeClass¶
Generic6DOFJoint¶
Inherits: Joint < Spatial < Node < Object
The generic 6-degrees-of-freedom joint can implement a variety of joint types by locking certain axes’ rotation or translation.
Description¶
The first 3 DOF axes are linear axes, which represent translation of Bodies, and the latter 3 DOF axes represent the angular motion. Each axis can be either locked, or limited.
Properties¶
Methods¶
| bool | get_flag_x ( Flag flag ) const |
| bool | get_flag_y ( Flag flag ) const |
| bool | get_flag_z ( Flag flag ) const |
| float | get_param_x ( Param param ) const |
| float | get_param_y ( Param param ) const |
| float | get_param_z ( Param param ) const |
| void | set_flag_x ( Flag flag, bool value ) |
| void | set_flag_y ( Flag flag, bool value ) |
| void | set_flag_z ( Flag flag, bool value ) |
| void | set_param_x ( Param param, float value ) |
| void | set_param_y ( Param param, float value ) |
| void | set_param_z ( Param param, float value ) |
Enumerations¶
enum Param:
- PARAM_LINEAR_LOWER_LIMIT = 0 — The minimum difference between the pivot points’ axes.
- PARAM_LINEAR_UPPER_LIMIT = 1 — The maximum difference between the pivot points’ axes.
- PARAM_LINEAR_LIMIT_SOFTNESS = 2 — A factor applied to the movement across the axes. The lower, the slower the movement.
- PARAM_LINEAR_RESTITUTION = 3 — The amount of restitution on the axes’ movement. The lower, the more momentum gets lost.
- PARAM_LINEAR_DAMPING = 4 — The amount of damping that happens at the linear motion across the axes.
- PARAM_LINEAR_MOTOR_TARGET_VELOCITY = 5 — The velocity the linear motor will try to reach.
- PARAM_LINEAR_MOTOR_FORCE_LIMIT = 6 — The maximum force the linear motor will apply while trying to reach the velocity target.
- PARAM_ANGULAR_LOWER_LIMIT = 10 — The minimum rotation in negative direction to break loose and rotate around the axes.
- PARAM_ANGULAR_UPPER_LIMIT = 11 — The minimum rotation in positive direction to break loose and rotate around the axes.
- PARAM_ANGULAR_LIMIT_SOFTNESS = 12 — The speed of all rotations across the axes.
- PARAM_ANGULAR_DAMPING = 13 — The amount of rotational damping across the axes. The lower, the more dampening occurs.
- PARAM_ANGULAR_RESTITUTION = 14 — The amount of rotational restitution across the axes. The lower, the more restitution occurs.
- PARAM_ANGULAR_FORCE_LIMIT = 15 — The maximum amount of force that can occur, when rotating around the axes.
- PARAM_ANGULAR_ERP = 16 — When rotating across the axes, this error tolerance factor defines how much the correction gets slowed down. The lower, the slower.
- PARAM_ANGULAR_MOTOR_TARGET_VELOCITY = 17 — Target speed for the motor at the axes.
- PARAM_ANGULAR_MOTOR_FORCE_LIMIT = 18 — Maximum acceleration for the motor at the axes.
- PARAM_MAX = 22 — Represents the size of the Param enum.
enum Flag:
- FLAG_ENABLE_LINEAR_LIMIT = 0 — If enabled, linear motion is possible within the given limits.
- FLAG_ENABLE_ANGULAR_LIMIT = 1 — If enabled, rotational motion is possible within the given limits.
- FLAG_ENABLE_LINEAR_SPRING = 3
- FLAG_ENABLE_ANGULAR_SPRING = 2
- FLAG_ENABLE_MOTOR = 4 — If enabled, there is a rotational motor across these axes.
- FLAG_ENABLE_LINEAR_MOTOR = 5 — If enabled, there is a linear motor across these axes.
- FLAG_MAX = 6 — Represents the size of the Flag enum.
Property Descriptions¶
- float angular_limit_x/damping
| Default | 1.0 |
| Setter | set_param_x(value) |
| Getter | get_param_x() |
The amount of rotational damping across the X axis.
The lower, the longer an impulse from one side takes to travel to the other side.
- bool angular_limit_x/enabled
| Default | true |
| Setter | set_flag_x(value) |
| Getter | get_flag_x() |
If true, rotation across the X axis is limited.
- float angular_limit_x/erp
| Default | 0.5 |
| Setter | set_param_x(value) |
| Getter | get_param_x() |
When rotating across the X axis, this error tolerance factor defines how much the correction gets slowed down. The lower, the slower.
- float angular_limit_x/force_limit
| Default | 0.0 |
| Setter | set_param_x(value) |
| Getter | get_param_x() |
The maximum amount of force that can occur, when rotating around the X axis.
- float angular_limit_x/lower_angle
| Default | 0.0 |
The minimum rotation in negative direction to break loose and rotate around the X axis.
- float angular_limit_x/restitution
| Default | 0.0 |
| Setter | set_param_x(value) |
| Getter | get_param_x() |
The amount of rotational restitution across the X axis. The lower, the more restitution occurs.
- float angular_limit_x/softness
| Default | 0.5 |
| Setter | set_param_x(value) |
| Getter | get_param_x() |
The speed of all rotations across the X axis.
- float angular_limit_x/upper_angle
| Default | 0.0 |
The minimum rotation in positive direction to break loose and rotate around the X axis.
- float angular_limit_y/damping
| Default | 1.0 |
| Setter | set_param_y(value) |
| Getter | get_param_y() |
The amount of rotational damping across the Y axis. The lower, the more dampening occurs.
- bool angular_limit_y/enabled
| Default | true |
| Setter | set_flag_y(value) |
| Getter | get_flag_y() |
If true, rotation across the Y axis is limited.
- float angular_limit_y/erp
| Default | 0.5 |
| Setter | set_param_y(value) |
| Getter | get_param_y() |
When rotating across the Y axis, this error tolerance factor defines how much the correction gets slowed down. The lower, the slower.
- float angular_limit_y/force_limit
| Default | 0.0 |
| Setter | set_param_y(value) |
| Getter | get_param_y() |
The maximum amount of force that can occur, when rotating around the Y axis.
- float angular_limit_y/lower_angle
| Default | 0.0 |
The minimum rotation in negative direction to break loose and rotate around the Y axis.
- float angular_limit_y/restitution
| Default | 0.0 |
| Setter | set_param_y(value) |
| Getter | get_param_y() |
The amount of rotational restitution across the Y axis. The lower, the more restitution occurs.
- float angular_limit_y/softness
| Default | 0.5 |
| Setter | set_param_y(value) |
| Getter | get_param_y() |
The speed of all rotations across the Y axis.
- float angular_limit_y/upper_angle
| Default | 0.0 |
The minimum rotation in positive direction to break loose and rotate around the Y axis.
- float angular_limit_z/damping
| Default | 1.0 |
| Setter | set_param_z(value) |
| Getter | get_param_z() |
The amount of rotational damping across the Z axis. The lower, the more dampening occurs.
- bool angular_limit_z/enabled
| Default | true |
| Setter | set_flag_z(value) |
| Getter | get_flag_z() |
If true, rotation across the Z axis is limited.
- float angular_limit_z/erp
| Default | 0.5 |
| Setter | set_param_z(value) |
| Getter | get_param_z() |
When rotating across the Z axis, this error tolerance factor defines how much the correction gets slowed down. The lower, the slower.
- float angular_limit_z/force_limit
| Default | 0.0 |
| Setter | set_param_z(value) |
| Getter | get_param_z() |
The maximum amount of force that can occur, when rotating around the Z axis.
- float angular_limit_z/lower_angle
| Default | 0.0 |
The minimum rotation in negative direction to break loose and rotate around the Z axis.
- float angular_limit_z/restitution
| Default | 0.0 |
| Setter | set_param_z(value) |
| Getter | get_param_z() |
The amount of rotational restitution across the Z axis. The lower, the more restitution occurs.
- float angular_limit_z/softness
| Default | 0.5 |
| Setter | set_param_z(value) |
| Getter | get_param_z() |
The speed of all rotations across the Z axis.
- float angular_limit_z/upper_angle
| Default | 0.0 |
The minimum rotation in positive direction to break loose and rotate around the Z axis.
- bool angular_motor_x/enabled
| Default | false |
| Setter | set_flag_x(value) |
| Getter | get_flag_x() |
If true, a rotating motor at the X axis is enabled.
- float angular_motor_x/force_limit
| Default | 300.0 |
| Setter | set_param_x(value) |
| Getter | get_param_x() |
Maximum acceleration for the motor at the X axis.
- float angular_motor_x/target_velocity
| Default | 0.0 |
| Setter | set_param_x(value) |
| Getter | get_param_x() |
Target speed for the motor at the X axis.
- bool angular_motor_y/enabled
| Default | false |
| Setter | set_flag_y(value) |
| Getter | get_flag_y() |
If true, a rotating motor at the Y axis is enabled.
- float angular_motor_y/force_limit
| Default | 300.0 |
| Setter | set_param_y(value) |
| Getter | get_param_y() |
Maximum acceleration for the motor at the Y axis.
- float angular_motor_y/target_velocity
| Default | 0.0 |
| Setter | set_param_y(value) |
| Getter | get_param_y() |
Target speed for the motor at the Y axis.
- bool angular_motor_z/enabled
| Default | false |
| Setter | set_flag_z(value) |
| Getter | get_flag_z() |
If true, a rotating motor at the Z axis is enabled.
- float angular_motor_z/force_limit
| Default | 300.0 |
| Setter | set_param_z(value) |
| Getter | get_param_z() |
Maximum acceleration for the motor at the Z axis.
- float angular_motor_z/target_velocity
| Default | 0.0 |
| Setter | set_param_z(value) |
| Getter | get_param_z() |
Target speed for the motor at the Z axis.
- float angular_spring_x/damping
| Default | 0.0 |
| Setter | set_param_x(value) |
| Getter | get_param_x() |
- bool angular_spring_x/enabled
| Default | false |
| Setter | set_flag_x(value) |
| Getter | get_flag_x() |
- float angular_spring_x/equilibrium_point
| Default | 0.0 |
| Setter | set_param_x(value) |
| Getter | get_param_x() |
- float angular_spring_x/stiffness
| Default | 0.0 |
| Setter | set_param_x(value) |
| Getter | get_param_x() |
- float angular_spring_y/damping
| Default | 0.0 |
| Setter | set_param_y(value) |
| Getter | get_param_y() |
- bool angular_spring_y/enabled
| Default | false |
| Setter | set_flag_y(value) |
| Getter | get_flag_y() |
- float angular_spring_y/equilibrium_point
| Default | 0.0 |
| Setter | set_param_y(value) |
| Getter | get_param_y() |
- float angular_spring_y/stiffness
| Default | 0.0 |
| Setter | set_param_y(value) |
| Getter | get_param_y() |
- float angular_spring_z/damping
| Default | 0.0 |
| Setter | set_param_z(value) |
| Getter | get_param_z() |
- bool angular_spring_z/enabled
| Default | false |
| Setter | set_flag_z(value) |
| Getter | get_flag_z() |
- float angular_spring_z/equilibrium_point
| Default | 0.0 |
| Setter | set_param_z(value) |
| Getter | get_param_z() |
- float angular_spring_z/stiffness
| Default | 0.0 |
| Setter | set_param_z(value) |
| Getter | get_param_z() |
- float linear_limit_x/damping
| Default | 1.0 |
| Setter | set_param_x(value) |
| Getter | get_param_x() |
The amount of damping that happens at the X motion.
- bool linear_limit_x/enabled
| Default | true |
| Setter | set_flag_x(value) |
| Getter | get_flag_x() |
If true, the linear motion across the X axis is limited.
- float linear_limit_x/lower_distance
| Default | 0.0 |
| Setter | set_param_x(value) |
| Getter | get_param_x() |
The minimum difference between the pivot points’ X axis.
- float linear_limit_x/restitution
| Default | 0.5 |
| Setter | set_param_x(value) |
| Getter | get_param_x() |
The amount of restitution on the X axis movement. The lower, the more momentum gets lost.
- float linear_limit_x/softness
| Default | 0.7 |
| Setter | set_param_x(value) |
| Getter | get_param_x() |
A factor applied to the movement across the X axis. The lower, the slower the movement.
- float linear_limit_x/upper_distance
| Default | 0.0 |
| Setter | set_param_x(value) |
| Getter | get_param_x() |
The maximum difference between the pivot points’ X axis.
- float linear_limit_y/damping
| Default | 1.0 |
| Setter | set_param_y(value) |
| Getter | get_param_y() |
The amount of damping that happens at the Y motion.
- bool linear_limit_y/enabled
| Default | true |
| Setter | set_flag_y(value) |
| Getter | get_flag_y() |
If true, the linear motion across the Y axis is limited.
- float linear_limit_y/lower_distance
| Default | 0.0 |
| Setter | set_param_y(value) |
| Getter | get_param_y() |
The minimum difference between the pivot points’ Y axis.
- float linear_limit_y/restitution
| Default | 0.5 |
| Setter | set_param_y(value) |
| Getter | get_param_y() |
The amount of restitution on the Y axis movement. The lower, the more momentum gets lost.
- float linear_limit_y/softness
| Default | 0.7 |
| Setter | set_param_y(value) |
| Getter | get_param_y() |
A factor applied to the movement across the Y axis. The lower, the slower the movement.
- float linear_limit_y/upper_distance
| Default | 0.0 |
| Setter | set_param_y(value) |
| Getter | get_param_y() |
The maximum difference between the pivot points’ Y axis.
- float linear_limit_z/damping
| Default | 1.0 |
| Setter | set_param_z(value) |
| Getter | get_param_z() |
The amount of damping that happens at the Z motion.
- bool linear_limit_z/enabled
| Default | true |
| Setter | set_flag_z(value) |
| Getter | get_flag_z() |
If true, the linear motion across the Z axis is limited.
- float linear_limit_z/lower_distance
| Default | 0.0 |
| Setter | set_param_z(value) |
| Getter | get_param_z() |
The minimum difference between the pivot points’ Z axis.
- float linear_limit_z/restitution
| Default | 0.5 |
| Setter | set_param_z(value) |
| Getter | get_param_z() |
The amount of restitution on the Z axis movement. The lower, the more momentum gets lost.
- float linear_limit_z/softness
| Default | 0.7 |
| Setter | set_param_z(value) |
| Getter | get_param_z() |
A factor applied to the movement across the Z axis. The lower, the slower the movement.
- float linear_limit_z/upper_distance
| Default | 0.0 |
| Setter | set_param_z(value) |
| Getter | get_param_z() |
The maximum difference between the pivot points’ Z axis.
- bool linear_motor_x/enabled
| Default | false |
| Setter | set_flag_x(value) |
| Getter | get_flag_x() |
If true, then there is a linear motor on the X axis. It will attempt to reach the target velocity while staying within the force limits.
- float linear_motor_x/force_limit
| Default | 0.0 |
| Setter | set_param_x(value) |
| Getter | get_param_x() |
The maximum force the linear motor can apply on the X axis while trying to reach the target velocity.
- float linear_motor_x/target_velocity
| Default | 0.0 |
| Setter | set_param_x(value) |
| Getter | get_param_x() |
The speed that the linear motor will attempt to reach on the X axis.
- bool linear_motor_y/enabled
| Default | false |
| Setter | set_flag_y(value) |
| Getter | get_flag_y() |
If true, then there is a linear motor on the Y axis. It will attempt to reach the target velocity while staying within the force limits.
- float linear_motor_y/force_limit
| Default | 0.0 |
| Setter | set_param_y(value) |
| Getter | get_param_y() |
The maximum force the linear motor can apply on the Y axis while trying to reach the target velocity.
- float linear_motor_y/target_velocity
| Default | 0.0 |
| Setter | set_param_y(value) |
| Getter | get_param_y() |
The speed that the linear motor will attempt to reach on the Y axis.
- bool linear_motor_z/enabled
| Default | false |
| Setter | set_flag_z(value) |
| Getter | get_flag_z() |
If true, then there is a linear motor on the Z axis. It will attempt to reach the target velocity while staying within the force limits.
- float linear_motor_z/force_limit
| Default | 0.0 |
| Setter | set_param_z(value) |
| Getter | get_param_z() |
The maximum force the linear motor can apply on the Z axis while trying to reach the target velocity.
- float linear_motor_z/target_velocity
| Default | 0.0 |
| Setter | set_param_z(value) |
| Getter | get_param_z() |
The speed that the linear motor will attempt to reach on the Z axis.
- float linear_spring_x/damping
| Default | 0.01 |
| Setter | set_param_x(value) |
| Getter | get_param_x() |
- bool linear_spring_x/enabled
| Default | false |
| Setter | set_flag_x(value) |
| Getter | get_flag_x() |
- float linear_spring_x/equilibrium_point
| Default | 0.0 |
| Setter | set_param_x(value) |
| Getter | get_param_x() |
- float linear_spring_x/stiffness
| Default | 0.01 |
| Setter | set_param_x(value) |
| Getter | get_param_x() |
- float linear_spring_y/damping
| Default | 0.01 |
| Setter | set_param_y(value) |
| Getter | get_param_y() |
- bool linear_spring_y/enabled
| Default | false |
| Setter | set_flag_y(value) |
| Getter | get_flag_y() |
- float linear_spring_y/equilibrium_point
| Default | 0.0 |
| Setter | set_param_y(value) |
| Getter | get_param_y() |
- float linear_spring_y/stiffness
| Default | 0.01 |
| Setter | set_param_y(value) |
| Getter | get_param_y() |
- float linear_spring_z/damping
| Default | 0.01 |
| Setter | set_param_z(value) |
| Getter | get_param_z() |
- bool linear_spring_z/enabled
| Default | false |
| Setter | set_flag_z(value) |
| Getter | get_flag_z() |
- float linear_spring_z/equilibrium_point
| Default | 0.0 |
| Setter | set_param_z(value) |
| Getter | get_param_z() |
- float linear_spring_z/stiffness
| Default | 0.01 |
| Setter | set_param_z(value) |
| Getter | get_param_z() |
- int precision
| Default | 1 |
| Setter | set_precision(value) |
| Getter | get_precision() |
Geometry¶
Inherits: Object
Helper node to calculate generic geometry operations.
Description¶
Geometry provides users with a set of helper functions to create geometric shapes, compute intersections between shapes, and process various other geometric operations.
Methods¶
Enumerations¶
enum PolyBooleanOperation:
- OPERATION_UNION = 0 — Create regions where either subject or clip polygons (or both) are filled.
- OPERATION_DIFFERENCE = 1 — Create regions where subject polygons are filled except where clip polygons are filled.
- OPERATION_INTERSECTION = 2 — Create regions where both subject and clip polygons are filled.
- OPERATION_XOR = 3 — Create regions where either subject or clip polygons are filled but not where both are filled.
enum PolyJoinType:
- JOIN_SQUARE = 0 — Squaring is applied uniformally at all convex edge joins at
1 * delta. - JOIN_ROUND = 1 — While flattened paths can never perfectly trace an arc, they are approximated by a series of arc chords.
- JOIN_MITER = 2 — There’s a necessary limit to mitered joins since offsetting edges that join at very acute angles will produce excessively long and narrow “spikes”. For any given edge join, when miter offsetting would exceed that maximum distance, “square” joining is applied.
enum PolyEndType:
- END_POLYGON = 0 — Endpoints are joined using the PolyJoinType value and the path filled as a polygon.
- END_JOINED = 1 — Endpoints are joined using the PolyJoinType value and the path filled as a polyline.
- END_BUTT = 2 — Endpoints are squared off with no extension.
- END_SQUARE = 3 — Endpoints are squared off and extended by
deltaunits. - END_ROUND = 4 — Endpoints are rounded off and extended by
deltaunits.
Method Descriptions¶
Returns an array with 6 Planes that describe the sides of a box centered at the origin. The box size is defined by extents, which represents one (positive) corner of the box (i.e. half its actual size).
Returns an array of Planes closely bounding a faceted capsule centered at the origin with radius radius and height height. The parameter sides defines how many planes will be generated for the side part of the capsule, whereas lats gives the number of latitudinal steps at the bottom and top of the capsule. The parameter axis describes the axis along which the capsule is oriented (0 for X, 1 for Y, 2 for Z).
Returns an array of Planes closely bounding a faceted cylinder centered at the origin with radius radius and height height. The parameter sides defines how many planes will be generated for the round part of the cylinder. The parameter axis describes the axis along which the cylinder is oriented (0 for X, 1 for Y, 2 for Z).
- PoolVector3Array clip_polygon ( PoolVector3Array points, Plane plane )
Clips the polygon defined by the points in points against the plane and returns the points of the clipped polygon.
- Array clip_polygons_2d ( PoolVector2Array polygon_a, PoolVector2Array polygon_b )
Clips polygon_a against polygon_b and returns an array of clipped polygons. This performs OPERATION_DIFFERENCE between polygons. Returns an empty array if polygon_b completely overlaps polygon_a.
If polygon_b is enclosed by polygon_a, returns an outer polygon (boundary) and inner polygon (hole) which could be distiguished by calling is_polygon_clockwise.
- Array clip_polyline_with_polygon_2d ( PoolVector2Array polyline, PoolVector2Array polygon )
Clips polyline against polygon and returns an array of clipped polylines. This performs OPERATION_DIFFERENCE between the polyline and the polygon. This operation can be thought of as cutting a line with a closed shape.
- PoolVector2Array convex_hull_2d ( PoolVector2Array points )
Given an array of Vector2s, returns the convex hull as a list of points in counterclockwise order. The last point is the same as the first one.
- Array exclude_polygons_2d ( PoolVector2Array polygon_a, PoolVector2Array polygon_b )
Mutually excludes common area defined by intersection of polygon_a and polygon_b (see intersect_polygons_2d) and returns an array of excluded polygons. This performs OPERATION_XOR between polygons. In other words, returns all but common area between polygons.
The operation may result in an outer polygon (boundary) and inner polygon (hole) produced which could be distiguished by calling is_polygon_clockwise.
Returns the 3D point on the 3D segment (s1, s2) that is closest to point. The returned point will always be inside the specified segment.
Returns the 2D point on the 2D segment (s1, s2) that is closest to point. The returned point will always be inside the specified segment.
Returns the 3D point on the 3D line defined by (s1, s2) that is closest to point. The returned point can be inside the segment (s1, s2) or outside of it, i.e. somewhere on the line extending from the segment.
Returns the 2D point on the 2D line defined by (s1, s2) that is closest to point. The returned point can be inside the segment (s1, s2) or outside of it, i.e. somewhere on the line extending from the segment.
- PoolVector3Array get_closest_points_between_segments ( Vector3 p1, Vector3 p2, Vector3 q1, Vector3 q2 )
Given the two 3D segments (p1, p2) and (q1, q2), finds those two points on the two segments that are closest to each other. Returns a PoolVector3Array that contains this point on (p1, p2) as well the accompanying point on (q1, q2).
- PoolVector2Array get_closest_points_between_segments_2d ( Vector2 p1, Vector2 q1, Vector2 p2, Vector2 q2 )
Given the two 2D segments (p1, p2) and (q1, q2), finds those two points on the two segments that are closest to each other. Returns a PoolVector2Array that contains this point on (p1, p2) as well the accompanying point on (q1, q2).
Used internally by the engine.
- Array intersect_polygons_2d ( PoolVector2Array polygon_a, PoolVector2Array polygon_b )
Intersects polygon_a with polygon_b and returns an array of intersected polygons. This performs OPERATION_INTERSECTION between polygons. In other words, returns common area shared by polygons. Returns an empty array if no intersection occurs.
The operation may result in an outer polygon (boundary) and inner polygon (hole) produced which could be distinguished by calling is_polygon_clockwise.
- Array intersect_polyline_with_polygon_2d ( PoolVector2Array polyline, PoolVector2Array polygon )
Intersects polyline with polygon and returns an array of intersected polylines. This performs OPERATION_INTERSECTION between the polyline and the polygon. This operation can be thought of as chopping a line with a closed shape.
Returns true if point is inside the circle or if it’s located exactly on the circle’s boundary, otherwise returns false.
- bool is_point_in_polygon ( Vector2 point, PoolVector2Array polygon )
Returns true if point is inside polygon or if it’s located exactly on polygon’s boundary, otherwise returns false.
- bool is_polygon_clockwise ( PoolVector2Array polygon )
Returns true if polygon’s vertices are ordered in clockwise order, otherwise returns false.
Checks if the two lines (from_a, dir_a) and (from_b, dir_b) intersect. If yes, return the point of intersection as Vector2. If no intersection takes place, returns an empty Variant.
Note: The lines are specified using direction vectors, not end points.
- Dictionary make_atlas ( PoolVector2Array sizes )
Given an array of Vector2s representing tiles, builds an atlas. The returned dictionary has two keys: points is a vector of Vector2 that specifies the positions of each tile, size contains the overall size of the whole atlas as Vector2.
- Array merge_polygons_2d ( PoolVector2Array polygon_a, PoolVector2Array polygon_b )
Merges (combines) polygon_a and polygon_b and returns an array of merged polygons. This performs OPERATION_UNION between polygons.
The operation may result in an outer polygon (boundary) and inner polygon (hole) produced which could be distinguished by calling is_polygon_clockwise.
- Array offset_polygon_2d ( PoolVector2Array polygon, float delta, PolyJoinType join_type=0 )
Inflates or deflates polygon by delta units (pixels). If delta is positive, makes the polygon grow outward. If delta is negative, shrinks the polygon inward. Returns an array of polygons because inflating/deflating may result in multiple discrete polygons. Returns an empty array if delta is negative and the absolute value of it approximately exceeds the minimum bounding rectangle dimensions of the polygon.
Each polygon’s vertices will be rounded as determined by join_type, see PolyJoinType.
The operation may result in an outer polygon (boundary) and inner polygon (hole) produced which could be distinguished by calling is_polygon_clockwise.
- Array offset_polyline_2d ( PoolVector2Array polyline, float delta, PolyJoinType join_type=0, PolyEndType end_type=3 )
Inflates or deflates polyline by delta units (pixels), producing polygons. If delta is positive, makes the polyline grow outward. Returns an array of polygons because inflating/deflating may result in multiple discrete polygons. If delta is negative, returns an empty array.
Each polygon’s vertices will be rounded as determined by join_type, see PolyJoinType.
Each polygon’s endpoints will be rounded as determined by end_type, see PolyEndType.
The operation may result in an outer polygon (boundary) and inner polygon (hole) produced which could be distinguished by calling is_polygon_clockwise.
Returns if point is inside the triangle specified by a, b and c.
Tests if the 3D ray starting at from with the direction of dir intersects the triangle specified by a, b and c. If yes, returns the point of intersection as Vector3. If no intersection takes place, an empty Variant is returned.
- float segment_intersects_circle ( Vector2 segment_from, Vector2 segment_to, Vector2 circle_position, float circle_radius )
Given the 2D segment (segment_from, segment_to), returns the position on the segment (as a number between 0 and 1) at which the segment hits the circle that is located at position circle_position and has radius circle_radius. If the segment does not intersect the circle, -1 is returned (this is also the case if the line extending the segment would intersect the circle, but the segment does not).
- PoolVector3Array segment_intersects_convex ( Vector3 from, Vector3 to, Array planes )
Given a convex hull defined though the Planes in the array planes, tests if the segment (from, to) intersects with that hull. If an intersection is found, returns a PoolVector3Array containing the point the intersection and the hull’s normal. If no intersecion is found, an the returned array is empty.
- PoolVector3Array segment_intersects_cylinder ( Vector3 from, Vector3 to, float height, float radius )
Checks if the segment (from, to) intersects the cylinder with height height that is centered at the origin and has radius radius. If no, returns an empty PoolVector3Array. If an intersection takes place, the returned array contains the point of intersection and the cylinder’s normal at the point of intersection.
- Variant segment_intersects_segment_2d ( Vector2 from_a, Vector2 to_a, Vector2 from_b, Vector2 to_b )
Checks if the two segments (from_a, to_a) and (from_b, to_b) intersect. If yes, return the point of intersection as Vector2. If no intersection takes place, returns an empty Variant.
- PoolVector3Array segment_intersects_sphere ( Vector3 from, Vector3 to, Vector3 sphere_position, float sphere_radius )
Checks if the segment (from, to) intersects the sphere that is located at sphere_position and has radius sphere_radius. If no, returns an empty PoolVector3Array. If yes, returns a PoolVector3Array containing the point of intersection and the sphere’s normal at the point of intersection.
Tests if the segment (from, to) intersects the triangle a, b, c. If yes, returns the point of intersection as Vector3. If no intersection takes place, an empty Variant is returned.
- PoolIntArray triangulate_delaunay_2d ( PoolVector2Array points )
Triangulates the area specified by discrete set of points such that no point is inside the circumcircle of any resulting triangle. Returns a PoolIntArray where each triangle consists of three consecutive point indices into points (i.e. the returned array will have n * 3 elements, with n being the number of found triangles). If the triangulation did not succeed, an empty PoolIntArray is returned.
- PoolIntArray triangulate_polygon ( PoolVector2Array polygon )
Triangulates the polygon specified by the points in polygon. Returns a PoolIntArray where each triangle consists of three consecutive point indices into polygon (i.e. the returned array will have n * 3 elements, with n being the number of found triangles). If the triangulation did not succeed, an empty PoolIntArray is returned.
GeometryInstance¶
Inherits: VisualInstance < Spatial < Node < Object
Inherited By: CPUParticles, CSGShape, ImmediateGeometry, MeshInstance, MultiMeshInstance, Particles, SpriteBase3D
Base node for geometry-based visual instances.
Description¶
Base node for geometry-based visual instances. Shares some common functionality like visibility and custom materials.
Properties¶
Methods¶
| bool | get_flag ( Flags flag ) const |
| void | set_custom_aabb ( AABB aabb ) |
| void | set_flag ( Flags flag, bool value ) |
Enumerations¶
enum ShadowCastingSetting:
- SHADOW_CASTING_SETTING_OFF = 0 — Will not cast any shadows.
- SHADOW_CASTING_SETTING_ON = 1 — Will cast shadows from all visible faces in the GeometryInstance.
Will take culling into account, so faces not being rendered will not be taken into account when shadow casting.
- SHADOW_CASTING_SETTING_DOUBLE_SIDED = 2 — Will cast shadows from all visible faces in the GeometryInstance.
Will not take culling into account, so all faces will be taken into account when shadow casting.
- SHADOW_CASTING_SETTING_SHADOWS_ONLY = 3 — Will only show the shadows casted from this object.
In other words, the actual mesh will not be visible, only the shadows casted from the mesh will be.
enum Flags:
- FLAG_USE_BAKED_LIGHT = 0 — Will allow the GeometryInstance to be used when baking lights using a GIProbe or BakedLightmap.
- FLAG_DRAW_NEXT_FRAME_IF_VISIBLE = 1 — Unused in this class, exposed for consistency with InstanceFlags.
- FLAG_MAX = 2 — Represents the size of the Flags enum.
Property Descriptions¶
- ShadowCastingSetting cast_shadow
| Default | 1 |
| Setter | set_cast_shadows_setting(value) |
| Getter | get_cast_shadows_setting() |
The selected shadow casting flag. See ShadowCastingSetting for possible values.
- float extra_cull_margin
| Default | 0.0 |
| Setter | set_extra_cull_margin(value) |
| Getter | get_extra_cull_margin() |
The extra distance added to the GeometryInstance’s bounding box (AABB) to increase its cull box.
- float lod_max_distance
| Default | 0.0 |
| Setter | set_lod_max_distance(value) |
| Getter | get_lod_max_distance() |
The GeometryInstance’s max LOD distance.
Note: This property currently has no effect.
- float lod_max_hysteresis
| Default | 0.0 |
| Setter | set_lod_max_hysteresis(value) |
| Getter | get_lod_max_hysteresis() |
The GeometryInstance’s max LOD margin.
Note: This property currently has no effect.
- float lod_min_distance
| Default | 0.0 |
| Setter | set_lod_min_distance(value) |
| Getter | get_lod_min_distance() |
The GeometryInstance’s min LOD distance.
Note: This property currently has no effect.
- float lod_min_hysteresis
| Default | 0.0 |
| Setter | set_lod_min_hysteresis(value) |
| Getter | get_lod_min_hysteresis() |
The GeometryInstance’s min LOD margin.
Note: This property currently has no effect.
- Material material_override
| Setter | set_material_override(value) |
| Getter | get_material_override() |
The material override for the whole geometry.
If a material is assigned to this property, it will be used instead of any material set in any material slot of the mesh.
- bool use_in_baked_light
| Default | false |
| Setter | set_flag(value) |
| Getter | get_flag() |
If true, this GeometryInstance will be used when baking lights using a GIProbe or BakedLightmap.
GIProbe¶
Inherits: VisualInstance < Spatial < Node < Object
Real-time global illumination (GI) probe.
Description¶
GIProbes are used to provide high-quality real-time indirect light to scenes. They precompute the effect of objects that emit light and the effect of static geometry to simulate the behavior of complex light in real-time. GIProbes need to be baked before using, however, once baked, dynamic objects will receive light from them. Further, lights can be fully dynamic or baked.
Having GIProbes in a scene can be expensive, the quality of the probe can be turned down in exchange for better performance in the ProjectSettings using ProjectSettings.rendering/quality/voxel_cone_tracing/high_quality.
Properties¶
| float | bias | 1.5 |
| bool | compress | false |
| GIProbeData | data | |
| int | dynamic_range | 4 |
| float | energy | 1.0 |
| Vector3 | extents | Vector3( 10, 10, 10 ) |
| bool | interior | false |
| float | normal_bias | 0.0 |
| float | propagation | 0.7 |
| Subdiv | subdiv | 1 |
Methods¶
| void | bake ( Node from_node=null, bool create_visual_debug=false ) |
| void | debug_bake ( ) |
Enumerations¶
enum Subdiv:
- SUBDIV_64 = 0 — Use 64 subdivisions. This is the lowest quality setting, but the fastest. Use it if you can, but especially use it on lower-end hardware.
- SUBDIV_128 = 1 — Use 128 subdivisions. This is the default quality setting.
- SUBDIV_256 = 2 — Use 256 subdivisions.
- SUBDIV_512 = 3 — Use 512 subdivisions. This is the highest quality setting, but the slowest. On lower-end hardware this could cause the GPU to stall.
- SUBDIV_MAX = 4 — Represents the size of the Subdiv enum.
Property Descriptions¶
- float bias
| Default | 1.5 |
| Setter | set_bias(value) |
| Getter | get_bias() |
Offsets the lookup of the light contribution from the GIProbe. This can be used to avoid self-shadowing, but may introduce light leaking at higher values. This and normal_bias should be played around with to minimize self-shadowing and light leaking.
Note: bias should usually be above 1.0 as that is the size of the voxels.
- bool compress
| Default | false |
| Setter | set_compress(value) |
| Getter | is_compressed() |
If true, the data for this GIProbe will be compressed. Compression saves space, but results in far worse visual quality.
- GIProbeData data
| Setter | set_probe_data(value) |
| Getter | get_probe_data() |
The GIProbeData resource that holds the data for this GIProbe.
- int dynamic_range
| Default | 4 |
| Setter | set_dynamic_range(value) |
| Getter | get_dynamic_range() |
The maximum brightness that the GIProbe will recognize. Brightness will be scaled within this range.
- float energy
| Default | 1.0 |
| Setter | set_energy(value) |
| Getter | get_energy() |
Energy multiplier. Makes the lighting contribution from the GIProbe brighter.
- Vector3 extents
| Default | Vector3( 10, 10, 10 ) |
| Setter | set_extents(value) |
| Getter | get_extents() |
The size of the area covered by the GIProbe. If you make the extents larger without increasing the subdivisions with subdiv, the size of each cell will increase and result in lower detailed lighting.
- bool interior
| Default | false |
| Setter | set_interior(value) |
| Getter | is_interior() |
If true, ignores the sky contribution when calculating lighting.
- float normal_bias
| Default | 0.0 |
| Setter | set_normal_bias(value) |
| Getter | get_normal_bias() |
Offsets the lookup into the GIProbe based on the object’s normal direction. Can be used to reduce some self-shadowing artifacts.
- float propagation
| Default | 0.7 |
| Setter | set_propagation(value) |
| Getter | get_propagation() |
How much light propagates through the probe internally. A higher value allows light to spread further.
- Subdiv subdiv
| Default | 1 |
| Setter | set_subdiv(value) |
| Getter | get_subdiv() |
Number of times to subdivide the grid that the GIProbe operates on. A higher number results in finer detail and thus higher visual quality, while lower numbers result in better performance.
Method Descriptions¶
Bakes the effect from all GeometryInstances marked with GeometryInstance.use_in_baked_light and Lights marked with either Light.BAKE_INDIRECT or Light.BAKE_ALL. If create_visual_debug is true, after baking the light, this will generate a MultiMesh that has a cube representing each solid cell with each cube colored to the cell’s albedo color. This can be used to visualize the GIProbe’s data and debug any issues that may be occurring.
- void debug_bake ( )
Calls bake with create_visual_debug enabled.
GIProbeData¶
Inherits: Resource < Reference < Object
Properties¶
| float | bias | 0.4 |
| AABB | bounds | AABB( 0, 0, 0, 1, 1, 1 ) |
| float | cell_size | 1.0 |
| bool | compress | false |
| PoolIntArray | dynamic_data | PoolIntArray( ) |
| int | dynamic_range | 1 |
| float | energy | 1.0 |
| bool | interior | false |
| float | normal_bias | 0.4 |
| float | propagation | 1.0 |
| Transform | to_cell_xform | Transform( 1, 0, 0, 0, 1, 0, 0, 0, 1, 0, 0, 0 ) |
Property Descriptions¶
- float bias
| Default | 0.4 |
| Setter | set_bias(value) |
| Getter | get_bias() |
- AABB bounds
| Default | AABB( 0, 0, 0, 1, 1, 1 ) |
| Setter | set_bounds(value) |
| Getter | get_bounds() |
- float cell_size
| Default | 1.0 |
| Setter | set_cell_size(value) |
| Getter | get_cell_size() |
- bool compress
| Default | false |
| Setter | set_compress(value) |
| Getter | is_compressed() |
- PoolIntArray dynamic_data
| Default | PoolIntArray( ) |
| Setter | set_dynamic_data(value) |
| Getter | get_dynamic_data() |
- int dynamic_range
| Default | 1 |
| Setter | set_dynamic_range(value) |
| Getter | get_dynamic_range() |
- float energy
| Default | 1.0 |
| Setter | set_energy(value) |
| Getter | get_energy() |
- bool interior
| Default | false |
| Setter | set_interior(value) |
| Getter | is_interior() |
- float normal_bias
| Default | 0.4 |
| Setter | set_normal_bias(value) |
| Getter | get_normal_bias() |
- float propagation
| Default | 1.0 |
| Setter | set_propagation(value) |
| Getter | get_propagation() |
- Transform to_cell_xform
| Default | Transform( 1, 0, 0, 0, 1, 0, 0, 0, 1, 0, 0, 0 ) |
| Setter | set_to_cell_xform(value) |
| Getter | get_to_cell_xform() |
GodotSharp¶
Inherits: Object
Methods¶
| void | attach_thread ( ) |
| void | detach_thread ( ) |
| int | get_domain_id ( ) |
| int | get_scripts_domain_id ( ) |
| bool | is_domain_finalizing_for_unload ( int domain_id ) |
| bool | is_runtime_initialized ( ) |
| bool | is_runtime_shutting_down ( ) |
| bool | is_scripts_domain_loaded ( ) |
Method Descriptions¶
- void attach_thread ( )
Attaches the current thread to the mono runtime.
- void detach_thread ( )
Detaches the current thread from the mono runtime.
- int get_domain_id ( )
- int get_scripts_domain_id ( )
Returns whether the domain is being finalized.
- bool is_runtime_initialized ( )
- bool is_runtime_shutting_down ( )
- bool is_scripts_domain_loaded ( )
Returns whether the scripts domain is loaded.
Gradient¶
Inherits: Resource < Reference < Object
A color interpolator resource which can be used to generate colors between user-defined color points.
Description¶
Given a set of colors, this resource will interpolate them in order. This means that if you have color 1, color 2 and color 3, the ramp will interpolate from color 1 to color 2 and from color 2 to color 3. The ramp will initially have 2 colors (black and white), one (black) at ramp lower offset 0 and the other (white) at the ramp higher offset 1.
Properties¶
| PoolColorArray | colors | PoolColorArray( 0, 0, 0, 1, 1, 1, 1, 1 ) |
| PoolRealArray | offsets | PoolRealArray( 0, 1 ) |
Methods¶
| void | add_point ( float offset, Color color ) |
| Color | get_color ( int point ) const |
| float | get_offset ( int point ) const |
| int | get_point_count ( ) const |
| Color | interpolate ( float offset ) |
| void | remove_point ( int offset ) |
| void | set_color ( int point, Color color ) |
| void | set_offset ( int point, float offset ) |
Property Descriptions¶
- PoolColorArray colors
| Default | PoolColorArray( 0, 0, 0, 1, 1, 1, 1, 1 ) |
| Setter | set_colors(value) |
| Getter | get_colors() |
Gradient’s colors returned as a PoolColorArray.
- PoolRealArray offsets
| Default | PoolRealArray( 0, 1 ) |
| Setter | set_offsets(value) |
| Getter | get_offsets() |
Gradient’s offsets returned as a PoolRealArray.
Method Descriptions¶
Adds the specified color to the end of the ramp, with the specified offset.
Returns the color of the ramp color at index point.
Returns the offset of the ramp color at index point.
- int get_point_count ( ) const
Returns the number of colors in the ramp.
Returns the interpolated color specified by offset.
- void remove_point ( int offset )
Removes the color at the index offset.
Sets the color of the ramp color at index point.
Sets the offset for the ramp color at index point.
GradientTexture¶
Inherits: Texture < Resource < Reference < Object
Gradient-filled texture.
Description¶
GradientTexture uses a Gradient to fill the texture data. The gradient will be filled from left to right using colors obtained from the gradient. This means the texture does not necessarily represent an exact copy of the gradient, but instead an interpolation of samples obtained from the gradient at fixed steps (see width).
GraphEdit¶
Inherits: Control < CanvasItem < Node < Object
GraphEdit is an area capable of showing various GraphNodes. It manages connection events between them.
Description¶
GraphEdit manages the showing of GraphNodes it contains, as well as connections and disconnections between them. Signals are sent for each of these two events. Disconnection between GraphNode slots is disabled by default.
It is greatly advised to enable low-processor usage mode (see OS.low_processor_usage_mode) when using GraphEdits.
Properties¶
| FocusMode | focus_mode | O: 2 |
| bool | rect_clip_content | O: true |
| bool | right_disconnects | false |
| Vector2 | scroll_offset | Vector2( 0, 0 ) |
| int | snap_distance | 20 |
| bool | use_snap | true |
| float | zoom | 1.0 |
Methods¶
| void | add_valid_connection_type ( int from_type, int to_type ) |
| void | add_valid_left_disconnect_type ( int type ) |
| void | add_valid_right_disconnect_type ( int type ) |
| void | clear_connections ( ) |
| Error | connect_node ( String from, int from_port, String to, int to_port ) |
| void | disconnect_node ( String from, int from_port, String to, int to_port ) |
| Array | get_connection_list ( ) const |
| HBoxContainer | get_zoom_hbox ( ) |
| bool | is_node_connected ( String from, int from_port, String to, int to_port ) |
| bool | is_valid_connection_type ( int from_type, int to_type ) const |
| void | remove_valid_connection_type ( int from_type, int to_type ) |
| void | remove_valid_left_disconnect_type ( int type ) |
| void | remove_valid_right_disconnect_type ( int type ) |
| void | set_connection_activity ( String from, int from_port, String to, int to_port, float amount ) |
| void | set_selected ( Node node ) |
Theme Properties¶
| Color | activity | Color( 1, 1, 1, 1 ) |
| int | bezier_len_neg | 160 |
| int | bezier_len_pos | 80 |
| StyleBox | bg | |
| Color | grid_major | Color( 1, 1, 1, 0.2 ) |
| Color | grid_minor | Color( 1, 1, 1, 0.05 ) |
| Texture | minus | |
| Texture | more | |
| int | port_grab_distance_horizontal | 48 |
| int | port_grab_distance_vertical | 6 |
| Texture | reset | |
| Color | selection_fill | Color( 1, 1, 1, 0.3 ) |
| Color | selection_stroke | Color( 1, 1, 1, 0.8 ) |
| Texture | snap |
Signals¶
- _begin_node_move ( )
Emitted at the beginning of a GraphNode movement.
- _end_node_move ( )
Emitted at the end of a GraphNode movement.
Emitted when user dragging connection from input port into empty space of the graph.
Emitted to the GraphEdit when the connection between the from_slot slot of the from GraphNode and the to_slot slot of the to GraphNode is attempted to be created.
Emitted when user dragging connection from output port into empty space of the graph.
- copy_nodes_request ( )
Emitted when the user presses Ctrl + C.
- delete_nodes_request ( )
Emitted when a GraphNode is attempted to be removed from the GraphEdit.
Emitted to the GraphEdit when the connection between from_slot slot of from GraphNode and to_slot slot of to GraphNode is attempted to be removed.
- duplicate_nodes_request ( )
Emitted when a GraphNode is attempted to be duplicated in the GraphEdit.
- node_selected ( Node node )
Emitted when a GraphNode is selected.
- paste_nodes_request ( )
Emitted when the user presses Ctrl + V.
- popup_request ( Vector2 position )
Emitted when a popup is requested. Happens on right-clicking in the GraphEdit. position is the position of the mouse pointer when the signal is sent.
- scroll_offset_changed ( Vector2 ofs )
Emitted when the scroll offset is changed by the user. It will not be emitted when changed in code.
Property Descriptions¶
- bool right_disconnects
| Default | false |
| Setter | set_right_disconnects(value) |
| Getter | is_right_disconnects_enabled() |
If true, enables disconnection of existing connections in the GraphEdit by dragging the right end.
- Vector2 scroll_offset
| Default | Vector2( 0, 0 ) |
| Setter | set_scroll_ofs(value) |
| Getter | get_scroll_ofs() |
The scroll offset.
- int snap_distance
| Default | 20 |
| Setter | set_snap(value) |
| Getter | get_snap() |
The snapping distance in pixels.
- bool use_snap
| Default | true |
| Setter | set_use_snap(value) |
| Getter | is_using_snap() |
If true, enables snapping.
- float zoom
| Default | 1.0 |
| Setter | set_zoom(value) |
| Getter | get_zoom() |
The current zoom value.
Method Descriptions¶
Makes possible the connection between two different slot types. The type is defined with the GraphNode.set_slot method.
- void add_valid_left_disconnect_type ( int type )
Makes possible to disconnect nodes when dragging from the slot at the left if it has the specified type.
- void add_valid_right_disconnect_type ( int type )
Makes possible to disconnect nodes when dragging from the slot at the right if it has the specified type.
- void clear_connections ( )
Removes all connections between nodes.
Create a connection between the from_port slot of the from GraphNode and the to_port slot of the to GraphNode. If the connection already exists, no connection is created.
Removes the connection between the from_port slot of the from GraphNode and the to_port slot of the to GraphNode. If the connection does not exist, no connection is removed.
- Array get_connection_list ( ) const
Returns an Array containing the list of connections. A connection consists in a structure of the form { from_port: 0, from: "GraphNode name 0", to_port: 1, to: "GraphNode name 1" }.
- HBoxContainer get_zoom_hbox ( )
Gets the HBoxContainer that contains the zooming and grid snap controls in the top left of the graph.
Warning: The intended usage of this function is to allow you to reposition or add your own custom controls to the container. This is an internal control and as such should not be freed. If you wish to hide this or any of it’s children use their CanvasItem.visible property instead.
Returns true if the from_port slot of the from GraphNode is connected to the to_port slot of the to GraphNode.
Returns whether it’s possible to connect slots of the specified types.
Makes it not possible to connect between two different slot types. The type is defined with the GraphNode.set_slot method.
- void remove_valid_left_disconnect_type ( int type )
Removes the possibility to disconnect nodes when dragging from the slot at the left if it has the specified type.
- void remove_valid_right_disconnect_type ( int type )
Removes the possibility to disconnect nodes when dragging from the slot at the right if it has the specified type.
Sets the coloration of the connection between from’s from_port and to’s to_port with the color provided in the activity theme property.
- void set_selected ( Node node )
Sets the specified node as the one selected.
GraphNode¶
Inherits: Container < Control < CanvasItem < Node < Object
A GraphNode is a container with potentially several input and output slots allowing connections between GraphNodes. Slots can have different, incompatible types.
Description¶
A GraphNode is a container. Each GraphNode can have several input and output slots, sometimes referred to as ports, allowing connections between GraphNodes. To add a slot to GraphNode, add any Control-derived child node to it.
After adding at least one child to GraphNode new sections will be automatically created in the Inspector called ‘Slot’. When ‘Slot’ is expanded you will see list with index number for each slot. You can click on each of them to expand further.
In the Inspector you can enable (show) or disable (hide) slots. By default all slots are disabled so you may not see any slots on your GraphNode initially. You can assign a type to each slot. Only slots of the same type will be able to connect to each other. You can also assign colors to slots. A tuple of input and output slots is defined for each GUI element included in the GraphNode. Input connections are on the left and output connections are on the right side of GraphNode. Only enabled slots are counted as connections.
Properties¶
| bool | comment | false |
| Vector2 | offset | Vector2( 0, 0 ) |
| Overlay | overlay | 0 |
| bool | resizable | false |
| bool | selected | false |
| bool | show_close | false |
| String | title | "" |
Methods¶
| void | clear_all_slots ( ) |
| void | clear_slot ( int idx ) |
| Color | get_connection_input_color ( int idx ) |
| int | get_connection_input_count ( ) |
| Vector2 | get_connection_input_position ( int idx ) |
| int | get_connection_input_type ( int idx ) |
| Color | get_connection_output_color ( int idx ) |
| int | get_connection_output_count ( ) |
| Vector2 | get_connection_output_position ( int idx ) |
| int | get_connection_output_type ( int idx ) |
| Color | get_slot_color_left ( int idx ) const |
| Color | get_slot_color_right ( int idx ) const |
| int | get_slot_type_left ( int idx ) const |
| int | get_slot_type_right ( int idx ) const |
| bool | is_slot_enabled_left ( int idx ) const |
| bool | is_slot_enabled_right ( int idx ) const |
| void | set_slot ( int idx, bool enable_left, int type_left, Color color_left, bool enable_right, int type_right, Color color_right, Texture custom_left=null, Texture custom_right=null ) |
Theme Properties¶
| StyleBox | breakpoint | |
| Texture | close | |
| Color | close_color | Color( 0, 0, 0, 1 ) |
| int | close_offset | 18 |
| StyleBox | comment | |
| StyleBox | commentfocus | |
| StyleBox | defaultfocus | |
| StyleBox | defaultframe | |
| StyleBox | frame | |
| Texture | port | |
| int | port_offset | 3 |
| StyleBox | position | |
| Texture | resizer | |
| Color | resizer_color | Color( 0, 0, 0, 1 ) |
| StyleBox | selectedframe | |
| int | separation | 1 |
| Color | title_color | Color( 0, 0, 0, 1 ) |
| Font | title_font | |
| int | title_offset | 20 |
Signals¶
- close_request ( )
Emitted when the GraphNode is requested to be closed. Happens on clicking the close button (see show_close).
Emitted when the GraphNode is dragged.
- offset_changed ( )
Emitted when the GraphNode is moved.
- raise_request ( )
Emitted when the GraphNode is requested to be displayed over other ones. Happens on focusing (clicking into) the GraphNode.
- resize_request ( Vector2 new_minsize )
Emitted when the GraphNode is requested to be resized. Happens on dragging the resizer handle (see resizable).
Enumerations¶
enum Overlay:
- OVERLAY_DISABLED = 0 — No overlay is shown.
- OVERLAY_BREAKPOINT = 1 — Show overlay set in the
breakpointtheme property. - OVERLAY_POSITION = 2 — Show overlay set in the
positiontheme property.
Property Descriptions¶
- bool comment
| Default | false |
| Setter | set_comment(value) |
| Getter | is_comment() |
If true, the GraphNode is a comment node.
- Vector2 offset
| Default | Vector2( 0, 0 ) |
| Setter | set_offset(value) |
| Getter | get_offset() |
The offset of the GraphNode, relative to the scroll offset of the GraphEdit.
Note: You cannot use position directly, as GraphEdit is a Container.
- Overlay overlay
| Default | 0 |
| Setter | set_overlay(value) |
| Getter | get_overlay() |
Sets the overlay shown above the GraphNode. See Overlay.
- bool resizable
| Default | false |
| Setter | set_resizable(value) |
| Getter | is_resizable() |
If true, the user can resize the GraphNode.
Note: Dragging the handle will only emit the resize_request signal, the GraphNode needs to be resized manually.
- bool selected
| Default | false |
| Setter | set_selected(value) |
| Getter | is_selected() |
If true, the GraphNode is selected.
- bool show_close
| Default | false |
| Setter | set_show_close_button(value) |
| Getter | is_close_button_visible() |
If true, the close button will be visible.
Note: Pressing it will only emit the close_request signal, the GraphNode needs to be removed manually.
- String title
| Default | "" |
| Setter | set_title(value) |
| Getter | get_title() |
The text displayed in the GraphNode’s title bar.
Method Descriptions¶
- void clear_all_slots ( )
Disables all input and output slots of the GraphNode.
- void clear_slot ( int idx )
Disables input and output slot whose index is idx.
Returns the color of the input connection idx.
- int get_connection_input_count ( )
Returns the number of enabled input slots (connections) to the GraphNode.
Returns the position of the input connection idx.
Returns the type of the input connection idx.
Returns the color of the output connection idx.
- int get_connection_output_count ( )
Returns the number of enabled output slots (connections) of the GraphNode.
Returns the position of the output connection idx.
Returns the type of the output connection idx.
Returns the color set to idx left (input) slot.
Returns the color set to idx right (output) slot.
Returns the (integer) type of left (input) idx slot.
Returns the (integer) type of right (output) idx slot.
Returns true if left (input) slot idx is enabled, false otherwise.
Returns true if right (output) slot idx is enabled, false otherwise.
- void set_slot ( int idx, bool enable_left, int type_left, Color color_left, bool enable_right, int type_right, Color color_right, Texture custom_left=null, Texture custom_right=null )
Sets properties of the slot with ID idx.
If enable_left/right, a port will appear and the slot will be able to be connected from this side.
type_left/right is an arbitrary type of the port. Only ports with the same type values can be connected.
color_left/right is the tint of the port’s icon on this side.
custom_left/right is a custom texture for this side’s port.
Note: This method only sets properties of the slot. To create the slot, add a Control-derived child to the GraphNode.
GridContainer¶
Inherits: Container < Control < CanvasItem < Node < Object
Grid container used to arrange elements in a grid like layout.
Description¶
Grid container will arrange its children in a grid like structure, the grid columns are specified using the columns property and the number of rows will be equal to the number of children in the container divided by the number of columns. For example, if the container has 5 children, and 2 columns, there will be 3 rows in the container.
Notice that grid layout will preserve the columns and rows for every size of the container, and that empty columns will be expanded automatically.
Properties¶
| int | columns | 1 |
| MouseFilter | mouse_filter | O: 1 |
GridMap¶
Inherits: Spatial < Node < Object
Node for 3D tile-based maps.
Description¶
GridMap lets you place meshes on a grid interactively. It works both from the editor and from scripts, which can help you create in-game level editors.
GridMaps use a MeshLibrary which contains a list of tiles. Each tile is a mesh with materials plus optional collision and navigation shapes.
A GridMap contains a collection of cells. Each grid cell refers to a tile in the MeshLibrary. All cells in the map have the same dimensions.
Internally, a GridMap is split into a sparse collection of octants for efficient rendering and physics processing. Every octant has the same dimensions and can contain several cells.
Tutorials¶
Properties¶
| bool | cell_center_x | true |
| bool | cell_center_y | true |
| bool | cell_center_z | true |
| int | cell_octant_size | 8 |
| float | cell_scale | 1.0 |
| Vector3 | cell_size | Vector3( 2, 2, 2 ) |
| int | collision_layer | 1 |
| int | collision_mask | 1 |
| MeshLibrary | mesh_library |
Methods¶
| void | clear ( ) |
| void | clear_baked_meshes ( ) |
| RID | get_bake_mesh_instance ( int idx ) |
| Array | get_bake_meshes ( ) |
| int | get_cell_item ( int x, int y, int z ) const |
| int | get_cell_item_orientation ( int x, int y, int z ) const |
| bool | get_collision_layer_bit ( int bit ) const |
| bool | get_collision_mask_bit ( int bit ) const |
| Array | get_meshes ( ) |
| Array | get_used_cells ( ) const |
| void | make_baked_meshes ( bool gen_lightmap_uv=false, float lightmap_uv_texel_size=0.1 ) |
| Vector3 | map_to_world ( int x, int y, int z ) const |
| void | resource_changed ( Resource resource ) |
| void | set_cell_item ( int x, int y, int z, int item, int orientation=0 ) |
| void | set_clip ( bool enabled, bool clipabove=true, int floor=0, Vector3.Axis axis=0 ) |
| void | set_collision_layer_bit ( int bit, bool value ) |
| void | set_collision_mask_bit ( int bit, bool value ) |
| Vector3 | world_to_map ( Vector3 pos ) const |
Constants¶
- INVALID_CELL_ITEM = -1 — Invalid cell item that can be used in set_cell_item to clear cells (or represent an empty cell in get_cell_item).
Property Descriptions¶
- bool cell_center_x
| Default | true |
| Setter | set_center_x(value) |
| Getter | get_center_x() |
If true, grid items are centered on the X axis.
- bool cell_center_y
| Default | true |
| Setter | set_center_y(value) |
| Getter | get_center_y() |
If true, grid items are centered on the Y axis.
- bool cell_center_z
| Default | true |
| Setter | set_center_z(value) |
| Getter | get_center_z() |
If true, grid items are centered on the Z axis.
- int cell_octant_size
| Default | 8 |
| Setter | set_octant_size(value) |
| Getter | get_octant_size() |
The size of each octant measured in number of cells. This applies to all three axis.
- float cell_scale
| Default | 1.0 |
| Setter | set_cell_scale(value) |
| Getter | get_cell_scale() |
The scale of the cell items.
This does not affect the size of the grid cells themselves, only the items in them. This can be used to make cell items overlap their neighbors.
- Vector3 cell_size
| Default | Vector3( 2, 2, 2 ) |
| Setter | set_cell_size(value) |
| Getter | get_cell_size() |
The dimensions of the grid’s cells.
This does not affect the size of the meshes. See cell_scale.
- int collision_layer
| Default | 1 |
| Setter | set_collision_layer(value) |
| Getter | get_collision_layer() |
The physics layers this GridMap is in.
GridMaps act as static bodies, meaning they aren’t affected by gravity or other forces. They only affect other physics bodies that collide with them.
- int collision_mask
| Default | 1 |
| Setter | set_collision_mask(value) |
| Getter | get_collision_mask() |
The physics layers this GridMap detects collisions in.
- MeshLibrary mesh_library
| Setter | set_mesh_library(value) |
| Getter | get_mesh_library() |
The assigned MeshLibrary.
Method Descriptions¶
- void clear ( )
Clear all cells.
- void clear_baked_meshes ( )
- Array get_bake_meshes ( )
The MeshLibrary item index located at the grid-based X, Y and Z coordinates. If the cell is empty, INVALID_CELL_ITEM will be returned.
The orientation of the cell at the grid-based X, Y and Z coordinates. -1 is returned if the cell is empty.
Returns an individual bit on the collision_layer.
Returns an individual bit on the collision_mask.
- Array get_meshes ( )
Returns an array of Transform and Mesh references corresponding to the non-empty cells in the grid. The transforms are specified in world space.
- Array get_used_cells ( ) const
Returns an array of Vector3 with the non-empty cell coordinates in the grid map.
Returns the position of a grid cell in the GridMap’s local coordinate space.
- void resource_changed ( Resource resource )
Sets the mesh index for the cell referenced by its grid-based X, Y and Z coordinates.
A negative item index such as INVALID_CELL_ITEM will clear the cell.
Optionally, the item’s orientation can be passed. For valid orientation values, see Basis.get_orthogonal_index.
Sets an individual bit on the collision_layer.
Sets an individual bit on the collision_mask.
Returns the coordinates of the grid cell containing the given point.
pos should be in the GridMap’s local coordinate space.
GrooveJoint2D¶
Inherits: Joint2D < Node2D < CanvasItem < Node < Object
Groove constraint for 2D physics.
Description¶
Groove constraint for 2D physics. This is useful for making a body “slide” through a segment placed in another.
Properties¶
| float | initial_offset | 25.0 |
| float | length | 50.0 |
Property Descriptions¶
- float initial_offset
| Default | 25.0 |
| Setter | set_initial_offset(value) |
| Getter | get_initial_offset() |
The body B’s initial anchor position defined by the joint’s origin and a local offset initial_offset along the joint’s Y axis (along the groove).
- float length
| Default | 50.0 |
| Setter | set_length(value) |
| Getter | get_length() |
The groove’s length. The groove is from the joint’s origin towards length along the joint’s local Y axis.
HashingContext¶
Context to compute cryptographic hashes over multiple iterations.
Description¶
The HashingContext class provides an interface for computing cryptographic hashes over multiple iterations. This is useful for example when computing hashes of big files (so you don’t have to load them all in memory), network streams, and data streams in general (so you don’t have to hold buffers).
The HashType enum shows the supported hashing algorithms.
const CHUNK_SIZE = 1024
func hash_file(path):
var ctx = HashingContext.new()
var file = File.new()
# Start a SHA-256 context.
ctx.start(HashingContext.HASH_SHA256)
# Check that file exists.
if not file.file_exists(path):
return
# Open the file to hash.
file.open(path, File.READ)
# Update the context after reading each chunk.
while not file.eof_reached():
ctx.update(file.get_buffer(CHUNK_SIZE))
# Get the computed hash.
var res = ctx.finish()
# Print the result as hex string and array.
printt(res.hex_encode(), Array(res))
Note: Not available in HTML5 exports.
Methods¶
| PoolByteArray | finish ( ) |
| Error | start ( HashType type ) |
| Error | update ( PoolByteArray chunk ) |
Enumerations¶
enum HashType:
- HASH_MD5 = 0 — Hashing algorithm: MD5.
- HASH_SHA1 = 1 — Hashing algorithm: SHA-1.
- HASH_SHA256 = 2 — Hashing algorithm: SHA-256.
Method Descriptions¶
- PoolByteArray finish ( )
Closes the current context, and return the computed hash.
Starts a new hash computation of the given type (e.g. HASH_SHA256 to start computation of a SHA-256).
- Error update ( PoolByteArray chunk )
Updates the computation with the given chunk of data.
HBoxContainer¶
Inherits: BoxContainer < Container < Control < CanvasItem < Node < Object
Horizontal box container.
Description¶
Horizontal box container. See BoxContainer.
HeightMapShape¶
Inherits: Shape < Resource < Reference < Object
Height map shape for 3D physics (Bullet only).
Description¶
Height map shape resource, which can be added to a PhysicsBody or Area.
Property Descriptions¶
- PoolRealArray map_data
| Default | PoolRealArray( 0, 0, 0, 0 ) |
| Setter | set_map_data(value) |
| Getter | get_map_data() |
Height map data, pool array must be of map_width * map_depth size.
- int map_depth
| Default | 2 |
| Setter | set_map_depth(value) |
| Getter | get_map_depth() |
Depth of the height map data. Changing this will resize the map_data.
- int map_width
| Default | 2 |
| Setter | set_map_width(value) |
| Getter | get_map_width() |
Width of the height map data. Changing this will resize the map_data.
HingeJoint¶
Inherits: Joint < Spatial < Node < Object
A hinge between two 3D bodies.
Description¶
A HingeJoint normally uses the Z axis of body A as the hinge axis, another axis can be specified when adding it manually though.
Properties¶
| float | angular_limit/bias | 0.3 |
| bool | angular_limit/enable | false |
| float | angular_limit/lower | -90.0 |
| float | angular_limit/relaxation | 1.0 |
| float | angular_limit/softness | 0.9 |
| float | angular_limit/upper | 90.0 |
| bool | motor/enable | false |
| float | motor/max_impulse | 1.0 |
| float | motor/target_velocity | 1.0 |
| float | params/bias | 0.3 |
Methods¶
| bool | get_flag ( Flag flag ) const |
| float | get_param ( Param param ) const |
| void | set_flag ( Flag flag, bool enabled ) |
| void | set_param ( Param param, float value ) |
Enumerations¶
enum Param:
- PARAM_BIAS = 0 — The speed with which the two bodies get pulled together when they move in different directions.
- PARAM_LIMIT_UPPER = 1 — The maximum rotation. Only active if angular_limit/enable is
true. - PARAM_LIMIT_LOWER = 2 — The minimum rotation. Only active if angular_limit/enable is
true. - PARAM_LIMIT_BIAS = 3 — The speed with which the rotation across the axis perpendicular to the hinge gets corrected.
- PARAM_LIMIT_SOFTNESS = 4
- PARAM_LIMIT_RELAXATION = 5 — The lower this value, the more the rotation gets slowed down.
- PARAM_MOTOR_TARGET_VELOCITY = 6 — Target speed for the motor.
- PARAM_MOTOR_MAX_IMPULSE = 7 — Maximum acceleration for the motor.
- PARAM_MAX = 8 — Represents the size of the Param enum.
enum Flag:
- FLAG_USE_LIMIT = 0 — If
true, the hinges maximum and minimum rotation, defined by angular_limit/lower and angular_limit/upper has effects. - FLAG_ENABLE_MOTOR = 1 — When activated, a motor turns the hinge.
- FLAG_MAX = 2 — Represents the size of the Flag enum.
Property Descriptions¶
- float angular_limit/bias
| Default | 0.3 |
| Setter | set_param(value) |
| Getter | get_param() |
The speed with which the rotation across the axis perpendicular to the hinge gets corrected.
- bool angular_limit/enable
| Default | false |
| Setter | set_flag(value) |
| Getter | get_flag() |
If true, the hinges maximum and minimum rotation, defined by angular_limit/lower and angular_limit/upper has effects.
- float angular_limit/lower
| Default | -90.0 |
The minimum rotation. Only active if angular_limit/enable is true.
- float angular_limit/relaxation
| Default | 1.0 |
| Setter | set_param(value) |
| Getter | get_param() |
The lower this value, the more the rotation gets slowed down.
- float angular_limit/softness
| Default | 0.9 |
| Setter | set_param(value) |
| Getter | get_param() |
- float angular_limit/upper
| Default | 90.0 |
The maximum rotation. Only active if angular_limit/enable is true.
- bool motor/enable
| Default | false |
| Setter | set_flag(value) |
| Getter | get_flag() |
When activated, a motor turns the hinge.
- float motor/max_impulse
| Default | 1.0 |
| Setter | set_param(value) |
| Getter | get_param() |
Maximum acceleration for the motor.
- float motor/target_velocity
| Default | 1.0 |
| Setter | set_param(value) |
| Getter | get_param() |
Target speed for the motor.
- float params/bias
| Default | 0.3 |
| Setter | set_param(value) |
| Getter | get_param() |
The speed with which the two bodies get pulled together when they move in different directions.
Method Descriptions¶
Returns the value of the specified flag.
Returns the value of the specified parameter.
If true, enables the specified flag.
Sets the value of the specified parameter.
HScrollBar¶
Inherits: ScrollBar < Range < Control < CanvasItem < Node < Object
Horizontal scroll bar.
HSeparator¶
Inherits: Separator < Control < CanvasItem < Node < Object
Horizontal separator.
HSplitContainer¶
Inherits: SplitContainer < Container < Control < CanvasItem < Node < Object
Horizontal split container.
Description¶
Horizontal split container. See SplitContainer. This goes from left to right.
HTTPClient¶
Hyper-text transfer protocol client.
Description¶
Hyper-text transfer protocol client (sometimes called “User Agent”). Used to make HTTP requests to download web content, upload files and other data or to communicate with various services, among other use cases. See HTTPRequest for an higher-level alternative.
Note: This client only needs to connect to a host once (see connect_to_host) to send multiple requests. Because of this, methods that take URLs usually take just the part after the host instead of the full URL, as the client is already connected to a host. See request for a full example and to get started.
A HTTPClient should be reused between multiple requests or to connect to different hosts instead of creating one client per request. Supports SSL and SSL server certificate verification. HTTP status codes in the 2xx range indicate success, 3xx redirection (i.e. “try again, but over here”), 4xx something was wrong with the request, and 5xx something went wrong on the server’s side.
For more information on HTTP, see https://developer.mozilla.org/en-US/docs/Web/HTTP (or read RFC 2616 to get it straight from the source: https://tools.ietf.org/html/rfc2616).
Tutorials¶
Properties¶
| bool | blocking_mode_enabled | false |
| StreamPeer | connection | |
| int | read_chunk_size | 4096 |
Methods¶
| void | close ( ) |
| Error | connect_to_host ( String host, int port=-1, bool use_ssl=false, bool verify_host=true ) |
| int | get_response_body_length ( ) const |
| int | get_response_code ( ) const |
| PoolStringArray | get_response_headers ( ) |
| Dictionary | get_response_headers_as_dictionary ( ) |
| Status | get_status ( ) const |
| bool | has_response ( ) const |
| bool | is_response_chunked ( ) const |
| Error | poll ( ) |
| String | query_string_from_dict ( Dictionary fields ) |
| PoolByteArray | read_response_body_chunk ( ) |
| Error | request ( Method method, String url, PoolStringArray headers, String body=”” ) |
| Error | request_raw ( Method method, String url, PoolStringArray headers, PoolByteArray body ) |
Enumerations¶
enum Method:
- METHOD_GET = 0 — HTTP GET method. The GET method requests a representation of the specified resource. Requests using GET should only retrieve data.
- METHOD_HEAD = 1 — HTTP HEAD method. The HEAD method asks for a response identical to that of a GET request, but without the response body. This is useful to request metadata like HTTP headers or to check if a resource exists.
- METHOD_POST = 2 — HTTP POST method. The POST method is used to submit an entity to the specified resource, often causing a change in state or side effects on the server. This is often used for forms and submitting data or uploading files.
- METHOD_PUT = 3 — HTTP PUT method. The PUT method asks to replace all current representations of the target resource with the request payload. (You can think of POST as “create or update” and PUT as “update”, although many services tend to not make a clear distinction or change their meaning).
- METHOD_DELETE = 4 — HTTP DELETE method. The DELETE method requests to delete the specified resource.
- METHOD_OPTIONS = 5 — HTTP OPTIONS method. The OPTIONS method asks for a description of the communication options for the target resource. Rarely used.
- METHOD_TRACE = 6 — HTTP TRACE method. The TRACE method performs a message loop-back test along the path to the target resource. Returns the entire HTTP request received in the response body. Rarely used.
- METHOD_CONNECT = 7 — HTTP CONNECT method. The CONNECT method establishes a tunnel to the server identified by the target resource. Rarely used.
- METHOD_PATCH = 8 — HTTP PATCH method. The PATCH method is used to apply partial modifications to a resource.
- METHOD_MAX = 9 — Represents the size of the Method enum.
enum Status:
- STATUS_DISCONNECTED = 0 — Status: Disconnected from the server.
- STATUS_RESOLVING = 1 — Status: Currently resolving the hostname for the given URL into an IP.
- STATUS_CANT_RESOLVE = 2 — Status: DNS failure: Can’t resolve the hostname for the given URL.
- STATUS_CONNECTING = 3 — Status: Currently connecting to server.
- STATUS_CANT_CONNECT = 4 — Status: Can’t connect to the server.
- STATUS_CONNECTED = 5 — Status: Connection established.
- STATUS_REQUESTING = 6 — Status: Currently sending request.
- STATUS_BODY = 7 — Status: HTTP body received.
- STATUS_CONNECTION_ERROR = 8 — Status: Error in HTTP connection.
- STATUS_SSL_HANDSHAKE_ERROR = 9 — Status: Error in SSL handshake.
enum ResponseCode:
- RESPONSE_CONTINUE = 100 — HTTP status code
100 Continue. Interim response that indicates everything so far is OK and that the client should continue with the request (or ignore this status if already finished). - RESPONSE_SWITCHING_PROTOCOLS = 101 — HTTP status code
101 Switching Protocol. Sent in response to anUpgraderequest header by the client. Indicates the protocol the server is switching to. - RESPONSE_PROCESSING = 102 — HTTP status code
102 Processing(WebDAV). Indicates that the server has received and is processing the request, but no response is available yet. - RESPONSE_OK = 200 — HTTP status code
200 OK. The request has succeeded. Default response for successful requests. Meaning varies depending on the request. GET: The resource has been fetched and is transmitted in the message body. HEAD: The entity headers are in the message body. POST: The resource describing the result of the action is transmitted in the message body. TRACE: The message body contains the request message as received by the server. - RESPONSE_CREATED = 201 — HTTP status code
201 Created. The request has succeeded and a new resource has been created as a result of it. This is typically the response sent after a PUT request. - RESPONSE_ACCEPTED = 202 — HTTP status code
202 Accepted. The request has been received but not yet acted upon. It is non-committal, meaning that there is no way in HTTP to later send an asynchronous response indicating the outcome of processing the request. It is intended for cases where another process or server handles the request, or for batch processing. - RESPONSE_NON_AUTHORITATIVE_INFORMATION = 203 — HTTP status code
203 Non-Authoritative Information. This response code means returned meta-information set is not exact set as available from the origin server, but collected from a local or a third party copy. Except this condition, 200 OK response should be preferred instead of this response. - RESPONSE_NO_CONTENT = 204 — HTTP status code
204 No Content. There is no content to send for this request, but the headers may be useful. The user-agent may update its cached headers for this resource with the new ones. - RESPONSE_RESET_CONTENT = 205 — HTTP status code
205 Reset Content. The server has fulfilled the request and desires that the client resets the “document view” that caused the request to be sent to its original state as received from the origin server. - RESPONSE_PARTIAL_CONTENT = 206 — HTTP status code
206 Partial Content. This response code is used because of a range header sent by the client to separate download into multiple streams. - RESPONSE_MULTI_STATUS = 207 — HTTP status code
207 Multi-Status(WebDAV). A Multi-Status response conveys information about multiple resources in situations where multiple status codes might be appropriate. - RESPONSE_ALREADY_REPORTED = 208 — HTTP status code
208 Already Reported(WebDAV). Used inside a DAV: propstat response element to avoid enumerating the internal members of multiple bindings to the same collection repeatedly. - RESPONSE_IM_USED = 226 — HTTP status code
226 IM Used(WebDAV). The server has fulfilled a GET request for the resource, and the response is a representation of the result of one or more instance-manipulations applied to the current instance. - RESPONSE_MULTIPLE_CHOICES = 300 — HTTP status code
300 Multiple Choice. The request has more than one possible responses and there is no standardized way to choose one of the responses. User-agent or user should choose one of them. - RESPONSE_MOVED_PERMANENTLY = 301 — HTTP status code
301 Moved Permanently. Redirection. This response code means the URI of requested resource has been changed. The new URI is usually included in the response. - RESPONSE_FOUND = 302 — HTTP status code
302 Found. Temporary redirection. This response code means the URI of requested resource has been changed temporarily. New changes in the URI might be made in the future. Therefore, this same URI should be used by the client in future requests. - RESPONSE_SEE_OTHER = 303 — HTTP status code
303 See Other. The server is redirecting the user agent to a different resource, as indicated by a URI in the Location header field, which is intended to provide an indirect response to the original request. - RESPONSE_NOT_MODIFIED = 304 — HTTP status code
304 Not Modified. A conditional GET or HEAD request has been received and would have resulted in a 200 OK response if it were not for the fact that the condition evaluated tofalse. - RESPONSE_USE_PROXY = 305 — HTTP status code
305 Use Proxy. Deprecated. Do not use. - RESPONSE_SWITCH_PROXY = 306 — HTTP status code
306 Switch Proxy. Deprecated. Do not use. - RESPONSE_TEMPORARY_REDIRECT = 307 — HTTP status code
307 Temporary Redirect. The target resource resides temporarily under a different URI and the user agent MUST NOT change the request method if it performs an automatic redirection to that URI. - RESPONSE_PERMANENT_REDIRECT = 308 — HTTP status code
308 Permanent Redirect. The target resource has been assigned a new permanent URI and any future references to this resource ought to use one of the enclosed URIs. - RESPONSE_BAD_REQUEST = 400 — HTTP status code
400 Bad Request. The request was invalid. The server cannot or will not process the request due to something that is perceived to be a client error (e.g., malformed request syntax, invalid request message framing, invalid request contents, or deceptive request routing). - RESPONSE_UNAUTHORIZED = 401 — HTTP status code
401 Unauthorized. Credentials required. The request has not been applied because it lacks valid authentication credentials for the target resource. - RESPONSE_PAYMENT_REQUIRED = 402 — HTTP status code
402 Payment Required. This response code is reserved for future use. Initial aim for creating this code was using it for digital payment systems, however this is not currently used. - RESPONSE_FORBIDDEN = 403 — HTTP status code
403 Forbidden. The client does not have access rights to the content, i.e. they are unauthorized, so server is rejecting to give proper response. Unlike401, the client’s identity is known to the server. - RESPONSE_NOT_FOUND = 404 — HTTP status code
404 Not Found. The server can not find requested resource. Either the URL is not recognized or the endpoint is valid but the resource itself does not exist. May also be sent instead of 403 to hide existence of a resource if the client is not authorized. - RESPONSE_METHOD_NOT_ALLOWED = 405 — HTTP status code
405 Method Not Allowed. The request’s HTTP method is known by the server but has been disabled and cannot be used. For example, an API may forbid DELETE-ing a resource. The two mandatory methods, GET and HEAD, must never be disabled and should not return this error code. - RESPONSE_NOT_ACCEPTABLE = 406 — HTTP status code
406 Not Acceptable. The target resource does not have a current representation that would be acceptable to the user agent, according to the proactive negotiation header fields received in the request. Used when negotiation content. - RESPONSE_PROXY_AUTHENTICATION_REQUIRED = 407 — HTTP status code
407 Proxy Authentication Required. Similar to 401 Unauthorized, but it indicates that the client needs to authenticate itself in order to use a proxy. - RESPONSE_REQUEST_TIMEOUT = 408 — HTTP status code
408 Request Timeout. The server did not receive a complete request message within the time that it was prepared to wait. - RESPONSE_CONFLICT = 409 — HTTP status code
409 Conflict. The request could not be completed due to a conflict with the current state of the target resource. This code is used in situations where the user might be able to resolve the conflict and resubmit the request. - RESPONSE_GONE = 410 — HTTP status code
410 Gone. The target resource is no longer available at the origin server and this condition is likely permanent. - RESPONSE_LENGTH_REQUIRED = 411 — HTTP status code
411 Length Required. The server refuses to accept the request without a defined Content-Length header. - RESPONSE_PRECONDITION_FAILED = 412 — HTTP status code
412 Precondition Failed. One or more conditions given in the request header fields evaluated tofalsewhen tested on the server. - RESPONSE_REQUEST_ENTITY_TOO_LARGE = 413 — HTTP status code
413 Entity Too Large. The server is refusing to process a request because the request payload is larger than the server is willing or able to process. - RESPONSE_REQUEST_URI_TOO_LONG = 414 — HTTP status code
414 Request-URI Too Long. The server is refusing to service the request because the request-target is longer than the server is willing to interpret. - RESPONSE_UNSUPPORTED_MEDIA_TYPE = 415 — HTTP status code
415 Unsupported Media Type. The origin server is refusing to service the request because the payload is in a format not supported by this method on the target resource. - RESPONSE_REQUESTED_RANGE_NOT_SATISFIABLE = 416 — HTTP status code
416 Requested Range Not Satisfiable. None of the ranges in the request’s Range header field overlap the current extent of the selected resource or the set of ranges requested has been rejected due to invalid ranges or an excessive request of small or overlapping ranges. - RESPONSE_EXPECTATION_FAILED = 417 — HTTP status code
417 Expectation Failed. The expectation given in the request’s Expect header field could not be met by at least one of the inbound servers. - RESPONSE_IM_A_TEAPOT = 418 — HTTP status code
418 I'm A Teapot. Any attempt to brew coffee with a teapot should result in the error code “418 I’m a teapot”. The resulting entity body MAY be short and stout. - RESPONSE_MISDIRECTED_REQUEST = 421 — HTTP status code
421 Misdirected Request. The request was directed at a server that is not able to produce a response. This can be sent by a server that is not configured to produce responses for the combination of scheme and authority that are included in the request URI. - RESPONSE_UNPROCESSABLE_ENTITY = 422 — HTTP status code
422 Unprocessable Entity(WebDAV). The server understands the content type of the request entity (hence a 415 Unsupported Media Type status code is inappropriate), and the syntax of the request entity is correct (thus a 400 Bad Request status code is inappropriate) but was unable to process the contained instructions. - RESPONSE_LOCKED = 423 — HTTP status code
423 Locked(WebDAV). The source or destination resource of a method is locked. - RESPONSE_FAILED_DEPENDENCY = 424 — HTTP status code
424 Failed Dependency(WebDAV). The method could not be performed on the resource because the requested action depended on another action and that action failed. - RESPONSE_UPGRADE_REQUIRED = 426 — HTTP status code
426 Upgrade Required. The server refuses to perform the request using the current protocol but might be willing to do so after the client upgrades to a different protocol. - RESPONSE_PRECONDITION_REQUIRED = 428 — HTTP status code
428 Precondition Required. The origin server requires the request to be conditional. - RESPONSE_TOO_MANY_REQUESTS = 429 — HTTP status code
429 Too Many Requests. The user has sent too many requests in a given amount of time (see “rate limiting”). Back off and increase time between requests or try again later. - RESPONSE_REQUEST_HEADER_FIELDS_TOO_LARGE = 431 — HTTP status code
431 Request Header Fields Too Large. The server is unwilling to process the request because its header fields are too large. The request MAY be resubmitted after reducing the size of the request header fields. - RESPONSE_UNAVAILABLE_FOR_LEGAL_REASONS = 451 — HTTP status code
451 Response Unavailable For Legal Reasons. The server is denying access to the resource as a consequence of a legal demand. - RESPONSE_INTERNAL_SERVER_ERROR = 500 — HTTP status code
500 Internal Server Error. The server encountered an unexpected condition that prevented it from fulfilling the request. - RESPONSE_NOT_IMPLEMENTED = 501 — HTTP status code
501 Not Implemented. The server does not support the functionality required to fulfill the request. - RESPONSE_BAD_GATEWAY = 502 — HTTP status code
502 Bad Gateway. The server, while acting as a gateway or proxy, received an invalid response from an inbound server it accessed while attempting to fulfill the request. Usually returned by load balancers or proxies. - RESPONSE_SERVICE_UNAVAILABLE = 503 — HTTP status code
503 Service Unavailable. The server is currently unable to handle the request due to a temporary overload or scheduled maintenance, which will likely be alleviated after some delay. Try again later. - RESPONSE_GATEWAY_TIMEOUT = 504 — HTTP status code
504 Gateway Timeout. The server, while acting as a gateway or proxy, did not receive a timely response from an upstream server it needed to access in order to complete the request. Usually returned by load balancers or proxies. - RESPONSE_HTTP_VERSION_NOT_SUPPORTED = 505 — HTTP status code
505 HTTP Version Not Supported. The server does not support, or refuses to support, the major version of HTTP that was used in the request message. - RESPONSE_VARIANT_ALSO_NEGOTIATES = 506 — HTTP status code
506 Variant Also Negotiates. The server has an internal configuration error: the chosen variant resource is configured to engage in transparent content negotiation itself, and is therefore not a proper end point in the negotiation process. - RESPONSE_INSUFFICIENT_STORAGE = 507 — HTTP status code
507 Insufficient Storage. The method could not be performed on the resource because the server is unable to store the representation needed to successfully complete the request. - RESPONSE_LOOP_DETECTED = 508 — HTTP status code
508 Loop Detected. The server terminated an operation because it encountered an infinite loop while processing a request with “Depth: infinity”. This status indicates that the entire operation failed. - RESPONSE_NOT_EXTENDED = 510 — HTTP status code
510 Not Extended. The policy for accessing the resource has not been met in the request. The server should send back all the information necessary for the client to issue an extended request. - RESPONSE_NETWORK_AUTH_REQUIRED = 511 — HTTP status code
511 Network Authentication Required. The client needs to authenticate to gain network access.
Property Descriptions¶
- bool blocking_mode_enabled
| Default | false |
| Setter | set_blocking_mode(value) |
| Getter | is_blocking_mode_enabled() |
If true, execution will block until all data is read from the response.
- StreamPeer connection
| Setter | set_connection(value) |
| Getter | get_connection() |
The connection to use for this client.
- int read_chunk_size
| Default | 4096 |
| Setter | set_read_chunk_size(value) |
| Getter | get_read_chunk_size() |
The size of the buffer used and maximum bytes to read per iteration. See read_response_body_chunk.
Method Descriptions¶
- void close ( )
Closes the current connection, allowing reuse of this HTTPClient.
Connects to a host. This needs to be done before any requests are sent.
The host should not have http:// prepended but will strip the protocol identifier if provided.
If no port is specified (or -1 is used), it is automatically set to 80 for HTTP and 443 for HTTPS (if use_ssl is enabled).
verify_host will check the SSL identity of the host if set to true.
- int get_response_body_length ( ) const
Returns the response’s body length.
Note: Some Web servers may not send a body length. In this case, the value returned will be -1. If using chunked transfer encoding, the body length will also be -1.
- int get_response_code ( ) const
Returns the response’s HTTP status code.
- PoolStringArray get_response_headers ( )
Returns the response headers.
- Dictionary get_response_headers_as_dictionary ( )
Returns all response headers as a Dictionary of structure { "key": "value1; value2" } where the case-sensitivity of the keys and values is kept like the server delivers it. A value is a simple String, this string can have more than one value where “; ” is used as separator.
Example:
{
"content-length": 12,
"Content-Type": "application/json; charset=UTF-8",
}
- Status get_status ( ) const
Returns a Status constant. Need to call poll in order to get status updates.
- bool has_response ( ) const
If true, this HTTPClient has a response available.
- bool is_response_chunked ( ) const
If true, this HTTPClient has a response that is chunked.
- Error poll ( )
This needs to be called in order to have any request processed. Check results with get_status.
- String query_string_from_dict ( Dictionary fields )
Generates a GET/POST application/x-www-form-urlencoded style query string from a provided dictionary, e.g.:
var fields = {"username": "user", "password": "pass"}
var query_string = http_client.query_string_from_dict(fields)
# Returns "username=user&password=pass"
Furthermore, if a key has a null value, only the key itself is added, without equal sign and value. If the value is an array, for each value in it a pair with the same key is added.
var fields = {"single": 123, "not_valued": null, "multiple": [22, 33, 44]}
var query_string = http_client.query_string_from_dict(fields)
# Returns "single=123¬_valued&multiple=22&multiple=33&multiple=44"
- PoolByteArray read_response_body_chunk ( )
Reads one chunk from the response.
- Error request ( Method method, String url, PoolStringArray headers, String body=”” )
Sends a request to the connected host. The URL parameter is just the part after the host, so for http://somehost.com/index.php, it is index.php.
Headers are HTTP request headers. For available HTTP methods, see Method.
To create a POST request with query strings to push to the server, do:
var fields = {"username" : "user", "password" : "pass"}
var query_string = http_client.query_string_from_dict(fields)
var headers = ["Content-Type: application/x-www-form-urlencoded", "Content-Length: " + str(query_string.length())]
var result = http_client.request(http_client.METHOD_POST, "index.php", headers, query_string)
- Error request_raw ( Method method, String url, PoolStringArray headers, PoolByteArray body )
Sends a raw request to the connected host. The URL parameter is just the part after the host, so for http://somehost.com/index.php, it is index.php.
Headers are HTTP request headers. For available HTTP methods, see Method.
Sends the body data raw, as a byte array and does not encode it in any way.
HTTPRequest¶
A node with the ability to send HTTP(S) requests.
Description¶
A node with the ability to send HTTP requests. Uses HTTPClient internally.
Can be used to make HTTP requests, i.e. download or upload files or web content via HTTP.
Example of contacting a REST API and printing one of its returned fields:
func _ready():
# Create an HTTP request node and connect its completion signal.
var http_request = HTTPRequest.new()
add_child(http_request)
http_request.connect("request_completed", self, "_http_request_completed")
# Perform the HTTP request. The URL below returns some JSON as of writing.
var error = http_request.request("https://httpbin.org/get")
if error != OK:
push_error("An error occurred in the HTTP request.")
# Called when the HTTP request is completed.
func _http_request_completed(result, response_code, headers, body):
var response = parse_json(body.get_string_from_utf8())
# Will print the user agent string used by the HTTPRequest node (as recognized by httpbin.org).
print(response.headers["User-Agent"])
Example of loading and displaying an image using HTTPRequest:
func _ready():
# Create an HTTP request node and connect its completion signal.
var http_request = HTTPRequest.new()
add_child(http_request)
http_request.connect("request_completed", self, "_http_request_completed")
# Perform the HTTP request. The URL below returns a PNG image as of writing.
var error = http_request.request("https://via.placeholder.com/512")
if error != OK:
push_error("An error occurred in the HTTP request.")
# Called when the HTTP request is completed.
func _http_request_completed(result, response_code, headers, body):
var image = Image.new()
var error = image.load_png_from_buffer(body)
if error != OK:
push_error("Couldn't load the image.")
var texture = ImageTexture.new()
texture.create_from_image(image)
# Display the image in a TextureRect node.
var texture_rect = TextureRect.new()
add_child(texture_rect)
texture_rect.texture = texture
Tutorials¶
Properties¶
| int | body_size_limit | -1 |
| int | download_chunk_size | 4096 |
| String | download_file | "" |
| int | max_redirects | 8 |
| int | timeout | 0 |
| bool | use_threads | false |
Methods¶
| void | cancel_request ( ) |
| int | get_body_size ( ) const |
| int | get_downloaded_bytes ( ) const |
| Status | get_http_client_status ( ) const |
| Error | request ( String url, PoolStringArray custom_headers=PoolStringArray( ), bool ssl_validate_domain=true, Method method=0, String request_data=”” ) |
Signals¶
- request_completed ( int result, int response_code, PoolStringArray headers, PoolByteArray body )
Emitted when a request is completed.
Enumerations¶
enum Result:
- RESULT_SUCCESS = 0 — Request successful.
- RESULT_CHUNKED_BODY_SIZE_MISMATCH = 1
- RESULT_CANT_CONNECT = 2 — Request failed while connecting.
- RESULT_CANT_RESOLVE = 3 — Request failed while resolving.
- RESULT_CONNECTION_ERROR = 4 — Request failed due to connection (read/write) error.
- RESULT_SSL_HANDSHAKE_ERROR = 5 — Request failed on SSL handshake.
- RESULT_NO_RESPONSE = 6 — Request does not have a response (yet).
- RESULT_BODY_SIZE_LIMIT_EXCEEDED = 7 — Request exceeded its maximum size limit, see body_size_limit.
- RESULT_REQUEST_FAILED = 8 — Request failed (currently unused).
- RESULT_DOWNLOAD_FILE_CANT_OPEN = 9 — HTTPRequest couldn’t open the download file.
- RESULT_DOWNLOAD_FILE_WRITE_ERROR = 10 — HTTPRequest couldn’t write to the download file.
- RESULT_REDIRECT_LIMIT_REACHED = 11 — Request reached its maximum redirect limit, see max_redirects.
- RESULT_TIMEOUT = 12
Property Descriptions¶
- int body_size_limit
| Default | -1 |
| Setter | set_body_size_limit(value) |
| Getter | get_body_size_limit() |
Maximum allowed size for response bodies.
- int download_chunk_size
| Default | 4096 |
| Setter | set_download_chunk_size(value) |
| Getter | get_download_chunk_size() |
The size of the buffer used and maximum bytes to read per iteration. See HTTPClient.read_chunk_size.
Set this to a higher value (e.g. 65536 for 64 KiB) when downloading large files to achieve better speeds at the cost of memory.
- String download_file
| Default | "" |
| Setter | set_download_file(value) |
| Getter | get_download_file() |
The file to download into. Will output any received file into it.
- int max_redirects
| Default | 8 |
| Setter | set_max_redirects(value) |
| Getter | get_max_redirects() |
Maximum number of allowed redirects.
- int timeout
| Default | 0 |
| Setter | set_timeout(value) |
| Getter | get_timeout() |
- bool use_threads
| Default | false |
| Setter | set_use_threads(value) |
| Getter | is_using_threads() |
If true, multithreading is used to improve performance.
Method Descriptions¶
- void cancel_request ( )
Cancels the current request.
- int get_body_size ( ) const
Returns the response body length.
Note: Some Web servers may not send a body length. In this case, the value returned will be -1. If using chunked transfer encoding, the body length will also be -1.
- int get_downloaded_bytes ( ) const
Returns the amount of bytes this HTTPRequest downloaded.
- Status get_http_client_status ( ) const
Returns the current status of the underlying HTTPClient. See Status.
- Error request ( String url, PoolStringArray custom_headers=PoolStringArray( ), bool ssl_validate_domain=true, Method method=0, String request_data=”” )
Creates request on the underlying HTTPClient. If there is no configuration errors, it tries to connect using HTTPClient.connect_to_host and passes parameters onto HTTPClient.request.
Returns @GlobalScope.OK if request is successfully created. (Does not imply that the server has responded), @GlobalScope.ERR_UNCONFIGURED if not in the tree, @GlobalScope.ERR_BUSY if still processing previous request, @GlobalScope.ERR_INVALID_PARAMETER if given string is not a valid URL format, or @GlobalScope.ERR_CANT_CONNECT if not using thread and the HTTPClient cannot connect to host.
Image¶
Inherits: Resource < Reference < Object
Image datatype.
Description¶
Native image datatype. Contains image data, which can be converted to a Texture, and several functions to interact with it. The maximum width and height for an Image are MAX_WIDTH and MAX_HEIGHT.
Properties¶
| Dictionary | data | {"data": PoolByteArray( ),"format": "Lum8","height": 0,"mipmaps": false,"width": 0} |
Methods¶
Enumerations¶
enum Format:
- FORMAT_L8 = 0 — Texture format with a single 8-bit depth representing luminance.
- FORMAT_LA8 = 1 — OpenGL texture format with two values, luminance and alpha each stored with 8 bits.
- FORMAT_R8 = 2 — OpenGL texture format
REDwith a single component and a bitdepth of 8. - FORMAT_RG8 = 3 — OpenGL texture format
RGwith two components and a bitdepth of 8 for each. - FORMAT_RGB8 = 4 — OpenGL texture format
RGBwith three components, each with a bitdepth of 8.
Note: When creating an ImageTexture, an sRGB to linear color space conversion is performed.
- FORMAT_RGBA8 = 5 — OpenGL texture format
RGBAwith four components, each with a bitdepth of 8.
Note: When creating an ImageTexture, an sRGB to linear color space conversion is performed.
- FORMAT_RGBA4444 = 6 — OpenGL texture format
RGBAwith four components, each with a bitdepth of 4. - FORMAT_RGBA5551 = 7 — OpenGL texture format
GL_RGB5_A1where 5 bits of depth for each component of RGB and one bit for alpha. - FORMAT_RF = 8 — OpenGL texture format
GL_R32Fwhere there’s one component, a 32-bit floating-point value. - FORMAT_RGF = 9 — OpenGL texture format
GL_RG32Fwhere there are two components, each a 32-bit floating-point values. - FORMAT_RGBF = 10 — OpenGL texture format
GL_RGB32Fwhere there are three components, each a 32-bit floating-point values. - FORMAT_RGBAF = 11 — OpenGL texture format
GL_RGBA32Fwhere there are four components, each a 32-bit floating-point values. - FORMAT_RH = 12 — OpenGL texture format
GL_R32Fwhere there’s one component, a 16-bit “half-precision” floating-point value. - FORMAT_RGH = 13 — OpenGL texture format
GL_RG32Fwhere there are two components, each a 16-bit “half-precision” floating-point value. - FORMAT_RGBH = 14 — OpenGL texture format
GL_RGB32Fwhere there are three components, each a 16-bit “half-precision” floating-point value. - FORMAT_RGBAH = 15 — OpenGL texture format
GL_RGBA32Fwhere there are four components, each a 16-bit “half-precision” floating-point value. - FORMAT_RGBE9995 = 16 — A special OpenGL texture format where the three color components have 9 bits of precision and all three share a single 5-bit exponent.
- FORMAT_DXT1 = 17 — The S3TC texture format that uses Block Compression 1, and is the smallest variation of S3TC, only providing 1 bit of alpha and color data being premultiplied with alpha.
Note: When creating an ImageTexture, an sRGB to linear color space conversion is performed.
- FORMAT_DXT3 = 18 — The S3TC texture format that uses Block Compression 2, and color data is interpreted as not having been premultiplied by alpha. Well suited for images with sharp alpha transitions between translucent and opaque areas.
Note: When creating an ImageTexture, an sRGB to linear color space conversion is performed.
- FORMAT_DXT5 = 19 — The S3TC texture format also known as Block Compression 3 or BC3 that contains 64 bits of alpha channel data followed by 64 bits of DXT1-encoded color data. Color data is not premultiplied by alpha, same as DXT3. DXT5 generally produces superior results for transparent gradients compared to DXT3.
Note: When creating an ImageTexture, an sRGB to linear color space conversion is performed.
- FORMAT_RGTC_R = 20 — Texture format that uses Red Green Texture Compression, normalizing the red channel data using the same compression algorithm that DXT5 uses for the alpha channel.
- FORMAT_RGTC_RG = 21 — Texture format that uses Red Green Texture Compression, normalizing the red and green channel data using the same compression algorithm that DXT5 uses for the alpha channel.
- FORMAT_BPTC_RGBA = 22 — Texture format that uses BPTC compression with unsigned normalized RGBA components.
Note: When creating an ImageTexture, an sRGB to linear color space conversion is performed.
- FORMAT_BPTC_RGBF = 23 — Texture format that uses BPTC compression with signed floating-point RGB components.
- FORMAT_BPTC_RGBFU = 24 — Texture format that uses BPTC compression with unsigned floating-point RGB components.
- FORMAT_PVRTC2 = 25 — Texture format used on PowerVR-supported mobile platforms, uses 2-bit color depth with no alpha. More information can be found here.
Note: When creating an ImageTexture, an sRGB to linear color space conversion is performed.
- FORMAT_PVRTC2A = 26 — Same as PVRTC2, but with an alpha component.
- FORMAT_PVRTC4 = 27 — Similar to PVRTC2, but with 4-bit color depth and no alpha.
- FORMAT_PVRTC4A = 28 — Same as PVRTC4, but with an alpha component.
- FORMAT_ETC = 29 — Ericsson Texture Compression format 1, also referred to as “ETC1”, and is part of the OpenGL ES graphics standard. This format cannot store an alpha channel.
- FORMAT_ETC2_R11 = 30 — Ericsson Texture Compression format 2 (
R11_EACvariant), which provides one channel of unsigned data. - FORMAT_ETC2_R11S = 31 — Ericsson Texture Compression format 2 (
SIGNED_R11_EACvariant), which provides one channel of signed data. - FORMAT_ETC2_RG11 = 32 — Ericsson Texture Compression format 2 (
RG11_EACvariant), which provides two channels of unsigned data. - FORMAT_ETC2_RG11S = 33 — Ericsson Texture Compression format 2 (
SIGNED_RG11_EACvariant), which provides two channels of signed data. - FORMAT_ETC2_RGB8 = 34 — Ericsson Texture Compression format 2 (
RGB8variant), which is a follow-up of ETC1 and compresses RGB888 data.
Note: When creating an ImageTexture, an sRGB to linear color space conversion is performed.
- FORMAT_ETC2_RGBA8 = 35 — Ericsson Texture Compression format 2 (
RGBA8variant), which compresses RGBA8888 data with full alpha support.
Note: When creating an ImageTexture, an sRGB to linear color space conversion is performed.
- FORMAT_ETC2_RGB8A1 = 36 — Ericsson Texture Compression format 2 (
RGB8_PUNCHTHROUGH_ALPHA1variant), which compresses RGBA data to make alpha either fully transparent or fully opaque.
Note: When creating an ImageTexture, an sRGB to linear color space conversion is performed.
- FORMAT_MAX = 37 — Represents the size of the Format enum.
enum Interpolation:
- INTERPOLATE_NEAREST = 0 — Performs nearest-neighbor interpolation. If the image is resized, it will be pixelated.
- INTERPOLATE_BILINEAR = 1 — Performs bilinear interpolation. If the image is resized, it will be blurry. This mode is faster than INTERPOLATE_CUBIC, but it results in lower quality.
- INTERPOLATE_CUBIC = 2 — Performs cubic interpolation. If the image is resized, it will be blurry. This mode often gives better results compared to INTERPOLATE_BILINEAR, at the cost of being slower.
- INTERPOLATE_TRILINEAR = 3 — Performs bilinear separately on the two most-suited mipmap levels, then linearly interpolates between them.
It’s slower than INTERPOLATE_BILINEAR, but produces higher-quality results with much less aliasing artifacts.
If the image does not have mipmaps, they will be generated and used internally, but no mipmaps will be generated on the resulting image.
Note: If you intend to scale multiple copies of the original image, it’s better to call generate_mipmaps] on it in advance, to avoid wasting processing power in generating them again and again.
On the other hand, if the image already has mipmaps, they will be used, and a new set will be generated for the resulting image.
- INTERPOLATE_LANCZOS = 4 — Performs Lanczos interpolation. This is the slowest image resizing mode, but it typically gives the best results, especially when downscalng images.
enum AlphaMode:
- ALPHA_NONE = 0 — Image does not have alpha.
- ALPHA_BIT = 1 — Image stores alpha in a single bit.
- ALPHA_BLEND = 2 — Image uses alpha.
enum CompressMode:
- COMPRESS_S3TC = 0 — Use S3TC compression.
- COMPRESS_PVRTC2 = 1 — Use PVRTC2 compression.
- COMPRESS_PVRTC4 = 2 — Use PVRTC4 compression.
- COMPRESS_ETC = 3 — Use ETC compression.
- COMPRESS_ETC2 = 4 — Use ETC2 compression.
enum CompressSource:
- COMPRESS_SOURCE_GENERIC = 0 — Source texture (before compression) is a regular texture. Default for all textures.
- COMPRESS_SOURCE_SRGB = 1 — Source texture (before compression) is in sRGB space.
- COMPRESS_SOURCE_NORMAL = 2 — Source texture (before compression) is a normal texture (e.g. it can be compressed into two channels).
Constants¶
- MAX_WIDTH = 16384 — The maximal width allowed for
Imageresources. - MAX_HEIGHT = 16384 — The maximal height allowed for
Imageresources.
Property Descriptions¶
- Dictionary data
| Default | {"data": PoolByteArray( ),"format": "Lum8","height": 0,"mipmaps": false,"width": 0} |
Holds all of the image’s color data in a given format. See Format constants.
Method Descriptions¶
Alpha-blends src_rect from src image to this image at coordinates dest.
Alpha-blends src_rect from src image to this image using mask image at coordinates dst. Alpha channels are required for both src and mask. dst pixels and src pixels will blend if the corresponding mask pixel’s alpha value is not 0. src image and mask image must have the same size (width and height) but they can have different formats.
Copies src_rect from src image to this image at coordinates dst.
Blits src_rect area from src image to this image at the coordinates given by dst. src pixel is copied onto dst if the corresponding mask pixel’s alpha value is not 0. src image and mask image must have the same size (width and height) but they can have different formats.
- void bumpmap_to_normalmap ( float bump_scale=1.0 )
Converts a bumpmap to a normalmap. A bumpmap provides a height offset per-pixel, while a normalmap provides a normal direction per pixel.
- void clear_mipmaps ( )
Removes the image’s mipmaps.
- Error compress ( CompressMode mode, CompressSource source, float lossy_quality )
Compresses the image to use less memory. Can not directly access pixel data while the image is compressed. Returns error if the chosen compression mode is not available. See CompressMode and CompressSource constants.
- void convert ( Format format )
Converts the image’s format. See Format constants.
- void copy_from ( Image src )
Copies src image to this image.
Creates an empty image of given size and format. See Format constants. If use_mipmaps is true then generate mipmaps for this image. See the generate_mipmaps.
- void create_from_data ( int width, int height, bool use_mipmaps, Format format, PoolByteArray data )
Creates a new image of given size and format. See Format constants. Fills the image with the given raw data. If use_mipmaps is true then generate mipmaps for this image. See the generate_mipmaps.
Crops the image to the given width and height. If the specified size is larger than the current size, the extra area is filled with black pixels.
- Error decompress ( )
Decompresses the image if it is compressed. Returns an error if decompress function is not available.
- AlphaMode detect_alpha ( ) const
Returns ALPHA_BLEND if the image has data for alpha values. Returns ALPHA_BIT if all the alpha values are stored in a single bit. Returns ALPHA_NONE if no data for alpha values is found.
- void expand_x2_hq2x ( )
Stretches the image and enlarges it by a factor of 2. No interpolation is done.
- void fill ( Color color )
Fills the image with a given Color.
- void fix_alpha_edges ( )
Blends low-alpha pixels with nearby pixels.
- void flip_x ( )
Flips the image horizontally.
- void flip_y ( )
Flips the image vertically.
Generates mipmaps for the image. Mipmaps are pre-calculated and lower resolution copies of the image. Mipmaps are automatically used if the image needs to be scaled down when rendered. This improves image quality and the performance of the rendering. Returns an error if the image is compressed, in a custom format or if the image’s width/height is 0.
- PoolByteArray get_data ( ) const
Returns the image’s raw data.
- Format get_format ( ) const
Returns the image’s format. See Format constants.
- int get_height ( ) const
Returns the image’s height.
Returns the offset where the image’s mipmap with index mipmap is stored in the data dictionary.
Returns the color of the pixel at (x, y) if the image is locked. If the image is unlocked, it always returns a Color with the value (0, 0, 0, 1.0). This is the same as get_pixelv, but two integer arguments instead of a Vector2 argument.
Returns the color of the pixel at src if the image is locked. If the image is unlocked, it always returns a Color with the value (0, 0, 0, 1.0). This is the same as get_pixel, but with a Vector2 argument instead of two integer arguments.
Returns a new image that is a copy of the image’s area specified with rect.
- Vector2 get_size ( ) const
Returns the image’s size (width and height).
- Rect2 get_used_rect ( ) const
Returns a Rect2 enclosing the visible portion of the image, considering each pixel with a non-zero alpha channel as visible.
- int get_width ( ) const
Returns the image’s width.
- bool has_mipmaps ( ) const
Returns true if the image has generated mipmaps.
- bool is_compressed ( ) const
Returns true if the image is compressed.
- bool is_empty ( ) const
Returns true if the image has no data.
- bool is_invisible ( ) const
Returns true if all the image’s pixels have an alpha value of 0. Returns false if any pixel has an alpha value higher than 0.
Loads an image from file path.
- Error load_jpg_from_buffer ( PoolByteArray buffer )
Loads an image from the binary contents of a JPEG file.
- Error load_png_from_buffer ( PoolByteArray buffer )
Loads an image from the binary contents of a PNG file.
- Error load_webp_from_buffer ( PoolByteArray buffer )
Loads an image from the binary contents of a WebP file.
- void lock ( )
Locks the data for reading and writing access. Sends an error to the console if the image is not locked when reading or writing a pixel.
- void normalmap_to_xy ( )
Converts the image’s data to represent coordinates on a 3D plane. This is used when the image represents a normalmap. A normalmap can add lots of detail to a 3D surface without increasing the polygon count.
- void premultiply_alpha ( )
Multiplies color values with alpha values. Resulting color values for a pixel are (color * alpha)/256.
- void resize ( int width, int height, Interpolation interpolation=1 )
Resizes the image to the given width and height. New pixels are calculated using interpolation. See interpolation constants.
- void resize_to_po2 ( bool square=false )
Resizes the image to the nearest power of 2 for the width and height. If square is true then set width and height to be the same.
- Image rgbe_to_srgb ( )
Converts a standard RGBE (Red Green Blue Exponent) image to an sRGB image.
Saves the image as an EXR file to path. If grayscale is true and the image has only one channel, it will be saved explicitly as monochrome rather than one red channel. This function will return @GlobalScope.ERR_UNAVAILABLE if Godot was compiled without the TinyEXR module.
Saves the image as a PNG file to path.
Sets the Color of the pixel at (x, y) if the image is locked. Example:
var img = Image.new()
img.create(img_width, img_height, false, Image.FORMAT_RGBA8)
img.lock()
img.set_pixel(x, y, color) # Works
img.unlock()
img.set_pixel(x, y, color) # Does not have an effect
Sets the Color of the pixel at (dst.x, dst.y) if the image is locked. Note that the dst values must be integers. Example:
var img = Image.new()
img.create(img_width, img_height, false, Image.FORMAT_RGBA8)
img.lock()
img.set_pixelv(Vector2(x, y), color) # Works
img.unlock()
img.set_pixelv(Vector2(x, y), color) # Does not have an effect
- void shrink_x2 ( )
Shrinks the image by a factor of 2.
- void srgb_to_linear ( )
Converts the raw data from the sRGB colorspace to a linear scale.
- void unlock ( )
Unlocks the data and prevents changes.
ImageTexture¶
Inherits: Texture < Resource < Reference < Object
Description¶
A Texture based on an Image. Can be created from an Image with create_from_image.
Methods¶
| void | create ( int width, int height, Format format, int flags=7 ) |
| void | create_from_image ( Image image, int flags=7 ) |
| Format | get_format ( ) const |
| Error | load ( String path ) |
| void | set_data ( Image image ) |
| void | set_size_override ( Vector2 size ) |
Enumerations¶
enum Storage:
- STORAGE_RAW = 0 — Image data is stored raw and unaltered.
- STORAGE_COMPRESS_LOSSY = 1 — Image data is compressed with a lossy algorithm. You can set the storage quality with lossy_quality.
- STORAGE_COMPRESS_LOSSLESS = 2 — Image data is compressed with a lossless algorithm.
Property Descriptions¶
- float lossy_quality
| Default | 0.7 |
| Setter | set_lossy_storage_quality(value) |
| Getter | get_lossy_storage_quality() |
The storage quality for STORAGE_COMPRESS_LOSSY.
- Storage storage
| Default | 0 |
| Setter | set_storage(value) |
| Getter | get_storage() |
The storage type (raw, lossy, or compressed).
Method Descriptions¶
Create a new ImageTexture with width and height.
format is a value from Format, flags is any combination of Flags.
Create a new ImageTexture from an Image with flags from Flags. An sRGB to linear color space conversion can take place, according to Format.
- Format get_format ( ) const
Returns the format of the ImageTexture, one of Format.
Load an ImageTexture from a file path.
- void set_data ( Image image )
Sets the Image of this ImageTexture.
- void set_size_override ( Vector2 size )
Resizes the ImageTexture to the specified dimensions.
ImmediateGeometry¶
Inherits: GeometryInstance < VisualInstance < Spatial < Node < Object
Draws simple geometry from code.
Description¶
Draws simple geometry from code. Uses a drawing mode similar to OpenGL 1.x.
Methods¶
| void | add_sphere ( int lats, int lons, float radius, bool add_uv=true ) |
| void | add_vertex ( Vector3 position ) |
| void | begin ( PrimitiveType primitive, Texture texture=null ) |
| void | clear ( ) |
| void | end ( ) |
| void | set_color ( Color color ) |
| void | set_normal ( Vector3 normal ) |
| void | set_tangent ( Plane tangent ) |
| void | set_uv ( Vector2 uv ) |
| void | set_uv2 ( Vector2 uv ) |
Method Descriptions¶
Simple helper to draw an UV sphere with given latitude, longitude and radius.
- void add_vertex ( Vector3 position )
Adds a vertex in local coordinate space with the currently set color/uv/etc.
- void begin ( PrimitiveType primitive, Texture texture=null )
Begin drawing (and optionally pass a texture override). When done call end. For more information on how this works, search for glBegin() and glEnd() references.
For the type of primitive, see the PrimitiveType enum.
- void clear ( )
Clears everything that was drawn using begin/end.
- void end ( )
Ends a drawing context and displays the results.
- void set_color ( Color color )
The current drawing color.
- void set_normal ( Vector3 normal )
The next vertex’s normal.
- void set_tangent ( Plane tangent )
The next vertex’s tangent (and binormal facing).
- void set_uv ( Vector2 uv )
The next vertex’s UV.
- void set_uv2 ( Vector2 uv )
The next vertex’s second layer UV.
Input¶
Inherits: Object
Inherited By: InputDefault
A singleton that deals with inputs.
Description¶
A singleton that deals with inputs. This includes key presses, mouse buttons and movement, joypads, and input actions. Actions and their events can be set in the Input Map tab in the Project > Project Settings, or with the InputMap class.
Methods¶
Signals¶
Emitted when a joypad device has been connected or disconnected.
Enumerations¶
enum MouseMode:
- MOUSE_MODE_VISIBLE = 0 — Makes the mouse cursor visible if it is hidden.
- MOUSE_MODE_HIDDEN = 1 — Makes the mouse cursor hidden if it is visible.
- MOUSE_MODE_CAPTURED = 2 — Captures the mouse. The mouse will be hidden and unable to leave the game window, but it will still register movement and mouse button presses. On Windows and Linux, the mouse will use raw input mode, which means the reported movement will be unaffected by the OS’ mouse acceleration settings.
- MOUSE_MODE_CONFINED = 3 — Makes the mouse cursor visible but confines it to the game window.
enum CursorShape:
- CURSOR_ARROW = 0 — Arrow cursor. Standard, default pointing cursor.
- CURSOR_IBEAM = 1 — I-beam cursor. Usually used to show where the text cursor will appear when the mouse is clicked.
- CURSOR_POINTING_HAND = 2 — Pointing hand cursor. Usually used to indicate the pointer is over a link or other interactable item.
- CURSOR_CROSS = 3 — Cross cursor. Typically appears over regions in which a drawing operation can be performed or for selections.
- CURSOR_WAIT = 4 — Wait cursor. Indicates that the application is busy performing an operation. This cursor shape denotes that the application is still usable during the operation.
- CURSOR_BUSY = 5 — Busy cursor. Indicates that the application is busy performing an operation. This cursor shape denotes that the application isn’t usable during the operation (e.g. something is blocking its main thread).
- CURSOR_DRAG = 6 — Drag cursor. Usually displayed when dragging something.
- CURSOR_CAN_DROP = 7 — Can drop cursor. Usually displayed when dragging something to indicate that it can be dropped at the current position.
- CURSOR_FORBIDDEN = 8 — Forbidden cursor. Indicates that the current action is forbidden (for example, when dragging something) or that the control at a position is disabled.
- CURSOR_VSIZE = 9 — Vertical resize mouse cursor. A double-headed vertical arrow. It tells the user they can resize the window or the panel vertically.
- CURSOR_HSIZE = 10 — Horizontal resize mouse cursor. A double-headed horizontal arrow. It tells the user they can resize the window or the panel horizontally.
- CURSOR_BDIAGSIZE = 11 — Window resize mouse cursor. The cursor is a double-headed arrow that goes from the bottom left to the top right. It tells the user they can resize the window or the panel both horizontally and vertically.
- CURSOR_FDIAGSIZE = 12 — Window resize mouse cursor. The cursor is a double-headed arrow that goes from the top left to the bottom right, the opposite of CURSOR_BDIAGSIZE. It tells the user they can resize the window or the panel both horizontally and vertically.
- CURSOR_MOVE = 13 — Move cursor. Indicates that something can be moved.
- CURSOR_VSPLIT = 14 — Vertical split mouse cursor. On Windows, it’s the same as CURSOR_VSIZE.
- CURSOR_HSPLIT = 15 — Horizontal split mouse cursor. On Windows, it’s the same as CURSOR_HSIZE.
- CURSOR_HELP = 16 — Help cursor. Usually a question mark.
Method Descriptions¶
This will simulate pressing the specified action.
The strength can be used for non-boolean actions, it’s ranged between 0 and 1 representing the intensity of the given action.
Note: This method will not cause any Node._input calls. It is intended to be used with is_action_pressed and is_action_just_pressed. If you want to simulate _input, use parse_input_event instead.
- void action_release ( String action )
If the specified action is already pressed, this will release it.
Adds a new mapping entry (in SDL2 format) to the mapping database. Optionally update already connected devices.
- Vector3 get_accelerometer ( ) const
If the device has an accelerometer, this will return the acceleration. Otherwise, it returns an empty Vector3.
Note this method returns an empty Vector3 when running from the editor even when your device has an accelerometer. You must export your project to a supported device to read values from the accelerometer.
Returns a value between 0 and 1 representing the intensity of the given action. In a joypad, for example, the further away the axis (analog sticks or L2, R2 triggers) is from the dead zone, the closer the value will be to 1. If the action is mapped to a control that has no axis as the keyboard, the value returned will be 0 or 1.
- Array get_connected_joypads ( )
Returns an Array containing the device IDs of all currently connected joypads.
- CursorShape get_current_cursor_shape ( ) const
Returns the currently assigned cursor shape (see CursorShape).
- Vector3 get_gravity ( ) const
If the device has an accelerometer, this will return the gravity. Otherwise, it returns an empty Vector3.
- Vector3 get_gyroscope ( ) const
If the device has a gyroscope, this will return the rate of rotation in rad/s around a device’s X, Y, and Z axes. Otherwise, it returns an empty Vector3.
Returns the current value of the joypad axis at given index (see JoystickList).
Returns the index of the provided axis name.
Receives a JoystickList axis and returns its equivalent name as a string.
Returns the index of the provided button name.
Receives a gamepad button from JoystickList and returns its equivalent name as a string.
Returns a SDL2-compatible device GUID on platforms that use gamepad remapping. Returns "Default Gamepad" otherwise.
Returns the name of the joypad at the specified device index.
Returns the duration of the current vibration effect in seconds.
Returns the strength of the joypad vibration: x is the strength of the weak motor, and y is the strength of the strong motor.
- Vector2 get_last_mouse_speed ( ) const
Returns the mouse speed for the last time the cursor was moved, and this until the next frame where the mouse moves. This means that even if the mouse is not moving, this function will still return the value of the last motion.
- Vector3 get_magnetometer ( ) const
If the device has a magnetometer, this will return the magnetic field strength in micro-Tesla for all axes.
- int get_mouse_button_mask ( ) const
Returns mouse buttons as a bitmask. If multiple mouse buttons are pressed at the same time, the bits are added together.
- MouseMode get_mouse_mode ( ) const
Returns the mouse mode. See the constants for more information.
Returns true when the user starts pressing the action event, meaning it’s true only on the frame that the user pressed down the button.
This is useful for code that needs to run only once when an action is pressed, instead of every frame while it’s pressed.
Returns true when the user stops pressing the action event, meaning it’s true only on the frame that the user released the button.
Returns true if you are pressing the action event. Note that if an action has multiple buttons assigned and more than one of them is pressed, releasing one button will release the action, even if some other button assigned to this action is still pressed.
Returns true if you are pressing the joypad button (see JoystickList).
Returns true if the system knows the specified device. This means that it sets all button and axis indices exactly as defined in JoystickList. Unknown joypads are not expected to match these constants, but you can still retrieve events from them.
Returns true if you are pressing the key. You can pass a KeyList constant.
Returns true if you are pressing the mouse button specified with ButtonList.
Notifies the Input singleton that a connection has changed, to update the state for the device index.
This is used internally and should not have to be called from user scripts. See joy_connection_changed for the signal emitted when this is triggered internally.
- void parse_input_event ( InputEvent event )
Feeds an InputEvent to the game. Can be used to artificially trigger input events from code. Also generates Node._input calls.
Example:
var a = InputEventAction.new()
a.action = "ui_cancel"
a.pressed = true
Input.parse_input_event(a)
- void remove_joy_mapping ( String guid )
Removes all mappings from the internal database that match the given GUID.
- void set_custom_mouse_cursor ( Resource image, CursorShape shape=0, Vector2 hotspot=Vector2( 0, 0 ) )
Sets a custom mouse cursor image, which is only visible inside the game window. The hotspot can also be specified. Passing null to the image parameter resets to the system cursor. See CursorShape for the list of shapes.
image’s size must be lower than 256×256.
hotspot must be within image’s size.
Note: AnimatedTextures aren’t supported as custom mouse cursors. If using an AnimatedTexture, only the first frame will be displayed.
Note: Only images imported with the Lossless, Lossy or Uncompressed compression modes are supported. The Video RAM compression mode can’t be used for custom cursors.
- void set_default_cursor_shape ( CursorShape shape=0 )
Sets the default cursor shape to be used in the viewport instead of CURSOR_ARROW.
Note: If you want to change the default cursor shape for Control’s nodes, use Control.mouse_default_cursor_shape instead.
Note: This method generates an InputEventMouseMotion to update cursor immediately.
- void set_mouse_mode ( MouseMode mode )
Sets the mouse mode. See the constants for more information.
- void set_use_accumulated_input ( bool enable )
Whether to accumulate similar input events sent by the operating system. Enabled by default.
- void start_joy_vibration ( int device, float weak_magnitude, float strong_magnitude, float duration=0 )
Starts to vibrate the joypad. Joypads usually come with two rumble motors, a strong and a weak one. weak_magnitude is the strength of the weak motor (between 0 and 1) and strong_magnitude is the strength of the strong motor (between 0 and 1). duration is the duration of the effect in seconds (a duration of 0 will try to play the vibration indefinitely).
Note: Not every hardware is compatible with long effect durations; it is recommended to restart an effect if it has to be played for more than a few seconds.
- void stop_joy_vibration ( int device )
Stops the vibration of the joypad.
- void vibrate_handheld ( int duration_ms=500 )
Vibrate Android and iOS devices.
Note: It needs VIBRATE permission for Android at export settings. iOS does not support duration.
- void warp_mouse_position ( Vector2 to )
Sets the mouse position to the specified vector.
InputEvent¶
Inherits: Resource < Reference < Object
Inherited By: InputEventAction, InputEventJoypadButton, InputEventJoypadMotion, InputEventMIDI, InputEventScreenDrag, InputEventScreenTouch, InputEventWithModifiers
Generic input event.
Description¶
Base class of all sort of input event. See Node._input.
Tutorials¶
Methods¶
| bool | accumulate ( InputEvent with_event ) |
| String | as_text ( ) const |
| float | get_action_strength ( String action ) const |
| bool | is_action ( String action ) const |
| bool | is_action_pressed ( String action, bool allow_echo=false ) const |
| bool | is_action_released ( String action ) const |
| bool | is_action_type ( ) const |
| bool | is_echo ( ) const |
| bool | is_pressed ( ) const |
| bool | shortcut_match ( InputEvent event ) const |
| InputEvent | xformed_by ( Transform2D xform, Vector2 local_ofs=Vector2( 0, 0 ) ) const |
Property Descriptions¶
- int device
| Default | 0 |
| Setter | set_device(value) |
| Getter | get_device() |
The event’s device ID.
Note: This device ID will always be -1 for emulated mouse input from a touchscreen. This can be used to distinguish emulated mouse input from physical mouse input.
Method Descriptions¶
- bool accumulate ( InputEvent with_event )
Returns true if the given input event and this input event can be added together (only for events of type InputEventMouseMotion).
The given input event’s position, global position and speed will be copied. The resulting relative is a sum of both events. Both events’ modifiers have to be identical.
- String as_text ( ) const
Returns a String representation of the event.
Returns a value between 0.0 and 1.0 depending on the given actions’ state. Useful for getting the value of events of type InputEventJoypadMotion.
Returns true if this input event matches a pre-defined action of any type.
Returns true if the given action is being pressed (and is not an echo event for InputEventKey events, unless allow_echo is true). Not relevant for events of type InputEventMouseMotion or InputEventScreenDrag.
Returns true if the given action is released (i.e. not pressed). Not relevant for events of type InputEventMouseMotion or InputEventScreenDrag.
- bool is_action_type ( ) const
Returns true if this input event’s type is one that can be assigned to an input action.
- bool is_echo ( ) const
Returns true if this input event is an echo event (only for events of type InputEventKey).
- bool is_pressed ( ) const
Returns true if this input event is pressed. Not relevant for events of type InputEventMouseMotion or InputEventScreenDrag.
- bool shortcut_match ( InputEvent event ) const
Returns true if the given input event is checking for the same key (InputEventKey), button (InputEventJoypadButton) or action (InputEventAction).
- InputEvent xformed_by ( Transform2D xform, Vector2 local_ofs=Vector2( 0, 0 ) ) const
Returns a copy of the given input event which has been offset by local_ofs and transformed by xform. Relevant for events of type InputEventMouseButton, InputEventMouseMotion, InputEventScreenTouch, InputEventScreenDrag, InputEventMagnifyGesture and InputEventPanGesture.
InputEventAction¶
Inherits: InputEvent < Resource < Reference < Object
Input event type for actions.
Description¶
Contains a generic action which can be targeted from several types of inputs. Actions can be created from the Input Map tab in the Project > Project Settings menu. See Node._input.
Tutorials¶
Property Descriptions¶
- String action
| Default | "" |
| Setter | set_action(value) |
| Getter | get_action() |
The action’s name. Actions are accessed via this String.
- bool pressed
| Default | false |
| Setter | set_pressed(value) |
| Getter | is_pressed() |
If true, the action’s state is pressed. If false, the action’s state is released.
- float strength
| Default | 1.0 |
| Setter | set_strength(value) |
| Getter | get_strength() |
The action’s strength between 0 and 1. This value is considered as equal to 0 if pressed is false. The event strength allows faking analog joypad motion events, by precising how strongly is the joypad axis bent or pressed.
InputEventGesture¶
Inherits: InputEventWithModifiers < InputEvent < Resource < Reference < Object
Inherited By: InputEventMagnifyGesture, InputEventPanGesture
Base class for touch control gestures.
Property Descriptions¶
- Vector2 position
| Default | Vector2( 0, 0 ) |
| Setter | set_position(value) |
| Getter | get_position() |
The local gesture position relative to the Viewport. If used in Control._gui_input, the position is relative to the current Control that received this gesture.
InputEventJoypadButton¶
Inherits: InputEvent < Resource < Reference < Object
Input event for gamepad buttons.
Description¶
Input event type for gamepad buttons. For gamepad analog sticks and joysticks, see InputEventJoypadMotion.
Tutorials¶
Property Descriptions¶
- int button_index
| Default | 0 |
| Setter | set_button_index(value) |
| Getter | get_button_index() |
Button identifier. One of the JoystickList button constants.
- bool pressed
| Default | false |
| Setter | set_pressed(value) |
| Getter | is_pressed() |
If true, the button’s state is pressed. If false, the button’s state is released.
- float pressure
| Default | 0.0 |
| Setter | set_pressure(value) |
| Getter | get_pressure() |
Represents the pressure the user puts on the button with his finger, if the controller supports it. Ranges from 0 to 1.
InputEventJoypadMotion¶
Inherits: InputEvent < Resource < Reference < Object
Input event type for gamepad joysticks and other motions. For buttons, see InputEventJoypadButton.
Description¶
Stores information about joystick motions. One InputEventJoypadMotion represents one axis at a time.
Tutorials¶
Properties¶
| int | axis | 0 |
| float | axis_value | 0.0 |
Property Descriptions¶
- int axis
| Default | 0 |
| Setter | set_axis(value) |
| Getter | get_axis() |
Axis identifier. Use one of the JoystickList axis constants.
- float axis_value
| Default | 0.0 |
| Setter | set_axis_value(value) |
| Getter | get_axis_value() |
Current position of the joystick on the given axis. The value ranges from -1.0 to 1.0. A value of 0 means the axis is in its resting position.
InputEventKey¶
Inherits: InputEventWithModifiers < InputEvent < Resource < Reference < Object
Input event type for keyboard events.
Description¶
Stores key presses on the keyboard. Supports key presses, key releases and echo events.
Tutorials¶
Methods¶
| int | get_scancode_with_modifiers ( ) const |
Property Descriptions¶
- bool echo
| Default | false |
| Setter | set_echo(value) |
| Getter | is_echo() |
If true, the key was already pressed before this event. It means the user is holding the key down.
- bool pressed
| Default | false |
| Setter | set_pressed(value) |
| Getter | is_pressed() |
If true, the key’s state is pressed. If false, the key’s state is released.
- int scancode
| Default | 0 |
| Setter | set_scancode(value) |
| Getter | get_scancode() |
The key scancode, which corresponds to one of the KeyList constants.
To get a human-readable representation of the InputEventKey, use OS.get_scancode_string(event.scancode) where event is the InputEventKey.
- int unicode
| Default | 0 |
| Setter | set_unicode(value) |
| Getter | get_unicode() |
The key Unicode identifier (when relevant). Unicode identifiers for the composite characters and complex scripts may not be available unless IME input mode is active. See OS.set_ime_active for more information.
Method Descriptions¶
- int get_scancode_with_modifiers ( ) const
Returns the scancode combined with modifier keys such as Shift or Alt. See also InputEventWithModifiers.
To get a human-readable representation of the InputEventKey with modifiers, use OS.get_scancode_string(event.get_scancode_with_modifiers()) where event is the InputEventKey.
InputEventMagnifyGesture¶
Inherits: InputEventGesture < InputEventWithModifiers < InputEvent < Resource < Reference < Object
InputEventMIDI¶
Inherits: InputEvent < Resource < Reference < Object
Properties¶
| int | channel | 0 |
| int | controller_number | 0 |
| int | controller_value | 0 |
| int | instrument | 0 |
| int | message | 0 |
| int | pitch | 0 |
| int | pressure | 0 |
| int | velocity | 0 |
Property Descriptions¶
- int channel
| Default | 0 |
| Setter | set_channel(value) |
| Getter | get_channel() |
- int controller_number
| Default | 0 |
| Setter | set_controller_number(value) |
| Getter | get_controller_number() |
- int controller_value
| Default | 0 |
| Setter | set_controller_value(value) |
| Getter | get_controller_value() |
- int instrument
| Default | 0 |
| Setter | set_instrument(value) |
| Getter | get_instrument() |
- int message
| Default | 0 |
| Setter | set_message(value) |
| Getter | get_message() |
- int pitch
| Default | 0 |
| Setter | set_pitch(value) |
| Getter | get_pitch() |
- int pressure
| Default | 0 |
| Setter | set_pressure(value) |
| Getter | get_pressure() |
- int velocity
| Default | 0 |
| Setter | set_velocity(value) |
| Getter | get_velocity() |
InputEventMouse¶
Inherits: InputEventWithModifiers < InputEvent < Resource < Reference < Object
Inherited By: InputEventMouseButton, InputEventMouseMotion
Base input event type for mouse events.
Description¶
Stores general mouse events information.
Tutorials¶
Properties¶
| int | button_mask | 0 |
| Vector2 | global_position | Vector2( 0, 0 ) |
| Vector2 | position | Vector2( 0, 0 ) |
Property Descriptions¶
- int button_mask
| Default | 0 |
| Setter | set_button_mask(value) |
| Getter | get_button_mask() |
The mouse button mask identifier, one of or a bitwise combination of the ButtonList button masks.
- Vector2 global_position
| Default | Vector2( 0, 0 ) |
| Setter | set_global_position(value) |
| Getter | get_global_position() |
The global mouse position relative to the current Viewport when used in Control._gui_input, otherwise is at 0,0.
- Vector2 position
| Default | Vector2( 0, 0 ) |
| Setter | set_position(value) |
| Getter | get_position() |
The local mouse position relative to the Viewport. If used in Control._gui_input, the position is relative to the current Control which is under the mouse.
InputEventMouseButton¶
Inherits: InputEventMouse < InputEventWithModifiers < InputEvent < Resource < Reference < Object
Input event type for mouse button events.
Description¶
Contains mouse click information. See Node._input.
Tutorials¶
Properties¶
| int | button_index | 0 |
| bool | doubleclick | false |
| float | factor | 1.0 |
| bool | pressed | false |
Property Descriptions¶
- int button_index
| Default | 0 |
| Setter | set_button_index(value) |
| Getter | get_button_index() |
The mouse button identifier, one of the ButtonList button or button wheel constants.
- bool doubleclick
| Default | false |
| Setter | set_doubleclick(value) |
| Getter | is_doubleclick() |
If true, the mouse button’s state is a double-click.
- float factor
| Default | 1.0 |
| Setter | set_factor(value) |
| Getter | get_factor() |
The amount (or delta) of the event. When used for high-precision scroll events, this indicates the scroll amount (vertical or horizontal). This is only supported on some platforms; the reported sensitivity varies depending on the platform. May be 0 if not supported.
- bool pressed
| Default | false |
| Setter | set_pressed(value) |
| Getter | is_pressed() |
If true, the mouse button’s state is pressed. If false, the mouse button’s state is released.
InputEventMouseMotion¶
Inherits: InputEventMouse < InputEventWithModifiers < InputEvent < Resource < Reference < Object
Input event type for mouse motion events.
Description¶
Contains mouse and pen motion information. Supports relative, absolute positions and speed. See Node._input.
Tutorials¶
Properties¶
| float | pressure | 0.0 |
| Vector2 | relative | Vector2( 0, 0 ) |
| Vector2 | speed | Vector2( 0, 0 ) |
| Vector2 | tilt | Vector2( 0, 0 ) |
Property Descriptions¶
- float pressure
| Default | 0.0 |
| Setter | set_pressure(value) |
| Getter | get_pressure() |
Represents the pressure the user puts on the pen. Ranges from 0.0 to 1.0.
- Vector2 relative
| Default | Vector2( 0, 0 ) |
| Setter | set_relative(value) |
| Getter | get_relative() |
The mouse position relative to the previous position (position at the last frame).
- Vector2 speed
| Default | Vector2( 0, 0 ) |
| Setter | set_speed(value) |
| Getter | get_speed() |
The mouse speed in pixels per second.
- Vector2 tilt
| Default | Vector2( 0, 0 ) |
| Setter | set_tilt(value) |
| Getter | get_tilt() |
Represents the angles of tilt of the pen. Positive X-coordinate value indicates a tilt to the right. Positive Y-coordinate value indicates a tilt toward the user. Ranges from -1.0 to 1.0 for both axes.
InputEventPanGesture¶
Inherits: InputEventGesture < InputEventWithModifiers < InputEvent < Resource < Reference < Object
InputEventScreenDrag¶
Inherits: InputEvent < Resource < Reference < Object
Input event type for screen drag events. Only available on mobile devices.
Description¶
Contains screen drag information. See Node._input.
Tutorials¶
Properties¶
| int | index | 0 |
| Vector2 | position | Vector2( 0, 0 ) |
| Vector2 | relative | Vector2( 0, 0 ) |
| Vector2 | speed | Vector2( 0, 0 ) |
Property Descriptions¶
- int index
| Default | 0 |
| Setter | set_index(value) |
| Getter | get_index() |
The drag event index in the case of a multi-drag event.
- Vector2 position
| Default | Vector2( 0, 0 ) |
| Setter | set_position(value) |
| Getter | get_position() |
The drag position.
- Vector2 relative
| Default | Vector2( 0, 0 ) |
| Setter | set_relative(value) |
| Getter | get_relative() |
The drag position relative to its start position.
- Vector2 speed
| Default | Vector2( 0, 0 ) |
| Setter | set_speed(value) |
| Getter | get_speed() |
The drag speed.
InputEventScreenTouch¶
Inherits: InputEvent < Resource < Reference < Object
Input event type for screen touch events.
(only available on mobile devices)
Description¶
Stores multi-touch press/release information. Supports touch press, touch release and index for multi-touch count and order.
Tutorials¶
Property Descriptions¶
- int index
| Default | 0 |
| Setter | set_index(value) |
| Getter | get_index() |
The touch index in the case of a multi-touch event. One index = one finger.
- Vector2 position
| Default | Vector2( 0, 0 ) |
| Setter | set_position(value) |
| Getter | get_position() |
The touch position.
- bool pressed
| Default | false |
| Setter | set_pressed(value) |
| Getter | is_pressed() |
If true, the touch’s state is pressed. If false, the touch’s state is released.
InputEventWithModifiers¶
Inherits: InputEvent < Resource < Reference < Object
Inherited By: InputEventGesture, InputEventKey, InputEventMouse
Base class for keys events with modifiers.
Description¶
Contains keys events information with modifiers support like Shift or Alt. See Node._input.
Tutorials¶
Property Descriptions¶
- bool alt
| Default | false |
| Setter | set_alt(value) |
| Getter | get_alt() |
State of the Alt modifier.
- bool command
| Default | false |
| Setter | set_command(value) |
| Getter | get_command() |
State of the Command modifier.
- bool control
| Default | false |
| Setter | set_control(value) |
| Getter | get_control() |
State of the Ctrl modifier.
- bool meta
| Default | false |
| Setter | set_metakey(value) |
| Getter | get_metakey() |
State of the Meta modifier.
- bool shift
| Default | false |
| Setter | set_shift(value) |
| Getter | get_shift() |
State of the Shift modifier.
InputMap¶
Inherits: Object
Singleton that manages InputEventAction.
Description¶
Manages all InputEventAction which can be created/modified from the project settings menu Project > Project Settings > Input Map or in code with add_action and action_add_event. See Node._input.
Tutorials¶
Methods¶
| void | action_add_event ( String action, InputEvent event ) |
| void | action_erase_event ( String action, InputEvent event ) |
| void | action_erase_events ( String action ) |
| bool | action_has_event ( String action, InputEvent event ) |
| void | action_set_deadzone ( String action, float deadzone ) |
| void | add_action ( String action, float deadzone=0.5 ) |
| void | erase_action ( String action ) |
| bool | event_is_action ( InputEvent event, String action ) const |
| Array | get_action_list ( String action ) |
| Array | get_actions ( ) |
| bool | has_action ( String action ) const |
| void | load_from_globals ( ) |
Method Descriptions¶
- void action_add_event ( String action, InputEvent event )
Adds an InputEvent to an action. This InputEvent will trigger the action.
- void action_erase_event ( String action, InputEvent event )
Removes an InputEvent from an action.
- void action_erase_events ( String action )
Removes all events from an action.
- bool action_has_event ( String action, InputEvent event )
Returns true if the action has the given InputEvent associated with it.
Sets a deadzone value for the action.
Adds an empty action to the InputMap with a configurable deadzone.
An InputEvent can then be added to this action with action_add_event.
- void erase_action ( String action )
Removes an action from the InputMap.
- bool event_is_action ( InputEvent event, String action ) const
Returns true if the given event is part of an existing action. This method ignores keyboard modifiers if the given InputEvent is not pressed (for proper release detection). See action_has_event if you don’t want this behavior.
Returns an array of InputEvents associated with a given action.
- Array get_actions ( )
Returns an array of all actions in the InputMap.
Returns true if the InputMap has a registered action with the given name.
- void load_from_globals ( )
Clears all InputEventAction in the InputMap and load it anew from ProjectSettings.
InstancePlaceholder¶
Placeholder for the root Node of a PackedScene.
Description¶
Turning on the option Load As Placeholder for an instanced scene in the editor causes it to be replaced by an InstancePlaceholder when running the game. This makes it possible to delay actually loading the scene until calling replace_by_instance. This is useful to avoid loading large scenes all at once by loading parts of it selectively.
The InstancePlaceholder does not have a transform. This causes any child nodes to be positioned relatively to the Viewport from point (0,0), rather than their parent as displayed in the editor. Replacing the placeholder with a scene with a transform will transform children relatively to their parent again.
Methods¶
| Node | create_instance ( bool replace=false, PackedScene custom_scene=null ) |
| String | get_instance_path ( ) const |
| Dictionary | get_stored_values ( bool with_order=false ) |
| void | replace_by_instance ( PackedScene custom_scene=null ) |
Method Descriptions¶
- Node create_instance ( bool replace=false, PackedScene custom_scene=null )
- String get_instance_path ( ) const
Gets the path to the PackedScene resource file that is loaded by default when calling replace_by_instance.
- Dictionary get_stored_values ( bool with_order=false )
- void replace_by_instance ( PackedScene custom_scene=null )
Replaces this placeholder by the scene handed as an argument, or the original scene if no argument is given. As for all resources, the scene is loaded only if it’s not loaded already. By manually loading the scene beforehand, delays caused by this function can be avoided.
int¶
Integer built-in type.
Description¶
Signed 64-bit integer type.
It can take values in the interval [-2^63, 2^63 - 1], i.e. [-9223372036854775808, 9223372036854775807]. Exceeding those bounds will wrap around.
int is a Variant type, and will thus be used when assigning an integer value to a Variant. It can also be enforced with the : int type hint.
var my_variant = 0 # int, value 0.
my_variant += 4.2 # float, value 4.2.
var my_int: int = 1 # int, value 1.
my_int = 4.2 # int, value 4, the right value is implicitly cast to int.
my_int = int("6.7") # int, value 6, the String is explicitly cast with int.
var max_int = 9223372036854775807
print(max_int) # 9223372036854775807, OK.
max_int += 1
print(max_int) # -9223372036854775808, we overflowed and wrapped around.
Method Descriptions¶
Cast a bool value to an integer value, int(true) will be equals to 1 and int(false) will be equals to 0.
Cast a float value to an integer value, this method simply removes the number fractions, so for example int(2.7) will be equals to 2, int(.1) will be equals to 0 and int(-2.7) will be equals to -2.
Cast a String value to an integer value, this method is an integer parser from a string, so calling this method with an invalid integer string will return 0, a valid string will be something like '1.7'. This method will ignore all non-number characters, so calling int('1e3') will return 13.
InterpolatedCamera¶
Inherits: Camera < Spatial < Node < Object
Camera which moves toward another node.
Description¶
InterpolatedCamera is a Camera which smoothly moves to match a target node’s position and rotation.
If it is not enabled or does not have a valid target set, InterpolatedCamera acts like a normal Camera.
Methods¶
| void | set_target ( Object target ) |
Property Descriptions¶
- bool enabled
| Default | false |
| Setter | set_interpolation_enabled(value) |
| Getter | is_interpolation_enabled() |
If true, and a target is set, the camera will move automatically.
- float speed
| Default | 1.0 |
| Setter | set_speed(value) |
| Getter | get_speed() |
How quickly the camera moves toward its target. Higher values will result in tighter camera motion.
- NodePath target
| Default | NodePath("") |
| Setter | set_target_path(value) |
| Getter | get_target_path() |
The target’s NodePath.
IP¶
Inherits: Object
Inherited By: IP_Unix
Internet protocol (IP) support functions such as DNS resolution.
Description¶
IP contains support functions for the Internet Protocol (IP). TCP/IP support is in different classes (see StreamPeerTCP and TCP_Server). IP provides DNS hostname resolution support, both blocking and threaded.
Methods¶
| void | clear_cache ( String hostname=”” ) |
| void | erase_resolve_item ( int id ) |
| Array | get_local_addresses ( ) const |
| Array | get_local_interfaces ( ) const |
| String | get_resolve_item_address ( int id ) const |
| ResolverStatus | get_resolve_item_status ( int id ) const |
| String | resolve_hostname ( String host, Type ip_type=3 ) |
| int | resolve_hostname_queue_item ( String host, Type ip_type=3 ) |
Enumerations¶
enum ResolverStatus:
- RESOLVER_STATUS_NONE = 0 — DNS hostname resolver status: No status.
- RESOLVER_STATUS_WAITING = 1 — DNS hostname resolver status: Waiting.
- RESOLVER_STATUS_DONE = 2 — DNS hostname resolver status: Done.
- RESOLVER_STATUS_ERROR = 3 — DNS hostname resolver status: Error.
enum Type:
- TYPE_NONE = 0 — Address type: None.
- TYPE_IPV4 = 1 — Address type: Internet protocol version 4 (IPv4).
- TYPE_IPV6 = 2 — Address type: Internet protocol version 6 (IPv6).
- TYPE_ANY = 3 — Address type: Any.
Constants¶
- RESOLVER_MAX_QUERIES = 32 — Maximum number of concurrent DNS resolver queries allowed, RESOLVER_INVALID_ID is returned if exceeded.
- RESOLVER_INVALID_ID = -1 — Invalid ID constant. Returned if RESOLVER_MAX_QUERIES is exceeded.
Method Descriptions¶
- void clear_cache ( String hostname=”” )
Removes all of a hostname’s cached references. If no hostname is given, all cached IP addresses are removed.
- void erase_resolve_item ( int id )
Removes a given item id from the queue. This should be used to free a queue after it has completed to enable more queries to happen.
- Array get_local_addresses ( ) const
Returns all of the user’s current IPv4 and IPv6 addresses as an array.
- Array get_local_interfaces ( ) const
Returns all network adapters as an array.
Each adapter is a dictionary of the form:
{
"index": "1", # Interface index.
"name": "eth0", # Interface name.
"friendly": "Ethernet One", # A friendly name (might be empty).
"addresses": ["192.168.1.101"], # An array of IP addresses associated to this interface.
}
Returns a queued hostname’s IP address, given its queue id. Returns an empty string on error or if resolution hasn’t happened yet (see get_resolve_item_status).
- ResolverStatus get_resolve_item_status ( int id ) const
Returns a queued hostname’s status as a ResolverStatus constant, given its queue id.
Returns a given hostname’s IPv4 or IPv6 address when resolved (blocking-type method). The address type returned depends on the Type constant given as ip_type.
Creates a queue item to resolve a hostname to an IPv4 or IPv6 address depending on the Type constant given as ip_type. Returns the queue ID if successful, or RESOLVER_INVALID_ID on error.
ItemList¶
Inherits: Control < CanvasItem < Node < Object
Control that provides a list of selectable items (and/or icons) in a single column, or optionally in multiple columns.
Description¶
This control provides a selectable list of items that may be in a single (or multiple columns) with option of text, icons, or both text and icon. Tooltips are supported and may be different for every item in the list.
Selectable items in the list may be selected or deselected and multiple selection may be enabled. Selection with right mouse button may also be enabled to allow use of popup context menus. Items may also be “activated” by double-clicking them or by pressing Enter.
Item text only supports single-line strings, newline characters (e.g. \n) in the string won’t produce a newline. Text wrapping is enabled in ICON_MODE_TOP mode, but column’s width is adjusted to fully fit its content by default. You need to set fixed_column_width greater than zero to wrap the text.
Properties¶
| bool | allow_reselect | false |
| bool | allow_rmb_select | false |
| bool | auto_height | false |
| int | fixed_column_width | 0 |
| Vector2 | fixed_icon_size | Vector2( 0, 0 ) |
| FocusMode | focus_mode | O: 2 |
| IconMode | icon_mode | 1 |
| float | icon_scale | 1.0 |
| int | max_columns | 1 |
| int | max_text_lines | 1 |
| bool | rect_clip_content | O: true |
| bool | same_column_width | false |
| SelectMode | select_mode | 0 |
Methods¶
Theme Properties¶
| StyleBox | bg | |
| StyleBox | bg_focus | |
| StyleBox | cursor | |
| StyleBox | cursor_unfocused | |
| Font | font | |
| Color | font_color | Color( 0.63, 0.63, 0.63, 1 ) |
| Color | font_color_selected | Color( 1, 1, 1, 1 ) |
| Color | guide_color | Color( 0, 0, 0, 0.1 ) |
| int | hseparation | 4 |
| int | icon_margin | 4 |
| int | line_separation | 2 |
| StyleBox | selected | |
| StyleBox | selected_focus | |
| int | vseparation | 2 |
Signals¶
- item_activated ( int index )
Triggered when specified list item is activated via double-clicking or by pressing Enter.
Triggered when specified list item has been selected via right mouse clicking.
The click position is also provided to allow appropriate popup of context menus at the correct location.
allow_rmb_select must be enabled.
- item_selected ( int index )
Triggered when specified item has been selected.
allow_reselect must be enabled to reselect an item.
Triggered when a multiple selection is altered on a list allowing multiple selection.
- nothing_selected ( )
Triggered when a left mouse click is issued within the rect of the list but on empty space.
- rmb_clicked ( Vector2 at_position )
Triggered when a right mouse click is issued within the rect of the list but on empty space.
allow_rmb_select must be enabled.
Enumerations¶
enum IconMode:
- ICON_MODE_TOP = 0 — Icon is drawn above the text.
- ICON_MODE_LEFT = 1 — Icon is drawn to the left of the text.
enum SelectMode:
- SELECT_SINGLE = 0 — Only allow selecting a single item.
- SELECT_MULTI = 1 — Allows selecting multiple items by holding Ctrl or Shift.
Property Descriptions¶
- bool allow_reselect
| Default | false |
| Setter | set_allow_reselect(value) |
| Getter | get_allow_reselect() |
If true, the currently selected item can be selected again.
- bool allow_rmb_select
| Default | false |
| Setter | set_allow_rmb_select(value) |
| Getter | get_allow_rmb_select() |
If true, right mouse button click can select items.
- bool auto_height
| Default | false |
| Setter | set_auto_height(value) |
| Getter | has_auto_height() |
If true, the control will automatically resize the height to fit its content.
- int fixed_column_width
| Default | 0 |
| Setter | set_fixed_column_width(value) |
| Getter | get_fixed_column_width() |
The width all columns will be adjusted to.
A value of zero disables the adjustment, each item will have a width equal to the width of its content and the columns will have an uneven width.
- Vector2 fixed_icon_size
| Default | Vector2( 0, 0 ) |
| Setter | set_fixed_icon_size(value) |
| Getter | get_fixed_icon_size() |
The size all icons will be adjusted to.
If either X or Y component is not greater than zero, icon size won’t be affected.
- IconMode icon_mode
| Default | 1 |
| Setter | set_icon_mode(value) |
| Getter | get_icon_mode() |
The icon position, whether above or to the left of the text. See the IconMode constants.
- float icon_scale
| Default | 1.0 |
| Setter | set_icon_scale(value) |
| Getter | get_icon_scale() |
The scale of icon applied after fixed_icon_size and transposing takes effect.
- int max_columns
| Default | 1 |
| Setter | set_max_columns(value) |
| Getter | get_max_columns() |
Maximum columns the list will have.
If greater than zero, the content will be split among the specified columns.
A value of zero means unlimited columns, i.e. all items will be put in the same row.
- int max_text_lines
| Default | 1 |
| Setter | set_max_text_lines(value) |
| Getter | get_max_text_lines() |
Maximum lines of text allowed in each item. Space will be reserved even when there is not enough lines of text to display.
Note: This property takes effect only when icon_mode is ICON_MODE_TOP. To make the text wrap, fixed_column_width should be greater than zero.
- bool same_column_width
| Default | false |
| Setter | set_same_column_width(value) |
| Getter | is_same_column_width() |
Whether all columns will have the same width.
If true, the width is equal to the largest column width of all columns.
- SelectMode select_mode
| Default | 0 |
| Setter | set_select_mode(value) |
| Getter | get_select_mode() |
Allows single or multiple item selection. See the SelectMode constants.
Method Descriptions¶
Adds an item to the item list with no text, only an icon.
Adds an item to the item list with specified text. Specify an icon, or use null as the icon for a list item with no icon.
If selectable is true, the list item will be selectable.
- void clear ( )
Removes all items from the list.
- void ensure_current_is_visible ( )
Ensure current selection is visible, adjusting the scroll position as necessary.
Returns the item index at the given position.
When there is no item at that point, -1 will be returned if exact is true, and the closest item index will be returned otherwise.
- int get_item_count ( ) const
Returns the number of items currently in the list.
Returns the custom background color of the item specified by idx index.
Returns the custom foreground color of the item specified by idx index.
Returns the icon associated with the specified index.
Returns a Color modulating item’s icon at the specified index.
Returns the region of item’s icon used. The whole icon will be used if the region has no area.
Returns the metadata value of the specified index.
Returns the text associated with the specified index.
Returns the tooltip hint associated with the specified index.
- PoolIntArray get_selected_items ( )
Returns an array with the indexes of the selected items.
- VScrollBar get_v_scroll ( )
Returns the Object ID associated with the list.
- bool is_anything_selected ( )
Returns true if one or more items are selected.
Returns true if the item at the specified index is disabled.
Returns true if the item icon will be drawn transposed, i.e. the X and Y axes are swapped.
Returns true if the item at the specified index is selectable.
Returns true if the tooltip is enabled for specified item index.
Returns true if the item at the specified index is currently selected.
Moves item from index from_idx to to_idx.
- void remove_item ( int idx )
Removes the item specified by idx index from the list.
Select the item at the specified index.
Note: This method does not trigger the item selection signal.
Sets the background color of the item specified by idx index to the specified Color.
var some_string = "Some text"
some_string.set_item_custom_bg_color(0,Color(1, 0, 0, 1) # This will set the background color of the first item of the control to red.
Sets the foreground color of the item specified by idx index to the specified Color.
var some_string = "Some text"
some_string.set_item_custom_fg_color(0,Color(1, 0, 0, 1) # This will set the foreground color of the first item of the control to red.
Disables (or enables) the item at the specified index.
Disabled items cannot be selected and do not trigger activation signals (when double-clicking or pressing Enter).
Sets (or replaces) the icon’s Texture associated with the specified index.
Sets a modulating Color of the item associated with the specified index.
Sets the region of item’s icon used. The whole icon will be used if the region has no area.
Sets whether the item icon will be drawn transposed.
Sets a value (of any type) to be stored with the item associated with the specified index.
Allows or disallows selection of the item associated with the specified index.
Sets text of the item associated with the specified index.
Sets the tooltip hint for the item associated with the specified index.
Sets whether the tooltip hint is enabled for specified item index.
- void sort_items_by_text ( )
Sorts items in the list by their text.
- void unselect ( int idx )
Ensures the item associated with the specified index is not selected.
- void unselect_all ( )
Ensures there are no items selected.
JavaScript¶
Inherits: Object
Singleton that connects the engine with the browser’s JavaScript context in HTML5 export.
Description¶
The JavaScript singleton is implemented only in the HTML5 export. It’s used to access the browser’s JavaScript context. This allows interaction with embedding pages or calling third-party JavaScript APIs.
Tutorials¶
Method Descriptions¶
Execute the string code as JavaScript code within the browser window. This is a call to the actual global JavaScript function eval().
If use_global_execution_context is true, the code will be evaluated in the global execution context. Otherwise, it is evaluated in the execution context of a function within the engine’s runtime environment.
Joint¶
Inherits: Spatial < Node < Object
Inherited By: ConeTwistJoint, Generic6DOFJoint, HingeJoint, PinJoint, SliderJoint
Base class for all 3D joints.
Description¶
Joints are used to bind together two physics bodies. They have a solver priority and can define if the bodies of the two attached nodes should be able to collide with each other.
Properties¶
| bool | collision/exclude_nodes | true |
| NodePath | nodes/node_a | NodePath("") |
| NodePath | nodes/node_b | NodePath("") |
| int | solver/priority | 1 |
Property Descriptions¶
- bool collision/exclude_nodes
| Default | true |
| Setter | set_exclude_nodes_from_collision(value) |
| Getter | get_exclude_nodes_from_collision() |
If true, the two bodies of the nodes are not able to collide with each other.
- NodePath nodes/node_a
| Default | NodePath("") |
| Setter | set_node_a(value) |
| Getter | get_node_a() |
The node attached to the first side (A) of the joint.
- NodePath nodes/node_b
| Default | NodePath("") |
| Setter | set_node_b(value) |
| Getter | get_node_b() |
The node attached to the second side (B) of the joint.
- int solver/priority
| Default | 1 |
| Setter | set_solver_priority(value) |
| Getter | get_solver_priority() |
The priority used to define which solver is executed first for multiple joints. The lower the value, the higher the priority.
Joint2D¶
Inherits: Node2D < CanvasItem < Node < Object
Inherited By: DampedSpringJoint2D, GrooveJoint2D, PinJoint2D
Base node for all joint constraints in 2D physics.
Description¶
Base node for all joint constraints in 2D physics. Joints take 2 bodies and apply a custom constraint.
Properties¶
| float | bias | 0.0 |
| bool | disable_collision | true |
| NodePath | node_a | NodePath("") |
| NodePath | node_b | NodePath("") |
Property Descriptions¶
- float bias
| Default | 0.0 |
| Setter | set_bias(value) |
| Getter | get_bias() |
When node_a and node_b move in different directions the bias controls how fast the joint pulls them back to their original position. The lower the bias the more the two bodies can pull on the joint.
- bool disable_collision
| Default | true |
| Setter | set_exclude_nodes_from_collision(value) |
| Getter | get_exclude_nodes_from_collision() |
If true, node_a and node_b can collide.
- NodePath node_a
| Default | NodePath("") |
| Setter | set_node_a(value) |
| Getter | get_node_a() |
The first body attached to the joint. Must derive from PhysicsBody2D.
- NodePath node_b
| Default | NodePath("") |
| Setter | set_node_b(value) |
| Getter | get_node_b() |
The second body attached to the joint. Must derive from PhysicsBody2D.
JSON¶
Inherits: Object
Helper class for parsing JSON data.
Description¶
Helper class for parsing JSON data. For usage example and other important hints, see JSONParseResult.
Methods¶
| JSONParseResult | parse ( String json ) |
| String | print ( Variant value, String indent=”“, bool sort_keys=false ) |
Method Descriptions¶
- JSONParseResult parse ( String json )
Parses a JSON encoded string and returns a JSONParseResult containing the result.
Converts a Variant var to JSON text and returns the result. Useful for serializing data to store or send over the network.
JSONParseResult¶
Data class wrapper for decoded JSON.
Description¶
Returned by JSON.parse, JSONParseResult contains the decoded JSON or error information if the JSON source wasn’t successfully parsed. You can check if the JSON source was successfully parsed with if json_result.error == OK.
Properties¶
| Error | error | |
| int | error_line | -1 |
| String | error_string | "" |
| Variant | result |
Property Descriptions¶
- Error error
| Setter | set_error(value) |
| Getter | get_error() |
The error type if the JSON source was not successfully parsed. See the Error constants.
- int error_line
| Default | -1 |
| Setter | set_error_line(value) |
| Getter | get_error_line() |
The line number where the error occurred if JSON source was not successfully parsed.
- String error_string
| Default | "" |
| Setter | set_error_string(value) |
| Getter | get_error_string() |
The error message if JSON source was not successfully parsed. See the Error constants.
- Variant result
| Setter | set_result(value) |
| Getter | get_result() |
A Variant containing the parsed JSON. Use @GDScript.typeof or the is keyword to check if it is what you expect. For example, if the JSON source starts with curly braces ({}), a Dictionary will be returned. If the JSON source starts with braces ([]), an Array will be returned.
Note: The JSON specification does not define integer or float types, but only a number type. Therefore, parsing a JSON text will convert all numerical values to float types.
Note: JSON objects do not preserve key order like Godot dictionaries, thus, you should not rely on keys being in a certain order if a dictionary is constructed from JSON. In contrast, JSON arrays retain the order of their elements:
var p = JSON.parse('["hello", "world", "!"]')
if typeof(p.result) == TYPE_ARRAY:
print(p.result[0]) # Prints "hello"
else:
print("unexpected results")
JSONRPC¶
Inherits: Object
Methods¶
| Dictionary | make_notification ( String method, Variant params ) |
| Dictionary | make_request ( String method, Variant params, Variant id ) |
| Dictionary | make_response ( Variant result, Variant id ) |
| Dictionary | make_response_error ( int code, String message, Variant id=null ) const |
| Variant | process_action ( Variant action, bool recurse=false ) |
| String | process_string ( String action ) |
| void | set_scope ( String scope, Object target ) |
Enumerations¶
enum ErrorCode:
- PARSE_ERROR = -32700
- INVALID_REQUEST = -32600
- METHOD_NOT_FOUND = -32601
- INVALID_PARAMS = -32602
- INTERNAL_ERROR = -32603
Method Descriptions¶
- Dictionary make_notification ( String method, Variant params )
- Dictionary make_request ( String method, Variant params, Variant id )
- Dictionary make_response ( Variant result, Variant id )
- Dictionary make_response_error ( int code, String message, Variant id=null ) const
KinematicBody¶
Inherits: PhysicsBody < CollisionObject < Spatial < Node < Object
Kinematic body 3D node.
Description¶
Kinematic bodies are special types of bodies that are meant to be user-controlled. They are not affected by physics at all; to other types of bodies, such as a character or a rigid body, these are the same as a static body. However, they have two main uses:
Simulated motion: When these bodies are moved manually, either from code or from an AnimationPlayer (with AnimationPlayer.playback_process_mode set to “physics”), the physics will automatically compute an estimate of their linear and angular velocity. This makes them very useful for moving platforms or other AnimationPlayer-controlled objects (like a door, a bridge that opens, etc).
Kinematic characters: KinematicBody also has an API for moving objects (the move_and_collide and move_and_slide methods) while performing collision tests. This makes them really useful to implement characters that collide against a world, but that don’t require advanced physics.
Tutorials¶
Properties¶
| float | collision/safe_margin | 0.001 |
| bool | move_lock_x | false |
| bool | move_lock_y | false |
| bool | move_lock_z | false |
Methods¶
| bool | get_axis_lock ( BodyAxis axis ) const |
| Vector3 | get_floor_normal ( ) const |
| Vector3 | get_floor_velocity ( ) const |
| KinematicCollision | get_slide_collision ( int slide_idx ) |
| int | get_slide_count ( ) const |
| bool | is_on_ceiling ( ) const |
| bool | is_on_floor ( ) const |
| bool | is_on_wall ( ) const |
| KinematicCollision | move_and_collide ( Vector3 rel_vec, bool infinite_inertia=true, bool exclude_raycast_shapes=true, bool test_only=false ) |
| Vector3 | move_and_slide ( Vector3 linear_velocity, Vector3 up_direction=Vector3( 0, 0, 0 ), bool stop_on_slope=false, int max_slides=4, float floor_max_angle=0.785398, bool infinite_inertia=true ) |
| Vector3 | move_and_slide_with_snap ( Vector3 linear_velocity, Vector3 snap, Vector3 up_direction=Vector3( 0, 0, 0 ), bool stop_on_slope=false, int max_slides=4, float floor_max_angle=0.785398, bool infinite_inertia=true ) |
| void | set_axis_lock ( BodyAxis axis, bool lock ) |
| bool | test_move ( Transform from, Vector3 rel_vec, bool infinite_inertia=true ) |
Property Descriptions¶
- float collision/safe_margin
| Default | 0.001 |
| Setter | set_safe_margin(value) |
| Getter | get_safe_margin() |
If the body is at least this close to another body, this body will consider them to be colliding.
- bool move_lock_x
| Default | false |
| Setter | set_axis_lock(value) |
| Getter | get_axis_lock() |
Lock the body’s X axis movement.
- bool move_lock_y
| Default | false |
| Setter | set_axis_lock(value) |
| Getter | get_axis_lock() |
Lock the body’s Y axis movement.
- bool move_lock_z
| Default | false |
| Setter | set_axis_lock(value) |
| Getter | get_axis_lock() |
Lock the body’s Z axis movement.
Method Descriptions¶
Returns true if the specified axis is locked. See also move_lock_x, move_lock_y and move_lock_z.
- Vector3 get_floor_normal ( ) const
Returns the surface normal of the floor at the last collision point. Only valid after calling move_and_slide or move_and_slide_with_snap and when is_on_floor returns true.
- Vector3 get_floor_velocity ( ) const
Returns the linear velocity of the floor at the last collision point. Only valid after calling move_and_slide or move_and_slide_with_snap and when is_on_floor returns true.
- KinematicCollision get_slide_collision ( int slide_idx )
Returns a KinematicCollision, which contains information about a collision that occurred during the last move_and_slide call. Since the body can collide several times in a single call to move_and_slide, you must specify the index of the collision in the range 0 to (get_slide_count - 1).
- int get_slide_count ( ) const
Returns the number of times the body collided and changed direction during the last call to move_and_slide.
- bool is_on_ceiling ( ) const
Returns true if the body is on the ceiling. Only updates when calling move_and_slide.
- bool is_on_floor ( ) const
Returns true if the body is on the floor. Only updates when calling move_and_slide.
- bool is_on_wall ( ) const
Returns true if the body is on a wall. Only updates when calling move_and_slide.
- KinematicCollision move_and_collide ( Vector3 rel_vec, bool infinite_inertia=true, bool exclude_raycast_shapes=true, bool test_only=false )
Moves the body along the vector rel_vec. The body will stop if it collides. Returns a KinematicCollision, which contains information about the collision.
If test_only is true, the body does not move but the would-be collision information is given.
- Vector3 move_and_slide ( Vector3 linear_velocity, Vector3 up_direction=Vector3( 0, 0, 0 ), bool stop_on_slope=false, int max_slides=4, float floor_max_angle=0.785398, bool infinite_inertia=true )
Moves the body along a vector. If the body collides with another, it will slide along the other body rather than stop immediately. If the other body is a KinematicBody or RigidBody, it will also be affected by the motion of the other body. You can use this to make moving or rotating platforms, or to make nodes push other nodes.
This method should be used in Node._physics_process (or in a method called by Node._physics_process), as it uses the physics step’s delta value automatically in calculations. Otherwise, the simulation will run at an incorrect speed.
linear_velocity is the velocity vector (typically meters per second). Unlike in move_and_collide, you should not multiply it by delta — the physics engine handles applying the velocity.
up_direction is the up direction, used to determine what is a wall and what is a floor or a ceiling. If set to the default value of Vector3(0, 0, 0), everything is considered a wall.
If stop_on_slope is true, body will not slide on slopes if you include gravity in linear_velocity.
If the body collides, it will change direction a maximum of max_slides times before it stops.
floor_max_angle is the maximum angle (in radians) where a slope is still considered a floor (or a ceiling), rather than a wall. The default value equals 45 degrees.
If infinite_inertia is true, body will be able to push RigidBody nodes, but it won’t also detect any collisions with them. If false, it will interact with RigidBody nodes like with StaticBody.
Returns the linear_velocity vector, rotated and/or scaled if a slide collision occurred. To get detailed information about collisions that occurred, use get_slide_collision.
- Vector3 move_and_slide_with_snap ( Vector3 linear_velocity, Vector3 snap, Vector3 up_direction=Vector3( 0, 0, 0 ), bool stop_on_slope=false, int max_slides=4, float floor_max_angle=0.785398, bool infinite_inertia=true )
Moves the body while keeping it attached to slopes. Similar to move_and_slide.
As long as the snap vector is in contact with the ground, the body will remain attached to the surface. This means you must disable snap in order to jump, for example. You can do this by setting snap to (0, 0, 0) or by using move_and_slide instead.
Locks or unlocks the specified axis depending on the value of lock. See also move_lock_x, move_lock_y and move_lock_z.
Checks for collisions without moving the body. Virtually sets the node’s position, scale and rotation to that of the given Transform, then tries to move the body along the vector rel_vec. Returns true if a collision would occur.
KinematicBody2D¶
Inherits: PhysicsBody2D < CollisionObject2D < Node2D < CanvasItem < Node < Object
Kinematic body 2D node.
Description¶
Kinematic bodies are special types of bodies that are meant to be user-controlled. They are not affected by physics at all; to other types of bodies, such as a character or a rigid body, these are the same as a static body. However, they have two main uses:
Simulated motion: When these bodies are moved manually, either from code or from an AnimationPlayer (with AnimationPlayer.playback_process_mode set to “physics”), the physics will automatically compute an estimate of their linear and angular velocity. This makes them very useful for moving platforms or other AnimationPlayer-controlled objects (like a door, a bridge that opens, etc).
Kinematic characters: KinematicBody2D also has an API for moving objects (the move_and_collide and move_and_slide methods) while performing collision tests. This makes them really useful to implement characters that collide against a world, but that don’t require advanced physics.
Properties¶
| float | collision/safe_margin | 0.08 |
| bool | motion/sync_to_physics | false |
Methods¶
| Vector2 | get_floor_normal ( ) const |
| Vector2 | get_floor_velocity ( ) const |
| KinematicCollision2D | get_slide_collision ( int slide_idx ) |
| int | get_slide_count ( ) const |
| bool | is_on_ceiling ( ) const |
| bool | is_on_floor ( ) const |
| bool | is_on_wall ( ) const |
| KinematicCollision2D | move_and_collide ( Vector2 rel_vec, bool infinite_inertia=true, bool exclude_raycast_shapes=true, bool test_only=false ) |
| Vector2 | move_and_slide ( Vector2 linear_velocity, Vector2 up_direction=Vector2( 0, 0 ), bool stop_on_slope=false, int max_slides=4, float floor_max_angle=0.785398, bool infinite_inertia=true ) |
| Vector2 | move_and_slide_with_snap ( Vector2 linear_velocity, Vector2 snap, Vector2 up_direction=Vector2( 0, 0 ), bool stop_on_slope=false, int max_slides=4, float floor_max_angle=0.785398, bool infinite_inertia=true ) |
| bool | test_move ( Transform2D from, Vector2 rel_vec, bool infinite_inertia=true ) |
Property Descriptions¶
- float collision/safe_margin
| Default | 0.08 |
| Setter | set_safe_margin(value) |
| Getter | get_safe_margin() |
If the body is at least this close to another body, this body will consider them to be colliding.
- bool motion/sync_to_physics
| Default | false |
| Setter | set_sync_to_physics(value) |
| Getter | is_sync_to_physics_enabled() |
If true, the body’s movement will be synchronized to the physics frame. This is useful when animating movement via AnimationPlayer, for example on moving platforms. Do not use together with move_and_slide or move_and_collide functions.
Method Descriptions¶
- Vector2 get_floor_normal ( ) const
Returns the surface normal of the floor at the last collision point. Only valid after calling move_and_slide or move_and_slide_with_snap and when is_on_floor returns true.
- Vector2 get_floor_velocity ( ) const
Returns the linear velocity of the floor at the last collision point. Only valid after calling move_and_slide or move_and_slide_with_snap and when is_on_floor returns true.
- KinematicCollision2D get_slide_collision ( int slide_idx )
Returns a KinematicCollision2D, which contains information about a collision that occurred during the last move_and_slide call. Since the body can collide several times in a single call to move_and_slide, you must specify the index of the collision in the range 0 to (get_slide_count - 1).
Example usage:
for i in get_slide_count():
var collision = get_slide_collision(i)
print("Collided with: ", collision.collider.name)
- int get_slide_count ( ) const
Returns the number of times the body collided and changed direction during the last call to move_and_slide.
- bool is_on_ceiling ( ) const
Returns true if the body is on the ceiling. Only updates when calling move_and_slide.
- bool is_on_floor ( ) const
Returns true if the body is on the floor. Only updates when calling move_and_slide.
- bool is_on_wall ( ) const
Returns true if the body is on a wall. Only updates when calling move_and_slide.
- KinematicCollision2D move_and_collide ( Vector2 rel_vec, bool infinite_inertia=true, bool exclude_raycast_shapes=true, bool test_only=false )
Moves the body along the vector rel_vec. The body will stop if it collides. Returns a KinematicCollision2D, which contains information about the collision.
If test_only is true, the body does not move but the would-be collision information is given.
- Vector2 move_and_slide ( Vector2 linear_velocity, Vector2 up_direction=Vector2( 0, 0 ), bool stop_on_slope=false, int max_slides=4, float floor_max_angle=0.785398, bool infinite_inertia=true )
Moves the body along a vector. If the body collides with another, it will slide along the other body rather than stop immediately. If the other body is a KinematicBody2D or RigidBody2D, it will also be affected by the motion of the other body. You can use this to make moving or rotating platforms, or to make nodes push other nodes.
This method should be used in Node._physics_process (or in a method called by Node._physics_process), as it uses the physics step’s delta value automatically in calculations. Otherwise, the simulation will run at an incorrect speed.
linear_velocity is the velocity vector in pixels per second. Unlike in move_and_collide, you should not multiply it by delta — the physics engine handles applying the velocity.
up_direction is the up direction, used to determine what is a wall and what is a floor or a ceiling. If set to the default value of Vector2(0, 0), everything is considered a wall. This is useful for topdown games.
If stop_on_slope is true, body will not slide on slopes when you include gravity in linear_velocity and the body is standing still.
If the body collides, it will change direction a maximum of max_slides times before it stops.
floor_max_angle is the maximum angle (in radians) where a slope is still considered a floor (or a ceiling), rather than a wall. The default value equals 45 degrees.
If infinite_inertia is true, body will be able to push RigidBody2D nodes, but it won’t also detect any collisions with them. If false, it will interact with RigidBody2D nodes like with StaticBody2D.
Returns the linear_velocity vector, rotated and/or scaled if a slide collision occurred. To get detailed information about collisions that occurred, use get_slide_collision.
- Vector2 move_and_slide_with_snap ( Vector2 linear_velocity, Vector2 snap, Vector2 up_direction=Vector2( 0, 0 ), bool stop_on_slope=false, int max_slides=4, float floor_max_angle=0.785398, bool infinite_inertia=true )
Moves the body while keeping it attached to slopes. Similar to move_and_slide.
As long as the snap vector is in contact with the ground, the body will remain attached to the surface. This means you must disable snap in order to jump, for example. You can do this by setting snap to (0, 0) or by using move_and_slide instead.
- bool test_move ( Transform2D from, Vector2 rel_vec, bool infinite_inertia=true )
Checks for collisions without moving the body. Virtually sets the node’s position, scale and rotation to that of the given Transform2D, then tries to move the body along the vector rel_vec. Returns true if a collision would occur.
KinematicCollision¶
Collision data for KinematicBody collisions.
Description¶
Contains collision data for KinematicBody collisions. When a KinematicBody is moved using KinematicBody.move_and_collide, it stops if it detects a collision with another body. If a collision is detected, a KinematicCollision object is returned.
This object contains information about the collision, including the colliding object, the remaining motion, and the collision position. This information can be used to calculate a collision response.
Properties¶
| Object | collider | |
| int | collider_id | 0 |
| Variant | collider_metadata | |
| Object | collider_shape | |
| int | collider_shape_index | 0 |
| Vector3 | collider_velocity | Vector3( 0, 0, 0 ) |
| Object | local_shape | |
| Vector3 | normal | Vector3( 0, 0, 0 ) |
| Vector3 | position | Vector3( 0, 0, 0 ) |
| Vector3 | remainder | Vector3( 0, 0, 0 ) |
| Vector3 | travel | Vector3( 0, 0, 0 ) |
Property Descriptions¶
- Object collider
| Getter | get_collider() |
The colliding body.
- int collider_id
| Default | 0 |
| Getter | get_collider_id() |
The colliding body’s unique instance ID. See Object.get_instance_id.
- Variant collider_metadata
| Getter | get_collider_metadata() |
The colliding body’s metadata. See Object.
- Object collider_shape
| Getter | get_collider_shape() |
The colliding body’s shape.
- int collider_shape_index
| Default | 0 |
| Getter | get_collider_shape_index() |
The colliding shape’s index. See CollisionObject.
- Vector3 collider_velocity
| Default | Vector3( 0, 0, 0 ) |
| Getter | get_collider_velocity() |
The colliding object’s velocity.
- Object local_shape
| Getter | get_local_shape() |
The moving object’s colliding shape.
- Vector3 normal
| Default | Vector3( 0, 0, 0 ) |
| Getter | get_normal() |
The colliding body’s shape’s normal at the point of collision.
- Vector3 position
| Default | Vector3( 0, 0, 0 ) |
| Getter | get_position() |
The point of collision, in global coordinates.
- Vector3 remainder
| Default | Vector3( 0, 0, 0 ) |
| Getter | get_remainder() |
The moving object’s remaining movement vector.
- Vector3 travel
| Default | Vector3( 0, 0, 0 ) |
| Getter | get_travel() |
The distance the moving object traveled before collision.
KinematicCollision2D¶
Collision data for KinematicBody2D collisions.
Description¶
Contains collision data for KinematicBody2D collisions. When a KinematicBody2D is moved using KinematicBody2D.move_and_collide, it stops if it detects a collision with another body. If a collision is detected, a KinematicCollision2D object is returned.
This object contains information about the collision, including the colliding object, the remaining motion, and the collision position. This information can be used to calculate a collision response.
Properties¶
| Object | collider | |
| int | collider_id | 0 |
| Variant | collider_metadata | |
| Object | collider_shape | |
| int | collider_shape_index | 0 |
| Vector2 | collider_velocity | Vector2( 0, 0 ) |
| Object | local_shape | |
| Vector2 | normal | Vector2( 0, 0 ) |
| Vector2 | position | Vector2( 0, 0 ) |
| Vector2 | remainder | Vector2( 0, 0 ) |
| Vector2 | travel | Vector2( 0, 0 ) |
Property Descriptions¶
- Object collider
| Getter | get_collider() |
The colliding body.
- int collider_id
| Default | 0 |
| Getter | get_collider_id() |
The colliding body’s unique instance ID. See Object.get_instance_id.
- Variant collider_metadata
| Getter | get_collider_metadata() |
The colliding body’s metadata. See Object.
- Object collider_shape
| Getter | get_collider_shape() |
The colliding body’s shape.
- int collider_shape_index
| Default | 0 |
| Getter | get_collider_shape_index() |
The colliding shape’s index. See CollisionObject2D.
- Vector2 collider_velocity
| Default | Vector2( 0, 0 ) |
| Getter | get_collider_velocity() |
The colliding object’s velocity.
- Object local_shape
| Getter | get_local_shape() |
The moving object’s colliding shape.
- Vector2 normal
| Default | Vector2( 0, 0 ) |
| Getter | get_normal() |
The colliding body’s shape’s normal at the point of collision.
- Vector2 position
| Default | Vector2( 0, 0 ) |
| Getter | get_position() |
The point of collision, in global coordinates.
- Vector2 remainder
| Default | Vector2( 0, 0 ) |
| Getter | get_remainder() |
The moving object’s remaining movement vector.
- Vector2 travel
| Default | Vector2( 0, 0 ) |
| Getter | get_travel() |
The distance the moving object traveled before collision.
Label¶
Inherits: Control < CanvasItem < Node < Object
Displays plain text in a line or wrapped inside a rectangle. For formatted text, use RichTextLabel.
Description¶
Label displays plain text on the screen. It gives you control over the horizontal and vertical alignment, and can wrap the text inside the node’s bounding rectangle. It doesn’t support bold, italics or other formatting. For that, use RichTextLabel instead.
Note: Contrarily to most other Controls, Label’s Control.mouse_filter defaults to Control.MOUSE_FILTER_IGNORE (i.e. it doesn’t react to mouse input events). This implies that a label won’t display any configured Control.hint_tooltip, unless you change its mouse filter.
Properties¶
| Align | align | 0 |
| bool | autowrap | false |
| bool | clip_text | false |
| int | lines_skipped | 0 |
| int | max_lines_visible | -1 |
| MouseFilter | mouse_filter | O: 2 |
| float | percent_visible | 1.0 |
| int | size_flags_vertical | O: 4 |
| String | text | "" |
| bool | uppercase | false |
| VAlign | valign | 0 |
| int | visible_characters | -1 |
Methods¶
| int | get_line_count ( ) const |
| int | get_line_height ( ) const |
| int | get_total_character_count ( ) const |
| int | get_visible_line_count ( ) const |
Theme Properties¶
| Font | font | |
| Color | font_color | Color( 1, 1, 1, 1 ) |
| Color | font_color_shadow | Color( 0, 0, 0, 0 ) |
| Color | font_outline_modulate | Color( 1, 1, 1, 1 ) |
| int | line_spacing | 3 |
| StyleBox | normal | |
| int | shadow_as_outline | 0 |
| int | shadow_offset_x | 1 |
| int | shadow_offset_y | 1 |
Enumerations¶
enum Align:
- ALIGN_LEFT = 0 — Align rows to the left (default).
- ALIGN_CENTER = 1 — Align rows centered.
- ALIGN_RIGHT = 2 — Align rows to the right.
- ALIGN_FILL = 3 — Expand row whitespaces to fit the width.
enum VAlign:
- VALIGN_TOP = 0 — Align the whole text to the top.
- VALIGN_CENTER = 1 — Align the whole text to the center.
- VALIGN_BOTTOM = 2 — Align the whole text to the bottom.
- VALIGN_FILL = 3 — Align the whole text by spreading the rows.
Property Descriptions¶
- Align align
| Default | 0 |
| Setter | set_align(value) |
| Getter | get_align() |
Controls the text’s horizontal align. Supports left, center, right, and fill, or justify. Set it to one of the Align constants.
- bool autowrap
| Default | false |
| Setter | set_autowrap(value) |
| Getter | has_autowrap() |
If true, wraps the text inside the node’s bounding rectangle. If you resize the node, it will change its height automatically to show all the text.
- bool clip_text
| Default | false |
| Setter | set_clip_text(value) |
| Getter | is_clipping_text() |
If true, the Label only shows the text that fits inside its bounding rectangle. It also lets you scale the node down freely.
- int lines_skipped
| Default | 0 |
| Setter | set_lines_skipped(value) |
| Getter | get_lines_skipped() |
The node ignores the first lines_skipped lines before it starts to display text.
- int max_lines_visible
| Default | -1 |
| Setter | set_max_lines_visible(value) |
| Getter | get_max_lines_visible() |
Limits the lines of text the node shows on screen.
- float percent_visible
| Default | 1.0 |
| Setter | set_percent_visible(value) |
| Getter | get_percent_visible() |
Limits the count of visible characters. If you set percent_visible to 50, only up to half of the text’s characters will display on screen. Useful to animate the text in a dialog box.
- String text
| Default | "" |
| Setter | set_text(value) |
| Getter | get_text() |
The text to display on screen.
- bool uppercase
| Default | false |
| Setter | set_uppercase(value) |
| Getter | is_uppercase() |
If true, all the text displays as UPPERCASE.
- VAlign valign
| Default | 0 |
| Setter | set_valign(value) |
| Getter | get_valign() |
Controls the text’s vertical align. Supports top, center, bottom, and fill. Set it to one of the VAlign constants.
- int visible_characters
| Default | -1 |
| Setter | set_visible_characters(value) |
| Getter | get_visible_characters() |
Restricts the number of characters to display. Set to -1 to disable.
Method Descriptions¶
- int get_line_count ( ) const
Returns the amount of lines of text the Label has.
- int get_line_height ( ) const
Returns the font size in pixels.
- int get_total_character_count ( ) const
Returns the total number of printable characters in the text (excluding spaces and newlines).
- int get_visible_line_count ( ) const
Returns the number of lines shown. Useful if the Label’s height cannot currently display all lines.
LargeTexture¶
Inherits: Texture < Resource < Reference < Object
A Texture capable of storing many smaller textures with offsets.
Description¶
A Texture capable of storing many smaller textures with offsets.
You can dynamically add pieces (Textures) to this LargeTexture using different offsets.
Methods¶
| int | add_piece ( Vector2 ofs, Texture texture ) |
| void | clear ( ) |
| int | get_piece_count ( ) const |
| Vector2 | get_piece_offset ( int idx ) const |
| Texture | get_piece_texture ( int idx ) const |
| void | set_piece_offset ( int idx, Vector2 ofs ) |
| void | set_piece_texture ( int idx, Texture texture ) |
| void | set_size ( Vector2 size ) |
Method Descriptions¶
Adds texture to this LargeTexture, starting on offset ofs.
- void clear ( )
Clears the LargeTexture.
- int get_piece_count ( ) const
Returns the number of pieces currently in this LargeTexture.
Returns the offset of the piece with the index idx.
Returns the Texture of the piece with the index idx.
Sets the offset of the piece with the index idx to ofs.
Sets the Texture of the piece with index idx to texture.
- void set_size ( Vector2 size )
Sets the size of this LargeTexture.
Light¶
Inherits: VisualInstance < Spatial < Node < Object
Inherited By: DirectionalLight, OmniLight, SpotLight
Provides a base class for different kinds of light nodes.
Description¶
Light is the abstract base class for light nodes, so it shouldn’t be used directly (it can’t be instanced). Other types of light nodes inherit from it. Light contains the common variables and parameters used for lighting.
Tutorials¶
Properties¶
| bool | editor_only | false |
| BakeMode | light_bake_mode | 1 |
| Color | light_color | Color( 1, 1, 1, 1 ) |
| int | light_cull_mask | 4294967295 |
| float | light_energy | 1.0 |
| float | light_indirect_energy | 1.0 |
| bool | light_negative | false |
| float | light_specular | 0.5 |
| float | shadow_bias | 0.15 |
| Color | shadow_color | Color( 0, 0, 0, 1 ) |
| float | shadow_contact | 0.0 |
| bool | shadow_enabled | false |
| bool | shadow_reverse_cull_face | false |
Enumerations¶
enum Param:
- PARAM_ENERGY = 0 — Constant for accessing light_energy.
- PARAM_INDIRECT_ENERGY = 1 — Constant for accessing light_indirect_energy.
- PARAM_SPECULAR = 2 — Constant for accessing light_specular.
- PARAM_RANGE = 3 — Constant for accessing OmniLight.omni_range or SpotLight.spot_range.
- PARAM_ATTENUATION = 4 — Constant for accessing OmniLight.omni_attenuation or SpotLight.spot_attenuation.
- PARAM_SPOT_ANGLE = 5 — Constant for accessing SpotLight.spot_angle.
- PARAM_SPOT_ATTENUATION = 6 — Constant for accessing SpotLight.spot_angle_attenuation.
- PARAM_CONTACT_SHADOW_SIZE = 7 — Constant for accessing shadow_contact.
- PARAM_SHADOW_MAX_DISTANCE = 8 — Constant for accessing DirectionalLight.directional_shadow_max_distance.
- PARAM_SHADOW_SPLIT_1_OFFSET = 9 — Constant for accessing DirectionalLight.directional_shadow_split_1.
- PARAM_SHADOW_SPLIT_2_OFFSET = 10 — Constant for accessing DirectionalLight.directional_shadow_split_2.
- PARAM_SHADOW_SPLIT_3_OFFSET = 11 — Constant for accessing DirectionalLight.directional_shadow_split_3.
- PARAM_SHADOW_NORMAL_BIAS = 12 — Constant for accessing DirectionalLight.directional_shadow_normal_bias.
- PARAM_SHADOW_BIAS = 13 — Constant for accessing shadow_bias.
- PARAM_SHADOW_BIAS_SPLIT_SCALE = 14 — Constant for accessing DirectionalLight.directional_shadow_bias_split_scale.
- PARAM_MAX = 15 — Represents the size of the Param enum.
enum BakeMode:
- BAKE_DISABLED = 0 — Light is ignored when baking.
Note: Hiding a light does not affect baking.
- BAKE_INDIRECT = 1 — Only indirect lighting will be baked (default).
- BAKE_ALL = 2 — Both direct and indirect light will be baked.
Note: You should hide the light if you don’t want it to appear twice (dynamic and baked).
Property Descriptions¶
- bool editor_only
| Default | false |
| Setter | set_editor_only(value) |
| Getter | is_editor_only() |
If true, the light only appears in the editor and will not be visible at runtime.
- BakeMode light_bake_mode
| Default | 1 |
| Setter | set_bake_mode(value) |
| Getter | get_bake_mode() |
The light’s bake mode. See BakeMode.
- Color light_color
| Default | Color( 1, 1, 1, 1 ) |
| Setter | set_color(value) |
| Getter | get_color() |
The light’s color.
- int light_cull_mask
| Default | 4294967295 |
| Setter | set_cull_mask(value) |
| Getter | get_cull_mask() |
The light will affect objects in the selected layers.
- float light_energy
| Default | 1.0 |
| Setter | set_param(value) |
| Getter | get_param() |
The light’s strength multiplier.
- float light_indirect_energy
| Default | 1.0 |
| Setter | set_param(value) |
| Getter | get_param() |
Secondary multiplier used with indirect light (light bounces). This works on both BakedLightmap and GIProbe.
- bool light_negative
| Default | false |
| Setter | set_negative(value) |
| Getter | is_negative() |
If true, the light’s effect is reversed, darkening areas and casting bright shadows.
- float light_specular
| Default | 0.5 |
| Setter | set_param(value) |
| Getter | get_param() |
The intensity of the specular blob in objects affected by the light. At 0 the light becomes a pure diffuse light.
- float shadow_bias
| Default | 0.15 |
| Setter | set_param(value) |
| Getter | get_param() |
Used to adjust shadow appearance. Too small a value results in self-shadowing, while too large a value causes shadows to separate from casters. Adjust as needed.
- Color shadow_color
| Default | Color( 0, 0, 0, 1 ) |
| Setter | set_shadow_color(value) |
| Getter | get_shadow_color() |
The color of shadows cast by this light.
- float shadow_contact
| Default | 0.0 |
| Setter | set_param(value) |
| Getter | get_param() |
Attempts to reduce shadow_bias gap.
- bool shadow_enabled
| Default | false |
| Setter | set_shadow(value) |
| Getter | has_shadow() |
If true, the light will cast shadows.
- bool shadow_reverse_cull_face
| Default | false |
| Setter | set_shadow_reverse_cull_face(value) |
| Getter | get_shadow_reverse_cull_face() |
If true, reverses the backface culling of the mesh. This can be useful when you have a flat mesh that has a light behind it. If you need to cast a shadow on both sides of the mesh, set the mesh to use double-sided shadows with GeometryInstance.SHADOW_CASTING_SETTING_DOUBLE_SIDED.
Light2D¶
Inherits: Node2D < CanvasItem < Node < Object
Casts light in a 2D environment.
Description¶
Casts light in a 2D environment. Light is defined by a (usually grayscale) texture, a color, an energy value, a mode (see constants), and various other parameters (range and shadows-related).
Note: Light2D can also be used as a mask.
Tutorials¶
Properties¶
| Color | color | Color( 1, 1, 1, 1 ) |
| bool | editor_only | false |
| bool | enabled | true |
| float | energy | 1.0 |
| Mode | mode | 0 |
| Vector2 | offset | Vector2( 0, 0 ) |
| float | range_height | 0.0 |
| int | range_item_cull_mask | 1 |
| int | range_layer_max | 0 |
| int | range_layer_min | 0 |
| int | range_z_max | 1024 |
| int | range_z_min | -1024 |
| int | shadow_buffer_size | 2048 |
| Color | shadow_color | Color( 0, 0, 0, 0 ) |
| bool | shadow_enabled | false |
| ShadowFilter | shadow_filter | 0 |
| float | shadow_filter_smooth | 0.0 |
| float | shadow_gradient_length | 0.0 |
| int | shadow_item_cull_mask | 1 |
| Texture | texture | |
| float | texture_scale | 1.0 |
Enumerations¶
enum Mode:
- MODE_ADD = 0 — Adds the value of pixels corresponding to the Light2D to the values of pixels under it. This is the common behavior of a light.
- MODE_SUB = 1 — Subtracts the value of pixels corresponding to the Light2D to the values of pixels under it, resulting in inversed light effect.
- MODE_MIX = 2 — Mix the value of pixels corresponding to the Light2D to the values of pixels under it by linear interpolation.
- MODE_MASK = 3 — The light texture of the Light2D is used as a mask, hiding or revealing parts of the screen underneath depending on the value of each pixel of the light (mask) texture.
enum ShadowFilter:
- SHADOW_FILTER_NONE = 0 — No filter applies to the shadow map. See shadow_filter.
- SHADOW_FILTER_PCF3 = 1 — Percentage closer filtering (3 samples) applies to the shadow map. See shadow_filter.
- SHADOW_FILTER_PCF5 = 2 — Percentage closer filtering (5 samples) applies to the shadow map. See shadow_filter.
- SHADOW_FILTER_PCF7 = 3 — Percentage closer filtering (7 samples) applies to the shadow map. See shadow_filter.
- SHADOW_FILTER_PCF9 = 4 — Percentage closer filtering (9 samples) applies to the shadow map. See shadow_filter.
- SHADOW_FILTER_PCF13 = 5 — Percentage closer filtering (13 samples) applies to the shadow map. See shadow_filter.
Property Descriptions¶
- Color color
| Default | Color( 1, 1, 1, 1 ) |
| Setter | set_color(value) |
| Getter | get_color() |
The Light2D’s Color.
- bool editor_only
| Default | false |
| Setter | set_editor_only(value) |
| Getter | is_editor_only() |
If true, Light2D will only appear when editing the scene.
- bool enabled
| Default | true |
| Setter | set_enabled(value) |
| Getter | is_enabled() |
If true, Light2D will emit light.
- float energy
| Default | 1.0 |
| Setter | set_energy(value) |
| Getter | get_energy() |
The Light2D’s energy value. The larger the value, the stronger the light.
- Mode mode
| Default | 0 |
| Setter | set_mode(value) |
| Getter | get_mode() |
The Light2D’s mode. See Mode constants for values.
- Vector2 offset
| Default | Vector2( 0, 0 ) |
| Setter | set_texture_offset(value) |
| Getter | get_texture_offset() |
The offset of the Light2D’s texture.
- float range_height
| Default | 0.0 |
| Setter | set_height(value) |
| Getter | get_height() |
The height of the Light2D. Used with 2D normal mapping.
- int range_item_cull_mask
| Default | 1 |
| Setter | set_item_cull_mask(value) |
| Getter | get_item_cull_mask() |
The layer mask. Only objects with a matching mask will be affected by the Light2D.
- int range_layer_max
| Default | 0 |
| Setter | set_layer_range_max(value) |
| Getter | get_layer_range_max() |
Maximum layer value of objects that are affected by the Light2D.
- int range_layer_min
| Default | 0 |
| Setter | set_layer_range_min(value) |
| Getter | get_layer_range_min() |
Minimum layer value of objects that are affected by the Light2D.
- int range_z_max
| Default | 1024 |
| Setter | set_z_range_max(value) |
| Getter | get_z_range_max() |
Maximum z value of objects that are affected by the Light2D.
- int range_z_min
| Default | -1024 |
| Setter | set_z_range_min(value) |
| Getter | get_z_range_min() |
Minimum z value of objects that are affected by the Light2D.
- int shadow_buffer_size
| Default | 2048 |
| Setter | set_shadow_buffer_size(value) |
| Getter | get_shadow_buffer_size() |
Shadow buffer size.
- Color shadow_color
| Default | Color( 0, 0, 0, 0 ) |
| Setter | set_shadow_color(value) |
| Getter | get_shadow_color() |
Color of shadows cast by the Light2D.
- bool shadow_enabled
| Default | false |
| Setter | set_shadow_enabled(value) |
| Getter | is_shadow_enabled() |
If true, the Light2D will cast shadows.
- ShadowFilter shadow_filter
| Default | 0 |
| Setter | set_shadow_filter(value) |
| Getter | get_shadow_filter() |
Shadow filter type. See ShadowFilter for possible values.
- float shadow_filter_smooth
| Default | 0.0 |
| Setter | set_shadow_smooth(value) |
| Getter | get_shadow_smooth() |
Smoothing value for shadows.
- float shadow_gradient_length
| Default | 0.0 |
| Setter | set_shadow_gradient_length(value) |
| Getter | get_shadow_gradient_length() |
Smooth shadow gradient length.
- int shadow_item_cull_mask
| Default | 1 |
| Setter | set_item_shadow_cull_mask(value) |
| Getter | get_item_shadow_cull_mask() |
The shadow mask. Used with LightOccluder2D to cast shadows. Only occluders with a matching light mask will cast shadows.
- Texture texture
| Setter | set_texture(value) |
| Getter | get_texture() |
Texture used for the Light2D’s appearance.
- float texture_scale
| Default | 1.0 |
| Setter | set_texture_scale(value) |
| Getter | get_texture_scale() |
The texture’s scale factor.
LightOccluder2D¶
Inherits: Node2D < CanvasItem < Node < Object
Occludes light cast by a Light2D, casting shadows.
Description¶
Occludes light cast by a Light2D, casting shadows. The LightOccluder2D must be provided with an OccluderPolygon2D in order for the shadow to be computed.
Tutorials¶
Properties¶
| int | light_mask | 1 |
| OccluderPolygon2D | occluder |
Property Descriptions¶
- int light_mask
| Default | 1 |
| Setter | set_occluder_light_mask(value) |
| Getter | get_occluder_light_mask() |
The LightOccluder2D’s light mask. The LightOccluder2D will cast shadows only from Light2D(s) that have the same light mask(s).
- OccluderPolygon2D occluder
| Setter | set_occluder_polygon(value) |
| Getter | get_occluder_polygon() |
The OccluderPolygon2D used to compute the shadow.
Line2D¶
Inherits: Node2D < CanvasItem < Node < Object
A 2D line.
Description¶
A line through several points in 2D space.
Note: By default, Godot can only draw up to 4,096 polygon points at a time. To increase this limit, open the Project Settings and increase ProjectSettings.rendering/limits/buffers/canvas_polygon_buffer_size_kb and ProjectSettings.rendering/limits/buffers/canvas_polygon_index_buffer_size_kb.
Properties¶
| bool | antialiased | false |
| LineCapMode | begin_cap_mode | 0 |
| Color | default_color | Color( 0.4, 0.5, 1, 1 ) |
| LineCapMode | end_cap_mode | 0 |
| Gradient | gradient | |
| LineJointMode | joint_mode | 0 |
| PoolVector2Array | points | PoolVector2Array( ) |
| int | round_precision | 8 |
| float | sharp_limit | 2.0 |
| Texture | texture | |
| LineTextureMode | texture_mode | 0 |
| float | width | 10.0 |
| Curve | width_curve |
Methods¶
| void | add_point ( Vector2 position, int at_position=-1 ) |
| void | clear_points ( ) |
| int | get_point_count ( ) const |
| Vector2 | get_point_position ( int i ) const |
| void | remove_point ( int i ) |
| void | set_point_position ( int i, Vector2 position ) |
Enumerations¶
enum LineJointMode:
- LINE_JOINT_SHARP = 0 — The line’s joints will be pointy. If
sharp_limitis greater than the rotation of a joint, it becomes a bevel joint instead. - LINE_JOINT_BEVEL = 1 — The line’s joints will be bevelled/chamfered.
- LINE_JOINT_ROUND = 2 — The line’s joints will be rounded.
enum LineCapMode:
- LINE_CAP_NONE = 0 — Don’t draw a line cap.
- LINE_CAP_BOX = 1 — Draws the line cap as a box.
- LINE_CAP_ROUND = 2 — Draws the line cap as a circle.
enum LineTextureMode:
- LINE_TEXTURE_NONE = 0 — Takes the left pixels of the texture and renders it over the whole line.
- LINE_TEXTURE_TILE = 1 — Tiles the texture over the line. The texture must be imported with Repeat enabled for it to work properly.
- LINE_TEXTURE_STRETCH = 2 — Stretches the texture across the line. Import the texture with Repeat disabled for best results.
Property Descriptions¶
- bool antialiased
| Default | false |
| Setter | set_antialiased(value) |
| Getter | get_antialiased() |
If true, the line’s border will be anti-aliased.
- LineCapMode begin_cap_mode
| Default | 0 |
| Setter | set_begin_cap_mode(value) |
| Getter | get_begin_cap_mode() |
Controls the style of the line’s first point. Use LineCapMode constants.
- Color default_color
| Default | Color( 0.4, 0.5, 1, 1 ) |
| Setter | set_default_color(value) |
| Getter | get_default_color() |
The line’s color. Will not be used if a gradient is set.
- LineCapMode end_cap_mode
| Default | 0 |
| Setter | set_end_cap_mode(value) |
| Getter | get_end_cap_mode() |
Controls the style of the line’s last point. Use LineCapMode constants.
- Gradient gradient
| Setter | set_gradient(value) |
| Getter | get_gradient() |
The gradient is drawn through the whole line from start to finish. The default color will not be used if a gradient is set.
- LineJointMode joint_mode
| Default | 0 |
| Setter | set_joint_mode(value) |
| Getter | get_joint_mode() |
The style for the points between the start and the end.
- PoolVector2Array points
| Default | PoolVector2Array( ) |
| Setter | set_points(value) |
| Getter | get_points() |
The points that form the lines. The line is drawn between every point set in this array.
- int round_precision
| Default | 8 |
| Setter | set_round_precision(value) |
| Getter | get_round_precision() |
The smoothness of the rounded joints and caps. This is only used if a cap or joint is set as round.
- float sharp_limit
| Default | 2.0 |
| Setter | set_sharp_limit(value) |
| Getter | get_sharp_limit() |
The direction difference in radians between vector points. This value is only used if joint mode is set to LINE_JOINT_SHARP.
- Texture texture
| Setter | set_texture(value) |
| Getter | get_texture() |
The texture used for the line’s texture. Uses texture_mode for drawing style.
- LineTextureMode texture_mode
| Default | 0 |
| Setter | set_texture_mode(value) |
| Getter | get_texture_mode() |
The style to render the texture on the line. Use LineTextureMode constants.
- float width
| Default | 10.0 |
| Setter | set_width(value) |
| Getter | get_width() |
The line’s width.
- Curve width_curve
| Setter | set_curve(value) |
| Getter | get_curve() |
The line’s width varies with the curve. The original width is simply multiply by the value of the Curve.
Method Descriptions¶
Adds a point at the position. Appends the point at the end of the line.
If at_position is given, the point is inserted before the point number at_position, moving that point (and every point after) after the inserted point. If at_position is not given, or is an illegal value (at_position < 0 or at_position >= [method get_point_count]), the point will be appended at the end of the point list.
- void clear_points ( )
Removes all points from the line.
- int get_point_count ( ) const
Returns the Line2D’s amount of points.
Returns point i’s position.
- void remove_point ( int i )
Removes the point at index i from the line.
Overwrites the position in point i with the supplied position.
LineEdit¶
Inherits: Control < CanvasItem < Node < Object
Control that provides single-line string editing.
Description¶
LineEdit provides a single-line string editor, used for text fields.
It features many built-in shortcuts which will always be available (Ctrl here maps to Command on macOS):
- Ctrl + C: Copy
- Ctrl + X: Cut
- Ctrl + V or Ctrl + Y: Paste/”yank”
- Ctrl + Z: Undo
- Ctrl + Shift + Z: Redo
- Ctrl + U: Delete text from the cursor position to the beginning of the line
- Ctrl + K: Delete text from the cursor position to the end of the line
- Ctrl + A: Select all text
- Up/Down arrow: Move the cursor to the beginning/end of the line
On macOS, some extra keyboard shortcuts are available:
- Ctrl + F: Like the right arrow key, move the cursor one character right
- Ctrl + B: Like the left arrow key, move the cursor one character left
- Ctrl + P: Like the up arrow key, move the cursor to the previous line
- Ctrl + N: Like the down arrow key, move the cursor to the next line
- Ctrl + D: Like the Delete key, delete the character on the right side of cursor
- Ctrl + H: Like the Backspace key, delete the character on the left side of the cursor
- Command + Left arrow: Like the Home key, move the cursor to the beginning of the line
- Command + Right arrow: Like the End key, move the cursor to the end of the line
Properties¶
| Align | align | 0 |
| bool | caret_blink | false |
| float | caret_blink_speed | 0.65 |
| int | caret_position | 0 |
| bool | clear_button_enabled | false |
| bool | context_menu_enabled | true |
| bool | editable | true |
| bool | expand_to_text_length | false |
| FocusMode | focus_mode | O: 2 |
| int | max_length | 0 |
| CursorShape | mouse_default_cursor_shape | O: 1 |
| float | placeholder_alpha | 0.6 |
| String | placeholder_text | "" |
| Texture | right_icon | |
| bool | secret | false |
| String | secret_character | "*" |
| bool | selecting_enabled | true |
| bool | shortcut_keys_enabled | true |
| String | text | "" |
Methods¶
| void | append_at_cursor ( String text ) |
| void | clear ( ) |
| void | deselect ( ) |
| PopupMenu | get_menu ( ) const |
| void | menu_option ( int option ) |
| void | select ( int from=0, int to=-1 ) |
| void | select_all ( ) |
Theme Properties¶
| Texture | clear | |
| Color | clear_button_color | Color( 0.88, 0.88, 0.88, 1 ) |
| Color | clear_button_color_pressed | Color( 1, 1, 1, 1 ) |
| Color | cursor_color | Color( 0.94, 0.94, 0.94, 1 ) |
| StyleBox | focus | |
| Font | font | |
| Color | font_color | Color( 0.88, 0.88, 0.88, 1 ) |
| Color | font_color_selected | Color( 0, 0, 0, 1 ) |
| Color | font_color_uneditable | Color( 0.88, 0.88, 0.88, 0.5 ) |
| int | minimum_spaces | 12 |
| StyleBox | normal | |
| StyleBox | read_only | |
| Color | selection_color | Color( 0.49, 0.49, 0.49, 1 ) |
Signals¶
- text_change_rejected ( )
Emitted when trying to append text that would overflow the max_length.
- text_changed ( String new_text )
Emitted when the text changes.
- text_entered ( String new_text )
Emitted when the user presses @GlobalScope.KEY_ENTER on the LineEdit.
Enumerations¶
enum Align:
- ALIGN_LEFT = 0 — Aligns the text on the left-hand side of the
LineEdit. - ALIGN_CENTER = 1 — Centers the text in the middle of the
LineEdit. - ALIGN_RIGHT = 2 — Aligns the text on the right-hand side of the
LineEdit. - ALIGN_FILL = 3 — Stretches whitespaces to fit the
LineEdit’s width.
- MENU_CUT = 0 — Cuts (copies and clears) the selected text.
- MENU_COPY = 1 — Copies the selected text.
- MENU_PASTE = 2 — Pastes the clipboard text over the selected text (or at the cursor’s position).
Non-printable escape characters are automatically stripped from the OS clipboard via String.strip_escapes.
- MENU_CLEAR = 3 — Erases the whole
LineEdittext. - MENU_SELECT_ALL = 4 — Selects the whole
LineEdittext. - MENU_UNDO = 5 — Undoes the previous action.
- MENU_REDO = 6 — Reverse the last undo action.
- MENU_MAX = 7 — Represents the size of the MenuItems enum.
Property Descriptions¶
- Align align
| Default | 0 |
| Setter | set_align(value) |
| Getter | get_align() |
Text alignment as defined in the Align enum.
- bool caret_blink
| Default | false |
| Setter | cursor_set_blink_enabled(value) |
| Getter | cursor_get_blink_enabled() |
If true, the caret (visual cursor) blinks.
- float caret_blink_speed
| Default | 0.65 |
| Setter | cursor_set_blink_speed(value) |
| Getter | cursor_get_blink_speed() |
Duration (in seconds) of a caret’s blinking cycle.
- int caret_position
| Default | 0 |
| Setter | set_cursor_position(value) |
| Getter | get_cursor_position() |
The cursor’s position inside the LineEdit. When set, the text may scroll to accommodate it.
- bool clear_button_enabled
| Default | false |
| Setter | set_clear_button_enabled(value) |
| Getter | is_clear_button_enabled() |
If true, the LineEdit will show a clear button if text is not empty, which can be used to clear the text quickly.
| Default | true |
| Setter | set_context_menu_enabled(value) |
| Getter | is_context_menu_enabled() |
If true, the context menu will appear when right-clicked.
- bool editable
| Default | true |
| Setter | set_editable(value) |
| Getter | is_editable() |
If false, existing text cannot be modified and new text cannot be added.
- bool expand_to_text_length
| Default | false |
| Setter | set_expand_to_text_length(value) |
| Getter | get_expand_to_text_length() |
If true, the LineEdit width will increase to stay longer than the text. It will not compress if the text is shortened.
- int max_length
| Default | 0 |
| Setter | set_max_length(value) |
| Getter | get_max_length() |
Maximum amount of characters that can be entered inside the LineEdit. If 0, there is no limit.
- float placeholder_alpha
| Default | 0.6 |
| Setter | set_placeholder_alpha(value) |
| Getter | get_placeholder_alpha() |
Opacity of the placeholder_text. From 0 to 1.
- String placeholder_text
| Default | "" |
| Setter | set_placeholder(value) |
| Getter | get_placeholder() |
Text shown when the LineEdit is empty. It is not the LineEdit’s default value (see text).
- Texture right_icon
| Setter | set_right_icon(value) |
| Getter | get_right_icon() |
Sets the icon that will appear in the right end of the LineEdit if there’s no text, or always, if clear_button_enabled is set to false.
- bool secret
| Default | false |
| Setter | set_secret(value) |
| Getter | is_secret() |
If true, every character is replaced with the secret character (see secret_character).
- String secret_character
| Default | "*" |
| Setter | set_secret_character(value) |
| Getter | get_secret_character() |
The character to use to mask secret input (defaults to “*”). Only a single character can be used as the secret character.
- bool selecting_enabled
| Default | true |
| Setter | set_selecting_enabled(value) |
| Getter | is_selecting_enabled() |
If false, it’s impossible to select the text using mouse nor keyboard.
- bool shortcut_keys_enabled
| Default | true |
| Setter | set_shortcut_keys_enabled(value) |
| Getter | is_shortcut_keys_enabled() |
If false, using shortcuts will be disabled.
- String text
| Default | "" |
| Setter | set_text(value) |
| Getter | get_text() |
String value of the LineEdit.
Note: Changing text using this property won’t emit the text_changed signal.
Method Descriptions¶
- void append_at_cursor ( String text )
Adds text after the cursor. If the resulting value is longer than max_length, nothing happens.
- void clear ( )
Erases the LineEdit text.
- void deselect ( )
Clears the current selection.
Returns the PopupMenu of this LineEdit. By default, this menu is displayed when right-clicking on the LineEdit.
Executes a given action as defined in the MenuItems enum.
Selects characters inside LineEdit between from and to. By default, from is at the beginning and to at the end.
text = "Welcome"
select() # Will select "Welcome".
select(4) # Will select "ome".
select(2, 5) # Will select "lco".
- void select_all ( )
Selects the whole String.
LineShape2D¶
Inherits: Shape2D < Resource < Reference < Object
Line shape for 2D collisions.
Description¶
Line shape for 2D collisions. It works like a 2D plane and will not allow any physics body to go to the negative side. Not recommended for rigid bodies, and usually not recommended for static bodies either because it forces checks against it on every frame.
LinkButton¶
Inherits: BaseButton < Control < CanvasItem < Node < Object
Simple button used to represent a link to some resource.
Description¶
This kind of button is primarily used when the interaction with the button causes a context change (like linking to a web page).
Properties¶
| FocusMode | enabled_focus_mode | O: 0 |
| FocusMode | focus_mode | O: 0 |
| CursorShape | mouse_default_cursor_shape | O: 2 |
| String | text | "" |
| UnderlineMode | underline | 0 |
Theme Properties¶
| StyleBox | focus | |
| Font | font | |
| Color | font_color | Color( 0.88, 0.88, 0.88, 1 ) |
| Color | font_color_hover | Color( 0.94, 0.94, 0.94, 1 ) |
| Color | font_color_pressed | Color( 1, 1, 1, 1 ) |
| int | underline_spacing | 2 |
Enumerations¶
- UNDERLINE_MODE_ALWAYS = 0 — The LinkButton will always show an underline at the bottom of its text.
- UNDERLINE_MODE_ON_HOVER = 1 — The LinkButton will show an underline at the bottom of its text when the mouse cursor is over it.
- UNDERLINE_MODE_NEVER = 2 — The LinkButton will never show an underline at the bottom of its text.
Property Descriptions¶
- String text
| Default | "" |
| Setter | set_text(value) |
| Getter | get_text() |
The button’s text that will be displayed inside the button’s area.
- UnderlineMode underline
| Default | 0 |
| Setter | set_underline_mode(value) |
| Getter | get_underline_mode() |
Determines when to show the underline. See UnderlineMode for options.
Listener¶
Inherits: Spatial < Node < Object
Overrides the location sounds are heard from.
Description¶
Once added to the scene tree and enabled using make_current, this node will override the location sounds are heard from. This can be used to listen from a location different from the Camera.
Note: There is no 2D equivalent for this node yet.
Methods¶
| void | clear_current ( ) |
| Transform | get_listener_transform ( ) const |
| bool | is_current ( ) const |
| void | make_current ( ) |
Method Descriptions¶
- void clear_current ( )
Disables the listener to use the current camera’s listener instead.
- Transform get_listener_transform ( ) const
Returns the listener’s global orthonormalized Transform.
- bool is_current ( ) const
Returns true if the listener was made current using make_current, false otherwise.
Note: There may be more than one Listener marked as “current” in the scene tree, but only the one that was made current last will be used.
- void make_current ( )
Enables the listener. This will override the current camera’s listener.
MainLoop¶
Inherits: Object
Inherited By: SceneTree
Abstract base class for the game’s main loop.
Description¶
MainLoop is the abstract base class for a Godot project’s game loop. It is inherited by SceneTree, which is the default game loop implementation used in Godot projects, though it is also possible to write and use one’s own MainLoop subclass instead of the scene tree.
Upon the application start, a MainLoop implementation must be provided to the OS; otherwise, the application will exit. This happens automatically (and a SceneTree is created) unless a main Script is provided from the command line (with e.g. godot -s my_loop.gd, which should then be a MainLoop implementation.
Here is an example script implementing a simple MainLoop:
extends MainLoop
var time_elapsed = 0
var keys_typed = []
var quit = false
func _initialize():
print("Initialized:")
print(" Starting time: %s" % str(time_elapsed))
func _idle(delta):
time_elapsed += delta
# Return true to end the main loop.
return quit
func _input_event(event):
# Record keys.
if event is InputEventKey and event.pressed and !event.echo:
keys_typed.append(OS.get_scancode_string(event.scancode))
# Quit on Escape press.
if event.scancode == KEY_ESCAPE:
quit = true
# Quit on any mouse click.
if event is InputEventMouseButton:
quit = true
func _finalize():
print("Finalized:")
print(" End time: %s" % str(time_elapsed))
print(" Keys typed: %s" % var2str(keys_typed))
Methods¶
| void | _drop_files ( PoolStringArray files, int from_screen ) virtual |
| void | _finalize ( ) virtual |
| void | _global_menu_action ( Variant id, Variant meta ) virtual |
| bool | _idle ( float delta ) virtual |
| void | _initialize ( ) virtual |
| void | _input_event ( InputEvent event ) virtual |
| void | _input_text ( String text ) virtual |
| bool | _iteration ( float delta ) virtual |
| void | finish ( ) |
| bool | idle ( float delta ) |
| void | init ( ) |
| void | input_event ( InputEvent event ) |
| void | input_text ( String text ) |
| bool | iteration ( float delta ) |
Signals¶
Emitted when a user responds to a permission request.
Constants¶
- NOTIFICATION_WM_MOUSE_ENTER = 1002 — Notification received from the OS when the mouse enters the game window.
Implemented on desktop and web platforms.
- NOTIFICATION_WM_MOUSE_EXIT = 1003 — Notification received from the OS when the mouse leaves the game window.
Implemented on desktop and web platforms.
- NOTIFICATION_WM_FOCUS_IN = 1004 — Notification received from the OS when the game window is focused.
Implemented on all platforms.
- NOTIFICATION_WM_FOCUS_OUT = 1005 — Notification received from the OS when the game window is unfocused.
Implemented on all platforms.
- NOTIFICATION_WM_QUIT_REQUEST = 1006 — Notification received from the OS when a quit request is sent (e.g. closing the window with a “Close” button or Alt+F4).
Implemented on desktop platforms.
- NOTIFICATION_WM_GO_BACK_REQUEST = 1007 — Notification received from the OS when a go back request is sent (e.g. pressing the “Back” button on Android).
Specific to the Android platform.
- NOTIFICATION_WM_UNFOCUS_REQUEST = 1008 — Notification received from the OS when an unfocus request is sent (e.g. another OS window wants to take the focus).
No supported platforms currently send this notification.
- NOTIFICATION_OS_MEMORY_WARNING = 1009 — Notification received from the OS when the application is exceeding its allocated memory.
Specific to the iOS platform.
- NOTIFICATION_TRANSLATION_CHANGED = 1010 — Notification received when translations may have changed. Can be triggered by the user changing the locale. Can be used to respond to language changes, for example to change the UI strings on the fly. Useful when working with the built-in translation support, like Object.tr.
- NOTIFICATION_WM_ABOUT = 1011 — Notification received from the OS when a request for “About” information is sent.
Specific to the macOS platform.
- NOTIFICATION_CRASH = 1012 — Notification received from Godot’s crash handler when the engine is about to crash.
Implemented on desktop platforms if the crash handler is enabled.
- NOTIFICATION_OS_IME_UPDATE = 1013 — Notification received from the OS when an update of the Input Method Engine occurs (e.g. change of IME cursor position or composition string).
Specific to the macOS platform.
- NOTIFICATION_APP_RESUMED = 1014 — Notification received from the OS when the app is resumed.
Specific to the Android platform.
- NOTIFICATION_APP_PAUSED = 1015 — Notification received from the OS when the app is paused.
Specific to the Android platform.
Method Descriptions¶
- void _drop_files ( PoolStringArray files, int from_screen ) virtual
Called when files are dragged from the OS file manager and dropped in the game window. The arguments are a list of file paths and the identifier of the screen where the drag originated.
- void _finalize ( ) virtual
Called before the program exits.
Called when the user performs an action in the system global menu (e.g. the Mac OS menu bar).
Called each idle frame with the time since the last idle frame as argument (in seconds). Equivalent to Node._process.
If implemented, the method must return a boolean value. true ends the main loop, while false lets it proceed to the next frame.
- void _initialize ( ) virtual
Called once during initialization.
- void _input_event ( InputEvent event ) virtual
Called whenever an InputEvent is received by the main loop.
- void _input_text ( String text ) virtual
Deprecated callback, does not do anything. Use _input_event to parse text input. Will be removed in Godot 4.0.
Called each physics frame with the time since the last physics frame as argument (in seconds). Equivalent to Node._physics_process.
If implemented, the method must return a boolean value. true ends the main loop, while false lets it proceed to the next frame.
- void finish ( )
Should not be called manually, override _finalize instead. Will be removed in Godot 4.0.
Should not be called manually, override _idle instead. Will be removed in Godot 4.0.
- void init ( )
Should not be called manually, override _initialize instead. Will be removed in Godot 4.0.
- void input_event ( InputEvent event )
Should not be called manually, override _input_event instead. Will be removed in Godot 4.0.
- void input_text ( String text )
Should not be called manually, override _input_text instead. Will be removed in Godot 4.0.
Should not be called manually, override _iteration instead. Will be removed in Godot 4.0.
MarginContainer¶
Inherits: Container < Control < CanvasItem < Node < Object
Simple margin container.
Description¶
Adds a top, left, bottom, and right margin to all Control nodes that are direct children of the container. To control the MarginContainer’s margin, use the margin_* theme properties listed below.
Note: Be careful, Control margin values are different than the constant margin values. If you want to change the custom margin values of the MarginContainer by code, you should use the following examples:
var margin_value = 100
set("custom_constants/margin_top", margin_value)
set("custom_constants/margin_left", margin_value)
set("custom_constants/margin_bottom", margin_value)
set("custom_constants/margin_right", margin_value)
Marshalls¶
Inherits: Object
Data transformation (marshalling) and encoding helpers.
Description¶
Provides data transformation and encoding utility functions.
Methods¶
| PoolByteArray | base64_to_raw ( String base64_str ) |
| String | base64_to_utf8 ( String base64_str ) |
| Variant | base64_to_variant ( String base64_str, bool allow_objects=false ) |
| String | raw_to_base64 ( PoolByteArray array ) |
| String | utf8_to_base64 ( String utf8_str ) |
| String | variant_to_base64 ( Variant variant, bool full_objects=false ) |
Method Descriptions¶
- PoolByteArray base64_to_raw ( String base64_str )
Returns a decoded PoolByteArray corresponding to the Base64-encoded string base64_str.
Returns a decoded string corresponding to the Base64-encoded string base64_str.
Returns a decoded Variant corresponding to the Base64-encoded string base64_str. If allow_objects is true, decoding objects is allowed.
Warning: Deserialized objects can contain code which gets executed. Do not use this option if the serialized object comes from untrusted sources to avoid potential security threats such as remote code execution.
- String raw_to_base64 ( PoolByteArray array )
Returns a Base64-encoded string of a given PoolByteArray.
Returns a Base64-encoded string of the UTF-8 string utf8_str.
Returns a Base64-encoded string of the Variant variant. If full_objects is true, encoding objects is allowed (and can potentially include code).
Material¶
Inherits: Resource < Reference < Object
Inherited By: CanvasItemMaterial, ParticlesMaterial, ShaderMaterial, SpatialMaterial
Abstract base Resource for coloring and shading geometry.
Description¶
Material is a base Resource used for coloring and shading geometry. All materials inherit from it and almost all VisualInstance derived nodes carry a Material. A few flags and parameters are shared between all material types and are configured here.
Properties¶
| Material | next_pass | |
| int | render_priority | 0 |
Constants¶
- RENDER_PRIORITY_MAX = 127 — Maximum value for the render_priority parameter.
- RENDER_PRIORITY_MIN = -128 — Minimum value for the render_priority parameter.
Property Descriptions¶
- Material next_pass
| Setter | set_next_pass(value) |
| Getter | get_next_pass() |
Sets the Material to be used for the next pass. This renders the object again using a different material.
Note: only applies to SpatialMaterials and ShaderMaterials with type “Spatial”.
- int render_priority
| Default | 0 |
| Setter | set_render_priority(value) |
| Getter | get_render_priority() |
Sets the render priority for transparent objects in 3D scenes. Higher priority objects will be sorted in front of lower priority objects.
Note: this only applies to sorting of transparent objects. This will not impact how transparent objects are sorted relative to opaque objects. This is because opaque objects are sorted based on depth, while transparent objects are sorted from back to front (subject to priority).
Mesh¶
Inherits: Resource < Reference < Object
Inherited By: ArrayMesh, PrimitiveMesh
A Resource that contains vertex array-based geometry.
Description¶
Mesh is a type of Resource that contains vertex array-based geometry, divided in surfaces. Each surface contains a completely separate array and a material used to draw it. Design wise, a mesh with multiple surfaces is preferred to a single surface, because objects created in 3D editing software commonly contain multiple materials.
Properties¶
| Vector2 | lightmap_size_hint | Vector2( 0, 0 ) |
Methods¶
| Shape | create_convex_shape ( ) const |
| Mesh | create_outline ( float margin ) const |
| Shape | create_trimesh_shape ( ) const |
| TriangleMesh | generate_triangle_mesh ( ) const |
| AABB | get_aabb ( ) const |
| PoolVector3Array | get_faces ( ) const |
| int | get_surface_count ( ) const |
| Array | surface_get_arrays ( int surf_idx ) const |
| Array | surface_get_blend_shape_arrays ( int surf_idx ) const |
| Material | surface_get_material ( int surf_idx ) const |
| void | surface_set_material ( int surf_idx, Material material ) |
Enumerations¶
enum PrimitiveType:
- PRIMITIVE_POINTS = 0 — Render array as points (one vertex equals one point).
- PRIMITIVE_LINES = 1 — Render array as lines (every two vertices a line is created).
- PRIMITIVE_LINE_STRIP = 2 — Render array as line strip.
- PRIMITIVE_LINE_LOOP = 3 — Render array as line loop (like line strip, but closed).
- PRIMITIVE_TRIANGLES = 4 — Render array as triangles (every three vertices a triangle is created).
- PRIMITIVE_TRIANGLE_STRIP = 5 — Render array as triangle strips.
- PRIMITIVE_TRIANGLE_FAN = 6 — Render array as triangle fans.
enum BlendShapeMode:
- BLEND_SHAPE_MODE_NORMALIZED = 0 — Blend shapes are normalized.
- BLEND_SHAPE_MODE_RELATIVE = 1 — Blend shapes are relative to base weight.
enum ArrayFormat:
- ARRAY_FORMAT_VERTEX = 1 — Mesh array contains vertices. All meshes require a vertex array so this should always be present.
- ARRAY_FORMAT_NORMAL = 2 — Mesh array contains normals.
- ARRAY_FORMAT_TANGENT = 4 — Mesh array contains tangents.
- ARRAY_FORMAT_COLOR = 8 — Mesh array contains colors.
- ARRAY_FORMAT_TEX_UV = 16 — Mesh array contains UVs.
- ARRAY_FORMAT_TEX_UV2 = 32 — Mesh array contains second UV.
- ARRAY_FORMAT_BONES = 64 — Mesh array contains bones.
- ARRAY_FORMAT_WEIGHTS = 128 — Mesh array contains bone weights.
- ARRAY_FORMAT_INDEX = 256 — Mesh array uses indices.
- ARRAY_COMPRESS_BASE = 9 — Used internally to calculate other
ARRAY_COMPRESS_*enum values. Do not use. - ARRAY_COMPRESS_VERTEX = 512 — Flag used to mark a compressed (half float) vertex array.
- ARRAY_COMPRESS_NORMAL = 1024 — Flag used to mark a compressed (half float) normal array.
- ARRAY_COMPRESS_TANGENT = 2048 — Flag used to mark a compressed (half float) tangent array.
- ARRAY_COMPRESS_COLOR = 4096 — Flag used to mark a compressed (half float) color array.
- ARRAY_COMPRESS_TEX_UV = 8192 — Flag used to mark a compressed (half float) UV coordinates array.
- ARRAY_COMPRESS_TEX_UV2 = 16384 — Flag used to mark a compressed (half float) UV coordinates array for the second UV coordinates.
- ARRAY_COMPRESS_BONES = 32768 — Flag used to mark a compressed bone array.
- ARRAY_COMPRESS_WEIGHTS = 65536 — Flag used to mark a compressed (half float) weight array.
- ARRAY_COMPRESS_INDEX = 131072 — Flag used to mark a compressed index array.
- ARRAY_FLAG_USE_2D_VERTICES = 262144 — Flag used to mark that the array contains 2D vertices.
- ARRAY_FLAG_USE_16_BIT_BONES = 524288 — Flag used to mark that the array uses 16-bit bones instead of 8-bit.
- ARRAY_COMPRESS_DEFAULT = 97280 — Used to set flags ARRAY_COMPRESS_VERTEX, ARRAY_COMPRESS_NORMAL, ARRAY_COMPRESS_TANGENT, ARRAY_COMPRESS_COLOR, ARRAY_COMPRESS_TEX_UV, ARRAY_COMPRESS_TEX_UV2 and ARRAY_COMPRESS_WEIGHTS quickly.
enum ArrayType:
- ARRAY_VERTEX = 0 — Array of vertices.
- ARRAY_NORMAL = 1 — Array of normals.
- ARRAY_TANGENT = 2 — Array of tangents as an array of floats, 4 floats per tangent.
- ARRAY_COLOR = 3 — Array of colors.
- ARRAY_TEX_UV = 4 — Array of UV coordinates.
- ARRAY_TEX_UV2 = 5 — Array of second set of UV coordinates.
- ARRAY_BONES = 6 — Array of bone data.
- ARRAY_WEIGHTS = 7 — Array of weights.
- ARRAY_INDEX = 8 — Array of indices.
- ARRAY_MAX = 9 — Represents the size of the ArrayType enum.
Property Descriptions¶
- Vector2 lightmap_size_hint
| Default | Vector2( 0, 0 ) |
| Setter | set_lightmap_size_hint(value) |
| Getter | get_lightmap_size_hint() |
Sets a hint to be used for lightmap resolution in BakedLightmap. Overrides BakedLightmap.bake_default_texels_per_unit.
Method Descriptions¶
- Shape create_convex_shape ( ) const
Calculate a ConvexPolygonShape from the mesh.
Calculate an outline mesh at a defined offset (margin) from the original mesh.
Note: This method typically returns the vertices in reverse order (e.g. clockwise to counterclockwise).
- Shape create_trimesh_shape ( ) const
Calculate a ConcavePolygonShape from the mesh.
- TriangleMesh generate_triangle_mesh ( ) const
Generate a TriangleMesh from the mesh.
- AABB get_aabb ( ) const
Returns the smallest AABB enclosing this mesh. Not affected by custom_aabb.
Note: This is only implemented for ArrayMesh and PrimitiveMesh.
- PoolVector3Array get_faces ( ) const
Returns all the vertices that make up the faces of the mesh. Each three vertices represent one triangle.
- int get_surface_count ( ) const
Returns the amount of surfaces that the Mesh holds.
Returns the arrays for the vertices, normals, uvs, etc. that make up the requested surface (see ArrayMesh.add_surface_from_arrays).
Returns the blend shape arrays for the requested surface.
Returns a Material in a given surface. Surface is rendered using this material.
Sets a Material for a given surface. Surface will be rendered using this material.
MeshDataTool¶
Helper tool to access and edit Mesh data.
Description¶
MeshDataTool provides access to individual vertices in a Mesh. It allows users to read and edit vertex data of meshes. It also creates an array of faces and edges.
To use MeshDataTool, load a mesh with create_from_surface. When you are finished editing the data commit the data to a mesh with commit_to_surface.
Below is an example of how MeshDataTool may be used.
var mdt = MeshDataTool.new()
mdt.create_from_surface(mesh, 0)
for i in range(mdt.get_vertex_count()):
var vertex = mdt.get_vertex(i)
...
mdt.set_vertex(i, vertex)
mesh.surface_remove(0)
mdt.commit_to_surface(mesh)
Methods¶
Method Descriptions¶
- void clear ( )
Clears all data currently in MeshDataTool.
Adds a new surface to specified Mesh with edited data.
Uses specified surface of given Mesh to populate data for MeshDataTool.
Requires Mesh with primitive type Mesh.PRIMITIVE_TRIANGLES.
- int get_edge_count ( ) const
Returns the number of edges in this Mesh.
- PoolIntArray get_edge_faces ( int idx ) const
Returns array of faces that touch given edge.
Returns meta information assigned to given edge.
Returns index of specified vertex connected to given edge.
Vertex argument can only be 0 or 1 because edges are comprised of two vertices.
- int get_face_count ( ) const
Returns the number of faces in this Mesh.
Returns specified edge associated with given face.
Edge argument must 2 or less because a face only has three edges.
Returns the metadata associated with the given face.
Calculates and returns the face normal of the given face.
Returns the specified vertex of the given face.
Vertex argument must be 2 or less because faces contain three vertices.
- int get_format ( ) const
Returns the Mesh’s format. Format is an integer made up of Mesh format flags combined together. For example, a mesh containing both vertices and normals would return a format of 3 because ArrayMesh.ARRAY_FORMAT_VERTEX is 1 and ArrayMesh.ARRAY_FORMAT_NORMAL is 2.
See ArrayFormat for a list of format flags.
- Material get_material ( ) const
Returns the material assigned to the Mesh.
Returns the vertex at given index.
- PoolIntArray get_vertex_bones ( int idx ) const
Returns the bones of the given vertex.
Returns the color of the given vertex.
- int get_vertex_count ( ) const
Returns the total number of vertices in Mesh.
- PoolIntArray get_vertex_edges ( int idx ) const
Returns an array of edges that share the given vertex.
- PoolIntArray get_vertex_faces ( int idx ) const
Returns an array of faces that share the given vertex.
Returns the metadata associated with the given vertex.
Returns the normal of the given vertex.
Returns the tangent of the given vertex.
Returns the UV of the given vertex.
Returns the UV2 of the given vertex.
- PoolRealArray get_vertex_weights ( int idx ) const
Returns bone weights of the given vertex.
Sets the metadata of the given edge.
Sets the metadata of the given face.
- void set_material ( Material material )
Sets the material to be used by newly-constructed Mesh.
Sets the position of the given vertex.
- void set_vertex_bones ( int idx, PoolIntArray bones )
Sets the bones of the given vertex.
Sets the color of the given vertex.
Sets the metadata associated with the given vertex.
Sets the normal of the given vertex.
Sets the tangent of the given vertex.
Sets the UV of the given vertex.
Sets the UV2 of the given vertex.
- void set_vertex_weights ( int idx, PoolRealArray weights )
Sets the bone weights of the given vertex.
MeshInstance¶
Inherits: GeometryInstance < VisualInstance < Spatial < Node < Object
Inherited By: SoftBody
Node that instances meshes into a scenario.
Description¶
MeshInstance is a node that takes a Mesh resource and adds it to the current scenario by creating an instance of it. This is the class most often used to get 3D geometry rendered and can be used to instance a single Mesh in many places. This allows to reuse geometry and save on resources. When a Mesh has to be instanced more than thousands of times at close proximity, consider using a MultiMesh in a MultiMeshInstance instead.
Methods¶
| void | create_convex_collision ( ) |
| void | create_debug_tangents ( ) |
| void | create_trimesh_collision ( ) |
| Material | get_surface_material ( int surface ) const |
| int | get_surface_material_count ( ) const |
| void | set_surface_material ( int surface, Material material ) |
Property Descriptions¶
- Mesh mesh
| Setter | set_mesh(value) |
| Getter | get_mesh() |
The Mesh resource for the instance.
- NodePath skeleton
| Default | NodePath("..") |
| Setter | set_skeleton_path(value) |
| Getter | get_skeleton_path() |
NodePath to the Skeleton associated with the instance.
- Skin skin
| Setter | set_skin(value) |
| Getter | get_skin() |
Sets the skin to be used by this instance.
Method Descriptions¶
- void create_convex_collision ( )
This helper creates a StaticBody child node with a ConvexPolygonShape collision shape calculated from the mesh geometry. It’s mainly used for testing.
- void create_debug_tangents ( )
This helper creates a MeshInstance child node with gizmos at every vertex calculated from the mesh geometry. It’s mainly used for testing.
- void create_trimesh_collision ( )
This helper creates a StaticBody child node with a ConcavePolygonShape collision shape calculated from the mesh geometry. It’s mainly used for testing.
Returns the Material for a surface of the Mesh resource.
- int get_surface_material_count ( ) const
Returns the number of surface materials.
MeshInstance2D¶
Inherits: Node2D < CanvasItem < Node < Object
Node used for displaying a Mesh in 2D.
Description¶
Node used for displaying a Mesh in 2D. Can be constructed from an existing Sprite via a tool in the editor toolbar. Select “Sprite” then “Convert to Mesh2D”, select settings in popup and press “Create Mesh2D”.
Property Descriptions¶
- Mesh mesh
| Setter | set_mesh(value) |
| Getter | get_mesh() |
The Mesh that will be drawn by the MeshInstance2D.
- Texture normal_map
| Setter | set_normal_map(value) |
| Getter | get_normal_map() |
The normal map that will be used if using the default CanvasItemMaterial.
- Texture texture
| Setter | set_texture(value) |
| Getter | get_texture() |
The Texture that will be used if using the default CanvasItemMaterial. Can be accessed as TEXTURE in CanvasItem shader.
MeshLibrary¶
Inherits: Resource < Reference < Object
Library of meshes.
Description¶
A library of meshes. Contains a list of Mesh resources, each with a name and ID. Each item can also include collision and navigation shapes. This resource is used in GridMap.
Methods¶
| void | clear ( ) |
| void | create_item ( int id ) |
| int | find_item_by_name ( String name ) const |
| PoolIntArray | get_item_list ( ) const |
| Mesh | get_item_mesh ( int id ) const |
| String | get_item_name ( int id ) const |
| NavigationMesh | get_item_navmesh ( int id ) const |
| Transform | get_item_navmesh_transform ( int id ) const |
| Texture | get_item_preview ( int id ) const |
| Array | get_item_shapes ( int id ) const |
| int | get_last_unused_item_id ( ) const |
| void | remove_item ( int id ) |
| void | set_item_mesh ( int id, Mesh mesh ) |
| void | set_item_name ( int id, String name ) |
| void | set_item_navmesh ( int id, NavigationMesh navmesh ) |
| void | set_item_navmesh_transform ( int id, Transform navmesh ) |
| void | set_item_preview ( int id, Texture texture ) |
| void | set_item_shapes ( int id, Array shapes ) |
Method Descriptions¶
- void clear ( )
Clears the library.
- void create_item ( int id )
Creates a new item in the library with the given ID.
You can get an unused ID from get_last_unused_item_id.
Returns the first item with the given name.
- PoolIntArray get_item_list ( ) const
Returns the list of item IDs in use.
Returns the item’s mesh.
Returns the item’s name.
Returns the item’s navigation mesh.
Returns the transform applied to the item’s navigation mesh.
When running in the editor, returns a generated item preview (a 3D rendering in isometric perspective). When used in a running project, returns the manually-defined item preview which can be set using set_item_preview. Returns an empty Texture if no preview was manually set in a running project.
Returns an item’s collision shapes.
The array consists of each Shape followed by its Transform.
- int get_last_unused_item_id ( ) const
Gets an unused ID for a new item.
- void remove_item ( int id )
Removes the item.
Sets the item’s mesh.
Sets the item’s name.
This name is shown in the editor. It can also be used to look up the item later using find_item_by_name.
Sets the item’s navigation mesh.
Sets the transform to apply to the item’s navigation mesh.
Sets a texture to use as the item’s preview icon in the editor.
Sets an item’s collision shapes.
The array should consist of Shape objects, each followed by a Transform that will be applied to it. For shapes that should not have a transform, use Transform.IDENTITY.
MeshTexture¶
Inherits: Texture < Resource < Reference < Object
Simple texture that uses a mesh to draw itself.
Description¶
Simple texture that uses a mesh to draw itself. It’s limited because flags can’t be changed and region drawing is not supported.
Properties¶
| Texture | base_texture | |
| int | flags | O: 0 |
| Vector2 | image_size | Vector2( 0, 0 ) |
| Mesh | mesh |
Property Descriptions¶
- Texture base_texture
| Setter | set_base_texture(value) |
| Getter | get_base_texture() |
Sets the base texture that the Mesh will use to draw.
- Vector2 image_size
| Default | Vector2( 0, 0 ) |
| Setter | set_image_size(value) |
| Getter | get_image_size() |
Sets the size of the image, needed for reference.
- Mesh mesh
| Setter | set_mesh(value) |
| Getter | get_mesh() |
Sets the mesh used to draw. It must be a mesh using 2D vertices.
MobileVRInterface¶
Inherits: ARVRInterface < Reference < Object
Generic mobile VR implementation.
Description¶
This is a generic mobile VR implementation where you need to provide details about the phone and HMD used. It does not rely on any existing framework. This is the most basic interface we have. For the best effect, you need a mobile phone with a gyroscope and accelerometer.
Note that even though there is no positional tracking, the camera will assume the headset is at a height of 1.85 meters. You can change this by setting eye_height.
You can initialise this interface as follows:
var interface = ARVRServer.find_interface("Native mobile")
if interface and interface.initialize():
get_viewport().arvr = true
Properties¶
| float | display_to_lens | 4.0 |
| float | display_width | 14.5 |
| float | eye_height | 1.85 |
| float | iod | 6.0 |
| float | k1 | 0.215 |
| float | k2 | 0.215 |
| float | oversample | 1.5 |
Property Descriptions¶
- float display_to_lens
| Default | 4.0 |
| Setter | set_display_to_lens(value) |
| Getter | get_display_to_lens() |
The distance between the display and the lenses inside of the device in centimeters.
- float display_width
| Default | 14.5 |
| Setter | set_display_width(value) |
| Getter | get_display_width() |
The width of the display in centimeters.
- float eye_height
| Default | 1.85 |
| Setter | set_eye_height(value) |
| Getter | get_eye_height() |
The height at which the camera is placed in relation to the ground (i.e. ARVROrigin node).
- float iod
| Default | 6.0 |
| Setter | set_iod(value) |
| Getter | get_iod() |
The interocular distance, also known as the interpupillary distance. The distance between the pupils of the left and right eye.
- float k1
| Default | 0.215 |
| Setter | set_k1(value) |
| Getter | get_k1() |
The k1 lens factor is one of the two constants that define the strength of the lens used and directly influences the lens distortion effect.
- float k2
| Default | 0.215 |
| Setter | set_k2(value) |
| Getter | get_k2() |
The k2 lens factor, see k1.
- float oversample
| Default | 1.5 |
| Setter | set_oversample(value) |
| Getter | get_oversample() |
The oversample setting. Because of the lens distortion we have to render our buffers at a higher resolution then the screen can natively handle. A value between 1.5 and 2.0 often provides good results but at the cost of performance.
MultiMesh¶
Inherits: Resource < Reference < Object
Provides high-performance mesh instancing.
Description¶
MultiMesh provides low-level mesh instancing. Drawing thousands of MeshInstance nodes can be slow, since each object is submitted to the GPU then drawn individually.
MultiMesh is much faster as it can draw thousands of instances with a single draw call, resulting in less API overhead.
As a drawback, if the instances are too far away of each other, performance may be reduced as every single instance will always rendered (they are spatially indexed as one, for the whole object).
Since instances may have any behavior, the AABB used for visibility must be provided by the user.
Properties¶
| ColorFormat | color_format | 0 |
| CustomDataFormat | custom_data_format | 0 |
| int | instance_count | 0 |
| Mesh | mesh | |
| TransformFormat | transform_format | 0 |
| int | visible_instance_count | -1 |
Methods¶
| AABB | get_aabb ( ) const |
| Color | get_instance_color ( int instance ) const |
| Color | get_instance_custom_data ( int instance ) const |
| Transform | get_instance_transform ( int instance ) const |
| Transform2D | get_instance_transform_2d ( int instance ) const |
| void | set_as_bulk_array ( PoolRealArray array ) |
| void | set_instance_color ( int instance, Color color ) |
| void | set_instance_custom_data ( int instance, Color custom_data ) |
| void | set_instance_transform ( int instance, Transform transform ) |
| void | set_instance_transform_2d ( int instance, Transform2D transform ) |
Enumerations¶
enum TransformFormat:
- TRANSFORM_2D = 0 — Use this when using 2D transforms.
- TRANSFORM_3D = 1 — Use this when using 3D transforms.
enum ColorFormat:
- COLOR_NONE = 0 — Use when you are not using per-instance Colors.
- COLOR_8BIT = 1 — Compress Color data into 8 bits when passing to shader. This uses less memory and can be faster, but the Color loses precision.
- COLOR_FLOAT = 2 — The Color passed into set_instance_color will use 4 floats. Use this for highest precision Color.
enum CustomDataFormat:
- CUSTOM_DATA_NONE = 0 — Use when you are not using per-instance custom data.
- CUSTOM_DATA_8BIT = 1 — Compress custom_data into 8 bits when passing to shader. This uses less memory and can be faster, but loses precision and range. Floats packed into 8 bits can only represent values between 0 and 1, numbers outside that range will be clamped.
- CUSTOM_DATA_FLOAT = 2 — The Color passed into set_instance_custom_data will use 4 floats. Use this for highest precision.
Property Descriptions¶
- ColorFormat color_format
| Default | 0 |
| Setter | set_color_format(value) |
| Getter | get_color_format() |
Format of colors in color array that gets passed to shader.
- CustomDataFormat custom_data_format
| Default | 0 |
| Setter | set_custom_data_format(value) |
| Getter | get_custom_data_format() |
Format of custom data in custom data array that gets passed to shader.
- int instance_count
| Default | 0 |
| Setter | set_instance_count(value) |
| Getter | get_instance_count() |
Number of instances that will get drawn. This clears and (re)sizes the buffers. By default, all instances are drawn but you can limit this with visible_instance_count.
- Mesh mesh
| Setter | set_mesh(value) |
| Getter | get_mesh() |
Mesh to be drawn.
- TransformFormat transform_format
| Default | 0 |
| Setter | set_transform_format(value) |
| Getter | get_transform_format() |
Format of transform used to transform mesh, either 2D or 3D.
- int visible_instance_count
| Default | -1 |
| Setter | set_visible_instance_count(value) |
| Getter | get_visible_instance_count() |
Limits the number of instances drawn, -1 draws all instances. Changing this does not change the sizes of the buffers.
Method Descriptions¶
- AABB get_aabb ( ) const
Returns the visibility axis-aligned bounding box.
Gets a specific instance’s color.
Returns the custom data that has been set for a specific instance.
Returns the Transform of a specific instance.
- Transform2D get_instance_transform_2d ( int instance ) const
Returns the Transform2D of a specific instance.
- void set_as_bulk_array ( PoolRealArray array )
Sets all data related to the instances in one go. This is especially useful when loading the data from disk or preparing the data from GDNative.
All data is packed in one large float array. An array may look like this: Transform for instance 1, color data for instance 1, custom data for instance 1, transform for instance 2, color data for instance 2, etc…
Transform is stored as 12 floats, Transform2D is stored as 8 floats, COLOR_8BIT / CUSTOM_DATA_8BIT is stored as 1 float (4 bytes as is) and COLOR_FLOAT / CUSTOM_DATA_FLOAT is stored as 4 floats.
Sets the color of a specific instance.
For the color to take effect, ensure that color_format is non-null on the MultiMesh and SpatialMaterial.vertex_color_use_as_albedo is true on the material.
Sets custom data for a specific instance. Although Color is used, it is just a container for 4 floating point numbers. The format of the number can change depending on the CustomDataFormat used.
Sets the Transform for a specific instance.
- void set_instance_transform_2d ( int instance, Transform2D transform )
Sets the Transform2D for a specific instance.
MultiMeshInstance¶
Inherits: GeometryInstance < VisualInstance < Spatial < Node < Object
Node that instances a MultiMesh.
Description¶
MultiMeshInstance is a specialized node to instance GeometryInstances based on a MultiMesh resource.
This is useful to optimize the rendering of a high amount of instances of a given mesh (for example trees in a forest or grass strands).
Tutorials¶
MultiMeshInstance2D¶
Inherits: Node2D < CanvasItem < Node < Object
Node that instances a MultiMesh in 2D.
Description¶
MultiMeshInstance2D is a specialized node to instance a MultiMesh resource in 2D.
Usage is the same as MultiMeshInstance.
Property Descriptions¶
- MultiMesh multimesh
| Setter | set_multimesh(value) |
| Getter | get_multimesh() |
The MultiMesh that will be drawn by the MultiMeshInstance2D.
- Texture normal_map
| Setter | set_normal_map(value) |
| Getter | get_normal_map() |
The normal map that will be used if using the default CanvasItemMaterial.
- Texture texture
| Setter | set_texture(value) |
| Getter | get_texture() |
The Texture that will be used if using the default CanvasItemMaterial. Can be accessed as TEXTURE in CanvasItem shader.
MultiplayerAPI¶
High-level multiplayer API.
Description¶
This class implements most of the logic behind the high-level multiplayer API.
By default, SceneTree has a reference to this class that is used to provide multiplayer capabilities (i.e. RPC/RSET) across the whole scene.
It is possible to override the MultiplayerAPI instance used by specific Nodes by setting the Node.custom_multiplayer property, effectively allowing to run both client and server in the same scene.
Properties¶
| bool | allow_object_decoding | false |
| NetworkedMultiplayerPeer | network_peer | |
| bool | refuse_new_network_connections | false |
Methods¶
| void | clear ( ) |
| PoolIntArray | get_network_connected_peers ( ) const |
| int | get_network_unique_id ( ) const |
| int | get_rpc_sender_id ( ) const |
| bool | has_network_peer ( ) const |
| bool | is_network_server ( ) const |
| void | poll ( ) |
| Error | send_bytes ( PoolByteArray bytes, int id=0, TransferMode mode=2 ) |
| void | set_root_node ( Node node ) |
Signals¶
- connected_to_server ( )
Emitted when this MultiplayerAPI’s network_peer successfully connected to a server. Only emitted on clients.
- connection_failed ( )
Emitted when this MultiplayerAPI’s network_peer fails to establish a connection to a server. Only emitted on clients.
- network_peer_connected ( int id )
Emitted when this MultiplayerAPI’s network_peer connects with a new peer. ID is the peer ID of the new peer. Clients get notified when other clients connect to the same server. Upon connecting to a server, a client also receives this signal for the server (with ID being 1).
- network_peer_disconnected ( int id )
Emitted when this MultiplayerAPI’s network_peer disconnects from a peer. Clients get notified when other clients disconnect from the same server.
- network_peer_packet ( int id, PoolByteArray packet )
Emitted when this MultiplayerAPI’s network_peer receive a packet with custom data (see send_bytes). ID is the peer ID of the peer that sent the packet.
- server_disconnected ( )
Emitted when this MultiplayerAPI’s network_peer disconnects from server. Only emitted on clients.
Enumerations¶
enum RPCMode:
- RPC_MODE_DISABLED = 0 — Used with Node.rpc_config or Node.rset_config to disable a method or property for all RPC calls, making it unavailable. Default for all methods.
- RPC_MODE_REMOTE = 1 — Used with Node.rpc_config or Node.rset_config to set a method to be called or a property to be changed only on the remote end, not locally. Analogous to the
remotekeyword. Calls and property changes are accepted from all remote peers, no matter if they are node’s master or puppets. - RPC_MODE_MASTER = 2 — Used with Node.rpc_config or Node.rset_config to set a method to be called or a property to be changed only on the network master for this node. Analogous to the
masterkeyword. Only accepts calls or property changes from the node’s network puppets, see Node.set_network_master. - RPC_MODE_PUPPET = 3 — Used with Node.rpc_config or Node.rset_config to set a method to be called or a property to be changed only on puppets for this node. Analogous to the
puppetkeyword. Only accepts calls or property changes from the node’s network master, see Node.set_network_master. - RPC_MODE_SLAVE = 3 — Deprecated. Use RPC_MODE_PUPPET instead. Analogous to the
slavekeyword. - RPC_MODE_REMOTESYNC = 4 — Behave like RPC_MODE_REMOTE but also make the call or property change locally. Analogous to the
remotesynckeyword. - RPC_MODE_SYNC = 4 — Deprecated. Use RPC_MODE_REMOTESYNC instead. Analogous to the
synckeyword. - RPC_MODE_MASTERSYNC = 5 — Behave like RPC_MODE_MASTER but also make the call or property change locally. Analogous to the
mastersynckeyword. - RPC_MODE_PUPPETSYNC = 6 — Behave like RPC_MODE_PUPPET but also make the call or property change locally. Analogous to the
puppetsynckeyword.
Property Descriptions¶
- bool allow_object_decoding
| Default | false |
| Setter | set_allow_object_decoding(value) |
| Getter | is_object_decoding_allowed() |
If true (or if the network_peer has PacketPeer.allow_object_decoding set to true), the MultiplayerAPI will allow encoding and decoding of object during RPCs/RSETs.
Warning: Deserialized objects can contain code which gets executed. Do not use this option if the serialized object comes from untrusted sources to avoid potential security threats such as remote code execution.
- NetworkedMultiplayerPeer network_peer
| Setter | set_network_peer(value) |
| Getter | get_network_peer() |
The peer object to handle the RPC system (effectively enabling networking when set). Depending on the peer itself, the MultiplayerAPI will become a network server (check with is_network_server) and will set root node’s network mode to master, or it will become a regular peer with root node set to puppet. All child nodes are set to inherit the network mode by default. Handling of networking-related events (connection, disconnection, new clients) is done by connecting to MultiplayerAPI’s signals.
- bool refuse_new_network_connections
| Default | false |
| Setter | set_refuse_new_network_connections(value) |
| Getter | is_refusing_new_network_connections() |
If true, the MultiplayerAPI’s network_peer refuses new incoming connections.
Method Descriptions¶
- void clear ( )
Clears the current MultiplayerAPI network state (you shouldn’t call this unless you know what you are doing).
- PoolIntArray get_network_connected_peers ( ) const
Returns the peer IDs of all connected peers of this MultiplayerAPI’s network_peer.
- int get_network_unique_id ( ) const
Returns the unique peer ID of this MultiplayerAPI’s network_peer.
- int get_rpc_sender_id ( ) const
Returns the sender’s peer ID for the RPC currently being executed.
Note: If not inside an RPC this method will return 0.
- bool has_network_peer ( ) const
Returns true if there is a network_peer set.
- bool is_network_server ( ) const
Returns true if this MultiplayerAPI’s network_peer is in server mode (listening for connections).
- void poll ( )
Method used for polling the MultiplayerAPI. You only need to worry about this if you are using Node.custom_multiplayer override or you set SceneTree.multiplayer_poll to false. By default, SceneTree will poll its MultiplayerAPI for you.
Note: This method results in RPCs and RSETs being called, so they will be executed in the same context of this function (e.g. _process, physics, Thread).
- Error send_bytes ( PoolByteArray bytes, int id=0, TransferMode mode=2 )
Sends the given raw bytes to a specific peer identified by id (see NetworkedMultiplayerPeer.set_target_peer). Default ID is 0, i.e. broadcast to all peers.
- void set_root_node ( Node node )
Sets the base root node to use for RPCs. Instead of an absolute path, a relative path will be used to find the node upon which the RPC should be executed.
This effectively allows to have different branches of the scene tree to be managed by different MultiplayerAPI, allowing for example to run both client and server in the same scene.
MultiplayerPeerGDNative¶
Inherits: NetworkedMultiplayerPeer < PacketPeer < Reference < Object
Mutex¶
A synchronization mutex (mutual exclusion).
Description¶
A synchronization mutex (mutual exclusion). This is used to synchronize multiple Threads, and is equivalent to a binary Semaphore. It guarantees that only one thread can ever acquire the lock at a time. A mutex can be used to protect a critical section; however, be careful to avoid deadlocks.
Tutorials¶
Method Descriptions¶
- void lock ( )
Locks this Mutex, blocks until it is unlocked by the current owner.
- Error try_lock ( )
Tries locking this Mutex, but does not block. Returns @GlobalScope.OK on success, @GlobalScope.ERR_BUSY otherwise.
- void unlock ( )
Unlocks this Mutex, leaving it to other threads.
NativeScript¶
Inherits: Script < Resource < Reference < Object
Properties¶
| String | class_name | "" |
| GDNativeLibrary | library | |
| String | script_class_icon_path | "" |
| String | script_class_name | "" |
Methods¶
| String | get_class_documentation ( ) const |
| String | get_method_documentation ( String method ) const |
| String | get_property_documentation ( String path ) const |
| String | get_signal_documentation ( String signal_name ) const |
| Variant | new ( … ) vararg |
Property Descriptions¶
- String class_name
| Default | "" |
| Setter | set_class_name(value) |
| Getter | get_class_name() |
- GDNativeLibrary library
| Setter | set_library(value) |
| Getter | get_library() |
- String script_class_icon_path
| Default | "" |
| Setter | set_script_class_icon_path(value) |
| Getter | get_script_class_icon_path() |
- String script_class_name
| Default | "" |
| Setter | set_script_class_name(value) |
| Getter | get_script_class_name() |
Method Descriptions¶
- String get_class_documentation ( ) const
Returns the documentation string that was previously set with godot_nativescript_set_class_documentation.
Returns the documentation string that was previously set with godot_nativescript_set_method_documentation.
Returns the documentation string that was previously set with godot_nativescript_set_property_documentation.
Returns the documentation string that was previously set with godot_nativescript_set_signal_documentation.
- Variant new ( … ) vararg
Constructs a new object of the base type with a script of this type already attached.
Note: Any arguments passed to this function will be ignored and not passed to the native constructor function. This will change with in a future API extension.
NetworkedMultiplayerENet¶
Inherits: NetworkedMultiplayerPeer < PacketPeer < Reference < Object
PacketPeer implementation using the ENet library.
Description¶
A PacketPeer implementation that should be passed to SceneTree.network_peer after being initialized as either a client or server. Events can then be handled by connecting to SceneTree signals.
Properties¶
| bool | always_ordered | false |
| int | channel_count | 3 |
| CompressionMode | compression_mode | 0 |
| bool | refuse_new_connections | O: false |
| bool | server_relay | true |
| int | transfer_channel | -1 |
| TransferMode | transfer_mode | O: 2 |
Methods¶
| void | close_connection ( int wait_usec=100 ) |
| Error | create_client ( String address, int port, int in_bandwidth=0, int out_bandwidth=0, int client_port=0 ) |
| Error | create_server ( int port, int max_clients=32, int in_bandwidth=0, int out_bandwidth=0 ) |
| void | disconnect_peer ( int id, bool now=false ) |
| int | get_last_packet_channel ( ) const |
| int | get_packet_channel ( ) const |
| String | get_peer_address ( int id ) const |
| int | get_peer_port ( int id ) const |
| void | set_bind_ip ( String ip ) |
Enumerations¶
enum CompressionMode:
- COMPRESS_NONE = 0 — No compression. This uses the most bandwidth, but has the upside of requiring the fewest CPU resources.
- COMPRESS_RANGE_CODER = 1 — ENet’s built-in range encoding.
- COMPRESS_FASTLZ = 2 — FastLZ compression. This option uses less CPU resources compared to COMPRESS_ZLIB, at the expense of using more bandwidth.
- COMPRESS_ZLIB = 3 — Zlib compression. This option uses less bandwidth compared to COMPRESS_FASTLZ, at the expense of using more CPU resources.
- COMPRESS_ZSTD = 4 — Zstandard compression.
Property Descriptions¶
- bool always_ordered
| Default | false |
| Setter | set_always_ordered(value) |
| Getter | is_always_ordered() |
Enforce ordered packets when using NetworkedMultiplayerPeer.TRANSFER_MODE_UNRELIABLE (thus behaving similarly to NetworkedMultiplayerPeer.TRANSFER_MODE_UNRELIABLE_ORDERED). This is the only way to use ordering with the RPC system.
- int channel_count
| Default | 3 |
| Setter | set_channel_count(value) |
| Getter | get_channel_count() |
The number of channels to be used by ENet. Channels are used to separate different kinds of data. In reliable or ordered mode, for example, the packet delivery order is ensured on a per channel basis.
- CompressionMode compression_mode
| Default | 0 |
| Setter | set_compression_mode(value) |
| Getter | get_compression_mode() |
The compression method used for network packets. These have different tradeoffs of compression speed versus bandwidth, you may need to test which one works best for your use case if you use compression at all.
- bool server_relay
| Default | true |
| Setter | set_server_relay_enabled(value) |
| Getter | is_server_relay_enabled() |
Enable or disable the server feature that notifies clients of other peers’ connection/disconnection, and relays messages between them. When this option is false, clients won’t be automatically notified of other peers and won’t be able to send them packets through the server.
- int transfer_channel
| Default | -1 |
| Setter | set_transfer_channel(value) |
| Getter | get_transfer_channel() |
Set the default channel to be used to transfer data. By default, this value is -1 which means that ENet will only use 2 channels, one for reliable and one for unreliable packets. Channel 0 is reserved, and cannot be used. Setting this member to any value between 0 and channel_count (excluded) will force ENet to use that channel for sending data.
Method Descriptions¶
- void close_connection ( int wait_usec=100 )
Closes the connection. Ignored if no connection is currently established. If this is a server it tries to notify all clients before forcibly disconnecting them. If this is a client it simply closes the connection to the server.
- Error create_client ( String address, int port, int in_bandwidth=0, int out_bandwidth=0, int client_port=0 )
Create client that connects to a server at address using specified port. The given address needs to be either a fully qualified domain name (e.g. "www.example.com") or an IP address in IPv4 or IPv6 format (e.g. "192.168.1.1"). The port is the port the server is listening on. The in_bandwidth and out_bandwidth parameters can be used to limit the incoming and outgoing bandwidth to the given number of bytes per second. The default of 0 means unlimited bandwidth. Note that ENet will strategically drop packets on specific sides of a connection between peers to ensure the peer’s bandwidth is not overwhelmed. The bandwidth parameters also determine the window size of a connection which limits the amount of reliable packets that may be in transit at any given time. Returns @GlobalScope.OK if a client was created, @GlobalScope.ERR_ALREADY_IN_USE if this NetworkedMultiplayerENet instance already has an open connection (in which case you need to call close_connection first) or @GlobalScope.ERR_CANT_CREATE if the client could not be created. If client_port is specified, the client will also listen to the given port; this is useful for some NAT traversal techniques.
Create server that listens to connections via port. The port needs to be an available, unused port between 0 and 65535. Note that ports below 1024 are privileged and may require elevated permissions depending on the platform. To change the interface the server listens on, use set_bind_ip. The default IP is the wildcard "*", which listens on all available interfaces. max_clients is the maximum number of clients that are allowed at once, any number up to 4095 may be used, although the achievable number of simultaneous clients may be far lower and depends on the application. For additional details on the bandwidth parameters, see create_client. Returns @GlobalScope.OK if a server was created, @GlobalScope.ERR_ALREADY_IN_USE if this NetworkedMultiplayerENet instance already has an open connection (in which case you need to call close_connection first) or @GlobalScope.ERR_CANT_CREATE if the server could not be created.
Disconnect the given peer. If “now” is set to true, the connection will be closed immediately without flushing queued messages.
- int get_last_packet_channel ( ) const
Returns the channel of the last packet fetched via PacketPeer.get_packet.
- int get_packet_channel ( ) const
Returns the channel of the next packet that will be retrieved via PacketPeer.get_packet.
Returns the IP address of the given peer.
Returns the remote port of the given peer.
- void set_bind_ip ( String ip )
The IP used when creating a server. This is set to the wildcard "*" by default, which binds to all available interfaces. The given IP needs to be in IPv4 or IPv6 address format, for example: "192.168.1.1".
NetworkedMultiplayerPeer¶
Inherits: PacketPeer < Reference < Object
Inherited By: MultiplayerPeerGDNative, NetworkedMultiplayerENet, WebRTCMultiplayer, WebSocketMultiplayerPeer
A high-level network interface to simplify multiplayer interactions.
Description¶
Manages the connection to network peers. Assigns unique IDs to each client connected to the server.
Tutorials¶
Properties¶
| bool | refuse_new_connections | true |
| TransferMode | transfer_mode | 0 |
Methods¶
| ConnectionStatus | get_connection_status ( ) const |
| int | get_packet_peer ( ) const |
| int | get_unique_id ( ) const |
| void | poll ( ) |
| void | set_target_peer ( int id ) |
Signals¶
- connection_failed ( )
Emitted when a connection attempt fails.
- connection_succeeded ( )
Emitted when a connection attempt succeeds.
- peer_connected ( int id )
Emitted by the server when a client connects.
- peer_disconnected ( int id )
Emitted by the server when a client disconnects.
- server_disconnected ( )
Emitted by clients when the server disconnects.
Enumerations¶
enum TransferMode:
- TRANSFER_MODE_UNRELIABLE = 0 — Packets are not acknowledged, no resend attempts are made for lost packets. Packets may arrive in any order. Potentially faster than TRANSFER_MODE_UNRELIABLE_ORDERED. Use for non-critical data, and always consider whether the order matters.
- TRANSFER_MODE_UNRELIABLE_ORDERED = 1 — Packets are not acknowledged, no resend attempts are made for lost packets. Packets are received in the order they were sent in. Potentially faster than TRANSFER_MODE_RELIABLE. Use for non-critical data or data that would be outdated if received late due to resend attempt(s) anyway, for example movement and positional data.
- TRANSFER_MODE_RELIABLE = 2 — Packets must be received and resend attempts should be made until the packets are acknowledged. Packets must be received in the order they were sent in. Most reliable transfer mode, but potentially the slowest due to the overhead. Use for critical data that must be transmitted and arrive in order, for example an ability being triggered or a chat message. Consider carefully if the information really is critical, and use sparingly.
enum ConnectionStatus:
- CONNECTION_DISCONNECTED = 0 — The ongoing connection disconnected.
- CONNECTION_CONNECTING = 1 — A connection attempt is ongoing.
- CONNECTION_CONNECTED = 2 — The connection attempt succeeded.
Constants¶
- TARGET_PEER_BROADCAST = 0 — Packets are sent to the server and then redistributed to other peers.
- TARGET_PEER_SERVER = 1 — Packets are sent to the server alone.
Property Descriptions¶
- bool refuse_new_connections
| Default | true |
| Setter | set_refuse_new_connections(value) |
| Getter | is_refusing_new_connections() |
If true, this NetworkedMultiplayerPeer refuses new connections.
- TransferMode transfer_mode
| Default | 0 |
| Setter | set_transfer_mode(value) |
| Getter | get_transfer_mode() |
The manner in which to send packets to the target_peer. See TransferMode.
Method Descriptions¶
- ConnectionStatus get_connection_status ( ) const
Returns the current state of the connection. See ConnectionStatus.
- int get_packet_peer ( ) const
Returns the ID of the NetworkedMultiplayerPeer who sent the most recent packet.
- int get_unique_id ( ) const
Returns the ID of this NetworkedMultiplayerPeer.
- void poll ( )
Waits up to 1 second to receive a new network event.
- void set_target_peer ( int id )
Sets the peer to which packets will be sent.
The id can be one of: TARGET_PEER_BROADCAST to send to all connected peers, TARGET_PEER_SERVER to send to the peer acting as server, a valid peer ID to send to that specific peer, a negative peer ID to send to all peers except that one. By default, the target peer is TARGET_PEER_BROADCAST.
NinePatchRect¶
Inherits: Control < CanvasItem < Node < Object
Scalable texture-based frame that tiles the texture’s centers and sides, but keeps the corners’ original size. Perfect for panels and dialog boxes.
Description¶
Also known as 9-slice panels, NinePatchRect produces clean panels of any size, based on a small texture. To do so, it splits the texture in a 3×3 grid. When you scale the node, it tiles the texture’s sides horizontally or vertically, the center on both axes but it doesn’t scale or tile the corners.
Properties¶
| AxisStretchMode | axis_stretch_horizontal | 0 |
| AxisStretchMode | axis_stretch_vertical | 0 |
| bool | draw_center | true |
| MouseFilter | mouse_filter | O: 2 |
| int | patch_margin_bottom | 0 |
| int | patch_margin_left | 0 |
| int | patch_margin_right | 0 |
| int | patch_margin_top | 0 |
| Rect2 | region_rect | Rect2( 0, 0, 0, 0 ) |
| Texture | texture |
Methods¶
| int | get_patch_margin ( Margin margin ) const |
| void | set_patch_margin ( Margin margin, int value ) |
Enumerations¶
enum AxisStretchMode:
- AXIS_STRETCH_MODE_STRETCH = 0 — Doesn’t do anything at the time of writing.
- AXIS_STRETCH_MODE_TILE = 1 — Doesn’t do anything at the time of writing.
- AXIS_STRETCH_MODE_TILE_FIT = 2 — Doesn’t do anything at the time of writing.
Property Descriptions¶
- AxisStretchMode axis_stretch_horizontal
| Default | 0 |
| Setter | set_h_axis_stretch_mode(value) |
| Getter | get_h_axis_stretch_mode() |
Doesn’t do anything at the time of writing.
- AxisStretchMode axis_stretch_vertical
| Default | 0 |
| Setter | set_v_axis_stretch_mode(value) |
| Getter | get_v_axis_stretch_mode() |
Doesn’t do anything at the time of writing.
- bool draw_center
| Default | true |
| Setter | set_draw_center(value) |
| Getter | is_draw_center_enabled() |
If true, draw the panel’s center. Else, only draw the 9-slice’s borders.
- int patch_margin_bottom
| Default | 0 |
| Setter | set_patch_margin(value) |
| Getter | get_patch_margin() |
The height of the 9-slice’s bottom row. A margin of 16 means the 9-slice’s bottom corners and side will have a height of 16 pixels. You can set all 4 margin values individually to create panels with non-uniform borders.
- int patch_margin_left
| Default | 0 |
| Setter | set_patch_margin(value) |
| Getter | get_patch_margin() |
The height of the 9-slice’s left column.
- int patch_margin_right
| Default | 0 |
| Setter | set_patch_margin(value) |
| Getter | get_patch_margin() |
The height of the 9-slice’s right column.
- int patch_margin_top
| Default | 0 |
| Setter | set_patch_margin(value) |
| Getter | get_patch_margin() |
The height of the 9-slice’s top row.
- Rect2 region_rect
| Default | Rect2( 0, 0, 0, 0 ) |
| Setter | set_region_rect(value) |
| Getter | get_region_rect() |
Rectangular region of the texture to sample from. If you’re working with an atlas, use this property to define the area the 9-slice should use. All other properties are relative to this one. If the rect is empty, NinePatchRect will use the whole texture.
- Texture texture
| Setter | set_texture(value) |
| Getter | get_texture() |
The node’s texture resource.
Node¶
Inherits: Object
Inherited By: AnimationPlayer, AnimationTree, AnimationTreePlayer, AudioStreamPlayer, CanvasItem, CanvasLayer, EditorFileSystem, EditorInterface, EditorPlugin, EditorResourcePreview, HTTPRequest, InstancePlaceholder, ResourcePreloader, SkeletonIK, Spatial, Timer, Tween, Viewport, WorldEnvironment
Base class for all scene objects.
Description¶
Nodes are Godot’s building blocks. They can be assigned as the child of another node, resulting in a tree arrangement. A given node can contain any number of nodes as children with the requirement that all siblings (direct children of a node) should have unique names.
A tree of nodes is called a scene. Scenes can be saved to the disk and then instanced into other scenes. This allows for very high flexibility in the architecture and data model of Godot projects.
Scene tree: The SceneTree contains the active tree of nodes. When a node is added to the scene tree, it receives the NOTIFICATION_ENTER_TREE notification and its _enter_tree callback is triggered. Child nodes are always added after their parent node, i.e. the _enter_tree callback of a parent node will be triggered before its child’s.
Once all nodes have been added in the scene tree, they receive the NOTIFICATION_READY notification and their respective _ready callbacks are triggered. For groups of nodes, the _ready callback is called in reverse order, starting with the children and moving up to the parent nodes.
This means that when adding a node to the scene tree, the following order will be used for the callbacks: _enter_tree of the parent, _enter_tree of the children, _ready of the children and finally _ready of the parent (recursively for the entire scene tree).
Processing: Nodes can override the “process” state, so that they receive a callback on each frame requesting them to process (do something). Normal processing (callback _process, toggled with set_process) happens as fast as possible and is dependent on the frame rate, so the processing time delta is passed as an argument. Physics processing (callback _physics_process, toggled with set_physics_process) happens a fixed number of times per second (60 by default) and is useful for code related to the physics engine.
Nodes can also process input events. When present, the _input function will be called for each input that the program receives. In many cases, this can be overkill (unless used for simple projects), and the _unhandled_input function might be preferred; it is called when the input event was not handled by anyone else (typically, GUI Control nodes), ensuring that the node only receives the events that were meant for it.
To keep track of the scene hierarchy (especially when instancing scenes into other scenes), an “owner” can be set for the node with the owner property. This keeps track of who instanced what. This is mostly useful when writing editors and tools, though.
Finally, when a node is freed with Object.free or queue_free, it will also free all its children.
Groups: Nodes can be added to as many groups as you want to be easy to manage, you could create groups like “enemies” or “collectables” for example, depending on your game. See add_to_group, is_in_group and remove_from_group. You can then retrieve all nodes in these groups, iterate them and even call methods on groups via the methods on SceneTree.
Networking with nodes: After connecting to a server (or making one, see NetworkedMultiplayerENet), it is possible to use the built-in RPC (remote procedure call) system to communicate over the network. By calling rpc with a method name, it will be called locally and in all connected peers (peers = clients and the server that accepts connections). To identify which node receives the RPC call, Godot will use its NodePath (make sure node names are the same on all peers). Also, take a look at the high-level networking tutorial and corresponding demos.
Tutorials¶
Properties¶
| MultiplayerAPI | custom_multiplayer | |
| String | filename | |
| MultiplayerAPI | multiplayer | |
| String | name | |
| Node | owner | |
| PauseMode | pause_mode | 0 |
| int | process_priority | 0 |
Methods¶
Signals¶
- ready ( )
Emitted when the node is ready.
- renamed ( )
Emitted when the node is renamed.
- tree_entered ( )
Emitted when the node enters the tree.
- tree_exited ( )
Emitted after the node exits the tree and is no longer active.
- tree_exiting ( )
Emitted when the node is still active but about to exit the tree. This is the right place for de-initialization (or a “destructor”, if you will).
Enumerations¶
enum PauseMode:
- PAUSE_MODE_INHERIT = 0 — Inherits pause mode from the node’s parent. For the root node, it is equivalent to PAUSE_MODE_STOP. Default.
- PAUSE_MODE_STOP = 1 — Stops processing when the SceneTree is paused.
- PAUSE_MODE_PROCESS = 2 — Continue to process regardless of the SceneTree pause state.
enum DuplicateFlags:
- DUPLICATE_SIGNALS = 1 — Duplicate the node’s signals.
- DUPLICATE_GROUPS = 2 — Duplicate the node’s groups.
- DUPLICATE_SCRIPTS = 4 — Duplicate the node’s scripts.
- DUPLICATE_USE_INSTANCING = 8 — Duplicate using instancing.
An instance stays linked to the original so when the original changes, the instance changes too.
Constants¶
- NOTIFICATION_ENTER_TREE = 10 — Notification received when the node enters a SceneTree.
- NOTIFICATION_EXIT_TREE = 11 — Notification received when the node is about to exit a SceneTree.
- NOTIFICATION_MOVED_IN_PARENT = 12 — Notification received when the node is moved in the parent.
- NOTIFICATION_READY = 13 — Notification received when the node is ready. See _ready.
- NOTIFICATION_PAUSED = 14 — Notification received when the node is paused.
- NOTIFICATION_UNPAUSED = 15 — Notification received when the node is unpaused.
- NOTIFICATION_PHYSICS_PROCESS = 16 — Notification received every frame when the physics process flag is set (see set_physics_process).
- NOTIFICATION_PROCESS = 17 — Notification received every frame when the process flag is set (see set_process).
- NOTIFICATION_PARENTED = 18 — Notification received when a node is set as a child of another node.
Note: This doesn’t mean that a node entered the SceneTree.
- NOTIFICATION_UNPARENTED = 19 — Notification received when a node is unparented (parent removed it from the list of children).
- NOTIFICATION_INSTANCED = 20 — Notification received when the node is instanced.
- NOTIFICATION_DRAG_BEGIN = 21 — Notification received when a drag begins.
- NOTIFICATION_DRAG_END = 22 — Notification received when a drag ends.
- NOTIFICATION_PATH_CHANGED = 23 — Notification received when the node’s NodePath changed.
- NOTIFICATION_INTERNAL_PROCESS = 25 — Notification received every frame when the internal process flag is set (see set_process_internal).
- NOTIFICATION_INTERNAL_PHYSICS_PROCESS = 26 — Notification received every frame when the internal physics process flag is set (see set_physics_process_internal).
- NOTIFICATION_WM_MOUSE_ENTER = 1002 — Notification received from the OS when the mouse enters the game window.
Implemented on desktop and web platforms.
- NOTIFICATION_WM_MOUSE_EXIT = 1003 — Notification received from the OS when the mouse leaves the game window.
Implemented on desktop and web platforms.
- NOTIFICATION_WM_FOCUS_IN = 1004 — Notification received from the OS when the game window is focused.
Implemented on all platforms.
- NOTIFICATION_WM_FOCUS_OUT = 1005 — Notification received from the OS when the game window is unfocused.
Implemented on all platforms.
- NOTIFICATION_WM_QUIT_REQUEST = 1006 — Notification received from the OS when a quit request is sent (e.g. closing the window with a “Close” button or Alt+F4).
Implemented on desktop platforms.
- NOTIFICATION_WM_GO_BACK_REQUEST = 1007 — Notification received from the OS when a go back request is sent (e.g. pressing the “Back” button on Android).
Specific to the Android platform.
- NOTIFICATION_WM_UNFOCUS_REQUEST = 1008 — Notification received from the OS when an unfocus request is sent (e.g. another OS window wants to take the focus).
No supported platforms currently send this notification.
- NOTIFICATION_OS_MEMORY_WARNING = 1009 — Notification received from the OS when the application is exceeding its allocated memory.
Specific to the iOS platform.
- NOTIFICATION_TRANSLATION_CHANGED = 1010 — Notification received when translations may have changed. Can be triggered by the user changing the locale. Can be used to respond to language changes, for example to change the UI strings on the fly. Useful when working with the built-in translation support, like Object.tr.
- NOTIFICATION_WM_ABOUT = 1011 — Notification received from the OS when a request for “About” information is sent.
Specific to the macOS platform.
- NOTIFICATION_CRASH = 1012 — Notification received from Godot’s crash handler when the engine is about to crash.
Implemented on desktop platforms if the crash handler is enabled.
- NOTIFICATION_OS_IME_UPDATE = 1013 — Notification received from the OS when an update of the Input Method Engine occurs (e.g. change of IME cursor position or composition string).
Specific to the macOS platform.
- NOTIFICATION_APP_RESUMED = 1014 — Notification received from the OS when the app is resumed.
Specific to the Android platform.
- NOTIFICATION_APP_PAUSED = 1015 — Notification received from the OS when the app is paused.
Specific to the Android platform.
Property Descriptions¶
- MultiplayerAPI custom_multiplayer
| Setter | set_custom_multiplayer(value) |
| Getter | get_custom_multiplayer() |
The override to the default MultiplayerAPI. Set to null to use the default SceneTree one.
- String filename
| Setter | set_filename(value) |
| Getter | get_filename() |
When a scene is instanced from a file, its topmost node contains the filename from which it was loaded.
- MultiplayerAPI multiplayer
| Getter | get_multiplayer() |
The MultiplayerAPI instance associated with this node. Either the custom_multiplayer, or the default SceneTree one (if inside tree).
- String name
| Setter | set_name(value) |
| Getter | get_name() |
The name of the node. This name is unique among the siblings (other child nodes from the same parent). When set to an existing name, the node will be automatically renamed.
- Node owner
| Setter | set_owner(value) |
| Getter | get_owner() |
The node owner. A node can have any other node as owner (as long as it is a valid parent, grandparent, etc. ascending in the tree). When saving a node (using PackedScene), all the nodes it owns will be saved with it. This allows for the creation of complex SceneTrees, with instancing and subinstancing.
- PauseMode pause_mode
| Default | 0 |
| Setter | set_pause_mode(value) |
| Getter | get_pause_mode() |
Pause mode. How the node will behave if the SceneTree is paused.
- int process_priority
| Default | 0 |
| Setter | set_process_priority(value) |
| Getter | get_process_priority() |
The node’s priority in the execution order of the enabled processing callbacks (i.e. NOTIFICATION_PROCESS, NOTIFICATION_PHYSICS_PROCESS and their internal counterparts). Nodes whose process priority value is lower will have their processing callbacks executed first.
Method Descriptions¶
- void _enter_tree ( ) virtual
Called when the node enters the SceneTree (e.g. upon instancing, scene changing, or after calling add_child in a script). If the node has children, its _enter_tree callback will be called first, and then that of the children.
Corresponds to the NOTIFICATION_ENTER_TREE notification in Object._notification.
- void _exit_tree ( ) virtual
Called when the node is about to leave the SceneTree (e.g. upon freeing, scene changing, or after calling remove_child in a script). If the node has children, its _exit_tree callback will be called last, after all its children have left the tree.
Corresponds to the NOTIFICATION_EXIT_TREE notification in Object._notification and signal tree_exiting. To get notified when the node has already left the active tree, connect to the tree_exited.
- String _get_configuration_warning ( ) virtual
The string returned from this method is displayed as a warning in the Scene Dock if the script that overrides it is a tool script.
Returning an empty string produces no warning.
Call update_configuration_warning when the warning needs to be updated for this node.
- void _input ( InputEvent event ) virtual
Called when there is an input event. The input event propagates up through the node tree until a node consumes it.
It is only called if input processing is enabled, which is done automatically if this method is overridden, and can be toggled with set_process_input.
To consume the input event and stop it propagating further to other nodes, SceneTree.set_input_as_handled can be called.
For gameplay input, _unhandled_input and _unhandled_key_input are usually a better fit as they allow the GUI to intercept the events first.
- void _physics_process ( float delta ) virtual
Called during the physics processing step of the main loop. Physics processing means that the frame rate is synced to the physics, i.e. the delta variable should be constant.
It is only called if physics processing is enabled, which is done automatically if this method is overridden, and can be toggled with set_physics_process.
Corresponds to the NOTIFICATION_PHYSICS_PROCESS notification in Object._notification.
- void _process ( float delta ) virtual
Called during the processing step of the main loop. Processing happens at every frame and as fast as possible, so the delta time since the previous frame is not constant.
It is only called if processing is enabled, which is done automatically if this method is overridden, and can be toggled with set_process.
Corresponds to the NOTIFICATION_PROCESS notification in Object._notification.
- void _ready ( ) virtual
Called when the node is “ready”, i.e. when both the node and its children have entered the scene tree. If the node has children, their _ready callbacks get triggered first, and the parent node will receive the ready notification afterwards.
Corresponds to the NOTIFICATION_READY notification in Object._notification. See also the onready keyword for variables.
Usually used for initialization. For even earlier initialization, Object._init may be used. See also _enter_tree.
Note: _ready may be called only once for each node. After removing a node from the scene tree and adding again, _ready will not be called for the second time. This can be bypassed with requesting another call with request_ready, which may be called anywhere before adding the node again.
- void _unhandled_input ( InputEvent event ) virtual
Called when an InputEvent hasn’t been consumed by _input or any GUI. The input event propagates up through the node tree until a node consumes it.
It is only called if unhandled input processing is enabled, which is done automatically if this method is overridden, and can be toggled with set_process_unhandled_input.
To consume the input event and stop it propagating further to other nodes, SceneTree.set_input_as_handled can be called.
For gameplay input, this and _unhandled_key_input are usually a better fit than _input as they allow the GUI to intercept the events first.
- void _unhandled_key_input ( InputEventKey event ) virtual
Called when an InputEventKey hasn’t been consumed by _input or any GUI. The input event propagates up through the node tree until a node consumes it.
It is only called if unhandled key input processing is enabled, which is done automatically if this method is overridden, and can be toggled with set_process_unhandled_key_input.
To consume the input event and stop it propagating further to other nodes, SceneTree.set_input_as_handled can be called.
For gameplay input, this and _unhandled_input are usually a better fit than _input as they allow the GUI to intercept the events first.
Adds a child node. Nodes can have any number of children, but every child must have a unique name. Child nodes are automatically deleted when the parent node is deleted, so an entire scene can be removed by deleting its topmost node.
If legible_unique_name is true, the child node will have an human-readable name based on the name of the node being instanced instead of its type.
Note: If the child node already has a parent, the function will fail. Use remove_child first to remove the node from its current parent. For example:
if child_node.get_parent():
child_node.get_parent().remove_child(child_node)
add_child(child_node)
Note: If you want a child to be persisted to a PackedScene, you must set owner in addition to calling add_child. This is typically relevant for tool scripts and editor plugins. If add_child is called without setting owner, the newly added Node will not be visible in the scene tree, though it will be visible in the 2D/3D view.
Adds a child node. The child is placed below the given node in the list of children.
If legible_unique_name is true, the child node will have an human-readable name based on the name of the node being instanced instead of its type.
Adds the node to a group. Groups are helpers to name and organize a subset of nodes, for example “enemies” or “collectables”. A node can be in any number of groups. Nodes can be assigned a group at any time, but will not be added until they are inside the scene tree (see is_inside_tree). See notes in the description, and the group methods in SceneTree.
The persistent option is used when packing node to PackedScene and saving to file. Non-persistent groups aren’t stored.
- bool can_process ( ) const
Returns true if the node can process while the scene tree is paused (see pause_mode). Always returns true if the scene tree is not paused, and false if the node is not in the tree.
Duplicates the node, returning a new node.
You can fine-tune the behavior using the flags (see DuplicateFlags).
Note: It will not work properly if the node contains a script with constructor arguments (i.e. needs to supply arguments to Object._init method). In that case, the node will be duplicated without a script.
Finds a descendant of this node whose name matches mask as in String.match (i.e. case-sensitive, but "*" matches zero or more characters and "?" matches any single character except ".").
Note: It does not match against the full path, just against individual node names.
If owned is true, this method only finds nodes whose owner is this node. This is especially important for scenes instantiated through a script, because those scenes don’t have an owner.
Finds the first parent of the current node whose name matches mask as in String.match (i.e. case-sensitive, but "*" matches zero or more characters and "?" matches any single character except ".").
Note: It does not match against the full path, just against individual node names.
Returns a child node by its index (see get_child_count). This method is often used for iterating all children of a node.
To access a child node via its name, use get_node.
- int get_child_count ( ) const
Returns the number of child nodes.
- Array get_children ( ) const
Returns an array of references to node’s children.
- Array get_groups ( ) const
Returns an array listing the groups that the node is a member of.
- int get_index ( ) const
Returns the node’s index, i.e. its position among the siblings of its parent.
- int get_network_master ( ) const
Returns the peer ID of the network master for this node. See set_network_master.
Fetches a node. The NodePath can be either a relative path (from the current node) or an absolute path (in the scene tree) to a node. If the path does not exist, a null instance is returned and an error is logged. Attempts to access methods on the return value will result in an “Attempt to call <method> on a null instance.” error.
Note: Fetching absolute paths only works when the node is inside the scene tree (see is_inside_tree).
Example: Assume your current node is Character and the following tree:
/root
/root/Character
/root/Character/Sword
/root/Character/Backpack/Dagger
/root/MyGame
/root/Swamp/Alligator
/root/Swamp/Mosquito
/root/Swamp/Goblin
Possible paths are:
get_node("Sword")
get_node("Backpack/Dagger")
get_node("../Swamp/Alligator")
get_node("/root/MyGame")
Fetches a node and one of its resources as specified by the NodePath’s subname (e.g. Area2D/CollisionShape2D:shape). If several nested resources are specified in the NodePath, the last one will be fetched.
The return value is an array of size 3: the first index points to the Node (or null if not found), the second index points to the Resource (or null if not found), and the third index is the remaining NodePath, if any.
For example, assuming that Area2D/CollisionShape2D is a valid node and that its shape property has been assigned a RectangleShape2D resource, one could have this kind of output:
print(get_node_and_resource("Area2D/CollisionShape2D")) # [[CollisionShape2D:1161], Null, ]
print(get_node_and_resource("Area2D/CollisionShape2D:shape")) # [[CollisionShape2D:1161], [RectangleShape2D:1156], ]
print(get_node_and_resource("Area2D/CollisionShape2D:shape:extents")) # [[CollisionShape2D:1161], [RectangleShape2D:1156], :extents]
Similar to get_node, but does not log an error if path does not point to a valid Node.
- Node get_parent ( ) const
Returns the parent node of the current node, or an empty Node if the node lacks a parent.
- NodePath get_path ( ) const
Returns the absolute path of the current node. This only works if the current node is inside the scene tree (see is_inside_tree).
Returns the relative NodePath from this node to the specified node. Both nodes must be in the same scene or the function will fail.
- float get_physics_process_delta_time ( ) const
Returns the time elapsed since the last physics-bound frame (see _physics_process). This is always a constant value in physics processing unless the frames per second is changed via Engine.iterations_per_second.
- int get_position_in_parent ( ) const
Returns the node’s order in the scene tree branch. For example, if called on the first child node the position is 0.
- float get_process_delta_time ( ) const
Returns the time elapsed (in seconds) since the last process callback. This value may vary from frame to frame.
- bool get_scene_instance_load_placeholder ( ) const
Returns true if this is an instance load placeholder. See InstancePlaceholder.
- SceneTree get_tree ( ) const
Returns the SceneTree that contains this node.
- Viewport get_viewport ( ) const
Returns the node’s Viewport.
Returns true if the node that the NodePath points to exists.
Returns true if the NodePath points to a valid node and its subname points to a valid resource, e.g. Area2D/CollisionShape2D:shape. Properties with a non-Resource type (e.g. nodes or primitive math types) are not considered resources.
Returns true if the given node is a direct or indirect child of the current node.
- bool is_displayed_folded ( ) const
Returns true if the node is folded (collapsed) in the Scene dock.
Returns true if the given node occurs later in the scene hierarchy than the current node.
Returns true if this node is in the specified group. See notes in the description, and the group methods in SceneTree.
- bool is_inside_tree ( ) const
Returns true if this node is currently inside a SceneTree.
- bool is_network_master ( ) const
Returns true if the local system is the master of this node.
- bool is_physics_processing ( ) const
Returns true if physics processing is enabled (see set_physics_process).
- bool is_physics_processing_internal ( ) const
Returns true if internal physics processing is enabled (see set_physics_process_internal).
- bool is_processing ( ) const
Returns true if processing is enabled (see set_process).
- bool is_processing_input ( ) const
Returns true if the node is processing input (see set_process_input).
- bool is_processing_internal ( ) const
Returns true if internal processing is enabled (see set_process_internal).
- bool is_processing_unhandled_input ( ) const
Returns true if the node is processing unhandled input (see set_process_unhandled_input).
- bool is_processing_unhandled_key_input ( ) const
Returns true if the node is processing unhandled key input (see set_process_unhandled_key_input).
Moves a child node to a different position (order) among the other children. Since calls, signals, etc are performed by tree order, changing the order of children nodes may be useful.
- void print_stray_nodes ( )
Prints all stray nodes (nodes outside the SceneTree). Used for debugging. Works only in debug builds.
- void print_tree ( )
Prints the tree to stdout. Used mainly for debugging purposes. This version displays the path relative to the current node, and is good for copy/pasting into the get_node function.
Example output:
TheGame
TheGame/Menu
TheGame/Menu/Label
TheGame/Menu/Camera2D
TheGame/SplashScreen
TheGame/SplashScreen/Camera2D
- void print_tree_pretty ( )
Similar to print_tree, this prints the tree to stdout. This version displays a more graphical representation similar to what is displayed in the scene inspector. It is useful for inspecting larger trees.
Example output:
┖╴TheGame
┠╴Menu
┃ ┠╴Label
┃ ┖╴Camera2D
┖-SplashScreen
┖╴Camera2D
Calls the given method (if present) with the arguments given in args on this node and recursively on all its children. If the parent_first argument is true, the method will be called on the current node first, then on all its children. If parent_first is false, the children will be called first.
- void propagate_notification ( int what )
Notifies the current node and all its children recursively by calling Object.notification on all of them.
- void queue_free ( )
Queues a node for deletion at the end of the current frame. When deleted, all of its child nodes will be deleted as well. This method ensures it’s safe to delete the node, contrary to Object.free. Use Object.is_queued_for_deletion to check whether a node will be deleted at the end of the frame.
- void raise ( )
Moves this node to the bottom of parent node’s children hierarchy. This is often useful in GUIs (Control nodes), because their order of drawing depends on their order in the tree, i.e. the further they are on the node list, the higher they are drawn. After using raise, a Control will be drawn on top of their siblings.
- void remove_and_skip ( )
Removes a node and sets all its children as children of the parent node (if it exists). All event subscriptions that pass by the removed node will be unsubscribed.
- void remove_child ( Node node )
Removes a child node. The node is NOT deleted and must be deleted manually.
- void remove_from_group ( String group )
Removes a node from a group. See notes in the description, and the group methods in SceneTree.
Replaces a node in a scene by the given one. Subscriptions that pass through this node will be lost.
- void request_ready ( )
Requests that _ready be called again. Note that the method won’t be called immediately, but is scheduled for when the node is added to the scene tree again (see _ready). _ready is called only for the node which requested it, which means that you need to request ready for each child if you want them to call _ready too (in which case, _ready will be called in the same order as it would normally).
Sends a remote procedure call request for the given method to peers on the network (and locally), optionally sending all additional arguments as arguments to the method called by the RPC. The call request will only be received by nodes with the same NodePath, including the exact same node name. Behaviour depends on the RPC configuration for the given method, see rpc_config. Methods are not exposed to RPCs by default. See also rset and rset_config for properties. Returns an empty Variant.
Note: You can only safely use RPCs on clients after you received the connected_to_server signal from the SceneTree. You also need to keep track of the connection state, either by the SceneTree signals like server_disconnected or by checking SceneTree.network_peer.get_connection_status() == CONNECTION_CONNECTED.
Changes the RPC mode for the given method to the given mode. See RPCMode. An alternative is annotating methods and properties with the corresponding keywords (remote, master, puppet, remotesync, mastersync, puppetsync). By default, methods are not exposed to networking (and RPCs). See also rset and rset_config for properties.
Sends a rpc to a specific peer identified by peer_id (see NetworkedMultiplayerPeer.set_target_peer). Returns an empty Variant.
Sends a rpc using an unreliable protocol. Returns an empty Variant.
Sends a rpc to a specific peer identified by peer_id using an unreliable protocol (see NetworkedMultiplayerPeer.set_target_peer). Returns an empty Variant.
Remotely changes a property’s value on other peers (and locally). Behaviour depends on the RPC configuration for the given property, see rset_config. See also rpc for RPCs for methods, most information applies to this method as well.
Changes the RPC mode for the given property to the given mode. See RPCMode. An alternative is annotating methods and properties with the corresponding keywords (remote, master, puppet, remotesync, mastersync, puppetsync). By default, properties are not exposed to networking (and RPCs). See also rpc and rpc_config for methods.
Remotely changes the property’s value on a specific peer identified by peer_id (see NetworkedMultiplayerPeer.set_target_peer).
Remotely changes the property’s value on other peers (and locally) using an unreliable protocol.
Remotely changes property’s value on a specific peer identified by peer_id using an unreliable protocol (see NetworkedMultiplayerPeer.set_target_peer).
- void set_display_folded ( bool fold )
Sets the folded state of the node in the Scene dock.
Sets the node’s network master to the peer with the given peer ID. The network master is the peer that has authority over the node on the network. Useful in conjunction with the master and puppet keywords. Inherited from the parent node by default, which ultimately defaults to peer ID 1 (the server). If recursive, the given peer is recursively set as the master for all children of this node.
- void set_physics_process ( bool enable )
Enables or disables physics (i.e. fixed framerate) processing. When a node is being processed, it will receive a NOTIFICATION_PHYSICS_PROCESS at a fixed (usually 60 FPS, see Engine.iterations_per_second to change) interval (and the _physics_process callback will be called if exists). Enabled automatically if _physics_process is overridden. Any calls to this before _ready will be ignored.
- void set_physics_process_internal ( bool enable )
Enables or disables internal physics for this node. Internal physics processing happens in isolation from the normal _physics_process calls and is used by some nodes internally to guarantee proper functioning even if the node is paused or physics processing is disabled for scripting (set_physics_process). Only useful for advanced uses to manipulate built-in nodes’ behaviour.
- void set_process ( bool enable )
Enables or disables processing. When a node is being processed, it will receive a NOTIFICATION_PROCESS on every drawn frame (and the _process callback will be called if exists). Enabled automatically if _process is overridden. Any calls to this before _ready will be ignored.
- void set_process_input ( bool enable )
Enables or disables input processing. This is not required for GUI controls! Enabled automatically if _input is overridden. Any calls to this before _ready will be ignored.
- void set_process_internal ( bool enable )
Enables or disabled internal processing for this node. Internal processing happens in isolation from the normal _process calls and is used by some nodes internally to guarantee proper functioning even if the node is paused or processing is disabled for scripting (set_process). Only useful for advanced uses to manipulate built-in nodes’ behaviour.
- void set_process_unhandled_input ( bool enable )
Enables unhandled input processing. This is not required for GUI controls! It enables the node to receive all input that was not previously handled (usually by a Control). Enabled automatically if _unhandled_input is overridden. Any calls to this before _ready will be ignored.
- void set_process_unhandled_key_input ( bool enable )
Enables unhandled key input processing. Enabled automatically if _unhandled_key_input is overridden. Any calls to this before _ready will be ignored.
- void set_scene_instance_load_placeholder ( bool load_placeholder )
Sets whether this is an instance load placeholder. See InstancePlaceholder.
- void update_configuration_warning ( )
Updates the warning displayed for this node in the Scene Dock.
Use _get_configuration_warning to setup the warning message to display.
Node2D¶
Inherits: CanvasItem < Node < Object
Inherited By: AnimatedSprite, AudioStreamPlayer2D, BackBufferCopy, Bone2D, CPUParticles2D, Camera2D, CanvasModulate, CollisionObject2D, CollisionPolygon2D, CollisionShape2D, Joint2D, Light2D, LightOccluder2D, Line2D, MeshInstance2D, MultiMeshInstance2D, Navigation2D, NavigationPolygonInstance, ParallaxLayer, Particles2D, Path2D, PathFollow2D, Polygon2D, Position2D, RayCast2D, RemoteTransform2D, Skeleton2D, Sprite, TileMap, TouchScreenButton, VisibilityNotifier2D, YSort
A 2D game object, inherited by all 2D-related nodes. Has a position, rotation, scale, and Z index.
Description¶
A 2D game object, with a transform (position, rotation, and scale). All 2D nodes, including physics objects and sprites, inherit from Node2D. Use Node2D as a parent node to move, scale and rotate children in a 2D project. Also gives control of the node’s render order.
Tutorials¶
Properties¶
| Vector2 | global_position | |
| float | global_rotation | |
| float | global_rotation_degrees | |
| Vector2 | global_scale | |
| Transform2D | global_transform | |
| Vector2 | position | Vector2( 0, 0 ) |
| float | rotation | 0.0 |
| float | rotation_degrees | 0.0 |
| Vector2 | scale | Vector2( 1, 1 ) |
| Transform2D | transform | |
| bool | z_as_relative | true |
| int | z_index | 0 |
Methods¶
| void | apply_scale ( Vector2 ratio ) |
| float | get_angle_to ( Vector2 point ) const |
| Transform2D | get_relative_transform_to_parent ( Node parent ) const |
| void | global_translate ( Vector2 offset ) |
| void | look_at ( Vector2 point ) |
| void | move_local_x ( float delta, bool scaled=false ) |
| void | move_local_y ( float delta, bool scaled=false ) |
| void | rotate ( float radians ) |
| Vector2 | to_global ( Vector2 local_point ) const |
| Vector2 | to_local ( Vector2 global_point ) const |
| void | translate ( Vector2 offset ) |
Property Descriptions¶
- Vector2 global_position
| Setter | set_global_position(value) |
| Getter | get_global_position() |
Global position.
- float global_rotation
| Setter | set_global_rotation(value) |
| Getter | get_global_rotation() |
Global rotation in radians.
- float global_rotation_degrees
| Setter | set_global_rotation_degrees(value) |
| Getter | get_global_rotation_degrees() |
Global rotation in degrees.
- Vector2 global_scale
| Setter | set_global_scale(value) |
| Getter | get_global_scale() |
Global scale.
- Transform2D global_transform
| Setter | set_global_transform(value) |
| Getter | get_global_transform() |
Global Transform2D.
- Vector2 position
| Default | Vector2( 0, 0 ) |
| Setter | set_position(value) |
| Getter | get_position() |
Position, relative to the node’s parent.
- float rotation
| Default | 0.0 |
| Setter | set_rotation(value) |
| Getter | get_rotation() |
Rotation in radians, relative to the node’s parent.
- float rotation_degrees
| Default | 0.0 |
| Setter | set_rotation_degrees(value) |
| Getter | get_rotation_degrees() |
Rotation in degrees, relative to the node’s parent.
- Vector2 scale
| Default | Vector2( 1, 1 ) |
| Setter | set_scale(value) |
| Getter | get_scale() |
The node’s scale. Unscaled value: (1, 1).
- Transform2D transform
| Setter | set_transform(value) |
| Getter | get_transform() |
Local Transform2D.
- bool z_as_relative
| Default | true |
| Setter | set_z_as_relative(value) |
| Getter | is_z_relative() |
If true, the node’s Z index is relative to its parent’s Z index. If this node’s Z index is 2 and its parent’s effective Z index is 3, then this node’s effective Z index will be 2 + 3 = 5.
- int z_index
| Default | 0 |
| Setter | set_z_index(value) |
| Getter | get_z_index() |
Z index. Controls the order in which the nodes render. A node with a higher Z index will display in front of others.
Method Descriptions¶
- void apply_scale ( Vector2 ratio )
Multiplies the current scale by the ratio vector.
Returns the angle between the node and the point in radians.
- Transform2D get_relative_transform_to_parent ( Node parent ) const
Returns the Transform2D relative to this node’s parent.
- void global_translate ( Vector2 offset )
Adds the offset vector to the node’s global position.
- void look_at ( Vector2 point )
Rotates the node so it points towards the point, which is expected to use global coordinates.
Applies a local translation on the node’s X axis based on the Node._process’s delta. If scaled is false, normalizes the movement.
Applies a local translation on the node’s Y axis based on the Node._process’s delta. If scaled is false, normalizes the movement.
- void rotate ( float radians )
Applies a rotation to the node, in radians, starting from its current rotation.
Converts a local point’s coordinates to global coordinates.
Converts a global point’s coordinates to local coordinates.
- void translate ( Vector2 offset )
Translates the node by the given offset in local coordinates.
NodePath¶
Pre-parsed scene tree path.
Description¶
A pre-parsed relative or absolute path in a scene tree, for use with Node.get_node and similar functions. It can reference a node, a resource within a node, or a property of a node or resource. For instance, "Path2D/PathFollow2D/Sprite:texture:size" would refer to the size property of the texture resource on the node named "Sprite" which is a child of the other named nodes in the path.
You will usually just pass a string to Node.get_node and it will be automatically converted, but you may occasionally want to parse a path ahead of time with NodePath or the literal syntax @"path". Exporting a NodePath variable will give you a node selection widget in the properties panel of the editor, which can often be useful.
A NodePath is composed of a list of slash-separated node names (like a filesystem path) and an optional colon-separated list of “subnames” which can be resources or properties.
Some examples of NodePaths include the following:
# No leading slash means it is relative to the current node.
@"A" # Immediate child A
@"A/B" # A's child B
@"." # The current node.
@".." # The parent node.
@"../C" # A sibling node C.
# A leading slash means it is absolute from the SceneTree.
@"/root" # Equivalent to get_tree().get_root().
@"/root/Main" # If your main scene's root node were named "Main".
@"/root/MyAutoload" # If you have an autoloaded node or scene.
Methods¶
| NodePath | NodePath ( String from ) |
| NodePath | get_as_property_path ( ) |
| String | get_concatenated_subnames ( ) |
| String | get_name ( int idx ) |
| int | get_name_count ( ) |
| String | get_subname ( int idx ) |
| int | get_subname_count ( ) |
| bool | is_absolute ( ) |
| bool | is_empty ( ) |
Method Descriptions¶
Creates a NodePath from a string, e.g. "Path2D/PathFollow2D/Sprite:texture:size". A path is absolute if it starts with a slash. Absolute paths are only valid in the global scene tree, not within individual scenes. In a relative path, "." and ".." indicate the current node and its parent.
The “subnames” optionally included after the path to the target node can point to resources or properties, and can also be nested.
Examples of valid NodePaths (assuming that those nodes exist and have the referenced resources or properties):
# Points to the Sprite node
"Path2D/PathFollow2D/Sprite"
# Points to the Sprite node and its "texture" resource.
# get_node() would retrieve "Sprite", while get_node_and_resource()
# would retrieve both the Sprite node and the "texture" resource.
"Path2D/PathFollow2D/Sprite:texture"
# Points to the Sprite node and its "position" property.
"Path2D/PathFollow2D/Sprite:position"
# Points to the Sprite node and the "x" component of its "position" property.
"Path2D/PathFollow2D/Sprite:position:x"
# Absolute path (from "root")
"/root/Level/Path2D"
- NodePath get_as_property_path ( )
Returns a node path with a colon character (:) prepended, transforming it to a pure property path with no node name (defaults to resolving from the current node).
# This will be parsed as a node path to the "x" property in the "position" node
var node_path = NodePath("position:x")
# This will be parsed as a node path to the "x" component of the "position" property in the current node
var property_path = node_path.get_as_property_path()
print(property_path) # :position:x
- String get_concatenated_subnames ( )
Returns all subnames concatenated with a colon character (:) as separator, i.e. the right side of the first colon in a node path.
var nodepath = NodePath("Path2D/PathFollow2D/Sprite:texture:load_path")
print(nodepath.get_concatenated_subnames()) # texture:load_path
Gets the node name indicated by idx (0 to get_name_count).
var node_path = NodePath("Path2D/PathFollow2D/Sprite")
print(node_path.get_name(0)) # Path2D
print(node_path.get_name(1)) # PathFollow2D
print(node_path.get_name(2)) # Sprite
- int get_name_count ( )
Gets the number of node names which make up the path. Subnames (see get_subname_count) are not included.
For example, "Path2D/PathFollow2D/Sprite" has 3 names.
Gets the resource or property name indicated by idx (0 to get_subname_count).
var node_path = NodePath("Path2D/PathFollow2D/Sprite:texture:load_path")
print(node_path.get_subname(0)) # texture
print(node_path.get_subname(1)) # load_path
- int get_subname_count ( )
Gets the number of resource or property names (“subnames”) in the path. Each subname is listed after a colon character (:) in the node path.
For example, "Path2D/PathFollow2D/Sprite:texture:load_path" has 2 subnames.
- bool is_absolute ( )
Returns true if the node path is absolute (as opposed to relative), which means that it starts with a slash character (/). Absolute node paths can be used to access the root node ("/root") or autoloads (e.g. "/global" if a “global” autoload was registered).
- bool is_empty ( )
Returns true if the node path is empty.
NoiseTexture¶
Inherits: Texture < Resource < Reference < Object
OpenSimplexNoise filled texture.
Description¶
Uses an OpenSimplexNoise to fill the texture data. You can specify the texture size but keep in mind that larger textures will take longer to generate and seamless noise only works with square sized textures.
NoiseTexture can also generate normalmap textures.
The class uses Threads to generate the texture data internally, so Texture.get_data may return null if the generation process has not completed yet. In that case, you need to wait for the texture to be generated before accessing the data:
var texture = preload("res://noise.tres")
yield(texture, "changed")
var image = texture.get_data()
Properties¶
| bool | as_normalmap | false |
| float | bump_strength | 8.0 |
| int | flags | O: 7 |
| int | height | 512 |
| OpenSimplexNoise | noise | |
| bool | seamless | false |
| int | width | 512 |
Property Descriptions¶
- bool as_normalmap
| Default | false |
| Setter | set_as_normalmap(value) |
| Getter | is_normalmap() |
If true, the resulting texture contains a normal map created from the original noise interpreted as a bump map.
- float bump_strength
| Default | 8.0 |
| Setter | set_bump_strength(value) |
| Getter | get_bump_strength() |
Strength of the bump maps used in this texture. A higher value will make the bump maps appear larger while a lower value will make them appear softer.
- int height
| Default | 512 |
| Setter | set_height(value) |
| Getter | get_height() |
Height of the generated texture.
- OpenSimplexNoise noise
| Setter | set_noise(value) |
| Getter | get_noise() |
The OpenSimplexNoise instance used to generate the noise.
- bool seamless
| Default | false |
| Setter | set_seamless(value) |
| Getter | get_seamless() |
Whether the texture can be tiled without visible seams or not. Seamless textures take longer to generate.
- int width
| Default | 512 |
| Setter | set_width(value) |
| Getter | get_width() |
Width of the generated texture.
Object¶
Inherited By: ARVRPositionalTracker, ARVRServer, AudioServer, CameraServer, ClassDB, EditorFileSystemDirectory, EditorNavigationMeshGenerator, EditorSelection, EditorVCSInterface, Engine, Geometry, GodotSharp, IP, Input, InputMap, JSON, JSONRPC, JavaClassWrapper, JavaScript, MainLoop, Marshalls, Node, OS, Performance, Physics2DDirectBodyState, Physics2DDirectSpaceState, Physics2DServer, PhysicsDirectBodyState, PhysicsDirectSpaceState, PhysicsServer, ProjectSettings, Reference, ResourceLoader, ResourceSaver, TranslationServer, TreeItem, UndoRedo, VisualScriptEditor, VisualServer
Base class for all non built-in types.
Description¶
Every class which is not a built-in type inherits from this class.
You can construct Objects from scripting languages, using Object.new() in GDScript, new Object in C#, or the “Construct Object” node in VisualScript.
Objects do not manage memory. If a class inherits from Object, you will have to delete instances of it manually. To do so, call the free method from your script or delete the instance from C++.
Some classes that extend Object add memory management. This is the case of Reference, which counts references and deletes itself automatically when no longer referenced. Node, another fundamental type, deletes all its children when freed from memory.
Objects export properties, which are mainly useful for storage and editing, but not really so much in programming. Properties are exported in _get_property_list and handled in _get and _set. However, scripting languages and C++ have simpler means to export them.
Property membership can be tested directly in GDScript using in:
var n = Node2D.new()
print("position" in n) # Prints "True".
print("other_property" in n) # Prints "False".
Objects also receive notifications. Notifications are a simple way to notify the object about different events, so they can all be handled together. See _notification.
Methods¶
Enumerations¶
enum ConnectFlags:
- CONNECT_DEFERRED = 1 — Connects a signal in deferred mode. This way, signal emissions are stored in a queue, then set on idle time.
- CONNECT_PERSIST = 2 — Persisting connections are saved when the object is serialized to file.
- CONNECT_ONESHOT = 4 — One-shot connections disconnect themselves after emission.
- CONNECT_REFERENCE_COUNTED = 8 — Connect a signal as reference counted. This means that a given signal can be connected several times to the same target, and will only be fully disconnected once no references are left.
Constants¶
- NOTIFICATION_POSTINITIALIZE = 0 — Called right when the object is initialized. Not available in script.
- NOTIFICATION_PREDELETE = 1 — Called before the object is about to be deleted.
Method Descriptions¶
Virtual method which can be overridden to customize the return value of get.
Returns the given property. Returns null if the property does not exist.
- Array _get_property_list ( ) virtual
Virtual method which can be overridden to customize the return value of get_property_list.
Returns the object’s property list as an Array of dictionaries.
Each property’s Dictionary must contain at least name: String and type: int (see Variant.Type) entries. Optionally, it can also include hint: int (see PropertyHint), hint_string: String, and usage: int (see PropertyUsageFlags).
- void _init ( ) virtual
Called when the object is initialized.
- void _notification ( int what ) virtual
Called whenever the object receives a notification, which is identified in what by a constant. The base Object has two constants NOTIFICATION_POSTINITIALIZE and NOTIFICATION_PREDELETE, but subclasses such as Node define a lot more notifications which are also received by this method.
Virtual method which can be overridden to customize the return value of set.
Sets a property. Returns true if the property exists.
- String _to_string ( ) virtual
Virtual method which can be overridden to customize the return value of to_string, and thus the object’s representation where it is converted to a string, e.g. with print(obj).
Returns a String representing the object. If not overridden, defaults to "[ClassName:RID]".
Adds a user-defined signal. Arguments are optional, but can be added as an Array of dictionaries, each containing name: String and type: int (see Variant.Type) entries.
Calls the method on the object and returns the result. This method supports a variable number of arguments, so parameters are passed as a comma separated list. Example:
call("set", "position", Vector2(42.0, 0.0))
- void call_deferred ( String method, … ) vararg
Calls the method on the object during idle time. This method supports a variable number of arguments, so parameters are passed as a comma separated list. Example:
call_deferred("set", "position", Vector2(42.0, 0.0))
Calls the method on the object and returns the result. Contrarily to call, this method does not support a variable number of arguments but expects all parameters to be via a single Array.
callv("set", [ "position", Vector2(42.0, 0.0) ])
- bool can_translate_messages ( ) const
Returns true if the object can translate strings. See set_message_translation and tr.
Connects a signal to a method on a target object. Pass optional binds to the call as an Array of parameters. These parameters will be passed to the method after any parameter used in the call to emit_signal. Use flags to set deferred or one-shot connections. See ConnectFlags constants.
A signal can only be connected once to a method. It will throw an error if already connected, unless the signal was connected with CONNECT_REFERENCE_COUNTED. To avoid this, first, use is_connected to check for existing connections.
If the target is destroyed in the game’s lifecycle, the connection will be lost.
Examples:
connect("pressed", self, "_on_Button_pressed") # BaseButton signal
connect("text_entered", self, "_on_LineEdit_text_entered") # LineEdit signal
connect("hit", self, "_on_Player_hit", [ weapon_type, damage ]) # User-defined signal
An example of the relationship between binds passed to connect and parameters used when calling emit_signal:
connect("hit", self, "_on_Player_hit", [ weapon_type, damage ]) # weapon_type and damage are passed last
emit_signal("hit", "Dark lord", 5) # "Dark lord" and 5 are passed first
func _on_Player_hit(hit_by, level, weapon_type, damage):
print("Hit by %s (lvl %d) with weapon %s for %d damage" % [hit_by, level, weapon_type, damage])
Disconnects a signal from a method on the given target.
If you try to disconnect a connection that does not exist, the method will throw an error. Use is_connected to ensure that the connection exists.
- void emit_signal ( String signal, … ) vararg
Emits the given signal. The signal must exist, so it should be a built-in signal of this class or one of its parent classes, or a user-defined signal. This method supports a variable number of arguments, so parameters are passed as a comma separated list. Example:
emit_signal("hit", weapon_type, damage)
emit_signal("game_over")
- void free ( )
Deletes the object from memory. Any pre-existing reference to the freed object will now return null.
Returns the Variant value of the given property. If the property doesn’t exist, this will return null.
- String get_class ( ) const
Returns the object’s class as a String.
- Array get_incoming_connections ( ) const
Returns an Array of dictionaries with information about signals that are connected to the object.
Each Dictionary contains three String entries:
sourceis a reference to the signal emitter.signal_nameis the name of the connected signal.method_nameis the name of the method to which the signal is connected.
Gets the object’s property indexed by the given NodePath. The node path should be relative to the current object and can use the colon character (:) to access nested properties. Examples: "position:x" or "material:next_pass:blend_mode".
- int get_instance_id ( ) const
Returns the object’s unique instance ID.
This ID can be saved in EncodedObjectAsID, and can be used to retrieve the object instance with @GDScript.instance_from_id.
Returns the object’s metadata entry for the given name.
- PoolStringArray get_meta_list ( ) const
Returns the object’s metadata as a PoolStringArray.
- Array get_method_list ( ) const
Returns the object’s methods and their signatures as an Array.
- Array get_property_list ( ) const
Returns the object’s property list as an Array of dictionaries.
Each property’s Dictionary contain at least name: String and type: int (see Variant.Type) entries. Optionally, it can also include hint: int (see PropertyHint), hint_string: String, and usage: int (see PropertyUsageFlags).
- Reference get_script ( ) const
Returns the object’s Script instance, or null if none is assigned.
Returns an Array of connections for the given signal.
- Array get_signal_list ( ) const
Returns the list of signals as an Array of dictionaries.
Returns true if a metadata entry is found with the given name.
Returns true if the object contains the given method.
Returns true if the given user-defined signal exists.
- bool is_blocking_signals ( ) const
Returns true if signal emission blocking is enabled.
Returns true if the object inherits from the given class.
Returns true if a connection exists for a given signal, target, and method.
- bool is_queued_for_deletion ( ) const
Returns true if the Node.queue_free method was called for the object.
Send a given notification to the object, which will also trigger a call to the _notification method of all classes that the object inherits from.
If reversed is true, _notification is called first on the object’s own class, and then up to its successive parent classes. If reversed is false, _notification is called first on the highest ancestor (Object itself), and then down to its successive inheriting classes.
- void property_list_changed_notify ( )
Notify the editor that the property list has changed, so that editor plugins can take the new values into account. Does nothing on export builds.
- void remove_meta ( String name )
Removes a given entry from the object’s metadata.
Assigns a new value to the given property. If the property does not exist, nothing will happen.
- void set_block_signals ( bool enable )
If set to true, signal emission is blocked.
Assigns a new value to the given property, after the current frame’s physics step. This is equivalent to calling set via call_deferred, i.e. call_deferred("set", property, value).
Assigns a new value to the property identified by the NodePath. The node path should be relative to the current object and can use the colon character (:) to access nested properties. Example:
set_indexed("position", Vector2(42, 0))
set_indexed("position:y", -10)
print(position) # (42, -10)
- void set_message_translation ( bool enable )
Defines whether the object can translate strings (with calls to tr). Enabled by default.
Adds or changes a given entry in the object’s metadata. Metadata are serialized, and can take any Variant value.
- void set_script ( Reference script )
Assigns a script to the object. Each object can have a single script assigned to it, which are used to extend its functionality.
If the object already had a script, the previous script instance will be freed and its variables and state will be lost. The new script’s _init method will be called.
- String to_string ( )
Returns a String representing the object. If not overridden, defaults to "[ClassName:RID]".
Override the method _to_string to customize the String representation.
Translates a message using translation catalogs configured in the Project Settings.
Only works if message translation is enabled (which it is by default), otherwise it returns the message unchanged. See set_message_translation.
OccluderPolygon2D¶
Inherits: Resource < Reference < Object
Defines a 2D polygon for LightOccluder2D.
Description¶
Editor facility that helps you draw a 2D polygon used as resource for LightOccluder2D.
Enumerations¶
enum CullMode:
Property Descriptions¶
- bool closed
| Default | true |
| Setter | set_closed(value) |
| Getter | is_closed() |
If true, closes the polygon. A closed OccluderPolygon2D occludes the light coming from any direction. An opened OccluderPolygon2D occludes the light only at its outline’s direction.
- CullMode cull_mode
| Default | 0 |
| Setter | set_cull_mode(value) |
| Getter | get_cull_mode() |
The culling mode to use.
- PoolVector2Array polygon
| Default | PoolVector2Array( ) |
| Setter | set_polygon(value) |
| Getter | get_polygon() |
A Vector2 array with the index for polygon’s vertices positions.
Note: The returned value is a copy of the underlying array, rather than a reference.
OmniLight¶
Inherits: Light < VisualInstance < Spatial < Node < Object
Omnidirectional light, such as a light bulb or a candle.
Description¶
An Omnidirectional light is a type of Light that emits light in all directions. The light is attenuated by distance and this attenuation can be configured by changing its energy, radius, and attenuation parameters.
Tutorials¶
Properties¶
| float | omni_attenuation | 1.0 |
| float | omni_range | 5.0 |
| ShadowDetail | omni_shadow_detail | 1 |
| ShadowMode | omni_shadow_mode | 1 |
Enumerations¶
enum ShadowMode:
- SHADOW_DUAL_PARABOLOID = 0 — Shadows are rendered to a dual-paraboloid texture. Faster than SHADOW_CUBE, but lower-quality.
- SHADOW_CUBE = 1 — Shadows are rendered to a cubemap. Slower than SHADOW_DUAL_PARABOLOID, but higher-quality.
enum ShadowDetail:
- SHADOW_DETAIL_VERTICAL = 0 — Use more detail vertically when computing the shadow.
- SHADOW_DETAIL_HORIZONTAL = 1 — Use more detail horizontally when computing the shadow.
Property Descriptions¶
- float omni_attenuation
| Default | 1.0 |
| Setter | set_param(value) |
| Getter | get_param() |
The light’s attenuation (drop-off) curve. A number of presets are available in the Inspector by right-clicking the curve.
- float omni_range
| Default | 5.0 |
| Setter | set_param(value) |
| Getter | get_param() |
The light’s radius.
- ShadowDetail omni_shadow_detail
| Default | 1 |
| Setter | set_shadow_detail(value) |
| Getter | get_shadow_detail() |
See ShadowDetail.
- ShadowMode omni_shadow_mode
| Default | 1 |
| Setter | set_shadow_mode(value) |
| Getter | get_shadow_mode() |
See ShadowMode.
OpenSimplexNoise¶
Inherits: Resource < Reference < Object
Noise generator based on Open Simplex.
Description¶
This resource allows you to configure and sample a fractal noise space. Here is a brief usage example that configures an OpenSimplexNoise and gets samples at various positions and dimensions:
var noise = OpenSimplexNoise.new()
# Configure
noise.seed = randi()
noise.octaves = 4
noise.period = 20.0
noise.persistence = 0.8
# Sample
print("Values:")
print(noise.get_noise_2d(1.0, 1.0))
print(noise.get_noise_3d(0.5, 3.0, 15.0))
print(noise.get_noise_4d(0.5, 1.9, 4.7, 0.0))
Methods¶
| Image | get_image ( int width, int height ) |
| float | get_noise_1d ( float x ) |
| float | get_noise_2d ( float x, float y ) |
| float | get_noise_2dv ( Vector2 pos ) |
| float | get_noise_3d ( float x, float y, float z ) |
| float | get_noise_3dv ( Vector3 pos ) |
| float | get_noise_4d ( float x, float y, float z, float w ) |
| Image | get_seamless_image ( int size ) |
Property Descriptions¶
- float lacunarity
| Default | 2.0 |
| Setter | set_lacunarity(value) |
| Getter | get_lacunarity() |
Difference in period between octaves.
- int octaves
| Default | 3 |
| Setter | set_octaves(value) |
| Getter | get_octaves() |
Number of OpenSimplex noise layers that are sampled to get the fractal noise. Higher values result in more detailed noise but take more time to generate.
Note: The maximum allowed value is 9.
- float period
| Default | 64.0 |
| Setter | set_period(value) |
| Getter | get_period() |
Period of the base octave. A lower period results in a higher-frequency noise (more value changes across the same distance).
- float persistence
| Default | 0.5 |
| Setter | set_persistence(value) |
| Getter | get_persistence() |
Contribution factor of the different octaves. A persistence value of 1 means all the octaves have the same contribution, a value of 0.5 means each octave contributes half as much as the previous one.
- int seed
| Default | 0 |
| Setter | set_seed(value) |
| Getter | get_seed() |
Seed used to generate random values, different seeds will generate different noise maps.
Method Descriptions¶
Generate a noise image with the requested width and height, based on the current noise parameters.
Returns the 1D noise value [-1,1] at the given x-coordinate.
Note: This method actually returns the 2D noise value [-1,1] with fixed y-coordinate value 0.0.
Returns the 2D noise value [-1,1] at the given position.
Returns the 2D noise value [-1,1] at the given position.
Returns the 3D noise value [-1,1] at the given position.
Returns the 3D noise value [-1,1] at the given position.
Returns the 4D noise value [-1,1] at the given position.
Generate a tileable noise image, based on the current noise parameters. Generated seamless images are always square (size × size).
OptionButton¶
Inherits: Button < BaseButton < Control < CanvasItem < Node < Object
Button control that provides selectable options when pressed.
Description¶
OptionButton is a type button that provides a selectable list of items when pressed. The item selected becomes the “current” item and is displayed as the button text.
Properties¶
| ActionMode | action_mode | O: 0 |
| TextAlign | align | O: 0 |
| int | selected | -1 |
| bool | toggle_mode | O: true |
Methods¶
| void | add_icon_item ( Texture texture, String label, int id=-1 ) |
| void | add_item ( String label, int id=-1 ) |
| void | add_separator ( ) |
| void | clear ( ) |
| int | get_item_count ( ) const |
| Texture | get_item_icon ( int idx ) const |
| int | get_item_id ( int idx ) const |
| int | get_item_index ( int id ) const |
| Variant | get_item_metadata ( int idx ) const |
| String | get_item_text ( int idx ) const |
| PopupMenu | get_popup ( ) const |
| int | get_selected_id ( ) const |
| Variant | get_selected_metadata ( ) const |
| bool | is_item_disabled ( int idx ) const |
| void | remove_item ( int idx ) |
| void | select ( int idx ) |
| void | set_item_disabled ( int idx, bool disabled ) |
| void | set_item_icon ( int idx, Texture texture ) |
| void | set_item_id ( int idx, int id ) |
| void | set_item_metadata ( int idx, Variant metadata ) |
| void | set_item_text ( int idx, String text ) |
Theme Properties¶
| Texture | arrow | |
| int | arrow_margin | 2 |
| StyleBox | disabled | |
| StyleBox | focus | |
| Font | font | |
| Color | font_color | Color( 0.88, 0.88, 0.88, 1 ) |
| Color | font_color_disabled | Color( 0.9, 0.9, 0.9, 0.2 ) |
| Color | font_color_hover | Color( 0.94, 0.94, 0.94, 1 ) |
| Color | font_color_pressed | Color( 1, 1, 1, 1 ) |
| StyleBox | hover | |
| int | hseparation | 2 |
| StyleBox | normal | |
| StyleBox | pressed |
Signals¶
- item_focused ( int id )
Emitted the when user navigates to an item using the ui_up or ui_down actions. The index of the item selected is passed as argument.
- item_selected ( int id )
Emitted when the current item has been changed by the user. The index of the item selected is passed as argument.
Property Descriptions¶
- int selected
| Default | -1 |
| Getter | get_selected() |
The index of the currently selected item, or -1 if no item is selected.
Method Descriptions¶
Adds an item, with a texture icon, text label and (optionally) id. If no id is passed, the item index will be used as the item’s ID. New items are appended at the end.
Adds an item, with text label and (optionally) id. If no id is passed, the item index will be used as the item’s ID. New items are appended at the end.
- void add_separator ( )
Adds a separator to the list of items. Separators help to group items. Separator also takes up an index and is appended at the end.
- void clear ( )
Clears all the items in the OptionButton.
- int get_item_count ( ) const
Returns the amount of items in the OptionButton, including separators.
Returns the icon of the item at index idx.
Returns the ID of the item at index idx.
Returns the index of the item with the given id.
Retrieves the metadata of an item. Metadata may be any type and can be used to store extra information about an item, such as an external string ID.
Returns the text of the item at index idx.
- PopupMenu get_popup ( ) const
Returns the PopupMenu contained in this button.
- int get_selected_id ( ) const
Returns the ID of the selected item, or 0 if no item is selected.
- Variant get_selected_metadata ( ) const
Gets the metadata of the selected item. Metadata for items can be set using set_item_metadata.
Returns true if the item at index idx is disabled.
- void remove_item ( int idx )
Removes the item at index idx.
- void select ( int idx )
Selects an item by index and makes it the current item. This will work even if the item is disabled.
Sets whether the item at index idx is disabled.
Disabled items are drawn differently in the dropdown and are not selectable by the user. If the current selected item is set as disabled, it will remain selected.
Sets the icon of the item at index idx.
Sets the ID of the item at index idx.
Sets the metadata of an item. Metadata may be of any type and can be used to store extra information about an item, such as an external string ID.
Sets the text of the item at index idx.
OS¶
Inherits: Object
Operating System functions.
Description¶
Operating System functions. OS wraps the most common functionality to communicate with the host operating system, such as the clipboard, video driver, date and time, timers, environment variables, execution of binaries, command line, etc.
Properties¶
| String | clipboard | "" |
| int | current_screen | 0 |
| int | exit_code | 0 |
| bool | keep_screen_on | true |
| bool | low_processor_usage_mode | false |
| int | low_processor_usage_mode_sleep_usec | 6900 |
| Vector2 | max_window_size | Vector2( 0, 0 ) |
| Vector2 | min_window_size | Vector2( 0, 0 ) |
| ScreenOrientation | screen_orientation | 0 |
| bool | vsync_enabled | true |
| bool | vsync_via_compositor | false |
| bool | window_borderless | false |
| bool | window_fullscreen | false |
| bool | window_maximized | false |
| bool | window_minimized | false |
| bool | window_per_pixel_transparency_enabled | false |
| Vector2 | window_position | Vector2( 0, 0 ) |
| bool | window_resizable | true |
| Vector2 | window_size | Vector2( 0, 0 ) |
Methods¶
Enumerations¶
enum VideoDriver:
- VIDEO_DRIVER_GLES2 = 1 — The GLES2 rendering backend. It uses OpenGL ES 2.0 on mobile devices, OpenGL 2.1 on desktop platforms and WebGL 1.0 on the web.
- VIDEO_DRIVER_GLES3 = 0 — The GLES3 rendering backend. It uses OpenGL ES 3.0 on mobile devices, OpenGL 3.3 on desktop platforms and WebGL 2.0 on the web.
enum Weekday:
- DAY_SUNDAY = 0 — Sunday.
- DAY_MONDAY = 1 — Monday.
- DAY_TUESDAY = 2 — Tuesday.
- DAY_WEDNESDAY = 3 — Wednesday.
- DAY_THURSDAY = 4 — Thursday.
- DAY_FRIDAY = 5 — Friday.
- DAY_SATURDAY = 6 — Saturday.
enum Month:
- MONTH_JANUARY = 1 — January.
- MONTH_FEBRUARY = 2 — February.
- MONTH_MARCH = 3 — March.
- MONTH_APRIL = 4 — April.
- MONTH_MAY = 5 — May.
- MONTH_JUNE = 6 — June.
- MONTH_JULY = 7 — July.
- MONTH_AUGUST = 8 — August.
- MONTH_SEPTEMBER = 9 — September.
- MONTH_OCTOBER = 10 — October.
- MONTH_NOVEMBER = 11 — November.
- MONTH_DECEMBER = 12 — December.
enum ScreenOrientation:
- SCREEN_ORIENTATION_LANDSCAPE = 0 — Landscape screen orientation.
- SCREEN_ORIENTATION_PORTRAIT = 1 — Portrait screen orientation.
- SCREEN_ORIENTATION_REVERSE_LANDSCAPE = 2 — Reverse landscape screen orientation.
- SCREEN_ORIENTATION_REVERSE_PORTRAIT = 3 — Reverse portrait screen orientation.
- SCREEN_ORIENTATION_SENSOR_LANDSCAPE = 4 — Uses landscape or reverse landscape based on the hardware sensor.
- SCREEN_ORIENTATION_SENSOR_PORTRAIT = 5 — Uses portrait or reverse portrait based on the hardware sensor.
- SCREEN_ORIENTATION_SENSOR = 6 — Uses most suitable orientation based on the hardware sensor.
enum SystemDir:
- SYSTEM_DIR_DESKTOP = 0 — Desktop directory path.
- SYSTEM_DIR_DCIM = 1 — DCIM (Digital Camera Images) directory path.
- SYSTEM_DIR_DOCUMENTS = 2 — Documents directory path.
- SYSTEM_DIR_DOWNLOADS = 3 — Downloads directory path.
- SYSTEM_DIR_MOVIES = 4 — Movies directory path.
- SYSTEM_DIR_MUSIC = 5 — Music directory path.
- SYSTEM_DIR_PICTURES = 6 — Pictures directory path.
- SYSTEM_DIR_RINGTONES = 7 — Ringtones directory path.
enum PowerState:
- POWERSTATE_UNKNOWN = 0 — Unknown powerstate.
- POWERSTATE_ON_BATTERY = 1 — Unplugged, running on battery.
- POWERSTATE_NO_BATTERY = 2 — Plugged in, no battery available.
- POWERSTATE_CHARGING = 3 — Plugged in, battery charging.
- POWERSTATE_CHARGED = 4 — Plugged in, battery fully charged.
Property Descriptions¶
- String clipboard
| Default | "" |
| Setter | set_clipboard(value) |
| Getter | get_clipboard() |
The clipboard from the host OS. Might be unavailable on some platforms.
- int current_screen
| Default | 0 |
| Setter | set_current_screen(value) |
| Getter | get_current_screen() |
The current screen index (starting from 0).
- int exit_code
| Default | 0 |
| Setter | set_exit_code(value) |
| Getter | get_exit_code() |
The exit code passed to the OS when the main loop exits. By convention, an exit code of 0 indicates success whereas a non-zero exit code indicates an error. For portability reasons, the exit code should be set between 0 and 125 (inclusive).
Note: This value will be ignored if using SceneTree.quit with an exit_code argument passed.
- bool keep_screen_on
| Default | true |
| Setter | set_keep_screen_on(value) |
| Getter | is_keep_screen_on() |
If true, the engine tries to keep the screen on while the game is running. Useful on mobile.
- bool low_processor_usage_mode
| Default | false |
| Setter | set_low_processor_usage_mode(value) |
| Getter | is_in_low_processor_usage_mode() |
If true, the engine optimizes for low processor usage by only refreshing the screen if needed. Can improve battery consumption on mobile.
- int low_processor_usage_mode_sleep_usec
| Default | 6900 |
| Setter | set_low_processor_usage_mode_sleep_usec(value) |
| Getter | get_low_processor_usage_mode_sleep_usec() |
The amount of sleeping between frames when the low-processor usage mode is enabled (in microseconds). Higher values will result in lower CPU usage.
- Vector2 max_window_size
| Default | Vector2( 0, 0 ) |
| Setter | set_max_window_size(value) |
| Getter | get_max_window_size() |
The maximum size of the window (without counting window manager decorations). Does not affect fullscreen mode. Set to (0, 0) to reset to the system default value.
- Vector2 min_window_size
| Default | Vector2( 0, 0 ) |
| Setter | set_min_window_size(value) |
| Getter | get_min_window_size() |
The minimum size of the window (without counting window manager decorations). Does not affect fullscreen mode. Set to (0, 0) to reset to the system default value.
- ScreenOrientation screen_orientation
| Default | 0 |
| Setter | set_screen_orientation(value) |
| Getter | get_screen_orientation() |
The current screen orientation.
- bool vsync_enabled
| Default | true |
| Setter | set_use_vsync(value) |
| Getter | is_vsync_enabled() |
If true, vertical synchronization (Vsync) is enabled.
- bool vsync_via_compositor
| Default | false |
| Setter | set_vsync_via_compositor(value) |
| Getter | is_vsync_via_compositor_enabled() |
If true and vsync_enabled is true, the operating system’s window compositor will be used for vsync when the compositor is enabled and the game is in windowed mode.
Note: This option is experimental and meant to alleviate stutter experienced by some users. However, some users have experienced a Vsync framerate halving (e.g. from 60 FPS to 30 FPS) when using it.
Note: This property is only implemented on Windows.
- bool window_borderless
| Default | false |
| Setter | set_borderless_window(value) |
| Getter | get_borderless_window() |
If true, removes the window frame.
Note: Setting window_borderless to false disables per-pixel transparency.
- bool window_fullscreen
| Default | false |
| Setter | set_window_fullscreen(value) |
| Getter | is_window_fullscreen() |
If true, the window is fullscreen.
- bool window_maximized
| Default | false |
| Setter | set_window_maximized(value) |
| Getter | is_window_maximized() |
If true, the window is maximized.
- bool window_minimized
| Default | false |
| Setter | set_window_minimized(value) |
| Getter | is_window_minimized() |
If true, the window is minimized.
- bool window_per_pixel_transparency_enabled
| Default | false |
| Setter | set_window_per_pixel_transparency_enabled(value) |
| Getter | get_window_per_pixel_transparency_enabled() |
If true, the window background is transparent and window frame is removed.
Use get_tree().get_root().set_transparent_background(true) to disable main viewport background rendering.
Note: This property has no effect if Project > Project Settings > Display > Window > Per-pixel transparency > Allowed setting is disabled.
Note: This property is implemented on HTML5, Linux, macOS and Windows.
- Vector2 window_position
| Default | Vector2( 0, 0 ) |
| Setter | set_window_position(value) |
| Getter | get_window_position() |
The window position relative to the screen, the origin is the top left corner, +Y axis goes to the bottom and +X axis goes to the right.
- bool window_resizable
| Default | true |
| Setter | set_window_resizable(value) |
| Getter | is_window_resizable() |
If true, the window is resizable by the user.
- Vector2 window_size
| Default | Vector2( 0, 0 ) |
| Setter | set_window_size(value) |
| Getter | get_window_size() |
The size of the window (without counting window manager decorations).
Method Descriptions¶
Displays a modal dialog box using the host OS’ facilities. Execution is blocked until the dialog is closed.
- bool can_draw ( ) const
Returns true if the host OS allows drawing.
- bool can_use_threads ( ) const
Returns true if the current host platform is using multiple threads.
- void center_window ( )
Centers the window on the screen if in windowed mode.
- void close_midi_inputs ( )
Shuts down system MIDI driver.
Note: This method is implemented on Linux, macOS and Windows.
- void delay_msec ( int msec ) const
Delay execution of the current thread by msec milliseconds.
- void delay_usec ( int usec ) const
Delay execution of the current thread by usec microseconds.
- void dump_memory_to_file ( String file )
Dumps the memory allocation ringlist to a file (only works in debug).
Entry format per line: “Address - Size - Description”.
- void dump_resources_to_file ( String file )
Dumps all used resources to file (only works in debug).
Entry format per line: “Resource Type : Resource Location”.
At the end of the file is a statistic of all used Resource Types.
- int execute ( String path, PoolStringArray arguments, bool blocking=true, Array output=[ ], bool read_stderr=false )
Execute the file at the given path with the arguments passed as an array of strings. Platform path resolution will take place. The resolved file must exist and be executable.
The arguments are used in the given order and separated by a space, so OS.execute("ping", ["-w", "3", "godotengine.org"], false) will resolve to ping -w 3 godotengine.org in the system’s shell.
This method has slightly different behavior based on whether the blocking mode is enabled.
If blocking is true, the Godot thread will pause its execution while waiting for the process to terminate. The shell output of the process will be written to the output array as a single string. When the process terminates, the Godot thread will resume execution.
If blocking is false, the Godot thread will continue while the new process runs. It is not possible to retrieve the shell output in non-blocking mode, so output will be empty.
The return value also depends on the blocking mode. When blocking, the method will return an exit code of the process. When non-blocking, the method returns a process ID, which you can use to monitor the process (and potentially terminate it with kill). If the process forking (non-blocking) or opening (blocking) fails, the method will return -1 or another exit code.
Example of blocking mode and retrieving the shell output:
var output = []
var exit_code = OS.execute("ls", ["-l", "/tmp"], true, output)
Example of non-blocking mode, running another instance of the project and storing its process ID:
var pid = OS.execute(OS.get_executable_path(), [], false)
If you wish to access a shell built-in or perform a composite command, a platform-specific shell can be invoked. For example:
OS.execute("CMD.exe", ["/C", "cd %TEMP% && dir"], true, output)
Note: This method is implemented on Android, iOS, Linux, macOS and Windows.
Returns the scancode of the given string (e.g. “Escape”).
- int get_audio_driver_count ( ) const
Returns the total number of available audio drivers.
Returns the audio driver name for the given index.
- PoolStringArray get_cmdline_args ( )
Returns the command line arguments passed to the engine.
- PoolStringArray get_connected_midi_inputs ( )
Returns an array of MIDI device names.
The returned array will be empty if the system MIDI driver has not previously been initialised with open_midi_inputs.
Note: This method is implemented on Linux, macOS and Windows.
- VideoDriver get_current_video_driver ( ) const
Returns the currently used video driver, using one of the values from VideoDriver.
- Dictionary get_date ( bool utc=false ) const
Returns current date as a dictionary of keys: year, month, day, weekday, dst (Daylight Savings Time).
- Dictionary get_datetime ( bool utc=false ) const
Returns current datetime as a dictionary of keys: year, month, day, weekday, dst (Daylight Savings Time), hour, minute, second.
- Dictionary get_datetime_from_unix_time ( int unix_time_val ) const
Gets a dictionary of time values corresponding to the given UNIX epoch time (in seconds).
The returned Dictionary’s values will be the same as get_datetime, with the exception of Daylight Savings Time as it cannot be determined from the epoch.
- int get_dynamic_memory_usage ( ) const
Returns the total amount of dynamic memory used (only works in debug).
Returns an environment variable.
- String get_executable_path ( ) const
Returns the path to the current engine executable.
- PoolStringArray get_granted_permissions ( ) const
With this function you can get the list of dangerous permissions that have been granted to the Android application.
Note: This method is implemented on Android.
- Vector2 get_ime_selection ( ) const
Returns the IME cursor position (the currently-edited portion of the string) relative to the characters in the composition string.
MainLoop.NOTIFICATION_OS_IME_UPDATE is sent to the application to notify it of changes to the IME cursor position.
Note: This method is implemented on macOS.
- String get_ime_text ( ) const
Returns the IME intermediate composition string.
MainLoop.NOTIFICATION_OS_IME_UPDATE is sent to the application to notify it of changes to the IME composition string.
Note: This method is implemented on macOS.
- String get_latin_keyboard_variant ( ) const
Returns the current latin keyboard variant as a String.
Possible return values are: "QWERTY", "AZERTY", "QZERTY", "DVORAK", "NEO", "COLEMAK" or "ERROR".
Note: This method is implemented on Linux, macOS and Windows. Returns "QWERTY" on unsupported platforms.
- String get_locale ( ) const
Returns the host OS locale.
- String get_model_name ( ) const
Returns the model name of the current device.
Note: This method is implemented on Android and iOS. Returns "GenericDevice" on unsupported platforms.
- String get_name ( ) const
Returns the name of the host OS. Possible values are: "Android", "Haiku", "iOS", "HTML5", "OSX", "Server", "Windows", "UWP", "X11".
- int get_power_percent_left ( )
Returns the amount of battery left in the device as a percentage. Returns -1 if power state is unknown.
Note: This method is implemented on Linux, macOS and Windows.
- int get_power_seconds_left ( )
Returns an estimate of the time left in seconds before the device runs out of battery. Returns -1 if power state is unknown.
Note: This method is implemented on Linux, macOS and Windows.
- PowerState get_power_state ( )
Returns the current state of the device regarding battery and power. See PowerState constants.
Note: This method is implemented on Linux, macOS and Windows.
- int get_process_id ( ) const
Returns the project’s process ID.
Note: This method is implemented on Android, iOS, Linux, macOS and Windows.
- int get_processor_count ( ) const
Returns the number of threads available on the host machine.
- Vector2 get_real_window_size ( ) const
Returns the window size including decorations like window borders.
Returns the given scancode as a string (e.g. Return values: "Escape", "Shift+Escape").
See also InputEventKey.scancode and InputEventKey.get_scancode_with_modifiers.
- int get_screen_count ( ) const
Returns the number of displays attached to the host machine.
Returns the dots per inch density of the specified screen. If screen is -1 (the default value), the current screen will be used.
On Android devices, the actual screen densities are grouped into six generalized densities:
ldpi - 120 dpi
mdpi - 160 dpi
hdpi - 240 dpi
xhdpi - 320 dpi
xxhdpi - 480 dpi
xxxhdpi - 640 dpi
Note: This method is implemented on Android, Linux, macOS and Windows. Returns 72 on unsupported platforms.
Returns the position of the specified screen by index. If screen is -1 (the default value), the current screen will be used.
Returns the dimensions in pixels of the specified screen. If screen is -1 (the default value), the current screen will be used.
- int get_splash_tick_msec ( ) const
Returns the amount of time in milliseconds it took for the boot logo to appear.
- int get_static_memory_peak_usage ( ) const
Returns the maximum amount of static memory used (only works in debug).
- int get_static_memory_usage ( ) const
Returns the amount of static memory being used by the program in bytes.
Returns the actual path to commonly used folders across different platforms. Available locations are specified in SystemDir.
Note: This method is implemented on Android, Linux, macOS and Windows.
- int get_system_time_msecs ( ) const
Returns the epoch time of the operating system in milliseconds.
- int get_system_time_secs ( ) const
Returns the epoch time of the operating system in seconds.
- int get_ticks_msec ( ) const
Returns the amount of time passed in milliseconds since the engine started.
- int get_ticks_usec ( ) const
Returns the amount of time passed in microseconds since the engine started.
- Dictionary get_time ( bool utc=false ) const
Returns current time as a dictionary of keys: hour, minute, second.
- Dictionary get_time_zone_info ( ) const
Returns the current time zone as a dictionary with the keys: bias and name.
- String get_unique_id ( ) const
Returns a string that is unique to the device.
Note: Returns an empty string on HTML5 and UWP, as this method isn’t implemented on those platforms yet.
- int get_unix_time ( ) const
Returns the current UNIX epoch timestamp.
- int get_unix_time_from_datetime ( Dictionary datetime ) const
Gets an epoch time value from a dictionary of time values.
datetime must be populated with the following keys: year, month, day, hour, minute, second.
You can pass the output from get_datetime_from_unix_time directly into this function. Daylight Savings Time (dst), if present, is ignored.
- String get_user_data_dir ( ) const
Returns the absolute directory path where user data is written (user://).
On Linux, this is ~/.local/share/godot/app_userdata/[project_name], or ~/.local/share/[custom_name] if use_custom_user_dir is set.
On macOS, this is ~/Library/Application Support/Godot/app_userdata/[project_name], or ~/Library/Application Support/[custom_name] if use_custom_user_dir is set.
On Windows, this is %APPDATA%\Godot\app_userdata\[project_name], or %APPDATA%\[custom_name] if use_custom_user_dir is set. %APPDATA% expands to %USERPROFILE%\AppData\Roaming.
If the project name is empty, user:// falls back to res://.
- int get_video_driver_count ( ) const
Returns the number of video drivers supported on the current platform.
- String get_video_driver_name ( VideoDriver driver ) const
Returns the name of the video driver matching the given driver index. This index is a value from VideoDriver, and you can use get_current_video_driver to get the current backend’s index.
- int get_virtual_keyboard_height ( )
Returns the on-screen keyboard’s height in pixels. Returns 0 if there is no keyboard or if it is currently hidden.
- Rect2 get_window_safe_area ( ) const
Returns unobscured area of the window where interactive controls should be rendered.
Add a new item with text “label” to global menu. Use “_dock” menu to add item to the macOS dock icon menu.
Note: This method is implemented on macOS.
Add a separator between items. Separators also occupy an index.
Note: This method is implemented on macOS.
Clear the global menu, in effect removing all items.
Note: This method is implemented on macOS.
Removes the item at index “idx” from the global menu. Note that the indexes of items after the removed item are going to be shifted by one.
Note: This method is implemented on macOS.
Returns true if an environment variable exists.
Returns true if the feature for the given feature tag is supported in the currently running instance, depending on platform, build etc. Can be used to check whether you’re currently running a debug build, on a certain platform or arch, etc. Refer to the Feature Tags documentation for more details.
Note: Tag names are case-sensitive.
- bool has_touchscreen_ui_hint ( ) const
Returns true if the device has a touchscreen or emulates one.
- bool has_virtual_keyboard ( ) const
Returns true if the platform has a virtual keyboard, false otherwise.
- void hide_virtual_keyboard ( )
Hides the virtual keyboard if it is shown, does nothing otherwise.
- bool is_debug_build ( ) const
Returns true if the Godot binary used to run the project is a debug export template, or when running in the editor.
Returns false if the Godot binary used to run the project is a release export template.
To check whether the Godot binary used to run the project is an export template (debug or release), use OS.has_feature("standalone") instead.
- bool is_ok_left_and_cancel_right ( ) const
Returns true if the OK button should appear on the left and Cancel on the right.
Returns true if the input scancode corresponds to a Unicode character.
- bool is_stdout_verbose ( ) const
Returns true if the engine was executed with -v (verbose stdout).
- bool is_userfs_persistent ( ) const
If true, the user:// file system is persistent, so that its state is the same after a player quits and starts the game again. Relevant to the HTML5 platform, where this persistence may be unavailable.
- bool is_window_always_on_top ( ) const
Returns true if the window should always be on top of other windows.
- bool is_window_focused ( ) const
Returns true if the window is currently focused.
Note: Only implemented on desktop platforms. On other platforms, it will always return true.
Kill (terminate) the process identified by the given process ID (pid), e.g. the one returned by execute in non-blocking mode.
Note: This method can also be used to kill processes that were not spawned by the game.
Note: This method is implemented on Android, iOS, Linux, macOS and Windows.
- void move_window_to_foreground ( )
Moves the window to the front.
Note: This method is implemented on Linux, macOS and Windows.
- bool native_video_is_playing ( )
Returns true if native video is playing.
Note: This method is implemented on Android and iOS.
- void native_video_pause ( )
Pauses native video playback.
Note: This method is implemented on Android and iOS.
Plays native video from the specified path, at the given volume and with audio and subtitle tracks.
Note: This method is implemented on Android and iOS, and the current Android implementation does not support the volume, audio_track and subtitle_track options.
- void native_video_stop ( )
Stops native video playback.
Note: This method is implemented on Android and iOS.
- void native_video_unpause ( )
Resumes native video playback.
Note: This method is implemented on Android and iOS.
- void open_midi_inputs ( )
Initialises the singleton for the system MIDI driver.
Note: This method is implemented on Linux, macOS and Windows.
- void print_all_resources ( String tofile=”” )
Shows all resources in the game. Optionally, the list can be written to a file by specifying a file path in tofile.
- void print_all_textures_by_size ( )
Shows the list of loaded textures sorted by size in memory.
- void print_resources_by_type ( PoolStringArray types )
Shows the number of resources loaded by the game of the given types.
- void print_resources_in_use ( bool short=false )
Shows all resources currently used by the game.
- void request_attention ( )
Request the user attention to the window. It’ll flash the taskbar button on Windows or bounce the dock icon on OSX.
Note: This method is implemented on Linux, macOS and Windows.
At the moment this function is only used by AudioDriverOpenSL to request permission for RECORD_AUDIO on Android.
- bool request_permissions ( )
With this function you can request dangerous permissions since normal permissions are automatically granted at install time in Android application.
Note: This method is implemented on Android.
- void set_icon ( Image icon )
Sets the game’s icon using an Image resource.
The same image is used for window caption, taskbar/dock and window selection dialog. Image is scaled as needed.
Note: This method is implemented on HTML5, Linux, macOS and Windows.
- void set_ime_active ( bool active )
Sets whether IME input mode should be enabled.
If active IME handles key events before the application and creates an composition string and suggestion list.
Application can retrieve the composition status by using get_ime_selection and get_ime_text functions.
Completed composition string is committed when input is finished.
Note: This method is implemented on Linux, macOS and Windows.
- void set_ime_position ( Vector2 position )
Sets position of IME suggestion list popup (in window coordinates).
Note: This method is implemented on Linux, macOS and Windows.
- void set_native_icon ( String filename )
Sets the game’s icon using a multi-size platform-specific icon file (*.ico on Windows and *.icns on macOS).
Appropriate size sub-icons are used for window caption, taskbar/dock and window selection dialog.
Note: This method is implemented on macOS and Windows.
Sets the name of the current thread.
- void set_use_file_access_save_and_swap ( bool enabled )
Enables backup saves if enabled is true.
- void set_window_always_on_top ( bool enabled )
Sets whether the window should always be on top.
Note: This method is implemented on Linux, macOS and Windows.
- void set_window_title ( String title )
Sets the window title to the specified string.
Note: This should be used sporadically. Don’t set this every frame, as that will negatively affect performance on some window managers.
Note: This method is implemented on HTML5, Linux, macOS and Windows.
Requests the OS to open a resource with the most appropriate program. For example:
OS.shell_open("C:\\Users\name\Downloads")on Windows opens the file explorer at the user’s Downloads folder.OS.shell_open("https://godotengine.org")opens the default web browser on the official Godot website.OS.shell_open("mailto:example@example.com")opens the default email client with the “To” field set toexample@example.com. See Customizing ``mailto:` Links <https://blog.escapecreative.com/customizing-mailto-links/>`_ for a list of fields that can be added.
Note: This method is implemented on Android, iOS, HTML5, Linux, macOS and Windows.
- void show_virtual_keyboard ( String existing_text=”” )
Shows the virtual keyboard if the platform has one. The existing_text parameter is useful for implementing your own LineEdit, as it tells the virtual keyboard what text has already been typed (the virtual keyboard uses it for auto-correct and predictions).
Note: This method is implemented on Android, iOS and UWP.
PackedDataContainer¶
Inherits: Resource < Reference < Object
Properties¶
| PoolByteArray | __data__ | PoolByteArray( ) |
PackedDataContainerRef¶
Reference version of PackedDataContainer.
PackedScene¶
Inherits: Resource < Reference < Object
An abstraction of a serialized scene.
Description¶
A simplified interface to a scene file. Provides access to operations and checks that can be performed on the scene resource itself.
Can be used to save a node to a file. When saving, the node as well as all the node it owns get saved (see owner property on Node).
Note: The node doesn’t need to own itself.
Example of saving a node with different owners: The following example creates 3 objects: Node2D (node), RigidBody2D (rigid) and CollisionObject2D (collision). collision is a child of rigid which is a child of node. Only rigid is owned by node and pack will therefore only save those two nodes, but not collision.
# Create the objects
var node = Node2D.new()
var rigid = RigidBody2D.new()
var collision = CollisionShape2D.new()
# Create the object hierarchy
rigid.add_child(collision)
node.add_child(rigid)
# Change owner of rigid, but not of collision
rigid.owner = node
var scene = PackedScene.new()
# Only node and rigid are now packed
var result = scene.pack(node)
if result == OK:
ResourceSaver.save("res://path/name.scn", scene) # Or "user://..."
Properties¶
| Dictionary | _bundled | {"conn_count": 0,"conns": PoolIntArray( ),"editable_instances": [ ],"names": PoolStringArray( ),"node_count": 0,"node_paths": [ ],"nodes": PoolIntArray( ),"variants": [ ],"version": 2} |
Methods¶
| bool | can_instance ( ) const |
| SceneState | get_state ( ) |
| Node | instance ( GenEditState edit_state=0 ) const |
| Error | pack ( Node path ) |
Enumerations¶
enum GenEditState:
- GEN_EDIT_STATE_DISABLED = 0 — If passed to instance, blocks edits to the scene state.
- GEN_EDIT_STATE_INSTANCE = 1 — If passed to instance, provides local scene resources to the local scene.
Note: Only available in editor builds.
- GEN_EDIT_STATE_MAIN = 2 — If passed to instance, provides local scene resources to the local scene. Only the main scene should receive the main edit state.
Note: Only available in editor builds.
Property Descriptions¶
- Dictionary _bundled
| Default | {"conn_count": 0,"conns": PoolIntArray( ),"editable_instances": [ ],"names": PoolStringArray( ),"node_count": 0,"node_paths": [ ],"nodes": PoolIntArray( ),"variants": [ ],"version": 2} |
A dictionary representation of the scene contents.
Available keys include “rnames” and “variants” for resources, “node_count”, “nodes”, “node_paths” for nodes, “editable_instances” for base scene children overrides, “conn_count” and “conns” for signal connections, and “version” for the format style of the PackedScene.
Method Descriptions¶
- bool can_instance ( ) const
Returns true if the scene file has nodes.
- SceneState get_state ( )
Returns the SceneState representing the scene file contents.
- Node instance ( GenEditState edit_state=0 ) const
Instantiates the scene’s node hierarchy. Triggers child scene instantiation(s). Triggers a Node.NOTIFICATION_INSTANCED notification on the root node.
Pack will ignore any sub-nodes not owned by given node. See Node.owner.
PacketPeer¶
Inherited By: NetworkedMultiplayerPeer, PacketPeerGDNative, PacketPeerStream, PacketPeerUDP, WebRTCDataChannel, WebSocketPeer
Abstraction and base class for packet-based protocols.
Description¶
PacketPeer is an abstraction and base class for packet-based protocols (such as UDP). It provides an API for sending and receiving packets both as raw data or variables. This makes it easy to transfer data over a protocol, without having to encode data as low-level bytes or having to worry about network ordering.
Properties¶
| bool | allow_object_decoding | false |
| int | encode_buffer_max_size | 8388608 |
Methods¶
| int | get_available_packet_count ( ) const |
| PoolByteArray | get_packet ( ) |
| Error | get_packet_error ( ) const |
| Variant | get_var ( bool allow_objects=false ) |
| Error | put_packet ( PoolByteArray buffer ) |
| Error | put_var ( Variant var, bool full_objects=false ) |
Property Descriptions¶
- bool allow_object_decoding
| Default | false |
| Setter | set_allow_object_decoding(value) |
| Getter | is_object_decoding_allowed() |
Deprecated. Use get_var and put_var parameters instead.
If true, the PacketPeer will allow encoding and decoding of object via get_var and put_var.
Warning: Deserialized objects can contain code which gets executed. Do not use this option if the serialized object comes from untrusted sources to avoid potential security threats such as remote code execution.
- int encode_buffer_max_size
| Default | 8388608 |
| Setter | set_encode_buffer_max_size(value) |
| Getter | get_encode_buffer_max_size() |
Maximum buffer size allowed when encoding Variants. Raise this value to support heavier memory allocations.
The put_var method allocates memory on the stack, and the buffer used will grow automatically to the closest power of two to match the size of the Variant. If the Variant is bigger than encode_buffer_max_size, the method will error out with @GlobalScope.ERR_OUT_OF_MEMORY.
Method Descriptions¶
- int get_available_packet_count ( ) const
Returns the number of packets currently available in the ring-buffer.
- PoolByteArray get_packet ( )
Gets a raw packet.
- Error get_packet_error ( ) const
Returns the error state of the last packet received (via get_packet and get_var).
Gets a Variant. If allow_objects (or allow_object_decoding) is true, decoding objects is allowed.
Warning: Deserialized objects can contain code which gets executed. Do not use this option if the serialized object comes from untrusted sources to avoid potential security threats such as remote code execution.
- Error put_packet ( PoolByteArray buffer )
Sends a raw packet.
Sends a Variant as a packet. If full_objects (or allow_object_decoding) is true, encoding objects is allowed (and can potentially include code).
PacketPeerGDNative¶
Inherits: PacketPeer < Reference < Object
PacketPeerStream¶
Inherits: PacketPeer < Reference < Object
Wrapper to use a PacketPeer over a StreamPeer.
Description¶
PacketStreamPeer provides a wrapper for working using packets over a stream. This allows for using packet based code with StreamPeers. PacketPeerStream implements a custom protocol over the StreamPeer, so the user should not read or write to the wrapped StreamPeer directly.
Properties¶
| int | input_buffer_max_size | 65532 |
| int | output_buffer_max_size | 65532 |
| StreamPeer | stream_peer |
Property Descriptions¶
- int input_buffer_max_size
| Default | 65532 |
| Setter | set_input_buffer_max_size(value) |
| Getter | get_input_buffer_max_size() |
- int output_buffer_max_size
| Default | 65532 |
| Setter | set_output_buffer_max_size(value) |
| Getter | get_output_buffer_max_size() |
- StreamPeer stream_peer
| Setter | set_stream_peer(value) |
| Getter | get_stream_peer() |
The wrapped StreamPeer object.
PacketPeerUDP¶
Inherits: PacketPeer < Reference < Object
UDP packet peer.
Methods¶
| void | close ( ) |
| String | get_packet_ip ( ) const |
| int | get_packet_port ( ) const |
| bool | is_listening ( ) const |
| Error | join_multicast_group ( String multicast_address, String interface_name ) |
| Error | leave_multicast_group ( String multicast_address, String interface_name ) |
| Error | listen ( int port, String bind_address=”*”, int recv_buf_size=65536 ) |
| void | set_broadcast_enabled ( bool enabled ) |
| Error | set_dest_address ( String host, int port ) |
| Error | wait ( ) |
Method Descriptions¶
- void close ( )
Closes the UDP socket the PacketPeerUDP is currently listening on.
- String get_packet_ip ( ) const
Returns the IP of the remote peer that sent the last packet(that was received with PacketPeer.get_packet or PacketPeer.get_var).
- int get_packet_port ( ) const
Returns the port of the remote peer that sent the last packet(that was received with PacketPeer.get_packet or PacketPeer.get_var).
- bool is_listening ( ) const
Returns whether this PacketPeerUDP is listening.
Joins the multicast group specified by multicast_address using the interface identified by interface_name.
You can join the same multicast group with multiple interfaces. Use IP.get_local_interfaces to know which are available.
Note: Some Android devices might require the CHANGE_WIFI_MULTICAST_STATE permission for multicast to work.
Removes the interface identified by interface_name from the multicast group specified by multicast_address.
Makes this PacketPeerUDP listen on the port binding to bind_address with a buffer size recv_buf_size.
If bind_address is set to "*" (default), the peer will listen on all available addresses (both IPv4 and IPv6).
If bind_address is set to "0.0.0.0" (for IPv4) or "::" (for IPv6), the peer will listen on all available addresses matching that IP type.
If bind_address is set to any valid address (e.g. "192.168.1.101", "::1", etc), the peer will only listen on the interface with that addresses (or fail if no interface with the given address exists).
- void set_broadcast_enabled ( bool enabled )
Enable or disable sending of broadcast packets (e.g. set_dest_address("255.255.255.255", 4343). This option is disabled by default.
Note: Some Android devices might require the CHANGE_WIFI_MULTICAST_STATE permission and this option to be enabled to receive broadcast packets too.
Sets the destination address and port for sending packets and variables. A hostname will be resolved using DNS if needed.
Note: set_broadcast_enabled must be enabled before sending packets to a broadcast address (e.g. 255.255.255.255).
- Error wait ( )
Waits for a packet to arrive on the listening port. See listen.
Panel¶
Inherits: Control < CanvasItem < Node < Object
Provides an opaque background for Control children.
PanelContainer¶
Inherits: Container < Control < CanvasItem < Node < Object
Inherited By: ScriptEditor
Panel container type.
Description¶
Panel container type. This container fits controls inside of the delimited area of a stylebox. It’s useful for giving controls an outline.
PanoramaSky¶
Inherits: Sky < Resource < Reference < Object
A type of Sky used to draw a background texture.
Description¶
A resource referenced in an Environment that is used to draw a background. The Panorama sky functions similar to skyboxes in other engines, except it uses an equirectangular sky map instead of a cube map.
Using an HDR panorama is strongly recommended for accurate, high-quality reflections. Godot supports the Radiance HDR (.hdr) and OpenEXR (.exr) image formats for this purpose.
You can use this tool to convert a cube map to an equirectangular sky map.
ParallaxBackground¶
Inherits: CanvasLayer < Node < Object
A node used to create a parallax scrolling background.
Description¶
A ParallaxBackground uses one or more ParallaxLayer child nodes to create a parallax effect. Each ParallaxLayer can move at a different speed using ParallaxLayer.motion_offset. This creates an illusion of depth in a 2D game. If not used with a Camera2D, you must manually calculate the scroll_offset.
Properties¶
| int | layer | O: -100 |
| Vector2 | scroll_base_offset | Vector2( 0, 0 ) |
| Vector2 | scroll_base_scale | Vector2( 1, 1 ) |
| bool | scroll_ignore_camera_zoom | false |
| Vector2 | scroll_limit_begin | Vector2( 0, 0 ) |
| Vector2 | scroll_limit_end | Vector2( 0, 0 ) |
| Vector2 | scroll_offset | Vector2( 0, 0 ) |
Property Descriptions¶
- Vector2 scroll_base_offset
| Default | Vector2( 0, 0 ) |
| Setter | set_scroll_base_offset(value) |
| Getter | get_scroll_base_offset() |
The base position offset for all ParallaxLayer children.
- Vector2 scroll_base_scale
| Default | Vector2( 1, 1 ) |
| Setter | set_scroll_base_scale(value) |
| Getter | get_scroll_base_scale() |
The base motion scale for all ParallaxLayer children.
- bool scroll_ignore_camera_zoom
| Default | false |
| Setter | set_ignore_camera_zoom(value) |
| Getter | is_ignore_camera_zoom() |
If true, elements in ParallaxLayer child aren’t affected by the zoom level of the camera.
- Vector2 scroll_limit_begin
| Default | Vector2( 0, 0 ) |
| Setter | set_limit_begin(value) |
| Getter | get_limit_begin() |
Top-left limits for scrolling to begin. If the camera is outside of this limit, the background will stop scrolling. Must be lower than scroll_limit_end to work.
- Vector2 scroll_limit_end
| Default | Vector2( 0, 0 ) |
| Setter | set_limit_end(value) |
| Getter | get_limit_end() |
Bottom-right limits for scrolling to end. If the camera is outside of this limit, the background will stop scrolling. Must be higher than scroll_limit_begin to work.
- Vector2 scroll_offset
| Default | Vector2( 0, 0 ) |
| Setter | set_scroll_offset(value) |
| Getter | get_scroll_offset() |
The ParallaxBackground’s scroll value. Calculated automatically when using a Camera2D, but can be used to manually manage scrolling when no camera is present.
ParallaxLayer¶
Inherits: Node2D < CanvasItem < Node < Object
A parallax scrolling layer to be used with ParallaxBackground.
Description¶
A ParallaxLayer must be the child of a ParallaxBackground node. Each ParallaxLayer can be set to move at different speeds relative to the camera movement or the ParallaxBackground.scroll_offset value.
This node’s children will be affected by its scroll offset.
Note: Any changes to this node’s position and scale made after it enters the scene will be ignored.
Properties¶
| Vector2 | motion_mirroring | Vector2( 0, 0 ) |
| Vector2 | motion_offset | Vector2( 0, 0 ) |
| Vector2 | motion_scale | Vector2( 1, 1 ) |
Property Descriptions¶
- Vector2 motion_mirroring
| Default | Vector2( 0, 0 ) |
| Setter | set_mirroring(value) |
| Getter | get_mirroring() |
The ParallaxLayer’s Texture mirroring. Useful for creating an infinite scrolling background. If an axis is set to 0, the Texture will not be mirrored.
- Vector2 motion_offset
| Default | Vector2( 0, 0 ) |
| Setter | set_motion_offset(value) |
| Getter | get_motion_offset() |
The ParallaxLayer’s offset relative to the parent ParallaxBackground’s ParallaxBackground.scroll_offset.
- Vector2 motion_scale
| Default | Vector2( 1, 1 ) |
| Setter | set_motion_scale(value) |
| Getter | get_motion_scale() |
Multiplies the ParallaxLayer’s motion. If an axis is set to 0, it will not scroll.
Particles¶
Inherits: GeometryInstance < VisualInstance < Spatial < Node < Object
3D particle emitter.
Description¶
3D particle node used to create a variety of particle systems and effects. Particles features an emitter that generates some number of particles at a given rate.
Use the process_material property to add a ParticlesMaterial to configure particle appearance and behavior. Alternatively, you can add a ShaderMaterial which will be applied to all particles.
Properties¶
| int | amount | 8 |
| DrawOrder | draw_order | 0 |
| Mesh | draw_pass_1 | |
| Mesh | draw_pass_2 | |
| Mesh | draw_pass_3 | |
| Mesh | draw_pass_4 | |
| int | draw_passes | 1 |
| bool | emitting | true |
| float | explosiveness | 0.0 |
| int | fixed_fps | 0 |
| bool | fract_delta | true |
| float | lifetime | 1.0 |
| bool | local_coords | true |
| bool | one_shot | false |
| float | preprocess | 0.0 |
| Material | process_material | |
| float | randomness | 0.0 |
| float | speed_scale | 1.0 |
| AABB | visibility_aabb | AABB( -4, -4, -4, 8, 8, 8 ) |
Methods¶
| AABB | capture_aabb ( ) const |
| Mesh | get_draw_pass_mesh ( int pass ) const |
| void | restart ( ) |
| void | set_draw_pass_mesh ( int pass, Mesh mesh ) |
Enumerations¶
enum DrawOrder:
- DRAW_ORDER_INDEX = 0 — Particles are drawn in the order emitted.
- DRAW_ORDER_LIFETIME = 1 — Particles are drawn in order of remaining lifetime.
- DRAW_ORDER_VIEW_DEPTH = 2 — Particles are drawn in order of depth.
Constants¶
- MAX_DRAW_PASSES = 4 — Maximum number of draw passes supported.
Property Descriptions¶
- int amount
| Default | 8 |
| Setter | set_amount(value) |
| Getter | get_amount() |
Number of particles to emit.
- DrawOrder draw_order
| Default | 0 |
| Setter | set_draw_order(value) |
| Getter | get_draw_order() |
Particle draw order. Uses DrawOrder values.
- Mesh draw_pass_1
| Setter | set_draw_pass_mesh(value) |
| Getter | get_draw_pass_mesh() |
Mesh that is drawn for the first draw pass.
- Mesh draw_pass_2
| Setter | set_draw_pass_mesh(value) |
| Getter | get_draw_pass_mesh() |
Mesh that is drawn for the second draw pass.
- Mesh draw_pass_3
| Setter | set_draw_pass_mesh(value) |
| Getter | get_draw_pass_mesh() |
Mesh that is drawn for the third draw pass.
- Mesh draw_pass_4
| Setter | set_draw_pass_mesh(value) |
| Getter | get_draw_pass_mesh() |
Mesh that is drawn for the fourth draw pass.
- int draw_passes
| Default | 1 |
| Setter | set_draw_passes(value) |
| Getter | get_draw_passes() |
The number of draw passes when rendering particles.
- bool emitting
| Default | true |
| Setter | set_emitting(value) |
| Getter | is_emitting() |
If true, particles are being emitted.
- float explosiveness
| Default | 0.0 |
| Setter | set_explosiveness_ratio(value) |
| Getter | get_explosiveness_ratio() |
Time ratio between each emission. If 0, particles are emitted continuously. If 1, all particles are emitted simultaneously.
- int fixed_fps
| Default | 0 |
| Setter | set_fixed_fps(value) |
| Getter | get_fixed_fps() |
The particle system’s frame rate is fixed to a value. For instance, changing the value to 2 will make the particles render at 2 frames per second. Note this does not slow down the simulation of the particle system itself.
- bool fract_delta
| Default | true |
| Setter | set_fractional_delta(value) |
| Getter | get_fractional_delta() |
If true, results in fractional delta calculation which has a smoother particles display effect.
- float lifetime
| Default | 1.0 |
| Setter | set_lifetime(value) |
| Getter | get_lifetime() |
Amount of time each particle will exist.
- bool local_coords
| Default | true |
| Setter | set_use_local_coordinates(value) |
| Getter | get_use_local_coordinates() |
If true, particles use the parent node’s coordinate space. If false, they use global coordinates.
- bool one_shot
| Default | false |
| Setter | set_one_shot(value) |
| Getter | get_one_shot() |
If true, only amount particles will be emitted.
- float preprocess
| Default | 0.0 |
| Setter | set_pre_process_time(value) |
| Getter | get_pre_process_time() |
Amount of time to preprocess the particles before animation starts. Lets you start the animation some time after particles have started emitting.
- Material process_material
| Setter | set_process_material(value) |
| Getter | get_process_material() |
Material for processing particles. Can be a ParticlesMaterial or a ShaderMaterial.
- float randomness
| Default | 0.0 |
| Setter | set_randomness_ratio(value) |
| Getter | get_randomness_ratio() |
Emission randomness ratio.
- float speed_scale
| Default | 1.0 |
| Setter | set_speed_scale(value) |
| Getter | get_speed_scale() |
Speed scaling ratio. A value of 0 can be used to pause the particles.
- AABB visibility_aabb
| Default | AABB( -4, -4, -4, 8, 8, 8 ) |
| Setter | set_visibility_aabb(value) |
| Getter | get_visibility_aabb() |
The AABB that determines the area of the world part of which needs to be visible on screen for the particle system to be active.
Method Descriptions¶
- AABB capture_aabb ( ) const
Returns the axis-aligned bounding box that contains all the particles that are active in the current frame.
Returns the Mesh that is drawn at index pass.
- void restart ( )
Restarts the particle emission, clearing existing particles.
Sets the Mesh that is drawn at index pass.
Particles2D¶
Inherits: Node2D < CanvasItem < Node < Object
2D particle emitter.
Description¶
2D particle node used to create a variety of particle systems and effects. Particles2D features an emitter that generates some number of particles at a given rate.
Use the process_material property to add a ParticlesMaterial to configure particle appearance and behavior. Alternatively, you can add a ShaderMaterial which will be applied to all particles.
Tutorials¶
Properties¶
| int | amount | 8 |
| DrawOrder | draw_order | 0 |
| bool | emitting | true |
| float | explosiveness | 0.0 |
| int | fixed_fps | 0 |
| bool | fract_delta | true |
| float | lifetime | 1.0 |
| bool | local_coords | true |
| Texture | normal_map | |
| bool | one_shot | false |
| float | preprocess | 0.0 |
| Material | process_material | |
| float | randomness | 0.0 |
| float | speed_scale | 1.0 |
| Texture | texture | |
| Rect2 | visibility_rect | Rect2( -100, -100, 200, 200 ) |
Methods¶
| Rect2 | capture_rect ( ) const |
| void | restart ( ) |
Enumerations¶
enum DrawOrder:
- DRAW_ORDER_INDEX = 0 — Particles are drawn in the order emitted.
- DRAW_ORDER_LIFETIME = 1 — Particles are drawn in order of remaining lifetime.
Property Descriptions¶
- int amount
| Default | 8 |
| Setter | set_amount(value) |
| Getter | get_amount() |
Number of particles emitted in one emission cycle.
- DrawOrder draw_order
| Default | 0 |
| Setter | set_draw_order(value) |
| Getter | get_draw_order() |
Particle draw order. Uses DrawOrder values.
- bool emitting
| Default | true |
| Setter | set_emitting(value) |
| Getter | is_emitting() |
If true, particles are being emitted.
- float explosiveness
| Default | 0.0 |
| Setter | set_explosiveness_ratio(value) |
| Getter | get_explosiveness_ratio() |
How rapidly particles in an emission cycle are emitted. If greater than 0, there will be a gap in emissions before the next cycle begins.
- int fixed_fps
| Default | 0 |
| Setter | set_fixed_fps(value) |
| Getter | get_fixed_fps() |
The particle system’s frame rate is fixed to a value. For instance, changing the value to 2 will make the particles render at 2 frames per second. Note this does not slow down the simulation of the particle system itself.
- bool fract_delta
| Default | true |
| Setter | set_fractional_delta(value) |
| Getter | get_fractional_delta() |
If true, results in fractional delta calculation which has a smoother particles display effect.
- float lifetime
| Default | 1.0 |
| Setter | set_lifetime(value) |
| Getter | get_lifetime() |
Amount of time each particle will exist.
- bool local_coords
| Default | true |
| Setter | set_use_local_coordinates(value) |
| Getter | get_use_local_coordinates() |
If true, particles use the parent node’s coordinate space. If false, they use global coordinates.
- Texture normal_map
| Setter | set_normal_map(value) |
| Getter | get_normal_map() |
Normal map to be used for the texture property.
- bool one_shot
| Default | false |
| Setter | set_one_shot(value) |
| Getter | get_one_shot() |
If true, only one emission cycle occurs. If set true during a cycle, emission will stop at the cycle’s end.
- float preprocess
| Default | 0.0 |
| Setter | set_pre_process_time(value) |
| Getter | get_pre_process_time() |
Particle system starts as if it had already run for this many seconds.
- Material process_material
| Setter | set_process_material(value) |
| Getter | get_process_material() |
Material for processing particles. Can be a ParticlesMaterial or a ShaderMaterial.
- float randomness
| Default | 0.0 |
| Setter | set_randomness_ratio(value) |
| Getter | get_randomness_ratio() |
Emission lifetime randomness ratio.
- float speed_scale
| Default | 1.0 |
| Setter | set_speed_scale(value) |
| Getter | get_speed_scale() |
Particle system’s running speed scaling ratio. A value of 0 can be used to pause the particles.
- Texture texture
| Setter | set_texture(value) |
| Getter | get_texture() |
Particle texture. If null, particles will be squares.
- Rect2 visibility_rect
| Default | Rect2( -100, -100, 200, 200 ) |
| Setter | set_visibility_rect(value) |
| Getter | get_visibility_rect() |
Editor visibility helper.
ParticlesMaterial¶
Inherits: Material < Resource < Reference < Object
Particle properties for Particles and Particles2D nodes.
Description¶
ParticlesMaterial defines particle properties and behavior. It is used in the process_material of Particles and Particles2D emitter nodes.
Some of this material’s properties are applied to each particle when emitted, while others can have a CurveTexture applied to vary values over the lifetime of the particle.
When a randomness ratio is applied to a property it is used to scale that property by a random amount. The random ratio is used to interpolate between 1.0 and a random number less than one, the result is multiplied by the property to obtain the randomized property. For example a random ratio of 0.4 would scale the original property between 0.4-1.0 of its original value.
Properties¶
Methods¶
| bool | get_flag ( Flags flag ) const |
| float | get_param ( Parameter param ) const |
| float | get_param_randomness ( Parameter param ) const |
| Texture | get_param_texture ( Parameter param ) const |
| void | set_flag ( Flags flag, bool enable ) |
| void | set_param ( Parameter param, float value ) |
| void | set_param_randomness ( Parameter param, float randomness ) |
| void | set_param_texture ( Parameter param, Texture texture ) |
Enumerations¶
enum Parameter:
- PARAM_INITIAL_LINEAR_VELOCITY = 0 — Use with set_param, set_param_randomness, and set_param_texture to set initial velocity properties.
- PARAM_ANGULAR_VELOCITY = 1 — Use with set_param, set_param_randomness, and set_param_texture to set angular velocity properties.
- PARAM_ORBIT_VELOCITY = 2 — Use with set_param, set_param_randomness, and set_param_texture to set orbital velocity properties.
- PARAM_LINEAR_ACCEL = 3 — Use with set_param, set_param_randomness, and set_param_texture to set linear acceleration properties.
- PARAM_RADIAL_ACCEL = 4 — Use with set_param, set_param_randomness, and set_param_texture to set radial acceleration properties.
- PARAM_TANGENTIAL_ACCEL = 5 — Use with set_param, set_param_randomness, and set_param_texture to set tangential acceleration properties.
- PARAM_DAMPING = 6 — Use with set_param, set_param_randomness, and set_param_texture to set damping properties.
- PARAM_ANGLE = 7 — Use with set_param, set_param_randomness, and set_param_texture to set angle properties.
- PARAM_SCALE = 8 — Use with set_param, set_param_randomness, and set_param_texture to set scale properties.
- PARAM_HUE_VARIATION = 9 — Use with set_param, set_param_randomness, and set_param_texture to set hue variation properties.
- PARAM_ANIM_SPEED = 10 — Use with set_param, set_param_randomness, and set_param_texture to set animation speed properties.
- PARAM_ANIM_OFFSET = 11 — Use with set_param, set_param_randomness, and set_param_texture to set animation offset properties.
- PARAM_MAX = 12 — Represents the size of the Parameter enum.
enum Flags:
- FLAG_ALIGN_Y_TO_VELOCITY = 0 — Use with set_flag to set flag_align_y.
- FLAG_ROTATE_Y = 1 — Use with set_flag to set flag_rotate_y.
- FLAG_DISABLE_Z = 2 — Use with set_flag to set flag_disable_z.
- FLAG_MAX = 3 — Represents the size of the Flags enum.
enum EmissionShape:
- EMISSION_SHAPE_POINT = 0 — All particles will be emitted from a single point.
- EMISSION_SHAPE_SPHERE = 1 — Particles will be emitted in the volume of a sphere.
- EMISSION_SHAPE_BOX = 2 — Particles will be emitted in the volume of a box.
- EMISSION_SHAPE_POINTS = 3 — Particles will be emitted at a position determined by sampling a random point on the emission_point_texture. Particle color will be modulated by emission_color_texture.
- EMISSION_SHAPE_DIRECTED_POINTS = 4 — Particles will be emitted at a position determined by sampling a random point on the emission_point_texture. Particle velocity and rotation will be set based on emission_normal_texture. Particle color will be modulated by emission_color_texture.
- EMISSION_SHAPE_MAX = 5 — Represents the size of the EmissionShape enum.
Property Descriptions¶
- float angle
| Default | 0.0 |
| Setter | set_param(value) |
| Getter | get_param() |
Initial rotation applied to each particle, in degrees.
Only applied when flag_disable_z or flag_rotate_y are true or the SpatialMaterial being used to draw the particle is using SpatialMaterial.BILLBOARD_PARTICLES.
- Texture angle_curve
| Setter | set_param_texture(value) |
| Getter | get_param_texture() |
Each particle’s rotation will be animated along this CurveTexture.
- float angle_random
| Default | 0.0 |
| Setter | set_param_randomness(value) |
| Getter | get_param_randomness() |
Rotation randomness ratio.
- float angular_velocity
| Default | 0.0 |
| Setter | set_param(value) |
| Getter | get_param() |
Initial angular velocity applied to each particle. Sets the speed of rotation of the particle.
Only applied when flag_disable_z or flag_rotate_y are true or the SpatialMaterial being used to draw the particle is using SpatialMaterial.BILLBOARD_PARTICLES.
- Texture angular_velocity_curve
| Setter | set_param_texture(value) |
| Getter | get_param_texture() |
Each particle’s angular velocity will vary along this CurveTexture.
- float angular_velocity_random
| Default | 0.0 |
| Setter | set_param_randomness(value) |
| Getter | get_param_randomness() |
Angular velocity randomness ratio.
- float anim_offset
| Default | 0.0 |
| Setter | set_param(value) |
| Getter | get_param() |
Particle animation offset.
- Texture anim_offset_curve
| Setter | set_param_texture(value) |
| Getter | get_param_texture() |
Each particle’s animation offset will vary along this CurveTexture.
- float anim_offset_random
| Default | 0.0 |
| Setter | set_param_randomness(value) |
| Getter | get_param_randomness() |
Animation offset randomness ratio.
- float anim_speed
| Default | 0.0 |
| Setter | set_param(value) |
| Getter | get_param() |
Particle animation speed.
- Texture anim_speed_curve
| Setter | set_param_texture(value) |
| Getter | get_param_texture() |
Each particle’s animation speed will vary along this CurveTexture.
- float anim_speed_random
| Default | 0.0 |
| Setter | set_param_randomness(value) |
| Getter | get_param_randomness() |
Animation speed randomness ratio.
- Color color
| Default | Color( 1, 1, 1, 1 ) |
| Setter | set_color(value) |
| Getter | get_color() |
Each particle’s initial color. If the Particles2D’s texture is defined, it will be multiplied by this color. To have particle display color in a SpatialMaterial make sure to set SpatialMaterial.vertex_color_use_as_albedo to true.
- Texture color_ramp
| Setter | set_color_ramp(value) |
| Getter | get_color_ramp() |
Each particle’s color will vary along this GradientTexture.
- float damping
| Default | 0.0 |
| Setter | set_param(value) |
| Getter | get_param() |
The rate at which particles lose velocity.
- Texture damping_curve
| Setter | set_param_texture(value) |
| Getter | get_param_texture() |
Damping will vary along this CurveTexture.
- float damping_random
| Default | 0.0 |
| Setter | set_param_randomness(value) |
| Getter | get_param_randomness() |
Damping randomness ratio.
- Vector3 direction
| Default | Vector3( 1, 0, 0 ) |
| Setter | set_direction(value) |
| Getter | get_direction() |
Unit vector specifying the particles’ emission direction.
- Vector3 emission_box_extents
| Setter | set_emission_box_extents(value) |
| Getter | get_emission_box_extents() |
The box’s extents if emission_shape is set to EMISSION_SHAPE_BOX.
- Texture emission_color_texture
| Setter | set_emission_color_texture(value) |
| Getter | get_emission_color_texture() |
Particle color will be modulated by color determined by sampling this texture at the same point as the emission_point_texture.
- Texture emission_normal_texture
| Setter | set_emission_normal_texture(value) |
| Getter | get_emission_normal_texture() |
Particle velocity and rotation will be set by sampling this texture at the same point as the emission_point_texture. Used only in EMISSION_SHAPE_DIRECTED_POINTS. Can be created automatically from mesh or node by selecting “Create Emission Points from Mesh/Node” under the “Particles” tool in the toolbar.
- int emission_point_count
| Setter | set_emission_point_count(value) |
| Getter | get_emission_point_count() |
The number of emission points if emission_shape is set to EMISSION_SHAPE_POINTS or EMISSION_SHAPE_DIRECTED_POINTS.
- Texture emission_point_texture
| Setter | set_emission_point_texture(value) |
| Getter | get_emission_point_texture() |
Particles will be emitted at positions determined by sampling this texture at a random position. Used with EMISSION_SHAPE_POINTS and EMISSION_SHAPE_DIRECTED_POINTS. Can be created automatically from mesh or node by selecting “Create Emission Points from Mesh/Node” under the “Particles” tool in the toolbar.
- EmissionShape emission_shape
| Default | 0 |
| Setter | set_emission_shape(value) |
| Getter | get_emission_shape() |
Particles will be emitted inside this region. Use EmissionShape constants for values.
- float emission_sphere_radius
| Setter | set_emission_sphere_radius(value) |
| Getter | get_emission_sphere_radius() |
The sphere’s radius if emission_shape is set to EMISSION_SHAPE_SPHERE.
- bool flag_align_y
| Default | false |
| Setter | set_flag(value) |
| Getter | get_flag() |
Align Y axis of particle with the direction of its velocity.
- bool flag_disable_z
| Default | false |
| Setter | set_flag(value) |
| Getter | get_flag() |
If true, particles will not move on the z axis.
- bool flag_rotate_y
| Default | false |
| Setter | set_flag(value) |
| Getter | get_flag() |
If true, particles rotate around Y axis by angle.
- float flatness
| Default | 0.0 |
| Setter | set_flatness(value) |
| Getter | get_flatness() |
Amount of spread in Y/Z plane. A value of 1 restricts particles to X/Z plane.
- Vector3 gravity
| Default | Vector3( 0, -9.8, 0 ) |
| Setter | set_gravity(value) |
| Getter | get_gravity() |
Gravity applied to every particle.
- float hue_variation
| Default | 0.0 |
| Setter | set_param(value) |
| Getter | get_param() |
Initial hue variation applied to each particle.
- Texture hue_variation_curve
| Setter | set_param_texture(value) |
| Getter | get_param_texture() |
Each particle’s hue will vary along this CurveTexture.
- float hue_variation_random
| Default | 0.0 |
| Setter | set_param_randomness(value) |
| Getter | get_param_randomness() |
Hue variation randomness ratio.
- float initial_velocity
| Default | 0.0 |
| Setter | set_param(value) |
| Getter | get_param() |
Initial velocity magnitude for each particle. Direction comes from spread and the node’s orientation.
- float initial_velocity_random
| Default | 0.0 |
| Setter | set_param_randomness(value) |
| Getter | get_param_randomness() |
Initial velocity randomness ratio.
- float lifetime_randomness
| Default | 0.0 |
| Setter | set_lifetime_randomness(value) |
| Getter | get_lifetime_randomness() |
Particle lifetime randomness ratio.
- float linear_accel
| Default | 0.0 |
| Setter | set_param(value) |
| Getter | get_param() |
Linear acceleration applied to each particle in the direction of motion.
- Texture linear_accel_curve
| Setter | set_param_texture(value) |
| Getter | get_param_texture() |
Each particle’s linear acceleration will vary along this CurveTexture.
- float linear_accel_random
| Default | 0.0 |
| Setter | set_param_randomness(value) |
| Getter | get_param_randomness() |
Linear acceleration randomness ratio.
- float orbit_velocity
| Setter | set_param(value) |
| Getter | get_param() |
Orbital velocity applied to each particle. Makes the particles circle around origin. Specified in number of full rotations around origin per second.
Only available when flag_disable_z is true.
- Texture orbit_velocity_curve
| Setter | set_param_texture(value) |
| Getter | get_param_texture() |
Each particle’s orbital velocity will vary along this CurveTexture.
- float orbit_velocity_random
| Setter | set_param_randomness(value) |
| Getter | get_param_randomness() |
Orbital velocity randomness ratio.
- float radial_accel
| Default | 0.0 |
| Setter | set_param(value) |
| Getter | get_param() |
Radial acceleration applied to each particle. Makes particle accelerate away from origin.
- Texture radial_accel_curve
| Setter | set_param_texture(value) |
| Getter | get_param_texture() |
Each particle’s radial acceleration will vary along this CurveTexture.
- float radial_accel_random
| Default | 0.0 |
| Setter | set_param_randomness(value) |
| Getter | get_param_randomness() |
Radial acceleration randomness ratio.
- float scale
| Default | 1.0 |
| Setter | set_param(value) |
| Getter | get_param() |
Initial scale applied to each particle.
- Texture scale_curve
| Setter | set_param_texture(value) |
| Getter | get_param_texture() |
Each particle’s scale will vary along this CurveTexture.
- float scale_random
| Default | 0.0 |
| Setter | set_param_randomness(value) |
| Getter | get_param_randomness() |
Scale randomness ratio.
- float spread
| Default | 45.0 |
| Setter | set_spread(value) |
| Getter | get_spread() |
Each particle’s initial direction range from +spread to -spread degrees. Applied to X/Z plane and Y/Z planes.
- float tangential_accel
| Default | 0.0 |
| Setter | set_param(value) |
| Getter | get_param() |
Tangential acceleration applied to each particle. Tangential acceleration is perpendicular to the particle’s velocity giving the particles a swirling motion.
- Texture tangential_accel_curve
| Setter | set_param_texture(value) |
| Getter | get_param_texture() |
Each particle’s tangential acceleration will vary along this CurveTexture.
- float tangential_accel_random
| Default | 0.0 |
| Setter | set_param_randomness(value) |
| Getter | get_param_randomness() |
Tangential acceleration randomness ratio.
- GradientTexture trail_color_modifier
| Setter | set_trail_color_modifier(value) |
| Getter | get_trail_color_modifier() |
Trail particles’ color will vary along this GradientTexture.
- int trail_divisor
| Default | 1 |
| Setter | set_trail_divisor(value) |
| Getter | get_trail_divisor() |
Emitter will emit amount divided by trail_divisor particles. The remaining particles will be used as trail(s).
- CurveTexture trail_size_modifier
| Setter | set_trail_size_modifier(value) |
| Getter | get_trail_size_modifier() |
Trail particles’ size will vary along this CurveTexture.
Method Descriptions¶
Returns true if the specified flag is enabled.
Returns the value of the specified parameter.
Returns the randomness ratio associated with the specified parameter.
Returns the Texture used by the specified parameter.
If true, enables the specified flag. See Flags for options.
Sets the specified Parameter.
Sets the randomness ratio for the specified Parameter.
Path¶
Inherits: Spatial < Node < Object
Contains a Curve3D path for PathFollow nodes to follow.
Description¶
Can have PathFollow child nodes moving along the Curve3D. See PathFollow for more information on the usage.
Note that the path is considered as relative to the moved nodes (children of PathFollow). As such, the curve should usually start with a zero vector (0, 0, 0).
Path2D¶
Inherits: Node2D < CanvasItem < Node < Object
Contains a Curve2D path for PathFollow2D nodes to follow.
Description¶
Can have PathFollow2D child nodes moving along the Curve2D. See PathFollow2D for more information on usage.
Note: The path is considered as relative to the moved nodes (children of PathFollow2D). As such, the curve should usually start with a zero vector ((0, 0)).
PathFollow¶
Inherits: Spatial < Node < Object
Point sampler for a Path.
Description¶
This node takes its parent Path, and returns the coordinates of a point within it, given a distance from the first vertex.
It is useful for making other nodes follow a path, without coding the movement pattern. For that, the nodes must be children of this node. The descendant nodes will then move accordingly when setting an offset in this node.
Properties¶
| bool | cubic_interp | true |
| float | h_offset | 0.0 |
| bool | loop | true |
| float | offset | 0.0 |
| RotationMode | rotation_mode | 3 |
| float | unit_offset | 0.0 |
| float | v_offset | 0.0 |
Enumerations¶
enum RotationMode:
- ROTATION_NONE = 0 — Forbids the PathFollow to rotate.
- ROTATION_Y = 1 — Allows the PathFollow to rotate in the Y axis only.
- ROTATION_XY = 2 — Allows the PathFollow to rotate in both the X, and Y axes.
- ROTATION_XYZ = 3 — Allows the PathFollow to rotate in any axis.
- ROTATION_ORIENTED = 4 — Uses the up vector information in a Curve3D to enforce orientation. This rotation mode requires the Path’s Curve3D.up_vector_enabled property to be set to
true.
Property Descriptions¶
- bool cubic_interp
| Default | true |
| Setter | set_cubic_interpolation(value) |
| Getter | get_cubic_interpolation() |
If true, the position between two cached points is interpolated cubically, and linearly otherwise.
The points along the Curve3D of the Path are precomputed before use, for faster calculations. The point at the requested offset is then calculated interpolating between two adjacent cached points. This may present a problem if the curve makes sharp turns, as the cached points may not follow the curve closely enough.
There are two answers to this problem: either increase the number of cached points and increase memory consumption, or make a cubic interpolation between two points at the cost of (slightly) slower calculations.
- float h_offset
| Default | 0.0 |
| Setter | set_h_offset(value) |
| Getter | get_h_offset() |
The node’s offset along the curve.
- bool loop
| Default | true |
| Setter | set_loop(value) |
| Getter | has_loop() |
If true, any offset outside the path’s length will wrap around, instead of stopping at the ends. Use it for cyclic paths.
- float offset
| Default | 0.0 |
| Setter | set_offset(value) |
| Getter | get_offset() |
The distance from the first vertex, measured in 3D units along the path. This sets this node’s position to a point within the path.
- RotationMode rotation_mode
| Default | 3 |
| Setter | set_rotation_mode(value) |
| Getter | get_rotation_mode() |
Allows or forbids rotation on one or more axes, depending on the RotationMode constants being used.
- float unit_offset
| Default | 0.0 |
| Setter | set_unit_offset(value) |
| Getter | get_unit_offset() |
The distance from the first vertex, considering 0.0 as the first vertex and 1.0 as the last. This is just another way of expressing the offset within the path, as the offset supplied is multiplied internally by the path’s length.
- float v_offset
| Default | 0.0 |
| Setter | set_v_offset(value) |
| Getter | get_v_offset() |
The node’s offset perpendicular to the curve.
PathFollow2D¶
Inherits: Node2D < CanvasItem < Node < Object
Point sampler for a Path2D.
Description¶
This node takes its parent Path2D, and returns the coordinates of a point within it, given a distance from the first vertex.
It is useful for making other nodes follow a path, without coding the movement pattern. For that, the nodes must be children of this node. The descendant nodes will then move accordingly when setting an offset in this node.
Properties¶
| bool | cubic_interp | true |
| float | h_offset | 0.0 |
| float | lookahead | 4.0 |
| bool | loop | true |
| float | offset | 0.0 |
| bool | rotate | true |
| float | unit_offset | 0.0 |
| float | v_offset | 0.0 |
Property Descriptions¶
- bool cubic_interp
| Default | true |
| Setter | set_cubic_interpolation(value) |
| Getter | get_cubic_interpolation() |
If true, the position between two cached points is interpolated cubically, and linearly otherwise.
The points along the Curve2D of the Path2D are precomputed before use, for faster calculations. The point at the requested offset is then calculated interpolating between two adjacent cached points. This may present a problem if the curve makes sharp turns, as the cached points may not follow the curve closely enough.
There are two answers to this problem: either increase the number of cached points and increase memory consumption, or make a cubic interpolation between two points at the cost of (slightly) slower calculations.
- float h_offset
| Default | 0.0 |
| Setter | set_h_offset(value) |
| Getter | get_h_offset() |
The node’s offset along the curve.
- float lookahead
| Default | 4.0 |
| Setter | set_lookahead(value) |
| Getter | get_lookahead() |
How far to look ahead of the curve to calculate the tangent if the node is rotating. E.g. shorter lookaheads will lead to faster rotations.
- bool loop
| Default | true |
| Setter | set_loop(value) |
| Getter | has_loop() |
If true, any offset outside the path’s length will wrap around, instead of stopping at the ends. Use it for cyclic paths.
- float offset
| Default | 0.0 |
| Setter | set_offset(value) |
| Getter | get_offset() |
The distance along the path in pixels.
- bool rotate
| Default | true |
| Setter | set_rotate(value) |
| Getter | is_rotating() |
If true, this node rotates to follow the path, making its descendants rotate.
- float unit_offset
| Default | 0.0 |
| Setter | set_unit_offset(value) |
| Getter | get_unit_offset() |
The distance along the path as a number in the range 0.0 (for the first vertex) to 1.0 (for the last). This is just another way of expressing the offset within the path, as the offset supplied is multiplied internally by the path’s length.
- float v_offset
| Default | 0.0 |
| Setter | set_v_offset(value) |
| Getter | get_v_offset() |
The node’s offset perpendicular to the curve.
PCKPacker¶
Creates packages that can be loaded into a running project.
Description¶
The PCKPacker is used to create packages that can be loaded into a running project using ProjectSettings.load_resource_pack.
var packer = PCKPacker.new()
packer.pck_start("test.pck")
packer.add_file("res://text.txt", "text.txt")
packer.flush()
The above PCKPacker creates package test.pck, then adds a file named text.txt at the root of the package.
Methods¶
| Error | add_file ( String pck_path, String source_path ) |
| Error | flush ( bool verbose=false ) |
| Error | pck_start ( String pck_name, int alignment=0 ) |
Method Descriptions¶
Adds the source_path file to the current PCK package at the pck_path internal path (should start with res://).
Writes the files specified using all add_file calls since the last flush. If verbose is true, a list of files added will be printed to the console for easier debugging.
Creates a new PCK file with the name pck_name. The .pck file extension isn’t added automatically, so it should be part of pck_name (even though it’s not required).
Performance¶
Inherits: Object
Exposes performance-related data.
Description¶
This class provides access to a number of different monitors related to performance, such as memory usage, draw calls, and FPS. These are the same as the values displayed in the Monitor tab in the editor’s Debugger panel. By using the get_monitor method of this class, you can access this data from your code.
Note: A few of these monitors are only available in debug mode and will always return 0 when used in a release build.
Note: Many of these monitors are not updated in real-time, so there may be a short delay between changes.
Methods¶
| float | get_monitor ( Monitor monitor ) const |
Enumerations¶
enum Monitor:
- TIME_FPS = 0 — Number of frames per second.
- TIME_PROCESS = 1 — Time it took to complete one frame, in seconds.
- TIME_PHYSICS_PROCESS = 2 — Time it took to complete one physics frame, in seconds.
- MEMORY_STATIC = 3 — Static memory currently used, in bytes. Not available in release builds.
- MEMORY_DYNAMIC = 4 — Dynamic memory currently used, in bytes. Not available in release builds.
- MEMORY_STATIC_MAX = 5 — Available static memory. Not available in release builds.
- MEMORY_DYNAMIC_MAX = 6 — Available dynamic memory. Not available in release builds.
- MEMORY_MESSAGE_BUFFER_MAX = 7 — Largest amount of memory the message queue buffer has used, in bytes. The message queue is used for deferred functions calls and notifications.
- OBJECT_COUNT = 8 — Number of objects currently instanced (including nodes).
- OBJECT_RESOURCE_COUNT = 9 — Number of resources currently used.
- OBJECT_NODE_COUNT = 10 — Number of nodes currently instanced in the scene tree. This also includes the root node.
- OBJECT_ORPHAN_NODE_COUNT = 11 — Number of orphan nodes, i.e. nodes which are not parented to a node of the scene tree.
- RENDER_OBJECTS_IN_FRAME = 12 — 3D objects drawn per frame.
- RENDER_VERTICES_IN_FRAME = 13 — Vertices drawn per frame. 3D only.
- RENDER_MATERIAL_CHANGES_IN_FRAME = 14 — Material changes per frame. 3D only.
- RENDER_SHADER_CHANGES_IN_FRAME = 15 — Shader changes per frame. 3D only.
- RENDER_SURFACE_CHANGES_IN_FRAME = 16 — Render surface changes per frame. 3D only.
- RENDER_DRAW_CALLS_IN_FRAME = 17 — Draw calls per frame. 3D only.
- RENDER_VIDEO_MEM_USED = 18 — The amount of video memory used, i.e. texture and vertex memory combined.
- RENDER_TEXTURE_MEM_USED = 19 — The amount of texture memory used.
- RENDER_VERTEX_MEM_USED = 20 — The amount of vertex memory used.
- RENDER_USAGE_VIDEO_MEM_TOTAL = 21 — Unimplemented in the GLES2 and GLES3 rendering backends, always returns 0.
- PHYSICS_2D_ACTIVE_OBJECTS = 22 — Number of active RigidBody2D nodes in the game.
- PHYSICS_2D_COLLISION_PAIRS = 23 — Number of collision pairs in the 2D physics engine.
- PHYSICS_2D_ISLAND_COUNT = 24 — Number of islands in the 2D physics engine.
- PHYSICS_3D_ACTIVE_OBJECTS = 25 — Number of active RigidBody and VehicleBody nodes in the game.
- PHYSICS_3D_COLLISION_PAIRS = 26 — Number of collision pairs in the 3D physics engine.
- PHYSICS_3D_ISLAND_COUNT = 27 — Number of islands in the 3D physics engine.
- AUDIO_OUTPUT_LATENCY = 28 — Output latency of the AudioServer.
- MONITOR_MAX = 29 — Represents the size of the Monitor enum.
PHashTranslation¶
Inherits: Translation < Resource < Reference < Object
Optimized translation.
Description¶
Optimized translation. Uses real-time compressed translations, which results in very small dictionaries.
Methods¶
| void | generate ( Translation from ) |
Method Descriptions¶
- void generate ( Translation from )
Generates and sets an optimized translation from the given Translation resource.
PhysicalBone¶
Inherits: PhysicsBody < CollisionObject < Spatial < Node < Object
Properties¶
| Transform | body_offset | Transform( 1, 0, 0, 0, 1, 0, 0, 0, 1, 0, 0, 0 ) |
| float | bounce | 0.0 |
| float | friction | 1.0 |
| float | gravity_scale | 1.0 |
| Transform | joint_offset | Transform( 1, 0, 0, 0, 1, 0, 0, 0, 1, 0, 0, 0 ) |
| JointType | joint_type | 0 |
| float | mass | 1.0 |
| float | weight | 9.8 |
Methods¶
| void | apply_central_impulse ( Vector3 impulse ) |
| void | apply_impulse ( Vector3 position, Vector3 impulse ) |
| int | get_bone_id ( ) const |
| bool | get_simulate_physics ( ) |
| bool | is_simulating_physics ( ) |
| bool | is_static_body ( ) |
Enumerations¶
enum JointType:
- JOINT_TYPE_NONE = 0
- JOINT_TYPE_PIN = 1
- JOINT_TYPE_CONE = 2
- JOINT_TYPE_HINGE = 3
- JOINT_TYPE_SLIDER = 4
- JOINT_TYPE_6DOF = 5
Property Descriptions¶
- Transform body_offset
| Default | Transform( 1, 0, 0, 0, 1, 0, 0, 0, 1, 0, 0, 0 ) |
| Setter | set_body_offset(value) |
| Getter | get_body_offset() |
- float bounce
| Default | 0.0 |
| Setter | set_bounce(value) |
| Getter | get_bounce() |
- float friction
| Default | 1.0 |
| Setter | set_friction(value) |
| Getter | get_friction() |
- float gravity_scale
| Default | 1.0 |
| Setter | set_gravity_scale(value) |
| Getter | get_gravity_scale() |
- Transform joint_offset
| Default | Transform( 1, 0, 0, 0, 1, 0, 0, 0, 1, 0, 0, 0 ) |
| Setter | set_joint_offset(value) |
| Getter | get_joint_offset() |
- JointType joint_type
| Default | 0 |
| Setter | set_joint_type(value) |
| Getter | get_joint_type() |
- float mass
| Default | 1.0 |
| Setter | set_mass(value) |
| Getter | get_mass() |
- float weight
| Default | 9.8 |
| Setter | set_weight(value) |
| Getter | get_weight() |
Physics2DDirectBodyState¶
Inherits: Object
Inherited By: Physics2DDirectBodyStateSW
Direct access object to a physics body in the Physics2DServer.
Description¶
Provides direct access to a physics body in the Physics2DServer, allowing safe changes to physics properties. This object is passed via the direct state callback of rigid/character bodies, and is intended for changing the direct state of that body. See RigidBody2D._integrate_forces.
Tutorials¶
Properties¶
Methods¶
| void | add_central_force ( Vector2 force ) |
| void | add_force ( Vector2 offset, Vector2 force ) |
| void | add_torque ( float torque ) |
| void | apply_central_impulse ( Vector2 impulse ) |
| void | apply_impulse ( Vector2 offset, Vector2 impulse ) |
| void | apply_torque_impulse ( float impulse ) |
| RID | get_contact_collider ( int contact_idx ) const |
| int | get_contact_collider_id ( int contact_idx ) const |
| Object | get_contact_collider_object ( int contact_idx ) const |
| Vector2 | get_contact_collider_position ( int contact_idx ) const |
| int | get_contact_collider_shape ( int contact_idx ) const |
| Variant | get_contact_collider_shape_metadata ( int contact_idx ) const |
| Vector2 | get_contact_collider_velocity_at_position ( int contact_idx ) const |
| int | get_contact_count ( ) const |
| Vector2 | get_contact_local_normal ( int contact_idx ) const |
| Vector2 | get_contact_local_position ( int contact_idx ) const |
| int | get_contact_local_shape ( int contact_idx ) const |
| Physics2DDirectSpaceState | get_space_state ( ) |
| void | integrate_forces ( ) |
Property Descriptions¶
- float angular_velocity
| Setter | set_angular_velocity(value) |
| Getter | get_angular_velocity() |
The body’s rotational velocity.
- float inverse_inertia
| Getter | get_inverse_inertia() |
The inverse of the inertia of the body.
- float inverse_mass
| Getter | get_inverse_mass() |
The inverse of the mass of the body.
- Vector2 linear_velocity
| Setter | set_linear_velocity(value) |
| Getter | get_linear_velocity() |
The body’s linear velocity.
- bool sleeping
| Setter | set_sleep_state(value) |
| Getter | is_sleeping() |
If true, this body is currently sleeping (not active).
- float step
| Getter | get_step() |
The timestep (delta) used for the simulation.
- float total_angular_damp
| Getter | get_total_angular_damp() |
The rate at which the body stops rotating, if there are not any other forces moving it.
- Vector2 total_gravity
| Getter | get_total_gravity() |
The total gravity vector being currently applied to this body.
- float total_linear_damp
| Getter | get_total_linear_damp() |
The rate at which the body stops moving, if there are not any other forces moving it.
- Transform2D transform
| Setter | set_transform(value) |
| Getter | get_transform() |
The body’s transformation matrix.
Method Descriptions¶
- void add_central_force ( Vector2 force )
Adds a constant directional force without affecting rotation.
Adds a positioned force to the body. Both the force and the offset from the body origin are in global coordinates.
- void add_torque ( float torque )
Adds a constant rotational force.
- void apply_central_impulse ( Vector2 impulse )
Applies a directional impulse without affecting rotation.
Applies a positioned impulse to the body. An impulse is time-independent! Applying an impulse every frame would result in a framerate-dependent force. For this reason, it should only be used when simulating one-time impacts (use the “_force” functions otherwise). The offset uses the rotation of the global coordinate system, but is centered at the object’s origin.
- void apply_torque_impulse ( float impulse )
Applies a rotational impulse to the body.
Returns the collider’s RID.
Returns the collider’s object id.
Returns the collider object. This depends on how it was created (will return a scene node if such was used to create it).
Returns the contact position in the collider.
Returns the collider’s shape index.
Returns the collided shape’s metadata. This metadata is different from Object.get_meta, and is set with Physics2DServer.shape_set_data.
Returns the linear velocity vector at the collider’s contact point.
- int get_contact_count ( ) const
Returns the number of contacts this body has with other bodies.
Note: By default, this returns 0 unless bodies are configured to monitor contacts. See RigidBody2D.contact_monitor.
Returns the local normal at the contact point.
Returns the local position of the contact point.
Returns the local shape index of the collision.
- Physics2DDirectSpaceState get_space_state ( )
Returns the current state of the space, useful for queries.
- void integrate_forces ( )
Calls the built-in force integration code.
Physics2DDirectBodyStateSW¶
Inherits: Physics2DDirectBodyState < Object
Software implementation of Physics2DDirectBodyState.
Description¶
Software implementation of Physics2DDirectBodyState. This object exposes no new methods or properties and should not be used, as Physics2DDirectBodyState selects the best implementation available.
Physics2DDirectSpaceState¶
Inherits: Object
Direct access object to a space in the Physics2DServer.
Description¶
Direct access object to a space in the Physics2DServer. It’s used mainly to do queries against objects and areas residing in a given space.
Tutorials¶
Methods¶
| Array | cast_motion ( Physics2DShapeQueryParameters shape ) |
| Array | collide_shape ( Physics2DShapeQueryParameters shape, int max_results=32 ) |
| Dictionary | get_rest_info ( Physics2DShapeQueryParameters shape ) |
| Array | intersect_point ( Vector2 point, int max_results=32, Array exclude=[ ], int collision_layer=2147483647, bool collide_with_bodies=true, bool collide_with_areas=false ) |
| Array | intersect_point_on_canvas ( Vector2 point, int canvas_instance_id, int max_results=32, Array exclude=[ ], int collision_layer=2147483647, bool collide_with_bodies=true, bool collide_with_areas=false ) |
| Dictionary | intersect_ray ( Vector2 from, Vector2 to, Array exclude=[ ], int collision_layer=2147483647, bool collide_with_bodies=true, bool collide_with_areas=false ) |
| Array | intersect_shape ( Physics2DShapeQueryParameters shape, int max_results=32 ) |
Method Descriptions¶
- Array cast_motion ( Physics2DShapeQueryParameters shape )
Checks how far the shape can travel toward a point. If the shape can not move, the array will be empty.
Note: Both the shape and the motion are supplied through a Physics2DShapeQueryParameters object. The method will return an array with two floats between 0 and 1, both representing a fraction of motion. The first is how far the shape can move without triggering a collision, and the second is the point at which a collision will occur. If no collision is detected, the returned array will be [1, 1].
- Array collide_shape ( Physics2DShapeQueryParameters shape, int max_results=32 )
Checks the intersections of a shape, given through a Physics2DShapeQueryParameters object, against the space. The resulting array contains a list of points where the shape intersects another. Like with intersect_shape, the number of returned results can be limited to save processing time.
- Dictionary get_rest_info ( Physics2DShapeQueryParameters shape )
Checks the intersections of a shape, given through a Physics2DShapeQueryParameters object, against the space. If it collides with more than one shape, the nearest one is selected. If the shape did not intersect anything, then an empty dictionary is returned instead.
Note: This method does not take into account the motion property of the object. The returned object is a dictionary containing the following fields:
collider_id: The colliding object’s ID.
linear_velocity: The colliding object’s velocity Vector2. If the object is an Area2D, the result is (0, 0).
metadata: The intersecting shape’s metadata. This metadata is different from Object.get_meta, and is set with Physics2DServer.shape_set_data.
normal: The object’s surface normal at the intersection point.
point: The intersection point.
rid: The intersecting object’s RID.
shape: The shape index of the colliding shape.
- Array intersect_point ( Vector2 point, int max_results=32, Array exclude=[ ], int collision_layer=2147483647, bool collide_with_bodies=true, bool collide_with_areas=false )
Checks whether a point is inside any shape. The shapes the point is inside of are returned in an array containing dictionaries with the following fields:
collider: The colliding object.
collider_id: The colliding object’s ID.
metadata: The intersecting shape’s metadata. This metadata is different from Object.get_meta, and is set with Physics2DServer.shape_set_data.
rid: The intersecting object’s RID.
shape: The shape index of the colliding shape.
Additionally, the method can take an exclude array of objects or RIDs that are to be excluded from collisions, a collision_mask bitmask representing the physics layers to check in, or booleans to determine if the ray should collide with PhysicsBodys or Areas, respectively.
- Array intersect_point_on_canvas ( Vector2 point, int canvas_instance_id, int max_results=32, Array exclude=[ ], int collision_layer=2147483647, bool collide_with_bodies=true, bool collide_with_areas=false )
- Dictionary intersect_ray ( Vector2 from, Vector2 to, Array exclude=[ ], int collision_layer=2147483647, bool collide_with_bodies=true, bool collide_with_areas=false )
Intersects a ray in a given space. The returned object is a dictionary with the following fields:
collider: The colliding object.
collider_id: The colliding object’s ID.
metadata: The intersecting shape’s metadata. This metadata is different from Object.get_meta, and is set with Physics2DServer.shape_set_data.
normal: The object’s surface normal at the intersection point.
position: The intersection point.
rid: The intersecting object’s RID.
shape: The shape index of the colliding shape.
If the ray did not intersect anything, then an empty dictionary is returned instead.
Additionally, the method can take an exclude array of objects or RIDs that are to be excluded from collisions, a collision_mask bitmask representing the physics layers to check in, or booleans to determine if the ray should collide with PhysicsBodys or Areas, respectively.
- Array intersect_shape ( Physics2DShapeQueryParameters shape, int max_results=32 )
Checks the intersections of a shape, given through a Physics2DShapeQueryParameters object, against the space.
Note: This method does not take into account the motion property of the object. The intersected shapes are returned in an array containing dictionaries with the following fields:
collider: The colliding object.
collider_id: The colliding object’s ID.
metadata: The intersecting shape’s metadata. This metadata is different from Object.get_meta, and is set with Physics2DServer.shape_set_data.
rid: The intersecting object’s RID.
shape: The shape index of the colliding shape.
The number of intersections can be limited with the max_results parameter, to reduce the processing time.
Physics2DServer¶
Inherits: Object
Inherited By: Physics2DServerSW
Server interface for low-level 2D physics access.
Description¶
Physics2DServer is the server responsible for all 2D physics. It can create many kinds of physics objects, but does not insert them on the node tree.
Methods¶
Enumerations¶
enum SpaceParameter:
- SPACE_PARAM_CONTACT_RECYCLE_RADIUS = 0 — Constant to set/get the maximum distance a pair of bodies has to move before their collision status has to be recalculated.
- SPACE_PARAM_CONTACT_MAX_SEPARATION = 1 — Constant to set/get the maximum distance a shape can be from another before they are considered separated.
- SPACE_PARAM_BODY_MAX_ALLOWED_PENETRATION = 2 — Constant to set/get the maximum distance a shape can penetrate another shape before it is considered a collision.
- SPACE_PARAM_BODY_LINEAR_VELOCITY_SLEEP_THRESHOLD = 3 — Constant to set/get the threshold linear velocity of activity. A body marked as potentially inactive for both linear and angular velocity will be put to sleep after the time given.
- SPACE_PARAM_BODY_ANGULAR_VELOCITY_SLEEP_THRESHOLD = 4 — Constant to set/get the threshold angular velocity of activity. A body marked as potentially inactive for both linear and angular velocity will be put to sleep after the time given.
- SPACE_PARAM_BODY_TIME_TO_SLEEP = 5 — Constant to set/get the maximum time of activity. A body marked as potentially inactive for both linear and angular velocity will be put to sleep after this time.
- SPACE_PARAM_CONSTRAINT_DEFAULT_BIAS = 6 — Constant to set/get the default solver bias for all physics constraints. A solver bias is a factor controlling how much two objects “rebound”, after violating a constraint, to avoid leaving them in that state because of numerical imprecision.
- SPACE_PARAM_TEST_MOTION_MIN_CONTACT_DEPTH = 7
enum ShapeType:
- SHAPE_LINE = 0 — This is the constant for creating line shapes. A line shape is an infinite line with an origin point, and a normal. Thus, it can be used for front/behind checks.
- SHAPE_RAY = 1
- SHAPE_SEGMENT = 2 — This is the constant for creating segment shapes. A segment shape is a line from a point A to a point B. It can be checked for intersections.
- SHAPE_CIRCLE = 3 — This is the constant for creating circle shapes. A circle shape only has a radius. It can be used for intersections and inside/outside checks.
- SHAPE_RECTANGLE = 4 — This is the constant for creating rectangle shapes. A rectangle shape is defined by a width and a height. It can be used for intersections and inside/outside checks.
- SHAPE_CAPSULE = 5 — This is the constant for creating capsule shapes. A capsule shape is defined by a radius and a length. It can be used for intersections and inside/outside checks.
- SHAPE_CONVEX_POLYGON = 6 — This is the constant for creating convex polygon shapes. A polygon is defined by a list of points. It can be used for intersections and inside/outside checks. Unlike the CollisionPolygon2D.polygon property, polygons modified with shape_set_data do not verify that the points supplied form is a convex polygon.
- SHAPE_CONCAVE_POLYGON = 7 — This is the constant for creating concave polygon shapes. A polygon is defined by a list of points. It can be used for intersections checks, but not for inside/outside checks.
- SHAPE_CUSTOM = 8 — This constant is used internally by the engine. Any attempt to create this kind of shape results in an error.
enum AreaParameter:
- AREA_PARAM_GRAVITY = 0 — Constant to set/get gravity strength in an area.
- AREA_PARAM_GRAVITY_VECTOR = 1 — Constant to set/get gravity vector/center in an area.
- AREA_PARAM_GRAVITY_IS_POINT = 2 — Constant to set/get whether the gravity vector of an area is a direction, or a center point.
- AREA_PARAM_GRAVITY_DISTANCE_SCALE = 3 — Constant to set/get the falloff factor for point gravity of an area. The greater this value is, the faster the strength of gravity decreases with the square of distance.
- AREA_PARAM_GRAVITY_POINT_ATTENUATION = 4 — This constant was used to set/get the falloff factor for point gravity. It has been superseded by AREA_PARAM_GRAVITY_DISTANCE_SCALE.
- AREA_PARAM_LINEAR_DAMP = 5 — Constant to set/get the linear dampening factor of an area.
- AREA_PARAM_ANGULAR_DAMP = 6 — Constant to set/get the angular dampening factor of an area.
- AREA_PARAM_PRIORITY = 7 — Constant to set/get the priority (order of processing) of an area.
enum AreaSpaceOverrideMode:
- AREA_SPACE_OVERRIDE_DISABLED = 0 — This area does not affect gravity/damp. These are generally areas that exist only to detect collisions, and objects entering or exiting them.
- AREA_SPACE_OVERRIDE_COMBINE = 1 — This area adds its gravity/damp values to whatever has been calculated so far. This way, many overlapping areas can combine their physics to make interesting effects.
- AREA_SPACE_OVERRIDE_COMBINE_REPLACE = 2 — This area adds its gravity/damp values to whatever has been calculated so far. Then stops taking into account the rest of the areas, even the default one.
- AREA_SPACE_OVERRIDE_REPLACE = 3 — This area replaces any gravity/damp, even the default one, and stops taking into account the rest of the areas.
- AREA_SPACE_OVERRIDE_REPLACE_COMBINE = 4 — This area replaces any gravity/damp calculated so far, but keeps calculating the rest of the areas, down to the default one.
enum BodyMode:
- BODY_MODE_STATIC = 0 — Constant for static bodies.
- BODY_MODE_KINEMATIC = 1 — Constant for kinematic bodies.
- BODY_MODE_RIGID = 2 — Constant for rigid bodies.
- BODY_MODE_CHARACTER = 3 — Constant for rigid bodies in character mode. In this mode, a body can not rotate, and only its linear velocity is affected by physics.
enum BodyParameter:
- BODY_PARAM_BOUNCE = 0 — Constant to set/get a body’s bounce factor.
- BODY_PARAM_FRICTION = 1 — Constant to set/get a body’s friction.
- BODY_PARAM_MASS = 2 — Constant to set/get a body’s mass.
- BODY_PARAM_INERTIA = 3 — Constant to set/get a body’s inertia.
- BODY_PARAM_GRAVITY_SCALE = 4 — Constant to set/get a body’s gravity multiplier.
- BODY_PARAM_LINEAR_DAMP = 5 — Constant to set/get a body’s linear dampening factor.
- BODY_PARAM_ANGULAR_DAMP = 6 — Constant to set/get a body’s angular dampening factor.
- BODY_PARAM_MAX = 7 — Represents the size of the BodyParameter enum.
enum BodyState:
- BODY_STATE_TRANSFORM = 0 — Constant to set/get the current transform matrix of the body.
- BODY_STATE_LINEAR_VELOCITY = 1 — Constant to set/get the current linear velocity of the body.
- BODY_STATE_ANGULAR_VELOCITY = 2 — Constant to set/get the current angular velocity of the body.
- BODY_STATE_SLEEPING = 3 — Constant to sleep/wake up a body, or to get whether it is sleeping.
- BODY_STATE_CAN_SLEEP = 4 — Constant to set/get whether the body can sleep.
enum JointType:
- JOINT_PIN = 0 — Constant to create pin joints.
- JOINT_GROOVE = 1 — Constant to create groove joints.
- JOINT_DAMPED_SPRING = 2 — Constant to create damped spring joints.
enum JointParam:
- JOINT_PARAM_BIAS = 0
- JOINT_PARAM_MAX_BIAS = 1
- JOINT_PARAM_MAX_FORCE = 2
enum DampedStringParam:
- DAMPED_STRING_REST_LENGTH = 0 — Sets the resting length of the spring joint. The joint will always try to go to back this length when pulled apart.
- DAMPED_STRING_STIFFNESS = 1 — Sets the stiffness of the spring joint. The joint applies a force equal to the stiffness times the distance from its resting length.
- DAMPED_STRING_DAMPING = 2 — Sets the damping ratio of the spring joint. A value of 0 indicates an undamped spring, while 1 causes the system to reach equilibrium as fast as possible (critical damping).
enum CCDMode:
- CCD_MODE_DISABLED = 0 — Disables continuous collision detection. This is the fastest way to detect body collisions, but can miss small, fast-moving objects.
- CCD_MODE_CAST_RAY = 1 — Enables continuous collision detection by raycasting. It is faster than shapecasting, but less precise.
- CCD_MODE_CAST_SHAPE = 2 — Enables continuous collision detection by shapecasting. It is the slowest CCD method, and the most precise.
enum AreaBodyStatus:
- AREA_BODY_ADDED = 0 — The value of the first parameter and area callback function receives, when an object enters one of its shapes.
- AREA_BODY_REMOVED = 1 — The value of the first parameter and area callback function receives, when an object exits one of its shapes.
enum ProcessInfo:
- INFO_ACTIVE_OBJECTS = 0 — Constant to get the number of objects that are not sleeping.
- INFO_COLLISION_PAIRS = 1 — Constant to get the number of possible collisions.
- INFO_ISLAND_COUNT = 2 — Constant to get the number of space regions where a collision could occur.
Method Descriptions¶
- void area_add_shape ( RID area, RID shape, Transform2D transform=Transform2D( 1, 0, 0, 1, 0, 0 ), bool disabled=false )
Adds a shape to the area, along with a transform matrix. Shapes are usually referenced by their index, so you should track which shape has a given index.
Assigns the area to a descendant of Object, so it can exist in the node tree.
- void area_clear_shapes ( RID area )
Removes all shapes from an area. It does not delete the shapes, so they can be reassigned later.
- RID area_create ( )
Creates an Area2D.
Gets the instance ID of the object the area is assigned to.
- Variant area_get_param ( RID area, AreaParameter param ) const
Returns an area parameter value. See AreaParameter for a list of available parameters.
Returns the RID of the nth shape of an area.
Returns the number of shapes assigned to an area.
- Transform2D area_get_shape_transform ( RID area, int shape_idx ) const
Returns the transform matrix of a shape within an area.
Returns the space assigned to the area.
- AreaSpaceOverrideMode area_get_space_override_mode ( RID area ) const
Returns the space override mode for the area.
- Transform2D area_get_transform ( RID area ) const
Returns the transform matrix for an area.
Removes a shape from an area. It does not delete the shape, so it can be reassigned later.
Assigns the area to one or many physics layers.
Sets which physics layers the area will monitor.
Sets the function to call when any body/area enters or exits the area. This callback will be called for any object interacting with the area, and takes five parameters:
1: AREA_BODY_ADDED or AREA_BODY_REMOVED, depending on whether the object entered or exited the area.
2: RID of the object that entered/exited the area.
3: Instance ID of the object that entered/exited the area.
4: The shape index of the object that entered/exited the area.
5: The shape index of the area where the object entered/exited.
- void area_set_param ( RID area, AreaParameter param, Variant value )
Sets the value for an area parameter. See AreaParameter for a list of available parameters.
Substitutes a given area shape by another. The old shape is selected by its index, the new one by its RID.
Disables a given shape in an area.
- void area_set_shape_transform ( RID area, int shape_idx, Transform2D transform )
Sets the transform matrix for an area shape.
Assigns a space to the area.
- void area_set_space_override_mode ( RID area, AreaSpaceOverrideMode mode )
Sets the space override mode for the area. See AreaSpaceOverrideMode for a list of available modes.
- void area_set_transform ( RID area, Transform2D transform )
Sets the transform matrix for an area.
Adds a body to the list of bodies exempt from collisions.
Adds a positioned force to the applied force and torque. As with body_apply_impulse, both the force and the offset from the body origin are in global coordinates. A force differs from an impulse in that, while the two are forces, the impulse clears itself after being applied.
- void body_add_shape ( RID body, RID shape, Transform2D transform=Transform2D( 1, 0, 0, 1, 0, 0 ), bool disabled=false )
Adds a shape to the body, along with a transform matrix. Shapes are usually referenced by their index, so you should track which shape has a given index.
Adds a positioned impulse to the applied force and torque. Both the force and the offset from the body origin are in global coordinates.
Assigns the area to a descendant of Object, so it can exist in the node tree.
- void body_clear_shapes ( RID body )
Removes all shapes from a body.
- RID body_create ( )
Creates a physics body.
Returns the physics layer or layers a body belongs to.
Returns the physics layer or layers a body can collide with.
Returns the continuous collision detection mode.
- Physics2DDirectBodyState body_get_direct_state ( RID body )
Returns the Physics2DDirectBodyState of the body.
Returns the maximum contacts that can be reported. See body_set_max_contacts_reported.
Returns the body mode.
Gets the instance ID of the object the area is assigned to.
- float body_get_param ( RID body, BodyParameter param ) const
Returns the value of a body parameter. See BodyParameter for a list of available parameters.
Returns the RID of the nth shape of a body.
Returns the number of shapes assigned to a body.
Returns the metadata of a shape of a body.
- Transform2D body_get_shape_transform ( RID body, int shape_idx ) const
Returns the transform matrix of a body shape.
Returns the RID of the space assigned to a body.
Returns a body state.
Returns whether a body uses a callback function to calculate its own physics (see body_set_force_integration_callback).
Removes a body from the list of bodies exempt from collisions.
Removes a shape from a body. The shape is not deleted, so it can be reused afterwards.
Sets an axis velocity. The velocity in the given vector axis will be set as the given vector length. This is useful for jumping behavior.
Sets the physics layer or layers a body belongs to.
Sets the physics layer or layers a body can collide with.
Sets the continuous collision detection mode using one of the CCDMode constants.
Continuous collision detection tries to predict where a moving body will collide, instead of moving it and correcting its movement if it collided.
- void body_set_force_integration_callback ( RID body, Object receiver, String method, Variant userdata=null )
Sets the function used to calculate physics for an object, if that object allows it (see body_set_omit_force_integration).
Sets the maximum contacts to report. Bodies can keep a log of the contacts with other bodies, this is enabled by setting the maximum amount of contacts reported to a number greater than 0.
Sets the body mode using one of the BodyMode constants.
Sets whether a body uses a callback function to calculate its own physics (see body_set_force_integration_callback).
- void body_set_param ( RID body, BodyParameter param, float value )
Sets a body parameter. See BodyParameter for a list of available parameters.
Substitutes a given body shape by another. The old shape is selected by its index, the new one by its RID.
Enables one way collision on body if enable is true.
Disables shape in body if disable is true.
Sets metadata of a shape within a body. This metadata is different from Object.set_meta, and can be retrieved on shape queries.
- void body_set_shape_transform ( RID body, int shape_idx, Transform2D transform )
Sets the transform matrix for a body shape.
Assigns a space to the body (see space_create).
Sets a body state using one of the BodyState constants.
- bool body_test_motion ( RID body, Transform2D from, Vector2 motion, bool infinite_inertia, float margin=0.08, Physics2DTestMotionResult result=null )
Returns true if a collision would result from moving in the given direction from a given point in space. Margin increases the size of the shapes involved in the collision detection. Physics2DTestMotionResult can be passed to return additional information in.
- RID capsule_shape_create ( )
- RID circle_shape_create ( )
- RID concave_polygon_shape_create ( )
- RID convex_polygon_shape_create ( )
Creates a damped spring joint between two bodies. If not specified, the second body is assumed to be the joint itself.
- float damped_string_joint_get_param ( RID joint, DampedStringParam param ) const
Returns the value of a damped spring joint parameter.
- void damped_string_joint_set_param ( RID joint, DampedStringParam param, float value )
Sets a damped spring joint parameter. See DampedStringParam for a list of available parameters.
- void free_rid ( RID rid )
Destroys any of the objects created by Physics2DServer. If the RID passed is not one of the objects that can be created by Physics2DServer, an error will be sent to the console.
- int get_process_info ( ProcessInfo process_info )
Returns information about the current state of the 2D physics engine. See ProcessInfo for a list of available states.
- RID groove_joint_create ( Vector2 groove1_a, Vector2 groove2_a, Vector2 anchor_b, RID body_a, RID body_b )
Creates a groove joint between two bodies. If not specified, the bodies are assumed to be the joint itself.
- float joint_get_param ( RID joint, JointParam param ) const
Returns the value of a joint parameter.
Returns a joint’s type (see JointType).
- void joint_set_param ( RID joint, JointParam param, float value )
Sets a joint parameter. See JointParam for a list of available parameters.
- RID line_shape_create ( )
Creates a pin joint between two bodies. If not specified, the second body is assumed to be the joint itself.
- RID ray_shape_create ( )
- RID rectangle_shape_create ( )
- RID segment_shape_create ( )
- void set_active ( bool active )
Activates or deactivates the 2D physics engine.
Returns the shape data.
Returns a shape’s type (see ShapeType).
Sets the shape data that defines its shape and size. The data to be passed depends on the kind of shape created shape_get_type.
- RID space_create ( )
Creates a space. A space is a collection of parameters for the physics engine that can be assigned to an area or a body. It can be assigned to an area with area_set_space, or to a body with body_set_space.
- Physics2DDirectSpaceState space_get_direct_state ( RID space )
Returns the state of a space, a Physics2DDirectSpaceState. This object can be used to make collision/intersection queries.
- float space_get_param ( RID space, SpaceParameter param ) const
Returns the value of a space parameter.
Returns whether the space is active.
Marks a space as active. It will not have an effect, unless it is assigned to an area or body.
- void space_set_param ( RID space, SpaceParameter param, float value )
Sets the value for a space parameter. See SpaceParameter for a list of available parameters.
Physics2DServerSW¶
Inherits: Physics2DServer < Object
Software implementation of Physics2DServer.
Description¶
This class exposes no new methods or properties and should not be used, as Physics2DServer automatically selects the best implementation available.
Physics2DShapeQueryParameters¶
Parameters to be sent to a 2D shape physics query.
Description¶
This class contains the shape and other parameters for 2D intersection/collision queries. See also Physics2DShapeQueryResult.
Properties¶
| bool | collide_with_areas | false |
| bool | collide_with_bodies | true |
| int | collision_layer | 2147483647 |
| Array | exclude | [ ] |
| float | margin | 0.0 |
| Vector2 | motion | Vector2( 0, 0 ) |
| RID | shape_rid | |
| Transform2D | transform | Transform2D( 1, 0, 0, 1, 0, 0 ) |
Property Descriptions¶
- bool collide_with_areas
| Default | false |
| Setter | set_collide_with_areas(value) |
| Getter | is_collide_with_areas_enabled() |
If true, the query will take Area2Ds into account.
- bool collide_with_bodies
| Default | true |
| Setter | set_collide_with_bodies(value) |
| Getter | is_collide_with_bodies_enabled() |
If true, the query will take PhysicsBody2Ds into account.
- int collision_layer
| Default | 2147483647 |
| Setter | set_collision_layer(value) |
| Getter | get_collision_layer() |
The physics layer(s) the query will take into account (as a bitmask).
- Array exclude
| Default | [ ] |
| Setter | set_exclude(value) |
| Getter | get_exclude() |
The list of objects or object RIDs that will be excluded from collisions.
- float margin
| Default | 0.0 |
| Setter | set_margin(value) |
| Getter | get_margin() |
The collision margin for the shape.
- Vector2 motion
| Default | Vector2( 0, 0 ) |
| Setter | set_motion(value) |
| Getter | get_motion() |
The motion of the shape being queried for.
- RID shape_rid
| Setter | set_shape_rid(value) |
| Getter | get_shape_rid() |
The queried shape’s RID. See also set_shape.
- Transform2D transform
| Default | Transform2D( 1, 0, 0, 1, 0, 0 ) |
| Setter | set_transform(value) |
| Getter | get_transform() |
The queried shape’s transform matrix.
Physics2DShapeQueryResult¶
Result of a 2D shape query in Physics2DServer.
Description¶
The result of a 2D shape query in Physics2DServer. See also Physics2DShapeQueryParameters.
Methods¶
| int | get_result_count ( ) const |
| Object | get_result_object ( int idx ) const |
| int | get_result_object_id ( int idx ) const |
| int | get_result_object_shape ( int idx ) const |
| RID | get_result_rid ( int idx ) const |
Method Descriptions¶
- int get_result_count ( ) const
Returns the number of objects that intersected with the shape.
Returns the Object that intersected with the shape at index idx.
Returns the instance ID of the Object that intersected with the shape at index idx.
Returns the child index of the object’s Shape that intersected with the shape at index idx.
Returns the RID of the object that intersected with the shape at index idx.
Physics2DTestMotionResult¶
Properties¶
| Object | collider | |
| int | collider_id | 0 |
| RID | collider_rid | |
| int | collider_shape | 0 |
| Vector2 | collider_velocity | Vector2( 0, 0 ) |
| Vector2 | collision_normal | Vector2( 0, 0 ) |
| Vector2 | collision_point | Vector2( 0, 0 ) |
| Vector2 | motion | Vector2( 0, 0 ) |
| Vector2 | motion_remainder | Vector2( 0, 0 ) |
Property Descriptions¶
- Object collider
| Getter | get_collider() |
- int collider_id
| Default | 0 |
| Getter | get_collider_id() |
- RID collider_rid
| Getter | get_collider_rid() |
- int collider_shape
| Default | 0 |
| Getter | get_collider_shape() |
- Vector2 collider_velocity
| Default | Vector2( 0, 0 ) |
| Getter | get_collider_velocity() |
- Vector2 collision_normal
| Default | Vector2( 0, 0 ) |
| Getter | get_collision_normal() |
- Vector2 collision_point
| Default | Vector2( 0, 0 ) |
| Getter | get_collision_point() |
- Vector2 motion
| Default | Vector2( 0, 0 ) |
| Getter | get_motion() |
- Vector2 motion_remainder
| Default | Vector2( 0, 0 ) |
| Getter | get_motion_remainder() |
PhysicsBody¶
Inherits: CollisionObject < Spatial < Node < Object
Inherited By: KinematicBody, PhysicalBone, RigidBody, StaticBody
Base class for all objects affected by physics in 3D space.
Description¶
PhysicsBody is an abstract base class for implementing a physics body. All *Body types inherit from it.
Tutorials¶
Properties¶
| int | collision_layer | 1 |
| int | collision_mask | 1 |
Methods¶
| void | add_collision_exception_with ( Node body ) |
| Array | get_collision_exceptions ( ) |
| bool | get_collision_layer_bit ( int bit ) const |
| bool | get_collision_mask_bit ( int bit ) const |
| void | remove_collision_exception_with ( Node body ) |
| void | set_collision_layer_bit ( int bit, bool value ) |
| void | set_collision_mask_bit ( int bit, bool value ) |
Property Descriptions¶
- int collision_layer
| Default | 1 |
| Setter | set_collision_layer(value) |
| Getter | get_collision_layer() |
The physics layers this area is in.
Collidable objects can exist in any of 32 different layers. These layers work like a tagging system, and are not visual. A collidable can use these layers to select with which objects it can collide, using the collision_mask property.
A contact is detected if object A is in any of the layers that object B scans, or object B is in any layer scanned by object A.
- int collision_mask
| Default | 1 |
| Setter | set_collision_mask(value) |
| Getter | get_collision_mask() |
The physics layers this area scans for collisions.
Method Descriptions¶
- void add_collision_exception_with ( Node body )
Adds a body to the list of bodies that this body can’t collide with.
- Array get_collision_exceptions ( )
Returns an array of nodes that were added as collision exceptions for this body.
Returns an individual bit on the collision_layer.
Returns an individual bit on the collision_mask.
- void remove_collision_exception_with ( Node body )
Removes a body from the list of bodies that this body can’t collide with.
Sets individual bits on the collision_layer bitmask. Use this if you only need to change one layer’s value.
Sets individual bits on the collision_mask bitmask. Use this if you only need to change one layer’s value.
PhysicsBody2D¶
Inherits: CollisionObject2D < Node2D < CanvasItem < Node < Object
Inherited By: KinematicBody2D, RigidBody2D, StaticBody2D
Base class for all objects affected by physics in 2D space.
Description¶
PhysicsBody2D is an abstract base class for implementing a physics body. All *Body2D types inherit from it.
Tutorials¶
Properties¶
| int | collision_layer | 1 |
| int | collision_mask | 1 |
| bool | input_pickable | O: false |
| int | layers |
Methods¶
| void | add_collision_exception_with ( Node body ) |
| Array | get_collision_exceptions ( ) |
| bool | get_collision_layer_bit ( int bit ) const |
| bool | get_collision_mask_bit ( int bit ) const |
| void | remove_collision_exception_with ( Node body ) |
| void | set_collision_layer_bit ( int bit, bool value ) |
| void | set_collision_mask_bit ( int bit, bool value ) |
Property Descriptions¶
- int collision_layer
| Default | 1 |
| Setter | set_collision_layer(value) |
| Getter | get_collision_layer() |
The physics layers this area is in.
Collidable objects can exist in any of 32 different layers. These layers work like a tagging system, and are not visual. A collidable can use these layers to select with which objects it can collide, using the collision_mask property.
A contact is detected if object A is in any of the layers that object B scans, or object B is in any layer scanned by object A.
- int collision_mask
| Default | 1 |
| Setter | set_collision_mask(value) |
| Getter | get_collision_mask() |
The physics layers this area scans for collisions.
- int layers
Both collision_layer and collision_mask. Returns collision_layer when accessed. Updates collision_layer and collision_mask when modified.
Method Descriptions¶
- void add_collision_exception_with ( Node body )
Adds a body to the list of bodies that this body can’t collide with.
- Array get_collision_exceptions ( )
Returns an array of nodes that were added as collision exceptions for this body.
Returns an individual bit on the collision_layer.
Returns an individual bit on the collision_mask.
- void remove_collision_exception_with ( Node body )
Removes a body from the list of bodies that this body can’t collide with.
Sets individual bits on the collision_layer bitmask. Use this if you only need to change one layer’s value.
Sets individual bits on the collision_mask bitmask. Use this if you only need to change one layer’s value.
PhysicsDirectBodyState¶
Inherits: Object
Inherited By: BulletPhysicsDirectBodyState
Direct access object to a physics body in the PhysicsServer.
Description¶
Provides direct access to a physics body in the PhysicsServer, allowing safe changes to physics properties. This object is passed via the direct state callback of rigid/character bodies, and is intended for changing the direct state of that body. See RigidBody._integrate_forces.
Properties¶
Methods¶
| void | add_central_force ( Vector3 force ) |
| void | add_force ( Vector3 force, Vector3 position ) |
| void | add_torque ( Vector3 torque ) |
| void | apply_central_impulse ( Vector3 j ) |
| void | apply_impulse ( Vector3 position, Vector3 j ) |
| void | apply_torque_impulse ( Vector3 j ) |
| RID | get_contact_collider ( int contact_idx ) const |
| int | get_contact_collider_id ( int contact_idx ) const |
| Object | get_contact_collider_object ( int contact_idx ) const |
| Vector3 | get_contact_collider_position ( int contact_idx ) const |
| int | get_contact_collider_shape ( int contact_idx ) const |
| Vector3 | get_contact_collider_velocity_at_position ( int contact_idx ) const |
| int | get_contact_count ( ) const |
| float | get_contact_impulse ( int contact_idx ) const |
| Vector3 | get_contact_local_normal ( int contact_idx ) const |
| Vector3 | get_contact_local_position ( int contact_idx ) const |
| int | get_contact_local_shape ( int contact_idx ) const |
| PhysicsDirectSpaceState | get_space_state ( ) |
| void | integrate_forces ( ) |
Property Descriptions¶
- Vector3 angular_velocity
| Setter | set_angular_velocity(value) |
| Getter | get_angular_velocity() |
The body’s rotational velocity.
- Vector3 center_of_mass
| Getter | get_center_of_mass() |
- Vector3 inverse_inertia
| Getter | get_inverse_inertia() |
The inverse of the inertia of the body.
- float inverse_mass
| Getter | get_inverse_mass() |
The inverse of the mass of the body.
- Vector3 linear_velocity
| Setter | set_linear_velocity(value) |
| Getter | get_linear_velocity() |
The body’s linear velocity.
- Basis principal_inertia_axes
| Getter | get_principal_inertia_axes() |
- bool sleeping
| Setter | set_sleep_state(value) |
| Getter | is_sleeping() |
If true, this body is currently sleeping (not active).
- float step
| Getter | get_step() |
The timestep (delta) used for the simulation.
- float total_angular_damp
| Getter | get_total_angular_damp() |
The rate at which the body stops rotating, if there are not any other forces moving it.
- Vector3 total_gravity
| Getter | get_total_gravity() |
The total gravity vector being currently applied to this body.
- float total_linear_damp
| Getter | get_total_linear_damp() |
The rate at which the body stops moving, if there are not any other forces moving it.
- Transform transform
| Setter | set_transform(value) |
| Getter | get_transform() |
The body’s transformation matrix.
Method Descriptions¶
- void add_central_force ( Vector3 force )
Adds a constant directional force without affecting rotation.
This is equivalent to add_force(force, Vector3(0,0,0)).
Adds a positioned force to the body. Both the force and the offset from the body origin are in global coordinates.
- void add_torque ( Vector3 torque )
Adds a constant rotational force without affecting position.
- void apply_central_impulse ( Vector3 j )
Applies a single directional impulse without affecting rotation.
This is equivalent to apply_impulse(Vector3(0, 0, 0), impulse).
Applies a positioned impulse to the body. An impulse is time-independent! Applying an impulse every frame would result in a framerate-dependent force. For this reason it should only be used when simulating one-time impacts. The position uses the rotation of the global coordinate system, but is centered at the object’s origin.
- void apply_torque_impulse ( Vector3 j )
Apply a torque impulse (which will be affected by the body mass and shape). This will rotate the body around the vector j passed as parameter.
Returns the collider’s RID.
Returns the collider’s object id.
Returns the collider object.
Returns the contact position in the collider.
Returns the collider’s shape index.
Returns the linear velocity vector at the collider’s contact point.
- int get_contact_count ( ) const
Returns the number of contacts this body has with other bodies.
Note: By default, this returns 0 unless bodies are configured to monitor contacts. See RigidBody.contact_monitor.
Impulse created by the contact. Only implemented for Bullet physics.
Returns the local normal at the contact point.
Returns the local position of the contact point.
Returns the local shape index of the collision.
- PhysicsDirectSpaceState get_space_state ( )
Returns the current state of the space, useful for queries.
- void integrate_forces ( )
Calls the built-in force integration code.
PhysicsDirectSpaceState¶
Inherits: Object
Direct access object to a space in the PhysicsServer.
Description¶
Direct access object to a space in the PhysicsServer. It’s used mainly to do queries against objects and areas residing in a given space.
Tutorials¶
Methods¶
| Array | cast_motion ( PhysicsShapeQueryParameters shape, Vector3 motion ) |
| Array | collide_shape ( PhysicsShapeQueryParameters shape, int max_results=32 ) |
| Dictionary | get_rest_info ( PhysicsShapeQueryParameters shape ) |
| Dictionary | intersect_ray ( Vector3 from, Vector3 to, Array exclude=[ ], int collision_mask=2147483647, bool collide_with_bodies=true, bool collide_with_areas=false ) |
| Array | intersect_shape ( PhysicsShapeQueryParameters shape, int max_results=32 ) |
Method Descriptions¶
- Array cast_motion ( PhysicsShapeQueryParameters shape, Vector3 motion )
Checks whether the shape can travel to a point. The method will return an array with two floats between 0 and 1, both representing a fraction of motion. The first is how far the shape can move without triggering a collision, and the second is the point at which a collision will occur. If no collision is detected, the returned array will be [1, 1].
If the shape can not move, the returned array will be [0, 0] under Bullet, and empty under GodotPhysics.
- Array collide_shape ( PhysicsShapeQueryParameters shape, int max_results=32 )
Checks the intersections of a shape, given through a PhysicsShapeQueryParameters object, against the space. The resulting array contains a list of points where the shape intersects another. Like with intersect_shape, the number of returned results can be limited to save processing time.
- Dictionary get_rest_info ( PhysicsShapeQueryParameters shape )
Checks the intersections of a shape, given through a PhysicsShapeQueryParameters object, against the space. If it collides with more than one shape, the nearest one is selected. The returned object is a dictionary containing the following fields:
collider_id: The colliding object’s ID.
linear_velocity: The colliding object’s velocity Vector3. If the object is an Area, the result is (0, 0, 0).
normal: The object’s surface normal at the intersection point.
point: The intersection point.
rid: The intersecting object’s RID.
shape: The shape index of the colliding shape.
If the shape did not intersect anything, then an empty dictionary is returned instead.
- Dictionary intersect_ray ( Vector3 from, Vector3 to, Array exclude=[ ], int collision_mask=2147483647, bool collide_with_bodies=true, bool collide_with_areas=false )
Intersects a ray in a given space. The returned object is a dictionary with the following fields:
collider: The colliding object.
collider_id: The colliding object’s ID.
normal: The object’s surface normal at the intersection point.
position: The intersection point.
rid: The intersecting object’s RID.
shape: The shape index of the colliding shape.
If the ray did not intersect anything, then an empty dictionary is returned instead.
Additionally, the method can take an exclude array of objects or RIDs that are to be excluded from collisions, a collision_mask bitmask representing the physics layers to check in, or booleans to determine if the ray should collide with PhysicsBodys or Areas, respectively.
- Array intersect_shape ( PhysicsShapeQueryParameters shape, int max_results=32 )
Checks the intersections of a shape, given through a PhysicsShapeQueryParameters object, against the space. The intersected shapes are returned in an array containing dictionaries with the following fields:
collider: The colliding object.
collider_id: The colliding object’s ID.
rid: The intersecting object’s RID.
shape: The shape index of the colliding shape.
The number of intersections can be limited with the max_results parameter, to reduce the processing time.
PhysicsMaterial¶
Inherits: Resource < Reference < Object
A material for physics properties.
Description¶
Provides a means of modifying the collision properties of a PhysicsBody.
Property Descriptions¶
- bool absorbent
| Default | false |
| Setter | set_absorbent(value) |
| Getter | is_absorbent() |
- float bounce
| Default | 0.0 |
| Setter | set_bounce(value) |
| Getter | get_bounce() |
The body’s bounciness. Values range from 0 (no bounce) to 1 (full bounciness).
- float friction
| Default | 1.0 |
| Setter | set_friction(value) |
| Getter | get_friction() |
The body’s friction. Values range from 0 (frictionless) to 1 (maximum friction).
- bool rough
| Default | false |
| Setter | set_rough(value) |
| Getter | is_rough() |
PhysicsServer¶
Inherits: Object
Inherited By: BulletPhysicsServer
Server interface for low-level physics access.
Description¶
PhysicsServer is the server responsible for all 3D physics. It can create many kinds of physics objects, but does not insert them on the node tree.
Methods¶
Enumerations¶
enum JointType:
- JOINT_PIN = 0 — The Joint is a PinJoint.
- JOINT_HINGE = 1 — The Joint is a HingeJoint.
- JOINT_SLIDER = 2 — The Joint is a SliderJoint.
- JOINT_CONE_TWIST = 3 — The Joint is a ConeTwistJoint.
- JOINT_6DOF = 4 — The Joint is a Generic6DOFJoint.
enum PinJointParam:
- PIN_JOINT_BIAS = 0 — The strength with which the pinned objects try to stay in positional relation to each other.
The higher, the stronger.
- PIN_JOINT_DAMPING = 1 — The strength with which the pinned objects try to stay in velocity relation to each other.
The higher, the stronger.
- PIN_JOINT_IMPULSE_CLAMP = 2 — If above 0, this value is the maximum value for an impulse that this Joint puts on its ends.
enum HingeJointParam:
- HINGE_JOINT_BIAS = 0 — The speed with which the two bodies get pulled together when they move in different directions.
- HINGE_JOINT_LIMIT_UPPER = 1 — The maximum rotation across the Hinge.
- HINGE_JOINT_LIMIT_LOWER = 2 — The minimum rotation across the Hinge.
- HINGE_JOINT_LIMIT_BIAS = 3 — The speed with which the rotation across the axis perpendicular to the hinge gets corrected.
- HINGE_JOINT_LIMIT_SOFTNESS = 4
- HINGE_JOINT_LIMIT_RELAXATION = 5 — The lower this value, the more the rotation gets slowed down.
- HINGE_JOINT_MOTOR_TARGET_VELOCITY = 6 — Target speed for the motor.
- HINGE_JOINT_MOTOR_MAX_IMPULSE = 7 — Maximum acceleration for the motor.
enum HingeJointFlag:
- HINGE_JOINT_FLAG_USE_LIMIT = 0 — If
true, the Hinge has a maximum and a minimum rotation. - HINGE_JOINT_FLAG_ENABLE_MOTOR = 1 — If
true, a motor turns the Hinge.
enum SliderJointParam:
- SLIDER_JOINT_LINEAR_LIMIT_UPPER = 0 — The maximum difference between the pivot points on their X axis before damping happens.
- SLIDER_JOINT_LINEAR_LIMIT_LOWER = 1 — The minimum difference between the pivot points on their X axis before damping happens.
- SLIDER_JOINT_LINEAR_LIMIT_SOFTNESS = 2 — A factor applied to the movement across the slider axis once the limits get surpassed. The lower, the slower the movement.
- SLIDER_JOINT_LINEAR_LIMIT_RESTITUTION = 3 — The amount of restitution once the limits are surpassed. The lower, the more velocityenergy gets lost.
- SLIDER_JOINT_LINEAR_LIMIT_DAMPING = 4 — The amount of damping once the slider limits are surpassed.
- SLIDER_JOINT_LINEAR_MOTION_SOFTNESS = 5 — A factor applied to the movement across the slider axis as long as the slider is in the limits. The lower, the slower the movement.
- SLIDER_JOINT_LINEAR_MOTION_RESTITUTION = 6 — The amount of restitution inside the slider limits.
- SLIDER_JOINT_LINEAR_MOTION_DAMPING = 7 — The amount of damping inside the slider limits.
- SLIDER_JOINT_LINEAR_ORTHOGONAL_SOFTNESS = 8 — A factor applied to the movement across axes orthogonal to the slider.
- SLIDER_JOINT_LINEAR_ORTHOGONAL_RESTITUTION = 9 — The amount of restitution when movement is across axes orthogonal to the slider.
- SLIDER_JOINT_LINEAR_ORTHOGONAL_DAMPING = 10 — The amount of damping when movement is across axes orthogonal to the slider.
- SLIDER_JOINT_ANGULAR_LIMIT_UPPER = 11 — The upper limit of rotation in the slider.
- SLIDER_JOINT_ANGULAR_LIMIT_LOWER = 12 — The lower limit of rotation in the slider.
- SLIDER_JOINT_ANGULAR_LIMIT_SOFTNESS = 13 — A factor applied to the all rotation once the limit is surpassed.
- SLIDER_JOINT_ANGULAR_LIMIT_RESTITUTION = 14 — The amount of restitution of the rotation when the limit is surpassed.
- SLIDER_JOINT_ANGULAR_LIMIT_DAMPING = 15 — The amount of damping of the rotation when the limit is surpassed.
- SLIDER_JOINT_ANGULAR_MOTION_SOFTNESS = 16 — A factor that gets applied to the all rotation in the limits.
- SLIDER_JOINT_ANGULAR_MOTION_RESTITUTION = 17 — The amount of restitution of the rotation in the limits.
- SLIDER_JOINT_ANGULAR_MOTION_DAMPING = 18 — The amount of damping of the rotation in the limits.
- SLIDER_JOINT_ANGULAR_ORTHOGONAL_SOFTNESS = 19 — A factor that gets applied to the all rotation across axes orthogonal to the slider.
- SLIDER_JOINT_ANGULAR_ORTHOGONAL_RESTITUTION = 20 — The amount of restitution of the rotation across axes orthogonal to the slider.
- SLIDER_JOINT_ANGULAR_ORTHOGONAL_DAMPING = 21 — The amount of damping of the rotation across axes orthogonal to the slider.
- SLIDER_JOINT_MAX = 22 — Represents the size of the SliderJointParam enum.
enum ConeTwistJointParam:
- CONE_TWIST_JOINT_SWING_SPAN = 0 — Swing is rotation from side to side, around the axis perpendicular to the twist axis.
The swing span defines, how much rotation will not get corrected allong the swing axis.
Could be defined as looseness in the ConeTwistJoint.
If below 0.05, this behavior is locked.
- CONE_TWIST_JOINT_TWIST_SPAN = 1 — Twist is the rotation around the twist axis, this value defined how far the joint can twist.
Twist is locked if below 0.05.
- CONE_TWIST_JOINT_BIAS = 2 — The speed with which the swing or twist will take place.
The higher, the faster.
- CONE_TWIST_JOINT_SOFTNESS = 3 — The ease with which the Joint twists, if it’s too low, it takes more force to twist the joint.
- CONE_TWIST_JOINT_RELAXATION = 4 — Defines, how fast the swing- and twist-speed-difference on both sides gets synced.
enum G6DOFJointAxisParam:
- G6DOF_JOINT_LINEAR_LOWER_LIMIT = 0 — The minimum difference between the pivot points’ axes.
- G6DOF_JOINT_LINEAR_UPPER_LIMIT = 1 — The maximum difference between the pivot points’ axes.
- G6DOF_JOINT_LINEAR_LIMIT_SOFTNESS = 2 — A factor that gets applied to the movement across the axes. The lower, the slower the movement.
- G6DOF_JOINT_LINEAR_RESTITUTION = 3 — The amount of restitution on the axes movement. The lower, the more velocity-energy gets lost.
- G6DOF_JOINT_LINEAR_DAMPING = 4 — The amount of damping that happens at the linear motion across the axes.
- G6DOF_JOINT_LINEAR_MOTOR_TARGET_VELOCITY = 5 — The velocity that the joint’s linear motor will attempt to reach.
- G6DOF_JOINT_LINEAR_MOTOR_FORCE_LIMIT = 6 — The maximum force that the linear motor can apply while trying to reach the target velocity.
- G6DOF_JOINT_ANGULAR_LOWER_LIMIT = 10 — The minimum rotation in negative direction to break loose and rotate around the axes.
- G6DOF_JOINT_ANGULAR_UPPER_LIMIT = 11 — The minimum rotation in positive direction to break loose and rotate around the axes.
- G6DOF_JOINT_ANGULAR_LIMIT_SOFTNESS = 12 — A factor that gets multiplied onto all rotations across the axes.
- G6DOF_JOINT_ANGULAR_DAMPING = 13 — The amount of rotational damping across the axes. The lower, the more dampening occurs.
- G6DOF_JOINT_ANGULAR_RESTITUTION = 14 — The amount of rotational restitution across the axes. The lower, the more restitution occurs.
- G6DOF_JOINT_ANGULAR_FORCE_LIMIT = 15 — The maximum amount of force that can occur, when rotating around the axes.
- G6DOF_JOINT_ANGULAR_ERP = 16 — When correcting the crossing of limits in rotation across the axes, this error tolerance factor defines how much the correction gets slowed down. The lower, the slower.
- G6DOF_JOINT_ANGULAR_MOTOR_TARGET_VELOCITY = 17 — Target speed for the motor at the axes.
- G6DOF_JOINT_ANGULAR_MOTOR_FORCE_LIMIT = 18 — Maximum acceleration for the motor at the axes.
enum G6DOFJointAxisFlag:
- G6DOF_JOINT_FLAG_ENABLE_LINEAR_LIMIT = 0 — If
setthere is linear motion possible within the given limits. - G6DOF_JOINT_FLAG_ENABLE_ANGULAR_LIMIT = 1 — If
setthere is rotational motion possible. - G6DOF_JOINT_FLAG_ENABLE_MOTOR = 4 — If
setthere is a rotational motor across these axes. - G6DOF_JOINT_FLAG_ENABLE_LINEAR_MOTOR = 5 — If
setthere is a linear motor on this axis that targets a specific velocity.
enum ShapeType:
- SHAPE_PLANE = 0 — The Shape is a PlaneShape.
- SHAPE_RAY = 1 — The Shape is a RayShape.
- SHAPE_SPHERE = 2 — The Shape is a SphereShape.
- SHAPE_BOX = 3 — The Shape is a BoxShape.
- SHAPE_CAPSULE = 4 — The Shape is a CapsuleShape.
- SHAPE_CYLINDER = 5 — The Shape is a CylinderShape.
- SHAPE_CONVEX_POLYGON = 6 — The Shape is a ConvexPolygonShape.
- SHAPE_CONCAVE_POLYGON = 7 — The Shape is a ConcavePolygonShape.
- SHAPE_HEIGHTMAP = 8 — The Shape is a HeightMapShape.
- SHAPE_CUSTOM = 9 — This constant is used internally by the engine. Any attempt to create this kind of shape results in an error.
enum AreaParameter:
- AREA_PARAM_GRAVITY = 0 — Constant to set/get gravity strength in an area.
- AREA_PARAM_GRAVITY_VECTOR = 1 — Constant to set/get gravity vector/center in an area.
- AREA_PARAM_GRAVITY_IS_POINT = 2 — Constant to set/get whether the gravity vector of an area is a direction, or a center point.
- AREA_PARAM_GRAVITY_DISTANCE_SCALE = 3 — Constant to set/get the falloff factor for point gravity of an area. The greater this value is, the faster the strength of gravity decreases with the square of distance.
- AREA_PARAM_GRAVITY_POINT_ATTENUATION = 4 — This constant was used to set/get the falloff factor for point gravity. It has been superseded by AREA_PARAM_GRAVITY_DISTANCE_SCALE.
- AREA_PARAM_LINEAR_DAMP = 5 — Constant to set/get the linear dampening factor of an area.
- AREA_PARAM_ANGULAR_DAMP = 6 — Constant to set/get the angular dampening factor of an area.
- AREA_PARAM_PRIORITY = 7 — Constant to set/get the priority (order of processing) of an area.
enum AreaSpaceOverrideMode:
- AREA_SPACE_OVERRIDE_DISABLED = 0 — This area does not affect gravity/damp. These are generally areas that exist only to detect collisions, and objects entering or exiting them.
- AREA_SPACE_OVERRIDE_COMBINE = 1 — This area adds its gravity/damp values to whatever has been calculated so far. This way, many overlapping areas can combine their physics to make interesting effects.
- AREA_SPACE_OVERRIDE_COMBINE_REPLACE = 2 — This area adds its gravity/damp values to whatever has been calculated so far. Then stops taking into account the rest of the areas, even the default one.
- AREA_SPACE_OVERRIDE_REPLACE = 3 — This area replaces any gravity/damp, even the default one, and stops taking into account the rest of the areas.
- AREA_SPACE_OVERRIDE_REPLACE_COMBINE = 4 — This area replaces any gravity/damp calculated so far, but keeps calculating the rest of the areas, down to the default one.
enum BodyMode:
- BODY_MODE_STATIC = 0 — Constant for static bodies.
- BODY_MODE_KINEMATIC = 1 — Constant for kinematic bodies.
- BODY_MODE_RIGID = 2 — Constant for rigid bodies.
- BODY_MODE_CHARACTER = 3 — Constant for rigid bodies in character mode. In this mode, a body can not rotate, and only its linear velocity is affected by physics.
enum BodyParameter:
- BODY_PARAM_BOUNCE = 0 — Constant to set/get a body’s bounce factor.
- BODY_PARAM_FRICTION = 1 — Constant to set/get a body’s friction.
- BODY_PARAM_MASS = 2 — Constant to set/get a body’s mass.
- BODY_PARAM_GRAVITY_SCALE = 3 — Constant to set/get a body’s gravity multiplier.
- BODY_PARAM_LINEAR_DAMP = 4 — Constant to set/get a body’s linear dampening factor.
- BODY_PARAM_ANGULAR_DAMP = 5 — Constant to set/get a body’s angular dampening factor.
- BODY_PARAM_MAX = 6 — Represents the size of the BodyParameter enum.
enum BodyState:
- BODY_STATE_TRANSFORM = 0 — Constant to set/get the current transform matrix of the body.
- BODY_STATE_LINEAR_VELOCITY = 1 — Constant to set/get the current linear velocity of the body.
- BODY_STATE_ANGULAR_VELOCITY = 2 — Constant to set/get the current angular velocity of the body.
- BODY_STATE_SLEEPING = 3 — Constant to sleep/wake up a body, or to get whether it is sleeping.
- BODY_STATE_CAN_SLEEP = 4 — Constant to set/get whether the body can sleep.
enum AreaBodyStatus:
- AREA_BODY_ADDED = 0 — The value of the first parameter and area callback function receives, when an object enters one of its shapes.
- AREA_BODY_REMOVED = 1 — The value of the first parameter and area callback function receives, when an object exits one of its shapes.
enum ProcessInfo:
- INFO_ACTIVE_OBJECTS = 0 — Constant to get the number of objects that are not sleeping.
- INFO_COLLISION_PAIRS = 1 — Constant to get the number of possible collisions.
- INFO_ISLAND_COUNT = 2 — Constant to get the number of space regions where a collision could occur.
enum SpaceParameter:
- SPACE_PARAM_CONTACT_RECYCLE_RADIUS = 0 — Constant to set/get the maximum distance a pair of bodies has to move before their collision status has to be recalculated.
- SPACE_PARAM_CONTACT_MAX_SEPARATION = 1 — Constant to set/get the maximum distance a shape can be from another before they are considered separated.
- SPACE_PARAM_BODY_MAX_ALLOWED_PENETRATION = 2 — Constant to set/get the maximum distance a shape can penetrate another shape before it is considered a collision.
- SPACE_PARAM_BODY_LINEAR_VELOCITY_SLEEP_THRESHOLD = 3 — Constant to set/get the threshold linear velocity of activity. A body marked as potentially inactive for both linear and angular velocity will be put to sleep after the time given.
- SPACE_PARAM_BODY_ANGULAR_VELOCITY_SLEEP_THRESHOLD = 4 — Constant to set/get the threshold angular velocity of activity. A body marked as potentially inactive for both linear and angular velocity will be put to sleep after the time given.
- SPACE_PARAM_BODY_TIME_TO_SLEEP = 5 — Constant to set/get the maximum time of activity. A body marked as potentially inactive for both linear and angular velocity will be put to sleep after this time.
- SPACE_PARAM_BODY_ANGULAR_VELOCITY_DAMP_RATIO = 6
- SPACE_PARAM_CONSTRAINT_DEFAULT_BIAS = 7 — Constant to set/get the default solver bias for all physics constraints. A solver bias is a factor controlling how much two objects “rebound”, after violating a constraint, to avoid leaving them in that state because of numerical imprecision.
- SPACE_PARAM_TEST_MOTION_MIN_CONTACT_DEPTH = 8
enum BodyAxis:
- BODY_AXIS_LINEAR_X = 1
- BODY_AXIS_LINEAR_Y = 2
- BODY_AXIS_LINEAR_Z = 4
- BODY_AXIS_ANGULAR_X = 8
- BODY_AXIS_ANGULAR_Y = 16
- BODY_AXIS_ANGULAR_Z = 32
Method Descriptions¶
- void area_add_shape ( RID area, RID shape, Transform transform=Transform( 1, 0, 0, 0, 1, 0, 0, 0, 1, 0, 0, 0 ), bool disabled=false )
Adds a shape to the area, along with a transform matrix. Shapes are usually referenced by their index, so you should track which shape has a given index.
Assigns the area to a descendant of Object, so it can exist in the node tree.
- void area_clear_shapes ( RID area )
Removes all shapes from an area. It does not delete the shapes, so they can be reassigned later.
- RID area_create ( )
Creates an Area.
Gets the instance ID of the object the area is assigned to.
- Variant area_get_param ( RID area, AreaParameter param ) const
Returns an area parameter value. A list of available parameters is on the AreaParameter constants.
Returns the RID of the nth shape of an area.
Returns the number of shapes assigned to an area.
Returns the transform matrix of a shape within an area.
Returns the space assigned to the area.
- AreaSpaceOverrideMode area_get_space_override_mode ( RID area ) const
Returns the space override mode for the area.
Returns the transform matrix for an area.
If true, area collides with rays.
Removes a shape from an area. It does not delete the shape, so it can be reassigned later.
Assigns the area to one or many physics layers.
Sets which physics layers the area will monitor.
Sets the function to call when any body/area enters or exits the area. This callback will be called for any object interacting with the area, and takes five parameters:
1: AREA_BODY_ADDED or AREA_BODY_REMOVED, depending on whether the object entered or exited the area.
2: RID of the object that entered/exited the area.
3: Instance ID of the object that entered/exited the area.
4: The shape index of the object that entered/exited the area.
5: The shape index of the area where the object entered/exited.
- void area_set_param ( RID area, AreaParameter param, Variant value )
Sets the value for an area parameter. A list of available parameters is on the AreaParameter constants.
Sets object pickable with rays.
Substitutes a given area shape by another. The old shape is selected by its index, the new one by its RID.
Sets the transform matrix for an area shape.
Assigns a space to the area.
- void area_set_space_override_mode ( RID area, AreaSpaceOverrideMode mode )
Sets the space override mode for the area. The modes are described in the AreaSpaceOverrideMode constants.
Sets the transform matrix for an area.
Adds a body to the list of bodies exempt from collisions.
- void body_add_shape ( RID body, RID shape, Transform transform=Transform( 1, 0, 0, 0, 1, 0, 0, 0, 1, 0, 0, 0 ), bool disabled=false )
Adds a shape to the body, along with a transform matrix. Shapes are usually referenced by their index, so you should track which shape has a given index.
Gives the body a push at a position in the direction of the impulse.
Gives the body a push to rotate it.
Assigns the area to a descendant of Object, so it can exist in the node tree.
- void body_clear_shapes ( RID body )
Removes all shapes from a body.
Creates a physics body. The first parameter can be any value from BodyMode constants, for the type of body created. Additionally, the body can be created in sleeping state to save processing time.
Returns the physics layer or layers a body belongs to.
Returns the physics layer or layers a body can collide with.
- PhysicsDirectBodyState body_get_direct_state ( RID body )
Returns the PhysicsDirectBodyState of the body.
Returns the maximum contacts that can be reported. See body_set_max_contacts_reported.
Returns the body mode.
Gets the instance ID of the object the area is assigned to.
- float body_get_param ( RID body, BodyParameter param ) const
Returns the value of a body parameter. A list of available parameters is on the BodyParameter constants.
Returns the RID of the nth shape of a body.
Returns the number of shapes assigned to a body.
Returns the transform matrix of a body shape.
Returns the RID of the space assigned to a body.
Returns a body state.
If true, the continuous collision detection mode is enabled.
Returns whether a body uses a callback function to calculate its own physics (see body_set_force_integration_callback).
If true, the body can be detected by rays.
Removes a body from the list of bodies exempt from collisions.
Continuous collision detection tries to predict where a moving body will collide, instead of moving it and correcting its movement if it collided.
Removes a shape from a body. The shape is not deleted, so it can be reused afterwards.
Sets an axis velocity. The velocity in the given vector axis will be set as the given vector length. This is useful for jumping behavior.
Sets the physics layer or layers a body belongs to.
Sets the physics layer or layers a body can collide with.
If true, the continuous collision detection mode is enabled.
Continuous collision detection tries to predict where a moving body will collide, instead of moving it and correcting its movement if it collided.
- void body_set_force_integration_callback ( RID body, Object receiver, String method, Variant userdata=null )
Sets the function used to calculate physics for an object, if that object allows it (see body_set_omit_force_integration).
Sets the maximum contacts to report. Bodies can keep a log of the contacts with other bodies, this is enabled by setting the maximum amount of contacts reported to a number greater than 0.
Sets the body mode, from one of the BodyMode constants.
Sets whether a body uses a callback function to calculate its own physics (see body_set_force_integration_callback).
- void body_set_param ( RID body, BodyParameter param, float value )
Sets a body parameter. A list of available parameters is on the BodyParameter constants.
Sets the body pickable with rays if enabled is set.
Substitutes a given body shape by another. The old shape is selected by its index, the new one by its RID.
Sets the transform matrix for a body shape.
Assigns a space to the body (see space_create).
Sets a body state (see BodyState constants).
- float cone_twist_joint_get_param ( RID joint, ConeTwistJointParam param ) const
Gets a cone_twist_joint parameter (see ConeTwistJointParam constants).
- void cone_twist_joint_set_param ( RID joint, ConeTwistJointParam param, float value )
Sets a cone_twist_joint parameter (see ConeTwistJointParam constants).
- void free_rid ( RID rid )
Destroys any of the objects created by PhysicsServer. If the RID passed is not one of the objects that can be created by PhysicsServer, an error will be sent to the console.
- bool generic_6dof_joint_get_flag ( RID joint, Vector3.Axis axis, G6DOFJointAxisFlag flag )
Gets a generic_6_DOF_joint flag (see G6DOFJointAxisFlag constants).
- float generic_6dof_joint_get_param ( RID joint, Vector3.Axis axis, G6DOFJointAxisParam param )
Gets a generic_6_DOF_joint parameter (see G6DOFJointAxisParam constants).
- void generic_6dof_joint_set_flag ( RID joint, Vector3.Axis axis, G6DOFJointAxisFlag flag, bool enable )
Sets a generic_6_DOF_joint flag (see G6DOFJointAxisFlag constants).
- void generic_6dof_joint_set_param ( RID joint, Vector3.Axis axis, G6DOFJointAxisParam param, float value )
Sets a generic_6_DOF_joint parameter (see G6DOFJointAxisParam constants).
- int get_process_info ( ProcessInfo process_info )
Returns an Info defined by the ProcessInfo input given.
- bool hinge_joint_get_flag ( RID joint, HingeJointFlag flag ) const
Gets a hinge_joint flag (see HingeJointFlag constants).
- float hinge_joint_get_param ( RID joint, HingeJointParam param ) const
Gets a hinge_joint parameter (see HingeJointParam).
- void hinge_joint_set_flag ( RID joint, HingeJointFlag flag, bool enabled )
Sets a hinge_joint flag (see HingeJointFlag constants).
- void hinge_joint_set_param ( RID joint, HingeJointParam param, float value )
Sets a hinge_joint parameter (see HingeJointParam constants).
- RID joint_create_cone_twist ( RID body_A, Transform local_ref_A, RID body_B, Transform local_ref_B )
Creates a ConeTwistJoint.
- RID joint_create_generic_6dof ( RID body_A, Transform local_ref_A, RID body_B, Transform local_ref_B )
Creates a Generic6DOFJoint.
Creates a HingeJoint.
Creates a PinJoint.
Creates a SliderJoint.
Gets the priority value of the Joint.
Returns the type of the Joint.
Sets the priority value of the Joint.
Returns position of the joint in the local space of body a of the joint.
Returns position of the joint in the local space of body b of the joint.
- float pin_joint_get_param ( RID joint, PinJointParam param ) const
Gets a pin_joint parameter (see PinJointParam constants).
Sets position of the joint in the local space of body a of the joint.
Sets position of the joint in the local space of body b of the joint.
- void pin_joint_set_param ( RID joint, PinJointParam param, float value )
Sets a pin_joint parameter (see PinJointParam constants).
- void set_active ( bool active )
Activates or deactivates the 3D physics engine.
Creates a shape of a type from ShapeType. Does not assign it to a body or an area. To do so, you must use area_set_shape or body_set_shape.
Returns the shape data.
Returns the type of shape (see ShapeType constants).
Sets the shape data that defines its shape and size. The data to be passed depends on the kind of shape created shape_get_type.
- float slider_joint_get_param ( RID joint, SliderJointParam param ) const
Gets a slider_joint parameter (see SliderJointParam constants).
- void slider_joint_set_param ( RID joint, SliderJointParam param, float value )
Gets a slider_joint parameter (see SliderJointParam constants).
- RID space_create ( )
Creates a space. A space is a collection of parameters for the physics engine that can be assigned to an area or a body. It can be assigned to an area with area_set_space, or to a body with body_set_space.
- PhysicsDirectSpaceState space_get_direct_state ( RID space )
Returns the state of a space, a PhysicsDirectSpaceState. This object can be used to make collision/intersection queries.
- float space_get_param ( RID space, SpaceParameter param ) const
Returns the value of a space parameter.
Returns whether the space is active.
Marks a space as active. It will not have an effect, unless it is assigned to an area or body.
- void space_set_param ( RID space, SpaceParameter param, float value )
Sets the value for a space parameter. A list of available parameters is on the SpaceParameter constants.
PhysicsShapeQueryParameters¶
Parameters to be sent to a 3D shape physics query.
Description¶
This class contains the shape and other parameters for 3D intersection/collision queries. See also PhysicsShapeQueryResult.
Properties¶
| bool | collide_with_areas | false |
| bool | collide_with_bodies | true |
| int | collision_mask | 2147483647 |
| Array | exclude | [ ] |
| float | margin | 0.0 |
| RID | shape_rid | |
| Transform | transform | Transform( 1, 0, 0, 0, 1, 0, 0, 0, 1, 0, 0, 0 ) |
Property Descriptions¶
- bool collide_with_areas
| Default | false |
| Setter | set_collide_with_areas(value) |
| Getter | is_collide_with_areas_enabled() |
If true, the query will take Areas into account.
- bool collide_with_bodies
| Default | true |
| Setter | set_collide_with_bodies(value) |
| Getter | is_collide_with_bodies_enabled() |
If true, the query will take PhysicsBodys into account.
- int collision_mask
| Default | 2147483647 |
| Setter | set_collision_mask(value) |
| Getter | get_collision_mask() |
The physics layer(s) the query will take into account (as a bitmask).
- Array exclude
| Default | [ ] |
| Setter | set_exclude(value) |
| Getter | get_exclude() |
The list of objects or object RIDs that will be excluded from collisions.
- float margin
| Default | 0.0 |
| Setter | set_margin(value) |
| Getter | get_margin() |
The collision margin for the shape.
- RID shape_rid
| Setter | set_shape_rid(value) |
| Getter | get_shape_rid() |
The queried shape’s RID. See also set_shape.
- Transform transform
| Default | Transform( 1, 0, 0, 0, 1, 0, 0, 0, 1, 0, 0, 0 ) |
| Setter | set_transform(value) |
| Getter | get_transform() |
The queried shape’s transform matrix.
PhysicsShapeQueryResult¶
Result of a 3D shape query in PhysicsServer.
Description¶
The result of a 3D shape query in PhysicsServer. See also PhysicsShapeQueryParameters.
Methods¶
| int | get_result_count ( ) const |
| Object | get_result_object ( int idx ) const |
| int | get_result_object_id ( int idx ) const |
| int | get_result_object_shape ( int idx ) const |
| RID | get_result_rid ( int idx ) const |
Method Descriptions¶
- int get_result_count ( ) const
Returns the number of objects that intersected with the shape.
Returns the Object that intersected with the shape at index idx.
Returns the instance ID of the Object that intersected with the shape at index idx.
Returns the child index of the object’s Shape that intersected with the shape at index idx.
Returns the RID of the object that intersected with the shape at index idx.
PinJoint¶
Inherits: Joint < Spatial < Node < Object
Pin joint for 3D shapes.
Description¶
Pin joint for 3D rigid bodies. It pins 2 bodies (rigid or static) together.
Properties¶
| float | params/bias | 0.3 |
| float | params/damping | 1.0 |
| float | params/impulse_clamp | 0.0 |
Enumerations¶
enum Param:
- PARAM_BIAS = 0 — The force with which the pinned objects stay in positional relation to each other. The higher, the stronger.
- PARAM_DAMPING = 1 — The force with which the pinned objects stay in velocity relation to each other. The higher, the stronger.
- PARAM_IMPULSE_CLAMP = 2 — If above 0, this value is the maximum value for an impulse that this Joint produces.
Property Descriptions¶
- float params/bias
| Default | 0.3 |
| Setter | set_param(value) |
| Getter | get_param() |
The force with which the pinned objects stay in positional relation to each other. The higher, the stronger.
- float params/damping
| Default | 1.0 |
| Setter | set_param(value) |
| Getter | get_param() |
The force with which the pinned objects stay in velocity relation to each other. The higher, the stronger.
- float params/impulse_clamp
| Default | 0.0 |
| Setter | set_param(value) |
| Getter | get_param() |
If above 0, this value is the maximum value for an impulse that this Joint produces.
PinJoint2D¶
Inherits: Joint2D < Node2D < CanvasItem < Node < Object
Pin Joint for 2D shapes.
Description¶
Pin Joint for 2D rigid bodies. It pins two bodies (rigid or static) together.
Plane¶
Plane in hessian form.
Description¶
Plane represents a normalized plane equation. Basically, “normal” is the normal of the plane (a,b,c normalized), and “d” is the distance from the origin to the plane (in the direction of “normal”). “Over” or “Above” the plane is considered the side of the plane towards where the normal is pointing.
Methods¶
| Plane | Plane ( float a, float b, float c, float d ) |
| Plane | Plane ( Vector3 v1, Vector3 v2, Vector3 v3 ) |
| Plane | Plane ( Vector3 normal, float d ) |
| Vector3 | center ( ) |
| float | distance_to ( Vector3 point ) |
| Vector3 | get_any_point ( ) |
| bool | has_point ( Vector3 point, float epsilon=1e-05 ) |
| Vector3 | intersect_3 ( Plane b, Plane c ) |
| Vector3 | intersects_ray ( Vector3 from, Vector3 dir ) |
| Vector3 | intersects_segment ( Vector3 begin, Vector3 end ) |
| bool | is_equal_approx ( Plane plane ) |
| bool | is_point_over ( Vector3 point ) |
| Plane | normalized ( ) |
| Vector3 | project ( Vector3 point ) |
Constants¶
- PLANE_YZ = Plane( 1, 0, 0, 0 ) — A plane that extends in the Y and Z axes.
- PLANE_XZ = Plane( 0, 1, 0, 0 ) — A plane that extends in the X and Z axes.
- PLANE_XY = Plane( 0, 0, 1, 0 ) — A plane that extends in the X and Y axes.
Property Descriptions¶
- float d
| Default | 0.0 |
Distance from the origin to the plane, in the direction of normal.
- Vector3 normal
| Default | Vector3( 0, 0, 0 ) |
The normal of the plane. “Over” or “Above” the plane is considered the side of the plane towards where the normal is pointing.
- float x
| Default | 0.0 |
The normal’s X component.
- float y
| Default | 0.0 |
The normal’s Y component.
- float z
| Default | 0.0 |
The normal’s Z component.
Method Descriptions¶
Creates a plane from the four parameters. The three components of the resulting plane’s normal are a, b and c, and the plane has a distance of d from the origin.
Creates a plane from the three points, given in clockwise order.
Creates a plane from the normal and the plane’s distance to the origin.
- Vector3 center ( )
Returns the center of the plane.
Returns the shortest distance from the plane to the position point.
- Vector3 get_any_point ( )
Returns a point on the plane.
Returns true if point is inside the plane (by a very minimum epsilon threshold).
Returns the intersection point of the three planes b, c and this plane. If no intersection is found, null is returned.
Returns the intersection point of a ray consisting of the position from and the direction normal dir with this plane. If no intersection is found, null is returned.
Returns the intersection point of a segment from position begin to position end with this plane. If no intersection is found, null is returned.
Returns true if this plane and plane are approximately equal, by running @GDScript.is_equal_approx on each component.
Returns true if point is located above the plane.
- Plane normalized ( )
Returns a copy of the plane, normalized.
Returns the orthogonal projection of point p into a point in the plane.
PlaneMesh¶
Inherits: PrimitiveMesh < Mesh < Resource < Reference < Object
Class representing a planar PrimitiveMesh.
Description¶
Class representing a planar PrimitiveMesh. This flat mesh does not have a thickness. By default, this mesh is aligned on the X and Z axes; this default rotation isn’t suited for use with billboarded materials. For billboarded materials, use QuadMesh instead.
Properties¶
| Vector2 | size | Vector2( 2, 2 ) |
| int | subdivide_depth | 0 |
| int | subdivide_width | 0 |
Property Descriptions¶
- Vector2 size
| Default | Vector2( 2, 2 ) |
| Setter | set_size(value) |
| Getter | get_size() |
Size of the generated plane.
- int subdivide_depth
| Default | 0 |
| Setter | set_subdivide_depth(value) |
| Getter | get_subdivide_depth() |
Number of subdivision along the Z axis.
- int subdivide_width
| Default | 0 |
| Setter | set_subdivide_width(value) |
| Getter | get_subdivide_width() |
Number of subdivision along the X axis.
PlaneShape¶
Inherits: Shape < Resource < Reference < Object
Infinite plane shape for 3D collisions.
Description¶
An infinite plane shape for 3D collisions. Note that the Plane’s normal matters; anything “below” the plane will collide with it. If the PlaneShape is used in a PhysicsBody, it will cause colliding objects placed “below” it to teleport “above” the plane.
PluginScript¶
PointMesh¶
Inherits: PrimitiveMesh < Mesh < Resource < Reference < Object
Mesh with a single Point primitive.
Description¶
The PointMesh is made from a single point. Instead of relying on triangles, points are rendered as a single rectangle on the screen with a constant size. They are intended to be used with Particle systems, but can be used as a cheap way to render constant size billboarded sprites (for example in a point cloud).
PointMeshes, must be used with a material that has a point size. Point size can be accessed in a shader with POINT_SIZE, or in a SpatialMaterial by setting SpatialMaterial.flags_use_point_size and the variable SpatialMaterial.params_point_size.
When using PointMeshes, properties that normally alter vertices will be ignored, including billboard mode, grow, and cull face.
Polygon2D¶
Inherits: Node2D < CanvasItem < Node < Object
A 2D polygon.
Description¶
A Polygon2D is defined by a set of points. Each point is connected to the next, with the final point being connected to the first, resulting in a closed polygon. Polygon2Ds can be filled with color (solid or gradient) or filled with a given texture.
Note: By default, Godot can only draw up to 4,096 polygon points at a time. To increase this limit, open the Project Settings and increase ProjectSettings.rendering/limits/buffers/canvas_polygon_buffer_size_kb and ProjectSettings.rendering/limits/buffers/canvas_polygon_index_buffer_size_kb.
Properties¶
| bool | antialiased | false |
| Array | bones | [ ] |
| Color | color | Color( 1, 1, 1, 1 ) |
| int | internal_vertex_count | 0 |
| float | invert_border | 100.0 |
| bool | invert_enable | false |
| Vector2 | offset | Vector2( 0, 0 ) |
| PoolVector2Array | polygon | PoolVector2Array( ) |
| Array | polygons | [ ] |
| NodePath | skeleton | NodePath("") |
| Texture | texture | |
| Vector2 | texture_offset | Vector2( 0, 0 ) |
| float | texture_rotation | |
| float | texture_rotation_degrees | 0.0 |
| Vector2 | texture_scale | Vector2( 1, 1 ) |
| PoolVector2Array | uv | PoolVector2Array( ) |
| PoolColorArray | vertex_colors | PoolColorArray( ) |
Methods¶
| void | add_bone ( NodePath path, PoolRealArray weights ) |
| void | clear_bones ( ) |
| void | erase_bone ( int index ) |
| int | get_bone_count ( ) const |
| NodePath | get_bone_path ( int index ) const |
| PoolRealArray | get_bone_weights ( int index ) const |
| void | set_bone_path ( int index, NodePath path ) |
| void | set_bone_weights ( int index, PoolRealArray weights ) |
Property Descriptions¶
- bool antialiased
| Default | false |
| Setter | set_antialiased(value) |
| Getter | get_antialiased() |
If true, polygon edges will be anti-aliased.
- Array bones
| Default | [ ] |
- Color color
| Default | Color( 1, 1, 1, 1 ) |
| Setter | set_color(value) |
| Getter | get_color() |
The polygon’s fill color. If texture is defined, it will be multiplied by this color. It will also be the default color for vertices not set in vertex_colors.
- int internal_vertex_count
| Default | 0 |
| Setter | set_internal_vertex_count(value) |
| Getter | get_internal_vertex_count() |
- float invert_border
| Default | 100.0 |
| Setter | set_invert_border(value) |
| Getter | get_invert_border() |
Added padding applied to the bounding box when using invert. Setting this value too small may result in a “Bad Polygon” error.
- bool invert_enable
| Default | false |
| Setter | set_invert(value) |
| Getter | get_invert() |
If true, polygon will be inverted, containing the area outside the defined points and extending to the invert_border.
- Vector2 offset
| Default | Vector2( 0, 0 ) |
| Setter | set_offset(value) |
| Getter | get_offset() |
The offset applied to each vertex.
- PoolVector2Array polygon
| Default | PoolVector2Array( ) |
| Setter | set_polygon(value) |
| Getter | get_polygon() |
The polygon’s list of vertices. The final point will be connected to the first.
Note: This returns a copy of the PoolVector2Array rather than a reference.
- Array polygons
| Default | [ ] |
| Setter | set_polygons(value) |
| Getter | get_polygons() |
- NodePath skeleton
| Default | NodePath("") |
| Setter | set_skeleton(value) |
| Getter | get_skeleton() |
- Texture texture
| Setter | set_texture(value) |
| Getter | get_texture() |
The polygon’s fill texture. Use uv to set texture coordinates.
- Vector2 texture_offset
| Default | Vector2( 0, 0 ) |
| Setter | set_texture_offset(value) |
| Getter | get_texture_offset() |
Amount to offset the polygon’s texture. If (0, 0) the texture’s origin (its top-left corner) will be placed at the polygon’s position.
- float texture_rotation
| Setter | set_texture_rotation(value) |
| Getter | get_texture_rotation() |
The texture’s rotation in radians.
- float texture_rotation_degrees
| Default | 0.0 |
| Setter | set_texture_rotation_degrees(value) |
| Getter | get_texture_rotation_degrees() |
The texture’s rotation in degrees.
- Vector2 texture_scale
| Default | Vector2( 1, 1 ) |
| Setter | set_texture_scale(value) |
| Getter | get_texture_scale() |
Amount to multiply the uv coordinates when using a texture. Larger values make the texture smaller, and vice versa.
| Default | PoolVector2Array( ) |
| Setter | set_uv(value) |
| Getter | get_uv() |
Texture coordinates for each vertex of the polygon. There should be one uv per polygon vertex. If there are fewer, undefined vertices will use (0, 0).
- PoolColorArray vertex_colors
| Default | PoolColorArray( ) |
| Setter | set_vertex_colors(value) |
| Getter | get_vertex_colors() |
Color for each vertex. Colors are interpolated between vertices, resulting in smooth gradients. There should be one per polygon vertex. If there are fewer, undefined vertices will use color.
Method Descriptions¶
- void add_bone ( NodePath path, PoolRealArray weights )
Adds a bone with the specified path and weights.
- void clear_bones ( )
Removes all bones from this Polygon2D.
- void erase_bone ( int index )
Removes the specified bone from this Polygon2D.
- int get_bone_count ( ) const
Returns the number of bones in this Polygon2D.
Returns the path to the node associated with the specified bone.
- PoolRealArray get_bone_weights ( int index ) const
Returns the height values of the specified bone.
Sets the path to the node associated with the specified bone.
- void set_bone_weights ( int index, PoolRealArray weights )
Sets the weight values for the specified bone.
PolygonPathFinder¶
Inherits: Resource < Reference < Object
Methods¶
| PoolVector2Array | find_path ( Vector2 from, Vector2 to ) |
| Rect2 | get_bounds ( ) const |
| Vector2 | get_closest_point ( Vector2 point ) const |
| PoolVector2Array | get_intersections ( Vector2 from, Vector2 to ) const |
| float | get_point_penalty ( int idx ) const |
| bool | is_point_inside ( Vector2 point ) const |
| void | set_point_penalty ( int idx, float penalty ) |
| void | setup ( PoolVector2Array points, PoolIntArray connections ) |
Method Descriptions¶
- PoolVector2Array find_path ( Vector2 from, Vector2 to )
- Rect2 get_bounds ( ) const
- PoolVector2Array get_intersections ( Vector2 from, Vector2 to ) const
- void setup ( PoolVector2Array points, PoolIntArray connections )
PoolByteArray¶
A pooled Array of bytes.
Description¶
An Array specifically designed to hold bytes. Optimized for memory usage, does not fragment the memory.
Note: This type is passed by value and not by reference.
Methods¶
| PoolByteArray | PoolByteArray ( Array from ) |
| void | append ( int byte ) |
| void | append_array ( PoolByteArray array ) |
| PoolByteArray | compress ( int compression_mode=0 ) |
| PoolByteArray | decompress ( int buffer_size, int compression_mode=0 ) |
| bool | empty ( ) |
| String | get_string_from_ascii ( ) |
| String | get_string_from_utf8 ( ) |
| String | hex_encode ( ) |
| int | insert ( int idx, int byte ) |
| void | invert ( ) |
| void | push_back ( int byte ) |
| void | remove ( int idx ) |
| void | resize ( int idx ) |
| void | set ( int idx, int byte ) |
| int | size ( ) |
| PoolByteArray | subarray ( int from, int to ) |
Method Descriptions¶
- PoolByteArray PoolByteArray ( Array from )
Constructs a new PoolByteArray. Optionally, you can pass in a generic Array that will be converted.
- void append ( int byte )
Appends an element at the end of the array (alias of push_back).
- void append_array ( PoolByteArray array )
Appends a PoolByteArray at the end of this array.
- PoolByteArray compress ( int compression_mode=0 )
Returns a new PoolByteArray with the data compressed. Set the compression mode using one of CompressionMode’s constants.
- PoolByteArray decompress ( int buffer_size, int compression_mode=0 )
Returns a new PoolByteArray with the data decompressed. Set buffer_size to the size of the uncompressed data. Set the compression mode using one of CompressionMode’s constants.
- bool empty ( )
Returns true if the array is empty.
- String get_string_from_ascii ( )
Returns a copy of the array’s contents as String. Fast alternative to get_string_from_utf8 if the content is ASCII-only. Unlike the UTF-8 function this function maps every byte to a character in the array. Multibyte sequences will not be interpreted correctly. For parsing user input always use get_string_from_utf8.
- String get_string_from_utf8 ( )
Returns a copy of the array’s contents as String. Slower than get_string_from_ascii but supports UTF-8 encoded data. Use this function if you are unsure about the source of the data. For user input this function should always be preferred.
- String hex_encode ( )
Returns a hexadecimal representation of this array as a String.
var array = PoolByteArray([11, 46, 255])
print(array.hex_encode()) # Prints: 0b2eff
Inserts a new element at a given position in the array. The position must be valid, or at the end of the array (idx == size()).
- void invert ( )
Reverses the order of the elements in the array.
- void push_back ( int byte )
Appends an element at the end of the array.
- void remove ( int idx )
Removes an element from the array by index.
- void resize ( int idx )
Sets the size of the array. If the array is grown, reserves elements at the end of the array. If the array is shrunk, truncates the array to the new size.
Changes the byte at the given index.
- int size ( )
Returns the size of the array.
- PoolByteArray subarray ( int from, int to )
Returns the slice of the PoolByteArray between indices (inclusive) as a new PoolByteArray. Any negative index is considered to be from the end of the array.
PoolColorArray¶
Description¶
An Array specifically designed to hold Color. Optimized for memory usage, does not fragment the memory.
Note: This type is passed by value and not by reference.
Methods¶
| PoolColorArray | PoolColorArray ( Array from ) |
| void | append ( Color color ) |
| void | append_array ( PoolColorArray array ) |
| bool | empty ( ) |
| int | insert ( int idx, Color color ) |
| void | invert ( ) |
| void | push_back ( Color color ) |
| void | remove ( int idx ) |
| void | resize ( int idx ) |
| void | set ( int idx, Color color ) |
| int | size ( ) |
Method Descriptions¶
- PoolColorArray PoolColorArray ( Array from )
Constructs a new PoolColorArray. Optionally, you can pass in a generic Array that will be converted.
- void append ( Color color )
Appends an element at the end of the array (alias of push_back).
- void append_array ( PoolColorArray array )
Appends a PoolColorArray at the end of this array.
- bool empty ( )
Returns true if the array is empty.
Inserts a new element at a given position in the array. The position must be valid, or at the end of the array (idx == size()).
- void invert ( )
Reverses the order of the elements in the array.
- void push_back ( Color color )
Appends a value to the array.
- void remove ( int idx )
Removes an element from the array by index.
- void resize ( int idx )
Sets the size of the array. If the array is grown, reserves elements at the end of the array. If the array is shrunk, truncates the array to the new size.
Changes the Color at the given index.
- int size ( )
Returns the size of the array.
PoolIntArray¶
A pooled Array of integers (int).
Description¶
An Array specifically designed to hold integer values (int). Optimized for memory usage, does not fragment the memory.
Note: This type is passed by value and not by reference.
Note: This type is limited to signed 32-bit integers, which means it can only take values in the interval [-2^31, 2^31 - 1], i.e. [-2147483648, 2147483647]. Exceeding those bounds will wrap around. In comparison, int uses signed 64-bit integers which can hold much larger values.
Methods¶
| PoolIntArray | PoolIntArray ( Array from ) |
| void | append ( int integer ) |
| void | append_array ( PoolIntArray array ) |
| bool | empty ( ) |
| int | insert ( int idx, int integer ) |
| void | invert ( ) |
| void | push_back ( int integer ) |
| void | remove ( int idx ) |
| void | resize ( int idx ) |
| void | set ( int idx, int integer ) |
| int | size ( ) |
Method Descriptions¶
- PoolIntArray PoolIntArray ( Array from )
Constructs a new PoolIntArray. Optionally, you can pass in a generic Array that will be converted.
- void append ( int integer )
Appends an element at the end of the array (alias of push_back).
- void append_array ( PoolIntArray array )
Appends a PoolIntArray at the end of this array.
- bool empty ( )
Returns true if the array is empty.
Inserts a new int at a given position in the array. The position must be valid, or at the end of the array (idx == size()).
- void invert ( )
Reverses the order of the elements in the array.
- void push_back ( int integer )
Appends a value to the array.
- void remove ( int idx )
Removes an element from the array by index.
- void resize ( int idx )
Sets the size of the array. If the array is grown, reserves elements at the end of the array. If the array is shrunk, truncates the array to the new size.
Changes the int at the given index.
- int size ( )
Returns the array size.
PoolRealArray¶
A pooled Array of reals (float).
Description¶
An Array specifically designed to hold floating-point values (float). Optimized for memory usage, does not fragment the memory.
Note: This type is passed by value and not by reference.
Methods¶
| PoolRealArray | PoolRealArray ( Array from ) |
| void | append ( float value ) |
| void | append_array ( PoolRealArray array ) |
| bool | empty ( ) |
| int | insert ( int idx, float value ) |
| void | invert ( ) |
| void | push_back ( float value ) |
| void | remove ( int idx ) |
| void | resize ( int idx ) |
| void | set ( int idx, float value ) |
| int | size ( ) |
Method Descriptions¶
- PoolRealArray PoolRealArray ( Array from )
Constructs a new PoolRealArray. Optionally, you can pass in a generic Array that will be converted.
- void append ( float value )
Appends an element at the end of the array (alias of push_back).
- void append_array ( PoolRealArray array )
Appends a PoolRealArray at the end of this array.
- bool empty ( )
Returns true if the array is empty.
Inserts a new element at a given position in the array. The position must be valid, or at the end of the array (idx == size()).
- void invert ( )
Reverses the order of the elements in the array.
- void push_back ( float value )
Appends an element at the end of the array.
- void remove ( int idx )
Removes an element from the array by index.
- void resize ( int idx )
Sets the size of the array. If the array is grown, reserves elements at the end of the array. If the array is shrunk, truncates the array to the new size.
Changes the float at the given index.
- int size ( )
Returns the size of the array.
PoolStringArray¶
Description¶
An Array specifically designed to hold Strings. Optimized for memory usage, does not fragment the memory.
Note: This type is passed by value and not by reference.
Methods¶
| PoolStringArray | PoolStringArray ( Array from ) |
| void | append ( String string ) |
| void | append_array ( PoolStringArray array ) |
| bool | empty ( ) |
| int | insert ( int idx, String string ) |
| void | invert ( ) |
| String | join ( String delimiter ) |
| void | push_back ( String string ) |
| void | remove ( int idx ) |
| void | resize ( int idx ) |
| void | set ( int idx, String string ) |
| int | size ( ) |
Method Descriptions¶
- PoolStringArray PoolStringArray ( Array from )
Constructs a new PoolStringArray. Optionally, you can pass in a generic Array that will be converted.
- void append ( String string )
Appends an element at the end of the array (alias of push_back).
- void append_array ( PoolStringArray array )
Appends a PoolStringArray at the end of this array.
- bool empty ( )
Returns true if the array is empty.
Inserts a new element at a given position in the array. The position must be valid, or at the end of the array (idx == size()).
- void invert ( )
Reverses the order of the elements in the array.
Returns a String with each element of the array joined with the given delimiter.
- void push_back ( String string )
Appends a string element at end of the array.
- void remove ( int idx )
Removes an element from the array by index.
- void resize ( int idx )
Sets the size of the array. If the array is grown, reserves elements at the end of the array. If the array is shrunk, truncates the array to the new size.
Changes the String at the given index.
- int size ( )
Returns the size of the array.
PoolVector2Array¶
Description¶
An Array specifically designed to hold Vector2. Optimized for memory usage, does not fragment the memory.
Note: This type is passed by value and not by reference.
Methods¶
| PoolVector2Array | PoolVector2Array ( Array from ) |
| void | append ( Vector2 vector2 ) |
| void | append_array ( PoolVector2Array array ) |
| bool | empty ( ) |
| int | insert ( int idx, Vector2 vector2 ) |
| void | invert ( ) |
| void | push_back ( Vector2 vector2 ) |
| void | remove ( int idx ) |
| void | resize ( int idx ) |
| void | set ( int idx, Vector2 vector2 ) |
| int | size ( ) |
Method Descriptions¶
- PoolVector2Array PoolVector2Array ( Array from )
Constructs a new PoolVector2Array. Optionally, you can pass in a generic Array that will be converted.
- void append ( Vector2 vector2 )
Appends an element at the end of the array (alias of push_back).
- void append_array ( PoolVector2Array array )
Appends a PoolVector2Array at the end of this array.
- bool empty ( )
Returns true if the array is empty.
Inserts a new element at a given position in the array. The position must be valid, or at the end of the array (idx == size()).
- void invert ( )
Reverses the order of the elements in the array.
- void push_back ( Vector2 vector2 )
Inserts a Vector2 at the end.
- void remove ( int idx )
Removes an element from the array by index.
- void resize ( int idx )
Sets the size of the array. If the array is grown, reserves elements at the end of the array. If the array is shrunk, truncates the array to the new size.
Changes the Vector2 at the given index.
- int size ( )
Returns the size of the array.
PoolVector3Array¶
Description¶
An Array specifically designed to hold Vector3. Optimized for memory usage, does not fragment the memory.
Note: This type is passed by value and not by reference.
Methods¶
| PoolVector3Array | PoolVector3Array ( Array from ) |
| void | append ( Vector3 vector3 ) |
| void | append_array ( PoolVector3Array array ) |
| bool | empty ( ) |
| int | insert ( int idx, Vector3 vector3 ) |
| void | invert ( ) |
| void | push_back ( Vector3 vector3 ) |
| void | remove ( int idx ) |
| void | resize ( int idx ) |
| void | set ( int idx, Vector3 vector3 ) |
| int | size ( ) |
Method Descriptions¶
- PoolVector3Array PoolVector3Array ( Array from )
Constructs a new PoolVector3Array. Optionally, you can pass in a generic Array that will be converted.
- void append ( Vector3 vector3 )
Appends an element at the end of the array (alias of push_back).
- void append_array ( PoolVector3Array array )
Appends a PoolVector3Array at the end of this array.
- bool empty ( )
Returns true if the array is empty.
Inserts a new element at a given position in the array. The position must be valid, or at the end of the array (idx == size()).
- void invert ( )
Reverses the order of the elements in the array.
- void push_back ( Vector3 vector3 )
Inserts a Vector3 at the end.
- void remove ( int idx )
Removes an element from the array by index.
- void resize ( int idx )
Sets the size of the array. If the array is grown, reserves elements at the end of the array. If the array is shrunk, truncates the array to the new size.
Changes the Vector3 at the given index.
- int size ( )
Returns the size of the array.
Popup¶
Inherits: Control < CanvasItem < Node < Object
Inherited By: PopupDialog, PopupMenu, PopupPanel, WindowDialog
Base container control for popups and dialogs.
Description¶
Popup is a base Control used to show dialogs and popups. It’s a subwindow and modal by default (see Control) and has helpers for custom popup behavior. All popup methods ensure correct placement within the viewport.
Properties¶
| bool | popup_exclusive | false |
| bool | visible | O: false |
Methods¶
| void | popup ( Rect2 bounds=Rect2( 0, 0, 0, 0 ) ) |
| void | popup_centered ( Vector2 size=Vector2( 0, 0 ) ) |
| void | popup_centered_clamped ( Vector2 size=Vector2( 0, 0 ), float fallback_ratio=0.75 ) |
| void | popup_centered_minsize ( Vector2 minsize=Vector2( 0, 0 ) ) |
| void | popup_centered_ratio ( float ratio=0.75 ) |
| void | set_as_minsize ( ) |
Signals¶
- about_to_show ( )
Emitted when a popup is about to be shown. This is often used in PopupMenu to clear the list of options then create a new one according to the current context.
- popup_hide ( )
Emitted when a popup is hidden.
Constants¶
- NOTIFICATION_POST_POPUP = 80 — Notification sent right after the popup is shown.
- NOTIFICATION_POPUP_HIDE = 81 — Notification sent right after the popup is hidden.
Property Descriptions¶
- bool popup_exclusive
| Default | false |
| Setter | set_exclusive(value) |
| Getter | is_exclusive() |
If true, the popup will not be hidden when a click event occurs outside of it, or when it receives the ui_cancel action event.
Method Descriptions¶
- void popup ( Rect2 bounds=Rect2( 0, 0, 0, 0 ) )
Popup (show the control in modal form).
- void popup_centered ( Vector2 size=Vector2( 0, 0 ) )
Popup (show the control in modal form) in the center of the screen relative to its current canvas transform, at the current size, or at a size determined by size.
Popup (show the control in modal form) in the center of the screen relative to the current canvas transform, clamping the size to size, then ensuring the popup is no larger than the viewport size multiplied by fallback_ratio.
- void popup_centered_minsize ( Vector2 minsize=Vector2( 0, 0 ) )
Popup (show the control in modal form) in the center of the screen relative to the current canvas transform, ensuring the size is never smaller than minsize.
- void popup_centered_ratio ( float ratio=0.75 )
Popup (show the control in modal form) in the center of the screen relative to the current canvas transform, scaled at a ratio of size of the screen.
- void set_as_minsize ( )
Shrink popup to keep to the minimum size of content.
PopupDialog¶
Inherits: Popup < Control < CanvasItem < Node < Object
Base class for popup dialogs.
Description¶
PopupDialog is a base class for popup dialogs, along with WindowDialog.
PopupPanel¶
Inherits: Popup < Control < CanvasItem < Node < Object
Class for displaying popups with a panel background.
Description¶
Class for displaying popups with a panel background. In some cases it might be simpler to use than Popup, since it provides a configurable background. If you are making windows, better check WindowDialog.
PrimitiveMesh¶
Inherits: Mesh < Resource < Reference < Object
Inherited By: CapsuleMesh, CubeMesh, CylinderMesh, PlaneMesh, PointMesh, PrismMesh, QuadMesh, SphereMesh
Base class for all primitive meshes. Handles applying a Material to a primitive mesh.
Description¶
Base class for all primitive meshes. Handles applying a Material to a primitive mesh. Examples include CapsuleMesh, CubeMesh, CylinderMesh, PlaneMesh, PrismMesh, QuadMesh, and SphereMesh.
Properties¶
| AABB | custom_aabb | AABB( 0, 0, 0, 0, 0, 0 ) |
| bool | flip_faces | false |
| Material | material |
Methods¶
| Array | get_mesh_arrays ( ) const |
Property Descriptions¶
- AABB custom_aabb
| Default | AABB( 0, 0, 0, 0, 0, 0 ) |
| Setter | set_custom_aabb(value) |
| Getter | get_custom_aabb() |
Overrides the AABB with one defined by user for use with frustum culling. Especially useful to avoid unnexpected culling when using a shader to offset vertices.
- bool flip_faces
| Default | false |
| Setter | set_flip_faces(value) |
| Getter | get_flip_faces() |
If set, the order of the vertices in each triangle are reversed resulting in the backside of the mesh being drawn.
This gives the same result as using SpatialMaterial.CULL_BACK in SpatialMaterial.params_cull_mode.
- Material material
| Setter | set_material(value) |
| Getter | get_material() |
The current Material of the primitive mesh.
PrismMesh¶
Inherits: PrimitiveMesh < Mesh < Resource < Reference < Object
Class representing a prism-shaped PrimitiveMesh.
Description¶
Class representing a prism-shaped PrimitiveMesh.
Properties¶
| float | left_to_right | 0.5 |
| Vector3 | size | Vector3( 2, 2, 2 ) |
| int | subdivide_depth | 0 |
| int | subdivide_height | 0 |
| int | subdivide_width | 0 |
Property Descriptions¶
- float left_to_right
| Default | 0.5 |
| Setter | set_left_to_right(value) |
| Getter | get_left_to_right() |
Displacement of the upper edge along the X axis. 0.0 positions edge straight above the bottom-left edge.
- Vector3 size
| Default | Vector3( 2, 2, 2 ) |
| Setter | set_size(value) |
| Getter | get_size() |
Size of the prism.
- int subdivide_depth
| Default | 0 |
| Setter | set_subdivide_depth(value) |
| Getter | get_subdivide_depth() |
Number of added edge loops along the Z axis.
- int subdivide_height
| Default | 0 |
| Setter | set_subdivide_height(value) |
| Getter | get_subdivide_height() |
Number of added edge loops along the Y axis.
- int subdivide_width
| Default | 0 |
| Setter | set_subdivide_width(value) |
| Getter | get_subdivide_width() |
Number of added edge loops along the X axis.
ProceduralSky¶
Inherits: Sky < Resource < Reference < Object
Type of Sky that is generated procedurally based on user input parameters.
Description¶
ProceduralSky provides a way to create an effective background quickly by defining procedural parameters for the sun, the sky and the ground. The sky and ground are very similar, they are defined by a color at the horizon, another color, and finally an easing curve to interpolate between these two colors. Similarly, the sun is described by a position in the sky, a color, and an easing curve. However, the sun also defines a minimum and maximum angle, these two values define at what distance the easing curve begins and ends from the sun, and thus end up defining the size of the sun in the sky.
The ProceduralSky is updated on the CPU after the parameters change. It is stored in a texture and then displayed as a background in the scene. This makes it relatively unsuitable for real-time updates during gameplay. However, with a small enough texture size, it can still be updated relatively frequently, as it is updated on a background thread when multi-threading is available.
Properties¶
| Color | ground_bottom_color | Color( 0.156863, 0.184314, 0.211765, 1 ) |
| float | ground_curve | 0.02 |
| float | ground_energy | 1.0 |
| Color | ground_horizon_color | Color( 0.423529, 0.396078, 0.372549, 1 ) |
| float | sky_curve | 0.09 |
| float | sky_energy | 1.0 |
| Color | sky_horizon_color | Color( 0.839216, 0.917647, 0.980392, 1 ) |
| Color | sky_top_color | Color( 0.647059, 0.839216, 0.945098, 1 ) |
| float | sun_angle_max | 100.0 |
| float | sun_angle_min | 1.0 |
| Color | sun_color | Color( 1, 1, 1, 1 ) |
| float | sun_curve | 0.05 |
| float | sun_energy | 1.0 |
| float | sun_latitude | 35.0 |
| float | sun_longitude | 0.0 |
| TextureSize | texture_size | 2 |
Enumerations¶
enum TextureSize:
- TEXTURE_SIZE_256 = 0 — Sky texture will be 256x128.
- TEXTURE_SIZE_512 = 1 — Sky texture will be 512x256.
- TEXTURE_SIZE_1024 = 2 — Sky texture will be 1024x512. This is the default size.
- TEXTURE_SIZE_2048 = 3 — Sky texture will be 2048x1024.
- TEXTURE_SIZE_4096 = 4 — Sky texture will be 4096x2048.
- TEXTURE_SIZE_MAX = 5 — Represents the size of the TextureSize enum.
Property Descriptions¶
- Color ground_bottom_color
| Default | Color( 0.156863, 0.184314, 0.211765, 1 ) |
| Setter | set_ground_bottom_color(value) |
| Getter | get_ground_bottom_color() |
Color of the ground at the bottom.
- float ground_curve
| Default | 0.02 |
| Setter | set_ground_curve(value) |
| Getter | get_ground_curve() |
How quickly the ground_horizon_color fades into the ground_bottom_color.
- float ground_energy
| Default | 1.0 |
| Setter | set_ground_energy(value) |
| Getter | get_ground_energy() |
Amount of energy contribution from the ground.
- Color ground_horizon_color
| Default | Color( 0.423529, 0.396078, 0.372549, 1 ) |
| Setter | set_ground_horizon_color(value) |
| Getter | get_ground_horizon_color() |
Color of the ground at the horizon.
- float sky_curve
| Default | 0.09 |
| Setter | set_sky_curve(value) |
| Getter | get_sky_curve() |
How quickly the sky_horizon_color fades into the sky_top_color.
- float sky_energy
| Default | 1.0 |
| Setter | set_sky_energy(value) |
| Getter | get_sky_energy() |
Amount of energy contribution from the sky.
- Color sky_horizon_color
| Default | Color( 0.839216, 0.917647, 0.980392, 1 ) |
| Setter | set_sky_horizon_color(value) |
| Getter | get_sky_horizon_color() |
Color of the sky at the horizon.
- Color sky_top_color
| Default | Color( 0.647059, 0.839216, 0.945098, 1 ) |
| Setter | set_sky_top_color(value) |
| Getter | get_sky_top_color() |
Color of the sky at the top.
- float sun_angle_max
| Default | 100.0 |
| Setter | set_sun_angle_max(value) |
| Getter | get_sun_angle_max() |
Distance from center of sun where it fades out completely.
- float sun_angle_min
| Default | 1.0 |
| Setter | set_sun_angle_min(value) |
| Getter | get_sun_angle_min() |
Distance from sun where it goes from solid to starting to fade.
- Color sun_color
| Default | Color( 1, 1, 1, 1 ) |
| Setter | set_sun_color(value) |
| Getter | get_sun_color() |
The sun’s color.
- float sun_curve
| Default | 0.05 |
| Setter | set_sun_curve(value) |
| Getter | get_sun_curve() |
How quickly the sun fades away between sun_angle_min and sun_angle_max.
- float sun_energy
| Default | 1.0 |
| Setter | set_sun_energy(value) |
| Getter | get_sun_energy() |
Amount of energy contribution from the sun.
- float sun_latitude
| Default | 35.0 |
| Setter | set_sun_latitude(value) |
| Getter | get_sun_latitude() |
The sun’s height using polar coordinates.
- float sun_longitude
| Default | 0.0 |
| Setter | set_sun_longitude(value) |
| Getter | get_sun_longitude() |
The direction of the sun using polar coordinates.
- TextureSize texture_size
| Default | 2 |
| Setter | set_texture_size(value) |
| Getter | get_texture_size() |
Size of Texture that the ProceduralSky will generate. The size is set using TextureSize.
ProgressBar¶
Inherits: Range < Control < CanvasItem < Node < Object
General-purpose progress bar.
Description¶
General-purpose progress bar. Shows fill percentage from right to left.
Properties¶
| bool | percent_visible | true |
| int | size_flags_vertical | O: 0 |
| float | step | O: 0.01 |
ProjectSettings¶
Inherits: Object
Contains global variables accessible from everywhere.
Description¶
Contains global variables accessible from everywhere. Use get_setting, set_setting or has_setting to access them. Variables stored in project.godot are also loaded into ProjectSettings, making this object very useful for reading custom game configuration options.
When naming a Project Settings property, use the full path to the setting including the category. For example, "application/config/name" for the project name. Category and property names can be viewed in the Project Settings dialog.
Overriding: Any project setting can be overridden by creating a file named override.cfg in the project’s root directory. This can also be used in exported projects by placing this file in the same directory as the project binary.
Properties¶
Methods¶
| void | add_property_info ( Dictionary hint ) |
| void | clear ( String name ) |
| int | get_order ( String name ) const |
| Variant | get_setting ( String name ) const |
| String | globalize_path ( String path ) const |
| bool | has_setting ( String name ) const |
| bool | load_resource_pack ( String pack, bool replace_files=true ) |
| String | localize_path ( String path ) const |
| bool | property_can_revert ( String name ) |
| Variant | property_get_revert ( String name ) |
| Error | save ( ) |
| Error | save_custom ( String file ) |
| void | set_initial_value ( String name, Variant value ) |
| void | set_order ( String name, int position ) |
| void | set_setting ( String name, Variant value ) |
Property Descriptions¶
- String android/modules
| Default | "" |
Comma-separated list of custom Android modules (which must have been built in the Android export templates) using their Java package path, e.g. org/godotengine/org/GodotPaymentV3,org/godotengine/godot/MyCustomSingleton".
- Color application/boot_splash/bg_color
| Default | Color( 0.14, 0.14, 0.14, 1 ) |
Background color for the boot splash.
- bool application/boot_splash/fullsize
| Default | true |
If true, scale the boot splash image to the full window length when engine starts. If false, the engine will leave it at the default pixel size.
- String application/boot_splash/image
| Default | "" |
Path to an image used as the boot splash.
- bool application/boot_splash/use_filter
| Default | true |
If true, applies linear filtering when scaling the image (recommended for high resolution artwork). If false, uses nearest-neighbor interpolation (recommended for pixel art).
- String application/config/custom_user_dir_name
| Default | "" |
This user directory is used for storing persistent data (user:// filesystem). If left empty, user:// resolves to a project-specific folder in Godot’s own configuration folder (see OS.get_user_data_dir). If a custom directory name is defined, this name will be used instead and appended to the system-specific user data directory (same parent folder as the Godot configuration folder documented in OS.get_user_data_dir).
The application/config/use_custom_user_dir setting must be enabled for this to take effect.
- String application/config/description
| Default | "" |
The project’s description, displayed as a tooltip in the Project Manager when hovering the project.
- String application/config/icon
| Default | "" |
Icon used for the project, set when project loads. Exporters will also use this icon when possible.
- String application/config/macos_native_icon
| Default | "" |
Icon set in .icns format used on macOS to set the game’s icon. This is done automatically on start by calling OS.set_native_icon.
- String application/config/name
| Default | "" |
The project’s name. It is used both by the Project Manager and by exporters. The project name can be translated by translating its value in localization files.
- String application/config/project_settings_override
| Default | "" |
Specifies a file to override project settings. For example: user://custom_settings.cfg.
Note: Regardless of this setting’s value, res://override.cfg will still be read to override the project settings (see this class’ description at the top).
- bool application/config/use_custom_user_dir
| Default | false |
If true, the project will save user data to its own user directory (see application/config/custom_user_dir_name). This setting is only effective on desktop platforms. A name must be set in the application/config/custom_user_dir_name setting for this to take effect. If false, the project will save user data to (OS user data directory)/Godot/app_userdata/(project name).
- String application/config/windows_native_icon
| Default | "" |
Icon set in .ico format used on Windows to set the game’s icon. This is done automatically on start by calling OS.set_native_icon.
- bool application/run/disable_stderr
| Default | false |
If true, disables printing to standard error in an exported build.
- bool application/run/disable_stdout
| Default | false |
If true, disables printing to standard output in an exported build.
- int application/run/frame_delay_msec
| Default | 0 |
Forces a delay between frames in the main loop (in milliseconds). This may be useful if you plan to disable vertical synchronization.
- bool application/run/low_processor_mode
| Default | false |
If true, enables low-processor usage mode. This setting only works on desktop platforms. The screen is not redrawn if nothing changes visually. This is meant for writing applications and editors, but is pretty useless (and can hurt performance) in most games.
- int application/run/low_processor_mode_sleep_usec
| Default | 6900 |
Amount of sleeping between frames when the low-processor usage mode is enabled (in microseconds). Higher values will result in lower CPU usage.
- String application/run/main_scene
| Default | "" |
Path to the main scene file that will be loaded when the project runs.
- float audio/channel_disable_threshold_db
| Default | -60.0 |
Audio buses will disable automatically when sound goes below a given dB threshold for a given time. This saves CPU as effects assigned to that bus will no longer do any processing.
- float audio/channel_disable_time
| Default | 2.0 |
Audio buses will disable automatically when sound goes below a given dB threshold for a given time. This saves CPU as effects assigned to that bus will no longer do any processing.
- String audio/default_bus_layout
| Default | "res://default_bus_layout.tres" |
Default AudioBusLayout resource file to use in the project, unless overridden by the scene.
- String audio/driver
| Default | "PulseAudio" |
Specifies the audio driver to use. This setting is platform-dependent as each platform supports different audio drivers. If left empty, the default audio driver will be used.
- bool audio/enable_audio_input
| Default | false |
If true, microphone input will be allowed. This requires appropriate permissions to be set when exporting to Android or iOS.
- int audio/mix_rate
| Default | 44100 |
Mixing rate used for audio. In general, it’s better to not touch this and leave it to the host operating system.
- int audio/output_latency
| Default | 15 |
Output latency in milliseconds for audio. Lower values will result in lower audio latency at the cost of increased CPU usage. Low values may result in audible cracking on slower hardware.
- int audio/video_delay_compensation_ms
| Default | 0 |
Setting to hardcode audio delay when playing video. Best to leave this untouched unless you know what you are doing.
- int compression/formats/gzip/compression_level
| Default | -1 |
Default compression level for gzip. Affects compressed scenes and resources.
- int compression/formats/zlib/compression_level
| Default | -1 |
Default compression level for Zlib. Affects compressed scenes and resources.
- int compression/formats/zstd/compression_level
| Default | 3 |
Default compression level for Zstandard. Affects compressed scenes and resources.
- bool compression/formats/zstd/long_distance_matching
| Default | false |
Enables long-distance matching in Zstandard.
- int compression/formats/zstd/window_log_size
| Default | 27 |
Largest size limit (in power of 2) allowed when compressing using long-distance matching with Zstandard.
- bool debug/gdscript/completion/autocomplete_setters_and_getters
| Default | false |
If true, displays getters and setters in autocompletion results in the script editor. This setting is meant to be used when porting old projects (Godot 2), as using member variables is the preferred style from Godot 3 onwards.
- bool debug/gdscript/warnings/constant_used_as_function
| Default | true |
If true, enables warnings when a constant is used as a function.
- bool debug/gdscript/warnings/deprecated_keyword
| Default | true |
If true, enables warnings when deprecated keywords such as slave are used.
- bool debug/gdscript/warnings/enable
| Default | true |
If true, enables specific GDScript warnings (see debug/gdscript/warnings/* settings). If false, disables all GDScript warnings.
- bool debug/gdscript/warnings/exclude_addons
| Default | true |
If true, scripts in the res://addons folder will not generate warnings.
- bool debug/gdscript/warnings/function_conflicts_constant
| Default | true |
If true, enables warnings when a function is declared with the same name as a constant.
- bool debug/gdscript/warnings/function_conflicts_variable
| Default | true |
If true, enables warnings when a function is declared with the same name as a variable. This will turn into an error in a future version when first-class functions become supported in GDScript.
- bool debug/gdscript/warnings/function_may_yield
| Default | true |
If true, enables warnings when a function assigned to a variable may yield and return a function state instead of a value.
- bool debug/gdscript/warnings/function_used_as_property
| Default | true |
If true, enables warnings when using a function as if it was a property.
- bool debug/gdscript/warnings/incompatible_ternary
| Default | true |
If true, enables warnings when a ternary operator may emit values with incompatible types.
- bool debug/gdscript/warnings/integer_division
| Default | true |
If true, enables warnings when dividing an integer by another integer (the decimal part will be discarded).
- bool debug/gdscript/warnings/narrowing_conversion
| Default | true |
If true, enables warnings when passing a floating-point value to a function that expects an integer (it will be converted and lose precision).
- bool debug/gdscript/warnings/property_used_as_function
| Default | true |
If true, enables warnings when using a property as if it was a function.
- bool debug/gdscript/warnings/return_value_discarded
| Default | true |
If true, enables warnings when calling a function without using its return value (by assigning it to a variable or using it as a function argument). Such return values are sometimes used to denote possible errors using the Error enum.
- bool debug/gdscript/warnings/shadowed_variable
| Default | true |
If true, enables warnings when defining a local or subclass member variable that would shadow a variable at an upper level (such as a member variable).
- bool debug/gdscript/warnings/standalone_expression
| Default | true |
If true, enables warnings when calling an expression that has no effect on the surrounding code, such as writing 2 + 2 as a statement.
- bool debug/gdscript/warnings/standalone_ternary
| Default | true |
If true, enables warnings when calling a ternary expression that has no effect on the surrounding code, such as writing 42 if active else 0 as a statement.
- bool debug/gdscript/warnings/treat_warnings_as_errors
| Default | false |
If true, all warnings will be reported as if they were errors.
- bool debug/gdscript/warnings/unassigned_variable
| Default | true |
If true, enables warnings when using a variable that wasn’t previously assigned.
- bool debug/gdscript/warnings/unassigned_variable_op_assign
| Default | true |
If true, enables warnings when assigning a variable using an assignment operator like += if the variable wasn’t previously assigned.
- bool debug/gdscript/warnings/unreachable_code
| Default | true |
If true, enables warnings when unreachable code is detected (such as after a return statement that will always be executed).
- bool debug/gdscript/warnings/unsafe_call_argument
| Default | false |
If true, enables warnings when using an expression whose type may not be compatible with the function parameter expected.
- bool debug/gdscript/warnings/unsafe_cast
| Default | false |
If true, enables warnings when performing an unsafe cast.
- bool debug/gdscript/warnings/unsafe_method_access
| Default | false |
If true, enables warnings when calling a method whose presence is not guaranteed at compile-time in the class.
- bool debug/gdscript/warnings/unsafe_property_access
| Default | false |
If true, enables warnings when accessing a property whose presence is not guaranteed at compile-time in the class.
- bool debug/gdscript/warnings/unused_argument
| Default | true |
If true, enables warnings when a function parameter is unused.
- bool debug/gdscript/warnings/unused_class_variable
| Default | false |
If true, enables warnings when a member variable is unused.
- bool debug/gdscript/warnings/unused_signal
| Default | true |
If true, enables warnings when a signal is unused.
- bool debug/gdscript/warnings/unused_variable
| Default | true |
If true, enables warnings when a local variable is unused.
- bool debug/gdscript/warnings/variable_conflicts_function
| Default | true |
If true, enables warnings when a variable is declared with the same name as a function. This will turn into an error in a future version when first-class functions become supported in GDScript.
- bool debug/gdscript/warnings/void_assignment
| Default | true |
If true, enables warnings when assigning the result of a function that returns void to a variable.
- String debug/settings/crash_handler/message
| Default | "Please include this when reporting the bug on https://github.com/godotengine/godot/issues" |
Message to be displayed before the backtrace when the engine crashes.
- int debug/settings/fps/force_fps
| Default | 0 |
Maximum number of frames per second allowed. The actual number of frames per second may still be below this value if the game is lagging.
If display/window/vsync/use_vsync is enabled, it takes precedence and the forced FPS number cannot exceed the monitor’s refresh rate.
This setting is therefore mostly relevant for lowering the maximum FPS below VSync, e.g. to perform non real-time rendering of static frames, or test the project under lag conditions.
- int debug/settings/gdscript/max_call_stack
| Default | 1024 |
Maximum call stack allowed for debugging GDScript.
- int debug/settings/profiler/max_functions
| Default | 16384 |
Maximum amount of functions per frame allowed when profiling.
- bool debug/settings/stdout/print_fps
| Default | false |
Print frames per second to standard output every second.
- bool debug/settings/stdout/verbose_stdout
| Default | false |
Print more information to standard output when running. It displays information such as memory leaks, which scenes and resources are being loaded, etc.
- int debug/settings/visual_script/max_call_stack
| Default | 1024 |
Maximum call stack in visual scripting, to avoid infinite recursion.
- Color debug/shapes/collision/contact_color
| Default | Color( 1, 0.2, 0.1, 0.8 ) |
Color of the contact points between collision shapes, visible when “Visible Collision Shapes” is enabled in the Debug menu.
- int debug/shapes/collision/max_contacts_displayed
| Default | 10000 |
Maximum number of contact points between collision shapes to display when “Visible Collision Shapes” is enabled in the Debug menu.
- Color debug/shapes/collision/shape_color
| Default | Color( 0, 0.6, 0.7, 0.5 ) |
Color of the collision shapes, visible when “Visible Collision Shapes” is enabled in the Debug menu.
| Default | Color( 1, 0.7, 0.1, 0.4 ) |
Color of the disabled navigation geometry, visible when “Visible Navigation” is enabled in the Debug menu.
| Default | Color( 0.1, 1, 0.7, 0.4 ) |
Color of the navigation geometry, visible when “Visible Navigation” is enabled in the Debug menu.
- String display/mouse_cursor/custom_image
| Default | "" |
Custom image for the mouse cursor (limited to 256×256).
- Vector2 display/mouse_cursor/custom_image_hotspot
| Default | Vector2( 0, 0 ) |
Hotspot for the custom mouse cursor image.
- Vector2 display/mouse_cursor/tooltip_position_offset
| Default | Vector2( 10, 10 ) |
Position offset for tooltips, relative to the mouse cursor’s hotspot.
- bool display/window/dpi/allow_hidpi
| Default | false |
If true, allows HiDPI display on Windows and macOS. This setting has no effect on desktop Linux, as DPI-awareness fallbacks are not supported there.
- bool display/window/energy_saving/keep_screen_on
| Default | true |
If true, keeps the screen on (even in case of inactivity), so the screensaver does not take over. Works on desktop and mobile platforms.
- String display/window/handheld/orientation
| Default | "landscape" |
Default orientation on mobile devices.
- bool display/window/ios/hide_home_indicator
| Default | true |
If true, the home indicator is hidden automatically. This only affects iOS devices without a physical home button.
- bool display/window/per_pixel_transparency/allowed
| Default | false |
If true, allows per-pixel transparency in a desktop window. This affects performance, so leave it on false unless you need it.
- bool display/window/per_pixel_transparency/enabled
| Default | false |
Sets the window background to transparent when it starts.
- bool display/window/size/always_on_top
| Default | false |
Force the window to be always on top.
- bool display/window/size/borderless
| Default | false |
Force the window to be borderless.
- bool display/window/size/fullscreen
| Default | false |
Sets the window to full screen when it starts.
- int display/window/size/height
| Default | 600 |
Sets the game’s main viewport height. On desktop platforms, this is the default window size. Stretch mode settings also use this as a reference when enabled.
- bool display/window/size/resizable
| Default | true |
Allows the window to be resizable by default.
- int display/window/size/test_height
| Default | 0 |
If greater than zero, overrides the window height when running the game. Useful for testing stretch modes.
- int display/window/size/test_width
| Default | 0 |
If greater than zero, overrides the window width when running the game. Useful for testing stretch modes.
- int display/window/size/width
| Default | 1024 |
Sets the game’s main viewport width. On desktop platforms, this is the default window size. Stretch mode settings also use this as a reference when enabled.
- bool display/window/vsync/use_vsync
| Default | true |
If true, enables vertical synchronization. This eliminates tearing that may appear in moving scenes, at the cost of higher input latency and stuttering at lower framerates. If false, vertical synchronization will be disabled, however, many platforms will enforce it regardless (such as mobile platforms and HTML5).
- bool display/window/vsync/vsync_via_compositor
| Default | false |
If Use Vsync is enabled and this setting is true, enables vertical synchronization via the operating system’s window compositor when in windowed mode and the compositor is enabled. This will prevent stutter in certain situations. (Windows only.)
Note: This option is experimental and meant to alleviate stutter experienced by some users. However, some users have experienced a Vsync framerate halving (e.g. from 60 FPS to 30 FPS) when using it.
- String editor/script_templates_search_path
| Default | "res://script_templates" |
Search path for project-specific script templates. Script templates will be search both in the editor-specific path and in this project-specific path.
- PoolStringArray editor/search_in_file_extensions
| Default | PoolStringArray( "gd", "shader" ) |
Text-based file extensions to include in the script editor’s “Find in Files” feature. You can add e.g. tscn if you wish to also parse your scene files, especially if you use built-in scripts which are serialized in the scene files.
- int gui/common/default_scroll_deadzone
| Default | 0 |
Default value for ScrollContainer.scroll_deadzone, which will be used for all ScrollContainers unless overridden.
- bool gui/common/swap_ok_cancel
| Default | false |
If true, swaps OK and Cancel buttons in dialogs on Windows and UWP to follow interface conventions.
- String gui/theme/custom
| Default | "" |
Path to a custom Theme resource file to use for the project (theme or generic tres/res extension).
- String gui/theme/custom_font
| Default | "" |
Path to a custom Font resource to use as default for all GUI elements of the project.
- bool gui/theme/use_hidpi
| Default | false |
If true, makes sure the theme used works with HiDPI.
- int gui/timers/incremental_search_max_interval_msec
| Default | 2000 |
Timer setting for incremental search in Tree, ItemList, etc. controls (in milliseconds).
- float gui/timers/text_edit_idle_detect_sec
| Default | 3 |
Timer for detecting idle in TextEdit (in seconds).
- float gui/timers/tooltip_delay_sec
| Default | 0.5 |
Default delay for tooltips (in seconds).
- Dictionary input/ui_accept
Default InputEventAction to confirm a focused button, menu or list item, or validate input.
Note: Default ui_* actions cannot be removed as they are necessary for the internal logic of several Controls. The events assigned to the action can however be modified.
- Dictionary input/ui_cancel
Default InputEventAction to discard a modal or pending input.
Note: Default ui_* actions cannot be removed as they are necessary for the internal logic of several Controls. The events assigned to the action can however be modified.
- Dictionary input/ui_down
Default InputEventAction to move down in the UI.
Note: Default ui_* actions cannot be removed as they are necessary for the internal logic of several Controls. The events assigned to the action can however be modified.
- Dictionary input/ui_end
Default InputEventAction to go to the end position of a Control (e.g. last item in an ItemList or a Tree), matching the behavior of @GlobalScope.KEY_END on typical desktop UI systems.
Note: Default ui_* actions cannot be removed as they are necessary for the internal logic of several Controls. The events assigned to the action can however be modified.
- Dictionary input/ui_focus_next
Default InputEventAction to focus the next Control in the scene. The focus behavior can be configured via Control.focus_next.
Note: Default ui_* actions cannot be removed as they are necessary for the internal logic of several Controls. The events assigned to the action can however be modified.
- Dictionary input/ui_focus_prev
Default InputEventAction to focus the previous Control in the scene. The focus behavior can be configured via Control.focus_previous.
Note: Default ui_* actions cannot be removed as they are necessary for the internal logic of several Controls. The events assigned to the action can however be modified.
- Dictionary input/ui_home
Default InputEventAction to go to the start position of a Control (e.g. first item in an ItemList or a Tree), matching the behavior of @GlobalScope.KEY_HOME on typical desktop UI systems.
Note: Default ui_* actions cannot be removed as they are necessary for the internal logic of several Controls. The events assigned to the action can however be modified.
- Dictionary input/ui_left
Default InputEventAction to move left in the UI.
Note: Default ui_* actions cannot be removed as they are necessary for the internal logic of several Controls. The events assigned to the action can however be modified.
- Dictionary input/ui_page_down
Default InputEventAction to go down a page in a Control (e.g. in an ItemList or a Tree), matching the behavior of @GlobalScope.KEY_PAGEDOWN on typical desktop UI systems.
Note: Default ui_* actions cannot be removed as they are necessary for the internal logic of several Controls. The events assigned to the action can however be modified.
- Dictionary input/ui_page_up
Default InputEventAction to go up a page in a Control (e.g. in an ItemList or a Tree), matching the behavior of @GlobalScope.KEY_PAGEUP on typical desktop UI systems.
Note: Default ui_* actions cannot be removed as they are necessary for the internal logic of several Controls. The events assigned to the action can however be modified.
- Dictionary input/ui_right
Default InputEventAction to move right in the UI.
Note: Default ui_* actions cannot be removed as they are necessary for the internal logic of several Controls. The events assigned to the action can however be modified.
- Dictionary input/ui_select
Default InputEventAction to select an item in a Control (e.g. in an ItemList or a Tree).
Note: Default ui_* actions cannot be removed as they are necessary for the internal logic of several Controls. The events assigned to the action can however be modified.
- Dictionary input/ui_up
Default InputEventAction to move up in the UI.
Note: Default ui_* actions cannot be removed as they are necessary for the internal logic of several Controls. The events assigned to the action can however be modified.
- bool input_devices/pointing/emulate_mouse_from_touch
| Default | true |
If true, sends mouse input events when tapping or swiping on the touchscreen.
- bool input_devices/pointing/emulate_touch_from_mouse
| Default | false |
If true, sends touch input events when clicking or dragging the mouse.
- String layer_names/2d_physics/layer_1
| Default | "" |
Optional name for the 2D physics layer 1.
- String layer_names/2d_physics/layer_10
| Default | "" |
Optional name for the 2D physics layer 10.
- String layer_names/2d_physics/layer_11
| Default | "" |
Optional name for the 2D physics layer 11.
- String layer_names/2d_physics/layer_12
| Default | "" |
Optional name for the 2D physics layer 12.
- String layer_names/2d_physics/layer_13
| Default | "" |
Optional name for the 2D physics layer 13.
- String layer_names/2d_physics/layer_14
| Default | "" |
Optional name for the 2D physics layer 14.
- String layer_names/2d_physics/layer_15
| Default | "" |
Optional name for the 2D physics layer 15.
- String layer_names/2d_physics/layer_16
| Default | "" |
Optional name for the 2D physics layer 16.
- String layer_names/2d_physics/layer_17
| Default | "" |
Optional name for the 2D physics layer 17.
- String layer_names/2d_physics/layer_18
| Default | "" |
Optional name for the 2D physics layer 18.
- String layer_names/2d_physics/layer_19
| Default | "" |
Optional name for the 2D physics layer 19.
- String layer_names/2d_physics/layer_2
| Default | "" |
Optional name for the 2D physics layer 2.
- String layer_names/2d_physics/layer_20
| Default | "" |
Optional name for the 2D physics layer 20.
- String layer_names/2d_physics/layer_3
| Default | "" |
Optional name for the 2D physics layer 3.
- String layer_names/2d_physics/layer_4
| Default | "" |
Optional name for the 2D physics layer 4.
- String layer_names/2d_physics/layer_5
| Default | "" |
Optional name for the 2D physics layer 5.
- String layer_names/2d_physics/layer_6
| Default | "" |
Optional name for the 2D physics layer 6.
- String layer_names/2d_physics/layer_7
| Default | "" |
Optional name for the 2D physics layer 7.
- String layer_names/2d_physics/layer_8
| Default | "" |
Optional name for the 2D physics layer 8.
- String layer_names/2d_physics/layer_9
| Default | "" |
Optional name for the 2D physics layer 9.
- String layer_names/2d_render/layer_1
| Default | "" |
Optional name for the 2D render layer 1.
- String layer_names/2d_render/layer_10
| Default | "" |
Optional name for the 2D render layer 10.
- String layer_names/2d_render/layer_11
| Default | "" |
Optional name for the 2D render layer 11.
- String layer_names/2d_render/layer_12
| Default | "" |
Optional name for the 2D render layer 12.
- String layer_names/2d_render/layer_13
| Default | "" |
Optional name for the 2D render layer 13.
- String layer_names/2d_render/layer_14
| Default | "" |
Optional name for the 2D render layer 14.
- String layer_names/2d_render/layer_15
| Default | "" |
Optional name for the 2D render layer 15.
- String layer_names/2d_render/layer_16
| Default | "" |
Optional name for the 2D render layer 16.
- String layer_names/2d_render/layer_17
| Default | "" |
Optional name for the 2D render layer 17.
- String layer_names/2d_render/layer_18
| Default | "" |
Optional name for the 2D render layer 18.
- String layer_names/2d_render/layer_19
| Default | "" |
Optional name for the 2D render layer 19.
- String layer_names/2d_render/layer_2
| Default | "" |
Optional name for the 2D render layer 2.
- String layer_names/2d_render/layer_20
| Default | "" |
Optional name for the 2D render layer 20.
- String layer_names/2d_render/layer_3
| Default | "" |
Optional name for the 2D render layer 3.
- String layer_names/2d_render/layer_4
| Default | "" |
Optional name for the 2D render layer 4.
- String layer_names/2d_render/layer_5
| Default | "" |
Optional name for the 2D render layer 5.
- String layer_names/2d_render/layer_6
| Default | "" |
Optional name for the 2D render layer 6.
- String layer_names/2d_render/layer_7
| Default | "" |
Optional name for the 2D render layer 7.
- String layer_names/2d_render/layer_8
| Default | "" |
Optional name for the 2D render layer 8.
- String layer_names/2d_render/layer_9
| Default | "" |
Optional name for the 2D render layer 9.
- String layer_names/3d_physics/layer_1
| Default | "" |
Optional name for the 3D physics layer 1.
- String layer_names/3d_physics/layer_10
| Default | "" |
Optional name for the 3D physics layer 10.
- String layer_names/3d_physics/layer_11
| Default | "" |
Optional name for the 3D physics layer 11.
- String layer_names/3d_physics/layer_12
| Default | "" |
Optional name for the 3D physics layer 12.
- String layer_names/3d_physics/layer_13
| Default | "" |
Optional name for the 3D physics layer 13.
- String layer_names/3d_physics/layer_14
| Default | "" |
Optional name for the 3D physics layer 14.
- String layer_names/3d_physics/layer_15
| Default | "" |
Optional name for the 3D physics layer 15.
- String layer_names/3d_physics/layer_16
| Default | "" |
Optional name for the 3D physics layer 16.
- String layer_names/3d_physics/layer_17
| Default | "" |
Optional name for the 3D physics layer 17.
- String layer_names/3d_physics/layer_18
| Default | "" |
Optional name for the 3D physics layer 18.
- String layer_names/3d_physics/layer_19
| Default | "" |
Optional name for the 3D physics layer 19.
- String layer_names/3d_physics/layer_2
| Default | "" |
Optional name for the 3D physics layer 2.
- String layer_names/3d_physics/layer_20
| Default | "" |
Optional name for the 3D physics layer 20.
- String layer_names/3d_physics/layer_3
| Default | "" |
Optional name for the 3D physics layer 3.
- String layer_names/3d_physics/layer_4
| Default | "" |
Optional name for the 3D physics layer 4.
- String layer_names/3d_physics/layer_5
| Default | "" |
Optional name for the 3D physics layer 5.
- String layer_names/3d_physics/layer_6
| Default | "" |
Optional name for the 3D physics layer 6.
- String layer_names/3d_physics/layer_7
| Default | "" |
Optional name for the 3D physics layer 7.
- String layer_names/3d_physics/layer_8
| Default | "" |
Optional name for the 3D physics layer 8.
- String layer_names/3d_physics/layer_9
| Default | "" |
Optional name for the 3D physics layer 9.
- String layer_names/3d_render/layer_1
| Default | "" |
Optional name for the 3D render layer 1.
- String layer_names/3d_render/layer_10
| Default | "" |
Optional name for the 3D render layer 10.
- String layer_names/3d_render/layer_11
| Default | "" |
Optional name for the 3D render layer 11.
- String layer_names/3d_render/layer_12
| Default | "" |
Optional name for the 3D render layer 12.
- String layer_names/3d_render/layer_13
| Default | "" |
Optional name for the 3D render layer 13.
- String layer_names/3d_render/layer_14
| Default | "" |
Optional name for the 3D render layer 14
- String layer_names/3d_render/layer_15
| Default | "" |
Optional name for the 3D render layer 15.
- String layer_names/3d_render/layer_16
| Default | "" |
Optional name for the 3D render layer 16.
- String layer_names/3d_render/layer_17
| Default | "" |
Optional name for the 3D render layer 17.
- String layer_names/3d_render/layer_18
| Default | "" |
Optional name for the 3D render layer 18.
- String layer_names/3d_render/layer_19
| Default | "" |
Optional name for the 3D render layer 19.
- String layer_names/3d_render/layer_2
| Default | "" |
Optional name for the 3D render layer 2.
- String layer_names/3d_render/layer_20
| Default | "" |
Optional name for the 3D render layer 20.
- String layer_names/3d_render/layer_3
| Default | "" |
Optional name for the 3D render layer 3.
- String layer_names/3d_render/layer_4
| Default | "" |
Optional name for the 3D render layer 4.
- String layer_names/3d_render/layer_5
| Default | "" |
Optional name for the 3D render layer 5.
- String layer_names/3d_render/layer_6
| Default | "" |
Optional name for the 3D render layer 6.
- String layer_names/3d_render/layer_7
| Default | "" |
Optional name for the 3D render layer 7.
- String layer_names/3d_render/layer_8
| Default | "" |
Optional name for the 3D render layer 8.
- String layer_names/3d_render/layer_9
| Default | "" |
Optional name for the 3D render layer 9.
- String locale/fallback
| Default | "en" |
The locale to fall back to if a translation isn’t available in a given language. If left empty, en (English) will be used.
- String locale/test
| Default | "" |
If non-empty, this locale will be used when running the project from the editor.
- bool logging/file_logging/enable_file_logging
| Default | false |
If true, logs all output to files.
- String logging/file_logging/log_path
| Default | "user://logs/log.txt" |
Path to logs within the project. Using an user:// path is recommended.
- int logging/file_logging/max_log_files
| Default | 10 |
Specifies the maximum amount of log files allowed (used for rotation).
- int memory/limits/message_queue/max_size_kb
| Default | 1024 |
Godot uses a message queue to defer some function calls. If you run out of space on it (you will see an error), you can increase the size here.
- int memory/limits/multithreaded_server/rid_pool_prealloc
| Default | 60 |
This is used by servers when used in multi-threading mode (servers and visual). RIDs are preallocated to avoid stalling the server requesting them on threads. If servers get stalled too often when loading resources in a thread, increase this number.
- int network/limits/debugger_stdout/max_chars_per_second
| Default | 2048 |
Maximum amount of characters allowed to send as output from the debugger. Over this value, content is dropped. This helps not to stall the debugger connection.
- int network/limits/debugger_stdout/max_errors_per_second
| Default | 100 |
Maximum number of errors allowed to be sent as output from the debugger. Over this value, content is dropped. This helps not to stall the debugger connection.
- int network/limits/debugger_stdout/max_messages_per_frame
| Default | 10 |
Maximum amount of messages allowed to send as output from the debugger. Over this value, content is dropped. This helps not to stall the debugger connection.
- int network/limits/debugger_stdout/max_warnings_per_second
| Default | 100 |
Maximum number of warnings allowed to be sent as output from the debugger. Over this value, content is dropped. This helps not to stall the debugger connection.
- int network/limits/packet_peer_stream/max_buffer_po2
| Default | 16 |
Default size of packet peer stream for deserializing Godot data. Over this size, data is dropped.
- int network/limits/tcp/connect_timeout_seconds
| Default | 30 |
Timeout (in seconds) for connection attempts using TCP.
- int network/limits/webrtc/max_channel_in_buffer_kb
| Default | 64 |
Maximum size (in kiB) for the WebRTCDataChannel input buffer.
- int network/limits/websocket_client/max_in_buffer_kb
| Default | 64 |
Maximum size (in kiB) for the WebSocketClient input buffer.
- int network/limits/websocket_client/max_in_packets
| Default | 1024 |
Maximum number of concurrent input packets for WebSocketClient.
- int network/limits/websocket_client/max_out_buffer_kb
| Default | 64 |
Maximum size (in kiB) for the WebSocketClient output buffer.
- int network/limits/websocket_client/max_out_packets
| Default | 1024 |
Maximum number of concurrent output packets for WebSocketClient.
- int network/limits/websocket_server/max_in_buffer_kb
| Default | 64 |
Maximum size (in kiB) for the WebSocketServer input buffer.
- int network/limits/websocket_server/max_in_packets
| Default | 1024 |
Maximum number of concurrent input packets for WebSocketServer.
- int network/limits/websocket_server/max_out_buffer_kb
| Default | 64 |
Maximum size (in kiB) for the WebSocketServer output buffer.
- int network/limits/websocket_server/max_out_packets
| Default | 1024 |
Maximum number of concurrent output packets for WebSocketServer.
- int network/remote_fs/page_read_ahead
| Default | 4 |
Amount of read ahead used by remote filesystem. Higher values decrease the effects of latency at the cost of higher bandwidth usage.
- int network/remote_fs/page_size
| Default | 65536 |
Page size used by remote filesystem (in bytes).
- String network/ssl/certificates
| Default | "" |
CA certificates bundle to use for SSL connections. If not defined, Godot’s internal CA certificates are used.
- int node/name_casing
| Default | 0 |
When creating node names automatically, set the type of casing in this project. This is mostly an editor setting.
- int node/name_num_separator
| Default | 0 |
What to use to separate node name from number. This is mostly an editor setting.
- int physics/2d/bp_hash_table_size
| Default | 4096 |
Size of the hash table used for the broad-phase 2D hash grid algorithm.
- int physics/2d/cell_size
| Default | 128 |
Cell size used for the broad-phase 2D hash grid algorithm.
- float physics/2d/default_angular_damp
| Default | 1.0 |
The default angular damp in 2D.
- int physics/2d/default_gravity
| Default | 98 |
The default gravity strength in 2D.
Note: This property is only read when the project starts. To change the default gravity at runtime, use the following code sample:
# Set the default gravity strength to 98.
Physics2DServer.area_set_param(get_viewport().find_world_2d().get_space(), Physics2DServer.AREA_PARAM_GRAVITY, 98)
- Vector2 physics/2d/default_gravity_vector
| Default | Vector2( 0, 1 ) |
The default gravity direction in 2D.
Note: This property is only read when the project starts. To change the default gravity vector at runtime, use the following code sample:
# Set the default gravity direction to `Vector2(0, 1)`.
Physics2DServer.area_set_param(get_viewport().find_world_2d().get_space(), Physics2DServer.AREA_PARAM_GRAVITY_VECTOR, Vector2(0, 1))
- float physics/2d/default_linear_damp
| Default | 0.1 |
The default linear damp in 2D.
- int physics/2d/large_object_surface_threshold_in_cells
| Default | 512 |
Threshold defining the surface size that constitutes a large object with regard to cells in the broad-phase 2D hash grid algorithm.
- String physics/2d/physics_engine
| Default | "DEFAULT" |
Sets which physics engine to use for 2D physics.
“DEFAULT” and “GodotPhysics” are the same, as there is currently no alternative 2D physics server implemented.
- float physics/2d/sleep_threshold_angular
| Default | 0.139626 |
Threshold angular velocity under which a 2D physics body will be considered inactive. See Physics2DServer.SPACE_PARAM_BODY_ANGULAR_VELOCITY_SLEEP_THRESHOLD.
- float physics/2d/sleep_threshold_linear
| Default | 2.0 |
Threshold linear velocity under which a 2D physics body will be considered inactive. See Physics2DServer.SPACE_PARAM_BODY_LINEAR_VELOCITY_SLEEP_THRESHOLD.
- int physics/2d/thread_model
| Default | 1 |
Sets whether physics is run on the main thread or a separate one. Running the server on a thread increases performance, but restricts API access to only physics process.
Warning: As of Godot 3.2, there are mixed reports about the use of a Multi-Threaded thread model for physics. Be sure to assess whether it does give you extra performance and no regressions when using it.
- float physics/2d/time_before_sleep
| Default | 0.5 |
Time (in seconds) of inactivity before which a 2D physics body will put to sleep. See Physics2DServer.SPACE_PARAM_BODY_TIME_TO_SLEEP.
- bool physics/3d/active_soft_world
| Default | true |
Sets whether the 3D physics world will be created with support for SoftBody physics. Only applies to the Bullet physics engine.
- float physics/3d/default_angular_damp
| Default | 0.1 |
The default angular damp in 3D.
- float physics/3d/default_gravity
| Default | 9.8 |
The default gravity strength in 3D.
Note: This property is only read when the project starts. To change the default gravity at runtime, use the following code sample:
# Set the default gravity strength to 9.8.
PhysicsServer.area_set_param(get_viewport().find_world().get_space(), PhysicsServer.AREA_PARAM_GRAVITY, 9.8)
- Vector3 physics/3d/default_gravity_vector
| Default | Vector3( 0, -1, 0 ) |
The default gravity direction in 3D.
Note: This property is only read when the project starts. To change the default gravity vector at runtime, use the following code sample:
# Set the default gravity direction to `Vector3(0, -1, 0)`.
PhysicsServer.area_set_param(get_viewport().find_world().get_space(), PhysicsServer.AREA_PARAM_GRAVITY_VECTOR, Vector3(0, -1, 0))
- float physics/3d/default_linear_damp
| Default | 0.1 |
The default linear damp in 3D.
- String physics/3d/physics_engine
| Default | "DEFAULT" |
Sets which physics engine to use for 3D physics.
“DEFAULT” is currently the Bullet physics engine. The “GodotPhysics” engine is still supported as an alternative.
- bool physics/common/enable_object_picking
| Default | true |
Enables Viewport.physics_object_picking on the root viewport.
- int physics/common/physics_fps
| Default | 60 |
The number of fixed iterations per second. This controls how often physics simulation and Node._physics_process methods are run.
Note: This property is only read when the project starts. To change the physics FPS at runtime, set Engine.iterations_per_second instead.
- float physics/common/physics_jitter_fix
| Default | 0.5 |
Fix to improve physics jitter, specially on monitors where refresh rate is different than the physics FPS.
Note: This property is only read when the project starts. To change the physics FPS at runtime, set Engine.physics_jitter_fix instead.
- Color rendering/environment/default_clear_color
| Default | Color( 0.3, 0.3, 0.3, 1 ) |
Default background clear color. Overridable per Viewport using its Environment. See Environment.background_mode and Environment.background_color in particular. To change this default color programmatically, use VisualServer.set_default_clear_color.
- String rendering/environment/default_environment
| Default | "" |
Environment that will be used as a fallback environment in case a scene does not specify its own environment. The default environment is loaded in at scene load time regardless of whether you have set an environment or not. If you do not rely on the fallback environment, it is best to delete default_env.tres, or to specify a different default environment here.
- int rendering/limits/buffers/blend_shape_max_buffer_size_kb
| Default | 4096 |
Max buffer size for blend shapes. Any blend shape bigger than this will not work.
- int rendering/limits/buffers/canvas_polygon_buffer_size_kb
| Default | 128 |
Max buffer size for drawing polygons. Any polygon bigger than this will not work.
- int rendering/limits/buffers/canvas_polygon_index_buffer_size_kb
| Default | 128 |
Max index buffer size for drawing polygons. Any polygon bigger than this will not work.
- int rendering/limits/buffers/immediate_buffer_size_kb
| Default | 2048 |
Max buffer size for drawing immediate objects (ImmediateGeometry nodes). Nodes using more than this size will not work.
- int rendering/limits/rendering/max_renderable_elements
| Default | 65536 |
Max amount of elements renderable in a frame. If more than this are visible per frame, they will be dropped. Keep in mind elements refer to mesh surfaces and not meshes themselves.
- int rendering/limits/rendering/max_renderable_lights
| Default | 4096 |
Max number of lights renderable in a frame. If more than this number are used, they will be ignored. On some systems (particularly web) setting this number as low as possible can increase the speed of shader compilation.
- int rendering/limits/rendering/max_renderable_reflections
| Default | 1024 |
Max number of reflection probes renderable in a frame. If more than this number are used, they will be ignored. On some systems (particularly web) setting this number as low as possible can increase the speed of shader compilation.
- float rendering/limits/time/time_rollover_secs
| Default | 3600 |
Shaders have a time variable that constantly increases. At some point, it needs to be rolled back to zero to avoid precision errors on shader animations. This setting specifies when (in seconds).
- bool rendering/quality/2d/gles2_use_nvidia_rect_flicker_workaround
| Default | false |
Some NVIDIA GPU drivers have a bug which produces flickering issues for the draw_rect method, especially as used in TileMap. Refer to GitHub issue 9913 for details.
If true, this option enables a “safe” code path for such NVIDIA GPUs at the cost of performance. This option only impacts the GLES2 rendering backend (so the bug stays if you use GLES3), and only desktop platforms.
- bool rendering/quality/2d/use_pixel_snap
| Default | false |
If true, forces snapping of polygons to pixels in 2D rendering. May help in some pixel art styles.
- bool rendering/quality/depth/hdr
| Default | true |
If true, allocates the main framebuffer with high dynamic range. High dynamic range allows the use of Color values greater than 1.
Note: Only available on the GLES3 backend.
- bool rendering/quality/depth/hdr.mobile
| Default | false |
Lower-end override for rendering/quality/depth/hdr on mobile devices, due to performance concerns or driver support.
- String rendering/quality/depth_prepass/disable_for_vendors
| Default | "PowerVR,Mali,Adreno,Apple" |
Disables depth pre-pass for some GPU vendors (usually mobile), as their architecture already does this.
- bool rendering/quality/depth_prepass/enable
| Default | true |
If true, performs a previous depth pass before rendering materials. This increases performance in scenes with high overdraw, when complex materials and lighting are used.
- int rendering/quality/directional_shadow/size
| Default | 4096 |
The directional shadow’s size in pixels. Higher values will result in sharper shadows, at the cost of performance. The value will be rounded up to the nearest power of 2.
- int rendering/quality/directional_shadow/size.mobile
| Default | 2048 |
Lower-end override for rendering/quality/directional_shadow/size on mobile devices, due to performance concerns or driver support.
- String rendering/quality/driver/driver_name
| Default | "GLES3" |
The video driver to use (“GLES2” or “GLES3”).
Note: The backend in use can be overridden at runtime via the --video-driver command line argument, or by the rendering/quality/driver/fallback_to_gles2 option if the target system does not support GLES3 and falls back to GLES2. In such cases, this property is not updated, so use OS.get_current_video_driver to query it at run-time.
- bool rendering/quality/driver/fallback_to_gles2
| Default | false |
If true, allows falling back to the GLES2 driver if the GLES3 driver is not supported.
Note: The two video drivers are not drop-in replacements for each other, so a game designed for GLES3 might not work properly when falling back to GLES2. In particular, some features of the GLES3 backend are not available in GLES2. Enabling this setting also means that both ETC and ETC2 VRAM-compressed textures will be exported on Android and iOS, increasing the data pack’s size.
- int rendering/quality/filters/anisotropic_filter_level
| Default | 4 |
Maximum anisotropic filter level used for textures with anisotropy enabled. Higher values will result in sharper textures when viewed from oblique angles, at the cost of performance. Only power-of-two values are valid (2, 4, 8, 16).
- int rendering/quality/filters/msaa
| Default | 0 |
Sets the number of MSAA samples to use. MSAA is used to reduce aliasing around the edges of polygons. A higher MSAA value results in smoother edges but can be significantly slower on some hardware.
Note: MSAA is not available on HTML5 export using the GLES2 backend.
- bool rendering/quality/filters/use_nearest_mipmap_filter
| Default | false |
If true, uses nearest-neighbor mipmap filtering when using mipmaps (also called “bilinear filtering”), which will result in visible seams appearing between mipmap stages. This may increase performance in mobile as less memory bandwidth is used. If false, linear mipmap filtering (also called “trilinear filtering”) is used.
- int rendering/quality/intended_usage/framebuffer_allocation
| Default | 2 |
Strategy used for framebuffer allocation. The simpler it is, the less resources it uses (but the less features it supports). If set to “2D Without Sampling” or “3D Without Effects”, sample buffers will not be allocated. This means SCREEN_TEXTURE and DEPTH_TEXTURE will not be available in shaders and post-processing effects will not be available in the Environment.
- int rendering/quality/intended_usage/framebuffer_allocation.mobile
| Default | 3 |
Lower-end override for rendering/quality/intended_usage/framebuffer_allocation on mobile devices, due to performance concerns or driver support.
- int rendering/quality/reflections/atlas_size
| Default | 2048 |
Size of the atlas used by reflection probes. A larger size can result in higher visual quality, while a smaller size will be faster and take up less memory.
- int rendering/quality/reflections/atlas_subdiv
| Default | 8 |
Number of subdivisions to use for the reflection atlas. A higher number lowers the quality of each atlas, but allows you to use more.
- bool rendering/quality/reflections/high_quality_ggx
| Default | true |
If true, uses a high amount of samples to create blurred variants of reflection probes and panorama backgrounds (sky). Those blurred variants are used by rough materials.
- bool rendering/quality/reflections/high_quality_ggx.mobile
| Default | false |
Lower-end override for rendering/quality/reflections/high_quality_ggx on mobile devices, due to performance concerns or driver support.
- int rendering/quality/reflections/irradiance_max_size
| Default | 128 |
Limits the size of the irradiance map which is normally determined by Sky.radiance_size. A higher size results in a higher quality irradiance map similarly to rendering/quality/reflections/high_quality_ggx. Use a higher value when using high-frequency HDRI maps, otherwise keep this as low as possible.
Note: Low and mid range hardware do not support complex irradiance maps well and may crash if this is set too high.
- bool rendering/quality/reflections/texture_array_reflections
| Default | true |
If true, uses texture arrays instead of mipmaps for reflection probes and panorama backgrounds (sky). This reduces jitter noise on reflections, but costs more performance and memory.
- bool rendering/quality/reflections/texture_array_reflections.mobile
| Default | false |
Lower-end override for rendering/quality/reflections/texture_array_reflections on mobile devices, due to performance concerns or driver support.
- bool rendering/quality/shading/force_blinn_over_ggx
| Default | false |
If true, uses faster but lower-quality Blinn model to generate blurred reflections instead of the GGX model.
- bool rendering/quality/shading/force_blinn_over_ggx.mobile
| Default | true |
Lower-end override for rendering/quality/shading/force_blinn_over_ggx on mobile devices, due to performance concerns or driver support.
- bool rendering/quality/shading/force_lambert_over_burley
| Default | false |
If true, uses faster but lower-quality Lambert material lighting model instead of Burley.
- bool rendering/quality/shading/force_lambert_over_burley.mobile
| Default | true |
Lower-end override for rendering/quality/shading/force_lambert_over_burley on mobile devices, due to performance concerns or driver support.
- bool rendering/quality/shading/force_vertex_shading
| Default | false |
If true, forces vertex shading for all rendering. This can increase performance a lot, but also reduces quality immensely. Can be used to optimize performance on low-end mobile devices.
- bool rendering/quality/shading/force_vertex_shading.mobile
| Default | true |
Lower-end override for rendering/quality/shading/force_vertex_shading on mobile devices, due to performance concerns or driver support.
- int rendering/quality/shadow_atlas/quadrant_0_subdiv
| Default | 1 |
Subdivision quadrant size for shadow mapping. See shadow mapping documentation.
- int rendering/quality/shadow_atlas/quadrant_1_subdiv
| Default | 2 |
Subdivision quadrant size for shadow mapping. See shadow mapping documentation.
- int rendering/quality/shadow_atlas/quadrant_2_subdiv
| Default | 3 |
Subdivision quadrant size for shadow mapping. See shadow mapping documentation.
- int rendering/quality/shadow_atlas/quadrant_3_subdiv
| Default | 4 |
Subdivision quadrant size for shadow mapping. See shadow mapping documentation.
- int rendering/quality/shadow_atlas/size
| Default | 4096 |
Size for shadow atlas (used for OmniLights and SpotLights). See documentation.
- int rendering/quality/shadow_atlas/size.mobile
| Default | 2048 |
Lower-end override for rendering/quality/shadow_atlas/size on mobile devices, due to performance concerns or driver support.
- int rendering/quality/shadows/filter_mode
| Default | 1 |
Shadow filter mode. Higher-quality settings result in smoother shadows that flicker less when moving. “Disabled” is the fastest option, but also has the lowest quality. “PCF5” is smoother but is also slower. “PCF13” is the smoothest option, but is also the slowest.
- int rendering/quality/shadows/filter_mode.mobile
| Default | 0 |
Lower-end override for rendering/quality/shadows/filter_mode on mobile devices, due to performance concerns or driver support.
- bool rendering/quality/subsurface_scattering/follow_surface
| Default | false |
Improves quality of subsurface scattering, but cost significantly increases.
- int rendering/quality/subsurface_scattering/quality
| Default | 1 |
Quality setting for subsurface scattering (samples taken).
- int rendering/quality/subsurface_scattering/scale
| Default | 1.0 |
Max radius used for subsurface scattering samples.
- bool rendering/quality/subsurface_scattering/weight_samples
| Default | true |
Weight subsurface scattering samples. Helps to avoid reading samples from unrelated parts of the screen.
- bool rendering/quality/voxel_cone_tracing/high_quality
| Default | false |
Use high-quality voxel cone tracing. This results in better-looking reflections, but is much more expensive on the GPU.
- int rendering/threads/thread_model
| Default | 1 |
Thread model for rendering. Rendering on a thread can vastly improve performance, but synchronizing to the main thread can cause a bit more jitter.
- bool rendering/vram_compression/import_bptc
| Default | false |
If true, the texture importer will import VRAM-compressed textures using the BPTC algorithm. This texture compression algorithm is only supported on desktop platforms, and only when using the GLES3 renderer.
- bool rendering/vram_compression/import_etc
| Default | false |
If true, the texture importer will import VRAM-compressed textures using the Ericsson Texture Compression algorithm. This algorithm doesn’t support alpha channels in textures.
- bool rendering/vram_compression/import_etc2
| Default | true |
If true, the texture importer will import VRAM-compressed textures using the Ericsson Texture Compression 2 algorithm. This texture compression algorithm is only supported when using the GLES3 renderer.
- bool rendering/vram_compression/import_pvrtc
| Default | false |
If true, the texture importer will import VRAM-compressed textures using the PowerVR Texture Compression algorithm. This texture compression algorithm is only supported on iOS.
- bool rendering/vram_compression/import_s3tc
| Default | true |
If true, the texture importer will import VRAM-compressed textures using the S3 Texture Compression algorithm. This algorithm is only supported on desktop platforms and consoles.
Method Descriptions¶
- void add_property_info ( Dictionary hint )
Adds a custom property info to a property. The dictionary must contain:
name: String (the property’s name)type: int (see Variant.Type)- optionally
hint: int (see PropertyHint) andhint_string: String
Example:
ProjectSettings.set("category/property_name", 0)
var property_info = {
"name": "category/property_name",
"type": TYPE_INT,
"hint": PROPERTY_HINT_ENUM,
"hint_string": "one,two,three"
}
ProjectSettings.add_property_info(property_info)
- void clear ( String name )
Clears the whole configuration (not recommended, may break things).
Returns the order of a configuration value (influences when saved to the config file).
Returns the value of a setting.
Example:
print(ProjectSettings.get_setting("application/config/name"))
Converts a localized path (res://) to a full native OS path.
Returns true if a configuration value is present.
Loads the contents of the .pck or .zip file specified by pack into the resource filesystem (res://). Returns true on success.
Note: If a file from pack shares the same path as a file already in the resource filesystem, any attempts to load that file will use the file from pack unless replace_files is set to false.
Convert a path to a localized path (res:// path).
Returns true if the specified property exists and its initial value differs from the current value.
Returns the specified property’s initial value. Returns null if the property does not exist.
- Error save ( )
Saves the configuration to the project.godot file.
Saves the configuration to a custom file.
Sets the specified property’s initial value. This is the value the property reverts to.
Sets the order of a configuration value (influences when saved to the config file).
Sets the value of a setting.
Example:
ProjectSettings.set_setting("application/config/name", "Example")
ProximityGroup¶
Inherits: Spatial < Node < Object
General-purpose proximity detection node.
Description¶
General-purpose proximity detection node.
Properties¶
| DispatchMode | dispatch_mode | 0 |
| Vector3 | grid_radius | Vector3( 1, 1, 1 ) |
| String | group_name | "" |
Property Descriptions¶
- DispatchMode dispatch_mode
| Default | 0 |
| Setter | set_dispatch_mode(value) |
| Getter | get_dispatch_mode() |
- Vector3 grid_radius
| Default | Vector3( 1, 1, 1 ) |
| Setter | set_grid_radius(value) |
| Getter | get_grid_radius() |
- String group_name
| Default | "" |
| Setter | set_group_name(value) |
| Getter | get_group_name() |
ProxyTexture¶
QuadMesh¶
Inherits: PrimitiveMesh < Mesh < Resource < Reference < Object
Class representing a square mesh.
Description¶
Class representing a square PrimitiveMesh. This flat mesh does not have a thickness. By default, this mesh is aligned on the X and Y axes; this default rotation is more suited for use with billboarded materials. Unlike PlaneMesh, this mesh doesn’t provide subdivision options.
Quat¶
Quaternion.
Description¶
A unit quaternion used for representing 3D rotations.
It is similar to Basis, which implements matrix representation of rotations, and can be parametrized using both an axis-angle pair or Euler angles. But due to its compactness and the way it is stored in memory, certain operations (obtaining axis-angle and performing SLERP, in particular) are more efficient and robust against floating-point errors.
Quaternions need to be (re)normalized.
Tutorials¶
Methods¶
| Quat | Quat ( Basis from ) |
| Quat | Quat ( Vector3 euler ) |
| Quat | Quat ( Vector3 axis, float angle ) |
| Quat | Quat ( float x, float y, float z, float w ) |
| Quat | cubic_slerp ( Quat b, Quat pre_a, Quat post_b, float t ) |
| float | dot ( Quat b ) |
| Vector3 | get_euler ( ) |
| Quat | inverse ( ) |
| bool | is_equal_approx ( Quat quat ) |
| bool | is_normalized ( ) |
| float | length ( ) |
| float | length_squared ( ) |
| Quat | normalized ( ) |
| void | set_axis_angle ( Vector3 axis, float angle ) |
| void | set_euler ( Vector3 euler ) |
| Quat | slerp ( Quat b, float t ) |
| Quat | slerpni ( Quat b, float t ) |
| Vector3 | xform ( Vector3 v ) |
Constants¶
- IDENTITY = Quat( 0, 0, 0, 1 ) — The identity rotation. Equivalent to an identity matrix. If a vector is transformed by an identity quaternion, it will not change.
Property Descriptions¶
- float w
| Default | 1.0 |
W component of the quaternion.
- float x
| Default | 0.0 |
X component of the quaternion.
- float y
| Default | 0.0 |
Y component of the quaternion.
- float z
| Default | 0.0 |
Z component of the quaternion.
Method Descriptions¶
Returns the rotation matrix corresponding to the given quaternion.
Returns a quaternion that will perform a rotation specified by Euler angles (in the YXZ convention: first Z, then X, and Y last), given in the vector format as (X angle, Y angle, Z angle).
Returns a quaternion that will rotate around the given axis by the specified angle. The axis must be a normalized vector.
Returns a quaternion defined by these values.
Performs a cubic spherical-linear interpolation with another quaternion.
Returns the dot product of two quaternions.
- Vector3 get_euler ( )
Returns Euler angles (in the YXZ convention: first Z, then X, and Y last) corresponding to the rotation represented by the unit quaternion. Returned vector contains the rotation angles in the format (X angle, Y angle, Z angle).
- Quat inverse ( )
Returns the inverse of the quaternion.
Returns true if this quaterion and quat are approximately equal, by running @GDScript.is_equal_approx on each component.
- bool is_normalized ( )
Returns whether the quaternion is normalized or not.
- float length ( )
Returns the length of the quaternion.
- float length_squared ( )
Returns the length of the quaternion, squared.
- Quat normalized ( )
Returns a copy of the quaternion, normalized to unit length.
Sets the quaternion to a rotation which rotates around axis by the specified angle, in radians. The axis must be a normalized vector.
- void set_euler ( Vector3 euler )
Sets the quaternion to a rotation specified by Euler angles (in the YXZ convention: first Z, then X, and Y last), given in the vector format as (X angle, Y angle, Z angle).
Performs a spherical-linear interpolation with another quaternion.
Performs a spherical-linear interpolation with another quaterion without checking if the rotation path is not bigger than 90°.
Transforms the vector v by this quaternion.
RandomNumberGenerator¶
A class for generating pseudo-random numbers.
Description¶
RandomNumberGenerator is a class for generating pseudo-random numbers. It currently uses PCG32.
Note: The underlying algorithm is an implementation detail. As a result, it should not be depended upon for reproducible random streams across Godot versions.
To generate a random float number (within a given range) based on a time-dependant seed:
var rng = RandomNumberGenerator.new()
func _ready():
rng.randomize()
var my_random_number = rng.randf_range(-10.0, 10.0)
Methods¶
| float | randf ( ) |
| float | randf_range ( float from, float to ) |
| float | randfn ( float mean=0.0, float deviation=1.0 ) |
| int | randi ( ) |
| int | randi_range ( int from, int to ) |
| void | randomize ( ) |
Property Descriptions¶
- int seed
| Default | -6398989897141750821 |
| Setter | set_seed(value) |
| Getter | get_seed() |
The seed used by the random number generator. A given seed will give a reproducible sequence of pseudo-random numbers.
Note: The RNG does not have an avalanche effect, and can output similar random streams given similar seeds. Consider using a hash function to improve your seed quality if they’re sourced externally.
Method Descriptions¶
- float randf ( )
Generates a pseudo-random float between 0.0 and 1.0 (inclusive).
Generates a pseudo-random float between from and to (inclusive).
Generates a normally-distributed pseudo-random number, using Box-Muller transform with the specified mean and a standard deviation. This is also called Gaussian distribution.
- int randi ( )
Generates a pseudo-random 32-bit unsigned integer between 0 and 4294967295 (inclusive).
Generates a pseudo-random 32-bit signed integer between from and to (inclusive).
- void randomize ( )
Setups a time-based seed to generator.
Range¶
Inherits: Control < CanvasItem < Node < Object
Inherited By: EditorSpinSlider, ProgressBar, ScrollBar, Slider, SpinBox, TextureProgress
Abstract base class for range-based controls.
Description¶
Range is a base class for Control nodes that change a floating-point value between a minimum and a maximum, using step and page, for example a ScrollBar.
Properties¶
| bool | allow_greater | false |
| bool | allow_lesser | false |
| bool | exp_edit | false |
| float | max_value | 100.0 |
| float | min_value | 0.0 |
| float | page | 0.0 |
| float | ratio | |
| bool | rounded | false |
| float | step | 1.0 |
| float | value | 0.0 |
Signals¶
- changed ( )
Emitted when min_value, max_value, page, or step change.
- value_changed ( float value )
Emitted when value changes.
Property Descriptions¶
- bool allow_greater
| Default | false |
| Setter | set_allow_greater(value) |
| Getter | is_greater_allowed() |
If true, value may be greater than max_value.
- bool allow_lesser
| Default | false |
| Setter | set_allow_lesser(value) |
| Getter | is_lesser_allowed() |
If true, value may be less than min_value.
- bool exp_edit
| Default | false |
| Setter | set_exp_ratio(value) |
| Getter | is_ratio_exp() |
If true, and min_value is greater than 0, value will be represented exponentially rather than linearly.
- float max_value
| Default | 100.0 |
| Setter | set_max(value) |
| Getter | get_max() |
Maximum value. Range is clamped if value is greater than max_value.
- float min_value
| Default | 0.0 |
| Setter | set_min(value) |
| Getter | get_min() |
Minimum value. Range is clamped if value is less than min_value.
- float page
| Default | 0.0 |
| Setter | set_page(value) |
| Getter | get_page() |
Page size. Used mainly for ScrollBar. ScrollBar’s length is its size multiplied by page over the difference between min_value and max_value.
- float ratio
| Setter | set_as_ratio(value) |
| Getter | get_as_ratio() |
The value mapped between 0 and 1.
- bool rounded
| Default | false |
| Setter | set_use_rounded_values(value) |
| Getter | is_using_rounded_values() |
If true, value will always be rounded to the nearest integer.
- float step
| Default | 1.0 |
| Setter | set_step(value) |
| Getter | get_step() |
If greater than 0, value will always be rounded to a multiple of step. If rounded is also true, value will first be rounded to a multiple of step then rounded to the nearest integer.
- float value
| Default | 0.0 |
| Setter | set_value(value) |
| Getter | get_value() |
Range’s current value.
Method Descriptions¶
Binds two ranges together along with any ranges previously grouped with either of them. When any of range’s member variables change, it will share the new value with all other ranges in its group.
Stops range from sharing its member variables with any other.
RayCast¶
Inherits: Spatial < Node < Object
Query the closest object intersecting a ray.
Description¶
A RayCast represents a line from its origin to its destination position, cast_to. It is used to query the 3D space in order to find the closest object along the path of the ray.
RayCast can ignore some objects by adding them to the exception list via add_exception or by setting proper filtering with collision layers and masks.
RayCast can be configured to report collisions with Areas (collide_with_areas) and/or PhysicsBodys (collide_with_bodies).
Only enabled raycasts will be able to query the space and report collisions.
RayCast calculates intersection every physics frame (see Node), and the result is cached so it can be used later until the next frame. If multiple queries are required between physics frames (or during the same frame), use force_raycast_update after adjusting the raycast.
Tutorials¶
Properties¶
| Vector3 | cast_to | Vector3( 0, -1, 0 ) |
| bool | collide_with_areas | false |
| bool | collide_with_bodies | true |
| int | collision_mask | 1 |
| bool | enabled | false |
| bool | exclude_parent | true |
Methods¶
| void | add_exception ( Object node ) |
| void | add_exception_rid ( RID rid ) |
| void | clear_exceptions ( ) |
| void | force_raycast_update ( ) |
| Object | get_collider ( ) const |
| int | get_collider_shape ( ) const |
| bool | get_collision_mask_bit ( int bit ) const |
| Vector3 | get_collision_normal ( ) const |
| Vector3 | get_collision_point ( ) const |
| bool | is_colliding ( ) const |
| void | remove_exception ( Object node ) |
| void | remove_exception_rid ( RID rid ) |
| void | set_collision_mask_bit ( int bit, bool value ) |
Property Descriptions¶
- Vector3 cast_to
| Default | Vector3( 0, -1, 0 ) |
| Setter | set_cast_to(value) |
| Getter | get_cast_to() |
The ray’s destination point, relative to the RayCast’s position.
- bool collide_with_areas
| Default | false |
| Setter | set_collide_with_areas(value) |
| Getter | is_collide_with_areas_enabled() |
If true, collision with Areas will be reported.
- bool collide_with_bodies
| Default | true |
| Setter | set_collide_with_bodies(value) |
| Getter | is_collide_with_bodies_enabled() |
If true, collision with PhysicsBodys will be reported.
- int collision_mask
| Default | 1 |
| Setter | set_collision_mask(value) |
| Getter | get_collision_mask() |
The ray’s collision mask. Only objects in at least one collision layer enabled in the mask will be detected.
- bool enabled
| Default | false |
| Setter | set_enabled(value) |
| Getter | is_enabled() |
If true, collisions will be reported.
- bool exclude_parent
| Default | true |
| Setter | set_exclude_parent_body(value) |
| Getter | get_exclude_parent_body() |
If true, collisions will be ignored for this RayCast’s immediate parent.
Method Descriptions¶
- void add_exception ( Object node )
Adds a collision exception so the ray does not report collisions with the specified node.
- void add_exception_rid ( RID rid )
Adds a collision exception so the ray does not report collisions with the specified RID.
- void clear_exceptions ( )
Removes all collision exceptions for this ray.
- void force_raycast_update ( )
Updates the collision information for the ray.
Use this method to update the collision information immediately instead of waiting for the next _physics_process call, for example if the ray or its parent has changed state.
Note: enabled == true is not required for this to work.
- Object get_collider ( ) const
Returns the first object that the ray intersects, or null if no object is intersecting the ray (i.e. is_colliding returns false).
- int get_collider_shape ( ) const
Returns the shape ID of the first object that the ray intersects, or 0 if no object is intersecting the ray (i.e. is_colliding returns false).
Returns true if the bit index passed is turned on.
Note: Bit indices range from 0-19.
- Vector3 get_collision_normal ( ) const
Returns the normal of the intersecting object’s shape at the collision point.
- Vector3 get_collision_point ( ) const
Returns the collision point at which the ray intersects the closest object.
Note: This point is in the global coordinate system.
- bool is_colliding ( ) const
Returns whether any object is intersecting with the ray’s vector (considering the vector length).
- void remove_exception ( Object node )
Removes a collision exception so the ray does report collisions with the specified node.
- void remove_exception_rid ( RID rid )
Removes a collision exception so the ray does report collisions with the specified RID.
Sets the bit index passed to the value passed.
Note: Bit indexes range from 0-19.
RayCast2D¶
Inherits: Node2D < CanvasItem < Node < Object
Query the closest object intersecting a ray.
Description¶
A RayCast represents a line from its origin to its destination position, cast_to. It is used to query the 2D space in order to find the closest object along the path of the ray.
RayCast2D can ignore some objects by adding them to the exception list via add_exception, by setting proper filtering with collision layers, or by filtering object types with type masks.
RayCast2D can be configured to report collisions with Area2Ds (collide_with_areas) and/or PhysicsBody2Ds (collide_with_bodies).
Only enabled raycasts will be able to query the space and report collisions.
RayCast2D calculates intersection every physics frame (see Node), and the result is cached so it can be used later until the next frame. If multiple queries are required between physics frames (or during the same frame) use force_raycast_update after adjusting the raycast.
Tutorials¶
Properties¶
| Vector2 | cast_to | Vector2( 0, 50 ) |
| bool | collide_with_areas | false |
| bool | collide_with_bodies | true |
| int | collision_mask | 1 |
| bool | enabled | false |
| bool | exclude_parent | true |
Methods¶
| void | add_exception ( Object node ) |
| void | add_exception_rid ( RID rid ) |
| void | clear_exceptions ( ) |
| void | force_raycast_update ( ) |
| Object | get_collider ( ) const |
| int | get_collider_shape ( ) const |
| bool | get_collision_mask_bit ( int bit ) const |
| Vector2 | get_collision_normal ( ) const |
| Vector2 | get_collision_point ( ) const |
| bool | is_colliding ( ) const |
| void | remove_exception ( Object node ) |
| void | remove_exception_rid ( RID rid ) |
| void | set_collision_mask_bit ( int bit, bool value ) |
Property Descriptions¶
- Vector2 cast_to
| Default | Vector2( 0, 50 ) |
| Setter | set_cast_to(value) |
| Getter | get_cast_to() |
The ray’s destination point, relative to the RayCast’s position.
- bool collide_with_areas
| Default | false |
| Setter | set_collide_with_areas(value) |
| Getter | is_collide_with_areas_enabled() |
If true, collision with Area2Ds will be reported.
- bool collide_with_bodies
| Default | true |
| Setter | set_collide_with_bodies(value) |
| Getter | is_collide_with_bodies_enabled() |
If true, collision with PhysicsBody2Ds will be reported.
- int collision_mask
| Default | 1 |
| Setter | set_collision_mask(value) |
| Getter | get_collision_mask() |
The ray’s collision mask. Only objects in at least one collision layer enabled in the mask will be detected.
- bool enabled
| Default | false |
| Setter | set_enabled(value) |
| Getter | is_enabled() |
If true, collisions will be reported.
- bool exclude_parent
| Default | true |
| Setter | set_exclude_parent_body(value) |
| Getter | get_exclude_parent_body() |
If true, the parent node will be excluded from collision detection.
Method Descriptions¶
- void add_exception ( Object node )
Adds a collision exception so the ray does not report collisions with the specified node.
- void add_exception_rid ( RID rid )
Adds a collision exception so the ray does not report collisions with the specified RID.
- void clear_exceptions ( )
Removes all collision exceptions for this ray.
- void force_raycast_update ( )
Updates the collision information for the ray. Use this method to update the collision information immediately instead of waiting for the next _physics_process call, for example if the ray or its parent has changed state.
Note: enabled == true is not required for this to work.
- Object get_collider ( ) const
Returns the first object that the ray intersects, or null if no object is intersecting the ray (i.e. is_colliding returns false).
- int get_collider_shape ( ) const
Returns the shape ID of the first object that the ray intersects, or 0 if no object is intersecting the ray (i.e. is_colliding returns false).
Returns an individual bit on the collision mask.
- Vector2 get_collision_normal ( ) const
Returns the normal of the intersecting object’s shape at the collision point.
- Vector2 get_collision_point ( ) const
Returns the collision point at which the ray intersects the closest object.
Note: this point is in the global coordinate system.
- bool is_colliding ( ) const
Returns whether any object is intersecting with the ray’s vector (considering the vector length).
- void remove_exception ( Object node )
Removes a collision exception so the ray does report collisions with the specified node.
- void remove_exception_rid ( RID rid )
Removes a collision exception so the ray does report collisions with the specified RID.
Sets or clears individual bits on the collision mask. This makes selecting the areas scanned easier.
RayShape¶
Inherits: Shape < Resource < Reference < Object
Ray shape for 3D collisions.
Description¶
Ray shape for 3D collisions, which can be set into a PhysicsBody or Area. A ray is not really a collision body; instead, it tries to separate itself from whatever is touching its far endpoint. It’s often useful for characters.
Properties¶
| float | length | 1.0 |
| bool | slips_on_slope | false |
RayShape2D¶
Inherits: Shape2D < Resource < Reference < Object
Ray shape for 2D collisions.
Description¶
Ray shape for 2D collisions. A ray is not really a collision body; instead, it tries to separate itself from whatever is touching its far endpoint. It’s often useful for characters.
Properties¶
| float | length | 20.0 |
| bool | slips_on_slope | false |
Rect2¶
2D axis-aligned bounding box.
Description¶
Rect2 consists of a position, a size, and several utility functions. It is typically used for fast overlap tests.
Properties¶
| Vector2 | end | Vector2( 0, 0 ) |
| Vector2 | position | Vector2( 0, 0 ) |
| Vector2 | size | Vector2( 0, 0 ) |
Methods¶
| Rect2 | Rect2 ( Vector2 position, Vector2 size ) |
| Rect2 | Rect2 ( float x, float y, float width, float height ) |
| Rect2 | abs ( ) |
| Rect2 | clip ( Rect2 b ) |
| bool | encloses ( Rect2 b ) |
| Rect2 | expand ( Vector2 to ) |
| float | get_area ( ) |
| Rect2 | grow ( float by ) |
| Rect2 | grow_individual ( float left, float top, float right, float bottom ) |
| Rect2 | grow_margin ( int margin, float by ) |
| bool | has_no_area ( ) |
| bool | has_point ( Vector2 point ) |
| bool | intersects ( Rect2 b, bool include_borders=false ) |
| bool | is_equal_approx ( Rect2 rect ) |
| Rect2 | merge ( Rect2 b ) |
Property Descriptions¶
- Vector2 end
| Default | Vector2( 0, 0 ) |
Ending corner.
- Vector2 position
| Default | Vector2( 0, 0 ) |
Position (starting corner).
- Vector2 size
| Default | Vector2( 0, 0 ) |
Size from position to end.
Method Descriptions¶
Constructs a Rect2 by position and size.
Constructs a Rect2 by x, y, width, and height.
- Rect2 abs ( )
Returns a Rect2 with equivalent position and area, modified so that the top-left corner is the origin and width and height are positive.
Returns the intersection of this Rect2 and b.
Returns true if this Rect2 completely encloses another one.
Returns this Rect2 expanded to include a given point.
- float get_area ( )
Returns the area of the Rect2.
Returns a copy of the Rect2 grown a given amount of units towards all the sides.
Returns a copy of the Rect2 grown a given amount of units towards each direction individually.
Returns a copy of the Rect2 grown a given amount of units towards the Margin direction.
- bool has_no_area ( )
Returns true if the Rect2 is flat or empty.
Returns true if the Rect2 contains a point.
Returns true if the Rect2 overlaps with b (i.e. they have at least one point in common).
If include_borders is true, they will also be considered overlapping if their borders touch, even without intersection.
Returns true if this Rect2 and rect are approximately equal, by calling is_equal_approx on each component.
Returns a larger Rect2 that contains this Rect2 and b.
RectangleShape2D¶
Inherits: Shape2D < Resource < Reference < Object
Rectangle shape for 2D collisions.
Description¶
Rectangle shape for 2D collisions. This shape is useful for modeling box-like 2D objects.
Reference¶
Inherits: Object
Inherited By: ARVRInterface, AStar, AStar2D, AnimationTrackEditPlugin, AudioEffectInstance, AudioStreamPlayback, CameraFeed, CharFXTransform, ConfigFile, Crypto, Directory, EditorExportPlugin, EditorFeatureProfile, EditorInspectorPlugin, EditorResourceConversionPlugin, EditorResourcePreviewGenerator, EditorSceneImporter, EditorScenePostImport, EditorScript, EncodedObjectAsID, Expression, File, FuncRef, GDNative, GDScriptFunctionState, GDScriptNativeClass, HTTPClient, HashingContext, JSONParseResult, JavaClass, KinematicCollision, KinematicCollision2D, MeshDataTool, MultiplayerAPI, Mutex, PCKPacker, PackedDataContainerRef, PacketPeer, Physics2DShapeQueryParameters, Physics2DShapeQueryResult, Physics2DTestMotionResult, PhysicsShapeQueryParameters, PhysicsShapeQueryResult, RandomNumberGenerator, RegEx, RegExMatch, Resource, ResourceFormatLoader, ResourceFormatSaver, ResourceImporter, ResourceInteractiveLoader, SceneState, SceneTreeTimer, Semaphore, SkinReference, SpatialGizmo, SpatialVelocityTracker, StreamPeer, SurfaceTool, TCP_Server, Thread, TriangleMesh, UPNP, UPNPDevice, VisualScriptFunctionState, WeakRef, WebRTCPeerConnection, XMLParser
Base class for reference-counted objects.
Description¶
Base class for any object that keeps a reference count. Resource and many other helper objects inherit this class.
References keep an internal reference counter so that they are automatically released when no longer in use, and only then. References therefore do not need to be freed manually with Object.free.
In the vast majority of use cases, instantiating and using Reference-derived types is all you need to do. The methods provided in this class are only for advanced users, and can cause issues if misused.
Method Descriptions¶
- bool init_ref ( )
Initializes the internal reference counter. Use this only if you really know what you are doing.
Returns whether the initialization was successful.
- bool reference ( )
Increments the internal reference counter. Use this only if you really know what you are doing.
Returns true if the increment was successful, false otherwise.
- bool unreference ( )
Decrements the internal reference counter. Use this only if you really know what you are doing.
Returns true if the decrement was successful, false otherwise.
ReferenceRect¶
Inherits: Control < CanvasItem < Node < Object
Reference frame for GUI.
Description¶
A rectangle box that displays only a border_color border color around its rectangle. ReferenceRect has no fill Color.
Properties¶
| Color | border_color | Color( 1, 0, 0, 1 ) |
| bool | editor_only | true |
Property Descriptions¶
- Color border_color
| Default | Color( 1, 0, 0, 1 ) |
| Setter | set_border_color(value) |
| Getter | get_border_color() |
Sets the border Color of the ReferenceRect.
- bool editor_only
| Default | true |
| Setter | set_editor_only(value) |
| Getter | get_editor_only() |
If set to true, the ReferenceRect will only be visible while in editor. Otherwise, ReferenceRect will be visible in game.
ReflectionProbe¶
Inherits: VisualInstance < Spatial < Node < Object
Captures its surroundings to create reflections.
Description¶
Capture its surroundings as a dual parabolid image, and stores versions of it with increasing levels of blur to simulate different material roughnesses.
The ReflectionProbe is used to create high-quality reflections at the cost of performance. It can be combined with GIProbes and Screen Space Reflections to achieve high quality reflections. ReflectionProbes render all objects within their cull_mask, so updating them can be quite expensive. It is best to update them once with the important static objects and then leave them.
Tutorials¶
Properties¶
| bool | box_projection | false |
| int | cull_mask | 1048575 |
| bool | enable_shadows | false |
| Vector3 | extents | Vector3( 1, 1, 1 ) |
| float | intensity | 1.0 |
| Color | interior_ambient_color | Color( 0, 0, 0, 1 ) |
| float | interior_ambient_contrib | 0.0 |
| float | interior_ambient_energy | 1.0 |
| bool | interior_enable | false |
| float | max_distance | 0.0 |
| Vector3 | origin_offset | Vector3( 0, 0, 0 ) |
| UpdateMode | update_mode | 0 |
Enumerations¶
enum UpdateMode:
- UPDATE_ONCE = 0 — Update the probe once on the next frame.
- UPDATE_ALWAYS = 1 — Update the probe every frame. This is needed when you want to capture dynamic objects. However, it results in an increased render time. Use UPDATE_ONCE whenever possible.
Property Descriptions¶
- bool box_projection
| Default | false |
| Setter | set_enable_box_projection(value) |
| Getter | is_box_projection_enabled() |
If true, enables box projection. This makes reflections look more correct in rectangle-shaped rooms by offsetting the reflection center depending on the camera’s location.
- int cull_mask
| Default | 1048575 |
| Setter | set_cull_mask(value) |
| Getter | get_cull_mask() |
Sets the cull mask which determines what objects are drawn by this probe. Every VisualInstance with a layer included in this cull mask will be rendered by the probe. It is best to only include large objects which are likely to take up a lot of space in the reflection in order to save on rendering cost.
- bool enable_shadows
| Default | false |
| Setter | set_enable_shadows(value) |
| Getter | are_shadows_enabled() |
If true, computes shadows in the reflection probe. This makes the reflection probe slower to render; you may want to disable this if using the UPDATE_ALWAYS update_mode.
- Vector3 extents
| Default | Vector3( 1, 1, 1 ) |
| Setter | set_extents(value) |
| Getter | get_extents() |
The size of the reflection probe. The larger the extents the more space covered by the probe which will lower the perceived resolution. It is best to keep the extents only as large as you need them.
- float intensity
| Default | 1.0 |
| Setter | set_intensity(value) |
| Getter | get_intensity() |
Defines the reflection intensity. Intensity modulates the strength of the reflection.
- Color interior_ambient_color
| Default | Color( 0, 0, 0, 1 ) |
| Setter | set_interior_ambient(value) |
| Getter | get_interior_ambient() |
Sets the ambient light color to be used when this probe is set to interior_enable.
- float interior_ambient_contrib
| Default | 0.0 |
| Setter | set_interior_ambient_probe_contribution(value) |
| Getter | get_interior_ambient_probe_contribution() |
Sets the contribution value for how much the reflection affects the ambient light for this reflection probe when set to interior_enable. Useful so that ambient light matches the color of the room.
- float interior_ambient_energy
| Default | 1.0 |
| Setter | set_interior_ambient_energy(value) |
| Getter | get_interior_ambient_energy() |
Sets the energy multiplier for this reflection probe’s ambient light contribution when set to interior_enable.
- bool interior_enable
| Default | false |
| Setter | set_as_interior(value) |
| Getter | is_set_as_interior() |
If true, reflections will ignore sky contribution. Ambient lighting is then controlled by the interior_ambient_* properties.
- float max_distance
| Default | 0.0 |
| Setter | set_max_distance(value) |
| Getter | get_max_distance() |
Sets the max distance away from the probe an object can be before it is culled.
- Vector3 origin_offset
| Default | Vector3( 0, 0, 0 ) |
| Setter | set_origin_offset(value) |
| Getter | get_origin_offset() |
Sets the origin offset to be used when this reflection probe is in box project mode.
- UpdateMode update_mode
| Default | 0 |
| Setter | set_update_mode(value) |
| Getter | get_update_mode() |
Sets how frequently the probe is updated. Can be UPDATE_ONCE or UPDATE_ALWAYS.
RegEx¶
Class for searching text for patterns using regular expressions.
Description¶
A regular expression (or regex) is a compact language that can be used to recognise strings that follow a specific pattern, such as URLs, email addresses, complete sentences, etc. For instance, a regex of ab[0-9] would find any string that is ab followed by any number from 0 to 9. For a more in-depth look, you can easily find various tutorials and detailed explanations on the Internet.
To begin, the RegEx object needs to be compiled with the search pattern using compile before it can be used.
var regex = RegEx.new()
regex.compile("\\w-(\\d+)")
The search pattern must be escaped first for GDScript before it is escaped for the expression. For example, compile("\\d+") would be read by RegEx as \d+. Similarly, compile("\"(?:\\\\.|[^\"])*\"") would be read as "(?:\\.|[^"])*".
Using search you can find the pattern within the given text. If a pattern is found, RegExMatch is returned and you can retrieve details of the results using functions such as RegExMatch.get_string and RegExMatch.get_start.
var regex = RegEx.new()
regex.compile("\\w-(\\d+)")
var result = regex.search("abc n-0123")
if result:
print(result.get_string()) # Would print n-0123
The results of capturing groups () can be retrieved by passing the group number to the various functions in RegExMatch. Group 0 is the default and will always refer to the entire pattern. In the above example, calling result.get_string(1) would give you 0123.
This version of RegEx also supports named capturing groups, and the names can be used to retrieve the results. If two or more groups have the same name, the name would only refer to the first one with a match.
var regex = RegEx.new()
regex.compile("d(?<digit>[0-9]+)|x(?<digit>[0-9a-f]+)")
var result = regex.search("the number is x2f")
if result:
print(result.get_string("digit")) # Would print 2f
If you need to process multiple results, search_all generates a list of all non-overlapping results. This can be combined with a for loop for convenience.
for result in regex.search_all("d01, d03, d0c, x3f and x42"):
print(result.get_string("digit"))
# Would print 01 03 3f 42
# Note that d0c would not match
Note: Godot’s regex implementation is based on the PCRE2 library. You can view the full pattern reference here.
Tip: You can use Regexr to test regular expressions online.
Methods¶
| void | clear ( ) |
| Error | compile ( String pattern ) |
| int | get_group_count ( ) const |
| Array | get_names ( ) const |
| String | get_pattern ( ) const |
| bool | is_valid ( ) const |
| RegExMatch | search ( String subject, int offset=0, int end=-1 ) const |
| Array | search_all ( String subject, int offset=0, int end=-1 ) const |
| String | sub ( String subject, String replacement, bool all=false, int offset=0, int end=-1 ) const |
Method Descriptions¶
- void clear ( )
This method resets the state of the object, as if it was freshly created. Namely, it unassigns the regular expression of this object.
Compiles and assign the search pattern to use. Returns @GlobalScope.OK if the compilation is successful. If an error is encountered, details are printed to standard output and an error is returned.
- int get_group_count ( ) const
Returns the number of capturing groups in compiled pattern.
- Array get_names ( ) const
Returns an array of names of named capturing groups in the compiled pattern. They are ordered by appearance.
- String get_pattern ( ) const
Returns the original search pattern that was compiled.
- bool is_valid ( ) const
Returns whether this object has a valid search pattern assigned.
- RegExMatch search ( String subject, int offset=0, int end=-1 ) const
Searches the text for the compiled pattern. Returns a RegExMatch container of the first matching result if found, otherwise null. The region to search within can be specified without modifying where the start and end anchor would be.
Searches the text for the compiled pattern. Returns an array of RegExMatch containers for each non-overlapping result. If no results were found, an empty array is returned instead. The region to search within can be specified without modifying where the start and end anchor would be.
Searches the text for the compiled pattern and replaces it with the specified string. Escapes and backreferences such as $1 and $name are expanded and resolved. By default, only the first instance is replaced, but it can be changed for all instances (global replacement). The region to search within can be specified without modifying where the start and end anchor would be.
RegExMatch¶
Contains the results of a RegEx search.
Description¶
Contains the results of a single RegEx match returned by RegEx.search and RegEx.search_all. It can be used to find the position and range of the match and its capturing groups, and it can extract its substring for you.
Methods¶
| int | get_end ( Variant name=0 ) const |
| int | get_group_count ( ) const |
| int | get_start ( Variant name=0 ) const |
| String | get_string ( Variant name=0 ) const |
Property Descriptions¶
- Dictionary names
| Default | {} |
| Getter | get_names() |
A dictionary of named groups and its corresponding group number. Only groups with that were matched are included. If multiple groups have the same name, that name would refer to the first matching one.
- Array strings
| Default | [ ] |
| Getter | get_strings() |
An Array of the match and its capturing groups.
- String subject
| Default | "" |
| Getter | get_subject() |
The source string used with the search pattern to find this matching result.
Method Descriptions¶
Returns the end position of the match within the source string. The end position of capturing groups can be retrieved by providing its group number as an integer or its string name (if it’s a named group). The default value of 0 refers to the whole pattern.
Returns -1 if the group did not match or doesn’t exist.
- int get_group_count ( ) const
Returns the number of capturing groups.
Returns the starting position of the match within the source string. The starting position of capturing groups can be retrieved by providing its group number as an integer or its string name (if it’s a named group). The default value of 0 refers to the whole pattern.
Returns -1 if the group did not match or doesn’t exist.
Returns the substring of the match from the source string. Capturing groups can be retrieved by providing its group number as an integer or its string name (if it’s a named group). The default value of 0 refers to the whole pattern.
Returns an empty string if the group did not match or doesn’t exist.
RemoteTransform¶
Inherits: Spatial < Node < Object
RemoteTransform pushes its own Transform to another Spatial derived Node in the scene.
Description¶
RemoteTransform pushes its own Transform to another Spatial derived Node (called the remote node) in the scene.
It can be set to update another Node’s position, rotation and/or scale. It can use either global or local coordinates.
Properties¶
| NodePath | remote_path | NodePath("") |
| bool | update_position | true |
| bool | update_rotation | true |
| bool | update_scale | true |
| bool | use_global_coordinates | true |
Methods¶
| void | force_update_cache ( ) |
Property Descriptions¶
- NodePath remote_path
| Default | NodePath("") |
| Setter | set_remote_node(value) |
| Getter | get_remote_node() |
The NodePath to the remote node, relative to the RemoteTransform’s position in the scene.
- bool update_position
| Default | true |
| Setter | set_update_position(value) |
| Getter | get_update_position() |
If true, the remote node’s position is updated.
- bool update_rotation
| Default | true |
| Setter | set_update_rotation(value) |
| Getter | get_update_rotation() |
If true, the remote node’s rotation is updated.
- bool update_scale
| Default | true |
| Setter | set_update_scale(value) |
| Getter | get_update_scale() |
If true, the remote node’s scale is updated.
- bool use_global_coordinates
| Default | true |
| Setter | set_use_global_coordinates(value) |
| Getter | get_use_global_coordinates() |
If true, global coordinates are used. If false, local coordinates are used.
Method Descriptions¶
- void force_update_cache ( )
RemoteTransform caches the remote node. It may not notice if the remote node disappears; force_update_cache forces it to update the cache again.
RemoteTransform2D¶
Inherits: Node2D < CanvasItem < Node < Object
RemoteTransform2D pushes its own Transform2D to another CanvasItem derived Node in the scene.
Description¶
RemoteTransform2D pushes its own Transform2D to another CanvasItem derived Node (called the remote node) in the scene.
It can be set to update another Node’s position, rotation and/or scale. It can use either global or local coordinates.
Properties¶
| NodePath | remote_path | NodePath("") |
| bool | update_position | true |
| bool | update_rotation | true |
| bool | update_scale | true |
| bool | use_global_coordinates | true |
Methods¶
| void | force_update_cache ( ) |
Property Descriptions¶
- NodePath remote_path
| Default | NodePath("") |
| Setter | set_remote_node(value) |
| Getter | get_remote_node() |
The NodePath to the remote node, relative to the RemoteTransform2D’s position in the scene.
- bool update_position
| Default | true |
| Setter | set_update_position(value) |
| Getter | get_update_position() |
If true, the remote node’s position is updated.
- bool update_rotation
| Default | true |
| Setter | set_update_rotation(value) |
| Getter | get_update_rotation() |
If true, the remote node’s rotation is updated.
- bool update_scale
| Default | true |
| Setter | set_update_scale(value) |
| Getter | get_update_scale() |
If true, the remote node’s scale is updated.
- bool use_global_coordinates
| Default | true |
| Setter | set_use_global_coordinates(value) |
| Getter | get_use_global_coordinates() |
If true, global coordinates are used. If false, local coordinates are used.
Method Descriptions¶
- void force_update_cache ( )
RemoteTransform2D caches the remote node. It may not notice if the remote node disappears; force_update_cache forces it to update the cache again.
Resource¶
Inherited By: Animation, AnimationNode, AnimationNodeStateMachinePlayback, AnimationNodeStateMachineTransition, AudioBusLayout, AudioEffect, AudioStream, BakedLightmapData, BitMap, ButtonGroup, CryptoKey, CubeMap, Curve, Curve2D, Curve3D, DynamicFontData, EditorSettings, EditorSpatialGizmoPlugin, Environment, Font, GDNativeLibrary, GIProbeData, Gradient, Image, InputEvent, Material, Mesh, MeshLibrary, MultiMesh, NavigationMesh, NavigationPolygon, OccluderPolygon2D, OpenSimplexNoise, PackedDataContainer, PackedScene, PhysicsMaterial, PolygonPathFinder, RichTextEffect, Script, Shader, Shape, Shape2D, ShortCut, Skin, Sky, SpriteFrames, StyleBox, TextFile, Texture, TextureLayered, Theme, TileSet, Translation, VideoStream, VisualScriptNode, VisualShaderNode, World, World2D, X509Certificate
Base class for all resources.
Description¶
Resource is the base class for all Godot-specific resource types, serving primarily as data containers. They are reference counted and freed when no longer in use. They are also cached once loaded from disk, so that any further attempts to load a resource from a given path will return the same reference (all this in contrast to a Node, which is not reference counted and can be instanced from disk as many times as desired). Resources can be saved externally on disk or bundled into another object, such as a Node or another resource.
Properties¶
| bool | resource_local_to_scene | false |
| String | resource_name | "" |
| String | resource_path | "" |
Methods¶
| void | _setup_local_to_scene ( ) virtual |
| Resource | duplicate ( bool subresources=false ) const |
| Node | get_local_scene ( ) const |
| RID | get_rid ( ) const |
| void | setup_local_to_scene ( ) |
| void | take_over_path ( String path ) |
Property Descriptions¶
- bool resource_local_to_scene
| Default | false |
| Setter | set_local_to_scene(value) |
| Getter | is_local_to_scene() |
If true, the resource will be made unique in each instance of its local scene. It can thus be modified in a scene instance without impacting other instances of that same scene.
- String resource_name
| Default | "" |
| Setter | set_name(value) |
| Getter | get_name() |
The name of the resource. This is an optional identifier.
- String resource_path
| Default | "" |
| Setter | set_path(value) |
| Getter | get_path() |
The path to the resource. In case it has its own file, it will return its filepath. If it’s tied to the scene, it will return the scene’s path, followed by the resource’s index.
Method Descriptions¶
- void _setup_local_to_scene ( ) virtual
Virtual function which can be overridden to customize the behavior value of setup_local_to_scene.
Duplicates the resource, returning a new resource. By default, sub-resources are shared between resource copies for efficiency, this can be changed by passing true to the subresources argument.
- Node get_local_scene ( ) const
If resource_local_to_scene is enabled and the resource was loaded from a PackedScene instantiation, returns the local scene where this resource’s unique copy is in use. Otherwise, returns null.
- RID get_rid ( ) const
Returns the RID of the resource (or an empty RID). Many resources (such as Texture, Mesh, etc) are high-level abstractions of resources stored in a server, so this function will return the original RID.
- void setup_local_to_scene ( )
This method is called when a resource with resource_local_to_scene enabled is loaded from a PackedScene instantiation. Its behavior can be customized by overriding _setup_local_to_scene from script.
For most resources, this method performs no base logic. ViewportTexture performs custom logic to properly set the proxy texture and flags in the local viewport.
- void take_over_path ( String path )
Sets the path of the resource, potentially overriding an existing cache entry for this path. This differs from setting resource_path, as the latter would error out if another resource was already cached for the given path.
ResourceFormatLoader¶
Inherited By: ResourceFormatLoaderCrypto
Loads a specific resource type from a file.
Description¶
Godot loads resources in the editor or in exported games using ResourceFormatLoaders. They are queried automatically via the ResourceLoader singleton, or when a resource with internal dependencies is loaded. Each file type may load as a different resource type, so multiple ResourceFormatLoaders are registered in the engine.
Extending this class allows you to define your own loader. Be sure to respect the documented return types and values. You should give it a global class name with class_name for it to be registered. Like built-in ResourceFormatLoaders, it will be called automatically when loading resources of its handled type(s). You may also implement a ResourceFormatSaver.
Note: You can also extend EditorImportPlugin if the resource type you need exists but Godot is unable to load its format. Choosing one way over another depends if the format is suitable or not for the final exported game. For example, it’s better to import .png textures as .stex (StreamTexture) first, so they can be loaded with better efficiency on the graphics card.
Methods¶
| void | get_dependencies ( String path, String add_types ) virtual |
| PoolStringArray | get_recognized_extensions ( ) virtual |
| String | get_resource_type ( String path ) virtual |
| bool | handles_type ( String typename ) virtual |
| Variant | load ( String path, String original_path ) virtual |
| int | rename_dependencies ( String path, String renames ) virtual |
Method Descriptions¶
If implemented, gets the dependencies of a given resource. If add_types is true, paths should be appended ::TypeName, where TypeName is the class name of the dependency.
Note: Custom resource types defined by scripts aren’t known by the ClassDB, so you might just return "Resource" for them.
- PoolStringArray get_recognized_extensions ( ) virtual
Gets the list of extensions for files this loader is able to read.
Gets the class name of the resource associated with the given path. If the loader cannot handle it, it should return "".
Note: Custom resource types defined by scripts aren’t known by the ClassDB, so you might just return "Resource" for them.
Tells which resource class this loader can load.
Note: Custom resource types defined by scripts aren’t known by the ClassDB, so you might just handle "Resource" for them.
Loads a resource when the engine finds this loader to be compatible. If the loaded resource is the result of an import, original_path will target the source file. Returns a Resource object on success, or an Error constant in case of failure.
If implemented, renames dependencies within the given resource and saves it. renames is a dictionary { String => String } mapping old dependency paths to new paths.
Returns @GlobalScope.OK on success, or an Error constant in case of failure.
ResourceFormatLoaderCrypto¶
Inherits: ResourceFormatLoader < Reference < Object
ResourceFormatSaver¶
Inherited By: ResourceFormatSaverCrypto
Saves a specific resource type to a file.
Description¶
The engine can save resources when you do it from the editor, or when you use the ResourceSaver singleton. This is accomplished thanks to multiple ResourceFormatSavers, each handling its own format and called automatically by the engine.
By default, Godot saves resources as .tres (text-based), .res (binary) or another built-in format, but you can choose to create your own format by extending this class. Be sure to respect the documented return types and values. You should give it a global class name with class_name for it to be registered. Like built-in ResourceFormatSavers, it will be called automatically when saving resources of its recognized type(s). You may also implement a ResourceFormatLoader.
Methods¶
| PoolStringArray | get_recognized_extensions ( Resource resource ) virtual |
| bool | recognize ( Resource resource ) virtual |
| int | save ( String path, Resource resource, int flags ) virtual |
Method Descriptions¶
- PoolStringArray get_recognized_extensions ( Resource resource ) virtual
Returns the list of extensions available for saving the resource object, provided it is recognized (see recognize).
Returns whether the given resource object can be saved by this saver.
Saves the given resource object to a file at the target path. flags is a bitmask composed with SaverFlags constants.
Returns @GlobalScope.OK on success, or an Error constant in case of failure.
ResourceFormatSaverCrypto¶
Inherits: ResourceFormatSaver < Reference < Object
ResourceInteractiveLoader¶
Interactive Resource loader.
Description¶
Interactive Resource loader. This object is returned by ResourceLoader when performing an interactive load. It allows loading resources with high granularity, which makes it mainly useful for displaying loading bars or percentages.
Methods¶
| Resource | get_resource ( ) |
| int | get_stage ( ) const |
| int | get_stage_count ( ) const |
| Error | poll ( ) |
| Error | wait ( ) |
Method Descriptions¶
- Resource get_resource ( )
Returns the loaded resource if the load operation completed successfully, null otherwise.
- int get_stage ( ) const
Returns the load stage. The total amount of stages can be queried with get_stage_count.
- int get_stage_count ( ) const
Returns the total amount of stages (calls to poll) needed to completely load this resource.
- Error poll ( )
Polls the loading operation, i.e. loads a data chunk up to the next stage.
Returns @GlobalScope.OK if the poll is successful but the load operation has not finished yet (intermediate stage). This means poll will have to be called again until the last stage is completed.
Returns @GlobalScope.ERR_FILE_EOF if the load operation has completed successfully. The loaded resource can be obtained by calling get_resource.
Returns another Error code if the poll has failed.
- Error wait ( )
Polls the loading operation successively until the resource is completely loaded or a poll fails.
Returns @GlobalScope.ERR_FILE_EOF if the load operation has completed successfully. The loaded resource can be obtained by calling get_resource.
Returns another Error code if a poll has failed, aborting the operation.
ResourceLoader¶
Inherits: Object
Singleton used to load resource files.
Description¶
Singleton used to load resource files from the filesystem.
It uses the many ResourceFormatLoader classes registered in the engine (either built-in or from a plugin) to load files into memory and convert them to a format that can be used by the engine.
GDScript has a simplified @GDScript.load built-in method which can be used in most situations, leaving the use of ResourceLoader for more advanced scenarios.
Methods¶
| bool | exists ( String path, String type_hint=”” ) |
| PoolStringArray | get_dependencies ( String path ) |
| PoolStringArray | get_recognized_extensions_for_type ( String type ) |
| bool | has ( String path ) |
| bool | has_cached ( String path ) |
| Resource | load ( String path, String type_hint=”“, bool no_cache=false ) |
| ResourceInteractiveLoader | load_interactive ( String path, String type_hint=”” ) |
| void | set_abort_on_missing_resources ( bool abort ) |
Method Descriptions¶
Returns whether a recognized resource exists for the given path.
An optional type_hint can be used to further specify the Resource type that should be handled by the ResourceFormatLoader.
- PoolStringArray get_dependencies ( String path )
Returns the dependencies for the resource at the given path.
- PoolStringArray get_recognized_extensions_for_type ( String type )
Returns the list of recognized extensions for a resource type.
Deprecated method. Use has_cached or exists instead.
Returns whether a cached resource is available for the given path.
Once a resource has been loaded by the engine, it is cached in memory for faster access, and future calls to the load or load_interactive methods will use the cached version. The cached resource can be overridden by using Resource.take_over_path on a new resource for that same path.
Loads a resource at the given path, caching the result for further access.
The registered ResourceFormatLoaders are queried sequentially to find the first one which can handle the file’s extension, and then attempt loading. If loading fails, the remaining ResourceFormatLoaders are also attempted.
An optional type_hint can be used to further specify the Resource type that should be handled by the ResourceFormatLoader.
If no_cache is true, the resource cache will be bypassed and the resource will be loaded anew. Otherwise, the cached resource will be returned if it exists.
Returns an empty resource if no ResourceFormatLoader could handle the file.
- ResourceInteractiveLoader load_interactive ( String path, String type_hint=”” )
Starts loading a resource interactively. The returned ResourceInteractiveLoader object allows to load with high granularity, calling its ResourceInteractiveLoader.poll method successively to load chunks.
An optional type_hint can be used to further specify the Resource type that should be handled by the ResourceFormatLoader.
- void set_abort_on_missing_resources ( bool abort )
Changes the behavior on missing sub-resources. The default behavior is to abort loading.
ResourcePreloader¶
Resource Preloader Node.
Description¶
This node is used to preload sub-resources inside a scene, so when the scene is loaded, all the resources are ready to use and can be retrieved from the preloader.
GDScript has a simplified @GDScript.preload built-in method which can be used in most situations, leaving the use of ResourcePreloader for more advanced scenarios.
Methods¶
| void | add_resource ( String name, Resource resource ) |
| Resource | get_resource ( String name ) const |
| PoolStringArray | get_resource_list ( ) const |
| bool | has_resource ( String name ) const |
| void | remove_resource ( String name ) |
| void | rename_resource ( String name, String newname ) |
Method Descriptions¶
Adds a resource to the preloader with the given name. If a resource with the given name already exists, the new resource will be renamed to “name N” where N is an incrementing number starting from 2.
Returns the resource associated to name.
- PoolStringArray get_resource_list ( ) const
Returns the list of resources inside the preloader.
Returns true if the preloader contains a resource associated to name.
- void remove_resource ( String name )
Removes the resource associated to name from the preloader.
Renames a resource inside the preloader from name to newname.
ResourceSaver¶
Inherits: Object
Singleton for saving Godot-specific resource types.
Description¶
Singleton for saving Godot-specific resource types to the filesystem.
It uses the many ResourceFormatSaver classes registered in the engine (either built-in or from a plugin) to save engine-specific resource data to text-based (e.g. .tres or .tscn) or binary files (e.g. .res or .scn).
Methods¶
| PoolStringArray | get_recognized_extensions ( Resource type ) |
| Error | save ( String path, Resource resource, SaverFlags flags=0 ) |
Enumerations¶
enum SaverFlags:
- FLAG_RELATIVE_PATHS = 1 — Save the resource with a path relative to the scene which uses it.
- FLAG_BUNDLE_RESOURCES = 2 — Bundles external resources.
- FLAG_CHANGE_PATH = 4 — Changes the Resource.resource_path of the saved resource to match its new location.
- FLAG_OMIT_EDITOR_PROPERTIES = 8 — Do not save editor-specific metadata (identified by their
__editorprefix). - FLAG_SAVE_BIG_ENDIAN = 16 — Save as big endian (see File.endian_swap).
- FLAG_COMPRESS = 32 — Compress the resource on save using File.COMPRESSION_ZSTD. Only available for binary resource types.
- FLAG_REPLACE_SUBRESOURCE_PATHS = 64 — Take over the paths of the saved subresources (see Resource.take_over_path).
Method Descriptions¶
- PoolStringArray get_recognized_extensions ( Resource type )
Returns the list of extensions available for saving a resource of a given type.
- Error save ( String path, Resource resource, SaverFlags flags=0 )
Saves a resource to disk to the given path, using a ResourceFormatSaver that recognizes the resource object.
The flags bitmask can be specified to customize the save behavior.
Returns @GlobalScope.OK on success.
RichTextEffect¶
Inherits: Resource < Reference < Object
A custom effect for use with RichTextLabel.
Description¶
A custom effect for use with RichTextLabel.
Note: For a RichTextEffect to be usable, a BBCode tag must be defined as a member variable called bbcode in the script.
# The RichTextEffect will be usable like this: `[example]Some text[/example]`
var bbcode = "example"
Note: As soon as a RichTextLabel contains at least one RichTextEffect, it will continuously process the effect unless the project is paused. This may impact battery life negatively.
Tutorials¶
Methods¶
| bool | _process_custom_fx ( CharFXTransform char_fx ) virtual |
Method Descriptions¶
- bool _process_custom_fx ( CharFXTransform char_fx ) virtual
Override this method to modify properties in char_fx. The method must return true if the character could be transformed successfully. If the method returns false, it will skip transformation to avoid displaying broken text.
RichTextLabel¶
Inherits: Control < CanvasItem < Node < Object
Label that displays rich text.
Description¶
Rich text can contain custom text, fonts, images and some basic formatting. The label manages these as an internal tag stack. It also adapts itself to given width/heights.
Note: Assignments to bbcode_text clear the tag stack and reconstruct it from the property’s contents. Any edits made to bbcode_text will erase previous edits made from other manual sources such as append_bbcode and the push_* / pop methods.
Tutorials¶
Properties¶
| bool | bbcode_enabled | false |
| String | bbcode_text | "" |
| Array | custom_effects | [ ] |
| bool | meta_underlined | true |
| bool | override_selected_font_color | false |
| float | percent_visible | 1.0 |
| bool | rect_clip_content | O: true |
| bool | scroll_active | true |
| bool | scroll_following | false |
| bool | selection_enabled | false |
| int | tab_size | 4 |
| String | text | "" |
| int | visible_characters | -1 |
Methods¶
Theme Properties¶
| Font | bold_font | |
| Font | bold_italics_font | |
| Color | default_color | Color( 1, 1, 1, 1 ) |
| StyleBox | focus | |
| Color | font_color_selected | Color( 0.49, 0.49, 0.49, 1 ) |
| Color | font_color_shadow | Color( 0, 0, 0, 0 ) |
| Font | italics_font | |
| int | line_separation | 1 |
| Font | mono_font | |
| StyleBox | normal | |
| Font | normal_font | |
| Color | selection_color | Color( 0.1, 0.1, 1, 0.8 ) |
| int | shadow_as_outline | 0 |
| int | shadow_offset_x | 1 |
| int | shadow_offset_y | 1 |
| int | table_hseparation | 3 |
| int | table_vseparation | 3 |
Signals¶
- meta_clicked ( Variant meta )
Triggered when the user clicks on content between meta tags. If the meta is defined in text, e.g. [url={"data"="hi"}]hi[/url], then the parameter for this signal will be a String type. If a particular type or an object is desired, the push_meta method must be used to manually insert the data into the tag stack.
- meta_hover_ended ( Variant meta )
Triggers when the mouse exits a meta tag.
- meta_hover_started ( Variant meta )
Triggers when the mouse enters a meta tag.
Enumerations¶
enum Align:
- ALIGN_LEFT = 0 — Makes text left aligned.
- ALIGN_CENTER = 1 — Makes text centered.
- ALIGN_RIGHT = 2 — Makes text right aligned.
- ALIGN_FILL = 3 — Makes text fill width.
enum ListType:
- LIST_NUMBERS = 0 — Each list item has a number marker.
- LIST_LETTERS = 1 — Each list item has a letter marker.
- LIST_DOTS = 2 — Each list item has a filled circle marker.
enum ItemType:
- ITEM_FRAME = 0
- ITEM_TEXT = 1
- ITEM_IMAGE = 2
- ITEM_NEWLINE = 3
- ITEM_FONT = 4
- ITEM_COLOR = 5
- ITEM_UNDERLINE = 6
- ITEM_STRIKETHROUGH = 7
- ITEM_ALIGN = 8
- ITEM_INDENT = 9
- ITEM_LIST = 10
- ITEM_TABLE = 11
- ITEM_FADE = 12
- ITEM_SHAKE = 13
- ITEM_WAVE = 14
- ITEM_TORNADO = 15
- ITEM_RAINBOW = 16
- ITEM_CUSTOMFX = 18
- ITEM_META = 17
Property Descriptions¶
- bool bbcode_enabled
| Default | false |
| Setter | set_use_bbcode(value) |
| Getter | is_using_bbcode() |
If true, the label uses BBCode formatting.
- String bbcode_text
| Default | "" |
| Setter | set_bbcode(value) |
| Getter | get_bbcode() |
The label’s text in BBCode format. Is not representative of manual modifications to the internal tag stack. Erases changes made by other methods when edited.
Note: It is unadvised to use += operator with bbcode_text (e.g. bbcode_text += "some string") as it replaces the whole text and can cause slowdowns. Use append_bbcode for adding text instead.
- Array custom_effects
| Default | [ ] |
| Setter | set_effects(value) |
| Getter | get_effects() |
The currently installed custom effects. This is an array of RichTextEffects.
To add a custom effect, it’s more convenient to use install_effect.
- bool meta_underlined
| Default | true |
| Setter | set_meta_underline(value) |
| Getter | is_meta_underlined() |
If true, the label underlines meta tags such as [url]{text}[/url].
- bool override_selected_font_color
| Default | false |
| Setter | set_override_selected_font_color(value) |
| Getter | is_overriding_selected_font_color() |
If true, the label uses the custom font color.
- float percent_visible
| Default | 1.0 |
| Setter | set_percent_visible(value) |
| Getter | get_percent_visible() |
The range of characters to display, as a float between 0.0 and 1.0. When assigned an out of range value, it’s the same as assigning 1.0.
Note: Setting this property updates visible_characters based on current get_total_character_count.
- bool scroll_active
| Default | true |
| Setter | set_scroll_active(value) |
| Getter | is_scroll_active() |
If true, the scrollbar is visible. Setting this to false does not block scrolling completely. See scroll_to_line.
- bool scroll_following
| Default | false |
| Setter | set_scroll_follow(value) |
| Getter | is_scroll_following() |
If true, the window scrolls down to display new content automatically.
- bool selection_enabled
| Default | false |
| Setter | set_selection_enabled(value) |
| Getter | is_selection_enabled() |
If true, the label allows text selection.
- int tab_size
| Default | 4 |
| Setter | set_tab_size(value) |
| Getter | get_tab_size() |
The number of spaces associated with a single tab length. Does not affect \t in text tags, only indent tags.
- String text
| Default | "" |
| Setter | set_text(value) |
| Getter | get_text() |
The raw text of the label.
When set, clears the tag stack and adds a raw text tag to the top of it. Does not parse BBCodes. Does not modify bbcode_text.
- int visible_characters
| Default | -1 |
| Setter | set_visible_characters(value) |
| Getter | get_visible_characters() |
The restricted number of characters to display in the label. If -1, all characters will be displayed.
Method Descriptions¶
Adds an image’s opening and closing tags to the tag stack, optionally providing a width and height to resize the image.
If width or height is set to 0, the image size will be adjusted in order to keep the original aspect ratio.
- void add_text ( String text )
Adds raw non-BBCode-parsed text to the tag stack.
Parses bbcode and adds tags to the tag stack as needed. Returns the result of the parsing, @GlobalScope.OK if successful.
- void clear ( )
Clears the tag stack and sets bbcode_text to an empty string.
- int get_content_height ( )
Returns the height of the content.
- int get_line_count ( ) const
Returns the total number of newlines in the tag stack’s text tags. Considers wrapped text as one line.
- int get_total_character_count ( ) const
Returns the total number of characters from text tags. Does not include BBCodes.
- VScrollBar get_v_scroll ( )
Returns the vertical scrollbar.
- int get_visible_line_count ( ) const
Returns the number of visible lines.
- void install_effect ( Variant effect )
Installs a custom effect. effect should be a valid RichTextEffect.
- void newline ( )
Adds a newline tag to the tag stack.
The assignment version of append_bbcode. Clears the tag stack and inserts the new content. Returns @GlobalScope.OK if parses bbcode successfully.
- Dictionary parse_expressions_for_values ( PoolStringArray expressions )
Parses BBCode parameter expressions into a dictionary.
- void pop ( )
Terminates the current tag. Use after push_* methods to close BBCodes manually. Does not need to follow add_* methods.
- void push_align ( Align align )
Adds an [align] tag based on the given align value. See Align for possible values.
- void push_bold ( )
Adds a [font] tag with a bold font to the tag stack. This is the same as adding a [b] tag if not currently in a [i] tag.
- void push_bold_italics ( )
Adds a [font] tag with a bold italics font to the tag stack.
- void push_cell ( )
Adds a [cell] tag to the tag stack. Must be inside a [table] tag. See push_table for details.
- void push_color ( Color color )
Adds a [color] tag to the tag stack.
- void push_font ( Font font )
Adds a [font] tag to the tag stack. Overrides default fonts for its duration.
- void push_indent ( int level )
Adds an [indent] tag to the tag stack. Multiplies level by current tab_size to determine new margin length.
- void push_italics ( )
Adds a [font] tag with a italics font to the tag stack. This is the same as adding a [i] tag if not currently in a [b] tag.
- void push_list ( ListType type )
Adds a [list] tag to the tag stack. Similar to the BBCodes [ol] or [ul], but supports more list types. Not fully implemented!
- void push_meta ( Variant data )
Adds a [meta] tag to the tag stack. Similar to the BBCode [url=something]{text}[/url], but supports non-String metadata types.
- void push_mono ( )
Adds a [font] tag with a monospace font to the tag stack.
- void push_normal ( )
Adds a [font] tag with a normal font to the tag stack.
- void push_strikethrough ( )
Adds a [s] tag to the tag stack.
- void push_table ( int columns )
Adds a [table=columns] tag to the tag stack.
- void push_underline ( )
Adds a [u] tag to the tag stack.
Removes a line of content from the label. Returns true if the line exists.
The line argument is the index of the line to remove, it can take values in the interval [0, get_line_count() - 1].
- void scroll_to_line ( int line )
Scrolls the window’s top line to match line.
Edits the selected column’s expansion options. If expand is true, the column expands in proportion to its expansion ratio versus the other columns’ ratios.
For example, 2 columns with ratios 3 and 4 plus 70 pixels in available width would expand 30 and 40 pixels, respectively.
If expand is false, the column will not contribute to the total ratio.
RID¶
Handle for a Resource’s unique ID.
Description¶
The RID type is used to access the unique integer ID of a resource. They are opaque, which means they do not grant access to the associated resource by themselves. They are used by and with the low-level Server classes such as VisualServer.
RigidBody¶
Inherits: PhysicsBody < CollisionObject < Spatial < Node < Object
Inherited By: VehicleBody
Physics Body whose position is determined through physics simulation in 3D space.
Description¶
This is the node that implements full 3D physics. This means that you do not control a RigidBody directly. Instead, you can apply forces to it (gravity, impulses, etc.), and the physics simulation will calculate the resulting movement, collision, bouncing, rotating, etc.
A RigidBody has 4 behavior modes: Rigid, Static, Character, and Kinematic.
Note: Don’t change a RigidBody’s position every frame or very often. Sporadic changes work fine, but physics runs at a different granularity (fixed Hz) than usual rendering (process callback) and maybe even in a separate thread, so changing this from a process loop may result in strange behavior. If you need to directly affect the body’s state, use _integrate_forces, which allows you to directly access the physics state.
If you need to override the default physics behavior, you can write a custom force integration function. See custom_integrator.
Tutorials¶
Properties¶
| float | angular_damp | -1.0 |
| Vector3 | angular_velocity | Vector3( 0, 0, 0 ) |
| bool | axis_lock_angular_x | false |
| bool | axis_lock_angular_y | false |
| bool | axis_lock_angular_z | false |
| bool | axis_lock_linear_x | false |
| bool | axis_lock_linear_y | false |
| bool | axis_lock_linear_z | false |
| float | bounce | |
| bool | can_sleep | true |
| bool | contact_monitor | false |
| int | contacts_reported | 0 |
| bool | continuous_cd | false |
| bool | custom_integrator | false |
| float | friction | |
| float | gravity_scale | 1.0 |
| float | linear_damp | -1.0 |
| Vector3 | linear_velocity | Vector3( 0, 0, 0 ) |
| float | mass | 1.0 |
| Mode | mode | 0 |
| PhysicsMaterial | physics_material_override | |
| bool | sleeping | false |
| float | weight | 9.8 |
Methods¶
| void | _integrate_forces ( PhysicsDirectBodyState state ) virtual |
| void | add_central_force ( Vector3 force ) |
| void | add_force ( Vector3 force, Vector3 position ) |
| void | add_torque ( Vector3 torque ) |
| void | apply_central_impulse ( Vector3 impulse ) |
| void | apply_impulse ( Vector3 position, Vector3 impulse ) |
| void | apply_torque_impulse ( Vector3 impulse ) |
| bool | get_axis_lock ( BodyAxis axis ) const |
| Array | get_colliding_bodies ( ) const |
| void | set_axis_lock ( BodyAxis axis, bool lock ) |
| void | set_axis_velocity ( Vector3 axis_velocity ) |
Signals¶
- body_entered ( Node body )
Emitted when a body enters into contact with this one. Contact monitor and contacts reported must be enabled for this to work.
- body_exited ( Node body )
Emitted when a body shape exits contact with this one. Contact monitor and contacts reported must be enabled for this to work.
Emitted when a body enters into contact with this one. Contact monitor and contacts reported must be enabled for this to work.
This signal not only receives the body that collided with this one, but also its RID (body_id), the shape index from the colliding body (body_shape), and the shape index from this body (local_shape) the other body collided with.
Emitted when a body shape exits contact with this one. Contact monitor and contacts reported must be enabled for this to work.
This signal not only receives the body that stopped colliding with this one, but also its RID (body_id), the shape index from the colliding body (body_shape), and the shape index from this body (local_shape) the other body stopped colliding with.
- sleeping_state_changed ( )
Emitted when the body changes its sleeping state. Either by sleeping or waking up.
Enumerations¶
enum Mode:
- MODE_RIGID = 0 — Rigid body mode. This is the “natural” state of a rigid body. It is affected by forces, and can move, rotate, and be affected by user code.
- MODE_STATIC = 1 — Static mode. The body behaves like a StaticBody, and can only move by user code.
- MODE_CHARACTER = 2 — Character body mode. This behaves like a rigid body, but can not rotate.
- MODE_KINEMATIC = 3 — Kinematic body mode. The body behaves like a KinematicBody, and can only move by user code.
Property Descriptions¶
- float angular_damp
| Default | -1.0 |
| Setter | set_angular_damp(value) |
| Getter | get_angular_damp() |
Damps RigidBody’s rotational forces.
- Vector3 angular_velocity
| Default | Vector3( 0, 0, 0 ) |
| Setter | set_angular_velocity(value) |
| Getter | get_angular_velocity() |
RigidBody’s rotational velocity.
- bool axis_lock_angular_x
| Default | false |
| Setter | set_axis_lock(value) |
| Getter | get_axis_lock() |
Lock the body’s rotation in the X axis.
- bool axis_lock_angular_y
| Default | false |
| Setter | set_axis_lock(value) |
| Getter | get_axis_lock() |
Lock the body’s rotation in the Y axis.
- bool axis_lock_angular_z
| Default | false |
| Setter | set_axis_lock(value) |
| Getter | get_axis_lock() |
Lock the body’s rotation in the Z axis.
- bool axis_lock_linear_x
| Default | false |
| Setter | set_axis_lock(value) |
| Getter | get_axis_lock() |
Lock the body’s movement in the X axis.
- bool axis_lock_linear_y
| Default | false |
| Setter | set_axis_lock(value) |
| Getter | get_axis_lock() |
Lock the body’s movement in the Y axis.
- bool axis_lock_linear_z
| Default | false |
| Setter | set_axis_lock(value) |
| Getter | get_axis_lock() |
Lock the body’s movement in the Z axis.
- float bounce
| Setter | set_bounce(value) |
| Getter | get_bounce() |
The body’s bounciness. Values range from 0 (no bounce) to 1 (full bounciness).
Deprecated, use PhysicsMaterial.bounce instead via physics_material_override.
- bool can_sleep
| Default | true |
| Setter | set_can_sleep(value) |
| Getter | is_able_to_sleep() |
If true, the RigidBody will not calculate forces and will act as a static body while there is no movement. It will wake up when forces are applied through other collisions or when the apply_impulse method is used.
- bool contact_monitor
| Default | false |
| Setter | set_contact_monitor(value) |
| Getter | is_contact_monitor_enabled() |
If true, the RigidBody will emit signals when it collides with another RigidBody.
- int contacts_reported
| Default | 0 |
| Setter | set_max_contacts_reported(value) |
| Getter | get_max_contacts_reported() |
The maximum contacts to report. Bodies can keep a log of the contacts with other bodies, this is enabled by setting the maximum amount of contacts reported to a number greater than 0.
- bool continuous_cd
| Default | false |
| Setter | set_use_continuous_collision_detection(value) |
| Getter | is_using_continuous_collision_detection() |
If true, continuous collision detection is used.
Continuous collision detection tries to predict where a moving body will collide, instead of moving it and correcting its movement if it collided. Continuous collision detection is more precise, and misses fewer impacts by small, fast-moving objects. Not using continuous collision detection is faster to compute, but can miss small, fast-moving objects.
- bool custom_integrator
| Default | false |
| Setter | set_use_custom_integrator(value) |
| Getter | is_using_custom_integrator() |
If true, internal force integration will be disabled (like gravity or air friction) for this body. Other than collision response, the body will only move as determined by the _integrate_forces function, if defined.
- float friction
| Setter | set_friction(value) |
| Getter | get_friction() |
The body’s friction, from 0 (frictionless) to 1 (max friction).
Deprecated, use PhysicsMaterial.friction instead via physics_material_override.
- float gravity_scale
| Default | 1.0 |
| Setter | set_gravity_scale(value) |
| Getter | get_gravity_scale() |
This is multiplied by the global 3D gravity setting found in Project > Project Settings > Physics > 3d to produce RigidBody’s gravity. For example, a value of 1 will be normal gravity, 2 will apply double gravity, and 0.5 will apply half gravity to this object.
- float linear_damp
| Default | -1.0 |
| Setter | set_linear_damp(value) |
| Getter | get_linear_damp() |
The body’s linear damp. Cannot be less than -1.0. If this value is different from -1.0, any linear damp derived from the world or areas will be overridden.
- Vector3 linear_velocity
| Default | Vector3( 0, 0, 0 ) |
| Setter | set_linear_velocity(value) |
| Getter | get_linear_velocity() |
The body’s linear velocity. Can be used sporadically, but don’t set this every frame, because physics may run in another thread and runs at a different granularity. Use _integrate_forces as your process loop for precise control of the body state.
- float mass
| Default | 1.0 |
| Setter | set_mass(value) |
| Getter | get_mass() |
The body’s mass.
- Mode mode
| Default | 0 |
| Setter | set_mode(value) |
| Getter | get_mode() |
The body mode. See Mode for possible values.
- PhysicsMaterial physics_material_override
| Setter | set_physics_material_override(value) |
| Getter | get_physics_material_override() |
The physics material override for the body.
If a material is assigned to this property, it will be used instead of any other physics material, such as an inherited one.
- bool sleeping
| Default | false |
| Setter | set_sleeping(value) |
| Getter | is_sleeping() |
If true, the body is sleeping and will not calculate forces until woken up by a collision or the apply_impulse method.
- float weight
| Default | 9.8 |
| Setter | set_weight(value) |
| Getter | get_weight() |
The body’s weight based on its mass and the global 3D gravity. Global values are set in Project > Project Settings > Physics > 3d.
Method Descriptions¶
- void _integrate_forces ( PhysicsDirectBodyState state ) virtual
Called during physics processing, allowing you to read and safely modify the simulation state for the object. By default, it works in addition to the usual physics behavior, but the custom_integrator property allows you to disable the default behavior and do fully custom force integration for a body.
- void add_central_force ( Vector3 force )
Adds a constant directional force without affecting rotation.
This is equivalent to add_force(force, Vector3(0,0,0)).
Adds a constant force (i.e. acceleration).
- void add_torque ( Vector3 torque )
Adds a constant rotational force (i.e. a motor) without affecting position.
- void apply_central_impulse ( Vector3 impulse )
Applies a directional impulse without affecting rotation.
This is equivalent to apply_impulse(Vector3(0,0,0), impulse).
Applies a positioned impulse to the body. An impulse is time independent! Applying an impulse every frame would result in a framerate-dependent force. For this reason it should only be used when simulating one-time impacts. The position uses the rotation of the global coordinate system, but is centered at the object’s origin.
- void apply_torque_impulse ( Vector3 impulse )
Applies a torque impulse which will be affected by the body mass and shape. This will rotate the body around the impulse vector passed.
Returns true if the specified linear or rotational axis is locked.
- Array get_colliding_bodies ( ) const
Returns a list of the bodies colliding with this one. By default, number of max contacts reported is at 0, see the contacts_reported property to increase it.
Note: The result of this test is not immediate after moving objects. For performance, list of collisions is updated once per frame and before the physics step. Consider using signals instead.
Locks the specified linear or rotational axis.
- void set_axis_velocity ( Vector3 axis_velocity )
Sets an axis velocity. The velocity in the given vector axis will be set as the given vector length. This is useful for jumping behavior.
RigidBody2D¶
Inherits: PhysicsBody2D < CollisionObject2D < Node2D < CanvasItem < Node < Object
A body that is controlled by the 2D physics engine.
Description¶
This node implements simulated 2D physics. You do not control a RigidBody2D directly. Instead you apply forces to it (gravity, impulses, etc.) and the physics simulation calculates the resulting movement based on its mass, friction, and other physical properties.
A RigidBody2D has 4 behavior modes: Rigid, Static, Character, and Kinematic.
Note: You should not change a RigidBody2D’s position or linear_velocity every frame or even very often. If you need to directly affect the body’s state, use _integrate_forces, which allows you to directly access the physics state.
Please also keep in mind that physics bodies manage their own transform which overwrites the ones you set. So any direct or indirect transformation (including scaling of the node or its parent) will be visible in the editor only, and immediately reset at runtime.
If you need to override the default physics behavior or add a transformation at runtime, you can write a custom force integration. See custom_integrator.
Properties¶
| float | angular_damp | -1.0 |
| float | angular_velocity | 0.0 |
| Vector2 | applied_force | Vector2( 0, 0 ) |
| float | applied_torque | 0.0 |
| float | bounce | |
| bool | can_sleep | true |
| bool | contact_monitor | false |
| int | contacts_reported | 0 |
| CCDMode | continuous_cd | 0 |
| bool | custom_integrator | false |
| float | friction | |
| float | gravity_scale | 1.0 |
| float | inertia | |
| float | linear_damp | -1.0 |
| Vector2 | linear_velocity | Vector2( 0, 0 ) |
| float | mass | 1.0 |
| Mode | mode | 0 |
| PhysicsMaterial | physics_material_override | |
| bool | sleeping | false |
| float | weight | 9.8 |
Methods¶
| void | _integrate_forces ( Physics2DDirectBodyState state ) virtual |
| void | add_central_force ( Vector2 force ) |
| void | add_force ( Vector2 offset, Vector2 force ) |
| void | add_torque ( float torque ) |
| void | apply_central_impulse ( Vector2 impulse ) |
| void | apply_impulse ( Vector2 offset, Vector2 impulse ) |
| void | apply_torque_impulse ( float torque ) |
| Array | get_colliding_bodies ( ) const |
| void | set_axis_velocity ( Vector2 axis_velocity ) |
| bool | test_motion ( Vector2 motion, bool infinite_inertia=true, float margin=0.08, Physics2DTestMotionResult result=null ) |
Signals¶
- body_entered ( Node body )
Emitted when a body enters into contact with this one. contact_monitor must be true and contacts_reported greater than 0.
- body_exited ( Node body )
Emitted when a body exits contact with this one. contact_monitor must be true and contacts_reported greater than 0.
Emitted when a body enters into contact with this one. Reports colliding shape information. See CollisionObject2D for shape index information. contact_monitor must be true and contacts_reported greater than 0.
Emitted when a body shape exits contact with this one. Reports colliding shape information. See CollisionObject2D for shape index information. contact_monitor must be true and contacts_reported greater than 0.
- sleeping_state_changed ( )
Emitted when sleeping changes.
Enumerations¶
enum Mode:
- MODE_RIGID = 0 — Rigid mode. The body behaves as a physical object. It collides with other bodies and responds to forces applied to it. This is the default mode.
- MODE_STATIC = 1 — Static mode. The body behaves like a StaticBody2D and does not move.
- MODE_CHARACTER = 2 — Character mode. Similar to MODE_RIGID, but the body can not rotate.
- MODE_KINEMATIC = 3 — Kinematic mode. The body behaves like a KinematicBody2D, and must be moved by code.
enum CCDMode:
- CCD_MODE_DISABLED = 0 — Continuous collision detection disabled. This is the fastest way to detect body collisions, but can miss small, fast-moving objects.
- CCD_MODE_CAST_RAY = 1 — Continuous collision detection enabled using raycasting. This is faster than shapecasting but less precise.
- CCD_MODE_CAST_SHAPE = 2 — Continuous collision detection enabled using shapecasting. This is the slowest CCD method and the most precise.
Property Descriptions¶
- float angular_damp
| Default | -1.0 |
| Setter | set_angular_damp(value) |
| Getter | get_angular_damp() |
Damps the body’s angular_velocity. If -1, the body will use the Default Angular Damp defined in Project > Project Settings > Physics > 2d.
- float angular_velocity
| Default | 0.0 |
| Setter | set_angular_velocity(value) |
| Getter | get_angular_velocity() |
The body’s rotational velocity.
- Vector2 applied_force
| Default | Vector2( 0, 0 ) |
| Setter | set_applied_force(value) |
| Getter | get_applied_force() |
The body’s total applied force.
- float applied_torque
| Default | 0.0 |
| Setter | set_applied_torque(value) |
| Getter | get_applied_torque() |
The body’s total applied torque.
- float bounce
| Setter | set_bounce(value) |
| Getter | get_bounce() |
The body’s bounciness. Values range from 0 (no bounce) to 1 (full bounciness).
Deprecated, use PhysicsMaterial.bounce instead via physics_material_override.
- bool can_sleep
| Default | true |
| Setter | set_can_sleep(value) |
| Getter | is_able_to_sleep() |
If true, the body will not calculate forces and will act as a static body if there is no movement. The body will wake up when other forces are applied via collisions or by using apply_impulse or add_force.
- bool contact_monitor
| Default | false |
| Setter | set_contact_monitor(value) |
| Getter | is_contact_monitor_enabled() |
If true, the body will emit signals when it collides with another RigidBody2D. See also contacts_reported.
- int contacts_reported
| Default | 0 |
| Setter | set_max_contacts_reported(value) |
| Getter | get_max_contacts_reported() |
The maximum number of contacts to report.
- CCDMode continuous_cd
| Default | 0 |
| Setter | set_continuous_collision_detection_mode(value) |
| Getter | get_continuous_collision_detection_mode() |
Continuous collision detection mode.
Continuous collision detection tries to predict where a moving body will collide instead of moving it and correcting its movement after collision. Continuous collision detection is slower, but more precise and misses fewer collisions with small, fast-moving objects. Raycasting and shapecasting methods are available. See CCDMode for details.
- bool custom_integrator
| Default | false |
| Setter | set_use_custom_integrator(value) |
| Getter | is_using_custom_integrator() |
If true, internal force integration is disabled for this body. Aside from collision response, the body will only move as determined by the _integrate_forces function.
- float friction
| Setter | set_friction(value) |
| Getter | get_friction() |
The body’s friction. Values range from 0 (frictionless) to 1 (maximum friction).
Deprecated, use PhysicsMaterial.friction instead via physics_material_override.
- float gravity_scale
| Default | 1.0 |
| Setter | set_gravity_scale(value) |
| Getter | get_gravity_scale() |
Multiplies the gravity applied to the body. The body’s gravity is calculated from the Default Gravity value in Project > Project Settings > Physics > 2d and/or any additional gravity vector applied by Area2Ds.
- float inertia
| Setter | set_inertia(value) |
| Getter | get_inertia() |
The body’s moment of inertia. This is like mass, but for rotation: it determines how much torque it takes to rotate the body. The moment of inertia is usually computed automatically from the mass and the shapes, but this function allows you to set a custom value. Set 0 inertia to return to automatically computing it.
- float linear_damp
| Default | -1.0 |
| Setter | set_linear_damp(value) |
| Getter | get_linear_damp() |
Damps the body’s linear_velocity. If -1, the body will use the Default Linear Damp in Project > Project Settings > Physics > 2d.
- Vector2 linear_velocity
| Default | Vector2( 0, 0 ) |
| Setter | set_linear_velocity(value) |
| Getter | get_linear_velocity() |
The body’s linear velocity.
- float mass
| Default | 1.0 |
| Setter | set_mass(value) |
| Getter | get_mass() |
The body’s mass.
- Mode mode
| Default | 0 |
| Setter | set_mode(value) |
| Getter | get_mode() |
The body’s mode. See Mode for possible values.
- PhysicsMaterial physics_material_override
| Setter | set_physics_material_override(value) |
| Getter | get_physics_material_override() |
The physics material override for the body.
If a material is assigned to this property, it will be used instead of any other physics material, such as an inherited one.
- bool sleeping
| Default | false |
| Setter | set_sleeping(value) |
| Getter | is_sleeping() |
If true, the body is sleeping and will not calculate forces until woken up by a collision or by using apply_impulse or add_force.
- float weight
| Default | 9.8 |
| Setter | set_weight(value) |
| Getter | get_weight() |
The body’s weight based on its mass and the Default Gravity value in Project > Project Settings > Physics > 2d.
Method Descriptions¶
- void _integrate_forces ( Physics2DDirectBodyState state ) virtual
Allows you to read and safely modify the simulation state for the object. Use this instead of Node._physics_process if you need to directly change the body’s position or other physics properties. By default, it works in addition to the usual physics behavior, but custom_integrator allows you to disable the default behavior and write custom force integration for a body.
- void add_central_force ( Vector2 force )
Adds a constant directional force without affecting rotation.
Adds a positioned force to the body. Both the force and the offset from the body origin are in global coordinates.
- void add_torque ( float torque )
Adds a constant rotational force.
- void apply_central_impulse ( Vector2 impulse )
Applies a directional impulse without affecting rotation.
Applies a positioned impulse to the body. An impulse is time-independent! Applying an impulse every frame would result in a framerate-dependent force. For this reason it should only be used when simulating one-time impacts (use the “_force” functions otherwise). The position uses the rotation of the global coordinate system, but is centered at the object’s origin.
- void apply_torque_impulse ( float torque )
Applies a rotational impulse to the body.
- Array get_colliding_bodies ( ) const
Returns a list of the bodies colliding with this one. Use contacts_reported to set the maximum number reported. You must also set contact_monitor to true.
Note: The result of this test is not immediate after moving objects. For performance, list of collisions is updated once per frame and before the physics step. Consider using signals instead.
- void set_axis_velocity ( Vector2 axis_velocity )
Sets the body’s velocity on the given axis. The velocity in the given vector axis will be set as the given vector length. This is useful for jumping behavior.
- bool test_motion ( Vector2 motion, bool infinite_inertia=true, float margin=0.08, Physics2DTestMotionResult result=null )
Returns true if a collision would result from moving in the given vector. margin increases the size of the shapes involved in the collision detection, and result is an object of type Physics2DTestMotionResult, which contains additional information about the collision (should there be one).
RootMotionView¶
Inherits: VisualInstance < Spatial < Node < Object
Property Descriptions¶
- NodePath animation_path
| Setter | set_animation_path(value) |
| Getter | get_animation_path() |
- float cell_size
| Setter | set_cell_size(value) |
| Getter | get_cell_size() |
- Color color
| Setter | set_color(value) |
| Getter | get_color() |
- float radius
| Setter | set_radius(value) |
| Getter | get_radius() |
- bool zero_y
| Setter | set_zero_y(value) |
| Getter | get_zero_y() |
SceneState¶
A script interface to a scene file’s data.
Description¶
Maintains a list of resources, nodes, exported, and overridden properties, and built-in scripts associated with a scene.
This class cannot be instantiated directly, it is retrieved for a given scene as the result of PackedScene.get_state.
Methods¶
| Array | get_connection_binds ( int idx ) const |
| int | get_connection_count ( ) const |
| int | get_connection_flags ( int idx ) const |
| String | get_connection_method ( int idx ) const |
| String | get_connection_signal ( int idx ) const |
| NodePath | get_connection_source ( int idx ) const |
| NodePath | get_connection_target ( int idx ) const |
| int | get_node_count ( ) const |
| PoolStringArray | get_node_groups ( int idx ) const |
| int | get_node_index ( int idx ) const |
| PackedScene | get_node_instance ( int idx ) const |
| String | get_node_instance_placeholder ( int idx ) const |
| String | get_node_name ( int idx ) const |
| NodePath | get_node_owner_path ( int idx ) const |
| NodePath | get_node_path ( int idx, bool for_parent=false ) const |
| int | get_node_property_count ( int idx ) const |
| String | get_node_property_name ( int idx, int prop_idx ) const |
| Variant | get_node_property_value ( int idx, int prop_idx ) const |
| String | get_node_type ( int idx ) const |
| bool | is_node_instance_placeholder ( int idx ) const |
Enumerations¶
enum GenEditState:
- GEN_EDIT_STATE_DISABLED = 0 — If passed to PackedScene.instance, blocks edits to the scene state.
- GEN_EDIT_STATE_INSTANCE = 1 — If passed to PackedScene.instance, provides inherited scene resources to the local scene.
Note: Only available in editor builds.
- GEN_EDIT_STATE_MAIN = 2 — If passed to PackedScene.instance, provides local scene resources to the local scene. Only the main scene should receive the main edit state.
Note: Only available in editor builds.
Method Descriptions¶
Returns the list of bound parameters for the signal at idx.
- int get_connection_count ( ) const
Returns the number of signal connections in the scene.
The idx argument used to query connection metadata in other get_connection_* methods in the interval [0, get_connection_count() - 1].
Returns the connection flags for the signal at idx. See ConnectFlags constants.
Returns the method connected to the signal at idx.
Returns the name of the signal at idx.
Returns the path to the node that owns the signal at idx, relative to the root node.
Returns the path to the node that owns the method connected to the signal at idx, relative to the root node.
- int get_node_count ( ) const
Returns the number of nodes in the scene.
The idx argument used to query node data in other get_node_* methods in the interval [0, get_node_count() - 1].
- PoolStringArray get_node_groups ( int idx ) const
Returns the list of group names associated with the node at idx.
Returns the node’s index, which is its position relative to its siblings. This is only relevant and saved in scenes for cases where new nodes are added to an instanced or inherited scene among siblings from the base scene. Despite the name, this index is not related to the idx argument used here and in other methods.
- PackedScene get_node_instance ( int idx ) const
Returns a PackedScene for the node at idx (i.e. the whole branch starting at this node, with its child nodes and resources), or null if the node is not an instance.
Returns the path to the represented scene file if the node at idx is an InstancePlaceholder.
Returns the name of the node at idx.
Returns the path to the owner of the node at idx, relative to the root node.
Returns the path to the node at idx.
If for_parent is true, returns the path of the idx node’s parent instead.
Returns the number of exported or overridden properties for the node at idx.
The prop_idx argument used to query node property data in other get_node_property_* methods in the interval [0, get_node_property_count() - 1].
Returns the name of the property at prop_idx for the node at idx.
Returns the value of the property at prop_idx for the node at idx.
Returns the type of the node at idx.
Returns true if the node at idx is an InstancePlaceholder.
SceneTree¶
Manages the game loop via a hierarchy of nodes.
Description¶
As one of the most important classes, the SceneTree manages the hierarchy of nodes in a scene as well as scenes themselves. Nodes can be added, retrieved and removed. The whole scene tree (and thus the current scene) can be paused. Scenes can be loaded, switched and reloaded.
You can also use the SceneTree to organize your nodes into groups: every node can be assigned as many groups as you want to create, e.g. a “enemy” group. You can then iterate these groups or even call methods and set properties on all the group’s members at once.
SceneTree is the default MainLoop implementation used by scenes, and is thus in charge of the game loop.
Tutorials¶
Properties¶
Methods¶
Signals¶
- connected_to_server ( )
Emitted whenever this SceneTree’s network_peer successfully connected to a server. Only emitted on clients.
- connection_failed ( )
Emitted whenever this SceneTree’s network_peer fails to establish a connection to a server. Only emitted on clients.
- files_dropped ( PoolStringArray files, int screen )
Emitted when files are dragged from the OS file manager and dropped in the game window. The arguments are a list of file paths and the identifier of the screen where the drag originated.
Emitted whenever global menu item is clicked.
- idle_frame ( )
Emitted immediately before Node._process is called on every node in the SceneTree.
- network_peer_connected ( int id )
Emitted whenever this SceneTree’s network_peer connects with a new peer. ID is the peer ID of the new peer. Clients get notified when other clients connect to the same server. Upon connecting to a server, a client also receives this signal for the server (with ID being 1).
- network_peer_disconnected ( int id )
Emitted whenever this SceneTree’s network_peer disconnects from a peer. Clients get notified when other clients disconnect from the same server.
- node_added ( Node node )
Emitted whenever a node is added to the SceneTree.
- node_configuration_warning_changed ( Node node )
Emitted when a node’s configuration changed. Only emitted in tool mode.
- node_removed ( Node node )
Emitted whenever a node is removed from the SceneTree.
- node_renamed ( Node node )
Emitted whenever a node is renamed.
- physics_frame ( )
Emitted immediately before Node._physics_process is called on every node in the SceneTree.
- screen_resized ( )
Emitted when the screen resolution (fullscreen) or window size (windowed) changes.
- server_disconnected ( )
Emitted whenever this SceneTree’s network_peer disconnected from server. Only emitted on clients.
- tree_changed ( )
Emitted whenever the SceneTree hierarchy changed (children being moved or renamed, etc.).
Enumerations¶
enum GroupCallFlags:
- GROUP_CALL_DEFAULT = 0 — Call a group with no flags (default).
- GROUP_CALL_REVERSE = 1 — Call a group in reverse scene order.
- GROUP_CALL_REALTIME = 2 — Call a group immediately (calls are normally made on idle).
- GROUP_CALL_UNIQUE = 4 — Call a group only once even if the call is executed many times.
enum StretchMode:
- STRETCH_MODE_DISABLED = 0 — No stretching.
- STRETCH_MODE_2D = 1 — Render stretching in higher resolution (interpolated).
- STRETCH_MODE_VIEWPORT = 2 — Keep the specified display resolution. No interpolation. Content may appear pixelated.
enum StretchAspect:
- STRETCH_ASPECT_IGNORE = 0 — Fill the window with the content stretched to cover excessive space. Content may appear stretched.
- STRETCH_ASPECT_KEEP = 1 — Retain the same aspect ratio by padding with black bars on either axis. This prevents distortion.
- STRETCH_ASPECT_KEEP_WIDTH = 2 — Expand vertically. Left/right black bars may appear if the window is too wide.
- STRETCH_ASPECT_KEEP_HEIGHT = 3 — Expand horizontally. Top/bottom black bars may appear if the window is too tall.
- STRETCH_ASPECT_EXPAND = 4 — Expand in both directions, retaining the same aspect ratio. This prevents distortion while avoiding black bars.
Property Descriptions¶
- Node current_scene
| Setter | set_current_scene(value) |
| Getter | get_current_scene() |
The current scene.
- bool debug_collisions_hint
| Default | false |
| Setter | set_debug_collisions_hint(value) |
| Getter | is_debugging_collisions_hint() |
If true, collision shapes will be visible when running the game from the editor for debugging purposes.
| Default | false |
| Setter | set_debug_navigation_hint(value) |
| Getter | is_debugging_navigation_hint() |
If true, navigation polygons will be visible when running the game from the editor for debugging purposes.
- Node edited_scene_root
| Setter | set_edited_scene_root(value) |
| Getter | get_edited_scene_root() |
The root of the edited scene.
- MultiplayerAPI multiplayer
| Setter | set_multiplayer(value) |
| Getter | get_multiplayer() |
The default MultiplayerAPI instance for this SceneTree.
- bool multiplayer_poll
| Default | true |
| Setter | set_multiplayer_poll_enabled(value) |
| Getter | is_multiplayer_poll_enabled() |
If true (default value), enables automatic polling of the MultiplayerAPI for this SceneTree during idle_frame.
If false, you need to manually call MultiplayerAPI.poll to process network packets and deliver RPCs/RSETs. This allows running RPCs/RSETs in a different loop (e.g. physics, thread, specific time step) and for manual Mutex protection when accessing the MultiplayerAPI from threads.
- NetworkedMultiplayerPeer network_peer
| Setter | set_network_peer(value) |
| Getter | get_network_peer() |
The peer object to handle the RPC system (effectively enabling networking when set). Depending on the peer itself, the SceneTree will become a network server (check with is_network_server) and will set the root node’s network mode to master, or it will become a regular peer with the root node set to puppet. All child nodes are set to inherit the network mode by default. Handling of networking-related events (connection, disconnection, new clients) is done by connecting to SceneTree’s signals.
- bool paused
| Default | false |
| Setter | set_pause(value) |
| Getter | is_paused() |
If true, the SceneTree is paused. Doing so will have the following behavior:
- 2D and 3D physics will be stopped.
- Node._process, Node._physics_process and Node._input will not be called anymore in nodes.
- bool refuse_new_network_connections
| Default | false |
| Setter | set_refuse_new_network_connections(value) |
| Getter | is_refusing_new_network_connections() |
If true, the SceneTree’s network_peer refuses new incoming connections.
- Viewport root
| Getter | get_root() |
The SceneTree’s root Viewport.
- bool use_font_oversampling
| Default | false |
| Setter | set_use_font_oversampling(value) |
| Getter | is_using_font_oversampling() |
If true, font oversampling is used.
Method Descriptions¶
Calls method on each member of the given group.
Calls method on each member of the given group, respecting the given GroupCallFlags.
Changes the running scene to the one at the given path, after loading it into a PackedScene and creating a new instance.
Returns @GlobalScope.OK on success, @GlobalScope.ERR_CANT_OPEN if the path cannot be loaded into a PackedScene, or @GlobalScope.ERR_CANT_CREATE if that scene cannot be instantiated.
- Error change_scene_to ( PackedScene packed_scene )
Changes the running scene to a new instance of the given PackedScene.
Returns @GlobalScope.OK on success or @GlobalScope.ERR_CANT_CREATE if the scene cannot be instantiated.
- SceneTreeTimer create_timer ( float time_sec, bool pause_mode_process=true )
Returns a SceneTreeTimer which will SceneTreeTimer.timeout after the given time in seconds elapsed in this SceneTree. If pause_mode_process is set to false, pausing the SceneTree will also pause the timer.
Commonly used to create a one-shot delay timer as in the following example:
func some_function():
print("start")
yield(get_tree().create_timer(1.0), "timeout")
print("end")
- int get_frame ( ) const
Returns the current frame number, i.e. the total frame count since the application started.
- PoolIntArray get_network_connected_peers ( ) const
Returns the peer IDs of all connected peers of this SceneTree’s network_peer.
- int get_network_unique_id ( ) const
Returns the unique peer ID of this SceneTree’s network_peer.
- int get_node_count ( ) const
Returns the number of nodes in this SceneTree.
Returns a list of all nodes assigned to the given group.
- int get_rpc_sender_id ( ) const
Returns the sender’s peer ID for the most recently received RPC call.
Returns true if the given group exists.
- bool has_network_peer ( ) const
Returns true if there is a network_peer set.
- bool is_input_handled ( )
Returns true if the most recent InputEvent was marked as handled with set_input_as_handled.
- bool is_network_server ( ) const
Returns true if this SceneTree’s network_peer is in server mode (listening for connections).
Sends the given notification to all members of the group.
Sends the given notification to all members of the group, respecting the given GroupCallFlags.
- void queue_delete ( Object obj )
Queues the given object for deletion, delaying the call to Object.free to after the current frame.
- void quit ( int exit_code=-1 )
Quits the application. A process exit_code can optionally be passed as an argument. If this argument is 0 or greater, it will override the OS.exit_code defined before quitting the application.
- Error reload_current_scene ( )
Reloads the currently active scene.
Returns @GlobalScope.OK on success, @GlobalScope.ERR_UNCONFIGURED if no current_scene was defined yet, @GlobalScope.ERR_CANT_OPEN if current_scene cannot be loaded into a PackedScene, or @GlobalScope.ERR_CANT_CREATE if the scene cannot be instantiated.
- void set_auto_accept_quit ( bool enabled )
If true, the application automatically accepts quitting. Enabled by default.
For mobile platforms, see set_quit_on_go_back.
Sets the given property to value on all members of the given group.
Sets the given property to value on all members of the given group, respecting the given GroupCallFlags.
- void set_input_as_handled ( )
Marks the most recent InputEvent as handled.
- void set_quit_on_go_back ( bool enabled )
If true, the application quits automatically on going back (e.g. on Android). Enabled by default.
To handle ‘Go Back’ button when this option is disabled, use MainLoop.NOTIFICATION_WM_GO_BACK_REQUEST.
- void set_screen_stretch ( StretchMode mode, StretchAspect aspect, Vector2 minsize, float shrink=1 )
Configures screen stretching to the given StretchMode, StretchAspect, minimum size and shrink ratio.
SceneTreeTimer¶
One-shot timer.
Description¶
A one-shot timer managed by the scene tree, which emits timeout on completion. See also SceneTree.create_timer.
As opposed to Timer, it does not require the instantiation of a node. Commonly used to create a one-shot delay timer as in the following example:
func some_function():
print("Timer started.")
yield(get_tree().create_timer(1.0), "timeout")
print("Timer ended.")
Script¶
Inherits: Resource < Reference < Object
Inherited By: CSharpScript, GDScript, NativeScript, PluginScript, VisualScript
A class stored as a resource.
Description¶
A class stored as a resource. A script extends the functionality of all objects that instance it.
The new method of a script subclass creates a new instance. Object.set_script extends an existing object, if that object’s class matches one of the script’s base classes.
Properties¶
| String | source_code |
Methods¶
| bool | can_instance ( ) const |
| Script | get_base_script ( ) const |
| String | get_instance_base_type ( ) const |
| Variant | get_property_default_value ( String property ) |
| Dictionary | get_script_constant_map ( ) |
| Array | get_script_method_list ( ) |
| Array | get_script_property_list ( ) |
| Array | get_script_signal_list ( ) |
| bool | has_script_signal ( String signal_name ) const |
| bool | has_source_code ( ) const |
| bool | instance_has ( Object base_object ) const |
| bool | is_tool ( ) const |
| Error | reload ( bool keep_state=false ) |
Property Descriptions¶
- String source_code
| Setter | set_source_code(value) |
| Getter | get_source_code() |
The script source code or an empty string if source code is not available. When set, does not reload the class implementation automatically.
Method Descriptions¶
- bool can_instance ( ) const
Returns true if the script can be instanced.
- Script get_base_script ( ) const
Returns the script directly inherited by this script.
- String get_instance_base_type ( ) const
Returns the script’s base type.
Returns the default value of the specified property.
- Dictionary get_script_constant_map ( )
Returns a dictionary containing constant names and their values.
- Array get_script_method_list ( )
Returns the list of methods in this Script.
- Array get_script_property_list ( )
Returns the list of properties in this Script.
- Array get_script_signal_list ( )
Returns the list of user signals defined in this Script.
Returns true if the script, or a base class, defines a signal with the given name.
- bool has_source_code ( ) const
Returns true if the script contains non-empty source code.
Returns true if base_object is an instance of this script.
- bool is_tool ( ) const
Returns true if the script is a tool script. A tool script can run in the editor.
Reloads the script’s class implementation. Returns an error code.
ScriptCreateDialog¶
Inherits: ConfirmationDialog < AcceptDialog < WindowDialog < Popup < Control < CanvasItem < Node < Object
The Editor’s popup dialog for creating new Script files.
Description¶
The ScriptCreateDialog creates script files according to a given template for a given scripting language. The standard use is to configure its fields prior to calling one of the Popup.popup methods.
func _ready():
dialog.config("Node", "res://new_node.gd") # For in-engine types
dialog.config("\"res://base_node.gd\"", "res://derived_node.gd") # For script types
dialog.popup_centered()
Properties¶
| bool | dialog_hide_on_ok | O: false |
| float | margin_bottom | O: 232.0 |
| float | margin_right | O: 361.0 |
| Vector2 | rect_size | O: Vector2( 361, 232 ) |
| String | window_title | O: "Attach Node Script" |
ScriptEditor¶
Inherits: PanelContainer < Container < Control < CanvasItem < Node < Object
Godot editor’s script editor.
Methods¶
| bool | can_drop_data_fw ( Vector2 point, Variant data, Control from ) const |
| void | drop_data_fw ( Vector2 point, Variant data, Control from ) |
| Script | get_current_script ( ) |
| Variant | get_drag_data_fw ( Vector2 point, Control from ) |
| Array | get_open_scripts ( ) const |
| void | goto_line ( int line_number ) |
| void | open_script_create_dialog ( String base_name, String base_path ) |
Signals¶
- editor_script_changed ( Script script )
Emitted when user changed active script. Argument is a freshly activated Script.
- script_close ( Script script )
Emitted when editor is about to close the active script. Argument is a Script that is going to be closed.
ScrollBar¶
Inherits: Range < Control < CanvasItem < Node < Object
Inherited By: HScrollBar, VScrollBar
Base class for scroll bars.
Description¶
Scrollbars are a Range-based Control, that display a draggable area (the size of the page). Horizontal (HScrollBar) and Vertical (VScrollBar) versions are available.
Properties¶
| float | custom_step | -1.0 |
| int | size_flags_vertical | O: 0 |
| float | step | O: 0.0 |
ScrollContainer¶
Inherits: Container < Control < CanvasItem < Node < Object
Inherited By: EditorInspector
A helper node for displaying scrollable elements such as lists.
Description¶
A ScrollContainer node meant to contain a Control child. ScrollContainers will automatically create a scrollbar child (HScrollBar, VScrollBar, or both) when needed and will only draw the Control within the ScrollContainer area. Scrollbars will automatically be drawn at the right (for vertical) or bottom (for horizontal) and will enable dragging to move the viewable Control (and its children) within the ScrollContainer. Scrollbars will also automatically resize the grabber based on the Control.rect_min_size of the Control relative to the ScrollContainer. Works great with a Panel control. You can set EXPAND on the children’s size flags, so they will upscale to the ScrollContainer’s size if it’s larger (scroll is invisible for the chosen dimension).
Properties¶
| bool | follow_focus | false |
| bool | rect_clip_content | O: true |
| int | scroll_deadzone | 0 |
| int | scroll_horizontal | 0 |
| bool | scroll_horizontal_enabled | true |
| int | scroll_vertical | 0 |
| bool | scroll_vertical_enabled | true |
Methods¶
| HScrollBar | get_h_scrollbar ( ) |
| VScrollBar | get_v_scrollbar ( ) |
Signals¶
- scroll_ended ( )
Emitted when scrolling stops.
- scroll_started ( )
Emitted when scrolling is started.
Property Descriptions¶
- bool follow_focus
| Default | false |
| Setter | set_follow_focus(value) |
| Getter | is_following_focus() |
If true, the ScrollContainer will automatically scroll to focused children (including indirect children) to make sure they are fully visible.
- int scroll_deadzone
| Default | 0 |
| Setter | set_deadzone(value) |
| Getter | get_deadzone() |
- int scroll_horizontal
| Default | 0 |
| Setter | set_h_scroll(value) |
| Getter | get_h_scroll() |
The current horizontal scroll value.
- bool scroll_horizontal_enabled
| Default | true |
| Setter | set_enable_h_scroll(value) |
| Getter | is_h_scroll_enabled() |
If true, enables horizontal scrolling.
- int scroll_vertical
| Default | 0 |
| Setter | set_v_scroll(value) |
| Getter | get_v_scroll() |
The current vertical scroll value.
- bool scroll_vertical_enabled
| Default | true |
| Setter | set_enable_v_scroll(value) |
| Getter | is_v_scroll_enabled() |
If true, enables vertical scrolling.
Method Descriptions¶
- HScrollBar get_h_scrollbar ( )
Returns the horizontal scrollbar HScrollBar of this ScrollContainer.
- VScrollBar get_v_scrollbar ( )
Returns the vertical scrollbar VScrollBar of this ScrollContainer.
SegmentShape2D¶
Inherits: Shape2D < Resource < Reference < Object
Segment shape for 2D collisions.
Description¶
Segment shape for 2D collisions. Consists of two points, a and b.
Semaphore¶
A synchronization semaphore.
Description¶
A synchronization semaphore which can be used to synchronize multiple Threads. Initialized to zero on creation. Be careful to avoid deadlocks. For a binary version, see Mutex.
Tutorials¶
Method Descriptions¶
- Error post ( )
Lowers the Semaphore, allowing one more thread in. Returns @GlobalScope.OK on success, @GlobalScope.ERR_BUSY otherwise.
- Error wait ( )
Tries to wait for the Semaphore, if its value is zero, blocks until non-zero. Returns @GlobalScope.OK on success, @GlobalScope.ERR_BUSY otherwise.
Separator¶
Inherits: Control < CanvasItem < Node < Object
Inherited By: HSeparator, VSeparator
Base class for separators.
Description¶
Separator is a Control used for separating other controls. It’s purely a visual decoration. Horizontal (HSeparator) and Vertical (VSeparator) versions are available.
Shader¶
Inherits: Resource < Reference < Object
Inherited By: VisualShader
A custom shader program.
Description¶
This class allows you to define a custom shader program that can be used by a ShaderMaterial. Shaders allow you to write your own custom behavior for rendering objects or updating particle information. For a detailed explanation and usage, please see the tutorials linked below.
Tutorials¶
Methods¶
| Texture | get_default_texture_param ( String param ) const |
| Mode | get_mode ( ) const |
| bool | has_param ( String name ) const |
| void | set_default_texture_param ( String param, Texture texture ) |
Enumerations¶
enum Mode:
- MODE_SPATIAL = 0 — Mode used to draw all 3D objects.
- MODE_CANVAS_ITEM = 1 — Mode used to draw all 2D objects.
- MODE_PARTICLES = 2 — Mode used to calculate particle information on a per-particle basis. Not used for drawing.
Property Descriptions¶
- String code
| Default | "" |
| Setter | set_code(value) |
| Getter | get_code() |
Returns the shader’s code as the user has written it, not the full generated code used internally.
Method Descriptions¶
Returns the texture that is set as default for the specified parameter.
Note: param must match the name of the uniform in the code exactly.
- Mode get_mode ( ) const
Returns the shader mode for the shader, either MODE_CANVAS_ITEM, MODE_SPATIAL or MODE_PARTICLES.
Returns true if the shader has this param defined as a uniform in its code.
Note: param must match the name of the uniform in the code exactly.
Sets the default texture to be used with a texture uniform. The default is used if a texture is not set in the ShaderMaterial.
Note: param must match the name of the uniform in the code exactly.
ShaderMaterial¶
Inherits: Material < Resource < Reference < Object
A material that uses a custom Shader program.
Description¶
A material that uses a custom Shader program to render either items to screen or process particles. You can create multiple materials for the same shader but configure different values for the uniforms defined in the shader.
Methods¶
| Variant | get_shader_param ( String param ) const |
| bool | property_can_revert ( String name ) |
| Variant | property_get_revert ( String name ) |
| void | set_shader_param ( String param, Variant value ) |
Property Descriptions¶
- Shader shader
| Setter | set_shader(value) |
| Getter | get_shader() |
The Shader program used to render this material.
Method Descriptions¶
Returns the current value set for this material of a uniform in the shader.
Returns true if the property identified by name can be reverted to a default value.
Returns the default value of the material property with given name.
Changes the value set for this material of a uniform in the shader. Note: param must match the name of the uniform in the code exactly.
Shape¶
Inherits: Resource < Reference < Object
Inherited By: BoxShape, CapsuleShape, ConcavePolygonShape, ConvexPolygonShape, CylinderShape, HeightMapShape, PlaneShape, RayShape, SphereShape
Base class for all 3D shape resources.
Description¶
Base class for all 3D shape resources. Nodes that inherit from this can be used as shapes for a PhysicsBody or Area objects.
Tutorials¶
Shape2D¶
Inherits: Resource < Reference < Object
Inherited By: CapsuleShape2D, CircleShape2D, ConcavePolygonShape2D, ConvexPolygonShape2D, LineShape2D, RayShape2D, RectangleShape2D, SegmentShape2D
Base class for all 2D shapes.
Description¶
Base class for all 2D shapes. All 2D shape types inherit from this.
Tutorials¶
Properties¶
| float | custom_solver_bias | 0.0 |
Methods¶
| bool | collide ( Transform2D local_xform, Shape2D with_shape, Transform2D shape_xform ) |
| Array | collide_and_get_contacts ( Transform2D local_xform, Shape2D with_shape, Transform2D shape_xform ) |
| bool | collide_with_motion ( Transform2D local_xform, Vector2 local_motion, Shape2D with_shape, Transform2D shape_xform, Vector2 shape_motion ) |
| Array | collide_with_motion_and_get_contacts ( Transform2D local_xform, Vector2 local_motion, Shape2D with_shape, Transform2D shape_xform, Vector2 shape_motion ) |
Property Descriptions¶
- float custom_solver_bias
| Default | 0.0 |
| Setter | set_custom_solver_bias(value) |
| Getter | get_custom_solver_bias() |
The shape’s custom solver bias.
Method Descriptions¶
- bool collide ( Transform2D local_xform, Shape2D with_shape, Transform2D shape_xform )
Returns true if this shape is colliding with another.
This method needs the transformation matrix for this shape (local_xform), the shape to check collisions with (with_shape), and the transformation matrix of that shape (shape_xform).
- Array collide_and_get_contacts ( Transform2D local_xform, Shape2D with_shape, Transform2D shape_xform )
Returns a list of the points where this shape touches another. If there are no collisions the list is empty.
This method needs the transformation matrix for this shape (local_xform), the shape to check collisions with (with_shape), and the transformation matrix of that shape (shape_xform).
- bool collide_with_motion ( Transform2D local_xform, Vector2 local_motion, Shape2D with_shape, Transform2D shape_xform, Vector2 shape_motion )
Returns whether this shape would collide with another, if a given movement was applied.
This method needs the transformation matrix for this shape (local_xform), the movement to test on this shape (local_motion), the shape to check collisions with (with_shape), the transformation matrix of that shape (shape_xform), and the movement to test onto the other object (shape_motion).
- Array collide_with_motion_and_get_contacts ( Transform2D local_xform, Vector2 local_motion, Shape2D with_shape, Transform2D shape_xform, Vector2 shape_motion )
Returns a list of the points where this shape would touch another, if a given movement was applied. If there are no collisions the list is empty.
This method needs the transformation matrix for this shape (local_xform), the movement to test on this shape (local_motion), the shape to check collisions with (with_shape), the transformation matrix of that shape (shape_xform), and the movement to test onto the other object (shape_motion).
ShortCut¶
Inherits: Resource < Reference < Object
A shortcut for binding input.
Description¶
A shortcut for binding input.
Shortcuts are commonly used for interacting with a Control element from a InputEvent.
Properties¶
| InputEvent | shortcut |
Methods¶
| String | get_as_text ( ) const |
| bool | is_shortcut ( InputEvent event ) const |
| bool | is_valid ( ) const |
Property Descriptions¶
- InputEvent shortcut
| Setter | set_shortcut(value) |
| Getter | get_shortcut() |
The shortcut’s InputEvent.
Generally the InputEvent is a keyboard key, though it can be any InputEvent.
Method Descriptions¶
- String get_as_text ( ) const
Returns the shortcut’s InputEvent as a String.
- bool is_shortcut ( InputEvent event ) const
Returns true if the shortcut’s InputEvent equals event.
- bool is_valid ( ) const
If true, this shortcut is valid.
Skeleton¶
Inherits: Spatial < Node < Object
Skeleton for characters and animated objects.
Description¶
Skeleton provides a hierarchical interface for managing bones, including pose, rest and animation (see Animation). It can also use ragdoll physics.
The overall transform of a bone with respect to the skeleton is determined by the following hierarchical order: rest pose, custom pose and pose.
Note that “global pose” below refers to the overall transform of the bone with respect to skeleton, so it not the actual global/world transform of the bone.
Methods¶
Constants¶
- NOTIFICATION_UPDATE_SKELETON = 50
Method Descriptions¶
- void add_bone ( String name )
Adds a bone, with name name. get_bone_count will become the bone index.
Deprecated soon.
- void clear_bones ( )
Clear all the bones in this skeleton.
Returns the bone index that matches name as its name.
- int get_bone_count ( ) const
Returns the amount of bones in the skeleton.
Returns the custom pose of the specified bone. Custom pose is applied on top of the rest pose.
Returns the overall transform of the specified bone, with respect to the skeleton. Being relative to the skeleton frame, this is not the actual “global” transform of the bone.
Returns the name of the bone at index index.
Returns the bone index which is the parent of the bone at bone_idx. If -1, then bone has no parent.
Note: The parent bone returned will always be less than bone_idx.
Returns the pose transform of the specified bone. Pose is applied on top of the custom pose, which is applied on top the rest pose.
Returns the rest transform for a bone bone_idx.
Deprecated soon.
- void localize_rests ( )
- void physical_bones_add_collision_exception ( RID exception )
- void physical_bones_remove_collision_exception ( RID exception )
- void physical_bones_start_simulation ( Array bones=[ ] )
- void physical_bones_stop_simulation ( )
- SkinReference register_skin ( Skin skin )
- void set_bone_global_pose_override ( int bone_idx, Transform pose, float amount, bool persistent=false )
Sets the bone index parent_idx as the parent of the bone at bone_idx. If -1, then bone has no parent.
Note: parent_idx must be less than bone_idx.
Returns the pose transform for bone bone_idx.
Sets the rest transform for bone bone_idx.
Deprecated soon.
- void unparent_bone_and_rest ( int bone_idx )
Skeleton2D¶
Inherits: Node2D < CanvasItem < Node < Object
Skeleton for 2D characters and animated objects.
Description¶
Skeleton2D parents a hierarchy of Bone2D objects. It is a requirement of Bone2D. Skeleton2D holds a reference to the rest pose of its children and acts as a single point of access to its bones.
Tutorials¶
Methods¶
| Bone2D | get_bone ( int idx ) |
| int | get_bone_count ( ) const |
| RID | get_skeleton ( ) const |
Signals¶
- bone_setup_changed ( )
Method Descriptions¶
Returns a Bone2D from the node hierarchy parented by Skeleton2D. The object to return is identified by the parameter idx. Bones are indexed by descending the node hierarchy from top to bottom, adding the children of each branch before moving to the next sibling.
- int get_bone_count ( ) const
Returns the number of Bone2D nodes in the node hierarchy parented by Skeleton2D.
- RID get_skeleton ( ) const
Returns the RID of a Skeleton2D instance.
SkeletonIK¶
Properties¶
| float | interpolation | 1.0 |
| Vector3 | magnet | Vector3( 0, 0, 0 ) |
| int | max_iterations | 10 |
| float | min_distance | 0.01 |
| bool | override_tip_basis | true |
| String | root_bone | "" |
| Transform | target | Transform( 1, 0, 0, 0, 1, 0, 0, 0, 1, 0, 0, 0 ) |
| NodePath | target_node | NodePath("") |
| String | tip_bone | "" |
| bool | use_magnet | false |
Methods¶
| Skeleton | get_parent_skeleton ( ) const |
| bool | is_running ( ) |
| void | start ( bool one_time=false ) |
| void | stop ( ) |
Property Descriptions¶
- float interpolation
| Default | 1.0 |
| Setter | set_interpolation(value) |
| Getter | get_interpolation() |
- Vector3 magnet
| Default | Vector3( 0, 0, 0 ) |
| Setter | set_magnet_position(value) |
| Getter | get_magnet_position() |
- int max_iterations
| Default | 10 |
| Setter | set_max_iterations(value) |
| Getter | get_max_iterations() |
- float min_distance
| Default | 0.01 |
| Setter | set_min_distance(value) |
| Getter | get_min_distance() |
- bool override_tip_basis
| Default | true |
| Setter | set_override_tip_basis(value) |
| Getter | is_override_tip_basis() |
- String root_bone
| Default | "" |
| Setter | set_root_bone(value) |
| Getter | get_root_bone() |
- Transform target
| Default | Transform( 1, 0, 0, 0, 1, 0, 0, 0, 1, 0, 0, 0 ) |
| Setter | set_target_transform(value) |
| Getter | get_target_transform() |
- NodePath target_node
| Default | NodePath("") |
| Setter | set_target_node(value) |
| Getter | get_target_node() |
- String tip_bone
| Default | "" |
| Setter | set_tip_bone(value) |
| Getter | get_tip_bone() |
- bool use_magnet
| Default | false |
| Setter | set_use_magnet(value) |
| Getter | is_using_magnet() |
Skin¶
Inherits: Resource < Reference < Object
Methods¶
| void | add_bind ( int bone, Transform pose ) |
| void | clear_binds ( ) |
| int | get_bind_bone ( int bind_index ) const |
| int | get_bind_count ( ) const |
| String | get_bind_name ( int bind_index ) const |
| Transform | get_bind_pose ( int bind_index ) const |
| void | set_bind_bone ( int bind_index, int bone ) |
| void | set_bind_count ( int bind_count ) |
| void | set_bind_name ( int bind_index, String name ) |
| void | set_bind_pose ( int bind_index, Transform pose ) |
Sky¶
Inherits: Resource < Reference < Object
Inherited By: PanoramaSky, ProceduralSky
The base class for PanoramaSky and ProceduralSky.
Description¶
The base class for PanoramaSky and ProceduralSky.
Properties¶
| RadianceSize | radiance_size | 2 |
Enumerations¶
enum RadianceSize:
- RADIANCE_SIZE_32 = 0 — Radiance texture size is 32×32 pixels.
- RADIANCE_SIZE_64 = 1 — Radiance texture size is 64×64 pixels.
- RADIANCE_SIZE_128 = 2 — Radiance texture size is 128×128 pixels.
- RADIANCE_SIZE_256 = 3 — Radiance texture size is 256×256 pixels.
- RADIANCE_SIZE_512 = 4 — Radiance texture size is 512×512 pixels.
- RADIANCE_SIZE_1024 = 5 — Radiance texture size is 1024×1024 pixels.
- RADIANCE_SIZE_2048 = 6 — Radiance texture size is 2048×2048 pixels.
- RADIANCE_SIZE_MAX = 7 — Represents the size of the RadianceSize enum.
Property Descriptions¶
- RadianceSize radiance_size
| Default | 2 |
| Setter | set_radiance_size(value) |
| Getter | get_radiance_size() |
The Sky’s radiance map size. The higher the radiance map size, the more detailed the lighting from the Sky will be.
See RadianceSize constants for values.
Note: Some hardware will have trouble with higher radiance sizes, especially RADIANCE_SIZE_512 and above. Only use such high values on high-end hardware.
Slider¶
Inherits: Range < Control < CanvasItem < Node < Object
Inherited By: HSlider, VSlider
Base class for GUI sliders.
Description¶
Base class for GUI sliders.
Properties¶
| bool | editable | true |
| FocusMode | focus_mode | O: 2 |
| bool | scrollable | true |
| int | size_flags_vertical | O: 0 |
| int | tick_count | 0 |
| bool | ticks_on_borders | false |
Property Descriptions¶
- bool editable
| Default | true |
| Setter | set_editable(value) |
| Getter | is_editable() |
If true, the slider can be interacted with. If false, the value can be changed only by code.
- bool scrollable
| Default | true |
| Setter | set_scrollable(value) |
| Getter | is_scrollable() |
If true, the value can be changed using the mouse wheel.
- int tick_count
| Default | 0 |
| Setter | set_ticks(value) |
| Getter | get_ticks() |
Number of ticks displayed on the slider, including border ticks. Ticks are uniformly-distributed value markers.
- bool ticks_on_borders
| Default | false |
| Setter | set_ticks_on_borders(value) |
| Getter | get_ticks_on_borders() |
If true, the slider will display ticks for minimum and maximum values.
SliderJoint¶
Inherits: Joint < Spatial < Node < Object
Piston kind of slider between two bodies in 3D.
Description¶
Slides across the X axis of the pivot object.
Properties¶
Enumerations¶
enum Param:
- PARAM_LINEAR_LIMIT_UPPER = 0 — The maximum difference between the pivot points on their X axis before damping happens.
- PARAM_LINEAR_LIMIT_LOWER = 1 — The minimum difference between the pivot points on their X axis before damping happens.
- PARAM_LINEAR_LIMIT_SOFTNESS = 2 — A factor applied to the movement across the slider axis once the limits get surpassed. The lower, the slower the movement.
- PARAM_LINEAR_LIMIT_RESTITUTION = 3 — The amount of restitution once the limits are surpassed. The lower, the more velocityenergy gets lost.
- PARAM_LINEAR_LIMIT_DAMPING = 4 — The amount of damping once the slider limits are surpassed.
- PARAM_LINEAR_MOTION_SOFTNESS = 5 — A factor applied to the movement across the slider axis as long as the slider is in the limits. The lower, the slower the movement.
- PARAM_LINEAR_MOTION_RESTITUTION = 6 — The amount of restitution inside the slider limits.
- PARAM_LINEAR_MOTION_DAMPING = 7 — The amount of damping inside the slider limits.
- PARAM_LINEAR_ORTHOGONAL_SOFTNESS = 8 — A factor applied to the movement across axes orthogonal to the slider.
- PARAM_LINEAR_ORTHOGONAL_RESTITUTION = 9 — The amount of restitution when movement is across axes orthogonal to the slider.
- PARAM_LINEAR_ORTHOGONAL_DAMPING = 10 — The amount of damping when movement is across axes orthogonal to the slider.
- PARAM_ANGULAR_LIMIT_UPPER = 11 — The upper limit of rotation in the slider.
- PARAM_ANGULAR_LIMIT_LOWER = 12 — The lower limit of rotation in the slider.
- PARAM_ANGULAR_LIMIT_SOFTNESS = 13 — A factor applied to the all rotation once the limit is surpassed.
- PARAM_ANGULAR_LIMIT_RESTITUTION = 14 — The amount of restitution of the rotation when the limit is surpassed.
- PARAM_ANGULAR_LIMIT_DAMPING = 15 — The amount of damping of the rotation when the limit is surpassed.
- PARAM_ANGULAR_MOTION_SOFTNESS = 16 — A factor applied to the all rotation in the limits.
- PARAM_ANGULAR_MOTION_RESTITUTION = 17 — The amount of restitution of the rotation in the limits.
- PARAM_ANGULAR_MOTION_DAMPING = 18 — The amount of damping of the rotation in the limits.
- PARAM_ANGULAR_ORTHOGONAL_SOFTNESS = 19 — A factor applied to the all rotation across axes orthogonal to the slider.
- PARAM_ANGULAR_ORTHOGONAL_RESTITUTION = 20 — The amount of restitution of the rotation across axes orthogonal to the slider.
- PARAM_ANGULAR_ORTHOGONAL_DAMPING = 21 — The amount of damping of the rotation across axes orthogonal to the slider.
- PARAM_MAX = 22 — Represents the size of the Param enum.
Property Descriptions¶
- float angular_limit/damping
| Default | 0.0 |
| Setter | set_param(value) |
| Getter | get_param() |
The amount of damping of the rotation when the limit is surpassed.
A lower damping value allows a rotation initiated by body A to travel to body B slower.
- float angular_limit/lower_angle
| Default | 0.0 |
The lower limit of rotation in the slider.
- float angular_limit/restitution
| Default | 0.7 |
| Setter | set_param(value) |
| Getter | get_param() |
The amount of restitution of the rotation when the limit is surpassed.
Does not affect damping.
- float angular_limit/softness
| Default | 1.0 |
| Setter | set_param(value) |
| Getter | get_param() |
A factor applied to the all rotation once the limit is surpassed.
Makes all rotation slower when between 0 and 1.
- float angular_limit/upper_angle
| Default | 0.0 |
The upper limit of rotation in the slider.
- float angular_motion/damping
| Default | 1.0 |
| Setter | set_param(value) |
| Getter | get_param() |
The amount of damping of the rotation in the limits.
- float angular_motion/restitution
| Default | 0.7 |
| Setter | set_param(value) |
| Getter | get_param() |
The amount of restitution of the rotation in the limits.
- float angular_motion/softness
| Default | 1.0 |
| Setter | set_param(value) |
| Getter | get_param() |
A factor applied to the all rotation in the limits.
- float angular_ortho/damping
| Default | 1.0 |
| Setter | set_param(value) |
| Getter | get_param() |
The amount of damping of the rotation across axes orthogonal to the slider.
- float angular_ortho/restitution
| Default | 0.7 |
| Setter | set_param(value) |
| Getter | get_param() |
The amount of restitution of the rotation across axes orthogonal to the slider.
- float angular_ortho/softness
| Default | 1.0 |
| Setter | set_param(value) |
| Getter | get_param() |
A factor applied to the all rotation across axes orthogonal to the slider.
- float linear_limit/damping
| Default | 1.0 |
| Setter | set_param(value) |
| Getter | get_param() |
The amount of damping that happens once the limit defined by linear_limit/lower_distance and linear_limit/upper_distance is surpassed.
- float linear_limit/lower_distance
| Default | -1.0 |
| Setter | set_param(value) |
| Getter | get_param() |
The minimum difference between the pivot points on their X axis before damping happens.
- float linear_limit/restitution
| Default | 0.7 |
| Setter | set_param(value) |
| Getter | get_param() |
The amount of restitution once the limits are surpassed. The lower, the more velocity-energy gets lost.
- float linear_limit/softness
| Default | 1.0 |
| Setter | set_param(value) |
| Getter | get_param() |
A factor applied to the movement across the slider axis once the limits get surpassed. The lower, the slower the movement.
- float linear_limit/upper_distance
| Default | 1.0 |
| Setter | set_param(value) |
| Getter | get_param() |
The maximum difference between the pivot points on their X axis before damping happens.
- float linear_motion/damping
| Default | 0.0 |
| Setter | set_param(value) |
| Getter | get_param() |
The amount of damping inside the slider limits.
- float linear_motion/restitution
| Default | 0.7 |
| Setter | set_param(value) |
| Getter | get_param() |
The amount of restitution inside the slider limits.
- float linear_motion/softness
| Default | 1.0 |
| Setter | set_param(value) |
| Getter | get_param() |
A factor applied to the movement across the slider axis as long as the slider is in the limits. The lower, the slower the movement.
- float linear_ortho/damping
| Default | 1.0 |
| Setter | set_param(value) |
| Getter | get_param() |
The amount of damping when movement is across axes orthogonal to the slider.
- float linear_ortho/restitution
| Default | 0.7 |
| Setter | set_param(value) |
| Getter | get_param() |
The amount of restitution when movement is across axes orthogonal to the slider.
- float linear_ortho/softness
| Default | 1.0 |
| Setter | set_param(value) |
| Getter | get_param() |
A factor applied to the movement across axes orthogonal to the slider.
SoftBody¶
Inherits: MeshInstance < GeometryInstance < VisualInstance < Spatial < Node < Object
A soft mesh physics body.
Description¶
A deformable physics body. Used to create elastic or deformable objects such as cloth, rubber, or other flexible materials.
Properties¶
| float | areaAngular_stiffness | 0.5 |
| int | collision_layer | 1 |
| int | collision_mask | 1 |
| float | damping_coefficient | 0.01 |
| float | drag_coefficient | 0.0 |
| float | linear_stiffness | 0.5 |
| NodePath | parent_collision_ignore | NodePath("") |
| float | pose_matching_coefficient | 0.0 |
| float | pressure_coefficient | 0.0 |
| bool | ray_pickable | true |
| int | simulation_precision | 5 |
| float | total_mass | 1.0 |
| float | volume_stiffness | 0.5 |
Methods¶
| void | add_collision_exception_with ( Node body ) |
| Array | get_collision_exceptions ( ) |
| bool | get_collision_layer_bit ( int bit ) const |
| bool | get_collision_mask_bit ( int bit ) const |
| void | remove_collision_exception_with ( Node body ) |
| void | set_collision_layer_bit ( int bit, bool value ) |
| void | set_collision_mask_bit ( int bit, bool value ) |
Property Descriptions¶
- float areaAngular_stiffness
| Default | 0.5 |
| Setter | set_areaAngular_stiffness(value) |
| Getter | get_areaAngular_stiffness() |
- int collision_layer
| Default | 1 |
| Setter | set_collision_layer(value) |
| Getter | get_collision_layer() |
The physics layers this SoftBody is in.
Collidable objects can exist in any of 32 different layers. These layers work like a tagging system, and are not visual. A collidable can use these layers to select with which objects it can collide, using the collision_mask property.
A contact is detected if object A is in any of the layers that object B scans, or object B is in any layer scanned by object A.
- int collision_mask
| Default | 1 |
| Setter | set_collision_mask(value) |
| Getter | get_collision_mask() |
The physics layers this SoftBody scans for collisions.
- float damping_coefficient
| Default | 0.01 |
| Setter | set_damping_coefficient(value) |
| Getter | get_damping_coefficient() |
- float drag_coefficient
| Default | 0.0 |
| Setter | set_drag_coefficient(value) |
| Getter | get_drag_coefficient() |
- float linear_stiffness
| Default | 0.5 |
| Setter | set_linear_stiffness(value) |
| Getter | get_linear_stiffness() |
- NodePath parent_collision_ignore
| Default | NodePath("") |
| Setter | set_parent_collision_ignore(value) |
| Getter | get_parent_collision_ignore() |
NodePath to a CollisionObject this SoftBody should avoid clipping.
- float pose_matching_coefficient
| Default | 0.0 |
| Setter | set_pose_matching_coefficient(value) |
| Getter | get_pose_matching_coefficient() |
- float pressure_coefficient
| Default | 0.0 |
| Setter | set_pressure_coefficient(value) |
| Getter | get_pressure_coefficient() |
- bool ray_pickable
| Default | true |
| Setter | set_ray_pickable(value) |
| Getter | is_ray_pickable() |
If true, the SoftBody will respond to RayCasts.
- int simulation_precision
| Default | 5 |
| Setter | set_simulation_precision(value) |
| Getter | get_simulation_precision() |
Increasing this value will improve the resulting simulation, but can affect performance. Use with care.
- float total_mass
| Default | 1.0 |
| Setter | set_total_mass(value) |
| Getter | get_total_mass() |
The SoftBody’s mass.
- float volume_stiffness
| Default | 0.5 |
| Setter | set_volume_stiffness(value) |
| Getter | get_volume_stiffness() |
Method Descriptions¶
- void add_collision_exception_with ( Node body )
Adds a body to the list of bodies that this body can’t collide with.
- Array get_collision_exceptions ( )
Returns an array of nodes that were added as collision exceptions for this body.
Returns an individual bit on the collision mask.
Returns an individual bit on the collision mask.
- void remove_collision_exception_with ( Node body )
Removes a body from the list of bodies that this body can’t collide with.
Sets individual bits on the layer mask. Use this if you only need to change one layer’s value.
Sets individual bits on the collision mask. Use this if you only need to change one layer’s value.
Spatial¶
Inherited By: ARVRAnchor, ARVRController, ARVROrigin, AudioStreamPlayer3D, BoneAttachment, Camera, CollisionObject, CollisionPolygon, CollisionShape, GridMap, Joint, Listener, Navigation, NavigationMeshInstance, Path, PathFollow, Position3D, ProximityGroup, RayCast, RemoteTransform, Skeleton, SpringArm, VehicleWheel, VisibilityNotifier, VisualInstance
Most basic 3D game object, parent of all 3D-related nodes.
Description¶
Most basic 3D game object, with a 3D Transform and visibility settings. All other 3D game objects inherit from Spatial. Use Spatial as a parent node to move, scale, rotate and show/hide children in a 3D project.
Affine operations (rotate, scale, translate) happen in parent’s local coordinate system, unless the Spatial object is set as top-level. Affine operations in this coordinate system correspond to direct affine operations on the Spatial’s transform. The word local below refers to this coordinate system. The coordinate system that is attached to the Spatial object itself is referred to as object-local coordinate system.
Tutorials¶
Properties¶
| SpatialGizmo | gizmo | |
| Transform | global_transform | |
| Vector3 | rotation | |
| Vector3 | rotation_degrees | Vector3( 0, 0, 0 ) |
| Vector3 | scale | Vector3( 1, 1, 1 ) |
| Transform | transform | Transform( 1, 0, 0, 0, 1, 0, 0, 0, 1, 0, 0, 0 ) |
| Vector3 | translation | Vector3( 0, 0, 0 ) |
| bool | visible | true |
Methods¶
Constants¶
- NOTIFICATION_TRANSFORM_CHANGED = 2000 — Spatial nodes receives this notification when their global transform changes. This means that either the current or a parent node changed its transform.
In order for NOTIFICATION_TRANSFORM_CHANGED to work, users first need to ask for it, with set_notify_transform.
- NOTIFICATION_ENTER_WORLD = 41 — Spatial nodes receives this notification when they are registered to new World resource.
- NOTIFICATION_EXIT_WORLD = 42 — Spatial nodes receives this notification when they are unregistered from current World resource.
- NOTIFICATION_VISIBILITY_CHANGED = 43 — Spatial nodes receives this notification when their visibility changes.
Property Descriptions¶
- SpatialGizmo gizmo
| Setter | set_gizmo(value) |
| Getter | get_gizmo() |
The SpatialGizmo for this node. Used for example in EditorSpatialGizmo as custom visualization and editing handles in Editor.
- Transform global_transform
| Setter | set_global_transform(value) |
| Getter | get_global_transform() |
World space (global) Transform of this node.
- Vector3 rotation
| Setter | set_rotation(value) |
| Getter | get_rotation() |
Rotation part of the local transformation in radians, specified in terms of YXZ-Euler angles in the format (X angle, Y angle, Z angle).
Note: In the mathematical sense, rotation is a matrix and not a vector. The three Euler angles, which are the three independent parameters of the Euler-angle parametrization of the rotation matrix, are stored in a Vector3 data structure not because the rotation is a vector, but only because Vector3 exists as a convenient data-structure to store 3 floating-point numbers. Therefore, applying affine operations on the rotation “vector” is not meaningful.
- Vector3 rotation_degrees
| Default | Vector3( 0, 0, 0 ) |
| Setter | set_rotation_degrees(value) |
| Getter | get_rotation_degrees() |
Rotation part of the local transformation in degrees, specified in terms of YXZ-Euler angles in the format (X angle, Y angle, Z angle).
- Vector3 scale
| Default | Vector3( 1, 1, 1 ) |
| Setter | set_scale(value) |
| Getter | get_scale() |
Scale part of the local transformation.
- Transform transform
| Default | Transform( 1, 0, 0, 0, 1, 0, 0, 0, 1, 0, 0, 0 ) |
| Setter | set_transform(value) |
| Getter | get_transform() |
Local space Transform of this node, with respect to the parent node.
- Vector3 translation
| Default | Vector3( 0, 0, 0 ) |
| Setter | set_translation(value) |
| Getter | get_translation() |
Local translation of this node.
- bool visible
| Default | true |
| Setter | set_visible(value) |
| Getter | is_visible() |
If true, this node is drawn.
Method Descriptions¶
- void force_update_transform ( )
Forces the transform to update. Transform changes in physics are not instant for performance reasons. Transforms are accumulated and then set. Use this if you need an up-to-date transform when doing physics operations.
- Spatial get_parent_spatial ( ) const
Returns the parent Spatial, or an empty Object if no parent exists or parent is not of type Spatial.
- World get_world ( ) const
Returns the current World resource this Spatial node is registered to.
Rotates the global (world) transformation around axis, a unit Vector3, by specified angle in radians. The rotation axis is in global coordinate system.
- void global_scale ( Vector3 scale )
Scales the global (world) transformation by the given Vector3 scale factors.
- void global_translate ( Vector3 offset )
Moves the global (world) transformation by Vector3 offset. The offset is in global coordinate system.
- void hide ( )
Disables rendering of this node. Changes visible to false.
- bool is_local_transform_notification_enabled ( ) const
Returns whether node notifies about its local transformation changes. Spatial will not propagate this by default.
- bool is_scale_disabled ( ) const
Returns whether this node uses a scale of (1, 1, 1) or its local transformation scale.
- bool is_set_as_toplevel ( ) const
Returns whether this node is set as Toplevel, that is whether it ignores its parent nodes transformations.
- bool is_transform_notification_enabled ( ) const
Returns whether the node notifies about its global and local transformation changes. Spatial will not propagate this by default.
- bool is_visible_in_tree ( ) const
Returns whether the node is visible, taking into consideration that its parents visibility.
Rotates itself so that the local -Z axis points towards the target position.
The transform will first be rotated around the given up vector, and then fully aligned to the target by a further rotation around an axis perpendicular to both the target and up vectors.
Operations take place in global space.
Moves the node to the specified position, and then rotates itself to point toward the target as per look_at. Operations take place in global space.
- void orthonormalize ( )
Resets this node’s transformations (like scale, skew and taper) preserving its rotation and translation by performing Gram-Schmidt orthonormalization on this node’s Transform.
Rotates the local transformation around axis, a unit Vector3, by specified angle in radians.
Rotates the local transformation around axis, a unit Vector3, by specified angle in radians. The rotation axis is in object-local coordinate system.
- void rotate_x ( float angle )
Rotates the local transformation around the X axis by angle in radians.
- void rotate_y ( float angle )
Rotates the local transformation around the Y axis by angle in radians.
- void rotate_z ( float angle )
Rotates the local transformation around the Z axis by angle in radians.
- void scale_object_local ( Vector3 scale )
Scales the local transformation by given 3D scale factors in object-local coordinate system.
- void set_as_toplevel ( bool enable )
Makes the node ignore its parents transformations. Node transformations are only in global space.
- void set_disable_scale ( bool disable )
Sets whether the node uses a scale of (1, 1, 1) or its local transformation scale. Changes to the local transformation scale are preserved.
- void set_identity ( )
Reset all transformations for this node (sets its Transform to the identity matrix).
- void set_ignore_transform_notification ( bool enabled )
Sets whether the node ignores notification that its transformation (global or local) changed.
- void set_notify_local_transform ( bool enable )
Sets whether the node notifies about its local transformation changes. Spatial will not propagate this by default.
- void set_notify_transform ( bool enable )
Sets whether the node notifies about its global and local transformation changes. Spatial will not propagate this by default.
- void show ( )
Enables rendering of this node. Changes visible to true.
Transforms local_point from this node’s local space to world space.
Transforms global_point from world space to this node’s local space.
- void translate ( Vector3 offset )
Changes the node’s position by the given offset Vector3.
Note that the translation offset is affected by the node’s scale, so if scaled by e.g. (10, 1, 1), a translation by an offset of (2, 0, 0) would actually add 20 (2 * 10) to the X coordinate.
- void translate_object_local ( Vector3 offset )
Changes the node’s position by the given offset Vector3 in local space.
- void update_gizmo ( )
Updates the SpatialGizmo of this node.
SpatialMaterial¶
Inherits: Material < Resource < Reference < Object
Default 3D rendering material.
Description¶
This provides a default material with a wide variety of rendering features and properties without the need to write shader code. See the tutorial below for details.
Tutorials¶
Properties¶
Methods¶
| bool | get_feature ( Feature feature ) const |
| bool | get_flag ( Flags flag ) const |
| Texture | get_texture ( TextureParam param ) const |
| void | set_feature ( Feature feature, bool enable ) |
| void | set_flag ( Flags flag, bool enable ) |
| void | set_texture ( TextureParam param, Texture texture ) |
Enumerations¶
enum TextureParam:
- TEXTURE_ALBEDO = 0 — Texture specifying per-pixel color.
- TEXTURE_METALLIC = 1 — Texture specifying per-pixel metallic value.
- TEXTURE_ROUGHNESS = 2 — Texture specifying per-pixel roughness value.
- TEXTURE_EMISSION = 3 — Texture specifying per-pixel emission color.
- TEXTURE_NORMAL = 4 — Texture specifying per-pixel normal vector.
- TEXTURE_RIM = 5 — Texture specifying per-pixel rim value.
- TEXTURE_CLEARCOAT = 6 — Texture specifying per-pixel clearcoat value.
- TEXTURE_FLOWMAP = 7 — Texture specifying per-pixel flowmap direction for use with anisotropy.
- TEXTURE_AMBIENT_OCCLUSION = 8 — Texture specifying per-pixel ambient occlusion value.
- TEXTURE_DEPTH = 9 — Texture specifying per-pixel depth.
- TEXTURE_SUBSURFACE_SCATTERING = 10 — Texture specifying per-pixel subsurface scattering.
- TEXTURE_TRANSMISSION = 11 — Texture specifying per-pixel transmission color.
- TEXTURE_REFRACTION = 12 — Texture specifying per-pixel refraction strength.
- TEXTURE_DETAIL_MASK = 13 — Texture specifying per-pixel detail mask blending value.
- TEXTURE_DETAIL_ALBEDO = 14 — Texture specifying per-pixel detail color.
- TEXTURE_DETAIL_NORMAL = 15 — Texture specifying per-pixel detail normal.
- TEXTURE_MAX = 16 — Represents the size of the TextureParam enum.
enum DetailUV:
- DETAIL_UV_1 = 0 — Use
UVwith the detail texture. - DETAIL_UV_2 = 1 — Use
UV2with the detail texture.
enum Feature:
- FEATURE_TRANSPARENT = 0 — Constant for setting flags_transparent.
- FEATURE_EMISSION = 1 — Constant for setting emission_enabled.
- FEATURE_NORMAL_MAPPING = 2 — Constant for setting normal_enabled.
- FEATURE_RIM = 3 — Constant for setting rim_enabled.
- FEATURE_CLEARCOAT = 4 — Constant for setting clearcoat_enabled.
- FEATURE_ANISOTROPY = 5 — Constant for setting anisotropy_enabled.
- FEATURE_AMBIENT_OCCLUSION = 6 — Constant for setting ao_enabled.
- FEATURE_DEPTH_MAPPING = 7 — Constant for setting depth_enabled.
- FEATURE_SUBSURACE_SCATTERING = 8 — Constant for setting subsurf_scatter_enabled.
- FEATURE_TRANSMISSION = 9 — Constant for setting transmission_enabled.
- FEATURE_REFRACTION = 10 — Constant for setting refraction_enabled.
- FEATURE_DETAIL = 11 — Constant for setting detail_enabled.
- FEATURE_MAX = 12 — Represents the size of the Feature enum.
enum BlendMode:
- BLEND_MODE_MIX = 0 — Default blend mode. The color of the object is blended over the background based on the object’s alpha value.
- BLEND_MODE_ADD = 1 — The color of the object is added to the background.
- BLEND_MODE_SUB = 2 — The color of the object is subtracted from the background.
- BLEND_MODE_MUL = 3 — The color of the object is multiplied by the background.
enum DepthDrawMode:
- DEPTH_DRAW_OPAQUE_ONLY = 0 — Default depth draw mode. Depth is drawn only for opaque objects.
- DEPTH_DRAW_ALWAYS = 1 — Depth draw is calculated for both opaque and transparent objects.
- DEPTH_DRAW_DISABLED = 2 — No depth draw.
- DEPTH_DRAW_ALPHA_OPAQUE_PREPASS = 3 — For transparent objects, an opaque pass is made first with the opaque parts, then transparency is drawn.
enum CullMode:
- CULL_BACK = 0 — Default cull mode. The back of the object is culled when not visible.
- CULL_FRONT = 1 — The front of the object is culled when not visible.
- CULL_DISABLED = 2 — No culling is performed.
enum Flags:
- FLAG_UNSHADED = 0 — No lighting is used on the object. Color comes directly from
ALBEDO. - FLAG_USE_VERTEX_LIGHTING = 1 — Lighting is calculated per-vertex rather than per-pixel. This can be used to increase the speed of the shader at the cost of quality.
- FLAG_DISABLE_DEPTH_TEST = 2 — Disables the depth test, so this object is drawn on top of all others. However, objects drawn after it in the draw order may cover it.
- FLAG_ALBEDO_FROM_VERTEX_COLOR = 3 — Set
ALBEDOto the per-vertex color specified in the mesh. - FLAG_SRGB_VERTEX_COLOR = 4 — Vertex color is in sRGB space and needs to be converted to linear. Only applies in the GLES3 renderer.
- FLAG_USE_POINT_SIZE = 5 — Uses point size to alter the size of primitive points. Also changes the albedo texture lookup to use
POINT_COORDinstead ofUV. - FLAG_FIXED_SIZE = 6 — Object is scaled by depth so that it always appears the same size on screen.
- FLAG_BILLBOARD_KEEP_SCALE = 7 — Shader will keep the scale set for the mesh. Otherwise the scale is lost when billboarding. Only applies when params_billboard_mode is BILLBOARD_ENABLED.
- FLAG_UV1_USE_TRIPLANAR = 8 — Use triplanar texture lookup for all texture lookups that would normally use
UV. - FLAG_UV2_USE_TRIPLANAR = 9 — Use triplanar texture lookup for all texture lookups that would normally use
UV2. - FLAG_AO_ON_UV2 = 11 — Use
UV2coordinates to look up from the ao_texture. - FLAG_EMISSION_ON_UV2 = 12 — Use
UV2coordinates to look up from the emission_texture. - FLAG_USE_ALPHA_SCISSOR = 13 — Use alpha scissor. Set by params_use_alpha_scissor.
- FLAG_TRIPLANAR_USE_WORLD = 10 — Use world coordinates in the triplanar texture lookup instead of local coordinates.
- FLAG_ALBEDO_TEXTURE_FORCE_SRGB = 14 — Forces the shader to convert albedo from sRGB space to linear space.
- FLAG_DONT_RECEIVE_SHADOWS = 15 — Disables receiving shadows from other objects.
- FLAG_DISABLE_AMBIENT_LIGHT = 17 — Disables receiving ambient light.
- FLAG_ENSURE_CORRECT_NORMALS = 16 — Ensures that normals appear correct, even with non-uniform scaling.
- FLAG_USE_SHADOW_TO_OPACITY = 18 — Enables the shadow to opacity feature.
- FLAG_MAX = 19 — Represents the size of the Flags enum.
enum DiffuseMode:
- DIFFUSE_BURLEY = 0 — Default diffuse scattering algorithm.
- DIFFUSE_LAMBERT = 1 — Diffuse scattering ignores roughness.
- DIFFUSE_LAMBERT_WRAP = 2 — Extends Lambert to cover more than 90 degrees when roughness increases.
- DIFFUSE_OREN_NAYAR = 3 — Attempts to use roughness to emulate microsurfacing.
- DIFFUSE_TOON = 4 — Uses a hard cut for lighting, with smoothing affected by roughness.
enum SpecularMode:
- SPECULAR_SCHLICK_GGX = 0 — Default specular blob.
- SPECULAR_BLINN = 1 — Older specular algorithm, included for compatibility.
- SPECULAR_PHONG = 2 — Older specular algorithm, included for compatibility.
- SPECULAR_TOON = 3 — Toon blob which changes size based on roughness.
- SPECULAR_DISABLED = 4 — No specular blob.
enum BillboardMode:
- BILLBOARD_DISABLED = 0 — Billboard mode is disabled.
- BILLBOARD_ENABLED = 1 — The object’s Z axis will always face the camera.
- BILLBOARD_FIXED_Y = 2 — The object’s X axis will always face the camera.
- BILLBOARD_PARTICLES = 3 — Used for particle systems when assigned to Particles and CPUParticles nodes. Enables
particles_anim_*properties.
The ParticlesMaterial.anim_speed or CPUParticles.anim_speed should also be set to a positive value for the animation to play.
enum TextureChannel:
- TEXTURE_CHANNEL_RED = 0 — Used to read from the red channel of a texture.
- TEXTURE_CHANNEL_GREEN = 1 — Used to read from the green channel of a texture.
- TEXTURE_CHANNEL_BLUE = 2 — Used to read from the blue channel of a texture.
- TEXTURE_CHANNEL_ALPHA = 3 — Used to read from the alpha channel of a texture.
- TEXTURE_CHANNEL_GRAYSCALE = 4 — Currently unused.
enum EmissionOperator:
- EMISSION_OP_ADD = 0 — Adds the emission color to the color from the emission texture.
- EMISSION_OP_MULTIPLY = 1 — Multiplies the emission color by the color from the emission texture.
enum DistanceFadeMode:
- DISTANCE_FADE_DISABLED = 0 — Do not use distance fade.
- DISTANCE_FADE_PIXEL_ALPHA = 1 — Smoothly fades the object out based on each pixel’s distance from the camera using the alpha channel.
- DISTANCE_FADE_PIXEL_DITHER = 2 — Smoothly fades the object out based on each pixel’s distance from the camera using a dither approach. Dithering discards pixels based on a set pattern to smoothly fade without enabling transparency. On certain hardware this can be faster than DISTANCE_FADE_PIXEL_ALPHA.
- DISTANCE_FADE_OBJECT_DITHER = 3 — Smoothly fades the object out based on the object’s distance from the camera using a dither approach. Dithering discards pixels based on a set pattern to smoothly fade without enabling transparency. On certain hardware this can be faster than DISTANCE_FADE_PIXEL_ALPHA.
Property Descriptions¶
- Color albedo_color
| Default | Color( 1, 1, 1, 1 ) |
| Setter | set_albedo(value) |
| Getter | get_albedo() |
The material’s base color.
- Texture albedo_texture
| Setter | set_texture(value) |
| Getter | get_texture() |
Texture to multiply by albedo_color. Used for basic texturing of objects.
- float anisotropy
| Setter | set_anisotropy(value) |
| Getter | get_anisotropy() |
The strength of the anisotropy effect.
- bool anisotropy_enabled
| Default | false |
| Setter | set_feature(value) |
| Getter | get_feature() |
If true, anisotropy is enabled. Changes the shape of the specular blob and aligns it to tangent space. Mesh tangents are needed for this to work. If the mesh does not contain tangents the anisotropy effect will appear broken.
- Texture anisotropy_flowmap
| Setter | set_texture(value) |
| Getter | get_texture() |
Texture that offsets the tangent map for anisotropy calculations.
- bool ao_enabled
| Default | false |
| Setter | set_feature(value) |
| Getter | get_feature() |
If true, ambient occlusion is enabled. Ambient occlusion darkens areas based on the ao_texture.
- float ao_light_affect
| Setter | set_ao_light_affect(value) |
| Getter | get_ao_light_affect() |
Amount that ambient occlusion affects lighting from lights. If 0, ambient occlusion only affects ambient light. If 1, ambient occlusion affects lights just as much as it affects ambient light. This can be used to impact the strength of the ambient occlusion effect, but typically looks unrealistic.
- bool ao_on_uv2
| Setter | set_flag(value) |
| Getter | get_flag() |
If true, use UV2 coordinates to look up from the ao_texture.
- Texture ao_texture
| Setter | set_texture(value) |
| Getter | get_texture() |
Texture that defines the amount of ambient occlusion for a given point on the object.
- TextureChannel ao_texture_channel
| Setter | set_ao_texture_channel(value) |
| Getter | get_ao_texture_channel() |
Specifies the channel of the ao_texture in which the ambient occlusion information is stored. This is useful when you store the information for multiple effects in a single texture. For example if you stored metallic in the red channel, roughness in the blue, and ambient occlusion in the green you could reduce the number of textures you use.
- float clearcoat
| Setter | set_clearcoat(value) |
| Getter | get_clearcoat() |
Sets the strength of the clearcoat effect. Setting to 0 looks the same as disabling the clearcoat effect.
- bool clearcoat_enabled
| Default | false |
| Setter | set_feature(value) |
| Getter | get_feature() |
If true, clearcoat rendering is enabled. Adds a secondary transparent pass to the lighting calculation resulting in an added specular blob. This makes materials appear as if they have a clear layer on them that can be either glossy or rough.
- float clearcoat_gloss
| Setter | set_clearcoat_gloss(value) |
| Getter | get_clearcoat_gloss() |
Sets the roughness of the clearcoat pass. A higher value results in a smoother clearcoat while a lower value results in a rougher clearcoat.
- Texture clearcoat_texture
| Setter | set_texture(value) |
| Getter | get_texture() |
Texture that defines the strength of the clearcoat effect and the glossiness of the clearcoat. Strength is specified in the red channel while glossiness is specified in the green channel.
- bool depth_deep_parallax
| Setter | set_depth_deep_parallax(value) |
| Getter | is_depth_deep_parallax_enabled() |
If true, the shader will read depth texture at multiple points along the view ray to determine occlusion and parrallax. This can be very performance demanding, but results in more realistic looking depth mapping.
- bool depth_enabled
| Default | false |
| Setter | set_feature(value) |
| Getter | get_feature() |
If true, depth mapping is enabled (also called “parallax mapping” or “height mapping”). See also normal_enabled.
- bool depth_flip_binormal
| Setter | set_depth_deep_parallax_flip_binormal(value) |
| Getter | get_depth_deep_parallax_flip_binormal() |
If true, direction of the binormal is flipped before using in the depth effect. This may be necessary if you have encoded your binormals in a way that is conflicting with the depth effect.
- bool depth_flip_tangent
| Setter | set_depth_deep_parallax_flip_tangent(value) |
| Getter | get_depth_deep_parallax_flip_tangent() |
If true, direction of the tangent is flipped before using in the depth effect. This may be necessary if you have encoded your tangents in a way that is conflicting with the depth effect.
- int depth_max_layers
| Setter | set_depth_deep_parallax_max_layers(value) |
| Getter | get_depth_deep_parallax_max_layers() |
Number of layers to use when using depth_deep_parallax and the view direction is perpendicular to the surface of the object. A higher number will be more performance demanding while a lower number may not look as crisp.
- int depth_min_layers
| Setter | set_depth_deep_parallax_min_layers(value) |
| Getter | get_depth_deep_parallax_min_layers() |
Number of layers to use when using depth_deep_parallax and the view direction is parallel to the surface of the object. A higher number will be more performance demanding while a lower number may not look as crisp.
- float depth_scale
| Setter | set_depth_scale(value) |
| Getter | get_depth_scale() |
Scales the depth offset effect. A higher number will create a larger depth.
- Texture depth_texture
| Setter | set_texture(value) |
| Getter | get_texture() |
Texture used to determine depth at a given pixel. Depth is always stored in the red channel.
- Texture detail_albedo
| Setter | set_texture(value) |
| Getter | get_texture() |
Texture that specifies the color of the detail overlay.
- BlendMode detail_blend_mode
| Setter | set_detail_blend_mode(value) |
| Getter | get_detail_blend_mode() |
Specifies how the detail_albedo should blend with the current ALBEDO. See BlendMode for options.
- bool detail_enabled
| Default | false |
| Setter | set_feature(value) |
| Getter | get_feature() |
If true, enables the detail overlay. Detail is a second texture that gets mixed over the surface of the object based on detail_mask. This can be used to add variation to objects, or to blend between two different albedo/normal textures.
- Texture detail_mask
| Setter | set_texture(value) |
| Getter | get_texture() |
Texture used to specify how the detail textures get blended with the base textures.
- Texture detail_normal
| Setter | set_texture(value) |
| Getter | get_texture() |
Texture that specifies the per-pixel normal of the detail overlay.
- DetailUV detail_uv_layer
| Setter | set_detail_uv(value) |
| Getter | get_detail_uv() |
Specifies whether to use UV or UV2 for the detail layer. See DetailUV for options.
- float distance_fade_max_distance
| Setter | set_distance_fade_max_distance(value) |
| Getter | get_distance_fade_max_distance() |
Distance at which the object fades fully and is no longer visible.
- float distance_fade_min_distance
| Setter | set_distance_fade_min_distance(value) |
| Getter | get_distance_fade_min_distance() |
Distance at which the object starts to fade. If the object is less than this distance away it will appear normal.
- DistanceFadeMode distance_fade_mode
| Default | 0 |
| Setter | set_distance_fade(value) |
| Getter | get_distance_fade() |
Specifies which type of fade to use. Can be any of the DistanceFadeModes.
- Color emission
| Setter | set_emission(value) |
| Getter | get_emission() |
The emitted light’s color. See emission_enabled.
- bool emission_enabled
| Default | false |
| Setter | set_feature(value) |
| Getter | get_feature() |
If true, the body emits light. Emitting light makes the object appear brighter. The object can also cast light on other objects if a GIProbe or BakedLightmap is used and this object is used in baked lighting.
- float emission_energy
| Setter | set_emission_energy(value) |
| Getter | get_emission_energy() |
The emitted light’s strength. See emission_enabled.
- bool emission_on_uv2
| Setter | set_flag(value) |
| Getter | get_flag() |
Use UV2 to read from the emission_texture.
- EmissionOperator emission_operator
| Setter | set_emission_operator(value) |
| Getter | get_emission_operator() |
Sets how emission interacts with emission_texture. Can either add or multiply. See EmissionOperator for options.
- Texture emission_texture
| Setter | set_texture(value) |
| Getter | get_texture() |
Texture that specifies how much surface emits light at a given point.
- bool flags_albedo_tex_force_srgb
| Default | false |
| Setter | set_flag(value) |
| Getter | get_flag() |
Forces a conversion of the albedo_texture from sRGB space to linear space.
- bool flags_disable_ambient_light
| Default | false |
| Setter | set_flag(value) |
| Getter | get_flag() |
If true, the object receives no ambient light.
- bool flags_do_not_receive_shadows
| Default | false |
| Setter | set_flag(value) |
| Getter | get_flag() |
If true, the object receives no shadow that would otherwise be cast onto it.
- bool flags_ensure_correct_normals
| Default | false |
| Setter | set_flag(value) |
| Getter | get_flag() |
If true, the shader will compute extra operations to make sure the normal stays correct when using a non-uniform scale. Only enable if using non-uniform scaling.
- bool flags_fixed_size
| Default | false |
| Setter | set_flag(value) |
| Getter | get_flag() |
If true, the object is rendered at the same size regardless of distance.
- bool flags_no_depth_test
| Default | false |
| Setter | set_flag(value) |
| Getter | get_flag() |
If true, depth testing is disabled and the object will be drawn in render order.
- bool flags_transparent
| Default | false |
| Setter | set_feature(value) |
| Getter | get_feature() |
If true, transparency is enabled on the body. See also params_blend_mode.
- bool flags_unshaded
| Default | false |
| Setter | set_flag(value) |
| Getter | get_flag() |
If true, the object is unaffected by lighting.
- bool flags_use_point_size
| Default | false |
| Setter | set_flag(value) |
| Getter | get_flag() |
If true, render point size can be changed.
Note: this is only effective for objects whose geometry is point-based rather than triangle-based. See also params_point_size.
- bool flags_use_shadow_to_opacity
| Default | false |
| Setter | set_flag(value) |
| Getter | get_flag() |
If true, enables the “shadow to opacity” render mode where lighting modifies the alpha so shadowed areas are opaque and non-shadowed areas are transparent. Useful for overlaying shadows onto a camera feed in AR.
- bool flags_vertex_lighting
| Default | false |
| Setter | set_flag(value) |
| Getter | get_flag() |
If true, lighting is calculated per vertex rather than per pixel. This may increase performance on low-end devices.
- bool flags_world_triplanar
| Default | false |
| Setter | set_flag(value) |
| Getter | get_flag() |
If true, triplanar mapping is calculated in world space rather than object local space. See also uv1_triplanar.
- float metallic
| Default | 0.0 |
| Setter | set_metallic(value) |
| Getter | get_metallic() |
A high value makes the material appear more like a metal. Non-metals use their albedo as the diffuse color and add diffuse to the specular reflection. With non-metals, the reflection appears on top of the albedo color. Metals use their albedo as a multiplier to the specular reflection and set the diffuse color to black resulting in a tinted reflection. Materials work better when fully metal or fully non-metal, values between 0 and 1 should only be used for blending between metal and non-metal sections. To alter the amount of reflection use roughness.
- float metallic_specular
| Default | 0.5 |
| Setter | set_specular(value) |
| Getter | get_specular() |
Sets the size of the specular lobe. The specular lobe is the bright spot that is reflected from light sources.
Note: unlike metallic, this is not energy-conserving, so it should be left at 0.5 in most cases. See also roughness.
- Texture metallic_texture
| Setter | set_texture(value) |
| Getter | get_texture() |
Texture used to specify metallic for an object. This is multiplied by metallic.
- TextureChannel metallic_texture_channel
| Default | 0 |
| Setter | set_metallic_texture_channel(value) |
| Getter | get_metallic_texture_channel() |
Specifies the channel of the metallic_texture in which the metallic information is stored. This is useful when you store the information for multiple effects in a single texture. For example if you stored metallic in the red channel, roughness in the blue, and ambient occlusion in the green you could reduce the number of textures you use.
- bool normal_enabled
| Default | false |
| Setter | set_feature(value) |
| Getter | get_feature() |
If true, normal mapping is enabled.
- float normal_scale
| Setter | set_normal_scale(value) |
| Getter | get_normal_scale() |
The strength of the normal map’s effect.
- Texture normal_texture
| Setter | set_texture(value) |
| Getter | get_texture() |
Texture used to specify the normal at a given pixel. The normal_texture only uses the red and green channels. The normal read from normal_texture is oriented around the surface normal provided by the Mesh.
- float params_alpha_scissor_threshold
| Setter | set_alpha_scissor_threshold(value) |
| Getter | get_alpha_scissor_threshold() |
Threshold at which the alpha scissor will discard values.
- bool params_billboard_keep_scale
| Default | false |
| Setter | set_flag(value) |
| Getter | get_flag() |
If true, the shader will keep the scale set for the mesh. Otherwise the scale is lost when billboarding. Only applies when params_billboard_mode is BILLBOARD_ENABLED.
- BillboardMode params_billboard_mode
| Default | 0 |
| Setter | set_billboard_mode(value) |
| Getter | get_billboard_mode() |
Controls how the object faces the camera. See BillboardMode.
- BlendMode params_blend_mode
| Default | 0 |
| Setter | set_blend_mode(value) |
| Getter | get_blend_mode() |
The material’s blend mode.
Note: Values other than Mix force the object into the transparent pipeline. See BlendMode.
- CullMode params_cull_mode
| Default | 0 |
| Setter | set_cull_mode(value) |
| Getter | get_cull_mode() |
Which side of the object is not drawn when backfaces are rendered. See CullMode.
- DepthDrawMode params_depth_draw_mode
| Default | 0 |
| Setter | set_depth_draw_mode(value) |
| Getter | get_depth_draw_mode() |
Determines when depth rendering takes place. See DepthDrawMode. See also flags_transparent.
- DiffuseMode params_diffuse_mode
| Default | 0 |
| Setter | set_diffuse_mode(value) |
| Getter | get_diffuse_mode() |
The algorithm used for diffuse light scattering. See DiffuseMode.
- bool params_grow
| Default | false |
| Setter | set_grow_enabled(value) |
| Getter | is_grow_enabled() |
If true, enables the vertex grow setting. See params_grow_amount.
- float params_grow_amount
| Setter | set_grow(value) |
| Getter | get_grow() |
Grows object vertices in the direction of their normals.
- float params_line_width
| Default | 1.0 |
| Setter | set_line_width(value) |
| Getter | get_line_width() |
Currently unimplemented in Godot.
- float params_point_size
| Default | 1.0 |
| Setter | set_point_size(value) |
| Getter | get_point_size() |
The point size in pixels. See flags_use_point_size.
- SpecularMode params_specular_mode
| Default | 0 |
| Setter | set_specular_mode(value) |
| Getter | get_specular_mode() |
The method for rendering the specular blob. See SpecularMode.
- bool params_use_alpha_scissor
| Default | false |
| Setter | set_flag(value) |
| Getter | get_flag() |
If true, the shader will discard all pixels that have an alpha value less than params_alpha_scissor_threshold.
- int particles_anim_h_frames
| Setter | set_particles_anim_h_frames(value) |
| Getter | get_particles_anim_h_frames() |
The number of horizontal frames in the particle sprite sheet. Only enabled when using BILLBOARD_PARTICLES. See params_billboard_mode.
- bool particles_anim_loop
| Setter | set_particles_anim_loop(value) |
| Getter | get_particles_anim_loop() |
If true, particle animations are looped. Only enabled when using BILLBOARD_PARTICLES. See params_billboard_mode.
- int particles_anim_v_frames
| Setter | set_particles_anim_v_frames(value) |
| Getter | get_particles_anim_v_frames() |
The number of vertical frames in the particle sprite sheet. Only enabled when using BILLBOARD_PARTICLES. See params_billboard_mode.
- float proximity_fade_distance
| Setter | set_proximity_fade_distance(value) |
| Getter | get_proximity_fade_distance() |
Distance over which the fade effect takes place. The larger the distance the longer it takes for an object to fade.
- bool proximity_fade_enable
| Default | false |
| Setter | set_proximity_fade(value) |
| Getter | is_proximity_fade_enabled() |
If true, the proximity fade effect is enabled. The proximity fade effect fades out each pixel based on its distance to another object.
- bool refraction_enabled
| Default | false |
| Setter | set_feature(value) |
| Getter | get_feature() |
If true, the refraction effect is enabled. Distorts transparency based on light from behind the object.
- float refraction_scale
| Setter | set_refraction(value) |
| Getter | get_refraction() |
The strength of the refraction effect.
- Texture refraction_texture
| Setter | set_texture(value) |
| Getter | get_texture() |
Texture that controls the strength of the refraction per-pixel. Multiplied by refraction_scale.
- TextureChannel refraction_texture_channel
| Setter | set_refraction_texture_channel(value) |
| Getter | get_refraction_texture_channel() |
Specifies the channel of the ao_texture in which the ambient occlusion information is stored. This is useful when you store the information for multiple effects in a single texture. For example if you stored metallic in the red channel, roughness in the blue, and ambient occlusion in the green you could reduce the number of textures you use.
- float rim
| Setter | set_rim(value) |
| Getter | get_rim() |
Sets the strength of the rim lighting effect.
- bool rim_enabled
| Default | false |
| Setter | set_feature(value) |
| Getter | get_feature() |
If true, rim effect is enabled. Rim lighting increases the brightness at glancing angles on an object.
- Texture rim_texture
| Setter | set_texture(value) |
| Getter | get_texture() |
Texture used to set the strength of the rim lighting effect per-pixel. Multiplied by rim.
- float rim_tint
| Setter | set_rim_tint(value) |
| Getter | get_rim_tint() |
The amount of to blend light and albedo color when rendering rim effect. If 0 the light color is used, while 1 means albedo color is used. An intermediate value generally works best.
- float roughness
| Default | 1.0 |
| Setter | set_roughness(value) |
| Getter | get_roughness() |
Surface reflection. A value of 0 represents a perfect mirror while a value of 1 completely blurs the reflection. See also metallic.
- Texture roughness_texture
| Setter | set_texture(value) |
| Getter | get_texture() |
Texture used to control the roughness per-pixel. Multiplied by roughness.
- TextureChannel roughness_texture_channel
| Default | 0 |
| Setter | set_roughness_texture_channel(value) |
| Getter | get_roughness_texture_channel() |
Specifies the channel of the ao_texture in which the ambient occlusion information is stored. This is useful when you store the information for multiple effects in a single texture. For example if you stored metallic in the red channel, roughness in the blue, and ambient occlusion in the green you could reduce the number of textures you use.
- bool subsurf_scatter_enabled
| Default | false |
| Setter | set_feature(value) |
| Getter | get_feature() |
If true, subsurface scattering is enabled. Emulates light that penetrates an object’s surface, is scattered, and then emerges.
- float subsurf_scatter_strength
| Setter | set_subsurface_scattering_strength(value) |
| Getter | get_subsurface_scattering_strength() |
The strength of the subsurface scattering effect.
- Texture subsurf_scatter_texture
| Setter | set_texture(value) |
| Getter | get_texture() |
Texture used to control the subsurface scattering strength. Stored in the red texture channel. Multiplied by subsurf_scatter_strength.
- Color transmission
| Setter | set_transmission(value) |
| Getter | get_transmission() |
The color used by the transmission effect. Represents the light passing through an object.
- bool transmission_enabled
| Default | false |
| Setter | set_feature(value) |
| Getter | get_feature() |
If true, the transmission effect is enabled.
- Texture transmission_texture
| Setter | set_texture(value) |
| Getter | get_texture() |
Texture used to control the transmission effect per-pixel. Added to transmission.
- Vector3 uv1_offset
| Default | Vector3( 0, 0, 0 ) |
| Setter | set_uv1_offset(value) |
| Getter | get_uv1_offset() |
How much to offset the UV coordinates. This amount will be added to UV in the vertex function. This can be used to offset a texture.
- Vector3 uv1_scale
| Default | Vector3( 1, 1, 1 ) |
| Setter | set_uv1_scale(value) |
| Getter | get_uv1_scale() |
How much to scale the UV coordinates. This is multiplied by UV in the vertex function.
- bool uv1_triplanar
| Default | false |
| Setter | set_flag(value) |
| Getter | get_flag() |
If true, instead of using UV textures will use a triplanar texture lookup to determine how to apply textures. Triplanar uses the orientation of the object’s surface to blend between texture coordinates. It reads from the source texture 3 times, once for each axis and then blends between the results based on how closely the pixel aligns with each axis. This is often used for natural features to get a realistic blend of materials. Because triplanar texturing requires many more texture reads per-pixel it is much slower than normal UV texturing. Additionally, because it is blending the texture between the three axes, it is unsuitable when you are trying to achieve crisp texturing.
- float uv1_triplanar_sharpness
| Default | 1.0 |
| Setter | set_uv1_triplanar_blend_sharpness(value) |
| Getter | get_uv1_triplanar_blend_sharpness() |
A lower number blends the texture more softly while a higher number blends the texture more sharply.
- Vector3 uv2_offset
| Default | Vector3( 0, 0, 0 ) |
| Setter | set_uv2_offset(value) |
| Getter | get_uv2_offset() |
How much to offset the UV2 coordinates. This amount will be added to UV2 in the vertex function. This can be used to offset a texture.
- Vector3 uv2_scale
| Default | Vector3( 1, 1, 1 ) |
| Setter | set_uv2_scale(value) |
| Getter | get_uv2_scale() |
How much to scale the UV2 coordinates. This is multiplied by UV2 in the vertex function.
- bool uv2_triplanar
| Default | false |
| Setter | set_flag(value) |
| Getter | get_flag() |
If true, instead of using UV2 textures will use a triplanar texture lookup to determine how to apply textures. Triplanar uses the orientation of the object’s surface to blend between texture coordinates. It reads from the source texture 3 times, once for each axis and then blends between the results based on how closely the pixel aligns with each axis. This is often used for natural features to get a realistic blend of materials. Because triplanar texturing requires many more texture reads per-pixel it is much slower than normal UV texturing. Additionally, because it is blending the texture between the three axes, it is unsuitable when you are trying to achieve crisp texturing.
- float uv2_triplanar_sharpness
| Default | 1.0 |
| Setter | set_uv2_triplanar_blend_sharpness(value) |
| Getter | get_uv2_triplanar_blend_sharpness() |
A lower number blends the texture more softly while a higher number blends the texture more sharply.
- bool vertex_color_is_srgb
| Default | false |
| Setter | set_flag(value) |
| Getter | get_flag() |
If true, the model’s vertex colors are processed as sRGB mode.
- bool vertex_color_use_as_albedo
| Default | false |
| Setter | set_flag(value) |
| Getter | get_flag() |
If true, the vertex color is used as albedo color.
Method Descriptions¶
Returns true, if the specified Feature is enabled.
Returns true, if the specified flag is enabled. See Flags enumerator for options.
- Texture get_texture ( TextureParam param ) const
Returns the Texture associated with the specified TextureParam.
If true, enables the specified Feature. Many features that are available in SpatialMaterials need to be enabled before use. This way the cost for using the feature is only incurred when specified. Features can also be enabled by setting the corresponding member to true.
If true, enables the specified flag. Flags are optional behaviour that can be turned on and off. Only one flag can be enabled at a time with this function, the flag enumerators cannot be bit-masked together to enable or disable multiple flags at once. Flags can also be enabled by setting the corresponding member to true. See Flags enumerator for options.
- void set_texture ( TextureParam param, Texture texture )
Sets the Texture to be used by the specified TextureParam. This function is called when setting members ending in *_texture.
SpatialVelocityTracker¶
Properties¶
| bool | track_physics_step | false |
Methods¶
| Vector3 | get_tracked_linear_velocity ( ) const |
| void | reset ( Vector3 position ) |
| void | update_position ( Vector3 position ) |
SphereMesh¶
Inherits: PrimitiveMesh < Mesh < Resource < Reference < Object
Class representing a spherical PrimitiveMesh.
Description¶
Class representing a spherical PrimitiveMesh.
Properties¶
| float | height | 2.0 |
| bool | is_hemisphere | false |
| int | radial_segments | 64 |
| float | radius | 1.0 |
| int | rings | 32 |
Property Descriptions¶
- float height
| Default | 2.0 |
| Setter | set_height(value) |
| Getter | get_height() |
Full height of the sphere.
- bool is_hemisphere
| Default | false |
| Setter | set_is_hemisphere(value) |
| Getter | get_is_hemisphere() |
If true, a hemisphere is created rather than a full sphere.
Note: To get a regular hemisphere, the height and radius of the sphere must be equal.
- int radial_segments
| Default | 64 |
| Setter | set_radial_segments(value) |
| Getter | get_radial_segments() |
Number of radial segments on the sphere.
- float radius
| Default | 1.0 |
| Setter | set_radius(value) |
| Getter | get_radius() |
Radius of sphere.
- int rings
| Default | 32 |
| Setter | set_rings(value) |
| Getter | get_rings() |
Number of segments along the height of the sphere.
SphereShape¶
Inherits: Shape < Resource < Reference < Object
Sphere shape for 3D collisions.
Description¶
Sphere shape for 3D collisions, which can be set into a PhysicsBody or Area. This shape is useful for modeling sphere-like 3D objects.
SpinBox¶
Inherits: Range < Control < CanvasItem < Node < Object
Numerical input text field.
Description¶
SpinBox is a numerical input text field. It allows entering integers and floats.
Example:
var spin_box = SpinBox.new()
add_child(spin_box)
var line_edit = spin_box.get_line_edit()
line_edit.context_menu_enabled = false
spin_box.align = LineEdit.ALIGN_RIGHT
The above code will create a SpinBox, disable context menu on it and set the text alignment to right.
See Range class for more options over the SpinBox.
Methods¶
| void | apply ( ) |
| LineEdit | get_line_edit ( ) |
Property Descriptions¶
- Align align
| Default | 0 |
| Setter | set_align(value) |
| Getter | get_align() |
Sets the text alignment of the SpinBox.
- bool editable
| Default | true |
| Setter | set_editable(value) |
| Getter | is_editable() |
If true, the SpinBox will be editable. Otherwise, it will be read only.
- String prefix
| Default | "" |
| Setter | set_prefix(value) |
| Getter | get_prefix() |
Adds the specified prefix string before the numerical value of the SpinBox.
- String suffix
| Default | "" |
| Setter | set_suffix(value) |
| Getter | get_suffix() |
Adds the specified prefix string after the numerical value of the SpinBox.
SplitContainer¶
Inherits: Container < Control < CanvasItem < Node < Object
Inherited By: HSplitContainer, VSplitContainer
Container for splitting and adjusting.
Description¶
Container for splitting two Controls vertically or horizontally, with a grabber that allows adjusting the split offset or ratio.
Properties¶
| bool | collapsed | false |
| DraggerVisibility | dragger_visibility | 0 |
| int | split_offset | 0 |
Methods¶
| void | clamp_split_offset ( ) |
Enumerations¶
- DRAGGER_VISIBLE = 0 — The split dragger is visible when the cursor hovers it.
- DRAGGER_HIDDEN = 1 — The split dragger is never visible.
- DRAGGER_HIDDEN_COLLAPSED = 2 — The split dragger is never visible and its space collapsed.
Property Descriptions¶
- bool collapsed
| Default | false |
| Setter | set_collapsed(value) |
| Getter | is_collapsed() |
If true, the area of the first Control will be collapsed and the dragger will be disabled.
- DraggerVisibility dragger_visibility
| Default | 0 |
| Setter | set_dragger_visibility(value) |
| Getter | get_dragger_visibility() |
Determines the dragger’s visibility. See DraggerVisibility for details.
- int split_offset
| Default | 0 |
| Setter | set_split_offset(value) |
| Getter | get_split_offset() |
The initial offset of the splitting between the two Controls, with 0 being at the end of the first Control.
Method Descriptions¶
- void clamp_split_offset ( )
Clamps the split_offset value to not go outside the currently possible minimal and maximum values.
SpotLight¶
Inherits: Light < VisualInstance < Spatial < Node < Object
A spotlight, such as a reflector spotlight or a lantern.
Description¶
A Spotlight is a type of Light node that emits lights in a specific direction, in the shape of a cone. The light is attenuated through the distance. This attenuation can be configured by changing the energy, radius and attenuation parameters of Light.
Tutorials¶
Properties¶
| float | spot_angle | 45.0 |
| float | spot_angle_attenuation | 1.0 |
| float | spot_attenuation | 1.0 |
| float | spot_range | 5.0 |
Property Descriptions¶
- float spot_angle
| Default | 45.0 |
| Setter | set_param(value) |
| Getter | get_param() |
The spotlight’s angle in degrees.
- float spot_angle_attenuation
| Default | 1.0 |
| Setter | set_param(value) |
| Getter | get_param() |
The spotlight’s angular attenuation curve.
- float spot_attenuation
| Default | 1.0 |
| Setter | set_param(value) |
| Getter | get_param() |
The spotlight’s light energy attenuation curve.
- float spot_range
| Default | 5.0 |
| Setter | set_param(value) |
| Getter | get_param() |
The maximal range that can be reached by the spotlight.
SpringArm¶
Inherits: Spatial < Node < Object
A helper node, mostly used in 3rd person cameras.
Description¶
The SpringArm node is a node that casts a ray (or collision shape) along its z axis and moves all its direct children to the collision point, minus a margin.
The most common use case for this is to make a 3rd person camera that reacts to collisions in the environment.
The SpringArm will either cast a ray, or if a shape is given, it will cast the shape in the direction of its z axis.
If you use the SpringArm as a camera controller for your player, you might need to exclude the player’s collider from the SpringArm’s collision check.
Properties¶
| int | collision_mask | 1 |
| float | margin | 0.01 |
| Shape | shape | |
| float | spring_length | 1.0 |
Methods¶
| void | add_excluded_object ( RID RID ) |
| void | clear_excluded_objects ( ) |
| float | get_hit_length ( ) |
| bool | remove_excluded_object ( RID RID ) |
Property Descriptions¶
- int collision_mask
| Default | 1 |
| Setter | set_collision_mask(value) |
| Getter | get_collision_mask() |
The layers against which the collision check shall be done.
- float margin
| Default | 0.01 |
| Setter | set_margin(value) |
| Getter | get_margin() |
When the collision check is made, a candidate length for the SpringArm is given.
The margin is then subtracted to this length and the translation is applied to the child objects of the SpringArm.
This margin is useful for when the SpringArm has a Camera as a child node: without the margin, the Camera would be placed on the exact point of collision, while with the margin the Camera would be placed close to the point of collision.
- Shape shape
| Setter | set_shape(value) |
| Getter | get_shape() |
The Shape to use for the SpringArm.
When the shape is set, the SpringArm will cast the Shape on its z axis instead of performing a ray cast.
- float spring_length
| Default | 1.0 |
| Setter | set_length(value) |
| Getter | get_length() |
The maximum extent of the SpringArm. This is used as a length for both the ray and the shape cast used internally to calculate the desired position of the SpringArm’s child nodes.
To know more about how to perform a shape cast or a ray cast, please consult the PhysicsDirectSpaceState documentation.
Method Descriptions¶
- void add_excluded_object ( RID RID )
Adds the PhysicsBody object with the given RID to the list of PhysicsBody objects excluded from the collision check.
- void clear_excluded_objects ( )
Clears the list of PhysicsBody objects excluded from the collision check.
- float get_hit_length ( )
Returns the proportion between the current arm length (after checking for collisions) and the spring_length. Ranges from 0 to 1.
Removes the given RID from the list of PhysicsBody objects excluded from the collision check.
Sprite¶
Inherits: Node2D < CanvasItem < Node < Object
General-purpose sprite node.
Description¶
A node that displays a 2D texture. The texture displayed can be a region from a larger atlas texture, or a frame from a sprite sheet animation.
Properties¶
| bool | centered | true |
| bool | flip_h | false |
| bool | flip_v | false |
| int | frame | 0 |
| Vector2 | frame_coords | Vector2( 0, 0 ) |
| int | hframes | 1 |
| Texture | normal_map | |
| Vector2 | offset | Vector2( 0, 0 ) |
| bool | region_enabled | false |
| bool | region_filter_clip | false |
| Rect2 | region_rect | Rect2( 0, 0, 0, 0 ) |
| Texture | texture | |
| int | vframes | 1 |
Signals¶
- frame_changed ( )
Emitted when the frame changes.
- texture_changed ( )
Emitted when the texture changes.
Property Descriptions¶
- bool centered
| Default | true |
| Setter | set_centered(value) |
| Getter | is_centered() |
If true, texture is centered.
- bool flip_h
| Default | false |
| Setter | set_flip_h(value) |
| Getter | is_flipped_h() |
If true, texture is flipped horizontally.
- bool flip_v
| Default | false |
| Setter | set_flip_v(value) |
| Getter | is_flipped_v() |
If true, texture is flipped vertically.
- int frame
| Default | 0 |
| Setter | set_frame(value) |
| Getter | get_frame() |
Current frame to display from sprite sheet. vframes or hframes must be greater than 1.
- Vector2 frame_coords
| Default | Vector2( 0, 0 ) |
| Setter | set_frame_coords(value) |
| Getter | get_frame_coords() |
Coordinates of the frame to display from sprite sheet. This is as an alias for the frame property. vframes or hframes must be greater than 1.
- int hframes
| Default | 1 |
| Setter | set_hframes(value) |
| Getter | get_hframes() |
The number of columns in the sprite sheet.
- Texture normal_map
| Setter | set_normal_map(value) |
| Getter | get_normal_map() |
The normal map gives depth to the Sprite.
- Vector2 offset
| Default | Vector2( 0, 0 ) |
| Setter | set_offset(value) |
| Getter | get_offset() |
The texture’s drawing offset.
- bool region_enabled
| Default | false |
| Setter | set_region(value) |
| Getter | is_region() |
If true, texture is cut from a larger atlas texture. See region_rect.
- bool region_filter_clip
| Default | false |
| Setter | set_region_filter_clip(value) |
| Getter | is_region_filter_clip_enabled() |
If true, the outermost pixels get blurred out.
- Rect2 region_rect
| Default | Rect2( 0, 0, 0, 0 ) |
| Setter | set_region_rect(value) |
| Getter | get_region_rect() |
The region of the atlas texture to display. region_enabled must be true.
- Texture texture
| Setter | set_texture(value) |
| Getter | get_texture() |
Texture object to draw.
- int vframes
| Default | 1 |
| Setter | set_vframes(value) |
| Getter | get_vframes() |
The number of rows in the sprite sheet.
Method Descriptions¶
- Rect2 get_rect ( ) const
Returns a Rect2 representing the Sprite’s boundary in local coordinates. Can be used to detect if the Sprite was clicked. Example:
func _input(event):
if event is InputEventMouseButton and event.pressed and event.button_index == BUTTON_LEFT:
if get_rect().has_point(to_local(event.position)):
print("A click!")
Returns true, if the pixel at the given position is opaque and false in other case.
Note: It also returns false, if the sprite’s texture is null or if the given position is invalid.
Sprite3D¶
Inherits: SpriteBase3D < GeometryInstance < VisualInstance < Spatial < Node < Object
2D sprite node in a 3D world.
Description¶
A node that displays a 2D texture in a 3D environment. The texture displayed can be a region from a larger atlas texture, or a frame from a sprite sheet animation.
Properties¶
| int | frame | 0 |
| Vector2 | frame_coords | Vector2( 0, 0 ) |
| int | hframes | 1 |
| bool | region_enabled | false |
| Rect2 | region_rect | Rect2( 0, 0, 0, 0 ) |
| Texture | texture | |
| int | vframes | 1 |
Property Descriptions¶
- int frame
| Default | 0 |
| Setter | set_frame(value) |
| Getter | get_frame() |
Current frame to display from sprite sheet. vframes or hframes must be greater than 1.
- Vector2 frame_coords
| Default | Vector2( 0, 0 ) |
| Setter | set_frame_coords(value) |
| Getter | get_frame_coords() |
Coordinates of the frame to display from sprite sheet. This is as an alias for the frame property. vframes or hframes must be greater than 1.
- int hframes
| Default | 1 |
| Setter | set_hframes(value) |
| Getter | get_hframes() |
The number of columns in the sprite sheet.
- bool region_enabled
| Default | false |
| Setter | set_region(value) |
| Getter | is_region() |
If true, texture will be cut from a larger atlas texture. See region_rect.
- Rect2 region_rect
| Default | Rect2( 0, 0, 0, 0 ) |
| Setter | set_region_rect(value) |
| Getter | get_region_rect() |
The region of the atlas texture to display. region_enabled must be true.
- Texture texture
| Setter | set_texture(value) |
| Getter | get_texture() |
Texture object to draw.
- int vframes
| Default | 1 |
| Setter | set_vframes(value) |
| Getter | get_vframes() |
The number of rows in the sprite sheet.
SpriteBase3D¶
Inherits: GeometryInstance < VisualInstance < Spatial < Node < Object
Inherited By: AnimatedSprite3D, Sprite3D
2D sprite node in 3D environment.
Description¶
A node that displays 2D texture information in a 3D environment.
Properties¶
| AlphaCutMode | alpha_cut | 0 |
| Vector3.Axis | axis | 2 |
| BillboardMode | billboard | 0 |
| bool | centered | true |
| bool | double_sided | true |
| bool | flip_h | false |
| bool | flip_v | false |
| Color | modulate | Color( 1, 1, 1, 1 ) |
| Vector2 | offset | Vector2( 0, 0 ) |
| float | opacity | 1.0 |
| float | pixel_size | 0.01 |
| bool | shaded | false |
| bool | transparent | true |
Methods¶
| TriangleMesh | generate_triangle_mesh ( ) const |
| bool | get_draw_flag ( DrawFlags flag ) const |
| Rect2 | get_item_rect ( ) const |
| void | set_draw_flag ( DrawFlags flag, bool enabled ) |
Enumerations¶
enum DrawFlags:
- FLAG_TRANSPARENT = 0 — If set, the texture’s transparency and the opacity are used to make those parts of the sprite invisible.
- FLAG_SHADED = 1 — If set, lights in the environment affect the sprite.
- FLAG_DOUBLE_SIDED = 2 — If set, texture can be seen from the back as well, if not, it is invisible when looking at it from behind.
- FLAG_MAX = 3 — Represents the size of the DrawFlags enum.
enum AlphaCutMode:
- ALPHA_CUT_DISABLED = 0
- ALPHA_CUT_DISCARD = 1
- ALPHA_CUT_OPAQUE_PREPASS = 2
Property Descriptions¶
- AlphaCutMode alpha_cut
| Default | 0 |
| Setter | set_alpha_cut_mode(value) |
| Getter | get_alpha_cut_mode() |
- Vector3.Axis axis
| Default | 2 |
| Setter | set_axis(value) |
| Getter | get_axis() |
The direction in which the front of the texture faces.
- BillboardMode billboard
| Default | 0 |
| Setter | set_billboard_mode(value) |
| Getter | get_billboard_mode() |
- bool centered
| Default | true |
| Setter | set_centered(value) |
| Getter | is_centered() |
If true, texture will be centered.
- bool double_sided
| Default | true |
| Setter | set_draw_flag(value) |
| Getter | get_draw_flag() |
If true, texture can be seen from the back as well, if false, it is invisible when looking at it from behind.
- bool flip_h
| Default | false |
| Setter | set_flip_h(value) |
| Getter | is_flipped_h() |
If true, texture is flipped horizontally.
- bool flip_v
| Default | false |
| Setter | set_flip_v(value) |
| Getter | is_flipped_v() |
If true, texture is flipped vertically.
- Color modulate
| Default | Color( 1, 1, 1, 1 ) |
| Setter | set_modulate(value) |
| Getter | get_modulate() |
A color value that gets multiplied on, could be used for mood-coloring or to simulate the color of light.
- Vector2 offset
| Default | Vector2( 0, 0 ) |
| Setter | set_offset(value) |
| Getter | get_offset() |
The texture’s drawing offset.
- float opacity
| Default | 1.0 |
| Setter | set_opacity(value) |
| Getter | get_opacity() |
The objects visibility on a scale from 0 fully invisible to 1 fully visible.
- float pixel_size
| Default | 0.01 |
| Setter | set_pixel_size(value) |
| Getter | get_pixel_size() |
The size of one pixel’s width on the sprite to scale it in 3D.
- bool shaded
| Default | false |
| Setter | set_draw_flag(value) |
| Getter | get_draw_flag() |
If true, the Light in the Environment has effects on the sprite.
- bool transparent
| Default | true |
| Setter | set_draw_flag(value) |
| Getter | get_draw_flag() |
If true, the texture’s transparency and the opacity are used to make those parts of the sprite invisible.
Method Descriptions¶
- TriangleMesh generate_triangle_mesh ( ) const
Returns the value of the specified flag.
- Rect2 get_item_rect ( ) const
Returns the rectangle representing this sprite.
If true, the specified flag will be enabled.
SpriteFrames¶
Inherits: Resource < Reference < Object
Sprite frame library for AnimatedSprite.
Description¶
Sprite frame library for AnimatedSprite. Contains frames and animation data for playback.
Methods¶
| void | add_animation ( String anim ) |
| void | add_frame ( String anim, Texture frame, int at_position=-1 ) |
| void | clear ( String anim ) |
| void | clear_all ( ) |
| bool | get_animation_loop ( String anim ) const |
| PoolStringArray | get_animation_names ( ) const |
| float | get_animation_speed ( String anim ) const |
| Texture | get_frame ( String anim, int idx ) const |
| int | get_frame_count ( String anim ) const |
| bool | has_animation ( String anim ) const |
| void | remove_animation ( String anim ) |
| void | remove_frame ( String anim, int idx ) |
| void | rename_animation ( String anim, String newname ) |
| void | set_animation_loop ( String anim, bool loop ) |
| void | set_animation_speed ( String anim, float speed ) |
| void | set_frame ( String anim, int idx, Texture txt ) |
Method Descriptions¶
- void add_animation ( String anim )
Adds a new animation to the library.
Adds a frame to the given animation.
- void clear ( String anim )
Removes all frames from the given animation.
- void clear_all ( )
Removes all animations. A “default” animation will be created.
If true, the given animation will loop.
- PoolStringArray get_animation_names ( ) const
Returns an array containing the names associated to each animation. Values are placed in alphabetical order.
The animation’s speed in frames per second.
Returns the animation’s selected frame.
Returns the number of frames in the animation.
If true, the named animation exists.
- void remove_animation ( String anim )
Removes the given animation.
Removes the animation’s selected frame.
Changes the animation’s name to newname.
If true, the animation will loop.
The animation’s speed in frames per second.
Sets the texture of the given frame.
StaticBody¶
Inherits: PhysicsBody < CollisionObject < Spatial < Node < Object
Static body for 3D physics.
Description¶
Static body for 3D physics. A static body is a simple body that is not intended to move. In contrast to RigidBody, they don’t consume any CPU resources as long as they don’t move.
Additionally, a constant linear or angular velocity can be set for the static body, so even if it doesn’t move, it affects other bodies as if it was moving (this is useful for simulating conveyor belts or conveyor wheels).
Properties¶
| float | bounce | |
| Vector3 | constant_angular_velocity | Vector3( 0, 0, 0 ) |
| Vector3 | constant_linear_velocity | Vector3( 0, 0, 0 ) |
| float | friction | |
| PhysicsMaterial | physics_material_override |
Property Descriptions¶
- float bounce
| Setter | set_bounce(value) |
| Getter | get_bounce() |
The body’s bounciness. Values range from 0 (no bounce) to 1 (full bounciness).
Deprecated, use PhysicsMaterial.bounce instead via physics_material_override.
- Vector3 constant_angular_velocity
| Default | Vector3( 0, 0, 0 ) |
| Setter | set_constant_angular_velocity(value) |
| Getter | get_constant_angular_velocity() |
The body’s constant angular velocity. This does not rotate the body, but affects other bodies that touch it, as if it was in a state of rotation.
- Vector3 constant_linear_velocity
| Default | Vector3( 0, 0, 0 ) |
| Setter | set_constant_linear_velocity(value) |
| Getter | get_constant_linear_velocity() |
The body’s constant linear velocity. This does not move the body, but affects other bodies that touch it, as if it was in a state of movement.
- float friction
| Setter | set_friction(value) |
| Getter | get_friction() |
The body’s friction, from 0 (frictionless) to 1 (full friction).
Deprecated, use PhysicsMaterial.friction instead via physics_material_override.
- PhysicsMaterial physics_material_override
| Setter | set_physics_material_override(value) |
| Getter | get_physics_material_override() |
The physics material override for the body.
If a material is assigned to this property, it will be used instead of any other physics material, such as an inherited one.
StaticBody2D¶
Inherits: PhysicsBody2D < CollisionObject2D < Node2D < CanvasItem < Node < Object
Static body for 2D physics.
Description¶
Static body for 2D physics. A StaticBody2D is a body that is not intended to move. It is ideal for implementing objects in the environment, such as walls or platforms.
Additionally, a constant linear or angular velocity can be set for the static body, which will affect colliding bodies as if it were moving (for example, a conveyor belt).
Properties¶
| float | bounce | |
| float | constant_angular_velocity | 0.0 |
| Vector2 | constant_linear_velocity | Vector2( 0, 0 ) |
| float | friction | |
| PhysicsMaterial | physics_material_override |
Property Descriptions¶
- float bounce
| Setter | set_bounce(value) |
| Getter | get_bounce() |
The body’s bounciness. Values range from 0 (no bounce) to 1 (full bounciness).
Deprecated, use PhysicsMaterial.bounce instead via physics_material_override.
- float constant_angular_velocity
| Default | 0.0 |
| Setter | set_constant_angular_velocity(value) |
| Getter | get_constant_angular_velocity() |
The body’s constant angular velocity. This does not rotate the body, but affects colliding bodies, as if it were rotating.
- Vector2 constant_linear_velocity
| Default | Vector2( 0, 0 ) |
| Setter | set_constant_linear_velocity(value) |
| Getter | get_constant_linear_velocity() |
The body’s constant linear velocity. This does not move the body, but affects colliding bodies, as if it were moving.
- float friction
| Setter | set_friction(value) |
| Getter | get_friction() |
The body’s friction. Values range from 0 (no friction) to 1 (full friction).
Deprecated, use PhysicsMaterial.friction instead via physics_material_override.
- PhysicsMaterial physics_material_override
| Setter | set_physics_material_override(value) |
| Getter | get_physics_material_override() |
The physics material override for the body.
If a material is assigned to this property, it will be used instead of any other physics material, such as an inherited one.
StreamPeer¶
Inherited By: StreamPeerBuffer, StreamPeerGDNative, StreamPeerSSL, StreamPeerTCP
Abstraction and base class for stream-based protocols.
Description¶
StreamPeer is an abstraction and base class for stream-based protocols (such as TCP or UNIX sockets). It provides an API for sending and receiving data through streams as raw data or strings.
Properties¶
| bool | big_endian | false |
Methods¶
| int | get_16 ( ) |
| int | get_32 ( ) |
| int | get_64 ( ) |
| int | get_8 ( ) |
| int | get_available_bytes ( ) const |
| Array | get_data ( int bytes ) |
| float | get_double ( ) |
| float | get_float ( ) |
| Array | get_partial_data ( int bytes ) |
| String | get_string ( int bytes=-1 ) |
| int | get_u16 ( ) |
| int | get_u32 ( ) |
| int | get_u64 ( ) |
| int | get_u8 ( ) |
| String | get_utf8_string ( int bytes=-1 ) |
| Variant | get_var ( bool allow_objects=false ) |
| void | put_16 ( int value ) |
| void | put_32 ( int value ) |
| void | put_64 ( int value ) |
| void | put_8 ( int value ) |
| Error | put_data ( PoolByteArray data ) |
| void | put_double ( float value ) |
| void | put_float ( float value ) |
| Array | put_partial_data ( PoolByteArray data ) |
| void | put_string ( String value ) |
| void | put_u16 ( int value ) |
| void | put_u32 ( int value ) |
| void | put_u64 ( int value ) |
| void | put_u8 ( int value ) |
| void | put_utf8_string ( String value ) |
| void | put_var ( Variant value, bool full_objects=false ) |
Property Descriptions¶
- bool big_endian
| Default | false |
| Setter | set_big_endian(value) |
| Getter | is_big_endian_enabled() |
If true, this StreamPeer will using big-endian format for encoding and decoding.
Method Descriptions¶
- int get_16 ( )
Gets a signed 16-bit value from the stream.
- int get_32 ( )
Gets a signed 32-bit value from the stream.
- int get_64 ( )
Gets a signed 64-bit value from the stream.
- int get_8 ( )
Gets a signed byte from the stream.
- int get_available_bytes ( ) const
Returns the amount of bytes this StreamPeer has available.
Returns a chunk data with the received bytes. The amount of bytes to be received can be requested in the bytes argument. If not enough bytes are available, the function will block until the desired amount is received. This function returns two values, an Error code and a data array.
- float get_double ( )
Gets a double-precision float from the stream.
- float get_float ( )
Gets a single-precision float from the stream.
Returns a chunk data with the received bytes. The amount of bytes to be received can be requested in the “bytes” argument. If not enough bytes are available, the function will return how many were actually received. This function returns two values, an Error code, and a data array.
Gets a string with byte-length bytes from the stream. If bytes is negative (default) the length will be read from the stream using the reverse process of put_string.
- int get_u16 ( )
Gets an unsigned 16-bit value from the stream.
- int get_u32 ( )
Gets an unsigned 32-bit value from the stream.
- int get_u64 ( )
Gets an unsigned 64-bit value from the stream.
- int get_u8 ( )
Gets an unsigned byte from the stream.
Gets an UTF-8 string with byte-length bytes from the stream (this decodes the string sent as UTF-8). If bytes is negative (default) the length will be read from the stream using the reverse process of put_utf8_string.
Gets a Variant from the stream. If allow_objects is true, decoding objects is allowed.
Warning: Deserialized objects can contain code which gets executed. Do not use this option if the serialized object comes from untrusted sources to avoid potential security threats such as remote code execution.
- void put_16 ( int value )
Puts a signed 16-bit value into the stream.
- void put_32 ( int value )
Puts a signed 32-bit value into the stream.
- void put_64 ( int value )
Puts a signed 64-bit value into the stream.
- void put_8 ( int value )
Puts a signed byte into the stream.
- Error put_data ( PoolByteArray data )
Sends a chunk of data through the connection, blocking if necessary until the data is done sending. This function returns an Error code.
- void put_double ( float value )
Puts a double-precision float into the stream.
- void put_float ( float value )
Puts a single-precision float into the stream.
- Array put_partial_data ( PoolByteArray data )
Sends a chunk of data through the connection. If all the data could not be sent at once, only part of it will. This function returns two values, an Error code and an integer, describing how much data was actually sent.
- void put_string ( String value )
Puts a zero-terminated ASCII string into the stream prepended by a 32-bit unsigned integer representing its size.
Note: To put an ASCII string without prepending its size, you can use put_data:
put_data("Hello world".to_ascii())
- void put_u16 ( int value )
Puts an unsigned 16-bit value into the stream.
- void put_u32 ( int value )
Puts an unsigned 32-bit value into the stream.
- void put_u64 ( int value )
Puts an unsigned 64-bit value into the stream.
- void put_u8 ( int value )
Puts an unsigned byte into the stream.
- void put_utf8_string ( String value )
Puts a zero-terminated UTF-8 string into the stream prepended by a 32 bits unsigned integer representing its size.
Note: To put an UTF-8 string without prepending its size, you can use put_data:
put_data("Hello world".to_utf8())
Puts a Variant into the stream. If full_objects is true encoding objects is allowed (and can potentially include code).
StreamPeerBuffer¶
Inherits: StreamPeer < Reference < Object
Properties¶
| PoolByteArray | data_array | PoolByteArray( ) |
Methods¶
| void | clear ( ) |
| StreamPeerBuffer | duplicate ( ) const |
| int | get_position ( ) const |
| int | get_size ( ) const |
| void | resize ( int size ) |
| void | seek ( int position ) |
Property Descriptions¶
- PoolByteArray data_array
| Default | PoolByteArray( ) |
| Setter | set_data_array(value) |
| Getter | get_data_array() |
StreamPeerGDNative¶
Inherits: StreamPeer < Reference < Object
StreamPeerSSL¶
Inherits: StreamPeer < Reference < Object
SSL stream peer.
Description¶
SSL stream peer. This object can be used to connect to an SSL server or accept a single SSL client connection.
Tutorials¶
Properties¶
| bool | blocking_handshake | true |
Methods¶
| Error | accept_stream ( StreamPeer stream, CryptoKey private_key, X509Certificate certificate, X509Certificate chain=null ) |
| Error | connect_to_stream ( StreamPeer stream, bool validate_certs=false, String for_hostname=”“, X509Certificate valid_certificate=null ) |
| void | disconnect_from_stream ( ) |
| Status | get_status ( ) const |
| void | poll ( ) |
Enumerations¶
enum Status:
- STATUS_DISCONNECTED = 0 — A status representing a
StreamPeerSSLthat is disconnected. - STATUS_HANDSHAKING = 1 — A status representing a
StreamPeerSSLduring handshaking. - STATUS_CONNECTED = 2 — A status representing a
StreamPeerSSLthat is connected to a host. - STATUS_ERROR = 3 — A status representing a
StreamPeerSSLin error state. - STATUS_ERROR_HOSTNAME_MISMATCH = 4 — An error status that shows a mismatch in the SSL certificate domain presented by the host and the domain requested for validation.
Property Descriptions¶
- bool blocking_handshake
| Default | true |
| Setter | set_blocking_handshake_enabled(value) |
| Getter | is_blocking_handshake_enabled() |
Method Descriptions¶
- Error accept_stream ( StreamPeer stream, CryptoKey private_key, X509Certificate certificate, X509Certificate chain=null )
Accepts a peer connection as a server using the given private_key and providing the given certificate to the client. You can pass the optional chain parameter to provide additional CA chain information along with the certificate.
- Error connect_to_stream ( StreamPeer stream, bool validate_certs=false, String for_hostname=”“, X509Certificate valid_certificate=null )
Connects to a peer using an underlying StreamPeer stream. If validate_certs is true, StreamPeerSSL will validate that the certificate presented by the peer matches the for_hostname.
Note: Specifying a custom valid_certificate is not supported in HTML5 exports due to browsers restrictions.
- void disconnect_from_stream ( )
Disconnects from host.
- Status get_status ( ) const
Returns the status of the connection. See Status for values.
- void poll ( )
Poll the connection to check for incoming bytes. Call this right before StreamPeer.get_available_bytes for it to work properly.
StreamPeerTCP¶
Inherits: StreamPeer < Reference < Object
TCP stream peer.
Description¶
TCP stream peer. This object can be used to connect to TCP servers, or also is returned by a TCP server.
Methods¶
| Error | connect_to_host ( String host, int port ) |
| void | disconnect_from_host ( ) |
| String | get_connected_host ( ) const |
| int | get_connected_port ( ) const |
| Status | get_status ( ) |
| bool | is_connected_to_host ( ) const |
| void | set_no_delay ( bool enabled ) |
Enumerations¶
enum Status:
- STATUS_NONE = 0 — The initial status of the
StreamPeerTCP. This is also the status after disconnecting. - STATUS_CONNECTING = 1 — A status representing a
StreamPeerTCPthat is connecting to a host. - STATUS_CONNECTED = 2 — A status representing a
StreamPeerTCPthat is connected to a host. - STATUS_ERROR = 3 — A status representing a
StreamPeerTCPin error state.
Method Descriptions¶
Connects to the specified host:port pair. A hostname will be resolved if valid. Returns @GlobalScope.OK on success or @GlobalScope.FAILED on failure.
- void disconnect_from_host ( )
Disconnects from host.
- String get_connected_host ( ) const
Returns the IP of this peer.
- int get_connected_port ( ) const
Returns the port of this peer.
- Status get_status ( )
Returns the status of the connection, see Status.
- bool is_connected_to_host ( ) const
Returns true if this peer is currently connected to a host, false otherwise.
- void set_no_delay ( bool enabled )
Disables Nagle’s algorithm to improve latency for small packets.
Note: For applications that send large packets or need to transfer a lot of data, this can decrease the total available bandwidth.
StreamTexture¶
Inherits: Texture < Resource < Reference < Object
A .stex texture.
Description¶
A texture that is loaded from a .stex file.
String¶
Built-in string class.
Description¶
This is the built-in string class (and the one used by GDScript). It supports Unicode and provides all necessary means for string handling. Strings are reference counted and use a copy-on-write approach, so passing them around is cheap in resources.
Tutorials¶
Methods¶
Method Descriptions¶
Constructs a new String from the given bool.
Constructs a new String from the given int.
Constructs a new String from the given float.
Constructs a new String from the given Vector2.
Constructs a new String from the given Rect2.
Constructs a new String from the given Vector3.
- String String ( Transform2D from )
Constructs a new String from the given Transform2D.
Constructs a new String from the given Plane.
Constructs a new String from the given Quat.
Constructs a new String from the given AABB.
Constructs a new String from the given Basis.
Constructs a new String from the given Transform.
Constructs a new String from the given Color.
Constructs a new String from the given NodePath.
Constructs a new String from the given RID.
- String String ( Dictionary from )
Constructs a new String from the given Dictionary.
Constructs a new String from the given Array.
- String String ( PoolByteArray from )
Constructs a new String from the given PoolByteArray.
- String String ( PoolIntArray from )
Constructs a new String from the given PoolIntArray.
- String String ( PoolRealArray from )
Constructs a new String from the given PoolRealArray.
- String String ( PoolStringArray from )
Constructs a new String from the given PoolStringArray.
- String String ( PoolVector2Array from )
Constructs a new String from the given PoolVector2Array.
- String String ( PoolVector3Array from )
Constructs a new String from the given PoolVector3Array.
- String String ( PoolColorArray from )
Constructs a new String from the given PoolColorArray.
Returns true if the string begins with the given string.
- PoolStringArray bigrams ( )
Returns the bigrams (pairs of consecutive letters) of this string.
- String c_escape ( )
Returns a copy of the string with special characters escaped using the C language standard.
- String c_unescape ( )
Returns a copy of the string with escaped characters replaced by their meanings according to the C language standard.
- String capitalize ( )
Changes the case of some letters. Replaces underscores with spaces, converts all letters to lowercase, then capitalizes first and every letter following the space character. For capitalize camelCase mixed_with_underscores, it will return Capitalize Camelcase Mixed With Underscores.
Performs a case-sensitive comparison to another string. Returns -1 if less than, +1 if greater than, or 0 if equal.
Returns the number of occurrences of substring what between from and to positions. If from and to equals 0 the whole string will be used. If only to equals 0 the remained substring will be used.
Returns the number of occurrences of substring what (ignoring case) between from and to positions. If from and to equals 0 the whole string will be used. If only to equals 0 the remained substring will be used.
- String dedent ( )
Returns a copy of the string with indentation (leading tabs and spaces) removed.
- bool empty ( )
Returns true if the string is empty.
Returns true if the string ends with the given string.
Erases chars characters from the string starting from position.
Finds the first occurrence of a substring. Returns the starting position of the substring or -1 if not found. Optionally, the initial search index can be passed.
Finds the last occurrence of a substring. Returns the starting position of the substring or -1 if not found.
Finds the first occurrence of a substring, ignoring case. Returns the starting position of the substring or -1 if not found. Optionally, the initial search index can be passed.
Formats the string by replacing all occurrences of placeholder with values.
- String get_base_dir ( )
If the string is a valid file path, returns the base directory name.
- String get_basename ( )
If the string is a valid file path, returns the full file path without the extension.
- String get_extension ( )
If the string is a valid file path, returns the extension.
- String get_file ( )
If the string is a valid file path, returns the filename.
- int hash ( )
Hashes the string and returns a 32-bit integer.
- int hex_to_int ( )
Converts a string containing a hexadecimal number into an integer. Hexadecimal strings are expected to be prefixed with “0x” otherwise 0 is returned.
print("0xff".hex_to_int()) # Print "255"
- String http_escape ( )
Escapes (encodes) a string to URL friendly format. Also referred to as ‘URL encode’.
print("https://example.org/?escaped=" + "Godot Engine:'docs'".http_escape())
- String http_unescape ( )
Unescapes (decodes) a string in URL encoded format. Also referred to as ‘URL decode’.
print("https://example.org/?escaped=" + "Godot%20Engine%3A%27docs%27".http_unescape())
Converts size represented as number of bytes to human-readable format using internationalized set of data size units, namely: B, KiB, MiB, GiB, TiB, PiB, EiB. Note that the next smallest unit is picked automatically to hold at most 1024 units.
var bytes = 133790307
var size = String.humanize_size(bytes)
print(size) # prints "127.5 MiB"
Returns a copy of the string with the substring what inserted at the given position.
- bool is_abs_path ( )
If the string is a path to a file or directory, returns true if the path is absolute.
- bool is_rel_path ( )
If the string is a path to a file or directory, returns true if the path is relative.
Returns true if this string is a subsequence of the given string.
Returns true if this string is a subsequence of the given string, without considering case.
- bool is_valid_filename ( )
Returns true if this string is free from characters that aren’t allowed in file names, those being:
: / \ ? * " | % < >
- bool is_valid_float ( )
Returns true if this string contains a valid float.
Returns true if this string contains a valid hexadecimal number. If with_prefix is true, then a validity of the hexadecimal number is determined by 0x prefix, for instance: 0xDEADC0DE.
- bool is_valid_html_color ( )
Returns true if this string contains a valid color in hexadecimal HTML notation. Other HTML notations such as named colors or hsl() colors aren’t considered valid by this method and will return false.
- bool is_valid_identifier ( )
Returns true if this string is a valid identifier. A valid identifier may contain only letters, digits and underscores (_) and the first character may not be a digit.
- bool is_valid_integer ( )
Returns true if this string contains a valid integer.
- bool is_valid_ip_address ( )
Returns true if this string contains a valid IP address.
- String json_escape ( )
Returns a copy of the string with special characters escaped using the JSON standard.
Returns a number of characters from the left of the string.
- int length ( )
Returns the string’s amount of characters.
Returns a copy of the string with characters removed from the left.
Does a simple case-sensitive expression match, where "*" matches zero or more arbitrary characters and "?" matches any single character except a period (".").
Does a simple case-insensitive expression match, where "*" matches zero or more arbitrary characters and "?" matches any single character except a period (".").
- PoolByteArray md5_buffer ( )
Returns the MD5 hash of the string as an array of bytes.
- String md5_text ( )
Returns the MD5 hash of the string as a string.
Performs a case-insensitive comparison to another string. Returns -1 if less than, +1 if greater than, or 0 if equal.
Returns the character code at position at.
Formats a number to have an exact number of digits after the decimal point.
Formats a number to have an exact number of digits before the decimal point.
- String percent_decode ( )
Decode a percent-encoded string. See percent_encode.
- String percent_encode ( )
Percent-encodes a string. Encodes parameters in a URL when sending a HTTP GET request (and bodies of form-urlencoded POST requests).
If the string is a path, this concatenates file at the end of the string as a subpath. E.g. "this/is".plus_file("path") == "this/is/path".
Returns original string repeated a number of times. The number of repetitions is given by the argument.
Replaces occurrences of a case-sensitive substring with the given one inside the string.
Replaces occurrences of a case-insensitive substring with the given one inside the string.
Performs a case-sensitive search for a substring, but starts from the end of the string instead of the beginning.
Performs a case-insensitive search for a substring, but starts from the end of the string instead of the beginning.
Returns the right side of the string from a given position.
- PoolStringArray rsplit ( String delimiter, bool allow_empty=true, int maxsplit=0 )
Splits the string by a delimiter string and returns an array of the substrings, starting from right.
The splits in the returned array are sorted in the same order as the original string, from left to right.
If maxsplit is specified, it defines the number of splits to do from the right up to maxsplit. The default value of 0 means that all items are split, thus giving the same result as split.
Example:
var some_string = "One,Two,Three,Four"
var some_array = some_string.rsplit(",", true, 1)
print(some_array.size()) # Prints 2
print(some_array[0]) # Prints "Four"
print(some_array[1]) # Prints "Three,Two,One"
Returns a copy of the string with characters removed from the right.
- PoolByteArray sha1_buffer ( )
Returns the SHA-1 hash of the string as an array of bytes.
- String sha1_text ( )
Returns the SHA-1 hash of the string as a string.
- PoolByteArray sha256_buffer ( )
Returns the SHA-256 hash of the string as an array of bytes.
- String sha256_text ( )
Returns the SHA-256 hash of the string as a string.
Returns the similarity index of the text compared to this string. 1 means totally similar and 0 means totally dissimilar.
- PoolStringArray split ( String delimiter, bool allow_empty=true, int maxsplit=0 )
Splits the string by a delimiter string and returns an array of the substrings.
If maxsplit is specified, it defines the number of splits to do from the left up to maxsplit. The default value of 0 means that all items are split.
Example:
var some_string = "One,Two,Three,Four"
var some_array = some_string.split(",", true, 1)
print(some_array.size()) # Prints 2
print(some_array[0]) # Prints "One"
print(some_array[1]) # Prints "Two,Three,Four"
- PoolRealArray split_floats ( String delimiter, bool allow_empty=true )
Splits the string in floats by using a delimiter string and returns an array of the substrings.
For example, "1,2.5,3" will return [1,2.5,3] if split by ",".
Returns a copy of the string stripped of any non-printable character (including tabulations, spaces and line breaks) at the beginning and the end. The optional arguments are used to toggle stripping on the left and right edges respectively.
- String strip_escapes ( )
Returns a copy of the string stripped of any escape character. These include all non-printable control characters of the first page of the ASCII table (< 32), such as tabulation (\t in C) and newline (\n and \r) characters, but not spaces.
Returns part of the string from the position from with length len. Argument len is optional and using -1 will return remaining characters from given position.
- PoolByteArray to_ascii ( )
Converts the String (which is a character array) to PoolByteArray (which is an array of bytes). The conversion is faster compared to to_utf8, as this method assumes that all the characters in the String are ASCII characters.
- float to_float ( )
Converts a string containing a decimal number into a float.
- int to_int ( )
Converts a string containing an integer number into an int.
- String to_lower ( )
Returns the string converted to lowercase.
- String to_upper ( )
Returns the string converted to uppercase.
- PoolByteArray to_utf8 ( )
Converts the String (which is an array of characters) to PoolByteArray (which is an array of bytes). The conversion is a bit slower than to_ascii, but supports all UTF-8 characters. Therefore, you should prefer this function over to_ascii.
Removes a given string from the start if it starts with it or leaves the string unchanged.
Removes a given string from the end if it ends with it or leaves the string unchanged.
- String xml_escape ( )
Returns a copy of the string with special characters escaped using the XML standard.
- String xml_unescape ( )
Returns a copy of the string with escaped characters replaced by their meanings according to the XML standard.
StyleBox¶
Inherits: Resource < Reference < Object
Inherited By: StyleBoxEmpty, StyleBoxFlat, StyleBoxLine, StyleBoxTexture
Base class for drawing stylized boxes for the UI.
Description¶
StyleBox is Resource that provides an abstract base class for drawing stylized boxes for the UI. StyleBoxes are used for drawing the styles of buttons, line edit backgrounds, tree backgrounds, etc. and also for testing a transparency mask for pointer signals. If mask test fails on a StyleBox assigned as mask to a control, clicks and motion signals will go through it to the one below.
Properties¶
| float | content_margin_bottom | -1.0 |
| float | content_margin_left | -1.0 |
| float | content_margin_right | -1.0 |
| float | content_margin_top | -1.0 |
Methods¶
| void | draw ( RID canvas_item, Rect2 rect ) const |
| Vector2 | get_center_size ( ) const |
| CanvasItem | get_current_item_drawn ( ) const |
| float | get_default_margin ( Margin margin ) const |
| float | get_margin ( Margin margin ) const |
| Vector2 | get_minimum_size ( ) const |
| Vector2 | get_offset ( ) const |
| void | set_default_margin ( Margin margin, float offset ) |
| bool | test_mask ( Vector2 point, Rect2 rect ) const |
Property Descriptions¶
- float content_margin_bottom
| Default | -1.0 |
| Setter | set_default_margin(value) |
| Getter | get_default_margin() |
The bottom margin for the contents of this style box. Increasing this value reduces the space available to the contents from the bottom.
If this value is negative, it is ignored and a child-specific margin is used instead. For example for StyleBoxFlat the border thickness (if any) is used instead.
It is up to the code using this style box to decide what these contents are: for example, a Button respects this content margin for the textual contents of the button.
get_margin should be used to fetch this value as consumer instead of reading these properties directly. This is because it correctly respects negative values and the fallback mentioned above.
- float content_margin_left
| Default | -1.0 |
| Setter | set_default_margin(value) |
| Getter | get_default_margin() |
The left margin for the contents of this style box. Increasing this value reduces the space available to the contents from the left.
Refer to content_margin_bottom for extra considerations.
- float content_margin_right
| Default | -1.0 |
| Setter | set_default_margin(value) |
| Getter | get_default_margin() |
The right margin for the contents of this style box. Increasing this value reduces the space available to the contents from the right.
Refer to content_margin_bottom for extra considerations.
- float content_margin_top
| Default | -1.0 |
| Setter | set_default_margin(value) |
| Getter | get_default_margin() |
The top margin for the contents of this style box. Increasing this value reduces the space available to the contents from the top.
Refer to content_margin_bottom for extra considerations.
Method Descriptions¶
Draws this stylebox using a CanvasItem with given RID.
You can get a RID value using Object.get_instance_id on a CanvasItem-derived node.
- Vector2 get_center_size ( ) const
Returns the size of this StyleBox without the margins.
- CanvasItem get_current_item_drawn ( ) const
Returns the CanvasItem that handles its CanvasItem.NOTIFICATION_DRAW or CanvasItem._draw callback at this moment.
Returns the default value of the specified Margin.
Returns the content margin offset for the specified Margin.
Positive values reduce size inwards, unlike Control’s margin values.
- Vector2 get_minimum_size ( ) const
Returns the minimum size that this stylebox can be shrunk to.
- Vector2 get_offset ( ) const
Returns the “offset” of a stylebox. This helper function returns a value equivalent to Vector2(style.get_margin(MARGIN_LEFT), style.get_margin(MARGIN_TOP)).
Sets the default value of the specified Margin to given offset in pixels.
Test a position in a rectangle, return whether it passes the mask test.
StyleBoxEmpty¶
Inherits: StyleBox < Resource < Reference < Object
Empty stylebox (does not display anything).
Description¶
Empty stylebox (really does not display anything).
StyleBoxFlat¶
Inherits: StyleBox < Resource < Reference < Object
Customizable StyleBox with a given set of parameters (no texture required).
Description¶
This StyleBox can be used to achieve all kinds of looks without the need of a texture. Those properties are customizable:
- Color
- Border width (individual width for each border)
- Rounded corners (individual radius for each corner)
- Shadow (with blur and offset)
Setting corner radius to high values is allowed. As soon as corners would overlap, the stylebox will switch to a relative system. Example:
height = 30
corner_radius_top_left = 50
corner_radius_bottom_left = 100
The relative system now would take the 1:2 ratio of the two left corners to calculate the actual corner width. Both corners added will never be more than the height. Result:
corner_radius_top_left: 10
corner_radius_bottom_left: 20
Properties¶
| bool | anti_aliasing | true |
| int | anti_aliasing_size | 1 |
| Color | bg_color | Color( 0.6, 0.6, 0.6, 1 ) |
| bool | border_blend | false |
| Color | border_color | Color( 0.8, 0.8, 0.8, 1 ) |
| int | border_width_bottom | 0 |
| int | border_width_left | 0 |
| int | border_width_right | 0 |
| int | border_width_top | 0 |
| int | corner_detail | 8 |
| int | corner_radius_bottom_left | 0 |
| int | corner_radius_bottom_right | 0 |
| int | corner_radius_top_left | 0 |
| int | corner_radius_top_right | 0 |
| bool | draw_center | true |
| float | expand_margin_bottom | 0.0 |
| float | expand_margin_left | 0.0 |
| float | expand_margin_right | 0.0 |
| float | expand_margin_top | 0.0 |
| Color | shadow_color | Color( 0, 0, 0, 0.6 ) |
| Vector2 | shadow_offset | Vector2( 0, 0 ) |
| int | shadow_size | 0 |
Methods¶
| int | get_border_width ( Margin margin ) const |
| int | get_border_width_min ( ) const |
| int | get_corner_radius ( Corner corner ) const |
| float | get_expand_margin ( Margin margin ) const |
| void | set_border_width ( Margin margin, int width ) |
| void | set_border_width_all ( int width ) |
| void | set_corner_radius ( Corner corner, int radius ) |
| void | set_corner_radius_all ( int radius ) |
| void | set_corner_radius_individual ( int radius_top_left, int radius_top_right, int radius_bottom_right, int radius_bottom_left ) |
| void | set_expand_margin ( Margin margin, float size ) |
| void | set_expand_margin_all ( float size ) |
| void | set_expand_margin_individual ( float size_left, float size_top, float size_right, float size_bottom ) |
Property Descriptions¶
- bool anti_aliasing
| Default | true |
| Setter | set_anti_aliased(value) |
| Getter | is_anti_aliased() |
Antialiasing draws a small ring around the edges, which fades to transparency. As a result, edges look much smoother. This is only noticeable when using rounded corners.
- int anti_aliasing_size
| Default | 1 |
| Setter | set_aa_size(value) |
| Getter | get_aa_size() |
This changes the size of the faded ring. Higher values can be used to achieve a “blurry” effect.
- Color bg_color
| Default | Color( 0.6, 0.6, 0.6, 1 ) |
| Setter | set_bg_color(value) |
| Getter | get_bg_color() |
The background color of the stylebox.
- bool border_blend
| Default | false |
| Setter | set_border_blend(value) |
| Getter | get_border_blend() |
If true, the border will fade into the background color.
- Color border_color
| Default | Color( 0.8, 0.8, 0.8, 1 ) |
| Setter | set_border_color(value) |
| Getter | get_border_color() |
Sets the color of the border.
- int border_width_bottom
| Default | 0 |
| Setter | set_border_width(value) |
| Getter | get_border_width() |
Border width for the bottom border.
- int border_width_left
| Default | 0 |
| Setter | set_border_width(value) |
| Getter | get_border_width() |
Border width for the left border.
- int border_width_right
| Default | 0 |
| Setter | set_border_width(value) |
| Getter | get_border_width() |
Border width for the right border.
- int border_width_top
| Default | 0 |
| Setter | set_border_width(value) |
| Getter | get_border_width() |
Border width for the top border.
- int corner_detail
| Default | 8 |
| Setter | set_corner_detail(value) |
| Getter | get_corner_detail() |
This sets the amount of vertices used for each corner. Higher values result in rounder corners but take more processing power to compute. When choosing a value, you should take the corner radius (set_corner_radius_all) into account.
For corner radii smaller than 10, 4 or 5 should be enough. For corner radii smaller than 30, values between 8 and 12 should be enough.
A corner detail of 1 will result in chamfered corners instead of rounded corners, which is useful for some artistic effects.
- int corner_radius_bottom_left
| Default | 0 |
| Setter | set_corner_radius(value) |
| Getter | get_corner_radius() |
The bottom-left corner’s radius. If 0, the corner is not rounded.
- int corner_radius_bottom_right
| Default | 0 |
| Setter | set_corner_radius(value) |
| Getter | get_corner_radius() |
The bottom-right corner’s radius. If 0, the corner is not rounded.
- int corner_radius_top_left
| Default | 0 |
| Setter | set_corner_radius(value) |
| Getter | get_corner_radius() |
The top-left corner’s radius. If 0, the corner is not rounded.
- int corner_radius_top_right
| Default | 0 |
| Setter | set_corner_radius(value) |
| Getter | get_corner_radius() |
The top-right corner’s radius. If 0, the corner is not rounded.
- bool draw_center
| Default | true |
| Setter | set_draw_center(value) |
| Getter | is_draw_center_enabled() |
Toggles drawing of the inner part of the stylebox.
- float expand_margin_bottom
| Default | 0.0 |
| Setter | set_expand_margin(value) |
| Getter | get_expand_margin() |
Expands the stylebox outside of the control rect on the bottom edge. Useful in combination with border_width_bottom to draw a border outside the control rect.
- float expand_margin_left
| Default | 0.0 |
| Setter | set_expand_margin(value) |
| Getter | get_expand_margin() |
Expands the stylebox outside of the control rect on the left edge. Useful in combination with border_width_left to draw a border outside the control rect.
- float expand_margin_right
| Default | 0.0 |
| Setter | set_expand_margin(value) |
| Getter | get_expand_margin() |
Expands the stylebox outside of the control rect on the right edge. Useful in combination with border_width_right to draw a border outside the control rect.
- float expand_margin_top
| Default | 0.0 |
| Setter | set_expand_margin(value) |
| Getter | get_expand_margin() |
Expands the stylebox outside of the control rect on the top edge. Useful in combination with border_width_top to draw a border outside the control rect.
- Color shadow_color
| Default | Color( 0, 0, 0, 0.6 ) |
| Setter | set_shadow_color(value) |
| Getter | get_shadow_color() |
The color of the shadow. This has no effect if shadow_size is lower than 1.
- Vector2 shadow_offset
| Default | Vector2( 0, 0 ) |
| Setter | set_shadow_offset(value) |
| Getter | get_shadow_offset() |
The shadow offset in pixels. Adjusts the position of the shadow relatively to the stylebox.
- int shadow_size
| Default | 0 |
| Setter | set_shadow_size(value) |
| Getter | get_shadow_size() |
The shadow size in pixels.
Method Descriptions¶
Returns the given margin’s border width. See Margin for possible values.
- int get_border_width_min ( ) const
Returns the smallest border width out of all four borders.
Returns the given corner’s radius. See Corner for possible values.
Returns the size of the given margin’s expand margin. See Margin for possible values.
Sets the border width to width pixels for the given margin. See Margin for possible values.
- void set_border_width_all ( int width )
Sets the border width to width pixels for all margins.
Sets the corner radius to radius pixels for the given corner. See Corner for possible values.
- void set_corner_radius_all ( int radius )
Sets the corner radius to radius pixels for all corners.
- void set_corner_radius_individual ( int radius_top_left, int radius_top_right, int radius_bottom_right, int radius_bottom_left )
Sets the corner radius for each corner to radius_top_left, radius_top_right, radius_bottom_right, and radius_bottom_left pixels.
Sets the expand margin to size pixels for the given margin. See Margin for possible values.
- void set_expand_margin_all ( float size )
Sets the expand margin to size pixels for all margins.
- void set_expand_margin_individual ( float size_left, float size_top, float size_right, float size_bottom )
Sets the expand margin for each margin to size_left, size_top, size_right, and size_bottom pixels.
StyleBoxLine¶
Inherits: StyleBox < Resource < Reference < Object
StyleBox that displays a single line.
Description¶
StyleBox that displays a single line of a given color and thickness. It can be used to draw things like separators.
Properties¶
| Color | color | Color( 0, 0, 0, 1 ) |
| float | grow_begin | 1.0 |
| float | grow_end | 1.0 |
| int | thickness | 1 |
| bool | vertical | false |
Property Descriptions¶
- Color color
| Default | Color( 0, 0, 0, 1 ) |
| Setter | set_color(value) |
| Getter | get_color() |
The line’s color.
- float grow_begin
| Default | 1.0 |
| Setter | set_grow_begin(value) |
| Getter | get_grow_begin() |
The number of pixels the line will extend before the StyleBoxLine’s bounds. If set to a negative value, the line will begin inside the StyleBoxLine’s bounds.
- float grow_end
| Default | 1.0 |
| Setter | set_grow_end(value) |
| Getter | get_grow_end() |
The number of pixels the line will extend past the StyleBoxLine’s bounds. If set to a negative value, the line will end inside the StyleBoxLine’s bounds.
- int thickness
| Default | 1 |
| Setter | set_thickness(value) |
| Getter | get_thickness() |
The line’s thickness in pixels.
- bool vertical
| Default | false |
| Setter | set_vertical(value) |
| Getter | is_vertical() |
If true, the line will be vertical. If false, the line will be horizontal.
StyleBoxTexture¶
Inherits: StyleBox < Resource < Reference < Object
Texture-based nine-patch StyleBox.
Description¶
Texture-based nine-patch StyleBox, in a way similar to NinePatchRect. This stylebox performs a 3×3 scaling of a texture, where only the center cell is fully stretched. This makes it possible to design bordered styles regardless of the stylebox’s size.
Properties¶
| AxisStretchMode | axis_stretch_horizontal | 0 |
| AxisStretchMode | axis_stretch_vertical | 0 |
| bool | draw_center | true |
| float | expand_margin_bottom | 0.0 |
| float | expand_margin_left | 0.0 |
| float | expand_margin_right | 0.0 |
| float | expand_margin_top | 0.0 |
| float | margin_bottom | 0.0 |
| float | margin_left | 0.0 |
| float | margin_right | 0.0 |
| float | margin_top | 0.0 |
| Color | modulate_color | Color( 1, 1, 1, 1 ) |
| Texture | normal_map | |
| Rect2 | region_rect | Rect2( 0, 0, 0, 0 ) |
| Texture | texture |
Methods¶
| float | get_expand_margin_size ( Margin margin ) const |
| float | get_margin_size ( Margin margin ) const |
| void | set_expand_margin_all ( float size ) |
| void | set_expand_margin_individual ( float size_left, float size_top, float size_right, float size_bottom ) |
| void | set_expand_margin_size ( Margin margin, float size ) |
| void | set_margin_size ( Margin margin, float size ) |
Enumerations¶
enum AxisStretchMode:
- AXIS_STRETCH_MODE_STRETCH = 0 — Stretch the stylebox’s texture. This results in visible distortion unless the texture size matches the stylebox’s size perfectly.
- AXIS_STRETCH_MODE_TILE = 1 — Repeats the stylebox’s texture to match the stylebox’s size according to the nine-patch system.
- AXIS_STRETCH_MODE_TILE_FIT = 2 — Repeats the stylebox’s texture to match the stylebox’s size according to the nine-patch system. Unlike AXIS_STRETCH_MODE_TILE, the texture may be slightly stretched to make the nine-patch texture tile seamlessly.
Property Descriptions¶
- AxisStretchMode axis_stretch_horizontal
| Default | 0 |
| Setter | set_h_axis_stretch_mode(value) |
| Getter | get_h_axis_stretch_mode() |
Controls how the stylebox’s texture will be stretched or tiled horizontally. See AxisStretchMode for possible values.
- AxisStretchMode axis_stretch_vertical
| Default | 0 |
| Setter | set_v_axis_stretch_mode(value) |
| Getter | get_v_axis_stretch_mode() |
Controls how the stylebox’s texture will be stretched or tiled vertically. See AxisStretchMode for possible values.
- bool draw_center
| Default | true |
| Setter | set_draw_center(value) |
| Getter | is_draw_center_enabled() |
If true, the nine-patch texture’s center tile will be drawn.
- float expand_margin_bottom
| Default | 0.0 |
| Setter | set_expand_margin_size(value) |
| Getter | get_expand_margin_size() |
Expands the bottom margin of this style box when drawing, causing it to be drawn larger than requested.
- float expand_margin_left
| Default | 0.0 |
| Setter | set_expand_margin_size(value) |
| Getter | get_expand_margin_size() |
Expands the left margin of this style box when drawing, causing it to be drawn larger than requested.
- float expand_margin_right
| Default | 0.0 |
| Setter | set_expand_margin_size(value) |
| Getter | get_expand_margin_size() |
Expands the right margin of this style box when drawing, causing it to be drawn larger than requested.
- float expand_margin_top
| Default | 0.0 |
| Setter | set_expand_margin_size(value) |
| Getter | get_expand_margin_size() |
Expands the top margin of this style box when drawing, causing it to be drawn larger than requested.
- float margin_bottom
| Default | 0.0 |
| Setter | set_margin_size(value) |
| Getter | get_margin_size() |
Increases the bottom margin of the 3×3 texture box.
A higher value means more of the source texture is considered to be part of the bottom border of the 3×3 box.
This is also the value used as fallback for StyleBox.content_margin_bottom if it is negative.
- float margin_left
| Default | 0.0 |
| Setter | set_margin_size(value) |
| Getter | get_margin_size() |
Increases the left margin of the 3×3 texture box.
A higher value means more of the source texture is considered to be part of the left border of the 3×3 box.
This is also the value used as fallback for StyleBox.content_margin_left if it is negative.
- float margin_right
| Default | 0.0 |
| Setter | set_margin_size(value) |
| Getter | get_margin_size() |
Increases the right margin of the 3×3 texture box.
A higher value means more of the source texture is considered to be part of the right border of the 3×3 box.
This is also the value used as fallback for StyleBox.content_margin_right if it is negative.
- float margin_top
| Default | 0.0 |
| Setter | set_margin_size(value) |
| Getter | get_margin_size() |
Increases the top margin of the 3×3 texture box.
A higher value means more of the source texture is considered to be part of the top border of the 3×3 box.
This is also the value used as fallback for StyleBox.content_margin_top if it is negative.
- Color modulate_color
| Default | Color( 1, 1, 1, 1 ) |
| Setter | set_modulate(value) |
| Getter | get_modulate() |
Modulates the color of the texture when this style box is drawn.
- Texture normal_map
| Setter | set_normal_map(value) |
| Getter | get_normal_map() |
The normal map to use when drawing this style box.
- Rect2 region_rect
| Default | Rect2( 0, 0, 0, 0 ) |
| Setter | set_region_rect(value) |
| Getter | get_region_rect() |
Species a sub-region of the texture to use.
This is equivalent to first wrapping the texture in an AtlasTexture with the same region.
- Texture texture
| Setter | set_texture(value) |
| Getter | get_texture() |
The texture to use when drawing this style box.
Method Descriptions¶
Returns the size of the given margin’s expand margin. See Margin for possible values.
Returns the size of the given margin. See Margin for possible values.
- void set_expand_margin_all ( float size )
Sets the expand margin to size pixels for all margins.
- void set_expand_margin_individual ( float size_left, float size_top, float size_right, float size_bottom )
Sets the expand margin for each margin to size_left, size_top, size_right, and size_bottom pixels.
Sets the expand margin to size pixels for the given margin. See Margin for possible values.
Sets the margin to size pixels for the given margin. See Margin for possible values.
SurfaceTool¶
Helper tool to create geometry.
Description¶
The SurfaceTool is used to construct a Mesh by specifying vertex attributes individually. It can be used to construct a Mesh from a script. All properties except indices need to be added before calling add_vertex. For example, to add vertex colors and UVs:
var st = SurfaceTool.new()
st.begin(Mesh.PRIMITIVE_TRIANGLES)
st.add_color(Color(1, 0, 0))
st.add_uv(Vector2(0, 0))
st.add_vertex(Vector3(0, 0, 0))
The above SurfaceTool now contains one vertex of a triangle which has a UV coordinate and a specified Color. If another vertex were added without calling add_uv or add_color, then the last values would be used.
Vertex attributes must be passed before calling add_vertex. Failure to do so will result in an error when committing the vertex information to a mesh.
Additionally, the attributes used before the first vertex is added determine the format of the mesh. For example, if you only add UVs to the first vertex, you cannot add color to any of the subsequent vertices.
Methods¶
| void | add_bones ( PoolIntArray bones ) |
| void | add_color ( Color color ) |
| void | add_index ( int index ) |
| void | add_normal ( Vector3 normal ) |
| void | add_smooth_group ( bool smooth ) |
| void | add_tangent ( Plane tangent ) |
| void | add_triangle_fan ( PoolVector3Array vertices, PoolVector2Array uvs=PoolVector2Array( ), PoolColorArray colors=PoolColorArray( ), PoolVector2Array uv2s=PoolVector2Array( ), PoolVector3Array normals=PoolVector3Array( ), Array tangents=[ ] ) |
| void | add_uv ( Vector2 uv ) |
| void | add_uv2 ( Vector2 uv2 ) |
| void | add_vertex ( Vector3 vertex ) |
| void | add_weights ( PoolRealArray weights ) |
| void | append_from ( Mesh existing, int surface, Transform transform ) |
| void | begin ( PrimitiveType primitive ) |
| void | clear ( ) |
| ArrayMesh | commit ( ArrayMesh existing=null, int flags=97280 ) |
| Array | commit_to_arrays ( ) |
| void | create_from ( Mesh existing, int surface ) |
| void | create_from_blend_shape ( Mesh existing, int surface, String blend_shape ) |
| void | deindex ( ) |
| void | generate_normals ( bool flip=false ) |
| void | generate_tangents ( ) |
| void | index ( ) |
| void | set_material ( Material material ) |
Method Descriptions¶
- void add_bones ( PoolIntArray bones )
Adds an array of bones for the next vertex to use. bones must contain 4 integers.
- void add_color ( Color color )
Specifies a Color for the next vertex to use.
- void add_index ( int index )
Adds an index to index array if you are using indexed vertices. Does not need to be called before adding vertices.
- void add_normal ( Vector3 normal )
Specifies a normal for the next vertex to use.
- void add_smooth_group ( bool smooth )
Specifies whether the current vertex (if using only vertex arrays) or current index (if also using index arrays) should use smooth normals for normal calculation.
- void add_tangent ( Plane tangent )
Specifies a tangent for the next vertex to use.
- void add_triangle_fan ( PoolVector3Array vertices, PoolVector2Array uvs=PoolVector2Array( ), PoolColorArray colors=PoolColorArray( ), PoolVector2Array uv2s=PoolVector2Array( ), PoolVector3Array normals=PoolVector3Array( ), Array tangents=[ ] )
Inserts a triangle fan made of array data into Mesh being constructed.
Requires the primitive type be set to Mesh.PRIMITIVE_TRIANGLES.
- void add_uv ( Vector2 uv )
Specifies a set of UV coordinates to use for the next vertex.
- void add_uv2 ( Vector2 uv2 )
Specifies an optional second set of UV coordinates to use for the next vertex.
- void add_vertex ( Vector3 vertex )
Specifies the position of current vertex. Should be called after specifying other vertex properties (e.g. Color, UV).
- void add_weights ( PoolRealArray weights )
Specifies weight values for next vertex to use. weights must contain 4 values.
Append vertices from a given Mesh surface onto the current vertex array with specified Transform.
- void begin ( PrimitiveType primitive )
Called before adding any vertices. Takes the primitive type as an argument (e.g. Mesh.PRIMITIVE_TRIANGLES).
- void clear ( )
Clear all information passed into the surface tool so far.
Returns a constructed ArrayMesh from current information passed in. If an existing ArrayMesh is passed in as an argument, will add an extra surface to the existing ArrayMesh.
Default flag is Mesh.ARRAY_COMPRESS_DEFAULT. See ARRAY_COMPRESS_* constants in ArrayFormat for other flags.
- Array commit_to_arrays ( )
Commits the data to the same format used by ArrayMesh.add_surface_from_arrays. This way you can further process the mesh data using the ArrayMesh API.
Creates a vertex array from an existing Mesh.
Creates a vertex array from the specified blend shape of an existing Mesh. This can be used to extract a specific pose from a blend shape.
- void deindex ( )
Removes the index array by expanding the vertex array.
- void generate_normals ( bool flip=false )
Generates normals from vertices so you do not have to do it manually. If flip is true, the resulting normals will be inverted.
Requires the primitive type to be set to Mesh.PRIMITIVE_TRIANGLES.
- void generate_tangents ( )
Generates a tangent vector for each vertex. Requires that each vertex have UVs and normals set already.
- void index ( )
Shrinks the vertex array by creating an index array (avoids reusing vertices).
- void set_material ( Material material )
TabContainer¶
Inherits: Container < Control < CanvasItem < Node < Object
Tabbed container.
Description¶
Sets the active tab’s visible property to the value true. Sets all other children’s to false.
Ignores non-Control children.
Individual tabs are always visible unless you use set_tab_disabled and set_tab_title to hide it.
To hide only a tab’s content, nest the content inside a child Control, so it receives the TabContainer’s visibility setting instead.
Properties¶
| int | current_tab | 0 |
| bool | drag_to_rearrange_enabled | false |
| TabAlign | tab_align | 1 |
| bool | tabs_visible | true |
| bool | use_hidden_tabs_for_min_size | false |
Methods¶
| Control | get_current_tab_control ( ) const |
| Popup | get_popup ( ) const |
| int | get_previous_tab ( ) const |
| Control | get_tab_control ( int idx ) const |
| int | get_tab_count ( ) const |
| bool | get_tab_disabled ( int tab_idx ) const |
| Texture | get_tab_icon ( int tab_idx ) const |
| String | get_tab_title ( int tab_idx ) const |
| int | get_tabs_rearrange_group ( ) const |
| void | set_popup ( Node popup ) |
| void | set_tab_disabled ( int tab_idx, bool disabled ) |
| void | set_tab_icon ( int tab_idx, Texture icon ) |
| void | set_tab_title ( int tab_idx, String title ) |
| void | set_tabs_rearrange_group ( int group_id ) |
Theme Properties¶
| Texture | decrement | |
| Texture | decrement_highlight | |
| Font | font | |
| Color | font_color_bg | Color( 0.69, 0.69, 0.69, 1 ) |
| Color | font_color_disabled | Color( 0.9, 0.9, 0.9, 0.2 ) |
| Color | font_color_fg | Color( 0.94, 0.94, 0.94, 1 ) |
| int | hseparation | 4 |
| Texture | increment | |
| Texture | increment_highlight | |
| int | label_valign_bg | 2 |
| int | label_valign_fg | 0 |
| Texture | menu | |
| Texture | menu_highlight | |
| StyleBox | panel | |
| int | side_margin | 8 |
| StyleBox | tab_bg | |
| StyleBox | tab_disabled | |
| StyleBox | tab_fg | |
| int | top_margin | 24 |
Signals¶
- pre_popup_pressed ( )
Emitted when the TabContainer’s Popup button is clicked. See set_popup for details.
- tab_changed ( int tab )
Emitted when switching to another tab.
- tab_selected ( int tab )
Emitted when a tab is selected, even if it is the current tab.
Enumerations¶
enum TabAlign:
- ALIGN_LEFT = 0 — Align the tabs to the left.
- ALIGN_CENTER = 1 — Align the tabs to the center.
- ALIGN_RIGHT = 2 — Align the tabs to the right.
Property Descriptions¶
- int current_tab
| Default | 0 |
| Setter | set_current_tab(value) |
| Getter | get_current_tab() |
The current tab index. When set, this index’s Control node’s visible property is set to true and all others are set to false.
- bool drag_to_rearrange_enabled
| Default | false |
| Setter | set_drag_to_rearrange_enabled(value) |
| Getter | get_drag_to_rearrange_enabled() |
If true, tabs can be rearranged with mouse drag.
- TabAlign tab_align
| Default | 1 |
| Setter | set_tab_align(value) |
| Getter | get_tab_align() |
The alignment of all tabs in the tab container. See the TabAlign constants for details.
- bool tabs_visible
| Default | true |
| Setter | set_tabs_visible(value) |
| Getter | are_tabs_visible() |
If true, tabs are visible. If false, tabs’ content and titles are hidden.
| Default | false |
| Setter | set_use_hidden_tabs_for_min_size(value) |
| Getter | get_use_hidden_tabs_for_min_size() |
If true, children Control nodes that are hidden have their minimum size take into account in the total, instead of only the currently visible one.
Method Descriptions¶
- Control get_current_tab_control ( ) const
Returns the child Control node located at the active tab index.
- Popup get_popup ( ) const
Returns the Popup node instance if one has been set already with set_popup.
- int get_previous_tab ( ) const
Returns the previously active tab index.
Returns the currently visible tab’s Control node.
- int get_tab_count ( ) const
Returns the number of tabs.
Returns true if the tab at index tab_idx is disabled.
Returns the Texture for the tab at index tab_idx or null if the tab has no Texture.
Returns the title of the tab at index tab_idx. Tab titles default to the name of the indexed child node, but this can be overridden with set_tab_title.
- int get_tabs_rearrange_group ( ) const
Returns the TabContainer rearrange group id.
- void set_popup ( Node popup )
If set on a Popup node instance, a popup menu icon appears in the top-right corner of the TabContainer. Clicking it will expand the Popup node.
If disabled is false, hides the tab at index tab_idx.
Note: Its title text will remain, unless also removed with set_tab_title.
Sets an icon for the tab at index tab_idx.
Sets a title for the tab at index tab_idx. Tab titles default to the name of the indexed child node, but this can be overridden with set_tab_title.
- void set_tabs_rearrange_group ( int group_id )
Defines rearrange group id, choose for each TabContainer the same value to enable tab drag between TabContainer. Enable drag with set_drag_to_rearrange_enabled(true).
Tabs¶
Inherits: Control < CanvasItem < Node < Object
Tabs control.
Description¶
Simple tabs control, similar to TabContainer but is only in charge of drawing tabs, not interact with children.
Properties¶
| int | current_tab | 0 |
| bool | drag_to_rearrange_enabled | false |
| bool | scrolling_enabled | true |
| TabAlign | tab_align | 1 |
| CloseButtonDisplayPolicy | tab_close_display_policy | 0 |
Methods¶
| void | add_tab ( String title=”“, Texture icon=null ) |
| void | ensure_tab_visible ( int idx ) |
| bool | get_offset_buttons_visible ( ) const |
| bool | get_select_with_rmb ( ) const |
| int | get_tab_count ( ) const |
| bool | get_tab_disabled ( int tab_idx ) const |
| Texture | get_tab_icon ( int tab_idx ) const |
| int | get_tab_offset ( ) const |
| Rect2 | get_tab_rect ( int tab_idx ) const |
| String | get_tab_title ( int tab_idx ) const |
| int | get_tabs_rearrange_group ( ) const |
| void | move_tab ( int from, int to ) |
| void | remove_tab ( int tab_idx ) |
| void | set_select_with_rmb ( bool enabled ) |
| void | set_tab_disabled ( int tab_idx, bool disabled ) |
| void | set_tab_icon ( int tab_idx, Texture icon ) |
| void | set_tab_title ( int tab_idx, String title ) |
| void | set_tabs_rearrange_group ( int group_id ) |
Theme Properties¶
| StyleBox | button | |
| StyleBox | button_pressed | |
| Texture | close | |
| Texture | decrement | |
| Texture | decrement_highlight | |
| Font | font | |
| Color | font_color_bg | Color( 0.69, 0.69, 0.69, 1 ) |
| Color | font_color_disabled | Color( 0.9, 0.9, 0.9, 0.2 ) |
| Color | font_color_fg | Color( 0.94, 0.94, 0.94, 1 ) |
| int | hseparation | 4 |
| Texture | increment | |
| Texture | increment_highlight | |
| int | label_valign_bg | 2 |
| int | label_valign_fg | 0 |
| StyleBox | panel | |
| StyleBox | tab_bg | |
| StyleBox | tab_disabled | |
| StyleBox | tab_fg | |
| int | top_margin | 24 |
Signals¶
- reposition_active_tab_request ( int idx_to )
Emitted when the active tab is rearranged via mouse drag. See drag_to_rearrange_enabled.
- right_button_pressed ( int tab )
Emitted when a tab is right-clicked.
- tab_changed ( int tab )
Emitted when switching to another tab.
- tab_clicked ( int tab )
Emitted when a tab is clicked, even if it is the current tab.
- tab_close ( int tab )
Emitted when a tab is closed.
- tab_hover ( int tab )
Emitted when a tab is hovered by the mouse.
Enumerations¶
enum TabAlign:
- ALIGN_LEFT = 0 — Align the tabs to the left.
- ALIGN_CENTER = 1 — Align the tabs to the center.
- ALIGN_RIGHT = 2 — Align the tabs to the right.
- ALIGN_MAX = 3 — Represents the size of the TabAlign enum.
- CLOSE_BUTTON_SHOW_NEVER = 0 — Never show the close buttons.
- CLOSE_BUTTON_SHOW_ACTIVE_ONLY = 1 — Only show the close button on the currently active tab.
- CLOSE_BUTTON_SHOW_ALWAYS = 2 — Show the close button on all tabs.
- CLOSE_BUTTON_MAX = 3 — Represents the size of the CloseButtonDisplayPolicy enum.
Property Descriptions¶
- int current_tab
| Default | 0 |
| Setter | set_current_tab(value) |
| Getter | get_current_tab() |
Select tab at index tab_idx.
- bool drag_to_rearrange_enabled
| Default | false |
| Setter | set_drag_to_rearrange_enabled(value) |
| Getter | get_drag_to_rearrange_enabled() |
If true, tabs can be rearranged with mouse drag.
- bool scrolling_enabled
| Default | true |
| Setter | set_scrolling_enabled(value) |
| Getter | get_scrolling_enabled() |
if true, the mouse’s scroll wheel cab be used to navigate the scroll view.
- TabAlign tab_align
| Default | 1 |
| Setter | set_tab_align(value) |
| Getter | get_tab_align() |
The alignment of all tabs. See TabAlign for details.
- CloseButtonDisplayPolicy tab_close_display_policy
| Default | 0 |
| Setter | set_tab_close_display_policy(value) |
| Getter | get_tab_close_display_policy() |
Sets when the close button will appear on the tabs. See CloseButtonDisplayPolicy for details.
Method Descriptions¶
Adds a new tab.
- void ensure_tab_visible ( int idx )
Moves the scroll view to make the tab visible.
- bool get_offset_buttons_visible ( ) const
Returns true if the offset buttons (the ones that appear when there’s not enough space for all tabs) are visible.
- bool get_select_with_rmb ( ) const
Returns true if select with right mouse button is enabled.
- int get_tab_count ( ) const
Returns the number of tabs.
Returns true if the tab at index tab_idx is disabled.
Returns the Texture for the tab at index tab_idx or null if the tab has no Texture.
- int get_tab_offset ( ) const
Returns the number of hidden tabs offsetted to the left.
Returns tab Rect2 with local position and size.
Returns the title of the tab at index tab_idx. Tab titles default to the name of the indexed child node, but this can be overridden with set_tab_title.
- int get_tabs_rearrange_group ( ) const
Returns the Tabs’ rearrange group ID.
Moves a tab from from to to.
- void remove_tab ( int tab_idx )
Removes the tab at index tab_idx.
- void set_select_with_rmb ( bool enabled )
If true, enables selecting a tab with the right mouse button.
If disabled is false, hides the tab at index tab_idx.
Note: Its title text will remain unless it is also removed with set_tab_title.
Sets an icon for the tab at index tab_idx.
Sets a title for the tab at index tab_idx.
- void set_tabs_rearrange_group ( int group_id )
Defines the rearrange group ID. Choose for each Tabs the same value to dragging tabs between Tabs. Enable drag with set_drag_to_rearrange_enabled(true).
TCP_Server¶
A TCP server.
Description¶
A TCP server. Listens to connections on a port and returns a StreamPeerTCP when it gets an incoming connection.
Methods¶
| bool | is_connection_available ( ) const |
| bool | is_listening ( ) const |
| Error | listen ( int port, String bind_address=”*” ) |
| void | stop ( ) |
| StreamPeerTCP | take_connection ( ) |
Method Descriptions¶
- bool is_connection_available ( ) const
Returns true if a connection is available for taking.
- bool is_listening ( ) const
Returns true if the server is currently listening for connections.
Listen on the port binding to bind_address.
If bind_address is set as "*" (default), the server will listen on all available addresses (both IPv4 and IPv6).
If bind_address is set as "0.0.0.0" (for IPv4) or "::" (for IPv6), the server will listen on all available addresses matching that IP type.
If bind_address is set to any valid address (e.g. "192.168.1.101", "::1", etc), the server will only listen on the interface with that addresses (or fail if no interface with the given address exists).
- void stop ( )
Stops listening.
- StreamPeerTCP take_connection ( )
If a connection is available, returns a StreamPeerTCP with the connection.
TextEdit¶
Inherits: Control < CanvasItem < Node < Object
Multiline text editing control.
Description¶
TextEdit is meant for editing large, multiline text. It also has facilities for editing code, such as syntax highlighting support and multiple levels of undo/redo.
Properties¶
| bool | breakpoint_gutter | false |
| bool | caret_blink | false |
| float | caret_blink_speed | 0.65 |
| bool | caret_block_mode | false |
| bool | caret_moving_by_right_click | true |
| bool | context_menu_enabled | true |
| bool | draw_spaces | false |
| bool | draw_tabs | false |
| FocusMode | focus_mode | O: 2 |
| bool | fold_gutter | false |
| bool | hiding_enabled | false |
| bool | highlight_all_occurrences | false |
| bool | highlight_current_line | false |
| bool | minimap_draw | false |
| int | minimap_width | 80 |
| CursorShape | mouse_default_cursor_shape | O: 1 |
| bool | override_selected_font_color | false |
| bool | readonly | false |
| int | scroll_horizontal | 0 |
| float | scroll_vertical | 0.0 |
| bool | selecting_enabled | true |
| bool | shortcut_keys_enabled | true |
| bool | show_line_numbers | false |
| bool | smooth_scrolling | false |
| bool | syntax_highlighting | false |
| String | text | "" |
| float | v_scroll_speed | 80.0 |
| bool | wrap_enabled | false |
Methods¶
Theme Properties¶
| Color | background_color | Color( 0, 0, 0, 0 ) |
| Color | bookmark_color | Color( 0.08, 0.49, 0.98, 1 ) |
| Color | brace_mismatch_color | Color( 1, 0.2, 0.2, 1 ) |
| Color | breakpoint_color | Color( 0.8, 0.8, 0.4, 0.2 ) |
| Color | caret_background_color | Color( 0, 0, 0, 1 ) |
| Color | caret_color | Color( 0.88, 0.88, 0.88, 1 ) |
| Color | code_folding_color | Color( 0.8, 0.8, 0.8, 0.8 ) |
| StyleBox | completion | |
| Color | completion_background_color | Color( 0.17, 0.16, 0.2, 1 ) |
| Color | completion_existing_color | Color( 0.87, 0.87, 0.87, 0.13 ) |
| Color | completion_font_color | Color( 0.67, 0.67, 0.67, 1 ) |
| int | completion_lines | 7 |
| int | completion_max_width | 50 |
| Color | completion_scroll_color | Color( 1, 1, 1, 1 ) |
| int | completion_scroll_width | 3 |
| Color | completion_selected_color | Color( 0.26, 0.26, 0.27, 1 ) |
| Color | current_line_color | Color( 0.25, 0.25, 0.26, 0.8 ) |
| Color | executing_line_color | Color( 0.2, 0.8, 0.2, 0.4 ) |
| StyleBox | focus | |
| Texture | fold | |
| Texture | folded | |
| Font | font | |
| Color | font_color | Color( 0.88, 0.88, 0.88, 1 ) |
| Color | font_color_readonly | Color( 0.88, 0.88, 0.88, 0.5 ) |
| Color | font_color_selected | Color( 0, 0, 0, 1 ) |
| Color | function_color | Color( 0.4, 0.64, 0.81, 1 ) |
| Color | line_number_color | Color( 0.67, 0.67, 0.67, 0.4 ) |
| int | line_spacing | 4 |
| Color | mark_color | Color( 1, 0.4, 0.4, 0.4 ) |
| Color | member_variable_color | Color( 0.9, 0.31, 0.35, 1 ) |
| StyleBox | normal | |
| Color | number_color | Color( 0.92, 0.58, 0.2, 1 ) |
| StyleBox | read_only | |
| Color | safe_line_number_color | Color( 0.67, 0.78, 0.67, 0.6 ) |
| Color | selection_color | Color( 0.49, 0.49, 0.49, 1 ) |
| Texture | space | |
| Color | symbol_color | Color( 0.94, 0.94, 0.94, 1 ) |
| Texture | tab | |
| Color | word_highlighted_color | Color( 0.8, 0.9, 0.9, 0.15 ) |
Signals¶
- breakpoint_toggled ( int row )
Emitted when a breakpoint is placed via the breakpoint gutter.
- cursor_changed ( )
Emitted when the cursor changes.
Emitted when the info icon is clicked.
- request_completion ( )
- text_changed ( )
Emitted when the text changes.
Enumerations¶
enum SearchFlags:
- SEARCH_MATCH_CASE = 1 — Match case when searching.
- SEARCH_WHOLE_WORDS = 2 — Match whole words when searching.
- SEARCH_BACKWARDS = 4 — Search from end to beginning.
enum SearchResult:
- SEARCH_RESULT_COLUMN = 0 — Used to access the result column from search.
- SEARCH_RESULT_LINE = 1 — Used to access the result line from search.
- MENU_CUT = 0 — Cuts (copies and clears) the selected text.
- MENU_COPY = 1 — Copies the selected text.
- MENU_PASTE = 2 — Pastes the clipboard text over the selected text (or at the cursor’s position).
- MENU_CLEAR = 3 — Erases the whole
TextEdittext. - MENU_SELECT_ALL = 4 — Selects the whole
TextEdittext. - MENU_UNDO = 5 — Undoes the previous action.
- MENU_REDO = 6 — Redoes the previous action.
- MENU_MAX = 7 — Represents the size of the MenuItems enum.
Property Descriptions¶
- bool breakpoint_gutter
| Default | false |
| Setter | set_breakpoint_gutter_enabled(value) |
| Getter | is_breakpoint_gutter_enabled() |
If true, the breakpoint gutter is visible.
- bool caret_blink
| Default | false |
| Setter | cursor_set_blink_enabled(value) |
| Getter | cursor_get_blink_enabled() |
If true, the caret (visual cursor) blinks.
- float caret_blink_speed
| Default | 0.65 |
| Setter | cursor_set_blink_speed(value) |
| Getter | cursor_get_blink_speed() |
Duration (in seconds) of a caret’s blinking cycle.
- bool caret_block_mode
| Default | false |
| Setter | cursor_set_block_mode(value) |
| Getter | cursor_is_block_mode() |
If true, the caret displays as a rectangle.
If false, the caret displays as a bar.
- bool caret_moving_by_right_click
| Default | true |
| Setter | set_right_click_moves_caret(value) |
| Getter | is_right_click_moving_caret() |
If true, a right-click moves the cursor at the mouse position before displaying the context menu.
If false, the context menu disregards mouse location.
| Default | true |
| Setter | set_context_menu_enabled(value) |
| Getter | is_context_menu_enabled() |
If true, a right-click displays the context menu.
- bool draw_spaces
| Default | false |
| Setter | set_draw_spaces(value) |
| Getter | is_drawing_spaces() |
If true, the “space” character will have a visible representation.
- bool draw_tabs
| Default | false |
| Setter | set_draw_tabs(value) |
| Getter | is_drawing_tabs() |
If true, the “tab” character will have a visible representation.
- bool fold_gutter
| Default | false |
| Setter | set_draw_fold_gutter(value) |
| Getter | is_drawing_fold_gutter() |
If true, the fold gutter is visible. This enables folding groups of indented lines.
- bool hiding_enabled
| Default | false |
| Setter | set_hiding_enabled(value) |
| Getter | is_hiding_enabled() |
If true, all lines that have been set to hidden by set_line_as_hidden, will not be visible.
- bool highlight_all_occurrences
| Default | false |
| Setter | set_highlight_all_occurrences(value) |
| Getter | is_highlight_all_occurrences_enabled() |
If true, all occurrences of the selected text will be highlighted.
- bool highlight_current_line
| Default | false |
| Setter | set_highlight_current_line(value) |
| Getter | is_highlight_current_line_enabled() |
If true, the line containing the cursor is highlighted.
- bool minimap_draw
| Default | false |
| Setter | draw_minimap(value) |
| Getter | is_drawing_minimap() |
- int minimap_width
| Default | 80 |
| Setter | set_minimap_width(value) |
| Getter | get_minimap_width() |
- bool override_selected_font_color
| Default | false |
| Setter | set_override_selected_font_color(value) |
| Getter | is_overriding_selected_font_color() |
- bool readonly
| Default | false |
| Setter | set_readonly(value) |
| Getter | is_readonly() |
If true, read-only mode is enabled. Existing text cannot be modified and new text cannot be added.
- int scroll_horizontal
| Default | 0 |
| Setter | set_h_scroll(value) |
| Getter | get_h_scroll() |
The current horizontal scroll value.
- float scroll_vertical
| Default | 0.0 |
| Setter | set_v_scroll(value) |
| Getter | get_v_scroll() |
The current vertical scroll value.
- bool selecting_enabled
| Default | true |
| Setter | set_selecting_enabled(value) |
| Getter | is_selecting_enabled() |
- bool shortcut_keys_enabled
| Default | true |
| Setter | set_shortcut_keys_enabled(value) |
| Getter | is_shortcut_keys_enabled() |
- bool show_line_numbers
| Default | false |
| Setter | set_show_line_numbers(value) |
| Getter | is_show_line_numbers_enabled() |
If true, line numbers are displayed to the left of the text.
- bool smooth_scrolling
| Default | false |
| Setter | set_smooth_scroll_enable(value) |
| Getter | is_smooth_scroll_enabled() |
If true, sets the step of the scrollbars to 0.25 which results in smoother scrolling.
- bool syntax_highlighting
| Default | false |
| Setter | set_syntax_coloring(value) |
| Getter | is_syntax_coloring_enabled() |
If true, any custom color properties that have been set for this TextEdit will be visible.
- String text
| Default | "" |
| Setter | set_text(value) |
| Getter | get_text() |
String value of the TextEdit.
- float v_scroll_speed
| Default | 80.0 |
| Setter | set_v_scroll_speed(value) |
| Getter | get_v_scroll_speed() |
Vertical scroll sensitivity.
- bool wrap_enabled
| Default | false |
| Setter | set_wrap_enabled(value) |
| Getter | is_wrap_enabled() |
If true, enables text wrapping when it goes beyond the edge of what is visible.
Method Descriptions¶
Adds color region (given the delimiters) and its colors.
Adds a keyword and its Color.
Returns if the given line is foldable, that is, it has indented lines right below it.
- void center_viewport_to_cursor ( )
- void clear_colors ( )
Clears all custom syntax coloring information previously added with add_color_region or add_keyword_color.
- void clear_undo_history ( )
Clears the undo history.
- void copy ( )
Copy’s the current text selection.
- int cursor_get_column ( ) const
Returns the column the editing cursor is at.
- int cursor_get_line ( ) const
Returns the line the editing cursor is at.
Moves the cursor at the specified column index.
If adjust_viewport is set to true, the viewport will center at the cursor position after the move occurs.
- void cursor_set_line ( int line, bool adjust_viewport=true, bool can_be_hidden=true, int wrap_index=0 )
Moves the cursor at the specified line index.
If adjust_viewport is set to true, the viewport will center at the cursor position after the move occurs.
If can_be_hidden is set to true, the specified line can be hidden using set_line_as_hidden.
- void cut ( )
Cut’s the current selection.
- void deselect ( )
Deselects the current selection.
- void fold_all_lines ( )
Folds all lines that are possible to be folded (see can_fold).
- void fold_line ( int line )
Folds the given line, if possible (see can_fold).
- Array get_breakpoints ( ) const
Returns an array containing the line number of each breakpoint.
Returns the Color of the specified keyword.
Returns the text of a specific line.
- int get_line_count ( ) const
Returns the amount of total lines in the text.
Returns the PopupMenu of this TextEdit. By default, this menu is displayed when right-clicking on the TextEdit.
- int get_selection_from_column ( ) const
Returns the selection begin column.
- int get_selection_from_line ( ) const
Returns the selection begin line.
- String get_selection_text ( ) const
Returns the text inside the selection.
- int get_selection_to_column ( ) const
Returns the selection end column.
- int get_selection_to_line ( ) const
Returns the selection end line.
- String get_word_under_cursor ( ) const
Returns a String text with the word under the mouse cursor location.
Returns whether the specified keyword has a color set to it or not.
- void insert_text_at_cursor ( String text )
Insert the specified text at the cursor position.
Returns whether the line at the specified index is folded or not.
Returns whether the line at the specified index is hidden or not.
- bool is_selection_active ( ) const
Returns true if the selection is active.
Triggers a right-click menu action by the specified index. See MenuItems for a list of available indexes.
- void paste ( )
Paste the current selection.
- void redo ( )
Perform redo operation.
- void remove_breakpoints ( )
Removes all the breakpoints. This will not fire the breakpoint_toggled signal.
- PoolIntArray search ( String key, int flags, int from_line, int from_column ) const
Perform a search inside the text. Search flags can be specified in the SearchFlags enum.
Returns an empty PoolIntArray if no result was found. Otherwise, the result line and column can be accessed at indices specified in the SearchResult enum, e.g:
var result = search(key, flags, line, column)
if result.size() > 0:
# Result found.
var res_line = result[TextEdit.SEARCH_RESULT_LINE]
var res_column = result[TextEdit.SEARCH_RESULT_COLUMN]
Perform selection, from line/column to line/column.
- void select_all ( )
Select all the text.
If true, hides the line of the specified index.
- void toggle_fold_line ( int line )
Toggle the folding of the code block at the given line.
- void undo ( )
Perform undo operation.
- void unfold_line ( int line )
Unfolds the given line, if folded.
- void unhide_all_lines ( )
Unhide all lines that were previously set to hidden by set_line_as_hidden.
Texture¶
Inherits: Resource < Reference < Object
Inherited By: AnimatedTexture, AtlasTexture, CameraTexture, CurveTexture, GradientTexture, ImageTexture, LargeTexture, MeshTexture, NoiseTexture, ProxyTexture, StreamTexture, ViewportTexture
Texture for 2D and 3D.
Description¶
A texture works by registering an image in the video hardware, which then can be used in 3D models or 2D Sprite or GUI Control.
Textures are often created by loading them from a file. See @GDScript.load.
Texture is a base for other resources. It cannot be used directly.
Methods¶
| void | draw ( RID canvas_item, Vector2 position, Color modulate=Color( 1, 1, 1, 1 ), bool transpose=false, Texture normal_map=null ) const |
| void | draw_rect ( RID canvas_item, Rect2 rect, bool tile, Color modulate=Color( 1, 1, 1, 1 ), bool transpose=false, Texture normal_map=null ) const |
| void | draw_rect_region ( RID canvas_item, Rect2 rect, Rect2 src_rect, Color modulate=Color( 1, 1, 1, 1 ), bool transpose=false, Texture normal_map=null, bool clip_uv=true ) const |
| Image | get_data ( ) const |
| int | get_height ( ) const |
| Vector2 | get_size ( ) const |
| int | get_width ( ) const |
| bool | has_alpha ( ) const |
Enumerations¶
enum Flags:
- FLAGS_DEFAULT = 7 — Default flags. FLAG_MIPMAPS, FLAG_REPEAT and FLAG_FILTER are enabled.
- FLAG_MIPMAPS = 1 — Generates mipmaps, which are smaller versions of the same texture to use when zoomed out, keeping the aspect ratio.
- FLAG_REPEAT = 2 — Repeats the texture (instead of clamp to edge).
- FLAG_FILTER = 4 — Uses a magnifying filter, to enable smooth zooming in of the texture.
- FLAG_ANISOTROPIC_FILTER = 8 — Uses anisotropic mipmap filtering. Generates smaller versions of the same texture with different aspect ratios.
This results in better-looking textures when viewed from oblique angles.
- FLAG_CONVERT_TO_LINEAR = 16 — Converts the texture to the sRGB color space.
- FLAG_MIRRORED_REPEAT = 32 — Repeats the texture with alternate sections mirrored.
- FLAG_VIDEO_SURFACE = 2048 — Texture is a video surface.
Property Descriptions¶
- int flags
| Default | 4 |
| Setter | set_flags(value) |
| Getter | get_flags() |
The texture’s Flags. Flags are used to set various properties of the Texture.
Method Descriptions¶
- void draw ( RID canvas_item, Vector2 position, Color modulate=Color( 1, 1, 1, 1 ), bool transpose=false, Texture normal_map=null ) const
Draws the texture using a CanvasItem with the VisualServer API at the specified position. Equivalent to VisualServer.canvas_item_add_texture_rect with a rect at position and the size of this Texture.
- void draw_rect ( RID canvas_item, Rect2 rect, bool tile, Color modulate=Color( 1, 1, 1, 1 ), bool transpose=false, Texture normal_map=null ) const
Draws the texture using a CanvasItem with the VisualServer API. Equivalent to VisualServer.canvas_item_add_texture_rect.
- void draw_rect_region ( RID canvas_item, Rect2 rect, Rect2 src_rect, Color modulate=Color( 1, 1, 1, 1 ), bool transpose=false, Texture normal_map=null, bool clip_uv=true ) const
Draws a part of the texture using a CanvasItem with the VisualServer API. Equivalent to VisualServer.canvas_item_add_texture_rect_region.
- Image get_data ( ) const
Returns an Image with the data from this Texture. Images can be accessed and manipulated directly.
- int get_height ( ) const
Returns the texture height.
- Vector2 get_size ( ) const
Returns the texture size.
- int get_width ( ) const
Returns the texture width.
- bool has_alpha ( ) const
Returns true if this Texture has an alpha channel.
Texture3D¶
Inherits: TextureLayered < Resource < Reference < Object
Texture with 3 dimensions.
Description¶
Texture3D is a 3-dimensional texture that has a width, height, and depth.
Properties¶
| Dictionary | data | O: {"depth": 0,"flags": 4,"format": 37,"height": 0,"layers": [ ],"width": 0} |
TextureArray¶
Inherits: TextureLayered < Resource < Reference < Object
Array of textures stored in a single primitive.
TextureButton¶
Inherits: BaseButton < Control < CanvasItem < Node < Object
Texture-based button. Supports Pressed, Hover, Disabled and Focused states.
Description¶
TextureButton has the same functionality as Button, except it uses sprites instead of Godot’s Theme resource. It is faster to create, but it doesn’t support localization like more complex Controls.
The “normal” state must contain a texture (texture_normal); other textures are optional.
Properties¶
| bool | expand | false |
| StretchMode | stretch_mode | 0 |
| BitMap | texture_click_mask | |
| Texture | texture_disabled | |
| Texture | texture_focused | |
| Texture | texture_hover | |
| Texture | texture_normal | |
| Texture | texture_pressed |
Enumerations¶
- STRETCH_SCALE = 0 — Scale to fit the node’s bounding rectangle.
- STRETCH_TILE = 1 — Tile inside the node’s bounding rectangle.
- STRETCH_KEEP = 2 — The texture keeps its original size and stays in the bounding rectangle’s top-left corner.
- STRETCH_KEEP_CENTERED = 3 — The texture keeps its original size and stays centered in the node’s bounding rectangle.
- STRETCH_KEEP_ASPECT = 4 — Scale the texture to fit the node’s bounding rectangle, but maintain the texture’s aspect ratio.
- STRETCH_KEEP_ASPECT_CENTERED = 5 — Scale the texture to fit the node’s bounding rectangle, center it, and maintain its aspect ratio.
- STRETCH_KEEP_ASPECT_COVERED = 6 — Scale the texture so that the shorter side fits the bounding rectangle. The other side clips to the node’s limits.
Property Descriptions¶
- bool expand
| Default | false |
| Setter | set_expand(value) |
| Getter | get_expand() |
If true, the texture stretches to the edges of the node’s bounding rectangle using the stretch_mode. If false, the texture will not scale with the node.
- StretchMode stretch_mode
| Default | 0 |
| Setter | set_stretch_mode(value) |
| Getter | get_stretch_mode() |
Controls the texture’s behavior when you resize the node’s bounding rectangle, only if expand is true. Set it to one of the StretchMode constants. See the constants to learn more.
- BitMap texture_click_mask
| Setter | set_click_mask(value) |
| Getter | get_click_mask() |
Pure black and white BitMap image to use for click detection. On the mask, white pixels represent the button’s clickable area. Use it to create buttons with curved shapes.
- Texture texture_disabled
| Setter | set_disabled_texture(value) |
| Getter | get_disabled_texture() |
Texture to display when the node is disabled. See BaseButton.disabled.
- Texture texture_focused
| Setter | set_focused_texture(value) |
| Getter | get_focused_texture() |
Texture to display when the node has mouse or keyboard focus.
- Texture texture_hover
| Setter | set_hover_texture(value) |
| Getter | get_hover_texture() |
Texture to display when the mouse hovers the node.
- Texture texture_normal
| Setter | set_normal_texture(value) |
| Getter | get_normal_texture() |
Texture to display by default, when the node is not in the disabled, focused, hover or pressed state.
- Texture texture_pressed
| Setter | set_pressed_texture(value) |
| Getter | get_pressed_texture() |
Texture to display on mouse down over the node, if the node has keyboard focus and the player presses the Enter key or if the player presses the BaseButton.shortcut key.
TextureLayered¶
Inherits: Resource < Reference < Object
Inherited By: Texture3D, TextureArray
Base class for 3D texture types.
Description¶
Base class for Texture3D and TextureArray. Cannot be used directly, but contains all the functions necessary for accessing and using Texture3D and TextureArray. Data is set on a per-layer basis. For Texture3Ds, the layer sepcifies the depth or Z-index, they can be treated as a bunch of 2D slices. Similarly, for TextureArrays, the layer specifies the array layer.
Properties¶
| Dictionary | data | {"depth": 0,"flags": 4,"format": 37,"height": 0,"layers": [ ],"width": 0} |
| int | flags | 4 |
Methods¶
| void | create ( int width, int height, int depth, Format format, int flags=4 ) |
| int | get_depth ( ) const |
| Format | get_format ( ) const |
| int | get_height ( ) const |
| Image | get_layer_data ( int layer ) const |
| int | get_width ( ) const |
| void | set_data_partial ( Image image, int x_offset, int y_offset, int layer, int mipmap=0 ) |
| void | set_layer_data ( Image image, int layer ) |
Enumerations¶
enum Flags:
- FLAG_MIPMAPS = 1 — Texture will generate mipmaps on creation.
- FLAG_REPEAT = 2 — Texture will repeat when UV used is outside the 0-1 range.
- FLAG_FILTER = 4 — Use filtering when reading from texture. Filtering smooths out pixels. Turning filtering off is slightly faster and more appropriate when you need access to individual pixels.
- FLAGS_DEFAULT = 4 — Equivalent to FLAG_FILTER.
Property Descriptions¶
- Dictionary data
| Default | {"depth": 0,"flags": 4,"format": 37,"height": 0,"layers": [ ],"width": 0} |
Returns a dictionary with all the data used by this texture.
- int flags
| Default | 4 |
| Setter | set_flags(value) |
| Getter | get_flags() |
Specifies which Flags apply to this texture.
Method Descriptions¶
Creates the Texture3D or TextureArray with specified width, height, and depth. See Format for format options. See Flags enumerator for flags options.
- int get_depth ( ) const
Returns the depth of the texture. Depth is the 3rd dimension (typically Z-axis).
- Format get_format ( ) const
Returns the current format being used by this texture. See Format for details.
- int get_height ( ) const
Returns the height of the texture. Height is typically represented by the Y-axis.
Returns an Image resource with the data from specified layer.
- int get_width ( ) const
Returns the width of the texture. Width is typically represented by the X-axis.
Partially sets the data for a specified layer by overwriting using the data of the specified image. x_offset and y_offset determine where the Image is “stamped” over the texture. The image must fit within the texture.
Sets the data for the specified layer. Data takes the form of a 2-dimensional Image resource.
TextureProgress¶
Inherits: Range < Control < CanvasItem < Node < Object
Texture-based progress bar. Useful for loading screens and life or stamina bars.
Description¶
TextureProgress works like ProgressBar, but uses up to 3 textures instead of Godot’s Theme resource. It can be used to create horizontal, vertical and radial progress bars.
Properties¶
| int | fill_mode | 0 |
| MouseFilter | mouse_filter | O: 1 |
| bool | nine_patch_stretch | false |
| Vector2 | radial_center_offset | Vector2( 0, 0 ) |
| float | radial_fill_degrees | 360.0 |
| float | radial_initial_angle | 0.0 |
| int | stretch_margin_bottom | 0 |
| int | stretch_margin_left | 0 |
| int | stretch_margin_right | 0 |
| int | stretch_margin_top | 0 |
| Texture | texture_over | |
| Texture | texture_progress | |
| Texture | texture_under | |
| Color | tint_over | Color( 1, 1, 1, 1 ) |
| Color | tint_progress | Color( 1, 1, 1, 1 ) |
| Color | tint_under | Color( 1, 1, 1, 1 ) |
Methods¶
| int | get_stretch_margin ( Margin margin ) const |
| void | set_stretch_margin ( Margin margin, int value ) |
Enumerations¶
enum FillMode:
- FILL_LEFT_TO_RIGHT = 0 — The texture_progress fills from left to right.
- FILL_RIGHT_TO_LEFT = 1 — The texture_progress fills from right to left.
- FILL_TOP_TO_BOTTOM = 2 — The texture_progress fills from top to bottom.
- FILL_BOTTOM_TO_TOP = 3 — The texture_progress fills from bottom to top.
- FILL_CLOCKWISE = 4 — Turns the node into a radial bar. The texture_progress fills clockwise. See radial_center_offset, radial_initial_angle and radial_fill_degrees to control the way the bar fills up.
- FILL_COUNTER_CLOCKWISE = 5 — Turns the node into a radial bar. The texture_progress fills counterclockwise. See radial_center_offset, radial_initial_angle and radial_fill_degrees to control the way the bar fills up.
- FILL_BILINEAR_LEFT_AND_RIGHT = 6 — The texture_progress fills from the center, expanding both towards the left and the right.
- FILL_BILINEAR_TOP_AND_BOTTOM = 7 — The texture_progress fills from the center, expanding both towards the top and the bottom.
- FILL_CLOCKWISE_AND_COUNTER_CLOCKWISE = 8 — Turns the node into a radial bar. The texture_progress fills radially from the center, expanding both clockwise and counterclockwise. See radial_center_offset, radial_initial_angle and radial_fill_degrees to control the way the bar fills up.
Property Descriptions¶
- int fill_mode
| Default | 0 |
| Setter | set_fill_mode(value) |
| Getter | get_fill_mode() |
The fill direction. See FillMode for possible values.
- bool nine_patch_stretch
| Default | false |
| Setter | set_nine_patch_stretch(value) |
| Getter | get_nine_patch_stretch() |
If true, Godot treats the bar’s textures like in NinePatchRect. Use the stretch_margin_* properties like stretch_margin_bottom to set up the nine patch’s 3×3 grid. When using a radial fill_mode, this setting will enable stretching.
- Vector2 radial_center_offset
| Default | Vector2( 0, 0 ) |
| Setter | set_radial_center_offset(value) |
| Getter | get_radial_center_offset() |
Offsets texture_progress if fill_mode is FILL_CLOCKWISE or FILL_COUNTER_CLOCKWISE.
- float radial_fill_degrees
| Default | 360.0 |
| Setter | set_fill_degrees(value) |
| Getter | get_fill_degrees() |
Upper limit for the fill of texture_progress if fill_mode is FILL_CLOCKWISE or FILL_COUNTER_CLOCKWISE. When the node’s value is equal to its max_value, the texture fills up to this angle.
See Range.value, Range.max_value.
- float radial_initial_angle
| Default | 0.0 |
| Setter | set_radial_initial_angle(value) |
| Getter | get_radial_initial_angle() |
Starting angle for the fill of texture_progress if fill_mode is FILL_CLOCKWISE or FILL_COUNTER_CLOCKWISE. When the node’s value is equal to its min_value, the texture doesn’t show up at all. When the value increases, the texture fills and tends towards radial_fill_degrees.
- int stretch_margin_bottom
| Default | 0 |
| Setter | set_stretch_margin(value) |
| Getter | get_stretch_margin() |
The height of the 9-patch’s bottom row. A margin of 16 means the 9-slice’s bottom corners and side will have a height of 16 pixels. You can set all 4 margin values individually to create panels with non-uniform borders.
- int stretch_margin_left
| Default | 0 |
| Setter | set_stretch_margin(value) |
| Getter | get_stretch_margin() |
The width of the 9-patch’s left column.
- int stretch_margin_right
| Default | 0 |
| Setter | set_stretch_margin(value) |
| Getter | get_stretch_margin() |
The width of the 9-patch’s right column.
- int stretch_margin_top
| Default | 0 |
| Setter | set_stretch_margin(value) |
| Getter | get_stretch_margin() |
The height of the 9-patch’s top row.
- Texture texture_over
| Setter | set_over_texture(value) |
| Getter | get_over_texture() |
Texture that draws over the progress bar. Use it to add highlights or an upper-frame that hides part of texture_progress.
- Texture texture_progress
| Setter | set_progress_texture(value) |
| Getter | get_progress_texture() |
Texture that clips based on the node’s value and fill_mode. As value increased, the texture fills up. It shows entirely when value reaches max_value. It doesn’t show at all if value is equal to min_value.
The value property comes from Range. See Range.value, Range.min_value, Range.max_value.
- Texture texture_under
| Setter | set_under_texture(value) |
| Getter | get_under_texture() |
Texture that draws under the progress bar. The bar’s background.
- Color tint_over
| Default | Color( 1, 1, 1, 1 ) |
| Setter | set_tint_over(value) |
| Getter | get_tint_over() |
Multiplies the color of the bar’s texture_over texture. The effect is similar to CanvasItem.modulate, except it only affects this specific texture instead of the entire node.
- Color tint_progress
| Default | Color( 1, 1, 1, 1 ) |
| Setter | set_tint_progress(value) |
| Getter | get_tint_progress() |
Multiplies the color of the bar’s texture_progress texture.
- Color tint_under
| Default | Color( 1, 1, 1, 1 ) |
| Setter | set_tint_under(value) |
| Getter | get_tint_under() |
Multiplies the color of the bar’s texture_under texture.
TextureRect¶
Inherits: Control < CanvasItem < Node < Object
Control for drawing textures.
Description¶
Used to draw icons and sprites in a user interface. The texture’s placement can be controlled with the stretch_mode property. It can scale, tile, or stay centered inside its bounding rectangle.
Properties¶
| bool | expand | false |
| bool | flip_h | false |
| bool | flip_v | false |
| MouseFilter | mouse_filter | O: 1 |
| StretchMode | stretch_mode | 0 |
| Texture | texture |
Enumerations¶
enum StretchMode:
- STRETCH_SCALE_ON_EXPAND = 0 — Scale to fit the node’s bounding rectangle, only if
expandistrue. Defaultstretch_mode, for backwards compatibility. Until you setexpandtotrue, the texture will behave like STRETCH_KEEP. - STRETCH_SCALE = 1 — Scale to fit the node’s bounding rectangle.
- STRETCH_TILE = 2 — Tile inside the node’s bounding rectangle.
- STRETCH_KEEP = 3 — The texture keeps its original size and stays in the bounding rectangle’s top-left corner.
- STRETCH_KEEP_CENTERED = 4 — The texture keeps its original size and stays centered in the node’s bounding rectangle.
- STRETCH_KEEP_ASPECT = 5 — Scale the texture to fit the node’s bounding rectangle, but maintain the texture’s aspect ratio.
- STRETCH_KEEP_ASPECT_CENTERED = 6 — Scale the texture to fit the node’s bounding rectangle, center it and maintain its aspect ratio.
- STRETCH_KEEP_ASPECT_COVERED = 7 — Scale the texture so that the shorter side fits the bounding rectangle. The other side clips to the node’s limits.
Property Descriptions¶
- bool expand
| Default | false |
| Setter | set_expand(value) |
| Getter | has_expand() |
If true, the texture scales to fit its bounding rectangle.
- bool flip_h
| Default | false |
| Setter | set_flip_h(value) |
| Getter | is_flipped_h() |
If true, texture is flipped horizontally.
- bool flip_v
| Default | false |
| Setter | set_flip_v(value) |
| Getter | is_flipped_v() |
If true, texture is flipped vertically.
- StretchMode stretch_mode
| Default | 0 |
| Setter | set_stretch_mode(value) |
| Getter | get_stretch_mode() |
Controls the texture’s behavior when resizing the node’s bounding rectangle. See StretchMode.
- Texture texture
| Setter | set_texture(value) |
| Getter | get_texture() |
The node’s Texture resource.
Theme¶
Inherits: Resource < Reference < Object
Theme for controls.
Description¶
A theme for skinning controls. Controls can be skinned individually, but for complex applications, it’s more practical to just create a global theme that defines everything. This theme can be applied to any Control; the Control and its children will automatically use it.
Theme resources can alternatively be loaded by writing them in a .theme file, see the documentation for more information.
Tutorials¶
Properties¶
| Font | default_font |
Methods¶
Property Descriptions¶
- Font default_font
| Setter | set_default_font(value) |
| Getter | get_default_font() |
The theme’s default font.
Method Descriptions¶
- void clear ( )
Clears all values on the theme.
Clears the Color at name if the theme has type.
Clears the constant at name if the theme has type.
Clears the Font at name if the theme has type.
Clears the icon at name if the theme has type.
Clears StyleBox at name if the theme has type.
- void copy_default_theme ( )
Sets the theme’s values to a copy of the default theme values.
- void copy_theme ( Theme other )
Sets the theme’s values to a copy of a given theme.
Returns the Color at name if the theme has type.
- PoolStringArray get_color_list ( String type ) const
Returns all the Colors as a PoolStringArray filled with each Color’s name, for use in get_color, if the theme has type.
Returns the constant at name if the theme has type.
- PoolStringArray get_constant_list ( String type ) const
Returns all the constants as a PoolStringArray filled with each constant’s name, for use in get_constant, if the theme has type.
Returns the Font at name if the theme has type.
- PoolStringArray get_font_list ( String type ) const
Returns all the Fonts as a PoolStringArray filled with each Font’s name, for use in get_font, if the theme has type.
Returns the icon Texture at name if the theme has type.
- PoolStringArray get_icon_list ( String type ) const
Returns all the icons as a PoolStringArray filled with each Texture’s name, for use in get_icon, if the theme has type.
Returns the icon StyleBox at name if the theme has type.
- PoolStringArray get_stylebox_list ( String type ) const
Returns all the StyleBoxs as a PoolStringArray filled with each StyleBox’s name, for use in get_stylebox, if the theme has type.
- PoolStringArray get_stylebox_types ( ) const
Returns all the StyleBox types as a PoolStringArray filled with each StyleBox’s type, for use in get_stylebox and/or get_stylebox_list, if the theme has type.
- PoolStringArray get_type_list ( String type ) const
Returns all the types in type as a PoolStringArray for use in any of the get_* functions, if the theme has type.
Returns true if Color with name is in type.
Returns false if the theme does not have type.
Returns true if constant with name is in type.
Returns false if the theme does not have type.
Returns true if Font with name is in type.
Returns false if the theme does not have type.
Returns true if icon Texture with name is in type.
Returns false if the theme does not have type.
Returns true if StyleBox with name is in type.
Returns false if the theme does not have type.
Sets the theme’s Color to color at name in type.
Does nothing if the theme does not have type.
Sets the theme’s constant to constant at name in type.
Does nothing if the theme does not have type.
Sets the theme’s Font to font at name in type.
Does nothing if the theme does not have type.
Sets the theme’s icon Texture to texture at name in type.
Does nothing if the theme does not have type.
Sets theme’s StyleBox to stylebox at name in type.
Does nothing if the theme does not have type.
Thread¶
A unit of execution in a process.
Description¶
A unit of execution in a process. Can run methods on Objects simultaneously. The use of synchronization via Mutex or Semaphore is advised if working with shared objects.
Tutorials¶
Methods¶
| String | get_id ( ) const |
| bool | is_active ( ) const |
| Error | start ( Object instance, String method, Variant userdata=null, Priority priority=1 ) |
| Variant | wait_to_finish ( ) |
Enumerations¶
enum Priority:
- PRIORITY_LOW = 0 — A thread running with lower priority than normally.
- PRIORITY_NORMAL = 1 — A thread with a standard priority.
- PRIORITY_HIGH = 2 — A thread running with higher priority than normally.
Method Descriptions¶
- String get_id ( ) const
Returns the current Thread’s ID, uniquely identifying it among all threads.
- bool is_active ( ) const
Returns true if this Thread is currently active. An active Thread cannot start work on a new method but can be joined with wait_to_finish.
Starts a new Thread that runs method on object instance with userdata passed as an argument. The priority of the Thread can be changed by passing a value from the Priority enum.
Returns @GlobalScope.OK on success, or @GlobalScope.ERR_CANT_CREATE on failure.
- Variant wait_to_finish ( )
Joins the Thread and waits for it to finish. Returns what the method called returned.
TileMap¶
Inherits: Node2D < CanvasItem < Node < Object
Node for 2D tile-based maps.
Description¶
Node for 2D tile-based maps. Tilemaps use a TileSet which contain a list of tiles (textures plus optional collision, navigation, and/or occluder shapes) which are used to create grid-based maps.
Tutorials¶
Properties¶
| bool | cell_clip_uv | false |
| Transform2D | cell_custom_transform | Transform2D( 64, 0, 0, 64, 0, 0 ) |
| HalfOffset | cell_half_offset | 2 |
| int | cell_quadrant_size | 16 |
| Vector2 | cell_size | Vector2( 64, 64 ) |
| TileOrigin | cell_tile_origin | 0 |
| bool | cell_y_sort | false |
| bool | centered_textures | false |
| float | collision_bounce | 0.0 |
| float | collision_friction | 1.0 |
| int | collision_layer | 1 |
| int | collision_mask | 1 |
| bool | collision_use_kinematic | false |
| bool | collision_use_parent | false |
| bool | compatibility_mode | false |
| Mode | mode | 0 |
| int | occluder_light_mask | 1 |
| TileSet | tile_set |
Methods¶
| void | clear ( ) |
| void | fix_invalid_tiles ( ) |
| int | get_cell ( int x, int y ) const |
| Vector2 | get_cell_autotile_coord ( int x, int y ) const |
| int | get_cellv ( Vector2 position ) const |
| bool | get_collision_layer_bit ( int bit ) const |
| bool | get_collision_mask_bit ( int bit ) const |
| Array | get_used_cells ( ) const |
| Array | get_used_cells_by_id ( int id ) const |
| Rect2 | get_used_rect ( ) |
| bool | is_cell_transposed ( int x, int y ) const |
| bool | is_cell_x_flipped ( int x, int y ) const |
| bool | is_cell_y_flipped ( int x, int y ) const |
| Vector2 | map_to_world ( Vector2 map_position, bool ignore_half_ofs=false ) const |
| void | set_cell ( int x, int y, int tile, bool flip_x=false, bool flip_y=false, bool transpose=false, Vector2 autotile_coord=Vector2( 0, 0 ) ) |
| void | set_cellv ( Vector2 position, int tile, bool flip_x=false, bool flip_y=false, bool transpose=false ) |
| void | set_collision_layer_bit ( int bit, bool value ) |
| void | set_collision_mask_bit ( int bit, bool value ) |
| void | update_bitmask_area ( Vector2 position ) |
| void | update_bitmask_region ( Vector2 start=Vector2( 0, 0 ), Vector2 end=Vector2( 0, 0 ) ) |
| void | update_dirty_quadrants ( ) |
| Vector2 | world_to_map ( Vector2 world_position ) const |
Enumerations¶
enum Mode:
- MODE_SQUARE = 0 — Orthogonal orientation mode.
- MODE_ISOMETRIC = 1 — Isometric orientation mode.
- MODE_CUSTOM = 2 — Custom orientation mode.
enum HalfOffset:
- HALF_OFFSET_X = 0 — Half offset on the X coordinate.
- HALF_OFFSET_Y = 1 — Half offset on the Y coordinate.
- HALF_OFFSET_DISABLED = 2 — Half offset disabled.
- HALF_OFFSET_NEGATIVE_X = 3 — Half offset on the X coordinate (negative).
- HALF_OFFSET_NEGATIVE_Y = 4 — Half offset on the Y coordinate (negative).
enum TileOrigin:
- TILE_ORIGIN_TOP_LEFT = 0 — Tile origin at its top-left corner.
- TILE_ORIGIN_CENTER = 1 — Tile origin at its center.
- TILE_ORIGIN_BOTTOM_LEFT = 2 — Tile origin at its bottom-left corner.
Constants¶
- INVALID_CELL = -1 — Returned when a cell doesn’t exist.
Property Descriptions¶
- bool cell_clip_uv
| Default | false |
| Setter | set_clip_uv(value) |
| Getter | get_clip_uv() |
If true, the cell’s UVs will be clipped.
- Transform2D cell_custom_transform
| Default | Transform2D( 64, 0, 0, 64, 0, 0 ) |
| Setter | set_custom_transform(value) |
| Getter | get_custom_transform() |
The custom Transform2D to be applied to the TileMap’s cells.
- HalfOffset cell_half_offset
| Default | 2 |
| Setter | set_half_offset(value) |
| Getter | get_half_offset() |
Amount to offset alternating tiles. See HalfOffset for possible values.
- int cell_quadrant_size
| Default | 16 |
| Setter | set_quadrant_size(value) |
| Getter | get_quadrant_size() |
The TileMap’s quadrant size. Optimizes drawing by batching, using chunks of this size.
- Vector2 cell_size
| Default | Vector2( 64, 64 ) |
| Setter | set_cell_size(value) |
| Getter | get_cell_size() |
The TileMap’s cell size.
- TileOrigin cell_tile_origin
| Default | 0 |
| Setter | set_tile_origin(value) |
| Getter | get_tile_origin() |
Position for tile origin. See TileOrigin for possible values.
- bool cell_y_sort
| Default | false |
| Setter | set_y_sort_mode(value) |
| Getter | is_y_sort_mode_enabled() |
If true, the TileMap’s children will be drawn in order of their Y coordinate.
- bool centered_textures
| Default | false |
| Setter | set_centered_textures(value) |
| Getter | is_centered_textures_enabled() |
If true, the textures will be centered in the middle of each tile. This is useful for certain isometric or top-down modes when textures are made larger or smaller than the tiles (e.g. to avoid flickering on tile edges). The offset is still applied, but from the center of the tile. If used, compatibility_mode is ignored.
If false, the texture position start in the top-left corner unless compatibility_mode is enabled.
- float collision_bounce
| Default | 0.0 |
| Setter | set_collision_bounce(value) |
| Getter | get_collision_bounce() |
Bounce value for static body collisions (see collision_use_kinematic).
- float collision_friction
| Default | 1.0 |
| Setter | set_collision_friction(value) |
| Getter | get_collision_friction() |
Friction value for static body collisions (see collision_use_kinematic).
- int collision_layer
| Default | 1 |
| Setter | set_collision_layer(value) |
| Getter | get_collision_layer() |
The collision layer(s) for all colliders in the TileMap.
- int collision_mask
| Default | 1 |
| Setter | set_collision_mask(value) |
| Getter | get_collision_mask() |
The collision mask(s) for all colliders in the TileMap.
- bool collision_use_kinematic
| Default | false |
| Setter | set_collision_use_kinematic(value) |
| Getter | get_collision_use_kinematic() |
If true, TileMap collisions will be handled as a kinematic body. If false, collisions will be handled as static body.
- bool collision_use_parent
| Default | false |
| Setter | set_collision_use_parent(value) |
| Getter | get_collision_use_parent() |
If true, this tilemap’s collision shape will be added to the collision shape of the parent. The parent has to be a CollisionObject2D.
- bool compatibility_mode
| Default | false |
| Setter | set_compatibility_mode(value) |
| Getter | is_compatibility_mode_enabled() |
If true, the compatibility with the tilemaps made in Godot 3.1 or earlier is maintained (textures move when the tile origin changes and rotate if the texture size is not homogeneous). This mode presents problems when doing flip_h, flip_v and transpose tile operations on non-homogeneous isometric tiles (e.g. 2:1), in which the texture could not coincide with the collision, thus it is not recommended for isometric or non-square tiles.
If false, the textures do not move when doing flip_h, flip_v operations if no offset is used, nor when changing the tile origin.
The compatibility mode doesn’t work with the centered_textures option, because displacing textures with the cell_tile_origin option or in irregular tiles is not relevant when centering those textures.
- Mode mode
| Default | 0 |
| Setter | set_mode(value) |
| Getter | get_mode() |
The TileMap orientation mode. See Mode for possible values.
- int occluder_light_mask
| Default | 1 |
| Setter | set_occluder_light_mask(value) |
| Getter | get_occluder_light_mask() |
The light mask assigned to all light occluders in the TileMap. The TileSet’s light occluders will cast shadows only from Light2D(s) that have the same light mask(s).
- TileSet tile_set
| Setter | set_tileset(value) |
| Getter | get_tileset() |
The assigned TileSet.
Method Descriptions¶
- void clear ( )
Clears all cells.
- void fix_invalid_tiles ( )
Clears cells that do not exist in the tileset.
Returns the tile index of the given cell. If no tile exists in the cell, returns INVALID_CELL.
Returns the coordinate of the autotile variation in the tileset. Returns a zero vector if the cell doesn’t have autotiling.
Returns the tile index of the cell given by a Vector2. If no tile exists in the cell, returns INVALID_CELL.
Returns true if the given collision layer bit is set.
Returns true if the given collision mask bit is set.
- Array get_used_cells ( ) const
Returns a Vector2 array with the positions of all cells containing a tile from the tileset (i.e. a tile index different from -1).
Returns an array of all cells with the given tile id.
- Rect2 get_used_rect ( )
Returns a rectangle enclosing the used (non-empty) tiles of the map.
Returns true if the given cell is transposed, i.e. the X and Y axes are swapped.
Returns true if the given cell is flipped in the X axis.
Returns true if the given cell is flipped in the Y axis.
Returns the global position corresponding to the given tilemap (grid-based) coordinates.
Optionally, the tilemap’s half offset can be ignored.
- void set_cell ( int x, int y, int tile, bool flip_x=false, bool flip_y=false, bool transpose=false, Vector2 autotile_coord=Vector2( 0, 0 ) )
Sets the tile index for the cell given by a Vector2.
An index of -1 clears the cell.
Optionally, the tile can also be flipped, transposed, or given autotile coordinates.
Note: Data such as navigation polygons and collision shapes are not immediately updated for performance reasons.
If you need these to be immediately updated, you can call update_dirty_quadrants.
Overriding this method also overrides it internally, allowing custom logic to be implemented when tiles are placed/removed:
func set_cell(x, y, tile, flip_x, flip_y, transpose, autotile_coord)
# Write your custom logic here.
# To call the default method:
.set_cell(x, y, tile, flip_x, flip_y, transpose, autotile_coord)
- void set_cellv ( Vector2 position, int tile, bool flip_x=false, bool flip_y=false, bool transpose=false )
Sets the tile index for the given cell.
An index of -1 clears the cell.
Optionally, the tile can also be flipped or transposed.
Note: Data such as navigation polygons and collision shapes are not immediately updated for performance reasons.
If you need these to be immediately updated, you can call update_dirty_quadrants.
Sets the given collision layer bit.
Sets the given collision mask bit.
- void update_bitmask_area ( Vector2 position )
Applies autotiling rules to the cell (and its adjacent cells) referenced by its grid-based X and Y coordinates.
Applies autotiling rules to the cells in the given region (specified by grid-based X and Y coordinates).
Calling with invalid (or missing) parameters applies autotiling rules for the entire tilemap.
- void update_dirty_quadrants ( )
Updates the tile map’s quadrants, allowing things such as navigation and collision shapes to be immediately used if modified.
Returns the tilemap (grid-based) coordinates corresponding to the given local position.
TileSet¶
Inherits: Resource < Reference < Object
Tile library for tilemaps.
Description¶
A TileSet is a library of tiles for a TileMap. It contains a list of tiles, each consisting of a sprite and optional collision shapes.
Tiles are referenced by a unique integer ID.
Methods¶
Enumerations¶
enum BitmaskMode:
- BITMASK_2X2 = 0
- BITMASK_3X3_MINIMAL = 1
- BITMASK_3X3 = 2
enum AutotileBindings:
- BIND_TOPLEFT = 1
- BIND_TOP = 2
- BIND_TOPRIGHT = 4
- BIND_LEFT = 8
- BIND_CENTER = 16
- BIND_RIGHT = 32
- BIND_BOTTOMLEFT = 64
- BIND_BOTTOM = 128
- BIND_BOTTOMRIGHT = 256
enum TileMode:
- SINGLE_TILE = 0
- AUTO_TILE = 1
- ATLAS_TILE = 2
Method Descriptions¶
- Vector2 _forward_atlas_subtile_selection ( int atlastile_id, Object tilemap, Vector2 tile_location ) virtual
- Vector2 _forward_subtile_selection ( int autotile_id, int bitmask, Object tilemap, Vector2 tile_location ) virtual
- void autotile_clear_bitmask_map ( int id )
Clears all bitmask information of the autotile.
Returns the bitmask of the subtile from an autotile given its coordinates.
The value is the sum of the values in AutotileBindings present in the subtile (e.g. a value of 5 means the bitmask has bindings in both the top left and top right).
- BitmaskMode autotile_get_bitmask_mode ( int id ) const
Returns the BitmaskMode of the autotile.
Returns the subtile that’s being used as an icon in an atlas/autotile given its coordinates.
The subtile defined as the icon will be used as a fallback when the atlas/autotile’s bitmask information is incomplete. It will also be used to represent it in the TileSet editor.
- OccluderPolygon2D autotile_get_light_occluder ( int id, Vector2 coord ) const
Returns the light occluder of the subtile from an atlas/autotile given its coordinates.
Returns the navigation polygon of the subtile from an atlas/autotile given its coordinates.
Returns the size of the subtiles in an atlas/autotile.
Returns the spacing between subtiles of the atlas/autotile.
Returns the priority of the subtile from an autotile given its coordinates.
When more than one subtile has the same bitmask value, one of them will be picked randomly for drawing. Its priority will define how often it will be picked.
Returns the drawing index of the subtile from an atlas/autotile given its coordinates.
Sets the bitmask of the subtile from an autotile given its coordinates.
The value is the sum of the values in AutotileBindings present in the subtile (e.g. a value of 5 means the bitmask has bindings in both the top left and top right).
- void autotile_set_bitmask_mode ( int id, BitmaskMode mode )
Sets the BitmaskMode of the autotile.
Sets the subtile that will be used as an icon in an atlas/autotile given its coordinates.
The subtile defined as the icon will be used as a fallback when the atlas/autotile’s bitmask information is incomplete. It will also be used to represent it in the TileSet editor.
- void autotile_set_light_occluder ( int id, OccluderPolygon2D light_occluder, Vector2 coord )
Sets the light occluder of the subtile from an atlas/autotile given its coordinates.
Sets the navigation polygon of the subtile from an atlas/autotile given its coordinates.
Sets the size of the subtiles in an atlas/autotile.
Sets the spacing between subtiles of the atlas/autotile.
Sets the priority of the subtile from an autotile given its coordinates.
When more than one subtile has the same bitmask value, one of them will be picked randomly for drawing. Its priority will define how often it will be picked.
Sets the drawing index of the subtile from an atlas/autotile given its coordinates.
- void clear ( )
Clears all tiles.
- void create_tile ( int id )
Creates a new tile with the given ID.
Returns the first tile matching the given name.
- int get_last_unused_tile_id ( ) const
Returns the ID following the last currently used ID, useful when creating a new tile.
- Array get_tiles_ids ( ) const
Returns an array of all currently used tile IDs.
- void remove_tile ( int id )
Removes the given tile ID.
- void tile_add_shape ( int id, Shape2D shape, Transform2D shape_transform, bool one_way=false, Vector2 autotile_coord=Vector2( 0, 0 ) )
Adds a shape to the tile.
- OccluderPolygon2D tile_get_light_occluder ( int id ) const
Returns the tile’s light occluder.
- ShaderMaterial tile_get_material ( int id ) const
Returns the tile’s material.
Returns the tile’s modulation color.
Returns the tile’s name.
Returns the navigation polygon of the tile.
Returns the offset of the tile’s navigation polygon.
Returns the tile’s normal map texture.
Returns the offset of the tile’s light occluder.
Returns the tile sub-region in the texture.
Returns a tile’s given shape.
Returns the number of shapes assigned to a tile.
Returns the offset of a tile’s shape.
Returns the one-way collision value of a tile’s shape.
- Transform2D tile_get_shape_transform ( int id, int shape_id ) const
Returns the Transform2D of a tile’s shape.
Returns an array of the tile’s shapes.
Returns the tile’s texture.
Returns the texture offset of the tile.
Returns the tile’s TileMode.
Returns the tile’s Z index (drawing layer).
- void tile_set_light_occluder ( int id, OccluderPolygon2D light_occluder )
Sets a light occluder for the tile.
- void tile_set_material ( int id, ShaderMaterial material )
Sets the tile’s material.
Sets the tile’s modulation color.
Sets the tile’s name.
Sets the tile’s navigation polygon.
Sets an offset for the tile’s navigation polygon.
Sets the tile’s normal map texture.
Sets an offset for the tile’s light occluder.
Sets the tile’s sub-region in the texture. This is common in texture atlases.
Sets a shape for the tile, enabling collision.
Sets the offset of a tile’s shape.
Enables one-way collision on a tile’s shape.
- void tile_set_shape_transform ( int id, int shape_id, Transform2D shape_transform )
Sets a Transform2D on a tile’s shape.
Sets an array of shapes for the tile, enabling collision.
Sets the tile’s texture.
Sets the tile’s texture offset.
Sets the tile’s TileMode.
Sets the tile’s drawing index.
Timer¶
A countdown timer.
Description¶
Counts down a specified interval and emits a signal on reaching 0. Can be set to repeat or “one-shot” mode.
Properties¶
| bool | autostart | false |
| bool | one_shot | false |
| bool | paused | |
| TimerProcessMode | process_mode | 1 |
| float | time_left | |
| float | wait_time | 1.0 |
Enumerations¶
enum TimerProcessMode:
- TIMER_PROCESS_PHYSICS = 0 — Update the timer during the physics step at each frame (fixed framerate processing).
- TIMER_PROCESS_IDLE = 1 — Update the timer during the idle time at each frame.
Property Descriptions¶
- bool autostart
| Default | false |
| Setter | set_autostart(value) |
| Getter | has_autostart() |
If true, the timer will automatically start when entering the scene tree.
Note: This property is automatically set to false after the timer enters the scene tree and starts.
- bool one_shot
| Default | false |
| Setter | set_one_shot(value) |
| Getter | is_one_shot() |
If true, the timer will stop when reaching 0. If false, it will restart.
- bool paused
| Setter | set_paused(value) |
| Getter | is_paused() |
If true, the timer is paused and will not process until it is unpaused again, even if start is called.
- TimerProcessMode process_mode
| Default | 1 |
| Setter | set_timer_process_mode(value) |
| Getter | get_timer_process_mode() |
Processing mode. See TimerProcessMode.
- float time_left
| Getter | get_time_left() |
The timer’s remaining time in seconds. Returns 0 if the timer is inactive.
Note: You cannot set this value. To change the timer’s remaining time, use start.
- float wait_time
| Default | 1.0 |
| Setter | set_wait_time(value) |
| Getter | get_wait_time() |
Wait time in seconds.
Method Descriptions¶
- bool is_stopped ( ) const
Returns true if the timer is stopped.
- void start ( float time_sec=-1 )
Starts the timer. Sets wait_time to time_sec if time_sec > 0. This also resets the remaining time to wait_time.
Note: this method will not resume a paused timer. See paused.
- void stop ( )
Stops the timer.
ToolButton¶
Inherits: Button < BaseButton < Control < CanvasItem < Node < Object
Flat button helper class.
Description¶
This is a helper class to generate a flat Button (see Button.flat), creating a ToolButton is equivalent to:
var btn = Button.new()
btn.flat = true
Theme Properties¶
| StyleBox | disabled | |
| StyleBox | focus | |
| Font | font | |
| Color | font_color | Color( 0.88, 0.88, 0.88, 1 ) |
| Color | font_color_disabled | Color( 0.9, 0.95, 1, 0.3 ) |
| Color | font_color_hover | Color( 0.94, 0.94, 0.94, 1 ) |
| Color | font_color_pressed | Color( 1, 1, 1, 1 ) |
| StyleBox | hover | |
| int | hseparation | 3 |
| StyleBox | normal | |
| StyleBox | pressed |
TouchScreenButton¶
Inherits: Node2D < CanvasItem < Node < Object
Button for touch screen devices.
Description¶
Button for touch screen devices. You can set it to be visible on all screens, or only on touch devices.
Properties¶
| String | action | "" |
| BitMap | bitmask | |
| Texture | normal | |
| bool | passby_press | false |
| Texture | pressed | |
| Shape2D | shape | |
| bool | shape_centered | true |
| bool | shape_visible | true |
| VisibilityMode | visibility_mode | 0 |
Methods¶
| bool | is_pressed ( ) const |
Signals¶
- pressed ( )
Emitted when the button is pressed (down).
- released ( )
Emitted when the button is released (up).
Enumerations¶
- VISIBILITY_ALWAYS = 0 — Always visible.
- VISIBILITY_TOUCHSCREEN_ONLY = 1 — Visible on touch screens only.
Property Descriptions¶
- String action
| Default | "" |
| Setter | set_action(value) |
| Getter | get_action() |
The button’s action. Actions can be handled with InputEventAction.
- BitMap bitmask
| Setter | set_bitmask(value) |
| Getter | get_bitmask() |
The button’s bitmask.
- Texture normal
| Setter | set_texture(value) |
| Getter | get_texture() |
The button’s texture for the normal state.
- bool passby_press
| Default | false |
| Setter | set_passby_press(value) |
| Getter | is_passby_press_enabled() |
If true, pass-by presses are enabled.
- Texture pressed
| Setter | set_texture_pressed(value) |
| Getter | get_texture_pressed() |
The button’s texture for the pressed state.
- Shape2D shape
| Setter | set_shape(value) |
| Getter | get_shape() |
The button’s shape.
- bool shape_centered
| Default | true |
| Setter | set_shape_centered(value) |
| Getter | is_shape_centered() |
If true, the button’s shape is centered in the provided texture. If no texture is used, this property has no effect.
- bool shape_visible
| Default | true |
| Setter | set_shape_visible(value) |
| Getter | is_shape_visible() |
If true, the button’s shape is visible.
- VisibilityMode visibility_mode
| Default | 0 |
| Setter | set_visibility_mode(value) |
| Getter | get_visibility_mode() |
The button’s visibility mode. See VisibilityMode for possible values.
Transform¶
3D transformation (3×4 matrix).
Description¶
Represents one or many transformations in 3D space such as translation, rotation, or scaling. It consists of a basis and an origin. It is similar to a 3×4 matrix.
Tutorials¶
Methods¶
| Transform | Transform ( Vector3 x_axis, Vector3 y_axis, Vector3 z_axis, Vector3 origin ) |
| Transform | Transform ( Basis basis, Vector3 origin ) |
| Transform | Transform ( Transform2D from ) |
| Transform | Transform ( Quat from ) |
| Transform | Transform ( Basis from ) |
| Transform | affine_inverse ( ) |
| Transform | interpolate_with ( Transform transform, float weight ) |
| Transform | inverse ( ) |
| bool | is_equal_approx ( Transform transform ) |
| Transform | looking_at ( Vector3 target, Vector3 up ) |
| Transform | orthonormalized ( ) |
| Transform | rotated ( Vector3 axis, float phi ) |
| Transform | scaled ( Vector3 scale ) |
| Transform | translated ( Vector3 offset ) |
| Variant | xform ( Variant v ) |
| Variant | xform_inv ( Variant v ) |
Constants¶
- IDENTITY = Transform( 1, 0, 0, 0, 1, 0, 0, 0, 1, 0, 0, 0 ) —
Transformwith no translation, rotation or scaling applied. When applied to other data structures, IDENTITY performs no transformation. - FLIP_X = Transform( -1, 0, 0, 0, 1, 0, 0, 0, 1, 0, 0, 0 ) —
Transformwith mirroring applied perpendicular to the YZ plane. - FLIP_Y = Transform( 1, 0, 0, 0, -1, 0, 0, 0, 1, 0, 0, 0 ) —
Transformwith mirroring applied perpendicular to the XZ plane. - FLIP_Z = Transform( 1, 0, 0, 0, 1, 0, 0, 0, -1, 0, 0, 0 ) —
Transformwith mirroring applied perpendicular to the XY plane.
Property Descriptions¶
- Basis basis
| Default | Basis( 1, 0, 0, 0, 1, 0, 0, 0, 1 ) |
The basis is a matrix containing 3 Vector3 as its columns: X axis, Y axis, and Z axis. These vectors can be interpreted as the basis vectors of local coordinate system traveling with the object.
- Vector3 origin
| Default | Vector3( 0, 0, 0 ) |
The translation offset of the transform.
Method Descriptions¶
Constructs the Transform from four Vector3. Each axis corresponds to local basis vectors (some of which may be scaled).
Constructs the Transform from a Basis and Vector3.
- Transform Transform ( Transform2D from )
Constructs the Transform from a Transform2D.
Constructs the Transform from a Quat. The origin will be Vector3(0, 0, 0).
Constructs the Transform from a Basis. The origin will be Vector3(0, 0, 0).
- Transform affine_inverse ( )
Returns the inverse of the transform, under the assumption that the transformation is composed of rotation, scaling and translation.
Interpolates the transform to other Transform by weight amount (0-1).
- Transform inverse ( )
Returns the inverse of the transform, under the assumption that the transformation is composed of rotation and translation (no scaling, use affine_inverse for transforms with scaling).
Returns true if this transform and transform are approximately equal, by calling is_equal_approx on each component.
Returns a copy of the transform rotated such that its -Z axis points towards the target position.
The transform will first be rotated around the given up vector, and then fully aligned to the target by a further rotation around an axis perpendicular to both the target and up vectors.
Operations take place in global space.
- Transform orthonormalized ( )
Returns the transform with the basis orthogonal (90 degrees), and normalized axis vectors.
Rotates the transform around the given axis by the given angle (in radians), using matrix multiplication. The axis must be a normalized vector.
Scales the transform by the given scale factor, using matrix multiplication.
Translates the transform by the given offset, relative to the transform’s basis vectors.
Unlike rotated and scaled, this does not use matrix multiplication.
Transforms the given Vector3, Plane, AABB, or PoolVector3Array by this transform.
Inverse-transforms the given Vector3, Plane, AABB, or PoolVector3Array by this transform.
Transform2D¶
2D transformation (3×2 matrix).
Description¶
Represents one or many transformations in 2D space such as translation, rotation, or scaling. It consists of two x and y Vector2s and an origin. It is similar to a 3×2 matrix.
Methods¶
| Transform2D | Transform2D ( Transform from ) |
| Transform2D | Transform2D ( Vector2 x_axis, Vector2 y_axis, Vector2 origin ) |
| Transform2D | Transform2D ( float rotation, Vector2 position ) |
| Transform2D | affine_inverse ( ) |
| Vector2 | basis_xform ( Vector2 v ) |
| Vector2 | basis_xform_inv ( Vector2 v ) |
| Vector2 | get_origin ( ) |
| float | get_rotation ( ) |
| Vector2 | get_scale ( ) |
| Transform2D | interpolate_with ( Transform2D transform, float weight ) |
| Transform2D | inverse ( ) |
| bool | is_equal_approx ( Transform2D transform ) |
| Transform2D | orthonormalized ( ) |
| Transform2D | rotated ( float phi ) |
| Transform2D | scaled ( Vector2 scale ) |
| Transform2D | translated ( Vector2 offset ) |
| Variant | xform ( Variant v ) |
| Variant | xform_inv ( Variant v ) |
Constants¶
- IDENTITY = Transform2D( 1, 0, 0, 1, 0, 0 ) —
Transform2Dwith no translation, rotation or scaling applied. When applied to other data structures, IDENTITY performs no transformation. - FLIP_X = Transform2D( -1, 0, 0, 1, 0, 0 ) —
Transform2Dwith mirroring applied parallel to the X axis. - FLIP_Y = Transform2D( 1, 0, 0, -1, 0, 0 ) —
Transform2Dwith mirroring applied parallel to the Y axis.
Property Descriptions¶
- Vector2 origin
| Default | Vector2( 0, 0 ) |
The transform’s translation offset.
- Vector2 x
| Default | Vector2( 1, 0 ) |
The X axis of 2×2 basis matrix containing 2 Vector2s as its columns: X axis and Y axis. These vectors can be interpreted as the basis vectors of local coordinate system traveling with the object.
- Vector2 y
| Default | Vector2( 0, 1 ) |
The Y axis of 2×2 basis matrix containing 2 Vector2s as its columns: X axis and Y axis. These vectors can be interpreted as the basis vectors of local coordinate system traveling with the object.
Method Descriptions¶
- Transform2D Transform2D ( Transform from )
Constructs the transform from a 3D Transform.
- Transform2D Transform2D ( Vector2 x_axis, Vector2 y_axis, Vector2 origin )
Constructs the transform from 3 Vector2s representing x, y, and origin.
- Transform2D Transform2D ( float rotation, Vector2 position )
Constructs the transform from a given angle (in radians) and position.
- Transform2D affine_inverse ( )
Returns the inverse of the matrix.
Transforms the given vector by this transform’s basis (no translation).
Inverse-transforms the given vector by this transform’s basis (no translation).
- Vector2 get_origin ( )
Returns the transform’s origin (translation).
- float get_rotation ( )
Returns the transform’s rotation (in radians).
- Vector2 get_scale ( )
Returns the scale.
- Transform2D interpolate_with ( Transform2D transform, float weight )
Returns a transform interpolated between this transform and another by a given weight (0-1).
- Transform2D inverse ( )
Returns the inverse of the transform, under the assumption that the transformation is composed of rotation and translation (no scaling, use affine_inverse for transforms with scaling).
- bool is_equal_approx ( Transform2D transform )
Returns true if this transform and transform are approximately equal, by calling is_equal_approx on each component.
- Transform2D orthonormalized ( )
Returns the transform with the basis orthogonal (90 degrees), and normalized axis vectors.
- Transform2D rotated ( float phi )
Rotates the transform by the given angle (in radians), using matrix multiplication.
- Transform2D scaled ( Vector2 scale )
Scales the transform by the given scale factor, using matrix multiplication.
- Transform2D translated ( Vector2 offset )
Translates the transform by the given offset, relative to the transform’s basis vectors.
Unlike rotated and scaled, this does not use matrix multiplication.
Transforms the given Vector2, Rect2, or PoolVector2Array by this transform.
Inverse-transforms the given Vector2, Rect2, or PoolVector2Array by this transform.
Translation¶
Inherits: Resource < Reference < Object
Inherited By: PHashTranslation
Language Translation.
Description¶
Translations are resources that can be loaded and unloaded on demand. They map a string to another string.
Tutorials¶
Methods¶
| void | add_message ( String src_message, String xlated_message ) |
| void | erase_message ( String src_message ) |
| String | get_message ( String src_message ) const |
| int | get_message_count ( ) const |
| PoolStringArray | get_message_list ( ) const |
Property Descriptions¶
- String locale
| Default | "en" |
| Setter | set_locale(value) |
| Getter | get_locale() |
The locale of the translation.
Method Descriptions¶
Adds a message if nonexistent, followed by its translation.
- void erase_message ( String src_message )
Erases a message.
Returns a message’s translation.
- int get_message_count ( ) const
Returns the number of existing messages.
- PoolStringArray get_message_list ( ) const
Returns all the messages (keys).
TranslationServer¶
Inherits: Object
Server that manages all translations.
Description¶
Server that manages all translations. Translations can be set to it and removed from it.
Tutorials¶
Methods¶
| void | add_translation ( Translation translation ) |
| void | clear ( ) |
| Array | get_loaded_locales ( ) const |
| String | get_locale ( ) const |
| String | get_locale_name ( String locale ) const |
| void | remove_translation ( Translation translation ) |
| void | set_locale ( String locale ) |
| String | translate ( String message ) const |
Method Descriptions¶
- void add_translation ( Translation translation )
Adds a Translation resource.
- void clear ( )
Clears the server from all translations.
- Array get_loaded_locales ( ) const
Returns an Array of all loaded locales of the game.
- String get_locale ( ) const
Returns the current locale of the game.
Returns a locale’s language and its variant (e.g. "en_US" would return "English (United States)").
- void remove_translation ( Translation translation )
Removes the given translation from the server.
- void set_locale ( String locale )
Sets the locale of the game.
Returns the current locale’s translation for the given message (key).
Tree¶
Inherits: Control < CanvasItem < Node < Object
Control to show a tree of items.
Description¶
This shows a tree of items that can be selected, expanded and collapsed. The tree can have multiple columns with custom controls like text editing, buttons and popups. It can be useful for structured displays and interactions.
Trees are built via code, using TreeItem objects to create the structure. They have a single root but multiple roots can be simulated if a dummy hidden root is added.
func _ready():
var tree = Tree.new()
var root = tree.create_item()
tree.set_hide_root(true)
var child1 = tree.create_item(root)
var child2 = tree.create_item(root)
var subchild1 = tree.create_item(child1)
subchild1.set_text(0, "Subchild1")
To iterate over all the TreeItem objects in a Tree object, use TreeItem.get_next and TreeItem.get_children after getting the root through get_root.
Properties¶
| bool | allow_reselect | false |
| bool | allow_rmb_select | false |
| int | columns | 1 |
| int | drop_mode_flags | 0 |
| FocusMode | focus_mode | O: 2 |
| bool | hide_folding | false |
| bool | hide_root | false |
| bool | rect_clip_content | O: true |
| SelectMode | select_mode | 0 |
Methods¶
| bool | are_column_titles_visible ( ) const |
| void | clear ( ) |
| TreeItem | create_item ( Object parent=null, int idx=-1 ) |
| void | ensure_cursor_is_visible ( ) |
| int | get_column_at_position ( Vector2 position ) const |
| String | get_column_title ( int column ) const |
| int | get_column_width ( int column ) const |
| Rect2 | get_custom_popup_rect ( ) const |
| int | get_drop_section_at_position ( Vector2 position ) const |
| TreeItem | get_edited ( ) const |
| int | get_edited_column ( ) const |
| Rect2 | get_item_area_rect ( Object item, int column=-1 ) const |
| TreeItem | get_item_at_position ( Vector2 position ) const |
| TreeItem | get_next_selected ( Object from ) |
| int | get_pressed_button ( ) const |
| TreeItem | get_root ( ) |
| Vector2 | get_scroll ( ) const |
| TreeItem | get_selected ( ) const |
| int | get_selected_column ( ) const |
| void | set_column_expand ( int column, bool expand ) |
| void | set_column_min_width ( int column, int min_width ) |
| void | set_column_title ( int column, String title ) |
| void | set_column_titles_visible ( bool visible ) |
Theme Properties¶
| Texture | arrow | |
| Texture | arrow_collapsed | |
| StyleBox | bg | |
| StyleBox | bg_focus | |
| int | button_margin | 4 |
| StyleBox | button_pressed | |
| Texture | checked | |
| StyleBox | cursor | |
| StyleBox | cursor_unfocused | |
| StyleBox | custom_button | |
| Color | custom_button_font_highlight | Color( 0.94, 0.94, 0.94, 1 ) |
| StyleBox | custom_button_hover | |
| StyleBox | custom_button_pressed | |
| int | draw_guides | 1 |
| int | draw_relationship_lines | 0 |
| Color | drop_position_color | Color( 1, 0.3, 0.2, 1 ) |
| Font | font | |
| Color | font_color | Color( 0.69, 0.69, 0.69, 1 ) |
| Color | font_color_selected | Color( 1, 1, 1, 1 ) |
| Color | guide_color | Color( 0, 0, 0, 0.1 ) |
| int | hseparation | 4 |
| int | item_margin | 12 |
| Color | relationship_line_color | Color( 0.27, 0.27, 0.27, 1 ) |
| int | scroll_border | 4 |
| int | scroll_speed | 12 |
| Texture | select_arrow | |
| StyleBox | selected | |
| StyleBox | selected_focus | |
| Color | title_button_color | Color( 0.88, 0.88, 0.88, 1 ) |
| Font | title_button_font | |
| StyleBox | title_button_hover | |
| StyleBox | title_button_normal | |
| StyleBox | title_button_pressed | |
| Texture | unchecked | |
| Texture | updown | |
| int | vseparation | 4 |
Signals¶
Emitted when a button on the tree was pressed (see TreeItem.add_button).
- cell_selected ( )
Emitted when a cell is selected.
- column_title_pressed ( int column )
Emitted when a column’s title is pressed.
- custom_popup_edited ( bool arrow_clicked )
Emitted when a cell with the TreeItem.CELL_MODE_CUSTOM is clicked to be edited.
- empty_rmb ( Vector2 position )
Emitted when the right mouse button is pressed in the empty space of the tree.
- empty_tree_rmb_selected ( Vector2 position )
Emitted when the right mouse button is pressed if right mouse button selection is active and the tree is empty.
- item_activated ( )
Emitted when an item’s label is double-clicked.
- item_collapsed ( TreeItem item )
Emitted when an item is collapsed by a click on the folding arrow.
- item_custom_button_pressed ( )
Emitted when a custom button is pressed (i.e. in a TreeItem.CELL_MODE_CUSTOM mode cell).
- item_double_clicked ( )
Emitted when an item’s icon is double-clicked.
- item_edited ( )
Emitted when an item is edited.
- item_rmb_edited ( )
Emitted when an item is edited using the right mouse button.
- item_rmb_selected ( Vector2 position )
Emitted when an item is selected with the right mouse button.
- item_selected ( )
Emitted when an item is selected.
Emitted instead of item_selected if select_mode is SELECT_MULTI.
- nothing_selected ( )
Emitted when a left mouse button click does not select any item.
Enumerations¶
enum SelectMode:
- SELECT_SINGLE = 0 — Allows selection of a single cell at a time. From the perspective of items, only a single item is allowed to be selected. And there is only one column selected in the selected item.
The focus cursor is always hidden in this mode, but it is positioned at the current selection, making the currently selected item the currently focused item.
- SELECT_ROW = 1 — Allows selection of a single row at a time. From the perspective of items, only a single items is allowed to be selected. And all the columns are selected in the selected item.
The focus cursor is always hidden in this mode, but it is positioned at the first column of the current selection, making the currently selected item the currently focused item.
- SELECT_MULTI = 2 — Allows selection of multiple cells at the same time. From the perspective of items, multiple items are allowed to be selected. And there can be multiple columns selected in each selected item.
The focus cursor is visible in this mode, the item or column under the cursor is not necessarily selected.
enum DropModeFlags:
- DROP_MODE_DISABLED = 0 — Disables all drop sections, but still allows to detect the “on item” drop section by get_drop_section_at_position.
Note: This is the default flag, it has no effect when combined with other flags.
- DROP_MODE_ON_ITEM = 1 — Enables the “on item” drop section. This drop section covers the entire item.
When combined with DROP_MODE_INBETWEEN, this drop section halves the height and stays centered vertically.
- DROP_MODE_INBETWEEN = 2 — Enables “above item” and “below item” drop sections. The “above item” drop section covers the top half of the item, and the “below item” drop section covers the bottom half.
When combined with DROP_MODE_ON_ITEM, these drop sections halves the height and stays on top / bottom accordingly.
Property Descriptions¶
- bool allow_reselect
| Default | false |
| Setter | set_allow_reselect(value) |
| Getter | get_allow_reselect() |
If true, the currently selected cell may be selected again.
- bool allow_rmb_select
| Default | false |
| Setter | set_allow_rmb_select(value) |
| Getter | get_allow_rmb_select() |
If true, a right mouse button click can select items.
- int columns
| Default | 1 |
| Setter | set_columns(value) |
| Getter | get_columns() |
The number of columns.
- int drop_mode_flags
| Default | 0 |
| Setter | set_drop_mode_flags(value) |
| Getter | get_drop_mode_flags() |
The drop mode as an OR combination of flags. See DropModeFlags constants. Once dropping is done, reverts to DROP_MODE_DISABLED. Setting this during Control.can_drop_data is recommended.
This controls the drop sections, i.e. the decision and drawing of possible drop locations based on the mouse position.
- bool hide_folding
| Default | false |
| Setter | set_hide_folding(value) |
| Getter | is_folding_hidden() |
If true, the folding arrow is hidden.
- bool hide_root
| Default | false |
| Setter | set_hide_root(value) |
| Getter | is_root_hidden() |
If true, the tree’s root is hidden.
- SelectMode select_mode
| Default | 0 |
| Setter | set_select_mode(value) |
| Getter | get_select_mode() |
Allows single or multiple selection. See the SelectMode constants.
Method Descriptions¶
- bool are_column_titles_visible ( ) const
Returns true if the column titles are being shown.
- void clear ( )
Clears the tree. This removes all items.
Creates an item in the tree and adds it as a child of parent.
If parent is null, the root item will be the parent, or the new item will be the root itself if the tree is empty.
The new item will be the idxth child of parent, or it will be the last child if there are not enough siblings.
- void ensure_cursor_is_visible ( )
Makes the currently focused cell visible.
This will scroll the tree if necessary. In SELECT_ROW mode, this will not do horizontal scrolling, as all the cells in the selected row is focused logically.
Note: Despite the name of this method, the focus cursor itself is only visible in SELECT_MULTI mode.
Returns the column index at position, or -1 if no item is there.
Returns the column’s title.
Returns the column’s width in pixels.
- Rect2 get_custom_popup_rect ( ) const
Returns the rectangle for custom popups. Helper to create custom cell controls that display a popup. See TreeItem.set_cell_mode.
Returns the drop section at position, or -100 if no item is there.
Values -1, 0, or 1 will be returned for the “above item”, “on item”, and “below item” drop sections, respectively. See DropModeFlags for a description of each drop section.
To get the item which the returned drop section is relative to, use get_item_at_position.
- TreeItem get_edited ( ) const
Returns the currently edited item. This is only available for custom cell mode.
- int get_edited_column ( ) const
Returns the column for the currently edited item. This is only available for custom cell mode.
Returns the rectangle area for the specified item. If column is specified, only get the position and size of that column, otherwise get the rectangle containing all columns.
Returns the tree item at the specified position (relative to the tree origin position).
Returns the next selected item after the given one, or null if the end is reached.
If from is null, this returns the first selected item.
- int get_pressed_button ( ) const
Returns the last pressed button’s index.
- TreeItem get_root ( )
Returns the tree’s root item, or null if the tree is empty.
- Vector2 get_scroll ( ) const
Returns the current scrolling position.
- TreeItem get_selected ( ) const
Returns the currently focused item, or null if no item is focused.
In SELECT_ROW and SELECT_SINGLE modes, the focused item is same as the selected item. In SELECT_MULTI mode, the focused item is the item under the focus cursor, not necessarily selected.
To get the currently selected item(s), use get_next_selected.
- int get_selected_column ( ) const
Returns the currently focused column, or -1 if no column is focused.
In SELECT_SINGLE mode, the focused column is the selected column. In SELECT_ROW mode, the focused column is always 0 if any item is selected. In SELECT_MULTI mode, the focused column is the column under the focus cursor, and there are not necessarily any column selected.
To tell whether a column of an item is selected, use TreeItem.is_selected.
If true, the column will have the “Expand” flag of Control. Columns that have the “Expand” flag will use their “min_width” in a similar fashion to Control.size_flags_stretch_ratio.
Sets the minimum width of a column. Columns that have the “Expand” flag will use their “min_width” in a similar fashion to Control.size_flags_stretch_ratio.
Sets the title of a column.
- void set_column_titles_visible ( bool visible )
If true, column titles are visible.
TreeItem¶
Inherits: Object
Control for a single item inside a Tree.
Description¶
Control for a single item inside a Tree. May have child TreeItems and be styled as well as contain buttons.
Properties¶
| bool | collapsed |
| int | custom_minimum_height |
| bool | disable_folding |
Methods¶
| void | add_button ( int column, Texture button, int button_idx=-1, bool disabled=false, String tooltip=”” ) |
| Variant | call_recursive ( String method, … ) vararg |
| void | clear_custom_bg_color ( int column ) |
| void | clear_custom_color ( int column ) |
| void | deselect ( int column ) |
| void | erase_button ( int column, int button_idx ) |
| Texture | get_button ( int column, int button_idx ) const |
| int | get_button_count ( int column ) const |
| String | get_button_tooltip ( int column, int button_idx ) const |
| TreeCellMode | get_cell_mode ( int column ) const |
| TreeItem | get_children ( ) |
| Color | get_custom_bg_color ( int column ) const |
| Color | get_custom_color ( int column ) const |
| bool | get_expand_right ( int column ) const |
| Texture | get_icon ( int column ) const |
| int | get_icon_max_width ( int column ) const |
| Color | get_icon_modulate ( int column ) const |
| Rect2 | get_icon_region ( int column ) const |
| Variant | get_metadata ( int column ) const |
| TreeItem | get_next ( ) |
| TreeItem | get_next_visible ( bool wrap=false ) |
| TreeItem | get_parent ( ) |
| TreeItem | get_prev ( ) |
| TreeItem | get_prev_visible ( bool wrap=false ) |
| float | get_range ( int column ) const |
| Dictionary | get_range_config ( int column ) |
| String | get_text ( int column ) const |
| TextAlign | get_text_align ( int column ) const |
| String | get_tooltip ( int column ) const |
| bool | is_button_disabled ( int column, int button_idx ) const |
| bool | is_checked ( int column ) const |
| bool | is_custom_set_as_button ( int column ) const |
| bool | is_editable ( int column ) |
| bool | is_selectable ( int column ) const |
| bool | is_selected ( int column ) |
| void | move_to_bottom ( ) |
| void | move_to_top ( ) |
| void | remove_child ( Object child ) |
| void | select ( int column ) |
| void | set_button ( int column, int button_idx, Texture button ) |
| void | set_button_disabled ( int column, int button_idx, bool disabled ) |
| void | set_cell_mode ( int column, TreeCellMode mode ) |
| void | set_checked ( int column, bool checked ) |
| void | set_custom_as_button ( int column, bool enable ) |
| void | set_custom_bg_color ( int column, Color color, bool just_outline=false ) |
| void | set_custom_color ( int column, Color color ) |
| void | set_custom_draw ( int column, Object object, String callback ) |
| void | set_editable ( int column, bool enabled ) |
| void | set_expand_right ( int column, bool enable ) |
| void | set_icon ( int column, Texture texture ) |
| void | set_icon_max_width ( int column, int width ) |
| void | set_icon_modulate ( int column, Color modulate ) |
| void | set_icon_region ( int column, Rect2 region ) |
| void | set_metadata ( int column, Variant meta ) |
| void | set_range ( int column, float value ) |
| void | set_range_config ( int column, float min, float max, float step, bool expr=false ) |
| void | set_selectable ( int column, bool selectable ) |
| void | set_text ( int column, String text ) |
| void | set_text_align ( int column, TextAlign text_align ) |
| void | set_tooltip ( int column, String tooltip ) |
Enumerations¶
enum TreeCellMode:
- CELL_MODE_STRING = 0 — Cell contains a string.
- CELL_MODE_CHECK = 1 — Cell can be checked.
- CELL_MODE_RANGE = 2 — Cell contains a range.
- CELL_MODE_ICON = 3 — Cell contains an icon.
- CELL_MODE_CUSTOM = 4
enum TextAlign:
- ALIGN_LEFT = 0 — Align text to the left. See
set_text_align(). - ALIGN_CENTER = 1 — Center text. See
set_text_align(). - ALIGN_RIGHT = 2 — Align text to the right. See
set_text_align().
Property Descriptions¶
- bool collapsed
| Setter | set_collapsed(value) |
| Getter | is_collapsed() |
If true, the TreeItem is collapsed.
- int custom_minimum_height
| Setter | set_custom_minimum_height(value) |
| Getter | get_custom_minimum_height() |
The custom minimum height.
- bool disable_folding
| Setter | set_disable_folding(value) |
| Getter | is_folding_disabled() |
If true, folding is disabled for this TreeItem.
Method Descriptions¶
- void add_button ( int column, Texture button, int button_idx=-1, bool disabled=false, String tooltip=”” )
Adds a button with Texture button at column column. The button_idx index is used to identify the button when calling other methods. If not specified, the next available index is used, which may be retrieved by calling get_button_count immediately after this method. Optionally, the button can be disabled and have a tooltip.
Calls the method on the actual TreeItem and its children recursively. Pass parameters as a comma separated list.
- void clear_custom_bg_color ( int column )
Resets the background color for the given column to default.
- void clear_custom_color ( int column )
Resets the color for the given column to default.
- void deselect ( int column )
Deselects the given column.
Removes the button at index button_idx in column column.
Returns the Texture of the button at index button_idx in column column.
Returns the number of buttons in column column. May be used to get the most recently added button’s index, if no index was specified.
Returns the tooltip string for the button at index button_idx in column column.
- TreeCellMode get_cell_mode ( int column ) const
Returns the column’s cell mode.
- TreeItem get_children ( )
Returns the TreeItem’s child items.
Returns the custom background color of column column.
Returns the custom color of column column.
Returns true if expand_right is set.
Returns the given column’s icon Texture. Error if no icon is set.
Returns the column’s icon’s maximum width.
Returns the Color modulating the column’s icon.
Returns the icon Texture region as Rect2.
- TreeItem get_next ( )
Returns the next TreeItem in the tree.
Returns the next visible TreeItem in the tree.
If wrap is enabled, the method will wrap around to the first visible element in the tree when called on the last visible element, otherwise it returns null.
- TreeItem get_parent ( )
Returns the parent TreeItem.
- TreeItem get_prev ( )
Returns the previous TreeItem in the tree.
Returns the previous visible TreeItem in the tree.
If wrap is enabled, the method will wrap around to the last visible element in the tree when called on the first visible element, otherwise it returns null.
- Dictionary get_range_config ( int column )
Returns the given column’s text.
Returns the given column’s text alignment.
Returns the given column’s tooltip.
Returns true if the button at index button_idx for the given column is disabled.
Returns true if the given column is checked.
Returns true if column column is editable.
Returns true if column column is selectable.
Returns true if column column is selected.
- void move_to_bottom ( )
Moves this TreeItem to the bottom in the Tree hierarchy.
- void move_to_top ( )
Moves this TreeItem to the top in the Tree hierarchy.
- void remove_child ( Object child )
Removes the given child TreeItem.
- void select ( int column )
Selects the column column.
Sets the given column’s button Texture at index button_idx to button.
If true, disables the button at index button_idx in column column.
- void set_cell_mode ( int column, TreeCellMode mode )
Sets the given column’s cell mode to mode. See TreeCellMode constants.
If true, the column column is checked.
Sets the given column’s custom background color and whether to just use it as an outline.
Sets the given column’s custom color.
Sets the given column’s custom draw callback to callback method on object.
The callback should accept two arguments: the TreeItem that is drawn and its position and size as a Rect2.
If true, column column is editable.
If true, column column is expanded to the right.
Sets the given column’s icon Texture.
Sets the given column’s icon’s maximum width.
Modulates the given column’s icon with modulate.
Sets the given column’s icon’s texture region.
If true, the given column is selectable.
Sets the given column’s text alignment. See TextAlign for possible values.
Sets the given column’s tooltip text.
TriangleMesh¶
Internal mesh type.
Description¶
Mesh type used internally for collision calculations.
Tween¶
Smoothly animates a node’s properties over time.
Description¶
Tweens are useful for animations requiring a numerical property to be interpolated over a range of values. The name tween comes from in-betweening, an animation technique where you specify keyframes and the computer interpolates the frames that appear between them.
Tween is more suited than AnimationPlayer for animations where you don’t know the final values in advance. For example, interpolating a dynamically-chosen camera zoom value is best done with a Tween node; it would be difficult to do the same thing with an AnimationPlayer node.
Here is a brief usage example that causes a 2D node to move smoothly between two positions:
var tween = get_node("Tween")
tween.interpolate_property($Node2D, "position",
Vector2(0, 0), Vector2(100, 100), 1,
Tween.TRANS_LINEAR, Tween.EASE_IN_OUT)
tween.start()
Many methods require a property name, such as "position" above. You can find the correct property name by hovering over the property in the Inspector. You can also provide the components of a property directly by using "property:component" (eg. position:x), where it would only apply to that particular component.
Many of the methods accept trans_type and ease_type. The first accepts an TransitionType constant, and refers to the way the timing of the animation is handled (see http://easings.net/ for some examples). The second accepts an EaseType constant, and controls the where trans_type is applied to the interpolation (in the beginning, the end, or both). If you don’t know which transition and easing to pick, you can try different TransitionType constants with EASE_IN_OUT, and use the one that looks best.
Properties¶
| TweenProcessMode | playback_process_mode | 1 |
| float | playback_speed | 1.0 |
| bool | repeat | false |
Methods¶
| bool | follow_method ( Object object, String method, Variant initial_val, Object target, String target_method, float duration, TransitionType trans_type=0, EaseType ease_type=2, float delay=0 ) |
| bool | follow_property ( Object object, NodePath property, Variant initial_val, Object target, NodePath target_property, float duration, TransitionType trans_type=0, EaseType ease_type=2, float delay=0 ) |
| float | get_runtime ( ) const |
| bool | interpolate_callback ( Object object, float duration, String callback, Variant arg1=null, Variant arg2=null, Variant arg3=null, Variant arg4=null, Variant arg5=null ) |
| bool | interpolate_deferred_callback ( Object object, float duration, String callback, Variant arg1=null, Variant arg2=null, Variant arg3=null, Variant arg4=null, Variant arg5=null ) |
| bool | interpolate_method ( Object object, String method, Variant initial_val, Variant final_val, float duration, TransitionType trans_type=0, EaseType ease_type=2, float delay=0 ) |
| bool | interpolate_property ( Object object, NodePath property, Variant initial_val, Variant final_val, float duration, TransitionType trans_type=0, EaseType ease_type=2, float delay=0 ) |
| bool | is_active ( ) const |
| bool | remove ( Object object, String key=”” ) |
| bool | remove_all ( ) |
| bool | reset ( Object object, String key=”” ) |
| bool | reset_all ( ) |
| bool | resume ( Object object, String key=”” ) |
| bool | resume_all ( ) |
| bool | seek ( float time ) |
| void | set_active ( bool active ) |
| bool | start ( ) |
| bool | stop ( Object object, String key=”” ) |
| bool | stop_all ( ) |
| bool | targeting_method ( Object object, String method, Object initial, String initial_method, Variant final_val, float duration, TransitionType trans_type=0, EaseType ease_type=2, float delay=0 ) |
| bool | targeting_property ( Object object, NodePath property, Object initial, NodePath initial_val, Variant final_val, float duration, TransitionType trans_type=0, EaseType ease_type=2, float delay=0 ) |
| float | tell ( ) const |
Signals¶
- tween_all_completed ( )
Emitted when all processes in a tween end.
Emitted when a tween ends.
Emitted when a tween starts.
Emitted at each step of the animation.
Enumerations¶
enum TweenProcessMode:
- TWEEN_PROCESS_PHYSICS = 0 — The tween updates with the
_physics_processcallback. - TWEEN_PROCESS_IDLE = 1 — The tween updates with the
_processcallback.
enum TransitionType:
- TRANS_LINEAR = 0 — The animation is interpolated linearly.
- TRANS_SINE = 1 — The animation is interpolated using a sine function.
- TRANS_QUINT = 2 — The animation is interpolated with a quintic (to the power of 5) function.
- TRANS_QUART = 3 — The animation is interpolated with a quartic (to the power of 4) function.
- TRANS_QUAD = 4 — The animation is interpolated with a quadratic (to the power of 2) function.
- TRANS_EXPO = 5 — The animation is interpolated with an exponential (to the power of x) function.
- TRANS_ELASTIC = 6 — The animation is interpolated with elasticity, wiggling around the edges.
- TRANS_CUBIC = 7 — The animation is interpolated with a cubic (to the power of 3) function.
- TRANS_CIRC = 8 — The animation is interpolated with a function using square roots.
- TRANS_BOUNCE = 9 — The animation is interpolated by bouncing at the end.
- TRANS_BACK = 10 — The animation is interpolated backing out at ends.
enum EaseType:
- EASE_IN = 0 — The interpolation starts slowly and speeds up towards the end.
- EASE_OUT = 1 — The interpolation starts quickly and slows down towards the end.
- EASE_IN_OUT = 2 — A combination of EASE_IN and EASE_OUT. The interpolation is slowest at both ends.
- EASE_OUT_IN = 3 — A combination of EASE_IN and EASE_OUT. The interpolation is fastest at both ends.
Property Descriptions¶
- TweenProcessMode playback_process_mode
| Default | 1 |
| Setter | set_tween_process_mode(value) |
| Getter | get_tween_process_mode() |
The tween’s animation process thread. See TweenProcessMode.
- float playback_speed
| Default | 1.0 |
| Setter | set_speed_scale(value) |
| Getter | get_speed_scale() |
The tween’s speed multiplier. For example, set it to 1.0 for normal speed, 2.0 for two times normal speed, or 0.5 for half of the normal speed. A value of 0 pauses the animation, but see also set_active or stop_all for this.
- bool repeat
| Default | false |
| Setter | set_repeat(value) |
| Getter | is_repeat() |
If true, the tween loops.
Method Descriptions¶
- bool follow_method ( Object object, String method, Variant initial_val, Object target, String target_method, float duration, TransitionType trans_type=0, EaseType ease_type=2, float delay=0 )
Follows method of object and applies the returned value on target_method of target, beginning from initial_val for duration seconds, delay later. Methods are called with consecutive values.
Use TransitionType for trans_type and EaseType for ease_type parameters. These values control the timing and direction of the interpolation. See the class description for more information.
- bool follow_property ( Object object, NodePath property, Variant initial_val, Object target, NodePath target_property, float duration, TransitionType trans_type=0, EaseType ease_type=2, float delay=0 )
Follows property of object and applies it on target_property of target, beginning from initial_val for duration seconds, delay seconds later.
Use TransitionType for trans_type and EaseType for ease_type parameters. These values control the timing and direction of the interpolation. See the class description for more information.
- float get_runtime ( ) const
Returns the total time needed for all tweens to end. If you have two tweens, one lasting 10 seconds and the other 20 seconds, it would return 20 seconds, as by that time all tweens would have finished.
- bool interpolate_callback ( Object object, float duration, String callback, Variant arg1=null, Variant arg2=null, Variant arg3=null, Variant arg4=null, Variant arg5=null )
Calls callback of object after duration. arg1-arg5 are arguments to be passed to the callback.
- bool interpolate_deferred_callback ( Object object, float duration, String callback, Variant arg1=null, Variant arg2=null, Variant arg3=null, Variant arg4=null, Variant arg5=null )
Calls callback of object after duration on the main thread (similar to Object.call_deferred). arg1-arg5 are arguments to be passed to the callback.
- bool interpolate_method ( Object object, String method, Variant initial_val, Variant final_val, float duration, TransitionType trans_type=0, EaseType ease_type=2, float delay=0 )
Animates method of object from initial_val to final_val for duration seconds, delay seconds later. Methods are called with consecutive values.
Use TransitionType for trans_type and EaseType for ease_type parameters. These values control the timing and direction of the interpolation. See the class description for more information.
- bool interpolate_property ( Object object, NodePath property, Variant initial_val, Variant final_val, float duration, TransitionType trans_type=0, EaseType ease_type=2, float delay=0 )
Animates property of object from initial_val to final_val for duration seconds, delay seconds later. Setting the initial value to null uses the current value of the property.
Use TransitionType for trans_type and EaseType for ease_type parameters. These values control the timing and direction of the interpolation. See the class description for more information.
- bool is_active ( ) const
Returns true if any tweens are currently running.
Note: This method doesn’t consider tweens that have ended.
Stops animation and removes a tween, given its object and property/method pair. By default, all tweens are removed, unless key is specified.
- bool remove_all ( )
Stops animation and removes all tweens.
Resets a tween to its initial value (the one given, not the one before the tween), given its object and property/method pair. By default, all tweens are removed, unless key is specified.
- bool reset_all ( )
Resets all tweens to their initial values (the ones given, not those before the tween).
Continues animating a stopped tween, given its object and property/method pair. By default, all tweens are resumed, unless key is specified.
- bool resume_all ( )
Continues animating all stopped tweens.
Sets the interpolation to the given time in seconds.
- void set_active ( bool active )
Activates/deactivates the tween. See also stop_all and resume_all.
- bool start ( )
Starts the tween. You can define animations both before and after this.
Stops a tween, given its object and property/method pair. By default, all tweens are stopped, unless key is specified.
- bool stop_all ( )
Stops animating all tweens.
- bool targeting_method ( Object object, String method, Object initial, String initial_method, Variant final_val, float duration, TransitionType trans_type=0, EaseType ease_type=2, float delay=0 )
Animates method of object from the value returned by initial_method to final_val for duration seconds, delay seconds later. Methods are animated by calling them with consecutive values.
Use TransitionType for trans_type and EaseType for ease_type parameters. These values control the timing and direction of the interpolation. See the class description for more information.
- bool targeting_property ( Object object, NodePath property, Object initial, NodePath initial_val, Variant final_val, float duration, TransitionType trans_type=0, EaseType ease_type=2, float delay=0 )
Animates property of object from the current value of the initial_val property of initial to final_val for duration seconds, delay seconds later.
Use TransitionType for trans_type and EaseType for ease_type parameters. These values control the timing and direction of the interpolation. See the class description for more information.
- float tell ( ) const
Returns the current time of the tween.
UndoRedo¶
Inherits: Object
Helper to manage undo/redo operations in the editor or custom tools.
Description¶
Helper to manage undo/redo operations in the editor or custom tools. It works by registering methods and property changes inside “actions”.
Common behavior is to create an action, then add do/undo calls to functions or property changes, then committing the action.
Here’s an example on how to add an action to the Godot editor’s own UndoRedo, from a plugin:
var undo_redo = get_undo_redo() # Method of EditorPlugin.
func do_something():
pass # Put your code here.
func undo_something():
pass # Put here the code that reverts what's done by "do_something()".
func _on_MyButton_pressed():
var node = get_node("MyNode2D")
undo_redo.create_action("Move the node")
undo_redo.add_do_method(self, "do_something")
undo_redo.add_undo_method(self, "undo_something")
undo_redo.add_do_property(node, "position", Vector2(100,100))
undo_redo.add_undo_property(node, "position", node.position)
undo_redo.commit_action()
create_action, add_do_method, add_undo_method, add_do_property, add_undo_property, and commit_action should be called one after the other, like in the example. Not doing so could lead to crashes.
If you don’t need to register a method, you can leave add_do_method and add_undo_method out; the same goes for properties. You can also register more than one method/property.
Methods¶
| void | add_do_method ( Object object, String method, … ) vararg |
| void | add_do_property ( Object object, String property, Variant value ) |
| void | add_do_reference ( Object object ) |
| void | add_undo_method ( Object object, String method, … ) vararg |
| void | add_undo_property ( Object object, String property, Variant value ) |
| void | add_undo_reference ( Object object ) |
| void | clear_history ( bool increase_version=true ) |
| void | commit_action ( ) |
| void | create_action ( String name, MergeMode merge_mode=0 ) |
| String | get_current_action_name ( ) const |
| int | get_version ( ) const |
| bool | has_redo ( ) |
| bool | has_undo ( ) |
| bool | is_commiting_action ( ) const |
| bool | redo ( ) |
| bool | undo ( ) |
Enumerations¶
enum MergeMode:
- MERGE_DISABLE = 0 — Makes “do”/”undo” operations stay in separate actions.
- MERGE_ENDS = 1 — Makes so that the action’s “do” operation is from the first action created and the “undo” operation is from the last subsequent action with the same name.
- MERGE_ALL = 2 — Makes subsequent actions with the same name be merged into one.
Method Descriptions¶
Register a method that will be called when the action is committed.
Register a property value change for “do”.
- void add_do_reference ( Object object )
Register a reference for “do” that will be erased if the “do” history is lost. This is useful mostly for new nodes created for the “do” call. Do not use for resources.
Register a method that will be called when the action is undone.
Register a property value change for “undo”.
- void add_undo_reference ( Object object )
Register a reference for “undo” that will be erased if the “undo” history is lost. This is useful mostly for nodes removed with the “do” call (not the “undo” call!).
- void clear_history ( bool increase_version=true )
Clear the undo/redo history and associated references.
Passing false to increase_version will prevent the version number to be increased from this.
- void commit_action ( )
Commit the action. All “do” methods/properties are called/set when this function is called.
Create a new action. After this is called, do all your calls to add_do_method, add_undo_method, add_do_property, and add_undo_property, then commit the action with commit_action.
The way actions are merged is dictated by the merge_mode argument. See MergeMode for details.
- String get_current_action_name ( ) const
Gets the name of the current action.
- int get_version ( ) const
Gets the version. Every time a new action is committed, the UndoRedo’s version number is increased automatically.
This is useful mostly to check if something changed from a saved version.
- bool has_redo ( )
Returns true if a “redo” action is available.
- bool has_undo ( )
Returns true if an “undo” action is available.
- bool is_commiting_action ( ) const
Returns true if the UndoRedo is currently committing the action, i.e. running its “do” method or property change (see commit_action).
- bool redo ( )
Redo the last action.
- bool undo ( )
Undo the last action.
UPNP¶
UPNP network functions.
Description¶
Provides UPNP functionality to discover UPNPDevices on the local network and execute commands on them, like managing port mappings (port forwarding) and querying the local and remote network IP address. Note that methods on this class are synchronous and block the calling thread.
To forward a specific port:
const PORT = 7777
var upnp = UPNP.new()
upnp.discover(2000, 2, "InternetGatewayDevice")
upnp.add_port_mapping(port)
To close a specific port (e.g. after you have finished using it):
upnp.delete_port_mapping(port)
Properties¶
| bool | discover_ipv6 | false |
| int | discover_local_port | 0 |
| String | discover_multicast_if | "" |
Methods¶
| void | add_device ( UPNPDevice device ) |
| int | add_port_mapping ( int port, int port_internal=0, String desc=”“, String proto=”UDP”, int duration=0 ) const |
| void | clear_devices ( ) |
| int | delete_port_mapping ( int port, String proto=”UDP” ) const |
| int | discover ( int timeout=2000, int ttl=2, String device_filter=”InternetGatewayDevice” ) |
| UPNPDevice | get_device ( int index ) const |
| int | get_device_count ( ) const |
| UPNPDevice | get_gateway ( ) const |
| String | query_external_address ( ) const |
| void | remove_device ( int index ) |
| void | set_device ( int index, UPNPDevice device ) |
Enumerations¶
enum UPNPResult:
- UPNP_RESULT_SUCCESS = 0 — UPNP command or discovery was successful.
- UPNP_RESULT_NOT_AUTHORIZED = 1 — Not authorized to use the command on the UPNPDevice. May be returned when the user disabled UPNP on their router.
- UPNP_RESULT_PORT_MAPPING_NOT_FOUND = 2 — No port mapping was found for the given port, protocol combination on the given UPNPDevice.
- UPNP_RESULT_INCONSISTENT_PARAMETERS = 3 — Inconsistent parameters.
- UPNP_RESULT_NO_SUCH_ENTRY_IN_ARRAY = 4 — No such entry in array. May be returned if a given port, protocol combination is not found on an UPNPDevice.
- UPNP_RESULT_ACTION_FAILED = 5 — The action failed.
- UPNP_RESULT_SRC_IP_WILDCARD_NOT_PERMITTED = 6 — The UPNPDevice does not allow wildcard values for the source IP address.
- UPNP_RESULT_EXT_PORT_WILDCARD_NOT_PERMITTED = 7 — The UPNPDevice does not allow wildcard values for the external port.
- UPNP_RESULT_INT_PORT_WILDCARD_NOT_PERMITTED = 8 — The UPNPDevice does not allow wildcard values for the internal port.
- UPNP_RESULT_REMOTE_HOST_MUST_BE_WILDCARD = 9 — The remote host value must be a wildcard.
- UPNP_RESULT_EXT_PORT_MUST_BE_WILDCARD = 10 — The external port value must be a wildcard.
- UPNP_RESULT_NO_PORT_MAPS_AVAILABLE = 11 — No port maps are available. May also be returned if port mapping functionality is not available.
- UPNP_RESULT_CONFLICT_WITH_OTHER_MECHANISM = 12 — Conflict with other mechanism. May be returned instead of UPNP_RESULT_CONFLICT_WITH_OTHER_MAPPING if a port mapping conflicts with an existing one.
- UPNP_RESULT_CONFLICT_WITH_OTHER_MAPPING = 13 — Conflict with an existing port mapping.
- UPNP_RESULT_SAME_PORT_VALUES_REQUIRED = 14 — External and internal port values must be the same.
- UPNP_RESULT_ONLY_PERMANENT_LEASE_SUPPORTED = 15 — Only permanent leases are supported. Do not use the
durationparameter when adding port mappings. - UPNP_RESULT_INVALID_GATEWAY = 16 — Invalid gateway.
- UPNP_RESULT_INVALID_PORT = 17 — Invalid port.
- UPNP_RESULT_INVALID_PROTOCOL = 18 — Invalid protocol.
- UPNP_RESULT_INVALID_DURATION = 19 — Invalid duration.
- UPNP_RESULT_INVALID_ARGS = 20 — Invalid arguments.
- UPNP_RESULT_INVALID_RESPONSE = 21 — Invalid response.
- UPNP_RESULT_INVALID_PARAM = 22 — Invalid parameter.
- UPNP_RESULT_HTTP_ERROR = 23 — HTTP error.
- UPNP_RESULT_SOCKET_ERROR = 24 — Socket error.
- UPNP_RESULT_MEM_ALLOC_ERROR = 25 — Error allocating memory.
- UPNP_RESULT_NO_GATEWAY = 26 — No gateway available. You may need to call discover first, or discovery didn’t detect any valid IGDs (InternetGatewayDevices).
- UPNP_RESULT_NO_DEVICES = 27 — No devices available. You may need to call discover first, or discovery didn’t detect any valid UPNPDevices.
- UPNP_RESULT_UNKNOWN_ERROR = 28 — Unknown error.
Property Descriptions¶
- bool discover_ipv6
| Default | false |
| Setter | set_discover_ipv6(value) |
| Getter | is_discover_ipv6() |
If true, IPv6 is used for UPNPDevice discovery.
- int discover_local_port
| Default | 0 |
| Setter | set_discover_local_port(value) |
| Getter | get_discover_local_port() |
If 0, the local port to use for discovery is chosen automatically by the system. If 1, discovery will be done from the source port 1900 (same as destination port). Otherwise, the value will be used as the port.
- String discover_multicast_if
| Default | "" |
| Setter | set_discover_multicast_if(value) |
| Getter | get_discover_multicast_if() |
Multicast interface to use for discovery. Uses the default multicast interface if empty.
Method Descriptions¶
- void add_device ( UPNPDevice device )
Adds the given UPNPDevice to the list of discovered devices.
- int add_port_mapping ( int port, int port_internal=0, String desc=”“, String proto=”UDP”, int duration=0 ) const
Adds a mapping to forward the external port (between 1 and 65535) on the default gateway (see get_gateway) to the internal_port on the local machine for the given protocol proto (either TCP or UDP, with UDP being the default). If a port mapping for the given port and protocol combination already exists on that gateway device, this method tries to overwrite it. If that is not desired, you can retrieve the gateway manually with get_gateway and call add_port_mapping on it, if any.
If internal_port is 0 (the default), the same port number is used for both the external and the internal port (the port value).
The description (desc) is shown in some router UIs and can be used to point out which application added the mapping. The mapping’s lease duration can be limited by specifying a duration (in seconds). However, some routers are incompatible with one or both of these, so use with caution and add fallback logic in case of errors to retry without them if in doubt.
See UPNPResult for possible return values.
- void clear_devices ( )
Clears the list of discovered devices.
Deletes the port mapping for the given port and protocol combination on the default gateway (see get_gateway) if one exists. port must be a valid port between 1 and 65535, proto can be either TCP or UDP. See UPNPResult for possible return values.
Discovers local UPNPDevices. Clears the list of previously discovered devices.
Filters for IGD (InternetGatewayDevice) type devices by default, as those manage port forwarding. timeout is the time to wait for responses in milliseconds. ttl is the time-to-live; only touch this if you know what you’re doing.
See UPNPResult for possible return values.
- UPNPDevice get_device ( int index ) const
Returns the UPNPDevice at the given index.
- int get_device_count ( ) const
Returns the number of discovered UPNPDevices.
- UPNPDevice get_gateway ( ) const
Returns the default gateway. That is the first discovered UPNPDevice that is also a valid IGD (InternetGatewayDevice).
- String query_external_address ( ) const
Returns the external IP address of the default gateway (see get_gateway) as string. Returns an empty string on error.
- void remove_device ( int index )
Removes the device at index from the list of discovered devices.
- void set_device ( int index, UPNPDevice device )
Sets the device at index from the list of discovered devices to device.
UPNPDevice¶
UPNP device.
Description¶
UPNP device. See UPNP for UPNP discovery and utility functions. Provides low-level access to UPNP control commands. Allows to manage port mappings (port forwarding) and to query network information of the device (like local and external IP address and status). Note that methods on this class are synchronous and block the calling thread.
Properties¶
| String | description_url | "" |
| String | igd_control_url | "" |
| String | igd_our_addr | "" |
| String | igd_service_type | "" |
| IGDStatus | igd_status | 9 |
| String | service_type | "" |
Methods¶
| int | add_port_mapping ( int port, int port_internal=0, String desc=”“, String proto=”UDP”, int duration=0 ) const |
| int | delete_port_mapping ( int port, String proto=”UDP” ) const |
| bool | is_valid_gateway ( ) const |
| String | query_external_address ( ) const |
Enumerations¶
enum IGDStatus:
- IGD_STATUS_OK = 0 — OK.
- IGD_STATUS_HTTP_ERROR = 1 — HTTP error.
- IGD_STATUS_HTTP_EMPTY = 2 — Empty HTTP response.
- IGD_STATUS_NO_URLS = 3 — Returned response contained no URLs.
- IGD_STATUS_NO_IGD = 4 — Not a valid IGD.
- IGD_STATUS_DISCONNECTED = 5 — Disconnected.
- IGD_STATUS_UNKNOWN_DEVICE = 6 — Unknown device.
- IGD_STATUS_INVALID_CONTROL = 7 — Invalid control.
- IGD_STATUS_MALLOC_ERROR = 8 — Memory allocation error.
- IGD_STATUS_UNKNOWN_ERROR = 9 — Unknown error.
Property Descriptions¶
- String description_url
| Default | "" |
| Setter | set_description_url(value) |
| Getter | get_description_url() |
URL to the device description.
- String igd_control_url
| Default | "" |
| Setter | set_igd_control_url(value) |
| Getter | get_igd_control_url() |
IDG control URL.
- String igd_our_addr
| Default | "" |
| Setter | set_igd_our_addr(value) |
| Getter | get_igd_our_addr() |
Address of the local machine in the network connecting it to this UPNPDevice.
- String igd_service_type
| Default | "" |
| Setter | set_igd_service_type(value) |
| Getter | get_igd_service_type() |
IGD service type.
- IGDStatus igd_status
| Default | 9 |
| Setter | set_igd_status(value) |
| Getter | get_igd_status() |
IGD status. See IGDStatus.
- String service_type
| Default | "" |
| Setter | set_service_type(value) |
| Getter | get_service_type() |
Service type.
Method Descriptions¶
- int add_port_mapping ( int port, int port_internal=0, String desc=”“, String proto=”UDP”, int duration=0 ) const
Adds a port mapping to forward the given external port on this UPNPDevice for the given protocol to the local machine. See UPNP.add_port_mapping.
Deletes the port mapping identified by the given port and protocol combination on this device. See UPNP.delete_port_mapping.
- bool is_valid_gateway ( ) const
Returns true if this is a valid IGD (InternetGatewayDevice) which potentially supports port forwarding.
- String query_external_address ( ) const
Returns the external IP address of this UPNPDevice or an empty string.
Variant¶
The most important data type in Godot.
Description¶
In computer programming, a Variant class is a class that is designed to store a variety of other types. Dynamic programming languages like PHP, Lua, JavaScript and GDScript like to use them to store variables’ data on the backend. With these Variants, properties are able to change value types freely.
var foo = 2 # foo is dynamically an integer
foo = "Now foo is a string!"
foo = Reference.new() # foo is an Object
var bar: int = 2 # bar is a statically typed integer.
# bar = "Uh oh! I can't make static variables become a different type!"
Godot tracks all scripting API variables within Variants. Without even realizing it, you use Variants all the time. When a particular language enforces its own rules for keeping data typed, then that language is applying its own custom logic over the base Variant scripting API.
- GDScript automatically wrap values in them. It keeps all data in plain Variants by default and then optionally enforces custom static typing rules on variable types.
- VisualScript tracks properties inside Variants as well, but it also uses static typing. The GUI interface enforces that properties have a particular type that doesn’t change over time.
- C# is statically typed, but uses the Mono
objecttype in place of Godot’s Variant class when it needs to represent a dynamic value.objectis the Mono runtime’s equivalent of the same concept. - The statically-typed language NativeScript C++ does not define a built-in Variant-like class. Godot’s GDNative bindings provide their own godot::Variant class for users; Any point at which the C++ code starts interacting with the Godot runtime is a place where you might have to start wrapping data inside Variant objects.
The global @GDScript.typeof function returns the enumerated value of the Variant type stored in the current variable (see Variant.Type).
var foo = 2
match typeof(foo):
TYPE_NIL:
print("foo is null")
TYPE_INTEGER:
print("foo is an integer")
TYPE_OBJECT:
# Note that Objects are their own special category.
# To get the name of the underlying Object type, you need the `get_class()` method.
print("foo is a(n) %s" % foo.get_class()) # inject the class name into a formatted string.
# Note also that there is not yet any way to get a script's `class_name` string easily.
# To fetch that value, you need to dig deeply into a hidden ProjectSettings setting: an Array of Dictionaries called "_global_script_classes".
# Open your project.godot file to see it up close.
A Variant takes up only 20 bytes and can store almost any engine datatype inside of it. Variants are rarely used to hold information for long periods of time. Instead, they are used mainly for communication, editing, serialization and moving data around.
Godot has specifically invested in making its Variant class as flexible as possible; so much so that it is used for a multitude of operations to facilitate communication between all of Godot’s systems.
A Variant:
- Can store almost any datatype.
- Can perform operations between many variants. GDScript uses Variant as its atomic/native datatype.
- Can be hashed, so it can be compared quickly to other variants.
- Can be used to convert safely between datatypes.
- Can be used to abstract calling methods and their arguments. Godot exports all its functions through variants.
- Can be used to defer calls or move data between threads.
- Can be serialized as binary and stored to disk, or transferred via network.
- Can be serialized to text and use it for printing values and editable settings.
- Can work as an exported property, so the editor can edit it universally.
- Can be used for dictionaries, arrays, parsers, etc.
Containers (Array and Dictionary): Both are implemented using variants. A Dictionary can match any datatype used as key to any other datatype. An Array just holds an array of Variants. Of course, a Variant can also hold a Dictionary and an Array inside, making it even more flexible.
Modifications to a container will modify all references to it. A Mutex should be created to lock it if multi-threaded access is desired.
Tutorials¶
VBoxContainer¶
Inherits: BoxContainer < Container < Control < CanvasItem < Node < Object
Vertical box container.
Description¶
Vertical box container. See BoxContainer.
Vector2¶
Vector used for 2D math.
Description¶
2-element structure that can be used to represent positions in 2D space or any other pair of numeric values.
Methods¶
Constants¶
- AXIS_X = 0 — Enumerated value for the X axis.
- AXIS_Y = 1 — Enumerated value for the Y axis.
- ZERO = Vector2( 0, 0 ) — Zero vector.
- ONE = Vector2( 1, 1 ) — One vector.
- INF = Vector2( inf, inf ) — Infinity vector.
- LEFT = Vector2( -1, 0 ) — Left unit vector.
- RIGHT = Vector2( 1, 0 ) — Right unit vector.
- UP = Vector2( 0, -1 ) — Up unit vector.
- DOWN = Vector2( 0, 1 ) — Down unit vector.
Property Descriptions¶
- float x
| Default | 0.0 |
The vector’s X component. Also accessible by using the index position [0].
- float y
| Default | 0.0 |
The vector’s Y component. Also accessible by using the index position [1].
Method Descriptions¶
Constructs a new Vector2 from the given x and y.
- Vector2 abs ( )
Returns a new vector with all components in absolute values (i.e. positive).
- float angle ( )
Returns the vector’s angle in radians with respect to the X axis, or (1, 0) vector.
Equivalent to the result of @GDScript.atan2 when called with the vector’s x and y as parameters: atan2(x, y).
Returns the angle in radians between the two vectors.
Returns the angle in radians between the line connecting the two points and the X coordinate.
- float aspect ( )
Returns the vector “bounced off” from a plane defined by the given normal.
- Vector2 ceil ( )
Returns the vector with all components rounded up.
Returns the vector with a maximum length.
Returns the 2-dimensional analog of the cross product with the given vector.
Cubically interpolates between this vector and b using pre_a and post_b as handles, and returns the result at position t. t is in the range of 0.0 - 1.0, representing the amount of interpolation.
Returns the normalized vector pointing from this vector to b.
Returns the squared distance to vector b. Prefer this function over distance_to if you need to sort vectors or need the squared distance for some formula.
Returns the distance to vector b.
Returns the dot product with vector b.
- Vector2 floor ( )
Returns the vector with all components rounded down.
Returns true if this vector and v are approximately equal, by running @GDScript.is_equal_approx on each component.
- bool is_normalized ( )
Returns true if the vector is normalized.
- float length ( )
Returns the vector’s length.
- float length_squared ( )
Returns the vector’s length squared. Prefer this method over length if you need to sort vectors or need the squared length for some formula.
Returns the result of the linear interpolation between this vector and b by amount t. t is in the range of 0.0 - 1.0, representing the amount of interpolation.
Moves the vector toward to by the fixed delta amount.
- Vector2 normalized ( )
Returns the vector scaled to unit length. Equivalent to v / v.length().
Returns a vector composed of the fposmod of this vector’s components and mod.
Returns a vector composed of the fposmod of this vector’s components and modv’s components.
Returns the vector projected onto the vector b.
Returns the vector reflected from a plane defined by the given normal.
Returns the vector rotated by phi radians. See also @GDScript.deg2rad.
- Vector2 round ( )
Returns the vector with all components rounded to the nearest integer, with halfway cases rounded away from zero.
- Vector2 sign ( )
Returns the vector with each component set to one or negative one, depending on the signs of the components.
Returns the result of spherical linear interpolation between this vector and b, by amount t. t is in the range of 0.0 - 1.0, representing the amount of interpolation.
Note: Both vectors must be normalized.
Returns the component of the vector along a plane defined by the given normal.
Returns the vector snapped to a grid with the given size.
- Vector2 tangent ( )
Returns a perpendicular vector.
Vector3¶
Vector used for 3D math.
Description¶
3-element structure that can be used to represent positions in 3D space or any other pair of numeric values.
Methods¶
Constants¶
- AXIS_X = 0 — Enumerated value for the X axis. Returned by max_axis and min_axis.
- AXIS_Y = 1 — Enumerated value for the Y axis. Returned by max_axis and min_axis.
- AXIS_Z = 2 — Enumerated value for the Z axis. Returned by max_axis and min_axis.
- ZERO = Vector3( 0, 0, 0 ) — Zero vector.
- ONE = Vector3( 1, 1, 1 ) — One vector.
- INF = Vector3( inf, inf, inf ) — Infinity vector.
- LEFT = Vector3( -1, 0, 0 ) — Left unit vector.
- RIGHT = Vector3( 1, 0, 0 ) — Right unit vector.
- UP = Vector3( 0, 1, 0 ) — Up unit vector.
- DOWN = Vector3( 0, -1, 0 ) — Down unit vector.
- FORWARD = Vector3( 0, 0, -1 ) — Forward unit vector.
- BACK = Vector3( 0, 0, 1 ) — Back unit vector.
Property Descriptions¶
- float x
| Default | 0.0 |
The vector’s X component. Also accessible by using the index position [0].
- float y
| Default | 0.0 |
The vector’s Y component. Also accessible by using the index position [1].
- float z
| Default | 0.0 |
The vector’s Z component. Also accessible by using the index position [2].
Method Descriptions¶
Returns a Vector3 with the given components.
- Vector3 abs ( )
Returns a new vector with all components in absolute values (i.e. positive).
Returns the minimum angle to the given vector.
Returns the vector “bounced off” from a plane defined by the given normal.
- Vector3 ceil ( )
Returns a new vector with all components rounded up.
Returns the cross product with b.
Performs a cubic interpolation between vectors pre_a, a, b, post_b (a is current), by the given amount t. t is in the range of 0.0 - 1.0, representing the amount of interpolation.
Returns the normalized vector pointing from this vector to b.
Returns the squared distance to b. Prefer this function over distance_to if you need to sort vectors or need the squared distance for some formula.
Returns the distance to b.
Returns the dot product with b.
- Vector3 floor ( )
Returns a new vector with all components rounded down.
- Vector3 inverse ( )
Returns the inverse of the vector. This is the same as Vector3( 1.0 / v.x, 1.0 / v.y, 1.0 / v.z ).
Returns true if this vector and v are approximately equal, by running @GDScript.is_equal_approx on each component.
- bool is_normalized ( )
Returns true if the vector is normalized.
- float length ( )
Returns the vector’s length.
- float length_squared ( )
Returns the vector’s length squared. Prefer this function over length if you need to sort vectors or need the squared length for some formula.
Returns the result of the linear interpolation between this vector and b by amount t. t is in the range of 0.0 - 1.0, representing the amount of interpolation..
- int max_axis ( )
Returns the axis of the vector’s largest value. See AXIS_* constants.
- int min_axis ( )
Returns the axis of the vector’s smallest value. See AXIS_* constants.
Moves the vector toward to by the fixed delta amount.
- Vector3 normalized ( )
Returns the vector scaled to unit length. Equivalent to v / v.length().
Returns the outer product with b.
Returns a vector composed of the fposmod of this vector’s components and mod.
Returns a vector composed of the fposmod of this vector’s components and modv’s components.
Returns the vector projected onto the vector b.
Returns the vector reflected from a plane defined by the given normal.
Rotates the vector around a given axis by phi radians. The axis must be a normalized vector.
- Vector3 round ( )
Returns the vector with all components rounded to the nearest integer, with halfway cases rounded away from zero.
- Vector3 sign ( )
Returns the vector with each component set to one or negative one, depending on the signs of the components.
Returns the result of spherical linear interpolation between this vector and b, by amount t. t is in the range of 0.0 - 1.0, representing the amount of interpolation.
Note: Both vectors must be normalized.
Returns the component of the vector along a plane defined by the given normal.
Returns a copy of the vector snapped to the lowest neared multiple.
- Basis to_diagonal_matrix ( )
Returns a diagonal matrix with the vector as main diagonal.
VehicleBody¶
Inherits: RigidBody < PhysicsBody < CollisionObject < Spatial < Node < Object
Physics body that simulates the behavior of a car.
Description¶
This node implements all the physics logic needed to simulate a car. It is based on the raycast vehicle system commonly found in physics engines. You will need to add a CollisionShape for the main body of your vehicle and add VehicleWheel nodes for the wheels. You should also add a MeshInstance to this node for the 3D model of your car but this model should not include meshes for the wheels. You should control the vehicle by using the brake, engine_force, and steering properties and not change the position or orientation of this node directly.
Note: The origin point of your VehicleBody will determine the center of gravity of your vehicle so it is better to keep this low and move the CollisionShape and MeshInstance upwards.
Properties¶
| float | brake | 0.0 |
| float | engine_force | 0.0 |
| float | mass | O: 40.0 |
| float | steering | 0.0 |
| float | weight | O: 392.0 |
Property Descriptions¶
- float brake
| Default | 0.0 |
| Setter | set_brake(value) |
| Getter | get_brake() |
Slows down the vehicle by applying a braking force. The vehicle is only slowed down if the wheels are in contact with a surface. The force you need to apply to adequately slow down your vehicle depends on the RigidBody.mass of the vehicle. For a vehicle with a mass set to 1000, try a value in the 25 - 30 range for hard braking.
- float engine_force
| Default | 0.0 |
| Setter | set_engine_force(value) |
| Getter | get_engine_force() |
Accelerates the vehicle by applying an engine force. The vehicle is only speed up if the wheels that have VehicleWheel.use_as_traction set to true and are in contact with a surface. The RigidBody.mass of the vehicle has an effect on the acceleration of the vehicle. For a vehicle with a mass set to 1000, try a value in the 25 - 50 range for acceleration.
Note: The simulation does not take the effect of gears into account, you will need to add logic for this if you wish to simulate gears.
A negative value will result in the vehicle reversing.
- float steering
| Default | 0.0 |
| Setter | set_steering(value) |
| Getter | get_steering() |
The steering angle for the vehicle. Setting this to a non-zero value will result in the vehicle turning when it’s moving. Wheels that have VehicleWheel.use_as_steering set to true will automatically be rotated.
VehicleWheel¶
Inherits: Spatial < Node < Object
Physics object that simulates the behavior of a wheel.
Description¶
This node needs to be used as a child node of VehicleBody and simulates the behavior of one of its wheels. This node also acts as a collider to detect if the wheel is touching a surface.
Properties¶
| float | brake | 0.0 |
| float | damping_compression | 0.83 |
| float | damping_relaxation | 0.88 |
| float | engine_force | 0.0 |
| float | steering | 0.0 |
| float | suspension_max_force | 6000.0 |
| float | suspension_stiffness | 5.88 |
| float | suspension_travel | 5.0 |
| bool | use_as_steering | false |
| bool | use_as_traction | false |
| float | wheel_friction_slip | 10.5 |
| float | wheel_radius | 0.5 |
| float | wheel_rest_length | 0.15 |
| float | wheel_roll_influence | 0.1 |
Methods¶
| float | get_rpm ( ) const |
| float | get_skidinfo ( ) const |
| bool | is_in_contact ( ) const |
Property Descriptions¶
- float brake
| Default | 0.0 |
| Setter | set_brake(value) |
| Getter | get_brake() |
Slows down the wheel by applying a braking force. The wheel is only slowed down if it is in contact with a surface. The force you need to apply to adequately slow down your vehicle depends on the RigidBody.mass of the vehicle. For a vehicle with a mass set to 1000, try a value in the 25 - 30 range for hard braking.
- float damping_compression
| Default | 0.83 |
| Setter | set_damping_compression(value) |
| Getter | get_damping_compression() |
The damping applied to the spring when the spring is being compressed. This value should be between 0.0 (no damping) and 1.0. A value of 0.0 means the car will keep bouncing as the spring keeps its energy. A good value for this is around 0.3 for a normal car, 0.5 for a race car.
- float damping_relaxation
| Default | 0.88 |
| Setter | set_damping_relaxation(value) |
| Getter | get_damping_relaxation() |
The damping applied to the spring when relaxing. This value should be between 0.0 (no damping) and 1.0. This value should always be slightly higher than the damping_compression property. For a damping_compression value of 0.3, try a relaxation value of 0.5.
- float engine_force
| Default | 0.0 |
| Setter | set_engine_force(value) |
| Getter | get_engine_force() |
Accelerates the wheel by applying an engine force. The wheel is only speed up if it is in contact with a surface. The RigidBody.mass of the vehicle has an effect on the acceleration of the vehicle. For a vehicle with a mass set to 1000, try a value in the 25 - 50 range for acceleration.
Note: The simulation does not take the effect of gears into account, you will need to add logic for this if you wish to simulate gears.
A negative value will result in the wheel reversing.
- float steering
| Default | 0.0 |
| Setter | set_steering(value) |
| Getter | get_steering() |
The steering angle for the wheel. Setting this to a non-zero value will result in the vehicle turning when it’s moving.
- float suspension_max_force
| Default | 6000.0 |
| Setter | set_suspension_max_force(value) |
| Getter | get_suspension_max_force() |
The maximum force the spring can resist. This value should be higher than a quarter of the RigidBody.mass of the VehicleBody or the spring will not carry the weight of the vehicle. Good results are often obtained by a value that is about 3× to 4× this number.
- float suspension_stiffness
| Default | 5.88 |
| Setter | set_suspension_stiffness(value) |
| Getter | get_suspension_stiffness() |
This value defines the stiffness of the suspension. Use a value lower than 50 for an off-road car, a value between 50 and 100 for a race car and try something around 200 for something like a Formula 1 car.
- float suspension_travel
| Default | 5.0 |
| Setter | set_suspension_travel(value) |
| Getter | get_suspension_travel() |
This is the distance the suspension can travel. As Godot units are equivalent to meters, keep this setting relatively low. Try a value between 0.1 and 0.3 depending on the type of car.
- bool use_as_steering
| Default | false |
| Setter | set_use_as_steering(value) |
| Getter | is_used_as_steering() |
If true, this wheel will be turned when the car steers. This value is used in conjunction with VehicleBody.steering and ignored if you are using the per-wheel steering value instead.
- bool use_as_traction
| Default | false |
| Setter | set_use_as_traction(value) |
| Getter | is_used_as_traction() |
If true, this wheel transfers engine force to the ground to propel the vehicle forward. This value is used in conjunction with VehicleBody.engine_force and ignored if you are using the per-wheel engine_force value instead.
- float wheel_friction_slip
| Default | 10.5 |
| Setter | set_friction_slip(value) |
| Getter | get_friction_slip() |
This determines how much grip this wheel has. It is combined with the friction setting of the surface the wheel is in contact with. 0.0 means no grip, 1.0 is normal grip. For a drift car setup, try setting the grip of the rear wheels slightly lower than the front wheels, or use a lower value to simulate tire wear.
It’s best to set this to 1.0 when starting out.
- float wheel_radius
| Default | 0.5 |
| Setter | set_radius(value) |
| Getter | get_radius() |
The radius of the wheel in meters.
- float wheel_rest_length
| Default | 0.15 |
| Setter | set_suspension_rest_length(value) |
| Getter | get_suspension_rest_length() |
This is the distance in meters the wheel is lowered from its origin point. Don’t set this to 0.0 and move the wheel into position, instead move the origin point of your wheel (the gizmo in Godot) to the position the wheel will take when bottoming out, then use the rest length to move the wheel down to the position it should be in when the car is in rest.
- float wheel_roll_influence
| Default | 0.1 |
| Setter | set_roll_influence(value) |
| Getter | get_roll_influence() |
This value affects the roll of your vehicle. If set to 1.0 for all wheels, your vehicle will be prone to rolling over, while a value of 0.0 will resist body roll.
Method Descriptions¶
- float get_rpm ( ) const
Returns the rotational speed of the wheel in revolutions per minute.
- float get_skidinfo ( ) const
Returns a value between 0.0 and 1.0 that indicates whether this wheel is skidding. 0.0 is skidding (the wheel has lost grip, e.g. icy terrain), 1.0 means not skidding (the wheel has full grip, e.g. dry asphalt road).
- bool is_in_contact ( ) const
Returns true if this wheel is in contact with a surface.
VideoPlayer¶
Inherits: Control < CanvasItem < Node < Object
Control for playing video streams.
Description¶
Control node for playing video streams using VideoStream resources.
Supported video formats are WebM (VideoStreamWebm), Ogg Theora (VideoStreamTheora), and any format exposed via a GDNative plugin using VideoStreamGDNative.
Properties¶
| int | audio_track | 0 |
| bool | autoplay | false |
| int | buffering_msec | 500 |
| String | bus | "Master" |
| bool | expand | true |
| bool | paused | false |
| VideoStream | stream | |
| float | stream_position | |
| float | volume | |
| float | volume_db | 0.0 |
Methods¶
| String | get_stream_name ( ) const |
| Texture | get_video_texture ( ) const |
| bool | is_playing ( ) const |
| void | play ( ) |
| void | stop ( ) |
Property Descriptions¶
- int audio_track
| Default | 0 |
| Setter | set_audio_track(value) |
| Getter | get_audio_track() |
The embedded audio track to play.
- bool autoplay
| Default | false |
| Setter | set_autoplay(value) |
| Getter | has_autoplay() |
If true, playback starts when the scene loads.
- int buffering_msec
| Default | 500 |
| Setter | set_buffering_msec(value) |
| Getter | get_buffering_msec() |
Amount of time in milliseconds to store in buffer while playing.
- String bus
| Default | "Master" |
| Setter | set_bus(value) |
| Getter | get_bus() |
Audio bus to use for sound playback.
- bool expand
| Default | true |
| Setter | set_expand(value) |
| Getter | has_expand() |
If true, the video scales to the control size. Otherwise, the control minimum size will be automatically adjusted to match the video stream’s dimensions.
- bool paused
| Default | false |
| Setter | set_paused(value) |
| Getter | is_paused() |
If true, the video is paused.
- VideoStream stream
| Setter | set_stream(value) |
| Getter | get_stream() |
The assigned video stream. See description for supported formats.
- float stream_position
| Setter | set_stream_position(value) |
| Getter | get_stream_position() |
The current position of the stream, in seconds.
- float volume
| Setter | set_volume(value) |
| Getter | get_volume() |
Audio volume as a linear value.
- float volume_db
| Default | 0.0 |
| Setter | set_volume_db(value) |
| Getter | get_volume_db() |
Audio volume in dB.
Method Descriptions¶
- String get_stream_name ( ) const
Returns the video stream’s name, or "<No Stream>" if no video stream is assigned.
- Texture get_video_texture ( ) const
Returns the current frame as a Texture.
- bool is_playing ( ) const
Returns true if the video is playing.
Note: The video is still considered playing if paused during playback.
- void play ( )
Starts the video playback from the beginning. If the video is paused, this will not unpause the video.
- void stop ( )
Stops the video playback and sets the stream position to 0.
Note: Although the stream position will be set to 0, the first frame of the video stream won’t become the current frame.
VideoStream¶
Inherits: Resource < Reference < Object
Inherited By: VideoStreamGDNative, VideoStreamTheora, VideoStreamWebm
Base resource for video streams.
Description¶
Base resource type for all video streams. Classes that derive from VideoStream can all be used as resource types to play back videos in VideoPlayer.
VideoStreamGDNative¶
Inherits: VideoStream < Resource < Reference < Object
VideoStream resource for for video formats implemented via GDNative.
Description¶
VideoStream resource for for video formats implemented via GDNative.
It can be used via godot-videodecoder which uses the FFmpeg library.
VideoStreamTheora¶
Inherits: VideoStream < Resource < Reference < Object
VideoStream resource for Ogg Theora videos.
Description¶
VideoStream resource handling the Ogg Theora video format with .ogv extension.
VideoStreamWebm¶
Inherits: VideoStream < Resource < Reference < Object
VideoStream resource for WebM videos.
Description¶
VideoStream resource handling the WebM video format with .webm extension.
Viewport¶
Creates a sub-view into the screen.
Description¶
A Viewport creates a different view into the screen, or a sub-view inside another viewport. Children 2D Nodes will display on it, and children Camera 3D nodes will render on it too.
Optionally, a viewport can have its own 2D or 3D world, so they don’t share what they draw with other viewports.
If a viewport is a child of a ViewportContainer, it will automatically take up its size, otherwise it must be set manually.
Viewports can also choose to be audio listeners, so they generate positional audio depending on a 2D or 3D camera child of it.
Also, viewports can be assigned to different screens in case the devices have multiple screens.
Finally, viewports can also behave as render targets, in which case they will not be visible unless the associated texture is used to draw.
Tutorials¶
Properties¶
| bool | arvr | false |
| bool | audio_listener_enable_2d | false |
| bool | audio_listener_enable_3d | false |
| Transform2D | canvas_transform | |
| DebugDraw | debug_draw | 0 |
| bool | disable_3d | false |
| Transform2D | global_canvas_transform | |
| bool | gui_disable_input | false |
| bool | gui_snap_controls_to_pixels | true |
| bool | handle_input_locally | true |
| bool | hdr | true |
| bool | keep_3d_linear | false |
| MSAA | msaa | 0 |
| bool | own_world | false |
| bool | physics_object_picking | false |
| bool | render_direct_to_screen | false |
| ClearMode | render_target_clear_mode | 0 |
| UpdateMode | render_target_update_mode | 2 |
| bool | render_target_v_flip | false |
| ShadowAtlasQuadrantSubdiv | shadow_atlas_quad_0 | 2 |
| ShadowAtlasQuadrantSubdiv | shadow_atlas_quad_1 | 2 |
| ShadowAtlasQuadrantSubdiv | shadow_atlas_quad_2 | 3 |
| ShadowAtlasQuadrantSubdiv | shadow_atlas_quad_3 | 4 |
| int | shadow_atlas_size | 0 |
| Vector2 | size | Vector2( 0, 0 ) |
| bool | size_override_stretch | false |
| bool | transparent_bg | false |
| Usage | usage | 2 |
| World | world | |
| World2D | world_2d |
Methods¶
Signals¶
- gui_focus_changed ( Control node )
Emitted when a Control node grabs keyboard focus.
- size_changed ( )
Emitted when the size of the viewport is changed, whether by set_size_override, resize of window, or some other means.
Enumerations¶
enum UpdateMode:
- UPDATE_DISABLED = 0 — Do not update the render target.
- UPDATE_ONCE = 1 — Update the render target once, then switch to UPDATE_DISABLED.
- UPDATE_WHEN_VISIBLE = 2 — Update the render target only when it is visible. This is the default value.
- UPDATE_ALWAYS = 3 — Always update the render target.
enum ShadowAtlasQuadrantSubdiv:
- SHADOW_ATLAS_QUADRANT_SUBDIV_DISABLED = 0 — This quadrant will not be used.
- SHADOW_ATLAS_QUADRANT_SUBDIV_1 = 1 — This quadrant will only be used by one shadow map.
- SHADOW_ATLAS_QUADRANT_SUBDIV_4 = 2 — This quadrant will be split in 4 and used by up to 4 shadow maps.
- SHADOW_ATLAS_QUADRANT_SUBDIV_16 = 3 — This quadrant will be split 16 ways and used by up to 16 shadow maps.
- SHADOW_ATLAS_QUADRANT_SUBDIV_64 = 4 — This quadrant will be split 64 ways and used by up to 64 shadow maps.
- SHADOW_ATLAS_QUADRANT_SUBDIV_256 = 5 — This quadrant will be split 256 ways and used by up to 256 shadow maps. Unless the shadow_atlas_size is very high, the shadows in this quadrant will be very low resolution.
- SHADOW_ATLAS_QUADRANT_SUBDIV_1024 = 6 — This quadrant will be split 1024 ways and used by up to 1024 shadow maps. Unless the shadow_atlas_size is very high, the shadows in this quadrant will be very low resolution.
- SHADOW_ATLAS_QUADRANT_SUBDIV_MAX = 7 — Represents the size of the ShadowAtlasQuadrantSubdiv enum.
enum RenderInfo:
- RENDER_INFO_OBJECTS_IN_FRAME = 0 — Amount of objects in frame.
- RENDER_INFO_VERTICES_IN_FRAME = 1 — Amount of vertices in frame.
- RENDER_INFO_MATERIAL_CHANGES_IN_FRAME = 2 — Amount of material changes in frame.
- RENDER_INFO_SHADER_CHANGES_IN_FRAME = 3 — Amount of shader changes in frame.
- RENDER_INFO_SURFACE_CHANGES_IN_FRAME = 4 — Amount of surface changes in frame.
- RENDER_INFO_DRAW_CALLS_IN_FRAME = 5 — Amount of draw calls in frame.
- RENDER_INFO_MAX = 6 — Represents the size of the RenderInfo enum.
enum DebugDraw:
- DEBUG_DRAW_DISABLED = 0 — Objects are displayed normally.
- DEBUG_DRAW_UNSHADED = 1 — Objects are displayed without light information.
- DEBUG_DRAW_OVERDRAW = 2 — Objected are displayed semi-transparent with additive blending so you can see where they intersect.
- DEBUG_DRAW_WIREFRAME = 3 — Objects are displayed in wireframe style.
enum MSAA:
- MSAA_DISABLED = 0 — Multisample anti-aliasing mode disabled. This is the default value.
- MSAA_2X = 1 — Use 2x Multisample Antialiasing.
- MSAA_4X = 2 — Use 4x Multisample Antialiasing.
- MSAA_8X = 3 — Use 8x Multisample Antialiasing. Likely unsupported on low-end and older hardware.
- MSAA_16X = 4 — Use 16x Multisample Antialiasing. Likely unsupported on medium and low-end hardware.
enum Usage:
- USAGE_2D = 0 — Allocates all buffers needed for drawing 2D scenes. This takes less VRAM than the 3D usage modes.
- USAGE_2D_NO_SAMPLING = 1 — Allocates buffers needed for 2D scenes without allocating a buffer for screen copy. Accordingly, you cannot read from the screen. Of the Usage types, this requires the least VRAM.
- USAGE_3D = 2 — Allocates full buffers for drawing 3D scenes and all 3D effects including buffers needed for 2D scenes and effects.
- USAGE_3D_NO_EFFECTS = 3 — Allocates buffers needed for drawing 3D scenes. But does not allocate buffers needed for reading from the screen and post-processing effects. Saves some VRAM.
enum ClearMode:
- CLEAR_MODE_ALWAYS = 0 — Always clear the render target before drawing.
- CLEAR_MODE_NEVER = 1 — Never clear the render target.
- CLEAR_MODE_ONLY_NEXT_FRAME = 2 — Clear the render target next frame, then switch to CLEAR_MODE_NEVER.
Property Descriptions¶
- bool arvr
| Default | false |
| Setter | set_use_arvr(value) |
| Getter | use_arvr() |
If true, the viewport will be used in AR/VR process.
- bool audio_listener_enable_2d
| Default | false |
| Setter | set_as_audio_listener_2d(value) |
| Getter | is_audio_listener_2d() |
If true, the viewport will process 2D audio streams.
- bool audio_listener_enable_3d
| Default | false |
| Setter | set_as_audio_listener(value) |
| Getter | is_audio_listener() |
If true, the viewport will process 3D audio streams.
- Transform2D canvas_transform
| Setter | set_canvas_transform(value) |
| Getter | get_canvas_transform() |
The canvas transform of the viewport, useful for changing the on-screen positions of all child CanvasItems. This is relative to the global canvas transform of the viewport.
- DebugDraw debug_draw
| Default | 0 |
| Setter | set_debug_draw(value) |
| Getter | get_debug_draw() |
The overlay mode for test rendered geometry in debug purposes.
- bool disable_3d
| Default | false |
| Setter | set_disable_3d(value) |
| Getter | is_3d_disabled() |
If true, the viewport will disable 3D rendering. For actual disabling use usage.
- Transform2D global_canvas_transform
| Setter | set_global_canvas_transform(value) |
| Getter | get_global_canvas_transform() |
The global canvas transform of the viewport. The canvas transform is relative to this.
- bool gui_disable_input
| Default | false |
| Setter | set_disable_input(value) |
| Getter | is_input_disabled() |
If true, the viewport will not receive input event.
- bool gui_snap_controls_to_pixels
| Default | true |
| Setter | set_snap_controls_to_pixels(value) |
| Getter | is_snap_controls_to_pixels_enabled() |
If true, the GUI controls on the viewport will lay pixel perfectly.
- bool handle_input_locally
| Default | true |
| Setter | set_handle_input_locally(value) |
| Getter | is_handling_input_locally() |
- bool hdr
| Default | true |
| Setter | set_hdr(value) |
| Getter | get_hdr() |
If true, the viewport rendering will receive benefits from High Dynamic Range algorithm. High Dynamic Range allows the viewport to receive values that are outside the 0-1 range. In Godot HDR uses 16 bits, meaning it does not store the full range of a floating point number.
- bool keep_3d_linear
| Default | false |
| Setter | set_keep_3d_linear(value) |
| Getter | get_keep_3d_linear() |
If true, the result after 3D rendering will not have a linear to sRGB color conversion applied. This is important when the viewport is used as a render target where the result is used as a texture on a 3D object rendered in another viewport. It is also important if the viewport is used to create data that is not color based (noise, heightmaps, pickmaps, etc.). Do not enable this when the viewport is used as a texture on a 2D object or if the viewport is your final output.
- MSAA msaa
| Default | 0 |
| Setter | set_msaa(value) |
| Getter | get_msaa() |
The multisample anti-aliasing mode. A higher number results in smoother edges at the cost of significantly worse performance. A value of 4 is best unless targeting very high-end systems.
- bool own_world
| Default | false |
| Setter | set_use_own_world(value) |
| Getter | is_using_own_world() |
If true, the viewport will use World defined in world property.
- bool physics_object_picking
| Default | false |
| Setter | set_physics_object_picking(value) |
| Getter | get_physics_object_picking() |
If true, the objects rendered by viewport become subjects of mouse picking process.
- bool render_direct_to_screen
| Default | false |
| Setter | set_use_render_direct_to_screen(value) |
| Getter | is_using_render_direct_to_screen() |
If true, renders the Viewport directly to the screen instead of to the root viewport. Only available in GLES2. This is a low-level optimization and should not be used in most cases. If used, reading from the Viewport or from SCREEN_TEXTURE becomes unavailable. For more information see VisualServer.viewport_set_render_direct_to_screen.
- ClearMode render_target_clear_mode
| Default | 0 |
| Setter | set_clear_mode(value) |
| Getter | get_clear_mode() |
The clear mode when viewport used as a render target.
- UpdateMode render_target_update_mode
| Default | 2 |
| Setter | set_update_mode(value) |
| Getter | get_update_mode() |
The update mode when viewport used as a render target.
- bool render_target_v_flip
| Default | false |
| Setter | set_vflip(value) |
| Getter | get_vflip() |
If true, the result of rendering will be flipped vertically.
- ShadowAtlasQuadrantSubdiv shadow_atlas_quad_0
| Default | 2 |
| Setter | set_shadow_atlas_quadrant_subdiv(value) |
| Getter | get_shadow_atlas_quadrant_subdiv() |
The subdivision amount of the first quadrant on the shadow atlas.
- ShadowAtlasQuadrantSubdiv shadow_atlas_quad_1
| Default | 2 |
| Setter | set_shadow_atlas_quadrant_subdiv(value) |
| Getter | get_shadow_atlas_quadrant_subdiv() |
The subdivision amount of the second quadrant on the shadow atlas.
- ShadowAtlasQuadrantSubdiv shadow_atlas_quad_2
| Default | 3 |
| Setter | set_shadow_atlas_quadrant_subdiv(value) |
| Getter | get_shadow_atlas_quadrant_subdiv() |
The subdivision amount of the third quadrant on the shadow atlas.
- ShadowAtlasQuadrantSubdiv shadow_atlas_quad_3
| Default | 4 |
| Setter | set_shadow_atlas_quadrant_subdiv(value) |
| Getter | get_shadow_atlas_quadrant_subdiv() |
The subdivision amount of the fourth quadrant on the shadow atlas.
- int shadow_atlas_size
| Default | 0 |
| Setter | set_shadow_atlas_size(value) |
| Getter | get_shadow_atlas_size() |
The shadow atlas’ resolution (used for omni and spot lights). The value will be rounded up to the nearest power of 2.
Note: If this is set to 0, shadows won’t be visible. Since user-created viewports default to a value of 0, this value must be set above 0 manually.
- Vector2 size
| Default | Vector2( 0, 0 ) |
| Setter | set_size(value) |
| Getter | get_size() |
The width and height of viewport.
- bool size_override_stretch
| Default | false |
| Setter | set_size_override_stretch(value) |
| Getter | is_size_override_stretch_enabled() |
If true, the size override affects stretch as well.
- bool transparent_bg
| Default | false |
| Setter | set_transparent_background(value) |
| Getter | has_transparent_background() |
If true, the viewport should render its background as transparent.
- Usage usage
| Default | 2 |
| Setter | set_usage(value) |
| Getter | get_usage() |
The rendering mode of viewport.
- World world
| Setter | set_world(value) |
| Getter | get_world() |
The custom World which can be used as 3D environment source.
- World2D world_2d
| Setter | set_world_2d(value) |
| Getter | get_world_2d() |
The custom World2D which can be used as 2D environment source.
Method Descriptions¶
- World find_world ( ) const
Returns the 3D world of the viewport, or if none the world of the parent viewport.
- World2D find_world_2d ( ) const
Returns the 2D world of the viewport.
- Camera get_camera ( ) const
Returns the active 3D camera.
- Transform2D get_final_transform ( ) const
Returns the total transform of the viewport.
- Control get_modal_stack_top ( ) const
Returns the topmost modal in the stack.
- Vector2 get_mouse_position ( ) const
Returns the mouse position relative to the viewport.
- int get_render_info ( RenderInfo info )
Returns information about the viewport from the rendering pipeline.
- ShadowAtlasQuadrantSubdiv get_shadow_atlas_quadrant_subdiv ( int quadrant ) const
Returns the ShadowAtlasQuadrantSubdiv of the specified quadrant.
- Vector2 get_size_override ( ) const
Returns the size override set with set_size_override.
- ViewportTexture get_texture ( ) const
Returns the viewport’s texture.
Note: Due to the way OpenGL works, the resulting ViewportTexture is flipped vertically. You can use Image.flip_y on the result of Texture.get_data to flip it back, for example:
var img = get_viewport().get_texture().get_data()
img.flip_y()
- RID get_viewport_rid ( ) const
Returns the viewport’s RID from the VisualServer.
- Rect2 get_visible_rect ( ) const
Returns the visible rectangle in global screen coordinates.
- Variant gui_get_drag_data ( ) const
Returns the drag data from the GUI, that was previously returned by Control.get_drag_data.
- bool gui_has_modal_stack ( ) const
Returns true if there are visible modals on-screen.
- bool gui_is_dragging ( ) const
Returns true if the viewport is currently performing a drag operation.
- void input ( InputEvent local_event )
- bool is_input_handled ( ) const
- bool is_size_override_enabled ( ) const
Returns true if the size override is enabled. See set_size_override.
- void set_attach_to_screen_rect ( Rect2 rect )
Attaches this Viewport to the root Viewport with the specified rectangle. This bypasses the need for another node to display this Viewport but makes you responsible for updating the position of this Viewport manually.
- void set_input_as_handled ( )
Stops the input from propagating further down the SceneTree.
- void set_shadow_atlas_quadrant_subdiv ( int quadrant, ShadowAtlasQuadrantSubdiv subdiv )
Sets the number of subdivisions to use in the specified quadrant. A higher number of subdivisions allows you to have more shadows in the scene at once, but reduces the quality of the shadows. A good practice is to have quadrants with a varying number of subdivisions and to have as few subdivisions as possible.
- void set_size_override ( bool enable, Vector2 size=Vector2( -1, -1 ), Vector2 margin=Vector2( 0, 0 ) )
Sets the size override of the viewport. If the enable parameter is true the override is used, otherwise it uses the default size. If the size parameter is (-1, -1), it won’t update the size.
- void unhandled_input ( InputEvent local_event )
- void update_worlds ( )
Forces update of the 2D and 3D worlds.
- void warp_mouse ( Vector2 to_position )
Warps the mouse to a position relative to the viewport.
ViewportContainer¶
Inherits: Container < Control < CanvasItem < Node < Object
Control for holding Viewports.
Properties¶
| bool | stretch | false |
| int | stretch_shrink | 1 |
Property Descriptions¶
- bool stretch
| Default | false |
| Setter | set_stretch(value) |
| Getter | is_stretch_enabled() |
If true, the viewport will be scaled to the control’s size.
- int stretch_shrink
| Default | 1 |
| Setter | set_stretch_shrink(value) |
| Getter | get_stretch_shrink() |
Divides the viewport’s effective resolution by this value while preserving its scale. This can be used to speed up rendering.
For example, a 1280×720 viewport with stretch_shrink set to 2 will be rendered at 640×360 while occupying the same size in the container.
Note: stretch must be true for this property to work.
ViewportTexture¶
Inherits: Texture < Resource < Reference < Object
Texture which displays the content of a Viewport.
Description¶
Displays the content of a Viewport node as a dynamic Texture. This can be used to mix controls, 2D, and 3D elements in the same scene.
To create a ViewportTexture in code, use the Viewport.get_texture method on the target viewport.
Properties¶
| int | flags | O: 0 |
| bool | resource_local_to_scene | O: true |
| NodePath | viewport_path | NodePath("") |
VisibilityEnabler¶
Inherits: VisibilityNotifier < Spatial < Node < Object
Enables certain nodes only when visible.
Description¶
The VisibilityEnabler will disable RigidBody and AnimationPlayer nodes when they are not visible. It will only affect other nodes within the same scene as the VisibilityEnabler itself.
Properties¶
| bool | freeze_bodies | true |
| bool | pause_animations | true |
Methods¶
| bool | is_enabler_enabled ( Enabler enabler ) const |
| void | set_enabler ( Enabler enabler, bool enabled ) |
Enumerations¶
enum Enabler:
- ENABLER_PAUSE_ANIMATIONS = 0 — This enabler will pause AnimationPlayer nodes.
- ENABLER_FREEZE_BODIES = 1 — This enabler will freeze RigidBody nodes.
- ENABLER_MAX = 2 — Represents the size of the Enabler enum.
Property Descriptions¶
- bool freeze_bodies
| Default | true |
| Setter | set_enabler(value) |
| Getter | is_enabler_enabled() |
If true, RigidBody nodes will be paused.
- bool pause_animations
| Default | true |
| Setter | set_enabler(value) |
| Getter | is_enabler_enabled() |
If true, AnimationPlayer nodes will be paused.
VisibilityEnabler2D¶
Inherits: VisibilityNotifier2D < Node2D < CanvasItem < Node < Object
Enables certain nodes only when visible.
Description¶
The VisibilityEnabler2D will disable RigidBody2D, AnimationPlayer, and other nodes when they are not visible. It will only affect nodes with the same root node as the VisibilityEnabler2D, and the root node itself.
Properties¶
| bool | freeze_bodies | true |
| bool | pause_animated_sprites | true |
| bool | pause_animations | true |
| bool | pause_particles | true |
| bool | physics_process_parent | false |
| bool | process_parent | false |
Methods¶
| bool | is_enabler_enabled ( Enabler enabler ) const |
| void | set_enabler ( Enabler enabler, bool enabled ) |
Enumerations¶
enum Enabler:
- ENABLER_PAUSE_ANIMATIONS = 0 — This enabler will pause AnimationPlayer nodes.
- ENABLER_FREEZE_BODIES = 1 — This enabler will freeze RigidBody2D nodes.
- ENABLER_PAUSE_PARTICLES = 2 — This enabler will stop Particles2D nodes.
- ENABLER_PARENT_PROCESS = 3 — This enabler will stop the parent’s _process function.
- ENABLER_PARENT_PHYSICS_PROCESS = 4 — This enabler will stop the parent’s _physics_process function.
- ENABLER_PAUSE_ANIMATED_SPRITES = 5 — This enabler will stop AnimatedSprite nodes animations.
- ENABLER_MAX = 6 — Represents the size of the Enabler enum.
Property Descriptions¶
- bool freeze_bodies
| Default | true |
| Setter | set_enabler(value) |
| Getter | is_enabler_enabled() |
If true, RigidBody2D nodes will be paused.
- bool pause_animated_sprites
| Default | true |
| Setter | set_enabler(value) |
| Getter | is_enabler_enabled() |
If true, AnimatedSprite nodes will be paused.
- bool pause_animations
| Default | true |
| Setter | set_enabler(value) |
| Getter | is_enabler_enabled() |
If true, AnimationPlayer nodes will be paused.
- bool pause_particles
| Default | true |
| Setter | set_enabler(value) |
| Getter | is_enabler_enabled() |
If true, Particles2D nodes will be paused.
- bool physics_process_parent
| Default | false |
| Setter | set_enabler(value) |
| Getter | is_enabler_enabled() |
If true, the parent’s Node._physics_process will be stopped.
- bool process_parent
| Default | false |
| Setter | set_enabler(value) |
| Getter | is_enabler_enabled() |
If true, the parent’s Node._process will be stopped.
VisibilityNotifier¶
Inherits: Spatial < Node < Object
Inherited By: VisibilityEnabler
Detects when the node is visible on screen.
Description¶
The VisibilityNotifier detects when it is visible on the screen. It also notifies when its bounding rectangle enters or exits the screen or a Camera’s view.
Methods¶
| bool | is_on_screen ( ) const |
Signals¶
- camera_entered ( Camera camera )
Emitted when the VisibilityNotifier enters a Camera’s view.
- camera_exited ( Camera camera )
Emitted when the VisibilityNotifier exits a Camera’s view.
- screen_entered ( )
Emitted when the VisibilityNotifier enters the screen.
- screen_exited ( )
Emitted when the VisibilityNotifier exits the screen.
Property Descriptions¶
- AABB aabb
| Default | AABB( -1, -1, -1, 2, 2, 2 ) |
| Setter | set_aabb(value) |
| Getter | get_aabb() |
The VisibilityNotifier’s bounding box.
Method Descriptions¶
- bool is_on_screen ( ) const
If true, the bounding box is on the screen.
Note: It takes one frame for the node’s visibility to be assessed once added to the scene tree, so this method will return false right after it is instantiated, even if it will be on screen in the draw pass.
VisibilityNotifier2D¶
Inherits: Node2D < CanvasItem < Node < Object
Inherited By: VisibilityEnabler2D
Detects when the node is visible on screen.
Description¶
The VisibilityNotifier2D detects when it is visible on the screen. It also notifies when its bounding rectangle enters or exits the screen or a viewport.
Methods¶
| bool | is_on_screen ( ) const |
Signals¶
- screen_entered ( )
Emitted when the VisibilityNotifier2D enters the screen.
- screen_exited ( )
Emitted when the VisibilityNotifier2D exits the screen.
- viewport_entered ( Viewport viewport )
Emitted when the VisibilityNotifier2D enters a Viewport’s view.
- viewport_exited ( Viewport viewport )
Emitted when the VisibilityNotifier2D exits a Viewport’s view.
Property Descriptions¶
- Rect2 rect
| Default | Rect2( -10, -10, 20, 20 ) |
| Setter | set_rect(value) |
| Getter | get_rect() |
The VisibilityNotifier2D’s bounding rectangle.
Method Descriptions¶
- bool is_on_screen ( ) const
If true, the bounding rectangle is on the screen.
Note: It takes one frame for the node’s visibility to be assessed once added to the scene tree, so this method will return false right after it is instantiated, even if it will be on screen in the draw pass.
VisualInstance¶
Inherits: Spatial < Node < Object
Inherited By: BakedLightmap, GIProbe, GeometryInstance, Light, ReflectionProbe, RootMotionView
Parent of all visual 3D nodes.
Description¶
The VisualInstance is used to connect a resource to a visual representation. All visual 3D nodes inherit from the VisualInstance. In general, you should not access the VisualInstance properties directly as they are accessed and managed by the nodes that inherit from VisualInstance. VisualInstance is the node representation of the VisualServer instance.
Methods¶
| AABB | get_aabb ( ) const |
| RID | get_base ( ) const |
| RID | get_instance ( ) const |
| bool | get_layer_mask_bit ( int layer ) const |
| AABB | get_transformed_aabb ( ) const |
| void | set_base ( RID base ) |
| void | set_layer_mask_bit ( int layer, bool enabled ) |
Property Descriptions¶
- int layers
| Default | 1 |
| Setter | set_layer_mask(value) |
| Getter | get_layer_mask() |
The render layer(s) this VisualInstance is drawn on.
This object will only be visible for Cameras whose cull mask includes the render object this VisualInstance is set to.
Method Descriptions¶
- AABB get_aabb ( ) const
Returns the AABB (also known as the bounding box) for this VisualInstance.
- RID get_base ( ) const
Returns the RID of the resource associated with this VisualInstance. For example, if the Node is a MeshInstance, this will return the RID of the associated Mesh.
- RID get_instance ( ) const
Returns the RID of this instance. This RID is the same as the RID returned by VisualServer.instance_create. This RID is needed if you want to call VisualServer functions directly on this VisualInstance.
Returns true when the specified layer is enabled in layers and false otherwise.
- AABB get_transformed_aabb ( ) const
Returns the transformed AABB (also known as the bounding box) for this VisualInstance.
Transformed in this case means the AABB plus the position, rotation, and scale of the Spatial’s Transform.
- void set_base ( RID base )
Sets the resource that is instantiated by this VisualInstance, which changes how the engine handles the VisualInstance under the hood. Equivalent to VisualServer.instance_set_base.
Enables a particular layer in layers.
VisualScript¶
Inherits: Script < Resource < Reference < Object
A script implemented in the Visual Script programming environment.
Description¶
A script implemented in the Visual Script programming environment. The script extends the functionality of all objects that instance it.
Object.set_script extends an existing object, if that object’s class matches one of the script’s base classes.
You are most likely to use this class via the Visual Script editor or when writing plugins for it.
Tutorials¶
Methods¶
Signals¶
Emitted when the ports of a node are changed.
Method Descriptions¶
- void add_custom_signal ( String name )
Add a custom signal with the specified name to the VisualScript.
- void add_function ( String name )
Add a function with the specified name to the VisualScript.
- void add_node ( String func, int id, VisualScriptNode node, Vector2 position=Vector2( 0, 0 ) )
Add a node to a function of the VisualScript.
Add a variable to the VisualScript, optionally giving it a default value or marking it as exported.
- void custom_signal_add_argument ( String name, Variant.Type type, String argname, int index=-1 )
Add an argument to a custom signal added with add_custom_signal.
Get the count of a custom signal’s arguments.
Get the name of a custom signal’s argument.
- Variant.Type custom_signal_get_argument_type ( String name, int argidx ) const
Get the type of a custom signal’s argument.
Remove a specific custom signal’s argument.
Rename a custom signal’s argument.
- void custom_signal_set_argument_type ( String name, int argidx, Variant.Type type )
Change the type of a custom signal’s argument.
Swap two of the arguments of a custom signal.
Connect two data ports. The value of from_node’s from_port would be fed into to_node’s to_port.
Disconnect two data ports previously connected with data_connect.
Returns the id of a function’s entry point node.
Returns the position of the center of the screen for a given function.
- VisualScriptNode get_node ( String func, int id ) const
Returns a node given its id and its function.
Returns a node’s position in pixels.
Returns the default (initial) value of a variable.
Returns whether a variable is exported.
- Dictionary get_variable_info ( String name ) const
Returns the information for a given variable as a dictionary. The information includes its name, type, hint and usage.
Returns whether a signal exists with the specified name.
- bool has_data_connection ( String func, int from_node, int from_port, int to_node, int to_port ) const
Returns whether the specified data ports are connected.
Returns whether a function exists with the specified name.
Returns whether a node exists with the given id.
Returns whether the specified sequence ports are connected.
Returns whether a variable exists with the specified name.
- void remove_custom_signal ( String name )
Remove a custom signal with the given name.
- void remove_function ( String name )
Remove a specific function and its nodes from the script.
Remove a specific node.
- void remove_variable ( String name )
Remove a variable with the given name.
Change the name of a custom signal.
Change the name of a function.
Change the name of a variable.
Connect two sequence ports. The execution will flow from of from_node’s from_output into to_node.
Unlike data_connect, there isn’t a to_port, since the target node can have only one sequence port.
Disconnect two sequence ports previously connected with sequence_connect.
Position the center of the screen for a function.
- void set_instance_base_type ( String type )
Set the base type of the script.
Position a node on the screen.
Change the default (initial) value of a variable.
Change whether a variable is exported.
- void set_variable_info ( String name, Dictionary value )
Set a variable’s info, using the same format as get_variable_info.
VisualScriptBasicTypeConstant¶
Inherits: VisualScriptNode < Resource < Reference < Object
A Visual Script node representing a constant from the base types.
Description¶
A Visual Script node representing a constant from base types, such as Vector3.AXIS_X.
Properties¶
| Variant.Type | basic_type | 0 |
| String | constant |
Property Descriptions¶
- Variant.Type basic_type
| Default | 0 |
| Setter | set_basic_type(value) |
| Getter | get_basic_type() |
The type to get the constant from.
- String constant
| Setter | set_basic_type_constant(value) |
| Getter | get_basic_type_constant() |
The name of the constant to return.
VisualScriptBuiltinFunc¶
Inherits: VisualScriptNode < Resource < Reference < Object
A Visual Script node used to call built-in functions.
Description¶
A built-in function used inside a VisualScript. It is usually a math function or an utility function.
See also @GDScript, for the same functions in the GDScript language.
Properties¶
| BuiltinFunc | function | 0 |
Enumerations¶
enum BuiltinFunc:
- MATH_SIN = 0 — Return the sine of the input.
- MATH_COS = 1 — Return the cosine of the input.
- MATH_TAN = 2 — Return the tangent of the input.
- MATH_SINH = 3 — Return the hyperbolic sine of the input.
- MATH_COSH = 4 — Return the hyperbolic cosine of the input.
- MATH_TANH = 5 — Return the hyperbolic tangent of the input.
- MATH_ASIN = 6 — Return the arc sine of the input.
- MATH_ACOS = 7 — Return the arc cosine of the input.
- MATH_ATAN = 8 — Return the arc tangent of the input.
- MATH_ATAN2 = 9 — Return the arc tangent of the input, using the signs of both parameters to determine the exact angle.
- MATH_SQRT = 10 — Return the square root of the input.
- MATH_FMOD = 11 — Return the remainder of one input divided by the other, using floating-point numbers.
- MATH_FPOSMOD = 12 — Return the positive remainder of one input divided by the other, using floating-point numbers.
- MATH_FLOOR = 13 — Return the input rounded down.
- MATH_CEIL = 14 — Return the input rounded up.
- MATH_ROUND = 15 — Return the input rounded to the nearest integer.
- MATH_ABS = 16 — Return the absolute value of the input.
- MATH_SIGN = 17 — Return the sign of the input, turning it into 1, -1, or 0. Useful to determine if the input is positive or negative.
- MATH_POW = 18 — Return the input raised to a given power.
- MATH_LOG = 19 — Return the natural logarithm of the input. Note that this is not the typical base-10 logarithm function calculators use.
- MATH_EXP = 20 — Return the mathematical constant e raised to the specified power of the input. e has an approximate value of 2.71828.
- MATH_ISNAN = 21 — Return whether the input is NaN (Not a Number) or not. NaN is usually produced by dividing 0 by 0, though other ways exist.
- MATH_ISINF = 22 — Return whether the input is an infinite floating-point number or not. Infinity is usually produced by dividing a number by 0, though other ways exist.
- MATH_EASE = 23 — Easing function, based on exponent. 0 is constant, 1 is linear, 0 to 1 is ease-in, 1+ is ease out. Negative values are in-out/out in.
- MATH_DECIMALS = 24 — Return the number of digit places after the decimal that the first non-zero digit occurs.
- MATH_STEPIFY = 25 — Return the input snapped to a given step.
- MATH_LERP = 26 — Return a number linearly interpolated between the first two inputs, based on the third input. Uses the formula
a + (a - b) * t. - MATH_INVERSE_LERP = 27
- MATH_RANGE_LERP = 28
- MATH_MOVE_TOWARD = 29 — Moves the number toward a value, based on the third input.
- MATH_DECTIME = 30 — Return the result of
valuedecreased bystep*amount. - MATH_RANDOMIZE = 31 — Randomize the seed (or the internal state) of the random number generator. Current implementation reseeds using a number based on time.
- MATH_RAND = 32 — Return a random 32 bits integer value. To obtain a random value between 0 to N (where N is smaller than 2^32 - 1), you can use it with the remainder function.
- MATH_RANDF = 33 — Return a random floating-point value between 0 and 1. To obtain a random value between 0 to N, you can use it with multiplication.
- MATH_RANDOM = 34 — Return a random floating-point value between the two inputs.
- MATH_SEED = 35 — Set the seed for the random number generator.
- MATH_RANDSEED = 36 — Return a random value from the given seed, along with the new seed.
- MATH_DEG2RAD = 37 — Convert the input from degrees to radians.
- MATH_RAD2DEG = 38 — Convert the input from radians to degrees.
- MATH_LINEAR2DB = 39 — Convert the input from linear volume to decibel volume.
- MATH_DB2LINEAR = 40 — Convert the input from decibel volume to linear volume.
- MATH_POLAR2CARTESIAN = 41 — Converts a 2D point expressed in the polar coordinate system (a distance from the origin
rand an angleth) to the cartesian coordinate system (X and Y axis). - MATH_CARTESIAN2POLAR = 42 — Converts a 2D point expressed in the cartesian coordinate system (X and Y axis) to the polar coordinate system (a distance from the origin and an angle).
- MATH_WRAP = 43
- MATH_WRAPF = 44
- LOGIC_MAX = 45 — Return the greater of the two numbers, also known as their maximum.
- LOGIC_MIN = 46 — Return the lesser of the two numbers, also known as their minimum.
- LOGIC_CLAMP = 47 — Return the input clamped inside the given range, ensuring the result is never outside it. Equivalent to
min(max(input, range_low), range_high). - LOGIC_NEAREST_PO2 = 48 — Return the nearest power of 2 to the input.
- OBJ_WEAKREF = 49 — Create a WeakRef from the input.
- FUNC_FUNCREF = 50 — Create a FuncRef from the input.
- TYPE_CONVERT = 51 — Convert between types.
- TYPE_OF = 52 — Return the type of the input as an integer. Check Variant.Type for the integers that might be returned.
- TYPE_EXISTS = 53 — Checks if a type is registered in the ClassDB.
- TEXT_CHAR = 54 — Return a character with the given ascii value.
- TEXT_STR = 55 — Convert the input to a string.
- TEXT_PRINT = 56 — Print the given string to the output window.
- TEXT_PRINTERR = 57 — Print the given string to the standard error output.
- TEXT_PRINTRAW = 58 — Print the given string to the standard output, without adding a newline.
- VAR_TO_STR = 59 — Serialize a Variant to a string.
- STR_TO_VAR = 60 — Deserialize a Variant from a string serialized using VAR_TO_STR.
- VAR_TO_BYTES = 61 — Serialize a Variant to a PoolByteArray.
- BYTES_TO_VAR = 62 — Deserialize a Variant from a PoolByteArray serialized using VAR_TO_BYTES.
- COLORN = 63 — Return the Color with the given name and alpha ranging from 0 to 1.
Note: Names are defined in color_names.inc.
- MATH_SMOOTHSTEP = 64 — Return a number smoothly interpolated between the first two inputs, based on the third input. Similar to MATH_LERP, but interpolates faster at the beginning and slower at the end. Using Hermite interpolation formula:
var t = clamp((weight - from) / (to - from), 0.0, 1.0)
return t * t * (3.0 - 2.0 * t)
- MATH_POSMOD = 65
- MATH_LERP_ANGLE = 66
- TEXT_ORD = 67
- FUNC_MAX = 68 — Represents the size of the BuiltinFunc enum.
Property Descriptions¶
- BuiltinFunc function
| Default | 0 |
| Setter | set_func(value) |
| Getter | get_func() |
The function to be executed.
VisualScriptClassConstant¶
Inherits: VisualScriptNode < Resource < Reference < Object
Gets a constant from a given class.
Description¶
This node returns a constant from a given class, such as @GlobalScope.TYPE_INT. See the given class’ documentation for available constants.
Input Ports:
none
Output Ports:
- Data (variant):
value
VisualScriptComment¶
Inherits: VisualScriptNode < Resource < Reference < Object
A Visual Script node used to annotate the script.
Description¶
A Visual Script node used to display annotations in the script, so that code may be documented.
Comment nodes can be resized so they encompass a group of nodes.
Property Descriptions¶
- String description
| Default | "" |
| Setter | set_description(value) |
| Getter | get_description() |
The text inside the comment node.
- Vector2 size
| Default | Vector2( 150, 150 ) |
| Setter | set_size(value) |
| Getter | get_size() |
The comment node’s size (in pixels).
- String title
| Default | "Comment" |
| Setter | set_title(value) |
| Getter | get_title() |
The comment node’s title.
VisualScriptComposeArray¶
Inherits: VisualScriptLists < VisualScriptNode < Resource < Reference < Object
A Visual Script Node used to create array from a list of items.
Description¶
A Visual Script Node used to compose array from the list of elements provided with custom in-graph UI hard coded in the VisualScript Editor.
VisualScriptCondition¶
Inherits: VisualScriptNode < Resource < Reference < Object
A Visual Script node which branches the flow.
Description¶
A Visual Script node that checks a bool input port. If true, it will exit via the “true” sequence port. If false, it will exit via the “false” sequence port. After exiting either, it exits via the “done” port. Sequence ports may be left disconnected.
Input Ports:
- Sequence:
if (cond) is - Data (boolean):
cond
Output Ports:
- Sequence:
true - Sequence:
false - Sequence:
done
VisualScriptConstant¶
Inherits: VisualScriptNode < Resource < Reference < Object
Gets a contant’s value.
Description¶
This node returns a constant’s value.
Input Ports:
none
Output Ports:
- Data (variant):
get
Properties¶
| Variant.Type | type | 0 |
| Variant | value |
Property Descriptions¶
- Variant.Type type
| Default | 0 |
| Setter | set_constant_type(value) |
| Getter | get_constant_type() |
The constant’s type.
- Variant value
| Setter | set_constant_value(value) |
| Getter | get_constant_value() |
The constant’s value.
VisualScriptConstructor¶
Inherits: VisualScriptNode < Resource < Reference < Object
A Visual Script node which calls a base type constructor.
Description¶
A Visual Script node which calls a base type constructor. It can be used for type conversion as well.
Methods¶
| Dictionary | get_constructor ( ) const |
| Variant.Type | get_constructor_type ( ) const |
| void | set_constructor ( Dictionary constructor ) |
| void | set_constructor_type ( Variant.Type type ) |
Method Descriptions¶
- Dictionary get_constructor ( ) const
- Variant.Type get_constructor_type ( ) const
- void set_constructor ( Dictionary constructor )
- void set_constructor_type ( Variant.Type type )
VisualScriptCustomNode¶
Inherits: VisualScriptNode < Resource < Reference < Object
A scripted Visual Script node.
Description¶
A custom Visual Script node which can be scripted in powerful ways.
Methods¶
| String | _get_caption ( ) virtual |
| String | _get_category ( ) virtual |
| int | _get_input_value_port_count ( ) virtual |
| String | _get_input_value_port_name ( int idx ) virtual |
| int | _get_input_value_port_type ( int idx ) virtual |
| int | _get_output_sequence_port_count ( ) virtual |
| String | _get_output_sequence_port_text ( int idx ) virtual |
| int | _get_output_value_port_count ( ) virtual |
| String | _get_output_value_port_name ( int idx ) virtual |
| int | _get_output_value_port_type ( int idx ) virtual |
| String | _get_text ( ) virtual |
| int | _get_working_memory_size ( ) virtual |
| bool | _has_input_sequence_port ( ) virtual |
| Variant | _step ( Array inputs, Array outputs, int start_mode, Array working_mem ) virtual |
Enumerations¶
enum StartMode:
- START_MODE_BEGIN_SEQUENCE = 0 — The start mode used the first time when _step is called.
- START_MODE_CONTINUE_SEQUENCE = 1 — The start mode used when _step is called after coming back from a STEP_PUSH_STACK_BIT.
- START_MODE_RESUME_YIELD = 2 — The start mode used when _step is called after resuming from STEP_YIELD_BIT.
Constants¶
- STEP_PUSH_STACK_BIT = 16777216 — Hint used by _step to tell that control should return to it when there is no other node left to execute.
This is used by VisualScriptCondition to redirect the sequence to the “Done” port after the true/false branch has finished execution.
- STEP_GO_BACK_BIT = 33554432 — Hint used by _step to tell that control should return back, either hitting a previous STEP_PUSH_STACK_BIT or exiting the function.
- STEP_NO_ADVANCE_BIT = 67108864
- STEP_EXIT_FUNCTION_BIT = 134217728 — Hint used by _step to tell that control should stop and exit the function.
- STEP_YIELD_BIT = 268435456 — Hint used by _step to tell that the function should be yielded.
Using this requires you to have at least one working memory slot, which is used for the VisualScriptFunctionState.
Method Descriptions¶
- String _get_caption ( ) virtual
Return the node’s title.
- String _get_category ( ) virtual
Return the node’s category.
- int _get_input_value_port_count ( ) virtual
Return the count of input value ports.
Return the specified input port’s name.
Return the specified input port’s type. See the Variant.Type values.
- int _get_output_sequence_port_count ( ) virtual
Return the amount of output sequence ports.
Return the specified sequence output’s name.
- int _get_output_value_port_count ( ) virtual
Return the amount of output value ports.
Return the specified output’s name.
Return the specified output’s type. See the Variant.Type values.
- String _get_text ( ) virtual
Return the custom node’s text, which is shown right next to the input sequence port (if there is none, on the place that is usually taken by it).
- int _get_working_memory_size ( ) virtual
Return the size of the custom node’s working memory. See _step for more details.
- bool _has_input_sequence_port ( ) virtual
Return whether the custom node has an input sequence port.
Execute the custom node’s logic, returning the index of the output sequence port to use or a String when there is an error.
The inputs array contains the values of the input ports.
outputs is an array whose indices should be set to the respective outputs.
The start_mode is usually START_MODE_BEGIN_SEQUENCE, unless you have used the STEP_* constants.
working_mem is an array which can be used to persist information between runs of the custom node.
When returning, you can mask the returned value with one of the STEP_* constants.
VisualScriptDeconstruct¶
Inherits: VisualScriptNode < Resource < Reference < Object
A Visual Script node which deconstructs a base type instance into its parts.
Description¶
A Visual Script node which deconstructs a base type instance into its parts.
Properties¶
| Variant.Type | type | 0 |
Property Descriptions¶
- Variant.Type type
| Default | 0 |
| Setter | set_deconstruct_type(value) |
| Getter | get_deconstruct_type() |
The type to deconstruct.
VisualScriptEditor¶
Inherits: Object
Methods¶
| void | add_custom_node ( String name, String category, Script script ) |
| void | remove_custom_node ( String name, String category ) |
Method Descriptions¶
Add a custom Visual Script node to the editor. It’ll be placed under “Custom Nodes” with the category as the parameter.
Remove a custom Visual Script node from the editor. Custom nodes already placed on scripts won’t be removed.
VisualScriptEmitSignal¶
Inherits: VisualScriptNode < Resource < Reference < Object
Emits a specified signal.
Description¶
Emits a specified signal when it is executed.
Input Ports:
- Sequence:
emit
Output Ports:
- Sequence
VisualScriptEngineSingleton¶
Inherits: VisualScriptNode < Resource < Reference < Object
A Visual Script node returning a singleton from @GlobalScope.
Description¶
A Visual Script node returning a singleton from @GlobalScope.
VisualScriptExpression¶
Inherits: VisualScriptNode < Resource < Reference < Object
VisualScriptFunction¶
Inherits: VisualScriptNode < Resource < Reference < Object
VisualScriptFunctionCall¶
Inherits: VisualScriptNode < Resource < Reference < Object
Properties¶
Enumerations¶
enum CallMode:
- CALL_MODE_SELF = 0
- CALL_MODE_NODE_PATH = 1
- CALL_MODE_INSTANCE = 2
- CALL_MODE_BASIC_TYPE = 3
- CALL_MODE_SINGLETON = 4
enum RPCCallMode:
- RPC_DISABLED = 0
- RPC_RELIABLE = 1
- RPC_UNRELIABLE = 2
- RPC_RELIABLE_TO_ID = 3
- RPC_UNRELIABLE_TO_ID = 4
Property Descriptions¶
- String base_script
| Setter | set_base_script(value) |
| Getter | get_base_script() |
- String base_type
| Default | "Object" |
| Setter | set_base_type(value) |
| Getter | get_base_type() |
- Variant.Type basic_type
| Setter | set_basic_type(value) |
| Getter | get_basic_type() |
- CallMode call_mode
| Default | 0 |
| Setter | set_call_mode(value) |
| Getter | get_call_mode() |
- String function
| Default | "" |
| Setter | set_function(value) |
| Getter | get_function() |
- NodePath node_path
| Setter | set_base_path(value) |
| Getter | get_base_path() |
- RPCCallMode rpc_call_mode
| Default | 0 |
| Setter | set_rpc_call_mode(value) |
| Getter | get_rpc_call_mode() |
- String singleton
| Setter | set_singleton(value) |
| Getter | get_singleton() |
- int use_default_args
| Setter | set_use_default_args(value) |
| Getter | get_use_default_args() |
- bool validate
| Default | true |
| Setter | set_validate(value) |
| Getter | get_validate() |
VisualScriptFunctionState¶
VisualScriptGlobalConstant¶
Inherits: VisualScriptNode < Resource < Reference < Object
VisualScriptIndexGet¶
Inherits: VisualScriptNode < Resource < Reference < Object
VisualScriptIndexSet¶
Inherits: VisualScriptNode < Resource < Reference < Object
VisualScriptInputAction¶
Inherits: VisualScriptNode < Resource < Reference < Object
Enumerations¶
enum Mode:
- MODE_PRESSED = 0
- MODE_RELEASED = 1
- MODE_JUST_PRESSED = 2
- MODE_JUST_RELEASED = 3
VisualScriptIterator¶
Inherits: VisualScriptNode < Resource < Reference < Object
Steps through items in a given input.
Description¶
This node steps through each item in a given input. Input can be any sequence data type, such as an Array or String. When each item has been processed, execution passed out the exit Sequence port.
Input Ports:
- Sequence:
for (elem) in (input) - Data (variant):
input
Output Ports:
- Sequence:
each - Sequence:
exit - Data (variant):
elem
VisualScriptLists¶
Inherits: VisualScriptNode < Resource < Reference < Object
Inherited By: VisualScriptComposeArray
A Visual Script virtual class for in-graph editable nodes.
Description¶
A Visual Script virtual class that defines the shape and the default behaviour of the nodes that have to be in-graph editable nodes.
Methods¶
| void | add_input_data_port ( Variant.Type type, String name, int index ) |
| void | add_output_data_port ( Variant.Type type, String name, int index ) |
| void | remove_input_data_port ( int index ) |
| void | remove_output_data_port ( int index ) |
| void | set_input_data_port_name ( int index, String name ) |
| void | set_input_data_port_type ( int index, Variant.Type type ) |
| void | set_output_data_port_name ( int index, String name ) |
| void | set_output_data_port_type ( int index, Variant.Type type ) |
Method Descriptions¶
- void add_input_data_port ( Variant.Type type, String name, int index )
- void add_output_data_port ( Variant.Type type, String name, int index )
- void remove_input_data_port ( int index )
- void remove_output_data_port ( int index )
- void set_input_data_port_type ( int index, Variant.Type type )
- void set_output_data_port_type ( int index, Variant.Type type )
VisualScriptLocalVar¶
Inherits: VisualScriptNode < Resource < Reference < Object
Gets a local variable’s value.
Description¶
Returns a local variable’s value. “Var Name” must be supplied, with an optional type.
Input Ports:
none
Output Ports:
- Data (variant):
get
Properties¶
| Variant.Type | type | 0 |
| String | var_name | "new_local" |
Property Descriptions¶
- Variant.Type type
| Default | 0 |
| Setter | set_var_type(value) |
| Getter | get_var_type() |
The local variable’s type.
- String var_name
| Default | "new_local" |
| Setter | set_var_name(value) |
| Getter | get_var_name() |
The local variable’s name.
VisualScriptLocalVarSet¶
Inherits: VisualScriptNode < Resource < Reference < Object
Changes a local variable’s value.
Description¶
Changes a local variable’s value to the given input. The new value is also provided on an output Data port.
Input Ports:
- Sequence
- Data (variant):
set
Output Ports:
- Sequence
- Data (variant):
get
Properties¶
| Variant.Type | type | 0 |
| String | var_name | "new_local" |
Property Descriptions¶
- Variant.Type type
| Default | 0 |
| Setter | set_var_type(value) |
| Getter | get_var_type() |
The local variable’s type.
- String var_name
| Default | "new_local" |
| Setter | set_var_name(value) |
| Getter | get_var_name() |
The local variable’s name.
VisualScriptMathConstant¶
Inherits: VisualScriptNode < Resource < Reference < Object
Commonly used mathematical constants.
Description¶
Provides common math constants, such as Pi, on an output Data port.
Input Ports:
none
Output Ports:
- Data (variant):
get
Properties¶
| MathConstant | constant | 0 |
Enumerations¶
enum MathConstant:
- MATH_CONSTANT_ONE = 0 — Unity:
1. - MATH_CONSTANT_PI = 1 — Pi:
3.141593. - MATH_CONSTANT_HALF_PI = 2 — Pi divided by two:
1.570796. - MATH_CONSTANT_TAU = 3 — Tau:
6.283185. - MATH_CONSTANT_E = 4 — Mathematical constant
e, the natural log base:2.718282. - MATH_CONSTANT_SQRT2 = 5 — Square root of two:
1.414214. - MATH_CONSTANT_INF = 6 — Infinity:
inf. - MATH_CONSTANT_NAN = 7 — Not a number:
nan. - MATH_CONSTANT_MAX = 8 — Represents the size of the MathConstant enum.
Property Descriptions¶
- MathConstant constant
| Default | 0 |
| Setter | set_math_constant(value) |
| Getter | get_math_constant() |
The math constant.
VisualScriptNode¶
Inherits: Resource < Reference < Object
Inherited By: VisualScriptBasicTypeConstant, VisualScriptBuiltinFunc, VisualScriptClassConstant, VisualScriptComment, VisualScriptCondition, VisualScriptConstant, VisualScriptConstructor, VisualScriptCustomNode, VisualScriptDeconstruct, VisualScriptEmitSignal, VisualScriptEngineSingleton, VisualScriptExpression, VisualScriptFunction, VisualScriptFunctionCall, VisualScriptGlobalConstant, VisualScriptIndexGet, VisualScriptIndexSet, VisualScriptInputAction, VisualScriptIterator, VisualScriptLists, VisualScriptLocalVar, VisualScriptLocalVarSet, VisualScriptMathConstant, VisualScriptOperator, VisualScriptPreload, VisualScriptPropertyGet, VisualScriptPropertySet, VisualScriptResourcePath, VisualScriptReturn, VisualScriptSceneNode, VisualScriptSceneTree, VisualScriptSelect, VisualScriptSelf, VisualScriptSequence, VisualScriptSubCall, VisualScriptSwitch, VisualScriptTypeCast, VisualScriptVariableGet, VisualScriptVariableSet, VisualScriptWhile, VisualScriptYield, VisualScriptYieldSignal
A node which is part of a VisualScript.
Description¶
A node which is part of a VisualScript. Not to be confused with Node, which is a part of a SceneTree.
Methods¶
| Variant | get_default_input_value ( int port_idx ) const |
| VisualScript | get_visual_script ( ) const |
| void | ports_changed_notify ( ) |
| void | set_default_input_value ( int port_idx, Variant value ) |
Method Descriptions¶
Returns the default value of a given port. The default value is used when nothing is connected to the port.
- VisualScript get_visual_script ( ) const
Returns the VisualScript instance the node is bound to.
- void ports_changed_notify ( )
Notify that the node’s ports have changed. Usually used in conjunction with VisualScriptCustomNode .
Change the default value of a given port.
VisualScriptOperator¶
Inherits: VisualScriptNode < Resource < Reference < Object
Properties¶
| Variant.Operator | operator | 6 |
| Variant.Type | type | 0 |
Property Descriptions¶
- Variant.Operator operator
| Default | 6 |
| Setter | set_operator(value) |
| Getter | get_operator() |
- Variant.Type type
| Default | 0 |
| Setter | set_typed(value) |
| Getter | get_typed() |
VisualScriptPreload¶
Inherits: VisualScriptNode < Resource < Reference < Object
Creates a new Resource or loads one from the filesystem.
VisualScriptPropertyGet¶
Inherits: VisualScriptNode < Resource < Reference < Object
Properties¶
| String | base_script | |
| String | base_type | "Object" |
| Variant.Type | basic_type | |
| String | index | |
| NodePath | node_path | |
| String | property | "" |
| CallMode | set_mode | 0 |
Property Descriptions¶
- String base_script
| Setter | set_base_script(value) |
| Getter | get_base_script() |
- String base_type
| Default | "Object" |
| Setter | set_base_type(value) |
| Getter | get_base_type() |
- Variant.Type basic_type
| Setter | set_basic_type(value) |
| Getter | get_basic_type() |
- String index
| Setter | set_index(value) |
| Getter | get_index() |
- NodePath node_path
| Setter | set_base_path(value) |
| Getter | get_base_path() |
- String property
| Default | "" |
| Setter | set_property(value) |
| Getter | get_property() |
- CallMode set_mode
| Default | 0 |
| Setter | set_call_mode(value) |
| Getter | get_call_mode() |
VisualScriptPropertySet¶
Inherits: VisualScriptNode < Resource < Reference < Object
Properties¶
| AssignOp | assign_op | 0 |
| String | base_script | |
| String | base_type | "Object" |
| Variant.Type | basic_type | |
| String | index | |
| NodePath | node_path | |
| String | property | "" |
| CallMode | set_mode | 0 |
Enumerations¶
enum CallMode:
- CALL_MODE_SELF = 0
- CALL_MODE_NODE_PATH = 1
- CALL_MODE_INSTANCE = 2
- CALL_MODE_BASIC_TYPE = 3
enum AssignOp:
- ASSIGN_OP_NONE = 0
- ASSIGN_OP_ADD = 1
- ASSIGN_OP_SUB = 2
- ASSIGN_OP_MUL = 3
- ASSIGN_OP_DIV = 4
- ASSIGN_OP_MOD = 5
- ASSIGN_OP_SHIFT_LEFT = 6
- ASSIGN_OP_SHIFT_RIGHT = 7
- ASSIGN_OP_BIT_AND = 8
- ASSIGN_OP_BIT_OR = 9
- ASSIGN_OP_BIT_XOR = 10
Property Descriptions¶
- AssignOp assign_op
| Default | 0 |
| Setter | set_assign_op(value) |
| Getter | get_assign_op() |
- String base_script
| Setter | set_base_script(value) |
| Getter | get_base_script() |
- String base_type
| Default | "Object" |
| Setter | set_base_type(value) |
| Getter | get_base_type() |
- Variant.Type basic_type
| Setter | set_basic_type(value) |
| Getter | get_basic_type() |
- String index
| Setter | set_index(value) |
| Getter | get_index() |
- NodePath node_path
| Setter | set_base_path(value) |
| Getter | get_base_path() |
- String property
| Default | "" |
| Setter | set_property(value) |
| Getter | get_property() |
- CallMode set_mode
| Default | 0 |
| Setter | set_call_mode(value) |
| Getter | get_call_mode() |
VisualScriptResourcePath¶
Inherits: VisualScriptNode < Resource < Reference < Object
VisualScriptReturn¶
Inherits: VisualScriptNode < Resource < Reference < Object
Exits a function and returns an optional value.
Description¶
Ends the execution of a function and returns control to the calling function. Optionally, it can return a Variant value.
Input Ports:
- Sequence
- Data (variant):
result(optional)
Output Ports:
none
Properties¶
| bool | return_enabled | false |
| Variant.Type | return_type | 0 |
Property Descriptions¶
- bool return_enabled
| Default | false |
| Setter | set_enable_return_value(value) |
| Getter | is_return_value_enabled() |
If true, the return input port is available.
- Variant.Type return_type
| Default | 0 |
| Setter | set_return_type(value) |
| Getter | get_return_type() |
The return value’s data type.
VisualScriptSceneTree¶
Inherits: VisualScriptNode < Resource < Reference < Object
VisualScriptSelect¶
Inherits: VisualScriptNode < Resource < Reference < Object
Chooses between two input values.
Description¶
Chooses between two input values based on a Boolean condition.
Input Ports:
- Data (boolean):
cond - Data (variant):
a - Data (variant):
b
Output Ports:
- Data (variant):
out
Properties¶
| Variant.Type | type | 0 |
Property Descriptions¶
- Variant.Type type
| Default | 0 |
| Setter | set_typed(value) |
| Getter | get_typed() |
The input variables’ type.
VisualScriptSelf¶
Inherits: VisualScriptNode < Resource < Reference < Object
Outputs a reference to the current instance.
Description¶
Provides a reference to the node running the visual script.
Input Ports:
none
Output Ports:
- Data (object):
instance
VisualScriptSequence¶
Inherits: VisualScriptNode < Resource < Reference < Object
Executes a series of Sequence ports.
Description¶
Steps through a series of one or more output Sequence ports. The current data port outputs the currently executing item.
Input Ports:
- Sequence:
in order
Output Ports:
- Sequence:
1 - Sequence:
2 - n(optional) - Data (int):
current
VisualScriptSubCall¶
Inherits: VisualScriptNode < Resource < Reference < Object
VisualScriptSwitch¶
Inherits: VisualScriptNode < Resource < Reference < Object
Branches program flow based on a given input’s value.
Description¶
Branches the flow based on an input’s value. Use Case Count in the Inspector to set the number of branches and each comparison’s optional type.
Input Ports:
- Sequence:
'input' is - Data (variant):
= - Data (variant):
=(optional) - Data (variant):
input
Output Ports:
- Sequence
- Sequence (optional)
- Sequence:
done
VisualScriptTypeCast¶
Inherits: VisualScriptNode < Resource < Reference < Object
Properties¶
| String | base_script | "" |
| String | base_type | "Object" |
VisualScriptVariableGet¶
Inherits: VisualScriptNode < Resource < Reference < Object
Gets a variable’s value.
Description¶
Returns a variable’s value. “Var Name” must be supplied, with an optional type.
Input Ports:
none
Output Ports:
- Data (variant):
value
VisualScriptVariableSet¶
Inherits: VisualScriptNode < Resource < Reference < Object
Changes a variable’s value.
Description¶
Changes a variable’s value to the given input.
Input Ports:
- Sequence
- Data (variant):
set
Output Ports:
- Sequence
VisualScriptWhile¶
Inherits: VisualScriptNode < Resource < Reference < Object
Conditional loop.
Description¶
Loops while a condition is true. Execution continues out the exit Sequence port when the loop terminates.
Input Ports:
- Sequence:
while(cond) - Data (bool):
cond
Output Ports:
- Sequence:
repeat - Sequence:
exit
VisualScriptYield¶
Inherits: VisualScriptNode < Resource < Reference < Object
VisualScriptYieldSignal¶
Inherits: VisualScriptNode < Resource < Reference < Object
Property Descriptions¶
- String base_type
| Default | "Object" |
| Setter | set_base_type(value) |
| Getter | get_base_type() |
- CallMode call_mode
| Default | 0 |
| Setter | set_call_mode(value) |
| Getter | get_call_mode() |
- NodePath node_path
| Setter | set_base_path(value) |
| Getter | get_base_path() |
- String signal
| Default | "" |
| Setter | set_signal(value) |
| Getter | get_signal() |
VisualServer¶
Inherits: Object
Server for anything visible.
Description¶
Server for anything visible. The visual server is the API backend for everything visible. The whole scene system mounts on it to display.
The visual server is completely opaque, the internals are entirely implementation specific and cannot be accessed.
The visual server can be used to bypass the scene system entirely.
Resources are created using the *_create functions.
All objects are drawn to a viewport. You can use the Viewport attached to the SceneTree or you can create one yourself with viewport_create. When using a custom scenario or canvas, the scenario or canvas needs to be attached to the viewport using viewport_set_scenario or viewport_attach_canvas.
In 3D, all visual objects must be associated with a scenario. The scenario is a visual representation of the world. If accessing the visual server from a running game, the scenario can be accessed from the scene tree from any Spatial node with Spatial.get_world. Otherwise, a scenario can be created with scenario_create.
Similarly in 2D, a canvas is needed to draw all canvas items.
In 3D, all visible objects are comprised of a resource and an instance. A resource can be a mesh, a particle system, a light, or any other 3D object. In order to be visible resources must be attached to an instance using instance_set_base. The instance must also be attached to the scenario using instance_set_scenario in order to be visible.
In 2D, all visible objects are some form of canvas item. In order to be visible, a canvas item needs to be the child of a canvas attached to a viewport, or it needs to be the child of another canvas item that is eventually attached to the canvas.
Tutorials¶
Methods¶
Signals¶
- frame_post_draw ( )
Emitted at the end of the frame, after the VisualServer has finished updating all the Viewports.
- frame_pre_draw ( )
Emitted at the beginning of the frame, before the VisualServer updates all the Viewports.
Enumerations¶
enum CubeMapSide:
- CUBEMAP_LEFT = 0 — Marks the left side of a cubemap.
- CUBEMAP_RIGHT = 1 — Marks the right side of a cubemap.
- CUBEMAP_BOTTOM = 2 — Marks the bottom side of a cubemap.
- CUBEMAP_TOP = 3 — Marks the top side of a cubemap.
- CUBEMAP_FRONT = 4 — Marks the front side of a cubemap.
- CUBEMAP_BACK = 5 — Marks the back side of a cubemap.
enum TextureType:
- TEXTURE_TYPE_2D = 0 — Normal texture with 2 dimensions, width and height.
- TEXTURE_TYPE_CUBEMAP = 1 — Texture made up of six faces, can be looked up with a
vec3in shader. - TEXTURE_TYPE_2D_ARRAY = 2 — An array of 2-dimensional textures.
- TEXTURE_TYPE_3D = 3 — A 3-dimensional texture with width, height, and depth.
enum TextureFlags:
- TEXTURE_FLAG_MIPMAPS = 1 — Generates mipmaps, which are smaller versions of the same texture to use when zoomed out, keeping the aspect ratio.
- TEXTURE_FLAG_REPEAT = 2 — Repeats the texture (instead of clamp to edge).
- TEXTURE_FLAG_FILTER = 4 — Uses a magnifying filter, to enable smooth zooming in of the texture.
- TEXTURE_FLAG_ANISOTROPIC_FILTER = 8 — Uses anisotropic mipmap filtering. Generates smaller versions of the same texture with different aspect ratios.
This results in better-looking textures when viewed from oblique angles.
- TEXTURE_FLAG_CONVERT_TO_LINEAR = 16 — Converts the texture to the sRGB color space.
- TEXTURE_FLAG_MIRRORED_REPEAT = 32 — Repeats the texture with alternate sections mirrored.
- TEXTURE_FLAG_USED_FOR_STREAMING = 2048 — Texture is a video surface.
- TEXTURE_FLAGS_DEFAULT = 7 — Default flags. TEXTURE_FLAG_MIPMAPS, TEXTURE_FLAG_REPEAT and TEXTURE_FLAG_FILTER are enabled.
enum ShaderMode:
- SHADER_SPATIAL = 0 — Shader is a 3D shader.
- SHADER_CANVAS_ITEM = 1 — Shader is a 2D shader.
- SHADER_PARTICLES = 2 — Shader is a particle shader.
- SHADER_MAX = 3 — Represents the size of the ShaderMode enum.
enum ArrayType:
- ARRAY_VERTEX = 0 — Array is a vertex array.
- ARRAY_NORMAL = 1 — Array is a normal array.
- ARRAY_TANGENT = 2 — Array is a tangent array.
- ARRAY_COLOR = 3 — Array is a color array.
- ARRAY_TEX_UV = 4 — Array is an UV coordinates array.
- ARRAY_TEX_UV2 = 5 — Array is an UV coordinates array for the second UV coordinates.
- ARRAY_BONES = 6 — Array contains bone information.
- ARRAY_WEIGHTS = 7 — Array is weight information.
- ARRAY_INDEX = 8 — Array is index array.
- ARRAY_MAX = 9 — Represents the size of the ArrayType enum.
enum ArrayFormat:
- ARRAY_FORMAT_VERTEX = 1 — Flag used to mark a vertex array.
- ARRAY_FORMAT_NORMAL = 2 — Flag used to mark a normal array.
- ARRAY_FORMAT_TANGENT = 4 — Flag used to mark a tangent array.
- ARRAY_FORMAT_COLOR = 8 — Flag used to mark a color array.
- ARRAY_FORMAT_TEX_UV = 16 — Flag used to mark an UV coordinates array.
- ARRAY_FORMAT_TEX_UV2 = 32 — Flag used to mark an UV coordinates array for the second UV coordinates.
- ARRAY_FORMAT_BONES = 64 — Flag used to mark a bone information array.
- ARRAY_FORMAT_WEIGHTS = 128 — Flag used to mark a weights array.
- ARRAY_FORMAT_INDEX = 256 — Flag used to mark an index array.
- ARRAY_COMPRESS_VERTEX = 512 — Flag used to mark a compressed (half float) vertex array.
- ARRAY_COMPRESS_NORMAL = 1024 — Flag used to mark a compressed (half float) normal array.
- ARRAY_COMPRESS_TANGENT = 2048 — Flag used to mark a compressed (half float) tangent array.
- ARRAY_COMPRESS_COLOR = 4096 — Flag used to mark a compressed (half float) color array.
- ARRAY_COMPRESS_TEX_UV = 8192 — Flag used to mark a compressed (half float) UV coordinates array.
- ARRAY_COMPRESS_TEX_UV2 = 16384 — Flag used to mark a compressed (half float) UV coordinates array for the second UV coordinates.
- ARRAY_COMPRESS_BONES = 32768 — Flag used to mark a compressed bone array.
- ARRAY_COMPRESS_WEIGHTS = 65536 — Flag used to mark a compressed (half float) weight array.
- ARRAY_COMPRESS_INDEX = 131072 — Flag used to mark a compressed index array.
- ARRAY_FLAG_USE_2D_VERTICES = 262144 — Flag used to mark that the array contains 2D vertices.
- ARRAY_FLAG_USE_16_BIT_BONES = 524288 — Flag used to mark that the array uses 16-bit bones instead of 8-bit.
- ARRAY_COMPRESS_DEFAULT = 97280 — Used to set flags ARRAY_COMPRESS_VERTEX, ARRAY_COMPRESS_NORMAL, ARRAY_COMPRESS_TANGENT, ARRAY_COMPRESS_COLOR, ARRAY_COMPRESS_TEX_UV, ARRAY_COMPRESS_TEX_UV2 and ARRAY_COMPRESS_WEIGHTS quickly.
enum PrimitiveType:
- PRIMITIVE_POINTS = 0 — Primitive to draw consists of points.
- PRIMITIVE_LINES = 1 — Primitive to draw consists of lines.
- PRIMITIVE_LINE_STRIP = 2 — Primitive to draw consists of a line strip from start to end.
- PRIMITIVE_LINE_LOOP = 3 — Primitive to draw consists of a line loop (a line strip with a line between the last and the first vertex).
- PRIMITIVE_TRIANGLES = 4 — Primitive to draw consists of triangles.
- PRIMITIVE_TRIANGLE_STRIP = 5 — Primitive to draw consists of a triangle strip (the last 3 vertices are always combined to make a triangle).
- PRIMITIVE_TRIANGLE_FAN = 6 — Primitive to draw consists of a triangle strip (the last 2 vertices are always combined with the first to make a triangle).
- PRIMITIVE_MAX = 7 — Represents the size of the PrimitiveType enum.
enum BlendShapeMode:
- BLEND_SHAPE_MODE_NORMALIZED = 0 — Blend shapes are normalized.
- BLEND_SHAPE_MODE_RELATIVE = 1 — Blend shapes are relative to base weight.
enum LightType:
- LIGHT_DIRECTIONAL = 0 — Is a directional (sun) light.
- LIGHT_OMNI = 1 — Is an omni light.
- LIGHT_SPOT = 2 — Is a spot light.
enum LightParam:
- LIGHT_PARAM_ENERGY = 0 — The light’s energy.
- LIGHT_PARAM_SPECULAR = 2 — The light’s influence on specularity.
- LIGHT_PARAM_RANGE = 3 — The light’s range.
- LIGHT_PARAM_ATTENUATION = 4 — The light’s attenuation.
- LIGHT_PARAM_SPOT_ANGLE = 5 — The spotlight’s angle.
- LIGHT_PARAM_SPOT_ATTENUATION = 6 — The spotlight’s attenuation.
- LIGHT_PARAM_CONTACT_SHADOW_SIZE = 7 — Scales the shadow color.
- LIGHT_PARAM_SHADOW_MAX_DISTANCE = 8 — Max distance that shadows will be rendered.
- LIGHT_PARAM_SHADOW_SPLIT_1_OFFSET = 9 — Proportion of shadow atlas occupied by the first split.
- LIGHT_PARAM_SHADOW_SPLIT_2_OFFSET = 10 — Proportion of shadow atlas occupied by the second split.
- LIGHT_PARAM_SHADOW_SPLIT_3_OFFSET = 11 — Proportion of shadow atlas occupied by the third split. The fourth split occupies the rest.
- LIGHT_PARAM_SHADOW_NORMAL_BIAS = 12 — Normal bias used to offset shadow lookup by object normal. Can be used to fix self-shadowing artifacts.
- LIGHT_PARAM_SHADOW_BIAS = 13 — Bias the shadow lookup to fix self-shadowing artifacts.
- LIGHT_PARAM_SHADOW_BIAS_SPLIT_SCALE = 14 — Increases bias on further splits to fix self-shadowing that only occurs far away from the camera.
- LIGHT_PARAM_MAX = 15 — Represents the size of the LightParam enum.
enum LightOmniShadowMode:
- LIGHT_OMNI_SHADOW_DUAL_PARABOLOID = 0 — Use a dual paraboloid shadow map for omni lights.
- LIGHT_OMNI_SHADOW_CUBE = 1 — Use a cubemap shadow map for omni lights. Slower but better quality than dual paraboloid.
enum LightOmniShadowDetail:
- LIGHT_OMNI_SHADOW_DETAIL_VERTICAL = 0 — Use more detail vertically when computing shadow map.
- LIGHT_OMNI_SHADOW_DETAIL_HORIZONTAL = 1 — Use more detail horizontally when computing shadow map.
enum LightDirectionalShadowMode:
- LIGHT_DIRECTIONAL_SHADOW_ORTHOGONAL = 0 — Use orthogonal shadow projection for directional light.
- LIGHT_DIRECTIONAL_SHADOW_PARALLEL_2_SPLITS = 1 — Use 2 splits for shadow projection when using directional light.
- LIGHT_DIRECTIONAL_SHADOW_PARALLEL_4_SPLITS = 2 — Use 4 splits for shadow projection when using directional light.
enum LightDirectionalShadowDepthRangeMode:
- LIGHT_DIRECTIONAL_SHADOW_DEPTH_RANGE_STABLE = 0 — Keeps shadows stable as camera moves but has lower effective resolution.
- LIGHT_DIRECTIONAL_SHADOW_DEPTH_RANGE_OPTIMIZED = 1 — Optimize use of shadow maps, increasing the effective resolution. But may result in shadows moving or flickering slightly.
enum ViewportUpdateMode:
- VIEWPORT_UPDATE_DISABLED = 0 — Do not update the viewport.
- VIEWPORT_UPDATE_ONCE = 1 — Update the viewport once then set to disabled.
- VIEWPORT_UPDATE_WHEN_VISIBLE = 2 — Update the viewport whenever it is visible.
- VIEWPORT_UPDATE_ALWAYS = 3 — Always update the viewport.
enum ViewportClearMode:
- VIEWPORT_CLEAR_ALWAYS = 0 — The viewport is always cleared before drawing.
- VIEWPORT_CLEAR_NEVER = 1 — The viewport is never cleared before drawing.
- VIEWPORT_CLEAR_ONLY_NEXT_FRAME = 2 — The viewport is cleared once, then the clear mode is set to VIEWPORT_CLEAR_NEVER.
enum ViewportMSAA:
- VIEWPORT_MSAA_DISABLED = 0 — Multisample antialiasing is disabled.
- VIEWPORT_MSAA_2X = 1 — Multisample antialiasing is set to 2×.
- VIEWPORT_MSAA_4X = 2 — Multisample antialiasing is set to 4×.
- VIEWPORT_MSAA_8X = 3 — Multisample antialiasing is set to 8×.
- VIEWPORT_MSAA_16X = 4 — Multisample antialiasing is set to 16×.
- VIEWPORT_MSAA_EXT_2X = 5 — Multisample antialiasing is set to 2× on external texture. Special mode for GLES2 Android VR (Oculus Quest and Go).
- VIEWPORT_MSAA_EXT_4X = 6 — Multisample antialiasing is set to 4× on external texture. Special mode for GLES2 Android VR (Oculus Quest and Go).
enum ViewportUsage:
- VIEWPORT_USAGE_2D = 0 — The Viewport does not render 3D but samples.
- VIEWPORT_USAGE_2D_NO_SAMPLING = 1 — The Viewport does not render 3D and does not sample.
- VIEWPORT_USAGE_3D = 2 — The Viewport renders 3D with effects.
- VIEWPORT_USAGE_3D_NO_EFFECTS = 3 — The Viewport renders 3D but without effects.
enum ViewportRenderInfo:
- VIEWPORT_RENDER_INFO_OBJECTS_IN_FRAME = 0 — Number of objects drawn in a single frame.
- VIEWPORT_RENDER_INFO_VERTICES_IN_FRAME = 1 — Number of vertices drawn in a single frame.
- VIEWPORT_RENDER_INFO_MATERIAL_CHANGES_IN_FRAME = 2 — Number of material changes during this frame.
- VIEWPORT_RENDER_INFO_SHADER_CHANGES_IN_FRAME = 3 — Number of shader changes during this frame.
- VIEWPORT_RENDER_INFO_SURFACE_CHANGES_IN_FRAME = 4 — Number of surface changes during this frame.
- VIEWPORT_RENDER_INFO_DRAW_CALLS_IN_FRAME = 5 — Number of draw calls during this frame.
- VIEWPORT_RENDER_INFO_MAX = 6 — Represents the size of the ViewportRenderInfo enum.
enum ViewportDebugDraw:
- VIEWPORT_DEBUG_DRAW_DISABLED = 0 — Debug draw is disabled. Default setting.
- VIEWPORT_DEBUG_DRAW_UNSHADED = 1 — Debug draw sets objects to unshaded.
- VIEWPORT_DEBUG_DRAW_OVERDRAW = 2 — Overwrites clear color to
(0,0,0,0). - VIEWPORT_DEBUG_DRAW_WIREFRAME = 3 — Debug draw draws objects in wireframe.
enum ScenarioDebugMode:
- SCENARIO_DEBUG_DISABLED = 0 — Do not use a debug mode.
- SCENARIO_DEBUG_WIREFRAME = 1 — Draw all objects as wireframe models.
- SCENARIO_DEBUG_OVERDRAW = 2 — Draw all objects in a way that displays how much overdraw is occurring. Overdraw occurs when a section of pixels is drawn and shaded and then another object covers it up. To optimize a scene, you should reduce overdraw.
- SCENARIO_DEBUG_SHADELESS = 3 — Draw all objects without shading. Equivalent to setting all objects shaders to
unshaded.
enum InstanceType:
- INSTANCE_NONE = 0 — The instance does not have a type.
- INSTANCE_MESH = 1 — The instance is a mesh.
- INSTANCE_MULTIMESH = 2 — The instance is a multimesh.
- INSTANCE_IMMEDIATE = 3 — The instance is an immediate geometry.
- INSTANCE_PARTICLES = 4 — The instance is a particle emitter.
- INSTANCE_LIGHT = 5 — The instance is a light.
- INSTANCE_REFLECTION_PROBE = 6 — The instance is a reflection probe.
- INSTANCE_GI_PROBE = 7 — The instance is a GI probe.
- INSTANCE_LIGHTMAP_CAPTURE = 8 — The instance is a lightmap capture.
- INSTANCE_MAX = 9 — Represents the size of the InstanceType enum.
- INSTANCE_GEOMETRY_MASK = 30 — A combination of the flags of geometry instances (mesh, multimesh, immediate and particles).
enum InstanceFlags:
- INSTANCE_FLAG_USE_BAKED_LIGHT = 0 — Allows the instance to be used in baked lighting.
- INSTANCE_FLAG_DRAW_NEXT_FRAME_IF_VISIBLE = 1 — When set, manually requests to draw geometry on next frame.
- INSTANCE_FLAG_MAX = 2 — Represents the size of the InstanceFlags enum.
enum ShadowCastingSetting:
- SHADOW_CASTING_SETTING_OFF = 0 — Disable shadows from this instance.
- SHADOW_CASTING_SETTING_ON = 1 — Cast shadows from this instance.
- SHADOW_CASTING_SETTING_DOUBLE_SIDED = 2 — Disable backface culling when rendering the shadow of the object. This is slightly slower but may result in more correct shadows.
- SHADOW_CASTING_SETTING_SHADOWS_ONLY = 3 — Only render the shadows from the object. The object itself will not be drawn.
enum NinePatchAxisMode:
- NINE_PATCH_STRETCH = 0 — The nine patch gets stretched where needed.
- NINE_PATCH_TILE = 1 — The nine patch gets filled with tiles where needed.
- NINE_PATCH_TILE_FIT = 2 — The nine patch gets filled with tiles where needed and stretches them a bit if needed.
enum CanvasLightMode:
- CANVAS_LIGHT_MODE_ADD = 0 — Adds light color additive to the canvas.
- CANVAS_LIGHT_MODE_SUB = 1 — Adds light color subtractive to the canvas.
- CANVAS_LIGHT_MODE_MIX = 2 — The light adds color depending on transparency.
- CANVAS_LIGHT_MODE_MASK = 3 — The light adds color depending on mask.
enum CanvasLightShadowFilter:
- CANVAS_LIGHT_FILTER_NONE = 0 — Do not apply a filter to canvas light shadows.
- CANVAS_LIGHT_FILTER_PCF3 = 1 — Use PCF3 filtering to filter canvas light shadows.
- CANVAS_LIGHT_FILTER_PCF5 = 2 — Use PCF5 filtering to filter canvas light shadows.
- CANVAS_LIGHT_FILTER_PCF7 = 3 — Use PCF7 filtering to filter canvas light shadows.
- CANVAS_LIGHT_FILTER_PCF9 = 4 — Use PCF9 filtering to filter canvas light shadows.
- CANVAS_LIGHT_FILTER_PCF13 = 5 — Use PCF13 filtering to filter canvas light shadows.
enum CanvasOccluderPolygonCullMode:
- CANVAS_OCCLUDER_POLYGON_CULL_DISABLED = 0 — Culling of the canvas occluder is disabled.
- CANVAS_OCCLUDER_POLYGON_CULL_CLOCKWISE = 1 — Culling of the canvas occluder is clockwise.
- CANVAS_OCCLUDER_POLYGON_CULL_COUNTER_CLOCKWISE = 2 — Culling of the canvas occluder is counterclockwise.
enum RenderInfo:
- INFO_OBJECTS_IN_FRAME = 0 — The amount of objects in the frame.
- INFO_VERTICES_IN_FRAME = 1 — The amount of vertices in the frame.
- INFO_MATERIAL_CHANGES_IN_FRAME = 2 — The amount of modified materials in the frame.
- INFO_SHADER_CHANGES_IN_FRAME = 3 — The amount of shader rebinds in the frame.
- INFO_SURFACE_CHANGES_IN_FRAME = 4 — The amount of surface changes in the frame.
- INFO_DRAW_CALLS_IN_FRAME = 5 — The amount of draw calls in frame.
- INFO_USAGE_VIDEO_MEM_TOTAL = 6 — Unimplemented in the GLES2 and GLES3 rendering backends, always returns 0.
- INFO_VIDEO_MEM_USED = 7 — The amount of video memory used, i.e. texture and vertex memory combined.
- INFO_TEXTURE_MEM_USED = 8 — The amount of texture memory used.
- INFO_VERTEX_MEM_USED = 9 — The amount of vertex memory used.
enum Features:
- FEATURE_SHADERS = 0 — Hardware supports shaders. This enum is currently unused in Godot 3.x.
- FEATURE_MULTITHREADED = 1 — Hardware supports multithreading. This enum is currently unused in Godot 3.x.
enum MultimeshTransformFormat:
- MULTIMESH_TRANSFORM_2D = 0 — Use Transform2D to store MultiMesh transform.
- MULTIMESH_TRANSFORM_3D = 1 — Use Transform to store MultiMesh transform.
enum MultimeshColorFormat:
- MULTIMESH_COLOR_NONE = 0 — MultiMesh does not use per-instance color.
- MULTIMESH_COLOR_8BIT = 1 — MultiMesh color uses 8 bits per component. This packs the color into a single float.
- MULTIMESH_COLOR_FLOAT = 2 — MultiMesh color uses a float per channel.
enum MultimeshCustomDataFormat:
- MULTIMESH_CUSTOM_DATA_NONE = 0 — MultiMesh does not use custom data.
- MULTIMESH_CUSTOM_DATA_8BIT = 1 — MultiMesh custom data uses 8 bits per component. This packs the 4-component custom data into a single float.
- MULTIMESH_CUSTOM_DATA_FLOAT = 2 — MultiMesh custom data uses a float per component.
enum ReflectionProbeUpdateMode:
- REFLECTION_PROBE_UPDATE_ONCE = 0 — Reflection probe will update reflections once and then stop.
- REFLECTION_PROBE_UPDATE_ALWAYS = 1 — Reflection probe will update each frame. This mode is necessary to capture moving objects.
enum ParticlesDrawOrder:
- PARTICLES_DRAW_ORDER_INDEX = 0 — Draw particles in the order that they appear in the particles array.
- PARTICLES_DRAW_ORDER_LIFETIME = 1 — Sort particles based on their lifetime.
- PARTICLES_DRAW_ORDER_VIEW_DEPTH = 2 — Sort particles based on their distance to the camera.
enum EnvironmentBG:
- ENV_BG_CLEAR_COLOR = 0 — Use the clear color as background.
- ENV_BG_COLOR = 1 — Use a specified color as the background.
- ENV_BG_SKY = 2 — Use a sky resource for the background.
- ENV_BG_COLOR_SKY = 3 — Use a custom color for background, but use a sky for shading and reflections.
- ENV_BG_CANVAS = 4 — Use a specified canvas layer as the background. This can be useful for instantiating a 2D scene in a 3D world.
- ENV_BG_KEEP = 5 — Do not clear the background, use whatever was rendered last frame as the background.
- ENV_BG_MAX = 7 — Represents the size of the EnvironmentBG enum.
enum EnvironmentDOFBlurQuality:
- ENV_DOF_BLUR_QUALITY_LOW = 0 — Use lowest blur quality. Fastest, but may look bad.
- ENV_DOF_BLUR_QUALITY_MEDIUM = 1 — Use medium blur quality.
- ENV_DOF_BLUR_QUALITY_HIGH = 2 — Used highest blur quality. Looks the best, but is the slowest.
enum EnvironmentGlowBlendMode:
- GLOW_BLEND_MODE_ADDITIVE = 0 — Add the effect of the glow on top of the scene.
- GLOW_BLEND_MODE_SCREEN = 1 — Blends the glow effect with the screen. Does not get as bright as additive.
- GLOW_BLEND_MODE_SOFTLIGHT = 2 — Produces a subtle color disturbance around objects.
- GLOW_BLEND_MODE_REPLACE = 3 — Shows the glow effect by itself without the underlying scene.
enum EnvironmentToneMapper:
- ENV_TONE_MAPPER_LINEAR = 0 — Output color as they came in.
- ENV_TONE_MAPPER_REINHARD = 1 — Use the Reinhard tonemapper.
- ENV_TONE_MAPPER_FILMIC = 2 — Use the filmic tonemapper.
- ENV_TONE_MAPPER_ACES = 3 — Use the ACES tonemapper.
enum EnvironmentSSAOQuality:
- ENV_SSAO_QUALITY_LOW = 0 — Lowest quality of screen space ambient occlusion.
- ENV_SSAO_QUALITY_MEDIUM = 1 — Medium quality screen space ambient occlusion.
- ENV_SSAO_QUALITY_HIGH = 2 — Highest quality screen space ambient occlusion.
enum EnvironmentSSAOBlur:
- ENV_SSAO_BLUR_DISABLED = 0 — Disables the blur set for SSAO. Will make SSAO look noisier.
- ENV_SSAO_BLUR_1x1 = 1 — Perform a 1x1 blur on the SSAO output.
- ENV_SSAO_BLUR_2x2 = 2 — Performs a 2x2 blur on the SSAO output.
- ENV_SSAO_BLUR_3x3 = 3 — Performs a 3x3 blur on the SSAO output. Use this for smoothest SSAO.
Constants¶
- NO_INDEX_ARRAY = -1 — Marks an error that shows that the index array is empty.
- ARRAY_WEIGHTS_SIZE = 4 — Number of weights/bones per vertex.
- CANVAS_ITEM_Z_MIN = -4096 — The minimum Z-layer for canvas items.
- CANVAS_ITEM_Z_MAX = 4096 — The maximum Z-layer for canvas items.
- MAX_GLOW_LEVELS = 7 — Max number of glow levels that can be used with glow post-process effect.
- MAX_CURSORS = 8 — Unused enum in Godot 3.x.
- MATERIAL_RENDER_PRIORITY_MIN = -128 — The minimum renderpriority of all materials.
- MATERIAL_RENDER_PRIORITY_MAX = 127 — The maximum renderpriority of all materials.
Method Descriptions¶
Sets images to be rendered in the window margin.
Sets margin size, where black bars (or images, if black_bars_set_images was used) are rendered.
- RID camera_create ( )
Creates a camera and adds it to the VisualServer. It can be accessed with the RID that is returned. This RID will be used in all camera_* VisualServer functions.
Once finished with your RID, you will want to free the RID using the VisualServer’s free_rid static method.
Sets the cull mask associated with this camera. The cull mask describes which 3D layers are rendered by this camera. Equivalent to Camera.cull_mask.
Sets the environment used by this camera. Equivalent to Camera.environment.
Sets camera to use frustum projection. This mode allows adjusting the offset argument to create “tilted frustum” effects.
Sets camera to use orthogonal projection, also known as orthographic projection. Objects remain the same size on the screen no matter how far away they are.
Sets camera to use perspective projection. Objects on the screen becomes smaller when they are far away.
Sets Transform of camera.
If true, preserves the horizontal aspect ratio which is equivalent to Camera.KEEP_WIDTH. If false, preserves the vertical aspect ratio which is equivalent to Camera.KEEP_HEIGHT.
- RID canvas_create ( )
Creates a canvas and returns the assigned RID. It can be accessed with the RID that is returned. This RID will be used in all canvas_* VisualServer functions.
Once finished with your RID, you will want to free the RID using the VisualServer’s free_rid static method.
Adds a circle command to the CanvasItem’s draw commands.
If ignore is true, the VisualServer does not perform clipping.
- void canvas_item_add_line ( RID item, Vector2 from, Vector2 to, Color color, float width=1.0, bool antialiased=false )
Adds a line command to the CanvasItem’s draw commands.
- void canvas_item_add_mesh ( RID item, RID mesh, Transform2D transform=Transform2D( 1, 0, 0, 1, 0, 0 ), Color modulate=Color( 1, 1, 1, 1 ), RID texture, RID normal_map )
Adds a mesh command to the CanvasItem’s draw commands.
Adds a MultiMesh to the CanvasItem’s draw commands. Only affects its aabb at the moment.
- void canvas_item_add_nine_patch ( RID item, Rect2 rect, Rect2 source, RID texture, Vector2 topleft, Vector2 bottomright, NinePatchAxisMode x_axis_mode=0, NinePatchAxisMode y_axis_mode=0, bool draw_center=true, Color modulate=Color( 1, 1, 1, 1 ), RID normal_map )
Adds a nine patch image to the CanvasItem’s draw commands.
See NinePatchRect for more explanation.
Adds a particle system to the CanvasItem’s draw commands.
- void canvas_item_add_polygon ( RID item, PoolVector2Array points, PoolColorArray colors, PoolVector2Array uvs=PoolVector2Array( ), RID texture, RID normal_map, bool antialiased=false )
Adds a polygon to the CanvasItem’s draw commands.
- void canvas_item_add_polyline ( RID item, PoolVector2Array points, PoolColorArray colors, float width=1.0, bool antialiased=false )
Adds a polyline, which is a line from multiple points with a width, to the CanvasItem’s draw commands.
- void canvas_item_add_primitive ( RID item, PoolVector2Array points, PoolColorArray colors, PoolVector2Array uvs, RID texture, float width=1.0, RID normal_map )
Adds a primitive to the CanvasItem’s draw commands.
Adds a rectangle to the CanvasItem’s draw commands.
- void canvas_item_add_set_transform ( RID item, Transform2D transform )
Adds a Transform2D command to the CanvasItem’s draw commands.
This sets the extra_matrix uniform when executed. This affects the later commands of the canvas item.
- void canvas_item_add_texture_rect ( RID item, Rect2 rect, RID texture, bool tile=false, Color modulate=Color( 1, 1, 1, 1 ), bool transpose=false, RID normal_map )
Adds a textured rect to the CanvasItem’s draw commands.
- void canvas_item_add_texture_rect_region ( RID item, Rect2 rect, RID texture, Rect2 src_rect, Color modulate=Color( 1, 1, 1, 1 ), bool transpose=false, RID normal_map, bool clip_uv=true )
Adds a texture rect with region setting to the CanvasItem’s draw commands.
- void canvas_item_add_triangle_array ( RID item, PoolIntArray indices, PoolVector2Array points, PoolColorArray colors, PoolVector2Array uvs=PoolVector2Array( ), PoolIntArray bones=PoolIntArray( ), PoolRealArray weights=PoolRealArray( ), RID texture, int count=-1, RID normal_map, bool antialiased=false, bool antialiasing_use_indices=false )
Adds a triangle array to the CanvasItem’s draw commands.
- void canvas_item_clear ( RID item )
Clears the CanvasItem and removes all commands in it.
- RID canvas_item_create ( )
Creates a new CanvasItem and returns its RID. It can be accessed with the RID that is returned. This RID will be used in all canvas_item_* VisualServer functions.
Once finished with your RID, you will want to free the RID using the VisualServer’s free_rid static method.
Sets clipping for the CanvasItem.
Sets the CanvasItem to copy a rect to the backbuffer.
Defines a custom drawing rectangle for the CanvasItem.
Enables the use of distance fields for GUI elements that are rendering distance field based fonts.
Sets CanvasItem to be drawn behind its parent.
Sets the index for the CanvasItem.
The light mask. See LightOccluder2D for more information on light masks.
Sets a new material to the CanvasItem.
Sets the color that modulates the CanvasItem and its children.
Sets the parent for the CanvasItem. The parent can be another canvas item, or it can be the root canvas that is attached to the viewport.
Sets the color that modulates the CanvasItem without children.
Sets if CanvasItem’s children should be sorted by y-position.
- void canvas_item_set_transform ( RID item, Transform2D transform )
Sets the CanvasItem’s Transform2D.
Sets if the CanvasItem uses its parent’s material.
Sets if the canvas item (including its children) is visible.
If this is enabled, the Z index of the parent will be added to the children’s Z index.
Sets the CanvasItem’s Z index, i.e. its draw order (lower indexes are drawn first).
Attaches the canvas light to the canvas. Removes it from its previous canvas.
- RID canvas_light_create ( )
Creates a canvas light and adds it to the VisualServer. It can be accessed with the RID that is returned. This RID will be used in all canvas_light_* VisualServer functions.
Once finished with your RID, you will want to free the RID using the VisualServer’s free_rid static method.
Attaches a light occluder to the canvas. Removes it from its previous canvas.
- RID canvas_light_occluder_create ( )
Creates a light occluder and adds it to the VisualServer. It can be accessed with the RID that is returned. This RID will be used in all canvas_light_ocluder_* VisualServer functions.
Once finished with your RID, you will want to free the RID using the VisualServer’s free_rid static method.
Enables or disables light occluder.
The light mask. See LightOccluder2D for more information on light masks.
Sets a light occluder’s polygon.
- void canvas_light_occluder_set_transform ( RID occluder, Transform2D transform )
Sets a light occluder’s Transform2D.
Sets the color for a light.
Enables or disables a canvas light.
Sets a canvas light’s energy.
Sets a canvas light’s height.
The light mask. See LightOccluder2D for more information on light masks.
The binary mask used to determine which layers this canvas light’s shadows affects. See LightOccluder2D for more information on light masks.
The layer range that gets rendered with this light.
- void canvas_light_set_mode ( RID light, CanvasLightMode mode )
The mode of the light, see CanvasLightMode constants.
Sets the texture’s scale factor of the light. Equivalent to Light2D.texture_scale.
Sets the width of the shadow buffer, size gets scaled to the next power of two for this.
Sets the color of the canvas light’s shadow.
Enables or disables the canvas light’s shadow.
- void canvas_light_set_shadow_filter ( RID light, CanvasLightShadowFilter filter )
Sets the canvas light’s shadow’s filter, see CanvasLightShadowFilter constants.
Sets the length of the shadow’s gradient.
Smoothens the shadow. The lower, the smoother.
Sets texture to be used by light. Equivalent to Light2D.texture.
Sets the offset of the light’s texture. Equivalent to Light2D.offset.
- void canvas_light_set_transform ( RID light, Transform2D transform )
Sets the canvas light’s Transform2D.
Sets the Z range of objects that will be affected by this light. Equivalent to Light2D.range_z_min and Light2D.range_z_max.
- RID canvas_occluder_polygon_create ( )
Creates a new light occluder polygon and adds it to the VisualServer. It can be accessed with the RID that is returned. This RID will be used in all canvas_occluder_polygon_* VisualServer functions.
Once finished with your RID, you will want to free the RID using the VisualServer’s free_rid static method.
- void canvas_occluder_polygon_set_cull_mode ( RID occluder_polygon, CanvasOccluderPolygonCullMode mode )
Sets an occluder polygons cull mode. See CanvasOccluderPolygonCullMode constants.
- void canvas_occluder_polygon_set_shape ( RID occluder_polygon, PoolVector2Array shape, bool closed )
Sets the shape of the occluder polygon.
- void canvas_occluder_polygon_set_shape_as_lines ( RID occluder_polygon, PoolVector2Array shape )
Sets the shape of the occluder polygon as lines.
A copy of the canvas item will be drawn with a local offset of the mirroring Vector2.
Modulates all colors in the given canvas.
- RID directional_light_create ( )
Creates a directional light and adds it to the VisualServer. It can be accessed with the RID that is returned. This RID can be used in most light_* VisualServer functions.
Once finished with your RID, you will want to free the RID using the VisualServer’s free_rid static method.
To place in a scene, attach this directional light to an instance using instance_set_base using the returned RID.
Draws a frame. This method is deprecated, please use force_draw instead.
- RID environment_create ( )
Creates an environment and adds it to the VisualServer. It can be accessed with the RID that is returned. This RID will be used in all environment_* VisualServer functions.
Once finished with your RID, you will want to free the RID using the VisualServer’s free_rid static method.
- void environment_set_adjustment ( RID env, bool enable, float brightness, float contrast, float saturation, RID ramp )
Sets the values to be used with the “Adjustment” post-process effect. See Environment for more details.
- void environment_set_ambient_light ( RID env, Color color, float energy=1.0, float sky_contibution=0.0 )
Sets the ambient light parameters. See Environment for more details.
- void environment_set_background ( RID env, EnvironmentBG bg )
Sets the BGMode of the environment. Equivalent to Environment.background_mode.
Color displayed for clear areas of the scene (if using Custom color or Color+Sky background modes).
Sets the intensity of the background color.
Sets the maximum layer to use if using Canvas background mode.
- void environment_set_dof_blur_far ( RID env, bool enable, float distance, float transition, float far_amount, EnvironmentDOFBlurQuality quality )
Sets the values to be used with the “DoF Far Blur” post-process effect. See Environment for more details.
- void environment_set_dof_blur_near ( RID env, bool enable, float distance, float transition, float far_amount, EnvironmentDOFBlurQuality quality )
Sets the values to be used with the “DoF Near Blur” post-process effect. See Environment for more details.
Sets the variables to be used with the scene fog. See Environment for more details.
- void environment_set_fog_depth ( RID env, bool enable, float depth_begin, float depth_end, float depth_curve, bool transmit, float transmit_curve )
Sets the variables to be used with the fog depth effect. See Environment for more details.
- void environment_set_fog_height ( RID env, bool enable, float min_height, float max_height, float height_curve )
Sets the variables to be used with the fog height effect. See Environment for more details.
- void environment_set_glow ( RID env, bool enable, int level_flags, float intensity, float strength, float bloom_threshold, EnvironmentGlowBlendMode blend_mode, float hdr_bleed_threshold, float hdr_bleed_scale, float hdr_luminance_cap, bool bicubic_upscale )
Sets the variables to be used with the “glow” post-process effect. See Environment for more details.
Sets the Sky to be used as the environment’s background when using BGMode sky. Equivalent to Environment.background_sky.
Sets a custom field of view for the background Sky. Equivalent to Environment.background_sky_custom_fov.
Sets the rotation of the background Sky expressed as a Basis. Equivalent to Environment.background_sky_orientation.
- void environment_set_ssao ( RID env, bool enable, float radius, float intensity, float radius2, float intensity2, float bias, float light_affect, float ao_channel_affect, Color color, EnvironmentSSAOQuality quality, EnvironmentSSAOBlur blur, float bilateral_sharpness )
Sets the variables to be used with the “Screen Space Ambient Occlusion (SSAO)” post-process effect. See Environment for more details.
- void environment_set_ssr ( RID env, bool enable, int max_steps, float fade_in, float fade_out, float depth_tolerance, bool roughness )
Sets the variables to be used with the “screen space reflections” post-process effect. See Environment for more details.
- void environment_set_tonemap ( RID env, EnvironmentToneMapper tone_mapper, float exposure, float white, bool auto_exposure, float min_luminance, float max_luminance, float auto_exp_speed, float auto_exp_grey )
Sets the variables to be used with the “tonemap” post-process effect. See Environment for more details.
- void finish ( )
Removes buffers and clears testcubes.
Forces a frame to be drawn when the function is called. Drawing a frame updates all Viewports that are set to update. Use with extreme caution.
- void force_sync ( )
Synchronizes threads.
- void free_rid ( RID rid )
Tries to free an object in the VisualServer.
- int get_render_info ( RenderInfo info )
Returns a certain information, see RenderInfo for options.
- RID get_test_cube ( )
Returns the id of the test cube. Creates one if none exists.
- RID get_test_texture ( )
Returns the id of the test texture. Creates one if none exists.
- String get_video_adapter_name ( ) const
Returns the name of the video adapter (e.g. “GeForce GTX 1080/PCIe/SSE2”).
Note: When running a headless or server binary, this function returns an empty string.
- String get_video_adapter_vendor ( ) const
Returns the vendor of the video adapter (e.g. “NVIDIA Corporation”).
Note: When running a headless or server binary, this function returns an empty string.
- RID get_white_texture ( )
Returns the id of a white texture. Creates one if none exists.
- RID gi_probe_create ( )
Creates a GI probe and adds it to the VisualServer. It can be accessed with the RID that is returned. This RID will be used in all gi_probe_* VisualServer functions.
Once finished with your RID, you will want to free the RID using the VisualServer’s free_rid static method.
To place in a scene, attach this GI probe to an instance using instance_set_base using the returned RID.
Returns the bias value for the GI probe. Bias is used to avoid self occlusion. Equivalent to GIProbeData.bias.
Returns the axis-aligned bounding box that covers the full extent of the GI probe.
Returns the cell size set by gi_probe_set_cell_size.
- PoolIntArray gi_probe_get_dynamic_data ( RID probe ) const
Returns the data used by the GI probe.
Returns the dynamic range set for this GI probe. Equivalent to GIProbe.dynamic_range.
Returns the energy multiplier for this GI probe. Equivalent to GIProbe.energy.
Returns the normal bias for this GI probe. Equivalent to GIProbe.normal_bias.
Returns the propagation value for this GI probe. Equivalent to GIProbe.propagation.
Returns the Transform set by gi_probe_set_to_cell_xform.
Returns true if the GI probe data associated with this GI probe is compressed. Equivalent to GIProbe.compress.
Returns true if the GI probe is set to interior, meaning it does not account for sky light. Equivalent to GIProbe.interior.
Sets the bias value to avoid self-occlusion. Equivalent to GIProbe.bias.
Sets the axis-aligned bounding box that covers the extent of the GI probe.
Sets the size of individual cells within the GI probe.
Sets the compression setting for the GI probe data. Compressed data will take up less space but may look worse. Equivalent to GIProbe.compress.
- void gi_probe_set_dynamic_data ( RID probe, PoolIntArray data )
Sets the data to be used in the GI probe for lighting calculations. Normally this is created and called internally within the GIProbe node. You should not try to set this yourself.
Sets the dynamic range of the GI probe. Dynamic range sets the limit for how bright lights can be. A smaller range captures greater detail but limits how bright lights can be. Equivalent to GIProbe.dynamic_range.
Sets the energy multiplier for this GI probe. A higher energy makes the indirect light from the GI probe brighter. Equivalent to GIProbe.energy.
Sets the interior value of this GI probe. A GI probe set to interior does not include the sky when calculating lighting. Equivalent to GIProbe.interior.
Sets the normal bias for this GI probe. Normal bias behaves similar to the other form of bias and may help reduce self-occlusion. Equivalent to GIProbe.normal_bias.
Sets the propagation of light within this GI probe. Equivalent to GIProbe.propagation.
Sets the to cell Transform for this GI probe.
- bool has_changed ( ) const
Returns true if changes have been made to the VisualServer’s data. draw is usually called if this happens.
Not yet implemented. Always returns false.
Returns true if the OS supports a certain feature. Features might be s3tc, etc, etc2 and pvrtc.
- void immediate_begin ( RID immediate, PrimitiveType primitive, RID texture )
Sets up ImmediateGeometry internals to prepare for drawing. Equivalent to ImmediateGeometry.begin.
- void immediate_clear ( RID immediate )
Clears everything that was set up between immediate_begin and immediate_end. Equivalent to ImmediateGeometry.clear.
Sets the color to be used with next vertex. Equivalent to ImmediateGeometry.set_color.
- RID immediate_create ( )
Creates an immediate geometry and adds it to the VisualServer. It can be accessed with the RID that is returned. This RID will be used in all immediate_* VisualServer functions.
Once finished with your RID, you will want to free the RID using the VisualServer’s free_rid static method.
To place in a scene, attach this immediate geometry to an instance using instance_set_base using the returned RID.
- void immediate_end ( RID immediate )
Ends drawing the ImmediateGeometry and displays it. Equivalent to ImmediateGeometry.end.
Returns the material assigned to the ImmediateGeometry.
Sets the normal to be used with next vertex. Equivalent to ImmediateGeometry.set_normal.
Sets the material to be used to draw the ImmediateGeometry.
Sets the tangent to be used with next vertex. Equivalent to ImmediateGeometry.set_tangent.
Sets the UV to be used with next vertex. Equivalent to ImmediateGeometry.set_uv.
Sets the UV2 to be used with next vertex. Equivalent to ImmediateGeometry.set_uv2.
Adds the next vertex using the information provided in advance. Equivalent to ImmediateGeometry.add_vertex.
Adds the next vertex using the information provided in advance. This is a helper class that calls immediate_vertex under the hood. Equivalent to ImmediateGeometry.add_vertex.
- void init ( )
Initializes the visual server. This function is called internally by platform-dependent code during engine initialization. If called from a running game, it will not do anything.
Attaches a unique Object ID to instance. Object ID must be attached to instance for proper culling with instances_cull_aabb, instances_cull_convex, and instances_cull_ray.
Attaches a skeleton to an instance. Removes the previous skeleton from the instance.
- RID instance_create ( )
Creates a visual instance and adds it to the VisualServer. It can be accessed with the RID that is returned. This RID will be used in all instance_* VisualServer functions.
Once finished with your RID, you will want to free the RID using the VisualServer’s free_rid static method.
An instance is a way of placing a 3D object in the scenario. Objects like particles, meshes, and reflection probes need to be associated with an instance to be visible in the scenario using instance_set_base.
Creates a visual instance, adds it to the VisualServer, and sets both base and scenario. It can be accessed with the RID that is returned. This RID will be used in all instance_* VisualServer functions.
Once finished with your RID, you will want to free the RID using the VisualServer’s free_rid static method.
Not implemented in Godot 3.x.
- void instance_geometry_set_cast_shadows_setting ( RID instance, ShadowCastingSetting shadow_casting_setting )
Sets the shadow casting setting to one of ShadowCastingSetting. Equivalent to GeometryInstance.cast_shadow.
- void instance_geometry_set_draw_range ( RID instance, float min, float max, float min_margin, float max_margin )
Not implemented in Godot 3.x.
- void instance_geometry_set_flag ( RID instance, InstanceFlags flag, bool enabled )
Sets the flag for a given InstanceFlags. See InstanceFlags for more details.
Sets a material that will override the material for all surfaces on the mesh associated with this instance. Equivalent to GeometryInstance.material_override.
Sets the base of the instance. A base can be any of the 3D objects that are created in the VisualServer that can be displayed. For example, any of the light types, mesh, multimesh, immediate geometry, particle system, reflection probe, lightmap capture, and the GI probe are all types that can be set as the base of an instance in order to be displayed in the scenario.
Sets the weight for a given blend shape associated with this instance.
Sets a custom AABB to use when culling objects from the view frustum. Equivalent to GeometryInstance.set_custom_aabb.
Function not implemented in Godot 3.x.
Sets a margin to increase the size of the AABB when culling objects from the view frustum. This allows you avoid culling objects that fall outside the view frustum. Equivalent to GeometryInstance.extra_cull_margin.
Sets the render layers that this instance will be drawn to. Equivalent to VisualInstance.layers.
Sets the scenario that the instance is in. The scenario is the 3D world that the objects will be displayed in.
Sets the material of a specific surface. Equivalent to MeshInstance.set_surface_material.
Sets the world space transform of the instance. Equivalent to Spatial.transform.
Sets the lightmap to use with this instance.
Sets whether an instance is drawn or not. Equivalent to Spatial.visible.
Returns an array of object IDs intersecting with the provided AABB. Only visual 3D nodes are considered, such as MeshInstance or DirectionalLight. Use @GDScript.instance_from_id to obtain the actual nodes. A scenario RID must be provided, which is available in the World you want to query. This forces an update for all resources queued to update.
Warning: This function is primarily intended for editor usage. For in-game use cases, prefer physics collision.
Returns an array of object IDs intersecting with the provided convex shape. Only visual 3D nodes are considered, such as MeshInstance or DirectionalLight. Use @GDScript.instance_from_id to obtain the actual nodes. A scenario RID must be provided, which is available in the World you want to query. This forces an update for all resources queued to update.
Warning: This function is primarily intended for editor usage. For in-game use cases, prefer physics collision.
Returns an array of object IDs intersecting with the provided 3D ray. Only visual 3D nodes are considered, such as MeshInstance or DirectionalLight. Use @GDScript.instance_from_id to obtain the actual nodes. A scenario RID must be provided, which is available in the World you want to query. This forces an update for all resources queued to update.
Warning: This function is primarily intended for editor usage. For in-game use cases, prefer physics collision.
If true, this directional light will blend between shadow map splits resulting in a smoother transition between them. Equivalent to DirectionalLight.directional_shadow_blend_splits.
- void light_directional_set_shadow_depth_range_mode ( RID light, LightDirectionalShadowDepthRangeMode range_mode )
Sets the shadow depth range mode for this directional light. Equivalent to DirectionalLight.directional_shadow_depth_range. See LightDirectionalShadowDepthRangeMode for options.
- void light_directional_set_shadow_mode ( RID light, LightDirectionalShadowMode mode )
Sets the shadow mode for this directional light. Equivalent to DirectionalLight.directional_shadow_mode. See LightDirectionalShadowMode for options.
- void light_omni_set_shadow_detail ( RID light, LightOmniShadowDetail detail )
Sets whether to use vertical or horizontal detail for this omni light. This can be used to alleviate artifacts in the shadow map. Equivalent to OmniLight.omni_shadow_detail.
- void light_omni_set_shadow_mode ( RID light, LightOmniShadowMode mode )
Sets whether to use a dual paraboloid or a cubemap for the shadow map. Dual paraboloid is faster but may suffer from artifacts. Equivalent to OmniLight.omni_shadow_mode.
Sets the color of the light. Equivalent to Light.light_color.
Sets the cull mask for this Light. Lights only affect objects in the selected layers. Equivalent to Light.light_cull_mask.
If true, light will subtract light instead of adding light. Equivalent to Light.light_negative.
- void light_set_param ( RID light, LightParam param, float value )
Sets the specified light parameter. See LightParam for options. Equivalent to Light.set_param.
Not implemented in Godot 3.x.
If true, reverses the backface culling of the mesh. This can be useful when you have a flat mesh that has a light behind it. If you need to cast a shadow on both sides of the mesh, set the mesh to use double sided shadows with instance_geometry_set_cast_shadows_setting. Equivalent to Light.shadow_reverse_cull_face.
If true, light will cast shadows. Equivalent to Light.shadow_enabled.
Sets the color of the shadow cast by the light. Equivalent to Light.shadow_color.
Sets whether GI probes capture light information from this light.
- RID lightmap_capture_create ( )
Creates a lightmap capture and adds it to the VisualServer. It can be accessed with the RID that is returned. This RID will be used in all lightmap_capture_* VisualServer functions.
Once finished with your RID, you will want to free the RID using the VisualServer’s free_rid static method.
To place in a scene, attach this lightmap capture to an instance using instance_set_base using the returned RID.
Returns the size of the lightmap capture area.
Returns the energy multiplier used by the lightmap capture.
- PoolByteArray lightmap_capture_get_octree ( RID capture ) const
Returns the octree used by the lightmap capture.
Returns the cell subdivision amount used by this lightmap capture’s octree.
Returns the cell transform for this lightmap capture’s octree.
Sets the size of the area covered by the lightmap capture. Equivalent to BakedLightmapData.bounds.
Sets the energy multiplier for this lightmap capture. Equivalent to BakedLightmapData.energy.
- void lightmap_capture_set_octree ( RID capture, PoolByteArray octree )
Sets the octree to be used by this lightmap capture. This function is normally used by the BakedLightmap node. Equivalent to BakedLightmapData.octree.
Sets the subdivision level of this lightmap capture’s octree. Equivalent to BakedLightmapData.cell_subdiv.
Sets the octree cell transform for this lightmap capture’s octree. Equivalent to BakedLightmapData.cell_space_transform.
Returns a mesh of a sphere with the given amount of horizontal and vertical subdivisions.
- RID material_create ( )
Creates an empty material and adds it to the VisualServer. It can be accessed with the RID that is returned. This RID will be used in all material_* VisualServer functions.
Once finished with your RID, you will want to free the RID using the VisualServer’s free_rid static method.
Returns the value of a certain material’s parameter.
Returns the default value for the param if available. Otherwise returns an empty Variant.
Returns the shader of a certain material’s shader. Returns an empty RID if the material doesn’t have a shader.
Sets a material’s line width.
Sets an object’s next material.
Sets a material’s parameter.
Sets a material’s render priority.
Sets a shader material’s shader.
- void mesh_add_surface_from_arrays ( RID mesh, PrimitiveType primitive, Array arrays, Array blend_shapes=[ ], int compress_format=97280 )
Adds a surface generated from the Arrays to a mesh. See PrimitiveType constants for types.
- void mesh_clear ( RID mesh )
Removes all surfaces from a mesh.
- RID mesh_create ( )
Creates a new mesh and adds it to the VisualServer. It can be accessed with the RID that is returned. This RID will be used in all mesh_* VisualServer functions.
Once finished with your RID, you will want to free the RID using the VisualServer’s free_rid static method.
To place in a scene, attach this mesh to an instance using instance_set_base using the returned RID.
Returns a mesh’s blend shape count.
- BlendShapeMode mesh_get_blend_shape_mode ( RID mesh ) const
Returns a mesh’s blend shape mode.
Returns a mesh’s custom aabb.
Returns a mesh’s number of surfaces.
Removes a mesh’s surface.
Sets a mesh’s blend shape count.
- void mesh_set_blend_shape_mode ( RID mesh, BlendShapeMode mode )
Sets a mesh’s blend shape mode.
Sets a mesh’s custom aabb.
Returns a mesh’s surface’s aabb.
- PoolByteArray mesh_surface_get_array ( RID mesh, int surface ) const
Returns a mesh’s surface’s vertex buffer.
Returns a mesh’s surface’s amount of indices.
Returns a mesh’s surface’s amount of vertices.
Returns a mesh’s surface’s buffer arrays.
Returns a mesh’s surface’s arrays for blend shapes.
Returns the format of a mesh’s surface.
- int mesh_surface_get_format_offset ( int format, int vertex_len, int index_len, int array_index ) const
Function is unused in Godot 3.x.
Function is unused in Godot 3.x.
- PoolByteArray mesh_surface_get_index_array ( RID mesh, int surface ) const
Returns a mesh’s surface’s index buffer.
Returns a mesh’s surface’s material.
- PrimitiveType mesh_surface_get_primitive_type ( RID mesh, int surface ) const
Returns the primitive type of a mesh’s surface.
Returns the aabb of a mesh’s surface’s skeleton.
Sets a mesh’s surface’s material.
- void mesh_surface_update_region ( RID mesh, int surface, int offset, PoolByteArray data )
Updates a specific region of a vertex buffer for the specified surface. Warning: this function alters the vertex buffer directly with no safety mechanisms, you can easily corrupt your mesh.
- void multimesh_allocate ( RID multimesh, int instances, MultimeshTransformFormat transform_format, MultimeshColorFormat color_format, MultimeshCustomDataFormat custom_data_format=0 )
Allocates space for the multimesh data. Format parameters determine how the data will be stored by OpenGL. See MultimeshTransformFormat, MultimeshColorFormat, and MultimeshCustomDataFormat for usage. Equivalent to MultiMesh.instance_count.
- RID multimesh_create ( )
Creates a new multimesh on the VisualServer and returns an RID handle. This RID will be used in all multimesh_* VisualServer functions.
Once finished with your RID, you will want to free the RID using the VisualServer’s free_rid static method.
To place in a scene, attach this multimesh to an instance using instance_set_base using the returned RID.
Calculates and returns the axis-aligned bounding box that encloses all instances within the multimesh.
Returns the number of instances allocated for this multimesh.
Returns the RID of the mesh that will be used in drawing this multimesh.
Returns the number of visible instances for this multimesh.
Returns the color by which the specified instance will be modulated.
Returns the custom data associated with the specified instance.
Returns the Transform of the specified instance.
- Transform2D multimesh_instance_get_transform_2d ( RID multimesh, int index ) const
Returns the Transform2D of the specified instance. For use when the multimesh is set to use 2D transforms.
Sets the color by which this instance will be modulated. Equivalent to MultiMesh.set_instance_color.
Sets the custom data for this instance. Custom data is passed as a Color, but is interpreted as a vec4 in the shader. Equivalent to MultiMesh.set_instance_custom_data.
Sets the Transform for this instance. Equivalent to MultiMesh.set_instance_transform.
- void multimesh_instance_set_transform_2d ( RID multimesh, int index, Transform2D transform )
Sets the Transform2D for this instance. For use when multimesh is used in 2D. Equivalent to MultiMesh.set_instance_transform_2d.
- void multimesh_set_as_bulk_array ( RID multimesh, PoolRealArray array )
Sets all data related to the instances in one go. This is especially useful when loading the data from disk or preparing the data from GDNative.
All data is packed in one large float array. An array may look like this: Transform for instance 1, color data for instance 1, custom data for instance 1, transform for instance 2, color data for instance 2, etc.
Transform is stored as 12 floats, Transform2D is stored as 8 floats, COLOR_8BIT / CUSTOM_DATA_8BIT is stored as 1 float (4 bytes as is) and COLOR_FLOAT / CUSTOM_DATA_FLOAT is stored as 4 floats.
Sets the mesh to be drawn by the multimesh. Equivalent to MultiMesh.mesh.
Sets the number of instances visible at a given time. If -1, all instances that have been allocated are drawn. Equivalent to MultiMesh.visible_instance_count.
- RID omni_light_create ( )
Creates a new omni light and adds it to the VisualServer. It can be accessed with the RID that is returned. This RID can be used in most light_* VisualServer functions.
Once finished with your RID, you will want to free the RID using the VisualServer’s free_rid static method.
To place in a scene, attach this omni light to an instance using instance_set_base using the returned RID.
- RID particles_create ( )
Creates a particle system and adds it to the VisualServer. It can be accessed with the RID that is returned. This RID will be used in all particles_* VisualServer functions.
Once finished with your RID, you will want to free the RID using the VisualServer’s free_rid static method.
To place in a scene, attach these particles to an instance using instance_set_base using the returned RID.
Calculates and returns the axis-aligned bounding box that contains all the particles. Equivalent to Particles.capture_aabb.
Returns true if particles are currently set to emitting.
Returns true if particles are not emitting and particles are set to inactive.
- void particles_request_process ( RID particles )
Add particle system to list of particle systems that need to be updated. Update will take place on the next frame, or on the next call to instances_cull_aabb, instances_cull_convex, or instances_cull_ray.
- void particles_restart ( RID particles )
Reset the particles on the next update. Equivalent to Particles.restart.
Sets the number of particles to be drawn and allocates the memory for them. Equivalent to Particles.amount.
Sets a custom axis-aligned bounding box for the particle system. Equivalent to Particles.visibility_aabb.
- void particles_set_draw_order ( RID particles, ParticlesDrawOrder order )
Sets the draw order of the particles to one of the named enums from ParticlesDrawOrder. See ParticlesDrawOrder for options. Equivalent to Particles.draw_order.
Sets the mesh to be used for the specified draw pass. Equivalent to Particles.draw_pass_1, Particles.draw_pass_2, Particles.draw_pass_3, and Particles.draw_pass_4.
Sets the number of draw passes to use. Equivalent to Particles.draw_passes.
Sets the Transform that will be used by the particles when they first emit.
If true, particles will emit over time. Setting to false does not reset the particles, but only stops their emission. Equivalent to Particles.emitting.
Sets the explosiveness ratio. Equivalent to Particles.explosiveness.
Sets the frame rate that the particle system rendering will be fixed to. Equivalent to Particles.fixed_fps.
If true, uses fractional delta which smooths the movement of the particles. Equivalent to Particles.fract_delta.
Sets the lifetime of each particle in the system. Equivalent to Particles.lifetime.
If true, particles will emit once and then stop. Equivalent to Particles.one_shot.
Sets the preprocess time for the particles animation. This lets you delay starting an animation until after the particles have begun emitting. Equivalent to Particles.preprocess.
Sets the material for processing the particles. Note: this is not the material used to draw the materials. Equivalent to Particles.process_material.
Sets the emission randomness ratio. This randomizes the emission of particles within their phase. Equivalent to Particles.randomness.
Sets the speed scale of the particle system. Equivalent to Particles.speed_scale.
If true, particles use local coordinates. If false they use global coordinates. Equivalent to Particles.local_coords.
- RID reflection_probe_create ( )
Creates a reflection probe and adds it to the VisualServer. It can be accessed with the RID that is returned. This RID will be used in all reflection_probe_* VisualServer functions.
Once finished with your RID, you will want to free the RID using the VisualServer’s free_rid static method.
To place in a scene, attach this reflection probe to an instance using instance_set_base using the returned RID.
If true, reflections will ignore sky contribution. Equivalent to ReflectionProbe.interior_enable.
Sets the render cull mask for this reflection probe. Only instances with a matching cull mask will be rendered by this probe. Equivalent to ReflectionProbe.cull_mask.
If true, uses box projection. This can make reflections look more correct in certain situations. Equivalent to ReflectionProbe.box_projection.
If true, computes shadows in the reflection probe. This makes the reflection much slower to compute. Equivalent to ReflectionProbe.enable_shadows.
Sets the size of the area that the reflection probe will capture. Equivalent to ReflectionProbe.extents.
Sets the intensity of the reflection probe. Intensity modulates the strength of the reflection. Equivalent to ReflectionProbe.intensity.
Sets the ambient light color for this reflection probe when set to interior mode. Equivalent to ReflectionProbe.interior_ambient_color.
Sets the energy multiplier for this reflection probes ambient light contribution when set to interior mode. Equivalent to ReflectionProbe.interior_ambient_energy.
Sets the contribution value for how much the reflection affects the ambient light for this reflection probe when set to interior mode. Useful so that ambient light matches the color of the room. Equivalent to ReflectionProbe.interior_ambient_contrib.
Sets the max distance away from the probe an object can be before it is culled. Equivalent to ReflectionProbe.max_distance.
Sets the origin offset to be used when this reflection probe is in box project mode. Equivalent to ReflectionProbe.origin_offset.
- void reflection_probe_set_update_mode ( RID probe, ReflectionProbeUpdateMode mode )
Sets how often the reflection probe updates. Can either be once or every frame. See ReflectionProbeUpdateMode for options.
Schedules a callback to the corresponding named method on where after a frame has been drawn.
The callback method must use only 1 argument which will be called with userdata.
- RID scenario_create ( )
Creates a scenario and adds it to the VisualServer. It can be accessed with the RID that is returned. This RID will be used in all scenario_* VisualServer functions.
Once finished with your RID, you will want to free the RID using the VisualServer’s free_rid static method.
The scenario is the 3D world that all the visual instances exist in.
- void scenario_set_debug ( RID scenario, ScenarioDebugMode debug_mode )
Sets the ScenarioDebugMode for this scenario. See ScenarioDebugMode for options.
Sets the environment that will be used with this scenario.
Sets the fallback environment to be used by this scenario. The fallback environment is used if no environment is set. Internally, this is used by the editor to provide a default environment.
Sets the size of the reflection atlas shared by all reflection probes in this scenario.
Sets a boot image. The color defines the background color. If scale is true, the image will be scaled to fit the screen size. If use_filter is true, the image will be scaled with linear interpolation. If use_filter is false, the image will be scaled with nearest-neighbor interpolation.
- void set_debug_generate_wireframes ( bool generate )
If true, the engine will generate wireframes for use with the wireframe debug mode.
- void set_default_clear_color ( Color color )
Sets the default clear color which is used when a specific clear color has not been selected.
- RID shader_create ( )
Creates an empty shader and adds it to the VisualServer. It can be accessed with the RID that is returned. This RID will be used in all shader_* VisualServer functions.
Once finished with your RID, you will want to free the RID using the VisualServer’s free_rid static method.
Returns a shader’s code.
Returns a default texture from a shader searched by name.
Returns the parameters of a shader.
Sets a shader’s code.
Sets a shader’s default texture. Overwrites the texture given by name.
Allocates the GPU buffers for this skeleton.
Returns the Transform set for a specific bone of this skeleton.
- Transform2D skeleton_bone_get_transform_2d ( RID skeleton, int bone ) const
Returns the Transform2D set for a specific bone of this skeleton.
Sets the Transform for a specific bone of this skeleton.
- void skeleton_bone_set_transform_2d ( RID skeleton, int bone, Transform2D transform )
Sets the Transform2D for a specific bone of this skeleton.
- RID skeleton_create ( )
Creates a skeleton and adds it to the VisualServer. It can be accessed with the RID that is returned. This RID will be used in all skeleton_* VisualServer functions.
Once finished with your RID, you will want to free the RID using the VisualServer’s free_rid static method.
Returns the number of bones allocated for this skeleton.
- RID sky_create ( )
Creates an empty sky and adds it to the VisualServer. It can be accessed with the RID that is returned. This RID will be used in all sky_* VisualServer functions.
Once finished with your RID, you will want to free the RID using the VisualServer’s free_rid static method.
Sets a sky’s texture.
- RID spot_light_create ( )
Creates a spot light and adds it to the VisualServer. It can be accessed with the RID that is returned. This RID can be used in most light_* VisualServer functions.
Once finished with your RID, you will want to free the RID using the VisualServer’s free_rid static method.
To place in a scene, attach this spot light to an instance using instance_set_base using the returned RID.
- void sync ( )
Not implemented in Godot 3.x.
- void texture_allocate ( RID texture, int width, int height, int depth_3d, Format format, TextureType type, int flags=7 )
Allocates the GPU memory for the texture.
Binds the texture to a texture slot.
- RID texture_create ( )
Creates an empty texture and adds it to the VisualServer. It can be accessed with the RID that is returned. This RID will be used in all texture_* VisualServer functions.
Once finished with your RID, you will want to free the RID using the VisualServer’s free_rid static method.
Creates a texture, allocates the space for an image, and fills in the image.
- Array texture_debug_usage ( )
Returns a list of all the textures and their information.
Returns a copy of a texture’s image unless it’s a CubeMap, in which case it returns the RID of the image at one of the cubes sides.
Returns the depth of the texture.
Returns the flags of a texture.
Returns the format of the texture’s image.
Returns the texture’s height.
Returns the texture’s path.
Returns the opengl id of the texture’s image.
- TextureType texture_get_type ( RID texture ) const
Returns the type of the texture, can be any of the TextureType.
Returns the texture’s width.
Sets the texture’s image data. If it’s a CubeMap, it sets the image data at a cube side.
- void texture_set_data_partial ( RID texture, Image image, int src_x, int src_y, int src_w, int src_h, int dst_x, int dst_y, int dst_mip, int layer=0 )
Sets a part of the data for a texture. Warning: this function calls the underlying graphics API directly and may corrupt your texture if used improperly.
Sets the texture’s flags. See TextureFlags for options.
Sets the texture’s path.
- void texture_set_shrink_all_x2_on_set_data ( bool shrink )
If true, sets internal processes to shrink all image data to half the size.
Resizes the texture to the specified dimensions.
- void textures_keep_original ( bool enable )
If true, the image will be stored in the texture’s images array if overwritten.
Sets a viewport’s camera.
Sets a viewport’s canvas.
Copies viewport to a region of the screen specified by rect. If Viewport.render_direct_to_screen is true, then viewport does not use a framebuffer and the contents of the viewport are rendered directly to screen. However, note that the root viewport is drawn last, therefore it will draw over the screen. Accordingly, you must set the root viewport to an area that does not cover the area that you have attached this viewport to.
For example, you can set the root viewport to not render at all with the following code:
func _ready():
get_viewport().set_attach_to_screen_rect(Rect2())
$Viewport.set_attach_to_screen_rect(Rect2(0, 0, 600, 600))
Using this can result in significant optimization, especially on lower-end devices. However, it comes at the cost of having to manage your viewports manually. For a further optimization see, viewport_set_render_direct_to_screen.
- RID viewport_create ( )
Creates an empty viewport and adds it to the VisualServer. It can be accessed with the RID that is returned. This RID will be used in all viewport_* VisualServer functions.
Once finished with your RID, you will want to free the RID using the VisualServer’s free_rid static method.
- void viewport_detach ( RID viewport )
Detaches the viewport from the screen.
- int viewport_get_render_info ( RID viewport, ViewportRenderInfo info )
Returns a viewport’s render information. For options, see the ViewportRenderInfo constants.
Returns the viewport’s last rendered frame.
Detaches a viewport from a canvas and vice versa.
If true, sets the viewport active, else sets it inactive.
Sets the stacking order for a viewport’s canvas.
layer is the actual canvas layer, while sublayer specifies the stacking order of the canvas among those in the same layer.
- void viewport_set_canvas_transform ( RID viewport, RID canvas, Transform2D offset )
Sets the transformation of a viewport’s canvas.
- void viewport_set_clear_mode ( RID viewport, ViewportClearMode clear_mode )
Sets the clear mode of a viewport. See ViewportClearMode for options.
- void viewport_set_debug_draw ( RID viewport, ViewportDebugDraw draw )
Sets the debug draw mode of a viewport. See ViewportDebugDraw for options.
If true, a viewport’s 3D rendering is disabled.
If true, rendering of a viewport’s environment is disabled.
- void viewport_set_global_canvas_transform ( RID viewport, Transform2D transform )
Sets the viewport’s global transformation matrix.
If true, the viewport renders to hdr.
If true, the viewport’s canvas is not rendered.
Currently unimplemented in Godot 3.x.
- void viewport_set_msaa ( RID viewport, ViewportMSAA msaa )
Sets the anti-aliasing mode. See ViewportMSAA for options.
Sets the viewport’s parent to another viewport.
If true, render the contents of the viewport directly to screen. This allows a low-level optimization where you can skip drawing a viewport to the root viewport. While this optimization can result in a significant increase in speed (especially on older devices), it comes at a cost of usability. When this is enabled, you cannot read from the viewport or from the SCREEN_TEXTURE. You also lose the benefit of certain window settings, such as the various stretch modes. Another consequence to be aware of is that in 2D the rendering happens in window coordinates, so if you have a viewport that is double the size of the window, and you set this, then only the portion that fits within the window will be drawn, no automatic scaling is possible, even if your game scene is significantly larger than the window size.
Sets a viewport’s scenario.
The scenario contains information about the ScenarioDebugMode, environment information, reflection atlas etc.
Sets the shadow atlas quadrant’s subdivision.
Sets the size of the shadow atlas’s images (used for omni and spot lights). The value will be rounded up to the nearest power of 2.
Sets the viewport’s width and height.
If true, the viewport renders its background as transparent.
- void viewport_set_update_mode ( RID viewport, ViewportUpdateMode update_mode )
Sets when the viewport should be updated. See ViewportUpdateMode constants for options.
- void viewport_set_usage ( RID viewport, ViewportUsage usage )
Sets the viewport’s 2D/3D mode. See ViewportUsage constants for options.
If true, the viewport uses augmented or virtual reality technologies. See ARVRInterface.
If true, the viewport’s rendering is flipped vertically.
VisualShader¶
Inherits: Shader < Resource < Reference < Object
A custom shader program with a visual editor.
Description¶
This class allows you to define a custom shader program that can be used for various materials to render objects.
The visual shader editor creates the shader.
Properties¶
| String | code | O: "shader_type spatial;void vertex() {// Output:0}void fragment() {// Output:0}void light() {// Output:0}" |
| Vector2 | graph_offset | Vector2( 0, 0 ) |
Methods¶
| void | add_node ( Type type, VisualShaderNode node, Vector2 position, int id ) |
| bool | can_connect_nodes ( Type type, int from_node, int from_port, int to_node, int to_port ) const |
| Error | connect_nodes ( Type type, int from_node, int from_port, int to_node, int to_port ) |
| void | connect_nodes_forced ( Type type, int from_node, int from_port, int to_node, int to_port ) |
| void | disconnect_nodes ( Type type, int from_node, int from_port, int to_node, int to_port ) |
| VisualShaderNode | get_node ( Type type, int id ) const |
| Array | get_node_connections ( Type type ) const |
| PoolIntArray | get_node_list ( Type type ) const |
| Vector2 | get_node_position ( Type type, int id ) const |
| int | get_valid_node_id ( Type type ) const |
| bool | is_node_connection ( Type type, int from_node, int from_port, int to_node, int to_port ) const |
| void | remove_node ( Type type, int id ) |
| void | set_mode ( Mode mode ) |
| void | set_node_position ( Type type, int id, Vector2 position ) |
Enumerations¶
enum Type:
- TYPE_VERTEX = 0 — A vertex shader, operating on vertices.
- TYPE_FRAGMENT = 1 — A fragment shader, operating on fragments (pixels).
- TYPE_LIGHT = 2 — A shader for light calculations.
- TYPE_MAX = 3 — Represents the size of the Type enum.
Constants¶
- NODE_ID_INVALID = -1
- NODE_ID_OUTPUT = 0
Property Descriptions¶
- Vector2 graph_offset
| Default | Vector2( 0, 0 ) |
| Setter | set_graph_offset(value) |
| Getter | get_graph_offset() |
The offset vector of the whole graph.
Method Descriptions¶
- void add_node ( Type type, VisualShaderNode node, Vector2 position, int id )
Adds the specified node to the shader.
Returns true if the specified nodes and ports can be connected together.
Connects the specified nodes and ports.
Connects the specified nodes and ports, even if they can’t be connected. Such connection is invalid and will not function properly.
Connects the specified nodes and ports.
- VisualShaderNode get_node ( Type type, int id ) const
Returns the shader node instance with specified type and id.
Returns the list of connected nodes with the specified type.
- PoolIntArray get_node_list ( Type type ) const
Returns the list of all nodes in the shader with the specified type.
Returns the position of the specified node within the shader graph.
Returns true if the specified node and port connection exist.
Removes the specified node from the shader.
- void set_mode ( Mode mode )
Sets the mode of this shader.
Sets the position of the specified node.
VisualShaderNode¶
Inherits: Resource < Reference < Object
Inherited By: VisualShaderNodeBooleanConstant, VisualShaderNodeColorConstant, VisualShaderNodeColorFunc, VisualShaderNodeColorOp, VisualShaderNodeCompare, VisualShaderNodeCubeMap, VisualShaderNodeCustom, VisualShaderNodeDeterminant, VisualShaderNodeDotProduct, VisualShaderNodeFaceForward, VisualShaderNodeFresnel, VisualShaderNodeGroupBase, VisualShaderNodeIf, VisualShaderNodeInput, VisualShaderNodeIs, VisualShaderNodeOuterProduct, VisualShaderNodeOutput, VisualShaderNodeScalarClamp, VisualShaderNodeScalarConstant, VisualShaderNodeScalarDerivativeFunc, VisualShaderNodeScalarFunc, VisualShaderNodeScalarInterp, VisualShaderNodeScalarOp, VisualShaderNodeScalarSmoothStep, VisualShaderNodeSwitch, VisualShaderNodeTexture, VisualShaderNodeTransformCompose, VisualShaderNodeTransformConstant, VisualShaderNodeTransformDecompose, VisualShaderNodeTransformFunc, VisualShaderNodeTransformMult, VisualShaderNodeTransformVecMult, VisualShaderNodeUniform, VisualShaderNodeVec3Constant, VisualShaderNodeVectorClamp, VisualShaderNodeVectorCompose, VisualShaderNodeVectorDecompose, VisualShaderNodeVectorDerivativeFunc, VisualShaderNodeVectorDistance, VisualShaderNodeVectorFunc, VisualShaderNodeVectorInterp, VisualShaderNodeVectorLen, VisualShaderNodeVectorOp, VisualShaderNodeVectorRefract, VisualShaderNodeVectorScalarMix, VisualShaderNodeVectorScalarSmoothStep, VisualShaderNodeVectorScalarStep, VisualShaderNodeVectorSmoothStep
Base class for nodes in a visual shader graph.
Tutorials¶
Properties¶
| int | output_port_for_preview | -1 |
Methods¶
| Array | get_default_input_values ( ) const |
| Variant | get_input_port_default_value ( int port ) const |
| void | set_default_input_values ( Array values ) |
| void | set_input_port_default_value ( int port, Variant value ) |
Signals¶
- editor_refresh_request ( )
Emitted when the node requests an editor refresh. Currently called only in setter of VisualShaderNodeTexture.source, VisualShaderNodeTexture, and VisualShaderNodeCubeMap (and their derivatives).
Enumerations¶
enum PortType:
- PORT_TYPE_SCALAR = 0 — Floating-point scalar. Translated to
floattype in shader code. - PORT_TYPE_VECTOR = 1 — 3D vector of floating-point values. Translated to
vec3type in shader code. - PORT_TYPE_BOOLEAN = 2 — Boolean type. Translated to
booltype in shader code. - PORT_TYPE_TRANSFORM = 3 — Transform type. Translated to
mat4type in shader code. - PORT_TYPE_SAMPLER = 4 — Sampler type. Translated to reference of sampler uniform in shader code. Can only be used for input ports in non-uniform nodes.
- PORT_TYPE_MAX = 5 — Represents the size of the PortType enum.
Property Descriptions¶
- int output_port_for_preview
| Default | -1 |
| Setter | set_output_port_for_preview(value) |
| Getter | get_output_port_for_preview() |
Sets the output port index which will be showed for preview. If set to -1 no port will be open for preview.
Method Descriptions¶
- Array get_default_input_values ( ) const
Returns an Array containing default values for all of the input ports of the node in the form [index0, value0, index1, value1, ...].
Returns the default value of the input port.
- void set_default_input_values ( Array values )
Sets the default input ports values using an Array of the form [index0, value0, index1, value1, ...]. For example: [0, Vector3(0, 0, 0), 1, Vector3(0, 0, 0)].
Sets the default value for the selected input port.
VisualShaderNodeBooleanConstant¶
Inherits: VisualShaderNode < Resource < Reference < Object
A boolean constant to be used within the visual shader graph.
VisualShaderNodeBooleanUniform¶
Inherits: VisualShaderNodeUniform < VisualShaderNode < Resource < Reference < Object
A boolean uniform to be used within the visual shader graph.
Description¶
Translated to uniform bool in the shader language.
VisualShaderNodeColorConstant¶
Inherits: VisualShaderNode < Resource < Reference < Object
A Color constant to be used within the visual shader graph.
VisualShaderNodeColorFunc¶
Inherits: VisualShaderNode < Resource < Reference < Object
A Color function to be used within the visual shader graph.
Enumerations¶
enum Function:
- FUNC_GRAYSCALE = 0 — Converts the color to grayscale using the following formula:
vec3 c = input;
float max1 = max(c.r, c.g);
float max2 = max(max1, c.b);
float max3 = max(max1, max2);
return vec3(max3, max3, max3);
- FUNC_SEPIA = 1 — Applies sepia tone effect using the following formula:
vec3 c = input;
float r = (c.r * 0.393) + (c.g * 0.769) + (c.b * 0.189);
float g = (c.r * 0.349) + (c.g * 0.686) + (c.b * 0.168);
float b = (c.r * 0.272) + (c.g * 0.534) + (c.b * 0.131);
return vec3(r, g, b);
VisualShaderNodeColorOp¶
Inherits: VisualShaderNode < Resource < Reference < Object
A Color operator to be used within the visual shader graph.
Enumerations¶
enum Operator:
- OP_SCREEN = 0 — Produce a screen effect with the following formula:
result = vec3(1.0) - (vec3(1.0) - a) * (vec3(1.0) - b);
- OP_DIFFERENCE = 1 — Produce a difference effect with the following formula:
result = abs(a - b);
- OP_DARKEN = 2 — Produce a darken effect with the following formula:
result = min(a, b);
- OP_LIGHTEN = 3 — Produce a lighten effect with the following formula:
result = max(a, b);
- OP_OVERLAY = 4 — Produce an overlay effect with the following formula:
for (int i = 0; i < 3; i++) {
float base = a[i];
float blend = b[i];
if (base < 0.5) {
result[i] = 2.0 * base * blend;
} else {
result[i] = 1.0 - 2.0 * (1.0 - blend) * (1.0 - base);
}
}
- OP_DODGE = 5 — Produce a dodge effect with the following formula:
result = a / (vec3(1.0) - b);
- OP_BURN = 6 — Produce a burn effect with the following formula:
result = vec3(1.0) - (vec3(1.0) - a) / b;
- OP_SOFT_LIGHT = 7 — Produce a soft light effect with the following formula:
for (int i = 0; i < 3; i++) {
float base = a[i];
float blend = b[i];
if (base < 0.5) {
result[i] = base * (blend + 0.5);
} else {
result[i] = 1.0 - (1.0 - base) * (1.0 - (blend - 0.5));
}
}
- OP_HARD_LIGHT = 8 — Produce a hard light effect with the following formula:
for (int i = 0; i < 3; i++) {
float base = a[i];
float blend = b[i];
if (base < 0.5) {
result[i] = base * (2.0 * blend);
} else {
result[i] = 1.0 - (1.0 - base) * (1.0 - 2.0 * (blend - 0.5));
}
}
VisualShaderNodeColorUniform¶
Inherits: VisualShaderNodeUniform < VisualShaderNode < Resource < Reference < Object
A Color uniform to be used within the visual shader graph.
Description¶
Translated to uniform vec4 in the shader language.
VisualShaderNodeCompare¶
Inherits: VisualShaderNode < Resource < Reference < Object
A comparison function for common types within the visual shader graph.
Description¶
Compares a and b of type by function. Returns a boolean scalar. Translates to if instruction in shader code.
Enumerations¶
enum ComparisonType:
- CTYPE_SCALAR = 0 — A floating-point scalar.
- CTYPE_VECTOR = 1 — A 3D vector type.
- CTYPE_BOOLEAN = 2 — A boolean type.
- CTYPE_TRANSFORM = 3 — A transform (
mat4) type.
enum Function:
- FUNC_EQUAL = 0 — Comparison for equality (
a == b). - FUNC_NOT_EQUAL = 1 — Comparison for inequality (
a != b). - FUNC_GREATER_THAN = 2 — Comparison for greater than (
a > b). Cannot be used if type set to CTYPE_BOOLEAN or CTYPE_TRANSFORM. - FUNC_GREATER_THAN_EQUAL = 3 — Comparison for greater than or equal (
a >= b). Cannot be used if type set to CTYPE_BOOLEAN or CTYPE_TRANSFORM. - FUNC_LESS_THAN = 4 — Comparison for less than (
a < b). Cannot be used if type set to CTYPE_BOOLEAN or CTYPE_TRANSFORM. - FUNC_LESS_THAN_EQUAL = 5 — Comparison for less than or equal (
a < b). Cannot be used if type set to CTYPE_BOOLEAN or CTYPE_TRANSFORM.
enum Condition:
- COND_ALL = 0 — The result will be true if all of component in vector satisfy the comparison condition.
- COND_ANY = 1 — The result will be true if any of component in vector satisfy the comparison condition.
Property Descriptions¶
- Condition condition
| Default | 0 |
| Setter | set_condition(value) |
| Getter | get_condition() |
Extra condition which is applied if type is set to CTYPE_VECTOR.
- Function function
| Default | 0 |
| Setter | set_function(value) |
| Getter | get_function() |
A comparison function. See Function for options.
- ComparisonType type
| Default | 0 |
| Setter | set_comparison_type(value) |
| Getter | get_comparison_type() |
The type to be used in the comparison. See ComparisonType for options.
VisualShaderNodeCubeMap¶
Inherits: VisualShaderNode < Resource < Reference < Object
A CubeMap sampling node to be used within the visual shader graph.
Description¶
Translated to texture(cubemap, vec3) in the shader language. Returns a color vector and alpha channel as scalar.
Properties¶
| CubeMap | cube_map | |
| Source | source | 0 |
| TextureType | texture_type | 0 |
Enumerations¶
enum Source:
- SOURCE_TEXTURE = 0 — Use the CubeMap set via cube_map. If this is set to source, the
samplerCubeport is ignored. - SOURCE_PORT = 1 — Use the CubeMap sampler reference passed via the
samplerCubeport. If this is set to source, the cube_map texture is ignored.
enum TextureType:
- TYPE_DATA = 0 — No hints are added to the uniform declaration.
- TYPE_COLOR = 1 — Adds
hint_albedoas hint to the uniform declaration for proper sRGB to linear conversion. - TYPE_NORMALMAP = 2 — Adds
hint_normalas hint to the uniform declaration, which internally converts the texture for proper usage as normal map.
Property Descriptions¶
- CubeMap cube_map
| Setter | set_cube_map(value) |
| Getter | get_cube_map() |
The CubeMap texture to sample when using SOURCE_TEXTURE as source.
- Source source
| Default | 0 |
| Setter | set_source(value) |
| Getter | get_source() |
Defines which source should be used for the sampling. See Source for options.
- TextureType texture_type
| Default | 0 |
| Setter | set_texture_type(value) |
| Getter | get_texture_type() |
Defines the type of data provided by the source texture. See TextureType for options.
VisualShaderNodeCubeMapUniform¶
Inherits: VisualShaderNodeTextureUniform < VisualShaderNodeUniform < VisualShaderNode < Resource < Reference < Object
A CubeMap uniform node to be used within the visual shader graph.
Description¶
Translated to uniform samplerCube in the shader language. The output value can be used as port for VisualShaderNodeCubeMap.
VisualShaderNodeCustom¶
Inherits: VisualShaderNode < Resource < Reference < Object
Virtual class to define custom VisualShaderNodes for use in the Visual Shader Editor.
Description¶
By inheriting this class you can create a custom VisualShader script addon which will be automatically added to the Visual Shader Editor. The VisualShaderNode’s behavior is defined by overriding the provided virtual methods.
In order for the node to be registered as an editor addon, you must use the tool keyword and provide a class_name for your custom script. For example:
tool
extends VisualShaderNodeCustom
class_name VisualShaderNodeNoise
Tutorials¶
Methods¶
| String | _get_category ( ) virtual |
| String | _get_code ( Array input_vars, Array output_vars, int mode, int type ) virtual |
| String | _get_description ( ) virtual |
| String | _get_global_code ( int mode ) virtual |
| int | _get_input_port_count ( ) virtual |
| String | _get_input_port_name ( int port ) virtual |
| int | _get_input_port_type ( int port ) virtual |
| String | _get_name ( ) virtual |
| int | _get_output_port_count ( ) virtual |
| String | _get_output_port_name ( int port ) virtual |
| int | _get_output_port_type ( int port ) virtual |
| int | _get_return_icon_type ( ) virtual |
| String | _get_subcategory ( ) virtual |
Method Descriptions¶
- String _get_category ( ) virtual
Override this method to define the category of the associated custom node in the Visual Shader Editor’s members dialog.
Defining this method is optional. If not overridden, the node will be filed under the “Custom” category.
Override this method to define the actual shader code of the associated custom node. The shader code should be returned as a string, which can have multiple lines (the """ multiline string construct can be used for convenience).
The input_vars and output_vars arrays contain the string names of the various input and output variables, as defined by _get_input_* and _get_output_* virtual methods in this class.
The output ports can be assigned values in the shader code. For example, return output_vars[0] + " = " + input_vars[0] + ";".
You can customize the generated code based on the shader mode (see Mode) and/or type (see Type).
Defining this method is required.
- String _get_description ( ) virtual
Override this method to define the description of the associated custom node in the Visual Shader Editor’s members dialog.
Defining this method is optional.
Override this method to add shader code on top of the global shader, to define your own standard library of reusable methods, varyings, constants, uniforms, etc. The shader code should be returned as a string, which can have multiple lines (the """ multiline string construct can be used for convenience).
Be careful with this functionality as it can cause name conflicts with other custom nodes, so be sure to give the defined entities unique names.
You can customize the generated code based on the shader mode (see Mode).
Defining this method is optional.
- int _get_input_port_count ( ) virtual
Override this method to define the amount of input ports of the associated custom node.
Defining this method is required. If not overridden, the node has no input ports.
Override this method to define the names of input ports of the associated custom node. The names are used both for the input slots in the editor and as identifiers in the shader code, and are passed in the input_vars array in _get_code.
Defining this method is optional, but recommended. If not overridden, input ports are named as "in" + str(port).
Override this method to define the returned type of each input port of the associated custom node (see PortType for possible types).
Defining this method is optional, but recommended. If not overridden, input ports will return the VisualShaderNode.PORT_TYPE_SCALAR type.
- String _get_name ( ) virtual
Override this method to define the name of the associated custom node in the Visual Shader Editor’s members dialog and graph.
Defining this method is optional, but recommended. If not overridden, the node will be named as “Unnamed”.
- int _get_output_port_count ( ) virtual
Override this method to define the amount of output ports of the associated custom node.
Defining this method is required. If not overridden, the node has no output ports.
Override this method to define the names of output ports of the associated custom node. The names are used both for the output slots in the editor and as identifiers in the shader code, and are passed in the output_vars array in _get_code.
Defining this method is optional, but recommended. If not overridden, output ports are named as "out" + str(port).
Override this method to define the returned type of each output port of the associated custom node (see PortType for possible types).
Defining this method is optional, but recommended. If not overridden, output ports will return the VisualShaderNode.PORT_TYPE_SCALAR type.
- int _get_return_icon_type ( ) virtual
Override this method to define the return icon of the associated custom node in the Visual Shader Editor’s members dialog.
Defining this method is optional. If not overridden, no return icon is shown.
- String _get_subcategory ( ) virtual
Override this method to define the subcategory of the associated custom node in the Visual Shader Editor’s members dialog.
Defining this method is optional. If not overridden, the node will be filed under the root of the main category (see _get_category).
VisualShaderNodeDeterminant¶
Inherits: VisualShaderNode < Resource < Reference < Object
Calculates the determinant of a Transform within the visual shader graph.
Description¶
Translates to deteminant(x) in the shader language.
VisualShaderNodeDotProduct¶
Inherits: VisualShaderNode < Resource < Reference < Object
Calculates a dot product of two vectors within the visual shader graph.
Description¶
Translates to dot(a, b) in the shader language.
VisualShaderNodeExpression¶
Inherits: VisualShaderNodeGroupBase < VisualShaderNode < Resource < Reference < Object
Inherited By: VisualShaderNodeGlobalExpression
A custom visual shader graph expression written in Godot Shading Language.
Description¶
Custom Godot Shading Language expression, with a custom amount of input and output ports.
The provided code is directly injected into the graph’s matching shader function (vertex, fragment, or light), so it cannot be used to to declare functions, varyings, uniforms, or global constants. See VisualShaderNodeGlobalExpression for such global definitions.
Properties¶
| String | expression | "" |
Property Descriptions¶
- String expression
| Default | "" |
| Setter | set_expression(value) |
| Getter | get_expression() |
An expression in Godot Shading Language, which will be injected at the start of the graph’s matching shader function (vertex, fragment, or light), and thus cannot be used to declare functions, varyings, uniforms, or global constants.
VisualShaderNodeFaceForward¶
Inherits: VisualShaderNode < Resource < Reference < Object
Returns the vector that points in the same direction as a reference vector within the visual shader graph.
Description¶
Translates to faceforward(N, I, Nref) in the shader language. The function has three vector parameters: N, the vector to orient, I, the incident vector, and Nref, the reference vector. If the dot product of I and Nref is smaller than zero the return value is N. Otherwise -N is returned.
VisualShaderNodeFresnel¶
Inherits: VisualShaderNode < Resource < Reference < Object
A Fresnel effect to be used within the visual shader graph.
Description¶
Returns falloff based on the dot product of surface normal and view direction of camera (pass associated inputs to it).
VisualShaderNodeGlobalExpression¶
Inherits: VisualShaderNodeExpression < VisualShaderNodeGroupBase < VisualShaderNode < Resource < Reference < Object
A custom global visual shader graph expression written in Godot Shading Language.
Description¶
Custom Godot Shader Language expression, which is placed on top of the generated shader. You can place various function definitions inside to call later in VisualShaderNodeExpressions (which are injected in the main shader functions). You can also declare varyings, uniforms and global constants.
VisualShaderNodeGroupBase¶
Inherits: VisualShaderNode < Resource < Reference < Object
Inherited By: VisualShaderNodeExpression
Base class for a family of nodes with variable amount of input and output ports within the visual shader graph.
Description¶
Currently, has no direct usage, use the derived classes instead.
Methods¶
| void | add_input_port ( int id, int type, String name ) |
| void | add_output_port ( int id, int type, String name ) |
| void | clear_input_ports ( ) |
| void | clear_output_ports ( ) |
| int | get_free_input_port_id ( ) const |
| int | get_free_output_port_id ( ) const |
| int | get_input_port_count ( ) const |
| String | get_inputs ( ) const |
| int | get_output_port_count ( ) const |
| String | get_outputs ( ) const |
| bool | has_input_port ( int id ) const |
| bool | has_output_port ( int id ) const |
| bool | is_valid_port_name ( String name ) const |
| void | remove_input_port ( int id ) |
| void | remove_output_port ( int id ) |
| void | set_input_port_name ( int id, String name ) |
| void | set_input_port_type ( int id, int type ) |
| void | set_inputs ( String inputs ) |
| void | set_output_port_name ( int id, String name ) |
| void | set_output_port_type ( int id, int type ) |
| void | set_outputs ( String outputs ) |
Property Descriptions¶
- Vector2 size
| Default | Vector2( 0, 0 ) |
| Setter | set_size(value) |
| Getter | get_size() |
The size of the node in the visual shader graph.
Method Descriptions¶
Adds an input port with the specified type (see PortType) and name.
Adds an output port with the specified type (see PortType) and name.
- void clear_input_ports ( )
Removes all previously specified input ports.
- void clear_output_ports ( )
Removes all previously specified output ports.
- int get_free_input_port_id ( ) const
Returns a free input port ID which can be used in add_input_port.
- int get_free_output_port_id ( ) const
Returns a free output port ID which can be used in add_output_port.
- int get_input_port_count ( ) const
Returns the number of input ports in use. Alternative for get_free_input_port_id.
- String get_inputs ( ) const
Returns a String description of the input ports as as colon-separated list using the format id,type,name; (see add_input_port).
- int get_output_port_count ( ) const
Returns the number of output ports in use. Alternative for get_free_output_port_id.
- String get_outputs ( ) const
Returns a String description of the output ports as as colon-separated list using the format id,type,name; (see add_output_port).
Returns true if the specified input port exists.
Returns true if the specified output port exists.
Returns true if the specified port name does not override an existed port name and is valid within the shader.
- void remove_input_port ( int id )
Removes the specified input port.
- void remove_output_port ( int id )
Removes the specified output port.
Renames the specified input port.
Sets the specified input port’s type (see PortType).
- void set_inputs ( String inputs )
Defines all input ports using a String formatted as a colon-separated list: id,type,name; (see add_input_port).
Renames the specified output port.
Sets the specified output port’s type (see PortType).
- void set_outputs ( String outputs )
Defines all output ports using a String formatted as a colon-separated list: id,type,name; (see add_output_port).
VisualShaderNodeIf¶
Inherits: VisualShaderNode < Resource < Reference < Object
VisualShaderNodeInput¶
Inherits: VisualShaderNode < Resource < Reference < Object
Properties¶
| String | input_name | "[None]" |
Methods¶
| String | get_input_real_name ( ) const |
Signals¶
- input_type_changed ( )
VisualShaderNodeIs¶
Inherits: VisualShaderNode < Resource < Reference < Object
VisualShaderNodeOuterProduct¶
Inherits: VisualShaderNode < Resource < Reference < Object
VisualShaderNodeOutput¶
Inherits: VisualShaderNode < Resource < Reference < Object
VisualShaderNodeScalarClamp¶
Inherits: VisualShaderNode < Resource < Reference < Object
VisualShaderNodeScalarConstant¶
Inherits: VisualShaderNode < Resource < Reference < Object
VisualShaderNodeScalarDerivativeFunc¶
Inherits: VisualShaderNode < Resource < Reference < Object
VisualShaderNodeScalarFunc¶
Inherits: VisualShaderNode < Resource < Reference < Object
Enumerations¶
enum Function:
- FUNC_SIN = 0
- FUNC_COS = 1
- FUNC_TAN = 2
- FUNC_ASIN = 3
- FUNC_ACOS = 4
- FUNC_ATAN = 5
- FUNC_SINH = 6
- FUNC_COSH = 7
- FUNC_TANH = 8
- FUNC_LOG = 9
- FUNC_EXP = 10
- FUNC_SQRT = 11
- FUNC_ABS = 12
- FUNC_SIGN = 13
- FUNC_FLOOR = 14
- FUNC_ROUND = 15
- FUNC_CEIL = 16
- FUNC_FRAC = 17
- FUNC_SATURATE = 18
- FUNC_NEGATE = 19
- FUNC_ACOSH = 20
- FUNC_ASINH = 21
- FUNC_ATANH = 22
- FUNC_DEGREES = 23
- FUNC_EXP2 = 24
- FUNC_INVERSE_SQRT = 25
- FUNC_LOG2 = 26
- FUNC_RADIANS = 27
- FUNC_RECIPROCAL = 28
- FUNC_ROUNDEVEN = 29
- FUNC_TRUNC = 30
- FUNC_ONEMINUS = 31
VisualShaderNodeScalarInterp¶
Inherits: VisualShaderNode < Resource < Reference < Object
VisualShaderNodeScalarOp¶
Inherits: VisualShaderNode < Resource < Reference < Object
Enumerations¶
enum Operator:
- OP_ADD = 0
- OP_SUB = 1
- OP_MUL = 2
- OP_DIV = 3
- OP_MOD = 4
- OP_POW = 5
- OP_MAX = 6
- OP_MIN = 7
- OP_ATAN2 = 8
- OP_STEP = 9
VisualShaderNodeScalarSmoothStep¶
Inherits: VisualShaderNode < Resource < Reference < Object
VisualShaderNodeScalarSwitch¶
Inherits: VisualShaderNodeSwitch < VisualShaderNode < Resource < Reference < Object
VisualShaderNodeScalarUniform¶
Inherits: VisualShaderNodeUniform < VisualShaderNode < Resource < Reference < Object
VisualShaderNodeSwitch¶
Inherits: VisualShaderNode < Resource < Reference < Object
Inherited By: VisualShaderNodeScalarSwitch
VisualShaderNodeTexture¶
Inherits: VisualShaderNode < Resource < Reference < Object
Properties¶
| Source | source | 0 |
| Texture | texture | |
| TextureType | texture_type | 0 |
Enumerations¶
enum Source:
- SOURCE_TEXTURE = 0
- SOURCE_SCREEN = 1
- SOURCE_2D_TEXTURE = 2
- SOURCE_2D_NORMAL = 3
- SOURCE_DEPTH = 4
- SOURCE_PORT = 5
enum TextureType:
- TYPE_DATA = 0
- TYPE_COLOR = 1
- TYPE_NORMALMAP = 2
Property Descriptions¶
- Source source
| Default | 0 |
| Setter | set_source(value) |
| Getter | get_source() |
- Texture texture
| Setter | set_texture(value) |
| Getter | get_texture() |
- TextureType texture_type
| Default | 0 |
| Setter | set_texture_type(value) |
| Getter | get_texture_type() |
VisualShaderNodeTextureUniform¶
Inherits: VisualShaderNodeUniform < VisualShaderNode < Resource < Reference < Object
Inherited By: VisualShaderNodeCubeMapUniform, VisualShaderNodeTextureUniformTriplanar
Properties¶
| ColorDefault | color_default | 0 |
| TextureType | texture_type | 0 |
Enumerations¶
enum TextureType:
- TYPE_DATA = 0
- TYPE_COLOR = 1
- TYPE_NORMALMAP = 2
- TYPE_ANISO = 3
enum ColorDefault:
- COLOR_DEFAULT_WHITE = 0
- COLOR_DEFAULT_BLACK = 1
Property Descriptions¶
- ColorDefault color_default
| Default | 0 |
| Setter | set_color_default(value) |
| Getter | get_color_default() |
- TextureType texture_type
| Default | 0 |
| Setter | set_texture_type(value) |
| Getter | get_texture_type() |
VisualShaderNodeTextureUniformTriplanar¶
Inherits: VisualShaderNodeTextureUniform < VisualShaderNodeUniform < VisualShaderNode < Resource < Reference < Object
VisualShaderNodeTransformCompose¶
Inherits: VisualShaderNode < Resource < Reference < Object
VisualShaderNodeTransformConstant¶
Inherits: VisualShaderNode < Resource < Reference < Object
VisualShaderNodeTransformDecompose¶
Inherits: VisualShaderNode < Resource < Reference < Object
VisualShaderNodeTransformFunc¶
Inherits: VisualShaderNode < Resource < Reference < Object
VisualShaderNodeTransformMult¶
Inherits: VisualShaderNode < Resource < Reference < Object
VisualShaderNodeTransformUniform¶
Inherits: VisualShaderNodeUniform < VisualShaderNode < Resource < Reference < Object
VisualShaderNodeTransformVecMult¶
Inherits: VisualShaderNode < Resource < Reference < Object
VisualShaderNodeUniform¶
Inherits: VisualShaderNode < Resource < Reference < Object
Inherited By: VisualShaderNodeBooleanUniform, VisualShaderNodeColorUniform, VisualShaderNodeScalarUniform, VisualShaderNodeTextureUniform, VisualShaderNodeTransformUniform, VisualShaderNodeVec3Uniform
Properties¶
| String | uniform_name | "" |
VisualShaderNodeVec3Constant¶
Inherits: VisualShaderNode < Resource < Reference < Object
VisualShaderNodeVec3Uniform¶
Inherits: VisualShaderNodeUniform < VisualShaderNode < Resource < Reference < Object
VisualShaderNodeVectorClamp¶
Inherits: VisualShaderNode < Resource < Reference < Object
VisualShaderNodeVectorCompose¶
Inherits: VisualShaderNode < Resource < Reference < Object
VisualShaderNodeVectorDecompose¶
Inherits: VisualShaderNode < Resource < Reference < Object
VisualShaderNodeVectorDerivativeFunc¶
Inherits: VisualShaderNode < Resource < Reference < Object
VisualShaderNodeVectorDistance¶
Inherits: VisualShaderNode < Resource < Reference < Object
VisualShaderNodeVectorFunc¶
Inherits: VisualShaderNode < Resource < Reference < Object
Enumerations¶
enum Function:
- FUNC_NORMALIZE = 0
- FUNC_SATURATE = 1
- FUNC_NEGATE = 2
- FUNC_RECIPROCAL = 3
- FUNC_RGB2HSV = 4
- FUNC_HSV2RGB = 5
- FUNC_ABS = 6
- FUNC_ACOS = 7
- FUNC_ACOSH = 8
- FUNC_ASIN = 9
- FUNC_ASINH = 10
- FUNC_ATAN = 11
- FUNC_ATANH = 12
- FUNC_CEIL = 13
- FUNC_COS = 14
- FUNC_COSH = 15
- FUNC_DEGREES = 16
- FUNC_EXP = 17
- FUNC_EXP2 = 18
- FUNC_FLOOR = 19
- FUNC_FRAC = 20
- FUNC_INVERSE_SQRT = 21
- FUNC_LOG = 22
- FUNC_LOG2 = 23
- FUNC_RADIANS = 24
- FUNC_ROUND = 25
- FUNC_ROUNDEVEN = 26
- FUNC_SIGN = 27
- FUNC_SIN = 28
- FUNC_SINH = 29
- FUNC_SQRT = 30
- FUNC_TAN = 31
- FUNC_TANH = 32
- FUNC_TRUNC = 33
- FUNC_ONEMINUS = 34
VisualShaderNodeVectorInterp¶
Inherits: VisualShaderNode < Resource < Reference < Object
VisualShaderNodeVectorLen¶
Inherits: VisualShaderNode < Resource < Reference < Object
VisualShaderNodeVectorOp¶
Inherits: VisualShaderNode < Resource < Reference < Object
Enumerations¶
enum Operator:
- OP_ADD = 0
- OP_SUB = 1
- OP_MUL = 2
- OP_DIV = 3
- OP_MOD = 4
- OP_POW = 5
- OP_MAX = 6
- OP_MIN = 7
- OP_CROSS = 8
- OP_ATAN2 = 9
- OP_REFLECT = 10
- OP_STEP = 11
VisualShaderNodeVectorRefract¶
Inherits: VisualShaderNode < Resource < Reference < Object
VisualShaderNodeVectorScalarMix¶
Inherits: VisualShaderNode < Resource < Reference < Object
VisualShaderNodeVectorScalarSmoothStep¶
Inherits: VisualShaderNode < Resource < Reference < Object
VisualShaderNodeVectorScalarStep¶
Inherits: VisualShaderNode < Resource < Reference < Object
VisualShaderNodeVectorSmoothStep¶
Inherits: VisualShaderNode < Resource < Reference < Object
VSeparator¶
Inherits: Separator < Control < CanvasItem < Node < Object
Vertical version of Separator.
VSplitContainer¶
Inherits: SplitContainer < Container < Control < CanvasItem < Node < Object
Vertical split container.
Description¶
Vertical split container. See SplitContainer. This goes from top to bottom.
WeakRef¶
Holds an Object, but does not contribute to the reference count if the object is a reference.
Description¶
A weakref can hold a Reference, without contributing to the reference counter. A weakref can be created from an Object using @GDScript.weakref. If this object is not a reference, weakref still works, however, it does not have any effect on the object. Weakrefs are useful in cases where multiple classes have variables that refer to each other. Without weakrefs, using these classes could lead to memory leaks, since both references keep each other from being released. Making part of the variables a weakref can prevent this cyclic dependency, and allows the references to be released.
WebRTCDataChannel¶
Inherits: PacketPeer < Reference < Object
Inherited By: WebRTCDataChannelGDNative
Properties¶
| WriteMode | write_mode | 1 |
Methods¶
| void | close ( ) |
| int | get_id ( ) const |
| String | get_label ( ) const |
| int | get_max_packet_life_time ( ) const |
| int | get_max_retransmits ( ) const |
| String | get_protocol ( ) const |
| ChannelState | get_ready_state ( ) const |
| bool | is_negotiated ( ) const |
| bool | is_ordered ( ) const |
| Error | poll ( ) |
| bool | was_string_packet ( ) const |
Enumerations¶
enum WriteMode:
- WRITE_MODE_TEXT = 0 — Tells the channel to send data over this channel as text. An external peer (non-Godot) would receive this as a string.
- WRITE_MODE_BINARY = 1 — Tells the channel to send data over this channel as binary. An external peer (non-Godot) would receive this as array buffer or blob.
enum ChannelState:
- STATE_CONNECTING = 0 — The channel was created, but it’s still trying to connect.
- STATE_OPEN = 1 — The channel is currently open, and data can flow over it.
- STATE_CLOSING = 2 — The channel is being closed, no new messages will be accepted, but those already in queue will be flushed.
- STATE_CLOSED = 3 — The channel was closed, or connection failed.
Property Descriptions¶
- WriteMode write_mode
| Default | 1 |
| Setter | set_write_mode(value) |
| Getter | get_write_mode() |
The transfer mode to use when sending outgoing packet. Either text or binary.
Method Descriptions¶
- void close ( )
Closes this data channel, notifying the other peer.
- int get_id ( ) const
Returns the id assigned to this channel during creation (or auto-assigned during negotiation).
If the channel is not negotiated out-of-band the id will only be available after the connection is established (will return 65535 until then).
- String get_label ( ) const
Returns the label assigned to this channel during creation.
- int get_max_packet_life_time ( ) const
Returns the maxPacketLifeTime value assigned to this channel during creation.
Will be 65535 if not specified.
- int get_max_retransmits ( ) const
Returns the maxRetransmits value assigned to this channel during creation.
Will be 65535 if not specified.
- String get_protocol ( ) const
Returns the sub-protocol assigned to this channel during creation. An empty string if not specified.
- ChannelState get_ready_state ( ) const
Returns the current state of this channel, see ChannelState.
- bool is_negotiated ( ) const
Returns true if this channel was created with out-of-band configuration.
- bool is_ordered ( ) const
Returns true if this channel was created with ordering enabled (default).
- Error poll ( )
Reserved, but not used for now.
- bool was_string_packet ( ) const
Returns true if the last received packet was transferred as text. See write_mode.
WebRTCDataChannelGDNative¶
Inherits: WebRTCDataChannel < PacketPeer < Reference < Object
WebRTCMultiplayer¶
Inherits: NetworkedMultiplayerPeer < PacketPeer < Reference < Object
A simple interface to create a peer-to-peer mesh network composed of WebRTCPeerConnection that is compatible with the MultiplayerAPI.
Description¶
This class constructs a full mesh of WebRTCPeerConnection (one connection for each peer) that can be used as a MultiplayerAPI.network_peer.
You can add each WebRTCPeerConnection via add_peer or remove them via remove_peer. Peers must be added in WebRTCPeerConnection.STATE_NEW state to allow it to create the appropriate channels. This class will not create offers nor set descriptions, it will only poll them, and notify connections and disconnections.
NetworkedMultiplayerPeer.connection_succeeded and NetworkedMultiplayerPeer.server_disconnected will not be emitted unless server_compatibility is true in initialize. Beside that data transfer works like in a NetworkedMultiplayerPeer.
Properties¶
| bool | refuse_new_connections | O: false |
| TransferMode | transfer_mode | O: 2 |
Methods¶
| Error | add_peer ( WebRTCPeerConnection peer, int peer_id, int unreliable_lifetime=1 ) |
| void | close ( ) |
| Dictionary | get_peer ( int peer_id ) |
| Dictionary | get_peers ( ) |
| bool | has_peer ( int peer_id ) |
| Error | initialize ( int peer_id, bool server_compatibility=false ) |
| void | remove_peer ( int peer_id ) |
Method Descriptions¶
- Error add_peer ( WebRTCPeerConnection peer, int peer_id, int unreliable_lifetime=1 )
Add a new peer to the mesh with the given peer_id. The WebRTCPeerConnection must be in state WebRTCPeerConnection.STATE_NEW.
Three channels will be created for reliable, unreliable, and ordered transport. The value of unreliable_lifetime will be passed to the maxPacketLifetime option when creating unreliable and ordered channels (see WebRTCPeerConnection.create_data_channel).
- void close ( )
Close all the add peer connections and channels, freeing all resources.
- Dictionary get_peer ( int peer_id )
Return a dictionary representation of the peer with given peer_id with three keys. connection containing the WebRTCPeerConnection to this peer, channels an array of three WebRTCDataChannel, and connected a boolean representing if the peer connection is currently connected (all three channels are open).
- Dictionary get_peers ( )
Returns a dictionary which keys are the peer ids and values the peer representation as in get_peer.
Returns true if the given peer_id is in the peers map (it might not be connected though).
Initialize the multiplayer peer with the given peer_id (must be between 1 and 2147483647).
If server_compatibilty is false (default), the multiplayer peer will be immediately in state NetworkedMultiplayerPeer.CONNECTION_CONNECTED and NetworkedMultiplayerPeer.connection_succeeded will not be emitted.
If server_compatibilty is true the peer will suppress all NetworkedMultiplayerPeer.peer_connected signals until a peer with id NetworkedMultiplayerPeer.TARGET_PEER_SERVER connects and then emit NetworkedMultiplayerPeer.connection_succeeded. After that the signal NetworkedMultiplayerPeer.peer_connected will be emitted for every already connected peer, and any new peer that might connect. If the server peer disconnects after that, signal NetworkedMultiplayerPeer.server_disconnected will be emitted and state will become NetworkedMultiplayerPeer.CONNECTION_CONNECTED.
- void remove_peer ( int peer_id )
Remove the peer with given peer_id from the mesh. If the peer was connected, and NetworkedMultiplayerPeer.peer_connected was emitted for it, then NetworkedMultiplayerPeer.peer_disconnected will be emitted.
WebRTCPeerConnection¶
Inherited By: WebRTCPeerConnectionGDNative
Interface to a WebRTC peer connection.
Description¶
A WebRTC connection between the local computer and a remote peer. Provides an interface to connect, maintain and monitor the connection.
Setting up a WebRTC connection between two peers from now on) may not seem a trivial task, but it can be broken down into 3 main steps:
- The peer that wants to initiate the connection (
Afrom now on) creates an offer and send it to the other peer (Bfrom now on). Breceives the offer, generate and answer, and sends it toA).AandBthen generates and exchange ICE candidates with each other.
After these steps, the connection should become connected. Keep on reading or look into the tutorial for more information.
Methods¶
| Error | add_ice_candidate ( String media, int index, String name ) |
| void | close ( ) |
| WebRTCDataChannel | create_data_channel ( String label, Dictionary options={ } ) |
| Error | create_offer ( ) |
| ConnectionState | get_connection_state ( ) const |
| Error | initialize ( Dictionary configuration={ } ) |
| Error | poll ( ) |
| Error | set_local_description ( String type, String sdp ) |
| Error | set_remote_description ( String type, String sdp ) |
Signals¶
- data_channel_received ( Object channel )
Emitted when a new in-band channel is received, i.e. when the channel was created with negotiated: false (default).
The object will be an instance of WebRTCDataChannel. You must keep a reference of it or it will be closed automatically. See create_data_channel.
Emitted when a new ICE candidate has been created. The three parameters are meant to be passed to the remote peer over the signaling server.
Emitted after a successful call to create_offer or set_remote_description (when it generates an answer). The parameters are meant to be passed to set_local_description on this object, and sent to the remote peer over the signaling server.
Enumerations¶
enum ConnectionState:
- STATE_NEW = 0 — The connection is new, data channels and an offer can be created in this state.
- STATE_CONNECTING = 1 — The peer is connecting, ICE is in progress, none of the transports has failed.
- STATE_CONNECTED = 2 — The peer is connected, all ICE transports are connected.
- STATE_DISCONNECTED = 3 — At least one ICE transport is disconnected.
- STATE_FAILED = 4 — One or more of the ICE transports failed.
- STATE_CLOSED = 5 — The peer connection is closed (after calling close for example).
Method Descriptions¶
Add an ice candidate generated by a remote peer (and received over the signaling server). See ice_candidate_created.
- void close ( )
Close the peer connection and all data channels associated with it. Note, you cannot reuse this object for a new connection unless you call initialize.
- WebRTCDataChannel create_data_channel ( String label, Dictionary options={ } )
Returns a new WebRTCDataChannel (or null on failure) with given label and optionally configured via the options dictionary. This method can only be called when the connection is in state STATE_NEW.
There are two ways to create a working data channel: either call create_data_channel on only one of the peer and listen to data_channel_received on the other, or call create_data_channel on both peers, with the same values, and the negotiated option set to true.
Valid options are:
{
"negotiated": true, # When set to true (default off), means the channel is negotiated out of band. "id" must be set too. data_channel_received will not be called.
"id": 1, # When "negotiated" is true this value must also be set to the same value on both peer.
# Only one of maxRetransmits and maxPacketLifeTime can be specified, not both. They make the channel unreliable (but also better at real time).
"maxRetransmits": 1, # Specify the maximum number of attempt the peer will make to retransmits packets if they are not acknowledged.
"maxPacketLifeTime": 100, # Specify the maximum amount of time before giving up retransmitions of unacknowledged packets (in milliseconds).
"ordered": true, # When in unreliable mode (i.e. either "maxRetransmits" or "maxPacketLifetime" is set), "ordered" (true by default) specify if packet ordering is to be enforced.
"protocol": "my-custom-protocol", # A custom sub-protocol string for this channel.
}
Note: You must keep a reference to channels created this way, or it will be closed.
- Error create_offer ( )
Creates a new SDP offer to start a WebRTC connection with a remote peer. At least one WebRTCDataChannel must have been created before calling this method.
If this functions returns @GlobalScope.OK, session_description_created will be called when the session is ready to be sent.
- ConnectionState get_connection_state ( ) const
Returns the connection state. See ConnectionState.
- Error initialize ( Dictionary configuration={ } )
Re-initialize this peer connection, closing any previously active connection, and going back to state STATE_NEW. A dictionary of options can be passed to configure the peer connection.
Valid options are:
{
"iceServers": [
{
"urls": [ "stun:stun.example.com:3478" ], # One or more STUN servers.
},
{
"urls": [ "turn:turn.example.com:3478" ], # One or more TURN servers.
"username": "a_username", # Optional username for the TURN server.
"credentials": "a_password", # Optional password for the TURN server.
}
]
}
- Error poll ( )
Call this method frequently (e.g. in Node._process or Node._physics_process) to properly receive signals.
Sets the SDP description of the local peer. This should be called in response to session_description_created.
If type is answer the peer will start emitting ice_candidate_created.
Sets the SDP description of the remote peer. This should be called with the values generated by a remote peer and received over the signaling server.
If type is offer the peer will emit session_description_created with the appropriate answer.
If type is answer the peer will start emitting ice_candidate_created.
WebRTCPeerConnectionGDNative¶
Inherits: WebRTCPeerConnection < Reference < Object
WebSocketClient¶
Inherits: WebSocketMultiplayerPeer < NetworkedMultiplayerPeer < PacketPeer < Reference < Object
A WebSocket client implementation.
Description¶
This class implements a WebSocket client compatible with any RFC 6455-compliant WebSocket server.
This client can be optionally used as a network peer for the MultiplayerAPI.
After starting the client (connect_to_url), you will need to NetworkedMultiplayerPeer.poll it at regular intervals (e.g. inside Node._process).
You will receive appropriate signals when connecting, disconnecting, or when new data is available.
Properties¶
| X509Certificate | trusted_ssl_certificate |
| bool | verify_ssl |
Methods¶
| Error | connect_to_url ( String url, PoolStringArray protocols=PoolStringArray( ), bool gd_mp_api=false, PoolStringArray custom_headers=PoolStringArray( ) ) |
| void | disconnect_from_host ( int code=1000, String reason=”” ) |
| String | get_connected_host ( ) const |
| int | get_connected_port ( ) const |
Signals¶
- connection_closed ( bool was_clean_close )
Emitted when the connection to the server is closed. was_clean_close will be true if the connection was shutdown cleanly.
- connection_error ( )
Emitted when the connection to the server fails.
- connection_established ( String protocol )
Emitted when a connection with the server is established, protocol will contain the sub-protocol agreed with the server.
- data_received ( )
Emitted when a WebSocket message is received.
Note: This signal is not emitted when used as high-level multiplayer peer.
Emitted when the server requests a clean close. You should keep polling until you get a connection_closed signal to achieve the clean close. See WebSocketPeer.close for more details.
Property Descriptions¶
- X509Certificate trusted_ssl_certificate
| Setter | set_trusted_ssl_certificate(value) |
| Getter | get_trusted_ssl_certificate() |
If specified, this X509Certificate will be the only one accepted when connecting to an SSL host. Any other certificate provided by the server will be regarded as invalid.
Note: Specifying a custom trusted_ssl_certificate is not supported in HTML5 exports due to browsers restrictions.
- bool verify_ssl
| Setter | set_verify_ssl_enabled(value) |
| Getter | is_verify_ssl_enabled() |
If true, SSL certificate verification is enabled.
Note: You must specify the certificates to be used in the Project Settings for it to work when exported.
Method Descriptions¶
- Error connect_to_url ( String url, PoolStringArray protocols=PoolStringArray( ), bool gd_mp_api=false, PoolStringArray custom_headers=PoolStringArray( ) )
Connects to the given URL requesting one of the given protocols as sub-protocol. If the list empty (default), no sub-protocol will be requested.
If true is passed as gd_mp_api, the client will behave like a network peer for the MultiplayerAPI, connections to non-Godot servers will not work, and data_received will not be emitted.
If false is passed instead (default), you must call PacketPeer functions (put_packet, get_packet, etc.) on the WebSocketPeer returned via get_peer(1) and not on this object directly (e.g. get_peer(1).put_packet(data)).
You can optionally pass a list of custom_headers to be added to the handshake HTTP request.
Note: Specifying custom_headers is not supported in HTML5 exports due to browsers restrictions.
Disconnects this client from the connected host. See WebSocketPeer.close for more information.
- String get_connected_host ( ) const
Return the IP address of the currently connected host.
- int get_connected_port ( ) const
Return the IP port of the currently connected host.
WebSocketMultiplayerPeer¶
Inherits: NetworkedMultiplayerPeer < PacketPeer < Reference < Object
Inherited By: WebSocketClient, WebSocketServer
Base class for WebSocket server and client.
Description¶
Base class for WebSocket server and client, allowing them to be used as network peer for the MultiplayerAPI.
Properties¶
| bool | refuse_new_connections | O: false |
| TransferMode | transfer_mode | O: 2 |
Methods¶
| WebSocketPeer | get_peer ( int peer_id ) const |
| Error | set_buffers ( int input_buffer_size_kb, int input_max_packets, int output_buffer_size_kb, int output_max_packets ) |
Signals¶
- peer_packet ( int peer_source )
Emitted when a packet is received from a peer.
Note: This signal is only emitted when the client or server is configured to use Godot multiplayer API.
Method Descriptions¶
- WebSocketPeer get_peer ( int peer_id ) const
Returns the WebSocketPeer associated to the given peer_id.
- Error set_buffers ( int input_buffer_size_kb, int input_max_packets, int output_buffer_size_kb, int output_max_packets )
Configures the buffer sizes for this WebSocket peer. Default values can be specified in the Project Settings under network/limits. For server, values are meant per connected peer.
The first two parameters define the size and queued packets limits of the input buffer, the last two of the output buffer.
Buffer sizes are expressed in KiB, so 4 = 2^12 = 4096 bytes. All parameters will be rounded up to the nearest power of two.
Note: HTML5 exports only use the input buffer since the output one is managed by browsers.
WebSocketPeer¶
Inherits: PacketPeer < Reference < Object
A class representing a specific WebSocket connection.
Description¶
This class represent a specific WebSocket connection, you can do lower level operations with it.
You can choose to write to the socket in binary or text mode, and you can recognize the mode used for writing by the other peer.
Methods¶
| void | close ( int code=1000, String reason=”” ) |
| String | get_connected_host ( ) const |
| int | get_connected_port ( ) const |
| WriteMode | get_write_mode ( ) const |
| bool | is_connected_to_host ( ) const |
| void | set_no_delay ( bool enabled ) |
| void | set_write_mode ( WriteMode mode ) |
| bool | was_string_packet ( ) const |
Enumerations¶
enum WriteMode:
- WRITE_MODE_TEXT = 0 — Specifies that WebSockets messages should be transferred as text payload (only valid UTF-8 is allowed).
- WRITE_MODE_BINARY = 1 — Specifies that WebSockets messages should be transferred as binary payload (any byte combination is allowed).
Method Descriptions¶
Closes this WebSocket connection. code is the status code for the closure (see RFC 6455 section 7.4 for a list of valid status codes). reason is the human readable reason for closing the connection (can be any UTF-8 string that’s smaller than 123 bytes).
Note: To achieve a clean close, you will need to keep polling until either WebSocketClient.connection_closed or WebSocketServer.client_disconnected is received.
Note: The HTML5 export might not support all status codes. Please refer to browser-specific documentation for more details.
- String get_connected_host ( ) const
Returns the IP address of the connected peer.
Note: Not available in the HTML5 export.
- int get_connected_port ( ) const
Returns the remote port of the connected peer.
Note: Not available in the HTML5 export.
- WriteMode get_write_mode ( ) const
Gets the current selected write mode. See WriteMode.
- bool is_connected_to_host ( ) const
Returns true if this peer is currently connected.
- void set_no_delay ( bool enabled )
Disable Nagle’s algorithm on the underling TCP socket (default). See StreamPeerTCP.set_no_delay for more information.
Note: Not available in the HTML5 export.
- void set_write_mode ( WriteMode mode )
Sets the socket to use the given WriteMode.
- bool was_string_packet ( ) const
Returns true if the last received packet was sent as a text payload. See WriteMode.
WebSocketServer¶
Inherits: WebSocketMultiplayerPeer < NetworkedMultiplayerPeer < PacketPeer < Reference < Object
A WebSocket server implementation.
Description¶
This class implements a WebSocket server that can also support the high-level multiplayer API.
After starting the server (listen), you will need to NetworkedMultiplayerPeer.poll it at regular intervals (e.g. inside Node._process). When clients connect, disconnect, or send data, you will receive the appropriate signal.
Note: Not available in HTML5 exports.
Properties¶
| String | bind_ip | "*" |
| X509Certificate | ca_chain | |
| CryptoKey | private_key | |
| X509Certificate | ssl_certificate |
Methods¶
| void | disconnect_peer ( int id, int code=1000, String reason=”” ) |
| String | get_peer_address ( int id ) const |
| int | get_peer_port ( int id ) const |
| bool | has_peer ( int id ) const |
| bool | is_listening ( ) const |
| Error | listen ( int port, PoolStringArray protocols=PoolStringArray( ), bool gd_mp_api=false ) |
| void | stop ( ) |
Signals¶
Emitted when a client requests a clean close. You should keep polling until you get a client_disconnected signal with the same id to achieve the clean close. See WebSocketPeer.close for more details.
Emitted when a new client connects. “protocol” will be the sub-protocol agreed with the client.
Emitted when a client disconnects. was_clean_close will be true if the connection was shutdown cleanly.
- data_received ( int id )
Emitted when a new message is received.
Note: This signal is not emitted when used as high-level multiplayer peer.
Property Descriptions¶
- String bind_ip
| Default | "*" |
| Setter | set_bind_ip(value) |
| Getter | get_bind_ip() |
When not set to * will restrict incoming connections to the specified IP address. Setting bind_ip to 127.0.0.1 will cause the server to listen only to the local host.
- X509Certificate ca_chain
| Setter | set_ca_chain(value) |
| Getter | get_ca_chain() |
When using SSL (see private_key and ssl_certificate), you can set this to a valid X509Certificate to be provided as additional CA chain information during the SSL handshake.
- CryptoKey private_key
| Setter | set_private_key(value) |
| Getter | get_private_key() |
When set to a valid CryptoKey (along with ssl_certificate) will cause the server to require SSL instead of regular TCP (i.e. the wss:// protocol).
- X509Certificate ssl_certificate
| Setter | set_ssl_certificate(value) |
| Getter | get_ssl_certificate() |
When set to a valid X509Certificate (along with private_key) will cause the server to require SSL instead of regular TCP (i.e. the wss:// protocol).
Method Descriptions¶
Disconnects the peer identified by id from the server. See WebSocketPeer.close for more information.
Returns the IP address of the given peer.
Returns the remote port of the given peer.
Returns true if a peer with the given ID is connected.
- bool is_listening ( ) const
Returns true if the server is actively listening on a port.
- Error listen ( int port, PoolStringArray protocols=PoolStringArray( ), bool gd_mp_api=false )
Starts listening on the given port.
You can specify the desired subprotocols via the “protocols” array. If the list empty (default), no sub-protocol will be requested.
If true is passed as gd_mp_api, the server will behave like a network peer for the MultiplayerAPI, connections from non-Godot clients will not work, and data_received will not be emitted.
If false is passed instead (default), you must call PacketPeer functions (put_packet, get_packet, etc.), on the WebSocketPeer returned via get_peer(id) to communicate with the peer with given id (e.g. get_peer(id).get_available_packet_count).
- void stop ( )
Stops the server and clear its state.
WindowDialog¶
Inherits: Popup < Control < CanvasItem < Node < Object
Inherited By: AcceptDialog
Base class for window dialogs.
Description¶
Windowdialog is the base class for all window-based dialogs. It’s a by-default toplevel Control that draws a window decoration and allows motion and resizing.
Properties¶
| bool | resizable | false |
| String | window_title | "" |
Methods¶
| TextureButton | get_close_button ( ) |
Theme Properties¶
| Texture | close | |
| int | close_h_ofs | 18 |
| Texture | close_highlight | |
| int | close_v_ofs | 18 |
| StyleBox | panel | |
| int | scaleborder_size | 4 |
| Color | title_color | Color( 0, 0, 0, 1 ) |
| Font | title_font | |
| int | title_height | 20 |
World¶
Inherits: Resource < Reference < Object
Class that has everything pertaining to a world.
Description¶
Class that has everything pertaining to a world. A physics space, a visual scenario and a sound space. Spatial nodes register their resources into the current world.
Tutorials¶
Properties¶
| PhysicsDirectSpaceState | direct_space_state |
| Environment | environment |
| Environment | fallback_environment |
| RID | scenario |
| RID | space |
Property Descriptions¶
- PhysicsDirectSpaceState direct_space_state
| Getter | get_direct_space_state() |
The World’s physics direct space state, used for making various queries. Might be used only during _physics_process.
- Environment environment
| Setter | set_environment(value) |
| Getter | get_environment() |
The World’s Environment.
- Environment fallback_environment
| Setter | set_fallback_environment(value) |
| Getter | get_fallback_environment() |
The World’s fallback_environment will be used if the World’s Environment fails or is missing.
- RID scenario
| Getter | get_scenario() |
The World’s visual scenario.
- RID space
| Getter | get_space() |
The World’s physics space.
World2D¶
Inherits: Resource < Reference < Object
Class that has everything pertaining to a 2D world.
Description¶
Class that has everything pertaining to a 2D world. A physics space, a visual scenario and a sound space. 2D nodes register their resources into the current 2D world.
Tutorials¶
Properties¶
| RID | canvas |
| Physics2DDirectSpaceState | direct_space_state |
| RID | space |
Property Descriptions¶
- RID canvas
| Getter | get_canvas() |
The RID of this world’s canvas resource. Used by the VisualServer for 2D drawing.
- Physics2DDirectSpaceState direct_space_state
| Getter | get_direct_space_state() |
The state of this world’s physics space. This allows arbitrary querying for collision.
- RID space
| Getter | get_space() |
The RID of this world’s physics space resource. Used by the Physics2DServer for 2D physics, treating it as both a space and an area.
WorldEnvironment¶
Default environment properties for the entire scene (post-processing effects, lighting and background settings).
Description¶
The WorldEnvironment node is used to configure the default Environment for the scene.
The parameters defined in the WorldEnvironment can be overridden by an Environment node set on the current Camera. Additionally, only one WorldEnvironment may be instanced in a given scene at a time.
The WorldEnvironment allows the user to specify default lighting parameters (e.g. ambient lighting), various post-processing effects (e.g. SSAO, DOF, Tonemapping), and how to draw the background (e.g. solid color, skybox). Usually, these are added in order to improve the realism/color balance of the scene.
Tutorials¶
Properties¶
| Environment | environment |
Property Descriptions¶
- Environment environment
| Setter | set_environment(value) |
| Getter | get_environment() |
The Environment resource used by this WorldEnvironment, defining the default properties.
X509Certificate¶
Inherits: Resource < Reference < Object
An X509 certificate (e.g. for SSL).
Description¶
The X509Certificate class represents an X509 certificate. Certificates can be loaded and saved like any other Resource.
They can be used as the server certificate in StreamPeerSSL.accept_stream (along with the proper CryptoKey), and to specify the only certificate that should be accepted when connecting to an SSL server via StreamPeerSSL.connect_to_stream.
Note: Not available in HTML5 exports.
XMLParser¶
Low-level class for creating parsers for XML files.
Description¶
This class can serve as base to make custom XML parsers. Since XML is a very flexible standard, this interface is low-level so it can be applied to any possible schema.
Methods¶
| int | get_attribute_count ( ) const |
| String | get_attribute_name ( int idx ) const |
| String | get_attribute_value ( int idx ) const |
| int | get_current_line ( ) const |
| String | get_named_attribute_value ( String name ) const |
| String | get_named_attribute_value_safe ( String name ) const |
| String | get_node_data ( ) const |
| String | get_node_name ( ) const |
| int | get_node_offset ( ) const |
| NodeType | get_node_type ( ) |
| bool | has_attribute ( String name ) const |
| bool | is_empty ( ) const |
| Error | open ( String file ) |
| Error | open_buffer ( PoolByteArray buffer ) |
| Error | read ( ) |
| Error | seek ( int position ) |
| void | skip_section ( ) |
Enumerations¶
enum NodeType:
- NODE_NONE = 0 — There’s no node (no file or buffer opened).
- NODE_ELEMENT = 1 — Element (tag).
- NODE_ELEMENT_END = 2 — End of element.
- NODE_TEXT = 3 — Text node.
- NODE_COMMENT = 4 — Comment node.
- NODE_CDATA = 5 — CDATA content.
- NODE_UNKNOWN = 6 — Unknown node.
Method Descriptions¶
- int get_attribute_count ( ) const
Gets the amount of attributes in the current element.
Gets the name of the attribute specified by the index in idx argument.
Gets the value of the attribute specified by the index in idx argument.
- int get_current_line ( ) const
Gets the current line in the parsed file (currently not implemented).
Gets the value of a certain attribute of the current element by name. This will raise an error if the element has no such attribute.
Gets the value of a certain attribute of the current element by name. This will return an empty String if the attribute is not found.
- String get_node_data ( ) const
Gets the contents of a text node. This will raise an error in any other type of node.
- String get_node_name ( ) const
Gets the name of the current element node. This will raise an error if the current node type is neither NODE_ELEMENT nor NODE_ELEMENT_END.
- int get_node_offset ( ) const
Gets the byte offset of the current node since the beginning of the file or buffer.
- NodeType get_node_type ( )
Gets the type of the current node. Compare with NodeType constants.
Check whether the current element has a certain attribute.
- bool is_empty ( ) const
Check whether the current element is empty (this only works for completely empty tags, e.g. <element \>).
Opens an XML file for parsing. This returns an error code.
- Error open_buffer ( PoolByteArray buffer )
Opens an XML raw buffer for parsing. This returns an error code.
- Error read ( )
Reads the next node of the file. This returns an error code.
Moves the buffer cursor to a certain offset (since the beginning) and read the next node there. This returns an error code.
- void skip_section ( )
Skips the current section. If the node contains other elements, they will be ignored and the cursor will go to the closing of the current element.
YSort¶
Inherits: Node2D < CanvasItem < Node < Object
Sort all child nodes based on their Y positions.
Description¶
Sort all child nodes based on their Y positions. The child node must inherit from CanvasItem for it to be sorted. Nodes that have a higher Y position will be drawn later, so they will appear on top of nodes that have a lower Y position.
Nesting of YSort nodes is possible. Children YSort nodes will be sorted in the same space as the parent YSort, allowing to better organize a scene or divide it in multiple ones, yet keep the unique sorting.
Properties¶
| bool | sort_enabled | true |
Social networks¶